Shipping Information
This chapter covers the following topics:
- Shipping Overview
- Shipping Information
- Using Advance Shipment Notices and Advance Shipment Billing Notices
- Creating Advance Shipment Notices and Advance Shipment Billing Notices
- Uploading Advance Shipment Notices and Advance Shipment Billing Notices
- Canceling Advance Shipment Notices and Advance Shipment Billing Notices
- Uploading Routing Requests
- Viewing Routing Responses
- Viewing Delivery Schedules
- Viewing Overdue Receipts
- Receiving Information
- Viewing Receipts
- Viewing Returns
- Viewing On-Time Delivery Performance
- Quality Information
Shipping Overview
This section includes the following topics:
Shipping Information
Oracle iSupplier Portal enables you to view your existing shipments. Using your shipments you can create or cancel advance shipment notices. The system enables you to view other shipment information such as delivery schedules.
Using shipping features, you can alert the buyer to upcoming shipments and expedite receipts and payments for the buying company.
Shipping information details all of your shipping transactions on Oracle iSupplier Portal. You can create or cancel shipment notices as well as view shipment delivery schedules and overdue shipment receipts.
The shipping information section includes:
Using Advance Shipment Notices and Advance Shipment Billing Notices
When you enter an Advance Shipment Notice (ASN) or Advance Shipment Billing Notice (ASBN), you alert the buying company of upcoming shipment deliveries. To create an ASN or ASBN, select the purchase order shipments being shipped and provide the appropriate shipment details.
The details that can be specified on an ASN/ASBN include:
Shipment Lines
-
Shipment Line Defaults:
-
Packing Slip
-
Country of Origin
-
Bar Code Label
-
Container Number
-
Truck Number
-
Comments
-
-
Shipments in Advance Shipment Notices
Note: In the Shipments in Advance Shipment Notices section, to view Details, click Show. To hide details, click Hide.
Shipment Headers
-
Shipment Information (Required fields are marked with *)
-
Shipment Number*
-
Shipment Date*
-
Expected Receipt Date*
-
-
Freight Information
-
Freight Terms
-
Number of Containers
-
Freight Carrier
-
Waybill/Airbill Number
-
Bill of Lading
-
Packaging Code
-
Packing Slip
-
Tar Weight
-
Special Handling Code
-
Net Weight
-
Tar Weight UOM
-
Comments
-
Net Weight UOM
-
You can enter billing information on a shipment notice to create an ASBN. An ASBN creates an invoice in the buyer's payables system. To create an ASBN, in addition to the above details, the following billing details should be provided (Required fields are marked with *):
-
Invoice Number*
-
Invoice Amount*
-
Invoice Date*
-
Payment Terms
-
Freight Amount
-
Currency
-
Tax Amount
-
Remit To Site
The Advance Shipment Notices section includes:
-
Creating Advance Shipment Notices and Advance Shipment Billing Notices
-
Uploading Advance Shipment Notices and Advance Shipment Billing Notices
-
Canceling Advance Shipment Notices and Advance Shipment Billing Notices
Creating Advance Shipment Notices and Advance Shipment Billing Notices
You can create advance shipment notices and advance shipment billing notices using PO shipment lines.
To create advance shipment notices and advance shipment billing notices:
-
Click the Shipments tab, and then click Shipment Notices in the task bar directly below the tabs.
-
On the Shipment Notices page, click Create Advance Shipment Notices for an ASN or Create Advance Shipment Billing Notice for an ASBN.
Note: If you are creating an ASBN, all selected shipments must belong to the same operating unit.
Create ASN Page
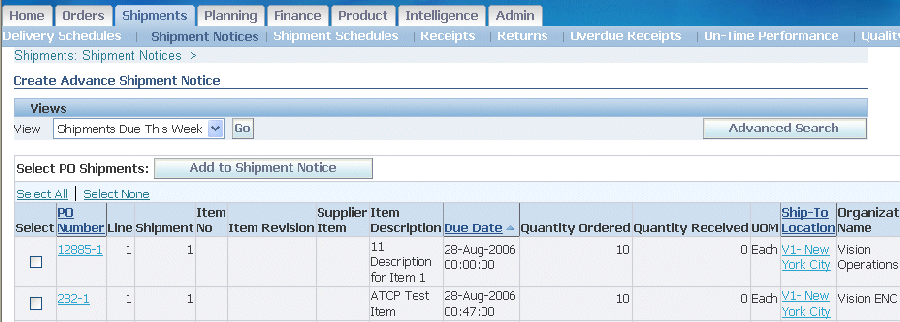
-
Select either View Shipments Due This Week or View Shipments Due Any Time, and then click Go. Click Advanced Search to enter additional search criteria to perform a more restrictive search .
-
Select one or multiple purchase order shipments, and then click Add to Shipment Notice.
Add to Shipment Notice Page
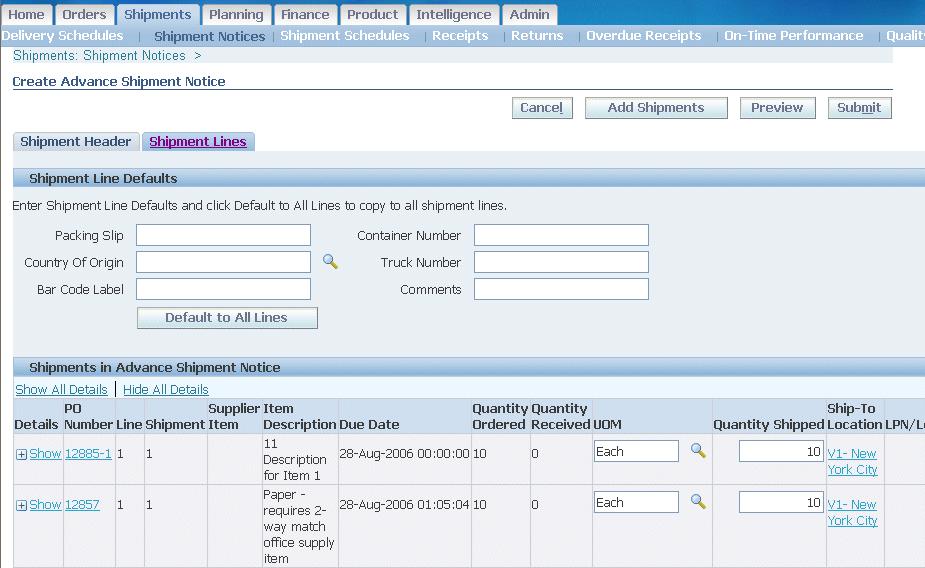
-
On the Create Advance Shipment Notice or Create Advance Shipment Billing Notice page, enter the appropriate shipment line defaults.
Note: Note:You can always add more shipments by clicking Add Shipments on the Shipments Line page.
-
You can enter the line details once for all shipment lines if the details are common to all lines. To copy all default shipment lines, click Default to All Lines.
-
To split a shipment line, click the split icon in the Shipments in Advance Shipment Notice section, and enter Shipping Quantity for the original and new lines.
-
To remove a shipment, click the remove icon in the Shipments in Advance Shipment Notice section.
Note: To display shipment details, click Show in the Shipment and Advance Shipment Notice section. To hide shipment details, click Hide in the Shipment and Advance Shipment Notice section.
-
If you would like to enter Licence Plate Number (LPN), Lot, or Serial Information, click the LPN/LOT/serial icon.
You will be able to enter lot and serial information for shipment lines only when the item has been defined as a lot or serial controlled item. You will only be able to enter lot information if the item is lot controlled, serial information if the item is serial controlled, and both lot and serial information if your item is a lot and serial controlled.
LPN Details page
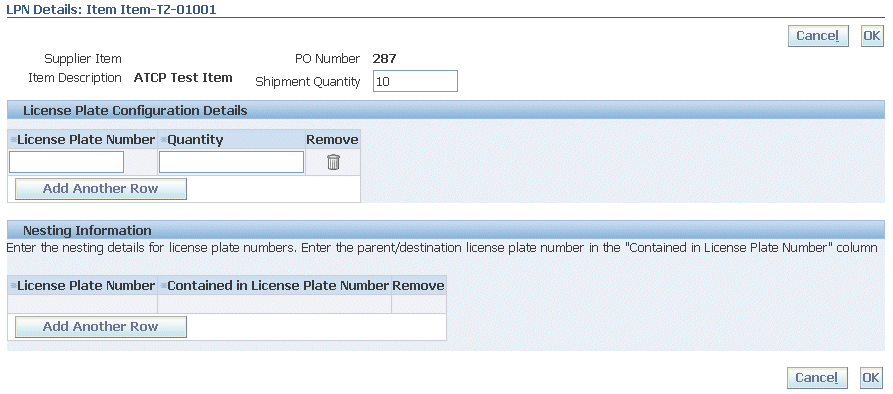
To enter details for a lot and serial controlled item:
-
Enter lot information. If you would like to add additional lot attributes, click the lot attributes icon.
-
If you would like to enter serial details for the lot, click Show, and then enter serial information. If you would like to add additional serial attributes, click the serial attributes icon.
-
If you have more than one lot or serial controlled item, click Add Another Row.
-
If you have LPNs nested within each other, enter nesting details in the License Plate Configuration Details section.
Note: You may change the total shipment quantity on the LPN/Lot/Serial Detail page. The total shipment quantity entered should be equal to the total lot/serial quantity.
-
When you are finished entering your LPN/Lot/Serial details, click OK.
-
Click Shipment Headers. Enter the required ASN or ASBN information.
You can also enter other information. The information you enter at the header level is transferred to the line level. (However, changes you make at the line level override information at the header level).
If you are entering an ASBN, you must enter the following billing information:
-
Invoice number
-
Invoice date
-
Invoice amount
In the Remit-To site section, verify that the Remit To Site details are correct. If the Remit to Site details need to be changed, click Change, select the correct Remit To Site details, and then click Apply.
-
-
To preview the ASN or ASBN, click Preview.
-
Review the ASN or ASBN and click Submit.
Uploading Advance Shipment Notices and Advance Shipment Billing Notices
If you have a large volume of ASNs or ASBNs, you may create a spreadsheet containing shipment details and upload it into your buying company's system. Using the spreadsheet template in iSupplier Portal, you can create shipment notices offline, and then upload the file.
To download instructions on how to upload ASN and ASBNs:
-
Click the Shipments tab, and then click Shipment Notices in the task bar directly below the tabs.
-
Click Upload Advanced Shipment and Billing Notice
-
On the Upload Shipment Notices page, click Download Templates for instructions on uploading an ASN or ASBN.
Download Templates Page
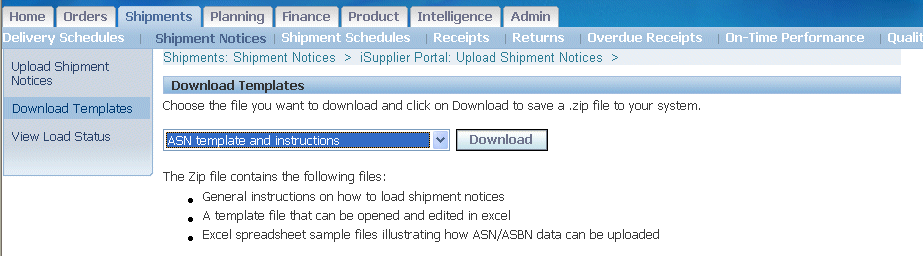
-
On the Download Templates page, choose the file you want to download and click Download. You may choose from the following files to download:
-
ASN Template and Instructions - Contains instructions for uploading ASNs, a sample ASN spreadsheet file, and the template to use when entering ASN information offline.
-
ASBN Template and Instructions - Contains instructions for uploading ASBNs, a sample ASBN spreadsheet file, and the template to use when entering ASBN information offline.
-
Valid List of UOM, freight terms, etc.... - A list of values including country of origin, UOM, freight, carriers, payments terms, etc. is provided. You should use these values when creating your ASN/ASBN file.
-
Zip, All Files - Contains instructions for uploading ASNs, ASBNs, samples of ASN and ASBN spreadsheet files, templates to use while entering ASN and ASBN information offline, and lists of values.
-
-
Complete the templates according to the instructions. Save your completed file locally.
-
To upload your template, return to the Upload Shipment Notices page, browse for your completed template and upload it.
Canceling Advance Shipment Notices and Advance Shipment Billing Notices
When you cancel an ASN or ASBN, the system sends a notification to the buyer. You can always reenter an ASN for the same purchase order shipments at a later time. When you cancel an ASBN, both the shipment notice and corresponding invoice that was issued in the buyer's payable system are canceled.
To cancel a submitted advance shipment notice or advance shipment billing notice:
-
Click the Shipments tab, and then click Shipment Notices in the task bar directly below the tabs.
-
On the Shipment Notices page, click View/Cancel Advance Shipment Notices.
-
On the View/Cancel Advance Shipment Notices page, search for and select the advance shipment notice you would like to cancel.
Note: You can use the advanced search feature to narrow your search.
-
Click Cancel Shipment Notice. A notification of your cancellation is sent to the buyer.
Note: Canceling a shipment notice cannot be undone. An ASN cannot be canceled if any of the lines have been received by the buying company. You can cancel an ASBN if none of the lines has been received and the invoice has not been paid by the buying company.
Uploading Routing Requests
If your buying company is responsible for arranging the packing and shipping of materials, you may need to submit a routing request. A routing request notifies your buyer when goods are ready for shipment. You may upload a routing request using a spreadsheet template.
To download instructions on how to upload a routing request:
-
Click the Shipments tab, and then click Shipment Notices in the task bar directly below the tabs.
-
On the Shipment Notices page, click Create Routing Requests.
-
On the Upload Routing Requests page, click Download Template.
The Readme file included in the download will provide instructions on how to upload your routing request.
Viewing Routing Responses
You may view buyer responses to your routing requests. From the Shipment Notices page, click View Routing Responses. On the Routing Response page, you may search for routing responses (after your buyer has responded to them). You may search using the following search criteria:
-
Response Number
-
Routing Number
-
PO Number
-
Ship-From
-
Ship-To
-
Pick Up Time
When you have found the routing response you would like to view, click the response number for details.
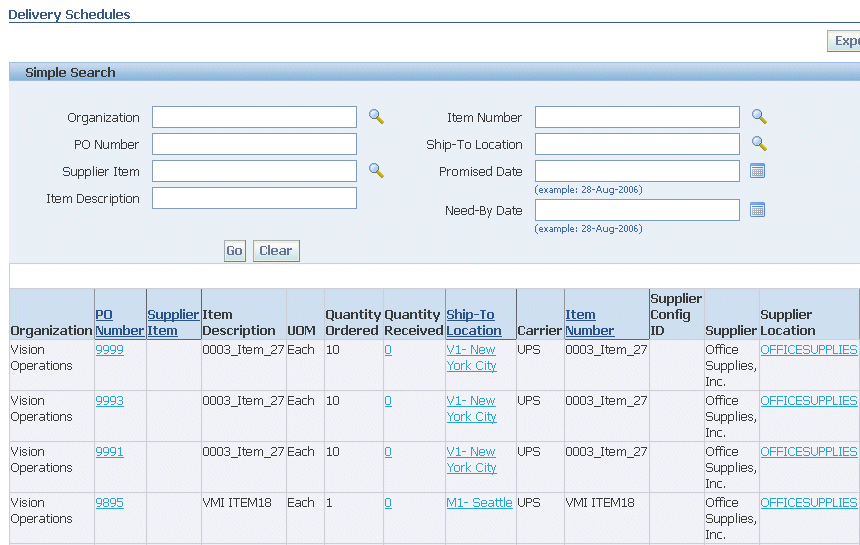
Viewing Delivery Schedules
You can use the Delivery Schedules Results page to quickly determine deliveries that need to be scheduled and deliveries that are past due. Click the purchase order number, receipt quantity, and ship-to location links to view further detail.
Delivery Schedules Results Page
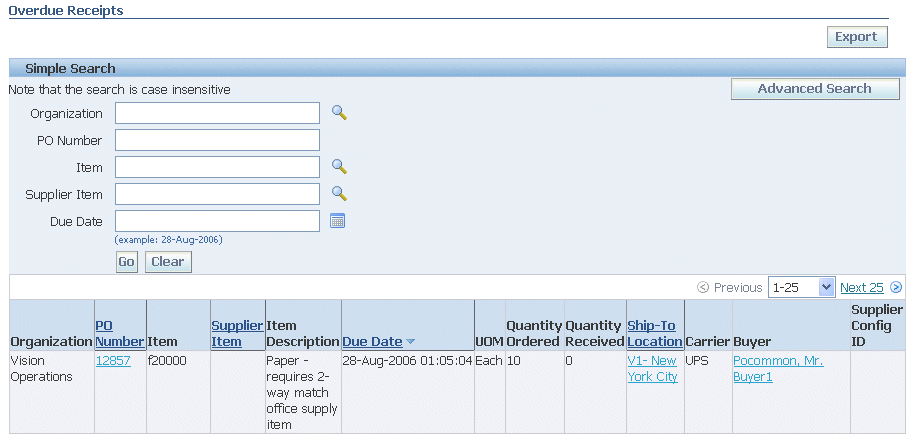
Viewing Overdue Receipts
The Overdue Receipts Results page enables you to view the details of past due purchase order shipments. Click the PO number, Ship-To Location, and Buyer to view further detail.
Overdue Receipts Results Page
Receiving Information
Receiving information enables you to view your receipts, returns, and delivery performance.
The receiving information section includes:
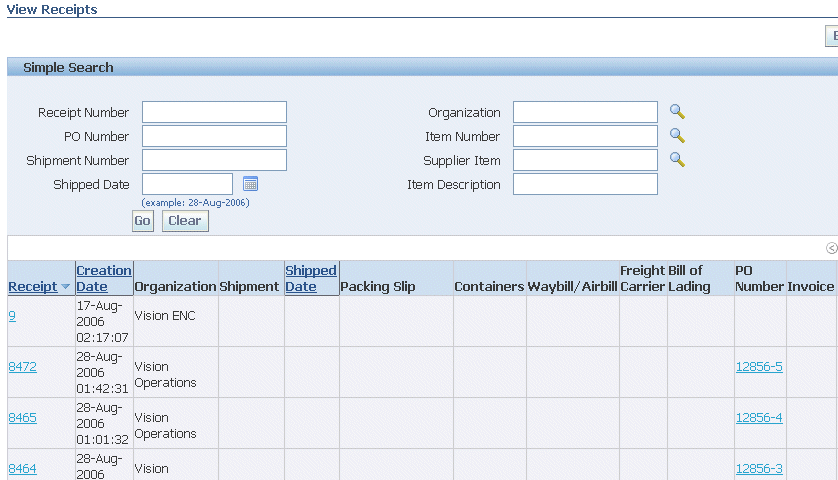
Viewing Receipts
The View Receipts page enables you to explore a historical view of all receipts that have been recorded for your shipped goods.
View Receipts page
-
On the View Receipts page, enter a value in one of the search fields to retrieve the receipt information. Optionally use the Advanced Search function to specify more complex search criteria.
-
The View Receipts redisplays, listing the receipts who matched your search criteria.
-
To view the information on a particular receipt, click the receipt number link.
-
The Receipt: details page displays information on that particular receipt. From this page, there are links to display
-
ASN/ASBN
-
PO information
-
Invoice information
-
Return information
-
On Time Performance information
-
Defect information
-
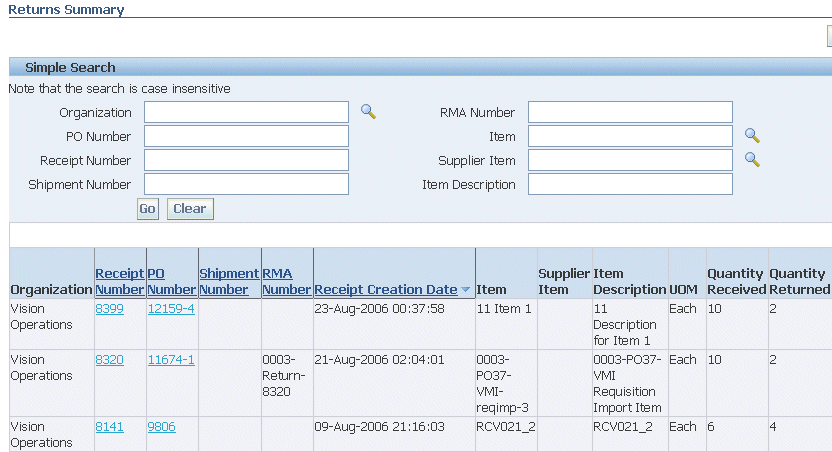
Viewing Returns
The Returns Summary page enables you to view the return history, the causes for goods returned by the buying company, and inspection results of a shipment. The search summary results include basic information along with details about the return, such as quantities and a reason for return. Click Receipt Number and PO Number to view further detail.
Returns Summary page
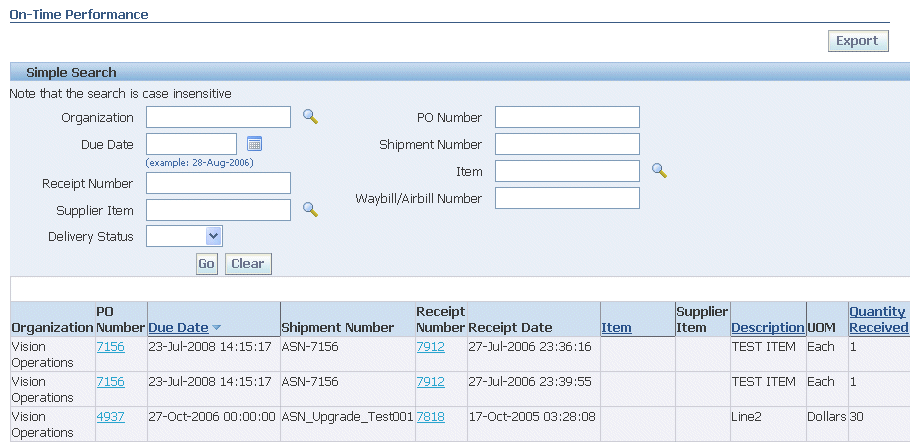
Viewing On-Time Delivery Performance
The On-Time Performance page provides the delivery status of shipments you made against purchase orders. You can view your performance for timeliness of deliveries. Click the PO Number and Receipt Number to view further details.
On-Time Performance Page
Quality Information
Entering quality information online enables paperless transactions for required quality standards. You can only enter quality information if the buying company has Oracle Quality and you have permission.
You first create a Quality Collection Plan in Oracle Quality and associate the plan with the Self-Service Quality for outside processing transactions. You enter quality information to communicate to your buyer if your item meets the quality standards required. For example, an electrical motor supplier performs a detailed electrical test on each motor. That supplier can enter the quality data gathered from each test and enter that information online in Oracle iSupplier Portal prior to shipping the motor. Quality engineers can evaluate the results and stop the shipment of any motors that do not meet the requirements.
The system displays an available link in the Quality Plans column. Clicking this link displays a list of collection plans associated with your purchase order. You can enter quality results, view quality results submitted, or view attachments for any purchase order listed.
The Quality Shipments page displays purchase order and shipping information for any purchased item being shipped, but only for open jobs that also have at least one collection plan assigned to them. You can obtain the shipment number, ship-to location, and ship-to organization. You can also download quality collection plans, and collect and submit quality data regarding your shipments.
-
On the Shipments tab, click Quality in the task bar directly below the tabs.
Search - Quality Shipments Page
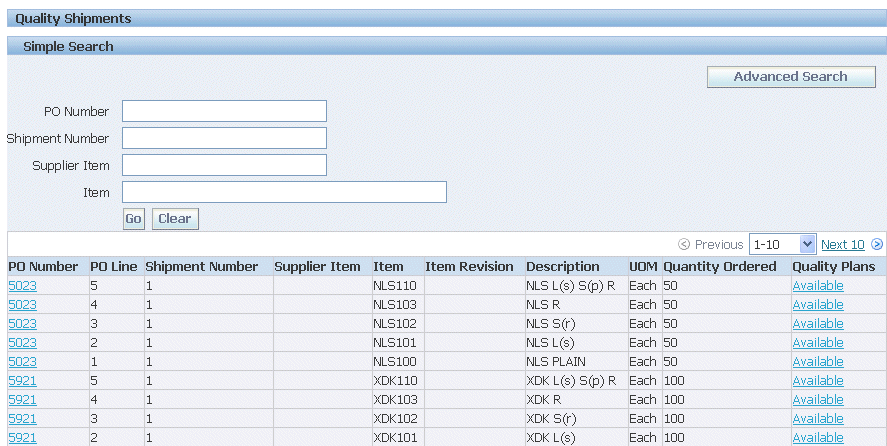
-
On the Search - Quality Shipments page, search for a shipment.
-
Click Available in the Quality Plans column for the appropriate shipment.
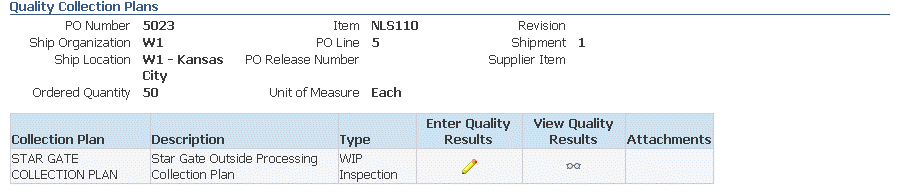
-
On the Quality Plans page, click the enter quality results icon. To view existing quality results, click the view quality results icon. To view attachments, click the attachment icon.
Quality Plans Page
-
On the Enter Test Results page, enter a number and click Continue. (You can only complete this task if you have permission).
Enter Quality Results Page

-
On the Enter Quality Results page, enter your quality information (the fields available to enter data vary depending on the type of information you need to enter) and click Submit. You can enter up to 25 rows of quality data at a time.
-
Once you have submitted all of the quality results, a notification is sent to the buyer.
To send quality notifications to the buyer or recipient:
After you have saved and submitted all of your quality results, click Notification to notify the buyer or recipient that you have submitted results (if you have permission). You can only submit 25 rows of results at a time. If you are submitting more than 25 rows of results, for example 100 rows of results, you must submit your results four times.
Note: To avoid sending duplicate notifications, click Notification only after you complete and submit all of your rows of data.