Supplier Profile Management
This chapter covers the following topics:
- Overview
- Supplier Profile Management Flow
- General Company Information
- Company Profile
- Tax Details
- Address Book
- Contact Directory
- Business Classifications
- Products and Services
- Banking Details
- Creating Banking Details
- Responding to Buyer Surveys
- Supplier Intelligence
Overview
Supplier Profile Management enables you to manage key profile details used to establish or maintain a business relationship with the buying company. This profile information includes address information, names of main contacts, user accounts (if you have the Supplier Profile and User Management responsibility), business classifications, banking details, and category information about the goods and services you are able to provide to the buyer. Buyer administrators will review the details you provide and use them to update the appropriate records in the buyer's purchasing transaction system.
You benefit from managing your profile yourself. Supplier Profile Management enables you to effectively represent yourself to the buying company and update your profiles details as necessary, making important information accurate.
This section includes the following sections:
Supplier Profile Management Flow
To have the information you enter in Supplier Profile Management processed in the system, log into the Oracle iSupplier Portal and access your profile. You can then enter information for your address book, contact directory, business classifications, products and services, or user accounts. The buyer administrator will review any changes to your profile and use this information to update their purchasing system.
General Company Information
Management of your company's profile information involves the use of two high-level pages. The General information page provides a quick, high-level display of information at the company level. You can use the General information page to add an attachment to your profile. Adding attachments allows you to upload documents pertinent to your relationship with the buying company or upload documents that may have been specifically requested by the buying company (for example, tax documents).
The Company Organization page allows you to navigate to other pages where you can add or update your actual profile information.
To access the General page, on the iSupplier Portal Home page, click the Admin tab.
General Information page
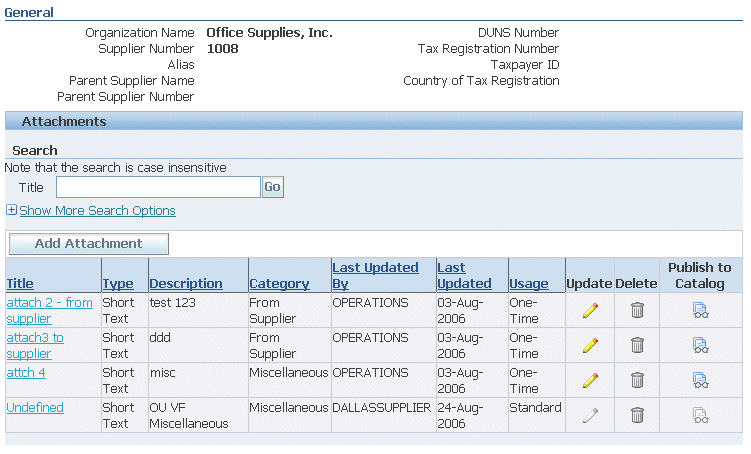
To upload a local attachment:
-
Click Add Attachment.
-
To upload an attachment stored locally, accept the default Desktop File/Text/URL from the Add menu.
-
Give the attachment a title, description, and select a Category value to indicate its original source
-
Browse to the location of the attachment and select it.
-
Click Apply.
To upload an attachment from the buyer's document catalog:
-
Click Add Attachment.
-
Select From Document Catalog from the Add menu.
-
Search on the document title, or expand the search options to use additional search fields.
-
Select the document(s), and click Apply.
Company Profile
Use the Company Profile pages to define the detailed information about your company. Use the navigation bar on the left to access the different pages of the Company Profile.
The Organization page defines high-level details about your company. To access the Organization page, click Organization in the Company Profile navigation tree.
Organization Page
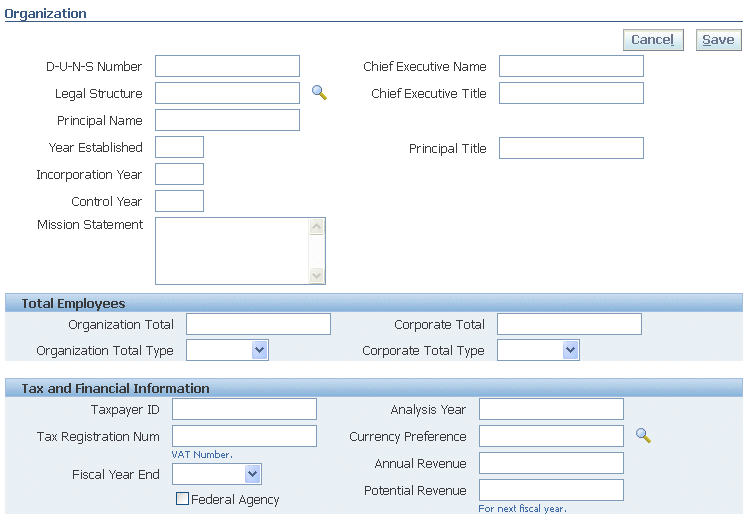
Once you have entered appropriate information, click Save.
Tax Details
Using the Payables responsibility ((N) Setup > Options > Payables Options) you can use the option to apply the withholding tax at Invoice Validation and Payment or both the Invoice Validation and Payment.
Withholding Tax window in Payables
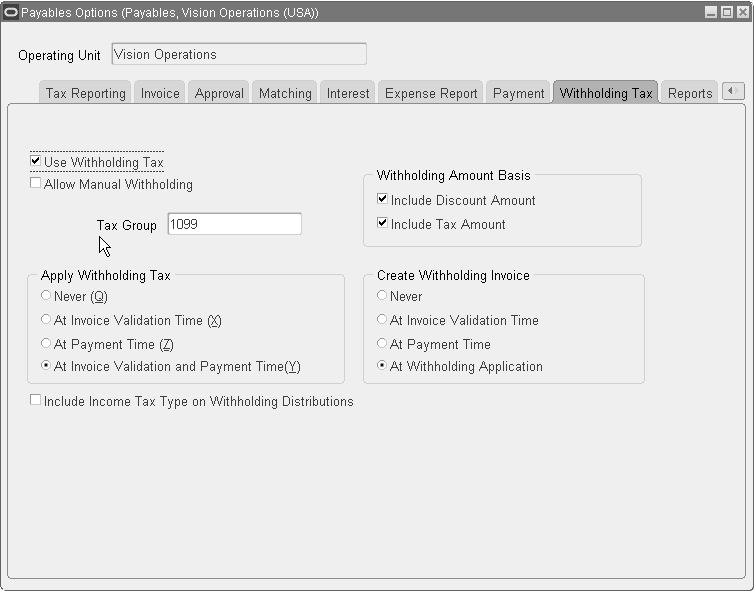
The option At Invoice Validation and Payment time has been included. This option can be selected only if the Use Withholding Tax box is selected in the Withholding Tax region of Payables Options and the option in Apply Withholding Tax is selected as At Invoice Validation and Payment Time. Another option called At Withholding Application is added to the Create Withholding Invoice region.
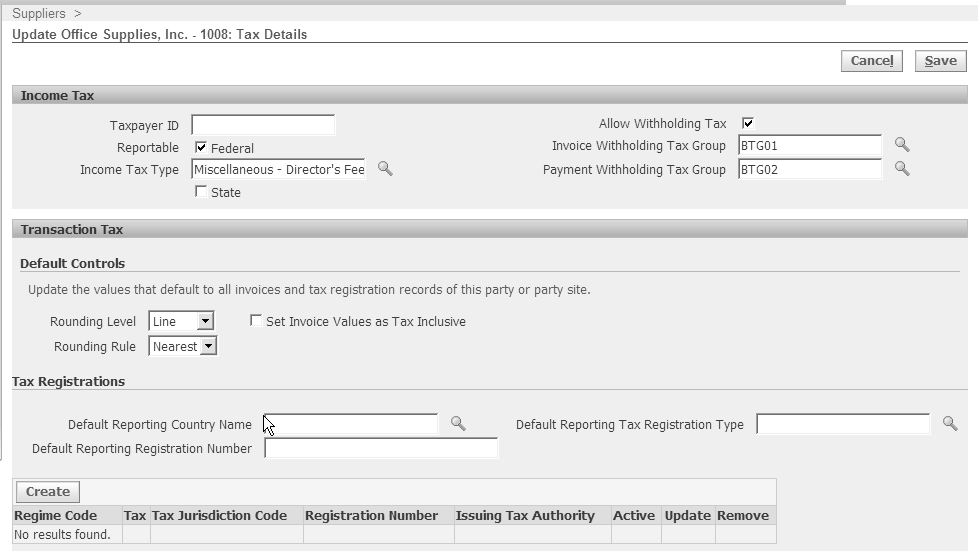
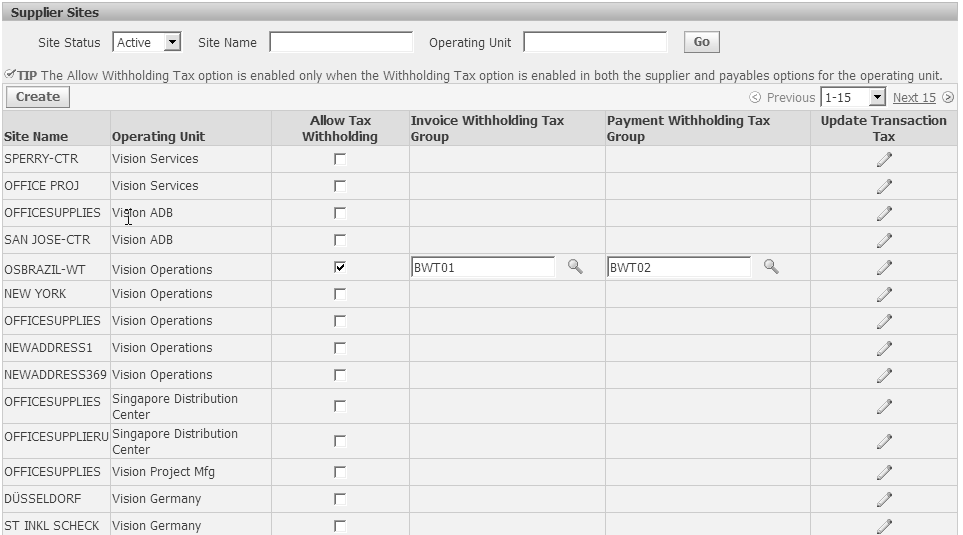
In the Supplier/Supplier Site pages, there are two Lists of Values to display Invoice Withholding Tax Group and Payment Withholding Tax Group. At the Supplier level, the Allow withholding tax box in tax details tab of the supplier is editable at the irrespective of the payables option selected. At the supplier site level the Allow withholding tax box is displayed at the supplier site level but is editable only if Use Withholding tax box is enabled in the Payables Options of the operating unit to which the supplier site is attached and Allow Withholding tax box is selected at the supplier level.
Tax Details Page with Withholding Tax
Tax Details Page with Withholding Tax (contd.)
Address Book
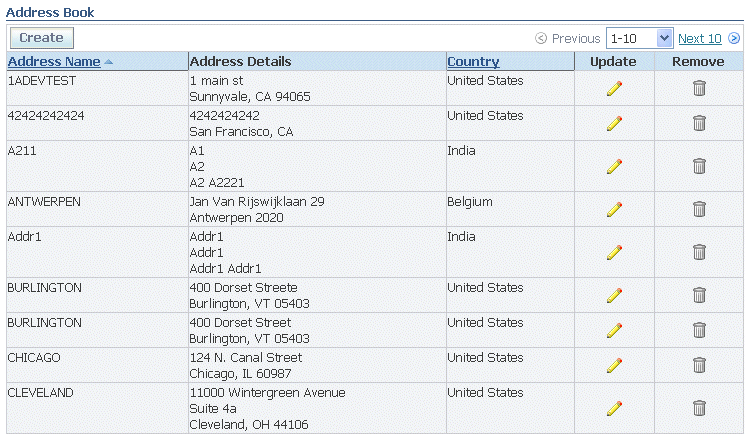
Use the Address Book page to enter information on your company sites. You can create and modify the multiple addresses used in transactions with the buying company (for example, purchasing locations, payment sites, and addresses for RFQs). You can provide a comment for each address entry to describe how it is used. For example, you can enter an address record and indicate that this is an address for a location from which goods or services may be purchased.
After you enter address information, buyer administrators are notified of the changes. Buyer administrators must review the updates and decide how to use the details to update the purchasing system. Therefore, any changes you make may not be promoted to the system for a few days.
To manage address book details:
-
To access the Address Book page, click Address Book in the Company Profile navigation tree.
Address Book Page
-
The Address Book page displays the current addresses defined for your company. From this page you can
-
Delete an address by clicking the trash can icon.
-
Update an address by clicking the pencil icon.
-
Add a new address by clicking Create.
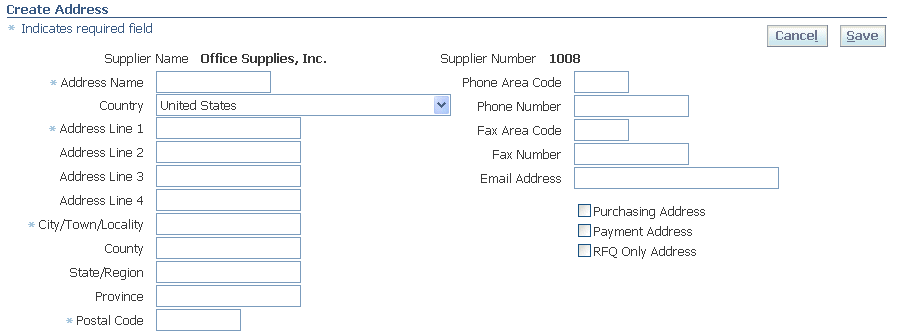
Create Address Page
-
On the Create Address page, enter the appropriate information for the new address (required fields are marked with an asterisk).
-
When finished, click Save.
-
-
Contact Directory
The Contact Directory lists the employees at your company who function as contacts between you and your buyer.
After entering the contact details, you can link the contacts to the appropriate address (described below). As people move within your organization, you can also revise the address details for a contact.
You can create multiple contacts and link each one to as many addresses as needed. Each contact must be unique based on first name, last name, and phone number. Contacts that are obsolete can be removed.
After you enter the information, buyer administrators are notified so they can review the details and use then to update their purchasing system. Therefore, your changes may not be promoted to the purchasing system for a few days.
-
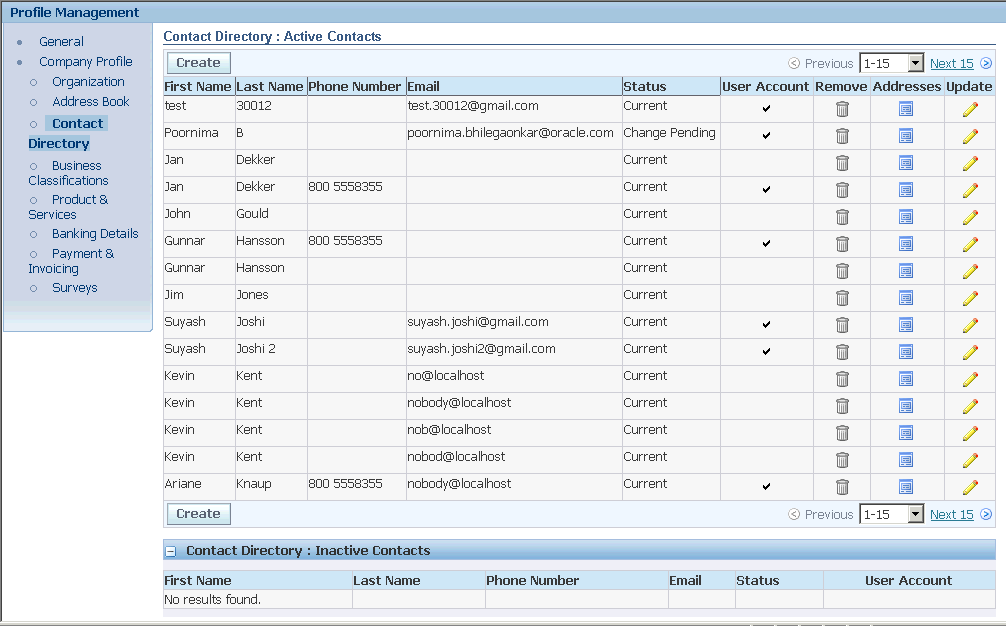
Click Contact Directory under the Company Profile navigation tree. The system displays your current list of contacts.
Contact Directory Details Page
-
On the Contact Directory page, you can
-
Delete a contact by clicking the trash can icon.
-
Update contact information by clicking the pencil icon.
-
View the inactive contacts by expanding the Contact Directory : Inactive Contacts region.
-
Manage address information for a contact by clicking the Addresses icon.
Address Associations for Contact Page

Use the Address Associations for Contact page to manage the addresses for a particular contact:
-
To remove an address for a contact, click the trashcan icon.
-
To add an address to a contact, click Add Another Row, search for the address, and click Save.
-
-
To create a new contact
-
On the Contact Directory Details page, click Create.
Create Contact Page

-
Enter the appropriate information for the contact. To create a temporary contact, use the pop-up calendar to identify and expiration date.
-
If you have the authority to create user accounts, the Create User Account for This Contact checkbox appears on this page. Clicking this checkbox displays additional fields for creating and authorizing users with access to iSupplier Portal..
To create a user account, grant the appropriate responsibilities and specify the appropriate user access restrictions to the new user. See the Oracle iSupplier Portal Implementation manual for details about defining user accounts.
-
Once you have specified your contact (and user account, if applicable) information, click Save.
Business Classifications
Buying companies establish a list of business classifications they want to use to classify their supply base. In some regions, these classifications are required by government regulations.
You can claim classifications that are appropriate to your business and add any required classification details. Buyers can then audit your qualifications. Once you claim the appropriate classifications, buyer administrators are notified so they can review the details.
Designated supplier users will be notified when the re-certification date for supplier's business classification is due. This is for the re-certification of the business classification and is based on the Business Classification Re-Certification Notification Reminder Days profile option set by the system administrator.
To claim / re-certify business classifications:
-
On the Admin information page, click Business Classifications.
-
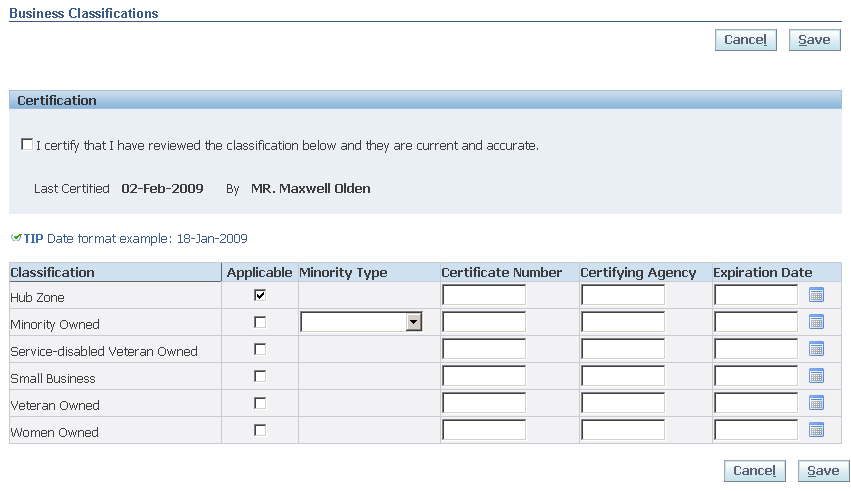
On the Business Classifications page, check Applicable check box for all classifications that apply to your company.
Business Classifications page
-
Select the “I certify, that I have reviewed the classification below and they are current and accurate” check box.
Note: Even if this check box is not selected the business classification is recertified when you click Save.
-
Complete the remaining fields.
-
Click Save. The Business Classification is updated.
Products and Services
Buying companies define product and service category sets that they use to categorize their supply base. You can browse the list of goods and services and select all those that apply to your business. Buying companies can then use this information; some may use it to help generate supplier invitation lists for RFQs or for reporting.
You can browse the hierarchy tree and select a parent category or child categories. When a parent is selected, the buying company assumes that you can provide all the products or services in that category. After you select the product and services categories that apply to your business, buyer administrators are notified so they can review the details. You can update your selections at any time.
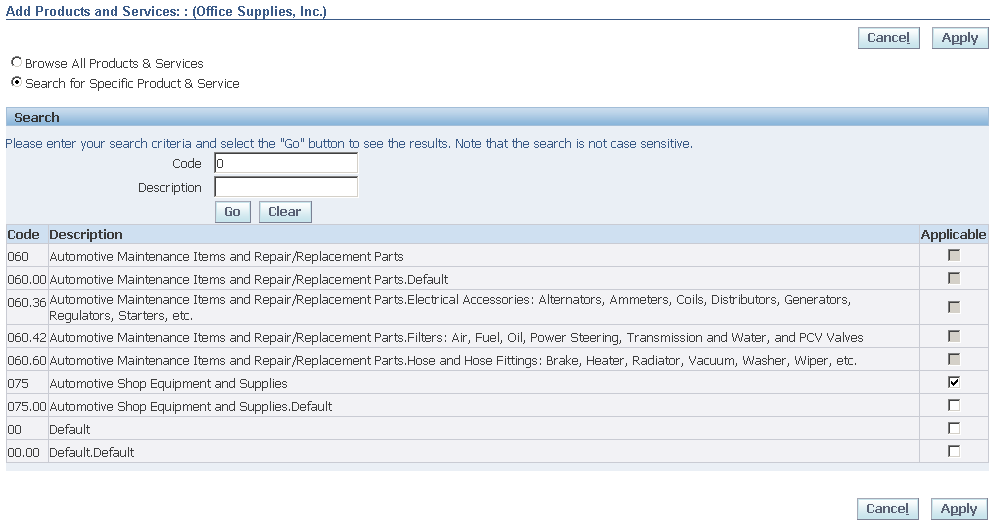
A supplier or supplier profile management administrator can search for a specific product or service from the Product & Services hierarchy. Supplier administrator can view the validation code corresponding to the respective product or service on the Add Products and Services page. Suppliers can view the search results with:
-
Products and Services codes along with Description.
-
List of Product and Services ordered by Description.
You can search for the products and services in the Prospective Supplier Registration: Additional Details page, Prospective Supplier Registration: Add Product and Services page, Supplier Profile Change Request page, and Product and Services Subcategories page.
To claim, or search for products and services:
-
On the Admin information page, click Product and Services.
Product and Services page

-
On the Products and Services page, the system displays the list of categories with their codes, and approval status that have already been claimed by your company. (To browse child category details for any parent, click the view sub-category icon.)
-
Click Add. The Add Products and Services page displays.
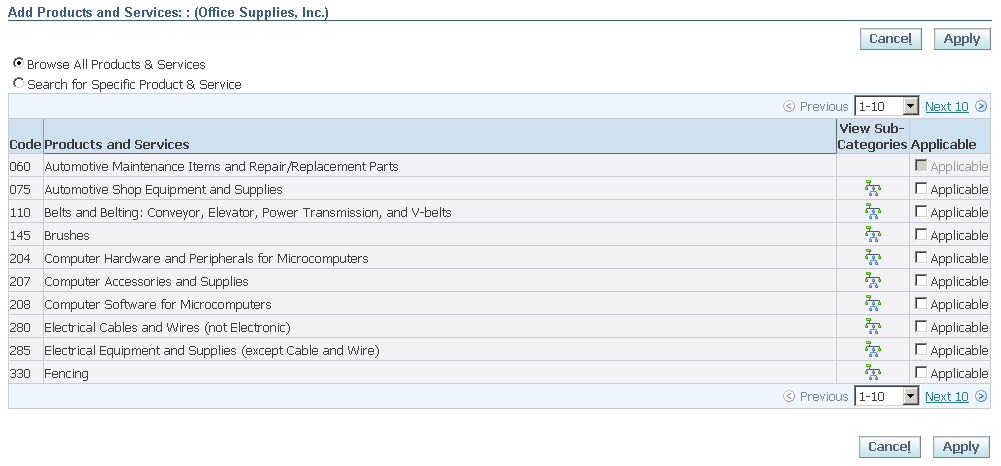
Add Products and Services page
-
In the Add Products and Service page, the supplier user can search for products and services with the Browse All Products & Services default option, or select the Search for Specific Product & Services option to enter the search criteria for code, description, or a combination of both and click Go.
-
You can view the search results for products and services ordered by description.
-
Select the Applicable check box. (Applicable check box is greyed out for products or services which are already selected as Applicable.)
-
Click Apply.
-
To view sub-category information about a product or service, click the view sub-categories icon. On the Add Products and Services page, click Applicable to apply a particular sub-category, and then click Apply.
View Products and Services Subcategories

To remove products or services:
-
On the Products and Services page, select a product or service.
-
Click Remove.
Banking Details
To simplify the process of capturing bank account related details and to improve data quality, you can create and maintain your own bank account details and assign these accounts to multiple addresses within your company. Buying companies can then access and approve these details for propagation into their payables systems.
You can create and maintain bank account details that you want the buying company to use when they make payments to you. The system captures all relevant information. Since bank accounts are defined for a particular bank, branch and account number, you have the ability to enter all this information when creating your account entries. When you enter your account information, the system validates for duplicate entries.
Creating Banking Details
To view existing bank accounts:
-
From the Company Profile navigation tree, click Banking Details. The Banking Details page displays information on any bank accounts already defined for your company. Use the View menu entries to control which bank accounts are displayed.
Banking Details Page

-
General Accounts displays accounts that are used company-wide (as opposed to accounts assigned to a particular address).
-
All Accounts displays general accounts as well as accounts assigned to an address. Use this view to update account information.
-
All Assignments displays which accounts are assigned to which sites.
-
-
To add an additional existing account to the list of general accounts, click Add, select the account, and click Save.
To create a new account:
-
On the Banking Details page, click Create.
-
On the Create Bank Account page, enter the appropriate values. Note that you can expand the Bank, Branch, and Bank Account sections to enter additional details.
Create Bank Accounts Page

-
When creating a bank account, you can create a new account at an existing bank/branch, or a new bank and/or branch.
-
To create an account at a new bank:
-
Identify the country where the bank is located.
-
Click Create New Bank.
-
Enter the bank name and number.
-
Click "Show Bank Details" and enter details about the new bank as needed.
-
-
To use an existing bank
-
Click the magnifying glass icon.
-
Use the Search and Select page to identify the bank.
-
-
To create a new branch
-
Click Create New Branch.
-
Enter the branch name and number.
-
Click "Show Branch Details" link and enter details about the new branch as needed. .
-
Enter the detail information about the new branch.
-
-
To use and existing branch:
-
Click the magnifying glass icon.
-
Use the Search and Select page to identify the branch.
-
-
-
Provide any additional account details by clicking "Show Account Details."
-
When you have finished entering bank account details, click Save.
Responding to Buyer Surveys
From time to time, buyers may request you respond to surveys. Surveys are used by the buying organizations to solicit information and input for use in improving relationships with suppliers.
To respond to a buyer survey:
-
From the iSupplier Portal Home page, click the Admin tab.
-
On the General page, click Surveys in the navigation tree on the left.
-
All surveys appropriate for you are listed in the table. To respond to a survey, click the pencil icon. The instructions on completing surveys vary from one to another.
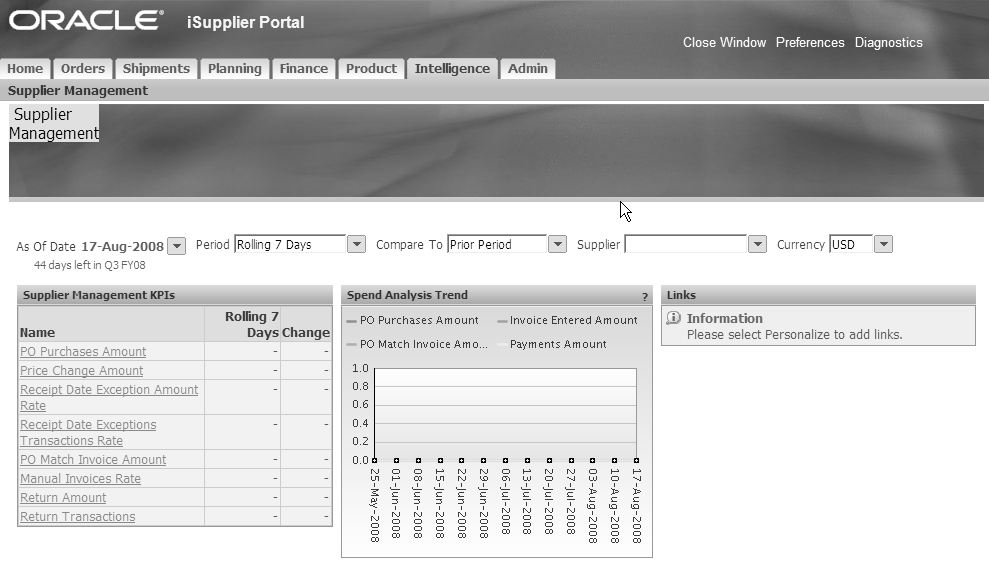
Supplier Intelligence
iSupplier Portal integrates with Oracle Daily Business Intelligence and allows a buying organization to view and share with supplier’s quantitative measures of supplier performance. Buyers can tailor the dashboard view based on the type of supplier. The Scorecard provides a one-stop location for relevant and reliable supplier performance information and a complete view from aggregated data to granular details on KPIs. Buyers can view suppliers scores based on the KPI’s and share the scores with the supplier. Both the supplier users and the buyers are able to query and view the following information on the iSP supplier performance (Intelligence) page:
-
Score bar chart
-
DBI trend graphs
-
DBI KPIs and Scores
-
Change
-
Weights
Intelligence tab
