Create and Assign Sources
Create and Assign Sources Overview
After creating transaction objects, assign these objects to event classes when setting up event class options in the Accounting Methods Builder (AMB).
Run the Create and Assign Sources program to automatically generate sources and source assignments based on transaction object and reference object definitions and assignments. These sources are used to create journal entries for transactions in the subledger.
Defining Accounting Event Class Options
In the Accounting Event Class Options window, you can:
-
Enter additional information for event classes
For example, for events belonging to a particular event class, enter supplemental information such as the default journal category, which is used to create journal entries in General Ledger.
-
Assign transaction objects to event classes
-
Define reference objects
-
Define relationships between transaction objects and reference objects
For example, a Payables implementer can define Payables table AP_PAYMENT_SCHEDULES and Projects table PA_PROJECTS as reference objects assigned to the transaction object AP_INVOICES for an event class Invoice.
-
Define relationships between primary and secondary reference objects.
To Set Up Accounting Event Class Options
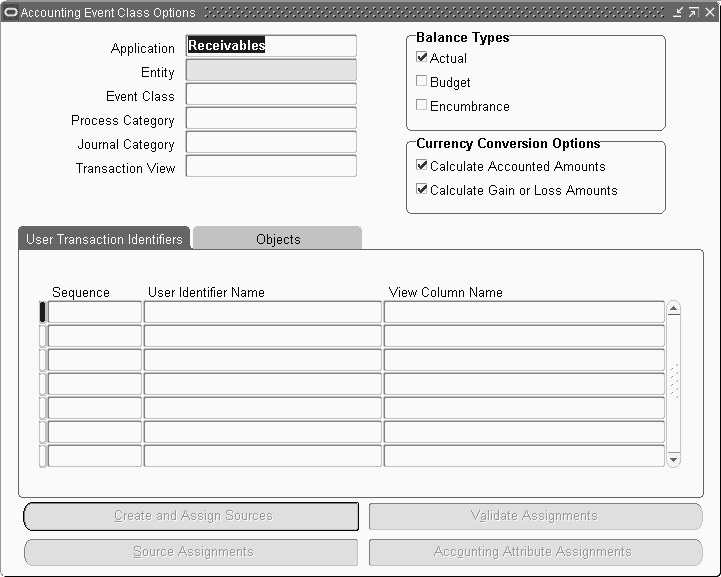
The following procedure describes selected fields in the Accounting Event Class Options window.
-
The Application field defaults from the application associated with the responsibility.
-
In the Event Class field, select the event class from the list of values.
The list of values for the Event Class field shows all event classes associated with the entity selected.
If accounting event class options are defined for the event class, then the options can be queried.
-
In the Process Category field, enter the process category associated with this event class from the list of values.
The list of values for this field contains all process categories for the application associated with this event class.
See: Process Categories
-
In the Journal Category field, select a journal category from the list of values.
For events belonging to this event class, the General Ledger Journal Category field stores the default journal category that is used to create journal entries in General Ledger. The list of values for this field contains all journal categories defined in General Ledger. These categories can be overwritten when users complete the Financial Services Accounting Hub setups in Accounting Setup Manager.
See: Oracle Financials Implementation Guide.
-
In the Transaction View field, enter the view name that can be used to retrieve additional information for an event from the list of values.
The information acquired from this view is displayed in the Financial Services Accounting Hub reports and inquiries.
You should provide a transaction view for each event class. This view should include all columns that have been mapped to system transaction identifiers for the event entity as well as those identifiers that may help users to uniquely identify the transaction in the application. The Financial Services Accounting Hub uses these values to select information from the view.
Many event classes can share a single transaction view. For example, the event class Prepayments can use the same transaction view as the event class Invoices. The transaction view column names can vary from event class to event class. For example, label the INVOICE_NUM column Invoice Number or Prepayment Number depending on the event class.
In the User Transaction Identifiers tab, you can specify up to ten columns from the transaction view that appear on the Financial Services Accounting Hub inquiry windows and reports. These identifiers uniquely identify a document or transaction in the application.
-
In the Balance Types region, select the balance types supported by the event class.
-
Select Budget for each event class that may have budget accounting lines.
-
Select Encumbrance for each event class that may have encumbrance accounting lines.
-
-
Optionally, to configure the Financial Services Accounting Hub to calculate accounted amounts for the event class, select the Calculate Accounted Amounts check box in the Currency Conversion Options region.
The Calculate Accounted Amounts option is for the primary ledger or secondary ledger with valuation method enabled. Subledger accounting calculates the accounted amount for the secondary ledger if the secondary ledger is in a different currency than the primary ledger and the secondary ledger is not enabled for valuation method.
-
Optionally, to configure the Financial Services Accounting Hub to calculate gain or loss amounts for the event class, select the Calculate Gain or Loss Amounts check box in the Currency Conversion Options region.
The table below describes the viable combinations for the Calculate Accounted Amounts and Calculate Gain or Loss amounts options.
Calculate Accounted Amounts Calculate Gain or Loss Amounts Financial Services Accounting Hub Behavior Implementers Provide in the Transaction Objects Yes Yes The Financial Services Accounting Hub calculates both accounted and gain or loss amounts. If the conversion rate type is User, then you should also provide the conversion rate; otherwise, provide the conversion date. No Yes The Financial Services Accounting Hub calculates gain or loss amounts only, including any rounding amounts for the event class. Unrounded accounted amounts, conversion information: conversion rate type, conversion date, or rate type No No The Financial Services Accounting Hub does not perform any calculations. Unrounded accounted amounts, conversion information: conversion rate type, conversion date, or rate type
Accounted amounts and gain or loss amountsNote: Conversion information, which includes conversion rate type, conversion date, or conversion rate, is always required for foreign currency.
-
In the Sequence field, enter a Sequence number to specify the column order that appears in the Financial Services Accounting Hub inquiry windows and reports.
The Sequence Number field automatically generates sequential numbers in ascending order. However, users can change the defaults.
-
In the User Identifier Name field, enter the label to use when the identifiers are displayed on reports and in subledger accounting inquiry windows.
This field is translated so that user transaction identifiers are always displayed with labels in their preferred language. Users can modify this name to meet their requirements.
-
In the View Column Name field, select the view column to display on accounting reports and inquiry windows.
You can specify up to five column names that provide additional information about the event.
The list of values for this field contains all columns from the view entered in the Transaction View field.
The Financial Services Accounting Hub displays user transaction identifiers on accounting event reports and inquiries by dynamically generating sql statements based on the definitions of both system and user transaction identifiers. Details are obtained as follows:
-
The Transaction View defines the database table or view with the user transaction identifiers.
-
The View Column Names field defines the columns to be selected from the database table or view.
-
The system transaction identifiers define the WHERE clause applied to the database view or table. The value of these unique identifiers are taken from the accounting event data model.
As an example, the Financial Services Accounting Hub builds the following select statement to retrieve the user transaction identifiers for accounting events for the Invoices and Prepayment event classes:
SELECT VENDOR_NAME,
VENDOR_NUMBER,
INVOICE_NUM,
INVOICE_DATE
FROM AP_INVOICES_TRANSACTION_LINK_V
WHERE INVOICE_ID = &SOURCE_ID_INT_1;
You must specify the tables or views from which the accounting transaction object takes source values for a particular event and transaction object line.
See: Introduction to Events and Sources
See: Transaction Objects Introduction
-
-
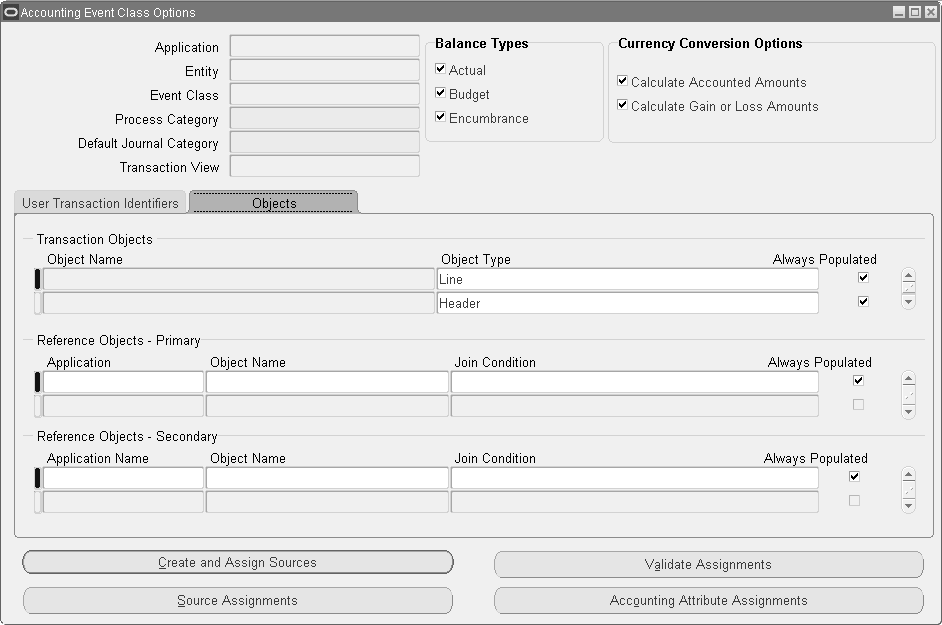
In the Object Name field in the Transaction Objects region of the Objects tab, enter the table or view name corresponding to the transaction object.
Object names must be unique inside an event class.
-
In the Object Type field, select the information provided by the sources included in the transaction object from the list of values.
The list of values contains the following transaction object types:
-
Transaction Objects Headers: for untranslated header level sources
-
Transaction Objects Headers MLS: for translated header level sources
-
Transaction Objects Lines: for untranslated line level sources
-
Transaction Objects Lines MLS: for translated line level sources
-
-
For each transaction object type, select the Always Populated check box for at least one transaction object.
The Always Populated check box is selected by default.
If Always Populated is selected, the Accounting Program expects that the transaction object specified always returns one or more records for the accounting event. If the rows are not returned, an error message appears and journal entries are not created.
If Always Populated is not selected, the transaction object does not always need to return records.
For example, since not all Payables invoice lines are matched to purchase orders, a transaction object lines object that is not Always Populated can be used to store all sources that relate to purchase orders. It returns rows only for those invoice lines that are matched to purchase orders.
-
In the Application field of the Reference Objects region, select the application of the primary or secondary reference object.
-
In the Object Name field, enter the object name of the reference object.
The object must exist in the database and be accessible to users. The object name must be unique within an event class.
-
In the Join Condition field, enter the join condition between the transaction and reference objects.
Note: Implementers cannot use the outer join operator (+).
-
Select the Always Populated check box if the join condition always returns a record.
If this check box is not selected, the Financial Services Accounting Hub creates the outer join.
Note: The Always Populated flag of a transaction object does not alter join conditions of reference objects.
See: Reference Objects
Create and Assign Sources Program
The Create and Assign Sources program derives sources and source assignments given the definitions of transaction objects and reference objects. The tool ensures consistency between transaction and reference objects and source and source assignment definitions. The program validates transaction objects, reference objects, source definitions, and source assignments. Optionally it can also validate accounting attribute assignments.
With the Create and Assign Sources program, you are only responsible for extending source definitions to include optional user attributes. You also need to add accounting attribute assignments.
The Create and Assign Sources program is generated by clicking Create and Assign Sources in the Accounting Event Class Options window.
See: Revise Source Definitions and Assign Accounting Attributes
Based on the transaction and reference object definitions and corresponding database data dictionary definitions, the Create and Assign Sources program can be launched in the following modes:
Create and Validate Mode
Select the Create and Validate mode when launching the Create and Assign Sources from the Submit Request window or by selecting the Create and Assign Sources button in the Event Class Options page. When run in the Create and Validate mode, the Create and Assign Sources program performs the following tasks:
Validation of Transaction and Reference Objects Defined in the AMB
The Create and Assign Sources program verifies the following for transactions and reference objects:
-
All transaction and reference objects defined for the event class exist in the database data dictionary.
-
All transaction objects, based on the transaction object type, contain the appropriate primary key columns of the correct data type.
-
The syntax of all join conditions between the transaction and reference objects is correct.
-
A reference object is not registered multiple times for an event class.
-
A reference object is not assigned to another reference object.
See: Transaction Objects Introduction
Creation of Sources
To create sources, the Create and Assign Sources program verifies whether a source with the same source code for the application already exists.
Note: When creating sources, the Create and Assign Sources program does not perform the following tasks:
-
Flagging sources as summed
-
Providing user friendly names or descriptions for the sources
-
Providing lookup types or value sets for the sources
-
Marking the sources as Accounting Flexfield or Accounting Flexfield qualifiers
Update the source definitions appropriately.
Assign Sources
For each database object column, the Create and Assign Sources program verifies that the corresponding source is assigned to the transaction or reference object's event class.
-
If no source assignment exists, the Create and Assign Sources program creates a new source assignment.
The source assignment level (header, line, or reporting currency) depends on the transaction object type.
The reference object inherits the extract object level of the source assignment in the joined transaction object.
If the sources are generated from reference objects, the program can assign them to event classes even if the corresponding application is different from that of the sources.
Validate Only Mode
Select the Validate Only mode when launching the Create and Assign Sources from the Submit Request window or by selecting the Validate Assignments button in the Event Class Options page. When run in the Validate Only mode, the Create and Assign Sources program performs the following tasks:
Validation of Transaction and Reference Objects Defined in the AMB
The Create and Assign Sources program verifies the following for transactions and reference objects:
-
All transaction and reference objects defined for the event class exist in the database data dictionary.
-
All transaction objects, based on the transaction object type, contain the appropriate primary key columns of the correct data type.
-
The syntax of all join conditions between the transaction and reference objects is correct.
-
A reference object is not registered multiple times for an event class.
-
A reference object is not assigned to another reference object.
See: Introduction to Transaction Objects
Validation of Sources and Source Assignments
The Create and Assign Sources program performs the following source and source assignment validations:
-
A source assigned to an event class is defined in at least one transaction or reference object associated with the event class.
-
The data type of the source matches the data type of a corresponding column from a transaction or a reference object assigned to an event class.
-
The source is assigned to the event class at a level that is consistent with the transaction or reference object type.
Validation of Accounting Attribute Assignments
The Create and Assign Sources program validates all accounting attribute assignments for the event class with the following validations:
-
Standard sources must be assigned to all accounting attributes that are required and do not belong to a group.
-
If any of the accounting attributes belonging to a group are assigned to a standard source, then all the required accounting attributes for that group must also be assigned to the event class.
For example, if one of the accounting attributes belonging to the group Third Party is assigned, then all other required accounting attributes for the same group must also be assigned.
-
If the Encumbrance Accounting flag for the event class is selected, then the accounting attribute Encumbrance Type identifier must be assigned to a standard source for that event class.
-
If the Budget Accounting flag for the event class is selected, then the accounting attribute Budget Version Identifier must be assigned to a standard source for that event class.
See: Revise Source Definitions and Assign Accounting Attributes
Duplicate Column Definitions
Since many transaction objects are assigned to an event class, the corresponding database objects may contain the same column definition many times. If a database object column definition is the same as that of another database object, the Create and Assign Sources program assumes that the columns always contain the same value. The program creates a single source that is assigned to an event class.
When the Create and Assign Sources program encounters duplicate database column definitions, it applies the following rules in the following order to determine from which database object the Accounting Program selects the source values:
-
Always populated transaction objects are used in preference to those that are not always populated.
This rule ensures that the Accounting Program selects source values from database objects that are most likely to have not null values for it.
-
Header transaction objects are used in preference to line transaction objects. The source is assigned to the event class at the highest level.
This rule ensures that sources are available to use in as many journal entry setups as possible.