Managing Containers
This chapter covers the following topics:
- Overview of Containers
- LPN Statuses
- Auto-packing Delivery Lines into Containers
- Creating a Container
- Naming Containers
- Manually Packing Delivery Lines into Containers
- Assigning Freight Costs to a Container
- Purging Containers/LPNs
- Packing Workbench
- Using the Packing Calculator
- Assigning Containers to a Delivery
- Unassigning Containers from a Delivery
Overview of Containers
In the Shipping Transactions form, you can create and manage containers (LPNs) at any point in the shipping process. If you are using the Auto-packing feature, containers can be automatically packed using the container-item relationships set up in the Container-Item Relationships window.
Note: LPN is an acronym for License Plate Number. A packing container has a license plate number for unit identification and reporting capability, so containers are also called LPNs in Oracle Shipping Execution.
You can create containers without assigning them to a delivery. This is useful if you want to create multiple containers of the same type then pack them with unassigned delivery lines.
Customer Items can be associated with containers within Oracle Inventory. See: Oracle Inventory User's Guide. This association is used when packing the Customer Item into a container in Oracle Shipping Execution. When the Customer Item is packed, the container associated with the Customer Item in Oracle Inventory is used as the default container.
You can pack multiple containers with multiple lines using one of the following packing methods:
-
-
Equal packing: splits the delivery lines equally between the selected LPNs. You cannot use this method with delivery lines of serial controlled items.
-
Sequential packing: fully packs one container at a time to its capacity (weight, volume, or quantity) before packing the next selected container.
-
You can complete the following tasks in container management:
Containers for Oracle Warehouse Management Enabled Organizations
The following container management conditions apply only if Oracle Warehouse Management (WMS) is enabled at the warehouse organization:
-
You must be in Warehouse Management to pack the contents before pick confirming or staging them. In Warehouse Management enabled organizations, Warehouse Management does the packing and passes the updated shipping information to Shipping Execution.
-
If Oracle Warehouse Management is installed, you can only assign and unassign the topmost container from a delivery. For example, if you have detail LPNs packed into a master container, you can only assign/unassign the master container not the detail container.
LPN Statuses
LPNs are used throughout Oracle Applications, including Oracle Shipping Execution. LPNs created in Oracle Warehouse Management are viewable on the Shipping Transactions form and Quick Ship window. The entire LPN hierarchy is passed to Oracle Shipping Execution upon pick confirmation completion and are kept synchronized through the shipping processes.
Note: LPNs created in Oracle Warehouse Management have statuses specific to Oracle Warehouse Management.
The following Oracle Warehouse Management statuses are visible in Oracle Shipping Execution:
-
Staged/Pick Confirmed
-
Loaded to Dock
-
Loaded in Staging
Certain fields on Oracle Warehouse Management generated LPNs can be modified through Oracle Shipping Execution, for example weight and volume. The Frozen Weight/Volume option is ignored for LPNs created by Oracle Warehouse Management. The weight and volume of these LPNs are kept synchronized with Oracle Warehouse Management.
See: Oracle Warehouse Management User's Guide
Auto-packing Delivery Lines into Containers
Auto-packing provides a convenient and quick way of automatically packing delivery lines into containers (LPNs). The delivery lines are packed into LPNs based on the container-item relationship set up in Oracle Shipping Execution or in Oracle Inventory (defined as a customer item) and the setting of the Shipping parameter Percent Fill Basis must be set to Quantity. The container-item relationship defines the container that is used for packing the delivery lines. If Percent Fill Basis is set to Quantity, then auto-pack will look at Container-Load Relationships set up for the item and the Detail Container.
If multiple container-item relationships exist for the same item, the Preferred setting in the Container-Item Relationships window indicates the default container-item relationship used for that item.
Auto-packing can also be performed for those items in Oracle Inventory that are defined as Customer Items.
Naming of the LPNs depends on whether or not you specify naming defaults when setting up your Organization Parameters. If you specify LPN Name Generation defaults, then those parameters are used during auto-packing of delivery lines into containers.
Using the Auto-pack Master Option
-
If you select Auto-pack, then only the detail LPNs are created and packed.
-
If you select Auto-pack Master, the delivery lines are packed into the detail container, and the detail containers are packed into the parent/master container in one action:
For example, a delivery line with a quantity of 12 of Item A has a container-load relationship set up so that 6 of Item A fits into Container A and 2 of Container A fits into Container B (the percent fill basis is set to quantity). If you run Auto-pack Master, the line is split into 2 lines of 6, the first line is packed into the first container, the second line is packed into the second container, and the two detail LPNs (2 Container As) are packed into Container B.
-
The Auto-pack Master option is available from the Actions menu in the Lines/LPNs tab in the Shipping Transactions form. It is also available at the delivery level.
Note: Container-Item Relationships must be pre-defined between the item and the detail container and between the detail container and the master container.
Naming of the LPNs depends on whether or not you specify naming defaults when setting up your Organization Parameters. If you specify LPN Name Generation defaults, then those parameters are used when auto-pack master is used.
Note: If your organization has Oracle Warehouse Management enabled, see Containers for Oracle Warehouse Management (WMS) enabled Organizations
To auto-pack delivery lines into containers
-
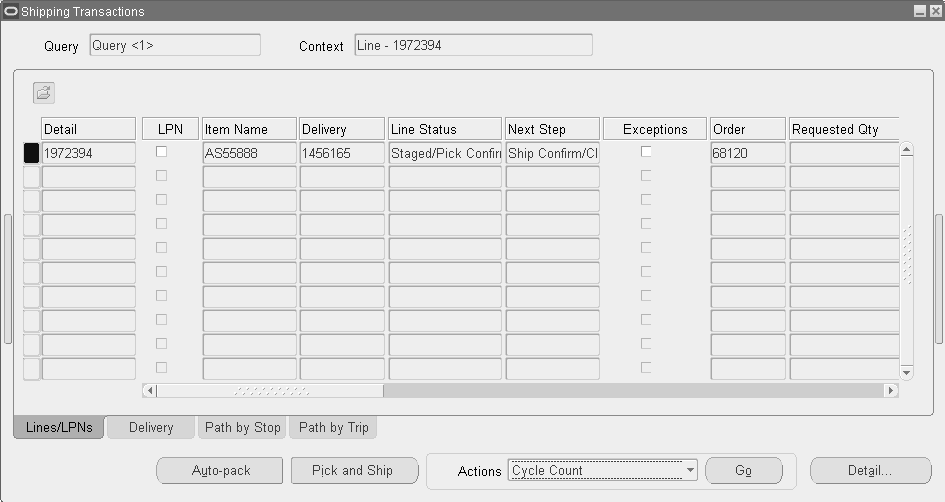
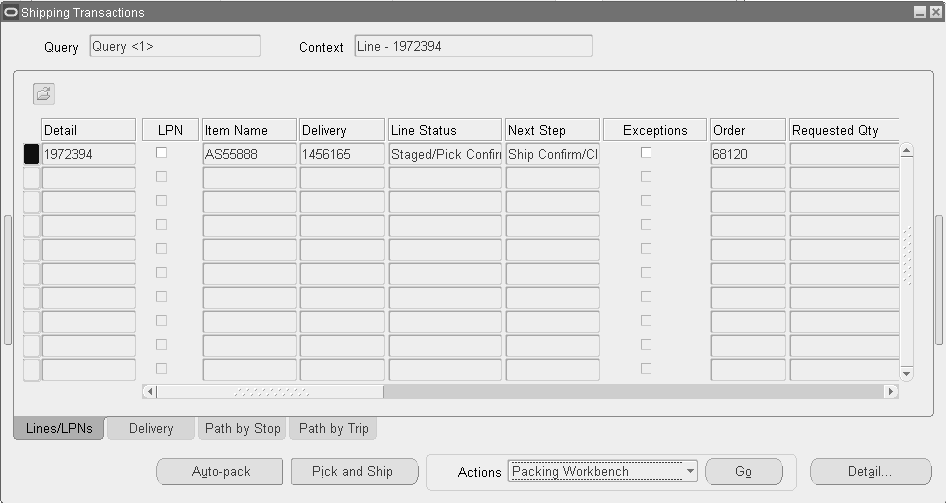
Navigate to the Query Manager window, and find the delivery lines.
Shipping Transactions form - Lines/LPNs Tab
-
Select one or more lines.
-
From the Actions menu, choose one of the following:
-
Auto-pack
-
Auto-pack Master
Or, right-click and select Auto-pack, or create your own Auto-pack button using Folders, and click that button.
-
-
Click Go.
The lines are auto-packed into LPNs. If you selected Auto-pack Master, the lines are packed into LPNs and detail LPNs are packed into the parent/master LPNs.
-
Save your work.
See Shipping Execution Setup, Defining Container-Item Relationships in Oracle Order Management Implementation Manual
Related Topics
Creating a Container
You can create multiple instances of an existing container type and assign them to trips or deliveries or use them in the future to pack delivery lines. This makes packing more flexible because you can plan and pack ahead of time or as needed. Once the container instances are created, they can be viewed in the Shipping Transactions form.
You can pack delivery lines into LPNs regardless of whether they are pick released or not pick released.
Related Topics
Naming Containers
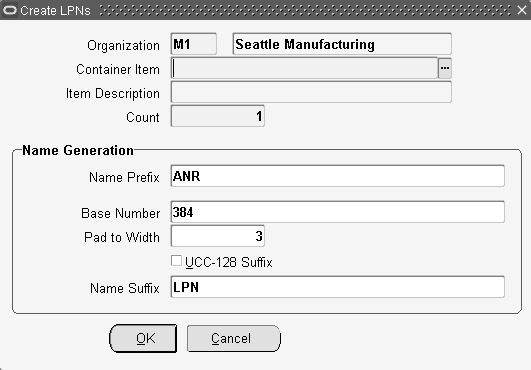
In the Create LPNs window, you assign names to identify and track individual LPNs. Naming of the LPNs depends on whether or not you specify naming defaults when setting up your Organization Parameters. If you specify LPN Name Generation defaults, then those parameters are used. Another option is to create your own container names or the system generates default container names based on your entries in the following Create LPNs window fields:
-
Name Prefix
-
Starting Number
-
Pad to Width
-
UCC-128 Suffix
-
Name Suffix
See: Oracle Order Management Implementation Manual for more information on creating LPNs.
Example: In the following table, ten container instances named VIS100BOX and ending with VIS109BOX are created.
| Prefix | Base Number | Quantity | Suffix |
|---|---|---|---|
| VIS | 100 | 10 | Box |
Note: To define a new container type rather than create an instance of an existing container (LPN), see Setting Up in the Oracle Inventory User's Guide.
To create containers
-
Navigate to the Shipping Transactions form, and find the Lines/LPNs.
-
From the Actions menu, select Create LPNs.
-
Click Go to display the Create LPNs window.
Create LPNs Window
-
Select the Organization for the container.
-
Select the Container Item such as a box or pallet.
-
Enter a Count for the number of container instances you want to create.
For example, to create ten instances of the BX54888 Container, enter 10 in the Count field.
-
Enter a Name Prefix for the container name.
The Prefix is defaulted if you specify it in the Prefix field within the Organization Parameters window/Revision, Lot, Serial and LPN tab.
-
Enter the Base Number for the container name.
The numbering starts from the base number and increments by 1. For example, if you enter 100 as the base number for the first instance of a container, the second is numbered 101, the third 102, and so on.
The Base Number is defaulted if you specify it in the Starting LPN Number field within the Organization Parameters window/Revision, Lot, Serial and LPN tab.
-
Enter the Pad to Width.
The default Pad to Width is the total number of digits in the base number. For example, the default Pad to Width for the container name VIS100BOX is 3.
-
Select the UCC-128 Suffix option if you want to enable the Uniform Code Council, 128 ASCII character set suffix functionality.
If you select the UCC-128 Suffix option (checked is Yes, unchecked is No), then you will not be able to specify the Name Suffix. The default suffix for UCC-128 is "No."
The UCC-238 Suffix is defaulted if you enable it by selecting the UCC-128 Suffix (Modulo-10) check box within the Organization Parameters window/Revision, Lot, Serial and LPN tab.
-
Enter a Name Suffix for the container name.
The Name Suffix is defaulted if you specify it in the Suffix field within the Organization Parameters window/Revision, Lot, Serial and LPN tab.
-
Click OK to create the container instances.
-
Save your work.
Manually Packing Delivery Lines into Containers
You can manually pack containers if you have delivery lines you want to pack without using the auto-pack method: for example, to quickly pack delivery lines into a box.
Prerequisites
An LPN must be available for packing.
The line(s) must not currently be assigned to another LPN.
To manually pack containers
-
Navigate to the Shipping Transactions form, and find the delivery line(s) you want to pack.
-
Select the delivery line(s) that you want to pack.
-
From the Actions menu, select Pack.
-
Click Go to display the LPNs Query window.
-
Query a previously created LPN.
-
Select the LPN.
-
Click OK.
You can only pack one container at a time.
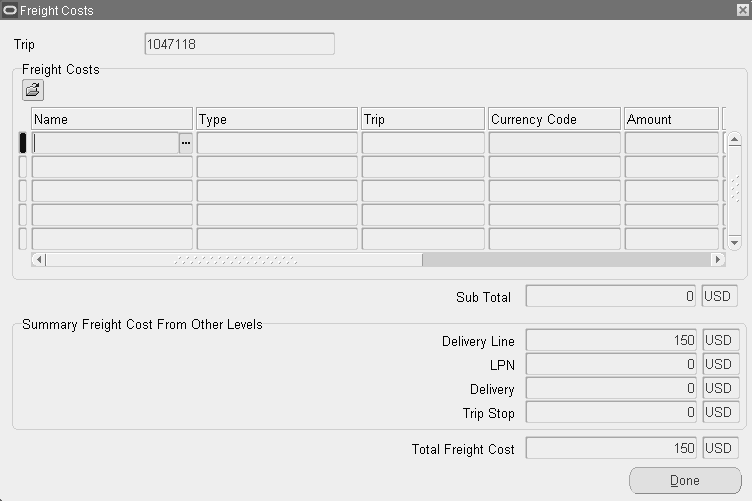
Assigning Freight Costs to a Container
You can assign new freight costs, override the suggested amounts, or update existing freight costs for a container. For example, you may need to add additional costs like Duty Fee or Priority Handling for a particular container. A freight cost can also be assigned to a delivery, a stop, or a delivery detail.
Prerequisites
A LPN must be created.
To assign freight costs for a container
-
Navigate to the Query Manager window.
-
Find the LPN.
The container displays in the Shipping Transactions form.
-
From the Actions menu, select Assign Freight Costs to manually assign your freight costs.
-
Click Go to display the Freight Costs window.
Freight Costs Window
-
Enter the Name, Type, Currency Code, Amount, Conversion Type, and Creation Date.
-
Click Done.
Note: Costs assigned to an LPN can be interfaced to Oracle Order Management and Oracle Receivables for invoicing a consignee (that is, freight terms are Collect or Prepay & Add) if a pricing modifier is set up. See: Defining Freight and Special Charge Types in Oracle Order Management Implementation Manual.
Costs assigned after ship confirmation are not passed as freight costs to Order Management; instead, they are stored in the shipping system for future reference.
-
Save your work.
Purging Containers/LPNs
Oracle Shipping Execution enables you to purge (permanently delete) containers/LPNs from the Oracle Shipping Execution tables.
LPNs must be empty (no shipping entities included in the LPN) before purging. Warehouse Management generated LPNs cannot be purged through Shipping Purge.
Related Topics
Shipping Purge Concurrent Process
Packing Workbench
You can use the Packing Workbench to split the delivery lines between containers or to pack sequentially one container at a time to its full capacity.
The Packing Workbench window consists of the LPNs tab which displays the LPNs and the Lines tab which displays the delivery lines. The packing workbench displays the tare or filled weight and volume of LPNs and delivery lines that can help you determine the number of delivery lines and LPNs.
Prerequisite
Weight and/or volume values must be defined for the items and containers within Oracle Inventory.
Packing Workbench Window
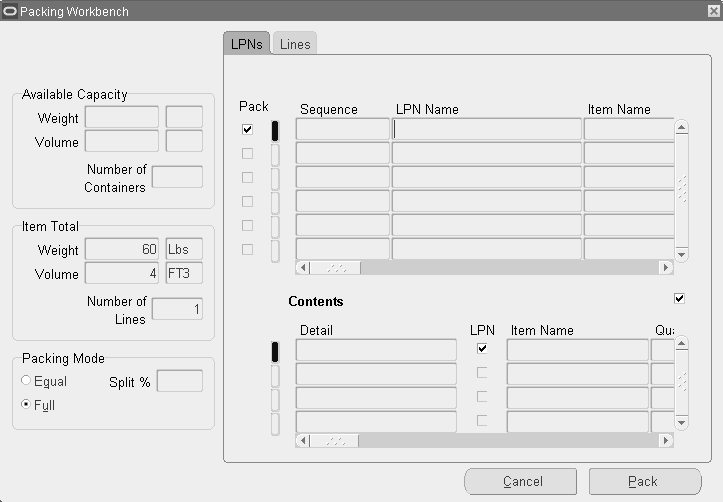
The LPNs and lines multi-record displays have check boxes next to each record to indicate whether a particular container or line has been selected for packing. As the LPNs are selected/deselected, the total available weight/volume is recalculated. Similarly when the delivery lines to be packed are selected/deselected, the total net weight/volume of all the lines is recalculated and displayed.
By matching the total net weight/volume of all lines with the total available weight/volume of the LPNs, you can determine whether you can pack the selected delivery lines in the available number of LPNs. Matching weights and volume does not guarantee that all the selected lines will be packed into the selected LPNs. Due to incompatibilities or differences in grouping attributes of the different lines and LPNs, there could be lines that remain unpacked at the end of the packing operation.
To assign/pack a number of lines into one or more LPNs, the packing can be performed using two different algorithms; one method is based on the sequential packing of the lines into the specified LPNs, and the other involves an equal packing of all the lines into the LPNs.
The following process-enabled fields are available on the Packing Workbench window if you are using Order Management with Process Inventory. If the item specified on the delivery line is dual UOM controlled, and lot controlled, then you will see values in these fields. Otherwise, these fields will be blank. The process-enabled fields are display only and include the following:
-
Secondary Quantity: Displays the quantity to be shipped in the secondary UOM
-
UOM: Displays the secondary UOM for the item for the delivery line
Equal Packing Delivery Lines into Containers
You can split the delivery lines equally between the selected LPNs so that each of the resulting split lines (from every delivery line) is packed into each available container. This results in a packing in which every container is packed with items from every delivery line. Every container will have the same quantity of a particular delivery line item. This method of packing is useful if you have a number of lines (each with a different item) that are grouped together at shipment time: for example, packing different home computer components into one box for shipping purposes. You cannot use this method with delivery lines of serial controlled items.
A selected delivery line is split equally by the number of LPNs and every line is packed into all the LPNs in a one to many relationship, provided the container grouping attributes are satisfied by the line. The preferred container specified on the delivery line or the container load-relationship is ignored. This method of packing could result in a gross over-packing or under-packing. If the LPNs are over-packed or under-packed, a warning appears. Again, this packing method could result in delivery lines that remain unpacked at the end of the packing operation because of incompatibilities in grouping attributes of lines and LPNs.
Note: If your organization has Oracle Warehouse Management enabled, see Containers for Oracle Warehouse Management (WMS) enabled Organizations.
To equally pack delivery lines into containers
-
Navigate to the Query Manager window, and find the delivery lines and containers that you want to pack.
Shipping Transactions form - Lines/LPNs Tab
-
The delivery lines and LPNs display in the Shipping Transactions form.
-
Select the delivery lines and LPNs.
Note: To select more than one, press and hold the CTRL key and select the lines and LPNs you want. To select multiple lines as a sequential group, place the cursor on the first line that you want and then press and hold Shift and then select the last line in the sequential group.
Do not select delivery lines of serial controlled items.
-
From the Actions menu, select Packing Workbench.
-
Click Go.
-
Optionally, deselect any lines or containers that you do not want to include in the packing operation.
-
In the Packing Mode region of the Packing Workbench window, choose Equal.
-
Click Pack.
-
Save your work.
Sequential Packing Delivery Lines into Containers
You can fully pack one LPN and then proceed to pack the next LPN. When packing multiple lines into multiple LPNs, the packing is performed one container at a time. The first delivery line is packed into the first container until the container is full or the line is completely packed. If the line is completely packed, then the next line is packed into the same container until the container is full.
If the LPN is fully packed before the line is completed (only partial quantity fits), then the line is split so that the split line now fills up the first container and the remaining quantity of the original line is packed into the next container. This is continued until all the lines have been packed or all the LPNs are full. If the LPNs are full before all the lines can be packed, the remaining lines are left unpacked. A warning will be issued to inform you that some lines were left unpacked.
Note: If Oracle Warehouse Management is enabled in your organization, see Containers for Oracle Warehouse Management (WMS) enabled Organizations.
To sequentially pack delivery lines into containers:
-
Navigate to the Query Manager window, and find the delivery lines and containers that you want to pack.
The delivery lines and containers display in the Shipping Transactions form.
-
From the Actions menu, select Packing Workbench.
-
Click Go.
The Packing Workbench window displays the LPNs in the LPN tab.
-
Select the Lines tab to display the lines.
-
Select the delivery lines you wish to pack into the LPNs.
-
In the Packing Mode region, choose Full.
-
Click Pack to pack the lines into the containers.
-
Save your work.
Note: To prevent unintended splitting of indivisible items during packing, the item should be defined as OM Indivisible within Oracle Inventory in the Master Items window, Physical Attributes tab.
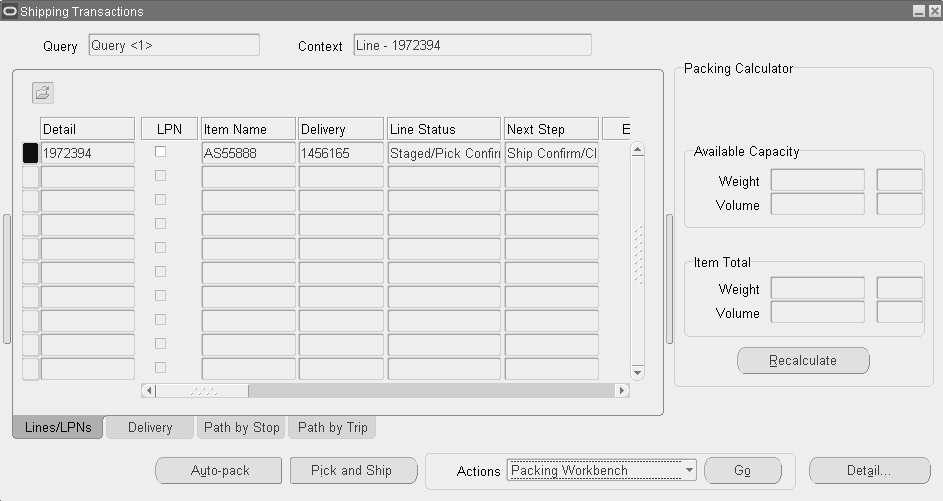
Using the Packing Calculator
When using the Packing Workbench, you can use the Packing Calculator to help plan your packing requirements. The Packing Calculator uses the default weight and volume values for items and containers as defined in Oracle Inventory to determine if the delivery lines fit into the selected LPNs.
If you select or deselect lines or LPNs, you can recalculate the displayed values by choosing the Recalculate button
Note: If your organization has Oracle Warehouse Management enabled, see Containers for Oracle Warehouse Management (WMS) enabled Organizations.
To use the packing calculator
-
Navigate to the Shipping Transactions form, and find the delivery lines and LPNs. Select the lines or LPNs.
Shipping Transactions form - Packing Calculator
-
Choose the vertical bar located on the right side of the Shipping Transactions form to display the packing calculator.
-
Click Recalculate to display the available capacity of the LPNs or the weight and volume totals for the items.
-
Choose the bar again to close the Packing Calculator.
Assigning Containers to a Delivery
You can assign an LPN (container) to an existing delivery by searching for the LPN and adding it to a delivery. If Oracle Warehouse Management System (WMS) is installed, you can only assign and unassign the topmost container to a delivery. For example, if you have detail LPNs packed into a master container, you can only assign the master container to a delivery.
Prerequisites
Delivery status must be set to Open.
A delivery and container must already be created.
Note: If your organization has Oracle Warehouse Management enabled, see Containers for Oracle Warehouse Management (WMS) enabled Organizations.
To manually assign a container to a delivery
-
Navigate to the Query Manager window, and find the container(s).
The container(s) display in the Shipping Transactions form.
-
Select the container(s) that you want to assign to the delivery.
-
From the Actions menu, select Assign to Delivery.
-
Click Go to display the Deliveries window.
-
Select the Delivery to which you want to assign the LPN(s).
-
Click OK to assign the LPN(s) to the delivery.
Note: Alternatively, you can select a delivery line assigned to a container, assign the line to a delivery, and the LPN will also be assigned to the delivery.
Unassigning Containers from a Delivery
You can unassign an LPN (container) by searching for the LPN and unassigning it from a delivery. If Oracle Warehouse Management (WMS) is installed, you can only assign and unassign the topmost container from a delivery. For example, if you have detail LPNs packed into a master container, you can only unassign the master container from a delivery.
Note: If your organization has Oracle Warehouse Management enabled, see Containers for Oracle Warehouse Management (WMS) enabled Organizations.
Note: Within a WMS enabled organization, unassigning a line from a delivery after LPN load will not prevent the line from being reassigned to the delivery during LPN drop.
Prerequisites
Delivery status must be set to Open.
To unassign a container from a delivery
-
Navigate to the Query Manager window, and find the LPN.
The LPN(s) displays in the Shipping Transactions form.
-
From the Actions menu, select Unassign from Delivery.
-
Click Go to unassign the container from the delivery.
-
Save your work.