Cartonization, Consolidation, and Packing
This chapter covers the following topics:
- Describing Cartonization Features
- Describing Carton Groups
- Describing Container-Load Relationships
- Using Cartonization
- Consolidation
- Describing the Consolidation Report
- Describing User-Initiated Consolidation
- Explaining Oracle Warehouse Management Packing Options
- Using the Desktop Application to Pack Material
- Performing Packing Processes
- Performing Unpacking Processes
- Performing Splitting Processes
- Performing Consolidation Processes
- Capturing Catch Weight Information
- Mobile Bulk Packing
Describing Cartonization Features
With container management features, Oracle Warehouse Management can automatically suggest packing configurations for groups of items. Optionally, cartonization may be based on the following packing requirements, Oracle Warehouse Management cartonization routines suggest the best carton selection for a grouping of items:
-
Container weight capacity
-
Volume
-
Item and container dimensions
-
Item's packaging restrictions
The system can determine the best carton size in which to pack the material being picked for shipment. It can also suggest the packed configuration for material being manufactured on a work order.
Using cartonization eliminates suboptimal packing configurations by always suggesting the best cartons to use based on grouping rules, carton weight capacity, carton volume, and the dimensions of the items to be packed in comparison to the carton's dimensions.
To use cartonization, you must setup carton groups and container load relationships. These concepts are described in more detail in the following sections.
Related Topics
Describing Container-Load Relationships
Cartonization Setup Steps, Oracle Warehouse Management Implementation Guide
Describing Carton Groups
You assign items to one or more carton groups. Carton groups represent a group of similar-type cartons that can carry a category of items. For example, a carton group that you define as miscellaneous might contain flashlights and stereos, while a liquid carton group might contain paint and oil.
Note: The system will never suggest packing an item of one type into a carton of a different type. For example, it will not suggest packing a liquid item into non-liquid carton type.
Explaining Carton Selection
First Oracle Warehouse Management separates items by carton group, and, in the case of sales order cartonization, by delivery. This step is not performed for WIP prepack, as WIP prepack is always performed on only a single item at a time, while bulk pack and sales order cartonization are performed on groups of items.
Within each carton group, the system first attempts to pack all of the items into a single carton. The total weight and volume of the items is compared with the weight capacity and volume of each carton. If the dimensions of any of the items will not fit into the dimensions of a container, then that container is not selected. If there are several potential matches, then the system selects the smallest container, verifying that Minimum Percent Fill of the container item has been met. If all of the items cannot fit into a single carton, then the system selects the largest carton, again verifying that Minimum Percent Fill of the container has been met. If the Minimum Percent Fill cannot be met, then the cartonization algorithm will look for a smaller container. The system repeats this step by trying to fit the remaining items into a single carton, and then suggesting subsequent cartons based on the carton sizes and capacity.
Note: 'Smallest" and "largest", as well as Minimum Percent Fill, can be based on either weight or volume. The Percent Fill Basis flag, in the Shipping Parameters form, is used to determine whether weight or volume should be used. If this flag is set to Quantity, then Weight will be used.
For pick release cartonization, the system tries to pack items into the container in the sequence in which the operator will be directed to pick them. When the next item in the picking sequence cannot fit into the container, the container is considered full.
Carton Selection Example
Assume that an item is 1 foot wide, 5 feet long, 3 feet high, and weighs 60 pounds. Also assume that five containers are available in which to pack this item. The Oracle Warehouse Management cartonization feature uses the following methodology to determine the optimal container in which to pack the item.
| Container | Width (feet) | Length (feet) | Height (feet) | Capacity (pounds) |
|---|---|---|---|---|
| A | 1 | 1 | 1 | 40 |
| B | 2 | 4 | 4 | 60 |
| C | 6 | 2 | 2 | 75 |
| D | 2 | 4 | 6 | 80 |
| E | 4 | 4 | 6 | 100 |
-
Container A is disqualified because with a capacity of 40 pounds, it does not have sufficient weight capacity to hold the item, which weighs 60 pounds.
-
Container B, with a capacity of 60 pounds, can hold the weight of the item, so the system checks its dimensions. The largest dimension of the item, its length (5 feet), cannot fit into any dimension of container B, so it is disqualified.
-
Container C's largest dimension, its width of 6 feet, can hold the item's largest dimension of 5 feet, but container C's next largest dimension, its width and height of 2 feet cannot hold the item's next largest dimension, its height of 3 feet.
-
Container D's dimensions and capacity can hold the item.
-
Container E's dimensions and capacity can hold the item.
Both Container D and E can hold the item, however, the system chooses container D, because it has the smaller weight capacity of the two containers. Thus, the system selects the smallest container possible that will fill the entire order.
Note: If the order exceeds the weight or volume capacity of the largest carton in the carton group, the largest carton is chosen and then filled to capacity. At that point, based on the criteria stated above, the system selects the next carton in the group.
Note: Non integer quantities cannot be cartonized. Also note, that if no container can hold a particular item, then that item will not be cartonized.
Describing Container-Load Relationships
You can define a container-load relationship for items that require more specific packing than what Oracle Warehouse Management would suggest. Container-load relationships specify the maximum quantity and required container to use whenever the item is packed. Container-load relationships apply to items that can only be packed in one type of container, or require a certain packing configuration.
Oracle Warehouse Management honors container-load relationships, regardless of the container group or physical characteristics of the container item or contained item.
Container-Load Relationship Example
For example, assume that a warehouse ships roses. For these items, quality assurance dictates that only small coolers be used to ship the roses. Furthermore, while 180 roses might fit into the small cooler by weight, volume, and size, experience has shown that any more than 144 roses causes damage in route. In this scenario, you can set up a container-load relationship that overrides the standard cartonization logic, so that only 144 roses are packed into each small container.
Multi Level Cartonization
Oracle Warehouse Management cartonization can consider multiple levels of packaging as well as single level packaging using cartonization. For example, a warehouse may have items that are packed into boxes, boxes packed into cases, and the cases packed into pallets. A packaging hierarchy can be build and the system will generate content and summary labels for each level of the hierarchy. However, only the outermost package generated by the system (in this case the pallet) will be considered an LPN. The cartonization process is triggered in one of three places:
-
Bulk pack
-
Prepack
-
Pick release
The bulk pack process can be set to stop at an arbitrary level for deep packaging hierarchies.
Multi-level cartonization enables multiple labels to be printed for a single cartonization request, thereby assisting with building pallets or complex packaging configurations. Different label formats can be produced at each of the levels, ensuring warehouse labels are formatted properly for the container on which they will be placed. In addition, summary labels are printed at every level of the cartonization hierarchy. One summary label is printed for each package and each LPN created by the cartonization process.
Like standard cartonization, multi-level cartonization can utilize either container groups relating a set of items to a set of containers, or specific container load relationship indicating exactly how much of an item can be packed into each container.
The following graphic illustrates an example of multi-level cartonization.
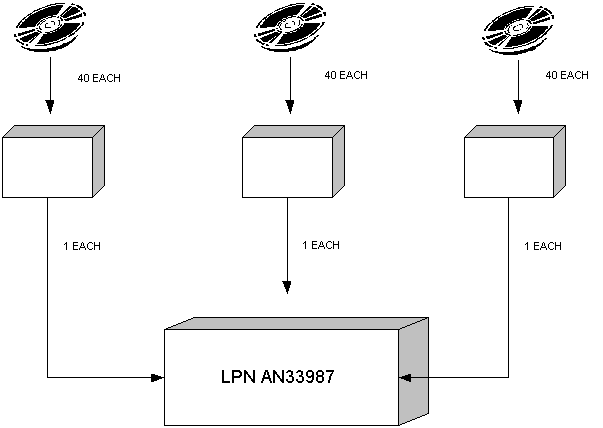
In this example, forty disks can fit into each box and three boxes can fit into each case. The case is the outermost container, therefore it is associated with an LPN. Each box is labeled with a summary label identifying the boxes contents and the LPN of the case that they are packed into.
Multi-level cartonization builds on the setup already defined for cartonization. The two inner boxes from the single level setup can now be assigned a category code in the Contained Item category set, and similarly, an outer box can be given a category code in the Container Item category set. This indicates that, for instance, forty disks can be packed in a small inner box, and three small inner box can, in turn, be packed into an outer box.
Using Cartonization
Oracle Warehouse Management uses cartonization for the following tasks:
-
Sales order and manufacturing picking (pick release)
-
Cartonization prior to WIP completion
-
Mobile bulk packing
-
Cartonization at task release
Cartonization at Pick Release
Cartonization is automatically performed when sales order or manufacturing jobs or schedules are released for picking, if the option is turned on for the organization and subinventory. After the lines are allocated using the Rules Engine, sales order lines are grouped by delivery, or by the delivery grouping rule if no deliveries are created prior to or at pick release. Manufacturing allocations are grouped by job or schedule. Cartonization is then performed on each grouping. This may be used to suggest the carton the operator should pick into, or the box that should be placed on the conveyor belt if conveyor-based picking is performed.
Without cartonization, at the beginning of the picking process, operators must guess the carton size to use. With cartonization, the system selects the best cartons to use, before the operator performs the first pick.
Sales Order Line Picking Example
The following figures provide an example of cartonization results for two sales order picks.
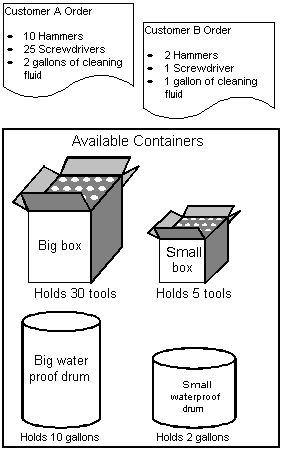
In this example, assume that two customers, A and B, submit the sales orders (shown in the figure) to your warehouse. Also assume that you have two boxes (one large, one small), and two drums (one large and one small) into which sales orders can be packed.
Based on the sales order requirements for customers A and B, the system suggests the packing suggestions shown in the following graphic.
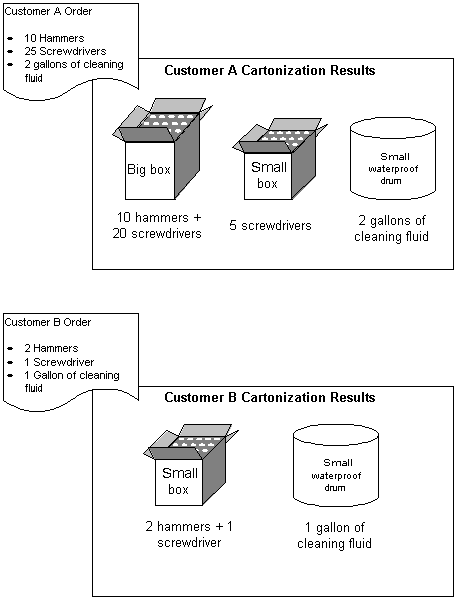
Of the 35 tools, and 2 gallons of cleaning fluid on Customer A's sales order, the system suggests the following packing configurations:
-
The 10 hammers plus 20 screwdrivers, for a total of 30 tools should be packed in the box, that has a capacity of the 30 tools
-
The remaining 5 tools should be packed in the small box–which has a capacity of 5 tools
-
The 2 gallon of cleaning fluid should be packed in the big drum–which has a capacity of 2 gallons
Of the 3 tools, and 1 gallon of cleaning fluid on Customer B's sales order, the system suggests the following packing configurations:
-
The 2 hammers and 1 screwdriver should all be packed in the small box
-
The 1 gallon of cleaning fluid should be packed in the small drum
A license plate number will be generated for each container suggested above. Even if both orders are released together, the system will not cartonize them together. Thus, the picker will not be directed to put 12 hammers in the same box.
Cartonization Prior to WIP Completion
Container prepack is used to suggest appropriate cartons and LPN labels prior to a WIP completion. By entering the quantity of an item that is nearing completion, Oracle Warehouse Management can print LPN content labels that specify how many of the assembly should be packed into each container. The transaction that is associated with the WIP completion can be performed by scanning the LPN labels and putting the containers away into inventory.
If the item is serial controlled, the serial numbers must be pregenerated, and only a consecutive sequence of serial numbers can be prepacked. If the item is lot controlled you can enter the lot number directly into the form, or a lot number can be generated by the system.
WIP Completion Example
Assume that a WIP job or schedule exists to produce 305 hammers. Assuming the same available containers as presented in the above example (big box with a capacity of 30, small box with a capacity of 5, a large waterproof drum with a capacity of 2 gallons, and a small waterproof drum with a capacity of 1 gallon), when prepack is run, the system will suggest the following cartons in which to pack the 305 hammers:
10 big boxes (10 big boxes X 30 tools per box) = 300 hammers1 small box (1 small box X 5 tools per box) = 5 hammer
The system will also generate license plate numbers and pack those license plates with their anticipated contents.
Note: The license plates and their contents will not be considered on-hand or available until they are completed from WIP.
When users are ready to complete the WIP job or schedule, he or she can scan the license plate rather than entering the item, quantity, and any required revision, lot, or serial number.
Cartonization Features to Pack Material
After the system performs allocations and the appropriate task types have been identified, the system must determine the appropriate packing configuration for the subject item. The system makes this determination for those items that are not already packed in cases or pallets for shipment. Thus, it is only advisable to use cartonization in subinventories where material is stored loose and not packed into LPNs.
At pick release, the system's cartonization engine selects the appropriate container items category for the item on the picking line and then determines a packed configuration, based on the number of items to be packed, their dimensions, weight, and capacity of the container, that minimizes the total number of containers that need to be used.
For more information about setting up cartonization see, Cartonization Setup Steps, Oracle Warehouse Management Implementation Guide.
Using Cartonization with Picking
If cartonization was used on the picking lines, you will see a slight change in the standard picking user interface. Now, the To LPN field, will already be determined, based on the LPN suggestion generated by the system during cartonization. Furthermore, the container item that was suggested will be displayed after the To LPN. Also, the system will not display the <Drop> option, until all lines have been picked into that LPN.
When all lines have been picked into a given LPN, the <Drop> option will be enabled. If you decide to load again, and later enter the drop form by viewing current tasks, the system will direct you to drop the material into the appropriate staging lane.
Note: Pick and pass picking can only be used with sales order lines that have been cartonized.
Using Cartonization at Task Release
The Launch Task Release concurrent request can cartonize tasks across pick release batches based on the cartonization options selected in the Organization Parameters window (Warehouse tab). There are four methods of cartonization:
-
Single item cartonization: 1-1 relationship of the same item in a container.
-
Mixed item cartonization: Multiple items in a carton based on item category relationships.
-
Pick slip grouping cartonization: One carton per pick slip.
-
Custom Cartonization: Based on an API customers can determine their own cartonization.
Related Topics
Oracle Inventory User's Guide, Organization Parameters Window
Launch Task Release Concurrent Request
Consolidation
Consolidation is the process of bringing material from various parts of the warehouse together for the purpose of packing and shipping. Consolidation can occur at one or more points during the outbound flow of material. Most warehouses perform consolidation of picked material so it can be packed prior to shipment. Some warehouses perform subsequent consolidations such as building pallets of packed items and then shipping the pallets.
Oracle Warehouse Management allows eight types of system-directed consolidation based on the following key factors:
-
Should material be consolidated in a consolidation locator or directly in a staging lane?
-
Should consolidation occur at the LPN level?
-
Can material from different deliveries be consolidated based on the operation plan while upholding the consolidation rules such as no loose material is allowed in the outermost LPN?
LPN Based Consolidation in Staging Lane Within Delivery
This is the default consolidation method. This consolidation method enables you to consolidate material for a single delivery directly to an LPN in a staging lane. The system suggests the last LPN that is dropped off for delivery in the staging lane.
Direct Consolidation in Staging Lane Across Deliveries
This consolidation method enables you to consolidate material across deliveries in a staging lane. In this consolidation method, you do not consolidate material in a consolidation LPN within the staging lane. The system does not suggest a drop into LPN for the material.
Direct Consolidation in Staging Lane Within Deliveries
This consolidation method enables you to consolidate material for a single delivery directly in a staging lane. The system does not suggest a drop into LPN for the material.
LPN Based Consolidation in Consolidation Locator Across Deliveries in Staging Lane
This consolidation method enables you to consolidate material across deliveries into a consolidation LPN in a consolidation locator. After you consolidate the material, you can use the mass move functionality to move all the material to the staging lane.
LPN Based Consolidation in Consolidation Locator Within Deliveries in Staging Lane
This consolidation method enables you to consolidate material within a delivery into a consolidation LPN in a consolidation locator. After you consolidate the material, you can use the mass move functionality to move all the material to a staging lane.
LPN Based Consolidation in Staging Lane Across Deliveries
This consolidation method enables you to consolidate material across multiple deliveries into a consolidation LPN directly in the staging lane.
Locator Based Consolidation in Consolidation Locator Across Deliveries in Staging Lane
This consolidation method enables you to consolidate material for each delivery in a separate consolidation locator and then consolidate material for multiple deliveries in the same staging lane.
Locator Based Consolidation in Consolidation Locator Within Delivery in Staging Lane
This consolidation method enables you to consolidate material for a delivery in a consolidation locator and then move the material to a staging lane.
Setting Up Consolidation
To use consolidation, you need to perform the following setup steps:
-
Define Default Consolidation Mode in the Organization Parameters window
-
Define Consolidation Locators
-
Define Locator Dropping Orders (optional)
-
Define Operation Plan Selection Rules
Consolidation Validation
When you perform a Pick Drop, Staging Move, or LPN Mass Consolidate for material consolidated across deliveries, the following conditions apply:
-
All lines in the From and To LPN, if the material resides in an existing LPN, must be assigned to a delivery.
-
The destination LPN must be in a locator of type Staging.
-
The destination LPN must not have any loose material. If LPNs are nested, the nested LPNs can contain loose material.
-
All tasks loaded into the From LPN and To LPN must have an operation plan with the consolidation method set to Across Deliveries.
Shipping Validation
Transportation Execution validates material consolidated across deliveries and determines if a valid deconsolidation point exists, and if the ship-from location are the same. After consolidation, and at ship confirm, Shipping Execution automatically creates a trip for the second leg, from the deconsolidation point to the final ship-to destination as follows:
-
If no trips associated to the deliveries exist for the second leg, Shipping Execution creates a trip for each delivery from the deconsolidation point to the final ship-to destination.
-
If deliveries for the second leg exist, Shipping Execution deletes the delivery from the associated trip, and creates a new trip from the deconsolidation point to the final ship-to destination.
Consolidation Inquiry
Once material is consolidated, it is ready for further processing such as packing, shipping, or loading. It is essential that you know the status of consolidated material so you can make a decision on what material is eligible for further processing.
Consolidation Locators Inquiry
The Consolidation Locators Inquiry page serves as the gateway to view consolidation locators with material in various states so that you can make a determination on what material is ready for further processing.
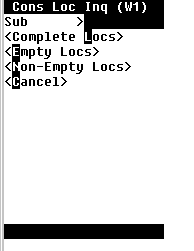
Three inquiries can be performed in the Consolidation Locators Inquiry mobile page.
-
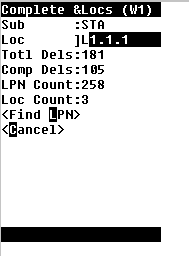
Complete Locators
The Complete Locators mobile page enables you to view consolidation locators that have completely consolidated material.
It displays the following information:
-
Subinventory and locators that have consolidated material
-
Total number of deliveries that currently exist in the displayed locator
-
Number of deliveries that have been completely consolidated
-
Number of LPNs that exist in the locator
It also has a <Find LPNs> button that invokes the Consolidated LPNs page and displays LPNs that exist in the displayed locator.
-
-
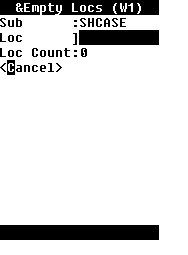
Empty Locators
The Empty Locators mobile page enables you to view empty consolidation locators.
It displays subinventory and locators that are empty, one locator at a time. The total number of empty locators displays at the bottom of the page.
-
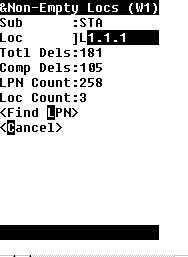
Non-Empty Locators
The Non-Empty Locators mobile page enables you to view consolidation locators that have at least one staged LPN in it. It includes locators with either completely or partially consolidated material or both.
It displays subinventory and locators that have at least one LPN with a status of Staged. It shows all locators that have material in them regardless of whether material has been completely consolidated or not.
It also has a <Find LPNs> button that invokes the Consolidated LPNs page and displays LPNs that exist in the displayed locator.
Consolidated LPNs Inquiry
The Consolidated LPN Inquiry page serves as the gateway to view consolidated LPNs with deliveries in various states so that you can make a determination on what material is ready for further processing. The Consolidated LPN Inquiry can be performed against any staged LPN, delivery, or order number or any combination of the three.
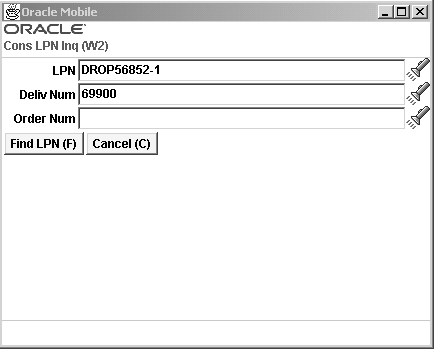
Two key inquiries can be performed in the Consolidated LPN Inquiry window:
-
Find LPNs
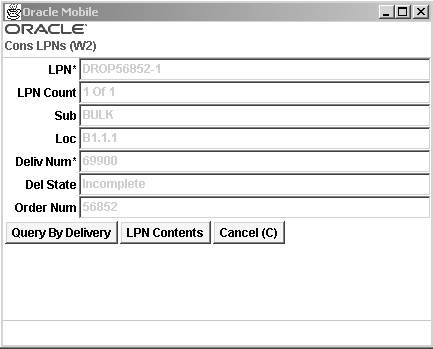
The Consolidated LPNs page enables you to view consolidated LPN(s) depending on the query criteria.
It displays the following information:
-
Subinventory and locator that have the queried LPN(s)
-
Number of LPNs that were returned by the query criteria
-
Delivery number that the LPN belongs to if a delivery has been created
-
Consolidation status of the delivery with Complete or Incomplete indicating if the delivery has been completely consolidated or not
-
Order Number if material belongs to a single order
If the LPN contains material belonging to more than one order, it displays Multiple.
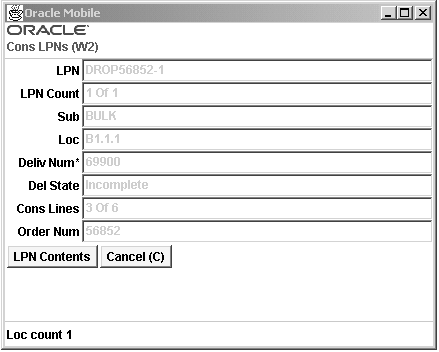
This page also has <Next LPN>, <Previous LPN>, <Query by Delivery> and <LPN Contents> buttons. The <Next LPN> and <Previous LPN> buttons enable navigation to the various LPNs that were returned. The <Query by Delivery> button returns the same page with all LPNs belonging to the selected delivery. The <LPN Contents> button invokes the LPN Contents page.
-
-
Query by Delivery
It is recommended that you press the <Query by Delivery> button for every inquiry in order to get an accurate picture of all LPNs for that delivery.
Related Topics
Describing the Consolidation Report
Staging Moves
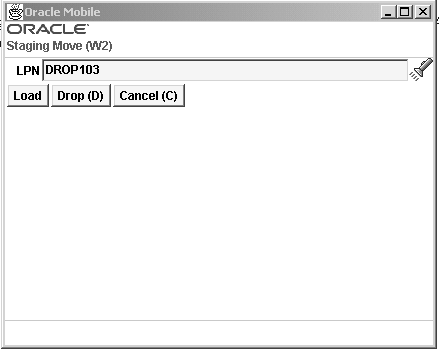
A staging move is used to perform system-directed moves of consolidated or consolidated and packed material to the final staging lane. It can also be used to move material from a consolidation, stock, packing, or staging locator to a system suggested staging locator. You can override the suggested locator and drop the LPN in any LPN controlled locator with locator type of staging or packing.
LPNs that have to be moved and further consolidated at the staging lane can be loaded using the Staging Move mobile page and dropped at the staging lane.
Staging Moves are performed using two mobile pages:
-
Loading is performed in the Staging Move page
-
Dropping/consolidation is performed in the Pick Drop page
The Pick Drop page can be accessed by selecting <Drop> in the Staging Move page or by selecting <Current Tasks> in the Task Menu.
Staging moves require material be license plated and have a status of staged. A staging move cannot be performed on loose and unstaged material, or both. Drops for staging moves are performed as whole LPNs only.
Related Topics
LPN Mass Moves
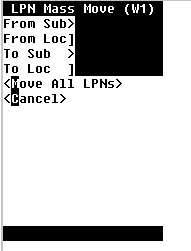
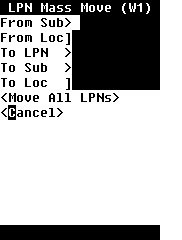
The LPN Mass Move mobile page can be used to move staged LPNs from one LPN controlled staging, consolidation, or packing locator to another LPN controlled staging, consolidation, or packing locator. When you enter the source subinventory and locator, the system displays a count of valid LPNs at the bottom. If at least one valid LPN exists, you can enter the destination subinventory and locator. When you select <Move All LPNs>, all valid LPNs are moved to the destination locator.
Note: If any loose material or unstaged LPNs exist in the source locator, they are left behind.
Related Topics
Mass Consolidate
You can use the Mass Consolidate page to enter LPNs to consolidate at the destination locator. You can enter a source locator and perform a mass move and consolidate multiple LPNs into a single LPN in a staging lane. You use this page to consolidate LPNs across deliveries. If you enter a new consolidation LPN, you need to enter a subinventory and locator. If the LPN is an existing consolidation LPN, the subinventory and locator appear automatically.
Related Topics
Describing the Consolidation Report
A consolidation report is available to help direct manual consolidation based on sales order, delivery, or trip. This report displays all staged LPNs for a given sales order, delivery, or trip.
Use the following instructions to run the Consolidation Report:
Running the Consolidation Report
-
Log into the application.
-
Navigate to the Submit Request window.
-
Enter, or select from the list of values, Consolidation Report in the Name field.
-
In the Parameters window, enter, or select from the list of values, the organization that you want to run the report against.
-
Enter one of the criteria in the Parameters window and submit your request.
Note: Only one of the following criteria should be entered per request: Trip, Delivery, Sales Order Type and Sales Order Number, and Customer Name. While the report supports entering any combination of criteria, the report will only include LPNs that meet all the criteria. Therefore, entering multiple criteria will likely not return data.
Consolidation Report Parameters
The Consolidation Report parameters include the following:
-
Organization - The organization that you want to run the report against
-
Trip - The trip for which staged LPNs should be included
-
Delivery - The delivery for which staged LPNs should be included
-
Sales Order Type and Sales Order Number - The sales order for which staged LPNs should be included
-
Customer Name - The customer for which staged LPNs should be included
-
Check LPN Multiple Association - Include additional data on whether the LPNs have been staged for other sales orders, deliveries, and trips in addition to that which has been queried
Consolidation Report Fields
The Consolidation Report displays the following fields:
-
Trip Number
-
Delivery Number
-
Sales Order Number
-
All LPNs that belong to the search criteria
-
Current location (subinventory and locator)
-
Items (Item Number)
-
Unit of Measure (UOM)
-
Quantity in the primary UOM (Qty)
-
A flag which lets the user know whether the LPN contains items that either belong to multiple sales orders, multiple deliveries, or multiple trip stops
-
Trip Stop Location (if a trip exists)
Note: It is only possible for LPNs to be staged for multiple sales orders, deliveries, or trips if bulk picking has been used. Therefore, if bulk picking is not used in the organization, the output will be easier to read and also will complete faster if this option is disabled.
Describing User-Initiated Consolidation
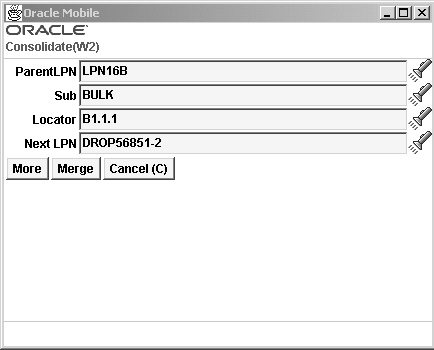
Based on the output of the Consolidation Report, the business processes might require that LPNs be consolidated into larger pallets or shipping containers. Consolidation of LPNs is supported via the mobile Consolidate form, by specifying a parent and a child LPN. Consolidation is ordinarily restricted to LPNs that reside in the same locator. However, LPNs that have been picked for a sales order can be consolidated even if they are in different locators. The child LPN will be moved to the locator of the parent LPN.
For instance, using the output of a consolidation report, the operator may note that there are two LPNs staged for the same delivery, and that should be consolidated into one LPN. Even though these LPNs are in two different staging lanes, the consolidation can be performed using a single transaction.
Use the following instructions to perform an LPN consolidation.
Performing LPN Consolidation
-
Log onto the mobile device.
-
Navigate to the mobile interface Consolidate form.
-
Enter, or select from the list of values, the parent LPN.
-
Enter, or select from the list of values, the Next LPN.
-
Enter or select the Subinventory from the list of values if applicable.
-
Enter or select the Locator from the list of values if applicable. See Locator Alias.
-
Select <Merge> to complete the consolidation.
Note: You can merge as many LPNs as required provided they belong to the same delivery. If the LPN does not belong to the same delivery, the system will generate an error and consolidation will not be completed.
Pick Drop Consolidation
Oracle Warehouse Management supports consolidation in the Pick Drop process. This is especially useful during palletization. In the “DROP” activity of the picking task, the operator drops the loaded material into an LPN, which could be a pallet in a subinventory and locator. If the operator is performing DROP task in the same subinventory and locator as the user did in the previous drop, the system will suggest the same drop LPN. Because the system cannot know if the pallet is full, the operator will have to make the determination. The operator can choose to drop in a different LPN if:
-
the operator is dropping in the same subinventory and locator
-
and the system suggests the same LPN
-
and the LPN is full
Consolidation Using Putaway Rules
In Oracle Warehouse Management one of the operations where the Oracle Warehouse Management Rules Engine is called is during pick release process. Once pick release is complete, Put Away tasks are generated using the Rules Engine. You can build consolidation Put Away rules that consolidate into particular staging lanes. Various objects on the sales order header, or sales order lines, can be used to construct different rules. Examples of frequently used sales order header objects are as follows:
-
Customer
-
Shipment Priority
-
Shipment Method
-
Order Type
Note: Do not commingle these rules with inbound put away rules. The non-inbound put away rules should have the lowest number in the strategy search order.
Similar rules can be built for other transaction types, for example internal orders. Different put away rules can be built for this transaction type and then assigned to strategy. Again this strategy is given a number that is lower then the inbound put away rules.
Related Topics
How to Set Up Warehouse Organizations, Oracle Warehouse Management Implementation Guide
Defining Subinventories, Oracle Inventory User's Guide
Defining Stock Locators, Oracle Inventory User's Guide
Explaining Oracle Warehouse Management Packing Options
Packing involves transferring of loose items into a container. You can pack items either on receipt, while they reside in inventory, and during outbound shipment to customers. Oracle Warehouse Management allows you to pack items into containers. Packing can satisfy one or more of the following objectives. You can use both the desktop and the mobile to pack material. While desktop packing enables you to pack inbound and outbound material, mobile packing enables you to pack only outbound material and material that resides in inventory.
-
Consolidate items into suitable containers based on criteria such as item, delivery, sales order, or warehouse location
-
Confirm and record the contents of containers while packing
-
Transact by container
-
Protect packed items from damage
Oracle Warehouse Management includes several packing options. With these options, you can perform the following:
-
Capture catch weight information
Note: You can use the Material Workbench to view the summary results of packing tasks.
Using the Desktop Application to Pack Material
The Packing Workbench enables you to use a desktop widow to pack material. You can pack an item, LPN serial number, or GTIN. You can enter or scan contents to perform pack, unpack, or split material.
-
Material in receiving not delivered to inventory
-
Inventory staged for an outbound sales order
To initialize material to pack
-
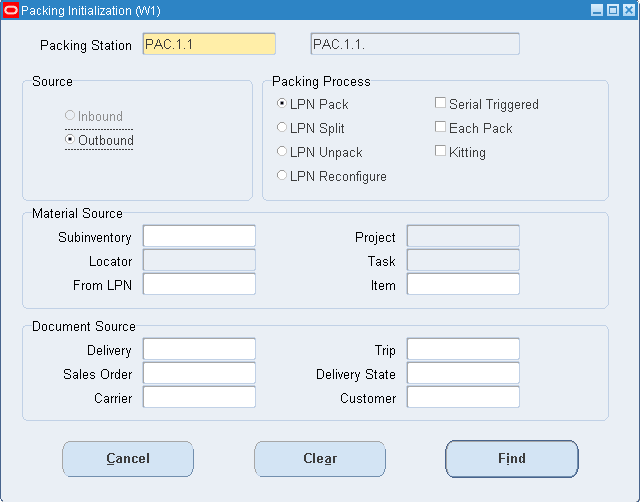
Navigate to the Packing Initialization window.
-
Enter the packing location in the Packing Station field. The packing station is a physical location where you pack material. The information you enter in to this field is the stock locator that corresponds to the packing station.
The packing station you enter determines the transaction source type. The transaction source types are inbound and outbound.
-
Select the Packing process. The packing process indicates the packing operation. You can perform the following packing processes:
-
LPN Pack- This process enables you to pack contents into an LPN. You typically use this process when you perform locator based consolidation. You pick the contents from the consolidation locator and pack them into a container. If you select material already located in an LPN it will be nested inside the To LPN.
-
LPN Split- This process enables you to unpack items from one container, and pack them into another container. You use this process during LPN consolidation. If you unpack a consolidated LPN (From LPN) and pack them into another LPN (To LPN), if the content is an LPN, it is nested inside the To LPN.
-
LPN Unpack-This process involves unpacking contents from a container. If the content is a nested LPN, it is de-nested.
-
LPN Reconfigure (Outbound only)- This process involves reconfiguring an LPN.
-
LPN-Merge-Up This process merges inner LPNs and their contents within the outermost LPN.
-
Break-Down LPN This process breaks the LPN apart in to LPNs that contain only items. It removes all nested LPNs.
-
-
Serial Triggered- If you select this box, when you scan the serial numbers the item, quantity, and lot information default. When you set up lot and serial attributes, verify the required attribute segments have a default value. If they do not have a default value, then the transaction manager fails.
-
Each Pack- If you select this check box then the primary default quantity is 1. This option is available if the item is not lot or serial controlled.
-
Kitting (Outbound only)- This check box provides visibility to BOM for a Kit/PTO Model in the kitting activity tab. When you scan a component of a BOM the packing workbench determines the PTO Model/Kit item for the competent and shows the complete BOM in the kitting activity tab. The kitting activity tab is not enabled if you do not select this check box.
-
-
Optionally, enter the following information in the Material Source alternate region:
-
Subinventory- The source subinventory for the material.
-
Locator- The source locator.
-
From LPN- The from LPN.
-
Project- The source project. This field is editable only if you are in a project manufacturing enabled organization.
-
Task- The source task. This field is editable only if you are in a project manufacturing enabled organization.
-
Item- The item to pack.
-
-
Optionally, in the Document Source alternate region enter the following information:
Note: The selections in the Document Source alternative region change based on the transaction source type.
-
Document Type (Inbound)
-
Document Number (Inbound)
-
Vendor (Inbound)
-
Receipt (Inbound)
-
Document Line (Inbound)
-
Receiving Location (Inbound)
-
Delivery (Outbound)
-
Sales Order (Outbound)
-
Carrier (Outbound)
-
Trip (Outbound)
-
Delivery Status (Outbound)
-
Customer (Outbound)
-
-
Click Find to find available items to pack.
Packing Workbench
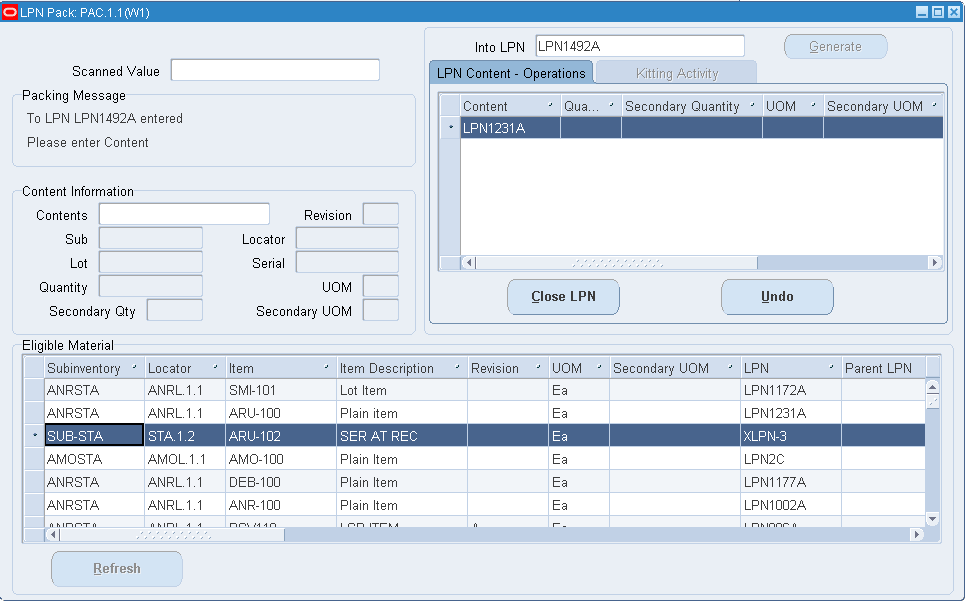
The packing workbench displays after you enter the packing initialization information. The packing workbench displays the items available to pack. The information you entered in the initialization window determines the information on the packing workbench.
-
Enter an LPN in the To LPN field, or click Generate to generate a new LPN.
-
Enter or scan the contents to pack in the Scanned Value field and click enter. If the content is an LPN, the LPN is nested in the To LPN. If the content is an item, you must enter the subinventory, locator, and quantity in the Content Information section. If the content is a serial number, then the item, subinventory, locator, and the quantity 1 appears. If you scan a GTIN, the item and UOM appear. Content Information section contains the following fields:
-
Contents- The LPN contents.
-
Revision- The item revision if applicable.
-
Lot- The item lot information if applicable. If a lot is indivisible, then you must pack the entire lot quantity. If a lot-level UOM conversion exists for the lot, the system honors the lot-level UOM conversion.
-
Serial- The item serial number if applicable.
-
Quantity- The item quantity based on the UOM.
-
UOM- The primary unit of measure.
-
Secondary Qty- The quantity based on the Secondary UOM.
-
Secondary UOM- The secondary unit of measure.
-
-
You can scan more contents to continue packing. The packed LPN appears in the LPN Content-Operations tab.
Note: You can also highlight a row and right-click and choose pack selected rows to pack the material.
Note: If you want to pack both loose items, and items that reside in a subinventory you must enter a subinventory and locator when you scan the items that reside in the subinventory.
-
Select the Kitting Activity tab to view the kitting information.
-
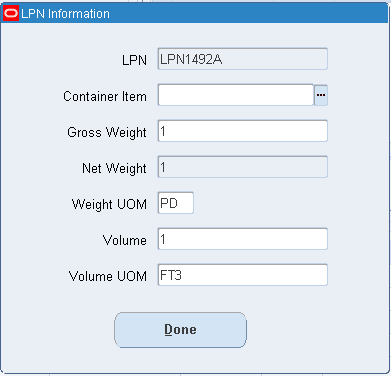
Click Close LPN to complete the packing. The LPN Information window appears.
-
Enter the LPN information.
-
Click Done when complete. The packing workbench refreshes automatically after you close the LPN. You can also click Refresh to manually refresh the packing workbench.
To Organize Information within the Packing Workbench
-
Select the column within the Eligible Material alternative region on which you want to sort. This sorts the column according to your selection.
-
Select the column within the Content Information alternative region on which you want to sort. This sorts the column according to your selection. The selected column contains an arrow in the header. The available choices are:
-
Optionally, to hide a column, place the cursor in the header row of the table, right-click the mouse, and select Hide Column.
-
After you organization your information, place the cursor in the header of the table, right-click the mouse and select Customization then Save to save the customizations.
-
Close the window when finished.
Related Topics
Inventory Attribute Group, Oracle Inventory User's Guide
Lot-Specific Unit of Measure Conversions, Oracle Inventory User's Guide
Performing Packing Processes
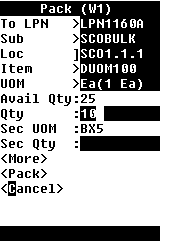
You can use the Packing page to move loose material into an LPN. Use the following instructions to perform a standard packing task.
-
Log onto the mobile device.
-
Navigate to the mobile interface Packing page.
-
In the To LPN field, enter, select, or generate ([CTRL]+[G]) the LPN.
This LPN can be any LPN that exists in the locator, or that is defined but not used.
-
Enter the subinventory and locator. See Locator Alias.
Note: If the LPN is already associated with a locator, then the value in the From Loc field takes on the current locator of the LPN and cannot be changed; however, if the LPN has been defined, but not used, then you must enter a from locator.
-
Enter the item.
-
If the material to pack is under revision control, enter the item revision.
-
Enter the quantity in the Qty field. If the item is under dual unit of measure control, enter the secondary quantity.
Note: You cannot pack more than the quantity of the item or revision available in the location from which you are packing.
-
If the material is lot controlled, in the Lot field, enter or select the lot number. Continue entering the lot and associated quantity for each lot controlled item. If the material is under dual unit of measure control, you must also enter the secondary lot quantity.
If the lot is indivisible, then you must pack the entire lot quantity into the LPN. See Inventory Attribute Group, Oracle Inventory User's Guide for more information.
If the lot has specific lot-level unit of measure conversions, then you must honor those conversions during packing. For more information about lot-specific unit of measure conversions see Lot-Specific Unit of Measure Conversions, Oracle Inventory User's Guide.
-
If the material is under serial controlled, in the SN field, enter or select the serial number for each serial item being packed.
-
Select the <More> option to save the current transaction and refresh the screen.
Note: The To LPN, Sub, and Loc fields remain visible. This enables you to pack more items into the same LPN without having to rescan those values. All pack transactions that you enter will be saved to the database when you select the <Pack> option.
-
Select the <Pack> option to save this transaction and return to the main packing window.
Performing Unpacking Processes
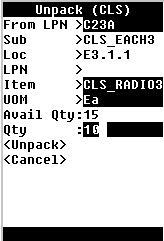
You can use the Unpack page to unpack material from an LPN.
-
Log onto the mobile device.
-
Navigate to the mobile interface Unpack page.
-
In the From LPN field, enter or select the LPN to unpack.
Note: After you select the LPN, the system displays the subinventory and locator where the LPN is stored.
-
In the Item field, select the item to unpack.
Note: If only one item is associated with the From LPN, when you select the list of values, the system automatically displays the associated item.
-
In the Qty field, enter the amount of the item to unpack. If the item is under dual unit of measure control, enter the secondary quantity.
-
Select <Unpack> to perform the unpacking transaction.
Note: You can use the mobile interface unpack option to also unpack an LPN from another LPN.
-
If the material is lot controlled, in the Lot field, enter or select the lot number. Continue entering the lot and associated quantity for each lot-controlled item. If the material is under dual unit of measure control, you must also enter the secondary lot quantity.
If the lot is indivisible, then you must unpack the entire lot quantity into the LPN. See Inventory Attribute Group, Oracle Inventory User's Guide for more information.
If the lot has specific lot-level unit of measure conversions, then you must honor those conversions during unpacking. For more information about lot-specific unit of measure conversions see Lot-Specific Unit of Measure Conversions, Oracle Inventory User's Guide.
-
If the material is under serial controlled, in the SN field, enter or select the serial number for each serial item.
-
Select the <Unpack> option to save this transaction.
Performing Splitting Processes
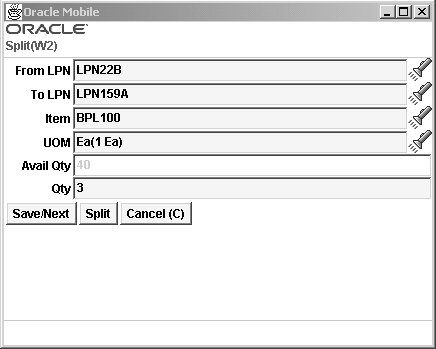
You use the mobile user interface Splitting page to move material from one LPN to another. Splitting tasks involve performing an unpacking transaction from the source LPN and then performing a packing transaction to the destination LPN. You can also split an LPN by sales order if the LPN contains more than one sales order.
To Split an LPN
-
Log onto the mobile device.
-
Navigate to the mobile interface Split page.
-
In the From LPN field, use the list of values to select the LPN to split.
-
In the To LPN field, enter, select, or generate the LPN to which you want to move the split contents.
-
In the Item field, select the associated item from the list of values.
Note: If only one item is associated with this LPN, when you select the item from the list of values, the system automatically displays the item in the Item field. The default UOM associated with the item is automatically displayed.
-
In the Qty field, enter the quantity that you want to split. If the item is under dual unit of measure control, enter the secondary quantity information.
-
If the material being split is lot controlled, in the Lot field, enter the lot number and lot quantity. If the material is under dual unit of measure control, then you must enter the secondary lot quantity. If the lot is indivisible, then you must split the entire lot quantity in to the new LPN. See Inventory Attribute Group, Oracle Inventory User's Guide
If the lot has specific lot-level unit of measure conversions, then you must honor those conversions during splitting. For more information about lot-specific unit of measure conversions see Lot-Specific Unit of Measure Conversions, Oracle Inventory User's Guide.
-
If the material being split is serial controlled, in the SN field, enter or select the serial number for each serial item being split.
-
Select <More> if you want to split additional quantities of this LPN, otherwise, go to step 10.
-
Select <Split> to split this LPN into the To LPN.
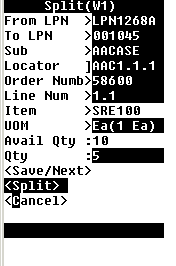
To split an LPN by sales order
-
Log onto the mobile device.
-
Navigate to the Split by Order page.
-
Enter the source LPN in the from LPN field.
-
Enter the destination LPN in the To LPN field.
-
Enter the subinventory in the Sub field.
-
Enter the locator in the Locator field. See Locator Alias.
-
Optionally, enter the sales order in the Order Number field.
-
Optionally, enter the sales order line in the Line Number field. The Item and the UOM field are populated automatically.
-
Enter the item number in the Item field if you did not enter the sales order or sales line. The UOM field is populated automatically.
-
Enter the quantity to move to the new LPN in the Qty field. If the item is under dual unit of measure control, enter the secondary unit of measure.
-
If the material being split is lot controlled, in the Lot field, enter the lot number and lot quantity. If the material is under dual unit of measure control, then you must enter the secondary lot quantity. If the lot is indivisible, then you must split the entire lot quantity in to the new LPN. See Inventory Attribute Group, Oracle Inventory User's Guide
If the lot has specific lot-level unit of measure conversions, then you must honor those conversions during splitting. For more information about lot-specific unit of measure conversions see Lot-Specific Unit of Measure Conversions, Oracle Inventory User's Guide.
-
If the material being split is serial controlled, in the SN field, enter or select the serial number for each serial item being split.
-
Choose <Save/Next> to split another LPN. Choose <Split> to split the LPN, or choose <Cancel> to cancel the LPN split.
Performing Consolidation Processes
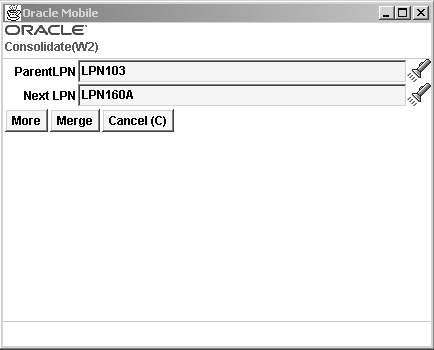
In the mobile interface LPN Consolidation form, you can consolidate, or pack an LPN into another LPN.
-
Log onto the mobile device.
-
Navigate to the mobile interface LPN Consolidate page.
-
In the Parent LPN field, enter or select the LPN to which you want to consolidate.
-
In the Next LPN field, enter or select the LPN from which you want to consolidate.
-
Select <More> to enter additional to and from consolidation LPNs.
-
Select <Merge> to complete the consolidation transaction.
Note: You can view the results of the consolidation in the Material Workbench. Query on Parent LPN to view the results of the consolidation task. The Next LPN, which is the LPN that you consolidated from, should not be displayed as a node under the parent LPN.
Capturing Catch Weight Information
Catch weight permits the capturing of a secondary quantity and unit of measure in addition to the primary quantity and unit of measure. You can then use this secondary unit of measure for billing and pricing to the customer. The secondary quantity is captured for the purpose of pricing and invoicing. Perpetual inventory is not kept in the secondary quantity. You can enter item catch weight information at the following points of the outbound process:
-
After you load the LPN as a task, but prior to task drop
-
After you drop the LPN but prior to loading it to the truck for ship confirm.
-
As part of a task on the task page.
-
As part of the shipping process on the direct ship page.
Note: You must define a secondary unit of measure, and the pricing as secondary to enable secondary billing and pricing to the customer. The Item parameters Default and No Default control if the secondary quantity defaults based on the primary unit of measure when you enter the quantity for the first time. The upper and lower tolerance limits the values that can be populated for the secondary quantity based on the deviation form the nominal quantity. See: Main Attribute Group, Oracle Inventory User's Guide.
Note: You must enter the secondary quantity prior to shipping if you set the item to No Default. If you do not enter a secondary quantity, the value defaults at shipping, and sets the item value to default.
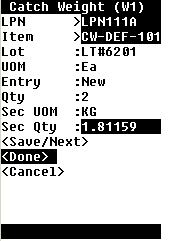
There are two pages on which you can enter catch weight information, the Catch Weight entry page, and the Catch Weight update page. The catch weight entry page shows only those order lines for which you have not entered catch weight information. The Catch Weight Update page shows all lines.
To enter catch weight information
-
Navigate to the Catch Weight Entry page.
-
Optionally, Enter or Scan the LPN.
-
Enter or scan the item number. The rest of the item information populates automatically.
-
Change the secondary quantity in the Sec Qty field if necessary.
-
Choose <Save/Next> to enter catch weight information for another item, <Done> when finished, or <Cancel>to cancel.
To update catch weight information
-
Navigate to the Catch Weight Update page.
-
Optionally, Enter or scan the LPN.
-
Enter or scan the item number. The rest of the item information populates automatically.
-
Change the secondary quantity in the Sec Qty field if necessary.
-
Choose <Save/Next> to enter catch weight information for another item, <Done> when finished, or <Cancel>to cancel.
Related Topics
Defining Items, Oracle Inventory User's Guide
Defining Unit of Measure Classes, Oracle Inventory User's Guide
Defining Units of Measure, Oracle Inventory User's Guide
Mobile Bulk Packing
Mobile bulk packing is used to suggest containers into which you can pack material in a particular locator in the warehouse. Mobile bulk packing also automatically generates the appropriate LPN labels. With bulk packing, you enter an item and quantity to pack. You can enter a container item if you want the system to suggest the appropriate quantity of that container, or you can let the system suggest both the type and quantity of containers.
You can use this method to pack any material for which there is a positive on-hand balance. For example, operators might use mobile bulk packing if they find a large amount of loose material of an item that should be packed.
You access and perform mobile bulk packing tasks from the mobile user interface Bulk Pack option.
Note: Before performing bulk packing tasks, make sure that you have set up the appropriate container items and their related dimensions. Also, make sure that the items you want to pack are included in the Contained Item category.
For example, locator 1.1.1 in the Finished Goods subinventory contains 305 hammers. When you run mobile bulk packing, the system suggests 10 big boxes and 1 small box (assuming that a big box has a capacity of 30 tools and a small box has a capacity of 5 tools) for packing. It then generates LPNs and then packs those LPNs with the suggested contents. The LPNs and the associated contents appear in on-hand the quantity.
Related Topics
Inventory Attribute Group, Oracle Inventory User's Guide
Lot-Specific Unit of Measure Conversions, Oracle Inventory User's Guide