Defining Workflow Processes
This chapter covers the following topics:
- Expenses Workflow
- Expenses Workflow Processes
- Credit Cards Workflow
- Accessing the Credit Cards Workflow Processes
- Setting Up Workflow Builder for the Credit Card Processes
- Credit Cards Workflow Item Type Attributes
- Credit Cards Process Activities
- Expense Receipts Workflow
- Expense Holds Workflow
- Initiating Deferred Workflow Processes
Expenses Workflow
The Expenses workflow process defines the administrative tasks necessary for managers and your accounting department to review and approve expense reports entered in Internet Expenses. The Expenses workflow process also routes information about expense reports and various notifications to managers and employees so that these tasks can be completed. You can modify the predefined workflow process by defining any company-specific policies that your business requires.
When an employee submits an expense report, the Workflow Engine initiates the Expenses workflow process. This workflow consists of several connected processes that send notifications to managers and employees, ensure reports adhere to company policy, check manager approval levels and, if necessary, split an expense report into multiple reports.
Accessing the Expenses Workflow Processes
You can view the Expenses workflow process in a Process window using Oracle Workflow Builder.
To display the process in Oracle Workflow Builder:
-
Choose Open from the File menu, and connect to the database.
Alternatively, you can connect to the workflow definitions file apwxwkfl.wft, located in the product directory tree of your Oracle Applications server.
-
Expand the data source, then the Item Type branch within that data source.
-
Expand the Processes branch within your item type then double–click on a process activity to display the diagram of the process in a Process window.
Setting Up Workflow Builder for the Expenses Process
Before you can use the Expenses Process to initiate a workflow, you must set up workflow activity attributes, timeouts, and performers using Workflow Builder. This table lists the setup steps and indicates whether each is required or optional:
| Step Number | Step Description | Required or Optional |
|---|---|---|
| 1 | Set workflow activity attributes. See: Setting Workflow Activity Attributes for the Expenses Process. | Required |
| 2 | Set workflow timeouts. See: Setting Workflow Timeouts for the Expenses Process. | Optional |
| 3 | Set expense reports performers. See: Setting Expense Report Performers for the Expenses Process. | Required |
| 4 | Defer workflow process at submit time. See: Deferring the Workflow Process for the Expenses Process. | Optional |
Setting Workflow Activity Attributes for the Expenses Process
To set up workflow activity attributes:
-
From the Processes branch, double click the appropriate process.
-
From the Processes diagram, double click the appropriate function.
-
In the Navigator Control Properties window, click the Node Attributes tab.
-
In the Attribute region, select the activity attribute from the Name field.
-
Select or enter the desired value in the Value field.
-
Click Apply and then, click OK.
-
Save your work.
Define Your Find Approver Method. The associated attribute is Find Approver Method. This Find Approver function activity is part of the Manager (Spending) Approval process. The Find Approver activity controls how workflow routes expense reports during the management approval process. See also: Finding and Verifying Approvers.
Notify Preparer When Resend Count Equals Limit. The associated attribute is Number of Times to Notify Manager. This function activity belongs to the No Manager Response process.
The attribute value (1, 2, 3,...) you define here controls the number of times workflow sends an expense report to a manager for approval. If the number of times a manager does not respond equals the number you define here, then workflow notifies the preparer that the manager did not respond to the approval request.
Sum of Exp Lines with Missing Receipts Exceeds AP Limit. The associated attribute is AP Limit of Sum of Missing Receipt Expense Lines. This function activity belongs to the Manager (Spending) Approval process. The attribute value you define here determines whether workflow requests a second approval from managers for an expense report they previously approved. This second approval confirms that managers recognize they have approved expense reports with missing receipts for a specific amount. For example, if you define this value as 200, then expenses reports with missing receipts that exceed $200.00 are forwarded to managers for a second approval.
Employee Approval Required. The associated attribute is Employee Approval Required. This function activity belongs to the Third Party Expense Report process. The value you define here (Yes or No) controls the kind of notification employees receive when their authorized delegate submits expense reports for them. (An authorized delegate is an employee with the responsibility to enter expense reports for another employee.) If you define the value as Yes, workflow requests employees to approve or reject expense reports created by their authorized delegates. If you define the value as No, workflow notifies employees when their authorized delegates submit expense reports for them (approval is not required).
Loop Counter. The associated attribute is Loop Limit. This function activity belongs to the Third Party Expense Report process. The value you define here limits the number of times workflow transitions through the Request Employee Approval notification activity. (The Request Employee Approval activity requests that an employee approve or reject an expense report entered by their authorized delegate.) If an employee does not respond to the Request Employee Approval notification before this attribute equals the number you specify, workflow transitions to the End (Continue) activity. Therefore, if an employee does not respond to the Request Employee Approval notifications, the Third Party Expense Report process ends with the same result as if the employee had approved the expense report.
Req Proof Of Payment Even If Mgr Apprvd Receipt Missing. The associated attribute is Always Require Proof Of Payment. This function activity belongs to the Manager (Spending) Approval process. When you define expense report templates in Payables, you specify whether employees are required to submit receipts (that is, proof of payment) for expense types that exceed a certain amount. For example, you can specify that employees submit receipts for all meals (an expense type) that exceed a certain value (for instance, 200). If a user submits an expense report with a meal expense type that cost more than 200, Internet Expenses populates the RECEIPT_REQUIRED_FLAG column of the AP_EXPENSE_REPORT_LINES_ALL table with the value “Y”.
When users enter expense reports in Internet Expenses they can check the Original Receipt Missing check box to indicate they do not have proof of purchase (an original receipt) for an expense. The value you define (Y or N) for the Always Require Proof of Payment attribute controls how workflow manages expense items that:
-
require proof of payment (as defined in the Expense Report Templates window of Payables)
-
have no proof of payment available (as indicated by the user by checking the Original Receipt Missing check box)
If you define the value as “N”, workflow changes the value of the RECEIPT_REQUIRED_FLAG column in the AP_EXPENSE_REPORT_LINES_ALL table from “Y” to “N” if employees check the Original Receipt Missing check box. Defining the value as “N” enables workflow to make proof of payment unnecessary if employees indicate that they do not have proof of payment (for example, she lost the receipt).
Note: You can require that managers approve an expense report twice if an expense report has missing receipts of a certain amount. The second approval notification ensures that managers acknowledge they are approving an expense report that contains missing receipts. See also: Sum of Exp Lines With Missing Receipts Exceeds AP Limit (Node 13).
If you define the value as Y, workflow cannot change the value of the RECEIPT_REQUIRED_FLAG column from “Y” to “N”, even if an employee checks the Original Receipt Missing check box. Setting this value to “Y” makes proof of payment necessary for every expense type in an expense report that exceeds the value defined in the Expense Report Templates window. Expense lines with this expense type that do not have original receipts (proof of payment) cause the report to be short paid during the Missing Receipts Shortpay process.
Setting Workflow Timeouts for the Expenses Process
You can specify any combination of days, hours, and minutes to indicate when a notification activity times out. For example, you can specify that a manager has five days to respond to an expense report approval notification before the notification activity times out. If a notification is not completed by the specified time, workflow redirects the process to transition to another activity. For example, if a manager does not respond to an expense report approval notification in time, the Request Approval process transitions to the No Manager Response process.
To set up a notification activity's timeout value:
-
From the Processes branch, double click the appropriate process.
-
From the Processes diagram, double click the appropriate notification.
-
In the Navigator Control Properties window, click the Node tab.
-
In the Timeout region, enter desired values in the Value fields for days, hours, and minutes.
-
Click Apply and then click OK.
-
Save your work.
Internet Expenses provides seeded values for all of these notification activities, grouped by processes. You can also specify another timeout value:
-
Missing Receipt Policy Non-Compliance Process
Inform Preparer of Policy Non-Compliance for Missing Receipts
-
Policy Non-Compliance Process
Inform Preparer of Policy Non-Compliance Additional Info Required
-
Rejection Process
Wait For Resubmission
-
Request Approval Process
Request Approval from APPROVER
-
Server Side Validation Process
-
Inform Sys Admin of Payables Validation Failure
-
Inform Sys Admin of Custom Validation Failure
-
Custom Validate Expense Report
-
Inform Individual of Expense Allocations Failure
-
-
No Manager Response Process
Inform Preparer - No Manager Response
-
Third Party Expense Report Process
Request Individual's Approval
-
AP Custom Default Error Process
AP Custom Default Error Notification
-
Bothpay Process
Inform System Administrator - No Vendor
-
No Manager Response Process 2
Inform Preparer - No Manager Response
-
Return Expense Report Process
Wait For Resubmission
-
AP Rejection Process
Wait For Resubmission
-
AP Request More Info
Inform Preparer of Auditor Requesting More Information
-
Withdraw Expense Report Process
Wait For Resubmission
-
AME Approval Process
Inform System Administrator - No Approver
-
AME Request Approval Process
AME Expense Report Approval Notification
-
Non AME Approval Process
Inform System Administrator - No Approver
-
Manager (Shortpay) Approval Subprocess
Verify With Mgr the Amt Approved With Policy Violations
Setting Expense Report Performers for the Expenses Process
All workflow notifications require a performer to be assigned to the notification. If a performer is not assigned, then Workflow will fail to send the notification.
All of the standard notifications come seeded with a performer. While some of the notification's performers are based on the item attribute associated with the notification message, other performers need to have a role assigned to the performer. For purposes of this discussion, roles are synonymous to employees defined in the Human Resources database.
When you define a notification's performer, you need to specify the Type of the Performer as well as the Value. If you select Constant for the Type, then the Value field will be limited to the roles that are loaded into the database. If you select Item Attribute for the Type, then all of the Item Attributes defined in the Expenses workflow will be available in the Value field.
For ease of maintenance, it is recommended that the notifications discussed below be set to the Type of Item Attribute. Then select either the AP or AP Expense Report Workflow Administrator item attribute.
Perform these steps in Oracle Workflow Builder to set up expense report performers. These steps include recommendations for which item attribute to use for each notification.
-
Load Roles: To load roles (employees):
-
From the Files menu, select Load Roles from Database.
-
In the Role Selection window, query the appropriate roles from the Find Roles field.
-
From the Query Results region, select the required roles and click the Add button to add the roles to the Loaded Roles region.
-
Click OK to save the loaded roles to the database.
-
Save your work.
-
-
Assign Role to the attribute:
-
From the Navigator window, open the attribute.
-
In the Navigator Control Properties, under the Attribute tab the Type in the main region should be set to Role.
-
In the Default region, select the proper Value (role) and click Apply.
-
Save your work.
-
Assign a role for each of the attributes listed in the Performer Definitions table below.
-
-
Define Notification Performers. For each notification outlined in the Performer Definitions table below:
-
Open the appropriate workflow process.
-
In the workflow process, open the notification.
-
In the Navigator Control Properties window, click the Node tab.
-
In the Node tab's Performer region, select Item Attribute as the Type.
-
For the Value, select the appropriate attribute as documented in the Performer Definitions table below.
-
Click Apply and save your work.
Note: By performing the steps above, you are indirectly linking a role to the notification. If you want to directly link a role to a notification, then set Performer Type as Constant instead of Attribute. Then, select the proper role. By using the Constant type, you have more flexibility. However, by using the item attribute, maintenance is minimized when any of the performer roles need to be changed.
-
Performer Definitions
This table lists the notifications and seeded performer for each workflow process.
| Workflow Process Name | Notification | Performer (Attribute) |
|---|---|---|
| Server Side Validation Process | Inform Sys Admin of Payables Validation Failure | AP Expense Report Workflow Administrator |
| Server Side Validation Process | Inform Sys Admin of Custom Validation Failure | AP Expense Report Workflow Administrator |
| Server Side Validation Process | Inform Individual of Expense Allocation Failure Notification | Expense Allocations Administrator |
| Manager (Spending) Approval Process | Inform System Administrator - No Approver | AP Expense Report Workflow Administrator |
| Manager (Spending) Approval Process | Inform AP Mgr Approved ShortPay With Missing Receipts | AP |
| AP Approval Process | Request AP To Review For Spending Policy Compliance | AP |
| Rejection Process | Inform AP Exp Report They Reviewed Is Mgr Rejected | AP |
| Policy Violation Shortpay Process | Provide AP With Missing Info To Rectify Policy Shortpay | AP |
| Bothpay Process | Inform System Administrator - No Vendor | AP Expense Report Workflow Administrator |
| AP Custom Default Error Process | AP Custom Default Error Notification | AP Expense Report Workflow Administrator |
Note: It should be noted that the performers listed in the table above are already seeded in the workflow notifications. In addition, the setup steps above are recommendations on how to use the seeded item attributes. For additional flexibility, you can configure workflow by creating new item attributes and then perform the same setup steps above.
Deferring the Workflow Process for the Expenses Process
To improve the performance at submit time, you can defer the workflow process upon expense report submission.
To defer the workflow process:
-
Using Workflow Builder, open the file:
$AP_TOP/patch/115/import/US/apwxwkfl.wft
-
From the Workflow Builder Navigator, expand the Processes list and double-click on the AP Standard Expense Report Process.
-
Double-click on the activity: Determine Which Process To Start From. Alternatively, right-click on the activity and select Properties.
-
In the Navigator Control Properties region, click the Function tab.
-
Select Properties.
-
Set the Cost field to a number larger than zero.
-
Save your work.
Related Topics
Activities, Oracle Workflow Developer's Guide
Process Window, Oracle Workflow Developer's Guide
Extending the Expenses Workflow
Although you can use the predefined Expenses workflow in its current state, you may want to configure the process to accommodate your organization's specific needs. You can modify the predefined PL/SQL client extensions to extend the basic functionality of Internet Expenses to implement and automate company–specific business rules.
Expenses Workflow Procedures
The PL/SQL procedures of the Expenses workflow are contained in two packages, AP_WEB_EXPENSE_WF.apwxwkfb.pls and AP_WEB_EXPENSE_CUST_WF.apwxwfcb.pls located in $AP_TOP/patch/115/sql/apwxwfcb.pls.
AP_WEB_EXPENSE_WF.apwxwkfb.pls. Do not configure any of PL/SQL procedures in this package. Modifying, replacing, or removing any of the procedures in this package can interfere with the proper functioning of the Expenses workflow.
AP_WEB_EXPENSE_CUST_WF.apwxwfcb.pls. This package contains PL/SQL procedures that you can modify. Some of the procedures in this package contain seeded business logic while others contain no seeded logic and are simply “hooks” to which you can add custom logic.
Note: To help you with modifications, refer to the sections that describe the components of this process so you know what attributes have already been predefined and what activities are requirements in the process.
You can modify these procedures in the AP_WEB_EXPENSE_CUST_WF package:
-
DetermineMgrInvolvement
-
VerifyAuthority
-
CustomValidateExpenseReport
-
FindApprover
See also: Chapter 5, "Implementing Client Extensions". We recommend that you do not create custom processes to replace the seeded processes. Doing so interferes with the proper functioning of the Expenses workflow.
Expenses Item Type
The Expenses workflow is associated with an item type called Expenses. This item type identifies all of the available Expenses workflow processes.
These processes are associated with the Expenses workflow:
-
AP Approval Process
-
AP Standard Expense Report Process
-
Bothpay Process
-
Manager (Spending) Approval Process
-
Missing Receipts Shortpay Process
-
No Manager Response Process
-
Policy Violation Shortpay Process
-
Rejection Process
-
Request Approval Process
-
Server Side Validation Process
-
Shortpay Unverified Receipt Items Process
-
Third Party Expense Report Process
The Expenses item type has many associated attributes. Most of these attributes reference information in the database tables AP_EXPENSE_REPORT_HEADERS_ALL and AP_EXPENSE_REPORT_LINES_ALL. These attributes are used and maintained by function activities as well as notification activities throughout the process.
Expenses Workflow Item Type Attributes
The Expenses workflow is associated with the item type Expense Report. This item type identifies all workflow processes available.
This table lists all the item type attributes for the Expenses workflow with their descriptions, field type, and their associated lengths, formats, or lookup types.
Related Topics
Item Types, Oracle Workflow Developer's Guide
Expenses Workflow Processes
This section details the various processes that comprise the Expenses workflow. These processes are:
AP Standard Expense Report Process
The AP Standard Expense Report process manages the entire workflow process for expense reports created in Internet Expenses. This process is initiated automatically when an employee submits an expense report for approval in Internet Expenses. This process activity can also be initiated as a top level process by making calls to the Workflow Engine APIs CreateProcess and StartProcess.
To view the properties of the AP Standard Expense Report process, select the process in the navigator tree, then choose Properties from the Edit menu. The AP Standard Expense Report process has a result type of Approval, indicating that when the process completes, it has a result of either Approved, Rejected, Returned, or Withdrawn.
The Details property page of the process activity indicates that the AP Standard Expense Report process is associated with an error process called DEFAULT_PROCESS (Error Process with Retry). Initiated only when an error occurs, DEFAULT_PROCESS notifies the system administrator and provides information about the error.
Note that three activities in the Expenses workflow contain specific error handling logic. When these activities fail, the workflow sends a special error notification to the system administrator.
This table lists these activities and their corresponding error notification activity.
| Function Activity | Notification Activity |
|---|---|
| AP Validate Expense Report (Server Side Validation process) | Inform Sys Admin of Payables Validation Failure |
| Custom Validate Expense Report (Server Side Validation process) | Inform Sys Admin of Custom Validation Failure |
| Find Approver (Manager Spending Approval process) | Inform System Administrator – No Approver |
For example, the process sends the workflow system administrator a notification when no approver is found while executing the Find Approver function activity. The system administrator must fix the error before the process can continue.
The AP Standard Expense Report has 13 different activities, one of which is reused, so 17 activity nodes are described below.
The AP Standard Expenses workflow begins when a user submits an expense report using Internet Expenses (Node 1). At Node 2, the process determines at which subprocess the approval process begins. By default, all expense reports transition to the Server Side Validation process (Node 3). Expense reports that passed the validations transition to the Manager (Spending) Approval process (Node 4).
Node 3 is a subprocess that updates an expense report with required information (for example, the employee's expense account) so the approval processes and the Expense Report Export program can process the report.
Node 4 is a process that routes an expense report to the appropriate managers for approval. If it is approved, the report transitions to the AP Approval process (Node 7). Otherwise, the report transitions to the Rejection process (Node 5) or Return Expense Report process (Node 6).
Node 7 is a process that determines whether the report requires approval from the accounts payable department. If the report is approved and is not short paid, then the process transitions to the Bothpay process (Node 11) which checks the setting for the Payment Due From field in the Card Programs form. If the Payment Due From field is set to Both, then the workflow continues with the Bothpay process. If the Payment Due From field is not set to Both, then the workflow transitions to the Mileage process (Node 12).
If the accounts payable department short pays the expense report, then the workflow transitions to the Policy Non-Compliance Control process (Node 10). This process creates new expense reports from the lines that the accounts payable department short paid, and routes the new expense reports to either the Missing Receipts Shortpay activity, or the Policy Violation Shortpay activity.
Node 5 is a process that notifies the employee when the expense report is rejected by management. The process then pauses until the rejected expense report is resubmitted. If the report is not resubmitted within the specified time period, then the report is deleted from the system.
AP Standard Expense Report Process Activities
This section provides a description of each activity in the process, listed by the activity's display name.
-
Start (Node 1)
This is a standard function activity that simply marks the start of the process.
Function: WF_STANDARD.NOOP
Result Type: None
Prerequisite Activities: None
-
Determine Which Process To Start From (Node 2)
This function activity checks the value of the Start from Specified Process item attribute to determine whether an expense report should start with the Server Side Validation process, the Manager (Spending) Approval process, or the AP Approval process. By default, the process starts from the Server Side Validation process.
Function: AP_WEB_EXPENSE_WF.DetermineStartFromProcess
Result Type: AP Start from Specified Process
Required: Yes
Prerequisite Activities: Start
-
Server Side Validation Process (Node 3)
This process activity adds required information to the AP_EXPENSE_REPORT_HEADERS and the AP_EXPENSE_REPORT_LINES_ALL tables so the workflow approval processes and the Expense Report Export program can function properly.
See also: Server Side Validation Process.
Result Type: None
Required: Yes
Prerequisite Activities: Start, Determine Which Process To Start From
-
Manager (Spending) Approval Process (Node 4)
This process activity routes the expense report to the appropriate managers for approval using your organization's internal management hierarchy. If management approves the report, it transitions to the AP Approval process. If management rejects the report, it transitions to the Rejection process.
See also: Manager (Spending) Approval Process.
Result Type: Approval
Required: Yes
Prerequisite Activities: Start, Determine Which Process To Start From, Server Side Validation
-
Rejection Process (Node 5)
This process activity notifies the employee when management rejects an expense report. The process then pauses until the expense report is resubmitted. If the expense report is not resubmitted within the time period specified for the Wait for Resubmission function, it is deleted.
See also: Rejection Process.
Result Type: AP Reject Process Result
Required: Yes
Prerequisite Activities: Start, Determine Which Process To Start From, Server Side Validation Process, Manager (Spending) Approval Process
-
Return Expense Report Process (Node 6)
This process activity notifies the employee when the manager or the system administrator returns the expense report.
Result Type: AP Returned Expense Report Process Result
Prerequisite Activities: Start, Determine Which Process To Start From, Server Side Validation Process or Manager (Spending) Approval Process
-
AP Approval Process (Node 7)
This process activity determines whether accounts payable review is necessary for an expense report. If your accounts payable department short pays an expense report, the workflow transitions to the Policy Non-Compliance Control process. If your accounts payable department does not short pay an expense report, the process gives final approval to the expense report and transitions to the Bothpay process.
See also: AP Approval Process.
Result Type: AP Approval Process Result
Required: Yes
Prerequisite Activities: Start, Determine Which Process To Start From, Server Side Validation, Manager Approval Process
-
AP Rejection Process (Node 8)
This process activity notifies the employee when the accounts payables department rejects an expense report. The process then pauses until the expense report is resubmitted. If the expense report is not resubmitted within the time period specified for the Wait for Resubmission function, then the report is deleted.
Result Type: AP Reject Expense Report Process Result
Prerequisite Activities: Start, Determine Which Process To Start From, Server Side Validation, Manager Approval Process, AP Approval Process
-
Withdraw Expense Report Process (Node 9)
This process activity is executed when an employee withdraws an expense report.
Result Type: Withdraw Expense Report Process Result
Prerequisite Activities: Start, Determine Which Process To Start From, Server Side Validation, Manager Approval Process, AP Approval Process
-
Policy Non-Compliance Control Process (Node 10)
This process activity creates new expense reports from the lines that your accounts payable department short pays, and routes them to either the Missing Receipts Shortpay subprocess or the Policy Violation Shortpay subprocess.
Result Type: None
Prerequisite Activities: Start, Determine Which Process To Start From, Server Side Validation, Manager Approval Process, AP Approval Process
-
Bothpay Process (Node 11)
This process activity checks the setting for the Payment Due From field in the Card Programs form. If the Payment Due From field is set to Both, then the workflow continues with the Bothpay subprocess. The activity further checks whether the report contains required credit card vendor information and whether the report should be split into two reports (depending on the type and amount of credit card transactions on the report).
See also: Bothpay Process.
Result Type: Yes/No
Required: Yes
Prerequisite Activities: Start, Determine Which Process To Start From, Server Side Validation, Manager Approval Process, AP Approval Process or Policy Non-Compliance Control Process
-
Mileage Process (Node 12)
This process activity checks the accumulated mileage for the employee and determines the new mileage rate. The process recalculates the mileage reimbursement if the rates are different from the rates in the expense report.
Result Type: None
Prerequisite Activities: Start, Determine Which Process To Start From, Server Side Validation, Manager Approval Process, AP Approval Process, Bothpay Process
-
End (Nodes 13, 14, 15, 16, and 17)
This function activity marks the end of the process. Although the activity itself does not have a result type, each node of this activity in the process must have a process result assigned to it. The process result is assigned in the property page of the activity node.
Since the AP Standard Expense Report process activity has a result type of Approval, each End activity node must have a process result matching one of the lookup codes in the Approval lookup type.
Function: WF_STANDARD.NOOP
Result Type: None
Prerequisite Activities: Start
Server Side Validation Process
The Server Side Validation process checks that the report contains all required information and populates columns in Oracle Payables tables so the Expenses workflow and the Expense Report Export program can process the report.
The Server Side Validation process has a result type of None, which indicates that when the process completes there is no specific result. This subprocess cannot be initiated as a top level process to run; it can only be run as a subprocess when called by another, higher level process. To view the properties of the Server Side Validation process, select the process in the navigator tree, then choose Properties from the Edit menu.
The Server Side Validation Process differentiates code combination errors from the other errors. When the process detects a code combination error, a new notification is sent to a new responsibility. You can set this new responsibility as system administrator or a new role.
From the new notification, the administrator can click on a link to a page that lists the expense allocation errors. The administrator can access a correction page to correct the expense allocations.
The Server Side Validation process has 7 different activities, none of which are reused, so 7 activity nodes appear in the workflow diagram below. To examine the activities of the process in more detail, we have numbered each node for easy referencing below. The numbers themselves are not part of the process diagram.
Server Side Validation Process
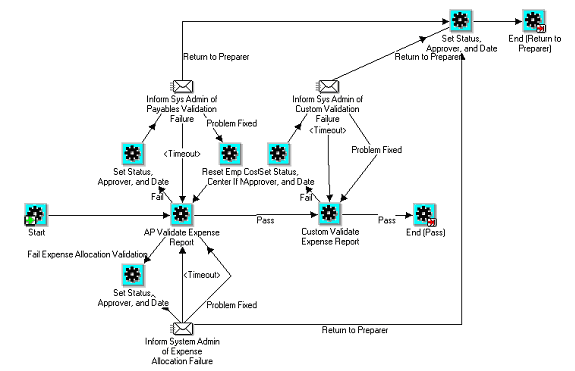
This process begins at Node 1 with the Start activity. At Node 2 the process validates the report and populates columns in the Oracle Payables tables AP_EXPENSE_REPORT_HEADERS and AP_EXPENSE_REPORT_LINES_ALL so the workflow approval processes and the Expense Report Export program can process the report. If the report fails at Node 2, the process notifies the system administrator (Node 3).
At Node 5 the process executes custom logic that you define using the Accounts Payable Involvement Extension (see Accounts Payable Involvement Procedure (CustomValidateExpenseReport)). If the report fails at Node 5, the process notifies the system administrator (Node 6). When the problem is fixed and the report passes validation, the process ends (Node 7).
Server Side Validation Process Activities
This section provides a description of each activity in the process, listed by the activity's display name. Each node corresponds to the workflow icons that appear in the above illustration.
-
Start (Node 1)
This is a standard function activity that simply marks the start of the process.
Function: WF_STANDARD.NOOP
Result Type: None
Prerequisite Activities: None
-
AP Validate Expense Report (Node 2)
This function validates information in the expense report, including expense allocations, and ensures that the information it contains can be exported into Oracle Payables. The node first checks to see if there are any expense allocation errors. If there are, then the node calls the Fail Expense Allocation Validation. If there are no expense allocation errors, the function completes the rest of the validations.
The system stores Internet Expenses expense report information in these tables:
-
AP_EXPENSE_REPORT_HEADERS
-
AP_EXPENSE_REPORT_LINES_ALL
This function activity populates columns in these two tables so the workflow approval processes and the Expense Report Export program can function properly.
If it completes successfully, the AP Validate Expense Report activity changes the value of the AP_EXPENSE_REPORT_HEADERS.SOURCE column from NonValidatedWebExpense to WebExpense. You can query and review Self–Service expense reports in the Payables Expense Reports window only if this column has a value of WebExpense (for example, this activity completes successfully).
Function: AP_WEB_EXPENSE_WF.APValidateExpenseReport
Result Type: AP Pass or Fail Result Type
Required: Yes
Prerequisite Activities: Start
This table identifies the columns this activity populates.
Columns populated in AP_EXPENSE_REPORT_HEADERS Description SOURCE If AP Validate Expense Report successfully completes, the AP Validate Expense Report changes the value of this column from NonValidatedWebExpense to WebExpense EMPLOYEE_CCID Indicates the accounting flexfield identifier for an expense report. If the employee's default cost center is used on the expense report, then this identifier is the same as the default expense account from the employee's setup in Human Resources. If the cost center is changed on the expense report, then the identifier will be based on the employee's default expense account overlaid with the cost center. EXPENSE_CHECK_ADDRESS_FLAG Indicates where to send expense check: Home or Office APPLY_ADVANCES_DEFAULT Indicates whether to apply an advance against an expense report AWT_GROUP_ID Indicates the withholding tax group identifier DEFAULT_EXCHANGE_RATE_TYPE Indicates the exchange rate type: Corporate, EMU Fixed, Spot, User–Defined DEFAULT_EXCHANGE_DATE Indicates the date that the exchange rate is effective. DEFAULT_EXCHANGE_RATE Indicates the exchange rate CODE_COMBINATION_ID Indicates the accounting flexfield identifier for the expense account associated with an expense item AWT_GROUP_ID Indicates the withholding tax group identifier RECEIPT_REQUIRED_FLAG Indicates whether the accounts payable department requires a receipt for an expense JUSTIFICATION_REQUIRED_FLAG Indicates whether your accounts payable department requires a justification for an expense
-
-
Inform Sys Admin of Payables Validation Failure (Node 3)
This activity notifies the system administrator when the AP Validation Expense Report activity fails. After fixing the problem, the expense report returns to the AP Validation Expense Report activity.
If the system administrator does not respond to this notification in the specified time, workflow redirects the process to transition to the AP Validation Expense Report activity.
Note: You must specify timeout period for this notification activity. To do this, display the properties window for the notification, then enter a new timeout value in the Node tabbed region.
Message: Oracle Payables Validation Failure
Result: AP Problem Has Been Fixed
Required: Yes
Prerequisite Activities: Start, AP Validate Expense Report
-
Reset Emp Cost Center If Null (Node 4)
This function activity enters the employee's cost center if it is not provided.
Function: AP_WEB_EXPENSE_WF.ResetEmpCostCenter
Result Type: None
Required: Yes
Prerequisite Activities: Start, AP Validate Expense Report, Inform Sys Admin of Payables Validation Failure
-
Custom Validate Expense Report (Node 5)
This function activity executes any custom validation you added to the function AP_WEB_EXPENSE_CUST_WF.DoCustomValidation.
See also: Accounts Payable Involvement Procedure (CustomValidateExpenseReport).
Function: AP_WEB_EXPENSE_WF.CustomValidateExpense Report
Result Type: AP Pass or Fail Result Type
Required: Yes
Prerequisite Activities: Start, AP Validate Expense Report
-
Inform Sys Admin of Custom Validation Failure (Node 6)
This activity notifies the system administrator that the Custom Validate Expense Report activity failed. When the system administrator responds that the problem is fixed, the expense report returns to the Custom Validate Expense Report activity.
If the system administrator does not respond to this notification in the specified time, workflow redirects the process to the AP Validation Expense Report activity.
Note: If you add custom validation logic to Custom Validate Expense Report activity, you must specify timeout period for this activity. To do this, display the properties window for the notification, then enter a new timeout value in the Node tabbed region.
Message: Custom Validation Failure
Result Type: AP Problem Has Been Fixed
Required: Yes
Prerequisite Activities: Start, AP Validate Expense Report, Custom Validate Expense Report
-
End (Node 7)
This function activity marks the end of the process. Since the Server Side Validation process has a result type of None, this activity has no process result.
Function: WF_STANDARD.NOOP
Result Type: None
Prerequisite Activities: Start
Manager (Spending) Approval Process
The Manager (Spending) Approval process verifies that a report requires manager approval, then forwards it to the appropriate managers for approval.
The Manager (Spending) Approval process has a result type of Approval, indicating that when the process completes, it has a result of Approve or Reject. This subprocess cannot be initiated as a top level process. It can only be run as a subprocess when called by another, higher level process. To view the properties of this process, select the process in the navigator tree, then choose Properties from the Edit menu.
To examine the activities of the process in more detail, we have numbered each node for easy referencing in the following illustration. The numbers themselves are not part of the process diagram.
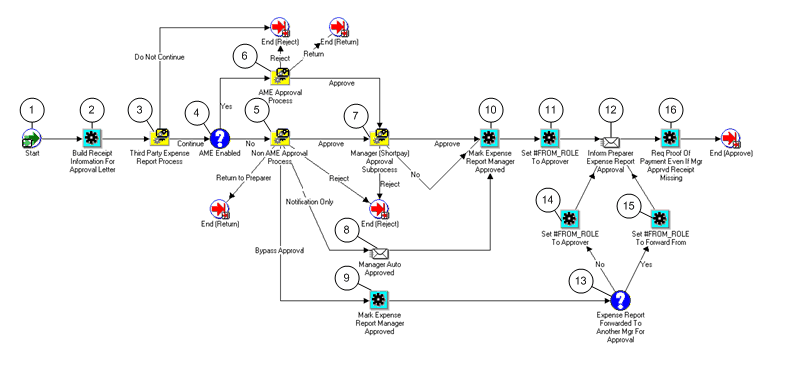
This process begins at Node 1 with the Start activity. If the Third Party Expense Report subprocess (Node 3) returns a result of Continue, the process transitions to the AME Enabled activity. Otherwise, the process ends with a result of Reject.
At Node 4 the process determines if Oracle Approvals Management (AME) is enabled:
-
If enabled, the process transitions to the AME Approval Process.
-
If not enabled, the process transitions to the Non-AME Approval Process.
After approval, the process transition to the Manager (Shortpay) Approval Subprocess.
If the expense report is approved or no approval was required, then the process marks the expense report with a status of Manager Approved (Node 10). The process then informs the preparer that the expense report has been approved by management (Node 12).
Manager (Spending) Approval Process Activities
This section describes each activity in the Manager (Spending) Approval process, listed by the activity's display name. Each node corresponds to the workflow icons that appear in the illustrations.
-
Start (Node 1)
This standard function activity marks the start of the process.
Function: WF_STANDARD.NOOP
Result Type: None
Prerequisite Activities: None
-
Build Receipt Information For Approval Letter (Node 2)
This function activity retrieves information about expense reports and sets some of the item attributes necessary for the Request Expense Report Approval message that workflow sends to managers.
Function: AP_WEB_EXPENSE_WF.BuildManagerApprvl
Result Type: None
Required: Yes
Prerequisite Activities: Start
-
Third Party Expense Report Process (Node 3)
This process activity ensures that employees approve expense reports created by their authorized delegate, if required. (An authorized delegate is an employee who can enter expense reports for other employees.)
See also: Third Party Expense Report Process.
Result Type: AP Continue or Reject Result Type
Required: Yes
Prerequisite Activities: Start, Build Receipt Information For Approval Letter
-
AME Enabled (Node 4)
This node determines if Oracle Approvals Management is enabled.
-
If so, the process transitions to Node 6, AME Approval Process.
-
If not enabled, the process transitions to Node 5, Non-AME Approval Process.
After approval, the process transition to Node 7, Manager (Shortpay) approval subprocess.
-
-
Manager Auto Approved (Node 8)
In the Non-AME Approval Process, if the level of manager involvement is set to Notification Only, then a notification is sent to the manager.
Message: Manager Auto Approved
Result Type: None
Required: Yes
Prerequisite Activities: Non-AME Approval Process
-
Mark Expense Report Manager Approved (Nodes 9, 10)
This function activity updates an expense report to indicate that it has received manager approval, or approval was bypassed. Once a report receives this approval, the Reviewed by Management check box is checked when viewing the report in the Payables Expense Report window.
Function: AP_WEB_EXPENSE_WF.ManagerApproved
Result Type: None
Required: Yes
Prerequisite Activities: Start, Build Receipt Information For Approval Letter, Third Party Expense Report Process, Find Approver, Level of Manager Involvement, Request Approval, Verify Authority, Check If ShortPaid Expense Report, Missing Receipts Sum Exceed Limit
-
Set #FROM_ROLE to Approver (Nodes 11, 14)
This function activity updates an expense report with the approving manager.
-
Inform Preparer Exp Report Approval (Node 12)
This notification activity informs the person who created the expense report that the report has received management approval.
Function: Expense Report Manager Approved
Result Type: None
Required: Yes
Prerequisite Activities: Start, Build Receipt Information For Approval Letter, Third Party Expense Report Process, Find Approver, Level of Manager Involvement, Request Approval, Verify Authority, Check If ShortPaid Expense Report, Missing Receipts Sum Exceed Limit, Mark Expense Report Manager Approved, Req Proof Of Payment Even If Mgr Apprvd Receipt Missing
-
Expense Report Forwarded to Another Mgr for Approval (Node 13)
This node determines if the expense report has been forwarded to another manager for approval. If the expense report has been forwarded to another manager for approval, then the expense report is updated with the new approving manager. If not, then the expense report is updated with the original approving manager.
-
Set #FROM_ROLE to Forward From (Node 15)
This function activity updates an expense report with the approving manager.
-
Req Proof of Payment Even if Mgt Apprvd Receipt Missing (Node 16)
This function activity uses the value you enter for the Always Require Proof of Payment attribute (Y or N) to indicate whether proof of payment (receipts) are required for expense items that:
Require proof of payment (as defined in the Payables Expense Report Templates window), or
Have no proof of payment (the Original Receipt Missing check box is checked when creating the report in Internet Expenses)
See also: Setting Workflow Activity Attributes for the Expenses Process.
Function: AP_WEB_EXPENSE_WF.RequireProofOfPayment
Result Type: None
Required: Yes
Prerequisite Activities: Start, Build Receipt Information For Approval Letter, Third Party Expense Report Process, Find Approver, Level of Manager Involvement, Request Approval, Verify Authority, Check If ShortPaid Expense Report, Missing Receipts Sum Exceed Limit, Mark Expense Report Manager Approved, Inform Preparer Expense Report Approval
-
End
This function activity marks the end of the process. Although the activity itself does not have a result type, each node of this activity in the process must have a process result assigned to it. The process result is assigned in the property page of the activity node.
Since the Manager (Spending) Approval process activity has a result type of Approval, each End activity node must have a process result matching one of the lookup codes in the Approval lookup type.
Function: WF_STANDARD.NOOP
Result Type: None
Prerequisite Activities: Start
Non-AME Approval Process
The Non-AME Approval Process manages the sending of notifications to managers for approval of expense reports, when Oracle Approvals Management (AME) is not enabled.
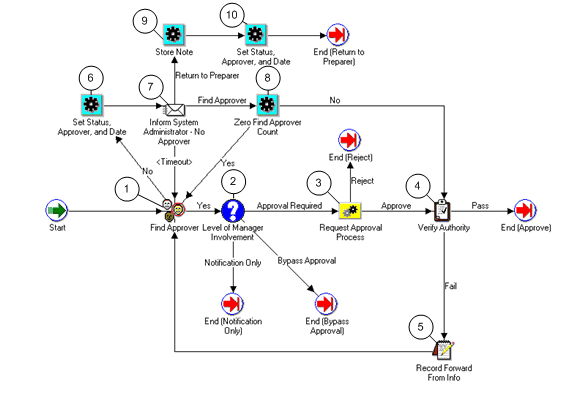
The process begins with the Start activity and transitions to the Find Approver activity (Node 1). This process attempts to identify an approver for an expense report. If the approver cannot be identified, then the process notifies the system administrator.
At Node 2, the process determines whether expense reports require manager approval, manager notification, or no manager involvement. If an expense report requires only manager notification, the process ends and returns to Node 8 in the Manager (Spending) Approval Process. If an expense report does not require any manager involvement, the process ends and returns to Node 9 in the Manager (Spending) Approval Process.
Expense reports that require manager approval transition to the Request Approval process (Node 3). If the Request Approval process returns a result of Approved, the process transitions to the Verify Authority activity (Node 4). If the Request Approval process returns a result of Reject, the process ends.
The Verify Authority activity (Node 4) determines whether an expense report exceeds the signing limit of the approver and whether the approver has signing authority for the cost center to which an expense report is charged. If an expense report fails the Verify Authority activity, the process records the name of manager who previously approved the expense report (Node 5), and the process returns to the Find Approver activity (Node 1).
Non-AME Approval Process Activities
-
Find Approver (Node 1)
This function activity determines the first and (if necessary) subsequent approvers for an expense report. The attribute value you define for the Find Approver Method function activity controls how this activity chooses approvers. For more information about the three methods, see Finding and Verifying Approvers.
Function: AP_WEB_EXPENSE_CUST_WF.FindApprover
Result Type: Yes/No
Required: Yes
Prerequisite Activities: Start, Build Receipt Information For Approval Letter, Third Party Expense Report Process
-
Level of Manager Involvement (Node 2)
This function activity determines whether expense reports require:
-
Manager approval
-
Manager notification
-
No manager involvement
You can configure this function activity to control manager involvement in the expense reporting process. For example, you can configure this activity so that expense reports for less than $100.00 do not require manager approval.
See also: Management Involvement Procedure (DetermineMgrInvolvement).
-
Default Behavior
Expense reports can consist of positive receipts (expense lines), negative receipts (credit lines), or both. Receipts can be either project–related or non–project–related.
If an expense report contains no project–related receipts, the Level of Manager Involvement activity requires manager approval whenever an expense report contains one or more positive expense lines. If an expense report contains only credit lines, the default behavior requires only that the manager receive a notification. This ensures that manager approval is necessary for every expense report that contains a positive expense line, even if the total amount of the report is less than or equal to zero. For example, an expense report that consists of one expense line of 400 and one credit line of 500 would require manager approval, even though the total amount of the expense report is negative (–100).
Note: Employees can only enter credit lines (receipts with negative totals) if the profile option OIE:Allow Credit Lines is set to Yes.
-
Expense Reports with Project-Related Receipts
Employees can create expense reports with project–related receipts in Internet Expenses. The default behavior of the Level of Manager Involvement activity depends on whether an expense report contains all, some, or no project-related receipts.
If an expense report contains only project-related receipts, the Level of Manager Involvement activity calls the AutoApproval client extension in Oracle Projects. The Oracle Projects profile option PA: AutoApprove Expense Report controls the default behavior of this client extension. If the AutoApproval extension returns Yes, the Level of Manager Involvement activity gives manager approval to the expense report. If the AutoApproval extension returns No, the Level of Manager Involvement activity requires that a manager approve the expense report manually.
You can configure the AutoApproval client extension in Oracle Projects to define specific rules concerning which expense reports qualify for automatic (manager) approval. For more information, see AutoApproval Extensions in Oracle Projects APIs, Client Extensions, and Open Interfaces Reference.
If an expense report contains both project–related and non–project–related receipts the Level of Manager Involvement activity calls the AutoApproval API in Oracle Projects and also calls the DetermineMgrInvolvement API in Payables. The activity compares the results from both APIs and uses the result with greater severity to determine the level of manager involvement for the expense report.
For example, if the result of the AutoApproval API in Oracle Projects is Bypass and the result of the DetermineMgrInvolvement API in Payables is Notification, the level of manager involvement is Notification. If the results of the AutoApproval API in Oracle Projects is Approval Required and the result of the DetermineMgrInvolvement API in Payables is Bypass, then the level of manager involvement is Approval Required.
If an expense report contains no project–related receipts, the Level of Manager Involvement activity calls only the DetermineMgrInvolvement API.
Function: AP_WEB_EXPENSE_CUST_WF.DetermineMgrInvolvement
Result Type: Level of Approval Process Involvement
Required: Yes
Prerequisite Activities: Start, Build Receipt Information For Approval Letter, Third Party Expense Report Process, Find Approver
-
-
Request Approval Process (Node 3)
This process activity sends managers an expense report for review. Managers can approve, reject, or reassign the expense report.
See also: Request Approval Process.
Result Type: Approval
Required: Yes
Prerequisite Activities: Start, Build Receipt Information For Approval Letter, Third Party Expense Report Process, Find Approver, Level of Manager Involvement
-
Verify Authority (Node 4)
This function activity determines whether an expense report exceeds the approver's signing limit. (The approver is the manager the Find Approver identifies as the person to which an expense report is forwarded.)
This activity also determines whether the approver has signing authority for the cost center to which the expense report is charged. If the expense report does not exceed the signing limit of the approver and the approver has the correct cost center signing authority, the expense report passes the Verify Authority activity.
Function: AP_WEB_EXPENSE_CUST_WF.VerifyAuthority
Result Type: AP Pass or Fail Result Type
Required: Yes
Prerequisite Activities: Start, Build Receipt Information For Approval Letter, Third Party Expense Report Process, Find Approver, Level of Manager Involvement, Request Approval
-
Record Forward From Info (Node 5)
The Verify Authority activity determines whether a manager has the authority to approve an expense report. If a manager approves an expense report but does not have sufficient signing limits or does not have approval authority, then the Record Forward From Info activity makes this manager the “forwarded from” manager.
The Inform Preparer of Mgr Approval Has Been Forwarded notification activity informs the preparer that the “forwarded from” Result Type manager approved the expense report but did not have the necessary signing authority (this activity is part of the Request Approval process).
Function: AP_WEB_EXPENSE_WF.RecordForwardFromInfo
Result Type: None
Required: Yes
Prerequisite Activities: Start, Build Receipt Information For Approval Letter, Third Party Expense Report Process, Find Approver, Level of Manager Involvement, Request Approval, Verify Authority
-
Inform System Administrator – No Approver (Node 7)
This activity notifies the workflow administrator when the Find Approver activity cannot find an approver for an expense report.
Message: No Approver
Result Type: AP Problem Has Been Fixed
Required: Yes
Prerequisite Activities: Start, Build Receipt Information For Approval Letter, Third Party Expense Report Process, Find Approver
Manager (Shortpay) Approval Subprocess
The Manager (Shortpay) Approval Process manages the sending of notifications to managers for approval of shortpaid expense reports.
The process begins with the Start activity and transitions to the Check If ShortPaid Expense Report activity (Node 1).
At Node 4, the process determines whether the total of missing receipts on an expense report exceeds the limit you define. For a description of how to set this limit, see Setting Workflow Activity Attributes for the Expenses Process. If the expense report exceeds the limit, the process confirms that the approver recognizes that he has approved an expense report that has missing receipts of a certain amount (Node 6).
If the expense report does not exceed the limit, the process ends and transitions back to the Manager (Spending) Approval Process to mark the expense report with a status of Manager Approved (Node 10). The Manager (Spending) Approval Process then informs the preparer that the expense report has been approved by management (Node 12).
Manager (Shortpay) Approval Subprocess Activities
-
Check If Shortpaid Expense Report (Node 1)
This function activity determines whether an expense report is the result of another expense report receiving short payment due to a policy violation, unverified receipt items, or missing receipts.
Function: AP_WEB_EXPENSE_WF.CheckIfShortPaid
Result Type: Yes/No
Required: Yes
Prerequisite Activities: Start, Build Receipt Information For Approval Letter, Third Party Expense Report Process, Find Approver, Level of Manager Involvement, Request Approval, Verify Authority
-
Inform AP Mgr Approved Shortpay With Missing Receipts (Node 3)
This notification activity informs the accounts payable department when an expense report that is missing original receipts has been shortpaid and received manager approval.
Message: Inform AP Mgr Has Approved Shortpay With No Receipts
Result Type: None
Required: Yes
Prerequisite Activities: Start, Build Receipt Information For Approval Letter, Third Party Expense Report Process, Find Approver, Level of Manager Involvement, Request Approval, Verify Authority, Check If ShortPaid Expense Report
-
Missing Receipts Sum Exceed Limit (Node 4)
Users check the Original Receipt Missing check box to indicate that they do not have a receipt for an expense. This function activity determines whether the total of missing receipts on an expense report exceeds the value you define for the AP Limit of Sum of Missing Receipts Expense Lines attribute.
Note: If Oracle Approvals Management is enabled, then set the AP Limit of Sum of Missing Receipts Expense Report Lines node attribute value to 999999.
See also: Setting Workflow Activity Attributes for the Expenses Process.
Function: AP_WEB_EXPENSE_WF.CheckSumMissingReceipts
Result Type: Yes/No
Required: Yes
Prerequisite Activities: Start, Build Receipt Information For Approval Letter, Third Party Expense Report Process, Find Approver, Level of Manager Involvement, Request Approval, Verify Authority, Check If ShortPaid Expense Report
-
Verify With Mgr the Amt Approved With Policy Violations (Node 6)
This notification activity sends a notification to a manager to confirm that the manager approved an expense report with policy violations.
Message: Verify with Manager Approval Amount
Result Type: Approval
Required: Yes
Prerequisite Activities: Start, Build Receipt Information For Approval Letter, Third Party Expense Report Process, Find Approver, Level of Manager Involvement, Request Approval, Verify Authority, Check If ShortPaid Expense Report, Missing Receipts Sum Exceed Limit
-
Store Note (Nodes 7, 8)
This function activity captures manager approval notes.
-
No Manager Response Process (Node 9)
This process activity occurs only if the Verify with Mgr the Amt Approved With Policy Violations activity times out before being completed. For example, this activity could time out when managers go on leave or vacation.
See also: No Manager Response Process.
Result Type: None
Required: Yes
Prerequisite Activities: Start, Build Receipt Information For Approval Letter, Third Party Expense Report Process, Find Approver, Level of Manager Involvement, Request Approval, Verify Authority, Check If ShortPaid Expense Report, Verify With Mgr the Amt Approved With Policy Violations
AME Approval Process
The AME Approval Process manages the sending of notifications based on Oracle Approvals Management setup.
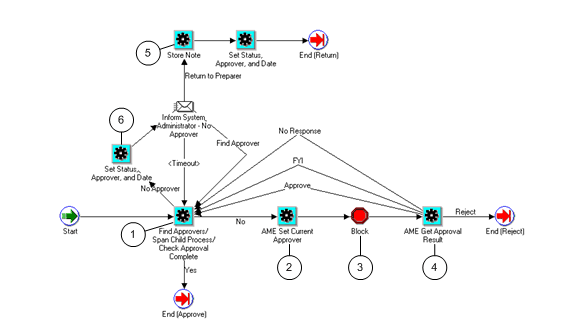
AME Approval Process Activities
This section provides a description of each activity in the process, listed by the activity's display name.
-
Find Approvers/Span Child Process/Check Approval Complete (Node 1)
This function activity retrieves the next set of approvers, and checks to see whether the approvals are complete. If approvals are completed, then the process ends. Otherwise, child processes are created by building new approval hierarchies.
-
AME Set Current Approver (Node 2)
This function activity updates the expense report with the current approver.
-
Block (Node 3)
This is completed when an approver approves or rejects a notification, or doesn't respond to a notification within the allotted time, or the notification is an FYI notification only.
-
AME Get Approval Result (Node 4)
This function activity retrieves the approver's response.
For example, if the response is approval, or a response was not received within the allotted time, or the notification is an FYI notification only, then the process proceeds to the Find Approvers/Span Child Process/Check Approval Complete to obtain the next approver. If the response is rejection, then the AME Approval Process ends.
-
Store Note (Node 5)
This function activity captures the system administrator’s notes.
-
Set Status, Approver, and Date (Node 6)
This function activity updates the expense report's Status, Current Approver, and Days Since Last Activity fields in the Track Submitted Expense Reports table on the Active Expense Reports page.
AME Request Approvals Process
This process requests approval from approvers when Oracle Approvals Management is enabled.
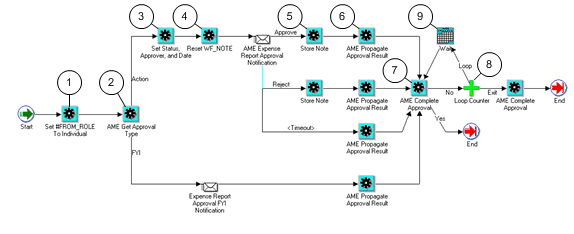
AME Request Approvals Process Activities
This section provides a description of each activity in the process, listed by the activity's display name.
-
Set #FROM_ROLE To Individual (Node 1)
This function activity retrieves the person who submitted the expense report.
-
AME Get Approval Type (Node 2)
This function activity identifies whether the notification is an action or FYI notification.
-
Set Status, Approver and Date (Node 3)
This function activity updates the expense report's Status, Current Approver, and Days Since Last Activity fields in the Track Submitted Expense Reports table on the Active Expense Reports page.
-
Reset WF_Note (Node 4)
This function activity clears any old existing notes before sending the notification to the approver, and replaces with any new notes.
-
Store Note (Node 5)
This function activity captures approval notes sent by the approver.
-
AME Propagate Approval Result (Node 6)
This function activity updates Oracle Approvals Management with the approver’s response.
-
AME Complete Approval (Node 7)
This function activity checks and stores the information on whether the approvals process is complete. This process is revisited until completion.
-
Loop Counter (Node 8)
This activity attribute Loop Limit is set to 15.
-
Wait (Node 9)
The Wait activity attribute Wait Mode is set to Relative Time, and Relative Time is set to 0.0069 (10 min).
Post Notification Activities
After the AME Request Approvals Process is completed, the AP_WEB_EXPENSE_WF.IsApprovalRequestTransferred function is called.
This function process results in the following two cases:
-
If a Request More Info (whether it is a question or answer) occurs: A note is stored in the Approval Notes.
-
If a Transfer occurs: "Inform Preparer About Approval Request Transfer" notification is sent to the preparer.
Finding and Verifying Approvers
The Manager (Spending) Approval process includes the activities Find Approver and Verify Authority. The functionality of these activities differ based on whether or not you have implemented Oracle Approvals Management to handle expense report approval routing. This section describes the functionality for both scenarios.
Find Approver and Verify Authority Behavior without Approvals Management
The behaviors of the approver selection and verify authority for the Manager (Spending) Approval Process are based on your selected Find Approver method.
The predefined Find Approver methods are:
-
Go Up Management Chain Method
-
One Stop Then Go Directly Method
-
Go Directly to Person With Signing Authority Method
Go Up Management Chain Method. This method first sends the expense report to the employee's direct manager. If the direct manager approves the expense report, the Verify Authority activity determines whether the expense report exceeds the direct manager's signing limit. If the expense report does not exceed the manager's signing limit, then the expense report passes the Verify Authority activity and the expense report continues to the Check if ShortPaid Expense Report activity.
If the expense report exceeds the direct manager's signing limit, the expense report fails the Verify Authority activity. The expense report then returns to the Find Approver activity which routes the expense report to the direct manager's manager for approval. This process continues (goes up the employee's management chain) until the expense report is either rejected or a manager with the necessary signing limit approves the expense report.
Note: Managers can reject expense reports even if they do not have the authority to approve them.
One Stop Then Go Directly Method. This method first sends the expense report to the employee's direct manager. If this manager approves the expense report, the Verify Authority activity determines whether the expense report exceeds the manager's signing limit. If the expense report does not exceed the manager's signing limit, the expense report passes the Verify Authority activity and the expense report continues to the Check if ShortPaid Expense Report activity.
If the expense report exceeds the direct manager's signing limit, it fails the Verify Authority activity. The expense report then returns to the Find Approver activity. The Find Approver activity routes the expense report to the nearest manager in the employee's management chain who has the signing authority necessary to approve the expense report. That is, the workflow searches the employee's management chain until it finds a manager with the necessary signing authority. Because the manager identified has the necessary signing authority, the expense report passes the Verify Authority activity if the manager approves the expense report.
Go Directly to Person With Signing Authority Method. This method routes the expense report directly to the nearest manager in the employee's management chain with the signing authority necessary to approve to the expense report. That is, it goes up the employee's management chain until it finds a manager with the necessary signing authority. If the manager approves the expense report, the report passes the Verify Authority activity, because the manager identified has the necessary signing authority.
Note: If you choose this option as the Find Approver method, expense reports may not be routed to direct managers for approval (the amount of the expense report and the direct manager's signing limit determine this). The CC Direct Manager notification activity in the Request Approval process informs managers when employees who report to them submit expense reports that do not require their approval.
Using Alternate Approvers. If a user selects an alternate approver, the approval process first routes the expense report to the alternate approver. If the alternate approver approves the expense report, the Verify Authority activity determines whether the expense report exceeds the alternate approver's signing limit. The Verify Authority activity also determines whether the alternate approver has signing authority for the cost center to which the expense report is charged. If the expense report does not exceed the alternate approver's signing limit, and the alternate approver has the correct cost center singing authority, the expense report passes the Verify Authority activity.
Note: If an employee enters an alternate approver, the expense report is not routed to the employee's direct manager for approval. The CC Direct Manager notification activity in the Request Approval process informs managers when employees who report to them submit expense reports that do not require their approval.
If the expense report exceeds the signing limit of the alternate approver, or the alternate approver does not have the correct cost center signing authority, the expense report fails the Verify Authority activity. The expense report then returns to the Find Approver activity. At this point, the Find Approver activity will handle the expense report differently based on the Find Approver method you are using.
-
If you are using the Go Up Management Chain method, the Find Approver activity routes the expense report to the manager of the alternate approver for approval. This process continues (moves up the alternate approver's management chain) until the expense report is either rejected or a manager with the necessary authority approves the expense report.
-
If you are using the One Stop Then Go Directly method, the Find Approver activity routes the expense report to the nearest manager in the management chain of the alternate approver who has the signing authority necessary to approve to the expense report. If this manager approves the expense report, the report passes the Verify Authority activity because the manager has the necessary signing authority. However, if the user entered an alternate approver who does not have the authority to approve expense reports for the specified cost center, the expense report fails the Verify Authority activity.
However, if you are using the Go Directly to Person with Signing Authority method, both the Find Approver and Verify Authority activities are simplified. The Find Approver activity routes the expense report to the nearest manager in the alternate approver's management chain with the signing authority necessary to approve the expense report. If this manager approves the expense report, the expense report passes the Verify Authority activity because the manager identified has the necessary signing authority. However, if the user enters an alternate approver who does not have the authority to approve expense reports for the specified cost center, the expense report fails the Verify Authority activity.
The Find Approver activity will not find an approver if users charge expense reports to cost centers different from their default cost centers and they do not enter an Alternate Approver. To prevent users from submitting expense reports with this scenario, set the profile option OIE: CC Approver Req to Yes. If this profile option is set to Yes, employees who charge an expense report to a cost center that is not their own must enter an alternate approver. However, an employee can enter an alternate approver who does not have signing authority for the cost center entered on the expense report.
If an alternate approver is assigned to an expense report and that approver does not have signing authority for the cost center specified, the manager approval process fails when it reaches the Verify Authority function activity regardless of the selected Find Approver method. Internet Expenses users must ensure that the alternate approver entered has signing authority for the specified cost center.
Transferring Approval Ownership. Approvers can change the approval ownership of an expense report. A Reassign button is available on the approval request which enables the approver to designate a new approver.
Find Approver and Verify Authority Behavior with Approvals Management
When enabled, Oracle Approvals Management approval routing rules are used by the Manager (Spending) Approval process. This workflow process still handles the overall flow of the expense report. However, the behaviors of these activities are modified to account for Approvals Management routing rules:
-
Find Approver
-
Verify Authority
-
Record Forward From Info
The Find Approver activity sends the specified approver of the expense report to an Approvals Management API. This API builds an approval chain based on the normal Human Resources hierarchy of this approver and the rules you have defined in Approvals Management if the approval chain does not exist. For example, you define a rule that specifies that expense reports over a certain dollar amount requires approval from a manager with a job grade level of 2. When an expense report is submitted that exceeds this dollar amount, Approvals Management builds the approval chain based on the HR hierarchy until it reaches an approver with that level.
Note: When expense lines are split into multiple distributions, Approvals Management can build multiple approval chains that require approvers to review and approve expense reports in parallel. See: Reviewing and Approving Expense Allocations With AME.
Once a manager approves the expense report, the Verify Authority checks the authority of the specified approver on the expense report. If the approver has the required authority for the expense report, then the approval process proceeds to the next step in the Manager (Spending) Approval Process. If the approver does not have the required authority, then Verify Authority cancels and the Find Approver activity is reactivated to retrieve the next approver from the pre-built approval chain. The expense report is then sent to this approver. This cycle continues until the expense report is approved by the final approver on the chain.
As the expense report is escalated to each approver, a notification is sent to the preparer that the expense report has been forwarded for approval. The process for releasing this notification is handled by the Record Forward From Info activity.
To summarize, Approvals Management is used to create a temporary approval chain based on the HR hierarchy and rules, and to return the next approver from the approval chain.
Using Alternate Approvers. The normal Human Resources hierarchy is used by Approvals Management to build the approval chain for an expense report. This chain is rebuilt if a user specifies an alternate approver. In this case, the approval chain is based on the selected alternate approver.
Transferring Approval Ownership. An approver can transfer the approval ownership of an expense report to another approver. When this occurs, the approval chain is rebuilt based on the new approver.
Third Party Expense Report Process
This process activity ensures that, if required, employees approve expense reports created by their authorized delegate (an employee who enters expense reports for another employee). If approval is not required, this process activity simply notifies the employee that an authorized delegate has submitted an expense report on their behalf.
Note: Whether expense reports submitted by authorized delegates require employee approval depends on the value you choose for the Employee Approval Required function attribute.
The Third Party Expense Report process has a result type of AP Continue or Reject Result Type, indicating that when the process completes, it has a result of Continue or Do Not Continue (the lookup codes in the AP Continue or Reject Result Type lookup type associated with the Expenses item type). This subprocess cannot be initiated as a top level process; it can only be run as a subprocess when called by another, higher level process. To view the properties of the Third Party Expense Report process, select the process in the navigator tree, then choose Properties from the Edit menu.
The Third Party Expense Report has 7 different activities, one of which is reused, so 8 activity nodes appear in the workflow diagram below. To examine the activities of the process in more detail, we have numbered each node for easy referencing below. The numbers themselves are not part of the process diagram.
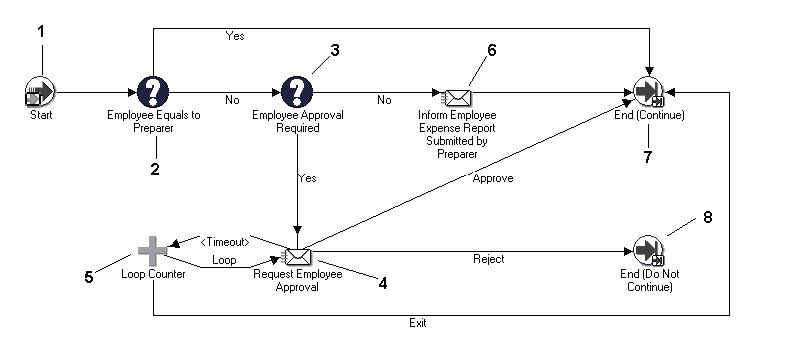
The process begins at Node 1 with the Start activity. The process then checks whether the person who submitted the expense report is the same as the employee name on the report. If the employee and preparer are the same, the process ends at Node 7. Otherwise, the process checks whether employee's approval is required. If it is, the process requests approval from the employee (Node 4) and then ends at Node 7 if it receives approval and at Node 8 otherwise. If the report does not require the employee's approval, the process notifies the employee that the report was submitted on their behalf (Node 6) and the process ends (Node 7).
Third Party Expense Report Process Activities
This section provides a description of each activity in the process, listed by the activity's display name. Each node corresponds to an icon in the above illustration.
-
Start (Node 1)
This is a standard function activity that simply marks the start of the process.
Function: WF_STANDARD.NOOP
Result Type: None
Required: Yes
Prerequisite Activities: None
-
Employee Equals to Preparer (Node 2)
This function activity determines whether the employee is the same person who prepared the report. If the preparer and the employee are the same, this function activity returns a result type of Yes, and the process ends with a result of Continue.
If the preparer and the employee are not the same (the report was created by an authorized delegate), this function activity returns a result type of No and the process transitions to the next activity.
Function: AP_WEB_EXPENSE_WF.EmployeeEqualsToPreparer
Result Type: Yes/No
Required: Yes
Prerequisite Activities: Start
-
Employee Approval Required (Node 3)
This function activity determines whether approval is necessary for expense reports entered by an authorized delegate. The value you enter for the Employee Approval Required function activity determines whether approval is necessary.
Function: AP_WEB_EXPENSE_WF.EmployeeApprovalRequired
Result Type: Yes/No
Required: No
Prerequisite Activities: Start, Employee Equals to Preparer
-
Request Employee Approval (Node 4)
This activity requests that an employee approve or reject an expense report entered by the authorized delegate. If an employee approves the report, the Third Party Expense Report process ends with a result type of Continue. Otherwise, the process ends with a result type of Do Not Continue.
Message: Request Employee Approval
Result Type: Approval
Required: No
Prerequisite Activities: Start, Employee Equals to Preparer, Employee Approval Required
-
Loop Counter (Node 5)
This standard function activity limits the number of times the Workflow Engine transitions through the Request Employee Approval notification activity. You can define how many times the Request Employee Approval activity transitions by entering a number for the Loop Limit activity attribute of the Loop Counter activity.
Message: WF_STANDARD.LOOPCOUNTER
Result Type: Loop Counter
Required: No
Prerequisite Activities: Start, Employee Equals to Preparer, Employee Approval Required, Request Employee Approval
-
Inform Employee Expense Report Submitted by Preparer (Node 6)
This activity notifies an employee when an authorized delegate enters an expense report on their behalf. The message summarizes the content of the expense report so the employee can review it.
Function: Inform Employee Expense Report Submitted by Preparer
Result Type: None
Required: No
Prerequisite Activities: Start, Employee Equals to Preparer, Employee Approval Required
-
End (Nodes 7 and 8)
This function activity marks the end of the process. Although the activity itself does not have a result type, each node of this activity in the process must have a process result assigned to it. The process result is assigned in the property page of the activity node.
Since the Third Party Expense Report process activity has a result type of AP Continue or Reject, each End activity node must have a process result matching one of the lookup codes in the Approval lookup type.
Function: WF_STANDARD.NOOP
Result Type: None
Prerequisite Activities: Start, Employee Equals to Employee
Request Approval Process
To view the properties of the Request Approval activity process, select the process in the navigator tree, then choose Properties from the Edit menu. The Request Approval process has a result type of Approval, indicating that when the process completes, it has a result of Approved or Rejected (the lookup codes in the Approval lookup type associated with the Standard item type). This subprocess cannot be initiated as a top level process to run; it can only be run as a subprocess when called by another, higher level process.
The Request Approval process activity has 9 different activities, one of which is reused, so 10 activity nodes appear in the workflow diagram. To examine the activities of the process in more detail, we have numbered each node for easy referencing below. The numbers themselves are not part of the process diagram.
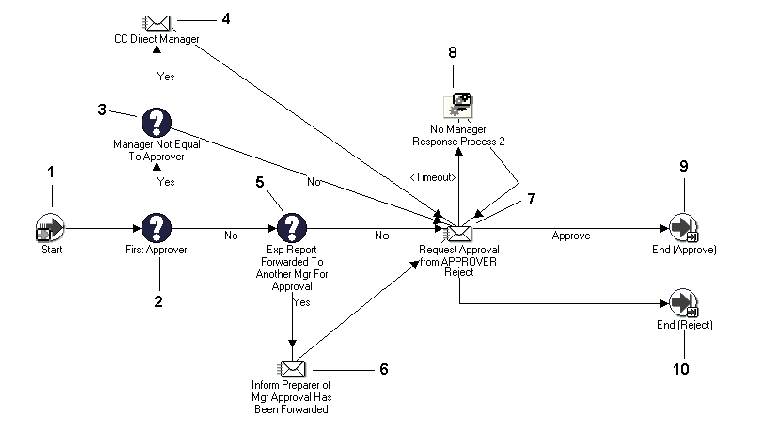
This process begins at Node 1 with the Start activity. At Node 2 the process determines whether a manager has approved the expense report. If a manager has approved the report, the process then checks whether the approver is the employee's direct manager (Node 3). (The Find Approver activity in the Manager (Spending) Approval process determines the approver.) If the approver and the direct manager are not the same, this process sends a notification to the direct manager (Node 4).
If an expense report has been previously reviewed, the process determines whether the expense report has been forwarded to another manager for approval (Node 5). If so, the process informs the preparer that the expense report was approved by a manager that does not have the necessary signing authority and that the expense report has been forwarded to another manager for review (Node 6).
At Node 7 the process sends the expense report to managers for review. Managers can approve, reject, or reassign the expense report. If the manager does not reply within the time period specified for the notification, the process transitions to the No Manager Response process (Node 8).
Request Approval Process Activities
This section provides a description of each activity in the process listed by the activity's display name. Each node corresponds to an icon shown in the illustration.
-
Start (Node 1)
This standard function activity marks the start of the process.
Function: WF_STANDARD.NOOP
Result Type: None
Required: Yes
Prerequisite Activities: None
-
First Approver (Node 2)
An expense report may require approval from more than one manager. For example, if you choose Go Up the Management Chain value for the Find Approver Method attribute, then an expense report for a large amount could require multiple approvals. The First Approver function activity determines whether an expense report has already been approved.
Function: AP_WEB_EXPENSE_WF.FirstApprover
Result Type: Yes/No
Required: Yes
Prerequisite Activities: Start
-
Manager Not Equal to Approver (Node 3)
This function activity determines whether the selected approver is the direct manager of the person seeking reimbursement. For example, if an employee enters an alternate approver, the expense report is not routed to the direct manager for approval.
Additionally, if the Find Approver method is Go Directly to Person With Signing Authority, an expense report for a large amount may not be sent to the employee's direct manager for approval if that manager's signing limits are too low to approve the report.
Function: AP_WEB_EXPENSE_WF.ManagerNotEqualTo Approver
Result Type: Yes/No
Required: Yes
Prerequisite Activities: Start, First Approver
-
CC Direct Manager (Node 4)
This notification activity informs managers when their direct reports submit expense reports that do not require their approval. For example, if an employee enters an alternate approver on an expense report, workflow sends this notification to the employee's manager. The notification includes the name of the manager to whom the expense report is being routed for approval and the expense report details.
Function: CC Direct Manager
Result Type: None
Required: Yes
Prerequisite Activities: Start, First Approver, Manager Not Equal To Approver
-
Exp Report Forwarded to Another Mgr for Approval (Node 5)
This function activity determines whether an expense report has been forwarded to another manager for approval.
Depending on the total of the expense report and which Find Approver method you specified, it may require approval from more than one manager. Expense reports can be approved by a manager even if the report exceeds that manager's signing authority. In this case, the report is also forwarded to another manager for approval. The person to whom the expense report is forwarded depends on the Find Approver method you selected.
Note: If you have Oracle Approvals Management enabled, the Find Approver method is not used. See: Find Approver and Verify Authority Behavior with Approvals Management.
Function: AP_WEB_EXPENSE_WF.ApprovalForwarded
Result Type: Yes/No
Required: Yes
Prerequisite Activities: Start, First Approver
-
Inform Preparer of Mgr Approval Has Been Forwarded (Node 6)
This notification activity informs users when an expense report needs another manager's approval. For example, workflow sends this notification to users when expense reports exceed their direct manager's signing limit or does not have the required authority.
Function: Inform Preparer Exp Report Approval Has Been Forwarded
Result Type: None
Required: Yes
Prerequisite Activities: Start, First Approver, Exp Report Forwarded To Another Mgr For Approval
Note: If you have Oracle Approvals Management enabled, the preparer will not receive the Inform Preparer of Mgr Approval Has Been Forwarded notification.
-
Request Approval from APPROVER (Node 7)
This notification activity forwards an expense report to a manager for review. Managers can approve, reject, or reassign the expense report.
Reimbursable Amount in Approver's Currency:
In situations where an approver's currency is different from the reimbursement currency, Internet Expenses converts the reimbursement currency into the Approver's currency. For example, if an approver lives in the United States and an expense report is submitted using British Pounds as the reimbursement currency, the reimbursable amount is also displayed in U.S. Dollars. This conversion provides approvers with information they understand.
The approver currency is the currency defined in the General Preferences. If no currency is set in General Preferences, then Internet Expenses determines the approver currency by using the functional currency defined for the set of books that is assigned to the approver in Oracle HRMS.
If the functional currency is different from the reimbursement currency, Internet Expenses then proceeds to obtain the default exchange rate type to perform the conversion.
Note: The rate type is obtained from the Exchange Rate Type field of the Currency Payables Options tabbed region of the Payables Options window.
Message: Request Expense Report Approval
Result Type: Approval
Required: Yes
Prerequisite Activities: Start, First Approver
-
No Manager Response Process (Node 8)
This process activity handles the approval process when managers do not respond to approval requests within the time period specified (for example, when they are out of the office or on vacation).
See also: No Manager Response Process.
Result Type: None
Required: Yes
Prerequisite Activities: Start, First Approver, Request Approval from APPROVER
-
End (Nodes 9 and 10)
This function activity marks the end of the process. Although the activity itself does not have a result type, each node of this activity in the process must have a process result assigned to it. The process result is assigned in the property page of the activity node. Since the Request Approval process activity has a result type of Approval, each End activity node must have a process result matching one of the lookup codes in the Approval lookup type.
Function: WF_STANDARD.NOOP
Result Type: None
Prerequisite Activities: Start, Request Approval from APPROVER
Post Notification Activities
After the Request Approval Process is completed, the "AP_WEB_EXPENSE_WF.IsApprovalRequestTransferred" function is called.
This function process results in the following two cases:
-
If a Request More Info (whether it is a question or answer) occurs: A note is stored in the Approval Notes.
-
If a Transfer occurs: "Inform Preparer About Approval Request Transfer" notification is sent to the preparer.
No Manager Response Process
This process enables the Expenses workflow to manage the approval process when managers do not respond to approval requests, for example, when they go on leave or vacation. It informs the person who prepared the expense report that the manager responsible for approving it did not respond within the time period specified. The preparer can choose to resend the expense report to the same manager, or direct the expense report to the manager's manager.
To view the properties of the No Manager Response process, select the process in the navigator tree, then choose Properties from the Edit menu. The No Manager Response process has no result type and cannot be initiated as a top level process; it can be run only as a subprocess when called by another, higher level process.
The Request Approval process activity has 7 different activities, all of which appear as activity nodes in the workflow diagram below. To examine the activities of the process in more detail, we have numbered each node for easy reference below. The numbers themselves are not part of the process diagram.
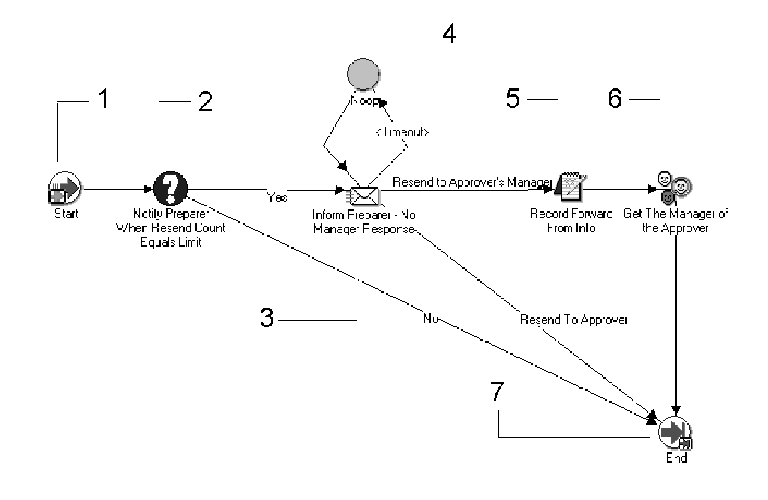
Note: The approval process stalls unless employees reply to No Manager Response messages. The No Manager Response process activity continues to send notifications until a response is given.
This process activity occurs when either of these notification activities time out before being completed:
-
The Request Approval from APPROVER notification activity in the Request Approval process activity.
-
The Verify With Mgr the Amt Approved With NO Receipt in the Manager (Spending) Approval process activity
The process begins at the Start activity (Node 1). At Node 3 the process notifies the person who prepared the expense report that the approver did not respond to any notifications requesting approval.
The process records the approver's information at Node 5 then identifies and resends the request to the approver's manager (Node 6).
No Manager Response Process Activities
This section provides a description of each activity in the process, listed by the activity's display name. Each node corresponds to an icon shown in the previous diagram.
-
Start (Node 1)
This is a Standard function activity that simply marks the start of the process.
Function: WF_STANDARD.NOOP
Result Type: None
Required: Yes
Prerequisite: None
-
Notify Preparer When Resend Count Equals Limit (Node 2)
This function activity determines when the person who created the expense report should be notified that the approver did not respond to the approval request. The value you define for this activity determines how many times a manager is notified about expense reports that are awaiting approval. Once the resend count equals the number you specified, a notification is sent to the preparer.
Function: AP_WEB_EXPENSE_WF.NotifyPreparer
Result Type: Yes/No
Required: Yes
Prerequisite Activities: Start
-
Inform Preparer – No Manager Response (Node 3)
This activity notifies the employee that the manager responsible for approving the expense report did not respond to the approval request. The employee must choose whether to resend the expense report to the manager again or to send the expense report to the manager's manager for approval.
Note: If employees do not reply to the No Manager Response messages, their expense reports cannot be approved and therefore cannot be reimbursed.
Message: No Manager Response
Result Type: AP Employee Action for Manager Requested
Required: No
Prerequisite Activities: Start, Notify Preparer When Resend Count Equals Limit
-
Noop (Node 4)
This standard function activity acts as a placeholder. It performs no action.
Function: WF_STANDARD.NOOP
Result Type: None
Required: No
Prerequisite Activities: Start, Notify Preparer When Resend Count Equals Limit, Inform Preparer – No Manager Response
-
Record Forward From Info (Node 5)
This function activity sets the “forwarded from” item attributes so notifications can inform the manager who was originally responsible for reviewing the expense report.
Function: AP_WEB_EXPENSE_WF.RecordForwardFromInfo
Result Type: None
Required: No
Prerequisite Activities: Start, Notify Preparer When Resend Count Equals Limit, Inform Preparer – No Manager Response
-
Get the Manager of the Approver (Node 6)
This function activity identifies the approver's manager. To do this, the activity first calls the AP_WEB_EXPENSE_WF.GetManager procedure and finds the original approver's manager in the HR_EMPLOYEES_CURRENT_V table. This function activity then calls the AP_WEB_EXPENSE_WF.SetPersonAs procedure and indicates that this manager is the new approver.
Function: AP_WEB_EXPENSE_WF.GetApproverManager
Result Type: None
Required: No
Prerequisite Activities: Start, Notify Preparer When Resend Count Equals Limit, Inform Preparer – No Manager Response, Record Forward From Info
-
End (Node 7)
This function activity marks the end of the process. Since the No Manager Response process activity has no result type, this End node has no process result associated with it.
Function: WF_STANDARD.NOOP
Result Type: None
Prerequisite Activities: Start
AP Approval Process
The AP Approval process has a result type of AP Approval Process Result, indicating that when the process completes, it has a result of Approved or ShortPay. This subprocess cannot be initiated as a top level process; it can only be run as a subprocess when called by another, higher level process. To view the properties of the AP Approval process, select the process in the navigator tree, then choose Properties from the Edit menu.
The AP Approval process has 15 different activities, one of which is reused, so 14 activity nodes are described below.
This process begins at Node 1 with the Start activity. At Node 2, the process determines, based on the audit rules, whether the expense report requires accounts payable review. At Node 5 the process automatically approves expense reports that do not require accounts payable review. If an expense report requires accounts payable review, the process checks whether the review is complete (Node 7). If the review is not complete, the process pauses until the accounts payable department reviews the expense report.
Note: To indicate a completed review, the accounts payable department clicks the Complete Audit button in the Audit Expense Reports page.
The process determines whether the accounts payable department has adjusted the report (Node 10) and, if necessary, notifies the preparer (Node 11). At Node 12 the process determines whether all expense report lines pass accounts payable department approval. The process approves expense reports with no short paid items (Node 13) and the process ends with a result of Approved (Node 15). If an expense report contains short paid items, the process ends with a result of ShortPay (Node 14).
AP Approval Process Activities
This section provides a description of each activity in the process, listed by the activity's display name. Each node corresponds to an icon in the illustration above.
-
Start (Node 1)
This standard function activity marks the start of the process.
Function: WF_STANDARD.NOOP
Result Type: None
Required: Yes
Prerequisite Activities: None
-
AP Audit Expense Report (Node 2)
This function activity determines whether an expense report is routed for audit using the audit rules, or if it will continue through the AP Approval Process without using audit rules.
Function: AP_WEB_EXPENSE_WF.AuditExpenseReport
Result Type: AP Audit Type
Activity Type: Function
Prerequisite Activities: Start
-
Any Receipt Required for Expense Report (Node 3)
This function activity determines whether an expense report contains an expense for which your accounts payable department requires proof of payment (a receipt).
Function: AP_WEB_EXPENSE_WF.AnyReceiptRequired
Result Type: Yes/No
Required: Yes
Prerequisite Activities: Start; AP Audit Expense Report
-
Any Required Justification or Policy Violation for Expense Report (Node 4)
This function activity determines whether an expense report contains expense items (airfare, meals, car rental, and so on) for which accounts payable requires justification. The Justification Required check box in the Payables Expense Report Templates window controls whether a user must enter a justification for an expense item.
This node is always hit if any of the lines on the expense report require justification, even if the justification text is entered. The expense report is not approved until the accounts payables department reads and confirms the validity of the entered justification.
Function: AP_WEB_EXPENSE_WF.AnyJustificationRequired
Result Type: Yes/No
Required: Yes
Prerequisite Activities: Start; AP Audit Expense Report; Any Receipt Required For Expense Report
-
Auto Approved (Node 5)
This function activity indicates whether an expense report has received accounts payable approval. If an expense report transitions through this activity, the Reviewed by Payables check box is checked when viewing the report in the Payables Expense Report window.
Function: AP_WEB_EXPENSE_WF.Approved
Result Type: None
Required: Yes
Prerequisite Activities: Start; AP Audit Expense Report; Any Receipt Required For Expense Report
-
Request AP to Review for Spending Policy Compliance (Node 6)
This notification activity notifies the accounts payable department requesting review of the expense report. Because the accounts payable department requires no receipts for this expense report, they do not receive a package with receipts, so this activity notifies them of a new expense report that requires review.
Message: Request AP Review Policy
Result Type: None
Required: Yes
Prerequisite Activities: Start; AP Audit Expense Report; Any Receipt Required For Expense Report; Any Justification Required for Expense Report
-
AP Expense Report Review Complete (Node 7)
Your accounts payable department indicates that an expense report has been reviewed by checking the Reviewed by Payables check box in the Payables Expense Reports window. This function activity determines whether accounts payable has checked this check box for an expense report.
Function: AP_WEB_EXPENSE_WF.APReviewComplete
Result Type: Yes/No
Required: Yes
Prerequisite Activities: Start; AP Audit Expense Report; Any Receipt Required For Expense Report
-
Set Status, Approver, and Date (Node 8)
This function activity is used to update the status of the expense report, as well as any changes to the approver and date. It is used to provide updates for the Status, Current Approver, and Days Since Last Activity fields in the Track Submitted Expense Reports table on the Active Expense Reports page.
Function: AP_WEB_EXPENSE_WF.SetStatusApproverAndDate
Result Type: None
Required: Yes
Prerequisite Activities: Start; AP Audit Expense Report; Any Receipt Required For Expense Report; Expense Report Review Complete
-
Block (Node 9)
This standard function activity pauses the AP Approval process until the accounts payable department checks the Reviewed by Payables check box and saves the expense report in the Payables Expense Report window.
Function: WF_STANDARD.BLOCK
Result Type: None
Required: Yes
Prerequisite Activities: Start; AP Audit Expense Report; Any Receipt Required For Expense Report; Expense Report Review Complete
-
AP Adjustment Made Due to Spending Policy Noncompliance (Node 10)
Your accounts payable department can adjust (reduce) the amount of an expense report when it violates company reimbursement policy. This function activity determines whether the accounts payable department has adjusted the report.
Function: AP_WEB_EXPENSE_WF.AnyAPAdjustment
Result Type: Yes/No
Required: Yes
Prerequisite Activities: Start; AP Audit Expense Report; Any Receipt Required For Expense Report; Expense Report Review Complete
-
Inform Preparer that Expense Report Has Been Adjusted (Node 11)
This notification activity informs preparers that your accounts payable department adjusted their expense reports. This notification includes reasons for the adjustments.
Function: Expense Report Adjustment
Result Type: None
Required: Yes
Prerequisite Activities: Start; AP Audit Expense Report; Any Receipt Required For Expense Report; Expense Report Review Complete; AP Adjustment Made Due To Spending Policy Noncompliance
-
All Expense Lines Pass AP Approval (Node 12)
Your accounts payable department short pays an expense report by indicating that one or more expense items (lines) in an expense report meet one of these two conditions:
-
The preparer did not provide required receipts
-
The preparer provided inadequate justifications for an expense items
This function activity determines whether your accounts payable department has short paid an expense report.
Function: AP_WEB_EXPENSE_WF.AllPassAPApproval
Result Type: Yes/No
Required: Yes
Prerequisite Activities: Start; AP Audit Expense Report; Any Receipt Required For Expense Report; Expense Report Review Complete; AP Adjustment Made Due To Spending Policy Noncompliance
-
-
Mark Expense Report as Approved (Manual) (Node 13)
This function activity indicates that an expense report has received accounts payable approval.
Function: AP_WEB_EXPENSE_WF.Approved
Result Type: None
Required: Yes
Prerequisite Activities: Start; AP Audit Expense Report; Any Receipt Required For Expense Report; Expense Report Review Complete; AP Adjustment Made Due To Spending Policy Noncompliance; All Expense Lines Pass AP Approval
-
End (Nodes 14 and 15)
This function activity marks the end of the process. Although the activity itself does not have a result type, each node of this activity in the process must have a process result assigned to it. The process result is assigned in the property page of the activity node. Since the AP Approval process activity has a result type of AP Approval Process Result, each End activity node must have a process result matching one of the lookup codes in the Approval lookup type.
Function: WF_STANDARD.NOOP
Result Type: None
Prerequisite Activities: Start; AP Audit Expense Report
Shortpay Unverified Receipt Items Process
The Shortpay Unverified Receipt Items process creates a new expense report for each line that is missing required receipts or contains an inadequate justification. This process has a result type of None which means that when the process completes there is no specific result. The Shortpay Unverified Receipt Items process cannot be initiated as a top level process, it can only be run as a subprocess when called by another, higher level process. To view the properties of the Shortpay Unverified Receipt Items process, select the process in the navigator tree, then choose Properties from the Edit menu.
This process has 11 different activities, one of which is reused, so 10 activity nodes appear in the workflow diagram. To examine the activities of the process in more detail, we have numbered each node for easy referencing below. The numbers themselves are not part of the process diagram.
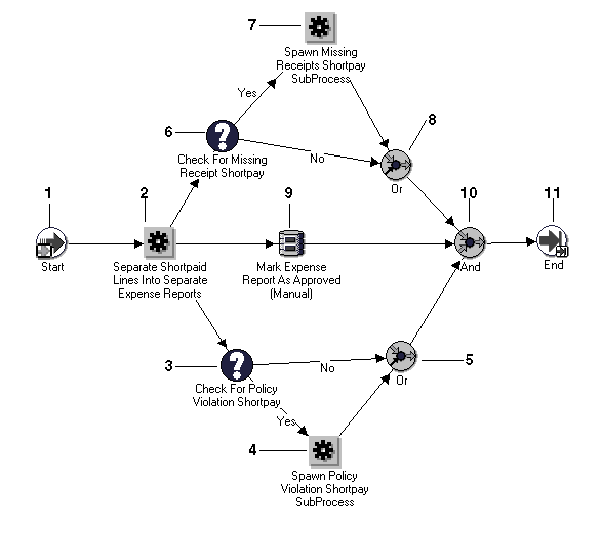
The process begins at Node 1 with the Start activity. At Node 2 the process creates a new expense report from any lines that have missing required receipts and/or creates a new expense report from the lines that have inadequate justifications. At Node 3 the process determines whether an expense report was created due to inadequate justifications and, if so, transitions to the Spawn Policy Violation Shortpay Subprocess activity (Node 4).
At Node 6 the process determines whether an expense report was created due to missing receipts and, if so, transitions to the Spawn Missing Receipts Shortpay Subprocess (Node 4). At Node 10 the process approves the original expense report.
Shortpay Unverified Receipt Items Process Activities
This section provides a description of each activity in the process, listed by the activity's display name. Each node corresponds to an icon shown in the illustration above.
-
Start (Node 1)
This standard function activity marks the start of the process.
Function: WF_STANDARD.NOOP
Result Type: None
Required: Yes
Prerequisite Activities: None
-
Separate Shortpaid Lines into Separate Expense Reports (Node 2)
When your accounts payable department short pays an expense report, this indicates that the expense report has one or more lines that is missing required receipts, has an inadequate or missing justification, or both. This function activity creates a new expense report for each line matching this criteria and removes the lines from the original report.
The activity assigns a report number to the new expense report by appending –1 to the original expense report number. If two lines have a problem, the system creates two new reports and appends the second report with –2.
For example, expense report 100 is shortpaid. The system creates two new reports numbered 100–1 and 100–2. If, for example, 100–1 is also shortpaid and the system creates two new reports, it numbers them 100–1–1 and 100–1–2.
Note: To avoid conflict with this naming convention, auditors should not manually append a dash or a period and a number, for example -1 or .1, to expense report numbers.
Function: AP_WEB_EXPENSE_WF.SplitExpenseReport
Result Type: None
Required: Yes
Prerequisite Activities: Start
-
Check for Policy Violation Shortpay (Node 3)
This function activity determines whether an expense report violates any company expense report policies, such as missing or invalid information.
Function: AP_WEB_EXPENSE_WF.PolicyViolationShortpay
Result Type: Yes/No
Required: Yes
Prerequisite Activities: Start, Separate Shortpaid Lines into Separate Expense Reports
-
Spawn Policy Violation Shortpay SubProcess (Node 4)
This function activity spawns the Policy Violation Shortpay subprocess. This subprocess informs the employee that the accounts payable department short paid one or more lines of an expense report due to inadequate justifications and that these lines have been transferred to a new expense report. The preparer can either delete the new expense report or provide additional information to justify the disputed expenses.
See also: Policy Violation Shortpay Process.
Function: AP_WEB_EXPENSE_WF.StartPolicyViolationShortpayProcess
Result Type: None
Required: Yes
Prerequisite Activities: Start, Separate Shortpaid Lines into Separate Expense Reports, Check for Policy Violation Shortpay
-
Or (Node 5 and 8)
This standard function activity completes when at least one of the converging branches also completes.
Function: WF_STANDARD.ORJOIN
Result Type: None
Required: Yes
Prerequisite Activities: Start, Separate Shortpaid Lines into Separate Expense Reports, Check for Policy Violation Shortpay
-
Check for Missing Receipts Shortpay (Node 6)
This function activity determines whether an expense report consists of lines that are missing required receipts.
Function: AP_WEB_EXPENSE_WF.MissingReceiptShortpay
Result Type: Yes/No
Required: Yes
Prerequisite Activities: Start, Separate Shortpaid Lines into Separate Expense Reports
-
Spawn Missing Receipts Shortpay SubProcess (Node 7)
This function activity spawns the Missing Receipts Shortpay subprocess. This subprocess informs the employee that the accounts payable department short paid one or more lines of an expense report due to missing receipts and that these lines were transferred to a new expense report.
See also: Missing Receipts Shortpay Process.
Function: AP_WEB_EXPENSE_WF.StartNoReceiptsShortpayProcess
Result Type: None
Required: Yes
Prerequisite Activities: Start, Separate Shortpaid Lines into Separate Expense Reports, Check for Missing Receipt Shortpay
-
Mark Expense Report As Approved (Manual) (Node 9)
This function activity updates the original expense report to indicate that the expense report is approved. To do this, the activity sets the value of the SOURCE column of the AP_EXPENSE_REPORT_HEADERS table to 'SelfService.'
Function: AP_WEB_EXPENSE_WF.Approved
Result Type: None
Required: Yes
Prerequisite Activities: Start, Separate Shortpaid Lines into Separate Expense Reports
-
And (Node 10)
This standard function activity merges the three parallel branches in the Shortpay Unverified Receipt Items process when all activities are complete.
Function: WF_STANDARD.ANDJOIN
Result Type: None
Required: Yes
Prerequisite Activities: Start, Separate Shortpaid Lines into Separate Expense Reports, Mark Expense Report As Approved (Manual)
-
End (Node 11)
This function activity marks the end of the process. Although the activity itself does not have a result type, each node of this activity in the process must have a process result assigned to it. The process result is assigned in the property page of the activity node. Since the Shortpay Unverified Receipt Items process activity has a result type of Approval, each End activity node must have a process result matching one of the lookup codes in the Approval lookup type.
Function: WF_STANDARD.NOOP
Result Type: None
Prerequisite Activities: Start
Bothpay Process
Workflow transitions to the Bothpay process if the Check If Both Pay function activity returns a value of Yes. The Check If Both Pay activity checks the setting of the Payment Due From field in the Card Program window to determine whether the employee, the company, or both the employee and the company are responsible for remitting payment for corporate credit card transactions. The Check If Both Pay function activity checks the Payment Due From field setting after the AP Approval Process or the Shortpay Unverified Receipt Items process is complete.
The Bothpay process cannot be initiated as a top level process, it can only be run as a subprocess when called by another, higher level process. To view the properties of the this process, select the process in the navigator tree, then choose Properties from the Edit menu.
This process has 7 different activities which appear as nodes in the workflow diagram below. To examine the activities of the process in more detail, we have numbered each node for easy referencing. The numbers themselves are not part of the process diagram.
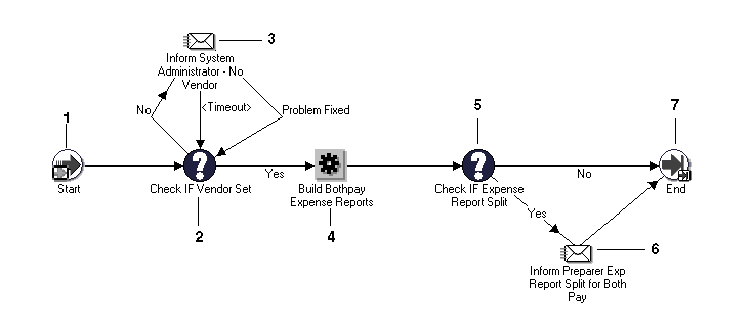
The process begins at Node 1 with the Start activity. At Node 2 the process checks whether the expense report contains credit card vendor information. If not, a notification is sent to the system administrator (Node 3) to resolve the issue. At Node 4 the Build Bothpay Expense Reports subprocess checks whether the report includes both cash and credit card transactions. If it does, the subprocess creates a new expense report for the credit card issuer (this new expense report generates a new invoice when it is exported to Payables). Otherwise, the expense report is not split and generates only one invoice (for either the employee or the credit card issuer) when exported to Payables.
At Node 5 the process checks whether the expense report was split. If the report was split, the process notifies the person who created the report (Node 6) and the process ends at Node 7.
Bothpay Process Activities
This section provides a description of each activity in the process, listed by the activity's display name. Each node corresponds to an icon shown in illustration above.
-
Start (Node 1)
This is a standard function activity that simply marks the start of the process.
Function: WF_STANDARD.NOOP
Result Type: None
Required: Yes
Prerequisite Activities: None
-
Check If Vendor Set (Node 2)
This function activity determines whether the expense report contains required credit card vendor information.
Function: AP_WEB_EXPENSE_WF.FindVendor
Result Type: Yes/No
Required: Yes
Prerequisite Activities: Start
-
Inform System Administrator – No Vendor (Node 3)
If the Check If Vendor Set activity returns a value of No, this notification activity contacts the system administrator and workflow checks the database tables for the vendor information. Once the vendor information is found, the system administrator responds by clicking “Problem Fixed” in the notification and the process continues.
Result Type: Problem Fixed
Required: No
Prerequisite Activities: Start, Check If Vendor Set
-
Build Bothpay Expense Reports (Node 4)
This function activity creates a new expense report if the original report includes both cash (out of pocket) and credit card transactions for which the employee must be reimbursed. If it does, the subprocess creates a new expense report for the credit card issuer (this creates a separate payment for the credit card issuer once the report is exported to Oracle Payables). Otherwise, the expense report is not split and generates only one invoice when exported to Payables (for either the employee or the credit card issuer).
Function: AP_WEB_EXPENSE_WF.BuildBothpayExpReport
Result Type: None
Required: Yes
Prerequisite Activities: Start, Check If Vendor Set
-
Check If Expense Report Split (Node 5)
This function activity returns Yes or No to indicate whether the expense report was split. An expense report is split when the expense report has corporate credit card expenses and cash and other expenses. If this activity returns Yes, the process sends a notification to the preparer (see below).
Function: AP_WEB_EXPENSE_WF.CheckIfSplit
Result Type: Yes/No
Required: Yes
Prerequisite Activities: Start, Check If Vendor Set, Build Bothpay Expense Reports
-
Inform Preparer Exp Report Split for Both Pay (Node 6)
If the Check If Expense Report Split function returns a value of Yes, this activity notifies the preparer. The notification includes both the original and the new expense report numbers and the transactions included in each report.
Note: When an expense report is split because it contains both cash (out of pocket) and corporate credit card transactions, workflow appends “.1” to the new expense report (for example, EXP11223.1). If the report was both short paid and split, the report number is appended with “–1.1” (for example, EXP11223-1.1).
Result Type: None
Required: No
Prerequisite Activities: Start, Check If Vendor Set, Build Bothpay Expense Reports, Check If Expense Report Split
-
End (Node 11)
This function activity marks the end of the process. Although the activity itself does not have a result type, each node of this activity in the process must have a process result assigned to it. The process result is assigned in the property page of the activity node.
Function: WF_STANDARD.NOOP
Result Type: None
Prerequisite Activities: Start
Missing Receipts Shortpay Process
The Missing Receipts Shortpay Process informs the person who prepared the report that the accounts payable department short paid one or more lines of the report due to missing receipts and that these lines have been transferred to a new expense report. The preparer can delete the new expense report, submit the missing receipts to the accounts payable department, or route the new expense report to management for approval despite the missing receipts.
This process has a result type of Approval, which indicates that when the process completes, it has a result of Approve or Reject. This subprocess cannot be initiated as a top level process, it can only be run as a subprocess when called by another, higher level process.
To view the properties of the Missing Receipts Shortpay process, select the process in the navigator tree, then choose Properties from the Edit menu.
The Missing Receipts Shortpay process has 9 different activities, one of which is reused, so 10 activity nodes are described below.
The process begins at Node 1 with the Start activity. At Node 3 the process informs the preparer that the accounts payable department short paid one or more lines of the expense report due to missing receipts and that these lines have been transferred to a new expense report. The preparer can delete the new expense report, submit the missing receipts to the accounts payable department, or route the new expense report to a manager for approval without the receipts. If the preparer chooses to delete the new expense report, the process does so at Node 5.
If the preparer had sent the missing receipts without replying to the missing receipts notifications, then the short pay of the expense report closes the notifications workflow for missing receipts.
If the preparer chooses to provide the missing receipts, the process updates the new expense report and begins the AP Standard Expense Report process at the AP Approval process (Node 7). The workflow then calls the AP Standard Expense Report process (Node 8). If the preparer forwards the new expense report to a manager for approval, the process updates the expense report and begins the Expense Report process at the Manager (Spending) Approval process (Node 6). The workflow then calls the AP Standard Expense Report process (Node 8).
If you have Oracle Approvals Management installed, you can use Approvals Management to route the expense report for management approval instead of the Manager Approval process.
Missing Receipts Shortpay Process Activities
This section provides a description of each activity in the process, listed by the activity's display name. Each node corresponds to an icon in the above illustration.
-
Start (Node 1)
This standard function activity marks the start of the process.
Function: WF_STANDARD.NOOP
Result Type: None
Required: Yes
Prerequisite Activities: None
-
Build Shortpay Notification Text (Node 2)
This function activity sets some of the item attributes necessary for the Inform Preparer of Shortpay Due to Missing Receipts message.
Function: AP_WEB_EXPENSE_WF.SetShortPaidLinesInfo
Result Type: None
Required: Yes
Prerequisite Activities: Start
-
Inform Preparer of Shortpay Due to Missing Receipts (Node 3)
This notification activity informs a preparer that the accounts payable department short paid the expense report due to missing receipts and includes the number of the new expense report. The preparer can then perform any of these activities without providing the missing receipts:
-
Delete the new expense report
-
Send the missing receipts to your accounts payable department
-
Forward the new expense report to a manager for approval
Note: If employees do not reply to Inform Preparer of Shortpay Due to Missing Receipts messages, the short paid expense reports cannot be approved and the employee cannot be reimbursed.
Message: Inform Preparer Missing Receipts Shortpay
Result Type: AP Response to Missing Receipts Shortpay
Required: Yes
Prerequisite Activities: Start, Build Shortpay Notification Text
-
-
Noop (Node 4)
This standard function activity acts as a placeholder and performs no action.
Function: WF_STANDARD.NOOP
Result Type: None
Required: Yes
Prerequisite Activities: Start, Build Shortpay Notification Text, Inform Preparer of ShortPay Due to Missing Receipts
-
Delete Expense Report From Interface Tables (Node 5)
This function activity deletes the short paid expense report.
Function: AP_WEB_EXPENSE_WF.DeleteExpenseReport
Result Type: None
Required: Yes
Prerequisite Activities: Start, Build Shortpay Notification Text, Inform Preparer of ShortPay Due to Missing Receipts
-
Set Exp Report Process to Start at Mgr Approval Process (Node 6)
This function activity updates the Start from Specified Process item attribute and indicates that the expense report must transition to the Manager (Spending) Approval process.
See also: Manager (Spending) Approval Process.
Function: AP_WEB_EXPENSE_WF.StartFromManagerApproval
Result Type: None
Required: Yes
Prerequisite Activities: Start, Build Shortpay Notification Text, Inform Preparer of ShortPay Due to Missing Receipts
-
Set Exp Report Process to Start at AP Approval Process (Node 7)
This function activity updates the Start From Specified Process item attribute to indicate that the expense report transitions to the AP Approval process.
See also: AP Approval Process.
Function: AP_WEB_EXPENSE_WF.StartFromAPApproval
Result Type: None
Required: Yes
Prerequisite Activities: Start, Build Shortpay Notification Text, Inform Preparer of ShortPay Due to Missing Receipts Expense Report ID Start from Specified Process
-
AP Standard Expense Report Process (Node 8)
This process activity manages the standard accounts payable expense report approval process.
See also: Expenses Workflow Processes.
Result Type: Approval
Required: Yes
Prerequisite Activities: Start, Build Shortpay Notification Text, Inform Preparer of ShortPay Due to Missing Receipts
Item AttributesRetrieved by Function: Expense Report ID
Item Attributes Set by Function: Start from Specified Process
-
End (Nodes 9 and 10)
This function activity marks the end of the process. Although the activity itself does not have a result type, each node of this activity in the process must have a process result assigned to it. The process result is assigned in the property page of the activity node. Since the Missing Receipts Shortpay process activity has a result type of Approval, each End activity node must have a process result matching one of the lookup codes in the Approval lookup type.
Function: WF_STANDARD.NOOP
Result Type: None
Prerequisite Activities: Start
Policy Violation Shortpay Process
The Policy Violation Shortpay Process informs the person who created the expense report that the accounts payable department short paid one or more lines due to inadequate justifications and that these lines have been transferred to a new expense report. The preparer can either delete the new expense report or provide additional information to justify the disputed expenses.
This process has a result type of Approval which indicates that when the process completes, it has a result of Approve or Reject. This subprocess cannot be initiated as a top level process; it can only be run as a subprocess when called by another, higher level process. To view the properties of the Policy Violation Shortpay process, select the process in the navigator tree, then choose Properties from the Edit menu.
The Policy Violation Shortpay process has 9 different activities, one of which is reused, so 10 activity nodes are described below.
The process begins at Node 1 with the Start activity. At Node 3 the process informs the employee that the accounts payable department short paid one or more lines of the expense report due to inadequate justifications and that these lines have been transferred to a new report.
The preparer responds to the notification by deleting the new expense report (Node 8) or providing accounts payable with missing information.
If the preparer provides additional information, the process forwards the information to your accounts payable department for review (Node 5). The process then updates the new expense report (Node 6) and transitions to the AP Standard Expense Report process (Node 7).
Policy Violation Shortpay Process Activities
This section provides a description of each activity in the process, listed by the activity's display name. Each node corresponds to an icon in the above illustration.
-
Start (Node 1)
This standard function activity marks the start of the process.
Function: WF_STANDARD.NOOP
Result Type: None
Required: Yes
Prerequisite Activities: None
-
Build Shortpay Notification Text (Node 2)
This function activity sets some of the item attributes necessary for the Inform Preparer Policy Violation Shortpay Req More Info message.
Function: AP_WEB_EXPENSE_WF.SetShortPaidLinesInfo
Result Type: None
Required: Yes
Prerequisite Activities: Start
-
Inform Preparer Policy Violation Shortpay Req More Info (Node 3)
This notification activity informs a preparer that the accounts payable department short paid an expense report due to one or more policy violations and provides the number of the new expense report. Policy violations include missing required receipts, incorrect cost center, or inadequate justifications.
The preparer can respond to the notification by:
-
Deleting the new expense report
-
Providing additional information to justify the expenses
Note: If employees do not reply to Inform Preparer Policy Violation Shortpay Req More Info messages, the short paid expense report cannot be approved and the employee cannot be reimbursed.
Message: Inform Preparer Policy Violation Shortpay Req More Info
Result Type: AP Response To Policy Violation Shortpay
Required: Yes
Prerequisite Activities: Start, Build Shortpay Notification Text
-
-
Noop (Node 4)
This standard function activity acts as a placeholder and performs no action.
Function: WF_STANDARD.NOOP
Result Type: None
Required: Yes
Prerequisite Activities: Start, Build shortpay Notification Text, Inform Preparer Policy Violation Shortpay Req More Info
-
Provide AP with Missing Info to Rectify Policy Shortpay (Node 5)
This notification activity forwards the additional information provided by the preparer to the accounts payable department for review.
Message: Provide AP More Info to Rectify Policy Shortpay
Result Type: None
Required: Yes
Prerequisite Activities: Start, Build shortpay Notification Text, Inform Preparer Policy Violation Shortpay Req More Info
-
Set Exp Report Process to Start at AP Approval Process (Node 6)
This function activity updates the Start from Specified Process item attribute to indicate that the expense report should start at the AP Approval process.
Function: AP_WEB_EXPENSE_WF.StartFromAPApproval
Result Type: None
Required: Yes
Prerequisite Activities: Start, Build shortpay Notification Text, Inform Preparer Policy Violation Shortpay Req More Info, Provide AP With Missing Info to Rectify Policy Shortpay
Item Attributes Retrieved by Function: Expense Report ID
Item Attributes Set by Function: Start from Specified Process
-
AP Standard Expense Report Process (Node 7)
This process activity manages the standard accounts payable expense report approval process.
See also: Expenses Workflow Processes.
Result Type: Approval
Required: Yes
Prerequisite Activities: Start, Build Shortpay Notification Text, Inform Preparer Policy Violation Shortpay Req More Info, Provide AP With Missing Info to Rectify Policy Shortpay, Set Expense Report to Start at AP Approval Process
-
Delete Expense Report from Interface Tables (Node 8)
This function activity deletes the short paid expense report.
Function: AP_WEB_EXPENSE_WF.DeleteExpenseReport
Result Type: None
Required: Yes
Prerequisite Activities: Start, Build shortpay Notification Text, Inform Preparer
-
End (Nodes 9 and 10)
This function activity marks the end of the process. Although the activity itself does not have a result type, each node of this activity in the process must have a process result assigned to it. The process result is assigned in the property page of the activity node. Since the Policy Violation Shortpay process activity has a result type of Approval, each End activity node must have a process result matching one of the lookup codes in the Approval lookup type.
Function: WF_STANDARD.NOOP
Result Type: None
Prerequisite Activities: Start
Rejection Process
The Rejection process informs the preparer or the accounts payable department that the expense report has been rejected by management. After modifying the report the preparer can resubmit the expense report for approval. However, if the expense report is not resubmitted within the time period specified, the report is deleted.
The Rejection process has a result type of AP Reject Process Result, which indicates that when the process completes, it has a result of Resubmit Report or Abort. This subprocess cannot be initiated as a top level process, it can only be run as a subprocess when called by another, higher level process. To view the properties of the Rejection process, select the process in the navigator tree, then choose Properties from the Edit menu.
The Rejection process has 7 different activities, one of which is reused, so 8 activity nodes appear in the workflow diagram. To examine the activities of the process in more detail, each node is numbered for easy referencing. The numbers themselves are not part of the process diagram.
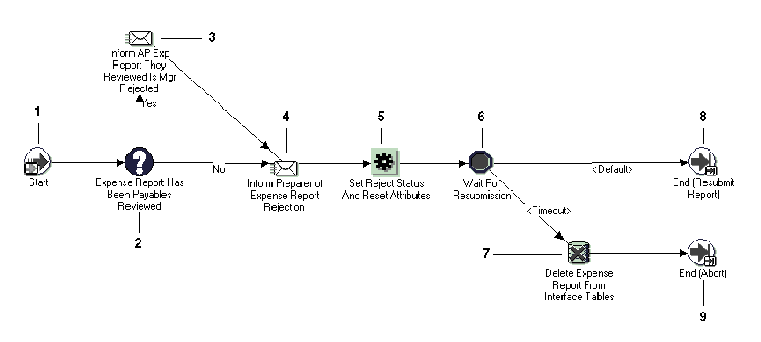
The process begins at Node 1 with the Start activity. If the report was previously reviewed by the Payables department but rejected by management, a notification is sent to the Payables department (Node 3). The process then informs the preparer that the report has been rejected by management (Node 4). The process then pauses for a specified period of time until the expense report is resubmitted (Node 6). If the expense report is not resubmitted within the specified time period, it is deleted (Node 7).
Note: Rejected expense reports can be corrected and resubmitted.
Rejection Process Activities
This section provides a description of each activity in the process, listed by the activity's display name. Each node corresponds to an icon in the above illustration.
-
Start (Node 1)
This standard function activity marks the start of the process.
Function: WF_STANDARD.NOOP
Result Type: None
Required: Yes
Prerequisite Activities: None
-
Expense Report Has Been Payables Reviewed (Node 2)
To indicate that it has reviewed an expense report, your accounts payable department checks the Reviewed by Payables check box in the Payables Expense Report window. This function activity determines whether this check box has been checked for an expense report.
Function: AP_WEB_EXPENSE_WF.PayablesReviewed
Result Type: Yes/No
Required: Yes
Prerequisite Activities: Start
-
Inform AP Exp Report They Reviewed Is Mgr Rejected (Node 3)
This notification activity informs the accounts payable department that an expense report that the department previously reviewed has been rejected by management. It also suggests that any receipts Account Payables received be returned to the preparer.
Message: Exp Report Has Been Mgr Rejected but AP Reviewed
Result Type: None
Required: Yes
Prerequisite Activities: Start, Expense Report Has Been Payables Reviewed
-
Inform Preparer of Expense Report Rejection (Node 4)
This notification activity informs the preparer that an expense report has been rejected by management. It also provides instructions on how the preparer can modify and resubmit the rejected expense report for approval.
Note: The expense report is saved in the system for a period of time specified by the Wait for Resubmission activity. Refer to the description of that activity below for more information.
Message: Expense Report Rejection
Result Type: None
Required: Yes
Prerequisite Activities: Start, Expense Report Has Been Payables Reviewed
-
Set Reject Status And Reset Attributes (Node 5)
This function activity updates the expense report to indicate that it has been rejected. To do this, the activity sets the value of the SOURCE column of the table AP_EXPENSE_REPORT_HEADERS to NonValidatedWebExpense. This activity also updates the Start from Specified Process item attribute and initiates the Server Side Validation process.
Function: AP_WEB_EXPENSE_WF.SetRejectStatusAndResetAttr
Result Type: None
Required: Yes
Prerequisite Activities: Start, Expense Report Has Been Payables Reviewed, Inform Preparer of Expense Report Rejection
-
Wait for Resubmission (Node 6)
This is a standard function activity that pauses the Rejection process until the employee fixes and resubmits the rejected expense report for approval. If a rejected expense report is not resubmitted before this activity “times out,” the process transitions to the Delete Expense Report From Interface Tables activity.
You can specify any combination of days, hours, and minutes before this activity times out and the expense report is deleted from the system. For example, you can specify that employees have thirty days to resubmit a rejected expense report before it is deleted.
To specify a timeout for this function:
-
View the properties for the activity.
-
Select the Node tab.
-
Choose a Timeout period of Relative Time, then specify a number of days, hours, and minutes.
-
Save your work.
-
-
Delete Expense Report From Interface Tables (Node 7)
This function activity deletes the rejected expense report when the Wait for Resubmission activity times out.
Function: AP_WEB_EXPENSE_WF.DeleteExpenseReport
Result Type: None
Required: Yes
Prerequisite Activities: Start, Expense Report Has Been Payables Reviewed, Inform Preparer of Expense Report Rejection, Set Reject Status and Reset Attributes, Wait for Resubmission
-
End (Node 8 and 9)
This function activity marks the end of the process. Although the activity itself does not have a result type, each node of this activity in the process must have a process result assigned to it. The process result is assigned in the property page of the activity node. Since the Rejection process activity has a result type of AP Reject Process Result, each End activity node must have a process result matching one of the lookup codes in the AP Reject Process Result lookup type.
Function: WF_STANDARD.NOOP
Result Type: None
Prerequisite Activities: Start
Credit Cards Workflow
The Credit Cards workflow consists of independent workflow processes and notifications that perform various activities. The following table provides a summary of each process.
Credit Card Workflow Processes
| Process | Purpose | Trigger Event | Conditions |
|---|---|---|---|
| Aging Credit Card Transactions | Notifies employees and managers of outstanding transactions by aging bucket. Also escalates manager notification. | Credit Card Outstanding Transactions Management (Aging) concurrent program is run. | Send Notifications parameter is set to any of the Notify... values. |
| Deactivated Transactions | Notifies employees when unused transactions are deactivated and categorized as Historical. | The Credit Card Historical Transactions Management program is run. | Unused transactions for the employee are deactivated. |
| Inform Manager of Inactive Employee Transactions | Notifies managers of unsubmitted transactions for inactive employees. Also automatically assigns and unassigns the securing attribute to facilitate transaction submission. | Credit Card Transactions Inactive Employees Process concurrent program is run. | Credit card transactions exist for inactive employees. |
| Payment to Card Issuer | Notifies employees when payments are made to the credit card issuer. | Payment is made to credit card issuer in Oracle Payables. | OIE: CC Payment Notify profile option is set to Yes. This process only applies to the Both Pay payment scenario. |
| Payment to Employee | Notifies employees when payments are made to them. | A direct deposit payment is made to an employee in Oracle Payables. | OIE: CC Payment Notify profile option is set to Yes. This process only applies to the Individual Pay payment scenario. |
| Payment to Employee by Check | Notifies employees when payments are made to them. | A check payment is made to an employee in Oracle Payables. | OIE: CC Payment Notify profile option is set to Yes. This process only applies to the Individual Pay payment scenario. |
| Process Invalid Credit Card Transactions | Notifies the system administrator when invalid transactions are detected during the import and validation process. | Any combined load and validate concurrent program is run. | Invalid transaction identified. |
| Process Unassigned Credit Cards | Notifies system administrator when new credit cards are created. Also attempts to match new accounts to employees, and can be defined to automatically activate new accounts if a unique match is found. | Either the MasterCard or American Express combined load and validate concurrent program is run. | Credit card records do not exist in the Credit Cards window. |
| Unapproved Expense Report | Notify managers of unapproved expense reports that contain credit card transactions. | Credit Card Outstanding Transactions Management (Details) concurrent program is run. | Send Notifications parameter is set to Yes. |
| Unused Credit Card Transactions | Notify Managers and employees of unsubmitted credit card transactions. | Credit Card Outstanding Transactions Management (Details) concurrent program. | Send Notifications parameter set to Yes. |
Note: The workflow processes and related concurrent programs cannot process credit card transactions for terminated employees once the system date is past the final process date of the employee. See: Terminating Employees. For Human Resources shared installs, this check is not applicable.
See: Specifying Values for Internet Expenses Profile Options.
To view the properties of the Credit Cards process, select the process in the navigator tree, then choose Properties from the Edit menu.
The Credit Cards item type has several associated attributes. Some of these attributes reference expense report and employee information in the database tables AP_EXPENSE_REPORT_HEADERS and HR_EMPLOYEES. These attributes are used and maintained by the notification activities throughout the process.
Accessing the Credit Cards Workflow Processes
You can view the Credit Cards workflow process in a Process window using Oracle Workflow Builder.
To display the process in Oracle Workflow Builder:
-
Choose Open from the File menu, and connect to the database.
Alternatively, you can connect to the workflow definitions file apwxwkfl.wft, located in the product directory tree of your Oracle Applications server.
-
Expand the data source, then the Item Type branch within that data source.
-
Expand the Processes branch within your item type then double–click on a process activity to display the diagram of the process in a Process window.
Setting Up Workflow Builder for the Credit Card Processes
Before you can use the Credit Card process to initiate a workflow, you must set up workflow activity attributes, timeouts, and performers using Workflow Builder. This table lists the setup steps and indicates whether each is required or optional:
| Step Number | Step Description | Required or Optional |
|---|---|---|
| 1 | Set workflow activity attributes. See: Setting Workflow Activity Attributes for the Credit Card Processes. | Required |
| 2 | Set workflow timeouts. See: Setting Workflow Timeouts for the Credit Card Processes. | Required |
| 3 | Set Workflow Attributes. See: Setting Workflow Attributes for the Credit Card Processes. | Required |
| 4 | Set expense reports performers. See: Setting Expense Report Performers for the Credit Card Processes. | Required |
| 5 | Defer workflow process at submit time. See: Deferring the Workflow Process for the Credit Card Processes. | Optional |
Setting Workflow Activity Attributes for the Credit Card Processes
Loop Counter. The Inform Manager of Inactive Employee CC Expenses process has two loop counters associated with the Inform Preparer Inactive Employee notification and the Remind Preparer Inactive Employee Expenses notification. The value that you define for this loop counter limits the number of times the notifications are sent. The default limit is 2.
Activate Assigned Cards. The Process Unassigned Credit Cards process can automatically activate new credit card accounts when Internet Expenses finds a unique employee match for the owner of the card. If you set this option to Yes, the new cards will be automatically activated. The default setting is No.
See: Setting Up Workflow Builder for the Expenses Process for more information.
Setting Workflow Timeouts for the Credit Card Processes
Set the workflow timeouts for the credit card process the same way that you would for the expenses process. See: Setting Up Workflow Builder for the Expenses Process for more information.
Inform Preparer Inactive Employee Expenses. The Inform Preparer Inactive Employee Expenses notification is triggered as part of the Inform Manager of Inactive Employee CC Expenses process. You can set the number of days for this notification. The default number of days is 2.
Inform Sys Admin of Adding Securing Attribute Failure. The Inform Sys Admin of Adding Securing Attribute Failure notification is triggered as part of the Inform Manager of Inactive Employee CC Expenses process. You can set the number of days for this notification. The default number of days is 2.
Wait Activity. The Wait activity is associated with the Inform Manager of Inactive Employee CC Expenses process. The value for this activity determines how long the system will wait before sending the notification. The default value is 2 days.
To modify the wait period:
-
Click the Node Attribute tab.
-
Select Relative Time for the Name field.
-
Remove all other values.
-
Click the Node tab.
-
Choose a Timeout period of Relative Time, and specify a number of days, hours, and minutes.
-
Save your work.
Setting Workflow Attributes for the Credit Card Processes
AP Exception Role Attribute. The Inform Manager of Inactive Employee CC Expenses process uses this attribute to determine who to send the Inform Preparer Inactive Employee Expenses notification to. The Inform Preparer Inactive Employee Expenses notification is sent when Internet Expenses cannot find an active manager for the employee. Perform steps 1-2 in Setting Expense Report Performers for the Expenses Process.
Setting Expense Report Performers for the Credit Card Processes
Set the expense report performers for the credit card process the same way you would for the expenses process. See: Setting Expense Report Performers for the Expenses Process for more information.
Inform Sys Admin of Adding Securing Attribute Failure notification. The Inform Sys Admin of Adding Securing Attribute Failure notification is triggered by the Inform Manager of Inactive Employee CC Expenses process. You can define a performer to receive this notification. It is recommended that you set this performer to the Expense Report Workflow Administrator. If you do not define a performer, the notification goes to the workflow administrator as defined in the System:Error workflow item type.
Deferring the Workflow Process for the Credit Card Processes
Defer the workflow process for the credit card process the same way that you would for the expenses process. See: Deferring the Workflow Process for the Expenses Process for more information.
Credit Cards Workflow Item Type Attributes
This table lists the item type attributes of the Credit Cards workflow. For more information, refer to Credit Cards Process Activities.
| Display Name | Description | Type | Length/Format/Lookup Type |
|---|---|---|---|
| Amount | The payment (reimbursement) amount. | Text | 30 |
| Bank Account | The name of the bank account to which the employee's reimbursement is sent via direct deposit. | Text | 80 |
| Bank Name | The name of the bank to which the employee's reimbursement is sent via direct deposit. | Text | 80 |
| Card Program ID | The Card Program ID number of the employee's corporate credit card. | Number | Not applicable |
| Check Number | The number of the check sent to the employee as reimbursement for business expenses. | Text | 30 |
| Credit Card Company | The name of the company issuing the corporate credit card. | Text | 80 |
| Currency | The reimbursement currency. | Text | 25 |
| Date 1 | The beginning date that corporate credit card transactions were incurred. | Text | 30 |
| Date 2 | The ending date that corporate credit card transactions were incurred. | Text | 30 |
| Date Object 1 | From dispute date | Date | Not applicable |
| Date Object 2 | To dispute date | Date | Not applicable |
| Employee Display Name | How the employee's name appears in notifications | Text | 80 |
| Employee ID | The employee's unique identification number | Number | Not applicable |
| Employee Name | The employee's name | Text | 80 |
| Expense Report Number | The expense report for which the employee received reimbursement | Text | 30 |
| List | List of disputed credit card transactions | Document | Not applicable |
| Manager Name | The manager's name | Text | 80 |
| Minimum Amount | The minimum amount of disputed transactions required to initiate the Notification of Outstanding Disputed Charges process | Number | Not applicable |
| Number of Days | The number of days that corporate card transactions have been outstanding | Number | Not applicable |
| Payment Date | The date payment was created for an approved expense report | Text | 30 |
Related Topics
Defining Workflow Process Components, Oracle Workflow Developer's Guide
Credit Cards Process Activities
This section provides a description of the activities in each process, listed by the activity's display name.
To avoid duplication, the Start and End activities are described only once in the Standard Function Activities section.
Standard Function Activities
-
Start
This standard function activity simply marks the start of the process.
Function: WF_STANDARD.NOOP
Result Type: None
Required: Yes
Prerequisite Activities: None
-
End
This standard function activity simply marks the end of the process. Although the activity itself does not have a result type, each node of this activity in the process must have a process result assigned to it. The process result is assigned in the property page of the activity node.
Function: WF_STANDARD.NOOP
Result Type: None
Prerequisite Activities: Start
Aging Credit Card Transactions Process
This process is initiated when an Oracle Payables user runs the Credit Card Outstanding Transactions Management (Aging) concurrent program with the Send Notifications parameter set to Yes.
This section provides a description of each activity in the process, listed by the activity's display name.
-
Start (Node 1)
-
Inform Manager of Employee's Credit Card Transactions with Aging (Node 2)
This notification activity informs managers when employees that report to them have outstanding corporate card transactions with aging that are not yet submitted in an expense report. This notification includes the employee's name as well as the amount and currency of the unsubmitted transactions.
Message: Notification of Unsubmitted Transactions to Manager
Result Type: None
Required: Yes
Prerequisite Activities: Start
-
Inform Employee of Credit Card Transactions with Aging (Node 3)
This notification activity informs employees of corporate credit card transactions with aging that have not been submitted in an expense report. This notification includes the dates the transactions took place, the amount and currency of the transactions, and the name of the card issuer.
Message: Notification of Unsubmitted Transactions
Result Type: None
Required: Yes
Prerequisite Activities: Start
-
And (Node 4)
This standard function activity merges the two branches in the Aging Credit Card Transactions process when all activities are complete.
Function: WF_STANDARD.ANDJOIN
Result Type: None
Required: Yes
Prerequisite Activities: Start, Notification of Unsubmitted Transactions with Aging, Notification of Unsubmitted Transactions with Aging to Manager
-
End (Node 5)
Unsubmitted Credit Card Transactions Process
This process is initiated when an Oracle Payables user creates the Credit Card Outstanding Transactions Management (Details) report with the Send Notifications parameter set to Yes.
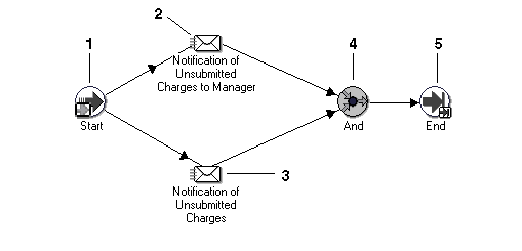
This section provides a description of each activity in the process, listed by the activity's display name. Each node corresponds to an icon shown in the above illustration.
-
Start (Node 1)
-
Notification of Unsubmitted Transactions to Manager (Node 2)
This notification activity informs managers when employees that report to them have outstanding corporate card transactions not yet submitted in an expense report. This notification includes the employee's name as well as the amount and currency of the unsubmitted transactions.
Message: Notification of Unsubmitted Transactions to Manager
Result Type: None
Required: Yes
Prerequisite Activities: Start
-
Notification of Unsubmitted Transactions (Node 3)
This notification activity informs employees of corporate credit card transactions that have not been included in an expense report. This notification includes the dates the transactions took place, the amount and currency of the transactions, and the name of the card issuer.
Message: Notification of Unsubmitted Transactions
Result Type: None
Required: Yes
Prerequisite Activities: Start
-
And (Node 4)
This standard function activity merges the two branches in the Unsubmitted Credit Card Transactions process when all activities are complete.
Function: WF_STANDARD.ANDJOIN
Result Type: None
Required: Yes
Prerequisite Activities: Start, Notification of Unsubmitted Transactions, Notification of Unsubmitted Transactions to Manager
-
End (Node 5)
Unapproved Expense Report Process
This process is initiated when an Oracle Payables user creates the Credit Card Outstanding Transactions Management (Details) report with the Send Notifications parameter set to Yes.
-
Start
-
Notification of Unapproved Report
This notification activity informs managers of submitted expense reports that require review. This notification includes the employee's name, the report amount, and the expense report number for each report awaiting approval.
Message: Notification of Unapproved Report
Result Type: None
Required: Yes
Prerequisite Activities: Start
-
End
See: Standard Function Activities.
Payment to Card Issuer Process
This process is initiated when payment is created in Oracle Payables for an employee's credit card transactions.
-
Start
-
Notification of Payment to Credit Card Issuer
This notification activity informs the employee that the company has remitted payment directly to the credit card issuer for the employee's corporate credit card transactions. This notification includes the payment amount, currency, date, and the related expense report number.
Message: Notification of Payment to Credit Card Issuer
Result Type: None
Required: Yes
Prerequisite Activities: Start
-
End
Payment to Employee Process
This process is initiated when payment is created in Oracle Payables for an employee's credit card transactions.
-
Start
-
Notification of Payment to Employee by Direct Deposit
This notification activity informs the employee that the company has remitted payment directly to the employee's bank account via direct deposit for corporate credit card transactions. This notification includes the payment amount, bank account number, bank name, and the related expense report number.
Message: Notification of Payment to Employee by Direct Deposit
Result Type: None
Required: Yes
Prerequisite Activities: Start
-
End
Payment to Employee by Check Process
This process is initiated when payment is created in Oracle Payables for an employee's credit card transactions.
-
Start
-
Notification of Payment to Employee by Check
This notification activity informs the employee that the company has sent a check to the employee as reimbursement for corporate credit card transactions. This notification includes the payment amount, payment date, check number, employee name, and the related expense report number.
Message: Notification of Payment to Employee by Check
Result Type: None
Required: Yes
Prerequisite Activities: Start
-
End
Inform Manager of Inactive Employee CC Expenses Process
This process is initiated when an employee is terminated or on temporary leave and has credit card transactions that were not submitted on expense reports. The inactive employee's securing attribute is automatically assigned to the manager as part of this process.
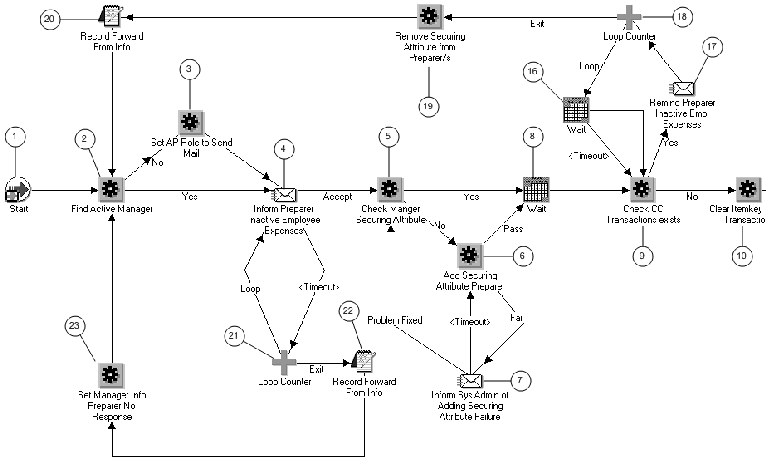
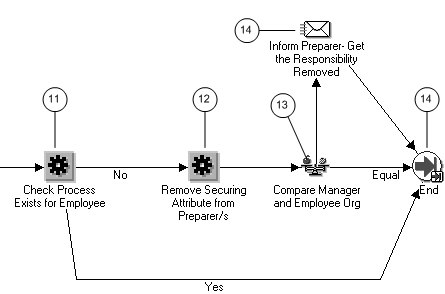
-
Start (Node 1)
-
Find Active Manager (Node 2)
The Find Active Manager function activity finds an active manager in the employee's supervisor hierarchy. This active manager is the employee's supervisor unless the employee's supervisor is also an inactive employee. This active manager is the owner of the particular workflow process (item key).
Function: AP_WEB_INACTIVE_EMP_WF_PKG.FINDACTIVEMANAGER
Result Type: Yes/No
-
Set AP Role to Send Mail (Node 3)
The Set AP Role to Send Mail function activity sets the owner of the workflow process if an active manager cannot be found. This function uses the AP Exception Role attribute to determine who the owner should be.
Function: AP_WEB_INACTIVE_EMP_WF_PKG.SetAPRolePreparer
Result Type: None
-
Inform Preparer Inactive Employee Expenses (Node 4)
This notification activity sends a notification to the workflow process owner requesting them to either accept or reassign the responsibility. If they accept, the system assigns them the inactive employee's securing attribute.
Message: Inform Manager Inactive Employee Expenses
Result Type: Notification Status
-
Check Manager Securing Attribute (Node 5)
This function activity checks whether the workflow process owner already has the inactive employee's securing attribute assigned to them.
Function: AP_WEB_INACTIVE_EMP_WF_PKG.CheckMangSecAttr
Result Type: Yes/No
-
Add Securing Attribute Preparer (Node 6)
This function activity is used to assign the inactive employee's securing attribute to the workflow process owner.
Function: AP_WEB_INACTIVE_EMP_WF_PKG.ADDSECATTRPREPARER
Result Type: Pass or Fail Result Type
-
Inform Sys Admin of Added Securing Attribute Failure (Node 7)
This notification activity sends a notification to the workflow administrator in case there were any problems when the system tries to assign the inactive employee's securing attribute to the workflow process owner.
Message Name: Adding Securing Attribute Failure Message.
Result Type: Problem Has Been Fixed
-
Wait (Node 8)
-
Check CC Transactions Exists (Node 9)
This function activity checks for workflow process (item key) transactions that have not been submitted on expense reports.
Function: AP_WEB_INACTIVE_EMP_WF_PKG.CheckCCTransactionExists
Result Type: Yes/No
-
Clear Itemkey for CC Transactions (Node 10)
This function activity removes the workflow item key from the associated transactions. Which allows transactions to be picked up by subsequent inactive employee processes. For example, the transaction would be picked up if the submitted transactions were later rejected, returned, or withdrawn in the Expenses workflow process.
Function: AP_WEB_INACTIVE_EMP_WF_PKG.ClearItemkeyCCTrx
Result Type: None
-
Check Process Exists for Employee (Node 11)
This function activity checks for other inactive employee workflow processes for the workflow process owner and the inactive employee. For example, if other processes exist for the inactive employee but another manager is the owner of the workflow process, then this function activity will return No.
Function: P_WEB_INACTIVE_EMP_WF_PKG.CHECKWFEXISTSEMPL
Result Type: Yes/No
-
Remove Securing Attribute from Preparer/s (Node 12)
This Remove Securing Attribute from Preparer/s activity removes the securing inactive employee's securing attribute from the workflow process owner.
Function: AP_WEB_INACTIVE_EMP_WF_PKG.RemoveSecAttrPreparer
Result Type: None
-
Compare Manager and Employee Org (Node 13)
The Compare Manager and Employee Org function activity checks to see if the workflow process owner and employee have the same organization assignment in the Oracle HRMS application. If the organization assignments are the same, The Compare Manager and Employee Org function activity returns the result Equal.
Function: WF_STANDARD.COMPARE
Result Type: Comparison
-
Inform Preparer - Get the Responsibility Removed (Node 14)
This notification activity sends a notification to the workflow process owner when the workflow process owner and inactive employee organization assignments are different. Message Name: Inform Preparer Get Responsibility Removed.
Result Type: None
-
End (Node 15)
-
Wait (Node 16)
-
Remind Preparer Inactive Empl Expenses (Node 17)
This notification activity sends a notification to the workflow process owner if a transaction associated with the workflow process has not been submitted on expense reports.
Message: Remind Preparer Inactive Empl Expenses
Result Type: None
-
Loop Counter (Node 18)
-
Remove Securing Attribute from Preparers (Node 19)
This function activity removes the securing inactive employee's securing attribute from the workflow process owner.
Function: AP_WEB_INACTIVE_EMP_WF_PKG.RemoveSecAttrPreparer
Result Type: None
-
Record Forward From Info (Node 20)
This function activity provides the From value for the Inform Preparer Inactive Employee Expenses notification when the current workflow process owner did not submit the transactions in a timely manner.
Function: Record Forward From Info
-
Loop counter (Node 21)
-
Record Forward From Info (Node 22)
This function activity provides the From value for the Inform Preparer Inactive Employee Expenses notification when the current workflow process owner does not choose Accept on the notification and that notification times out.
Function: AP_WEB_INACTIVE_EMP_WF_PKG.RecordForwardFromInfo
Result Type: None
-
Set Manager Info Prepare No Response (Node 23)
This function activity sets attribute information related to the unresponsive manager that is then used in the Inform Preparer Inactive Employee Expenses notification.
Function: AP_WEB_INACTIVE_EMP_WF_PKG.SetMangInfoPrepNoResp
Result Type: None
Process Invalid Credit Card Transactions Process
If the system finds invalid transactions during the validation phase of the Upload and Validation program.
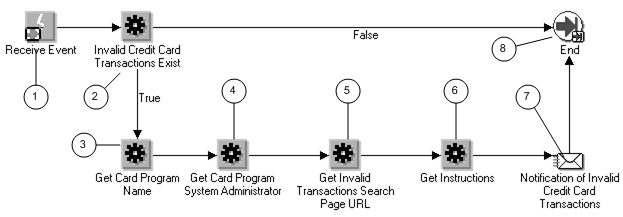
-
Invalid Credit Card Transactions Exist (Node 2)
The Invalid Credit Card Transaction Exist checks to see if there are invalid credit card transactions.
Function: AP_WEB_CC_VALIDATION_WF_PKG.invalid_cctrx_exist
Result Type: Boolean
Required: No
Prerequisite Activities: Start
-
Get Card Program Name (Node 3)
The Get Card Program Name function retrieves the card program name using the internal ID. This card program name is displayed in the notification.
Function: AP_WEB_CC_VALIDATION_WF_PKG.get_card_program_name
Result Type: None
Required: No
Prerequisite Activities: Start, Invalid Credit Card Transactions Exist
-
Get Card Program System Administrator (Node 4)
The Get Card Program System Administrator function retrieves the system administrator for the card program. If no system administrator exists for the card program, the system will return the user who initiated the workflow.
Function: AP_WEB_CC_VALIDATION_WF_PKG.get_card_sysadmin
Result Type: None
Required: No
Prerequisite Activities: Start, Invalid Credit Card Transactions Exist
-
Get Invalid Transactions Search Page URL (Node 5)
The Get Invalid Transactions Search Page URL function returns the URL for the Credit Card Transactions page.
Function: AP_WEB_CC_VALIDATION_WF_PKG.get_search_page_url
Result Type: None
Require: No
Prerequisite Activities: Start, Invalid Credit Card Transactions Exist
-
Get Instructions (Node 6)
Retrieves the instruction to be embedded in the following notification.
Function: AP_WEB_CC_VALIDATION_WF_PKG.get_instructions
Required: No
Prerequisite Activities: Start, Find Employee Matches, Get Card Program Name, Get Card Program System Administrator, Get New Card Page URL, Inactive Cards Exist
-
Notification of Invalid Credit Card Transactions (Node 7)
The Notification of Invalid Credit Card Transactions notification informs the system administrator of the number of invalid credit card transactions. The performer is determined by the Get Card Program Administrator System Administrator function as either the system administrator assigned to the card program or the user who submitted the concurrent program if the card program administrator is not defined.
Message: Notification of Invalid Credit Card Transactions
Result Type: None
Required: No
Prerequisite Activities: Start, Invalid Credit Card Transactions Exist, Get Card Program Name, Get Card Program System Administrator, Get Invalid Transactions Search Page URL, Get Instructions
-
End
Process Unassigned Credit Cards Process
The Process Unassigned Credit Cards process attempts to match employees with credit card accounts.
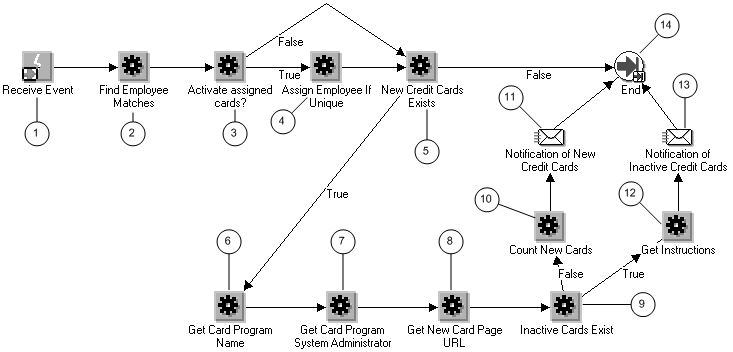
-
Start (Node 1)
-
Find Employee Matches (Node 2)
The Find Employee Matches Process attempts to match your employees with the account owner information given by your credit card provider. Your credit card providers may provide varying information about the account owners. In order to support these different formats, the system stores matching rules in the OIE_EMP_MATCH_RULE lookup type. The system assigns matching rules for the card programs. If there is no matching rule assigned to the card program, then the system will not perform a match.
Function: AP_WEB_CC_VALIDATION_WF_PKG.card_employee_match
Result Type: None
Required: Yes
Prerequisite Activities: Start
-
Activate Assigned Cards? (Node 3)
If the system finds a unique employee match, the card can be automatically activated. By default, automatic activation is disabled. If you want to enable automatic activation, set the value for the Node attribute 'Enable Automatic Activation' to Yes.
Function: AP_WEB_CC_VALIDATION_WF_PKG.get_act_attribute_value
Result Type: Yes/No
Required: No
Prerequisite Activities: Start, Find Employee Matches
-
Assign Employee if Unique (Node 4)
The following outcomes from the Find Employee Match process are possible:
-
No employee matches were found
-
Multiple employee matches were found
-
A unique match was found
If a unique match is found, the Assign Employee if Unique process will assign the employee to the credit card account.
Function: AP_WEB_CC_VALIDATION_WF_PKG.assign_emp_if_unique
Result Type: None
Required: No
Prerequisite Activities: Start, Find Employee Matches, Activate Assigned Cards
-
-
New Credit Cards Exist (Node 5)
The New Credit Cards Exist function check for new credit cards. If new credit cards exist, the system sends notifications.
Function: AP_WEB_CC_VALIDATION_WF_PKG.new_cards_exist
Result Type: Boolean
Required: No
Prerequisite Activities: Start, Find Employee Matches
-
Get Card Program Name (Node 6)
The Get Card Program Name function retrieves the card program name using the internal ID. This card program name is displayed in the notification.
Function: AP_WEB_CC_VALIDATION_WF_PKG.get_card_program_name
Result Type: None
Required: No
Prerequisite Activities: Start, Invalid Credit Card Transactions Exist
-
Get Card Program System Administrator (Node 7)
This function retrieves the system administrator for the card program. If a system administrator does not exist for the card program, the system returns the user who initiated the workflow.
Function: AP_WEB_CC_VALIDATION_WF_PKG.get_card_sysadmin
Result Type: None
Required: No
Prerequisite Activities: Start, Find Employee Matches
-
Get New Card Page URL (Node 8)
The Get New Card Page URL function returns the URL for the New Credit Card Accounts page. A link to this page is included in the notification.
Function: AP_WEB_CC_VALIDATION_WF_PKG.get_newe_card_page_url
Result Type: None
Required: No
Prerequisite Activities: Start, Find Employee Matches
-
Inactive Cards Exist (Node 9)
The Inactive Cards Exist function checks for inactive credit cards.
Function: AP_WEB_CC_VALIDATION_WF_PKG.inactive_cards-exist
Result Type: Boolean
Required: No
Prerequisite Activities: Start, Find Employee Matches, Get Card Program Name, Get Card Program System Administrator, Get New Card Page URL
-
Count New Cards (Node 10)
The Count New Cards process counts the number of new credit cards created so that this number can be included in the notification.
Function: AP_WEB_CC_VALIDATION_WF_PKG.count_new_cards
Result Type: None
Required: No
Prerequisite Activities: Start, Find Employee Matches, Get Card Program name, Get Card Program System Administrator, Get New Card Page URL, Inactive Cards Exist
-
Notification of New Credit Cards (Node 11)
The Notification of New Credit Cards notification informs the system administrator of the number of new credit cards created. The performer is determined by the Get Card Program Administrator System Administrator function as either the system administrator assigned to the card program or the user who submitted the concurrent program if the card program administrator is not defined.
Message: Notification of New Credit Cards
Result Type: None
Required: Yes
Prerequisite Activities: Start, Find Employee Matches, Get Card Program Name, Get Card Program system Administrator, Get New Card Page URL, Inactive Cards Exist, Count New Cards
-
Get Instructions (Node 12)
The Get Instructions function retrieves the appropriate instructions to embed in the Notification of Inactive Credit Cards notification.
Function: AP_WEB_CC_VALIDATION_WF_PKG.get_instructions
Result Type: None
Required: No
Prerequisite Activities: Start, Find Employee Matches, Get Card Program Name, Get Card Program System Administrator, Get New Card Page URL, Inactive Cards Exist
-
Notification of Inactive Credit Cards (Node 13)
The Notification of Inactive Credit Cards notification informs the system administrator of the number of inactive credit cards created and provides instructions on activating the unassigned or inactive credit cards. The performer is determined by the Get Card Program Administrator System Administrator function as either the system administrator assigned to the card program or the user who submitted the concurrent program if the card program administrator is not defined.
Message: Notification of Inactive Credit Cards
Result Type: None
Required: No
Prerequisite Activities: Start, Find Employee Matches, Get Card Program Name, Get Card Program System Administrator, Get New Card Page URL, Inactive Cards Exist, Get Instructions
Expense Receipts Workflow
The Expense Receipts workflow manages the tracking of overdue receipts. The workflow has four independent processes that send various notifications to preparers, depending on the status of the receipts for the expense report.
This table describes the processes that make up the Expense Receipts workflow:
| Process | Purpose | Trigger Event | Conditions |
|---|---|---|---|
| Receipts Overdue | Sends overdue receipts notifications. The notifications allow users to send replies in relation to the status of missing receipts. The replies are Already Sent Receipts, Will Send Receipts, or Receipts Missing. | Expenses Overdue Receipts Tracking concurrent program | 1) Notification Rule Set is defined and assigned to the operating unit; 2) The "Receipts overdue or missing after expense report submitted" rule is defined for the rule set; 3) Receipts have not been received within the specified time; 4) Receipts Status is Required. |
| Receipts Missing | Sends a notification when all required receipts are missing for an expense report, or when the preparer must submit some form of missing receipts declaration. | Expenses Overdue Receipts Tracking concurrent program | 1) Notification rule set is defined and assigned to the operating unit; 2) Receipts Status is Missing. |
| Receipts Received | Sends a notification when Payables receives receipts for an expense report. | Receipts are received in the Expenses Audit pages. | Notification rule set is defined and assigned to the operating unit. |
| Receipts Aborted | Aborts the Receipts Overdue Process and/or the Receipts Missing Process, and purges the tracking of missing receipts. | User withdraws an expense report; receipts are received or waived; expense report is rejected by managers or auditors; expense report is returned by the system administration; or when the original expense report receipt status is no longer required, such as after a shortpay. | Not applicable |
Prerequisite
Before you can run the Expense Receipts workflow and the Expenses Overdue Receipts Tracking concurrent program, you must set up notification rules. See: Managing Receipt Notifications for more information.
Receipts Overdue Process
The Receipts Overdue Process is initiated by the Expenses Overdue Receipts Tracking concurrent program. This program tracks overdue receipts on expense reports. You can run the Expenses Overdue Receipts Tracking concurrent program for the operating unit you choose or all operating units. See: Expenses Overdue Receipts Tracking Program, Oracle Payables User Guide for more information.
The Expenses Overdue Receipts Tracking Program determines if receipts are overdue by comparing the active Notification rule setup to the difference between the expense report submit date and the system date. If receipts are overdue, then the process initiates the sending of notification reminders to the user to send the receipts. The process ends if the receipts are received, waived, or shortpaid. The process also ends if the expense report is withdrawn, rejected, or returned.
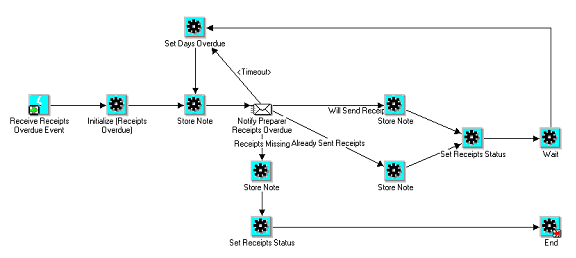
-
Receive Receipts Overdue Event
This is the start node.
-
Initialize (Receipts Overdue)
Initializes the item attributes for the workflow process.
-
Store Note (first occurrence)
Update the Approval Notes with information that the overdue receipts notification was sent to the preparer.
-
Notify Preparer Receipts Overdue
Notification sent to the preparer.
-
Store Note (subsequent occurrences)
Updates the Approval Notes with the preparer's response.
-
Set Receipts Status
If user response is either Will Send Receipts or Already Sent Receipts, the receipts status is set to In Transit. If user response is Receipts Missing, the receipts status is set to Missing.
-
Wait
The number of days to wait before sending the preparer a reminder notification after their response. The number of days to wait is retrieved from the "Receipts considered overdue or missing after user response" rule on the active Notification rule set.
-
Timeout
If the user does not respond to the notifications, the notifications are resent according to the “Subsequent notifications if receipts still overdue” value in the Notification rule setup.
-
Set Days Overdue
Updates the number of days overdue. This value is displayed in the subject of the notification.
-
End
End the workflow process.
Receipts Missing Process
The Receipts Missing Process sends notification reminders to employees for appropriate documentation to replace missing receipts. The Receipts Missing Process is only initiated when the Notification rule setup requires physical documents in place of missing receipts.
The Receipts Missing Process is called by the Expenses Overdue Receipts Tracking concurrent program, when the program determines that overdue receipts are in a status of "Missing". The "Receipt Missing" status can occur in one of three ways:
-
User specifies that all required receipts are missing when entering the expense report.
-
User respond to an overdue receipt notification by "Receipt Missing".
-
Auditor shortpays the expense report after manager approval. The expense report is set to the status Receipt Missing if the user requests the manager to approve the missing receipts and the manager grants approval.
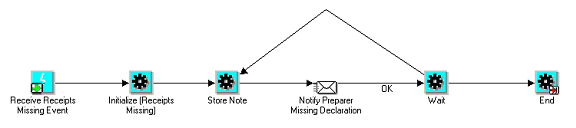
-
Receive Receipts Missing Event
This is the start node.
-
Initialize (Receipts Missing)
Initializes the item attributes for the workflow process.
-
Store Note
Update the Approval Notes with information that the overdue receipts notification was sent to the preparer.
-
Notify Preparer Missing Declaration
Send the notification.
-
Wait
Wait according to the setting of the “Receipts considered overdue or missing after user response” option of the Notification rule setup.
-
End
To effect receiving the required documentation and end the workflow process), auditor must enter the receipt package received date.
Receipts Received Process
The Receipts Received Process sends notifications to acknowledge receipts received according to the Notification rule setup. This process begins when the auditor indicates that the receipts were received by entering a receipt package received date on the expense report.

-
Receive Receipts Received Event
This is the start node.
-
Initialize (Receipts Received)
Initializes the item attributes for the workflow process.
-
Notify Receipts Received?
Checks the setting of the Notify Individual rule in the active Notification rule set to see if a notification should be sent.
-
Notify Preparer Missing Declaration
Send when the Notify Individual rule is set to either "When overdue receipts are received" or "When receipts are received".
-
Raise Receipts Aborted Event
Raises the Receipts Aborted event.
Receipts Aborted Process
The Receipts Aborted Process stops the tracking of overdue or missing receipts for an expense report. This process begins after any of these events:
-
User withdraws the expense report.
-
Auditor or manager rejects or returns the expense report.
-
Receipts are received.
-
Receipts are waived.
-
Original receipt status changes from the original value to Not Required.
The Receipts Aborted Process includes these steps:
-
Receive receipts aborted event:
This is the start node.
-
Initialize (Receipts Aborted)
Initializes the item attributes for the workflow process.
-
Is Receipts Received or Waived
Determine if receipts were received or waived.
-
Is this a Missing Receipts Shortpay?
Checks to see if the expense report in question was spawned as a result of missing receipts shortpay.
-
Complete the Missing Receipts Shortpay
Automatically completes the missing receipts short pay process.
-
Is this a Policy Violation Shortpay?
Checks to see if the expense report in question resulted from a policy shortpay.
-
Complete the Policy Violation Shortpay
Automatically completes the policy short pay process.
-
Receipts Overdue Process Exists?
Checks to see if a receipts overdue process exists for the expense report in question.
-
Abort Receipts Overdue Process
Terminates the Receipts Overdue process.
-
Receipts Missing Process Exists?
Checks to see if a receipts missing process exists for the expense report in question.
-
Abort Receipts Missing Process
Terminates the Receipts Missing process.
-
End
End the process.
Expense Holds Workflow
The Expense Holds workflow has two independent processes that send notifications to users when holds are placed and released on expense reports by the Expense Report Export program. The two processes that make up the Expense Holds workflow are:
-
Expense Payment Held Process. This process manages the sending of notifications when expense reports are placed on hold.
-
Expense Payment Hold Released Process. This process manages the sending of notifications when expense reports are released from hold.
The Expense Holds workflow sends notifications regarding the placing of a hold on expense reports by the Expense Report Export program under either of these conditions:
-
Expense Report Export places a hold on expense reports with overdue or missing receipts until the receipts are received or the replacement receipt documents are received.
-
Expense Report Export places a hold on all expense reports for a user, including newly submitted expense reports, if overdue receipts for a previous expense report exceed the limit specified in the active Hold rule.
If you use the Both Pay scenario, then if either the employee invoice or the credit card provider invoice are put on hold (not exported into Payables), then a single notification is sent for the entire expense report.
Prerequisite
Before you can run the Expense Holds workflow, you must set up hold rules. See: Setting Up Hold Rules for more information.
Expense Payment Held Process
The Expense Payment Held Process manages the sending of notifications regarding the placing of holds on expense reports. This process sends notifications for each aspect of placing expense reports on hold.
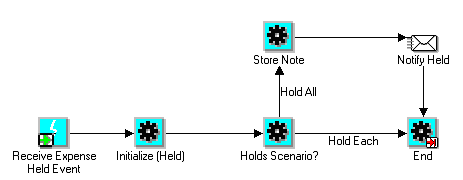
-
Receive Expense Payment Held Event
Start the workflow process.
-
Initialize (Held)
Initializes the item attributes for the workflow process.
-
Holds Scenario?
This activity determines which Holds scenario is used. The Hold scenario is determined in the Individual Payment Holds section of the Create Hold Rule Sets page. Hold Each maps to the "Until receipts received" option, and Hold All maps to the "When receipts are overdue" option.
-
Store Note
Updates the Approval Notes when this path is taken.
-
Notify Held
A notification is sent when the "When receipts are overdue" setup option is chosen.
-
End
End the process.
Bothpay Process
If you use the Both Pay scenario, the process sends notifications regarding the placing of holds on expense reports according to the Both Pay option setting in the active Hold rule set. All notifications refer to the entire expense report; notifications are not sent for the credit card provider invoice to be imported into Payables.
Whether or not payment is held on the credit card provider invoice, notifications are sent if the expense report requires receipts and the receipts are overdue. This means, for example, if the Credit Card Payment Holds option is set to "Never hold credit card payment", the expense report is still placed on hold and a notification is sent, even if the expense report only contains credit card expenses.
Expense Payment Hold Released Process
The Expense Payment Hold Released Process manages the sending of notifications regarding the releasing of holds on expense reports. This process is invoked when the Expense Report Export program determines that a receipt has been received or waived. The event that immediately raises the payment hold released event is when a hold is manually released.
This notification is only sent once there are no outstanding hold issues for all related expense reports. For example, if expense report ER3 is on hold because the receipts were not received for expense report ER1, then if the receipts are received for ER1 but ER3 is put back on hold because the receipts have not been received for expense report ER2, the hold release notification is not sent. This is because the hold on ER3, although potentially released because of ER1 still persists because of ER2.
This process sends notifications that are initiated in these ways only when the receipts are received or waived for the expense report that caused the hold:
-
Receipts are received from the user.
-
Receipts are waived by the auditor or manager.
-
Hold is manually released by auditors.
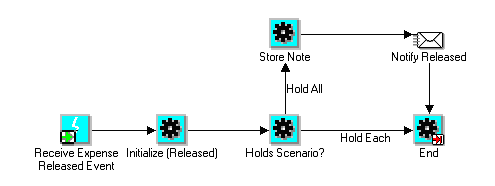
-
Receive Expense Released Event
This is the start node.
-
Initialize (Released)
Initializes the item attributes for the workflow process.
-
Holds Scenario?
This activity determines which Holds scenario is used. The Hold scenario is determined in the Individual Payment Holds section of the Create Hold Rule Sets page. Hold Each maps to the "Until receipts received" option, and Hold All maps to the "When receipts are overdue" option.
-
Store Note
Updates the Approval Notes when this path is taken.
-
Notify Released
A notification is sent when the "When receipts are overdue" setup option is chosen.
-
End
End the workflow process.
Initiating Deferred Workflow Processes
Deferred workflow processes handle notifications and time-consuming tasks that can be automated and placed in the background so that users can continue working in the application without waiting for the requested task to complete. These deferred workflow processes need at least one background engine to monitor background activities in order to ensure consistent processing. Therefore, you must submit a request to enable a concurrent program for workflow background processing.
To submit a request:
-
Using the Oracle Applications System Administrator responsibility, navigate to the Submit Requests form.
-
Submit the Workflow Background Process concurrent program as a request.
-
Schedule the process to repeat itself at appropriate intervals.
Related Topics
Running Reports and Programs, Oracle Applications User's Guide
Overview of Setting Up, Oracle Workflow Administrator's Guide