Deliverables Tracking System
This chapter covers the following topics:
- Overview of the Deliverables Tracking System
- Deliverables Tracking System Window
- Viewing Deliverable Tracking Information
- Splitting Deliverables
- Defining Dependencies
- Tracking Drawing or Report Submissions
- Linking Subcontracts to Deliverable Lines
- Shipping Deliverables
- Initiating Purchasing Documents for a Contract
- Initiating Planning
- Relief Deliverable Demand Concurrent Program
- Defaulting Contract Changes to the Deliverables Tracking System
- Integration with Government Print Forms
Overview of the Deliverables Tracking System
The Deliverables Tracking System is used to monitor contractual activities including deliverables tracking, subcontracting, purchasing, receiving, shipping, and billing. Deliverables are defined as received in or shipped out (inbound or outbound), and internal or external. Examples of deliverables are delivery of goods by a certain date, engineering designs by a particular date, purchase of goods from a third party, subcontracted goods or services, and shipment of goods.
The Deliverable Tracking System is integrated with other major components of Oracle e-Business Suite, including Oracle Projects, Oracle Project Manufacturing, Oracle Advanced Planning and Scheduling, Oracle Purchasing, and Oracle Shipping Execution. In addition to tracking shipping and delivery statuses, this integration enables you to:
-
Collect costs against a contract through projects and tasks in Oracle Projects
-
Generate billing events and recognize revenue in Oracle Projects
-
Transfer demand into the planning and execution system
-
View accounts payable information, including invoice and payment details for a purchase order created from the DTS
-
View accounts receivable information, including invoice and payment receipt details for a billing event initiated from the DTS
-
Create procurement documents and shipment requests directly in the Deliverables Tracking System
Note: Departure of shipping notifications are available to customer for Project Contract's Inventory items that are shipped from the Deliverable Tracking System.
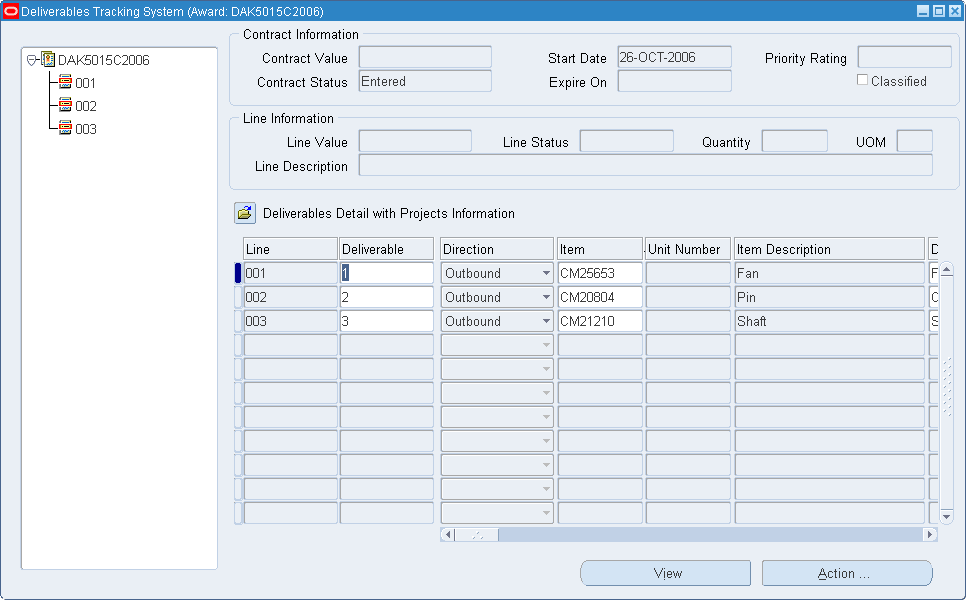
Deliverables Tracking System Window
Once a contract is awarded, you can use this window to monitor the progress of the products or services in accordance with terms of the contract. For the contract lines to display in the tree hierarchy of the Deliverables Tracking System window, you must create deliverable records in the Contract Authoring Workbench.
To default deliverables for all lines on a contract
-
Select your contract and navigate to the Contract Authoring Workbench.
-
Select the Contract Header tab.
-
Choose Action, and select Default Deliverables.
A confirmation message displays.
When the lines on the contract have been defaulted as deliverables, they are available on the Deliverables Tracking System window.
To view and update line deliverables on a contract:
-
Select a contract and navigate to the Deliverables Tracking System window.
Initially, the system displays the information for all contract line deliverables, provided they have been defaulted to this window.
-
The values in the Contract Information region (value, status, dates) default from the Contract Header window of the Contract Authoring Workbench. See: Main Region in the Contract Header Window.
The values in the Contract Lines Information region (value, status, description) default from the Contract Line window of the Contract Authoring Workbench. See: Main Region in the Contract Lines Window.
-
Select the line you want to view or update in the navigator. The system displays only the deliverables for that line in the right pane.
-
As you update your delivery line information, you can change values defaulted from the Contract Authoring Workbench.
-
The Deliverable field displays the number of this delivery. To create new deliverables for a line from an existing deliverable, see: Splitting Deliverables. To create a new deliverable, select a new record and add the field information.
-
In the Direction field, a value displays of either Inbound or Outbound. Outbound refers to goods or services that are shipped out to your customers. If you are creating a new deliverable for a subcontracted or purchased item, you create an inbound delivery for the parts or services received in.
-
If you are creating a new deliverable, then you can add or change goods or services in the Item, Item Description, Unit Price, and Unit of Measure fields.
-
The Unit Number displays if you are using the Oracle Project Manufacturing feature End item model/unit number. This feature lets you identify which bill of material is used for building unit effective items.
-
The value in the Quantity field originates from the Contract Lines window in the Contract Authoring Workbench. If the value is later changed in that window after using the Default Deliverables action, then you must manually revise the line quantity in the Deliverable Tracking System window.
-
The Destination Type field is used when initiating purchasing documents for a line. Indicate if this item is an expense or inventory type. See: Initiating Purchasing Document for a Contract.
-
If this deliverable's completion effects other deliverables, then the Dependency indicator is selected, see: Defining Dependencies .
-
-
Add any additional shipping, billing, purchasing, or planning information in the appropriate fields.
-
Save your work.
If your contract has numerous lines and deliverables, then you can search the Deliverables Tracking System for specific records.
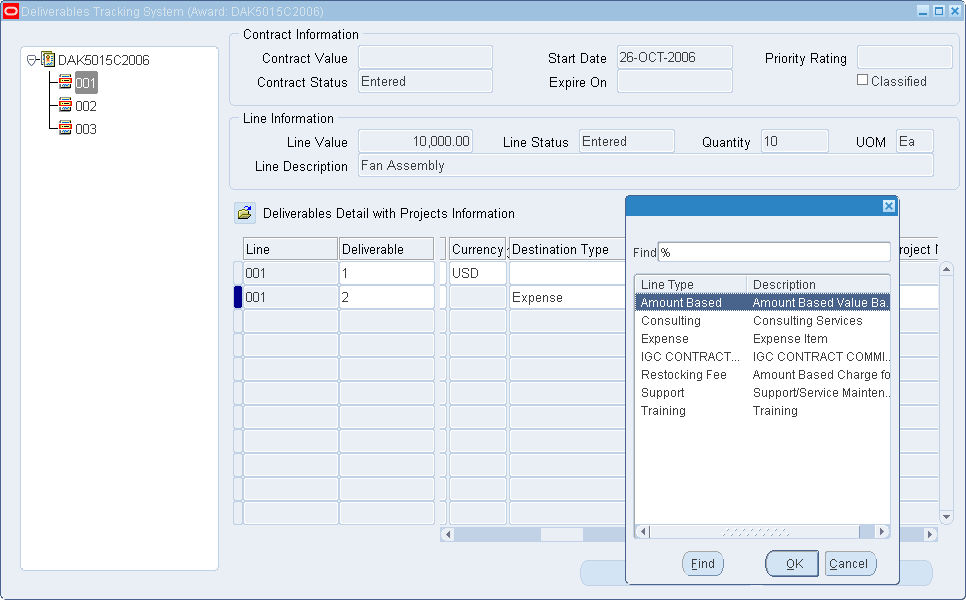
Initiating Quantity Based Requisitions
To initiate quantity based requisitions
-
Choose an item.
The application disables the Line Type, and the previous value is null. If the Item is disabled, then verify that Line Type is entered. During the initiate action process, the line type defaults as Goods, which is quantity based. The Category value is based on the item setup. If Item is entered, then you cannot update these fields in the DTS.
-
Choose destination for the requisition.
If you choose Expense, and both project and task are present, then expenditure related fields are required. Include Expenditure Organization, Expenditure Type, and Expenditure Date. If project is entered for the Expense Destination, then Task is required.
The application validates contract currency with functional currency. If different, then the unit price for requisition is populated by converted unit price. Otherwise, unit price is copied over as is.
-
Enter Quantity.
-
Enter the UOM.
The application defaults the UOM based on item setup. You can change this in the DTS.
-
Enter Ship To and Ship From information.
The application validates with the item to verify item and inventory organization consistency. If not, then you have the option to enter Item, or Ship To and Ship From Organization.
-
Enter Unit Number for the item, from item setup.
-
Enter PO Need By Date.
-
Select the Ready To Procure indicator.
Amount Based Requisitions Initiated in the Deliverable Tracking System
You can initiate and track purchase requisitions for non items in the DTS. Requirements may exist during contract execution to issue purchase orders for non-item number procurements. You can initiate purchase order requisitions in the DTS for required items under a contract that can include labor, material, services, or any other item with a non-item number designation.
Benefits include:
-
Creating purchase order requisitions for non items
-
Procure non items and services, and link to a line and subline on the contract
-
Integrate with purchasing for non-inventory purchase requisitions and purchase orders
To initiate amount based requisitions
-
Select a contract and navigate to the Deliverables Tracking System window.
-
Choose an amount based line type.
The application enables Line Type when the Item is not entered, and the Destination is Expense. By entering line types, the application disables the Item. Amount-based line type appears on the LOV for line types.
-
Enter expense related fields.
The Category is enabled only when Line Type is entered. It is required for amount-based requisitions. The application defaults the value for the Category based on the Line Type. You can update Category.
Note: If you enter Line Type, then the application enters the UOM with the default value from the line type, and is disabled for update. UOM is enabled only when the Line Type field is cleared. The UOM value in DTS is not used by requisition import as the Procurement module defaults the UOM from the setup of line types in the PO Line Types window.
-
Enter the Quantity and the Unit Price values.
The application converts these values to the correct format that Procurement requires for amount-based requisition. Currency checking also provides currency conversion if needed.
-
Optionally, enter Ship To and Ship From information.
-
Enter PO Need By Date.
-
Select the Ready To Procure indicator.
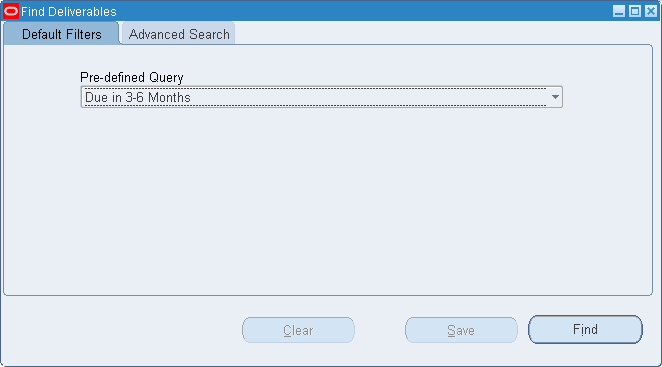
To search for specific deliverable lines:
-
Navigate to the Deliverables Tracking system window and choose Find from the View menu or Toolbar.
The Find Deliverables window displays.
-
In the Default Filters tab, select a value in the Pre-defined Query box.
These values are delivered with Oracle Project Contracts.
-
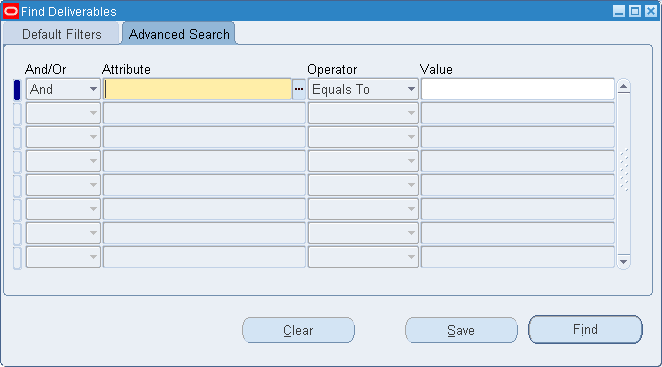
You can also search using your own criteria. Select the Advanced Search tab and select values in the following query fields:
-
And/Or: Indicates if you want to include this criteria with the information selected on the Default Filters region.
-
Attribute: You can search using a field on the Deliverable Tracking System window.
-
Operator: Select a query operator (such as greater than, less than, and equal to) in conjunction with the attribute value.
-
Value: You can enter a value for the attribute field selected.
-
-
Choose Find to search using your selection.
-
Choose Save to save this query. The system displays the Search Name window.
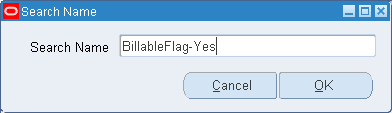
-
Enter a name for this query in the Search Name field.
-
Choose OK to save this query. The name displays in the Pre-defined Query list on the Default Filters tab.
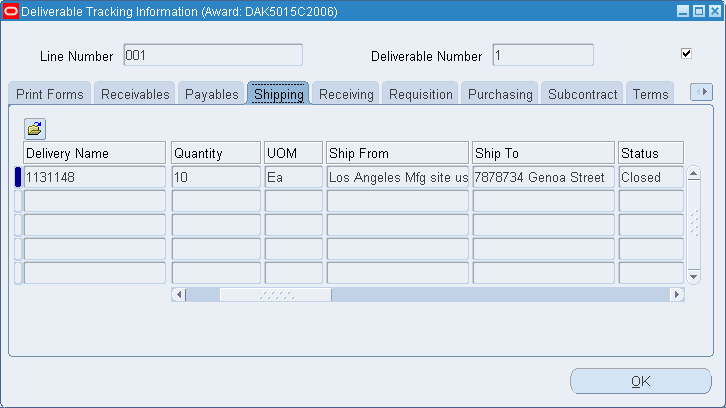
Viewing Deliverable Tracking Information
You can view all the information about any deliverable on the Deliverable Tracking Information window. This includes information about print forms used, shipping activities, purchase orders, receiving data, requisition information, subcontracts for a delivery, terms, and standard notes.
This is a view-only window. The data is generated from entries and transactions within Oracle Project Contracts and from other Oracle Application products.
To view deliverable tracking information:
-
Select a contract and navigate to the Deliverables Tracking System window.
-
Select a deliverable line on the contract.
-
Choose View.
-
Select the tabbed window pertaining to the tracking information you want to view.
-
Print Forms: Displays the printed forms required by contractors or customers during the contracting process. The forms are designated in the Contract Authoring Workbench.
-
Shipping: Displays the status and details of shipping activity, initiated in the Deliverable Tracking System and integrated with Oracle Shipping Execution. See: Overview of Shipping, Oracle Shipping Execution User's Guide.
-
Receiving: Receiving activity displays if any inventory is received for a purchase order created for an inbound deliverable. See: Overview of Receiving, Oracle Purchasing User's Guide,Receiving Transactions, Oracle Purchasing User's Guide.
-
Requisition: Displays purchase requisition data generated for inbound deliverables. See: Initiating Purchasing Document for a Contract.
-
Purchasing: Displays purchase order data generated for inbound deliverables. See: Initiating Purchasing Document for a Contract.
-
Subcontract: Displays the subcontract data linked to customer deliverables. See: Linking Subcontracts to Deliverable Lines.
-
Terms: Displays the terms designated in the Contract Authoring Workbench.
-
Project: If the contract line number is linked to a project and task, that information displays.
-
Standard Notes: This tabbed region has a View and Maintain mode. The View mode displays standard notes defined in the Contract Authoring Workbench. The Maintains mode is used to enter new text. See: Standard Notes Tabbed Window.
-
-
Choose OK to return to the Deliverable Tracking System window.
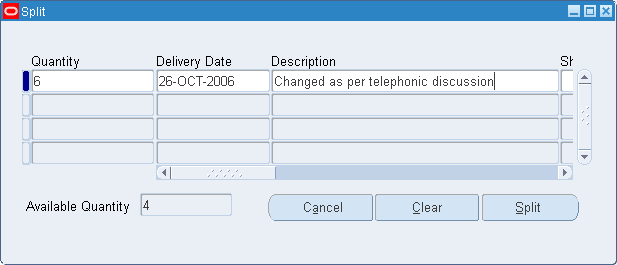
Splitting Deliverables
The Deliverable field value in the Deliverable Tracking system window defaults to 1 per line item. The Split window is used to split the initial line value into other delivery lines.
Note: You cannot split a deliverable on a line that has been billed.
To split a deliverable:
-
Select a line on the left pane, and a deliverable line on the right pane of the window.
-
Choose Action and select Split
The system displays the Split window. The value in the Available Quantity field is the amount that you must divide into separate deliverables.
-
Enter the value you want for this deliverable in the Quantity field, and the due date in the Delivery Date field.
-
Optionally, you can change the defaulted information in the other fields including Description, Ship From and To Locations, Start and End Dates, and Project and Task.
-
Continue entering new deliverables until the Available Quantity value is 0.
-
Choose Split to save your work.
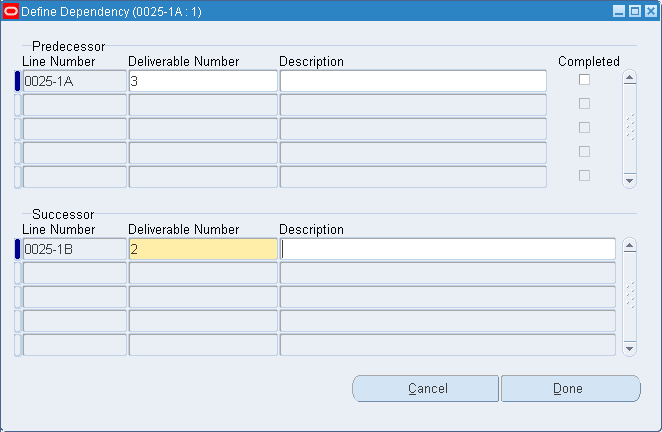
Defining Dependencies
You may have contract situations where actions for one deliverable depend on completion of other deliverables. For example, deliverable B cannot be completed until deliverable A is complete. In this case, deliverable B is dependent on deliverable A. The Define Dependency window enables you to define multiple dependencies for a specified deliverable.
To define dependencies for line deliverables:
-
Select a contract and navigate to the Deliverables Tracking System window.
-
Select a contract line on the tree in the left pane, and select the deliverable on the right pane.
-
Choose Action, and select Define Dependency.
-
Optionally, in the Predecessor region, select the Deliverable Number that needs to be completed before this deliverable is completed.
The Line Number displays, you can add descriptive text in the Description field. When this deliverable is completed, the Completed check box is checked.
-
Continue adding any other applicable deliverables in the Predecessor region.
-
Optionally, in the Successor region, select the Deliverable Number that needs to be completed after this deliverable is completed.
-
The Line Number displays, you can add descriptive text in the Description field.
-
Choose Done to save your work.
Tracking Drawing or Report Submissions
The Deliverable Tracking system window provides the facility to track the number of times you submit reports, drawings, manuals, and other material. These items are referred to as CDRL (Contractor Data Requirement List), and they might be sent back and forth for changes and approvals.
Use the data item line style when these contract lines are created. On the Contract Lines window, the Other region, the information entered in the Data Item section defaults to the fields on the Deliverable Tracking System window and are used to flag this functionality. See: Other Region in the Contract Lines Tabbed Window.
To track contractor data submissions:
-
Select a contract and navigate to the Deliverables Tracking System window.
-
Select the deliverable line for the data item you want to track.
-
The following fields must contain values in order create submission transactions:
-
CDRL Category
-
First Submission Date
-
Total Number of Copies
-
Frequency
-
Data Item Subtitle
Note: Information entered in the Authoring Workbench, the Other region of the Contract Lines window, defaults to these fields.
-
-
Choose Action and select Subsequent Submission.
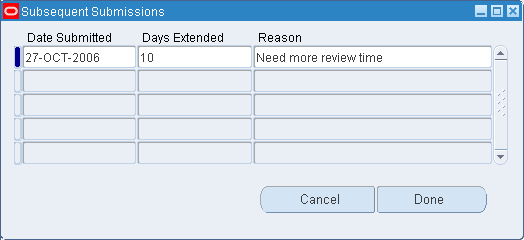
-
Select the date in the Date Submitted field.
-
If applicable, you can enter a value in the Days Extended field if this submission has been given more time for review.
-
Optionally, you can enter descriptive text for any reason for this transaction.
-
Choose Done to save your work.
Linking Subcontracts to Deliverable Lines
Subcontracts are agreements between your organization and your suppliers used to supply a customer contract. You can link subcontracts to the corresponding customer contract deliverables. You first create a contract document with a contract type of Subcontract. Then you use the Deliverable Tracking System to link the deliverables of this document to your main customer contract.
To link a subcontract to a deliverable line:
-
Select the subcontract document and navigate to the Deliverable Tracking System.
-
In the tree hierarchy in the left pane, select the line you want to associate with another customer contract.
The right pane displays the delivery information for this line.
-
Choose Action and select Link to Contract.
The Link Subcontract Deliverable window displays.
-
Select the Contract Number, Line Number, and Deliverable Number.
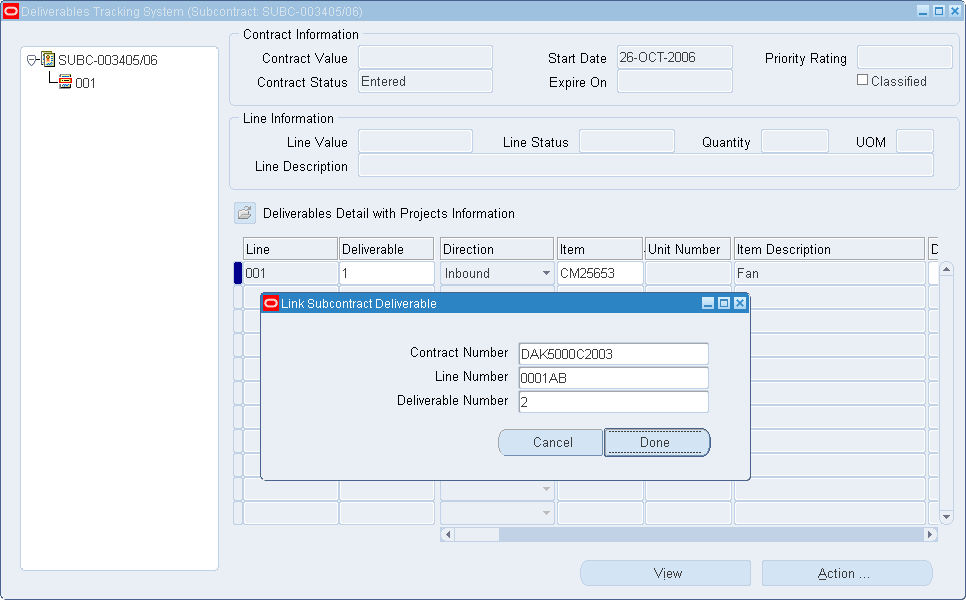
-
Choose Done to Save your work.
You can view all associated subcontract information for the main contract by navigating to the Deliverable Tracking Information window. Select the Subcontract tab to display the linked information. See: Viewing Deliverable Tracking Information.
Shipping Deliverables
Oracle Project Contracts is integrated with Oracle Shipping Execution enabling you to ship contract deliverables through the Deliverable Tracking system. Features include:
-
Records are generated and passed into Oracle Shipping Execution through a workflow
-
Contract number, deliverable number, project, task, unit number references from the contract deliverable are passed to the shipping transactions.
-
Auto-create Deliveries function in Shipping Execution is used to create deliveries for delivery lines that are not assigned
-
Ship Confirm function in Shipping Execution is used to confirm that the delivery lines associated with the delivery has been shipped
Note: Shipping of an Inventory Item in Project Contracts will create a record in the Oracle Install Base with the contract information.
To initiate shipping for deliverables on a contract:
-
Navigate to the Deliverables Tracking System window.
-
Select the deliverables you want to ship.
You can create partial shipments for deliverable lines, create a new deliverable for the remaining quantity.
-
Enter the deliverable information for the contract lines. See: Deliverables Tracking System Window.
The following fields must contain the correct values in order to be flagged for shipping:
-
Direction: Outbound
-
Ship To Organization, and Ship To Location
-
Ship From Organization, and Ship From Location
-
Shippable check box
-
Expected Shipment Date
-
Available For Shipment check box
-
Initiate Shipment Date
-
-
If the Inspection Required check box is flagged, then Shipping status is set to Inspection Required, the shipping activity can not be completed until shipping status is manually set to Inspected.
-
Choose Action, and select Initiate Shipping.
The Select Action Level window displays.
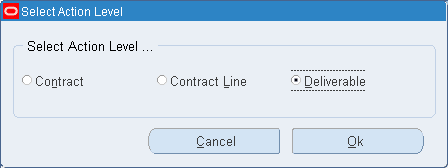
-
Select one of the radio button depending on whether you are shipping the entire contract, a contract line, or a deliverable line.
-
Choose OK to initiate the shipment transaction.
See Also
Overview of Shipping, Oracle Shipping Execution User's Guide and
Oracle Project Contracts Implementation Guide.
Initiating Purchasing Documents for a Contract
You can initiate purchasing documents, such as requisitions for material that you want to link to a specific contract. Procurement records initiated from Oracle Project Contracts are automatically linked to the contract. Features include:
-
You can create both inventory and expense type purchasing lines. Expense destination purchases enable you to create drop shipment deliverables.
-
Contract number, contract line, deliverable number, project, and task are passed to the purchasing documents.
-
Records are specified as inbound deliverables on the Deliverable Tracking System.
-
The Requisition Import Process is used to import the delivery information into Oracle Purchasing.
-
AutoCreate in Oracle Purchasing is used to create purchase orders from the requisition.
-
Oracle Purchasing information linked to a contract can be viewed in the Deliverable Tracking Information window.
The first step is to create a new contract. See: Creating A New Contract Document.
Next, default deliverables to display contract lines on the Deliverable Tracking System window. See: Deliverables Tracking System Window.
To initiate procurement documents for a contract:
-
Navigate to the Deliverables Tracking System window.
-
Enter the deliverable information for the contract lines. See: Deliverables Tracking System Window.
The following fields must contain the correct values to be flagged for purchasing:
-
Destination Type: Expense or Inventory. Inventory items are received into stock; expense items are not tracked in the stock room. If the Destination Type is expense, then you must also have values in the fields for Expenditure Item Date, Expenditure Organization, Expenditure Type.
Expense destination types are used to create drop shipment deliverables. This is done by creating an outbound deliverable line with your customer as the ship-to organization and ship-to location. And then creating a corresponding inbound deliverable set as Expense destination type. All other details of the line are copied from the outbound line to the inbound line. See: ERP Integration, Oracle Project Contracts Implementation Guide.
-
Direction: Inbound
-
Ship To Organization, and Ship To Location: Both of these fields should reflect your location
-
Ship From Organization, and Ship From Location: Both of these fields should not have values in a contract with intent to Sell. In a contract with intent to Buy, enter your supplier and supplier site in these fields.
-
PO Need By Date: You must enter a date.
-
Ready To Procure: This box must be checked
-
-
Choose Action, and select Initiate Requisition.
-
This initiates the Requisition Import process to import requisitions from other Oracle or non–Oracle systems. Requisition Import creates requisition lines and distributions.
-
Purchase orders are created in the Purchase Orders window. Purchasing also provides automatic creation capabilities for documents.
-
You can view the all associated procurement information for the contract by navigating to the Deliverable Tracking Information window. Select the Requisition or Purchasing tab to display the linked information. See: Viewing Deliverable Tracking Information.
See Also
Overview of Requisitions, Oracle Purchasing User's Guide.
Requisition Import Process, Oracle Purchasing User's Guide.
Overview of Purchase Orders, Oracle Purchasing User's Guide.
AutoCreate Documents Overview, Oracle Purchasing User's Guide.
Initiating Planning
Oracle Project Contracts is integrated with Oracle Planning applications so you can plan contract deliverables.
The following activity takes place when planning is initiated in the Deliverable Tracking System:
-
Oracle Project MRP is used to plan the contract demand. For more information, see Launching a Project MRP Plan, Oracle Master Scheduling/MRP and Oracle Supply Chain Planning User's Guides.
-
Planning data is created as manual Master Demand Schedule (MDS) using a workflow
-
Project, task, unit number references from the contract deliverable are passed to the MDS entry in addition to other deliverable details
-
The MRP plan is run using the MDS as input
-
All the manufacturing planning takes place at the project or project-task level depending on how the planning options are set.
To initiate planning for deliverables:
-
Navigate to the Deliverables Tracking System window.
-
Enter the deliverable information for the contract lines. See: Deliverables Tracking System Window.
The following fields must contain the correct values in order to enable planning:
-
Create Demand check box
-
Plan Name
-
Item
-
Quantity
-
Ship From Organization
-
Expected Ship Date
-
-
Choose Action, and select Initiate Planning.
When planning demand is initiated, deliverable details are passed to Oracle Planning through a workflow. After the MRP plan is generated, run the Relief Deliverable Demand concurrent program to relieve MDS schedule quantities.
See: Relief Deliverable Demand Concurrent Program.
Relief Deliverable Demand Concurrent Program
After the planning demand is initiated in the Deliverable Tracking System, planning data is created as manual Master Demand Schedule (MDS) through a Project Contracts workflow. The material requirements plan (MRP) is then generated. The Deliverable Demand Relief concurrent program is used to relieve MDS quantities upon shipment against a contract deliverable. This program is used to prevent the duplication of demand.
To run the Relief Deliverable Demand program:
-
Navigate to the Submit Request window.
-
On the Submit a New Request window, choose Single Request and choose OK.
-
Submit Request window, in the Name field select Relief Deliverable Demand from the list of values.
The project listed on the deliverable is validated against the Project Parameters for the organization.
-
Choose Submit.
Defaulting Contract Changes to the Deliverables Tracking System
If you make changes to your contract lines in the Authoring Workbench, you can forward those changes to the Deliverables Tracking System. Changes default when fields exist on both the Authoring Workbench and the Deliverables Tracking System window.
After creating the change, and saving your work on the Authoring Workbench, a decision window prompts you for updating existing deliverables.
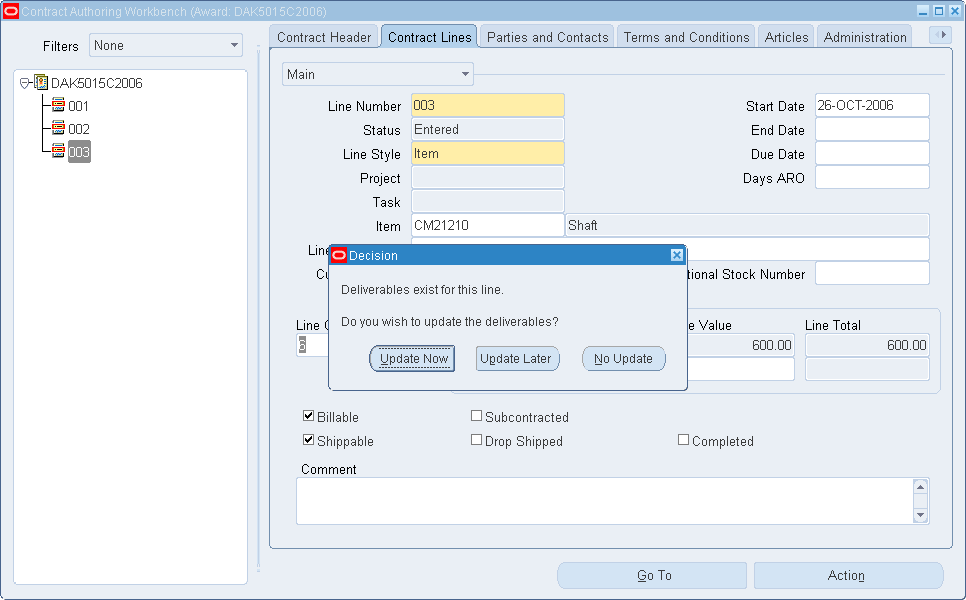
You can choose one of the following options:
-
Update Now: Automatically defaults your changes to the Deliverables Tracking System.
-
Update Later: Changes are not updated on the Deliverables Tracking System. When you exit and later reopen the Authoring Workbench, use the Default Deliverables action to forward saved changes to the Deliverable Tracking System.
-
No Update: Changed field information is not forwarded to the Deliverables Tracking System window, and a discrepancy will exist between authoring and deliverables.
Integration with Government Print Forms
You can export Oracle Project Contracts and Oracle Shipping Execution data into the federal government Defense Department form Material Inspection and Receiving Report (DD250). This feature provides for provisions required by the government for printing, viewing, and transmitting to a recipient through electronic means such as extensible markup language (XML).
Enter the required data for the report in fields on the Contract Authoring Workbench, the Deliverables Tracking System window, and the Confirm Delivery window in Oracle Shipping Execution. This data is integrated with a third party forms vendor.
To set up and print DD250:
-
Select a contract and navigate to the Contract Authoring Workbench.
The value in the Number field prints in the Order Number field on the DD250 form.
-
Select the Contract Lines tab and the lines to be shipped. Ensure that values are entered in the Item, Line Description, National Stock Number, Line Quantity, Unit Price fields.
-
Select the Parties and Contacts tab and ensure that records are created for the Prime Contractor, Payment Will Be Made By, and either the Shipped To, or Marked For roles.
See: Parties and Contacts.
-
Select the Terms and Conditions tab and ensure that records are created for the following Term Names:
-
Acceptance Point
-
Discount Terms
-
Contract Quality Assurance
-
Inspection Point
See: Terms and Conditions.
-
-
Select the Print Forms tab and create a record for DD250.
Select values in the following fields:
-
Form Type: Shipping
-
Form Name: DD250
-
Required box: enabled
The Start Date and End Date fields default the information created in the Print Forms tabbed window of the System Setup window.
Mark the other applicable boxes regarding information about this form including Customer Furnished and Completed. See: Print Forms Tabbed Window.
-
-
Save your work.
-
Navigate to the Deliverables Tracking System window and select the deliverables you want to ship.
-
Enter a value in the Quantity field and flag the other fields needed to initiate shipping.
See: Deliverables Tracking System Window, and Shipping Deliverables.
The print form values entered on the Contract Authoring Workbench default to the Deliverable Tracking Information window.
-
Choose Action and Initiate Shipping.
-
Navigate to the Query Manager window in Oracle Shipping Execution, and search for this delivery.
You can select the Lines and LPNs tab—and in the Lines region, select Project Contracts in the Source System field and any other search criteria. See: Finding Delivery Lines and LPNs, Oracle Shipping Execution User's Guide.
-
Choose Find to display the delivery in the Shipping Transactions window.
-
Enter the values used to create a shipping confirmation transaction, and then choose AutoCreate from the Actions menu. See: Creating a Trip, Oracle Shipping Execution User's Guide.
-
Select Ship Confirm from the Actions menu to display the Confirm Delivery window. Two fields must be set on this window to create the DD250 form:
-
Create Bill of Lading box must be enabled. This generates a Bill of Lading number and prints it if it is part of a document set.
-
In the Document Set field, select With DD250
-
-
Choose OK to save your work.
A trip and related stops are created for the delivery. Records are generated and passed into Oracle Shipping Execution through a workflow.
-
Navigate to the Worklist window in Oracle Workflow
You can use any Web browser that supports JavaScript and Frames to view and respond to your notifications in the Notifications Web page.
-
In the Subject field, select your DD250 record.
The notification contains a link to view or download the DD250 form.