Payroll Processing and Analysis
Payroll Processing and Analysis Overview
Using Oracle HRMS you can run a payroll, perform post processing on a successful payroll, and also make changes and corrections for a payroll that has not completed successfully.
Payroll Processing and Analysis in Oracle HRMS
You can run your payroll as:
-
A batch process if you want to include all employees or a group of employees in the same run
-
A QuickPay process if you want to run a payroll for an individual employee
You can perform all the necessary post processing to generate payment for your employees once you are satisfied that your payroll run results are correct:
-
The PrePayments Process enables you to allocate employee payments between the payment methods that you have defined.
-
The Payments Processes enable you to make automated payments to a bank account, generate cheques/checks and report on the amounts paid to your employees. You can also verify that cheques/checks have been cashed.
-
The External/Manual Payments Process enables you to make cash payments or to pay employees from external sources.
You can analyze your payroll run results to get early notification of possible discrepancies:
-
The Payroll Exception report enables you to identify overpayments or underpayments.
-
The Void Cheque/Check Payments Process allows you to cancel a cheque/check that was produced in error.
-
Employee Run Results give you a list of all results created for this payroll run.
You can use these processes for correcting a payroll run:
-
Correction of Run Results: Retries. Retries enable you to correct a payroll run before post-processing has occurred.
-
Correction of Run Results: Reversals. Reversals enable you to correct a payroll run when post-processing has already occurred.
-
Correction of Run Results: Rollbacks. Rollbacks enable you to correct a payroll run without keeping any record of the original run.
You can run these processes to make accurate provision for current payments backdated from a previous pay period, or current payments received in advance for a future pay period:
-
The RetroPay process enables you to retrospectively distribute current payments to the period in which they were earned.
-
For non-North American legislations, the Advance Pay process enables you to pay employees in advance for an absence recognized by your legislation.
Key Concepts
To enable you to process and analyze payrolls, you need to understand these concepts:
-
Note: You can use this if it is enabled for your localization.
-
For non-North American legislations: Advance Pay, Oracle HRMS Payroll Processing Management Guide
Reporting on Payroll Processing and Analysis
See Reports and Processes in Oracle HRMS, Oracle HRMS Window Navigation and Reports Guide
Payroll Processing and Analysis
The main purpose of the payroll run is to calculate employee pay correctly at regular intervals. In addition you can perform other payroll processes to ensure accuracy and provide flexibility for your organization. For example, you can roll back a payroll run when you want to carry out a test run without keeping any record of it having taken place. You can also run a RetroPay process when you want to make retrospective adjustments to allow for backdated pay awards.
Does Oracle Payroll enable you to run part payrolls?
Yes, Oracle Payroll enables you to run part payrolls. This is useful in each of the following circumstances where you do not want to process a payroll for the entire organization.
Calculating Pay for an Individual Employee or Group of Employees
If an employee leaves the company before the end of a payroll period, you will need to calculate the individual pay entitlement.
You may also want to calculate individual pay to check the details for an employee before starting a payroll run for all employees.
Specifying What Details You Can Include in a Payroll Run
You may want to specify that only particular types of earnings or particular categories of employee should be included in a payroll run.
Can you verify that a payroll run has completed successfully?
On completion of a payroll run you will need to verify that the run completed successfully. You can display run messages and view latest balances and assignment level results. You may also need to have relevant information grouped by topic in report format so that you can review the outcome of processing. Payroll runs can be monitored through the Payroll Progress Monitor, enabling you to view the name of the run and the percentage/time of completion.
Can you make adjustments after a payroll run has completed?
Oracle Payroll enables you to make each of the following types of adjustment when a payroll run has completed.
-
Addition of late entries that were not included in the initial run
-
Corrections to details that were wrongly entered in the initial run
-
Retrospective distribution of current payments to the period in which they were earned
When you have made these corrections and modifications you can then run the payroll again. However, you do not need to rerun the entire payroll. You need only to perform a retry, and Oracle Payroll will reprocess only those items that were incorrect in the initial run.
Can you produce payment and costing information from a completed payroll run?
Oracle Payroll enables you to use the results of a payroll run to allocate payments to your employees, and to provide costing information.
Ensuring that Employees are Paid by the Correct Payment Method
When a payroll run has completed you need to pay each employee according to the payment methods that you have specified. You may also need to override the predefined payment methods where employees are receiving special payments such as bonuses, which may not be paid by the usual methods of payment. You also have the ability to pay an employee, who has multiple assignments within your organization, a regular single payment.
Ensuring that Costing Information Can be Provided
On completion of a payroll run you may need to distribute the associated costs across particular cost centers. For information on this, see: Cost Analysis Overview, Oracle HRMS Enterprise and Workforce Management Guide
Can Oracle Payroll run payroll processes throughout a payroll period?
Yes, the continuous calculation process enables you to process static employee data throughout the payroll period, leaving you extra time for validation and correction at the end of the payroll period.
What if you want to know how much gross pay is required to produce a given net amount?
Where employers have agreed to pay tax on a known fixed net payment, Oracle Payroll can calculate the gross amount that employees must receive in order to meet all deductions and still receive the correct net amount. This is referred to as Net-to-Gross processing, and the calculations that derive the correct gross amounts are referred to as Grossups, provided that the feature is enabled in your country.
Note: The entries made in the "Grossup Processing" tab on the earnings form only specify what deductions are to be included when calculating the gross pay. The system looks at the taxability rules to determine what deductions should be taken from an earning and does not take into consideration what is entered on the grossup processing tab. For example, if the gross up processing tab shows that Federal tax is to be the only tax included in the grossup calculation but the element is subject to CPP, EI and Federal tax as per the taxability rules, all three taxes will be deducted.
Can you process external and manual payments
Yes, Oracle Payroll enables you to make external and manual payments.
The Payroll Run
Process Part of a Payroll
Oracle Payroll enables you to run a payroll and conduct post-processing on a payroll that has completed successfully. You can also enter subsequent changes and corrections for a payroll that has not completed successfully.
Oracle Payroll makes use of the following concepts when implementing payroll procedures:
Assignment Sets
Occasions when you need to use assignment sets for the payroll run include:
-
You need to process the night shift earlier than the rest of the payroll as they must receive their pay advices the night before the rest.
-
You need to process a correction run, as entries were not received in time for the normal run and the overtime must be paid this period.
-
You want to process an additional run for a long service award, which the enterprise is presenting as a cheque/check to each qualifying employee.
To fulfil these requirements, you can select from a range of assignments:
-
Include all assignments
-
Include or exclude individually identified assignments
-
Use a formula to include or exclude certain groups of assignments
Consolidation Sets
A consolidation set is a grouping of payrolls that simplify post-run processing and reporting. It enables you to produce a single set of reports, costing results, and other results for all payrolls in a consolidation set. When you run a payroll, make sure that you have named the consolidation set to which the payroll belongs.
Element and Distribution Sets
With a normal payroll run, you would want to include all elements, but for a long service award bonus you would want to include only the bonus element and the statutory elements. You first calculate gross pay for ascertaining the gross amount to transfer into the payroll account. Then you complete the gross to net calculation.
You can select element sets as follows:
-
Include all elements
-
Include or exclude individually identified elements
-
Include or exclude classifications of elements.
Canada only: When creating a Run set, you need to explicitly add the Canadian Tax recurring element to your element set.
US only: When creating a Run set, you need to explicitly add the VERTEX recurring element to your element set.
The predefined elements for Oracle Payroll are processed for every payroll run in which they have been included. The deductions are recalculated using the period totals, the amount already paid in previous runs is deducted, leaving the remainder as the deduction for the new payroll run.
QuickPay
QuickPay enables you to carry out payroll processing for individual employees. You can use QuickPay to pay employees who are leaving and who require payment immediately. If an employee asks what their net pay will be this month, you can run QuickPay to find the answer, then roll it back to remove all results from the database.
QuickPay: Two Options for PrePayments:
Once the QuickPay run has a status of Complete, you have a choice of two options for post-run processing:
-
Include the QuickPay in the batch prepayments processing for the assignment's payroll.
Choose this option if, for example, you have a new employee who joins after the payroll run for the current period has taken place. Instead of rolling back the whole payroll and resubmitting it with the new employee added, you run QuickPay instead so that you can include the new employee in the consolidation set for batch prepayments.
-
Start the PrePayments process from the QuickPay window, if necessary overriding the default payment method.
Choose this option if, for example, an employee is leaving and is waiting to be paid by cash or cheque/check.
Troubleshooting QuickPay: Concurrent Manager
When you start the QuickPay process, the screen freezes, and you cannot delete or update the QuickPay definition until the process completes.
You may receive one of the following error messages:
-
The process has not started
This means either that the concurrent manager has not been started, or that there are other requests of a higher priority. Ask your system administrator to start your request or change its priority.
-
The process has started but has not finished
Ask your system administrator to investigate the reason for this.
Continuous Calculation
Continuous Calculation enables you to distribute your payroll processing throughout a payroll period. You can run processes such as the payroll run, prepayments steps, and costing, which deal with predominantly static employee data, at the start of the payroll period, leaving more time for validation and correction of changed data.
Continuous Calculation works by using triggers. You define triggers and events which inform the system when data has changed. For example, if an employee receives a bonus, the corresponding event is triggered. When you subsequently run the Continuous Calculation process, the system identifies these triggers and marks the corresponding payroll processes (such as the payroll run) to be repeated. The affected processes are repeated in a batch process which can be run as often as required. You define the frequency of the batch process when you run the Continuous Calculation process.
Event Group Qualification
Event Qualification is a system to restrict the type of datetracked-events to be interpreted from the Incident Register. You can qualify the event so only a subset of these event types are actually returned. An event qualifier is a basic definition of events to be monitored for a table to represent additional filtering.
You can form event groups that enable you to construct a grouping of events. A list of events gives you the ability to say “I am interested in this event occurring” and provides a simple solution for most problems. In more complex implementations, you can use Event Qualifiers. If, for example, there are date changes, you can address it to a further level of granularity such as “why the change occurred”. It enables you to specifically control the events creation; for example, “to raise event if the change is from A to B, but do not raise it if it is from A to C. In other words, a specific change qualifies the event.
The Qualifiers button is enabled only when you enter an event with update type “Datetrack Update” using the Event Group window. An event can be qualified if predefined qualifiers exist for that table, and you can enter exact changes that cause the event to be valid or invalid.
If you require qualifiers, you can create a default change with old and new values set to <ANY_VALUE>, such that all changes result in the event being registered. A list of exceptions to this default behavior displays in the Value Change Exception region. You can set some causes of the event and select the Valid check box and if the change occurs, the application fires the event or validates the event. For example, consider 20 possible values for a field but the event is considered important only if value10 is changed to value15. By using the Event Qualifiers, you can add a validation that the application should not process if the fields are changed from and to any other value.
The Event Qualification window enables you to record the name of the qualifier, the table being monitored, the qualifying value and query (the From and To clause for the validation) used to validate comparisons. The table PAY_EVENT_QUALIFIERS holds this information.
Qualifiers are of two types - direct and indirect comparisons. You can use direct comparisons for assignment changes and indirect comparisons for entry value changes. The indirect changes relate to dynamic triggers monitoring one table, but looking for changes in another table. This is particularly relevant to entries, where you can monitor the entries table, then look for changes in the entry value table.
The table PAY_EVENT_VALUE_CHANGES holds information detailing the definitions of the changes that cause the events to be valid or invalid. The table includes the qualifier and name that is to be used, with the values of from and to, the column that triggers the qualification check, with whether it is valid and the type of proration it relates to.
The comparison determines if the event is a valid event and the type of proration that is associated with that event. You can use <ANY_VALUE> and <NULL> to denote the type of change in the comparison.
The Run Proration field is enabled only if the Event Group is Proration and if the legislation has enabled it in PAY_LEGISLATIVE_FIELD_INFO.
For information on how to define event group qualifiers, see: Defining Event Group, Note ID: 971206.1 on MyOracle Support.
Payroll Process Workflow
Oracle Payroll includes a process workflow that enables you to complete all the individual payroll processing steps by submitting a single request.
The workflow included in the process sends out notifications to the Payroll manager at key times in the process (such as when one phase of the process completes), initiating the next step in the process. The flow is defined by Oracle to match the methodology of payroll processing, and all the processes included in the Payroll Process Workflow are modules provided by Oracle Payroll. The flow is predefined, and the modules included are based on Oracle best practices. You can view the progress and results of the process as part of the Payroll Process Workflow interface.
If any of the critical modules encounters an error while running, the workflow process stops running and user intervention is required to continue the cycle.
In situations when the Payroll Process Workflow executes multiple processes in parallel, the next process gets executed after completion of all the previous parallel processes.
You can show and hide details for each process within the Workflow Diagram. You can view details of the individual processes from within the application through the Requests window, the same way you view individual processes.
When configuring this workflow, you are prompted to define the parameters for all of the constituent processes. If you do not specify the required parameters for a given module, then that module is not executed in the workflow. For example, if you do not specify a batch name, the workflow does not run the Batch Element Entry Transfer process.
See Using the Payroll Process Workflow
List of Processes Included in the Payroll Process Workflow
This table shows the processes in the Payroll Process Workflow and the sequence in which they run:
| Process Name | Sequence in Which It Is Run |
|---|---|
| BEE Batch Process (Transfer) | 1 |
| Retro-Notifications Report | 2 |
| RetroPay By Element | 3 |
| Payroll Process | 4 |
| Gross to Net Summary | 5 |
| Payroll Message Report
Note: This report only generates data if it detects "Fatal" errors. If you want to check for non-fatal issues, run this report separately from the Payroll Process Workflow. |
5 |
| Employee Assignments Not Paid | 5 |
| Payroll Exception Report | 5 |
| Statutory Deductions Report | 5 |
| Quebec Health Services Fund | 5 |
| Prepayments | 11 |
| Payroll Register Report | 12 |
| Element Register Report | 12 |
| Deduction Report | 12 |
| Direct Deposit | 15 |
| Canadian Payroll Archiver | 16 |
| Canadian Cheque Writer | 17 |
| Canadian Deposit Advice | 18 |
| Payment Report | 19 |
| Record of Employment by Assignment Set | 20 |
| ROE Worksheet | 21 |
| ROE Magnetic Media | 22 |
| Costing | 23 |
| Costing Detail Report | 24 |
| Costing Summary Report | 24 |
Parameters for Payroll Process Workflow
The common parameters for the Payroll Process Workflow are:
| 1 | Batch ID |
| 2 | Payroll Name |
| 3 | Consolidation Set Name |
| 4 | Date Earned |
| 5 | Date Paid |
| 6 | Event Group |
| 7 | Retro Assignment Set |
| 8 | Retro Element Set |
| 9 | Retro Start Date |
| 10 | Retro End Date |
| 11 | Payroll Element Set |
| 12 | Payroll Assignment Set |
| 13 | Payroll Run Type |
| 14 | Reporting GRE |
| 15 | Reporting Organization |
| 16 | Reporting Location |
| 17 | Select Report or Group |
| 18 | Exception Group Name |
| 19 | Exception Report Name |
| 20 | Override Variance Type |
| 21 | Override Variance Value |
| 22 | Direct Deposit Payment Method |
| 23 | Override Direct Deposit Date |
| 24 | Override CPA Code |
| 25 | Override File Creation Number |
| 26 | Chequewriter Payment Method |
| 27 | Chequewriter Sort Sequence |
| 28 | Cheque Style |
| 29 | Start Cheque Number |
| 30 | End Cheque Number |
| 31 | Chequewriter Payment Type |
| 32 | Deposit Advice Report Data Type |
| 33 | Deposit Advice Sort Sequence |
| 34 | Deposit Advice Assignment Set |
| 35 | Element Register Selection Criterion |
| 36 | Element Register Element Set |
| 37 | Element Register Element Classification |
| 38 | Element Register Element |
| 39 | Element Register Employee |
| 40 | Payment Method Override |
| 41 | ROE Effective Date |
| 42 | ROE Assignment Set |
Notifications
Oracle Payroll issues notifications on the status of all critical events. Notification will be of two types:
-
Require users response to continue
-
Does not require user response
Status of individual process are available in the Notification. Notification also includes Detail Information about the process.
The notifications available for Payroll Process Workflow are:
| Sequence | Notification Name | Comments |
|---|---|---|
| 1 | List of Processes to be Run | |
| 2 | BEE Batch Process (Transfer) Completed | |
| 3 | Retro-Notifications Report Complete require reply | Send Retro-Notification and Wait for Reply |
| 4 | RetroPay By Element Completed | |
| 5 | Completion of Payroll Process | |
| 6 | Reports Completed require reply | Reports Completed and Wait for Review |
| 7 | Pre Payments Completed | |
| 8 | Canadian Payroll Archiver Completed | |
| 9 | Cheque Writer Completed | |
| 10 | Deposit Advice Completed | |
| 11 | ROE Completed | Wait for ROE review |
| 12 | ROE Magnetic Media Completed | |
| 13 | Costing Notification | |
| 14 | Process Complete | |
| 15 | Process has Errored |
Multiple GRE Payroll Processing
There are a number of year end forms that employers use to report employee income and tax related deductions. At a federal level, the T4 slip reports employment earnings and the T4A slip reports pension, annuity, and other earnings. Employers issue these forms to employees in all provinces and territories. For those employees in the province of Quebec, RL-1 and RL-2 slips are also issued. The RL-1 reports employment and other income and the RL-2 reports retirement and annuity income.
The government reporting entity (GRE) controls which year end form is used to report earnings paid by an employer to an employee. To make employee payments that are reported on multiple year end forms, some additional configuration is required.
Multiple GREs
Oracle HRMS supports the ability to associate multiple GREs with a single employee assignment. This enables employers to make payments to an employee that are reported on different year end forms (such as T4 and T4A) without changing the GRE or creating an additional assignment for new GREs.
When an employee terminates and receives their final pay (T4) as well as a retiring allowance (T4A), all payments may now be made in one assignment simultaneously.
With this functionality, an employee can:
-
Receive a separate cheque or deposit advice for each GRE processed for the same pay period and assignment
-
Receive a single cheque or deposit advice for all GREs within a single tax group
This depends on the option selected for Payroll Archiver Level.
Run Type Architecture
Run types provide greater control on payroll runs. By employing them, Oracle Payroll provides different types of payroll runs, specifies the elements that are processed in those runs, and specifies how the results are to be paid.
The architecture of run types consolidates all the elements to be processed in one payroll run. The "All" run type processes all payrolls for the assignment, regardless of run type or year end form type.
The multiple GRE enhancement provides three layers of run types:
First Layer Run Types
-
All
-
Regular
-
Non Periodic
-
Lump Sum
Second Layer Run Types
-
T4/RL1 Regular
-
T4/RL1 Non Periodic
-
T4/RL1 Lump Sum
-
T4A/RL1 Regular
-
T4A/RL1 Non Periodic
-
T4A/RL1 Lump Sum
-
T4A/RL2 Regular
-
T4A/RL2 Non Periodic
-
T4A/RL2 Lump Sum
Third Layer Run Types
-
Standard Run
-
Tax Separate Run
-
Separate Payment Run
Run types are the driving force of the iterative engine. Each run type has a method of processing associated with it: Cumulative, Standard Run, Process Separately, and Separate Payment.
| Abbreviation | Run Method | Description |
|---|---|---|
| C | Cumulative | Cumulative run types are made up of run types in the subsequent layer. |
| N | Standard Run (Normal) | All earning elements of type N are processed under this run type. |
| P | Tax Separate Run (Process Separately) | The run type with run method P processes all earning elements for which the tax calculation must occur separately. |
| S | Separate Payment Run | The separate payment earning elements process under this run type. |
The first layer run types call all second layer run types whenever you initiate a payroll run. The "All" first layer run type calls all second layer run types. The "Regular," "Non Periodic," and "Lump Sum" first layer run types call only the appropriate second layer run types.
The "Regular" first layer run type calls all second layer "Regular" run types (such as "T4/RL1 Regular," "T4A/RL1 Regular," and "T4A/RL2 Regular").
| Layers | Run Type Name | Run Method | Short Name |
|---|---|---|---|
| First Layer | All | C | TOP |
| Regular | C | REG | |
| Non Periodic | C | NP | |
| Lump Sum | C | LS | |
| Second Layer | T4/RL1 Regular | C | REG_T4_RL1 |
| T4/RL1 Non Periodic | C | NP_T4_RL1 | |
| T4/RL1 Lump Sum | C | LS_T4_RL1 | |
| T4A/RL1 Regular | C | REG_T4A_RL1 | |
| T4A/RL1 Non Periodic | C | NP_T4A_RL1 | |
| T4A/RL1 Lump Sum | C | LS_T4A_RL1 | |
| T4A/RL2 Regular | C | REG_T4A_RL2 | |
| T4A/RL2 Non Periodic | C | NP_T4A_RL2 | |
| T4A/RL2 Lump Sum | C | LS_T4A_RL2 | |
| Third Layer | Standard Run | N | STANDARD |
| Tax Separate Run | P | TAX_SEP | |
| Separate Payment Run | S | SEP_PAY |
Note: The first layer run types with the suffix of "(old)" represent run types from a previous, 2-layer run type architecture. The "(old)" suffix helps you keep track of older payroll processes that you have run before the Multiple GRE functionality was enabled.
| Layers | Previous Run Type Name | Current Run Type Name |
|---|---|---|
| First Layer | Regular | Regular (old) |
| Non Periodic | Non Periodic (old) | |
| Lump Sum | Lump Sum (old) |
Payroll Runs
The first layer run type is a mandatory field for the Process Payroll Run and QuickPay processes. Depending on which first layer run type you select, Oracle Payroll automatically determines what other layers it needs to include. The elements to be selected are also determined by the run type of the payroll.
Note: Oracle recommends you use the "All" run type consistently to ensure proper retroactive processing.
If a non-periodic element is paid retroactive to a previous pay period, and in that pay period, only a regular run type was processed, Oracle Payroll taxes the non-periodic element as a regular element because a non-periodic run does not exist for the pay period. By processing "All," it ensures that a run exists for each run type for each pay period in the event that a retroactive process is required.
PrePayments Process
The PrePayments process supports multiple GRE functionality. By default, Oracle Payroll makes separate payments for each GRE processed during payroll runs for the same pay period and same assignment. Customers can have separate payments by tax group by selecting a Payroll Archiver Level of tax group for the business group.
The Statements of Earnings for PrePayments displays a Master Assignment Action (all assignment actions merged into one SOE) and a row for each assignment processed by Payroll. Customers should select the Master Assignment Action to view the PrePayment SOE.
You can use multiple GREs with the multiple assignment functionality disabled when you set the Payroll Archiver Level to "GRE" or "Tax Group." If you set the Payroll Archiver Level to "Tax Group," all GREs for an employee must belong to one tax group.
Oracle Payroll supports using multiple GREs with the multiple assignment functionality enabled (selecting the Multiple Assignments checkbox at the Payroll level) when the Payroll Archiver Level is Tax Group and all GREs for an employee belong to one tax group.
Note: This functionality is not supported when the Payroll Archiver Level is "GRE" or the Payroll Archiver Level is "Tax Group" and the GREs for an employee belong to multiple tax groups.
Payroll Archiver
The Payroll Archiver archives payroll data with or without the Multiple GRE functionality. The archiver creates two assignment actions for each assignment:
-
One is the master assignment action, which locks all prepayment assignment actions of the assignment
-
One is a child assignment action, which locks prepayment assignment actions of the GRE of the assignment
If an assignment has two GREs, the Archiver creates two prepayments when its Level is set to "GRE" (separate payment by GRE) and three assignment actions are created for this assignment for the prepayment.
Assignment Actions of Prepayment
-
Master Assignment Action
-
Child Assignment Action for GRE1
-
Child Assignment Action for GRE2
-
Assignment Actions for the Archiver
-
Master Assignment Action
Locks all above assignment actions of prepayment.
-
Child Assignment Action for GRE1
Locks the child assignment action of the prepayment for GRE1.
-
Child Assignment Action for GRE2
Locks the child assignment action of the prepayment for GRE2.
-
The archiver creates a separate assignment action for each separate payment element processed for it, and it archives the data separately.
Cheque Writer/Deposit Advice
You must run the Archive Cheque Writer and Archive Deposit Advice processes when one of the following conditions is true:
-
You have selected "Multiple Assignment" for the payroll
-
Multiple GREs are associated with an assignment
-
You have set the Payroll Archiver Level to "Year to Date within Tax Group"
Payroll Run Window
Using the Payroll Process Workflow
For complete information, see Payroll Process Workflow
Run the Payroll Process Workflow from the Submit Request window.
To run the payroll process workflow
-
Select Payroll Process Workflow in the Name field.
-
Click in the Parameters field if the Parameters window does not open automatically.
-
Enter the parameters for each process or report you want to include in the workflow (see below for a list of possible processes and parameters).
-
Click OK, and then Submit.
Starting a Payroll Run
You start a payroll run in the Submit Requests window.
To run a payroll
-
Select Single Request, then Canadian Process Payroll Run to process any of the run types: All, Regular, Non Periodic, or Lump Sum.
Note: If you are paying assignments that are only associated with a single GRE, select Process Payroll Run instead. If you are using the Multiple Assignment functionality provided with Canadian Payroll, you must select this option. Canadian Process Payroll Run will not run when you have multiple assignments defined for one employee in a GRE.
Unless you select All, Oracle Payroll processes each request as a single run. Process Regular runs before you process Non Periodic runs. If you select All, Oracle Payroll processes all run types for all the GREs associated with assignments in the run. Regardless of what you select, the Canadian Process Payroll Run request creates multiple assignment actions per run type. You can view these by way of the Assignment Processes window.
-
Click on the parameters window for each run. If you have selected Process Payroll Run, the parameter window automatically opens.
-
Select a payroll or consolidation set to be processed. If you select a payroll, its default consolidation set displays.
Use the consolidation set to control post-run processing of the results.
-
Select the payroll period for the run.
-
Select an element set and assignment set if required.
-
Enter the run type to be processed.
-
Choose OK and then Submit.
Setting Up Continuous Calculation
To set up your system for continuous calculation:
-
In the Table Event Update window, check that the events are defined for the tables you require for continuous calculation.
-
If the table has already been defined, but the required event is missing, create either an Update, Delete, or Insert event and enter the table column to which the event refers. Select the change type defined by the event.
-
If the tables you require for continuous calculation have not been defined in the Table Event Update window, define them now in the Table Event Updates window.
-
In the Functional Area Maintenance window, choose the Incident Register functional area. Make sure your triggers are included in this functional area. If your triggers are not included, insert them.
You can also activate the triggers according to legislation or business group.
See: Grouping Dynamic Triggers into Legislative Functional Areas
Note: When you save a single trigger, this has the effect of regenerating all triggers contained in the same package.
-
Run the Continuous Calculation process from the Submit Reports and Processes window.
Running the Continuous Calculation Process
The Continuous Calculation process enables you to process static employee data throughout a payroll period.
You run the Continuous Calculation process from the Submit Requests window.
To run continuous calculation
-
Enter Continuous Calculation in the Name field of the Submit Requests window.
-
Select a payroll.
-
Schedule your process.
You can choose how often you want to run the continuous calculation process. For example, you can run the process every day, every week, or on specific days.
-
Choose Submit.
Running QuickPay
You navigate to the QuickPay window from an employee assignment.
To define a QuickPay run for an employee assignment
-
Set your effective date to the day you want to make the QuickPay payment.
The Payroll Period displays for the date selected, and the Date Paid and Date Earned for this period also display. Date Paid is the regular payment date for your legislation. You can update the Date Paid field, but only to another period's regular payment date.
Note: If you select an effective date for which there is no valid payroll period, all three fields remain blank. You cannot select an effective date earlier than the start date of the parent record - the employee assignment.
-
Select a consolidation set.
The default is the consolidation set for the assignment's payroll.
Note: The Number field remains blank and the status field remains set to Unprocessed until the QuickPay run process is completed.
-
If your legislation makes use of run types, select the run type for this QuickPay.
-
Enter a pay advice date and message if required. These fields are for information only.
-
Save your QuickPay definition.
Note: All assignment processes for the assignment's payroll must have a status of Complete for you to save the definition. If not, you see an assignment interlock failure message. Check the status of the assignment processes in the Assignment Processes window, and delete, roll back or rerun any non-Complete processes.
If the QuickPay Run itself displays In Error or Marked for Retry, choose the Retry Run button to run the process again.
To execute a QuickPay run for an employee assignment
-
Choose the Element Selection button if you want to check or verify element entries for the QuickPay run. All the elements for the assignment that exist as of Date Earned are listed in the Element Selection window. Select or clear the Include in Run check box for elements you want to include or exclude from the run.
-
You can choose the Entry Values button to view entry values for each element.
Note: You cannot create, update or delete entries or entry values in the Element Selection and Entry Values windows. You can only select or clear the Include check box for entries.
-
Choose Start Run to run the QuickPay process.
You run QuickPay from the QuickPay window, not from the Submit Requests window. You can view the status of the run in the View Requests window. If necessary, you can then mark it for retry or roll it back either from the QuickPay window or the Payroll Processes window.
When the run is processed, the Status and Number fields in the QuickPay Run block display values for the run as follows:
-
Number: Numbering is consecutive, starting from 1, for each QuickPay run in a payroll period. There is a separate series for each separate payroll. The numbering restarts from 1 for each successive period.
-
Status: Values displayed for processed QuickPay runs are Complete, In Error, Mark for Retry. You cannot enter or update values directly in this field. Choose Retry Run to rerun the QuickPay process for runs with the status In Error or Marked for Retry.
-
Running the Generate Run Balances Process
Run this process when you want to recalculate run level balance values that may have become invalid, such as through changes to historical data.
You run this process in the Submit Requests window.
To run the Generate Run Balances process
-
In the Name field, select Generate Run Balances.
-
Select the Parameters field to open the Parameters window.
-
In the Parameters window, enter a start date from when you want run balances recalculated.
-
Select a mode to determine which balances to include. There is no specific time required to run these, such as once a month. All Invalid Balances is likely to be run most often, with Single Balances and All Balances run as required. You can choose from the following:
-
A Single Balance - If you select Single Balance mode, then the Defined Balance field becomes active.
-
All Invalid Balances
-
All Balances
Important: The profile option PAY: Allow All Balances for Assignment Level controls running the process for all balances at the assignment level. The profile option is set to No by default. Set this option to Yes if you want to run the process at the assignment level and for All Balances mode.
If the profile option is set to NULL or No and you select the mode as All Balances, then you can select Group at the balance level. When you select the mode as All Invalid Balances, you can run for both Assignment and Group levels.
-
-
Select the option that shows the route for retrieving balance values, even if its status is Invalid.
-
Select a balance level to determine which balances are to be recalculated, depending if enabled for your localization:
-
Assignment
-
Group
-
Assignment and Group
-
-
Click OK and then Submit.
Performing Run Balance Diagnostics
Use the Run Balance Architecture Diagnostic report to assist you in identifying problems with your balance reporting setup.
This report consists of four sections:
| Run Balance Status | Lists the status of each run balance for your business group. It lists all invalid balances, followed by all valid balances. |
| Balance Attribute Status | Lists the status of each attribute with the date from which the balance is valid. |
| Balances By Attribute | Describes the relationship between attributes and balances. This section is omitted from the report by default. |
| Incorrect Run Balance and Attribute Setup | Displays any balances that are in attribute but have no row in balance validation. |
The recommended best-practice is to run the Generate Run Balance process every month to correct invalid balances. Use the Run Balance Architecture Diagnostic report to identify these invalid balances, and any other conditions that may cause performance issues with your run balances. Do not use the Payroll Technical Diagnostics report to determine the status of run balances. Always use the Run Balance Architecture Diagnostic report.
To run the Run Balance Architecture Diagnostic report
-
In the Name field, select the Run Balance Architecture Diagnostic report name.
-
Click in the Parameters field to open the Parameters window.
-
Choose whether you want the output report in either CSV or HTML formats.
-
Indicate if you want to enable the "Balances By Attribute" section.
-
Click OK and then Submit.
-
Check the report output and fix any problems that were detected:
-
If there are any entries in the "Run Balance Status," "Balance Attribute Status," or "Balances By Attribute" sections, run the Generate Run Balances process to correct the invalid balances.
-
If there are any entries in the "Incorrect Run Balance and Attribute Setup" section, contact Oracle Support and log a TAR. This data condition is likely an issue with the code in the report rather than a data issue.
-
Adjusting Run Balances
The Adjust Run Balance Dates concurrent process moves the date for the valid run balances backwards or forwards.
The recommended best practice is to maintain run balances over a 15 month period. You can use Adjust Run Balance Dates to purge older run balances by moving the effective date forward, or you can expand your effective run balances period by moving the date back.
As part of your yearly planning, schedule time to run this process to purge older run balances.
Note: The Adjust Run Balance Dates process adjusts the dates for valid run balances only.
You ran the Generate Run Balance process with the start date of 01-Jan-2003. On 01-Apr-2005, you run the Adjust Ran Balance Date process with a date of 01-Jan-2004. This purges any run balances with a date earlier than 01-Jan-2004.
To run the Adjust Run Balance Dates process
-
In the Name field, select the Adjust Run Balance Dates process name.
-
Click in the Parameters field to open the Parameters window.
-
In the Parameters window, enter a start date from when you want run balances adjusted.
-
Click OK and then Submit.
Setting Up Payroll Processing for Multiple GREs
Configuring Employee Statutory Information
The "GRE and Other Info" flexfield under the Statutory Information tab on the Assignment form provides fields so that you can associate three different GREs to an assignment, each representing a different kind of income:
| GRE Field | Income Type |
|---|---|
| Government Reporting Entity (T4/RL1) | Employment income, reported on a Federal T4 slip and the Quebec RL-1 slip |
| Government Reporting Entity (T4A/RL1) | Other income, such as retiring allowances, which is reported on the Federal T4A slip and the Quebec RL-1 slip |
| Government Reporting Entity (T4A/RL2) | Retirement income, reported on a Federal T4A slip and the Quebec RL-2 slip |
To specify the multiple GREs
-
Create three GREs, one to represent each payment type.
See: Entering Organization Classifications, Oracle HRMS Enterprise and Workforce Management Guide
-
For each GRE, in the Statutory Information tab of the Assignment window, assign the appropriate reporting type and business number.
See: Entering Employer Identification Information for a GRE, Oracle HRMS Enterprise Workforce Management Guide
-
Open the Assignment window.
-
Click the Statutory Information Tab.
See: Entering Additional Assignment Details, Oracle HRMS Workforce Sourcing, Deployment, and Talent Management Guide
-
Specify the GREs.
The list of values for each segment displays only those GREs of the appropriate type within the same business group. If you select T4/RL1 GRE in the first field, and if there is only one GRE for each type within the same business group, then the second and third fields default the T4A/RL1 and T4A/RL2 GREs respectively.
A business group has only three GREs:
-
"Active" (T4/RL1 GRE)
-
"Inactive" (T4A/RL1 GRE)
-
"Pension" (T4A/RL2 GRE)
When you assign the "Active" GRE to the first field, Oralce HRMS automatically assigns the other two GREs, "Inactive" and "Pension," to the remaining two fields.
-
-
Click OK and save your work.
Post Processing for a Payroll
Post-Processing for a Payroll
PrePayments Process
Oracle Payroll enables you to define any number of payment methods, and you can distribute employee pay over more than one method using either a percentage or monetary split.
You can override the Pre-Payments process.
Suppose you have run the normal payroll run and made payments through one payment method. You then have to run supplementary payments for some employees and pay them by a different payment method. The PrePayments process, having distributed the regular payments over the payment methods entered, allocates the supplementary payments to the override method.
Canadian Cheque Writer Process
Run the Canadian Cheque Writer process to generate cheques for a specified payroll and consolidation set over a specified time period.
You can generate sequential serial numbers for cheque printing, and you can use this feature to account for cheque stationery used during the cheque printing process. If you do this, you also need to take into account the cheques you use to carry out the alignment of your printer.
A cheque format is supplied with the Canadian Cheque Writer process. You can customize the format, or add your own cheque style to meet your enterprise requirements.
Void Cheque Payments Process
Run the Void Cheque Payments process when you want to void cheques you have issued using Oracle Cheque Writer. You may want to do this if there is a printing error or if the cheques you print are misplaced or destroyed. The process cancels the cheques issued, records details of the cancellation, and enables you to give a reason for canceling.
RetroPay
You run the RetroPay process when items affecting pay have to be altered retrospectively, leading to backpay adjustments. You may have to make such adjustments when, for example, pay awards are backdated, or when you receive late notification of changes to element entries that should have changed in the past. Such changes may affect groups of employees or individuals.
The RetroPay process can be run in one of the following ways, depending on which RetroPay process has been enabled in your legislation.
RetroPay by Aggregate
This combines all backdated adjustments into a single entry for each balance. It does not allow you to see how the effects of backdated changes would be distributed across individual processes. For example, if an employee receives a March salary increase of 100 per month backdated to January, then RetroPay will only calculate the total backpay of 300. It will not allow you to see how the 300 total has been distributed across each of the three months from January to March.
RetroPay by Run
This allows you to see how backdated changes are distributed across individual processes. For example, if an employee receives a March salary increase of 300 backdated to January then RetroPay by Run allows you to see modified process statements for January, February, and March.
Both RetroPay by Run and RetroPay by Aggregate rerun the payroll calculations for all the periods affected by the retroactive change. This payroll processing is held in memory only and the results are not saved to the database. Instead, the system calculates the difference between the original results and the results using the new information.
This recalculation feeds into a pay balance that you choose. If the changes affect multiple elements or rate values, you may want to recalculate Gross Pay YTD. Alternatively, you may want to recalculate the balance for a single element, for example, Regular Salary YTD. Another option is to define a new balance and to recalculate for a specific set of elements that feed that new balance.
Canadian Payroll Archiver
You run the Canadian Payroll Archiver to ensure that online details of payments that are shown on a deposit advice or cheque display the same information when viewed at a later date regardless of any retrospective changes that may have been processed. This process must be run after each payroll period so that Self Service users can view their payslips.
You must run the Canadian Payroll Archiver before:
-
Running the Canadian Cheque Writer process for the 'Archive Cheque Writer' style
-
Running the Canadian Deposit Advice for an 'Arhive Deposit Advice' report data type.
External/Manual Payments Process
Use the External/Manual Payments window to record cash or cheque payments to employees from external sources or petty cash. The window enables you to record details of each payment.
Data Locks for Payroll Processes
Data locking is a mechanism that enables you to protect your data from unwanted updates. For example: If you are running a monthly report at the end of each month, the data contained in the report has to remain unchanged for as long as the report exists. If you want to change this data, you must first rollback the report.
Data Locks: Automatic or User Selectable
Automatic
Some payroll processes automatically lock your data and you do not need to take any additional action to apply a lock. For example, whenever you run the prepayments process, your data is automatically locked against update while the prepayments process completes.
User Selectable
Some payroll processes do not apply a lock automatically, but do provide you with the option of selecting a process to apply a lock. Where this is the case, the lock process can usually be selected from the Submit Requests window for your legislation.
For example, if you are using Oracle Payroll for Ireland you can select the P30 Data Lock process which specifies a date at which you want to lock the P30 monthly report before generating the report output. By applying the data lock you also maintains the lock date as a historical record so that you can be confident that subsequent monthly reports start from the correct point.
Data Locks: Rollbacks Can Override Them
You should also be aware that some payroll post-processes can override any data locks that you have established. Oracle Payroll does not provide validation to prevent this, since it is a legitimate action that you may need to perform. For this reason we recommend that you should always refer to the individual topics in Oracle Applications Help before attempting to work with user selectable data locks.
Payroll Register Report CA
The Payroll Register Report CA displays the balances for earnings, deductions, and taxes. Use Payroll Register Reporting to show employee and group level details, such as:
-
Complete payroll run details for pay runs, quick pays, and reversals
-
Specific federal or provincial taxes withheld
-
Earnings and deductions
-
Employer liability
-
Predefined liabilities:
-
CPP ER Liability
-
EI ER Liability
-
PPIP ER Liability
-
QPIP ER Liability
-
WCB ER Liability
-
-
User-defined employer liabilities. You must complete setup steps to view the user-defined employer liabilities in the Payroll Register Report. See: Setup Steps to View the User-Defined Employer Liabilities in the Payroll Register Report.
-
Setup Steps to View the User-Defined Employer Liabilities in the Payroll Register Report
The Payroll Register Report CA displays the predefined or seeded liabilities by default. To view the user-defined employer liabilities, complete the following setup steps for each user-defined employer liability:
-
Create a primary balance with Category as 'Employer Liabilities'.
-
Navigate to the Balance window.
-
Enter the name of the balance.
-
Select Employer Liabilities as the category.
-
Enter Money as units.
-
Click Dimensions. Add the following dimensions to this balance.
Assignment within Government Reporting Entity Run
Assignment Payments
Assignment within Government Reporting Entity Month
Assignment within Government Reporting Entity Year to Date
-
Save your work.
-
Query the balance and click the Attributes button.
-
Make sure that the PAY_CA_EMPLOYER_LIABILITY attribute is attached to the balance.
-
-
Create a user-defined employer liability element.
-
Navigate to the Element window.
-
Create element details for the user employer liability element.
-
Click the Further Information field. The Further Element Information window appears.
-
Select the balance that you created in the Primary Balance field.
-
Save your work.
-
Click Balance Feeds. The Balance Feeds window appears.
-
Add the balance that you created as the balance feed.
-
-
Attach the user-defined employer liability element to the employee record.
-
Navigate to the People window.
-
Search for the employee.
-
Click Assignment and then Entries. The Element Entries window appears.
-
Add the element that you created.
-
Click Entry Values and provide the required details in the Entry Values window.
-
-
Run the Payroll and PrePayments Processes before you run the Payroll Register Report.
Payroll Register Report
The Payroll Register Report CA request set consists of two separate reports:
-
Payroll Register CA report
This report shows details for Organizations, Locations, and GREs, as well as details for individual employees and any Earnings and Deductions element paid or deducted during that payroll run, sorted by employee.
Note: Depending on the selected parameters, the Payroll Register report can be large and may take considerable time to run and print. See the final section of this document on report performance for more information.
-
Payroll Register Totals CA report
This report shows the current totals for the selected sort options: Organizations, Locations, and GREs. It also shows the total value of all hours and earnings for all employees processed in the payroll run.
See: Payroll Register Reporting
Parameters
The following parameters exist for the Payroll Register reports:
-
Beginning Date Paid (required)
Select the beginning date for report selection. This date represents the payment date for the payroll runs/QuickPays or the effective date of the payroll reversals that are to be included in the report.
-
Select the end for the report selection. This date represents the payment date for the payroll runs/QuickPays or the effective date of the payroll reversals that are to be included in the report.
Note: In very large organizations, there may be a slight delay in accessing the List of Values for Ending Date Paid.
-
Select from the List of Values to run this report for a specific payroll. Either a payroll or a consolidation set is required to run the Payroll Register report.
-
Select from the List of Values to run this report for a consolidation set. If you select a payroll in the Payroll field that is associated with a consolidation set, this field automatically populates. Either a payroll or a consolidation set is required to run the Payroll Register report.
-
Government Reporting Entity (GRE)
Select from the List of Values to limit the report to a single GRE. If you enter nothing in this field, the report contains information for all valid GREs.
-
Select from the List of Values to limit the report to a single Organization. If you enter nothing in this field, the report contains information for all valid Organizations.
-
Select from the List of Values to limit the report to a single Location. If you enter nothing in this field, the report contains information for all valid Locations.
-
Select from the List of Values to limit the report to a single employee. If you enter nothing in this field, the report contains information for all valid employees.
-
The default entry for this field is Yes. If you enter No in this field, the report shows balances for employees that have no current balances, but may have month-to-date or year-to-date balances.
This parameter applies to individual line items only and does not suppress entire assignments with Zero Records.
-
The default entry for this field is No. With No selected, the report shows balances for Hours, Earnings, and Deductions. If you select Yes, the report also includes balances for Taxable Wages and Employer Tax Liabilities.
-
The default entry for this field is Current. The Payroll Register report always show the current balances. The default entry for this field is Current. The Payroll Register report always show the current balances. In addition to current balances, the report detail can also display month-to-date (MTD) and year-to-date (YTD) balances.
Note: You may encounter slow performance while running the Payroll Register report with a month-to-date Reporting Dimension selected. Depending on the reporting dimension selected, the Payroll Register Totals report displays the current, month-to-date and year-to-date totals.
-
There are three fields for sort options. See the Sort Options section for more information on how to properly use these parameters.
-
The default entry for this field is No. If Yes is selected, the Payroll Register report prints with a page break after each employee contained in the report. This parameter is ignored by the Payroll Register Totals report.
Sort Options
You can organize Payroll Register reports according to user-defined criteria or sort options. Oracle Payroll does not require that you use sort options to generate your report, but they are the best way to customize the reports to your specific needs. You can sort reports by any or all of the following options:
-
GRE
Note: GRE should only be selected as a sort option if you have included all GREs in the parameters for a Payroll Register request set.
-
Location
-
Organization
-
Employee Name
The sort options are hierarchical in nature. The Sort Option Two field enables only after you have made a selection in the Sort Option One field. The Sort Option Three field enables after you have made a selection in the Sort Option Two field.
The following is an example of how to use sort options to customize the Payroll Register reports.
If you want to create reports sorted by GRE, Organization, and Location, you enter GRE into the Sort Option One field, Organization into the Sort Option Two field, and the Location into the Sort Option Three field. Using the selected Sort Options, Oracle Payroll generates the reports listing payroll register data for each Location alphabetically by Organization within each GRE for the selected payroll or consolidation set.
Note: The sort options are nested. Using the previous example, if you change Sort Option Two from Organization to Location, Sort Option Three is automatically cleared.
Report Output
In order to make balance information more meaningful, Oracle HRMS groups similar types of balances in the report:
-
Earnings (Including Non Payroll Payment)
-
Deductions
-
Employer Liabilities
-
Information
The Payroll Register Report and Payroll Register Totals Report are two separate reports submitted by way of a single Request Set. Both reports are printed according to the parameters that you select. These reports are printed in landscape fashion and are designed to fit on 8.5" x 11" paper. The Payroll Register Report and Payroll Register Totals report do not contain page numbers.
For performance reasons (see below) the two reports are designed to take advantage of a multi-threaded environment, and contain sequence numbers that can be viewed from the Requests window.
Note: Due to certain printer configurations, a heading may appear twice on the Payroll Register Report. In cases where this happens, all of the selected report data is listed beneath the second instance of the heading.
Performance and the Payroll Register Reports
The Payroll Register reports can contain large amounts of information. For maximum system performance, these reports are designed to take advantage of a multi-threaded environment. In order to make sure you are getting maximum performance from the Payroll Register reporting process, your system should have the Payroll Action Parameters configured for Parallel Processing.
If you are running the Payroll Register request set for a large organization, you may experience performance concerns when including quarter-to-date balances in the Reporting Dimensions parameter. You may also experience performance issues if you change the Full Report parameter from No to Yes.
Post-Run Process Windows
Running Post-Run Processes for QuickPay
To run Pre-Payments and other processes from the QuickPay window
-
Choose Start Pre-Payments. If required, you can override the default payment method for the assignment. You have a choice of Cash or Cheque for prepayments run from the QuickPay window.
The status for the completed process displays in the Status field in the QuickPay Pre-Payment block.
-
When a status of Complete displays, do one of the following:
-
Choose External Payment to make payment by cash or cheque from the External/Manual Payments window.
-
Leave the payment to be made by the normal post-pay process.
Note: If you have already included the QuickPay run in the default consolidation set for the assignment payroll, it can take part in the batch pre-payment process for the payroll without further action on your part.
-
Defining the Profile Option to Generate Payslips for Employees with Zero Net Pay
Payroll administrators can generate payslips for those employees receiving a net pay amount of zero by defining the PAY: Show Payslip with Zero Net Pay profile option. This is useful for informing employees when there is payroll activity on their behalf during the pay period but that activity results in zero net pay.
Note: This profile option is applicable to the US and Canadian localizations only.
This profile option impacts the following pay processes:
-
US: Payslip and Deposit Advice
-
Canada: Payslip
The PAY: Show Payslip with Zero Net Pay can be configured at the following levels: Site, Application, Responsibility, or User.
-
If the profile option value is set to No or left blank, then the payroll archive process does not archive data for those employees receiving a net pay amount of zero and payslips are not generated for such employees. The default value is Null.
-
If the profile option value is set to Yes, then the payroll archive process archives data for those employees receiving a net pay amount of zero and payslips are generated for such employees.
Viewing Payroll Process Results
To view, retry or roll back payroll processes
-
Select the name, period dates and action type of the payroll you want to view results for.
If you leave the Period To field blank, the end date in the Period From field becomes the end date for the query. If you run the query directly without entering payroll or period details, the window displays all payroll process results for all payrolls in the Business Group.
-
Choose Find.
The window displays details of all payroll processes for the payroll and period selected. See below for further display details.
-
To mark a payroll process for retrial, select the Retry check box for the record. You can then run the Retry process from the Submit Requests window.
-
To monitor the progress of a payroll run, select the record and choose the Process Info button. This activates the Payroll Progress Monitor, allowing you to view the name of the run currently processing and the percentage/time of completion. You can update these details through the Refresh button or check the Automatic Refresh box to enable changes to display as they occur.
-
To roll back a payroll process, select the record and choose the Delete Record icon. This deletes the process from the database and returns all values to their former state.
Note: Use the Payroll Processes window to roll back small processes only. It is better to roll back large processes such as payroll runs from the Submit Requests window. This runs the process under concurrent manager control, freeing you to carry out other tasks during processing and handling the process more quickly. You can also run processes for assignment sets in Submit Requests.
-
To see further information about the assignments making up the payroll process, select the record and choose from the buttons at the bottom of the window. Information then displays for the records you select.
-
Assignment Process: Lists details of the assignment processes making up the payroll process.
-
Message: Displays any system messages relating to the payroll process.
-
Process Info: Summarizes processing status information for the assignment processes.
-
Conc Manager: Enables you to query details of the run to view log file details.
-
Breakdown: Summarizes costing process information as follows:
-
Costings that were correctly costed (Normal Number)
-
Costings posted to the suspense account
Note: Costings can be posted to the suspense account if costing codes are wrong or, for example, values missing for distributed costing. Such costings still have a status of Complete. For costing processes to be given a status of Error there must be a serious breakdown at system or process level.
-
-
Output: This button enables you to view and download magnetic media, audit and other output files from the View Payroll Process Results page after running the Federal/State/Local W-2 magnetic media processes, State Quarter Wage Listings (SQWL's), and TIAA CREF interface. If the Output button is inaccessible (greyed out), this may indicate you are attempting to view output from a process other than the processes listed above, such as the pdf output from the Employee W2 PDF process.
-
Reconciliation Details Allows you to see whether a specific payment has been cleared by the system. One of the following statuses will be displayed:
-
Cleared
-
Uncleared
-
In error
-
You can also see the messages produced by the reconciliation process.
-
Printing the Payslip
You can generate your payslips to be printed and distributed to your employees using a report that picks up the payroll information you extracted previously through the payslip archive process, and converts it into a formatted file ready for printing. The payslip consists of a header and a body section, with the information you enter in the Parameters window appearing on the header page and the payslip figures in the main body.
You run the payslip report from the Submit Request window.
To run the payslip report
-
Select your country's payslip report in the Name field.
-
In the Parameters window, enter the start and end dates for the period of time you want the report to cover. You run the report for the same period as the payslip information extracted by the payslip archiver.
-
In the Parameters window, select a payroll, consolidation set and assignment set. This selects the employees for whom you want to run the report. Selecting a payroll overrides the consolidation set and processes the report only for the selected payroll. You can opt to select just a consolidation set, but cannot do the same with the assignment set.
-
The Sort Order fields that appear on the header section of the payslip enable you to divide the payslips into areas of your choice. For example, the current defaults divide the payslips into Person Info 1(Employer), Organization and Full Name areas. You can change the default values that appear by selecting another item from the list of values, selecting information about Additional Employee Details, Address Details, Payroll Information and Employee Details.
-
Choose the Submit button.
-
Choose the View Output button to view or print the payslip report file.
Running the Employee Assignments Without Payroll Report
Use the Employee Assignments without Payroll report to identify any employee assignments that do not have a payroll.
To run the Employee Assignments without Payroll report
-
Enter the beginning date. This is the date from which you want to begin identifying assignments without a payroll.
-
Enter the end date. This is the date at which you want your report to conclude.
-
If you are running the PDF version of this report, select a template for your PDF template.
-
Click OK.
-
Click Submit.
Running the Payroll Actions Not Processed Report
Use the Payroll Actions Not Processed report to identify all payroll actions not yet processed.
You run the Payroll Actions Not Processed report from the Submit Requests window.
To run the Payroll Actions Not Processed Report
-
Enter a start date for the report to begin from.
-
Enter an end date to indicate the end of the reporting period.
-
Enter further identifying information to make your report as specific as possible. For example, you can enter payroll name, consolidation set name, and Government Reporting Entity (GRE).
-
Select the mode, for example, Costing, Payroll Archive and so on.
-
If you are running the PDF version of this report, select a template for your PDF template.
-
Click OK.
-
Click Submit.
Running the Employee Assignments Not Processed Report
Use the Employee Assignments Not Processed report to produce a list of all unprocessed employee assignments and decide on sort criteria for the list.
You run the Employee Assignments Not Processed report from the Submit Requests window.
To run the Employee Assignments Not Processed report
-
Enter a beginning date for the start of your reporting period.
-
Enter an end date to specify the end of your reporting period.
-
Enter further identifying information to make your report as specific as possible. For example, you can enter payroll name, default consolidation set name, Government Reporting Entity (GRE), and location.
-
Enter the sort options for your report.
-
If you are running the PDF version of this report, select a template for your PDF output.
-
Click OK.
-
Click Submit.
Running the Element Register Report
Use the Element Register report after a payroll or QuickPay run to display a listing of the elements and pay values for each employee. You can specify selection criteria to determine what the report includes. For example, you can select elements by element set, element classification or by individual element name. You can also specify a report output type for browser display, or for export to an editable spreadsheet.
You run the Element Register report from the Submit Request window.
Note: The report output is based on the value set for the ICX: Numeric Characters profile option. For example, if the profile option value is given as 10.000,00, then the report output is generated with the decimal separator "," (comma). When set to blank, the decimal and group separators are obtained from the NLS_NUMERIC_PARAMETERS setting in the database. The decimal separator will be "." (dot) and the thousand separator will be "," (comma), unless NLS_NUMERIC_CHARACTERS is modified.
To run the element register report
-
Enter the Beginning Date Paid and the Ending Date Paid to specify your reporting period.
-
Select the criterion for determining which elements appear in your report. You can select one of the following:
-
Element set - your report includes all elements in an element set
-
Element classification - your report includes all elements belonging to a classification.
-
Element Name - your report only includes a single element
When you have selected the criterion, enter a name to identify the particular element set, element classification or element for reporting. For example, if your criterion is element set, you enter the name of the particular element set that you want to report on.
-
-
Select the Payroll, or Consolidation Set for your report. If you select a payroll, the consolidation set appears by default. You must select either a payroll, or a consolidation set.
-
If you want to report on a single GRE, select the GRE name. If you do not make a selection, your report contains information for all valid GREs.
-
If you want to report on a single organization, select the Organization name. If you do not make a selection, your report contains information for all valid organizations.
-
If you want to report on a single location, select the Location name. If you do not make a selection, your report contains information for all valid locations.
-
If you want to report on an individual employee select Employee name. If you do not make a selection, your report contains information for all valid employees.
-
Select an assignment set if you want to report on all assignments in a particular assignment set. You can only select a static assignment set. Dynamic, or formula-based assignment sets do not appear in the list of values.
-
Select an Output File Type:
-
HTML - this file type produces an output file that you can view in your browser.
-
Comma Delimited - this file type produces a comma delimited file that you can view in a browser. Additionally, you can save the comma delimited file as csv or txt so that you can open it for editing in a spreadsheet.
-
Entering Payroll Archiver Level Information
You indicate if the Payroll Archiver should archive either GRE or Tax Group YTD balances using the Payroll Archiver Level from the Organization window.
To enter Payroll Archiver Level information
-
Select Payroll Archiver Level from the Others window.
-
Select the Level.
-
Save you work.
Running the Canadian Payroll Archiver
The Payslip uses data archived by the Canadian Payroll Archiver process. You run this process after each payroll period to enable Self Service users to view their current Payslip. It is run after Prepayments and before the Archive Chequewriter and Archive Deposit Advice. The results may be viewed through the following navigation: View > Assignment Process Results > Query the employee > Select type "Magnetic Report" > View Results.
Archiving Payoll Data for Zero Net Pay:
If required, you can set the PAY:Show Payslip with Zero Net Pay profile option to archive the payroll data and generate payslips for those employees receiving a net pay amount of zero. See: Defining the Profile Option to Generate Payslips for Employees with Zero Net Pay
When Multiple Assignments is enabled, Oracle Payroll archives the sum of the net pay for all assignments. When the Payroll Archiver Level is set to GRE, the net pay will be archived for each GRE and for each separate payment element. When the Payroll Archiver Level is set to Tax Group, the sum of the net pay for all GREs within the same tax group is archived. All remaining information is archived by assignment.
You run the Canadian Payroll Archiver from the Submit Request window.
To run the Canadian Payroll Archiver
-
In the name filed, select Canadian Payroll Archiver.
-
Enter the Starting Pay Date and Ending Pay Date. The archive process archives data for payroll runs that have a payment date between the starting and ending payment dates.
-
In the Parameters window, select the name of the payroll and consolidation set to run the process for. When you select a payroll, the default consolidation set is displayed.
-
Choose Submit and then OK.
Direct Deposit
The Direct Deposit process produces files that you transfer to your financial institution for direct deposit payments. This process must be run prior to the Deposit Advice process.
To run the Direct Deposit process
-
In the Name field, select Direct Deposit.
-
Click in the Parameters field if the Parameters window does not open automatically.
-
Select the name of the payroll or consolidation set to run the process for.
When you select a payroll name, its default consolidation set displays.
-
Enter the start and end dates of the time span for the processing to cover. For some financial institutions, this should be within 30 days of the effective date.
-
Select the name of a payment method to use for all the payments resulting from this process run.
The payment method defaults to Direct Deposit.
-
If required, enter an override deposit date to use for all the payments resulting from this process run.
-
If required, enter an appropriate code in the override CPA code.
Override CPA code is used to override the default code 200, which identifies the transaction as a payroll deposit. There are other values to identify specific payment types (vacation pay for example) under payroll deposit, if desired.
-
If required, enter the override file creation number.
Override file creation number overrides the system maintained sequence number for file creation numbers. This may be necessary when a file needs to be re-transmitted under the same file creation number.
-
Choose OK, and then Submit.
This process creates two output reports:
-
Summary report
-
File for submission
To download or view these reports, select View Output from the Requests window. A HTML page displays with links to these reports.
Deposit Advice Report
The Canadian Deposit Advice report produces deposit advices with attached statements of earnings.
You must run the Archive Deposit Advice process when:
-
You have selected "Multiple Assignment" for the payroll
-
Multiple GREs are associated with an assignment
-
You have set the Payroll Archiver Level to "Year to Date within Tax Group"
Moore Canada has developed a preprinted form that accommodates the standard print format of the deposits. Customers in Canada can call Moore Canada at 1-888-621-1919 to place an order for the forms. The form number for the deposit is 10002. The Canadian French PAY patch must be applied to have deposit advices print in French.
To run the Deposit Advice report
-
Select Canadian Deposit Advice in the Name field.
-
Select the Report Data Type:
-
Archive Deposit Advice (uses multi assignment processing archived data)
-
Deposit Advice
-
-
Select the name of the payroll or consolidation set to run the process for. When you select a payroll name, its default consolidation set displays.
-
Enter the start and end dates of the time span for the deposit advice to cover.
-
A default sort sequence of Organization, then Person, displays. To add more sort sequences, your MIS staff can modify the Deposit Advice process.
-
Select an assignment set if required.
-
Choose OK, and then Submit.
Reconciling Payments
You can use Oracle Payroll in combination with Oracle Cash Management to verify that payments have been processed. The process is:
-
Import the bank statement. You do this in Oracle Cash Management.
-
See: Importing Bank Statements in the Oracle Cash Management User's Guide.
-
Run the automatic reconciliation process. You do this from Oracle Cash Management.
-
See: Reconciling Bank Statements in the Oracle Cash Management User's Guide.
-
View the results of the reconciliation process. You can do this either through Oracle Payroll or Oracle Cash Management.
-
In Oracle Cash Management, you can view the following reports:
-
Available Transactions
-
AutoReconciliation Execution
-
-
Identify any payments that are marked in error and reconcile them manually.
Note: If you are using Oracle Payroll with Oracle Cash Management for the reconciliation of payments, you need to set up accounting reference data when you are setting up Oracle Cash Management.
See: Define Accounting Reference Data in the Oracle Training Administration Implementation Steps.
Running the Payment Report
The Payment Report provides users with the ability to reconcile their payments with other reports. Through this report, users can view the employee-level details with their payments. It displays all payments made to employees based on the consolidation set, period start date, and period end date. It displays all employee payments within a GRE, payroll, payment type, or payment method that are paid in each pay period.
The Payment Report includes the following payment details:
-
Employee Name
-
Employee Number
-
Payment Type
-
Payment Number
-
Bank Number - Bank Name
-
Transit Code
-
Account Number
-
Payment Amount
-
Payroll Name
-
GRE
-
Period
-
Payment Method
Run this report from the Submit Request window.
Note: The report output is based on the value set for the ICX: Numeric Characters profile option. For example, if the profile option value is given as 10.000,00, then the report output is generated with the decimal separator "," (comma). When set to blank, the decimal and group separators are obtained from the NLS_NUMERIC_PARAMETERS setting in the database. The decimal separator will be "." (dot) and the thousand separator will be "," (comma), unless NLS_NUMERIC_CHARACTERS is modified.
To run the Payment Report
-
Select Payment Report in the Name field.
-
If the parameters window does not open automatically, click in the Parameters field to open it.
-
Enter the starting and ending pay dates to include in this report.
-
Select a payroll or consolidation set whose run results the report should cover. If you select a payroll, HRMS automatically selects the consolidation set.
-
Optionally, select a GRE. If you make no selection, the report covers all GREs.
-
Optionally, select a payment type. If you make no selection, the report covers all payment types.
-
Optionally, select a payment method. If you make no selection, the report covers all payment methods.
-
Specify the output file type. You can choose between HTML and Comma Delimited. The default is HTML.
-
HTML: The report opens in a Web browser.
-
Comma Delimited: The report opens in a Web browser, but the data is comma delimited. You can save the file with a .csv or .txt extension.
-
-
Click OK and then Submit.
Running the PrePayments Process
Run this process when you want to do one of the following:
-
Distribute employee pay over more than one payment method using either a percentage or monetary split. You define the amount or percentage to be paid by each method for each employee in the Personal Payment Method window. You can also indicate that payment methods should take account of run types and run types at personal level.
-
Override the default payment methods. For example, you may need to run a supplemental payroll for which the distribution between payment methods will be different from that specified for the regular run. When you override the defaults, the payments for the supplemental run only are distributed according to the override payment method that you specify.
-
If Multiple Assignments is enabled for your Payroll, the PrePayments process creates one regular cheque for all assignments and one cheque for each separate payment. Assignments must be included on the same payroll in the same payroll period or they will not be included.
Note: The Net Pay from each assignment is deposited into the payment method account for the primary assignment unless the primary assignment is not processed. If it is not processed and the secondary assignment does not have a personal payment method, the employee receives a cheque.
Additional Information: You cannot delete personal payment methods if a PrePayment process is run.
Canada only: The PrePayments process creates different results depending on the setting of the Payroll Archiver Level option, which is set at the business group level. If you set it to "Tax Group," PrePayments consolidates the payment for all GREs of an assignment (which must belong to the same tax group), and Cheque Writer/Deposit Advice generates only one cheque or deposit (this can happen only at the beginning of the year, after running the last payroll for the previous year and before running the first payroll of the current year). If you set it to "GRE," PrePayments creates separate payments for each GRE, and Cheque Writer/Deposit Advice generates a cheque or deposit advice for each GRE.
See: Entering Payroll Archiver Level Information
You run this process from the Submit Requests window.
To run the PrePayments process
-
In the Name field, select PrePayments.
-
In the Parameters window, select the name of the payroll or consolidation set to run the process for.
When you select a payroll, the default consolidation set is displayed.
-
Enter the start and end dates of the time span for the prepayments processing to cover.
Note: If you specify the end date and not a start date, the process automatically uses the start date of the period for the end date you specified.
-
If required, enter an override payment method. The method you select overrides all other payment methods for this processing.
-
Choose OK.
-
Choose Submit
Payroll Register Reporting CA
Run the Payroll Register Report CA request set from the Submit Requests window.
The Payroll Register Report CA displays the predefined or seeded liabilities by default. To view the user-defined employer liabilities, complete the setup steps for each user-defined employer liability. See: Setup Steps to View the User-Defined Employer Liabilities in the Payroll Register Report.
To run the Payroll Register Report CA request set
-
Select Request Set as the type of run.
-
In the Submit Request Set window, select the Payroll Register Report CA from the List of Values.
-
Select the parameters for the report. See the Payroll Register Parameters section for more information.
-
Click OK to close the Parameters window.
-
Choose Options to select a printer or accept the default.
-
In the Submit Request Set window, click Submit.
Important: The Payroll Register Report can require substantial printing resources for large organizations.
Defining the Profile Option for Pay Annualization
Oracle Payroll provides the flexibility to choose the way annual salary is calculated and reported on the following:
US Payroll
-
Online Payslip (both HTML and PDF).
-
Checks produced by running the Check Writer(XML) process.
-
Deposit advices produced by running the Deposit Advice (XML) process.
Canada Payroll
-
Online Payslip (both HTML and PDF)
-
Cheques produced by running the Canadian Cheque Writer (XML) process.
-
Deposit advices produced by running the Canadian Deposit Advice (XML) process.
This flexibility is available through the HR: Base Annual Salary Display on Standard Work Conditions profile option, which allows you to choose whether to base the annual salary calculation on the pay annualization factor value of the employee assignment's salary basis or to derive it based on the values populated in the employee assignment's standard working conditions.
You can select any of the following values:
-
Yes: When set to Yes the annual salary is calculated based on the assignment's standard work condition values.
-
No: When set to No or left blank, the annual salary is calculated based on the pay annualization factor configured in the employee assignment's salary basis.
This profile option can be set at Site level only.
Use the System Profile Values window to set the profile option.
Setting Up Custom BI Publisher Templates for Canadian Payroll
Oracle Payroll for Canada supports the use of custom Oracle Business Intelligence (BI) Publisher templates for the following reports:
-
Canadian Cheque Writer (XML)
-
Canadian Deposit Advice (XML)
-
Canadian Third Party Cheque Writer (XML)
-
RL1
-
RL2
-
T4
-
T4A
-
Gross to Net Summary (CA)
This functionality may be used after performing the following procedures:
-
Registering Custom Templates: Register the custom templates using the XML Publisher Administrator responsibility.
-
Grouping Related Templates: After registering the custom templates, you must group them so that all the related templates can be seeded at the same time using the new concurrent program.
-
Registering the Custom Template Group: Once a template group has been created, it needs to be registered in the Payroll tables in order to make use of the custom templates. For this purpose, use the concurrent program Register BI Publisher Templates for Payroll. This program will accept two parameters: the XML based Payroll report name for which registering is to be done and the template groups that have been created based on the custom templates. This concurrent program will seed the template details in the Payroll tables after which the template group can then be selected when running the applicable report.
-
Using the Template Group: Select the applicable template group from the list of all available template groups when running a report in order to produce the output in the desired format.
Creating custom BI Publisher template for Canadian Cheque Writer (XML)
To register a custom BI Publisher template for Canadian Cheque Writer (XML)
The following example can be used to create a custom template for Canadian Cheque Writer (XML). Using the XML Publisher Administrator responsibility, navigate to Templates.
-
Click Create Template.
-
Enter the following fields:
-
Name: Enter an appropriate name (in less than 50 characters), for example: Custom Template for Canadian Cheque Writer.
-
Code: Enter the code such as '%_PDF' in all caps to indicate that this template will be used for generating the PDF file. This format is mandatory, for example, CUSCACHQWVXML_PDF.
-
Application: Select Payroll.
-
Data Definition: Select Canadian Cheque Writer XML.
-
Type: Select RTF.
-
Start Date: Enter a date prior to today's date
-
Subtemplate: Select No.
-
Default Output Type: PDF
-
Description: Enter a description.
-
Language: Select English.
-
Territory: Select Canada.
-
-
Click Apply.
To group related templates for Canadian Cheque Writer (XML)
Using the Application Developer responsibility, navigate to Applications > Lookups > Common.
-
Enter the following fields:
-
Type: Enter an appropriate name. The name should be in a format like '%CA% PAYCAARCHCHQW %'. The format is mandatory, for example, VISION_CA_ PAYCAARCHCHQW _CUST.
-
Meaning: Enter an appropriate meaning here as this will be displayed as the Template Group in the report, for example, 'Custom Template for Canadian Cheque Writer (XML)'. (Less than 80 characters)
-
Application: Select Payroll
-
Code: Enter the code used to register the template, for example, 'CUSCACHQWVXML_PDF'.
-
Meaning: Re-enter the same template code (that is, re-use the Code as the Meaning).
-
From: Enter a date prior to today's date.
-
-
Click Save.
To register a template group for Canadian Cheque Writer (XML)
The template group comprised of the custom template created earlier can now be registered to produce the Canadian Cheque Writer (XML) output. Using the CA Payroll Manager or CA HRMS Manager or CA Super HRMS Manager responsibility, navigate to View > Request.
-
Submit a New Request and click OK.
-
Enter the parameters as follows:
-
Payroll Process Name: Canadian Cheque Writer (XML).
-
Template Group: Enter the template group name to be registered, for example, Custom Template for Canadian Cheque Writer (XML).
-
-
Click OK and submit the request.
To use a template group for Canadian Cheque Writer (XML)
The template group comprised of the custom template created earlier can now be used to produce the Canadian Cheque Writer (XML) output. Using the CA Payroll Manager or CA HRMS Manager or CA Super HRMS Manager responsibility, navigate to View > Request.
-
Submit a New Request and click OK.
-
Name: Canadian Cheque Writer (XML).
-
Select the Template Group created earlier in parameter 'Cheque Style'.
-
Click OK and submit the request.
Creating custom BI Publisher template for Canadian Deposit Advice (XML)
To register a custom BI Publisher template for Canadian Deposit Advice (XML)
The following example can be used to create a custom template for Canadian Deposit Advice (XML). Using the XML Publisher Administrator responsibility, navigate to Templates.
-
Click Create Template.
-
Enter the following fields:
-
Name: Enter an appropriate name (in less than 50 characters), for example: Custom Template for Canadian Deposit Advice.
-
Code: Enter the code such as '%_PDF' in all caps to indicate that this template will be used for generating the PDF file. This format is mandatory, for example, CUSCADEPADVXML_PDF.
-
Application: Select Payroll.
-
Data Definition: Select Deposit Advice XML for CA
-
Type: Select RTF.
-
Start Date: Enter a date prior to today's date.
-
Subtemplate: Select No.
-
Default Output Type: PDF
-
Description: Enter a description.
-
File: Browse to select the desired template file. Make sure this file is the one to be used for PDF file generation.
-
Language: Select English.
-
Territory: Select Canada.
-
Translatable: Select the check box.
-
-
Click Apply.
To group related templates for Canadian Deposit Advice (XML)
Using the Application Developer responsibility, navigate to Applications > Lookups > Common.
-
Enter the following fields:
-
Type: Enter an appropriate name. The name should be in a format like %CA%PYCADEPADVXML%. The format is mandatory, e.g. VISION_CA_PYCADEPADVXML_CUST.
-
Meaning: Enter an appropriate meaning here as this will be displayed as the Template Group in the report, for example, 'Custom Template for Canadian Deposit Advice (XML)'. (Less than 80 characters)
-
Application: Select Payroll
-
Code: Enter the code used to register the template, e.g. 'CUSCADEPADVXML_PDF'.
-
Meaning: Re-enter the same template code (i.e. re-use the Code as the Meaning).
-
From: Enter a date prior to today's date.
-
-
Click Save.
To register a template group for Canadian Deposit Advice (XML)
The template group comprised of the custom template created earlier can now be registered to produce the Canadian Deposit Advice (XML) output. Using the CA Payroll Manager or CA HRMS Manager or CA Super HRMS Manager responsibility, navigate to View > Request.
-
Submit a New Request and click OK.
-
Name: Select Register BI Publisher Templates for Payroll.
-
Enter the parameters as follows:
-
Payroll Process Name: Canadian Deposit Advice (XML).
-
Template Group: Enter the template group name to be registered, e.g., Custom Template for Canadian Deposit Advice (XML).
-
-
Click OK and submit the request.
To use a template group for Canadian Deposit Advice (XML)
The template group comprised of the custom template created earlier can now be used to produce the Canadian Deposit Advice (XML) output. Using the CA Payroll Manager or CA HRMS Manager or CA Super HRMS Manager responsibility, navigate to View > Request.
-
Submit a New Request and click OK.
-
Name: Canadian Deposit Advice (XML).
-
Select the Template Group created earlier in parameter 'Deposit Advice Style'.
-
Click OK and submit the request.
Creating custom BI Publisher templates for Third Party Cheque Writer (XML)
To register custom BI Publisher templates for Third Party Cheque Writer (XML)
The following example can be used to create a custom template for Third Party Cheque Writer (XML). Using the XML Publisher Administrator responsibility, navigate to Templates.
-
Click Create Template.
-
Enter the following fields:
-
Name: Enter an appropriate name (in less than 50 characters), for example: Custom Template for Third Party Cheque.
-
Code: Enter the code using the mandatory format: <CODENAME>_PDF in all caps to indicate that this template will be used for generating the PDF file, for example CUSCATPCHQWXML_PDF.
-
Application: Select Payroll.
-
Data Definition: Select Third Party Cheque Writer XML.
-
Type: Select RTF.
-
Start Date: Enter a date prior to today's date.
-
Subtemplate: Select No.
-
Default Output Type: PDF
-
Description: Enter a description.
-
File: Browse to select the desired template file. Make sure this file is the one to be used for PDF file generation.
-
Language: Select English.
-
Territory: Select Canada.
-
Translatable: Check the check box.
-
-
Click Apply.
To group related templates for Canadian Third Party Cheque Writer (XML)
Using the Application Developer responsibility, navigate to Applications > Lookups > Common.
-
Enter the following fields:
-
Type: Enter an appropriate name. The name should be in a format like '%CA% PAYCATPCHQW%'. The format is mandatory, for example, CA_ PAYCATPCHQW_CUST'.
-
Meaning: Enter an appropriate meaning here as this will be displayed as the Template Group in the report, for example, 'Custom Template for Canadian Third Party Cheque Writer (XML)'. (Less than 80 characters)
-
Application: Select Payroll
-
Code: Enter the code used to register the template, for example, CUSCATPCHQWXML _PDF'.
-
Meaning: Re-enter the same template code (i.e. re-use the Code as the Meaning).
-
From: Enter a date prior to today's date.
-
-
Click Save.
To register a template group for Canadian Third Party Cheque Writer (XML)
The template group comprised of the custom template created earlier can now be registered to produce the Canadian Third Party Cheque Writer (XML) output. Using the CA Payroll Manager or CA HRMS Manager or CA Super HRMS Manager responsibility, navigate to View > Request.
-
Submit a New Request and click OK.
-
Name: Select Register BI Publisher Templates for Payroll.
-
Enter the parameters as follows:
-
Payroll Process Name: Canadian Third Party Cheque Writer (XML).
-
Template Group: Enter the template group name to be registered, for example, Custom Template for Canadian Third Party Cheque Writer (XML).
-
-
Click OK and submit the request.
Now the Custom Template is available for use as the parameter 'Cheque Style' for the concurrent program 'Canadian Third Party Cheque Writer (XML)'.
To use a template group for Canadian Third Party Cheque Writer (XML)
The template group comprised of the custom template created earlier can now be registered to produce the Canadian Third Party Cheque Writer (XML) output. Using the CA Payroll Manager or CA HRMS Manager or CA Super HRMS Manager responsibility, navigate to View > Request.
-
Submit a New Request and click OK.
-
Name: Canadian Third Party Cheque Writer (XML).
-
Select the Template Group created earlier in parameter 'Cheque Style' (e.g. Custom Template for Canadian Third Party Cheque Writer (XML)).
-
Click OK and submit the request.
Creating custom BI Publisher templates for Employee RL1 and RL2 Online PDFs
Oracle Payroll provides the following predefined templates to generate RL1 and RL2 PDFs online. All these templates are maintained under XDO template manager, which is available through the XML Publisher Administration responsibility.
Following tables provide information about RL1 and RL2 predefined templates:
| Definition Name | Default File | Template Name |
|---|---|---|
| RL1 PAPER PDF | PAYCARL1PAPERPDF.pdf | RL1 Paper PDF |
| RL1 PAPER PDF | PAYCARL1AMPDFxxxx.pdf | RL1 Amendment PDF |
| RL1 PAPER PDF | PAYCARL1CLPDFxxxx.pdf | RL1 Cancelled PDF |
| RL1 PAPER PDF | PAYCARL1ERR.rtf | RL1 PDF Error Report |
| RL1 PAPER PDF | PAYCARL1AMERRxxxx.rtf | RL1 Amendment Error Report |
| RL2 Paper PDF | PAYCARL2PAPER.pdf | RL2 Paper PDF |
| RL2 Paper PDF | PAYCARL2AMPDFxxxx.pdf | RL2 Amendment PDF |
| RL2 Paper PDF | PAYCARL2CLPDFxxxx.pdf | RL2 Cancel PDF |
| RL2 Paper PDF | PAYCARL2ERR.rtf | RL2 PDF Error Report |
| RL2 Paper PDF | PAYCARL2AMERRxxxx.rtf | RL2 Amendment Error Report |
Note that xxxx denotes the year.
You can create your own templates using the same data definition of predefined RL1 PDF and RL2 PDF templates.
The following example can be used to create custom templates to generate RL1 and RL2 PDFs online:
To register custom BI Publisher templates for Employee RL1 and RL2 Online PDFs
-
Using the XML Publisher Administrator responsibility, navigate to Templates.
-
Click Create Template.
-
Enter the following fields:
-
Name: Enter an appropriate name, for example: RL1 Amend PDF 2012
-
Code: Enter the code such as '%_PDF' to indicate that this template will be used to generate the PDF file, for example., PAYCARL1AMPDF_2012PDF.
-
Application: Select Payroll.
-
Data Definition: Select RL1 PAPER PDF for RL1 or RL2 PAPER PDF for RL2
-
Type: Select PDF.
-
Start Date: Enter a date prior to today's date.
-
Subtemplate: Select No.
-
Default Output Type: PDF
-
Description: Enter a description.
-
File: Browse to select the desired template file. Make sure this is the correct file to be used for PDF file generation.
-
Language: Select English.
-
Territory: Select Canada.
-
-
Click Apply.
Creating custom BI Publisher templates for Employee T4 and T4A Online PDFs
Oracle Payroll provides the following predefined templates to generate T4 and T4A PDFs online. All these templates are maintained under XDO template manager, which is available through the XML Publisher Administration responsibility.
Following tables provide information about T4 and T4A predefined templates:
| Definition Name | Default File | Template Name |
|---|---|---|
| T4 PDF | PAYCAT4MAINxxxx.pdf | T4 Slip |
| T4 PDF | paycat4instruct.pdf | T4 Instructions |
| T4 PDF | PAYCAT4AMPDFxxxx.pdf | T4 Amendment PDF |
| T4 PDF | PAYCAT4AMINSTxxxx.pdf | T4 Amendment Instructions |
| T4 PDF | PAYCAT4CLPDFxxxx.pdf | T4 Cancellation PDF |
| T4 PDF | PAYCAT4CLINSTxxxx.pdf | T4 Cancellation Instructions |
| T4A XML | PAYCAT4APDFxxxx.pdf | T4A PDF Template |
| T4A XML | PAYCAT4APDFERRxxxx.rtf | T4A PDF Error Report |
| T4A XML | PAYCAT4AAMPDFxxxx.pdf | T4A Amendment PDF |
| T4A XML | PAYCAT4AAMPDFERRxxxx.rtf | T4A Amendment PDF Error Report |
| T4A XML | PAYCAT4ACLPDFxxxx.pdf | T4A Cancellation PDF |
Note that xxxx denotes the year.
You can create your own templates using the same data definition of predefined T4 and T4A templates.
The following example can be used to create custom templates to generate T4 and T4A PDFs online:
To register custom BI Publisher templates for Employee T4 and T4A Online PDFs
-
Using the XML Publisher Administrator responsibility, navigate to Templates.
-
Click Create Template.
-
Enter the following fields:
-
Name: Enter an appropriate name, for example: RL1 Amend PDF 2012
-
Code: Enter the code such as '%_PDF' to indicate that this template will be used for generating the PDF file, for example., PAYCAT4PDF _PDF.
-
Application: Select Payroll.
-
Data Definition: Select T4 PDF for T4 or 'T4A XML for T4A.
-
Type: Select PDF.
-
Start Date: Enter a date prior to today's date.
-
Subtemplate: Select No.
-
Default Output Type: PDF
-
Description: Enter a description.
-
File: Browse to select the desired template file. Make sure this is the correct file to be used for PDF file generation.
-
Language: Select English.
-
Territory: Select Canada.
-
-
Click Apply.
Creating custom BI Publisher templates for the Gross to Net Summary (CA) Report
The Gross to Net Summary (CA) report shows current totals for the results calculated for earnings, deductions, and other elements of pay from the regular Payroll Run, QuickPay, and Payroll Reversal processes. Oracle Payroll provides a predefined BI Publisher template named CA Gross to Net Summary (PDF) to generate CA Gross to Net Summary reports. For an overview, see Gross to Net Summary (CA) Report.
The following list provides information about the predefined template:
-
Template Name: CA Gross To Net Summary (PDF)
-
Code: PAY_CA_XML_GTN
-
Data Definition: CA Gross To Net Summary (PDF)
-
Type: RTF
-
Default File: PAY_CA_GTN_TEMPL.rtf
You can use the predefined CA Gross To Net Summary (PDF) template or you can create custom templates that are based on the predefined template.
Prerequisite: PAY_CA_GTN_TEMPL.rtf is the template layout for the CA Gross to Net Summary (PDF) template. When you create a custom template, you can use either the predefined template layout or a custom template layout. Before you create a custom template, you must create a custom template layout. Use PAY_CA_GTN_TEMPL.rtf as a sample to create a custom template layout.
To register a custom BI Publisher template to generate Gross to Net Summary (CA) reports
-
Log in to the XML Publisher Administrator responsibility.
-
Navigate to the Templates page.
-
Click Create Template. The Create Template page appears.
-
Enter the following fields:
-
Enter an appropriate name such as Custom Template for Canada Gross to Net Summary Report.
-
Enter a code using the mandatory format: <CODENAME>_PDF. For example, you can enter CUSCAGTNXML_PDF as the code.
-
Select Payroll as the application.
-
Select CA Gross to Net Summary (PDF) as the data definition.
-
Select RTF as the type.
-
Enter a date prior to today's date as the start date.
-
Select No in the Subtemplate field.
-
Enter a description of the custom template.
-
Browse to select the template layout file. Make sure that this is the correct file to be used for PDF file generation.
-
Select English as the language.
-
Select Canada as the territory.
-
Click Apply.
-
Using Custom XML with Oracle US & Canadian Payroll Reports
Custom XML code can be defined for the Oracle BI Publisher based Check/Cheque Writer (XML), Third Party Check/Cheque Writer (XML), Deposit Advice (XML) and PDF Payslip delivered with the US and Canadian Payroll localizations. Using the PAY: Disable Custom XML Code (Yes/No) profile option, users can enable or disable the custom XML code to run if there are issues with the custom code.
For more information about this functionality, refer to the Using Custom XML with Oracle US & Canadian Payroll Reports note on My Oracle Support note ID 1530347.1.
Running the Cheque Writer (XML) Process
Running the Canadian Cheque Writer (XML) Process
The Canadian Cheque Writer (XML) process produces pay cheques with attached statements of earnings (SOEs).
Oracle Payroll provides the flexibility to choose the way annual salary is calculated and reported in the pay cheques using the HR: Base Annual Salary Display on Standard Work Conditions profile option. See: Defining the Profile Option for Pay Annualization
Note: The report output is based on the value set for the ICX: Numeric Characters profile option. For example, if the profile option value is given as 10.000,00, then the report output is generated with the decimal separator "," (comma). When set to blank, the decimal and group separators are obtained from the NLS_NUMERIC_PARAMETERS setting in the database. The decimal separator will be "." (dot) and the thousand separator will be "," (comma), unless NLS_NUMERIC_CHARACTERS is modified.
To run the Canadian Cheque Writer (XML) process
-
Select Canadian Cheque Writer (XML) in the Name field.
-
Select the process name: Cheque.
-
Select the payroll or consolidation set of the pay processing for which to produce cheques and SOEs. If you select a payroll, its default consolidation set displays.
-
Enter the start and end dates of the time period for which to print the cheques and statements of earnings.
-
The system defaults Canadian Cheque as the payment type and Cheque as the payment method for all the payments resulting from this process run. A default sort sequence of Organization, then Person, displays. Select the cheque style. If using the seeded template, select Seeded Archive Cheque Writer Template.
-
Enter the cheque number with which to start this cheque run.
-
If required, enter the cheque number with which to end this cheque run. Select the Action Parameter Group.
-
Enter a date in the Overriding Cheque Date field. This is an optional parameter. If you provide the overriding cheque date, then the Payment Date and the Cheque Date are printed with this override date in the cheque writer output.
-
Select the Cheque Style to generate the output in the PDF format.
-
Choose OK, then click Submit.
Running the Canadian Deposit Advice (XML)
The Canadian Deposit Advice (XML) program generates deposit advice data in the PDF format.
Note: The report output is based on the value set for the ICX: Numeric Characters profile option. For example, if the profile option value is given as 10.000,00, then the report output is generated with the decimal separator "," (comma). When set to blank, the decimal and group separators are obtained from the NLS_NUMERIC_PARAMETERS setting in the database. The decimal separator will be "." (dot) and the thousand separator will be "," (comma), unless NLS_NUMERIC_CHARACTERS is modified. The PDF output generated by the concurrent request will display output according to the profile value.
To run the Canadian Deposit Advice (XML) process
-
Select Canadian Deposit Advice (XML) in the Name field.
-
Select the name of the payroll or consolidation set to run the process for. When you select a payroll name, its default consolidation set displays.
-
Enter the start and end dates of the time span for the deposit advice to cover.
-
A default sort sequence of Organization, then Person, displays. To add more sort sequences, your MIS staff can modify the Deposit Advice process.
-
Select an assignment set if required.
-
Select a predefined or custom template as the deposit style to generate the output in the PDF format.
-
Choose OK, and then Submit.
Running the Canadian Third Party Cheque Writer (XML)
The Canadian Third Party Cheque Writer (XML) program produces the third-party cheque information in the form of XML data that merges with the RTF template to generate PDF output.
Prerequisites
- Before you run the Canadian Third Party Check Writer (XML) Process:
-
Run the Canadian Payroll Archiver process before running this program, so that checks are produced. The Canadian Payroll Archiver process archives third party check information available in the 'CA THIRD PARTY CHEQUES' context in the Action Information DF.
-
Ensure that the Payment Method parameter is provided as an Organization Payment Method defined with the Payment type as 'Check' for Third Party Payment.
To run the Canadian Third Party Cheque Writer (XML) process
-
Select Canadian Third Party Cheque Writer (XML) in the Name field.
-
Select the name of the payroll or consolidation set to run the process for.
-
When you select a payroll name, its default consolidation set displays.
-
Enter the start and end dates of the time span for the third-party cheques to cover.
-
Select the payment method valid for the given business group, payment type and payroll.
-
A default sort sequence of Organization, then Person, displays. To add more sort sequences, your MIS staff can modify the Third Party Cheque Writer process.
-
Enter the cheque number with which to start this cheque run.
-
If required, enter the cheque number with which to end this cheque run.
-
Select a predefined or custom template as the cheque style to generate the output in the PDF format.
-
Choose OK, and then Submit.
Processing Cheques
Running the Canadian Cheque Writer Process
The Canadian Cheque Write Process produces pay cheques with attached statements of earnings (SOEs).
You must run the Archive Cheque Writer process when:
-
You have selected "Multiple Assignment" for the payroll
-
Multiple GREs are associated with an assignment
-
You have set the Payroll Archiver Level to "Year to Date within Tax Group"
A preprinted form which will accommodate the standard print format of the cheques has been developed by Moore Canada. Customers in Canada can call Moore Canada at 1-888-621-1919 to place an order for the forms. The form number for the cheque is 10001. The Canadian French PAY patch is required in order to have cheques print in French.
Note: The report output is based on the value set for the ICX: Numeric Characters profile option. For example, if the profile option value is given as 10.000,00, then the report output is generated with the decimal separator "," (comma). When set to blank, the decimal and group separators are obtained from the NLS_NUMERIC_PARAMETERS setting in the database. The decimal separator will be "." (dot) and the thousand separator will be "," (comma), unless NLS_NUMERIC_CHARACTERS is modified.
To run the Canadian Cheque Writer process
-
Select Canadian Cheque Writer in the Name field.
-
Select the payroll or consolidation set of the pay processing for which to produce cheques and SOEs. If you select a payroll, its default consolidation set displays.
-
Enter the start and end dates of the time period for which to print the cheques and statements of earnings.
-
The system defaults Canadian Cheque as the payment type and Cheque as the payment method for all the payments resulting from this process run.
-
A default sort sequence of Organization, then Person, displays. To add more sort sequences, your MIS staff can modify the Cheque Writer process.
-
Select the cheque style: Chequewriter and Deposit Advice or, to make payments to third parties, the style Third Party Cheque Writer.
-
Chequewriter
-
Third Party Cheque Writer (to make payments to third parties)
Note: The Canadian Cheque Writer process can only accept attachment reference numbers of 20 characters or less. In cases where the attachment number is greater than 20 characters, this process truncates the reference number to 20 characters.
-
Archive Cheque Writer (uses multi assignment processing information archived by the Payroll Archive process)
Note: If you run the Prepayment process and do not run the Payroll Archive process, then Cheque Writer will produce blank cheques for the 'Archive Cheque Writer' style.
-
-
Enter the cheque number with which to start this cheque run.
-
If required, enter the cheque number with which to end this cheque run. This entry may be necessary when the supply of stationary is limited.
-
Choose OK, then Submit.
Setting Printer Styles for Cheque Writer and Deposit Advice
The Canadian Cheque Writer and Deposit Advice processes use a specific printer style that needs to be set up every time a new printer for one of these processes is registered. The printer driver should not be changed for these processes.
To set up a printer for the Canadian Cheque Writer or Deposit Advice processes
-
Using the System Administrator Responsibility, select Install > Printer > Types from the Navigator.
-
Query the new printer in the Type field.
-
Select CACHEQUE in the Style field and in the Driver field.
-
Save your work.
Running the Void Cheque/Check Payments Process
Void Check/Cheque Payments is a payroll process, and for every check/cheque that is voided, Oracle Payroll creates a corresponding assignment process.
You run the Void Check/Cheque Payments process from the Submit Requests window.
To run the Void Cheque/Check Payments process
-
In the Name field, select Void Check/Cheque Payments.
South African Payroll: Select Void Cheque Payments (South Africa).
-
In the Parameters window, select the payment run for the Cheque/Check Writer that you want to void.
-
Enter the date on which you want to void the cheques/checks. The default is your system date.
-
Enter, optionally, a reason for voiding the cheque/check issue.
-
Enter start and end numbers of the cheque/check sequence you are voiding. For single cheques/checks, enter the cheque/check number in both fields.
Reissuing a Voided Cheque
Once a cheque has been voided, you may wish to reissue the cheque, either with the same amount or with a different amount.
To reissue a voided cheque with the same amount
-
To verify that the void has been processed, select the employee in the Employee Assignment Processes window. For the process that originally produced the cheque, VOID appears in the Status Column.
-
Run the Canadian Cheque Writer process again. A new cheque is produced with a new number.
-
If you want to verify the process, select the employee in the Employee Assignment Processes window. The number of the original prepayment will be in the Applied Column of the latest process.
-
Run the Void Payments Report any time after the void has been processed.
To reissue a voided cheque with a different amount
-
Reverse the cheque that you have voided in the Reverse Payroll Run window.
-
Enter the new amount to be paid in the Salary Administration or Element Entries window as appropriate.
-
Run QuickPay for the new amount that is to be paid to the employee.
-
Run the PrePayments precess.
-
You can now do one of the following:
-
Manually issue the cheque.
-
Run the Canadian Cheque Writer process again.
-
-
If you want to verify the process, select the employee in the Employee Assignment Processes window. The number of the original prepayment will be in the Applied Column of the latest process.
-
Run the Void Payments Report any time after the void has been processed.
Running the Cheque Listing Report
The Cheque Listing report shows the details of the cheque numbers issued and enables employees to sign for their cheques.
Run this report from the Submit Requests window.
To run the Cheque Listing report
-
Select Cheque Listing in the Name field.
Irish Payroll: select IE Cheque Listing
-
Select the payment run for which you want to show cheque details in the Parameters window.
-
Select the sort order for this report.
-
Choose Submit.
Running the Void Payments Report
This report shows details of cancelled cheque payments.
Run this report in the Submit Request window.
To run the Void Payments report
-
In the Name field, select Void Payments Report.
-
In the Parameters window, enter a start date and an end date for the report.
-
Select a payroll and/or consolidation set if you want to restrict your information by these parameters. If you leave these fields blank the report returns information on all payrolls for the period chosen.
-
Choose OK and then Submit.
Running the Payroll Cheque/Check Payment Report
Use this report to view void and reversal information for a cheque/check. Select your parameters in the parameter wizard to determine the period and payment method for your report.
To run the Payroll Cheque/Check Payment report
-
Enter the Process Start Date.
-
Enter the Process End Date.
-
Select a Payment Method.
-
Click Finish.
Voiding Magnetic Tape Payments
Run the Void Magnetic Tape Payments process when you want to cancel an EFT payment (NACHA or Direct Deposit for example) made by magnetic tape. The Void Magnetic Tape Payments process enters a record of the reversal into Oracle Payroll. Note, however, that the Void Magnetic Tape Payments process does not create a new magnetic tape for onward submission to the bank. You must contact the bank to request a manual reversal of the amount that you have voided. Remember that individual banks have different procedures for requesting a manual reversal. Before you request a reversal from your bank, always verify:
-
The period of notice required for a reversal
-
The information necessary to support a reversal request (for example, Employee Name, Social Security Number, Account Number, Routing Number, Amount, Effective Date, and so on).
-
The preferred transmission method for the reversal request
You run the Void Magnetic Payments process from the Submit Requests window.
To run the Void Magnetic Payments process
-
Select the payment run that you want to void.
-
Enter the effective date for the void process.
-
Enter a reason for voiding the payment.
-
Select the employee who received the payment that you want to void.
-
Select the payment that you want to void.
-
Click Submit
Processing External/Manual Payments
Making External/Manual Payments
You often make manual payments following QuickPay runs. To do this, you can navigate to the External/Manual Payments window either from the Assignment window or the QuickPay window.
To make a manual payment by cash or cheque to an employee
-
Run a query in the Payment Method field to see a list of any unpaid cash or cheque payments for the current assignment.
The window displays each prepayments source type (either PrePayments or QuickPay PrePayments) and its effective date.
Note: If you enter the External/Manual Payments window from the QuickPay window, you can query unpaid payment methods associated with the current QuickPay PrePayment only. The Effective Date and Type fields do not display as the source type is always QuickPay, and the date is the same as the date of the QuickPay run.
-
Select the Pay check box for the payment methods you are now going to pay manually.
-
Enter the value of the payment and, if you are paying by cheque, the cheque number.
-
Save your entry.
Viewing Tax Deductions
Use the Statutory Deduction report to view the kinds of moneys the employees and employers submit to the government as taxes. This report shows the federal and provincial tax balances summarized for a particular range of pay dates. With Oracle Payroll, you can choose from the following options for generating this report:
-
Pay Begin Date (required)
-
Pay End Date (required)
-
Tax Group (optional)
Choose from a list of all valid Tax Groups. Leave this field blank to include all Tax Groups in the report.
-
GRE (optional)
Choose from a list of all valid GREs. Leave this field blank to include all GREs in the report.
-
Federal
Specify statutory deduction details for the remittance to the CRA.
-
Provincial
Specify statutory deduction details for the remittance to the Ministere du Revenu. The Provincial section of this report includes only the provinces that have separate provincial taxes.
-
Reporting Dimension
Provides the option of printing information for a pay date range: month to date, quarter to date, or year to date values.
Note: The report output is based on the value set for the ICX: Numeric Characters profile option. For example, if the profile option value is given as 10.000,00, then the report output is generated with the decimal separator "," (comma). When set to blank, the decimal and group separators are obtained from the NLS_NUMERIC_PARAMETERS setting in the database. The decimal separator will be "." (dot) and the thousand separator will be "," (comma), unless NLS_NUMERIC_CHARACTERS is modified.
To create a Federal and Provincial Statutory Deduction Report
Run the Statutory Deduction report from the Submit Requests window.
-
Select the Statutory Deduction report in the Name field.
-
Click on the Parameters field if the Parameters window does not automatically open.
-
Enter the pay date range in the Pay Begin Date and Pay End Date fields.
-
Enter an appropriate Tax Group or GRE, if applicable.
Leave these fields blank to include all GREs and Tax Groups in the report.
-
Enter a Yes or No value in Federal and Provincial for the type of remittance report you want to generate.
-
Enter the appropriate reporting dimension.
-
Click OK, and Submit.
Viewing Non-Tax Deductions
Use the Deductions report to show any non-tax Payroll deduction details. It includes:
-
Actual deduction amount. This includes any arrears deducted for the run.
-
Scheduled deduction amount.
-
Not taken amount. This is the amount of deduction that could not be taken for the run.
-
Current arrears. This is the amount of deduction put into arrears for the run.
-
Arrears taken. This is the amount of arrears taken for the run.
Deductions with a total owed also show:
-
Accrued balance. This is the running balance of the amount deducted to be applied to the total owed amount.
-
Total owed. This is the total amount of a deduction. Once this amount has been deducted, the deduction stops.
-
Remaining amount. This is the total owed less the accrued balance.
Run the Deductions report from the Submit Requests window.
To run the Deductions report
-
In the Type field, select Request.
-
In the Name field, select Deductions Report from the List of Values.
-
Click in the Parameters field if the Parameters window does not automatically open.
-
Select the starting and ending date range.
-
(Optional) Choose the payroll employee deduction amount you want to display.
-
Choose the consolidation set employee deduction amount you want to display.
-
Choose the deduction selection criteria.
Available options are:
-
Element Set
-
Deduction Classification
-
Deduction Element
-
-
Depending on your selection, specify you element set, deduction classification, or deduction element:
-
Element Set: Specifies element deductions defined in the element set.
-
Deduction Classification: Specifies element deductions for this deduction classification.
-
Deduction Element: Specifies the deduction element amount you want to display.
-
-
(Optional) Specify the GRE of the records you want to retrieve.
This returns all deductions for the specified GRE. If you leave this field empty, this report returns information on all GREs.
-
(Optional) Specify the Organization of the records you want to retrieve.
This returns all deductions for the specified Organization. If you leave this field empty, this report returns information on all Organizations.
-
(Optional) Specify the Location of the records you want to retrieve.
This returns all deductions for the specified Location. If you leave this field empty, this report returns information on all Locations.
-
If you want to restrict returned results to a single employee, specify that employee here.
-
Use the three sort option fields to sort your results by GRE, Location, and Organization.
-
Click OK to close the Parameters window.
-
In the Print Options region, select the number of copies you want to print.
-
In the Printer field, select a printer or accept the default.
-
Click Submit.
Quebec Health Services Reporting
The Quebec Health Services Fund Report details the required information to remit employer premiums for the Quebec Health Services Fund. The information included on this report includes:
-
Gross Wages (Period and Year to Date)
-
Rate
-
Levy
Oracle Payroll allows you to choose the following options for generating this report:
-
Account Number
-
Starting and Ending Payment Dates
-
Override Table: Enter the table which overrides the standard QHSF table (if applicable)
Note: The report output is based on the value set for the ICX: Numeric Characters profile option. For example, if the profile option value is given as 10.000,00, then the report output is generated with the decimal separator "," (comma). When set to blank, the decimal and group separators are obtained from the NLS_NUMERIC_PARAMETERS setting in the database. The decimal separator will be "." (dot) and the thousand separator will be "," (comma), unless NLS_NUMERIC_CHARACTERS is modified.
Creating a Quebec Health Services Fund Report
You run the Quebec Health Services Fund Report from the Submit Requests window.
To create a Quebec Health Services Fund Report
-
Select the Quebec Health Services Fund report in the Name field.
-
Click on the parameters field if the Parameters window does not automatically open.
-
Select the Account Number or leave blank for all account numbers.
-
Starting Payment Date: The first Payment Date to include in this report.
-
Ending Payment Date: The last Payment Date to include in this report.
-
Override Table: Enter the table which overrides the standard QHSF table (if applicable).
-
Click OK and then Submit.
Setting Up Provincial Medical Reporting
You can set up Provincial Medical Plans (PMED) for the following provinces:
-
Manitoba
-
Newfoundland/Labrador
-
Ontario
-
Quebec
-
British Columbia
To setup provincial medical reporting:
-
Create locations for the Provincial Medical Carriers. Enter the locations for which you want to generate provincial medical reports. See Setting Up Locations, Oracle HRMS Enterprise and Workforce Management Guide (Canada) for more information.
-
Set up the Provincial Medical organizations as organizations with the "Provincial Medical Carrier" classification.
See: Entering Organization Classifications, Oracle HRMS Enterprise and Workforce Management Guide
-
Set up the Provincial Medical accounts under "PMED Account Numbers," where the province and account number are identified. This number must then be linked to a GRE as the default account.
See: Creating the Provincial Medical Account Numbers, Oracle HRMS Enterprise and Workforce Management Guide and Entering Provincial Medical Carrier Information, Oracle HRMS Enterprise and Workforce Management Guide (Canada)
-
Define the Provincial Medical exemptions and rates for each province in the Table Values window. The thresholds are seeded; however, the rates for each threshold must be entered.
Query the appropriate table structure and enter the rates for the following.
-
Manitoba HAPSET Rate
-
Newfoundland/Labrador HAPSET Rate
-
Ontario EHT Rate
-
Quebec Health Services Fund Tax Rate
-
British Columbia EHT Rate
-
-
Navigate to the Link window and link the Provincial Medical Element to all payrolls or create an applicable link for your specific organizational needs.
-
Attach the Provincial Medical element to employees using the Element Entries window.
-
Run the Payroll or QuickPay to set your setup.
-
Submit the following reports:
-
Provincial Medical Report (for Manitoba, Newfoundland and Labrador, Ontario, and British Columbia)
-
Quebec Health Services Fund
-
Provincial Medical Reporting
The Provincial Medical Report details the required information to remit employer premiums for provincial medical for those provinces that require it. The information included on this report includes:
-
Gross Wages (Period and Year to Date)
-
Unused Exemption (if applicable)
-
Taxable Wages
-
Rate (for provinces other than Manitoba)
-
Wages subject to Notch Tax Rate (Manitoba only)
-
Wages subject to Full Tax Rate (Manitoba only)
-
Levy
Oracle Payroll allows you to choose the following options for generating this report:
-
Province
-
Account Number
-
Starting and Ending Payment Dates
-
Override Table
Note: The report output is based on the value set for the ICX: Numeric Characters profile option. For example, if the profile option value is given as 10.000,00, then the report output is generated with the decimal separator "," (comma). When set to blank, the decimal and group separators are obtained from the NLS_NUMERIC_PARAMETERS setting in the database. The decimal separator will be "." (dot) and the thousand separator will be "," (comma), unless NLS_NUMERIC_CHARACTERS is modified.
Creating a Provincial Medical Report
Run the Provincial Medical Report from the Submit Requests window.
To create a Provincial Medical Report
-
Select the Provincial Medical Report in the Name field.
-
Click on the parameters field if the Parameters window does not automatically open.
-
Select the Province or leave blank to process all provinces.
-
Select the Account Number or leave blank for all account numbers.
-
Starting Payment Date: The first Payment Date to include in this report.
-
Ending Payment Date: The last Payment Date to include in this report.
-
Override Table: Enter the table which overrides the standard Provincial Medical table (if applicable)
-
EHT Monthly Remitter - Enter a Yes or No value.
Select Yes to ensure correct year-to-date wages are reported when employer premiums are remitted on a monthly basis.
Select No to ensure correct year-to-date wages are reported when employer premiums are not remitted on a monthly basis.
Note: For the Provinces of Manitoba, Newfoundland, and Ontario, the EHT Monthly Remitter is defaulted to No.
-
Click OK and then Submit.
Workers' Compensation Reporting
The Workers Compensation Assessable Wages Report details the required information to remit employer premiums for WCB. This report provides options to view either summary level information of the wages for each account within a province or a detailed report with the employee level information.
The information included on this report includes:
-
The Summary report type includes the following information:
-
Number of Employees
-
Assessable Wages
-
Excess Wages
-
Levy
-
Detail
-
-
The Detail report type includes the following information:
-
Employee Name
-
Assignment Number
-
Assessable Wages (Pay Date Range)
-
Excess Wages (Pay Date Range)
-
Levy (Pay Date Range)
-
YTD Assessable Wages
-
YTD Excess Wages
-
YTD Levy
-
The following options are available for generating this report:
-
Starting Pay Date and Ending Pay Date
-
Province
-
Account Number
-
Report Type
-
Assignment Type is enabled only if you select Detail as the Report Type
-
Reporting Dimension
Note: The report output is based on the value set for the ICX: Numeric Characters profile option. For example, if the profile option value is given as 10.000,00, then the report output is generated with the decimal separator "," (comma). When set to blank, the decimal and group separators are obtained from the NLS_NUMERIC_PARAMETERS setting in the database. The decimal separator will be "." (dot) and the thousand separator will be "," (comma), unless NLS_NUMERIC_CHARACTERS is modified.
Creating a Workers' Compensation Report
Run the Workers Compensation Assessable Wages Report from the Submit Request window.
To create a Workers' Compensation report
-
Select the Workers Compensation Assessable Wages Report in the Name field.
-
Click on the parameters field if the Parameters window does not automatically open.
-
Select the Pay Begin Date: The first payment date to include in this report.
-
Select the Pay End Date: The last payment date to include in this report.
-
Select the Province or leave blank to process all provinces.
-
Select the Account Number or leave blank for all account numbers.
-
Select one of the options as the report type:
-
Summary: Prints only summary information. The report provides the total assessable as well as excess wages by WCB Account number within each province. This is a default value.
-
Detail: Creates employees' details in addition to the summary information. The report lists names of employee along with both their assessable and excess wages.
-
-
The Assignment Set field is enabled only if you selected Detail as the Report Type. Select an assignment set if you want to print the employee details for a small group of employees.
-
Select the reporting dimension.
-
Click OK and then Submit.
Viewing the Detail Report Output
You can override an employee's compensation account and rate at the assignment level.
-
If an employee has multiple assignments with different rates or account numbers, the output reports multiple lines for each combination of account and rate.
-
If an employee has multiple assignments that have the same account and rate, then the report combines assignments into a single line. In such a case, the primary assignment number is reported.
Business Payrolls Survey
The Business Payroll Survey (Survey of Employment, Payrolls and Hours) is a monthly report that is requested by Statistics Canada. It provides statistical information on the total number of hourly and salaried employees paid, hours worked, earnings, and payrolls at industrial, provincial, and territorial levels.
All earnings with a classification of "Earnings" are represented in the values for payments made in the last pay period in the month. All earnings with a classification of "Supplemental" are represented in the Special Payments sections.
The following options are available for generating this report:
-
Reference Month
-
GRE
-
Province or Location
-
Province to be reported
-
Location to be reported
Creating a Business Payrolls Survey
You run the Business Payrolls Survey from the Submit Requests window.
To create a Business Payrolls Survey
-
Select the Business Payrolls Survey in the Name field.
-
Click on the parameters field if the Parameters window does not automatically open.
-
Select the Reference Month: The month to include in this report.
-
Select the GRE or leave blank to process all GREs.
-
Province or Location: Select province to report by province or location to report by location.
-
Province: Select the applicable province if province was selected in the above parameter.
-
Location: Select the applicable location if the location was selected in the above parameter.
-
Click OK and then Submit.
Payroll Exception Reporting (Canada)
Payroll Exception Reporting (Canada)
Use the Payroll Exception Report program to identify variations in payroll balances in the payroll run and report them as exceptions.
To enable exception reporting for Canada Payroll, the table PQP_EXCEPTION_REPORT_SUFFIX contains balance dimensions with legislation code 'CA'.
The Payroll Exception Reporting process involves the following tasks:
-
Setting Up Exception Reports
-
Grouping Exception Reports
-
Running an Exception Report
Setting Up Exception Reports
You can report payroll exceptions by selecting balances and dimensions. Use the CA legislation code in the PQP_EXCEPTION_REPORT_SUFFIX table to identify the balance dimensions supported for Canada legislation. The following table lists the balance dimensions delivered for the Canada legislation with the CA suffix:
| Balance Dimension | Exception Report Period | Description |
|---|---|---|
| _ASG_MONTH | MONTH | |
| _ASG_PTD | PERIOD | Period to Date |
| _ASG_QTD | QUARTER | Quarter to Date |
| _ASG_YTD | YEAR | Year to Date |
| _PER_MONTH | MONTH | |
| _PER_PTD | PERIOD | Period to Date |
| _PER_QTD | QUARTER | Quarter to Date |
| _PER_YTD | YEAR | Year to Date |
| _ASG_GRE_MONTH | MONTH | |
| _ASG_GRE_PTD | PERIOD | Period to Date |
| _ASG_GRE_QTD | QUARTER | Quarter to Date |
| _ASG_GRE_YTD | YEAR | Year to Date |
| _PER_GRE_MONTH | MONTH | |
| _PER_GRE_PTD | PERIOD | Period to Date |
| _PER_GRE_QTD | QUARTER | Quarter to Date |
| _PER_GRE_YTD | YEAR | Year to Date |
For information on how to setup exception reports, refer to Payroll Exception Reporting: Overview
The following section provides an example on how to set up information for the exception report. This example lists all employees who have a variation in Total Earnings when compared to the average of previous 2 months.
-
Create a balance 'Payroll Exc Earnings' and attach all Earnings classifications to the balance using the Balance window. The dimensions _ASG_YTD, _ASG_QTD, _ASG_MONTH are attached to the balance.
-
Navigate to the Exception Reports window (Other Definitions > Payroll Exception Reporting > Payroll Exception Reports and Groups > Reports) to create an exception report.
-
Provide the following details:
-
Enter a unique name for the report.
-
Enter the balance name as Payroll Exc Earnings.
-
Enter the dimension, which is the value of the balance that is to be compared.
-
Enter comparison type and comparison value to specify the range over which to compare the balance.
-
Enter the variance type, which is the factor that is to be compared. It can be amount or percentage. 'Variance operator' and 'Variance Value' is the permissible range over which, any variation can be reported. Variance operator can be Variance (+/-), Less than, Less than or Equal, Greater than, Greater than or Equal and Equal.
-
Select the report output. You can select from Portable Document Format (PDF), Hyper Text Markup Language (HTML), Real Text Format (RTF) or Spread sheet formats.
-
Grouping Exception Reports
Use the Exception Report window to group together a selection of exception reports so that they can be run in a single operation. You can include the same exception report in multiple exception groups. For more information, refer to the generic Grouping Exception Reports topic in the Oracle HRMS Payroll Processing Management Guide
Running an Exception Report
You can run the exception report from the Submit Request window or through the user interface when you create the exception report.
Record of Employment
Record of Employment
A Record of Employment (ROE) is issued by the employer to employees that have an interruption of insurable earnings. The information on the ROE determines if a person qualifies for Employment Insurance (EI) benefits, the benefit rate and the duration of benefits.
See: Setting Up Elements for ROE
ROE Block Information
| Block | Information | HRMS Source |
|---|---|---|
| 1 | Serial number | Assigned by ROE Web |
| 2 | Serial number of amended or replaced Record of Employment | ROE Serial Number in the Terminate or Absence Detail window (imported through the “Import Record of Employment Data” concurrent process). |
| 3 | Employer's payroll reference number | Employee assignment number
Note: A separate ROE is produced for each assignment. |
| 4 | Employer's name and address | Entered through ROE Web |
| 5 | Business number | Payroll Account Number assigned to the GRE |
| 6 | Pay period type | Frequency of the payroll |
| 7 | Postal code | Entered via ROE Web |
| 8 | Employee's Social Insurance Number | Employee Social Insurance Number |
| 9 | Employee's name and address | Employee name and primary address |
| 10 | First day worked | Latest start date. If an employee returns from a leave of absence and then subsequently has another interruption of earnings, the first day worked is the next working date after the Actual End Date or the Projected End Date in the Absence Detail form. The work schedule is used to determine the next working day after the Actual End Date or the Projected End Date in the Absence Detail form. If a work schedule is not found for the assignment, then the schedule for the HR Organization is checked. If a work schedule is not found, then one day is added to the Actual End Date or the Projected End Date in the Absence Detail form. This date is then archived as the First Day Worked. |
| 11 | Last day for which paid | The date prior to the interruption of earnings (in most cases, the termination date) or the day prior to the projected or actual start date of the leave of absence. Oracle HRMS uses the work schedule to determine the day prior to the projected or actual start date of the LOA in the Absence Detail form. If the application does not find a work schedule for the assignment, then it checks the schedule for the HR Organization. If it does not find a work schedule, then it subtracts one day from the Actual Start Date or Projected Start Date in the Absence Detail form. This date is then archived as the last day for which paid.
Additional Information: For active employees the effective date is reported as the last day for which paid. |
| 12 | Final pay period ending date | The Last Standard Process date in the Terminate window. This should reflect the pay period ending date of the pay period in which the employee was terminated or went on a leave of absence. |
| 13 | Occupation | The first segment of the Job Flexfield appears as the employee's occupation. |
| 14 | Expected date of recall | The expected date of recall displays the next working day following the projected or actual end date of an absence. Oracle HRMS uses the work schedule to determine the next working day after the Actual End Date or the Projected End Date in the Absence Detail form. If the application does not find a work schedule for the assignment, then it checks the schedule for the HR Organization. If it does not find a work schedule, then it adds one day to the Actual End Date or Projected End Date in the Absence Detail window. This date is then archived as the Expected Date of Recall. If the employee is terminated, then the Unknown box is checked. If the employee is on a leave of absence and does not have a projected end date entered, the, the Unknown box is checked. Important: It is recommended that you do not enter the actual return date before running the ROE process. It should however, be entered when the employee returns to work to ensure that any subsequent Records of Employment reflect the correct dates. |
| 15A | Total insurable hours | Total hours of all elements with the EI hours box checked for the last 53 weeks or since the latest start date, whichever is later. |
| 15B | Total insurable earnings | Total earnings of all elements that are subject to EI premiums, as defined in taxability rules for the last 27 weeks (or since latest start date, whichever is most recent). For payrolls with holdbacks, the total earnings include those paid in the pay period after termination or leave of absence. This block always has an entry if there are insurable earnings. |
| 15C | Breakdown of insurable earnings by pay periods | Insurable earnings for each pay period in the last 53 weeks (or since latest start date, whichever is sooner). |
| 16 | Reason for issuing this ROE | ROE Reason code entered in the Terminate or Absence Detail window. |
| 17 | Payment of benefits paid in, or in anticipation of the final pay period or payable at a later date | See description for 17A, B and C |
| 17A | Vacation pay | Earnings that feed the seeded balance ROE Vacation Pay |
| 17B | Statutory holiday | Employers must manually enter the statutory holiday dates and amounts on the ROE Worksheet. Do this through the Employee Assignment Processes Form. |
| 17C | Other Monies | Earnings that feed one of the 12 balances that comprise other monies See: Setting Up Elements for ROE |
| 18 | Comments | The ROE Reason Description entered as Further Information in the Terminate or Absence Detail window. |
| 19 | Paid sick/maternity/parental leave or group wage loss indemnity payments (after last day worked) | Employers must manually enter these amounts on the ROE worksheet. Do this through the Employee Assignment Processes Form. |
| 20 | Communication preferred in | Correspondence language entered in the Payroll Description Further Information Flexfield. |
| 21 | Telephone number | Entered through ROE Web |
| 22 | Issuer's signature and date of issue | Entered through ROE Web. The Effective Date entered when running the Record of Employment process will appear as the date of issue on the ROE. The worksheet will not reflect this date, however the date will display on the ROE. |
Record of Employment and GRE Changes
When there is a GRE change for an employee, use the last date paid in the original GRE as the effective date to generate the ROE data. If the employee is subsequently terminated, then the new ROE will only consider payments from the date of the GRE transfer to the termination date.
Generating the ROE Data
Run the Record of Employment Interface concurrent program to generate an XML file of ROE data using the ROE Version 2.0 specifications. To generate the XML file, Oracle Payroll for Canada provides the following components:
Data Definition: ROE Interface includes the following templates:
-
ROE Interface MF: Generates an XML file for all successful employees.
-
ROE Interface Employee Details Report: Generates a text file for all employees.
See: Setting Up the Record of Employment Interface Process
Set the PAY: Enable ROE Interface profile option to Yes to generate the ROE data using the Record of Employment Interface concurrent process. If profile option is set to No or left blank, then the Record of Employment concurrent process will archive data for the ROE - Magnetic Media report, which is no longer supported.
Important: Effective September 2016, the ROE - Magnetic Media program must not be used as Service Canada no longer accepts this version of the ROE Web extract file.
Generating the ROE Data for Employees with Multiple Assignments
Oracle Canada Payroll consolidates ROE data for employees with multiple assignments in the same GRE, payroll frequency and payroll start date. For these assignments, the application combines 15A, 15B, 15C, 17B, and 17C balances and reports them in a single ROE. The application consolidates the data for both original and amended ROEs.
The following example shows how ROE data is reported for employees with multiple assignments in the same GRE, payroll frequency and start date.
| Assignment | Payroll Name | Payroll Start Date | Payroll Frequency GRE | GRE | Assignment Effective Start Date |
|---|---|---|---|---|---|
| 1 | Monthly Payroll | 1-Jan-2017 | Monthly | 1 | 01-Jan-2017 |
| 2 | Monthly Payroll | 1-Jan-2017 | Monthly | 1 | 15-Jan-2017 |
| 3 | Monthly Payroll | 1-Jan-2017 | Monthly | 1 | 25-Jan-2017 |
| 4 | Semi Monthly Payroll | 1-Jan-2017 | Semi-Monthly | 1 | 01-Jan-2017 |
| 5 | Semi Monthly Payroll | 1-Jan-2017 | Semi-Monthly | 1 | 10-Jan-2017 |
| 6 | Semi Monthly Payroll | 4-Jan-2017 | Semi-Monthly | 1 | 05-Jan-2017 |
| 7 | Weekly Payroll | 1-Jan-2017 | Weekly | 1 | 01-Jan-2017 |
| 8 | Weekly Payroll | 1-Jan-2017 | Weekly | 1 | 15-Jan-2017 |
| 9 | Monthly Payroll | 1-Jan-2017 | Monthly | 2 | 01-Jan-2017 |
| 10 | Monthly Payroll | 1-Jan-2017 | Monthly | 2 | 15-Jan-2017 |
If multiple assignments exist in the same GRE with same payroll frequency and payroll start date, then ROE data is consolidated and archived using the earliest active assignment start date.
The Record of Employment Interface process will generate the following ROE data in the above scenario:
-
ROE1: Data from assignments belonging to GRE1, monthly payroll frequency and payroll start date of 1-Jan-2017 is reported. ROE balances from Assignment 1, 2 and 3 are consolidated as part of Assignment-1 as this assignment's start date is the earliest.
-
ROE2: Data from assignments belonging to GRE1, semi-monthly payroll frequency and payroll start date of 1-Jan-2017 is reported. ROE balances from Assignment 4 and 5 are consolidated as part of Assignment-4 as this assignment's start date is the earliest.
-
ROE3: Data from assignments belonging to GRE1, semi-monthly payroll frequency and payroll start date of 04-Jan-2017 is reported. ROE balances from Assignment 6 are reported in this ROE. Note that ROE balances from Assignment 6 are not consolidated with ROE balances from Assignment 4 and 5 since the payroll start date of Assignment 6 is different from the payroll start date of Assignments 4 and 5.
-
ROE4: Data from assignments belonging to GRE1, weekly payroll frequency and payroll start date of 01-Jan-2017 is reported. ROE balances from Assignment 7 and 8 are consolidated as part of Assignment-7 as this assignment's start date is earliest.
-
ROE5: Data from assignments belonging to GRE2, monthly payroll frequency and payroll start date of 01-Jan-2017 is reported. ROE balances from Assignment 9 and 10 are consolidated as part of Assignment-9 as this assignment's start date is earliest.
Generating Amended Record of Employment
It may be necessary for an employer to amend the information reported on a previously issued ROE. An amended ROE must be issued if any of the data on the original ROE has changed with the exception of details such as employee name and address, employer name and address, occupation, and employer's payroll reference number.
Run the Amended Record of Employment Interface process to generate an XML file of the amended ROE data to submit to Service Canada.
For information on the processes that you must run to generate amended Records of Employment, see Amended Record of Employment (ROE) Processes. You can use the ROE Work Sheet (XML) program to generate worksheets for amended ROEs. For more information, see ROE Work Sheet (XML) Program.
Follow steps in Generating the Amended ROE Data to generate the amended ROE data.
Amended Record of Employment (ROE) Processes
To generate amended Records of Employment, run the following processes in this order:
-
Import Record of Employment Data: After the Record of Employment Interface XML submission, serial numbers generated by the ROE Web program must be imported into Oracle Payroll. Employers must extract and store these serial numbers in their database as these are required for the submission of amended Records of Employment. The Import Record of Employment Data program enables you to extract serial numbers of the ROEs and store them in your database.
Prerequisite: Before you run the program, you must set the PAY:ROE Serial Number Directory profile option. This profile option specifies the directory to store the ROE Web Import XML file. Serial numbers extracted from this file are stamped in the Amended ROE Interface output. The Import Record of Employment Data program refers to the file name of the import file that you obtain from ROE Web. You must specify the correct name of the XML file and the file directory location. Otherwise, the Import Record of Employment Data process will fail.
-
Amended Record of Employment: This process archives the latest amended ROE data.
-
Amended Record of Employment Interface: Run this process to generate an XML file of the amended ROE data to submit to Service Canada.
Oracle Canada Payroll consolidates ROE data for employees with multiple assignments in the same GRE, payroll frequency and payroll start date. For these assignments, the application combines 15A, 15B, 15C, 17B and 17C balances and reports them in a single ROE. The application consolidates the data for both original and amended ROEs. See Generating the ROE Data for Employees with Multiple Assignments for more information.
Setting Up Elements for ROE
In support of the Record of Employment (ROE), perform the following configuration operations on your Earnings elements:
After you configure these steps, depending on the process that you use to generate the ROE data, you must feed the balances and create appropriate element entries. See: Feed the Balances and Create Element Entries for the Record Employment Interface Process
To configure Earnings elements for the Record of Employment
The seeded earnings elements Regular Salary, Regular Wages and Time Entry Wages are insurable and report EI hours on the ROE. In order for the insurable hours to be captured and reported on the ROE for user defined elements, the EI Hours box on the Earnings Form must be checked. This includes elements that are used to pay insurable retro payments. The hours worked for elements with the EI Hours box checked are reported in Block 15A “Total Insurable Hours”. Insurable hours are reported for the 53 weeks prior to the pay period that contains the date in Block 11 “Last day for which paid”. The system captures insurable hours as of the effective date of the ROE and the pay period following that date. For example, if an employee terminates or goes on a leave of absence and is paid their final pay in pay period 10, any hours subsequently paid with a pay date that falls between the pay period begin and end dates of pay period 11 will be included in the ROE.
Perform the following steps to configure your seeded elements for the Record of Employment:
-
Open the Earnings window.
-
Query for the Regular Salary, Regular Wages, or Time Entry Wages seeded element.
-
Select the EI Hours check box.
-
Save your changes.
To set the earnings allocations for the Record of Employment
The manner in which the earnings are allocated is defined on the Element Description window in Further Information. The field ROE Allocation By must be assigned either a Date Paid or a Date Earned value. As defined by Service Canada, different types of earnings are either insurable in the pay period in which they are earned (for example, regular salary and wages, overtime, etc.) or in the pay period in which they are paid (for example, bonus, shift premiums, etc.). For user defined elements, the allocation will default to date earned if an entry is not made in the ROE Allocation By field. For the seeded elements of Regular Salary, Regular Wages and Time Entry Wages, the allocation will default to date earned. For the seeded earning Vacation Payout, the allocation defaults to date paid.
Different types of earnings are either insurable in the pay period in which they are earned (such as regular salary, regular wages, and overtime) or in the pay period in which they are paid (such as bonus and shift premiums). The default allocation depends on element type:
-
The Regular Salary, Regular Wages, and Time Entry Wages seeded elements default to date earned.
-
The Vacation Payout seeded element defaults to date paid.
-
User-defined elements default to date earned.
Payrolls where the pay date is the same as the period ending date report "Date Paid" earnings differently than payrolls where the pay period ending date is prior to the pay date:
Date Paid and Date Earned Elements:
-
For payrolls where the pay date and pay period ending date are the same, Oracle Payroll reports the date paid and date earned elements together in the current pay period.
-
For payrolls where the pay period ending date is prior to the pay date, Oracle Payroll reports the date earned elements in the current pay period but reports the date paid elements in the following pay period, as the pay date falls within the next period.
To change the default allocation for your earnings elements:
-
Open the Element window.
-
Query for the appropriate earnings element.
-
Open the Further Element Information window.
-
Set the allocation in the ROE Allocation By field.
You can choose between Date Paid and Date Earned.
-
Save your changes.
To specify EI exemption rules for earnings categories
Earning categories that are defined as exempt from EI will not be included on the Record of Employment.
-
Use the Tax Withholding Rules window to enter taxability rules: (N) Total Compensation > Basic > Tax Withholding Rules
-
Save your work.
Feed the Balances and Create Element Entries for the Record of Employment Interface Process
-
From the Earnings window, define Earnings elements to feed the ROE-specific balances. These elements should belong to a category that is subject to EI in taxability rules. For an element that is reported in Block 17A, Vacation Pay, the classification must be Supplemental.
-
If these elements have hours that should be reported on the ROE, select the EI Hours check box.
-
For each element, open the window and set the allocation in the ROE Allocation By field.
-
Click Balance Feeds.
-
For Block 17A, add the ROE Vacation Pay balance to the element.
-
For Block 17C, add any of the following balances to the element:
Balance Name Code ROE Other Monies Bonus Holiday B05 ROE Other Monies Bonus Production_Incentive B06 ROE Other Monies Bonus Event B07 ROE Other Monies Bonus Staying_Contract complete_End of season - B08 ROE Other Monies Bonus Separation or retirement B09 ROE Other Monies Bonus Closure B10 ROE Other Monies Bonus Other B11 ROE Other Monies Severance Pay E00 ROE Other Monies Gratuities G00 ROE Other Monies Honorariums H00 ROE Other Monies Sick Leave Credit I00 ROE Other Monies Retroactive Pay Adjustment J00 ROE Other Monies Other O00 ROE Other Monies Profit Sharing Q00 ROE Other Monies Retiring Allowance_Retirement Leave Credits R00 ROE Other Monies Settlement Pay S00 ROE Other Monies Payout of Banked Overtime T00 ROE Other Monies SUB Maternity_Parental_Compassionate Care_Parents U12 ROE Other Monies SUB Layoff U13 ROE Other Monies SUB Illness U14 ROE Other Monies SUB Training U15 ROE Other Monies Pay in Lieu of Notice Y00
-
-
Attach the elements to the employee record.
-
Navigate to the People window and click the Assignment button.
-
Click Entries to open the Element Entries window.
-
Select the elements that you created and click Entry Values.
-
Click the Further Entry Information field in the Entry Values window. The Further Element Entry information window opens where you can specify ROE values.
-
For Block 17A, select the appropriate vacation code and if applicable, the start and end dates.
-
For Block 17C, enter start and end dates if appropriate.
-
If incorrect values are provided, the employee will not be reported in the ROE interface.
-
To ensure the proper reporting of retro overtime hours in Block 15A, "Total Insurable Hours," on the Record of Employment (ROE), additional setup is required. For more information, see: Setting up Retro Elements for Overtime.
Setting Up the Record of Employment Interface Process
Complete the following steps before you run the Record of Employment Interface Process:
-
Set the PAY: Enable ROE Interface profile option to Yes using the System Administrator responsibility. This profile option can be set at different levels: Site, User, and Responsibility.
-
Complete the employer level setup using the Further Payroll Information window. The ROE contacts are defined for each payroll in the further information flexfield of the payroll. For more information, see Further Payroll Information Window.
-
Configure Earnings elements in support of the Record of Employment (ROE). For more information, see Setting Up Elements for ROE.
-
Ensure the proper reporting of retro overtime hours in Block 15A, "Total Insurable Hours," on the Record of Employment (ROE). For more information, see Setting up Retro Elements for Overtime.
-
Mark employees for inclusion in the ROE. For more information, see Marking Employees for Inclusion by Providing a ROE Reason.
-
Run the Record of Employment process or the Record of Employment by Assignment Set process to archive information for employees. For more information, see Running the Record of Employment for Employees or Assignment Set.
-
Run the ROE Work Sheet (XML) concurrent program to preview the ROE data and generate the ROE output in XML format. The ROE Data parameter enables you to generate a worksheet for an employee's amended ROE information. For more information, see Running the ROE Work Sheet (XML) Program.
-
Run the Record of Employment Interface Process to generate an XML file of the ROE data. After you run this process, you can upload the ROE data to the Service Canada site and print the ROE. For more information, see Running the Record of Employment Interface Process .
Marking Employees for Inclusion in the Record of Employment
To initiate the ROE process, entries must be made at the employee level to end employment or put the employee on a leave of absence. When an employee terminates, information entered in the Terminate window, Further Information field will be reported on the Record of Employment.
See: Ending Employment, Oracle HRMS Workforce Sourcing, Deployment, and Talent Management Guide.
Likewise, when an employee goes on a leave of absence, information entered in the Absence Detail window, Further Information field will also be reported on the Record of Employment. See: Entering Absences, Oracle HRMS Compensation and Benefits Management Guide
Note:
-
The assignment set for terminated employees (TERMINATION_ASG_SET) is created automatically when an employee is terminated with an Actual Date in the Terminate window and a ROE Reason is selected in the Further Information field, Add'l Periods of Service Information window
-
The assignment set for employees on a leave of absence (LOA_ASG_SET) is created automatically when an employee's leave information is entered in the Absence Details window and a ROE Reason is selected in the Further Information field, Additional Absence Detail Information window.
To mark employees for inclusion in the ROE
Whenever you mark an employee as terminated or on a leave of absence, you must provide a ROE Reason in the Further Information window. Oracle Payroll generates a ROE for each assignment, payroll, or GRE associated with that employee. The values in the LOV for ROE Reason are those defined by Service Canada and cannot be updated. With the multiple GRE functionality, Oracle Payroll combines all GREs on the same assignment onto one ROE if the business number for each GRE is the same.
The ROE generates only if a T4 GRE exists on the employee's assignment.
The information you enter as ROE Reason appears on the Record Of Employment as the Reason Code. The information you enter in the ROE Comments field appears in Block 18 (Comments) of the ROE. If an employee requires multiple Records of Employment (such as due to multiple assignments), the same comments appear on every ROE.
Note: The ROE Reason is a required field for the ROE Web software. As the ROE Reason is a mandatory field for ROE Web, Records of Employment that are generated for employees who are not terminated or who have not gone on a leave must have the ROE Reason entered on the archive record.
When a termination is reversed, the application clears all information in the Terminate window including the ROE Reason and ROE Comments.
Running the Record of Employment for Employees or Assignment Set
There are two Record of Employment archive processes that capture the information required to create the Record of Employment:
-
To create a single ROE, use the "Record of Employment" process. The Record of Employment process archives ROE information for an individual employee.
-
To create multiple Records of Employment simultaneously, use the "Record of Employment by Assignment Set" process.
The Record of Employment archive process will archive information for employees that have a termination date (Actual Date in the Terminate window) or leave of absence start date that is up to 31 days prior to the effective date entered when running the process. Hours and earnings for the last 53 weeks or up to the latest start date will be archived.
For terminated and leave of absence employees, earnings that are paid in the pay period of the termination or leave of absence start and the subsequent pay period, will be reported on the ROE. If the payroll has a holdback, that is, the pay date falls after the period end date, then any payments made in elements that are allocated to date paid must have a pay date that falls within the pay period begin and end dates of the pay period following termination or the leave start, in order for the information to be reported.
If a ROE is requested for an employee who is not terminated or who has not gone on a leave of absence, the ROE will reflect payments made up to the final pay period end date only. Employee and employer information is reported as it exists on the final pay period ending date.
To run the Record of Employment process for an individual employee
The Record of Employment concurrent process archives the information required to create a single Record of Employment
Run the Record of Employment process from the Submit Request window.
-
Select Record of Employment.
-
Click in the Parameters field if the Parameters window does not automatically open.
-
Enter the effective date. This is a mandatory field.
-
For an active employee, the "Last Day For Which Paid" is the effective date.
-
For a terminated employee, the effective date represents the employee's termination date or the date that must be displayed as the Last Day for Which Paid on the ROE. If the Actual Termination Date is available in the Terminate window, then the actual termination date is reported on the ROE.
-
For employees on a leave of absence, the effective date represents the last working day prior to the start of their leave.
If you are generating an ROE for an employee who is not terminated or has not gone on a leave of absence, then the effective date entered must be the last day worked in the last payroll to be included on the ROE. If the effective date is a working day according to the employee's calendar, then that day is archived as the "Last Day For Which Paid". If the effective date is not a working day according to the employee's calendar, then the next immediate previous working day is archived as the Last Day for Which Paid.
-
-
Enter the name of the employee for whom an ROE is to be issued.
-
Click OK and then Submit.
To run the Record of Employment by Assignment Set process
The Record of Employment by Assignment Set concurrent process archives the information required to create multiple or mass Records of Employment
Assignment Sets used in the Record of Employment Process
There are two assignment sets used in this process:
-
For a terminated employee to be automatically included in the assignment set for terminated employees (TERMINATION_ASG_SET), the Actual Date must be entered in the Terminate window and a ROE Reason must be selected in the Further Information window. If a reverse termination is done and the ROE has not been issued to the employee, the employee will be deleted from the assignment set. If the Record of Employment process has been run for this employee, they will also be deleted from the assignment set.
-
The assignment set for employees on a leave of absence (LOA_ASG_SET) is created automatically when an employee has been put on a leave in the Absence Detail window and has a ROE Reason in the Further Information window. Employees are deleted from the assignment set if the ROE Reason is removed or the absence record is deleted from the system and the ROE has not been issued to the employee. The ROE is considered not issued when the interface has not been processed and the ROE archive has been deleted. If the Record of Employment process has been run for this employee, they will also be deleted from the assignment set.
Once the Record of Employment by Assignment Set has successfully completed for all the employees, the employees in the assignment set are deleted. The assignment set is deleted when the last employee is deleted from the set.
Note: Each employee must have insurable earnings. If they do not, then Oracle HRMS will not generate the ROE.
Run the Record of Employment by Assignment Set process from the Submit Request window.
-
Select Record of Employment by Assignment Set.
-
Click in the Parameters field if the Parameters window does not automatically open.
-
Enter the effective date. This is a mandatory field. The system will process ROEs for employees who have terminated or went on a leave of absence and have an ROE Reason up to 31 days prior to this date.
-
Select the assignment set to process. If not entered, all assignment sets are processed.
-
Click OK and then Submit.
The results may be viewed online using the Payroll Process Results window.
To review and modify the archive
-
Open the Assignment Process Results window.
-
Specify the name of the employee.
-
Select the period in which the Record of Employment process (or ROE Archiver) was initiated.
This is the effective date entered for the Record of Employment process.
-
Click Find to display all payroll actions for the period.
-
Select the Magnetic Report (Type column) entry within the period then select Run Results. This will allow the user to view and update ROE information. Note that when viewing this information, the ROE_DATE represents the date entered in the Effective Date parameter.
To preview the actual Record of Employment
You can generate a preview of the actual ROE by processing the ROE Worksheet. To generate the ROE worksheet, you can run the ROE Work Sheet or the ROE Work Sheet (XML) concurrent program. You must have previously processed the archive in order to produce a worksheet. The information that appears on the worksheet reflects what Oracle Payroll transfers to the ROE Web software.
See:
Rolling Back the Record of Employment Archive Data
Once the Record of Employment by Assignment Set has successfully completed, the employees in the assignment set are deleted. If you want to roll back the ROE archive data, then you must manually add the employees to the terminated employees set (TERMINATION_ASG_SET) or the leave of absence set (LOA_ASG_SET).
Running the ROE Work Sheet Program
After running the Record of Employment or the Record of Employment by Assignment Set concurrent program, you can generate a preview of the actual ROE by processing the ROE worksheet. To generate the ROE worksheet, run the ROE Work Sheet concurrent program.
Run the ROE Work Sheet from the Submit Request window.
You can generate an employee's amended ROE information using the ROE Work Sheet (XML) program. For more information, see Running the ROE Work Sheet (XML) Program.
To run the ROE Work Sheet program
-
Select ROE Work Sheet.
-
Click in the Parameters field if the Parameters window does not automatically open.
-
Specify the period in which the records were archived.
-
Specify the selection type. This provides the option of creating worksheets for an employee or an assignment set.
-
If you selected an employee in the selection type, specify the name of the employee for which you want to create an ROE worksheet.
-
If you selected an assignment set in the selection type, specify the assignment set for which you want to create ROE worksheets. If not entered, all assignment sets are processed.
Note: You cannot use the TERMINATION_ASG_SET or LOA_ASG_SET assignment set as employee assignments are deleted whenever you run the Record of Employment process.
-
Select View Output to view the data.
You can view the ROE worksheet online or print it.
Running the ROE Work Sheet (XML) Program
After running the Record of Employment or the Record of Employment by Assignment Set concurrent program, you can generate a preview of the actual ROE by processing the ROE worksheet. To generate the ROE worksheet, run the ROE Work Sheet (XML) concurrent program.
The ROE Work Sheet (XML) program uses Oracle Business Intelligence (BI) Publisher to generate the ROE data in PDF format. The ROE Data parameter enables you to generate a worksheet for an employee's amended ROE information. Run the ROE Work Sheet (XML) program before you run the Record of Employment Interface program.
Note: The report output is based on the value set for the ICX: Numeric Characters profile option. For example, if the profile option value is given as 10.000,00, then the report output is generated with the decimal separator "," (comma). When set to blank, the decimal and group separators are obtained from the NLS_NUMERIC_PARAMETERS setting in the database. The decimal separator will be "." (dot) and the thousand separator will be "," (comma), unless NLS_NUMERIC_CHARACTERS is modified.
The following parameters are common to both the ROE Work Sheet and ROE Work Sheet (XML) programs:
-
Start Date
-
End Date
-
Selection Type
-
Employee Name
-
Assignment Set
For more information, see Running the ROE Work Sheet Program.
The ROE Data parameter is available only to the ROE Work Sheet (XML) program. Select any one of the options for the ROE Data parameter:
-
Original: If you select this value, then only original ROE data is displayed. Amended ROE data is not included.
-
Amended: If you select this value, then the amended ROE data is reported. The output also displays the original ROE data that corresponds to the amended ROE data.
-
Both: If you select this value, then both the original and amended ROE worksheets are displayed in the output.
When you select the Both option, the worksheets will display amended ROE data but will not display the original ROE data that corresponds to the amended ROE data.
Reporting the Serial Number
When you select the Amended option, the ROE Work Sheet (XML) program reports the serial number of the original ROE in field 2 of the amended ROE worksheet. The program also reports the original ROE serial number in field 1 of the original ROE so that you can associate the amended ROE data with the original ROE data. The program does not report serial numbers for Original and Both options.
Running the Record of Employment Interface Process
The Record of Employment Interface process generates the ROE data using the ROE Web Version 2.0 XML file layout specifications.
Oracle Canada Payroll consolidates ROE data for employees with multiple assignments in the same GRE, payroll frequency and payroll start date. For these assignments, the application combines 15A, 15B, 15C, 17B and 17C balances and reports them in a single ROE. The application consolidates the data for both original and amended ROEs. See Generating the ROE Data for Employees with Multiple Assignments for more information.
Run the Record of Employment Interface process from the Submit Request window.
Note: The value set for the ICX: Numeric Characters profile option does not apply to the Record of Employment Interface process report output. As Service Canada only accepts "." (dot) as a decimal place notation, the default format "10,000.00" is used to generate the report output.
To run the Record of Employment Interface process
-
Select Record of Employment Interface in the Name field.
-
Click in the Parameters field if the Parameters window does not automatically open.
-
Specify the period in which the ROE archiver was processed. This is the effective date you entered for the ROE process. The Start Date and End Date are the only mandatory parameter details that need to be entered for this program.
-
Specify the selection type. This provides the option of generating an ROE for an employee or an assignment set.
Note: You must not use the LOA_ASG_SET or TERMINATION_ASG_SET for the Record of Employment Interface process as the assignments are cleared when the Record of Employment process is run. You must create a new assignment set.
-
If you selected employee in the selection type, then specify the name of the employee.
-
If you selected assignment set in the selection type, then specify the assignment set. If not entered, all assignment sets are processed.
-
Click OK and then Submit.
Program Output
The ROE Interface process generates three output files, two .xml files, and one .rtf file:
-
The first output file is the final XML file in the format of o<request_id>.xml_2_P_M.xml. This will have the XML data of all successfully completed employees. You must change the extension of this file from .xml to .BLK and submit the file to ROE Web.
-
The second output file is the Employee Details Report. This is an rtf in the format of o<request_id>.xml_1_P.eft. This output file contains all the employees and their status.
-
The third output file contains the XML data of all employees. The format of this file is o<request_id>.xml.
The XML schema (XSD files) can be used to validate the XML and the bulk file structure prior to transferring the file to ROE Web. To perform this kind of validation, a tool which is capable of validating an XML Schema is required.
-
To upload bulk ROEs to the Service Canada site
-
Once the Record of Employment Interface is run, navigate to the output directory for that request. Each file name must include a file prefix, a dot and an extension as follows, for example, ACME_ROE200.BLK
-
Do not open the .xml file. Simply right click on the .xml request in the output directory and select "Save Target As". Save the file to a local drive. This file will be saved as a Text document by default.
-
Navigate to the local drive where the file is stored, right click on the file, and rename it with .BLK extension.
-
Navigate to the Service Canada site and using the BULK transfer option upload the .BLK file.
The bulk transfer process should produce the following Status message: "Process Completed".
All Records of Employment within the bulk transfer should be viewable within the Service Canada site.
To print the ROE
Service Canada provides the necessary Web software to print the ROE. This software validates the incoming information and assigns a serial number to the ROE. You can configure Service Canada software to automatically point to where the XML file resides, or you can copy the file to your hard drive.
For information on the ROE Web software, refer to the Service Canada website.
To rerun the ROE
If you need to rerun either the ROE archive or Record of Employment Interface processes due to errors, you must roll them back and then rerun them. You do not need to rollback the ROE Worksheet.
Running the Amended ROE Processes
Generating the Amended ROE Data
This topic lists the steps to generate the amended ROE data.
To generate the amended ROE data
-
Run the Record of Employment Interface program to generate the ROE data. For more information, see Running the Record of Employment for Employees or Assignment Set.
-
Submit the ROE data to Service Canada.
-
Make necessary amendments to the employee data.
-
Run the Import Record of Employment Data program to import the serial numbers. For information, see Running Running the Import Record of Employment Data Program.
-
Run the Amended Record of Employment program to archive the latest amended data. For more information, see Running the Amended Record of Employment Program.
-
Run the ROE Work Sheet (XML) program with the Amended option in the ROE Data parameter. Verify that the amended ROE information is reported. For more information, see ROE Work Sheet (XML) Program.
-
Run the Amended Record of Employment Interface program to generate the amended ROE data. For more information, see Running the Amended Record of Employment Interface.
Running the Import Record of Employment Data Program
For information on the processes that you must run to generate amended Records of Employment (ROE), see: Amended Record of Employment (ROE) Processes.
After the Record of Employment Interface XML submission, serial numbers generated by the ROE Web program can be imported by the employer. Employers must extract and store these serial numbers in their database as these are required for the submission of amended Records of Employment.
The Import Record of Employment Data program enables you to extract serial numbers of the Records of Employment and store them in your database. This process generates a PDF output file indicating the serial numbers tagged to the corresponding employees. When you run this process, the serial numbers are stamped in the output XML so those employees for whom amendments are made are tracked correctly. If an employee has more than one assignment, then the corresponding serial number for each assignment is stored.
Run the Import Record of Employment Data program from the Submit Request window.
Prerequisites
- Before you run the program, you must set the PAY:ROE Serial Number Directory profile option to specify the name and directory location of the import file. See: Amended Record of Employment (ROE) Processes
To run the Import Record of Employment Data program
-
Select Import Record of Employment Data in the Name field.
-
Click in the Parameters field to open the Parameters window.
-
In the File Name field, enter the file name of the Import file obtained from the government. For example, Import-025831-20160322.xml.
-
The Validate Mode field has the following values:
-
Validate Only: When the program is run using this option, a PDF output is generated with the list of employee names and serial numbers but changes are not committed to the database. The PDF output provides the information on serial numbers that are assigned to employees for a specific date range. Use this option to review the details.
-
Validate and Commit: In addition to the PDF output, the changes are committed to the database.
-
-
Click OK and then Submit.
Program Output
A PDF document is generated that shows a list of employees in each GRE for whom the ROE serial number has been updated. The document displays the employee name, social insurance number, corresponding date range, and serial number. You can also view the Status of the serial number update. The status indicates whether the update is successful or has failed.
A serial number imported through this process is stored in the "ROE Serial Number" read-only field in the Terminate and Absence Detail windows. Users cannot update the serial number in these windows. If an employee has multiple assignments, then multiple serial numbers are stored in the ROE Serial Number field in the Terminate and Absence Detail windows using a separator. For example if there are 3 serial numbers to be stored for an employee, they are stored as W12312312 | W23423423 | W34534534
Running the Amended Record of Employment Program
For information about the processes that you must run to generate amended Records of Employment (ROE), see: Amended Record of Employment (ROE) Processes.
Run the Amended Record of Employment program to archive the amended ROE data of an individual employee or multiple employees.
In the Selection Type parameter:
-
To create a single amended ROE, select the employee name.
-
To create multiple amended Records of Employment, select the assignment set name.
The Amended Record of Employment program is similar to the Record of Employment and Record of Employment by Assignment Set programs, except that Amended Record of Employment program archives the amended ROE data.
Run the Amended Record of Employment program from the Submit Request window.
Prerequisites
- You must run this program after you run the Import Record of Employment Data program. See: Import Record of Employment Data
To run the Amended Record of Employment program
-
Select Amended Record of Employment in the Name field.
-
Click in the Parameters field if the Parameters window does not automatically open.
-
Enter the effective date.
-
Specify the selection type: employee or assignment set.
-
Select the employee or the assignment set you want to process. If you leave the Assignment Set field empty, all assignment sets are processed.
-
The ROE Date field lists the previous ROE archived records submitted for employees. The ROE Date field is available for entry only when the employee option is selected in the selection type. Each record in the list represents the previous archived record which needs to be amended and has the following format: ROE Date (ROE/Amended ROE) – Assignment action ID of the archiver – Request ID of the archiver. You can select the record that you want to amend. The appropriate record must be selected for which the Amended Record of Employment archiver has to be run.
-
-
Click OK and then Submit.
Program Output
The Amended Record of Employment program archives all ROE data including the changes made after the latest ROE was generated. It also archives the serial numbers that were imported for the employees.
Running the Amended Record of Employment Interface Process
For information on the processes that you must run to generate amended Records of Employment (ROE), see: Amended Record of Employment (ROE) Processes.
This process generates the amended ROE data using the ROE Web Version 2.0 XML file layout specifications.
The Amended Record of Employment Interface process is similar to the Record of Employment Interface process, except that it generates an XML file of the amended ROE data.
Run the Amended Record of Employment Interface process from the Submit Request window.
To run the Amended Record of Employment Interface process
-
Select Amended Record of Employment Interface in the Name field.
-
Click in the Parameters field if the Parameters window does not automatically open.
-
Specify the period in which the Amended ROE archiver was processed. This is the effective date you entered for the ROE process.
-
Specify the selection type. This provides the option of creating the Amend ROE XML Output file.
You must not use the LOA_ASG_SET or TERMINATION_ASG_SET for the Amended Record of Employment Interface process as the assignments in these are cleared when the Record of Employment process is run. You must create a new assignment set.
-
If you selected employee in the selection type, specify the name of the employee to create the amended ROE XML output.
-
If you selected assignment set in the selection type, specify the assignment set to create the amended ROE XML output.
-
Click OK and then Submit.
Program Output
The Amended ROE Interface process generates the following files:
-
The first output file is the final XML file in the format of o<request_id>.xml_2_P_M.xml. This will have the XML data of all successfully completed employees. You must change the extension of this file from .xml to .BLK and submit the file to ROE Web.
-
The second output file is the Employee Details Report. This is an rtf in the format of o<request_id>.xml_1_P.eft.This output file contains all the amended employees and their status.
-
The third output file contains the XML data of all employees. The format of this file is o<request_id>.xml.
The XML schema (XSD files) can be used to validate the XML and the bulk file structure prior to transferring the file to ROE Web. To perform this kind of validation, a tool which is capable of validating an XML Schema is required.
To upload bulk amended ROEs to the Service Canada site
-
After the Amended Record of Employment Interface is run, navigate to the output directory for that request. Each file name must include a file prefix, a dot and an extension as follows, for example, ABC_AMENDROE200.BLK
-
Do not open the .xml file. Simply right click on the .xml request in the output directory and select "Save Target As". Save the file to a local drive. This file will be saved as a Text document by default.
-
Navigate to the local drive where the file is stored and right click on the file. Rename it with a .BLK extension.
-
Navigate to the Service Canada site and using the BULK transfer option upload the .BLK file.
The bulk transfer process should produce the following Status message: "Process Completed".
All records of employment within the bulk transfer should be viewable within the Service Canada site.
To print the amended ROE
Service Canada provides the necessary Web software to print the amended ROE. This software validates the incoming information and assigns a serial number to the ROE. You can configure Service Canada software to automatically point to where the XML file resides, or you can copy the file to your hard drive.
For information on the ROE Web software, refer to the Service Canada website.
RetroPay Processing
Overview of RetroPay Processing
Purpose of the RetroPay Process
Run the RetroPay process to ensure that your payroll run for the current period reflects any backdated payments or deductions. Backdated adjustments can occur when:
-
An employee receives a pay award that is backdated to a previous pay period.
-
The payroll department makes a retrospective correction for an error that occurred in a previous pay period

For example, at the start of the current pay period, this employee has a pay award backdated to pay period 1. The employee has not yet received any payments for this award. In the current pay period the employee is entitled to payments that represent the backdated amounts for:
-
Each of the preceding payroll periods (pay periods 1 to 4)
-
The current pay period
You run your RetroPay process to ensure that the employee receives correct payment when you next run the payroll.
Period Earned is Distinct from Period Paid
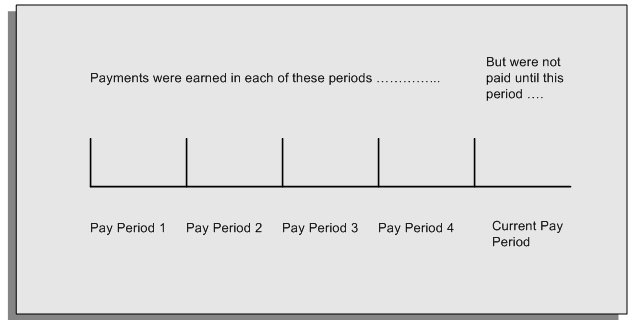
When backdated payments occur, the accuracy of your subsequent payroll processing depends on distinguishing between:
-
The period in which the payment was earned
-
The period in which the payment was made
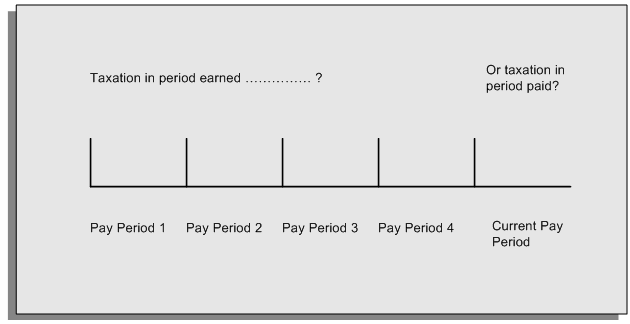
For example, the taxation implications are different for:
-
A pay award backdated to period 1 and not paid until the current period. You may want to tax this award in the current period.
-
A correction to an underpayment in period 3 which is paid to the employee in the current period. You may want to tax this correction in period 3 rather than in the current period.
The RetroPay Process Does Not Overwrite Your Historical Payment Records

You never overwrite historical payroll data when you run RetroPay. Although you recalculate all periods that have retroactive changes whenever you run a RetroPay, you never modify the stored results for these periods. Instead, you create one or more RetroPay entries to receive the process results.
Think of the RetroPay process as a calculator holding results in memory so that it can process a final set of results. The RetroPay process uses your historical results to calculate the changes for the current period. The results for your current period change, but your historical records remain unchanged.
Process RetroPay with Overlapping Periods
The RetroPay process recalculates payroll runs, balance adjustments and reversals from a particular date onwards, the start date of the recalculations. When you have retroactive changes overlapping another retroactive change, the application resets the start date to the earliest start date of the RetroPay processes and recalculates.
For example, you perform a RetroPay (RetroPay 1)for an assignment in period 3, with Payroll Runs being recalculated from a start date of period 1. In period 5, you perform another RetroPay (RetroPay 2) for the assignment with a start date of Period 3. The second RetroPay detects an overlap of RetroPays and sets the start date to the earliest start date.
In this case, the application sets the start date as Period 1. An overlapping override occurs to ensure that the balances are correct for the RetroPay process.
The processing of overlapping RetroPay results in an overall increase in time to process the RetroPay. If there are multiple overlaps, the increase in time is excessive.
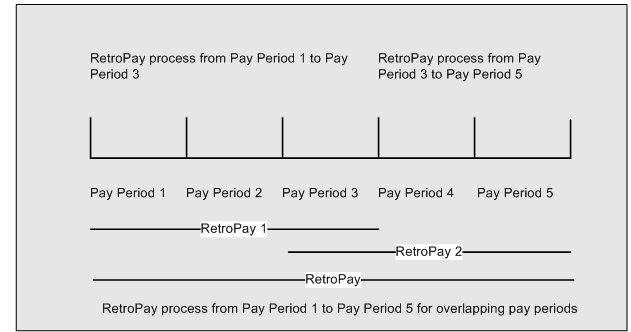
RetroPay Processes Available in Oracle Payroll
Oracle Payroll provides several versions of RetroPay, for example Enhanced RetroPay, RetroPay by Element, and so on. However, in most situations, you only have access to a single version of RetroPay.
How To Identify Your Version of RetroPay
Navigate to the Submit Requests window, and search for RetroPay. Your search returns the name of the single version of RetroPay enabled for your use, for example, Enhanced RetroPay.
An exception occurs in transitional situations. If you are replacing RetroPay by Element with Enhanced RetroPay, the Submit Requests window enables you to select each version of RetroPay so that you can complete the transition.
Summary of Available RetroPay Processes
We recommend Enhanced RetroPay as the standard version of RetroPay for new customers to adopt. Older RetroPay versions do exist, and this table exists as reference so that you can distinguish between each version. In practice however, your System Administrator determines which version of RetroPay you can use, and you are unlikely to see any reference to RetroPay versions that are unavailable to you .
| RetroPay Process | Distinguishing Features |
|---|---|
| Enhanced RetroPay | Enables you to
|
| RetroPay by Element | Enables you to identify the value of backdated changes for individual elements |
| RetroPay by Run | Only for use with Oracle HRMS (Japan) |
| RetroPay (by Aggregate) | Does not differentiate backdated payments at element entry level. Produces a single aggregated RetroPay This is the original version of RetroPay. You can continue to use RetroPay (by Aggregate) but we recommend that new customers should implement Enhanced RetroPay rather than RetroPay (by Aggregate) |
Implications of Migrating Between RetroPay Processes
You cannot run one category of RetroPay with data that you have already run on a different category of RetroPay. For example, if your localization has moved from RetroPay by Run to Enhanced RetroPay, you cannot use Enhanced RetroPay on data previously processed in RetroPay by Run.
When to Run the RetroPay Process
The RetroPay Process and the Payroll Cycle
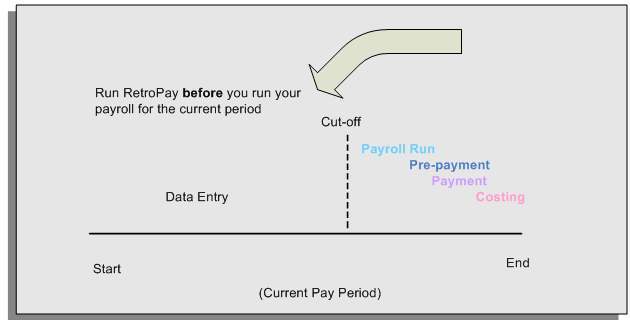
It is important to run your RetroPay process at the correct point in the payroll cycle. Always run RetroPay immediately before you run a payroll, and, for greatest accuracy, as close to the cut-off date as possible. The cut-off date is the point at which all data entry for the payroll is complete.
The RetroPay Process Always Precedes a Payroll Run
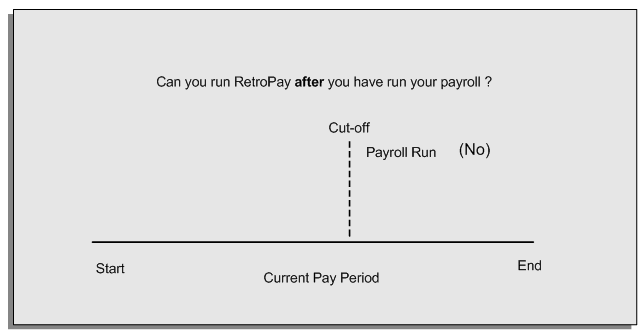
The RetroPay process cannot occur after your payroll run. If you run your payroll and then discover further backdated adjustments you must hold them over until a later payroll period and run the RetroPay process in that subsequent payroll period.
Backdated Adjustments Are Always Paid in the First Open Payroll Period
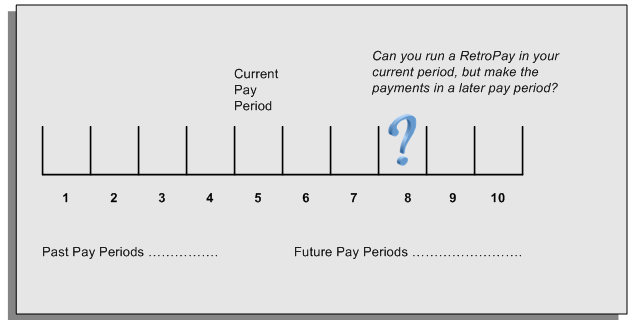
When you run a RetroPay process in your current payroll period, any backdated adjustments are always paid in your current payroll period. So, a RetroPay process in period 5 calculates any backdated adjustments from periods 1 to 4, and marks them for payment in period 5.
You cannot stipulate that a RetroPay process in period 5 should withhold any resulting payments until a future pay period. For example, you cannot stipulate that a RetroPay run in period 5 should withhold payments until period 8.
If you want to use a future payroll period such as period 8 to make payments of backdated amounts for periods 1 to 4, then you must wait until period 8 before you run your RetroPay process.
Troubleshooting RetroPay
The most common RetroPay problems occur when the RetroPay process completes, but produces unexpected results.
Consult these tables for quick reference on common RetroPay difficulties and their solutions. The problem description links or refers to extra information where you need more details to solve a problem.
Troubleshooting Enhanced RetroPay and Retro-Notification
| Problem Description | What to Do |
|---|---|
| Enhanced RetroPay is not available when you expected it to be, or you do not have the Retro Components button on the Recalculation tab of the Elements window. | This is a single problem - your localization has not implemented the legislation rule ADVANCED_RETRO. |
| View RetroPay Status does not display some of my expected choices | Contact your System Administrator. The configuration of View RetroPay Status is determined at setup. If the legislation rule RETRO_STATUS_USER_UPD is set to Y, then you have a choice when you view RetroPay status. You can either exclude the assignment from RetroPay processing (you select Deferred), or include it (you select Confirmed Awaiting Processing). However, if RETRO_STATUS_USER_UPD is set to N, then the assignment is automatically included in the next RetroPay run (it displays in View RetroPay Status as Included Awaiting Processing). |
| After setting up Enhanced RetroPay for the United States, the Enhanced RetroPay run does not produce any results. Also: the Retro-Notification report (Enhanced) for the United States does not record a salary change for an employee unless you add the changed details from View RetroPay Status. |
In both cases: Navigate to the Element window and ensure that the Default Component check box is checked. The United States has one component only (RetroPay) and one reprocess type (Reprocess) - you must check the Default Component check box for the element. |
| RetroPay Element field is missing when Enhanced RetroPay is enabled. | This is intended behavior. The RetroPay Element field is hidden when Enhanced RetroPay is enabled. You now add your RetroPay elements from the Retro Components button available from the Recalculation tab of the Elements window. |
| How do I know whether Enhanced RetroPay is enabled for my legislation? | System Administrators can run the following SQL code to determine whether Enhanced RetroPay is enabled. select * from pay_legislation_rules where rule_type like '%ADVANCED%RETRO%' and legislation_code = 'xx'; (Where "xx" is your legislation code). If the SQL query returns a rule mode of Y, then Enhanced RetroPay is enabled for your legislation. |
Troubleshooting Earlier Versions of RetroPay
| Problem Description | What To Do |
|---|---|
| RetroPay process element entry not generated for one or more assignments. | Check that the element links exist, then check your RetroPay setup. |
| Unexpected value returned. | Check your RetroPay setup. |
| Start and end times ignored. | Check for a previous RetroPay run that overlaps with your current run. If there is an overlap, rerun a new RetroPay with dates that fully include the period processed by the earlier RetroPay. |
| RetroPay Warning: Process Log shows zero employees in error - did not create element entries for processed employees. | Check that you are using the correct balance in the RetroPay set. If you are processing RetroPay within a single calendar year, choose a balance that represents gross pay for year to date. If your RetroPay spans two years, do not select a balance with the _YTD dimension. |
| Cannot use the Element Entries window to delete RetroPay generated elements. | Roll back the RetroPay process, remove the unwanted assignments from the assignment set and then rerun RetroPay.
Note: The RetroPay process does not permit use of the Element Entries window to make these changes. This is expected behavior rather than an error. |
| RetroPay Error: APP-6370 Cannot create an entry past the termination rule date. | The setup of your RetroPay element (specifically, the termination rule) does not enable you to process terminated employees. Remove the assignments of terminated employees from your assignment set and then rerun RetroPay. |
Detailed Problem Resolutions
This section provides step-by-step solutions for more complex problems.
Check that the Element Links Exist, and then Check Your RetroPay Setup
If the RetroPay process does not generate a RetroPay element for one or more assignments, follow this sequence to correct the problem,:
-
Check that there is a valid, current element link for each assignment in the RetroPay set. If the links do not exist, the RetroPay process can still calculate a retro-payment but cannot attribute the calculation results to an assignment.
-
Check that RetroPay entries exist for this assignment. Do this by inspecting the log file for the HR_HRPROC_EE_NOT_CRE message and searching for the text Warning RetroPay has detected no change. This text indicates that RetroPay entries do not exist. There are no differences between the original payroll run and the RetroPay run.
-
Check that your RetroPay setup correctly defines all the required balances. The RetroPay process always uses a balance to track the difference between an original entry and a retro entry. If retro-payments do not specifically feed your RetroPay balances, then the RetroPay process cannot identify that a retro-payment has occurred.
Example (from U.K. Payroll)
If you specify an NI balance in your RetroPay setup and then make changes to element entries that are not subject to tax or NI, your run results will be different when you compare the original run and the retro-paid run. However, the RetroPay element does not include these changes because it can only report on those differences that affect the NI balance.
-
Confirm that your RetroPay element has a classification of Earnings. The Earnings classification ensures that you can pay the amounts identified by the RetroPay process. Other classifications, such as Information, do not allow you to make payments.
-
Find out whether your RetroPay definition includes any Year to Date (_YTD) balances. If you run a RetroPay process that spans the end of year, you could see unexpected results if you are using _YTD balances. Errors occur because the payroll run clears the_YTD balance at the end of year in preparation for the next year.
-
Check that there is a correct end date for the payment of RetroPay entries. Do this by View | Lists | Employees by Element to see whether the entry was created for an unexpected period. If this is the case, set the end date to the first date of the payroll period in which the RetroPay entry should be paid. For example, if you run RetroPay for June to September 2004 to pay back pay in October 2004, your start date should be 01-JUN-2005 and your end date 01-OCT-2005.
Check Your RetroPay Setup
If the RetroPay process returns an unexpected value follow this sequence to correct the problem,:
-
Check the logic of the RetroPay setup to determine that you are feeding the correct balance and confirm that you are not feeding the correct balance more than once.
-
Find out whether your RetroPay definition includes any Year to Date (_YTD) balances. If you run a RetroPay process that spans the end of year, you may see unexpected results if you are using _YTD balances. Errors occur because the payroll run clears the_YTD balance at the end of year in preparation for the next year.
-
Establish whether there are changes elsewhere in the application that might impact the value of a balance. This can be a difficult area to identify because anything that feeds the balance specified in the RetroPay definition can potentially affect the RetroPay.
In particular:
-
Balances like Gross Pay can reflect multiple changes to an assignment. These changes can affect the recalculated value of that assignment.
-
Generic changes such as updates to a formula can affects the results of associated elements, and introduce balance value changes that subsequently affect RetroPay values.
-
Setting Up Retro-Notification and RetroPay
Follow this process to set up the Retro-Notifications report, and the correct RetroPay process for your payroll.
-
The RetroPay component determines the default style of RetroPay processing for your localization. For example, you can specify that your default style is Tax When Paid, rather than Tax When Earned .
Note: The Tax When Paid Retro Style is available for China localization users only.
You can use either of the following methods to set up your RetroPay component:
Method How To Advantages Set Up the Organization DFF From the Additional Organizational Information window: -
Select Retro Component Usages.
-
Select the Tax Area.
-
Enter a Retro Style, for example, Tax When Paid.
-
Enter an Effective Start Date.
-
Enter an Effective Date.
-
Choose OK to confirm your choices.
Processing the retrospective payments for all employees in the same style is a faster alternative than setting up details at the element level for each assignment.
This method does not prevent you from making changes for individual assignments when you view RetroPay status.Set Up Retro Components and Spans at Element Level From the Element window: -
Query the element.
-
Choose the Recalculation tab.
South African users: Select the predefined ZA Statutory Updates event group from the list of values in the Recalculation Events field. Alternatively, you can create and attach an event group of your choice.
-
Choose the Retro Components button.
Important: Do not enable the Retro Component of the elements that are themselves being used to process retropay for another element.
-
Select a Recalculation Reason.
-
Select a Reprocess Type.
-
Select an Element Span to indicate the start date and end date on which you want to report.
You can modify entries at element level to make exceptions for particular assignments. Note: Your localization may advocate one of these as the preferred method.
-
-
Determine whether a retrospective change in Oracle Payroll will appear in the Retro-Notifications report. Set up an event group to contain all the retrospective change events that you want to record.
-
Although Enhanced RetroPay is the recommended RetroPay process for most localizations, your System Administrator can also set up these earlier versions of RetroPay.
Set Up the RetroPay Component
Set Up the Retro-Notifications Report
Set Up Your RetroPay Process
Setting Up the Retro-Notifications Report
You use the Retro-Notifications report to identify any changes that have a retrospective effect for payrolls that you have already run. You can define the relevant types of change by setting up an event group to specify the changes. Follow these steps to set up the Retro-Notifications report:
To enable dynamic triggers
-
Navigate to the Dynamic Triggers window.
-
Enable any dynamic triggers that the application generates. It is important to enable these triggers to ensure your payroll processing updates each database table correctly. The recommended minimum list of triggers to enable for the Retro-Notifications report is as follows:
Table Name Trigger Type PAY_ELEMENT_ENTRY_VALUES_F Update PAY_ELEMENT_ENTRIES_F Update PAY_ELEMENT_ENTRIES_F Insert PAY_ELEMENT_ENTRIES_F Delete
To define an event group
-
Navigate to the Table Event Group window.
-
Enter a name for your Event Group, for example, Retro-Notification Events.
-
Select Retro as your event groups type.
-
Save your entries.
-
Select the events that will produce notification if retrospective changes occur. Specify the following information to identify the type of update and the database table to which it applies:
-
Update Type
-
Base Table Name
-
Column Name
For example:
Update Type Table Column Name DateTrack Correction PAY_ELEMENT_ENTRY_VALUES_F SCREEN_ENTRY_VALUE DateTrack Update PAY_ELEMENT_ENTRIES_F EFFECTIVE_START_DATE DateTrack Update PAY_ELEMENT_ENTRIES_F EFFECTIVE_END_DATE DateTrack End Date PAY_ELEMENT_ENTRIES_F DateTrack Insert PAY_ELEMENT_ENTRIES_F DateTrack Delete PAY_ELEMENT_ENTRIES_F -
To enable the Incident Register
-
Navigate to the Functional Area Maintenance window.
-
Query the Incident Register and ensure that you have triggers defined.
-
Decide whether to capture the triggers by legislation, business group, or payroll. Navigate to each tab to make your selection.
Setting Up RetroPay by Element
RetroPay by Element is the recommended RetroPay process for most localizations, and is required if you use Enhanced RetroPay.
To set up RetroPay by Element:
-
Create the retroactive element. The recommended settings are:
-
Non-recurring
-
Multiple entries allowed
View this element in the RetroPay field of the Element Description window. By default, retroactive elements use the same name as the element that they represent, but you can change this name for user-defined elements.
-
-
Enter retroactive changes using DateTrack.
-
Create assignment and element sets including the assignments and elements for retroactive processing. The element set type is Run Set.
Note: North American HRMS: For earnings elements defined as Reduce Regular, include the Special Features element in the element set.
Use one of two methods to create your assignment set:
-
Use the Assignment Set window. This method is useful when you have a few employees to include in a RetroPay run and you are confident that you can identify all the employees that you want to include.
See: Creating an Assignment Set
-
Run the Retro-Notifications report to automatically generate an assignment set of all employees with retrospective changes.. This method is useful if you want to be certain that your assignment set includes all potential changes. You can edit this assignment set to add and remove assignments.
-
Setting Up RetroPay by Run and RetroPay (by Aggregate)
You should consider setting up Enhanced RetroPay in preference to RetroPay by Run or RetroPay (by Aggregate). However, we include setup information on these older types of RetroPay as reference.
To set up the RetroPay process for RetroPay (by Aggregate) and RetroPay by Run
Each step applies to both RetroPay (by Aggregate) and RetroPay by Run unless explicitly indicated otherwise.
-
Create an assignment set to define the set of employee assignments that you want to change. There are two methods of doing this:
-
Use the Assignment Set window. This method is useful when you have a few employees to include in a RetroPay run and you are confident that you can identify all the employees that you want to include.
See: Assignment Sets
-
Run the Retro-Notifications report to automatically generate an assignment set of all employees with retrospective changes. This method is useful if you want to be certain that your assignment set includes all potential changes. You can edit this assignment set to add and remove assignments.
-
-
In the Element Entries window, make the necessary date effective updates to element entry values for each employee assignment in the set.
See: Making Manual Element Entries, Oracle HRMS Compensation and Benefits Management Guide
-
Make other changes if necessary to salary information or to other database values relevant to the backdated changes.
-
In the Element window, define the RetroPay elements you require to receive entries of the retroactive adjustments. Your definition must include the following:
-
An appropriate element classification such as Earnings or Voluntary Deduction (not Information)
-
The processing type Nonrecurring
-
The rule Multiple Entries Allowed
-
Input values with these names:
-
Pay value
-
Start date (not necessary for RetroPay by Run)
-
End date (not necessary for RetroPay by Run)
-
See: Defining an Element (Payroll Users), Oracle HRMS Compensation and Benefits Management Guide
-
-
In the Element Link window, link the element to define your eligibility criteria.
See: Defining Element Links, Oracle HRMS Compensation and Benefits Management Guide
To create a RetroPay set
-
In the RetroPay Set window, enter a name and a description for the RetroPay set you are creating. Save this information before moving to the next block.
-
Select the balance in which the RetroPay process will create new values, such as Gross Pay to Date. You can select more than one balance. However, for RetroPay by Run the balance dimension must always be ASG_RETRO_RUN.
For RetroPay (by Aggregate), if you plan to run the process over several past payroll periods, check that you are not going through an end of year or similar period where the application resets balance totals to zero. If necessary, adjust the balance dimension span to ITD.
-
Select the RetroPay element you have defined to receive the values of the updated balance.
-
Select an input value for the element. Normally this value is Pay Value, but you can also calculate RetroPay hours by including an Hours input value.
Setting up Retro Elements for Overtime
To ensure the proper reporting of retro overtime hours in Block 15A, "Total Insurable Hours," the following setup is required. Note that this setup is mandatory to display the retro hours on the Record of Employment (ROE).
To ensure that the EI Hours check box is selected for the Retro Earnings Overtime element
-
Open the Earnings window.
-
Query the defined retro element, for example, Retro Overtime.
-
Select the EI Hours check box.
-
Save your changes.
To set up a retro component for an overtime element
-
Open the Element Description window.
-
Query the main Earnings overtime element.
-
Select the Recalculation tab.
-
Select Retro Components.
-
Select the Component.
-
Select the Reprocess Type.
-
In the Retropay Elements section, select the Retro Overtime element.
-
Save your changes.
To set up a retro component for an overtime special features element
-
Open the Element Description window.
-
Query the main overtime special features element.
-
Select the Recalculation tab.
-
Select Retro Components.
-
Select the Component.
-
Select the Reprocess Type.
-
In the Retropay Elements section, select the Retro Overtime Special Features element.
-
Save your changes.
To link the overtime element
You must create links to the main earnings, retro, and special feature elements.
-
Open the Element Link window.
-
Query the defined elements, for example, Main Earnings Overtime Element, Main Overtime Special Features Element, Retro Overtime Element, and Retro Overtime Special Features Element.
-
Link the elements.
-
Save your changes.
Setting Up Enhanced RetroPay with Component Usages and Element Time Spans
Standard RetroPay is the default RetroPay processing method for the Netherlands. It enables you to deal with any earnings changes made in the previous or current year, and any changes to tax and social insurance, impacting payroll calculations made in the current year. To carry out RetroPay processing, for every earnings element defined, you must set up two RetroPay elements, both with the skip rule Once Each Period assigned. These elements require the primary classifications Earnings, for changes in the previous year, and Retro Earnings, for changes in the current year. The same rule applies to imputed elements with the classifications Imputed Earnings and Retro Imputed Earnings. You set up RetroPay component usages to define how RetroPay will process the component. For each of these components you define an element time span to specify the start and end dates of the retro processing, and which RetroPay element applies for each time span.
Note: Each RetroPay element you create must have the skip rule, Once Each Period, assigned to it. Users in the Netherlands select a particular RetroPay method by running the concurrent program Enable Dutch RetroPay Method and selecting, either standard or replacement. The default entry is standard.
Only add assignments requiring RetroPay processing to the RetroPay set. The RetroPay process posts retro entries for each of the assignments in the RetroPay set. Note that these retro entries always include any changes to tax and SI information, even if there are no retrospective earnings entries.
Each pre-tax or pre_si and pre-tax deductions element processed by RetroPay must have a corresponding RetroPay element with a primary classification of Retro Pre-Tax Deduction or Retro Pre-SI and Pre-Tax Deduction. You must also define a RetroPay Component Usage and an Element Span Usage for the original element for each RetroPay method used, whether Standard or Replacement. All earnings elements require a corresponding RetroPay element and link.
For further information on the methods of RetroPay available for the Netherlands, see: RetroPay for the Netherlands, Oracle HRMS Payroll Processing Management Guide.
For further information on how to enable your RetroPay method of choice, see:Enabling the Method of RetroPay, Oracle HRMS Payroll Processing Management Guide.
For further information on how to override the Replacement RetroPay method for the Netherlands, see: Business Groups: Entering Dutch Business Group Information, Oracle HRMS Enterprise and Workforce Management Guide.
Important: If you do not require the Replacement method of RetroPay, you do not have to enable the Standard method, as it is the default method.
Defining Retropay Earnings Elements
You enter element information in the Element window.
An example of defining an earnings element for Netherlands payroll appears in the notes below.
-
Define your salary element with the primary classification of Earnings.
-
Choose the Balance Feeds Control button. In the Balance Feed Control region select the appropriate element classifications from the list of values.
Note: Netherlands users, for example, select the classifications SI Income Subject to Standard Tax: Earnings and Subject to Standard Tax: Earnings.
-
Choose the Balance Feeds button to view the resulting balances feeding the element.
Note: You must now set up two retropay elements with the skip rule Once Each Period assigned.
-
Define the retropay element for the previous salary year, with the primary classification Earnings.
Note: Netherlands users, in the Processing region, click on the Skip Rule and select NL_ONCE_EACH_PERIOD from the menu.
-
Choose the Balance Feeds Control button. In the Balance Feed Control region select the appropriate element classifications from the list of values. Retropay elements for the previous year that are subject to tax must always be subclassified as subject to special tax, regardless of the tax category of the original earnings element. If an original earnings element is subject to standard tax, then the retropay element must be subject to special tax. This includes SI Income and SI Gross Salary elements that are subject to tax.
Note: Netherlands users, for example, select the classifications SI Income Subject to Special Tax: Earnings and Subject to Special Tax: Earnings.
-
Choose the Balance Feeds button to view the resulting balances feeding the element.
-
Save your work.
-
Define the retropay element for the current salary year, with the primary classification of Retro Earnings.
Note: Netherlands users, in the Processing region, click on the Skip Rule and select NL_ONCE_EACH_PERIOD from the menu.
-
Choose the Balance Feeds Control button. In the Balance Feed Control region select the appropriate element classifications from the list of values. Retropay elements for the current year, subject to tax, must always be subclassified the same as the tax category of the original earnings element. If an original earnings element is subject to standard tax, then the retropay element must be subject to standard tax also. This includes SI Income and SI Gross Salary elements that are subject to tax.
Note: Netherlands users, for example, select the classifications SI Income Subject to Standard Tax: Earnings and Subject to Standard Tax: Earnings.
-
Choose the Balance Feeds button to view the resulting balances feeding the element.
-
Save your work.
-
You can now set up your retropay components and element span usages.
Setting Up Retropay Component Usages
Retropay component usages assign the components to the salary elements you created, ensuring all the elements recalculate with the latest values.
-
Query your defined salary element, in the Element window.
-
Select the Recalculation tab, and check the Retro Components button.
-
In the Retropay Components region of the Retropay Element window, choose the component field, and an appropriate component from the list of values.
Note: Netherlands users select the Retro Component Standard, or Replacement as required.
-
Select the Reprocess Type. If you select Static, then Retropay will not process any changes to the element when running the relevant component. Opting for the Reprocess Type ensures the element changes process.
Note: Netherlands users select the Reprocess Type, Reprocess. Dutch Retropay processes the period of change, and not the nature of change, such as a correction or backdated change. As a result, the whole retro period reprocesses.
-
Save your work.
-
You can now enter the element time spans.
Example of a standard retropay component set up for an earnings element Element Component Name Reprocess Type Comments User Defined Element Standard Reprocess Retro Earnings Example of a replacement retropay component set up for an earnings element Element Component Name Reprocess Type Replace Run Use Override Dates User Defined Element Replacement Reprocess Yes Yes
Setting Up Element Span Usages for Earnings Elements
The element time span usages defines the start and end dates for retropay processing. Most elements have the standard time span of Start of Current Year to End of Time already assigned, to cover any changes made in the current year. The exceptions for the Netherlands are standard taxable income and standard tax deduction, which include the timescales Start of Current Year to End of Previous Quarter, and Start of Current Quarter to End of Time, to cover student taxation. For each earnings element, or imputed earnings element with a defined retropay component usage, you must define two element span usages. These element span usages cover the earnings for both the current and the previous year, defining not only how far back processing should cover, but also up to where a particular retropay element carries forward the retro changes. You must define your retropay elements and components before defining the element time spans.
Set up the Element Span Usages in the Retropay Elements window.
-
Query your defined salary element in the Element window.
-
Select the Recalculation tab, and check the Retro Components button.
-
In the Retropay Elements region, select the appropriate time spans from the From and To fields, to define the time period the retropay element is covering.
Note: In the Time Spans fields, for each earnings element or imputed earnings element with a standard retropay component usage defined, you must define the element span usages for both the current and previous years. For example, for the retropay element, Retro Salary Previous Year, you define the time span from Start of Time to End of Previous Year. For each earnings, or imputed earnings element with a replacement retropay component defined, you must define the element span usage for the current year. You can set up a second time span to cover the previous year, if required.
-
Select the retropay elements you created from the Retropay Element field.
-
Save your work.
Example of earnings element span definitions for both standard and replacement components Element Component Span From Span To Retropay Element User Defined Element Standard Start of Time End of Previous Year Retro Earnings Previous Year User Defined Element Standard Start of Current Year End of Time Retro Earnings Current Year User Defined Element Replacement Start of Current Year End of Time Retro Earnings Current Year User Defined Element Replacement Start of Time End of Previous Year Retro Earnings Previous Year
Setting Up Overlapping RetroPay Using Balance Adjustments
If you have overlapping periods for making retro payments, ensure that the Retro Overlap feature is enabled. This process recalculates from the latest reprocess date and uses Balance Adjustments. Follow these steps to set up the Retro Overlap feature :
To set up Retro Overlap using Balance Adjustments
-
Run the corresponding concurrent program to enable the retro overlap feature for your localization, for e.g. Enable Retro Overlap for all UK Business Group.
-
Set up all the Retro Element Types and associate them with their corresponding elements.
-
Define a retro element for every element that feeds a balance. The Balance Adjustment process uses the retro entries created in future periods to do adjustments.
-
Enable the 'Do Not Process' check box for any new retro elements used for retro balance adjustments.
Understanding the Sequence of Your RetroPay Activities
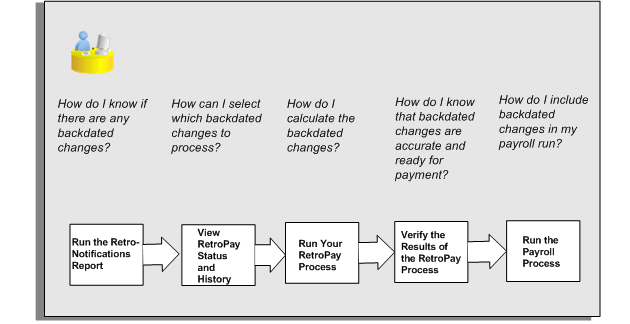
Follow this sequence to:
-
Identify outstanding backdated adjustments
-
Monitor and control the processing of backdated adjustments
-
Include backdated adjustments in your next payroll run.
You can only run the Retro-Notifications report and view RetroPay status if you are using RetroPay by Element, or the version of RetroPay by Element sometimes referred to as Advanced or Enhanced RetroPay.
This sequence does not apply to RetroPay by Run and RetroPay (by Aggregate)
-
Run the Retro-Notifications report to identify any backdated changes that have not been included in a payroll run.
You can save your summary of backdated changes into either an assignment set or an event group.
Once you have identified the retrospective changes, you can then decide whether to include them in your RetroPay process.
The Enhanced Retro-Notifications report uses the Payroll Events Model to identify what changes have occurred to your underlying data. If these changes correspond to the retrospective types of change that you want to be notified about, then these changes appear on the Retro-Notifications report.
-
Once you have identified unprocessed retrospective payments, you can determine how you want to process these changes.
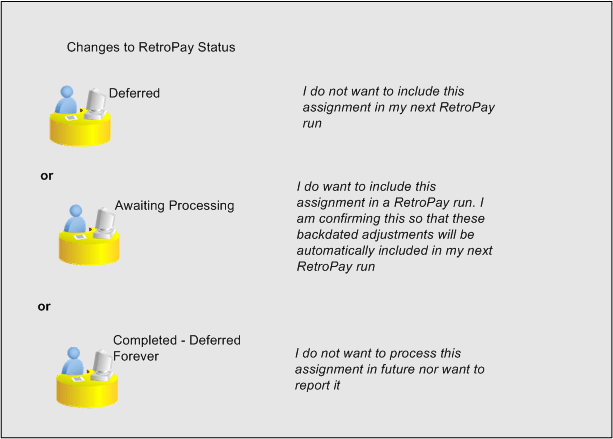
The Retro-Notifications report identifies the assignments with backdated adjustments. If you defer, then the assignment is not included when you next run RetroPay.
You can also include additional assignments that the Retro-Notifications report did not identify. This typically occurs when you discover additional backdated adjustments that were not known about when you ran the Retro-Notifications report.
The following diagram shows the sequence of statuses for each RetroPay status:
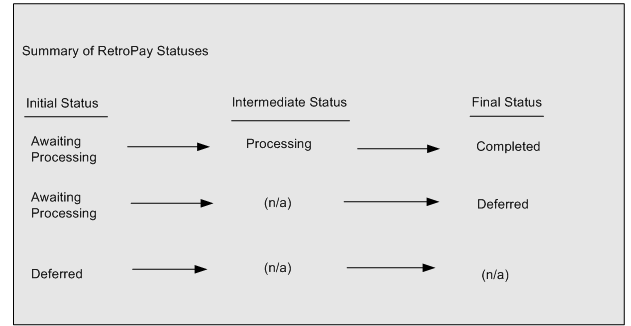
Once RetroPay processing begins, the initial status changes to an intermediate status of Processing.
You can query all retro assignments that are at the initial (outstanding) status, and all retro assignments at the final (completed) status.
The following diagram shows what statuses are included when your query All Outstanding, and All Completed:
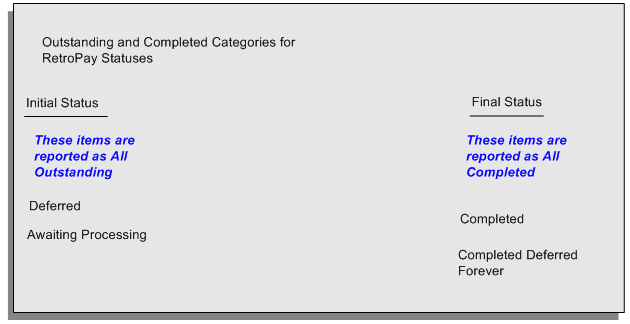
-
You enable Oracle Payroll to make retrospective adjustments for the combination of changes identified on the Retro-Notifications report, and subsequently modified when viewing RetroPay status.
See: Running Enhanced RetroPay
See: Running RetroPay by Element
RetroPay by Element already enables you to distribute retrospective payments across individual elements.
If you have Enhanced RetroPay you can decide whether each retrospective payment requires:
-
A full reprocessing in which you recalculate all amounts for the current payroll. This option is typical when you are processing backdated payments, or when you want to deduct tax for backdated amounts in the period when it was earned, rather than in the current payroll period.
-
A limited reprocessing in which you recalculate only some of the amounts for the current payroll. This option is typical when you are processing corrections, or when you want to deduct tax for retrospective changes in the current payroll period rather than in the period when it was earned.
Components for RetroPay
Oracle Payroll describes each different type of Enhanced RetroPay run as a component. For example, you could set up a component Earnings Correction for the element Basic Salary. A component always has:
-
A name (for example, Earnings Correction)
-
A reprocess type (Static, Partial, Reprocess) to determine how to process the component
Element Spans for RetroPay
You can also attach element spans to your selected element. An element span provides a start and end date for retrospective processing.
-
-
When you have run the RetroPay process, verify your results and correct any errors.
-
Finally, run your payroll to reflect the adjustments that you have made for the retrospective payments.
Run the Retro-Notifications Report
View RetroPay Status and History
Run the RetroPay Process
Verify Your RetroPay Results
Run Your Payroll
Viewing RetroPay Status and History
You use the RetroPay Status window to control how you want to process changes that have a retrospective impact. You typically find outstanding retrospective changes where changes are entered in Self-Service HRMS independently of Oracle Payroll.
Use the RetroPay Status window to:
-
Identify any assignments that have changes implying retrospective processing.
-
Specify how you would like to process any outstanding retrospective changes.
-
Confirm that your application has processed the specified requests.
-
Create or update multiple retro assignments for status as Awaiting Processing or Deferred.
You can still use the Retro-Notifications report to identify all outstanding retrospective changes that have not been applied, and group them into an assignment set ready for processing.
See: Running the Retro-Notifications Report
However, the advantage of using the RetroPay Status window is that you can identify what you want to process, or exclude from processing, and then mark your selections for completion. Additionally if you have to create or update multiple retro assignments, you can do so using the Web ADI spreadsheet.
To search for assignments that have retrospective changes
-
Select the search criteria for assignments that you want to view. If you do not select any criteria, then your search returns all assignments that have retrospective changes. You can search for any of these criteria:
Name: Specify a name, or search for all names.
Assignment Number: Specify an assignment or search for all assignments.
Recalculation Date: Use this start date and end date to determine the period for retrospective changes.
Status: Select the status that you want to identify.
-
All Completed. This status displays all assignments with retrospective implications that are already processed.
-
All Outstanding. This status displays all assignments with retrospective implications that are not yet processed.
-
Awaiting Processing. This status indicates that this assignment has cleared for processing and that the processing will occur in the next payroll run.
-
Completed. This status indicates that this assignment has now been processed.
-
Completed – Deferred Forever. This status indicates that the retro assignments created by the system are deferred forever. The action of the retro assignment (RETRO_ASSIGNMENT_ACTION_ID) is to changed to –1. The retro assignments are not processed in the future nor reported with the new status.
-
Deferred. This status indicates that an assignment was scheduled for processing, but that the processing was deferred and will not occur until you change the status.
-
Processing. This status indicates that an assignment is being processed.
Recalculation Reason: This criterion indicates why retrospective processing is necessary and enables you to search particular categories of retrospective change to process them independently of other retrospective changes.
-
-
Click Go when you have selected all your search criteria.
To change the status of an assignment
You typically change the status of an assignment when you want to defer processing that was previously scheduled, or to indicate that you have already processed this change even though it was automatically scheduled.
-
Select the assignment that you want to change.
-
Select the new status for the assignment from the Change Status list of values.
-
Click Change Status.
To view the elements included on each assignment
-
Select the assignment name in the Name column.
-
View the elements for this assignment, and the Recalculation Reason for each element.
To update or delete elements for each assignment
-
Select the assignment name.
-
Click Update to add an element to the assignment.
-
Click Delete to remove an element from the assignment.
To confirm that your specified requests have been processed
-
Query the individual assignment, but leave the status field blank.
-
Alternatively, query all assignments with a status of All Completed or All Outstanding and check the details for your individual assignment.
To create multiple retro lines
-
Select the Create Retro Lines button.
-
A spreadsheet opens.
-
In the spreadsheet that appears, enter new records with a status of Awaiting Processing or Deferred.
-
Click on Upload. You can select Commit All Rows or Each Row option, if you want the application to validate all records and commit or validate each record prior to uploading the details to the database. If you select Each Row option, then all successful records will be uploaded and error records will not be uploaded. Only on successful validation, the application makes changes to the database.
If you select the Upload All Rows or Each Row, then the application does not validate the details prior to uploading.
To update the multiple retro lines
-
Query the assignments with Awaiting Processing or Deferred.
-
Click on Download to Spreadsheet check box and click Go
-
In the spreadsheet that opens, you can update the status. You cannot modify any employee or assignment information but can only change the status of the assignment or you can delete the retro entry or update the reprocess date of the retro entry.
Note: In the Entry Delete/ Update column, ensure to select the applicable value if there are any entry changes made. If you do not select any value the application does not make any changes to the database.
-
Click on Upload. You can select Commit All Rows or Each Row option, if you want the application to validate all records and commit or validate each record prior to uploading the details to the database. If you select the Each Row option, then all successful records will be uploaded and error records will not be uploaded. Only on successful validation, the application makes changes to the database.
If you select the Upload All Rows or Each Row, then the application does not validate the details prior to uploading.
Running the Retro-Notifications Report
Use the Retro-Notifications report to
-
Identify all retrospective changes that have occurred since the last payroll run.
-
Automatically save these changes into an assignment set or as an event, depending on which Retro-Notifications report that you use in your localization.
-
Produce a report that lists the employees included in the assignment set and the trigger event that included them. You can view this output through Concurrent Manager by clicking the View Output button. Your reporting output is stored under the title Retro-Notifications Report (Internal).
Retro-Notification information is particularly useful when changes with retrospective impact are entered in Self Service HRMS independently of the Payroll department.
The Retro-Notifications report does not perform any RetroPay processing. It only identifies element entries that have changed. You must still run your RetroPay process separately to process these changes. When you produce the assignment set, or event group, you can decide whether to:
-
Run your RetroPay process on all assignments in this assignment set.
-
Edit the assignment set or event group to remove or add assignments, and then run your RetroPay process.
-
Take no retrospective action on any of the assignments in the assignment set.
You can use the RetroPay Status window to schedule automatic processing.
You run the Retro-Notifications report from the Submit Processes and Reports window.
To run the Retro-Notifications report
-
Select Retro-Notifications report in the Name field. If the parameters window does not open automatically, click in the Parameters field to open it.
-
Select the payroll. You can only run this report for a single payroll.
-
Select the last Report Period that you want to run the report for. The List of Values contains all periods for your selected payroll. The report runs for all periods up to and including the one you select.
-
Select an Event Group for the report to use. You can only run this report for a single event group. A default event group captures changes made at element level, but you can override the default, if, for example, you are testing your initial setup.
-
Enter the name of the Assignment Set that you want the report to generate. You can use this assignment set as a starting point for further processing of the assignments identified in the report.
Note: The assignment set name generated by the report will include what you enter in the Generated Assignment Set field followed by the Report ID.
-
If you want to produce this report in Portable Document Format, (PDF), select a template.
-
Select OK and Submit.
When you have generated the assignment set remember to run your RetroPay process for those retrospective changes that you want to process. You can either run your RetroPay process directly or, if your RetroPay process is RetroPay by Element, or Enhanced RetroPay you can use the RetroPay Status window to schedule your processing.
Running the Retro-Notifications Report (Enhanced and Enhanced PDF)
-
Identify all retrospective changes that have occurred since the last payroll run.
-
Automatically save these changes into an assignment set, or as an event, depending on which Retro-Notifications report you use in your localization.
-
Produce a report (.a01) that lists the employees included in the assignment set and the trigger event that included them. You can view this output through Concurrent Manager by choosing the View Output button.
This information is particularly useful when changes with retrospective impact are entered in Self Service HRMS independently of the Payroll department.
The Retro-Notifications report does not perform any RetroPay processing. It only identifies element entries that have changed. You must still run your RetroPay process separately to process these changes. When you produce the assignment set, or event group, you can decide whether to:
-
Run your RetroPay process on all assignments in this assignment set.
-
Edit the assignment set or event group to remove or add assignments and then run your RetroPay process.
-
Take no retrospective action on any of the assignments in the assignment set.
You can use the RetroPay Status window to schedule automatic processing.
You run the Retro-Notifications (Enhanced) report from the Submit Processes and Reports window.
To run the Retro-Notifications (Enhanced) report
-
Select the payroll. You can only run this report for a single payroll
-
If you want to see the retro-notifications for a particular event group, select an overriding event group.
-
If you are running the PDF-enabled version of this report, select a template for your PDF output.
-
Select OK, and submit.
Running Enhanced RetroPay
Use the Enhanced RetroPay process to distribute backdated amounts or corrections that you have identified from the Retro-Notifications report.
You run the Enhanced RetroPay process from the Submit Requests window.
To run the Enhanced RetroPay process
-
Enter an effective date to indicate the date from which you want to create the retrospective elements for Enhanced RetroPay process.
-
Select the payroll.
-
If you want to create retrospective entries in a different pay period other than effective date, enter an entry creation date. The application creates retrospective entries in the pay period in which the Entry Creation Date occurs.
If you leave this field blank, the application creates the default retrospective entries as of Effective Date.
-
Click Submit
Running RetroPay by Element
Use the RetroPay by Element process to distribute backdated amounts or corrections that you have identified from the Retro-Notifications report.
You run the RetroPay by Element process from the Submit Requests window.
To run the RetroPay by Element process
-
Select an assignment set.
-
Select an element set.
-
Select a start date and end date.
The end date must be within the current payroll period and must have a date after the latest effective check/cheque date.
-
Click Submit
Oracle Payroll temporarily rolls back and reprocesses all the payrolls for all assignments included in the assignment set from the start date specified. The application compares the old balance values with the new ones, and creates entry values for the RetroPay elements based on the difference.
These entries are processed for the assignments in the subsequent payroll run for your current period.
There are no changes to your audited payroll data.
Running RetroPay by Run or by Aggregate
You run the RetroPay processes in the Submit Requests window.
To run the RetroPay processes
-
In the Name field, select your RetroPay process.
-
In the Parameters window, select the assignment set.
-
Select the RetroPay set.
-
Enter the start date and end date for the recalculation. The default end date is the current date. The application will create the RetroPay element in the payroll period that includes the current date.
The end date must be within the current payroll period and must have a date after the latest effective check/cheque date. If you already processed a run for the pay period, for example, because of an earlier supplemental run, you cannot include the RetroPay elements for the current regular payroll run. To process these RetroPay elements you must include them in the subsequent run.
-
Click Submit.
Oracle Payroll temporarily rolls back and reprocesses all the payrolls for all assignments included in the assignment set from the start date specified. The application compares the old balance values with the new ones and creates entry values for the RetroPay elements based on the difference.
These entries are processed for the assignments in the subsequent payroll run for your current period.
There are no changes to your audited payroll data.
Running Quick RetroPay
Run Quick RetroPay to process any retrospective payments for a single assignment. You run the Quick RetroPay process from the Submit Requests window.
Note: It is not mandatory to run the Retro-Notifications Report for QuickRetropay process.
To run the Quick RetroPay process
-
Enter a date on which you want to create the derived retro element entries. This is mandatory.
-
Select the assignment number of the assignment for which you want to run the backdated change. This is mandatory.
-
Enter an earliest date from which you want to reprocess the assignment backdated changes. If you do not specify any date, then the application calculates it internally. This is optional.
-
If you want the retro-notifications for a particular event group, select an overriding event group.
-
Click Submit.
Exception Reporting
Payroll Exception Reporting: Overview
You run exception reports immediately after the payroll run to identify potential overpayments or underpayments. This helps you to avoid corrections when you accidentally make an incorrect payment. For ease of use, you can do each of the following to control the output and definition of your exception reports:
-
Request your report output in either CSV or text format so that you can use familiar desktop tools for editing the output
-
Group a set of reports so that you can run them as a single reporting request
-
Override exception criteria for a single run of a report without changing your underlying report
-
Run predefined exception reports, or define additional reports that incorporate your own exception criteria. For example, you cannot modify the predefined High Gross Pay and High Net Pay reports. You can, however, define your own reports to identify other exceptions.
-
Select your preferred exception criteria from a forms interface without having to develop your own query code.
Examples of Exception Reporting Criteria
You must always select a balance and a balance dimension for exception reporting. This table lists additional criteria that you must define, explains what each one means, and gives an example to illustrate how you use them:
| Exception Criterion | What it Identifies | Example |
|---|---|---|
| Comparison Type | The period against which you want to compare when determining whether an exception has occurred | Average in Months |
| Comparison Value | This is a numerical value to determine how averages are calculated when you are using an average as your basis for comparison | If you select 3 as the comparison value for a comparison type of Average in Months, then you are comparing the current month with the average of the previous 3 months. |
| Variance Type | The category of variance that you want to report on. | Either Percentage or Amount |
| Variance Value | The magnitude of overpayment or underpayment that you want to report on. | Variance Value of 500 If Amount is your variance type, and you are reporting on a total amount of 5000, then a variance value of 500 means that amounts greater than 5500 are regarded as overpayments and amounts less than 4500 are regarded as underpayments. |
| Variance Operator | The precise range of variance that you want to report on. You can use variance operators to specify that you are only interested in a particular section of the range defined by the variance value. | Greater than, Less than, Equal |
These are only examples. There is an extensive list of comparison types and variance operators enabling you to set the required degree of precision for your own reports.
See Comparison Types for Exception Reporting
See Variance Operators and How You Can Use Them
Exception reporting activities are as follows:
Setting Up Exception Reports
-
Create an exception report
-
Group existing exception reports
Running Exception Reports
-
Run an exception report, or exception report group
-
View an exception report
Examples of Exception Report Setup
This topic explains what values to include if you want to:
-
Set up an Exception Report to show Net Pay Amounts greater than 5000
-
Derive the Total Payments for your Employee Population
Setting Up an Exception Report to Show Net Pay Amounts Greater Than 5000
To show Net Pay Amounts greater than 5000, set up your report with these values:
| Exception Criterion | Values |
|---|---|
| Balance | Net |
| Dimension | Assignment Period-to-date |
| Comparison Type | Current Period |
| Comparison Value | 0 |
| Variance Type | Amount |
| Variance Operator | Greater Than |
| Variance Value | 5000 |
| Output Format | Spreadsheet (CSV) |
Derive the Total Payments For Your Employee Population
To derive the total payments for your organization, make these entries to produce a spreadsheet listing all assignments and then sum them to derive the total payments for your employee population
| Exception Criterion | Values |
|---|---|
| Balance | Net |
| Dimension | Assignment Period-to-date |
| Comparison Type | Current Period |
| Comparison Value | 0 |
| Variance Type | Amount |
| Variance Operator | Equal |
| Variance Value | 0 |
| Output Format | Spreadsheet (CSV) |
Running the Payroll Message Report
You run the report in the Submit Requests window.
To run the Payroll Message Report
-
In the Name field, select the report name. Then enter the Parameters field to open the Parameters window.
-
Select the name of the payroll for which you want to see messages.
This is the only required field. If you leave the next three fields blank the system brings back all messages for all processes connected to this payroll in all periods.
-
Select a payroll period for which to view messages.
This restricts payroll messages to the period you select.
-
Select a payroll process type.
This restricts payroll messages to the payroll process type you select. All messages for all runs of this process during the period selected are returned.
-
Select a payroll process.
This restricts payroll messages to one instance of the payroll process type selected. If you leave the Process Type field blank you can choose one instance of any payroll process for the period selected.
-
Select a message severity level for the messages in the report, or leave the field blank to see messages of all levels of severity.
-
Select assignment number or employee name as sort criteria for the report. The default is employee name.
-
If you want to produce this report in Portable Document Format, (PDF), select a template.
-
Choose the Submit button.
Reconciling Payments
You can use Oracle Payroll in combination with Oracle Cash Management to verify that payments have been processed. The process is:
-
Import the bank statement. You do this in Oracle Cash Management.
-
Run the automatic reconciliations process. You do this from Oracle Cash Management.
-
View the results of the reconciliation process. You can do this either through Oracle Payroll, or Oracle Cash Management.
Note: For US only: For EFT or NACHA payments to be reconciled in Oracle Cash Management, the following 3 pieces of data are checked: amount, transaction date and batch name (file ID + company ID). Manual reconciliation will check amount and transaction date only.
To do this in Oracle Payroll, see Viewing Payroll Process Results
In Oracle Cash Management, you can view the following reports:
-
Available Transactions report
-
AutoReconciliation Execution report
-
-
Identify any payments that are marked in error, and reconcile them manually.
Note: If you are using Oracle Payroll with Oracle Cash Management for the reconciliation of payments then you will need to set up accounting reference data when you are setting up Oracle Cash Management
See Accounting Reference Information for Cash Management Integration, Oracle HRMS Implementation Guide
Setting Up Exception Reports
You use exception reports to identify potential overpayments or underpayments before they occur. You can specify the amount, or percentage that will cause an exception to be noted. If you run your exception reports immediately after the payroll run you can identify discrepancies and avoid the retrospective corrections necessary when a wrong payment has already been made.
To create an exception report
Use the Exception Reports window to create an exception report.
-
Select Add Another Row
-
Enter the report name. You can enter any name that meets your reporting requirements - there is no standard format.
-
Select the balance that you want to report on. You can enter a predefined, or user-defined balance.
-
Select the balance dimension that you want to report on. Some dimensions apply only to particular localizations. There are some dimensions that you must select when you choose a particular comparison type:
Balance Dimension When to Select these Dimensions _ASG_MONTH, _PER_MONTH You must select one of these dimensions if you want to use the Average in Months comparison type. These dimensions are not available for Japanese and Australian Payroll. _PER_QTD, _ASG_QTD You must select one of these dimensions if you want to use the Average in Quarters comparison type. These dimensions are not available for Japanese Payroll. The _PER_QTD dimension is not available for Australian Payroll. _PTD You must select this dimension for the comparison types Average of Previous Periods, Average of Previous Paid Periods, Average of Total Periods in Days, and Average of Paid Periods in Days. This dimension is not available for Japanese Payroll. _ASG_MTD_JP You must select this dimension if you want to use the Average in Months comparison type. This dimension is available for Japanese Payroll only. _ASG_QTD_JP You must select this dimension if you want to use the Average in Quarters comparison type. This dimension is available for Japanese Payroll only. ASG_PROC_PTD You must select this dimension for the comparison types Average of Previous Periods, Average of Previous Paid Periods, Average of Total Periods in Days, and Average of Paid Periods in Days. This dimension is available for Japanese Payroll only. _ASG_MTD You must select this dimension if you want to use the Average in Months comparison type. This dimension is available for Australian Payroll only. _ASG_PTD You must select this dimension for the comparison types Average of Previous Periods, Average of Previous Paid Periods, Average of Total Periods in Days, and Average of Paid Periods in Days. This dimension is available for Australian Payroll only. _ASG_YTD You must select this dimension if you want to use the Current Year or Previous Year comparison type. This dimension is available for Australian Payroll only. _ASG_LE_MTD You must select this dimension if you want to use the Average in Months comparison type for a legal employer. This dimension is available for Australian Payroll only. _ASG_LE_PTD You must select this dimension for the comparison types Average of Previous Periods, Average of Previous Paid Periods, Average of Total Periods in Days, and Average of Paid Periods in Days for a legal employer. This dimension is available for Australian Payroll only. _ASG_LE_QTD You must select this dimension if you want to use the Average in Quarters comparison type for a legal employer. This dimension is available for Australian Payroll only. _ASG_LE_YTD You must select this dimension if you want to use the Current Year or Previous Year comparison type for a legal employer. This dimension is available for Australian Payroll only. -
Select the comparison type.
Comparison Types for Exception Reporting
This table lists each comparison type that you can select and explains how it operates as a basis of comparison:
| Comparison Type | How it Operates as a Basis of Comparison |
|---|---|
| Current Period | Identifies any exceptions within the current payroll period. Does not use any previous period as a basis for comparison. |
| Previous Period | Uses the previous period as a basis of comparison. |
| Previous Month | Uses the previous month as a basis of comparison. |
| Previous Quarter | Uses the previous quarter as a basis of comparison. |
| Previous Year | Uses the previous year as a basis of comparison. |
| Average in Months | Compares the current month-to-date with the average of previous months-to-date. Only available if you have the balance dimensions ASG_MONTH or _PER_MONTH. |
| Average in Quarters | Compares the current quarter-to-date with the average of previous quarters-to-date. Only available if you have the balance dimensions _PER_QTD or _ASG_QTD. |
| Average of Paid Periods in Days | Compares the current period with the number of previous pay period included within the specified number of days. However, only includes those pay periods in which an employee actually received payment. Only available for _PTD dimensions. |
| Average of Previous Paid Periods | Compares the current period with the number of previous periods in which the employee actually received payment for _PTD dimensions only. |
| Average of Previous Periods | Compares the current period with previous periods for _PTD dimensions only. |
| Average of Total Periods in Days | Compares the current period with the number of previous pay periods included within the specified number of days. Only available for _PTD dimensions. |
-
Enter your comparison value. For example, if you select 3, when your comparison type is Average in Quarters, this means that your current quarter is compared to the average of the previous three quarters.
Some comparison values are preset and you cannot change them:
-
Current period always has a comparison value of 0.
-
Previous Period, Previous Month, Previous Quarter and Previous Year all have a comparison value of 1.
-
-
Select your variance type. This must be either percentage or amount.
-
Enter a variance operator.
Variance Operators and How You Can Use Them
You can choose one of the following variance operators. The Exception Reporting Output column indicates the effect of selecting each variance operator assuming that:
-
Comparison Type is Previous Period
-
Previous period amount is 10,000
-
Variance Value is 1000
| Variance Operator | Exception Report Output |
|---|---|
| Variance (+/-) | All assignments that either exceed or are less than the previous period amount by the amount or percentage stated in the variance value. Therefore, Variance Value (+/-) returns all assignments having a value between 9000 and 11000. |
| Less than | All assignments that are less than the previous period amount by the amount or percentage stated in the variance value. Therefore, Less than returns all assignments having a value of less than 9000. |
| Less than or equal | All assignments with a current value either equal to or less than the previous period amount by the amount or percentage stated in the variance value. Therefore,Less than or equal returns all assignments having a value of 9000 or less. |
| Equal | All values that are exactly equal to the higher limit or the lower limit of the variance value. Therefore, Equal returns all assignments having a current value equal to 9000 or 11000. |
| Greater than | All assignments that are greater than the previous period amount by the amount or percentage stated in the variance value. Therefore, Greater than returns all assignments having a value of more than 11000. |
| Greater than or equal | All assignments with a current value either equal to or greater than the previous period amount by the amount or percentage stated in the variance value. Therefore, Greater than or equal returns all assignments having a value of 11000 or more. |
-
Enter a variance value, unless your comparison type is previous payroll period.
For all other comparison types you can specify the exact percentage, or the numerical value depending on which variance type you choose. In subsequent exception reports you can change your variance values in the SRS window when you are running the report.
For examples of how to set exception reporting to identify particular exceptions, see Examples of Exception Report Setup.
Grouping Exception Reports
Use the Exception Report window to group together a selection of exception reports so that they can be run in a single operation. You can include the same exception report in multiple exception groups.
To group exception reports
-
Check the Select check box for each of the reports that you want to include in your report group.
-
Choose the Create Group button.
-
Enter the group name.
-
Select a consolidation set for this reporting group.
-
Select a payroll for this reporting group.
-
Select your output format.
-
Choose the Apply button to create your group.
Running an Exception Report, or Exception Report Group
Use the Exception Report Window to run exception reports singularly, or as a group. You can also override the variance type or variance for a single run of the report.
To run an exception report
Use the Submit Requests window to run the exception report:
-
Check that your effective date is compatible with the date for which you want the report to run.
-
Select Exception Report as the report type.
-
If you want to run a single exception report, enter the name of the report. You do not need to enter the Exception Group name if you are running a single report.
-
If you want to run a group of exception reports, then enter an Exception Group name, but do not provide an Exception Report Name.
Exception reports are identified either by the report name, or by a group name. When you are running the report you must supply either the report name or the group name, but you never have to supply both.
-
Select the payroll that you are reporting on. The consolidation set is the default selection.
-
Override the variance type and variance value if you want to specify particular values for a single run of this report. This does not change your underlying report.
-
For Australian, India users only: Select the legal entity for the report. If you do not specify the legal entity in case of a LE dimension, the report does not return a result.
India users only: Select the component name for the report. If you do not specify the component name in case of a Component Balance dimension, the report does not return a result.
-
Save your work.
-
Click Submit.
To view an exception report
Use the View Requests window to view an exception report:
-
Choose the Find button and select the report that you want to view.
-
Choose the View Output button.
Retries, Reversals and Rollbacks
Correction of Run Results: Rollbacks
Use run rollbacks when you have no need to keep any record that a run occurred. When you roll the run back, the process removes all the assignments and the run results.
For example, if an employee should never have been processed in a run, you can roll back the run for that employee. A rollback completely removes an employee from a run, as if the processing had never occurred.
You cannot roll back payroll processing for individuals or payrolls if post-run processing has already occurred.
US and Canadian Payroll Only: If you are using Net-to-Gross payroll processing then each assignment action for a run type can also generate additional actions derived from the parent action. These additional actions are known as child actions.
Mexico Payroll Only: HRMS Payroll for Mexico provides the Rollback MX Payroll Processes concurrent program for rollback purposes. This process enforces Mexico-specific business rules for handling payroll processes.
You can mark a parent assignment action for rollback, but you cannot roll back a child assignment action independently of its parent.
Uses of Rollbacks
Suppose that just after a payroll run, you receive notification that three employees have been transferred to a different payroll. This means you should not have processed them in the run just completed.
In this case you can roll back the processing for the three individuals. This action completely removes them from the run.
If the whole set of employees a run processes is the wrong set, you can roll back the entire run.
Rollbacks can also be useful if you want to do a run for testing purposes only, examine the results, and then remove all traces of it.
Important: If a recurring element has an end date that coincides with the end of the pay period, then the element end date will be removed by the rollback.
Correction of Run Results: Retries
Retrying Employee Assignments
You use retries for correcting mistakes shortly after a payroll run finishes. For example, you receive late entries of hours worked for some employees after a run starts, and you must enter these late details for some assignments.
Provided there has been no post-run processing for these assignments, you can mark them for retry. After you have corrected the element entry information for the marked employees, you submit the Retry Payroll Process. The new run processes only those employees marked for retry.
When you mark employee Assignments for retry, the run's status is Incomplete. This protects you from forgetting to correct and rerun an assignment marked for retry.
US and Canadian Payroll Only
If you are using Net-to-Gross payroll processing then each assignment action for a run type can also generate additional actions derived from the parent action. These additional actions are known as child actions.
You can mark a parent assignment action for retry, but you cannot retry a child assignment action independently of its parent.
Automatic Retries
Any assignments having a status of Error after a payroll run are automatically retried when you run the payroll again. You do not have to mark these assignments for retry and cannot unmark them. The recommended procedure for dealing with retries, therefore, is as follows:
-
Run the payroll and examine the results.
-
Check any assignments with a status of Error and make the necessary changes to them so that they can process correctly.
-
Check the other assignments. Mark for retry any that require changes and make the necessary changes.
-
Run the payroll again. It will now process only the assignments having a status of Error after the first run, together with those you have manually marked for retry.
Retries and Post-run Processing
You cannot run the payroll retry process if you have already started off another post-run process, such as PrePayments. In such a case, to start the payroll run retry process you must first roll back the other process. This deletes all element entries for the process and enables you to run the retry of the payroll.
The payroll run's status remains at Incomplete as long as some employees remain marked for retry.
Retrying Runs
In another situation, you may realize after a run that results for a sizeable number of employees may be incorrect. This could happen, for example, when you neglected to modify a formula for an earnings or deduction before starting the run.
In this case you can make the necessary changes and retry the entire run. The new run ignores employees whose processing is unaffected by the corrections you have made. It reprocesses only those whose original results are incorrect in view of the corrections entered.
Correction of Run Results: Reversals
You can retry an employee or a run only when no post-run processing has occurred. You use reversals when you need to correct run results for a single assignment after post-run actions have already occurred.
In other words, reversals are useful when you need to correct run results some time after the run has occurred.
Restarting Earnings or Deductions after Reversals
You may reverse a run for a past period during or after which stop dates exist for earnings or deductions. When this happens, Oracle Payroll issues a warning. This tells you to check whether you should restart any of the stopped earnings or deductions.
For example, the reversal may have cancelled out a deduction that was an employee's final payment toward an outstanding loan. In this case, the warning alerts you to the need to restart the deduction.
Reprocessing Nonrecurring and Additional Entries after Reversals
Reversals of payroll runs with nonrecurring and additional element entries provide an exception to the 'once only' rule for processing nonrecurring elements.
Normally, nonrecurring element entries can be given only once to an employee. Additional entries for recurring elements can be given only once in each pay period.
The effect of this rule on payroll run reversals is that nonrecurring and additional entries do not get reprocessed in subsequent runs following a reversal. As a consequence, the results of subsequent runs will not be identical to the original run results.
To prevent this, Oracle Payroll allows nonrecurring and additional entries to be reactivated and reprocessed in subsequent runs following payroll run reversals. This makes it possible for the run results of subsequent runs to be identical to the original results.
Warning: You cannot roll back a reversal if there are subsequent payroll runs. This is to prevent nonrecurring and additional entries being given twice - in the reversed run and in the subsequent run.
Performing a Batch Reversal
You use batch reversal when you need to correct run results for a batch or multiple assignments after post-run actions have already occurred.
Marking and Retrying Payroll Runs and Other Processes
To mark a small payroll process for retry
-
In the Payroll Processes window, select the process to retry and check the Retry box. This effectively marks every employee assignment included in the process for reprocessing when you retry it.
To mark a large payroll process for retry
-
In the Submit Requests window, select Mark Payroll Run for Retry in the Name field if you are retrying a payroll run. Otherwise select Mark Process for Retry. These processes have the same parameters, Payroll Process and Assignment Set.
-
Select the process you are marking for retry.
-
Leave the Assignment Set field blank.
-
Choose Submit.
To mark an individual employee assignment for retry
-
In the Assignment Processes window, select the assignment to retry and check the Retry box. Then when you retry the process, only these assignments are reprocessed. This is a convenient approach when only a few assignments require reprocessing.
Marking a Group of Employee Assignments for Retry
To mark a group of employee assignments for retry
-
Place the group of employee assignments in an assignment set.
See: Assignment Sets
-
In the Submit Requests window, select Mark Payroll Run for Retry in the Name field if you are retrying a payroll run. Otherwise select Mark Process for Retry. These processes have the same parameters, Payroll Process and Assignment Set.
-
Select the process you are marking for retry.
-
Select the assignment set name.
-
Choose Submit.
Correcting Run Results: Reversals
You reverse pay runs in the Reverse Payroll Run window for the employee assignment.
To reverse a payroll run or QuickPay for an assignment
-
Select the run you want to reverse.
All the payroll runs for the assignment are displayed when you open the window.
-
Select the Reverse check box for the run you want to reverse.
The consolidation set for the run automatically displays as the consolidation set for the reversal.
-
Select a different consolidation set if you want to process the reversal in a different set to the original run set.
Running the Batch Reversals Process
Use the Batch Reversals process to perform quicker reversals of payroll and QuickPay runs. A batch reversal enables you to reverse your payroll calculations for an entire assignment set rather than for a single assignment. You run the Batch Reversals process from the Submit Requests window
To run the batch reversals process
-
Select the Payroll Action ID.
-
Select the Assignment Set that you want to reverse.
-
Select the Reversal Date to specify the date from which you want to reverse your payroll or QuickPay run.
-
Click OK to confirm your choices.
-
Click Submit.
Retrying a Payroll Run or Other Payroll Process
To retry a payroll run or other payroll process
-
Mark the entire process, individual employee assignments, or a group (assignment set) of assignments for retry.
-
In the Submit Requests window, select Retry Payroll Run in the Name field to retry a run. Otherwise select Retry Payroll Process to retry another process.
If the Parameters box does not automatically appear, click in the Parameters field.
-
In the Payroll Process field of the Parameters box, select the process to retry.
-
Choose Submit.
Rolling Back Payroll Runs and Other Processes
You can roll back a process in one of several ways depending on the extent of the rollback.
| If you want to ... | Then refer to... |
|---|---|
| Roll back processes for a few individuals | Rolling Back a Process from the Payroll Processes Window |
| Roll back processes for many employees (defined as an assignment set) | Rolling Back a Process from the Submit Requests Window |
| Roll back an assignment process for an individual employee | Rolling Back a Process from the Assignment Processes Window |
Rolling Back a Process from the Payroll Processes Window
Use the Payroll Processes window when you want to roll back a process for a few individuals.
To roll back a process from the Payroll Processes window
-
Select the process record.
-
Select Delete Record from the Edit menu.
Rolling Back a Process from the Submit Requests Window
Use the Submit Requests window when you want to roll back a process for many employees. If you do not want to roll back the process for all employees originally processed, you must create an assignment set. See: Creating an Assignment Set.
To roll back a process from the Submit Requests window
-
In the Name field, do one of the following:
-
Select Rollback to roll back all processes except a payroll run.
-
Select Rollback Run to roll back a payroll run.
-
Mexico only: Select Rollback MX Payroll Processes.
-
-
If the Parameters box does not appear, click in the Parameters field.
-
Select the process to roll back. The list for Rollback displays processing dates with the corresponding process types, payrolls, and consolidation sets. The list for Rollback Run displays process run dates with the corresponding period dates and payrolls.
-
To roll back processing for an assignment set, select the set name.
-
Choose Submit.
Rolling Back a Process from the Assignment Processes Window
Use the Assignment Processes window when you want to roll back a process for an individual employee assignment.
To roll back an assignment process
-
Select the record for the assignment process.
-
Choose Delete Record from the Edit menu.
Payroll Purge
Setting Up the Payroll Purge Process
The Purge process deletes data from a list of payroll tables to maintain data integrity and also rolls up balances to maintain the value of important balances.
Before you run the Payroll Purge process, you must do the following:
-
Run the Upgrade Action Context process to determine the assignments for upgrade.
-
Optionally, create a balance set containing a list of balances required for roll-up. This ensures that the process will roll-up only the balances in the default list and those in the balance set. You can define the balance sets using the Payroll > Balance Set window. The application uses this balance set during the Purge Preparation Process.
-
Run the Purge Preparation Phase. Check and ensure that all the balances are correct. If any balance is incorrect, you can rollback the Purge Preparation Phase. You must complete the rollback at this point, because you cannot roll back later.
-
Run the Purge Deletion Phase if all the balances in Preparation Phase are correct.
Running the Upgrade Action Contexts Process
You run the Upgrade Action Contexts concurrent manager process for a business group to determine the time period for performing an upgrade.
You run the Upgrade Action Contexts process using the Submit Request window.
To run the Upgrade Action Contexts process
-
In the Name field, select Upgrade Action Contexts.
-
In the Parameters window, enter the start and end date to perform an upgrade for a business group.
Note: .If you have not enabled Action Context functionality prior to running this process, then you must enter the End Date as the current day. For purge to run successfully you should also enter a start date as early as necessary, for example Start of Time.
Running the Purge Preparation Phase
You must run the Purge Preparation Phase to determine the data you want to purge from the application database. The preparation phase decides which assignments to purge and the values of any balances that subsequently require rolling up.
This phase enables you to produce a consolidated total of balances from an assignment and balance set before you purge it.
Important: You must run the Purge Preparation Phase prior to running the Purge Deletion Phase.
You run this process from the Submit Requests window.
To run the Purge Preparation Phase process
-
Query Purge Preparation Phase in the Name field.
-
In the Parameters window, select the balance set that includes the balances that you want to roll up.
-
Select the assignment set to include all the assignments for which you want to run the purge process.
-
Enter an effective date to determine from when you want to roll up the balances.
-
Click OK and then Submit.
Running the Purge Deletion Phase
Purging unwanted data helps in improving application performance. You run the Purge Deletion Phase process to delete unnecessary data from the database. Remember to backup important data before you run the deletion process as you cannot roll it back and the changes are irreversible.
Important: Run the deletion process only after you have successfully completed the Purge Preparation Phase process.
You run this process from the Submit Requests window.
To run the Purge Deletion Process
-
Query Purge Preparation Phase Deletion process in the Name field.
-
In the Parameters window, select the payroll action of the associated Purge Preparation Phase process.
-
Click OK and then Submit.
Running the Purge Process Events Process
Run the Purge Process Events process when you want to purge the details of the pay process events table and archive this data prior to a particular date. The application purges and archives this data into a shadow table as a backup. You can use this process to enhance the performance of processes accessing the table pay process events.
Run this process in the Submit Requests window.
To run the Purge Process Events process
-
In the Name field, select Purge Process Events process.
-
In the Parameters window, enter a date to purge data from the pay process events table prior to this date and the recorded date (if it exists) from pay recorded requests table.
Additional Information: The application collects data in chunks for a complete delete from pay process events table and inserts into pay process events shadow table. The PPE_bulk_limit value is defaulted to 10,000. You can change this parameter to fine tune the performance of process.
-
Click OK and then Submit.
Workforce Intelligence (HRMS) for Payroll Processing and Analysis
Costing Detail Workbook
The Costing Detail workbook enables you to review cost allocations for an element, element set, or a particular element classification.
Business Questions
Are my costs assigned to the correct cost center?
What are my cost totals for an element, element set, or element classification?
Worksheets
Costing Detail worksheet.
Parameters
You need to specify values for the following parameters:
-
Costing Effective Date Begin
-
Costing Effective Date End
-
Element Set (only mandatory if you do not specify an Element, or Element Classification)
-
Element Classification (only mandatory if you do not specify an Element, or Element Set)
-
Element (only mandatory if you do not specify an Element Set, or Element Classification)
Use the following optional parameters to further restrict the values in the workbook:
-
Costing Process
-
Payroll
-
Consolidation Set Name
-
Organization
-
Location
-
Employee
-
Reporting Currency
-
Include Estimate Costing
Costing Summary Workbook
The Costing Summary workbook enables you to view total costing details for a payroll, consolidation set, or organization name.
Business Questions
What are my overall debits and credits for a particular costing period?
Worksheets
Costing Summary worksheet.
Parameters
You need to specify values for the following parameters:
-
Costing Effective Date Begin
-
Costing Effective Date End
Use the following optional parameters to further restrict the values in the workbook:
-
Costing Process
-
Payroll Name
-
Consolidation Set Name
-
Organization Name
-
Reporting Currency
-
Include Estimate Costing
Element Detail Workbook
The Element Detail workbook enables you to select an element effective date and element classification and then view further details for all elements within these reporting criteria.
Business Questions
What are the attributes for each element within a particular element classification?
Do any of my selected elements belong to a proration group or recalculation group, and if so, which group?
Are any of my selected elements paid separately or processed separately?
Worksheets
Element Detail worksheet.
Parameters
You need to specify values for the following parameters:
-
Effective Date
-
Classification
Use the following optional parameters to further restrict the values in the workbook:
-
Processing Type
-
Standard Links
-
Separate Payment
-
Process Separate
-
Recalculation Group
-
Proration Group
Element Link Detail Workbook
The Element Link Detail workbook enables you to select a group of elements by effective date and classification. You refine your selection by specifying whether you want view elements that are available to all payrolls, or those elements that only available to some payrolls. When you have defined your subset of elements, you can see link details for each of them.
Business Questions
What are the costable types and costing codes for a group or elements?
Do these elements belong to a distribution set?
Are there any service criteria or age criteria for these elements?
Worksheets
Element Link Detail worksheet.
Parameters
You need to specify values for the following parameters:
-
Effective Date
-
Classification
-
All Payrolls
Use the following optional parameters to further restrict the values in the workbook:
-
Element
-
Processing Type
-
Standard Links
-
Link Status
-
Payroll
-
Job
-
Organization
Employee Assignments Without Payroll Workbook
The employee assignments without payroll workbook enables you to identify those assignments that do not belong to a payroll. You can also view assignment status.
Business Questions
Is there a valid reason for these assignments not to belong to a payroll, or is there an error requiring correction?
Worksheets
Assignments Without Payroll worksheet.
Parameters
You need to specify values for the following parameters:
-
Beginning Date
-
Ending Date
Employee Assignments Not Processed Workbook
The employee assignments not processed workbook enables you to identify all assignments excluded from processing and view further detail such as employee name, assignment number and payroll.
Business Questions
Is there a valid reason for excluding these assignments from processing, or is there an error requiring correction?
Worksheets
Assignments not Processed worksheet.
Parameters
You need to specify values for the following parameters:
-
Beginning Date
-
Ending Date
Use the following optional parameters to further restrict the values in the workbook:
-
Payroll
-
Organization
-
Location
-
Government Reporting Entity (Hidden)
Employee Payment Methods Workbook
The employee payment methods workbook enables you to view payment method totals and run type totals from an effective date that you select.
Business Questions
Are the employee totals for this payment method as expected for the given period?
Did each run type produce the expected totals for this payment method, or is there a discrepancy requiring correction?
Worksheets
Employee Payment Methods worksheet.
Parameters
You need to specify values for the following parameters:
-
Effective Date
Use the following optional parameters to further restrict the values in the workbook:
-
Payment Method
-
Run Type
Organization Payment Methods Workbook
The organization payment methods workbook enables you to see summary information for each payment method from an effective date that you select. You can view third party details and source bank details.
Business Questions
Were payments correctly allocated for the duration of the reporting period?
What were the total payments for each payment type for the duration of the reporting period?
Worksheets
Organization Payment Methods worksheet.
Parameters
You need to specify values for the following parameters:
-
Effective Date
Use the following optional parameters to further restrict the values in the workbook:
-
Payment Type
Payroll Message Workbook
The Payroll Message workbook enables you to view the total number of messages for each payroll process, payroll, and pay period.
Business Questions
Was there an unusual number of messages for any particular process, payroll or pay period?
Were messages of the greatest severity level concentrated in any particular process, payroll or pay period?
Worksheets
Payroll Message worksheet.
Parameters
You need to specify values for the following parameters:
-
Payroll Name
-
Start Date
-
End Date
Use the following optional parameters to further restrict the values in the workbook:
-
Process Type
-
Severity Level