Setting Up Notifications
This chapter describes how you can automatically notify customers, agents, and other interested parties, about service request and case updates.
This chapter covers the following topics:
- Notification Overview
- About When and Whom You Can Notify
- Setting Up Notifications
- Notification Post-Install Steps
- Specifying the “From:” Field in the Message
- About Seeded Notification Templates
- Available Tokens
- Displaying Existing Notification Rules
- Creating a New Notification Rule
- Updating Existing Notification Rules
Notification Overview
You can keep interested parties, including customers and agents, informed of any service request or case updates via an Oracle Workflow process included with your application.
The Customer Support Event Process automatically sends out a notification whenever a certain event occurs, for example, when a service request or case is created, set to a specific status, or reassigned to another agent.
Note: There is a separate notification process for electronic signatures (e-signatures). For details, see Electronic Approvals and Records.
The subject and text of the notification message are stored in a Oracle Workflow message template. You can create your own notification message templates or you can modify those provided with the application according to Oracle Workflow documentation.
The topics in this chapter explain how you can set up the rules that trigger the notifications, how to choose and modify the notification templates, and how to specify the recipients.
Both service applications and Case Management share the same setup steps and seeded templates. For Case Management, please read “case” for every mention of “service request”. For the seeded templates, you must change this wording in the message text itself.
The application sends notifications in the background according to the setup you perform here. This means that agents themselves do not know when the application sends the notifications, nor can they decide which service requests send the notifications or to whom. The application sends the notifications across all service request types.
You may wish to inform agents about the notification rules you set up, so that they are aware what information the application sends when.
The application does record that a notification has been sent in the interaction history record of the service request. The notification appears as an activity, for example, “Email Sent to Customer Contact by Automated Process.” (The reason and outcome for this activity are the defaults you set in creating wrap-ups.)
Unlike e-mails sent regarding the service request, agents cannot review the notification text itself.
Depending on the notification rule, agents can receive copies of the notifications themselves if they are the service request owner or a contact.
Using Customer Support, Case Management, and Service Desk agents view their notifications from the Workflow Notifications page, accessible via a link from the Dashboard. (From Oracle Forms-based windows, users view notifications by navigating to Service Requests, Workflow Notifications instead.)
Agents can request to have the notifications sent to them via e-mail instead by changing their Notifications E-Mail Style Preferences. (You can accomplish this on any page by selecting the Preferences link at the top right hand side of the page and navigating to General Preferences, Display Preferences).
Alternately, you can set up e-mail as the preferred method of delivery by changing the Notification Mailer setup in Oracle Workflow.
For employees to receive notifications via e-mail, e-mail addresses must be entered in their Oracle HRMS records.
Customers and contacts, who cannot log into an Oracle E-Business Suite application, can be notified by e-mail only. Agents must make sure customer contact records include e-mail addresses. The application does not generate any errors for missing or invalid e-mail addresses.
Note: The notification process does not permit you to receive or view any replies to the notifications. For this reason, Oracle recommends that you include a message in the notification body reminding customers that they cannot reply to the e-mail.
This release includes one seeded notification rule: If a service request or a case status changes to closed, the rule notifies the primary contact of any related service requests or cases. You must set up other rules yourself.
Notification topics covered in this section include:
Notification Template Types
The application includes two types of templates for the notifications:
-
Text templates
-
Preconfigured HTML notification templates
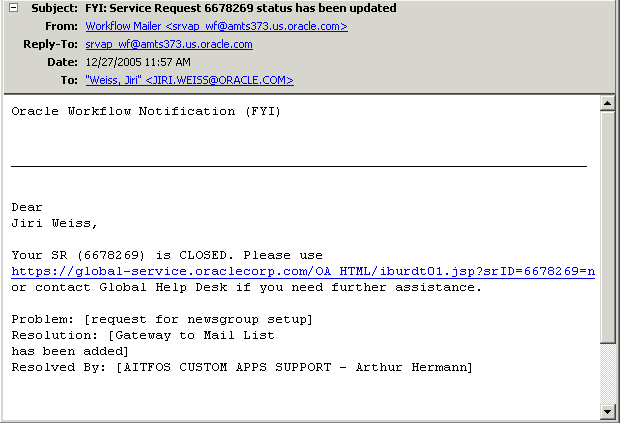
Text Templates
The seeded text templates generate a plain text message that the recipient can view either through their workflow notifications or e-mail inboxes. Merge fields provide service request-specific information such as customer name, service request number, and problem summary.
Although you can add HTML markup to these templates, the information about the service request is limited to that available through the merge fields. For example, you cannot include notes agents have entered into the service request.
Recipients who want to view the full contents of the service request must follow a link. For customers, this means logging into their Oracle iSupport Web portal.
Here is a sample text notification:
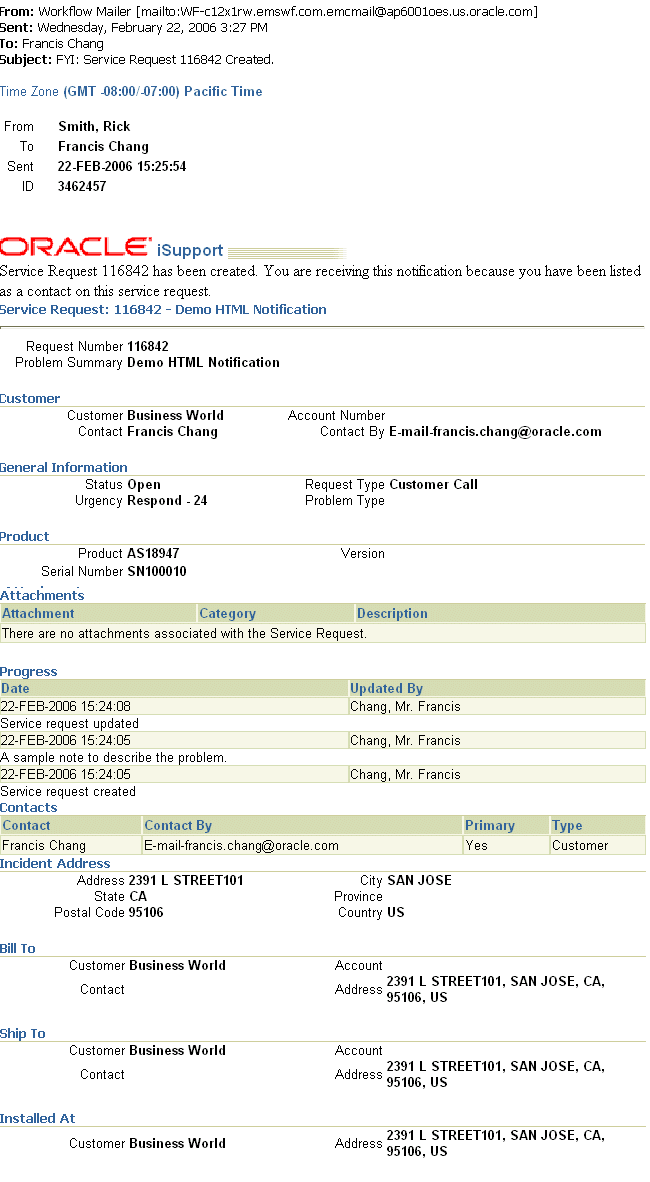
Preconfigured HTML Notifications for Service Request Contacts
This type of seeded template is available for notifications to service request contacts via e-mail only. It delivers a complete HTML report of the service request as the customer contact would see it on their self-service Oracle iSupport Web portal. This means that it is unnecessary for the recipient to log onto the portal itself.
You can customize the look of these notifications through corporate branding (to replace the Oracle logo, for example) and you can use Oracle Workflow Builder to change the text of the notification, including merge fields. To modify the service request content itself, however, you must use Oracle iSupport configuration features according to the procedures outlined in the Oracle iSupport Implementation and Administration Guide. You do not require an Oracle iSupport license to do so.
Here is a partial view of a sample notification e-mail generated with the seeded iSupport notification template:
Restrictions for the Notification Process
The following restrictions apply:
-
You can only notify individual service request owners (not group owners).
-
Service request owners are not notified if they themselves have taken the action that triggered the notification. For example, a service request owner who is being notified every time a service request is being updated receives notifications only when others update the service request.
-
For e-mail notifications, the customer contact or associated party record must contain an e-mail address. Employees must have their e-mail address entered in their Oracle HRMS application records
-
Recipients cannot reply to the notification e-mails.
-
Notifications based on preconfigured HTML templates can only be used to notify contacts listed on the service request (not agents, or associated parties).
About When and Whom You Can Notify
This section explains the different events that trigger notifications and the individuals you can notify for each event. The list of events is slightly different for Oracle service applications and Case Management, so these are covered in separate sections:
Events that Trigger Notifications for Service Modules
The table below describes the events that can trigger a notification message for service modules (Oracle Forms-based module, Customer Support, and Service Desk) and whom you can notify for each.
| Event | Description | Whom you can notify | Explanation |
|---|---|---|---|
| Contact Added to Service Request | An agent or customer adds a contact to a service request. A contact can be either a customer contact or an employee. |
|
The application sends out notifications when an agent or a customer adds a contact to the service request. The notifications are sent to contacts who have an active e-mail contact point on the service request. |
| Published Solution Added to Service Request | An agent or a customer has linked a published knowledge management solution to the service request. |
|
The application sends out notifications whenever an agent or customer links a knowledge management solution to a service request. You can use this message to e-mail suggested fixes to customers. The notifications are sent to contacts who have an active e-mail contact point on the service request. |
| Relationship Created | An agent creates a relationship between service requests. |
|
Agents can specify different relationships between service requests. For example, they can specify service request A is a duplicate of service request B or caused by the problem described in the service request B. You can specify which relationship will trigger the notification. See Setting up Service Request Relationships for more details. |
| Relationship Removed | An agent removes a relationship in a service request. |
|
You can notify the owner of the service request if another agent has removed a previously established relationship between two service requests. You must specify the relationship you wish to trigger the notification. The notifications are sent to contacts who have an active e-mail contact point on the service request. |
| Service Request Created | A service request is created. |
|
The application sends out a notification whenever an agent or customer creates a service request. The notifications are sent to contacts who have an active e-mail contact point on the service request. |
| Service Request Owner Changed | An agent or concurrent program has assigned a new owner or removed an old owner. |
|
You can notify new owner that a service request has been assigned to them and that the old owner is no longer assigned. |
| Service Request Status Changed | An agent or a customer changes the service request status. |
|
The application sends out notifications to active contacts whenever the service request status is changed. For example, to notify all contacts whenever a service request is closed, you can trigger a message whenever the service request is changed to "Closed". |
| Service Request Updated | An agent or customer updates the service request. |
|
You can notify the owner whenever someone else updates the service request. The notifications are sent to contacts who have an active e-mail contact point on the service request. |
Notifications for Case Management
Case Management permits you to send notifications to associated parties as well as contacts.
Whether or not you want to notify contacts depends on whether your Case Management implementation exposes customer fields. Social service agencies who provide service to the public must use customer fields to track information about their clients; investigative agencies do not.
Associated parties to a case are any individuals with a relationship to the case, for example, lawyers, judges, and case workers.
Contacts are a special type of associated party because they must either be employees or have an existing relationship with the customer:
-
If the case customer is a person (for example, Andre Beaulie), the contacts must be person parties related to the customer (for example, Mary Beaulie - Spouse of - Andre Beaulie).
-
If the case customer is an organization (for example, Business World), the contacts must be relationship parties related to the customer party in the Trading Community Architecture (TCA) party model (for example, Andre Beaulie - Employee of - Business World).
For this reason, you will want to send notifications to contacts only if you are exposing customers functionality in your application.
Note: Although associated parties include contacts, the associated party and contact notifications are mutually exclusive. If you are notifying associated parties, the application does not notify those associated parties who are contacts.
The table below describes the notifications you can send for each of the events. Note that the event name used here is the one used in the user interface and uses the service request terminology.
For associated parties, you can choose either to notify all parties with a particular party role, for example, all the lawyers on the case, or all parties belonging to a party role group. A party role group is a grouping of party roles. The legal role group may contain lawyers, judges, legal assistants, and clerks, for example.
| Event | Description | Whom you can notify | Explanation |
|---|---|---|---|
| Associated Party Added | When an agent associates a party to the case. |
|
The application sends out notifications when a user associates a new party to the case. For example, you can notify all the lawyers that a new suspect has been added. |
| Contact Added to Service Request | An agent associates a party to the case with the relationship of “Contact”. |
|
The application sends out notifications when an agent associates contact to the case. |
| Published Solution Added to Service Request | An agent has linked a published knowledge management article to the case. |
|
The application sends out notifications whenever an agent links a knowledge management article to the case. |
| Relationship Created | An agent creates a relationship to another case. |
|
Agents can specify different relationships between cases. for example, that Case A is a duplicate of Case B or that Case A is caused by B. You must specify the relationship that triggers the notification. See Setting up Service Request Relationships for more details. |
| Relationship Removed | An agent removes a relationship. |
|
You can notify the case owner when another user has removed a relationship between two cases. You must specify the relationships that triggers the notification. |
| Service Request Created | An agent creates a case. |
|
The application sends out a notification on service request or case creation. |
| Service Request Owner Changed | An agent or concurrent program has assigned a new owner for the case or removed an old owner. |
|
You can notify new owners that cases have been assigned to them and former owners that cases are no longer assigned to them. |
| Service Request Status Changed | An agent changes the case status. |
|
The application sends out notifications whenever a case is changed to or from a status. For example, you may want to send out the notification when the status changes from any status to “Closed”. |
| Service Request Updated | An agent updates the case. |
|
You can notify the case owner whenever someone else updates the case. |
Setting Up Notifications
Use this general procedure to guide you through the setup of notifications. Follow the references in steps to learn more.
Prerequisites:
-
Basic knowledge of Oracle Workflow Builder. Login for connecting to your database.
-
If you plan to notify employees by e-mail, then ensure that employees have their e-mail addresses entered in Oracle HRMS.
To set up notifications
-
Create or modify the message templates using Oracle Workflow Builder according to the following guidelines:
-
All seeded message templates are defined in the Oracle Workflow item type Service Request (Internal Name: SERVEREQ).
-
The message body can be up to 1376 characters in length.
-
To supply service request information, you can use any of the tokens listed in Available Tokens.
-
The internal names of any templates based on the preconfigured HTML notification templates must start with “CS_SR_IBU_EVT”.
Those based on the seeded text templates must start with “CS_SR_EVT”.
-
You can enter HTML markup into any template. To modify the way the service request information displays in templates derived from the preconfigured HTML notification templates, however, you must use Oracle iSupport to make the modifications.
-
If you are implementing Case Management, you must change the service request-specific language in the seeded messages to refer to cases instead.
-
-
Optionally, remove unnecessary lines from the notifications using Oracle Workflow Builder. These are introduced by the workflow process. For details, see Notification Post-Install Steps.
-
Set up the rules that trigger the notifications. For setup details, see Creating a New Notification Rule.
Notification Post-Install Steps
This procedure explains how to remove unnecessary lines in the body of e-mail notification messages using Oracle Workflow Builder.
By default, all e-mail notification templates contain the following two unnecessary lines in the body of the message:
-
Oracle Workflow Notification (FYI)
-
From
To remove unnecessary e-mail notification lines
-
Open the "System: Mailer" item type.
-
Open the "Workflow Open FYI Mail" (internal name: OPEN_MAIL_FYI) message.
-
Select the Body tab.
-
Delete the first two lines and save the message.
Specifying the “From:” Field in the Message
The From field in the notification message body is set to the value of the profile Service: Default System Resource. If the profile value is null, the following text appears in the From field: “Automated Service Request System”.
About Seeded Notification Templates
Oracle provides two types of templates: text and preconfigured HTML. See Notification Template Types for an explanation of the difference. The rest of this topic lists the seeded templates.
Text Notification Templates
This table lists the text templates provided with your application. Please use Oracle Workflow Builder to view the body text and other details of each seeded template:
| Template Name | Description |
|---|---|
| Notify Contact: Service Request Created Message | Notifies a contact that they have been listed as a contact in a service request. |
| Notify Contact: Service Request Status Updated Message | Notifies an agent that a service request status has been updated. |
| Notify New Owner: Service Request Reassigned Message | Notifies an agent that they have been assigned as the new owner of a service request. |
| Notify Old Owner: Service Request Reassigned Message | Notifies an agent that ownership of the service request has been reassigned to someone else. |
| Notify Owner: Service Request Created Message | Notifies an agent that a service request was created with them as the owner. |
| Notify Owner: Service Request Status Updated Message | Notifies the recipient that the service request status was updated. |
| Notify Primary Contact: Service Request Created Message | Notifies the recipient that a service request has been created with them listed as a primary contact. |
| Notify: Published Solution Added to Service Request Message | Notifies recipient that a knowledge base solution has been added to the service request. |
| Notify: Related Service Request Created Message | Notifies recipient that an agent has created a relationship with another service request. For example, if an agent has indicated another service request is a duplicate of the service request. |
| Notify: Related Service Request Removed Message | Notifies recipient that a relationship between a service request and a second service request or object has been removed. For example, if an agent removes the link indicating a duplicate service request. |
| Notify: Related Service Request Updated Message | Notifies recipient that a linked service request has been updated. |
| Notify: Service Request Contact Added Message | Notifies recipient that a new contact has been added to the service request. |
| Notify: Service Request Updated Message | Notifies recipient that a service request has been updated. |
| Notify: Contacts of Related Service Requests | Notifies contacts of related service request that the status of the primary service request has been updated. |
| Notify: Associated Party Added | For Case Management only: Notifies recipient that a party has been associated with the case. |
| Notify Associated Parties: Case Create Message | For Case Management only: Notifies specified parties that they have been associated to a new case. |
| Notify: Associated Parties of Related Cases Message | For Case Management only: Notifies specified parties in a case that the status of a related case has been updated. |
| Notify Associated Parties: Case Status Updated Message | For Case Management only: Notifies specified parties that the case status has been updated. |
Preconfigured HTML Templates for Contact Notifications
The application includes the following four templates you can use to notify service request contacts.
Please note that you must keep the IBGUCONTENT tokens without modification in the body of any text messages you set up:
&IBUCONTENT1&IBUCONTENT2&IBUCONTENT3& IBUCONTENT4&IBUCONTENT5&IBUCONTENT6& IBUCONTENT7&IBUCONTENT8&IBUCONTENT9& IBUCONTENT10&IBUCONTENT11&IBUCONTENT12& IBUCONTENT13&IBUCONTENT14&IBUCONTENT15& IBUCONTENT15&
These tokens are not merge fields, they merely bring over the information from Oracle iSupport where the content is configured.
The following table provides information about the template sent on Oracle iSupport service request creation:
| Template Attribute | Value |
|---|---|
| Internal Name | CS_SR_IBU_EVT_SR_CREATED |
| Display Name | Notify Contact: iSupport Service Request Created Message |
| Subject | Service Request &REQUEST_NUMBER Created |
| Text Body | Service Request &REQUEST_NUMBER has been created. You are receiving this notification because you have been listed as a contact on this service request. &IBUCONTENT1&IBUCONTENT2&IBUCONTENT3& IBUCONTENT4&IBUCONTENT5&IBUCONTENT6& IBUCONTENT7&IBUCONTENT8&IBUCONTENT9& IBUCONTENT10&IBUCONTENT11&IBUCONTENT12& IBUCONTENT13&IBUCONTENT14&IBUCONTENT15& IBUCONTENT15&URL to view Service Request #&REQUEST_NUMBER |
| HTML Body | &STYPESHEET&BRANDING&Service Request &REQUEST_NUMBER has been created. You are receiving this notification because you have been listed as a contact on this service request. &IBUCONTENT1&IBUCONTENT2&IBUCONTENT3& IBUCONTENT4&IBUCONTENT5&IBUCONTENT6& IBUCONTENT7&IBUCONTENT8&IBUCONTENT9& IBUCONTENT10&IBUCONTENT11&IBUCONTENT12& IBUCONTENT13&IBUCONTENT14&IBUCONTENT15& IBUCONTENT15&Click <a href="&URL">here</a> to view Service Request #&REQUEST_NUMBER |
The following table provides information about the template sent on the addition of a service request contact:
| Template Attribute | Value |
|---|---|
| Internal Name | CS_SR_IBU_EVT_CNT_ADDED |
| Display Name | Notify Contact: iSupport Service Request Contact Added Message |
| Subject | New Contact Added to Service Request &REQUEST_NUMBER |
| Text Body | A new contact has been added to Service Request &REQUEST_NUMBER. You are receiving this notification because you have been listed as a contact on this service request.&IBUCONTENT1&IBUCONTENT2&IBUCONTENT3& IBUCONTENT4&IBUCONTENT5&IBUCONTENT6& IBUCONTENT7&IBUCONTENT8&IBUCONTENT9& IBUCONTENT10&IBUCONTENT11&IBUCONTENT12& IBUCONTENT13&IBUCONTENT14&IBUCONTENT15& IBUCONTENT15&URL to view Service Request #&REQUEST_NUMBER |
| HTML Body | &STYPESHEET&BRANDING&A new contact has been added to Service Request &REQUEST_NUMBER. You are receiving this notification because you have been listed as a contact on this service request. &IBUCONTENT1&IBUCONTENT2&IBUCONTENT3& IBUCONTENT4&IBUCONTENT5&IBUCONTENT6& IBUCONTENT7&IBUCONTENT8&IBUCONTENT9& IBUCONTENT10&IBUCONTENT11&IBUCONTENT12& IBUCONTENT13&IBUCONTENT14&IBUCONTENT15& IBUCONTENT15&Click <a href="&URL">here</a> to view Service Request #&REQUEST_NUMBER |
The following table provides information about the template sent on the addition of a knowledge management solution:
| Template Attribute | Value |
|---|---|
| Internal Name | CS_SR_IBU_EVT_SOLUTION_ADDED |
| Display Name | Notify Contact: iSupport Solution Added Message |
| Subject | Solution &SOLUTION_NUMBER added to Service Request &REQUEST_NUMBER |
| Text Body | A new knowledge base solution has been added to Service Request &REQUEST_NUMBER. You are receiving this notification because you have been listed as a contact on this service request.&IBUCONTENT1&IBUCONTENT2&IBUCONTENT3& IBUCONTENT4&IBUCONTENT5&IBUCONTENT6& IBUCONTENT7&IBUCONTENT8&IBUCONTENT9& IBUCONTENT10&IBUCONTENT11&IBUCONTENT12& IBUCONTENT13&IBUCONTENT14&IBUCONTENT15& IBUCONTENT15&URL to view Service Request #&REQUEST_NUMBER |
| HTML Body | &STYPESHEET&BRANDING&A new knowledge base solution has been added to Service Request &REQUEST_NUMBER. You are receiving this notification because you have been listed as a contact on this service request.&IBUCONTENT1&IBUCONTENT2&IBUCONTENT3& IBUCONTENT4&IBUCONTENT5&IBUCONTENT6& IBUCONTENT7&IBUCONTENT8&IBUCONTENT9& IBUCONTENT10&IBUCONTENT11&IBUCONTENT12& IBUCONTENT13&IBUCONTENT14&IBUCONTENT15& IBUCONTENT15&Click <a href="&URL">here</a> to view Service Request #&REQUEST_NUMBER |
The following table provides information about the template sent on the change in service request status:
| Template Attribute | Value |
|---|---|
| Internal Name | CS_SR_IBU_EVT_STATUS _CHANGE |
| Display Name | Notify Contact: Service Request Status Changed Message |
| Subject | Service Request &REQUEST_NUMBER Status Has Changed |
| Text Body | The status of Service Request &REQUEST_NUMBER has changed from &REQUEST_STATUS_OLD to &REQUEST_STATUS. You are receiving this notification because you have been listed as a contact on this service request.&IBUCONTENT1&IBUCONTENT2&IBUCONTENT3& IBUCONTENT4&IBUCONTENT5&IBUCONTENT6& IBUCONTENT7&IBUCONTENT8&IBUCONTENT9& IBUCONTENT10&IBUCONTENT11&IBUCONTENT12& IBUCONTENT13&IBUCONTENT14&IBUCONTENT15& IBUCONTENT15&URL to view Service Request #&REQUEST_NUMBER |
| HTML Body | &STYPESHEET&BRANDING&The status of Service Request &REQUEST_NUMBER has changed from &REQUEST_STATUS_OLD to &REQUEST_STATUS. You are receiving this notification because you have been listed as a contact on this service request. &IBUCONTENT1&IBUCONTENT2&IBUCONTENT3& IBUCONTENT4&IBUCONTENT5&IBUCONTENT6& IBUCONTENT7&IBUCONTENT8&IBUCONTENT9& IBUCONTENT10&IBUCONTENT11&IBUCONTENT12& IBUCONTENT13&IBUCONTENT14&IBUCONTENT15& IBUCONTENT15&Click <a href="&URL">here</a> to view Service Request #&REQUEST_NUMBER |
Available Tokens
You can merge service request information into your message by entering tokens. (In Oracle Workflow these tokens are called “item attributes”.)
The following table provides the list of available tokens and their meaning. Please note that some of the available tokens represent information that is not visible to users or to message recipients and so should not be used in messages. For example, Customer Product ID, is an internal application number not visible to the agent or customer. These internal tokens are marked with a "Yes" in the “Internal Only?” column.
| Display Name (Explanation) | Internal Name | Internal Only? |
|---|---|---|
| Created By (Name of individual who created the service request.) |
CREATED_BY | No |
| Customer Product ID | CUSTOMER_PRODUCT_ID | Yes |
| Expected Resolution Date (Resolve by field) |
EXPECTED_RESOLUTION_DATE | No |
| Initiator Role (Workflow role of the user who has initiated the transaction that triggered the notification) |
INITIATOR_ROLE | Yes |
| Inventory Item ID | INVENTORY_ITEM_ID | Yes |
| Old Request Status (Former service request status) |
REQUEST_STATUS_OLD | No |
| Owner ID | OWNER_ID | Yes |
| Owner Name (Service request owner) |
OWNER_NAME | No |
| Owner Role (Oracle Workflow role of the service request owner) |
OWNER_ROLE | Yes |
| Previous Owner ID | PREV_OWNER_ID | Yes |
| Previous Owner Name (Former service request owner) |
PREV_OWNER_NAME | No |
| Previous Owner Role (Oracle Workflow role of the former service request owner) |
PREV_OWNER_ROLE | Yes |
| Problem Code | PROBLEM_CODE | No |
| Problem Description | PROBLEM_DESCRIPTION | No |
| Product Description | PRODUCT_DESCRIPTION | No |
| Request Customer (Customer on service request) |
REQUEST_CUSTOMER | No |
| Request Date | REQUEST_DATE | No |
| Request ID | REQUEST_ID | Yes |
| Request Number (Service request number) |
REQUEST_NUMBER | No |
| Request Severity | REQUEST_SEVERITY | No |
| Request Status | REQUEST_STATUS | No |
| Request Summary | REQUEST_SUMMARY | No |
| Request Type | REQUEST_TYPE | No |
| Request Urgency | REQUEST_URGENCY | No |
| Resp Appl ID | RESP_APPL_ID | Yes |
| Resp ID | RESP_ID | Yes |
| Solution Summary (Summary of the solution being added to the service request) |
SOLUTION_SUMMARY | No |
| Updated By (Name of the individual who last updated the service request.) |
UPDATED_BY | No |
| URL agents can click to launch the Service Request window (Forms) displaying the service request | REQUEST_FORM | N/A |
| URL Oracle iSupport users can click to view service request details | NTFY_REQUEST_NUMBER_URL | N/A |
| User ID | USER_ID | Yes |
| Workflow Administrator Role | WF_ADMINISTRATOR | Yes |
The SERVEREQ item type includes additional item attributes which are specific to internal application workflows.
Displaying Existing Notification Rules
Notifications rules specify both the conditions that trigger a notification and who gets notified.
To display existing notification rules under the Service responsibility, navigate to Setup, Rules, Notification Rules.
The View Notification Rules page lists existing rules.
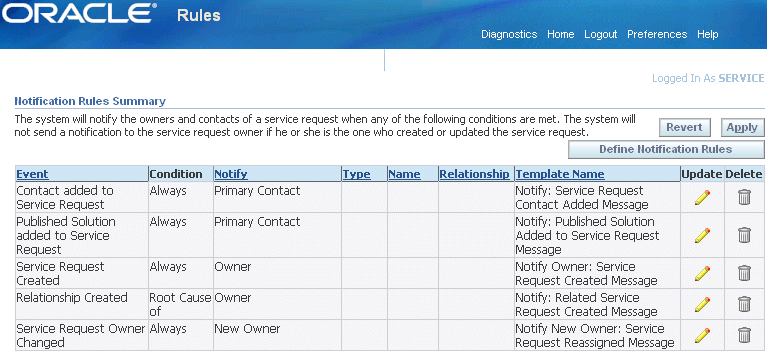
From this page you can:
-
Delete a rule by clicking Delete (the trash can icon).
-
Update a rule by clicking Update (the pencil icon). See Updating Existing Notification Rules.
-
Create a new rule by clicking Define Notification Rules. See Creating a New Notification Rule.
Creating a New Notification Rule
Use this procedure to create a new notification rule as part of the notification setup process.
See the following topics for more information:
To create a new notification rule
-
Under the Service Responsibility, navigate to Setup, Rules, Notification Rules.
-
Click Define Notification Rules.
The Define Notification Rule page appears.
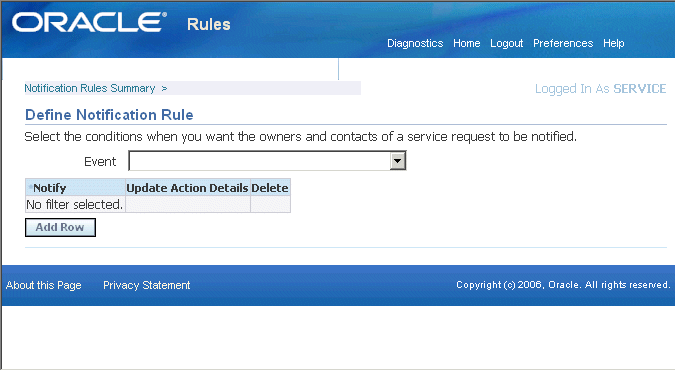
-
Select the event for the rule using the Event drop-down box. For a description of each event, see Events That Trigger Notifications .
-
Click Go.
The page displays any rules already created for this event.
-
Click Add Row.
-
In the new row, select the condition(s) you wish to use as the trigger the notification. The conditions are different for each type of event.
For example, to send out a notification each time a service request changes a status, select:
-
The status to trigger the notification.
-
The condition.
Whether you want to send the notification each time a service request changes to the target status or changes from that status.
-
Whom you want to notify.
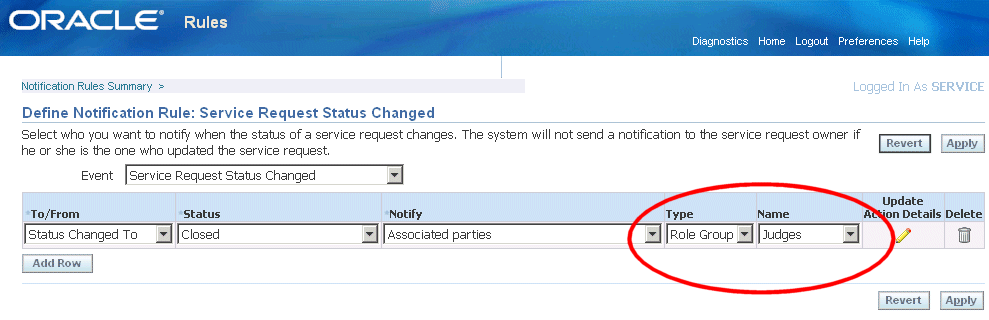
For example, you can notify all active contacts on the service request, the service request owner, or all the owners of linked service requests. For cases, you can also notify associated parties or associated parties on the linked cases.
The Type and Name fields (highlighted in the image below) are enabled only for notifying associated parties in Case Management.
In Case Management, you can use them to notify individuals with a specific role or everyone in a role group. For example, you can notify everyone with the role of attorney or everyone in the legal team, including attorneys, clerks, and investigators.
-
-
Click Update Action Details.
The Select Notification Details page appears.
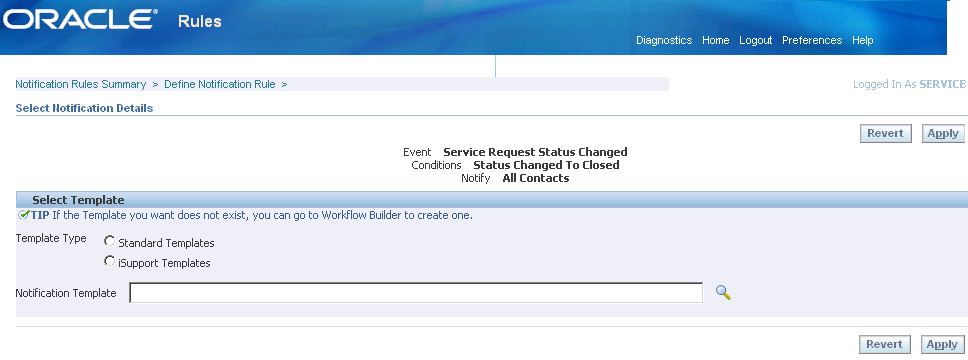
-
If you are notifying contacts, choose the radio button for the type of template you want to use:
-
Standard Templates: Templates based on the seeded text templates. (Their internal names are prefaced with "CS_SR_EVT".)
-
iSupport Templates: These are templates based on the seeded HTML templates (prefaced with "CS_SR_IBU_EVT").
Note: If your notification rule is configured to notify recipients that are not contacts in the service request, then you must use the standard templates. In this case, the application selects the Standard Templates radio button for you and disables the iSupport Templates choice.
For an explanation of the two template types, see Notification Template Types.
-
-
Click Search for Notification Template (the searchlight icon) and use the list of values to choose the template.
-
Click Apply.
-
To create or update another rule, select the View Notifications Rule link at the top left of the page.
Updating Existing Notification Rules
Use this procedure to update existing notification rules. You can delete rules, update existing rule conditions, or choose different notification message templates.
To update existing notification rule
-
Under the Service responsibility, navigate to the View Notification Rules page (Setup, Rules, Notification Rules).
-
Click Update (the pencil icon) for the rule type you wish to update.
The Define Notification Rule page appears displaying the rules already associated with this event.
-
To delete a rule, click Delete (the trash can icon).
-
To modify the conditions for this rule, make your modifications. The procedure is the same as for creating new conditions.
-
To select a different notification message template for this rule:
-
Click Update Action Details.
The Notification Details page appears.
-
If you are notifying contacts with this rule, choose the radio button for the type of template you wish to use:
-
Standard templates are based on the seeded text templates. (Their internal names are prefaced with CS_SR_EVT.)
-
iSupport templates are based on the seeded HTML templates (prefaced with CS_SR_IBU_EVT).
See Notification Template Types for an explanation of the two types.
-
-
Click Search for Notification Template (the searchlight icon) and choose the template you wish to use.
-
-
Click Apply.