Desktop Integration
Desktop Integration Overview
Web Applications Desktop Integrator (Web ADI) is a self-service Oracle application, accessed using a browser. The Web ADI software is not installed on individual client machines, as the processing takes place on the server rather than on individual client PCs.
Web ADI generates Microsoft Excel or Word documents on your desktop, and downloads the data you have selected from the application. You can modify the data in the Microsoft Excel or Word documents, working either online or offline, and upload the data using Web ADI.
How Web ADI works
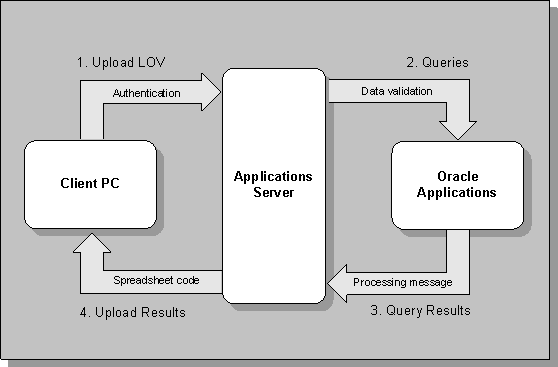
Configurable layouts determine the appearance of the spreadsheet or word processing document. System administrators can restrict the fields that users access in the spreadsheet, and can create different layouts for different users. Experienced users can also create their own layouts to include just the fields they need.
Web ADI is used in HRMS forms, such as Person, Assignment, People and Assignment folders, and Salary Approvals, in letter requests, in the Rapid Implementation Workbench, for reports in the Compensation Workbench, and for configuring links in Knowledge Integration.
See: Data Download and Upload using Web ADI
Alternatively, you can use the concurrent processing method to set up your standard letters. With concurrent processing, you generate and review your letters without interrupting other work you perform at your computer. You can control when a concurrent process runs and schedule long-running processes to run at times when the system is not busy.
There are two methods of using concurrent processing to set up your standard letters:
-
Using word processors
-
Using Oracle Reports
Desktop Integration
You can download data from your Oracle HRMS application to spreadsheets or word processing documents on your desktop using Web ADI.
Can you download data from a window in Oracle HRMS?
Yes. Oracle HRMS is supplied with certain windows already set up to enable you to download data. In addition, your system administrator can configure the system so that you can download from other windows in the Professional User Interface (Forms interface).
Can you modify data downloaded from Oracle HRMS windows and upload the modified data back to the application?
Yes, provided that the system has been configured to enable upload, and that you have the appropriate upload access rights.
Can you upload data from legacy systems using Web ADI?
Yes. By incorporating a text file into the spreadsheet you create using Web ADI, and then uploading the data to the database, you can upload data from legacy systems.
Does Web ADI check that information is not being overwritten when you upload?
Yes. Error checking is carried out by the Application Programmatic Interfaces (APIs) used to upload the data. If errors are found, the data is not uploaded to the Oracle database.
Can you create standard letters using data from Oracle HRMS?
You can generate standard letters by downloading employee data into a template letter to form a mail merge letter. You can also save the template letter in the Oracle application database.
Do you need a separate licence for Web ADI?
No. Web ADI is available when you purchase Oracle HRMS.
Can you reuse ADE information with Web ADI?
Much of the information required by Application Data Exchange (ADE) can be converted for use with Web ADI. Views that you have created for use with ADE can be reused, and ADE style information can be converted to a format suitable for use by Web ADI.
Do you need to install Web ADI on individual user PCs?
No. Unlike ADE, Web ADI does not require separate installation on client PCs.
What types of standard letter can you create?
Standard letters enable you to manage your enterprise's recruitment or enrollment activities more easily. Using Oracle Human Resources or Oracle Learning Management (OLM), you can issue standard letters to applicants and students respectively, triggered by changes in assignment or enrollment status. For example, you can set up a standard enrollment confirmation letter that is triggered when a student's enrollment status is set to Placed, or you can set up a rejection letter that is triggered when an applicant's assignment status is set to Rejected.
Here are a few examples of letters you can set up to help you to manage recruitment or enrollment activities:
| Oracle Human Resources | Oracle Learning Management |
|---|---|
| Acknowledgement letters (for all active applications) | Acknowledgement letters (for all requested enrollments) |
| Confirmation letters (for interviews) | Confirmation letters (for placed enrollments, including event joining instructions based on the date, venue, and trainers) |
| Reports for interviewers and schedules | Reports for trainers (listing the students to attend an event) |
| Offer and Rejection letters (for applicants) | Chase-up letters (for non-response or non-payment) |
| Acknowledgement letters (for cancellations) | |
| Certificates (of successful course completion) |
Implementing Web ADI for use with Oracle HRMS
Implementing Web ADI for use with Oracle HRMS
The following implementation steps are required to implement Web ADI for use with Oracle HRMS.
See also the Oracle Web Applications Desktop Integrator Implementation and Administration Guide.
HR: Enable Web ADI Integration Profile Option
In the System Profile Values window, the HR: Enable Web ADI Integration profile option default is Yes. The Web ADI pages open when you choose the Export Data icon on the toolbar of an HRMS window.
To use Application Data Exchange (ADE) instead of Web ADI, change this profile option to No at Site level. This change enables the Export Data icon to launch Application Data Exchange (ADE) software.
Web ADI Menu Options
-
The supplied Web ADI responsibility and self-service menu give access to the following menu options:
-
Create Document
-
Define Layout
-
Define Mapping
-
Manage Document Links
Give users access to this responsibility, or attach this menu to their responsibility, if they need to access Web ADI from the self-service menu (without going through one of the HRMS application windows), or if they need to define layouts or mappings, or create links between template letters and layouts.
See the Oracle Web Applications Desktop Integrator Implementation and Administration Guide for further details about this menu.
-
-
A self-service menu "HRMS ADI Document Manager Menu", is supplied for use with Web ADI. This contains the Document Management menu option and required functions. Add this menu to the main menu attached to the responsibilities of any users who need access to the Document Management features.
-
The supplied function "Web ADI Create Document" gives access to Web ADI from any HRMS window.
Important: You must add this function to the main menu attached to the responsibilities of any users who need access to Web ADI from an HRMS application window.
-
The Create Document menu option on the Web ADI menu includes integrators for all applications. An alternative self-service menu, "HRMS ADI Create Document menu" is supplied, containing the menu option "HRMS Create Document". This restricts the list of integrators to HRMS application integrators that are not launched from a window (that is, where the FORM_NAME parameter for the integrator is "GENERAL").
If you create your own "GENERAL" integrators, you need to change the parameters of this function from:
-
&bne:integrator=800:GENERAL%25
to:
-
&bne:integrator=800:GENERAL%25,999:GENERAL%25
replacing 999 with your own Application ID.
-
-
If only one option is available in Web ADI, the page automatically defaults the option. If all the options on a screen are defaulted, the page is skipped, so that the end user does not have to fill them in. The user only sees the final 'Review' page. To remove the Review page that appears at the end of the Web ADI wizard, edit the "HRMS Create Document" or "Web ADI Create Document" function, and change the parameters of the function, by appending:
-
&bne:noreview=true
-
-
To restrict users to carrying out download-only operations, edit the "HRMS Create Document" or "Web ADI Create Document" function, and change the parameters of the function, by appending:
-
&bne:reporting=Y
-
-
Integrators provided by HRMS for setup purposes may be grouped by creating a function similar to the "HRMS Create Document" by changing the following:
-
&bne:integrator=800:GENERAL%25
to
-
&bne:intergator=800:HR_SETUP%25
This function may be added to menus for users with privileges to create and edit integrators.
-
Macro Security Settings in Microsoft Excel
Web ADI integration with Microsoft Excel enables you to download, view, edit, and to create Oracle HRMS data. After editing the spreadsheet, you can use the Web ADI Integrator validation functionality to validate the data before uploading it to Oracle HRMS.
You must set the appropriate macro security settings in Microsoft Excel for Web ADI Integrator to work with Microsoft Excel. For more information, see: Selecting Macro Security Settings in Microsoft Excel topic in the Oracle Web Applications Desktop Integrator Implementation and Administration Guide
Data Download and Upload Using Web ADI
Data Download and Upload Using Web ADI - Overview
You can download data from your Oracle HRMS application to spreadsheets or word processing documents on your desktop using Web ADI.
You can query the data in a window, download the queried data to your desktop, and view the data in spreadsheet format or in a word processing document.
In some cases, you can manipulate the data you have downloaded and upload your changes to Oracle HRMS. Validation of the data takes place by the Application Programmatic Interfaces (APIs) used to upload the data, and any errors are flagged. If errors occur, no data is uploaded to the database.
You can create a mail merge by downloading the data directly into a template letter.
You can create an empty spreadsheet and enter new data or import data from a text file, and then upload the data to Oracle HRMS. The data is validated using the usual HRMS validation.
Standard Oracle security is maintained.
Note: Oracle Configuration Workbench provides a new framework to use spreadsheets. This framework provides additional capabilities such as customizing and downloading of spreadsheets to suite business requirements. See: Overview: Spread Sheets Framework, Oracle HRMS Implementation Guide
Methods of Running Web ADI
You can invoke Web ADI from an icon in an HRMS Professional User Interface window (including OLM windows), or you can launch it directly from a Web ADI self-service menu option.
You cannot invoke Web ADI from the People Management templates, nor the Self-Service HRMS (SSHR) pages, nor the following windows:
-
Absence Detail
-
Mass Update of Applicant Assignments
-
Mass Update of Employee Assignments
-
Mass Update of Assignments
-
Position Copy
-
Mass Position Update
In addition, you cannot invoke Web ADI from the Assignment window when you access it by task flow from the Person window.
Note: If you access the Assignment window by task flow from the Person window, you will not be able to invoke Web ADI from that Person window for the current person query. To restore Web ADI function, perform the query in the person form again.
You can invoke Web ADI from the Assignment window when you access it directly from the Navigator.
Your access to Web ADI depends on the access rights set up for your responsibility.
Integrators
The functionality available with Web ADI depends on the information stored in an "integrator". Each integrator contains all relevant information about a particular data download, upload, or create process, such as whether you are downloading data from an HRMS window, from a Web ADI self-service window, or from the Request Letter window. It also specifies whether you can download one-way or whether you require the ability to upload edited data again, whether the data is being downloaded into a mail merge, and so on. The integrator details also indicate whether you can use it to create new data or just update existing data.
When you create your spreadsheet or word processing document using Web ADI, you select an appropriate integrator, and Web ADI handles the transfer and validation of data accordingly.
Predefined Integrators
Oracle HRMS supplies some sample integrators that enable you to download data from the following windows and folders for reporting or analysis purposes:
| Window or Folder | Integrator |
|---|---|
| People Window | HR People Details Integrator |
| People Folder | HR People Folder Detail Integrator |
| Assignment Window (accessed directly from the Navigator) | HR Assignment Detail Integrator |
| Assignments Folder | HR Assignment Folder Detail Integrator |
| Salary Management Folder | HR Update Salary Proposals Integrator |
Using the HR Update Salary Proposals integrator, you can edit the downloaded data and upload it to HRMS. The remaining four sample integrators support data download only.
Note: These five predefined integrators demonstrate the supplied function but are not supported solutions, and you cannot create your own layouts for these integrators. However, you can create your own integrators to enable download and upload of HRMS data.
See: Configuration of Data Download and Upload
Key Concepts
An understanding of the following terms may assist you in downloading and uploading data between Oracle HRMS and your desktop using Web ADI.
API
Application Programmatic Interfaces, used to upload data to the Oracle Applications database. APIs handle error checking and ensure that invalid data is not uploaded to the database.
Content
When you create a spreadsheet or word processing document, the layout defines the columns that appear in the document and the content identifies the data in the document. Content is usually downloaded from the Oracle application database, so that the spreadsheet contains the data you have queried from a window in Oracle HRMS. You can also create a spreadsheet with no content, so that you can enter new data using the spreadsheet and upload it to the application. Another method is to bring in the content of the spreadsheet from a text file on your desktop. This enables you to upload the data from the text file to the application, for example to upload legacy data or information from third-party applications to Oracle HRMS.
Download
This is the process of transferring data from the Oracle HRMS application to your desktop (the original data remains in the application database).
Integrator
An integrator defines all the information that you need to download or upload from a particular window or database view or for a particular purpose (the type of integrator determines the purpose for which you can use it). Your system administrator can set up the appropriate integrators depending on whether you want to download for reporting or mail merge purposes, or in order to manipulate the data and upload it again.
Interface
A Web ADI term for the item that specifies the columns to be transferred from the Oracle applications database to your desktop or vice versa. In HRMS, interfaces can be views (for downloading data) or APIs (for uploading data). The integrator includes all the columns that are available in the interface, whereas the layout specifies only those that the user needs to see.
Layout
A layout identifies the columns to appear in a spreadsheet or Word document. A single integrator can have multiple layouts for different purposes. If more than one layout is available for an integrator, you select a layout when you create a document. If only one layout is available, the application selects it for you automatically.
Mapping
If you are bringing in data from a text file to Oracle HRMS using a spreadsheet created in Web ADI, you need to map the columns in the text file to the application's tables and columns. When Web ADI creates the spreadsheet, it ignores any columns from the text file not included in the mapping.
Template Letter
This is a form letter or skeleton letter that acts as the basis for creating mail merge letters. The template letter contains the standard text, and also contains field codes, which are replaced by data from the application during the mail merge process.
Upload
This is the process of transferring the data from a spreadsheet on your desktop back to the Oracle HRMS application, overwriting the existing data in the application database. This process can take place only if Web ADI created the spreadsheet.
View
A view is an example of an interface that you can use to download data from the application to a spreadsheet. The integrator definition includes the name of the view. Views to access many windows are already available with Oracle HRMS. System administrators can create additional views if necessary.
Viewer
A viewer is a desktop application, such as a spreadsheet or word processing tool, that you use to view the data downloaded from Oracle HRMS.
Data Download Using Web ADI
You can download data from your Oracle HRMS application to a spreadsheet or word processor on your desktop. You can then use the features of your spreadsheet or word processing tool to manipulate data for analysis and reporting purposes.
Note: When you download data from a spreadsheet, you have to select the appropriate security setting for macros in Microsoft Excel. See: Selecting Macro Security Settings in Microsoft Excel topic in the Oracle Web Applications Desktop Integrator Implementation and Administration Guide
You can download from within a window in the HRMS Professional User Interface (including OLM windows), or directly from a Web ADI self-service page.
You can save the spreadsheet that you have created and return to it later. The spreadsheet includes all the data you have downloaded. You can refresh the data without creating a new spreadsheet by carrying out a new download directly from the spreadsheet, without recreating the spreadsheet.
See: Data Upload Using Web ADI and Letter Generation Using Web ADI
Downloading from an HRMS Window
This method enables you to use the query you enter in the window to specify the records to download.
Downloading from a Self Service menu Function
This method enables you to apply values at runtime so that you can specify the records to download.
Downloading an Empty Spreadsheet
You can download an empty spreadsheet from the ADI web page (that is, containing the columns you want, but no data), and then use the spreadsheet to enter new data.
Downloading an Empty Spreadsheet and Incorporating Data from a Text File
You can download the structure of your spreadsheet using Web ADI, but instead of downloading the content of the spreadsheet from the applications database, you can incorporate a text file in the spreadsheet as you create it, and then upload the data from the text file to the database. See: Data Upload Using Web ADI
Format of Text files
Text files must be in delimited format, separated by commas or other standard characters. You can use text files that include or exclude headings in the first line.
Data Upload Using Web ADI
You can use Web ADI to upload data that you have previously downloaded to a spreadsheet, or data that you have entered in an empty spreadsheet. You can do this only if the spreadsheet was created using an upload integrator.
Note: When you upload data from a spreadsheet, you have to select the appropriate security setting for macros in Microsoft Excel. See: Selecting Macro Security Settings in Microsoft Excel topic in the Oracle Web Applications Desktop Integrator Implementation and Administration Guide
Features of Data Upload
You can only upload data using an integrator that has been created for this purpose (for example, the HR Update Salary Proposals integrator available from the Salary Management folder). You must specify at the time you download the data that you intend to upload it again, by unchecking the Reporting check box. You must also have access to a responsibility that gives you access rights to upload data as well as download it.
Data to be uploaded is validated before the upload occurs. You must ensure that you enter values in all mandatory fields, so that validation is successful when the data is uploaded to the application. If you do not, the data is not uploaded, and an error message appears in the Messages column in the spreadsheet for the record with the invalid data.
For example, if you are using the HR Update Salary Proposals integrator, you must enter values in the Proposed_salary and Change_date fields, as a minimum, for any row you want to upload. If your organization has created its own integrators for uploading data, your system administrator can tell you which fields you must enter.
When you change any field in the spreadsheet, the row is flagged for upload. By default, only flagged rows are uploaded. You can change this setting so that all rows are uploaded.
Letter Generation Using Web ADI
You can generate mail merge letters from Oracle HRMS using Web ADI.
Web ADI retrieves the data and downloads it directly into a template letter (which you can also store in the Oracle applications database) to form the mail merge.
When you create a document for a mail merge, ensure that you select Word as the viewer, and check the Reporting check box.
Your system administrator must set up integrators to enable the letter generation to take place.
In addition, the layout associated with the letter generation process must have the same name as the letter created in the Letter window in the Oracle HRMS application. This associates a letter with an assignment status in Oracle HRMS or an enrollment status in OLM, and links the letter to the layout.
Configuration of Data Download and Upload Using Web ADI
You can create integrators to download and upload data from Oracle HRMS windows or directly from Web ADI, create merge letters, and upload data from text files.
Views for Web ADI
Depending on the information you want to download, you may need to create new views for use with Web ADI. You can use existing HRMS views, if appropriate.
To identify a view used by a window in Oracle HRMS, display a record in the window, and select Help > Diagnostics > Examine from the menu. In the Examine Field and Variable Values dialog box, select SYSTEM in the Block list of values and LAST_QUERY in the Field list of values. Scroll through the SQL query that appears in the Value field to obtain the view name.
Note: If you define a new view for downloading data from a form, the new view must include at least the same columns as the view used by the form. This restriction is necessary because the integrator uses the query you use in the window to restrict the data. If the query restricts on columns that do not appear in your view, the query fails.
APIs for Web ADI
The seeded HR Update Salary Proposals integrator, available from the Salary Management folder, uses the HR_UPLOAD_PROPOSAL_API.
The details of APIs that you can use for uploading data are available in the Oracle Integration Repository. See: Oracle Integration Repository Overview, Oracle Integration Repository User Guide .
Note: HRMS APIs use IDs in their parameters rather than user-friendly data. Therefore, when you define Upload or Update Integrators, write wrapper packages to convert or preprocess the data before calling the APIs.
Integrators for Web ADI
To enable users to download, create merge letters, or upload newly created or updated data, either from within an HRMS window or direct from Web ADI, you need to create integrators of the appropriate types.
To create new integrators, you use the Create Document menu option in Web ADI to create an empty spreadsheet containing all the columns you need to fill in to create an integrator. Oracle supplies an integrator for this purpose: the "HR Integrator Setup" integrator. You then enter the relevant data into the spreadsheet and upload it to the database.
You can apply a restriction to a standalone integrator using the "HR Create Standalone Query" integrator, and you can update a runtime restriction using the "HR Maintain Standalone Query" integrator.
You can disable Integrators using the HR Disable Integrator integrator.
Note: This integrator does not disable integrators created for the HRMS Application which are delivered with the application. Therefore, if you create your own integrator, you should specify your own custom application name when creating the new integrator, so that you can disable it if required.
So that your users can easily identify the integrator they need to use, use a standard naming convention for the integrators. For example, names could begin with HR, include the name of the window or a clear indication of the type of information they contain, and indicate whether they are for download only, download and upload, or letter generation.
For information about defining standalone queries, see: Defining Standalone Integrator Queries
For information about maintaining standalone queries, see: Maintaining Standalone Queries
For information about disabling queries, see: Disabling Standalone Integrator Queries
Layouts for Web ADI
To use the integrator, you must set up at least one layout. If there is more than one layout, users must choose one. Ensure that the layout contains all mandatory fields and any other fields the user will need.
You should ensure that the name of the layout gives a clear indication of its purpose.
Additional Information
For information about setting up and configuring Web ADI, see the Oracle Web Applications Desktop Integrator Implementation and Administration Guide .
Controlling Access to HRMS Web ADI Integrators
You control access to HRMS Web ADI integrators using standard system-administration form functions and menus.
Controlling Access to Predefined Integrators
HRMS provides form functions for the predefined integrators. HRMS also automatically adds the form functions for some predefined integrators to the seeded menus from which they are accessed. The menus HR ADI Seeded Integrator Form Functions and HR ADI Skills Seeded Integrator Form Functions include the remaining form functions for predefined integrators. You can add these form functions to menus simply by adding the seeded menus HR ADI Seeded Integrator Form Functions and HR ADI Skills Seeded Integrator Form Functions (without the prompts) to any menu you use to access them. Alternatively, you can modify copies of the seeded menus and add them to existing menus, or you can add selected Web ADI functions directly to existing menus.
If you fail to add the predefined form functions to menus, the message "You do not have permission to access this functionality" appears when you select an integrator.
The following table shows the predefined integrators and their associated form functions in menu HR ADI Seeded Integrator Form Functions (HR_ADI_CAG_FORM_FUNCTIONS):
| Predefined Integrator | Form Function (Internal Name) | Form Function (User Name) |
|---|---|---|
| HR Assignment Detail | HR_ADI_CAG_ASG_DETAIL | HR Assignment Detail Integrator |
| HR Assignment Folder Detail | HR_ADI_CAG_ASG_FOLDER | HR Assignment Folder Integrator |
| HR People Details | HR_ADI_CAG_PEOPLE_DETAILS | HR People Details Integrator |
| HR People Folder Detail | HR_ADI_CAG_PEOPLE_FOLDER | HR People Folder Detail Integrator |
| HR Update Salary Proposals | HR_ADI_CAG_UPD_SAL_PROP | HR Update Salary Proposals Integrator |
| HR Create Standalone Query | HR_ADI_CAG_SETUP_CREATE_QRY | HR Create Standalone Query Integrator |
| HR Disable Integrator | HR_ADI_CAG_SETUP_DISABLE | HR Disable Integrator |
| HR Create Integrator Responsibility Restrictions | HR_ADI_CAG_SETUP_INTG_RESP | HR Create Integrator Responsibility Restrictions |
| HR Maintain Standalone Query | HR_ADI_CAG_SETUP_MAINTAIN_QRY | HR Maintain Standalone Query Integrator |
| HR Maintain Integrator Form Function Associations | HR_ADI_CAG_SETUP_MAINT_FUNC | HR Maintain Integrator Form Functions |
| HR Maintain Integrator Responsibility Restrictions | HR_ADI_CAG_SETUP_MAINT_RESP | HR Maintain Integrator Responsibility Restrictions |
| HR Integrator Setup | HR_ADI_CAG_SETUP_SETUP | HR Integrator Setup |
| Web ADI - Interface Columns Integrator | HR_ADI_CAG_INTERFACE_COLS | Web ADI - Interface Columns Integrator |
The following table shows the predefined integrators and their associated form functions in menu HR ADI Skills Seeded Integrator Form Functions (HR_ADI_SKILLS_FORM_FUNCTIONS):
| Predefined Integrator | Form Function (Internal Name) | Form Function (User Name) |
|---|---|---|
| Upload Third Party Rating Scale | HR_ADI_SKILLS_RSC | HR Upload Third Party Rating Scale |
| Upload Third Party Rating Level | HR_ADI_SKILLS_RTL | HR Upload Third Party Rating Level |
| Upload Third Party Competence | HR_ADI_SKILLS_CPN | HR Upload Third Party |
| Step 1: Upload Third Party Rating Scale | HR_ADI_SKILLS_STEP1_RSC | HR Upload Third Party Step 1 |
| Step 2: Upload Third Party Rating Level | HR_ADI_SKILLS_STEP2_RTL | HR Upload Third Party Step 2 |
| Step 3: Upload Third Party Competence | HR_ADI_SKILLS_STEP3_CPN | HR Upload Third Party Step 3 |
Controlling Access to Custom Integrators
Custom integrators, like predefined integrators, must be associated with form functions. Therefore, for custom integrators you must:
-
Define at least one form function.
-
Add the form function to appropriate menus.
-
Associate the form function with one or more integrators using the HR Maintain Integrator Form Function Associations Integrator.
For detailed instructions for Step 3, see Controlling Integrator Access
Note that the form function HR Maintain Integrator Form Functions Integrator must be accessible from your menu before you can use the HR Maintain Integrator Form Function Associations integrator. You can associate:
-
One custom integrator with one form function
-
One custom integrator with many form functions
-
Many custom integrators with one form function
Grouping custom integrators by form function improves integrator administration and gives you finer control over user access. For example, you can:
-
Associate related integrators with a single form function, then add that form function to the menus of authorized users.
-
Associate download integrators with one form function and upload integrators with a different form function to provide a restricted level of access to some users.
-
Define a form function for each integrator, create a menu for each group of related integrators, and add those menus of functions to users' menus, as appropriate.
Controlling Access to Integrators Using Responsibilities
You can restrict access to integrators by responsibility using the HR Create Integrator Responsibility Restriction integrator. If you create a restriction for an integrator, only users who have access via the responsibility can access the integrator. You can link integrators to multiple responsibilities. The restriction applies only when you launch Web ADI from the Professional User Interface (PUI) window.
You can update or remove the restriction using the HR Maintain Integrator Responsibility Restrictions integrator.
Note: Oracle recommends that you control access to integrators using the form functions and menus instead of responsibility restrictions. Use of form functions and menus provides a greater degree of control over user access.
For information about restricting integrators by responsibility, see: Controlling Integrator Access
Upgrade Information for Converting from ADE to Web ADI
This section provides information about upgrading to Web ADI for customers who are currently using Application Data Exchange (ADE) to transfer information between Oracle HRMS applications and desktop tools.
Comparison of Features in ADE and Web ADI
For details of the features available in Web ADI, see: Data Download and Upload Using Web ADI: Overview
The method of operation of Web ADI is different from that of ADE, and terms used in ADE do not always have an exact equivalent. The following table lists terms used in ADE and the equivalent functionality in Web ADI.
| ADE | Web ADI |
|---|---|
| Style | Integrator |
| Style columns (columns set as displayed) | Layout |
| View name | Content |
| Style columns (queried from view) | Content columns |
| API name | Interface |
| Style columns (making up API parameters) | Interface columns |
| Style columns (that are view columns and API parameters) | Mapping |
| Style - Form Name | HR Integrator Setup - FORM_NAME parameter |
| Style - Letter Name | Layout Name (for Letter Request integrators) |
Note: Customers converting from older versions of Oracle HRMS and ADE, in which ADE included hierarchy diagrammers, should note that the hierarchy diagrammers functionality is now available from standard windows in the HRMS Professional User Interface.
Additional Features in Web ADI
The following additional features are available in Web ADI:
-
In addition to the ability to upload data that you have previously downloaded from a spreadsheet to the Oracle application database, Web ADI enables you to upload new data from legacy systems.
-
Web ADI enables you to store your mail merge template letters in the Oracle application database
Prerequisites for Upgrading from ADE to Web ADI
The following information may assist you when upgrading from ADE to Web ADI.
Views
When creating new integrators for use with Web ADI, you may need to create a suitable view. If you have views that you have created for use with ADE, you can reuse these views.
Styles
You can convert existing styles in ADE to Integrators in Web ADI. See: Converting ADE styles to Web ADI Integrators
The conversion process uses the Upgrade from ADE to Web ADI concurrent process. This process is available in the Global SHRMS Reports & Processes request group, attached to the Global Super HRMS Manager responsibility.
Profile Option HR: Data Exchange Directory
Information about ADE styles is stored in an ADE.INI file located on either individual user desktops or a shared drive. The Upgrade from ADE to Web ADI concurrent process uses this file to convert ADE styles to Web ADI integrators.
To use this concurrent process, you need to copy the ADE.INI file to a directory accessible to the Oracle database. The path to this directory must be within the UTL_FILE_DIR setting for your database and must be specified on the HR: Data Exchange Directory profile option.
Downloading Data to your Desktop using Web ADI
You can download data from Oracle HRMS to a spreadsheet or word processor using Web ADI, either from within a window in the HRMS application, or directly from a Web ADI page without accessing HRMS.
See: Data Download Using Web ADI
To download data to a document from an HRMS window
-
Navigate to the window from which you want to download the data, for example, the People window.
-
Enter a query to return the records you want to download.
-
Choose the Export Data icon on the toolbar. The Settings page of the Web ADI wizard appears.
Caution: When moving between Web ADI pages, do not use your browser's Back or Forward buttons, as this causes information to be lost; instead, use the Back, Next and Cancel buttons displayed on the Web ADI page.
-
Select the viewer you want to use to display the document. If you intend to edit the data and upload it again, select a spreadsheet viewer. If several different versions of a viewer are available, your system administrator can tell you which version is appropriate.
-
Select the Reporting check box if you are downloading data for reporting or letter generation purposes. If you want to edit the data in the spreadsheet and upload it to the application again, leave this box blank. You cannot upload data if the Reporting check box is selected when you download the data.
Note: You can only upload data using an integrator that has been set up to allow upload. Check with your system administrator to ensure that an appropriate integrator is available.
-
If more than one integrator is available for the HRMS window from which you ran the query, the Integrator page appears. Select an integrator.
-
If more than one layout is available, the Layout page appears. Select the appropriate layout.
-
All other information is defaulted, and a Review page displays technical details of the document that will be created. Choose the Create Document button to continue.
-
A spreadsheet or word processing document is created and displayed using the viewer you selected, and the data from the records you queried is added to the spreadsheet. Confirmation messages appear as the document is created.
The data downloaded to the document depends on the query you entered in the window and the columns in your layout.
Note: You may want to save the spreadsheet on your desktop at this stage, as otherwise the spreadsheet and the data it contains will be lost from your desktop when you close the spreadsheet (the data remains in the Oracle application).
To use integrators from the Web ADI self-service menu
You can download application data to an existing spreadsheet, or download a spreadsheet layout.
Caution: To move within the application, use the application's Back, Next, and Cancel buttons only.
-
Select Create Document from the Web ADI self-service menu. The Settings page of the Web ADI wizard appears.
-
Select a viewer to display the document. If you want to upload data, then select a spreadsheet viewer. If several different versions of a viewer are available, ask your system administrator which version to use.
-
If you want to upload data, deselect the Reporting check box.
Note: You can only upload data using an integrator that allows uploads. Check with your system administrator to ensure that an appropriate integrator is available.
-
In the Integrator page, select an integrator from the list.
-
In the Layout page, select the appropriate layout.
-
In the Content page, select None to create a spreadsheet layout only, if you are not downloading data from the database to the spreadsheet. Select the default content to download data from the database.
-
In the Mapping page, to download data from a text file, select the location of the source text file and the delimiter type, and indicate the row at which to start transferring data. If your text file has header rows, start from row 2; otherwise, use row 1.
The Mapping page also shows you the runtime restriction applicable for your integrator. You can enter appropriate values here to restrict your query.
-
In the Review page, review the full details of the new document. Choose the Back button to change any of the information, or choose the Create Document button to continue.
-
The new document displays in the selected viewer you selected. Confirmation messages appear during this process.
-
Save the spreadsheet on your desktop.
Uploading Data using Web ADI
You can upload data to the Oracle applications database using a spreadsheet created in Web ADI. See: Data Upload Using Web ADI
To upload data from a spreadsheet using Web ADI
-
If you have saved the spreadsheet on your local PC, locate and open the spreadsheet in Excel.
-
In the Upl column of the spreadsheet, each row in which you have changed data in any field is flagged for upload. As you change data in a field, the row is flagged for upload.
-
Select the Oracle menu on the Excel toolbar, and choose Upload.
-
If you are not already logged in to Oracle applications, a login page appears. Enter your user name and password, then choose the Login button.
-
In the Set Responsibility page, choose your responsibility, and then choose Select.
-
In the Upload Parameters page, choose the Parameters button. If you want to upload flagged rows only, choose the Flagged Rows option button. To upload all rows (for example, if uploading from a text file), choose the All Rows option button.
-
Choose the Proceed to Upload button, then choose the Upload button in the page that appears next. The upload takes place, and a series of upload messages is displayed, indicating the success or failure of the upload.
-
If the upload fails, return to the spreadsheet and correct any errors, then retry the upload. Further details of errors are available in the Messages column at the end of each row of the spreadsheet. If the upload is successful, the data is uploaded to the database. Confirmation messages indicate the success of the upload.
Note: Web ADI uploads all rows to the database if the data is error-free. If any errors occur, no rows are uploaded.
Uploading Data from Legacy Systems using Web ADI
Follow these steps to upload legacy data to your Oracle HRMS applications database using Web ADI.
To upload data from legacy systems using Web ADI
System Administrator steps
-
Set up an integrator that enables both download and upload. See: Creating Integrators in Web ADI
-
Define one or more layouts for the integrator. See: Defining Layouts in Web ADI. Ensure that the layout contains all the mandatory fields you will need to create a valid record.
System Administrator or end-user steps
-
Ensure that the data to be transferred to the spreadsheet is in a text file in the appropriate format (see: Format of Text Files for further details of file formats). Place the file in any directory you can access directly from your PC.
-
Define mappings between the columns in your text file and columns in the database. See: Defining Mappings in Web ADI
End-user steps
-
Download the empty spreadsheet. See: To create an empty spreadsheet using Web ADI
-
Check that the data has transferred correctly to the spreadsheet.
-
Upload the spreadsheet to the database, ensuring that you select the All Rows option button in the Parameters page. See: Uploading Data Using Web ADI
Defining Standalone Integrator Queries
To define a new query, you must use an existing standalone integrator.
To define a new query
-
Select Create Document from the Web ADI menu.
-
Select a spreadsheet viewer. Leave the reporting box unchecked to download data.
-
Select HR Create Standalone Query integrator.
-
Select the default options for layout and content.
-
Specify the application short name that you used, when you created the standalone integrator, in the mapping window.
-
Specify the integrator username, if required.
-
Review the data entered in the review window, and select the Create Document button.
-
Specify the query restriction to use for your integrator in the SQL WHERE clause column.
Enter the SQL WHERE clause in the following format:
WHERE COL_NAME
LIKE $PARAM$.app:COL_NAME
col_name = any column in the view used by the integrator
app = application shortname
You can use any SQL conditional operator in the SQL WHERE clause. For example:
WHERE first_name
LIKE $PARAM$.per:first_name
Each instance of $PARAM$ is a bind variable, and you can use a maximum of 5 within a single WHERE clause.
-
Specify the name for each bind variable in the application parameter name column. For example: per:first_name.
-
Specify the type for each bind variable in the appropriate parameter type columns. For example: Varchar2. You can use the list of values to display the available options.
-
Specify the prompts for each bind variable. These prompts appear when you use the integrator (for example: first_name LIKE).
-
Upload your spreadsheet data to the database. Your integrator is now ready to use.
Using your integrator
-
Select Create Document from the Web ADI menu.
-
Select a spreadsheet viewer. Leave the Reporting check box unselected to download data.
-
Select the standalone integrator you created earlier.
-
Select the default options for layout and content.
-
Enter values for each prompt for every bind variable that you defined in the mapping window. You can also change the session date, if required, to ensure that you obtain the latest data for your query.
-
Review the data entered in the review window, and select the Create Document button.
-
View your results in the displayed spreadsheet.
Maintaining Standalone Integrator Queries
When you have finished defining a standalone query you can use the HR Maintain Standalone Query integrator to update the query.
Using the Maintain Standalone Query integrator
-
Select Create Document from the Web ADI menu.
-
Select a spreadsheet viewer. Leave the Reporting check box unselected to download data.
-
Select HR Maintain Standalone Query Integrator.
-
Select the default options for layout and content.
-
Enter the application short name, and optionally enter the integrator username.
-
Review the data entered in the review window, and select the Create Document button.
-
Modify the details in the displayed spreadsheet. Upload your changes.
Disabling Standalone Integrator Queries
You can use the HR Disable Standalone integrator to remove access to an integrator.
-
Select Create Document from the Web ADI menu.
-
Select a spreadsheet viewer. Leave the Reporting check box unselected to download data.
-
Select HR Disable Integrator integrator.
-
Select the default options for layout and content.
-
Enter the application short name.
-
Review the data entered in the review window, and select the Create Document button.
-
Select the integrator from the list displayed, and change the value in the Disable column to Yes.
-
Upload your changes.
Controlling Integrator Access
You now control access to integrators using form functions and menus. Before associating the form functions with integrators you need to define your form functions and menus.
Note: When you define your form function select Subfunction in the Type field.
Associating Form Functions with Integrators
-
Select Create Document from the Web ADI menu.
-
Select a spreadsheet viewer. Leave the Reporting check box unselected to download data for updating.
-
Select HR Maintain Integrator Form Functions Integrator.
-
Enter the Application Short Name (for example, your custom application name). Optionally, enter the integrator name.
-
The displayed spreadsheet shows your selected custom integrators, and has a column for associating form functions. Enter the form function required for controlling access to the integrator.
Note: You can add additional form functions to the same integrator using the comma as a delimiter.
-
Upload your changes.
Defining responsibility restrictions
Note: Oracle recommends that you control access to integrators using the form functions and menus instead of responsibility restrictions. Use of form functions and menus provides a greater degree of control over user access.
-
Select Create Document from the Web ADI menu.
-
Select a spreadsheet viewer. Leave the Reporting check box unselected to download data.
-
Select HR Create Integrator Responsibility Restrictions Integrator.
-
Select the default options for layout and content.
-
Review the data entered in the review window, and select the Create Document button.
-
Select Integrator Application Shortname from the list of values.
-
Select the Integrator User Name from the list of values.
-
Select your Responsibility Application Shortname from the list of values.
-
Select the responsibility name from the list of values.
Note: The responsibility you select must be applicable to the responsibility/application short name.
-
Upload your changes.
Maintaining Responsibility Restrictions
You can update or remove any restrictions you created for your integrators using the HR Maintain Integrator Responsibility Restrictions integrator.
-
Select Create Document from the Web ADI menu.
-
Select a spreadsheet viewer. Leave the Reporting check box unselected to download data.
-
Select HR Maintain Integrator Responsibility Restrictions Integrator.
-
Select the default options for layout and content.
-
Enter the Application Shortname from the list of values, and optionally enter the integrator username.
-
Review the data entered in the review window, and select the Create Document button.
-
Update the Responsibility/Application Short Name and Responsibility Name columns in your spreadsheet. You can remove the values in these two columns to remove any restrictions.
-
Upload your changes.
Creating Word Documents Using Web ADI
Follow these steps to create Word documents by downloading data from the HRMS Professional User Interface windows using Web ADI.
Note: You cannot launch Web ADI from certain Oracle HRMS windows. For a list of these windows, see: the Methods of Running Web ADI section in the Data Download and Upload Using Web ADI - Overview topic
To create Word documents using Web ADI
-
Create an integrator to define all the information that you need to download or upload from a particular Oracle HRMS window.
-
Define an integrator layout that includes all the columns you may want to include as fields in the Word document.
-
To create a data source for the creation of the Word document, click the Export Data icon on the toolbar in the particular Oracle HRMS window, and then download the data, selecting Word as the viewer. The application creates a simple Excel spreadsheet (even though you selected Word as the viewer) containing a column for each column in the integrator layout defined in Step 2.
-
Save the Excel spreadsheet to your local PC. This is the data source for the Word document.
-
Create the template Word document using the data source file you saved in Step 4, so that you can select any required fields to include in the Word document. You can use the Mail Merge feature in Microsoft Word to create the template. This action is similar to the creation of the template letter.
-
Save the Word template to your local PC.
-
Upload the template Word document to the database.
-
Use the Manage Layout Document Links page to create a link between the integrator and layout and the Word template.
-
To generate the Word document, navigate to the Oracle HRMS window to which the integrator has been attached.
-
Search for the required data and click the Export Data icon, and download the data, selecting Word as the viewer. This time, as the template is linked to the integrator and the layout is available in the database, the data automatically creates an Excel spreadsheet and merges it with the Word template to produce the final Word document.
Defining Mappings in Web ADI
You need to define mappings if you want to transfer data from a text file to a spreadsheet generated by Web ADI in order to upload it to the Oracle application database.
Define Mappings
-
Choose Define Mapping from the Web ADI menu.
-
Select the integrator for which you want to create mappings.
-
Choose the Define Mappings button.
-
Enter a unique name for the mapping. Ensure that it clearly indicates the purpose of the mapping. For example, include the name of the text file and the API.
-
Enter a unique key. The key can contain only uppercase English characters, numerals, or the underscore character (_). The Web ADI application uses this key to identify the mapping.
-
If you are mapping from a text file, enter the number of columns you want to map. This does not have to be the same as the number of columns in the text file or the API. However, only those columns mapped are transferred from the text file.
-
In the Define Mapping page, select a column from the text file in the source column and a column from the API in the target column that you want to map it to.
Note: The columns you use to map the text file are not read directly from the text file, but are simply numbered columns from 1 to the number you specified in Step 6. To create the mapping, look at the text file and enter the number of the column you want to map to the API column.
-
When you have finished mapping, choose Apply.
Creating Mail Merge Letters using Web ADI
Follow these steps to create mail merge letters by downloading data from the Request Letters window using Web ADI.
To create mail merge letters
System Administrator steps
-
If necessary, create a new view to retrieve data for the standard letter.
Note: Any views you use for letter requests must join to the PER_LETTER_REQUEST_LINES table, and must include the column LETTER_REQUEST_ID. For example, the following view returns a person's first and last names following a letter request:
create or replace view hrv_people_letters as select letter_request_id, last_name, first_name from per_letter_request_lines plrl, per_people_f pp where pp.person_id = plrl.person_id / -
Create an integrator. Ensure that you create the integrator with a METADATA_TYPE of DOWNLOAD, and enter LETTER in the FORM_NAME column. See: Creating an Integrator in Web ADI
System Administrator or end-user steps
-
Define an integrator layout that includes all the columns you may want to include as fields in the standard letter. See: Defining a Layout in Web ADI
-
In the Letter window in Oracle HRMS, define a letter by entering a name and selecting assignment or enrollment statuses to associate with the letter.
See: To define a Standard Letter type
Important: The name you enter for the letter in this window must be the same as the name of the layout you created in Step 3.
You must select a concurrent program before you can save the letter type in this window, but you can select any concurrent program as this information is not used by Web ADI.
-
In the Request Letter window in Oracle HRMS, select the letter name and define a letter request, then save your work.
See: Requesting Letters
-
To create a data source for the creation of the template letter, click the Export Data icon on the toolbar in the Request Letter window, and then download the data, selecting Word as the viewer. See: To download data to a document from an HRMS window
The application creates a simple Excel spreadsheet (even though you selected Word as the viewer) containing a column for each column in the integrator layout defined in Step 3.
-
Save the Excel spreadsheet to a temporary directory.
-
Create the template letter in Word using the file you saved in Step 7 as your data source, so that you can select any required fields to include in the letter. Save the template letter to a temporary directory.
-
Upload the template Word document to the database. See: Managing Template Letters Using Web ADI
-
Use the Manage Layout Document Links page to create a link between the integrator and layout and the template letter. See: Creating Links between Template Letters and Layouts
-
Delete the temporary files you created in Steps 7 and 8 when you have uploaded the template to the database.
End-user steps
-
To create the Merge letter, in the Request Letter window, select a letter name, click the Export Data icon on the toolbar, and download the data, selecting Word as the viewer. This time, as the template linked to the integrator and layout is available in the database, the data automatically creates a merge letter. See: To download data to a document from an HRMS window
-
Save the mail merge letter to your local PC if required.
Managing Template Letters Using Web ADI
You can upload template letters to the Oracle applications database, making them available for use by anyone creating a mail merge letter. You can also overwrite an existing template letter with an updated version, and delete unused letters from the database.
To Upload Template Letters
-
Select Document Management from the Web ADI menu. The Document Management page appears.
-
Choose the Upload New Document button. The Upload New Document page appears.
-
Select the template letter file from the temporary directory where you saved it on your PC (see Creating Mail Merge Letters), and select a document category to identify the type of letter (for example, whether it is a recruitment letter or an offer letter).
Note: To add document categories, use the Application Utilities Lookups window to edit the "HR ADI Document Type" extensible lookup type. See: Adding Lookup Types and Values
-
Choose Apply to upload the document.
To Overwrite Template Letters
-
Select Document Management from the Web ADI menu. The Document Management page appears.
-
Choose the Overwrite icon next to the name of the letter you want to update.
-
In the Overwrite Existing Document page, select the new version of the template letter file from the temporary directory where you saved it on your PC, then choose the Apply button. The new document is uploaded to the database, replacing the old one.
To Delete Template Letters
-
Select Document Management from the Web ADI menu. The Document Management page appears.
-
Choose the Delete icon next to the name of the letter you want to delete.
The document is deleted from the database.
Note: You cannot delete documents if they are in use by the Oracle HRMS application. If a template letter is linked to a layout, you must first unlink the document from the layout (see: Creating Links Between Template Letters and Layouts).
Creating Links between Template Letters and Layouts
You can create links between template letters in the Oracle HRMS database and the integrator and layout that you want to use to generate mail merges using the template.
To create links between template letters and layouts
-
Select Manage Document Links from the Web ADI menu. The Web ADI Mail Merge page appears.
-
Select the integrator for the mail merge and choose Go.
-
A list of layouts for the integrator appears. Choose the Link icon next to the layout you want to link to your template letter. A list of documents that have been uploaded to the database is displayed (you can restrict the list of documents by using the Search feature).
-
Select the template letter you want to link to the layout, then choose the Select button. The template letter is associated with the document.
To remove links between template letters and layouts
-
Select Manage Document Links from the Web ADI menu. The Web ADI Mail Merge page appears.
-
Select the integrator for the mail merge and choose Go.
-
A list of layouts for the integrator appears. Choose the Unlink icon next to the template letter you want to unlink from the layout. The link between the layout and the template letter is removed.
Configuring Web ADI
You can configure Web ADI to use your own integrators for downloading and uploading data between Oracle HRMS and spreadsheets or word processors.
To configure Web ADI
System Administrator steps
-
Create new views if necessary.
-
Set up an integrator of the type required. See: Creating an Integrator in Web ADI
-
Define one or more layouts for the integrator. See: Defining a Layout in Web ADI
Creating Integrators in Web ADI
Creating integrators is a system administration step required to enable download or upload of data from and to windows for which no seeded integrator exists.
Web ADI has two types of integrators:
-
Application Integrators
-
Standalone Integrators
An Application Integrator links to a specific form. You typically use the form to download HRMS data, using some form restriction, modify the data, and then upload the data.
You use standalone integrators directly from the self-service menu function. These integrators allow you to create new data or download and update existing data. You can set up a query restriction to use at runtime. For Standalone Integrators the form name is GENERAL.
Note: You must not call Application Integrators directly from the self-service menu function. These integrators rely on information passed to them from the form for which they are defined. In addition, you can link custom Application Integrators to Oracle-supplied forms only.
To create an integrator
-
Select HR Create Document from the menu. The Settings page of the Web ADI wizard appears.
Caution: When moving between Web ADI pages, do not use your browser's Back or Forward buttons, as this causes information to be lost; instead, use the Back, Next and Cancel buttons displayed on the Web ADI page.
-
In the Settings page, select a spreadsheet viewer in the Viewer field.
-
Deselect the Reporting check box, as this integrator is used to upload data to the database.
-
In the Integrator page, select the seeded integrator "HR Integrator Setup".
-
In the Layout page, select the default layout "HR Integrator Setup".
-
In the Content page, select None.
-
In the Review page, you can see full details of the document that will be created. Choose the Back button if you want to change any of the information, or choose the Create Document button to continue.
-
A spreadsheet document is created, containing all the fields you need to enter to create your own integrator.
Download-only Integrators
If you are creating download-only integrators, including letter generation integrators, enter details in the following columns:
-
METADATA_TYPE - select DOWNLOAD from the list of values.
-
APPLICATION_SHORT_NAME - select the Application Short Name of your custom application from the list of values. The name appears from the FND_APPLICATION table.
-
INTEGRATOR_USER_NAME - the name that appears when the end user selects the integrator in the Web ADI Create Document pages.
-
VIEW_NAME - Web ADI uses a view to determine the tables and columns to download. Enter the name of the view you want to use to base the download on.
-
FORM_NAME - the name of the window from which you want the integrator to be available to the user. Select GENERAL from the list of values, or select LETTER for a letter generation integrator.
If you are creating download-only and letter generation integrators, leave the remaining columns blank.
-
To upload the integrator
Follow the steps for uploading a spreadsheet. See: Uploading Data using Web ADI
Controlling Access to the Integrator
You must associate at least one form function with the integrator for granting user access. See: Controlling Integrator Access
Note: Your System Administrator must grant access for each new integrator to the Web ADI responsibility. Without this, you cannot create layouts for the integrators.
Defining Layouts in Web ADI
Each integrator must have at least one layout specifying the columns to appear in the spreadsheet.
To define a layout
-
Choose Define Layout from the Web ADI menu. The Layout page appears.
-
Select the integrator for which you want to define the layout, and choose Go.
-
If the integrator already contains layouts, these are displayed. Choose the Define Layout button to define a new layout.
System Administrators should always create at least one default layout for an integrator. End users can optionally create their own layouts to restrict the fields displayed to those they are concerned with.
-
In the Define Layout page, enter a unique name for the layout. This appears whenever the user is required to select the layout, so should clearly indicate the purpose of the layout.
Note: When you create a layout for use in running mail merges, the layout name must exactly match the Letter Name in the Letter window of the HRMS application.
-
Enter a unique key. The key is used internally by the system to identify the mapping.
-
The Field List defaults to the complete list of columns available in the view or API. Choose Continue. In the next page, you select a subset of these fields to include in your layout.
Fields for a Letter Generation Layout
-
Choose Select All, so that the user can choose from all fields when entering field codes and creating their template letter.
-
To save the layout
-
Choose Apply to save the layout.
Converting ADE Styles to Web ADI Integrators
Follow these steps to convert your ADE styles to Web ADI integrators.
To convert ADE styles to Web ADI integrators
-
Check that your HR: Data Exchange Directory profile option is set to point to a directory accessible from your Oracle applications database.
-
Using the Global Super HRMS Manager responsibility, navigate to the Submit Request window, and select the Upgrade from ADE to Web ADI concurrent process.
-
In the Parameters dialog box, enter the name of your ADE.INI file in the ADE ini file name field. This file must be located in the directory referred to in the HR: Data Exchange Directory profile option.
-
Submit the request.
Note: The request may complete with warning messages, because information that is required by Web ADI is not available in ADE. This is as expected, and can be corrected in Step 8.
-
Locate the output file from the concurrent process, which is placed in the same directory as the ADE.INI file. The output file has the name UPGDDMMYYHHMISS.CSV (where DDMMYYHHMISS represents the date and time the file was created).
-
Copy the output file to a local directory or shared network drive that you can access from your desktop.
You can now create integrators using this file as the content.
-
Use the Create Document menu to create an integrator spreadsheet containing all required columns (see: Creating Integrators), but when selecting the content for the spreadsheet, select Text File. In the Mapping page, select the UPGDDMMYYHHMISS.CSV file, and enter 1 in the Start Importing at Line Number field.
The process creates a spreadsheet containing the columns required to create an integrator, and transfers each ADE style from the text file into a separate row in the spreadsheet.
-
Missing information is shown in angle brackets in the appropriate column, for example, <<VIEWNAME>>. You must supply all missing values before you can upload the integrators.
The following columns may have information missing:
-
VIEW_NAME. This information may be missing because some styles in ADE were defined without views, whereas Web ADI requires a view. Enter the name of the view to use to download the data.
-
APPLICATION SHORT NAME. Web ADI requires the short name of your custom application. Enter the application short name in each row.
-
-
When you have inserted all the missing information for each row, you can upload the spreadsheet, selecting All Rows in the Parameters page. See: Uploading Data using Web ADI. Each ADE style is converted to an integrator with the same name as the style.
-
Set up a layout for each style. See: Defining Layouts. For letter generation integrators, ensure that the layout name you use is the same as that of the letter name in the HRMS application.
Additional Steps for Letter Generation Integrators
-
Upload your existing template letters to the Oracle applications database. See: Managing Template Letters
-
Link the layout to a template document. See: Creating Links between Template Letters and Layouts
Letter Generation
Letter Generation Overview
There are three different methods provided to create standard letters:
Which Method Should You Use?
Use the online method (Web ADI), if you want to generate and review your letters immediately.
Web ADI enables you to generate standard letters and reports by retrieving data and exporting it to a data file that is merged with a standard word processed document. The word processed document includes all the merge fields required to merge the data and the standard text for the letter. Web ADI is fully compatible with Microsoft Word 6.
You can use Web ADI to generate standard letters for recruitment or enrollment by performing a mail merge from the Request Letter window in your application.
Alternatively, you can use the concurrent processing method to set up your standard letters. With concurrent processing, you generate and review your letters without interrupting other work you perform at your computer. You can control when a concurrent process runs and schedule long-running processes to run at times when the system is lightly loaded. Another advantage of using concurrent processing is that you do not need to have Windows 95 or 98, Excel or Lotus 123 installed.
Concurrent Processing
There are two methods of using concurrent processing to set up your standard letters:
-
Using word processors
-
Using Oracle Reports
Using Word Processors
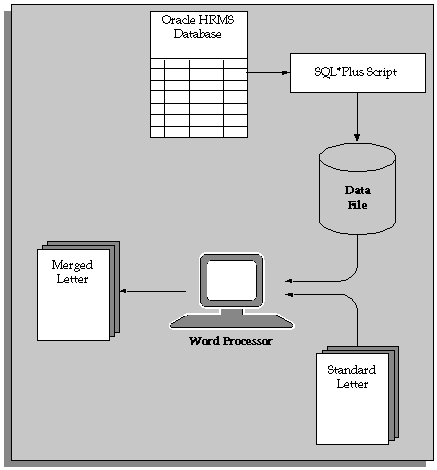
You can use any word processor to produce standard letters from Oracle HRMS. If you use a word processor, you can submit a concurrent request in the Letter Request window to generate the mail merge file. When the concurrent request is complete, you can use your word processor's mail merge facilities to create the merged letters.
To create standard letters using a word processor, you need to extract the data you want to include in the letters from the Oracle HRMS database. To do this, create a program, such as a SQL*Plus script, to extract the data, which is then stored in a data file. You also write skeleton standard letters using your word processor.
Note: Oracle HRMS supplies SQL*Plus script templates for use with MultiMate, WordPerfect and Microsoft Word. You can copy the SQL*Plus script templates and modify them to create the standard letters you require.
Each time you run your SQL*Plus script, it extracts data to the data file. You then use the mail merge features of your word processor to merge this data with the skeleton standard letters you previously prepared. This merging process creates the actual letters that you send out to students and applicants.
An overview of creating standard letters using a word processor is shown in the following figure.
Using a Word Processor
If you use Microsoft Word as your word processor, not only can you use the concurrent processing method to produce your standard letters, but you can also generate letters online using Oracle Web Applications Desktop Integrator (Web ADI)
See: Letter Generation Using Web ADI page
Using Oracle Reports
As an alternative to using a word processor to produce standard letters, you can use the Standard Letter and Label features of Oracle Reports. Use this method if you do not want to use word processors to print your letters (or if you do not have word processors).
See: Linking the Report with a Letter
Example Files
PERWPOUK Template
The template SQL*Plus script for mail merge letters for Microsoft Word is PERWPOUK.sql. See: Writing a SQL*Plus Script for Microsoft Word
The following section defines the required SQL*Plus environment settings. You should produce this section exactly as you see it when you define your mail merge file.
WHENEVER SQLERROR EXIT FAILURE ROLLBACK
REM Define the MS Word mail merge record separator
DEFINE ch="'%'"
REM Define the column width for returning query results
COLUMN L1 FORMAT A2000
SET PAUSE OFF
SET FEEDBACK OFF
SET RECSEP OFF
SET HEADING OFF
SET VERIFY OFF
SET TERMOUT OFF
SET PAGESIZE 0
The following section creates a row in the Application Object Library table (AOL) FND_SESSIONS. This enables the datetrack security views to be accessed for the session.The &2 argument contains the current SQL*Forms session date.You should produce this section exactly as you see it when you define your mail merge file.
REM Insert session row
insert into fnd_sessions(session_id ,effective_date)
select  userenv('SESSIONID'),
        to_date('&2','DD-MON-YYYY')
from    sys.dual
/
The following section has two functions:
-
To set the mail merge header linesize. This is dependent on the character length of all the mail merge items you want to use. In the example, the header linesize equates approximately to 220 characters.
-
To enable the spooling of the SQL results. You must remove the REM keyword from the line that spools output to a file for the Microsoft Mailmerge. If you use concurrent processing to generate the data source file, Concurrent Manager creates the output file.
REM Set length of the header
SET LINESIZE 220
REM Create the mail merge 'header' record for MS Word
REM Note: SPOOL command commented out for concurrent manager.
REM       PC based solution required the SPOOL command.
REM spool perwpouk.txt
The following section defines the mail merge header information. These are the mail merge fields you integrate with your word processed letter. Each mail merge field is delimited by the pre-defined &ch character. Ensure that the field size does not exceed 40 characters and that the field name does not include white spaces. Do not forget that the length in characters of this selected row from sys.dual is the LINESIZE value you specified above.
select  'address_line1'         ||&ch||
        'address_line2'         ||&ch||
        'address_line3'         ||&ch||
        'town_or_city'          ||&ch||
        'country'               ||&ch||
        'postal_code'           ||&ch||
        'applicant_title'       ||&ch||
        'applicant_last_name'   ||&ch||
        'position_name'         ||&ch||
        'organization_name'     ||&ch||
        'grade_name'            ||&ch||
        'projected_hire_date'   ||&ch||
        'recruiter_title'       ||&ch||
        'recruiter_last_name'   ||&ch
from    sys.dual
/
After selecting your mail merge header information, you must re-set the LINESIZE to the maximum to VARCHAR2 size which is 2000.
REM re-initialise the linesize to the maximum 2000 varchar2 length
SET LINESIZE 2000
The following section is the main SQL*Plus query that generates the mail merge field information. Note that the columns are merged together using the &ch character as the field delimiter.The RPAD function pads out the row of information with # for all white spaces. Without this function, mail merge cannot distinguish when a row/record has ended.The SQL*Plus query in this example is generated from letter requests. Therefore the &1 argument is used to identify which letter_request_id is being generated.
REM Mail merge interview query
select  rpad(
        nvl(pa.address_line1,' ')                                       ||&ch||
                nvl(pa.address_line2,' ')                               ||&ch||
                nvl(pa.address_line3,' ')                               ||&ch||
                nvl(pa.town_or_city,' ')                                ||&ch||
                nvl(ft.territory_short_name, ' ')                       ||&ch||
                nvl(pa.postal_code,' ')                                 ||&ch||
                nvl(hl1.meaning, ' ')                                   ||&ch||
                nvl(pp1.last_name, ' ')                                 ||&ch||
                nvl(pos.name, ' ')                                      ||&ch||
                pou.name                                                ||&ch||
                nvl(pg.name, ' ')                                       ||&ch||
                nvl(to_char(pappl.projected_hire_date,
                            'fmDay fmddth "of" fmMonth YYYY'), ' ')     ||&ch||
                nvl(hl2.meaning, ' ')                                   ||&ch||
                nvl(pp2.last_name, ' ')                                 ||&ch,
                2000, '#') L1
from            per_addresses                   pa,
                fnd_territories                 ft,
                hr_lookups                      hl1,
                hr_lookups                      hl2,
                hr_all_organization_units       pou,
                per_positions                   pos,
                per_grades                      pg,
                per_applications                pappl,
                per_all_people                  pp1,
                per_all_people                  pp2,
                per_all_assignments             pasg1,
                per_letter_request_lines        plr
where           plr.letter_request_id           = &1
and             pp1.person_id                   = plr.person_id
and             pa.primary_flag          (+)    = 'Y'
and             pa.person_id             (+)    = pp1.person_id
and             ft.territory_code        (+)    = pa.country
and             hl1.lookup_code          (+)    = pp1.title
and             hl1.lookup_type          (+)    = 'TITLE'
and             pasg1.assignment_id      (+)    = plr.assignment_id
and             pos.position_id          (+)    = pasg1.position_id
and             pou.organization_id      (+)    = pasg1.organization_id
and             pg.grade_id              (+)    = pasg1.grade_id
and             pappl.application_id     (+)    = pasg1.application_id
and             pp2.person_id            (+)    = pasg1.recruiter_id
and             hl2.lookup_code          (+)    = pp2.title
and             hl2.lookup_type          (+)    = 'TITLE'
/
REM Note: SPOOL command commented out for concurrent manager.
REM       PC based solution required the SPOOL command.
REM spool off
The following section updates the letter request from Pending to Complete (as the example is for letter requests).
REM update the letter request_status from PENDING to COMPLETE
update per_letter_requests plr
set    plr.request_status      = 'COMPLETE'
where  plr.letter_request_id   = &1
and    plr.request_status      = 'PENDING'
/
The following section deletes the row inserted into FND_SESSIONS.
REM delete the session row created
delete from fnd_sessions fs
where  fs.session_id = userenv('sessionid')
and    fs.effective_date = to_date('&2','DD-MON-YYYY')
/
The following section commits the changes and exits the SQL*Plus session.
REM commit the changes
commit
/
exit
PERWPWUK Template
The template SQL*Plus script for mail merge letters for MultiMate or WordPerfect is PERWPWUK.sql. See: Writing a SQL*Plus script for MultiMate or WordPerfect
The following section defines the required SQL*Plus environment settings. You should produce this section exactly as you see it when you define your mail merge file.
REM
DEFINE line_size=80
DEFINE field_size= &line_size-1
DEFINE ch="'%'"
SET PAGESIZE 0
SET LINESIZE &line_size
BREAK ON L1 SKIP PAGE
COLUMN L1 FORMAT A&line_size
COLUMN L2 FORMAT A&line_size
COLUMN L3 FORMAT A&line_size
COLUMN L4 FORMAT A&line_size
COLUMN L5 FORMAT A&line_size
COLUMN L6 FORMAT A&line_size
COLUMN L7 FORMAT A&line_size
COLUMN L8 FORMAT A&line_size
COLUMN L9 FORMAT A&line_size
SET FEEDBACK OFF
SET RECSEP OFF
SET HEADING OFF
SET VERIFY OFF
SET TERMOUT OFF
The following section creates a row in the Application Object Library table (AOL) FND_SESSIONS. The &2 argument contains the current SQL*Forms session date.You should produce this section exactly as you see it when you define your mail merge file.
insert into fnd_sessions
(session_id ,effective_date)
select  userenv('SESSIONID')
,       to_date('&2','DD-MON-YYYY')
from    sys.dual
/
After selecting your mail merge header information, you must re-set the LINESIZE to the maximum to VARCHAR2 size which is 2000.
REM re-initialise the linesize to the maximum 2000 varchar2 length
SET LINESIZE 2000
The following section is the main SQL*Plus query that generates the mail merge field information. Note that the columns are merged together using the &ch character as the field delimiter.The SQL*Plus query in this example is generated from letter requests. Therefore the &1 argument is used to identify which letter_request_id is being generated.
select       nvl(t.meaning||' '||p.first_name||' '||p.last_name, ' ')||&ch||
        nvl(a.address_line1,' ') ||&ch||
        nvl(a.address_line2,' ') ||&ch||
        nvl(a.address_line3,' ') ||&ch||
        nvl(a.town_or_city,' ')  ||&ch||
        nvl(a.region_1, ' ')     ||&ch||
        nvl(a.postal_code,' ')   ||&ch||
        nvl(t.meaning||' '||p.last_name,' ')
from    per_addresses a,
        per_people p,
        per_letter_request_lines s,
        hr_lookups t
where   a.person_id (+) = p.person_id
and     p.person_id = s.person_id
and     p.title = t.lookup_code (+)
and     t.lookup_type (+) = 'TITLE'
and     s.letter_request_id = &1
/
The following section updates the letter request from Pending to Complete (as the example is for letter requests).
update per_letter_requests r
set    r.request_status    = 'COMPLETE'
where  r.letter_request_id = &1
and    r.request_status    = 'PENDING'
/
The following section commits the changes and exits the SQL*Plus session.
commit
/exit
/
OTA SQL*Plus Script
Example SQL mail merge file. See: Writing a SQL*Plus Script for MultiMate or WordPerfect and Writing a SQL*Plus Script for Microsoft Word
The template to produce confirmation letters is OTA.sql.
The following section defines the required SQL*Plus environment settings.You should produce this section exactly as you see it when you define your mail merge file.
WHENEVER SQLERROR EXIT FAILURE ROLLBACK
REM Define the MS Word mail merge record separator
DEFINE ch="'%'"
REM Define the column width for returning query results
COLUMN L1 FORMAT A2000
SET PAUSE OFF
SET FEEDBACK OFF
SET RECSEP OFF
SET HEADING OFF
SET VERIFY OFF
SET TERMOUT OFF
SET PAGESIZE 0
The following section creates a row in the Application Object Library table (AOL) FND_SESSIONS. This enables the datetrack security views to be accessed for the session. The &2 argument contains the current SQL*Forms session date.You should produce this section exactly as you see it when you define your mail merge file.
REM Insert session row
insert into fnd_sessions(session_id ,effective_date)
select  userenv('SESSIONID'),
        to_date('&2','DD-MON-YYYY')
from    sys.dual
/
The following section has two functions:
-
To set the mail merge header line size. This is dependent on the character length of all the mail merge items you want to use. In the example, the header line size equates approximately to 220 characters.
-
To enable the spooling of the SQL results. The spool file should match the name of the SQL file you are writing, but with a text file extension. 2.2
REM Set length of the header
SET LINESIZE 200
REM Create the mail merge 'header' record for MS Word
REM Note: SPOOL command commented out for concurrent manager.
REM       PC based solution required the SPOOL command.
RWM spool xxxxx.txt
The following section defines the mail merge header information. These are the mail merge fields you integrate with your word processed letter. Each mail merge field is delimited by the pre-defined &ch character. Ensure that the field size does not exceed 40 characters and that the field name does not include white spaces. Do not forget that the length in characters of this selected row from sys.dual is the line size value you specified above.
select       'student_title'        ||&ch||
                'student_first_name'   ||&ch||
                'student_last_name'    ||&ch||
                'event_name'           ||&ch||
                'event_code'           ||&ch||
                'event_end_date'       ||&ch
from    sys.dual
/
After selecting your mail merge header information, you must re-set the line size to the maximum VARCHAR2 size, which is 2000.
REM re-initialise the linesize to the maximum 2000 varchar2 length
SET LINESIZE 2000
The following section is the main SQL*Plus query that generates the mail merge field information. Note that the columns are merged together using the &ch character as the field delimiter.The RPAD function pads out the row of information with # for all white spaces. Without this function, mail merge cannot distinguish when a row/record has ended.The SQL*Plus query in this example is generated from letter requests. Therefore the &1 argument is used to identify which letter_request_id is being generated.
REM Mail merge confirmation query
 select rpad(
        initcap(nvl(d.delegate_title_meaning,' ' ))           ||&ch||
        nvl(d.delegate_first_name,' ')                  ||&ch||
        nvl(d.delegate_last_name,' ' )                  ||&ch||
        nvl(v.description,' ')                          ||&ch||
        nvl(d.event_activity_version_name,' ' )         ||&ch||
        to_char(d.course_end_date, 'DD fmMonth YYYY')   ||&ch,
        2000, '#')                              L1
   from ota_delegate_bookings_v                 d,
        ota_activity_versions                   v,
        per_letter_request_lines                plr
  where plr.letter_request_id                   = &1
  and   (plr.ota_booking_id                     = d.booking_id
  or     plr.ota_event_id                       = d.event_id)
  and   d.activity_version_id                   = v.activity_version_id
/
REM Note: SPOOL command commented out for concurrent manager.
REM       PC based solution required the SPOOL command.
REM spool off
The following section updates the letter request from Pending to Complete (as the example is for letter requests).
REM Update the letter request_status from PENDING to COMPLETE
update  per_letter_requests     plr
set     plr.request_status      ='COMPLETE'
where   plr.letter_request_id   =&1
and     plr.request_status      ='PENDING'
/
The following section deletes the row inserted into FND_SESSIONS.
REM delete the session row created
delete from fnd_sessions        fs
where  fs.session_id            = userenv('sessionid')
and    fs.effective_date        = to_date('&2','DD-MON-YYYY')
/
The following section commits the changes and exits the SQL*Plus session
REM commit the changes
commit
/
exit
/
Planning Standard Letter Requirements
Before creating standard letters, you need to identify several things.
To plan standard letter requirements
-
Identify the database information to include in the letters.
You need to identify the select statements to provide you with the data as the content of your letters. Oracle HRMS supplies you with SQL*Plus scripts as templates to help you do this.
-
Identify the text that you want to include as the body of your letters.
-
Decide whether to associate your standard letters with student enrollment or applicant assignment statuses.
-
Identify which statuses you want to trigger your standard letters (if you do want to link your standard letters to student enrollment or applicant assignment statuses).
For example, do you want to link your standard enrollment confirmation letter to the status Placed so that the letter is triggered when you set a student's enrollment status to Placed? Do you want to link your standard rejection letter to the status Rejected so that it is triggered when an applicant's assignment status is set to Rejected?
Writing a SQL*Plus Script for MultiMate or WordPerfect
Oracle HRMS supplies you with SQL*Plus scripts as templates for extracting database information for standard letters. You can copy the SQL*Plus script templates and modify them to create the standard letters you require.
The template scripts Oracle HRMS provides are:
| Scripts | Purpose | Used By |
| PERWPMUK.sql | Example UK SQL*Plus script for MultiMate | HR |
| PERWPMUS.sql | Example US SQL*Plus script for MultiMate | HR |
| PERWPWUK.sql | Example US SQL*Plus script for WordPerfect | HR |
| PERWPWUS.sql | Example US SQL*Plus script for WordPerfect | HR |
One of the template SQL*Plus scripts (PERWPWUK.sql) is provided as a example. See: PERWPWUK Template
Oracle Training Administration does not provide template scripts, but we provide an example of a Confirmation letter SQL mail merge file. See: OTA SQL*Plus Script
To write a SQL*Plus script for MultiMate or WordPerfect
-
Copy the appropriate SQL*Plus script from the server side sql directory of the HR product tree (consult your installation guide for details).
-
Edit (or write) a SQL*Plus script to select data from the database in a format your word processor can read and that is compatible with the standard letter.
-
Save the file with the name PERWP*** (or OTAWP*** for OTA).
You must use this prefix for the system to recognize it as a type of letter. See your Oracle Applications installation server guides for details of where the concurrent manager places the files.
Writing a SQL*Plus Script for Microsoft Word
Oracle HRMS supplies four SQL*Plus script templates.
You can run the scripts on the server side and make them accessible to other users across the network, or you must copy them to a directory which is accessible from the PC, such as a network drive.
The template scripts that Oracle HRMS provides are:
| Scripts | Purpose | Used By |
| PERWPOUS.sql | Example US Offer letter SQL mail merge file | HR |
| PERWPOUK.sql | Example UK Offer letter SQL mail merge file | HR |
| PERWPIUS.sql | Example US Interview letter SQL mail merge file | HR |
| PERWPIUK.sql | Example UK Interview letter SQL mail merge file | HR |
One of the template SQL*Plus scripts is provided as an example. See: Template SQL*Plus Script PERWPOUK
Oracle Training Administration does not provide template scripts, but we provide an example of a Confirmation letter SQL mail merge file. See: OTA SQL*Plus Script
To write a SQL*Plus script for Microsoft Word
-
Copy the SQL*Plus scripts from the server side sql directory of the HR product tree. (Consult your installation guide for details).
-
Edit (or write) a SQL*Plus script to select data from the database in a format your word processor can read and is compatible with the standard letter.
-
Save the file with the name PERWP*** (or OTAWP*** for OTA).
You must use this prefix for the system to recognize it as a type of letter. See your Oracle Applications installation server guides for details of where the concurrent manager places the files.
Registering the SQL*Plus Script
Register your SQL*Plus program with Oracle HRMS. You register your program so that you can run it as a concurrent program. Name the file PERWP*** (or OTAWP***). You must use this prefix for the system to recognize it as a type of letter.
You use the Concurrent Programs window to register your program (using a system administrator responsibility).
See: Concurrent Programs Window, Oracle Applications System Administrator's Guide
Linking the SQL*Plus Script With a Letter
You need to link your SQL*Plus script with a letter and one or more statuses. In Oracle Human Resources, you can link one or more applicant assignment statuses with each recruitment letter. A request for the letter is then created automatically when an applicant is given an associated assignment status. For example, you can link your standard recruitment rejection letter to the status Rejected so that the letter is triggered when you set an applicant's assignment status to Rejected.
In Oracle Training Administration, you can link one or more enrollment statuses with each enrollment letter. A request for the letter is then created automatically when an enrollment is given an associated status.
Define your standard letter types in the Letter window.
To define a standard letter type
-
Enter a name for the letter in the Name field.
-
Select the Concurrent Program Name assigned by your System Administrator to the SQL*Plus script.
For Oracle Human Resources:
-
Select one or more applicant assignment statuses to create letter requests automatically for applicants, and check the Enabled box.
When an applicant is given one of these statuses, a pending request for this letter type is created automatically. If a pending letter request already exists, the applicant is added to the list of people to receive the letter when you submit the request.
For Oracle Training Administration:
-
Select one or more enrollment statuses to create letter requests automatically for enrollments, and check the Enabled box.
When an enrollment is given one of these statuses, a pending request for this letter type is created automatically. If a pending letter request already exists, the enrollment is added to the list of people to receive the letter when you submit the request.
Writing a Skeleton Letter
Write a skeleton letter using your word processor. Include the appropriate merge codes from the data source for the word processor you are using.
Merging Data with Standard Letters
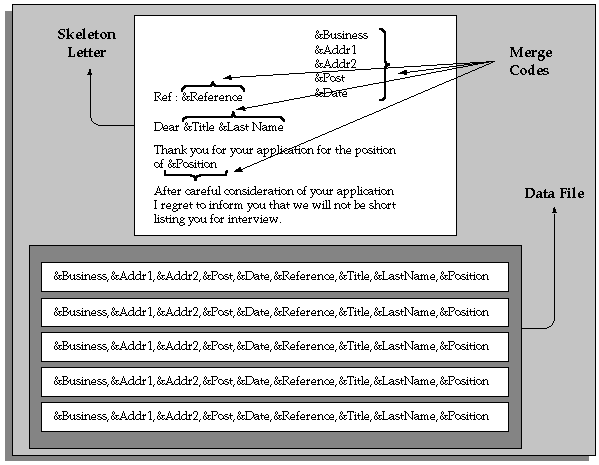
The mail merge feature of any word processor enables you to merge text from the data file you create into a standard letter. Each line in the data file contains the text to merge into one standard letter for one recipient.
Within the program, you can format the data and include the characters that are recognized as separators by your word processor.
A standard letter comprises standard text with a number of embedded variables in it. When you print the letter, the variables are replaced with specific items of data, such as name and address details for different people.
Merging the Data File with the Standard Letter
When the concurrent manager has finished processing a letter request, you can merge the data in the Data File with your skeleton letters.
To merge the data file with the standard letter
-
Merge the data in the Data File with your skeleton letters to create your standard letters. The merging of text and data files is normally carried out using the mail merge features of your word processor.
If you do not have access to the directory where the Data File resides (consult your installation guide for details of the location Concurrent Manager places the file), you need to transfer the mail merge files created by the concurrent process to your word processor before you can merge the data file with the skeleton letters.
-
If you are using a word processor to merge the data file, you need to save the merged letters you generate.
If you do not save the merged letters, when you exit the word processor you lose the letters. You do not lose the data file or the skeleton letter, however.
Linking the Report With a Letter
You need to link your report with a letter and one or more statuses. In Oracle Human Resources, you can link one or more applicant assignment statuses with each recruitment letter. A request for the letter is then created automatically when an applicant is given an associated assignment status. In Oracle Training Administration, you can link one or more enrollment statuses with each enrollment letter. A request for the letter is then created automatically when an enrollment is given an associated status.
For example, you can link your standard recruitment rejection letter to the status Rejected so that the letter is triggered when you set an applicant's assignment status to Rejected.
Define your standard letter types in the Letter window.
To define a standard letter type
-
Enter a name for the letter in the Name field.
-
Select the concurrent program name assigned by your system administrator to the report.
For Oracle Human Resources:
-
Select one or more applicant assignment statuses to create letter requests automatically for applicants, and check the Enabled box.
When an applicant is given one of these statuses, a pending request for this letter type is created automatically. If a pending letter request already exists, the applicant is added to the list of people to receive the letter when you submit the request.
For Oracle Training Administration:
-
Select one or more enrollment statuses to create letter requests automatically for enrollments, and check the Enabled box.
When an enrollment is given one of these statuses, a pending request for this letter type is created automatically. If a pending letter request already exists, the enrollment is added to the list of people to receive the letter when you submit the request.
Writing and Registering the Report
You need to write and register the report.
To write and register the report
-
Identify which data you want to extract from the database. Write your skeleton letter text and Select statements specifying the data to be extracted from the Oracle database.
-
Register your report with Oracle HRMS. You register your report so that you can run it as a concurrent program. Name the file PERWP*** (or OTAWP*** for OTA). You must use this prefix for the system to recognize it.
You use the Concurrent Programs window to register your report (using a system administrator responsibility).
See: Concurrent Programs Window, Oracle Applications System Administrator's Guide
Requesting Letters/Running the Report
When you, or other users, set the status for an applicant or enrollment that triggers your standard letters, Oracle HRMS creates a letter request automatically, with the status of Pending. It also adds the applicant's or student's name to the request. You can view the pending request and names through the Request Letter window.
Then, when you change the letter request from Pending to Requested, Oracle HRMS runs the report or SQL*Plus script for this type of letter.
Depending on the requirements of your enterprise, you can generate letter requests for every organization within your enterprise or you can generate separate letter requests for each vacancy you define. If you want to generate separate letter requests by a specific vacancy you must select Yes for the HR: Restrict Letter by Vacancy Name or Event profile.
The advantages of restricting the generation of letters to a specific vacancy is that you can process letters for one organization without affecting another organization within your enterprise.
See: User Profiles
You can add further names to the list manually, if required. For example, you might have a last minute acknowledgement letter to send.
You can also create manual letter requests. You do this by entering the status of Pending yourself, then entering all the recipients of the letter before changing the status of the letter to Requested.
To submit an automatic letter request
-
Query the letter you require in the Letter Name field.
-
Ensure that the method is Automatic.
-
Select the vacancy in the Vacancy Name field.
Note: You must set the HR: Restrict Letter by Vacancy or Event profile to Yes to enable this field.
-
Move to the Requested For block to query the applicants, events or students that have been entered automatically on this request, according to their status. You can add further names manually.
-
Update the status from Pending to Requested.
-
Save your changes.
A concurrent request ID number appears in the Concurrent Request field. When the Concurrent Manager has processed the request it changes the status to Completed.
-
You can query the request ID in the Concurrent Requests window and monitor its progress.
Note: Consult your installation guide for details of the location Concurrent Manager places the output or data file.
To create a manual letter request
-
Select the Letter Name for the letter type you want to request.
-
Ensure that the method is Manual.
-
Select the vacancy in the Vacancy Name field.
Note: You must set the HR: Restrict Letter by Vacancy or Event profile to Yes to enable this field.
-
Leave the status of the request as Pending.
-
Save the changes.
Adding the Names
-
Select the names to add:
-
Select employees or applicants (for Oracle Human Resources) to receive the letter in the Requested For region.
The Assignment field displays the organization to which the person is assigned. You can view the other components of the assignment by choosing List of Values from the Edit menu.
-
Select events or students or both (for Oracle Training Administration) in the Requested For region.
This depends on how the letter has been set up on your system. For example, an enrollment confirmation letter might be defined so that it is sent to all students with the status Confirmed who are enrolled on the event selected in the Requested For region.
-
-
Save the changes.
Changing the Status
-
Update the status from Pending to Requested.
-
Save the changes.
A concurrent request ID number appears in the Concurrent Request field. When the Concurrent Manager has processed the request it changes the status to Completed.
-
You can query the request ID in the Concurrent Requests window and monitor its progress.
Note: Consult your installation guide for details of the location Concurrent Manager places the output file.
Performing the Next Step
If your letters are produced by Oracle Reports, they are ready for printing. If you use your word processor's mail merge facility, you are ready to merge the data. See: Merging the Data File With the Standard Letter