Transactions
Approval Limits
Use the Approval Limits window to define approval limits for:
-
Adjustments: When you enter an adjustment that is outside your approval limit range, Receivables assigns the adjustment a status of Pending until someone with the appropriate approval limits either approves or rejects it.
Receivables uses approval limits that have a document type of Adjustment when you create an adjustment in the Adjustments, Submit AutoAdjustments, and Approve Adjustments windows.
Define Adjustment approval limits by currency and amount.
To review your adjustments and adjustment statuses, see the: Adjustment Register, Oracle Receivables User Guide.
-
Credit Memo Requests: The Credit Memo Request Approval Workflow uses approval limits that have a document type of Credit Memo when forwarding credit memo requests from iReceivables. The workflow sends a notification to an approver if the request is within the approval limit range for the currency and reason code specified.
Define Credit Memo approval limits by reason type, currency, and amount.
-
Credit Memo Refunds: When you attempt to electronically refund an on-account credit memo, Receivables uses approval limits that have a document type of Credit Memo Refund.
Define Credit Memo Refund approval limits by currency and amount.
-
Receipt Write-Offs: When you write off an unapplied receipt amount or an underpayment on a receipt, Receivables uses approval limits that have a document type of Receipt Write-off. You cannot write off a receipt amount that is outside your approval limit range.
Define Receipt Write-off approval limits by currency and amount.
The approval limits for write-offs are separate from, but cannot exceed, the system level write-off amounts that you define in the System Options window.
You must specify both lower and upper approval limits for each approver.
Important: Be sure to update approval limits when personnel changes occur and whenever you define new credit memo reasons in the Receivables Lookups window.
Prerequisites
-
Define application users, Oracle Applications System Administrator's Guide - Security
-
Define currencies, Oracle General Ledger User's Guide
To define approval limits:
-
Enter the Username of the person for whom you are defining approval limits, or select from the list of values. You define valid user names and descriptions in the Users window. For more information, refer to Oracle Applications System Administrator's Guide - Security.
-
Select a Document Type of either Adjustment, Credit Memo, Credit Memo Refund, or Receipt Write-off.
-
If the Document Type is Credit Memo, enter a Reason code for this approval limit. An approver can only approve credit memo requests with the same reason code. You can define additional reason codes in the Receivables Lookups window.
-
Enter a Currency code. You can define multiple user approval limits for each currency defined in your system.
-
Enter a minimum approval amount in this currency for this user. You can enter either a positive or negative amount, but the From Amount must be less than or equal to the To Amount.
-
Enter a maximum approval amount in this currency for this user. You can enter either a positive or negative amount, but the To Amount must be equal to or greater than the From Amount.
Note: Credit memo approval ranges cannot overlap for limits with the same reason type and currency. For example, the approval range for primary approver JSMITH is from -200 USD to -100 USD and the reason code is Free Product. Therefore, you cannot define a credit memo approval range for primary approver AJONES from -250 USD to -150 USD and specify the same reason code.
-
If you specified a Document Type of Credit Memo, indicate whether this approver is the primary approver for this range by checking the Primary box.
-
To enter a Description of this approval limit, open the More tabbed region.
Related Topics
About Adjustments, Oracle Receivables User Guide
Approving Adjustments, Oracle Receivables User Guide
Adjustment Approval Report, Oracle Receivables User Guide
Applying On-Account Credits, Oracle Receivables User Guide
Writing Off Receipts, Oracle Receivables User Guide
AutoInvoice Line Ordering Rules
Define invoice line ordering rules for transaction lines that you import into Receivables using AutoInvoice. AutoInvoice uses these rules to order transaction lines when grouping the transactions it creates into invoices, debit memos, and credit memos. You can assign a line ordering rule to each grouping rule.
You also assign transaction attributes to your line ordering rules. AutoInvoice uses these attributes to order invoice lines. You can assign a priority to these attributes for each of your invoice line ordering rules. You can also specify an ascending or descending order for each transaction attribute assigned to a rule.
Active invoice line ordering rules appear as list of values choices in the Grouping Rules window.
Tip: If you are importing transactions from Oracle Order Management, create an invoice line ordering rule with the attribute SALES_ORDER_LINE to list the items on the invoice in the same order as they appear on the sales order.
To define an invoice line ordering rule:
-
Enter the Name of this line ordering rule.
-
Enter a range of Effective Dates for this line ordering rule. The default start date is today's date, but you can change it. If you do not enter an end date, this line ordering rule will be active indefinitely.
-
Enter a Description of this line ordering rule (optional).
-
Enter the priority of the transaction attribute in the Sequence field. Enter a higher number to specify a lower priority transaction attribute for this invoice line ordering rule.
-
Enter the Transaction Attribute to use to order your invoice lines. Receivables uses the transaction attributes you specify to determine how AutoInvoice orders invoice lines when it groups the transactions that it creates into invoices, debit memos, and credit memos.
-
Enter the type of this line ordering attribute. Enter either 'Ascending' or 'Descending' to specify whether you want this transaction attribute to be ordered from least to greatest (Ascending), or greatest to least (Descending).
Related Topics
Importing Transactions Using AutoInvoice, Oracle Receivables User Guide
Using AutoInvoice, Oracle Receivables User Guide
Using Line Ordering Rules, Oracle Receivables User Guide
Ordering and Grouping Rules Listing, Oracle Receivables User Guide
Setting Up Balance Forward Billing
Perform the following to set up Receivables to create balance forward bills.
Step 1 Define Balance Forward Billing Cycles
The Balance Forward Billing program uses balance forward billing cycles:
-
To determine the billing date of a balance forward bill.
-
To select the transactions to include in the balance forward bill.
See: Balance Forward Billing Cycles.
Step 2 Define Balance Forward Billing Payment Terms
Create one or more payment terms for use with balance forward billing by assigning a balance forward billing cycle to a payment term. See: Payment Terms.
Assign balance forward billing payment terms at the customer profile class, account, or site level. Receivables defaults the assigned payment term during transaction entry.
Step 3 Enable Balance Forward Billing
Enabling balance forward billing is a two step process:
Depending on setup, customers can generate balance forward bills consolidated at either the account or site level:
Setting Up Customer Profile Classes for Balance Forward Billing
To set up a customer profile class for balance forward billing, update an existing customer profile class with balance forward billing information, or define a new customer profile class.
Note: The balance forward billing information entered at the customer profile class level is defaulted at the account and site profile levels.
To update a customer profile class with balance forward billing information
-
Navigate to the Customer Profile Classes window.
-
Query the profile class to update.
-
In the Balance Forward Billing region, select Enable.
Note: When you select Enable, Bill Level and Type become required and the Payment Terms list of values displays only balance forward billing payment terms. If you do not select Enable, then Bill Level and Type are not required and the Payment Terms list of values displays only non-balance forward billing payment terms.
-
Select the Bill Level to indicate whether customers assigned to this profile class will receive balance forward bills consolidated at either the account or site level.
-
Select Type: Detail, Summary, or Import.
Select the bill format type to indicate the bill format.
-
Detail lists the item description, quantity, and unit price for each item on each invoice.
-
Summary lists only the total amount of each transaction.
Important: The Imported format supports the Imported Billing Number feature, and is available only if the bill level is set to Site. You cannot print the Imported format using the Balance Forward Billing Print program. Use custom invoices instead. See: Imported Billing Number, Oracle Receivables User Guide.
-
-
Select a balance forward billing payment term from the Payment Terms list of values.
-
(Optional) Select Override Terms only if you want to exclude some transactions in the balance forward bill for customers using this profile class. When you select Override Terms, only non-balance forward payment terms and the balance forward billing payment term associated at the profile class, account, or site level are available for selection in the Transactions workbench. You can select an appropriate non-balance forward payment term to exclude a particular transaction.
Tip: Not selecting Override Terms ensures that all transactions for a particular customer account or site share the same balance forward billing payment term, due date, and aging.
You can assign this customer profile class to new customers on the Create Customer page, and to existing customers on the Account and Site profile tabs. See:
-
Creating a Customer, Oracle Receivables User Guide
-
Adding and Updating Account Profiles, Oracle Receivables User Guide
-
Adding and Updating Account Site Profiles, Oracle Receivables User Guide
Setting Up Account and Site Profiles for Balance Forward Billing
Use account and site profiles to:
-
Generate balance forward bills consolidated at either the account or site level. See:
-
Generate individual invoices for regular billing.
-
Disable balance forward billing. See: Disabling Balance Forward Billing.
Set up account and site profiles by selecting an appropriate customer profile class from the Account Overview page, and by updating the defaulted balance forward billing information.
The balance forward information entered at the customer profile class level is defaulted at the account profile. The same holds true for the site profile with the exception of Bill Level and Type, which are defaulted at the site profile from the account profile. Bill Level is displayed as a read-only field at the site profile level. When Bill Level is set to Site, you can update Type at the site profile. However, Type is not displayed at all at the site profile when Bill Level is set to Account.
Important: The modifications that you make to the defaulted values of a particular account or account site profile apply only to that particular account or site profile.
To update account and site profile classes with balance forward billing information:
-
Navigate to the Account or Site Profile subtab on the Account Overview page.
-
The remaining steps are same as that for updating a customer profile class with balance forward billing information. See: Setting Up Customer Profile Classes.
To define new account and site profile classes with balance forward billing information:
-
Navigate to the Account or Profile subtab on the Account Overview page.
-
See:
-
Adding and Updating Account Profiles, Oracle Receivables User Guide.
-
Adding and Updating Account Site Profiles, Oracle Receivables User Guide.
-
Important: You must enable balance forward billing for a customer both at the account and site profile level in order for Receivables to pick any transactions of the customer. If balance forward billing is enabled at the site profile level but not at the account profile level, the application does not recognize the site as a balance forward billing site. Although transactions for the site continue to inherit the balance forward billing payment term, Receivables never picks them up.
Account Level Balance Forward Billing Example
Account-level balance forward billing lets you send one bill for each operating unit of an account to the primary bill-to site of the account, instead of a separate bill for each site.
To generate account level bills, select Account as the Bill Level at the customer profile class and account profile level. The Bill Level at the site profile level is a read-only field, defaulted from the account profile level. The values for Type and Payment Term set at the account profile level are used for billing. Corresponding values set at the site profile level are ignored.
You need not set all sites under an account for balance forward billing. You can exclude activities for a site from an account level bill by not disabling balance forward billing at the site profile level. See: Disabling Balance Forward Billing.
You can also exclude specific transactions from an account level balance forward bill if you selected Override Terms while defining the balance forward billing payment terms. You can generate regular individual invoices for such transactions by assigning them an appropriate non-balance forward billing payment term.
The following diagram illustrates account level balance forward billing.
Customer with Account Level Balance Forward Billing
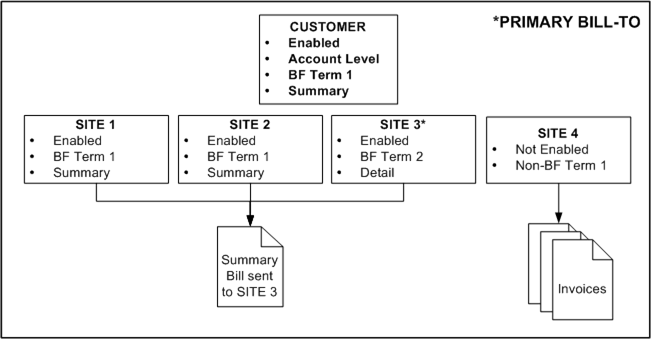
In this example, the customer has four sites under the same operating unit. While balance forward billing is enabled at sites 1, 2, and 3, site 4 is not enabled for balance forward billing. Consequently, the account level balance forward bill consolidates transactions for only sites 1, 2, and 3 and is sent to the primary bill-to site, which is designated as Site 3. Transactions for Site 4 are not included in the account level bill.
Because balance forward billing is set at the account level, Receivables generates the account level balance forward bill using the payment term and the type (bill format) selected at the account profile level. Receivables ignores the payment terms and bill formats set at the site profile level.
Regular, individual invoices are sent to the bill-to addresses of Site 4's transactions. Additionally, if this customer's account profile has Override Terms selected, then any transactions with non-balance forward billing payment terms at Sites 1, 2, and 3 are excluded from the balance forward bill and also receive individual invoices.
Site Level Balance Forward Billing Example
Use site level balance forward billing to generate balance forward bills consolidated at site level.
To generate site level bills, select Site as the bill level at the customer profile class and account profile level. The Bill Level at the site profile level is a read-only field, defaulted from the account profile level. The values for Type and Payment Term set at each site profile level are used for billing that site. These values can be different for each site.
Under site level balance forward billing, both balance forward billing and non-balance forward billing sites can exist under the same account. Receivables generates individual invoices for the non-balance forward billing sites and a bill per site for the balance forward billing sites. You can designate each site of the account as either balance forward billing or regular billing by enabling or disabling balance forward billing at the site profile level. See: Disabling Balance Forward Billing.
You can exclude specific transactions from a site level balance forward bill if you selected Override Terms while defining the balance forward billing payment term at the account profile level. You can generate regular individual invoices for such transactions by assigning them an appropriate non-balance forward billing payment term.
The following diagram illustrates site level balance forward billing.
Customer with Site Level Balance Forward Billing
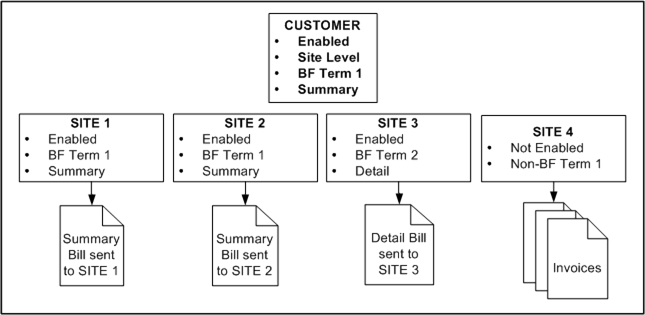
In this example, the customer has four sites under the same operating unit. While balance forward billing is enabled at sites 1, 2, and 3, Site 4 is set up for regular billing.
Consequently, a unique and distinct balance forward bill will be generated for each site 1 through 3. However, Regular, individual invoices are sent to the bill-to addresses of Site 4's transactions. Additionally, if this customer's account profile has Override Terms selected, then any transactions with non-balance forward billing payment terms at Sites 1, 2, and 3 are excluded from the respective site-level balance forward bill and also receive individual invoices.
.
Disabling Balance Forward Billing
You can disable balance forward billing for a customer either at the site level or at both account and site level.
To disable balance forward billing at the site level:
-
Navigate to the Site Profile tab of the Account Site Overview page.
-
Deselect Enable.
To disable balance forward billing at both account and site level:
-
Navigate to the Account Profile tab of the Account Overview page.
-
Deselect Enable.
Important: You must disable balance forward billing for a customer both at the account and site profile level in order for Receivables to pick any transactions of the customer for regular billing. If balance forward billing is disabled at the account profile level but not at the site profile level, the application does not recognize the site as a non-balance forward billing site. Although transactions for the site continue to inherit the balance forward billing payment term, Receivables never includes those transactions in the balance forward bill.
-
Disable balance forward billing at the site level.
Important: If balance forward billing is disabled for a customer, Receivables does not pick existing transactions with balance forward billing payment terms. To invoice these transactions, you can do either of the following:
-
Before disabling balance forward billing, generate a final balance forward bill that picks up existing transactions with balance forward billing payment terms.
-
After disabling balance forward billing, change the payment term to a non- balance forward billing payment term for every existing transaction.
-
Related Topics
Balance Forward Billing, Oracle Receivables User Guide
Balance Forward Billing Cycles
How Receivables Selects Transactions for Balance Forward Billing, Oracle Receivables User Guide
Imported Billing Number, Oracle Receivables User Guide
Balance Forward Billing Cycles
Balance forward billing cycles determine:
-
The date at which Receivable generates balance forward bills.
-
The transactions that are included in balance forward bills.
A balance forward billing cycle is passed to the balance forward billing program as an attribute of the payment term. A payment term that has a balance forward billing cycle associated with it is called a balance forward billing payment term. See:
-
Balance Forward Billing, Oracle Receivables User Guide
Define balance forward billing cycles in Oracle Receivables, or externally in feeder systems. External cycles maintained in feeder systems trigger the bill generation program according to their own schedules, and are assigned the seeded External cycle.
To define a balance forward billing cycle in Oracle Receivables:
-
Navigate to the Balance Forward Billing Cycles window.
-
Enter the name, description, start date, and frequency of the balance forward billing cycle.
-
Enter the frequency of the balance forward billing cycle: daily, weekly, or monthly.
To define daily cycles:
-
Enter the number of days the billing should repeat.
-
(Optional) Select Exclude Saturdays and Sundays.
To define weekly cycles:
-
Enter the number of weeks the billing should repeat.
-
Select the day of the week the billing should occur.
To define monthly cycles:
-
Enter the number of months the billing should repeat.
-
Select the day of the month the billing should occur.
Billing can occur on more than one day. For cycles with a billing day between 29 and 31, Receivables considers the last day of the month as the billing day for months with fewer days.
-
Select either All Days or Exclude Saturdays and Sundays.
-
Freight Carriers
Define freight carriers to assign additional freight charges to your transactions. You use freight carriers for internal transfers between organizations as well as shipments to and from customers and vendors.
Prerequisites
-
Define accounts, Oracle General Ledger Implementation Guide
To define carriers:
-
Enter a unique Carrier Name.
-
Enter a Description for this carrier (optional).
-
Enter the general ledger Distribution Account that collects the costs associated with using this carrier. You use this account when you perform an inter-organization transfer and specify freight charges.
-
Enter the date that this carrier is Inactive After (optional). As of this date, you can no longer assign the freight carrier to any function within Receivables.
Related Topics
Grouping Rules
Define grouping rules that AutoInvoice will use to group revenue and credit transactions into invoices, debit memos, and credit memos. Grouping rules specify attributes that must be identical for lines to appear on the same transaction.
Grouping rules include mandatory attributes which are always included in all grouping rules, and optional attributes which may be included in a grouping rule. Optional attributes may be added to the mandatory attributes to create new grouping rules. To be included in a group a transaction must always match on all of the mandatory attributes as well as on all of the optional attributes included in a grouping rule. For complete lists of the mandatory attributes and the optional attributes see the section titled "Using Grouping Rules to Create Transactions" in the Transactions chapter. All attributes of the Transaction Flexfield are optional within a grouping rule, and you can assign these attributes as optional grouping characteristics in the Grouping Rules window.
Note: The Grouping Rules window only displays the optional attributes included in a grouping rule. This window does not display any mandatory grouping attributes. The mandatory attributes are the same for all grouping rules. Use the Ordering and Grouping Rules Listing report to view all of the mandatory and optional attributes assigned to your grouping rules. See: Ordering and Grouping Rules Listing, Oracle Receivables User Guide.
In the diagram below, the grouping rule specifies that to appear on the same invoice items must match on all of the mandatory attributes, for example currency (CURRENCY_CODE) and bill-to address (ORIG_SYSTEM_BILL_ADDRESS_ID) and must also match on the optional attribute of order type (SALES_ORDER_SOURCE). For example, in the diagram, assume that all mandatory attributes match other than currency and bill-to address. Items A and B share the same currency and order type, so they appear on the same invoice (Invoice 1). Item C has the same currency as A and B, but it has a different order type, so it appears on its own invoice (Invoice 2). Items D and E share the same currency and Order Type, so they appear on the same invoice (Invoice 3).
Using Grouping Rules
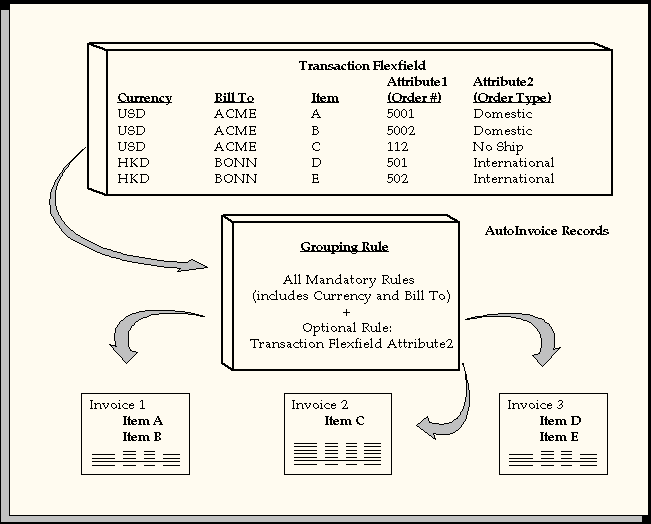
For a text description of this graphic, see Text Description of the Using Grouping Rules Graphic.
AutoInvoice uses the following hierarchy to determine which grouping rule to use for a transaction line:
1) The grouping rule specified in the Transaction Sources window for the batch source of the transaction line
2) The grouping rule specified in the Customer Profile Classes window for the bill-to site use of the transaction line
3) The grouping rule specified in the Customer Profile Classes window for the bill-to customer of the transaction line
4) If you do not specify a rule in either the Transaction Sources or Customer Profile Classes window, AutoInvoice uses the default grouping rule specified in the System Options window. See: Defining Receivables System Options.
Receivables provides the DEFAULT grouping rule which contains all of the mandatory attributes. If you upgrade from a previous version of Receivables, the DEFAULT grouping rule initially becomes your default grouping rule. If you use the DEFAULT rule to create transactions, Receivables does not require that you define any additional grouping rules. You can add optional attributes to the DEFAULT grouping rule to create new grouping rules. You cannot delete any mandatory attributes from a grouping rule.
Important: If you are doing a fresh install of Receivables, you must enter a default grouping rule in the System Options window. You can enter the grouping rule that Receivables provides or one that you create.
Receivables lets you assign an invoice line ordering rule to each of your grouping rules. AutoInvoice uses the invoice line ordering rule to order your transaction lines when grouping revenue and credit transactions into invoices, debit memos, and credit memos. See: AutoInvoice Line Ordering Rules.
Note: You cannot view the required grouping on transaction attributes from the Grouping Rules window. Use the Ordering and Grouping Rules Listing report to view all grouping on transaction attributes that are assigned to your grouping rules. See: Ordering and Grouping Rules Listing Report, Oracle Receivables User Guide.
Prerequisites
To define a grouping rule:
-
Enter a Name for this grouping rule.
-
Enter a Description for this grouping rule (optional).
-
Enter the invoice line ordering rule for this grouping rule (optional). The invoice line ordering rule tells AutoInvoice how to order transaction lines within this grouping rule.
-
Enter a range of Effective Dates for this grouping rule. The default Start Date is today's date, but you can change it. If you do not enter an end date, this grouping rule will be active indefinitely.
-
Enter the Transaction Class to define for this grouping rule. Choose from the following classes: Invoice, Debit Memo, or Credit Memo.
Note: If AutoInvoice uses grouping rules and it is processing a transaction class that is not defined for this grouping rule, AutoInvoice will only use the mandatory grouping transaction attributes.
-
Enter any Optional Grouping Characteristics you want to use to group your transactions. For example, if you enter the transaction flexfield attribute 'Attribute2' (order type), only transactions with the same order type can appear together on a transaction. Use the list of values to review the description and sources of each attribute.
Receivables ensures that you do not assign duplicate transaction class grouping characteristics to your grouping rule.
Related Topics
Importing Transactions Using AutoInvoice, Oracle Receivables User Guide
Using AutoInvoice, Oracle Receivables User Guide
Ordering and Grouping Rules Listing, Oracle Receivables User Guide
Item Status
Use the Item Status window to define statuses that you assign to items. You can also use item statuses to provide default values for some attributes when you define an item. Statuses you define appear as list of values choices in the Lines windows.
Important: When your current organization is not the item master organization, Receivables temporarily changes your current organization to the item master organization until you exit this window. This means that you can use the statuses you create here in any of the organizations you define.
To define item statuses:
-
Enter a unique Status name.
-
Enter a Description for this status (optional).
-
Enter a Disable Date (optional). After this date you can no longer assign this status to an item. The status will remain valid for items to which it is already assigned.
-
Define attributes by checking the appropriate Value check boxes. Choose from the following:
-
BOM Allowed
-
Build in WIP
-
Customer Orders Enabled
-
Internal Orders Enabled
-
Invoice Enabled
-
Transactable
-
Purchasable
-
Stockable
Note: For a complete description of all item attributes, refer to the Oracle Inventory User's Guide.
-
Related Topics
Items
Use the Items window to define and update your items and their associated attributes, such as physical description, lead time, and unit of measure. Items you define appear as list of value choices in the Lines window when you enter transactions or credit memos.
Much of the information you can define for an item is optional. You only need to enter the information required to maintain the item.
For a complete description of this window and its fields, refer to the Oracle Inventory User's Guide.
Tip: You can set up AutoAccounting to create account segments based on inventory items and warehouse. For example, define the Product segment of your Revenue account to use Standard Lines and specify a warehouse name when entering transaction lines.
Note: If your installation does not include Oracle Order Management or Oracle Inventory, you can define standard memo lines to use instead of items when entering lines for your transactions and credit memos. See: Standard Memo Lines.
Prerequisites
To define an item:
-
Enter a Name for this item.
-
Enter a Description for this item.
-
To define additional information for this item, open the appropriate tabbed region.
Related Topics
Unposted Items Report, Oracle Receivables User Guide
Deleting Items
Use the Delete Items window to delete predefined items from Receivables. If the item you are deleting has a bill of material and routing from another product, you can also choose to delete these entities.
Prerequisites
To delete an item:
-
Enter the Group name of the entities you are deleting.
-
Choose the information to delete. Choose to delete only Item information, or Item, Bill, and Routing information.
-
To save deleted entities in the archive tables, check the Archive check box.
-
Enter the Item to delete. Receivables displays the Description of this item.
-
To view the Organization from which you are deleting this item and the entity Type, open the Details tabbed region.
-
To verify that the information you are deleting is within your delete constraints, choose Check.
To delete the items, choose Delete. To view the delete Status and the Date that the concurrent program deleted this item, open the Results tabbed region.
-
Save your work. To view any errors that occurred during the concurrent program, choose Errors.
Related Topics
Entering Transactions, Oracle Receivables User Guide
Remit-To Addresses
Define remit-to addresses to let your customers know where to send payment for their invoices Receivables uses the addresses that you define in the Remit To Addresses window to provide default remit-to information when you enter transactions.
Note: Receivables does not provide default remit-to information when you enter credit memos.
If you use AutoInvoice but have not defined a remit-to address for a location, AutoInvoice will reject all invoices for which it could not determine a remit-to address. However, if you do not wish to set up a remit-to address for each location, you can set up one remit-to address with a default assignment. Receivables will then use this address for all locations or for any locations for which you do not have specific location assignments. This ensures that AutoInvoice will not reject invoices because it could not determine a remit-to address. See: Defining a Default Remit To Address.
If you check the Print Remit-To Address box in the System Options window, Receivables prints the remit-to address that you define here on your dunning letters and statements.
The width and height (in characters) of your customer's remit-to address in your printed dunning letters is 8 characters (height) by 30 characters (width).
Prerequisites
To define a remit-to address:
-
Enter the Country for this address. The default is the country you entered in the System Options window.
Note: If you have implemented flexible address formats and the country you enter has an address style assigned to it, Receivables opens a window in which you can enter address information in the style most appropriate for that country. See: Flexible Addresses.
-
Enter an Alternate Name for this address (optional). You can only enter information in this field if the profile option AR: Customers - Enter Alternate Fields is Yes. Receivables also uses the value you enter here to sort customer names in certain reports if the profile option AR: Sort Customer Reports by Alternate Fields is Yes.
-
Enter a remit-to Address.
-
If the Country for this address is 'United States', enter a City and State; otherwise, these fields are optional.
-
Enter the Postal Code for this remit-to address. You must enter a postal code if you entered values for both the From Postal Code and the To Postal Code in the System Options window. This postal code appears when you print your remit-to address on either your statements or your dunning letters.
-
Enter each Country to assign to this remit-to address. Receivables assigns all of your customers who have bill-to addresses in the countries that you enter to this remit-to address.
-
Enter the State and range of Postal Codes for each country (optional). You can define multiple assignments for a remit-to address that has the same country or state, but different postal code ranges.
Defining a Default Remit-To Address
Define default remit-to addresses to ensure that:
-
Receivables is able to provide a default remit-to address when you enter transactions
-
AutoInvoice will not reject invoices because it is not able to determine a remit-to address
You can only have one default remit-to address for each country and state combination. For example, you can have one default remit-to address for United States/California, one for United States/Nevada, and so on.
To define a default remit-to address:
-
Perform steps 1-6 from 'To define a remit-to address' (see above).
-
Enter 'Default value' in the Country field, or select this from the list of values.
Related Topics
Reprinting Historical Dunning Letters, Oracle Receivables User Guide
Printing Statements, Oracle Receivables User Guide
Defining Receivables System Options
Salespersons
You set up your salespersons and assign sales territories using the Resource window, with most of the information you enter being on the Receivables tab. Receivables lets you define multiple salespersons to which you can assign sales credits when entering invoices. If AutoAccounting depends on salesperson, Receivables uses the general ledger accounts that you enter here in combination with your AutoAccounting rules to determine the default revenue, freight, and receivable accounts for your invoices.
Oracle Receivables uses No Sales Credit as the default in the Salesperson field when you enter transactions if the system option Require Salesperson is set to Yes and no salesperson is defined at the bill-to, ship-to, or customer level.
Note: If AutoAccounting is based on salesperson, then you must query the No Sales Credit record in the Resource window and enter revenue, freight, and receivable accounting information. These accounts are required when creating a debit memo reversal or when entering transactions with No Sales Credit.
Active salespersons appear in the list of values in the Transaction and Customers windows. You can make a salesperson inactive by unchecking the Active in Receivables check box and then saving your work, or by specifying an end date for this salesperson.
Note: Information that you enter in this window is shared by Oracle Customer Relations Management (CRM), Oracle Sales, and Oracle Sales Compensation.
To set up a new or existing resource as a salesperson, see: Creating a Resource Manually, Oracle Trading Community Architecture Administration Guide.
For more information, refer to the online documentation for these products.
The following figure shows how Receivables chooses the default salesperson when you enter transactions.
Determining the default salesperson during transaction entry
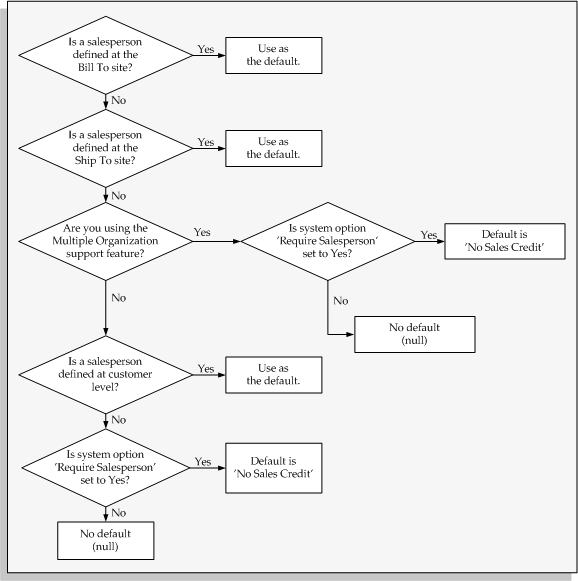
For a text description of this illustration, see: Text Description of the Default Salesperson Graphic.
Sales Groups
You can organize salespeople into groups. A group is a unit of organization based on the similar function or roles of its members.
For example, a manufacturing company might have sales groups for different product models.
See: Managing Resources with Resource Manager, Oracle Trading Community Architecture Administration Guide.
Receivables captures the sales group attribute so that sales activity reporting can include your enterprise's sales group hierarchy. This lets you present sales data to your management in a meaningful way.
Receivables captures the sales group attribute when:
-
Importing transaction data from feeder systems, such as Oracle Order Management.
See: AutoInvoice Table and Column Descriptions, Oracle Receivables Reference Guide.
-
Entering transactions in the Transactions workbench.
See: Entering Revenue Credits, Oracle Receivables User Guide.
Related Topics
Overview of Setting Up Resource Manager, Oracle Trading Community Architecture Administration Guide
Overview of the Oracle Resource Manager, Oracle Trading Community Architecture User Guide
Entering Transactions, Oracle Receivables User Guide
Entering and Updating Customer Information, Oracle Receivables User Guide
Standard Memo Lines
Standard memo lines are lines that you assign to a transaction when the item is not an inventory item (for example, 'Consulting Services'). You can assign memo lines to debit memos, on-account credits, debit memo reversals, chargebacks, commitments, and invoices. Receivables displays your standard memo lines as list of values choices during credit memo entry in the Credit Transactions window and during invoice entry in the Lines window. When you create chargebacks and debit memo reversals, you can either use the standard line that Receivables provides or enter your own. You can create an unlimited number of standard memo lines.
If AutoAccounting depends on standard line items, Receivables uses the revenue account that you enter here along with your AutoAccounting setup to determine the default revenue, freight, AutoInvoice Clearing, Tax, Unbilled Receivable, Unearned Revenue, and Receivable accounts for invoices with this line item.
Warning: When you enter a standard memo line in the Lines window, place the cursor in the Description field and then use the list of values to select a memo line. If AutoAccounting is based on Standard Lines and you type or copy the memo line information, Receivables will not generate the proper accounting entries for this line when you save.
Receivables lets you enter a tax product category, unit list price, and unit of measure information for each standard memo line. You can also specify a standard invoicing and accounting rule for each standard memo line.
Note: If you have Multi Lingual Support (MLS), you can define standard memo lines in each of your installed languages. To enter translations, select Translations from the View menu or click on the globe icon. For more information, see: Oracle Applications Concepts or the Oracle Applications User Guide.
Prerequisites
To define a standard memo line:
-
Select an operating unit.
-
Enter the Name and a Description of this memo line. Receivables prints this description on your debit memo, on-account credit, debit memo reversal, chargeback, commitment, or invoice.
Note: If you are modifying your chargeback or debit memo reversal standard line, Receivables lets you embed variables within the text of your description. For example, you may want to print the receipt number on your debit memo reversals. To do this, enter &receipt_number& within your the text of your description. Receivables then prints the corresponding receipt number on your debit memo reversal. The following are valid variable types: receipt_number for debit memo reversals and invoice_number for invoices, chargebacks, and debit memos.
-
Choose a line type of Chargeback Line, Charges, Debit Memo Receipt Reversal, Freight, Line, or Tax.
-
Select a default tax classification to associate with this standard line (optional).
Note: You use tax classifications only if you upgraded to Release 12 from Release 11i.
-
Select a default tax product category to associate with this standard line (optional).
Oracle E-Business Tax uses this value along with other transaction details to determine the correct taxes to apply.
-
Enter the Unit List Price for this memo line (optional). Receivables displays this price on the debit memos, on-account credits, chargebacks, and invoices you create using this standard line.
-
If the type of this memo line is 'Line,' enter a Unit of Measure. Receivables defaults the unit of measure to this value when you choose this standard line item during invoice or memo entry.
-
Enter the Revenue Account for this memo line (optional). When you create a debit memo or on-account credit, this revenue account will be the default for each standard memo line that you select. When you create debit memo reversals or chargebacks, Receivables uses the Revenue Flexfield from the original receivable item as the credit account. Therefore, Receivables does not let you specify a value for the Revenue Flexfield for your debit memo reversal and chargeback standard lines.
Note: AutoAccounting lets you use the values that you specify for the segments of your standard lines' revenue accounts to determine the revenue accounts of your invoices. Receivables uses these revenue account segment values in combination with the rest of your AutoAccounting structure to determine the default revenue, freight, AutoInvoice Clearing, Tax, Unbilled Receivable, Unearned Revenue, and Receivable accounts for invoices which include this standard invoice line.
-
Enter the Invoicing Rule to use with this standard line (optional). Receivables does not currently use this information when you select a standard line (in the Lines window during invoice entry) to which you have assigned a standard invoicing rule. Oracle Order Management assigns standard invoicing rules to standard lines for orders that you import through AutoInvoice.
-
Enter the Accounting Rule to use with this standard line (optional). If you select a standard line during invoice entry to which you have assigned a standard accounting rule, Receivables uses this rule to determine this line's revenue recognition schedule. Oracle Order Management lets you assign standard accounting rules to standard lines for orders that you import through AutoInvoice.
-
Enter the range of Active Dates for this standard line. The start date is today's date, but you can change it. If you do not enter an end date, this memo line will be active indefinitely.
Note: You can have only one line type of Chargeback Line active at a time.
Related Topics
Standard Memo Lines Listing Report, Oracle Receivables User Guide
Standard Messages
Define standard messages to provide the text that Receivables prints on the bottom of your customer's statements, debit memos, and interest invoices. You can use messages to inform your customers of special promotions or to make your printed documents more personal.
Active standard messages appear as list of values choices in the Print Statements window and in the Customer Profile Classes window.
Note: If you have Multi Lingual Support (MLS), you can define standard messages in each of your installed languages. To enter translations, select Translations from the View menu or click on the globe icon. For more information, see: Oracle Applications Concepts or the Oracle Applications User Guide.
To define standard messages:
-
Enter a Name for this message.
-
Enter the Type of message you are defining. Valid standard message types include 'Holiday' and 'Promotional'.
-
Enter the Start and End Dates during which this standard message will be active.
-
Enter the standard Message to appear on your customer's statement. The text of your standard message cannot exceed 255 characters.
Related Topics
Using Statements, Oracle Receivables User Guide
Printing Statements, Oracle Receivables User Guide
Transaction Batch Sources
Batch sources control the standard transaction type assigned to a transaction and determine whether Receivables automatically numbers your transactions and transaction batches. Active transaction batch sources appear as list of values choices in the Transactions, Transactions Summary, and Credit Transactions windows, and for bills receivable in the Bills Receivable and Bills Receivable Transaction Batches windows.
Note: A batch source provides default information, which you can optionally change at the transaction level.
You can define two types of transaction batch sources:
-
Manual: Use manual batch sources with transactions that you enter manually in the Transactions and Transactions Summary windows, and for bills receivable transactions.
Credit memos that are created by the Credit Memo workflow also use manual batch sources.
-
Imported: Use imported batch sources to import transactions into Receivables using AutoInvoice.
You can make a batch source inactive by unchecking the Active check box and then saving your work. Receivables does not display inactive transaction batch sources as list of values choices or let you assign them to your transactions.
Tip: If you have installed multiple organization support, define an imported batch source with the same name in each organization (these sources can have the same or different settings). This enables you to import order lines that belong to different organizations in Oracle Order Management into corresponding organizations into Receivables.
Bills receivable batch sources: After you define batch sources for bills receivable, enter a batch source in the profile option AR: Bills Receivable Batch Source. See: Profile Options.
Prerequisites
-
Define credit memo batch sources (optional)
-
Define grouping rules (optional)
To define a transaction batch source:
-
Select an operating unit and legal entity.
Receivables uses the selected legal entity to default for transactions using this transaction batch source, if the legal entity cannot be derived from the transaction type.
For more information about legal entities, see the Oracle Financials Concepts Guide and Oracle Financials Implementation Guide.
-
Enter a unique Name and a Description for this transaction source.
-
Enter a Type of 'Manual' or 'Imported.' For bills receivable batch sources, enter 'Manual.'
-
Enter the range of Effective Dates for this source. The Start date is the current date, but you can change it. If you do not enter an end date, this transaction batch source will be active indefinitely.
-
If this is a Manual source and you want to automatically number new batches you create using this source, or if this is a Manual source for bills receivable and you want to generate bills receivable automatically, check the Automatic Batch Numbering box and enter a Last Number. For example, to start numbering your batches with 1000, enter 999 in the Last Number field. If you are defining an Imported transaction batch source, Receivables automatically numbers the batch with the batch source name - request ID.
-
To automatically number new transactions you create using this source, check the Automatic Transaction Numbering box and enter a Last Number. You can use automatic transaction numbering with both Imported and Manual sources.
Note: For bills receivable transaction batch sources, you must use the Automatic Transaction Numbering box and Last Number field to number bills receivable generated automatically. If you are using a bills receivable creation receipt method that has Inherit Transaction Number set to Yes, the bill receivable number inherits the transaction number when there is a one-to-one relationship between the exchanged transaction, but uses Automatic Transaction Numbering when more than one transaction is assigned to a bill.
Note: Receivables automatically updates the Last Number fields, so you can review this batch source later and see the last transaction number that was generated (note that this number is only an approximation due to caching).
-
To use the same value for both the document number and the transaction number for transactions assigned to this source, check the Copy Document Number to Transaction Number box (optional).
Tip: If your application uses Gapless document sequences, check this box if you require gapless transaction numbers. Checking this box ensures that transaction numbers are generated sequentially and there are no "missing" numbers. See: Implementing Document Sequences.
-
Select the Allow Duplicate Transaction Numbers box to allow duplicate transaction numbers within this batch source.
Selecting the Copy Document Number to Transaction Number box automatically selects this option.
This option and the Automatic Transaction Numbering box, however, are mutually exclusive.
-
Select the Copy Transaction Information Flexfield to Credit Memo check box if you want to copy an invoice's Transaction Information flexfield data to a related credit memo that uses this batch source (optional).
This check box is enabled only if this source's type is Manual.
Whenever you save a credit memo, Receivables checks the batch source. If the source type is Manual and the box is selected, then Receivables copies Transaction Information flexfield data, if available on the invoice, to the credit memo.
-
Select Generate Line Level Balances to calculate and populate the line level balances for invoices created using this transaction source.
Note: Receivables calculates and populates the line level balances for an invoice only if the invoice does not have multiple payment schedules.
-
Indicate your enterprise's policy for automatic receipt handling for imported credits against paid invoices (optional).
Set this option only if you want AutoInvoice to automatically evaluate imported credits for receipt handling.
-
Select On Account if you want AutoInvoice to place any credit requests on account.
-
Select Refund if you want AutoInvoice to automatically create a refund for the amount of the requested credit.
For credit card transactions, Receivables submits a refund request directly to Oracle Payments to create the disbursement. Payments applies the refund to the same credit card used on the original transaction.
For non-credit card transactions, Receivables submits a refund request to Oracle Payables, which uses Oracle Payments to create the disbursement.
By default, no option is selected.
Note: Only imported sources use this setting. Manual sources ignore any value entered here.
See: Automated Receipt Handling for Credits, Oracle Receivables User Guide.
-
-
In the Reference Field Default Value, enter the Invoice Transaction Flexfield attribute that you want to appear in the Reference field of the Transactions window. Receivables uses this to further identify the invoice and displays this value under the Reference column in the invoice list of values in the Applications window.
The default value is INTERFACE_HEADER_ATTRIBUTE1.
See: Transaction Flexfields, Oracle Receivables User Guide.
-
Enter the Standard Transaction Type for this batch source. When you choose a batch source during transaction entry, this is the default transaction type. You can define new transaction types in the Transaction Types window.
Tip: If you are using Oracle Cash Management, then optionally enter a standard transaction type for the seeded Debit Memo Reversal batch source. Cash Management automatically uses this transaction type when creating a debit memo reversal.
-
To number your credit memos created against invoices and commitments with this source differently than the invoices or commitments they are crediting, enter a Credit Memo Batch Source. Before you can assign a credit memo batch source, you must first define your credit memo batch sources using this window. If you do not specify a credit memo batch source, Receivables enters the invoice or commitment batch source here.
Tip: Will invoices with this batch source contain Transaction Information flexfield data that should be copied to any credit memos that are manually created against these invoices in the future? If so, then you should enter a credit memo batch source that has the Copy Transaction Information Flexfield to Credit Memo check box selected (step 8).
-
If you are defining a Manual transaction batch source, then you have completed this task.
If you are defining an Imported transaction batch source, open the AutoInvoice Processing Options tabbed region.
-
Specify how you want AutoInvoice to handle imported transactions that have Invalid Tax Rates. An invalid tax rate is one in which the imported transaction's tax rate does not match its tax code. Enter 'Correct' if you want AutoInvoice to automatically update the tax rate that you supplied to the one that you defined previously for the tax code. Enter 'Reject' if you want AutoInvoice to reject the transaction.
-
Specify how you want AutoInvoice to handle imported transactions with Invalid Lines by entering either 'Reject Invoice' or 'Create Invoice.'
-
Specify how you want AutoInvoice to handle imported transactions that have lines in the Interface Lines table that are in a closed period. To have AutoInvoice automatically adjust the GL dates to the first GL date of the next open or future enterable period, enter 'Adjust' in the GL Date in a Closed Period field. Enter 'Reject' to reject these transactions.
-
Enter a Grouping Rule to use for a transaction line (optional). If you do not enter a grouping rule, AutoInvoice uses the following hierarchy to determine which rule to use:
-
The grouping rule specified in the Transaction Sources window for the batch source of the transaction line.
-
The grouping rule specified in the Customer Profile Classes window for the bill-to customer and bill-to site of the transaction line.
-
The grouping rule specified in the Customer Profile Classes window for the bill-to customer of the transaction line.
-
The default grouping rule specified in the System Options window.
-
-
Check the Create Clearing box if you want AutoInvoice to require that the revenue amount for each transaction line is equal to the selling price times the quantity specified for that line. Use this option to distribute revenue on an transaction in an amount that is not equal to the transaction line amount.
If you check this box, AutoInvoice puts any difference between the revenue amount and the selling price times the quantity for a transaction into the AutoInvoice Clearing account that you have defined. Otherwise, AutoInvoice requires that the revenue amount be equal to the selling price times the quantity for all of the transactions it is processing. Define your clearing account in the Automatic Accounting window. See: AutoAccounting.
-
Indicate whether sales credits can be entered for transactions using this source by checking or unchecking the Allow Sales Credit box. This option and the Require Salesreps option in the System Options window determine whether sales credits are optional or required. See: Transaction Batch Sources Field Reference.
-
Open the Customer Information tabbed region, then choose either 'Value' or 'ID' for each option to indicate whether AutoInvoice validates your customer information for this batch source using a value or identifier. Choose 'None' for no validation.
Choose Value to import a record into AutoInvoice tables using its actual name; choose ID to use its internal identifier. For example, if Payment Term is set to Value, you must pass the name of the payment term, such as 'Standard-Check' when running AutoInvoice. If Payment Term is set to ID, you must pass the number that identifies the payment term (the term_id), not the name itself. Choose Value if you use this source to import data from a non-Oracle system.
-
Open the Accounting Information tabbed region, then choose ID, Value, or None to indicate how AutoInvoice validates your Invoice and Accounting Rule data for this batch source.
Note: If you choose 'None,' then AutoInvoice will not import this information into Receivables. However, AutoInvoice might still validate the data and could reject the containing line(s) if that data is invalid.
-
Choose either 'Id' or 'Segment' to indicate whether you want AutoInvoice to validate the identifier or the flexfield segment for this batch source.
-
Check the Derive Date check box to derive the default rule start date and default GL date from the ship date, rule start date, order date and the default date that you supply when you submit AutoInvoice.
Tip: If you use Oracle Inventory and Oracle Order Management for sales order shipments, you should elect to derive your dates and use the shipment date for your transaction general ledger date. In this way you can ensure that you have booked your revenue and cost to the same accounting period.
If you do not match revenue and cost in the same period, you violate basic GAAP principles, and may distort your profit. In addition, you are unable to run a meaningful Margin Analysis report. This report summarizes your revenue and cost of goods sold transactions by item and customer order and specifies a transaction date range. If your transactions are booked in the wrong period, this report reflects those incorrect transactions.
-
Choose either 'Id' or 'Value' to indicate whether AutoInvoice validates your Payment Terms for this batch source using identifiers or values.
-
Choose either 'Amount' or 'Percent' to indicate how you want AutoInvoice to validate your Revenue Account Allocation data for this batch source.
-
Open the Other Information tabbed region, then choose how you want AutoInvoice to validate data. Choose 'None' if you do not want AutoInvoice to import this information.
Note: Even if you choose 'None,' AutoInvoice might still validate the data and could reject the containing line(s) if that data is invalid.
-
Open the Sales Credits Data Validation tabbed region, then choose how you want AutoInvoice to validate data for salespersons, sales credit types and sales credit. Choose Number, ID, or Value to validate information using identifiers, numbers, or values for this batch source. Choose to validate Sales Credits based on either Amount or Percent.
Related Topics
Entering Transactions, Oracle Receivables User Guide
Importing Transactions Using AutoInvoice, Oracle Receivables User Guide
Transaction Batch Sources Field Reference
Transaction Batch Sources Listing, Oracle Receivables User Guide
Transaction Batch Sources Field Reference
Allow Sales Credit Check Box: Whether you must enter sales credit information depends on this check box and the Require Salesreps field in the System Options window. AutoInvoice will pass the information in the following table with your transaction, and validate it.
| Allow Sales Credit Field | Your System Option Requires Salesperson | Enter Sales Credit Information |
|---|---|---|
| If set to Yes | Required | Must Enter |
| If set to Yes | Not Required | Can Enter |
| If set to No | Required | Must Enter |
| If set to No | Not Required | Cannot Enter** |
** AutoInvoice ignores any values that you pass.
-
If your system option requires salesperson and your transaction batch source allows sales credits, you must provide sales credit information.
-
If your system option does not require salesperson, but your transaction batch source allows sales credits, you can provide sales credit information, but it is not mandatory.
-
If your system option requires salesperson, but your transaction batch source does not allow sales credits, you must provide sales credit information.
-
If your system option does not require a salesperson and your transaction batch source does not allow sales credits, do not provide sales credit information. AutoInvoice ignores any values that you pass.
Transaction Types
Use transaction types to define the accounting for the debit memos, credit memos, on-account credits, chargebacks, commitments, invoices, and bills receivable you create in Receivables. Transaction types also determine whether your transaction entries update your customers' balances and whether Receivables posts these transactions to your general ledger.
If AutoAccounting depends on transaction type, Receivables uses the general ledger accounts that you enter here, along with your AutoAccounting rules, to determine the default revenue, receivable, freight, tax, unearned revenue, unbilled receivable, and AutoInvoice clearing accounts for transactions you create using this type. For bills receivable, the accounts that you enter here determine the bills receivable, unpaid bills receivable, remitted bills receivable, and factored bills receivable accounts for a bill receivable.
Note: The default accounting that AutoAccounting creates is considered interim accounting only. Receivables integrates with Oracle Subledger Accounting, the E-Business Suite's centralized accounting engine, which accepts the default accounts that AutoAccounting derives without change. However, you can modify the accounting rules in Subledger Accounting to create accounting that meets your business requirements. See: Accounting in Receivables, Oracle Receivables User Guide.
You can associate transaction types with your invoice sources in the Transaction Sources window to speed data entry in the Transactions and Credit Transactions windows. Active transaction types appear as list of values choices in the Transactions, Reverse Receipts, Credit Transactions, and Transaction Sources windows, and for bills receivable in the Bills Receivable and Receipt Classes windows.
You can also define credit memo and invoice transaction types to use with AutoInvoice.
You should define your transaction types in the following order:
-
credit memo transaction types
-
invoice, debit memo, and chargeback transaction types
-
bills receivable transaction types
-
commitment transaction types
You must define your invoice transaction types before you define your commitment types.
Tip: To be able to void a debit memo, credit memo, on-account credit or invoice, define a Void transaction type with 'Open Receivables' and 'Post to GL' set to No. Then, as long as there is no activity against the transaction and it has not been posted to your general ledger, you can make it invalid by simply changing the transaction type to 'Void'.
Natural Application and Allow Overapplication Rules
The transaction type that you assign to a transaction indicates the type of application that is permitted for that transaction: natural application only, or overapplication.
The Natural Application Only and Allow Overapplication options determine how applications can affect the balance due for transactions using this type. Natural Application refers to the type of application, either positive or negative, that a transaction requires to become closer to zero. For example, invoices have a positive balance, so to reduce the balance due you need to create a negative application (such as apply a receipt).
Overapplication indicates whether you can overapply transactions using this type. For example, if you apply a $500 receipt to a $400 invoice, you overapply the invoice and reverse its sign (from positive to negative).
The figure below shows how these rules affect your applications.
Natural Application and Overapplication
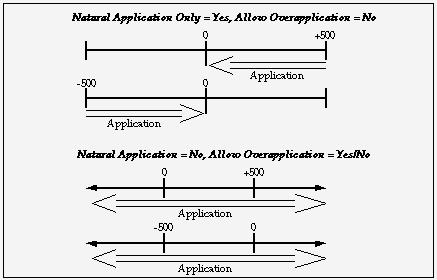
For a description of this graphic, see: Description of Natural Application and Overapplication.
Whether or not a transaction allows overapplication determines the actions that you can take on that transaction.
For example, a fully paid transaction's transaction type allows natural application only (in other words, prohibits overapplication). To credit that transaction, you must first unapply the transaction from the receipt before you can create the credit. See: Unapplying Cash when Crediting a Transaction, Oracle Receivables User Guide.
Moreover, some features in Receivables work only with one option or the other:
-
For example, to automatically create claims during AutoLockbox and Post QuickCash processing, the transaction type of the debit item to which you are applying the receipt must be set to allow natural application only. See: How AutoLockbox Creates Claims, Oracle Receivables User Guide and QuickCash, Oracle Receivables User Guide.
-
To evaluate imported credit memos against paid invoices, and automatically determine how to treat the receipt, the transaction type of the debit item to which you are applying the credit memo must be set to allow natural application only. See: Importing Credit Memos, Oracle Receivables User Guide and Automated Receipt Handling for Credits, Oracle Receivables User Guide.
Note: When importing credit memos against transactions with this kind of transaction type, refer to Automated Receipt Handling for Credits, Oracle Receivables User Guide to learn how to prevent AutoInvoice errors.
Prerequisites
-
Define your key segment values, Oracle Applications Flexfields Guide
-
Define your key flexfield segments, Oracle Applications Flexfields Guide
To define a transaction type:
-
Select an operating unit and legal entity for this transaction type.
Receivables uses the selected legal entity to default for transactions using this transaction type.
For more information about legal entities, see the Oracle Financials Concepts Guide and Oracle Financials Implementation Guide.
-
Enter a Name and Description for this transaction type.
Note: Select a transaction type name that is different from all the existing receipt method, adjustment, and receivable activity names. Oracle Receivables lets you create a transaction type only if there is no receipt method, adjustment, or receivable activity with the same name.
-
Enter a Class for this transaction type. Choose from the following classes: Invoice, Chargeback, Credit Memo, Debit Memo, Deposit, or Guarantee.
If you choose Deposit or Guarantee, Receivables sets Open Receivable and Post to GL to Yes, Allow Freight, Default Tax Classification, and Allow Overapplication to No, Creation Sign to 'Positive Sign,' and Natural Application Only to Yes. You cannot change these options. See: Define Your Commitment Transaction Types, Oracle Receivables User Guide.
To define a bills receivable transaction type, see: Bills Receivable Transaction Types.
-
Choose a Creation Sign. The default is Positive Sign for transaction types with a class of either Guarantee or Deposit. You cannot update this field after you enter transactions with this type.
-
Choose a Transaction Status of Open, Closed, Pending, or Void. Use these statuses to implement your own invoice approval system. Enter 'Void' to void debit memos, on-account credits or invoices to which you assign this transaction type.
-
Choose a default Printing Option for transactions with this transaction type. Choose Print or Do Not Print. You can override this value when entering transactions.
Note: If you choose Do Not Print, iReceivables does not display the details for transactions with this transaction type.
-
If this transaction type's class is either Deposit or Guarantee, enter the Invoice Type to use for invoices entered against commitments or deposits with this transaction type. When you enter an invoice against either a deposit or a guarantee with this transaction type, the value you enter here is the default invoice transaction type.
-
If this transaction type's class is Deposit, Guarantee, Debit Memo, or Invoice, enter the Credit Memo Type to use when crediting items with this transaction type (optional). When you enter a credit memo against an invoice with this transaction type, the value you enter here is the default credit memo transaction type.
-
Enter an Application Rule Set for this transaction type or select one from the list of values (optional). An Application Rule Set determines the default payment steps when you use the Applications window or AutoLockbox to apply receipts to transactions using this type. If you do not enter a rule set, Receivables uses the rule set in the System Options window as the default. See: Receivables Application Rule Sets, Oracle Receivables User Guide.
-
Enter the payment Terms to use for transactions with this transaction type.
Any payment terms entered at the customer level will override the payment terms that you enter here.
-
Enter the range of dates that this transaction type will be active. The default Start Date is today's date, but you can change it. If you do not enter an End Date, this transaction type will be active indefinitely.
-
If this transaction type's class is not Deposit or Guarantee, indicate whether you want transactions with this type to update your customer balances by checking or unchecking the Open Receivable box.
If Open Receivable is set to Yes, Receivables updates your customer balances each time you create a complete debit memo, credit memo, chargeback, or on-account credit with this transaction type. Receivables also includes these transactions in the standard aging and collection processes.
If you are defining a 'void' transaction type, set Open Receivable to No.
Tip: You can use the Open Receivable option to implement an approval cycle for any temporary or preliminary debit memos, credit memos, on-account credits, chargebacks, and invoices that you may use in your business. For particularly sensitive debit memos, credit memos, on-account credits, chargebacks, and invoices that you may want to review, you can define a transaction type called Preliminary with Open Receivable set to No. This transaction type does not update your customer balances. When you review and approve the item, you can then change the transaction type to Final (a transaction type that you define with Open Receivable set to Yes) which will update your customer's balances.
-
To allow freight to be entered for transactions with this transaction type, check the Allow Freight box.
-
To be able to post transactions with this type to your general ledger, check the Post To GL box. The default is the value you specified for the Open Receivables option. This box must be checked if the class is Deposit or Guarantee. If you leave this box unchecked, then no accounting will be generated for transactions with this type. If you leave this box unchecked, then no accounting will be generated for transactions with this type.
If you are defining a 'void' transaction type, do not check this box.
-
To automatically assign a default tax classification on transaction lines, select the Default tax classification box.
Note: You use tax classifications only if you upgraded to Release 12 from Release 11i.
-
If this transaction type's class is not Deposit or Guarantee and you want to restrict the direction in which items with this transaction type can be updated by applications entered against them, check the Natural Application Only box. If you check this box, Receivables sets Allow Overapplication to No.
Note: If the Allow Overapplication box is checked and you then check the Natural Application Only box, Receivables automatically unchecks the Allow Overapplication box. To check the Allow Overapplication box again, you must first manually uncheck the Natural Application Only box. You can update these options.
If you want AutoInvoice to automatically evaluate imported credit memos for receipt handling, then select the Natural Application Only check box. See: Automated Receipt Handling for Credits, Oracle Receivables User Guide.
-
If this transaction type's class is not Deposit or Guarantee, and you did not check the Natural Application Only box, choose whether to Allow Overapplication against items with this transaction type by checking or unchecking this box. You can update these options.
-
Select the Exclude from Late Charges Calculation box if you do not want to assess late charges on overdue transactions using this transaction type.
See: Calculating Late Charges, Oracle Receivables User Guide.
-
If this transaction type's class is Invoice, Chargeback, Credit Memo, Debit Memo, or Guarantee, then define the accounting for this transaction type in the Accounts tabbed region.
If this transaction type's class is Bills Receivable, then define the accounting for this transaction type in the Bills Receivable tabbed region.
If this transaction type's class is Deposit, then define the accounting for this transaction type in the Deposit tabbed region.
-
Enter the Receivable Account for transactions with this transaction type. Receivables uses this information, along with your AutoAccounting definition, to determine the receivable accounts for transactions with these types. Receivables creates a receivables transaction record using this account so you can transfer to your general ledger and create a journal entry if Post To GL is Yes for this transaction type.
Tip: For Guarantee transaction types, enter the Accounting Flexfield for your Unbilled Receivable account in the Receivable Account field. Receivables only uses the Unbilled Account field to determine the Unbilled Receivable account for invoices with the rule 'Bill in Arrears.'
Tip: For Chargeback transaction types, enter the Receivable Chargeback account. The offset to the Receivable account on the original debit transaction will be generated by the chargeback adjustment.
Note: Receivables does not require you to enter a Receivable account for Credit Memo transaction types if the profile option Use Invoice Accounting for Credit Memos is set to Yes; otherwise, you must enter a Receivable Account.
-
Enter a Freight Account for transactions with this transaction type. Receivables uses this information, along with your AutoAccounting definition, to determine the freight account for transactions with this transaction type. Receivables skips this field if this transaction type's class is Guarantee or if Allow Freight is set to No.
-
Enter a Revenue Account for transactions with this transaction type. Receivables skips this field if Allow Freight is set to No. Receivables uses this information, along with your AutoAccounting definition, to determine the revenue account for transactions with this transaction type.
Tip: For Guarantee transaction types, enter the Accounting Flexfield for your Unearned Revenue account in the Revenue Account field. Receivables only uses the Unearned Account field to determine the Unearned Revenue account for invoices with the rule Bill In Advance.
Note: Receivables does not require you to enter a Revenue Account for Credit Memo transaction types if the profile option Use Invoice Accounting for Credit Memos is set to Yes. Otherwise, you must enter a Revenue Account.
-
If this transaction type's class is Invoice or Debit Memo, enter a Clearing Account for transactions with this transaction type. Receivables uses this account to hold any difference between the revenue amount specified for the Revenue account and the selling price times the quantity for imported invoice lines. Receivables only uses the clearing account if you have enabled this feature for transaction sources that you use for your imported transactions.
-
If this transaction type's class is Invoice or Credit Memo, enter an Unbilled Receivable Account. When you use the Bill In Arrears invoicing rule, Receivables uses this information, along with your AutoAccounting definition, to determine the Unbilled Receivable account for transactions with this transaction type.
Tip: For transaction types with a class of Guarantee, enter the Accounting Flexfield for your unbilled receivable in the Receivable Account field, as described above.
-
If this transaction type's class is Invoice or Credit Memo, enter an Unearned Revenue Account. Receivables uses this information, along with your AutoAccounting definition, to determine the unearned revenue account for transactions with this transaction type. Receivables only uses this account when your transaction's invoicing rule is Bill In Advance.
Tip: For transaction types with a class of Guarantee, enter the Accounting Flexfield for your Unearned Revenue account in the Revenue Account field, as described above.
-
If this transaction type's class is Invoice, Credit Memo, or Debit Memo, enter a Tax Account. Receivables uses this information along with your AutoAccounting definition to determine the tax account for transactions with this transaction type.
-
If this transaction type's class is Deposit, then complete these fields in the Deposit tabbed region:
-
In the Allocation Basis field, indicate how you want to apply the balance of deposits with this transaction type to transactions.
You can select Lines Only to apply deposits to invoice lines only. Or, you can select Lines, Tax and Freight to include tax and freight amounts on invoices when applying deposits to transactions.
-
Enter a Receivable Account for deposits with this transaction type.
-
Enter an Offset Account for deposits with this transaction type.
If you set the AR: Deposit Offset Account Source profile option to Transaction Type, then Receivables uses the Offset Account that you specify here to derive the offset account for deposits. Otherwise, Receivables uses AutoAccounting to derive the deposit's offset account.
For more information, see: Overview of Receivables User Profile Options.
-
Note: The procedure for updating a transaction type is similar to that for defining a transaction type. Oracle Receivables lets you update the name of a transaction type only if:
-
The name of the transaction type is used in only one operating unit and not across multiple operating units.
-
The name of the transaction type is different from all the existing receipt method, adjustment, and receivable activity names. However, there is no restriction on updating other transaction type parameters.
Related Topics
Entering Transactions, Oracle Receivables User Guide
Entering Invoices with Rules, Oracle Receivables User Guide
Using AutoAccounting, Oracle Receivables User Guide
Transaction Types Listing Report, Oracle Receivables User Guide
Bills Receivable Transaction Types
Bills receivable transaction types indicate the type of bill receivable, such as accepted bill, promissory note, or unsigned bill, and define accounting and other attributes for bills receivable. You enter a transaction class of 'Bills Receivable' to enable the Bills Receivable tabbed region for entering bills receivable transaction type information.
To define a bills receivable transaction type:
-
Select an operating unit and legal entity for this transaction type.
-
Enter a Name and Description for this bills receivable transaction type.
-
Enter Bills Receivable in the Class field.
-
Enter Print or Do Not Print in the Printing Option field.
Note: If you check the Signed box, then you must enter Print.
-
Enter an Application Rule Set for this transaction type. Receivables uses the rule set that you enter when receipts are applied against a bill receivable.
-
In the Start Date and End Date fields, enter the range of dates that this transaction type is active.
-
Open the Bills Receivable tabbed region.
-
In the Bills Receivable field, enter the account segment for open bills receivable with this transaction type.
-
In the Unpaid Bills Receivable field, enter the account segment for bills receivable with this transaction type that are unpaid at the maturity date.
-
Enter the default Format Program Name to use to format bills receivable for this transaction type. This field is mandatory if Printing Option is set to Print, or if the Signed box is checked.
-
In the Remitted Bills Receivable field, enter the account segment for bills receivable with this transaction type that were remitted to a remittance bank.
-
In the Factored Bills Receivable field, enter the account segment for bills receivable with this transaction type that were factored to a bank or other financial institution.
-
Use the Signed and Issued by Drawee boxes to identify the type of bill receivable for this transaction type according to the combinations in this table:
TYPE OF BILL Signed Issued by Drawee Requires acceptance Checked Unchecked Issued by drawee Unchecked Checked Unsigned bill Unchecked Unchecked
Unit of Measure Classes
Define unit of measure classes to group units of measure with similar characteristics. For example, the unit of measure class 'Length' might contain the units of measure inches, feet, and yards. Use the Unit of Measure Classes window to define and update unit of measure classes and the base unit of measure for each class.
For a complete description of this window and its fields, see: Overview of Units of Measure, Oracle Inventory User's Guide.
You define and assign units of measure (other than the base unit) to a class in the Units of Measure window. See: Units of Measure.
To define a unit of measure class:
-
Enter a unique unit of measure class Name.
-
Enter a Description for this class (optional).
-
Enter a unique Base Unit abbreviation. For example, you could use mnemonics such as 'EA' for each or 'HRS' for hours.
-
Enter a unique UOM abbreviation to define the unit of measure that acts as the base unit of measure in this class.
-
Enter the date this unit of measure class will become Inactive On (optional). If you do not enter an inactive date, this class will be valid indefinitely.
Related Topics
Units of Measure
Define units of measure for tracking, issuing, purchasing, receiving, and storing inventory items. Receivables provides default units of measure from the items on invoice and credit memo lines. Valid units of measure are ones that are in the same class as the unit of measure on the item.
For a complete description of this window and its fields, see: Overview of Units of Measure, Oracle Inventory User's Guide.
Note: Receivables does not perform unit of measure conversions, so if you change your unit of measure in the Transaction or Credit Memo windows, the list price will not be updated.
Prerequisites
To define units of measure:
-
Enter a unique Name for this unit of measure.
-
Enter a unique UOM abbreviation.
-
If this is the base unit of measure you defined for the unit of measure class, check the Base box.
-
If you did not enter this window from the Unit of Measure Class window, enter the Class to assign to this unit of measure, or select from the list of values.
-
Enter the date this unit of measure will become Inactive On (optional). If you do not enter an inactive date, this unit of measure will be valid indefinitely.
Related Topics
Defining Unit of Measure Conversions, Oracle Inventory User's Guide