HRMS Configuration Workbench
Getting Started with the Configuration Workbench
The Configuration Workbench is an integrated toolset that simplifies the tasks of configuration management. Configuration tasks are grouped together in a framework that makes it easy to find the right configuration tool for each task.
Added features make it easy to:
-
Track your configuration activities or progress
-
Store supporting documents
-
View related reports
-
Link directly to online training and help
-
Link to the latest release information on My Oracle Support
With HRMS you tailor each business area of the system to reflect your own data structures and policies or processes. The Configuration Workbench provides one central point with direct access to the tools for configuring each business area of the HRMS system.
Embedded in the tools is the distilled knowledge of good practice configuration choices based on our experience of working with many hundreds of customers in different industries and geographies. The wizards provide step-by-step information as you go through them and the pages of the Configuration Workbench contain detailed context sensitive information.
New or Existing Customers
If you are new to Oracle HRMS, you use the Quick Start Implementation to evaluate different configuration options as part of a conference room pilot (CRP). When you are satisfied with your prototype configuration, you use the Full Implementation. See: Configuration Interview and Quick Start Implementation
If you already use Oracle HR as a shared option with Financials or Projects, you use the Upgrade HR Foundation diagnostic to analyze your existing setup before upgrading to full HRMS. See: Upgrade HR Foundation
If you are an existing Oracle HRMS customer, you use the Full Implementation tools to manage the ongoing activities of your existing configuration, such as data migration and diagnostics, adding new modules, entering batches of elements for payroll, and extracting records for third-party vendors. See: Full Implementation and Managing Data with the Configuration Workbench
Oracle HRMS Functional Areas
Oracle HRMS is organized into seven business areas, called functional areas. The seven Oracle HRMS functional areas are:
-
Enterprise and Workforce Management
-
Workforce Sourcing and Deployment
-
Talent Management
-
Compensation and Benefits Management
-
Payroll Process Management
-
Time Management
-
HR Information Systems
The current version of the Configuration Workbench supports Enterprise and Workforce Management, Compensation and Benefits Management, Payroll Process Management, and HR Information Systems.
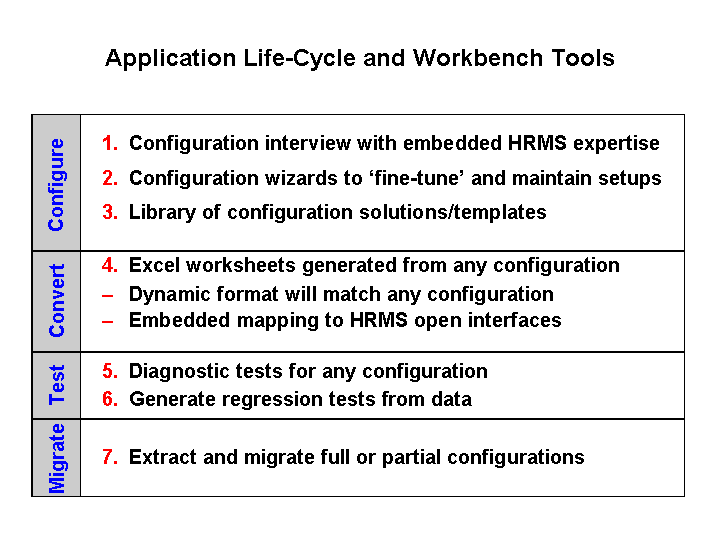
Application Life-Cycle and Workbench Tools
The tools in the Configuration Workbench are intended for use at different stages of the application life-cycle. These stages can be described with different names but they usually include the following:
-
Evaluate - Gather and retain essential information for prototyping configurations during the sales cycle
-
Install - Install the Oracle application modules with all of the related software components
-
Configure - Configure the modules that support the functional areas you decide to deploy
-
Convert - Load data from your legacy systems into your configured Oracle system
-
Test - Test your configuration for completeness, for user acceptance, and to establish regression tests for upgrade
-
Migrate - Selectively extract and migrate configuration data from one environment and move it to another, see: Configuration Workbench for Migrating Data
-
Sustain - Change your configuration or upgrade to add new functions or features to your system
The Configuration Workbench provides the following tools:
-
The guided configuration interview simplifies the process of gathering the key facts about your enterprise needs. The interview uses best-practice setup templates to generate an actual configuration reliably and consistently. By using the configuration interview, you can quickly start to use your Oracle HRMS system with your own data.
-
The implementation wizards guide you through complex combinations of steps and choices making it easy to setup and maintain specific functional areas.
-
You can select configured solutions from a library of predefined templates.
-
Excel worksheets for data conversion are dynamically formatted to match your existing setup using Oracle's Web ADI tool for desktop integration. The knowledge of your setup for validating data before loading is embedded in these generated worksheets. Values you enter in the worksheet are automatically mapped to the right place in the Oracle system using published open interfaces.
-
Diagnostic reports display current setup details testing for common problems and suggest actions if any problems are found.
-
The Configuration Workbench generates regression test plans and Mercury Winrunner Interactive test scripts that combine your specific setup data with predefined test templates.
-
The Configuration Workbench has specialist migration tools for specific functional areas or general table and row level migration. You can migrate all the setup data or selected setup data between instances.
Configuration Interview
The configuration interview is a tool that you use to define new configurations. In the interview, you describe the legal entities, and operating companies that comprise your organizational framework. The Configuration Workbench uses the configuration interview to review the decisions and operational questions you make about setting up your enterprise using Oracle HRMS.
In the Quick Start Implementation, you create copies of the configuration and use the configuration interview to change some of the key decisions and detailed information. You then generate different prototypes from the configurations. You use the prototypes to view and test the differences of specific decisions in each functional area. You use the Configuration Workbench to store and restore different configuration versions for comparison and tracking decision-making.
When you use the configuration interview in the Quick Start Implementation, you also complete the jobs or positions, and grades wizards in sequence. For the Full Implementation you must ensure that after you complete the configuration interview you also configure jobs or positions, and grades before you load the configuration.
Note: You can use all the other tools in the Configuration Workbench even if you do not use the configuration interview to generate your setup. For example, if you configured Oracle HR in an earlier release and have since upgraded, you can immediately start to use the data loaders or diagnostic tools on your existing setup.
First Steps
If this is your first time using HRMS applications, explore some of the online education and other information sources you can access from the Configuration Workbench home page. The HRMS Total View class is a good introduction to all the functional areas and features of Oracle HRMS.
Next, study the Organization Structures Overview to understand the best-practice configuration models that are embedded as templates in the Configuration Workbench. These templates are based on the practical experience gained from many implementation projects and an understanding of the integration points between the different modules in the Oracle eBusiness Suite.
If you are an implementer who is already familiar with Oracle HR you should pay special attention to the Organization Structures Overview and the best practice configuration models. These standard configuration models introduce new organization classifications and the recommended use of these may differ from how you have used them in the past. The recommended best practice configuration choices for Business Groups and Organizations in Oracle HR, or for Jobs and Positions:
-
Provide a consistent platform for customers in all industries and geographies
-
Incorporate best practice in configuration for using HR only or for full integration of Company and Cost Center structures with Oracle Financials
-
Minimize the risk of reconfiguration if the enterprise expands into new geographies or acquires new companies
See: Organization Structures Overview, Oracle HRMS Enterprise and Workforce Management Guide
Implementation Options
Quick Start Implementation
The Quick Start Implementation is a simplified configuration process that focuses on the essential tasks for creating a CRP. This process is a quick way to test out the system and evaluate your own needs.
You use the Quick Start Implementation if you're a new Oracle HRMS customer and you want to use your own data to evaluate or compare different configuration options as prototypes for conference room pilots (CRPs).
You use the configuration interview to set up your organization structures and make decisions about jobs and positions, and grades. The Quick Start Implementation configures the Oracle HR and Payroll applications and generates default settings for the required system components in HR and Payroll that you would typically set up manually.
For the US legislation, the Quick Start Implementation generates open links for Regular Salary, Regular Wages, VERTEX, and Workers Compensation Elements.
You copy your configuration and use the configuration interview to create alternative versions of setup information. You generate the configurations, upload your data through spreadsheets, and compare the versions to decide the best prototype for your organization.
You can use jobs in one version and positions in another. You use spreadsheets to upload the same data to both versions. You then evaluate whether using jobs or positions works best for you.
See: Quick Evaluation of Prototypes Using the Configuration Workbench
You choose the best prototype for your organization and use it as the basis for the Full Implementation.
See: Full Implementation
Quick Evaluation of Prototypes Using the Configuration Workbench
The Quick Start Implementation is a simplified configuration process that focuses on key setup and is a quick way to test out the system and evaluate your own needs. You copy your configuration and use the configuration interview to create alternative versions of setup information. You generate the configurations, upload your data through spreadsheets, and compare the versions to decide the best prototype for your organization.
The sequence of tasks for creating a CRP is:
-
Complete the manage organization tasks: configuration interview, configure jobs or positions, and configure grades
-
Load the configuration
-
Optionally log in with HRMS_USER
-
Optionally select the common Earnings and Deductions from the Solution Library and upload
-
Generate the default settings
-
Load reference data
On the Workbench Home page:
-
Select HR and Payroll and Manage Organization Configuration to access the work structures wizard. Use this wizard to configure your organization structures and to modify, import, export, and load configuration.
See: Key Concepts for Representing Enterprises, Oracle HRMS Enterprise and Workforce Management Guide
The auto-generation process creates an HRMS_USER and automatically assigns all responsibilities, security profiles, and user profiles that are appropriate for the loaded configuration. The password for the HRMS_USER is welcome.
-
Select HR and Payroll and Select Earnings and Deductions Templates to select the earnings and deductions you would like the Workbench to load for you. The Workbench creates the elements, formulas, balances, and formula result rules that Oracle Payroll requires to process each earnings and deduction type. You can configure any of the generated components.
See: Elements: Building Blocks of Pay and Benefits, Oracle HRMS Compensation and Benefits Management Guide and Other Payroll Earnings and Deductions Overview, Oracle HRMS Compensation and Benefits Management Guide
-
Select HR and Payroll and Generate Default Settings to generate default settings for the required system components in HR and Payroll that you would typically set up manually.
UK only: This process generates definitions for payroll and payment methods, eligibility links for tax elements, eligibility links for all earnings and deductions, and working conditions.
US only: This process generates definitions for payroll and payment methods, eligibility links for tax elements, eligibility links for all earnings and deductions, working conditions, and salary bases.
Note: Before generating default settings, ensure that the HR: Cross Business Group profile options is set to Yes.
-
Select HR and Payroll and Load Reference Data to access the spreadsheets into which you import your legacy location, job, and employee data and enter your new data. After you enter your data into the downloaded spreadsheets, you upload the data to the open interface tables for Oracle HRMS. You then run the Data Pump to validate and upload your data from the open interface tables to the HRMS tables.
The CRP employee data load process differs from the Full Implementation employee data load process. The Employee data load process for the Quick Start Implementation combines person, address, assignment, and salary details. This process automatically generates a user name and password for each person. The format of the user name is <first name>.<last name> and the password is welcome.
To demonstrate Employee Self-Service functionality, you use the System Administrator responsibility to add the Person ID of one of the loaded employees to the HRMS_USER. You then log in as that user and use Self Service HR to check and update that user's personal details.
Upgrade HR Foundation
Upgrade HR Foundation is a guided process to assist customers who are upgrading from using HR Foundation as a shared option with Financials or Projects to a full implementation of Oracle HR.
You use the Upgrade HR Foundation process to determine whether you should re-implement your HR configuration or set up additional business groups and migrate the data while maintaining references to the existing applications. You also use the methodology to plan which tools to use to perform the migration and what types of tests to run to verify that the migration has been successful.
The sequence of tasks for upgrading from HR Foundation is:
-
Review your options for change or reconfiguration
-
Determine your ideal setup of work structures
-
Run the diagnostic tool
On the Workbench Home page:
-
Select HR Foundation to Full HR and Review Migration White Paper and Get Diagnostics Scripts to download the "Migrating from Shared to Full HR" White Paper from My Oracle Support, Note 304002.1). Use this White Paper to review your options for change or reconfiguration and plan the detailed steps to make your specific setup changes. You must also download the diagnostic scripts available from this note for use later.
-
Select HR Foundation to Full HR and Determine Full HR Setup to access the work structures wizard. Follow the configuration interview process to determine your ideal setup of work structures for HR users. The summary report at the end of this task gives you the full configuration detail for HR users.
-
Select HR Foundation to Full HR and Review Financials Integration to run the diagnostic scripts to report and analyze your existing setup of the shared HR data.
Note: You must run these scripts on your shared instance, and not on the instance upon which you have installed Configuration Workbench.
Full Implementation
The Full Implementation process provides access to the complete set of tasks and tools used to configure Enterprise and Workforce Management; Compensation, Benefits and Payroll; and Payroll Process Management. You can use the Configuration Workbench to access these tools even if you did not use the configuration wizard to implement HRMS.
If you are new to Oracle HRMS, you use the Full Implementation after you have completed the CRP. You can load the full version of the configuration only once, so you must include all the required details about your organization, jobs or positions, and grades before you generate the full configuration.
If you already use Oracle HR, you use the Full Implementation tasks and tools to manage your existing HRMS configuration or add new modules.
You use the Full Implementation to:
-
Create a configuration that tailors the capabilities of the applications to your specific operational requirements
-
Select predefined configuration options from a library of solution templates
-
Maintain and adapt an existing configuration with functional area wizards
-
Generate spreadsheets for data conversion from an existing configuration and use these to load data directly to your system
-
Extract and migrate all or part of your configuration to another instance
-
Run diagnostic reports to check the status of your configuration and identify common problems
-
Generate regression test plans and scripts with test data taken from your configuration
After you have used the Full Implementation to configure HRMS, convert legacy data, test for completeness, and finally to migrate setup data from a test to a production environment, you are ready to use the newly configured system to perform HRMS transactions. You can continue to use the tools in the Configuration Workbench to manage your configuration through the different stages of the application life cycle.
Configuring HRMS Functional Areas
Configuration Workbench for Enterprise and Workforce Management
All the Oracle HRMS functional areas are built on a common platform of organizations and people structures. You start the configuration process by defining the legal entities and operating companies that comprise your organizational framework. Next you provide information about the ways that different groups of employees work in your organization and the Configuration Workbench generates the business groups and organizations with the job or position structures you need.
A business group in Oracle HR is a container of country specific data. Usually each business group will be tied to one and only one country, however sometimes if you do not have a large presence in a country a single business group may contain data from more than one country.
You must configure organizations, jobs or positions, and grades before you load the configuration. Create your configuration structures in this sequence:
-
Configure organizations
-
Configure jobs and positions
-
Configure grades
-
Load the configuration
-
Load data using spreadsheets
On the Workbench Home page:
-
Select Organization Structures and Manage Organization Configuration to access the work structures wizard. Use this wizard to configure your organization structures and to modify, import, export, and load configuration. See: Key Concepts for Representing Enterprises, Oracle HRMS Enterprise and Workforce Management Guide
-
Select Jobs and Positions and Configure Jobs or Positions to define roles to represent the ways that different groups of employees work. If you operate in multiple countries the process will also guide you through the options to use a common global setup or to accommodate different configuration choices for a region or a country. See: Defining Jobs in the Configuration Workbench and Defining Positions in the Configuration Workbench
-
Select Organization Structures and Load Organization Data to access the spreadsheets into which you enter or import the location and organization details for each business group. After you enter your data into the downloaded spreadsheets, you upload the data to the open interface tables for Oracle HRMS and run the Data Pump to upload your data from the open interface tables to the HRMS tables.
-
Select Jobs and Positions and Load Job/Positions Details to access the spreadsheets into which you enter or import details about your jobs or positions and set their values for each business group. After you enter your data into the downloaded spreadsheets, you upload the data to the open interface tables for Oracle HRMS and run the Data Pump to upload your data from the open interface tables to the HRMS tables.
Note: You configure grade structures in the configuration interview. For information about grades, see: Configuration Workbench for Compensation, Benefits and Payroll
To understand the full implementation process for enterprise and workforce management, see: Enterprise and Workforce Management
Configuration Models for Your Enterprise Framework
The first step in any configuration is to decide what organization structures your enterprise requires. To help you decide, you can use the following best practice configuration models:
-
Model 1: A single operating company in one country
-
Model 2: A single operating company in multiple countries
-
Model 3: Multiple operating companies in one country
-
Model 4: Multiple operating companies in multiple countries
These models deal with integration points between the different applications and the requirements of different industries and geographies. They can help you choose the right organization structures to meet your management and reporting requirements.
The Configuration Workbench uses the models as templates to generate the organization framework of business groups, operating companies, legal entities, and employers for any enterprise. Through an interview process, the Configuration Workbench gathers the detailed information it requires to generate an actual configuration of your enterprise using the appropriate configuration model.
Mexico only: You cannot use the Configuration Workbench to create the hierarchy. You must use the Generic Hierarchy functionality.
Single Operating Company in One Country
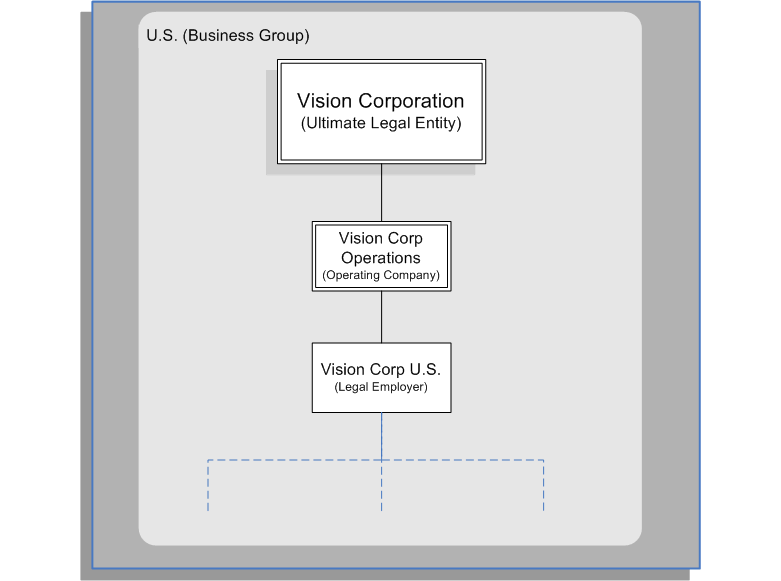
The preceding diagram shows the basic configuration for a small or medium sized enterprise with little or no complexity in operating structures. Vision Corporation is the ultimate legal entity, and for reporting purposes, this organization holds any data associated with the enterprise. Every enterprise has one ultimate legal entity.
This simple enterprise structure is based on the best practice configuration model. Creating the key enterprise structures as separate organizations enables your enterprise to expand and acquire new companies whilst reducing the cost of re-implementation.
Single Operating Company in Multiple Countries
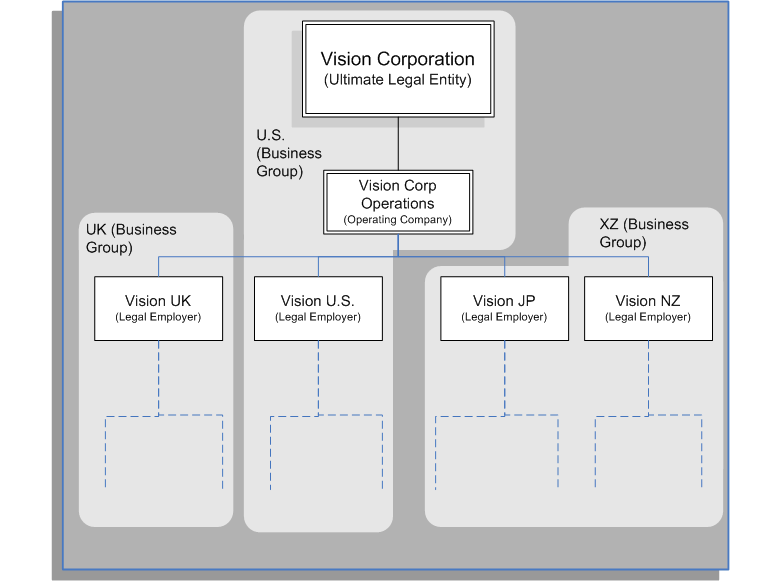
The preceding diagram shows a configuration for a medium or large enterprise with some international operations introducing a degree of complexity. It also shows that operations and people in some countries are held within an international business group (XZ). You can see that the business groups represent countries, and do not appear in the organization hierarchy. This is based on the best practice configuration model.
For more information on the key organization structures, see: Key Concepts for Representing Enterprises, Oracle HRMS Enterprise and Workforce Management Guide
Multiple Operating Companies in One Country
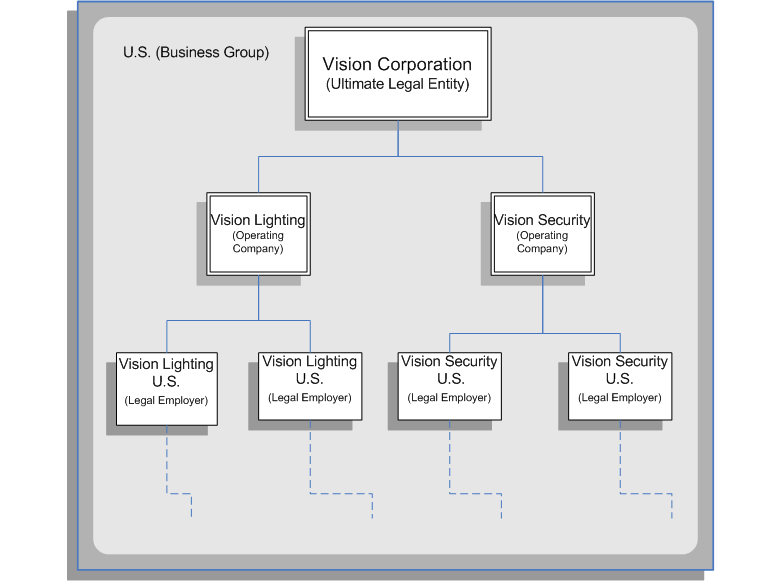
The preceding diagram shows a configuration for a multi-company enterprise operating in a single country. This type of complexity can exist in any size of enterprise. Vision Lighting and Vision Security in the diagram are represented as operating companies. Every enterprise has at least one operating company. This may be a division, or a subsidiary within the enterprise which is legally registered in at least one country.
The Configuration Workbench creates at least one operating company organization as best practice. This reduces the cost of any re-implementation as a result of expansion due to acquisition or diversification within the enterprise.
Multiple Operating Companies in Multiple Countries
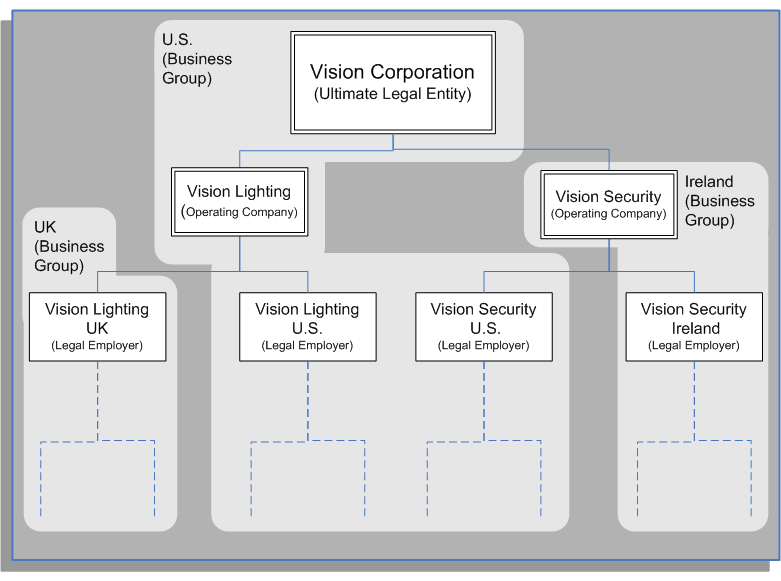
The preceding diagram demonstrates a multi-company enterprise operating in multiple countries. Every enterprise has at least one legal entity that is the designated legal employer for all employment related activities. In the diagram, the Vision Security operating company operates and employs people in the U.S. and Ireland. The Vision Security U.S. and the Vision Security Ireland organizations represent the designated legal entities/employers in those countries.
The Configuration Workbench classifies an organization as a GRE/Legal Entity where your enterprise operates in a country, and classifies it as an Employer if you employ people in that country also. For example, you can have a legal entity in a country where you do business, but do not employ people in that country.
Multiple Operating Companies in Multiple Countries with a Consolidated Legal Entity
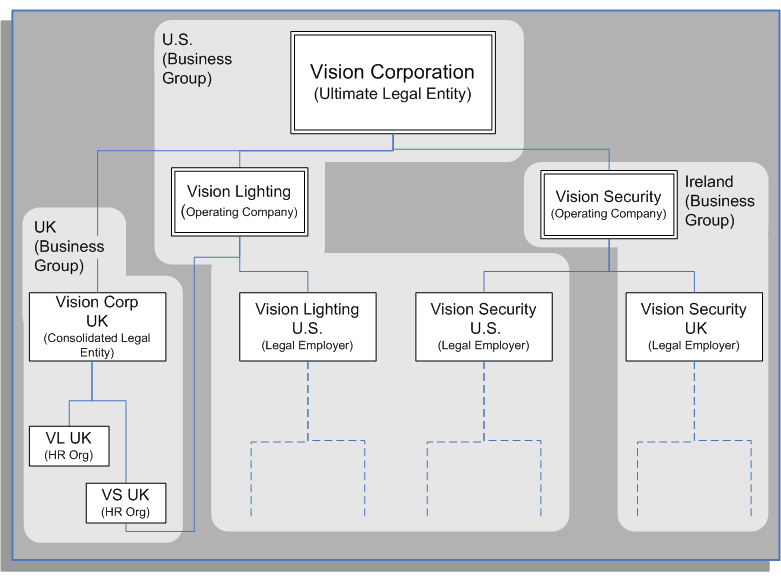
The preceding diagram shows an alternative configuration for a multi-national and multi-company enterprise with the addition of a consolidated legal entity. A consolidated legal entity acts on behalf of several operating companies or the enterprise, and is the legal employer in the country. Using the preceding diagram as an example, Vision Corp UK is the consolidated legal entity for Vision Corporation in the UK. For management reporting, VL UK and VS UK report to Vision Lighting, and for legal reporting, they report to Vision Corp UK.
For more information on the key organization structures, see: Key Concepts for Representing Enterprises, Oracle HRMS Enterprise and Workforce Management Guide
Defining Jobs in the Configuration Workbench
You define roles to represent the ways that different groups of employees work. A job is a generic role within a business group, which is independent of any single organization. For example, the jobs Manager and Consultant can occur in many organizations.
Your enterprise may have groups of employees hired to perform specific tasks. This can be on a temporary or a permanent basis. Staff in this category can include agency workers, consultants, and contractors. For these staff, you can define the role more flexibly as a job.
You can also use jobs to set up supplementary roles that an employee might hold, for example, fire warden, or health and safety officer. You can distinguish these supplementary roles from other jobs by using job groups. Job groups are used to store supplementary roles of a similar type in one group.
Defining Jobs in the Configuration Workbench
In the jobs and positions interview, you have chosen to use the flexibility of jobs and supervisor reporting to represent the primary working roles in your enterprise. The jobs you define will be available to all departments or organizations in your enterprise and an employee can move between departments but keep the same job.
In this part of the interview you decide the structure and the component parts of the job name that best meet your requirements for identifying jobs in your enterprise. When you define a job you enter a value for each segment of the job name structure. Most customers who use jobs choose between one and five segments. A typical job might be HR Application Specialist.Consulting.Level 1.
Define more segments to make job names more specific. For example, use Job Type and Job Level to be more specific about a job than just using a Job Title. You decide how many components you want to use to define the unique name for each job. Standard capabilities mean that you can use the different segments of the name to identify common jobs or job holders for analysis or compensation, or for grouping records in reports, for example, to find all jobs of a specific Job Type.
Note: You shouldn't use segments with values that change regularly, for example, Salary Ranges or Expense Approval Levels that change every year. Use the name to uniquely identify the job and use standard capabilities of the system to enter and maintain related information for government reporting, valid grades, and skill requirements.
If you operate in multiple countries we usually recommend that you use the same structure for job names in all countries. However, in this interview you can define exceptions to this common structure for a single country or for a set of countries that you define as a Region. See: Defining Regional Jobs, Positions or Grades in the Configuration Workbench
Defining Positions in the Configuration Workbench
A position is a specific occurrence of one job, fixed within one organization. For example, the position Finance Manager is an instance of the job of Manager in the Finance organization. The position belongs to the organization. There may be one, many, or no holders of a position at any time.
Positions are normally used in role-based enterprise structures where clearly defined rules largely determine the ways employees work, and the compensation and benefits they receive.
You can set up both organizations and positions to define reporting structures in your enterprise, but be careful to avoid duplication of information. It's best to define most of the detail at position level. Use your organizations to show your highest level of departments or divisions and your positions and position hierarchies to show the reporting groups in your enterprise.
Defining Position Components in the Configuration Workbench
In the jobs and positions interview, you have chosen to use the detailed reporting capability of positions to represent the primary working roles in your enterprise. A position can have multiple post holders and a person can be assigned to multiple posts. You define the rules that control assignments when you define each position.
Each position you define will identify a specific role in the enterprise, which you can manage independently of the person in the post, and it will belong to one specific department or organization. The name of each position must be unique.
To make it easier for you to manage unique names for positions you can define a structure for position names that identifies separate components or segments with separate rules for validation of each segment. For example, you can have a position Title segment with text names, and another segment for position Number with numeric values. Standard capabilities mean that you can use the different segments of the name for queries or grouping records in a report.
When defining the segments that make up the structure of a position name you should also consider if any of your segments are really part of the definition of a common job type. Using job types for a position you can efficiently manage common information that applies to many different positions. For example you can define a job type of Manager.Level 1 and use this for comparison of positions across departments or lines or business, or for setting common job requirements. You can then define ten manager type positions in your HR department, each of which has responsibility for a different management function or group.
When you define a position you enter a value for each segment of the position name structure. Most customers who use positions choose between one and five segments.
Note: Do not use segments with values that change regularly, for example, Salary Ranges or Expense Approval Levels that change every year. Use the name to uniquely identify the position and use standard capabilities of the system to enter and maintain related information for government reporting, valid grades, and skill requirements.
We recommend that you use the same structure for position names in all countries in which you operate. However, later in the interview you can define exceptions to this common structure for a single country or for a set of countries that you define as a Region. See: Defining Regional Jobs, Positions or Grades in the Configuration Workbench
Identify all the components you might use to define the structure of a Position Name and then consider if any of these are really part of the definition of a common job type. For example, you might consider Title, Name, and Code as components of a position. When you review these you might consider that the Position name should contain Title while the Job name should contain Name and Code. With this choice, you could define common types of job using the combination of Name and Code and maintain reporting or other details for these common job types.
Defining Grades in the Configuration Workbench
Grades are normally used to record the relative status of employee assignments and to determine compensation and benefits, such as salary, overtime rates, and company car.
For more information about Grades, see: Grades and Grade Structures, Oracle HRMS Compensation and Benefits Management Guide
In this part of the interview you decide the structure and the component parts of the grade names that best meet your requirements for identifying grades in your enterprise. When you define a grade you enter a value for each segment of the grade name structure. Most customers who use grades choose between one and five segments. A typical grade might be Clerical.C.1.
Define more segments to make grade names more specific. For example, use Grade Type and Grade Level to be more specific about a job than just using a Grade Title. You decide how many components you want to use to define the unique name for each grade. Standard capabilities mean that you can use the different segments of the name to identify common grades or for analysis or compensation, or for grouping records in reports, for example, to find all grades of a specific Grade Type.
Note: You shouldn't use segments with values that change regularly, for example, Salary Ranges or Expense Approval Levels that change every year. Use the name to uniquely identify the Grade and use standard capabilities of the system to enter and maintain related information for government reporting, valid grades, and skill requirements.
If you operate in multiple countries we usually recommend that you use the same structure for grade names in all countries. However, in this interview you can define exceptions to this common structure for a single country or for a set of countries that you define as a Region. See: Defining Regional Jobs, Positions or Grades in the Configuration Workbench
Configuration Workbench for Compensation, Benefits, and Payroll
Once you have defined your work structures framework, you can start to define your structures for managing compensation, benefits, and payroll.
On the Workbench Home page:
-
Select General Compensation Structures and then Plan Design to access the Total Compensation Setup Wizard and Plan Design Copy Wizard. Use these wizards to create new or to copy and modify plans. You can also use the Plan Design Copy wizard to migrate program and plan design data for health and welfare plans from one instance to another. See: Configuration Workbench for Migrating Data
See: Plan Design, Oracle HRMS Compensation and Benefits Management Guide and Plan Design Copy, Oracle HRMS Compensation and Benefits Management Guide
-
Select Salary and Grade Related Pay and Progression and then Configure Grades to define or maintain your grade structures. See: Defining Grades in the Configuration Workbench and Grades and Grade Structures, Oracle HRMS Compensation and Benefits Management Guide
Note: You must include all the required details about your organization, jobs or positions, and grades before you generate the full configuration.
-
Select Salary and Grade Related Pay and Progression and then Load Grade Details to access the spreadsheets into which you enter or import the grades and grade values for each business group. After you enter your data into the downloaded spreadsheets, you upload the data to the open interface tables for Oracle HRMS and run the Data Pump to upload your data from the open interface tables to the HRMS tables.
-
Select Payroll Earnings and Deductions to select the earnings and deductions you would like the Workbench to load for you. The Workbench creates the elements, formulas, balances, and formula result rules that Oracle Payroll requires to process each earnings and deduction type. You can configure any of the generated components. See: Elements: Building Blocks of Pay and Benefits, Oracle HRMS Compensation and Benefits Management Guide and Other Payroll Earnings and Deductions Overview, Oracle HRMS Compensation and Benefits Management Guide
-
Under Data Conversion, select Benefits Enrollments to upload participant and enrollment data from third-party and legacy systems. See: Converting Benefits Enrollments
To understand the complete implementation process for compensation, benefits, and payroll, see: Compensation, Benefits, and Payroll
Configuration Workbench for Payroll Process Management
Once you have defined your organization framework using the Configuration Workbench, you can start to define your structures for managing the payroll process. If you use Oracle Payroll, you must define payrolls and payment methods. You can also define these items for information and reporting in Oracle Human Resources.
On the Workbench Home page:
-
Select Payroll Payment and Distribution and then Configure Organization Payment Method to define your own names for the standard categories of payment methods that are predefined with your system. If you have installed Oracle Payroll you can also use these methods to control payments to your employees.
-
Select Payrolls and then Configure Payroll to define payroll groups to meet your business needs for processing and payment. For example, you may have a monthly and a weekly payroll but you might want to manage and process your weekly payroll by plant location. In this case you could define one monthly payroll and two weekly payrolls, one for each plant.
-
US and Canadian business groups only: Select Payroll Statutory Deductions and Reporting to access the spreadsheets into which you enter or import rules for withholding tax. After you enter your data into the downloaded spreadsheets, you upload the data to the open interface tables for Oracle HRMS and run the Data Pump to upload your data from the open interface tables to the HRMS tables.
To understand the HRMS payroll process, see: Payroll Overview, Oracle HRMS Payroll Processing Management Guide
Defining Regional Jobs, Positions or Grades in the Configuration Workbench
From experience with many customers we recommend that you use the same name structure for all countries in your enterprise and don't define exceptions for individual countries.
A common structure will still allow countries to enter local names or use local language versions of common grades. This choice is best practice if you want to deploy or develop a consistent approach to reporting and compensation by defining a consistent structure for reference and administration.
However, if you want to define a different naming structure for one or more countries then add a regional group and select the countries in the group. For example, you might define a regional group for South America that includes operations in Brazil, Argentina, and Chile. Alternatively you might want a regional group for all Spanish-speaking countries regardless of geography. Then you would add a Spanish region and include Argentina, Spain, and Chile.
You can also define exceptions for one country at a time. For example, you might want a different name structure for Japan only. Using the regional group you can support individual local choices within a common corporate framework.
Note: If you define a Regional Group we recommend you use your corporate definitions and add new segments for local requirements. Alternatively, if your local definitions are completely different you should include an extra segment to hold a corporate name and use a list of values to make this consistent across all countries. Both examples make it easier to do corporate analysis and reporting.
Converting Benefits Enrollments
You can use Configuration Workbench to upload legacy and third-party participant and enrollment data. You cannot use this process for conversion of historical elections.
For details on the conversion process, including spreadsheet contents, conversion scenarios, and the method for converting historical elections, see the white paper Converting Enrollments, My Oracle Support note 365034.1.
To convert benefits enrollments
-
Under Data Conversion on the Configuration Workbench home page, select Benefits Conversion.
-
Go to the Review and Complete Plan Design task to launch the Programs window, enabling you to review and test the plan design setup.
See: Plan Design, Oracle HRMS Compensation and Benefits Management Guide
-
Go to the Run Participation Life Event Process task to launch the Submit Request window, where you must submit the appropriate Participation Process.
Important: Different plan designs can require different processes. While using unrestricted life event mode, for example, you must submit the Maintain Participation Eligibility and Recalculate Participant Values process; in other cases you can use any normal or administrative life event process.
See: Running the Participation Batch Process, Oracle HRMS Compensation and Benefits Management Guide
The next three steps use the Web ADI-enabled spreadsheet loaders. See Spreadsheet Loaders: Frequently Asked Questions, Oracle HRMS Configuring, Reporting, and System Administration. Spreadsheet details for these steps appear in the Converting Enrollments white paper on My Oracle Support, Note: 365034.1
-
Go to the Load Benefits Elections task to upload data into enrollment results and participant rate values tables. You must perform this step before the next two steps unless the enrollments come from a different source.
-
Go to the Load Dependents Information task to run the process that designates dependents to the elections made in the prior step.
-
Go to the Load Beneficiaries Information task to run the process that designates beneficiaries to the elections made in the prior step.
-
Go to the Review Benefits Enrollment task to review the upload results from the View Enrollment Results window.
See: Displaying Enrollment Results, Oracle HRMS Compensation and Benefits Management Guide
Configuration Workbench Spread Sheet Solutions
Overview
Configuration Workbench provides a new framework to use spreadsheets. The new framework provides additional capabilities such as customizing and downloading of spreadsheets to suit business requirements.
As a functional analyst you can use this feature to carve out customized sub-sets of the spreadsheets and support multiple data sources. You can change the layout of the spreadsheet, hide or display columns, change the column names, configure tasks and sub-tasks with access options, and generate process-specific spreadsheets for mass relocation of employees or mass organization updates. Additionally, you can use the spreadsheets to configure jobs, grades, locations, and for learning objects such as Course, Classes, Offerings and Enrollments.
Does the Spread Sheet framework support multiple processes?
The Spread Sheet Solutions allow you to save specific columns and the spreadsheets that are necessary for a particular process according to the process. For example, if you need to update data on mass locations, you can create spreadsheets with columns specific to mass location.
Does the Spread Sheet framework support different sources of data?
Yes. You can download data from a business group, edit the data in that spreadsheet and upload the edited data in the same business group. For example, you can transfer mass employees to a different organization using this feature.
You can download data from a database such as a legacy system, edit the data and upload the edited data to another database. For example, you can transfer data in CSV or an XML file to an HRMS instance using the spreadsheet.
How can I ensure that the spread sheets suit my business requirements?
You can customize spreadsheet columns and change the layout easily to meet your business needs by doing the following:
-
Change the order of the columns to ensure that optional and rarely used columns are towards the end.
-
Hide optional columns.
-
Change the labels of the columns.
-
Display mandatory columns.
-
Easily change the predefined Wed ADI data.
-
Integrate with the configuration workbench team.
-
Duplicate the spreadsheets.
-
Preview and test the target spreadsheet that is copied from the source.
-
Use the spreadsheet for learning objects such as Course, Classes, Offerings, and Enrollments.
-
Decide on the display and access of task and sub-tasks and configure them accordingly.
-
Use the spreadsheet to configure jobs, grades, and location.
Can I support this framework at person or assignment level?
Yes, you can. You can support the spreadsheet framework to provide a provision to download and upload other entities that reference person and assignment entities. Based on a framework, you can extend the data for extra information or some other entity. Similarly, you can extend data to multiple assignments.
Can I use security settings to protect data?
Yes. You can specify security settings on the Launch Page Security Settings panel in the Fields Configuration page. Using the security options, you can do the following:
-
Display all business groups while downloading and uploading data.
-
Display only the applicable business groups while downloading and uploading data.
Configuration Workbench provides you security groups (security profile and business groups) option to reuse a responsibility and assign it to different security profiles in various business groups or as per requirement. You can ensure that when a user logs-in to the application with a particular responsibility, then that responsibility is grouped with specific security groups.
-
Provide the user with create and update, update only or view only options for the spreadsheets.
-
Upload spreadsheets using the data pump.
-
Provide read-only access for certain fields/columns making them non- updatable and ensuring security.
See: Using the Spread Sheet Framework
See: Create a Function and Download the Spread Sheet
See: Upload Spread Sheets
Using the Spread Sheet Framework
After downloading the data, use the framework to do the following:
-
Support different sources of data.
-
Customize the spreadsheet according to business requirements.
-
Support multiple processes.
To use the Spread Sheet framework:
-
Create a function using the Spreadsheet Configuration Loader function. See: Create a Function and Download the Spread Sheet
-
Edit the launched spreadsheet locally.
-
Upload the edited spreadsheet to the application. See:Upload and Download of Spread Sheets
Create a Function and Download the Spread Sheet
As an administrator, you can create a customized spreadsheet function using the Spreadsheet Loader Configuration function.
To create a function
-
Using the Configuration Workbench responsibility, navigate to Spreadsheet Loader Configuration and click the Go to Task icon.
-
Click the Go to Task icon for People Data Function and Layout on the Spreadsheet Loader Configuration page.
-
Click Create to start creating a new function.
-
Select the Data Source as XML, CSV or Oracle HR in the function details section of the Create Function and Layout: Function and Spreadsheet Details page.
-
Select the applicable Menu.
-
Enter the User Function Prompt name. The spreadsheet loader records the function prompt name as the name of the layout.
-
Select the Entity from the following options.
-
Person
-
Address
-
Assignment
-
Course
-
Classes
-
Offerings
-
Enrollments
-
Jobs
-
Grades
-
Location
-
-
Select the applicable fields from the field options on the left, and click the Move or Move All icon to transfer them to the spreadsheet section, and click Continue.
-
Select the Allow Migration check box to display all business groups while uploading and downloading data. Otherwise, leave this option unchecked to display only the applicable business groups.
-
Select the Read Only check box to enable certain fields/columns as non-updatable while uploading and downloading data. Otherwise, leave this option unchecked to make any changes edit the fields/columns.
-
Select the Allow Batch Processing option to upload spreadsheets using the data pump.
-
Select Create and Update, Update Only or View Only options as applicable.
-
Click Finish.
-
Click the Test icon for a function, specify the applicable and click Launch Spreadsheet to download the spreadsheet.
To Download the Spreadsheets
-
Click the Test icon for a function in the People Data Function and Layout page.
-
Enter the applicable information in the fields and click Launch Spreadsheet to download the spreadsheet.
Upload and Download Spread Sheets
You can download and upload edited spread sheets in XML format, CSV format and HR Tables using APIs and the data pump.
Note: The Business Group list of values displays business groups associated with the user depending on the security model associated with the environment and the security group associated with the user responsibility.
To upload and download spread sheets using APIs:
First, open the applicable function from the Configuration Workbench menu or click the Test icon on the People Data Function and Layout page and do the following:
-
Set the Do You Want to Upload Data as a Batch Process field to NO.
-
Select the applicable Source Business Group.
-
Select the applicable Target Business Group.
-
Set Do you want to Search option to Yes to filter information that you want to download in the spreadsheet. Otherwise, set to NO to download all records in the spreadsheet
-
If you have set the option in step 6 to YES, then select the applicable parameters on the Person Search page.
-
Click Launch the Spreadsheet.
To upload spread sheets to data tables using the data pump
-
Set the Do You Want to Upload Data as a Batch Process field to Yes.
-
Set Run Data Pump to No to load the data from spreadsheet to Data Pump tables
-
Provide a Batch Prefix.
-
Select the applicable Source Business Group.
-
Select the applicable Target Business Group.
-
Set Do you want to Search option to Yes to filter information that you want to download in the spreadsheet. Otherwise, set to NO to download all records in the spreadsheet
-
Click Continue
-
If you have set the option in step 6 to YES, then select the applicable parameters on the Person Search page.
-
Click Launch the Spreadsheet.
To run the data pump
-
Set the Do You Want to Upload Data as a Batch Process field to Yes
-
Set Run Data Pump Flag to Yes
-
Select the applicable Target Business Group.
-
Select the Batch Name from the list
-
Click Process Batch Lines
For information on Data Pump, see: Oracle HRMS Data Pump
To upload spreadsheets in XML and CSV format
-
Browse and select the applicable XML or CSV data.
-
Select the applicable Target Business Group.
-
Click Launch Spreadsheet to upload the data.
Managing Data with the Configuration Workbench
Configuration Workbench for Data Conversion
Once you have defined your organization framework and structures for managing the payroll process, you load your employee details and, optionally, existing benefits enrollments.
Under Data Conversion on the Workbench Home page:
-
Select People Data or Benefits Enrollments to access the spreadsheets into which you import your legacy data and enter your new employee data. After you enter your data into the downloaded spreadsheets, you upload the data to the open interface tables for Oracle HRMS. You then run the Data Pump to validate and upload your data from the open interface tables to the HRMS tables.
Note: The Quick Start Implementation has a simplified version of the People Data spreadsheets.
Features of Data Upload
Data to be uploaded is validated before the upload occurs. You must ensure that you enter values in all mandatory fields so that validation is successful when the data is uploaded to the application. If you do not, the data is not uploaded, and an error message appears in the Messages column in the spreadsheet for the record with the invalid data.
When you change any field in the spreadsheet, the row is flagged for upload. By default, only flagged rows are uploaded. You can change this setting so that all rows are uploaded.
Features of Data Pump
The Data Pump Engine process is a standard concurrent process that performs the actual data validation and loading operations.
When you submit the Data Pump concurrent process you can choose to run it in validation mode. This enables you to review errors in batches or in related records in a batch and to change them before any of them are committed to the HRMS database.
When you run the Data Pump the process only loads data that has not already been processed successfully. This means that you can run a batch, review and correct errors for any specific lines, and then rerun the same batch. You can repeat this process until you have successfully loaded all lines in the batch. To do this you submit the concurrent process with the same batch name. All unprocessed lines or lines with errors are reprocessed automatically.
The Data Pump has many logging options that help you find errors when running the process.
Configuration Workbench for HR Information Systems
You use the tools in this part of the Configuration Workbench to administer and maintain your system, for example, to enter batches of elements for payroll and to extract records for third-party vendors.
On the Workbench Home page:
-
Select HRIS Management: Interface Configuration and then Batch Element Entry to use BEE (Batch Element Entry) to enter batches of element entries for your employees, using defaults for fast entry. For example, you can use BEE to record timecard data needed for regular pay processing, such as hours worked, location or shift worked, absences, and costing or labor distribution data.
Note: BEE migrates all the Secondary Element Classification records within the given business group but does not have the capability to migrate only the classifications attached to the elements. During the upload, default secondary element classifications are always attached to elements based on the element's primary classification, even when the default secondary element classifications are deleted from the source instance
See: BEE (Batch Element Entry), Oracle HRMS Configuring, Reporting, and System Administration Guide
-
Select HRIS Management: Interface Configuration and then System Extract to manage the formatting, extraction, and delivery of HRMS data to benefits carriers, payroll providers, and other third-party vendors. For example, you can use System Extract to extract records for benefits plans into an extract file that you then transmit to a third-party benefits carrier. See: Benefits System Extract, Oracle HRMS Configuring, Reporting, and System Administration Guide
Configuration Workbench for Migrating Data
The Configuration Workbench migration tool uses predefined groups of related data called selection sets. You define the criteria for selection and then extract and migrate the data as a set.
Note: To migrate benefit plans you use the Plan Design Copy Wizard, see: Configuration Workbench for Compensation, Benefits and Payroll
Before you extract or migrate data, your database administrator uses the Administration tab to map the databases you have permission to use as the source or target instances for extracting and loading setup data. The instance names then appear as choices in the drop-down lists for extract and load.
You migrate data in three steps:
-
Define selection criteria
-
Run the extract process
-
Load the extracted data
Define Selection Criteria
You define the selection criteria in the Selection Sets option on the Migrations tab.
You use a selection set template as a starting point to create a selection set. After you select the template, you enter the name of the selection set and a description of it, and select the source instance from the list. You scroll down until the locations filter is visible and then select the button to set the filter. You select the Update Existing (During Load) option if you want to update the existing setup data in the target instance as well as insert new records during the load process.
Run the Extract Process
You now run the extract process using the selection set you have just created. You use the Selection Sets option on the Migrations tab. You select the selection set in the list and then run the extract process.
The migration tool saves the snapshot to the database. You can select the snapshot in the list on the Extracts option on the Migration tab to review it or to download the snapshot to a local file.
The migration tool creates a log file of the extract process. If the extract process has an error status, you can identify the problem by reading the log file.
Load the Extracted Data
You load the saved snapshot of extracted data onto the target instance using the Loads option on the Migration tab.
You select the file to load from a list of saved snapshots or from a local directory. The target instance you specify for loading the extracted data can be same instance as the snapshot was extracted from, or another instance.
Note: When you define the selection set, you specify whether to update the existing records as well as load the new ones.