Implementing Oracle Approvals Management
Implementing Oracle Approvals Management
Overview
AME provides you the flexibility to create the approval processes your organization needs without writing programming code. AME's power and flexibility require that you attend carefully to detail during implementation, to ensure your approvals processes function as planned.
The following graphic illustrates the AME implementation process. Depending on your organization's requirements, you may be able to skip some of the implementation steps. Please ensure you understand them all, even if you expect to skip some of them.

Planning your Organization's Approval Processes
Before you begin using an AME transaction type, you should document the approvals processes that the transaction type must implement. A transaction type's requirements document should specify the following:
-
A set of business cases
-
How to represent the business cases in AME by defining a set of configuration-variable values, item class use, mandatory-attribute values, approver groups, and rule use sufficient to express each business case.
-
A representative test case for each business case.
Business Cases
A transaction type's requirements document should account for four types of business cases:
-
Transactions having similarly structured approval processes.
-
Transactions whose default approver lists include repeated approvers.
-
Transactions whose approver's forward approval requests in unusual ways.
-
Transactions whose approval processes should have similar parallelization.
Approvals Cases
The first type of business case accounts for general approvals requirements. Such cases should specify informally what kinds of approvals are required for a set of transactions having attribute values that your organization deems similar. For example, a business case might say,
All expense reports for travel having totals above $1,000 and not exceeding $5,000 should be approved by the submitter's two immediate supervisors.
Approvals business cases typically translate directly into a combination of rule use, values for the rulePriorityModes configuration variable, and mandatory-attribute use. If a business case requires approvals from a group of approvers, rather than a chain of authority, the translation can involve defining approver groups as well.
Repeated-Approvers Case
A repeated-approvers case indicates how AME should behave when the approval rules require that an approver appear several times in a single transaction's approver list. (AME can suppress repeated approvers in specified cases.) This business case translates directly to a single transaction-type-specific value for the repeatedApprovers configuration variable.
Special Forwarding Cases
A special case of forwarding occurs, for example, when an approver forwards to someone preceding them in the approver list, or to a subordinate not already in the list. There are eight special cases that translate into eight transaction-type-specific values for the forwardingBehaviors configuration variable.
Parallelization Cases
A parallelization case indicates how AME should treat approvers in the same subset of approvers, at the same level in the hierarchy of approvers that constitutes an approver list. There are six levels:
-
Item class
-
Item
-
Sublist
-
Action type
-
Group or chain
-
Approver
Your requirements document should specify whether approvers in the same subset at each level should be ordered serially or in parallel. For example, it might say that, other things being equal, approvers generated by the same action type should be ordered in parallel.
Representation of Business Cases in AME
There are often several ways to translate your approvals business cases into a transaction type. For example, you can sometimes use fewer or simpler rules by using rule priorities. In general, translating your approvals business cases into a transaction type involves setting values for several transaction-type-specific configuration variables, creating item class use, defining use for several mandatory attributes, defining approver groups, and then creating rules and rule use.
Configuration Variables
The configuration variables you should consider when implementing approvals business cases are:
-
adminApprover
-
allowAllApproverTypes
-
allowAllItemClassRules
-
allowFyiNotifications
-
productionFunctionality
-
purgeFrequency
-
repeatedApprovers
-
distributedEnvironment
-
currencyConversionWindow
-
rulePriorityModes
-
forwardingBehaviors
Item Class Use
You may wish to use item classes other than those that came with a given transaction type, when implementing your business cases. There are two possible reasons to do so. First, you may wish to define attributes that have a distinct value for each item in the new item class. This would let you define conditions on these attributes, so your rules could account for per-item variations. Second, you may want AME to generate an approver list for each item in the item class.
Mandatory Attributes
The mandatory attributes related to implementing approvals business cases are:
-
ALLOW_DELETING_RULE_GENERATED_APPROVERS
-
ALLOW_REQUESTOR_APPROVAL
-
AT_LEAST_ONE_RULE_MUST_APPLY
-
EFFECTIVE_RULE_DATE
-
EVALUATE_PRIORITIES_PER_ITEM
-
REJECTION_RESPONSE
-
REPEAT_SUBSTITUTIONS
-
USE_RESTRICTIVE_ITEM_EVALUATION
-
USE_WORKFLOW
-
WORKFLOW_ITEM_KEY
-
WORKFLOW_ITEM_TYPE
Approver Groups
You must create or include approver groups in your transaction type. If a business case requires approvers from a group of approvers that does not exist as a chain of authority in an approver hierarchy supported by AME, then you must define an approver group containing the approvers. When you define the approver group, AME automatically creates the related approval-group actions in all of the action types that come with AME. It can be convenient to list in your requirements document the approver groups required by the business cases, for ease of reference during implementation. The list must contain for each group a name, description, and membership list. The members must be ordered, but their order numbers do not need to be unique. For example, if you assign all of a group's members the order number one, the group will typically be notified in parallel.
Rules and Rule Use
If your organization has more than a few approvals rules, it can be useful to represent the rules in an approvals matrix or a decision tree. An approvals matrix is just a table that had one row per rule. The right-most column contains one or more actions; the other columns contain sets of allowed values for a given attribute. Here's a fragment of an approvals matrix for expense reports, where the rules only depend on the expense category and the expense-report total:
| Expense Category | Total | Action |
| Travel | up to $1,000 | one supervisor |
| Travel | over $1,000 and not over $5,000 | two supervisors |
| Office supplies | up to $1,000 | one supervisor |
| Office supplies | over $1,000 and not over $5,000 | two supervisors |
(This table is a fragment because it does not account for important business cases. For example, it does not account for expense reports for travel totaling over $5,000. A real approvals matrix should generally be enumerating the business cases exhaustively, even when some of them require no approval, or merely require requestor approval.)
A decision tree typically has one column of nodes for each attribute, with each branch leaving a node representing a set of allowed values for the attribute represented by the node. The final (leaf) nodes represent actions, and a path from the root node to a leaf node represents a rule. The following decision tree is equivalent to the above approvals-matrix fragment:
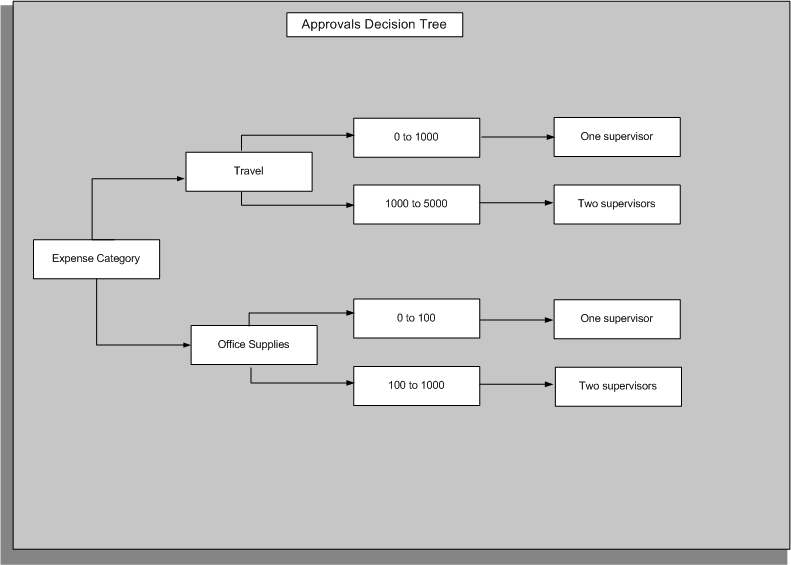
Decision trees are more flexible than approvals matrixes because they do not have to have the same attributes in the same order along all of the paths from the root node to the leaf nodes. This makes decision trees appropriate where your approval rules' conditions will not all be defined on the same set of attributes. It also complicates verifying that the decision tree represents all of your business cases. When you use a decision tree to represent your set of rules, make sure there is a one-to-one correspondence between your business cases and the tree's paths from the root node to the leaf nodes.
Whatever representation you choose for your sets of rules, keep in mind the following suggestions:
-
Make sure your rules capture every business case requiring approval.
-
Make sure your rules do not express conflicting outcomes for any given business case.
-
Minimize the number of rules that apply to any given transaction.
-
Minimize the total number of rules in a transaction type.
Test Cases
A test case should represent a business case. It should specify a value for each of the transaction type's active attributes (that is, all attributes that are mandatory, required by an action type used in a rule that the transaction type uses, or referenced by a condition used in such a rule). A test case should also specify the approver list that AME should generate in response to the test case's attribute values. AME should produce the correct approval process for all of a transaction type's test cases in a test environment, before the transaction type goes into production.
You may find it convenient to create test cases as transactions in the appropriate integrating application. This lets you test the application's AME integration by viewing approver lists in the application, as well as testing AME's behavior by viewing approver lists on AME's Test Workbench. It also avoids the tedium and possibility of error related to repeatedly entering test cases' attribute values in the Test Workbench's test-transaction pages.
Parallel Approval Process
Approval process parallelization shortens a transaction's approval process time. The parallel approval process imposes a hierarchical (tree) structure on the transaction's approver list and enables each part of the tree at a given level to progress through its notification-approval cycle asynchronous. This enables the approval process of each item in the transaction to continue irrespective of the progress of approval process of other items in the transaction and reduces the transaction's approval process time.
The detailed behavior of parallelization is as follows:
-
AME engine constructs an approver tree based on the parallelization configuration at each level.
-
The AME engine calculates the order numbers for each level and the approvers at each leaf of approver tree.
-
The approval process of nodes which are in parallel with respect to each other start at the same time.
-
There after, the approval process of each node proceeds independently.
Approver List
The approver list for a single transaction has a hierarchical (inverted tree) structure with six subordinate levels. Proceeding from the root downward, the levels are:
-
Item class
-
Item
-
Sub-list
-
Action type
-
Group or chain
-
Group or chain member
There can be many objects at a given level for a single object at the next higher level.
The following graphic illustrates an example of the parallel approval process:
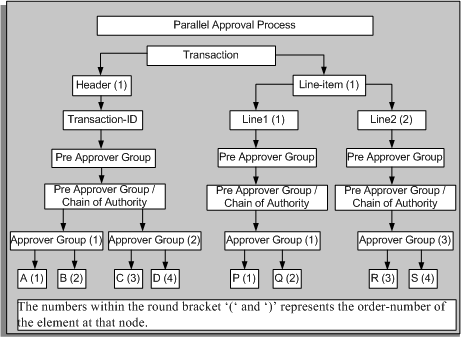
From the example given in the graphic, the approver-list tree requires the following eight approvals:
-
A
-
B
-
C
-
D
-
P
-
Q
-
R
-
S
For example, as seen in the graphic, the sub-tree under 'header' item class progresses independently irrespective of approval process of the sub-tree under 'line-item' item class because they have the same order number. The progress of approvers A, B, C, and D is independent from the progress of approvers P, Q, R, and S, as the item-classes are in parallel. The parallel approval process progresses as follows:
-
A and P are notified
-
A approves
-
B notified
-
B approves
-
C notified
-
P approves
-
Q notified
-
Q and C approve
-
D and R notified
-
D approves
-
At this stage, AME does not return any approvers as there are no approvers after D to approve.
-
R approves
-
S notified
-
S approves
-
AME completes the approval process.
If you decided to start the approval processes for each item class and again for each item at the same time, then there would be three sub-processes running in parallel. The process for the header would start with A. The line item 1 will start with P and line item 2 would start with R.
To shorten the transaction's approval process further, you could notify all of the approvers in a group or chain at once. Then the process for the header would begin by notifying A, B, C, and D. When all these approvers approve, the approval process for header is complete. Now the longest sub-process of the transaction's overall approval process would require just two notification-approval cycles. In terms of approver order numbers, the list would be:
-
1 - A
-
1 - B
-
1 - C
-
1 - D
-
1 - P
-
2 - Q
-
1 - R
-
2 - S
Returning to the example, the decision to parallelize approvals at the item class and item levels amounts to assigning order number 1 to all the item classes, and setting each item class' parallelization mode to parallel. Likewise, the decision to parallelize the transaction's approver groups and chains of authority amount to choosing consensus voting regimes for the approver groups 1 and 2. The example's final approver list, which is consistent with the order number and ordering mode decisions explained above is as follows:
-
1 - A
-
1 - B
-
1 - C
-
1 - D
-
1 - P
-
2 - Q
-
1 - R
-
2 - S
Suppressed Repeated Approvers
If the approver list has repeated approvers, then AME suppresses them in a dynamic manner and based on the option selected for the configuration variable repeatedApprovers. See: Configuration Variables
It notifies repeated approvers in the first occurrence during the approval process. For example, let us take the case of two items whose approval is progressing in parallel. Item 1 has three approvers, M, N, and O; Item 2 has three approvers, T, W, and O. The approvers are in serial for each item. With the repeated approver functionality, the occurrence of O in item 2 is set to repeated. However, during the approval process, based on the progress of approvals for item 2, the occurrence of O in item 1 becomes repeated.
How to Parallelize an Approval Process
This section explains the approval-process parallelizations options available at each level of the approver-list tree and at the same level as the approver-list tree. Please refer to the appropriate topics to learn how to choose an option for a given level of the tree.
The approval process parallelization options at each level of the approver-list tree are:
Item Classes
Item-class parallelization is controlled explicitly via the item class order numbers that a transaction type assigns the item class for which it has an item class use.
Items
An item-class' use parallelization mode determines the item order numbers of the item class' items. If the mode is serial, then the items' item order numbers are sequential, in ascending order of item ID. If the mode is parallel, then all the items are assigned the item order number one.
Sub-Lists
An item-class' sub-list mode determines the sub-list order numbers of the sub-lists in the approver lists of the item class' items. There are four options:
-
Serial mode assigns pre-approvers the sub-list order number one, authority approvers the sub-list order number two, and post-approvers the sub-list order number three.
-
Parallel mode assigns all approvers the sub-list order number one.
-
Pre-approvers first, then authority and post-approvers assigns pre-approvers the sub-list order number one, and other approvers the sub-list order number two.
-
Pre-approvers and authority approvers first, then post-approvers assigns pre-approvers and authority approvers the sub-list order number one, and post-approvers the sub-list order number two.
Note that all these modes, except the serial mode are only weakly consistent with the ordering implicit in the pre-approver/authority approver/post-approver nomenclature. That is, a pre-approver never follows an authority or post-approver, and an authority approver never follows a post-approver, under any of the sub-list modes.
Action Types
Action-type parallelization is controlled explicitly via the action-type order numbers that a transaction type assigns the action types.
The approval process parallelization options at the same level as the approver-list tree are:
Approver Groups and Chains of Authority
Approver groups and chains of authority occur at the same level of the approver-list tree, and so share the group-or-chain order number.
-
Approver groups
Approver-group parallelization is controlled explicitly via the approver-group order numbers that a transaction type assigns the approver groups.
-
Chains of Authority
A transaction type assigns a chain of authority ordering mode to each action type that generates a chain of authority. The serial mode gives the chains ascending group-or-chain order numbers, in the order that the chains are generated. The parallel mode gives all chains the group-or-chain order number one.
Approver-group and Chain of Authority Members
Approver-group members and chain of authority members occur at the same level of the approver-list tree, and so share the group-or-chain-member order number.
-
Approver-group Members
An approver group functioning as a pre-approval or post-approver group determines its members' group-or-chain-member order numbers using the group's voting regime, and possibly also the member order numbers assigned to static members or generated for dynamic members. (Dynamic members are assigned sequential member order numbers according to the order in which the group's SQL query returns the members.) Approver-group voting regimes can have any of four values. The values determine not only the group-or-chain-member order numbers, but also whether all group members or one must approve the item.
-
The serial regime assigns group-or-chain-member order numbers in ascending order of the member order numbers, breaking ties arbitrarily. All group members must approve.
-
The consensus regime assigns group-or-chain-member order number one to all members. All group members must approve.
-
The first-responder-wins regime assigns group-or-chain-member order number one to all members. In this case, only the first responder must approve; all other members' responses are recorded but ignored.
-
The order number regime sets each member's group-or-chain-member order number to the member's member order number. All group members must approve.
-
-
Chain of Authority Members
An action type that generates a chain of authority has a voting regime. The voting regime determines the group-or-chain-member order numbers of the approvers in the chains of authority generated by the action type. (This is even true for the chains of authority generated by the approver-group chain of authority action type. This action type ignores the approver-group voting regimes of the groups it uses.) An action type's voting regime can have any of the values allowed for an approver group's voting regime, other than the order-number regime.
AME Roles and Responsibilities
Oracle Approvals Management uses roles and responsibilities to define access levels. It provides security at two levels:
-
Data security, which enables you to define access to transaction types for a limited user role.
-
Function security, which enables you to define access to AME functions (modules) for a business analyst and administrator.
To implement function security, AME predefines
-
Permissions, which are a security function that can be used to determine access permissions of an user to an object.
-
Permission sets, which are groups of permissions or navigation functions and permission sets. These sets are used to create hierarchy of permissions.
-
Roles, which are generalized set of functions which can be assigned to a user or group of users.
-
Permission Sets
If you create your own roles, then use the following predefined permission sets to allow or prevent users from navigating to respective pages:
Note: You must specifically grant individual permission sets to enable users access to multiple pages. For example, if you want a user to access update pages and also want the user to view the details, then you must specifically grant view permissions.
| Permission Set | Functions |
|---|---|
| AME Attribute Viewer | Attribute tab access and view attribute details |
| AME Attribue Create | Attribute create, copy, and use existing |
| AME Attribute Update | Attribute update |
| AME Attribute Delete | AME Attribute Delete |
| AME Attribute Modifier | AME Attribue Create AME Attribute Update AME Attribute Delete AME Attribute Viewer |
| Permission Set | Functions |
|---|---|
| AME Condition Viewer | Conditions tab access and view condition details |
| AME Condition Create | Condition Create (both regular and list mod) |
| AME Condition Update | Condition Update (both regular and list mod) |
| AME Condition Delete | AME Condition Delete |
| AME Condition Modifier | AME Condition Create AME Condition Update AME Condition Viewer AME Condition Delete |
| Permission Set | Functions |
|---|---|
| AME Action Viewer | Actions tab access and view all details |
| AME Action Type Create | Action Type Create permission, and also action type config create |
| AME Action Type Update | Action Type update and action type config create |
| AME Action Type Delete | Action Type Delete |
| AME Action Type Modifier | Action Type Create Action Type Update Action Type Delete |
| AME Action Create | Action Create |
| AME Action Update | Action Update |
| AME Action Delete | Action Delete |
| AME Action Modifier | AME Action Create AME Action Update AME Action Delete AME Action Viewer |
| AME Action Type Config Create | Add action type config |
| AME Action Type Config Update | Action Type Config Update |
| AME Action Type Config Update | Action Type Config Update |
| AME Action Type Config Delete | Action Type Config Delete |
| AME Action Type Config Modifier | AME Action Type Config Create AME Action Type Config Update AME Action Type Config Delete AME Action Viewer |
| Permission Set | Functions |
|---|---|
| AME Approver Group Viewer | Approver Group Tab access and view all details |
| AME Approver Group Create | Approver group Create in transaction type specific create page |
| AME Approver Group Update | Approver Group Update in both transaction type specific update and global update page |
| AME Approver Group Delete | Approver group Delete |
| AME Approver Group Config Create | Add config to existing groups |
| AME Approver Group Config Update | Approver Group Config Update |
| AME Approver Group Config Delete | AME Approver Group Config Delete |
| AME Approver Group Modifier | AME Approver Group Create AME Approver Group Update AME Approver Group Delete AME Approver Group Viewer |
| Permission Set | Functions |
|---|---|
| AME Test Viewer | Test Workbench tab, view test details, run real and stored test cases, view approval process stages access |
| AME Test Create | Test Case Create/Save |
| AME Test Update | Test Case Update |
| AME Test Delete | Test Case Delete |
| AME Test Modifier | AME Test Create AME Test Update AME Test Delete AME Test Viewer |
| Permission Set | Functions |
|---|---|
| AME Rule Viewer | Rules tab access, view rule details, rules table view in dashboard page |
| AME Rule Create | Rule Create/Duplicate/Use Existing |
| AME Rule Update | Rule Update |
| AME Rule Delete | Rule Delete |
| AME Rule Modifier | AME Rule Create AME Rule Update AME Rule Delete AME Rule Modifier |
| Permission Set | Functions |
|---|---|
| AME Admin Dashboard Viewer | Administrator dashboard access with view page of transaction type |
| AME Admin Create | Transaction Type Create |
| AME Admin Update | Transaction Type Update |
| AME Admin Delete | Transaction Type Delete |
| AME Admin Modifier | AME Admin Create AME Admin Update AME Admin Delete AME Admin Dashboard Viewer |
| Permission Set | Function |
|---|---|
| AME Business Dashboard Viewer | View Dashboard page: Includes business dashboard and transaction type view page |
| Permission Set | Function |
|---|---|
| AME Setup Report Viewer | Access to Setup Report to view details |
| AME Exceptions Log Viewer | Access to Exceptions Log page to view details and purge permission |
| AME Config Variable | Access to configuration variables page with permission to create/Modify transaction type specific values |
| AME Calling Applications | Permission set to be used for data security grant on AME Transaction Types object |
Responsibilities
An Oracle Applications' user must have one of the two available AME end-user responsibilities to use AME. One responsibility is for non-technical (business) users while the other is for technical (administrative) users. The remainder of this guide indicates when AME user-interface functionality requires administrative privileges. Otherwise, you may assume that the business-user responsibilities can access the functionality that this guide describes.
AME predefines the following responsibilities:
-
Approvals Management Business Analyst responsibility enables you to access areas of the user interface that do not require expertise in SQL or PL/SQL programming, or technical knowledge of Oracle Applications.
-
Approvals Management Administrator, which has full access to AME's user interface. You typically must grant at least one user administrative privileges in AME, to perform technical tasks such as setting AME's configuration variables.
Note: If you are an existing customer, then you must ensure to assign these responsibilities to the existing users. You must run the Approvals Management Post Upgrade Process to migrate existing users to the new responsibilities. See: Implementing Oracle Approvals Management
Roles
The following roles are predefined:
-
Approvals Management Process Owner - has view only access to Business dashboard, Attributes, Conditions, Action Types, Approver Groups, Test Workbench, Rules. Also access to the setup report page.
-
Approvals Management System Viewer - has view only access to the Admin dashboard and Setup Report.
-
Approvals Management Business Analyst - has Business dashboard view access, attributes, conditions, groups, test, rules access with create, update, delete permissions. Access to setup report page and configuration variables page with permission to change transaction specific configuration values. Can create, update, delete actions; create, update, delete action type configuration values but cannot create, update, delete action types.
-
Approvals Management System Administrator - Admin dashboard access, setup report, exceptions log access, configuration variables access with permission to define transaction type specific values. Can create, update, delete transaction types.
-
Approvals Management Administrator - Has all access rights of Business Analyst and System administrator. Can create, update, delete action types. Can modify default configuration values.
Implementing Oracle Approvals Management
To implement AME, you need to carry out the following steps:
-
Install the application.
AME's installation routines and administration features determine which applications can use AME. Installation and administration are typically jobs for a technical specialist. Installation is generally done only once, and administrative tasks (using AME's Administrator Dashboard) are usually only necessary to enable a new application to use AME, or to access or clear a transaction's error log.
-
Set up AME security by completing the following:
-
Attach the predefined roles to a user or group of users.
AME uses the Role Based Access Model (RBAC) to provide users access to AME functions. This access model has the following predefined roles:
Role Description Approvals Management Administrator Role inherits Process Owner role and System Administrator role. User with this role can create action types and modify default configuration variables. Approvals Management Business Analyst Role provides full access to Business Analyst dashboard pages. Role does not provide access to default configuration variables and create Action Types. Approvals Management System Viewer Role provides view only access to Administrator dashboard pages. Approvals Management System Administrator Role enables users to create, update, or delete transaction types. Users can access exception logs and configuration variables. This role inherits the System Viewer role. Approvals Management Process Owner Role provides view access to all Business Analyst Dashboard view pages. The Approvals Management Administrator role inherits all the other roles. Based on your business requirements, you can assign specific roles to users in your enterprise.
Each of the five predefined roles has a specific set of functional grants. The grants provide users access to AME. To enable functional grants, you must assign roles to users using the User Management page. For information about accessing User Management page, see: Oracle E-Business Suite System Administrator's Guide - Security
Set up user access as follows:
-
Login as Administrator.
-
Select the User Management responsibility.
-
Select the Users page.
-
Search for the user to whom you wish to grant AME roles.
-
In the results table, click Update. In the Update User page, you can view user details along with a list of roles available to the user.
-
Click Assign Roles.
-
Select the roles from the resulting list and click Apply.
When you assign any of the five predefined roles to a user, you are indirectly assigning AME responsibilities to the user.
Note: You can create custom roles to meet your requirements. See: Oracle E-Business Suite System Administrator's Guide - Security. For information about permission sets for roles, see: AME Roles and Responsibilities.
-
-
Grant data access to users.
As AME restricts access to transaction types using Data Security, you grant users access to the transaction types using the Grants page. Set up user access as follows:
-
Login as Administrator.
-
Select the Functional Administrator responsibility.
-
Select the Grants tab.
-
Click Create Grant.
-
Select Specific User as grantee type.
-
Select the user as grantee key.
-
Select AME Transaction Types as object:
-
All rows: This grants access to all AME Transaction Types to the User
-
Instance: This grants access to a specific AME Transaction Type specified by the following parameters: FND_APPLICATION_ID => Application ID of the application to which the transaction type belongs TRANSACTION_TYPE_ID => Unique identifier of the AME Transaction type within application
-
Instance set: This grants access to one or more AME Transaction Types specified by the following parameters:
-
Use the predefined instance set AME Transaction Type Instance Set.
-
In the next page, select FND_APPLICATION_ID as Parameter1 and a wild card search string for TRANSACTION_TYPE_ID as Parameter2.
-
-
-
In the next page there will be three options for instance type: select AME Calling Applications as the permission set.
-
Review and Finish.
For more information, see: Oracle E-Business Suite System Administrator's Guide - Security
-
Note: If you are an existing customer, then you must ensure your existing users have the Approvals Management Business Analyst and Approvals Management Administrator responsibilities. You must run the Approvals Management Post Upgrade Process to migrate existing users to the new responsibilities. See: Running the Approvals Management Post Upgrade Process
-
-
Set the user profile - AME:Installed
This user profile is predefined by AME and is available for integrating applications such as Internet Expenses, iProcurement, to make use of. It is set at the application level and can be used by that application to determine if AME is installed and if so what action to take. In some instances this determination is used to decide if AME should be used for the approval process of that application, this is not always the case however. Please review the specific documentation of the integrating application to determine if that application uses this user profile.
-
Configure transaction types.
An application administrator should review AME's configuration-variable values as soon as AME is installed and its security has been set up. AME has the following kinds of configuration variables:
-
Single-Valued Configuration Variables
AME's configuration variable distributedEnvironment has a single value for the entire application. This variable describe various aspects of AME's computing environment. You must set its value for AME to function properly.
-
Transaction-Type-Specific Variables
Other AME configuration variables can have a default value, as well as a value for each transaction type. These variables are:
-
adminApprover
-
allowAllApproverTypes
-
allowAllItemClassRules
-
allowFyiNotifications
-
currencyConversionWindow
-
forwardingBehaviors
-
productionFunctionality
-
purgeFrequency
-
repeatedApprovers
-
rulePriorityModes
These variables determine many aspects of how AME generates a transaction type's approval processes and are similar to the mandatory attributes. The difference is, their values are always constant for all transactions in the transaction type. Ensure you are satisfied with these variables' default values before using AME.
-
-
Note: You must run the purge utility from the concurrent manager daily to remove old transaction data. Failure to perform this task will eventually result in performance degradation and unlimited growth of the size of certain AME database tables. See: Purging Transaction Data
Implementing the Transaction Type
To implement the transaction type, you need to specify or create, if required, the following components of the approval process:
-
Create item-class use (Optional).
Once you have documented the approval processes you want a transaction type to implement, you can begin implementing the transaction type. The first step is to register any custom item-class use your transaction type requires.
-
Create transaction attributes (Optional).
In AME, an attribute is a named business variable such as TRANSACTION_AMOUNT, whose value AME fetches at run time, when it constructs transactions' approver lists. Only a user with the Application Administrator responsibility can create or alter attributes (using the Attributes tab), because doing so generally requires entering or changing an SQL query.
AME includes the attributes commonly required for the transaction type(s) of each application that can use AME. If your organization has customized an application, or has defined flexfields in it, and wants to use these in the application's approval processes, a user with the AME Application Administrator responsibility must create new attribute names representing the customizations or flexfields, and must define SQL queries that fetch their values at run time. Business users can only select from existing attributes, when they create conditions for AME rules.
-
Create conditions (Optional).
In AME, a condition specifies a list or range of attribute values required to make a rule apply to a transaction. For example:
USD1000 < TRANSACTION_AMOUNT < USD5000
You create and maintain conditions using the Conditions tab.
-
Create approver groups (Optional).
You can create AME rules to include one or more approver groups in a transaction's approver list. You create and maintain approver groups using the Approver Groups tab. You must create an approver group before using it in an approval-group rule. You can also add existing approver groups to an approval-group rule.
-
Prepare to use the action types.
You add action types to a transaction type using the Action Types tab. The action types available to use are:
-
Predefined action and approver types
AME comes with many predefined action types and actions for them. The predefined action types currently support three types of approvers: HR employees (in the HR supervisory hierarchy), HR positions (in the HR position hierarchy), and Oracle Applications (FND) users. The predefined action types ascend the HR hierarchies in many different ways.
An action determines which approvers are included in a transaction's approver list. Typically an action type represents a way to ascend a certain organizational hierarchy, including in a transaction's approver list an appropriate chain of authority from the hierarchy; and an approval specifies where the chain starts and ends. If your organization wishes to require approvals from an organizational hierarchy that none of AME's predefined action types ascend, you need to use a custom action type. The procedure to create a custom action type is detailed within the AME Developers guide.
-
Custom action and approver types
AME can support approvers from any originating system registered with Workflow Directory Services (that is, any entity that can function in Workflow as an approver). If your organization requires chains of authority structured differently than those generated by AME's predefined action types, or approvals from approvers in an originating system that AME does not yet support, you may elect to code a custom action type. This requires a significant programming effort (a typical action-type handler PL/SQL package is several hundred lines of code), and an application administrator must register the resulting PL/SQL package with AME. You may also have to register the non-predefined approver type with AME. Currently there is no user interface to register an approver type; one must do so from the SQL*Plus command line. We encourage you to request that AME development release a patch supporting the approver type your organization requires, rather than registering the approver type yourself.
-
Add approvals to existing approval types
Your organization may plan to use AME's predefined action types, but may require additional actions. For example, the supervisory-level action type comes with actions for a supervisory hierarchy having at most 10 levels. If your organization has 15 levels, you must create supervisory-level actions for levels 11-15. An application administrator can add these action types using the actions tab.
-
Preparing to use the Job-Level approval types
If your organization plans to use one of the job-level action types, it must first assign a job level to each job defined in HRMS (that is, it must first populate the approval_authority column of the HRMS table per_jobs). Your organization should also have a business process for maintaining job levels.
-
-
Define approval rules.
With your item-class use, attributes, conditions, approver groups, action types, and actions prepared, you can create your approval rules using the Rules tab. Again, an approvals matrix or decision tree may serve as a convenient checklist.
In AME, an approval rule associates one or more conditions with an approval action. The rule applies to a transaction if and only if all of the rule's conditions are true for the transaction.
Each application that can use AME defines one or more transaction types. Each transaction type has its own set of approval rules. Several transaction types can share attribute names, while defining separate use for those attribute names. This makes it possible for several transaction types to share conditions and rules. See: Using Attributes.
-
Test approval rules.
Once a transaction type has a set of rules, it is critical to test the rules, to ensure they apply to the proper cases and do not contain logical gaps or inconsistencies. You can store these test cases to reuse later.
There are three ways to test a transaction type:
-
Create a transaction in the integrating application, and use the application's user interface to view the transaction's approver list.
-
Create a transaction in the integrating application, and use AME's Test Workbench tab to view the transaction's approver list.
-
Create a test transaction and view its approver list using AME's Test Workbench tab.
-
-
Create custom transaction types.
It is possible to create a custom transaction type from scratch, for instance to use AME as the approvals engine for a custom application. Transaction-type creation is beyond the scope of this guide. If your organization wants to create a custom transaction type, contact Oracle Support and request the Oracle Approvals Management Developer Guide. Also see: Creating a Transaction Type.
-
Configure Oracle applications to use AME.
An Oracle Application should be configured to use AME only after thoroughly testing the set(s) of rules defined for that application's transaction type(s) in AME. Consult the application's user or technical documentation to learn how to configure the application to use AME.
Running the Approvals Deviation Report
You can run the Approvals Deviation report to track transaction deviations after the approval process is complete. This report displays deviations to the generated approver list.
Before you run this report, ensure that you set the configuration variable Record Approval Deviations to Yes at transaction type level to run and track deviations.
-
Using the System Administrator responsibility, navigate to the Submit Request window.
-
Enter Approvals Deviation Report as the name of your request.
-
Click in the Parameters field if the Parameters window does not open. If the Parameters window opens by default, then enter the parameter details specified in the next steps.
-
Select the application for which the transaction types exist.
-
Select the transaction type for which you want to run the report.
-
Specify the From and To dates. You can run the report for transactions between the specified dates.
-
Click OK.
-
Click Submit to purge the deviation data.
Purging Transaction Data
You can run the purge utility to remove old transaction data. You can define the age of transaction data by setting the required value for the configuration variable purge Frequency. See: Configuration Variables
To purge transaction data
Use the Submit Request window.
-
Using the System Administrator responsibility, navigate to the Submit Request window.
-
Enter Approvals Management Transaction Data Purge as the name of your request.
-
Click in the Parameters field if the Parameters window does not open. If the Parameters window opens by default, then enter the parameter details specified in the next steps.
-
Select the transaction type whose old data you want to purge.
-
Select the transaction to be purged. You can purge all completed, in progress, approved, and rejected transactions.
-
Click OK.
-
Click Submit to purge the old transaction data.
Running the Approvals Deviation Data Purge Process
You can run the Approvals Deviation Data Purge process to purge data of completed transactions. Purging of data is based on a specified date and the type of transaction.
Before you run this process, you must set the date for the system profile AME Deviation Purge Date, as all deviation data to be purged is based on this date. If you do not specify the date or leave it as null, data will be purged till the date specified in the Purge Up To Date parameter.
To Run the Approvals Deviation Data Purge Process
-
Using the System Administrator responsibility, navigate to the Submit Request window.
-
Enter Approvals Deviation Data Purge as the name of your request.
-
Click in the Parameters field if the Parameters window does not open. If the Parameters window opens by default, then enter the parameter details specified in the next steps.
-
Select the application for which the transaction types exist.
-
Select the transaction type whose data you want to purge.
-
Specify the date till which you want to purge data.
-
Click OK.
-
Click Submit to purge the deviation data.
Running the Approvals Management Post Upgrade Process
If you are an existing customer, then you must ensure your existing users have the Approvals Management Business Analyst and Approvals Management Administrator responsibilities. You must run the Approvals Management Post Upgrade Process to migrate the existing users to these responsibilities.
Use the Submit Request window.
To run the Approvals Management Post Upgrade Process
-
Using the System Administrator responsibility, navigate to the Submit Request window.
-
Enter Approvals Management Post Upgrade Process as the name of your request.
-
Click in the Parameters field if the Parameters window does not open. If the Parameters window opens by default, then enter the parameter details specified in the next steps.
-
To migrate, do one of the following:
-
Select MIGRATE_USERS to migrate the existing users.
-
Select MIGRATE_ITEM_CLASS_USAGES to migrate the item class use.
-
Select MIGRATE_ALL to migrate users and item class use.
-
-
Click OK.
-
Click Submit to migrate existing users to the Approvals Management Business Analyst and Approvals Management Administrator responsibilities.