Implementing iRecruitment
iRecruitment Implementation
What type of user does iRecruitment support?
iRecruitment supports the following types of users:
-
Site visitor: A user who accesses the external web site but does not create an account.
-
Registered user: A user who registers on your web site and provides a minimum amount of personal information. When an external visitor registers in iRecruitment, iRecruitment creates an Oracle HRMS user with the e-mail address as the username.
-
Employee: A user who can apply to internal job postings, perform employee referral, and interview tasks.
-
Manager or recruiter: A user who can access the entire functionality. Using iRecruitment, managers or recruiters can:
-
Post and manage vacancies
-
Process candidates and applicants
-
Manage recruitment communication
-
Create and manager offers
-
Create and manage interviews
You must assign the iRecruitment Manager and iRecruitment Recruiter responsibilities to your managers or recruiters to enable them to access iRecruitment using their standard self-service login.
-
-
Agency user: An external person who belongs to a recruiting agency and accesses iRecruitment to conduct recruiting activities such as creating candidates and applying on behalf of candidates. You assign the iRecruitment Agency responsibility to agency users to enable them to access iRecruitment.
Is a HR Professional User Interface delivered with iRecruitment?
You need Oracle HRMS to hold work structure information that is used in iRecruitment. An HR responsibility - iRecruitment HRMS Manager, is supplied to customers who do not have the complete Oracle HRMS application. Using this responsibility they can access all the HR functionality they require to run iRecruitment.
Can I migrate legacy data into iRecruitment?
Yes. You can migrate data such as candidate information and vacancy details to the iRecruitment system. You can also import other data such as qualifications and competencies. To load your legacy data to the Oracle database, use Application Programming Interfaces (APIs).
What are the security features of Oracle iRecruitment?
You can define user profiles, security profiles, responsibilities, and menu structures to control who uses iRecruitment. You can create security profiles to control manager access to vacancy information. Managers can set up vacancy security to define who has access to vacancy details.
Do we define users for iRecruitment candidates?
When an external site visitor registers in iRecruitment, an Oracle HRMS user is automatically created using the visitor's e-mail address as the username. The iRecruitment External Candidate responsibility is assigned to the user.
Can I use personalization options in iRecruitment?
Yes. Since iRecruitment uses the standard OA Framework, you can use all of the personalization options. To enable administration-level personalizations you need to set the profile options that are available for personalization as required:
-
Personalize Self–Service Defn
-
Disable Self–Service Personal
Can I modify flexfields that are available on the iRecruitment web pages?
You can use Personlization Framework, a component of the Oracle Applications (OA) Framework technology to customize pages and flexfields. You can restrict the display of the whole flexfield, or certain segments of a flexfield.
Can I configure the existing notifications in iRecruitment?
A number of predefined notifications are supplied with iRecruitment. For example, candidates can receive notifications about matching jobs and new vacancies. Managers can receive notifications about the status of the vacancy that they have created. They get a vacancy approval notification if the vacancy is approved. You can use the Application Developer responsibility and the Messages window to edit the contents of the notification messages.
Can I use iRecruitment to meet country-specific recruitment requirements?
Yes. iRecruitment supports localization level personalization. You can use this feature to meet legislative or country-specific recruitment requirements. For example, you can hide the gender field in the Enter Applicant Details page at the localization level to conform to the legal requirements of a specific country.
Does iRecruitment support the approval process for vacancies and job offers?
Yes. You can set up an approval process to route vacancies and offers to appropriate managers for approval.
Can I create common job description for vacancies?
Yes. The Default Postings feature enables you to enter a set of values to use as a default whenever a particular business group, organization, job, or position is selected for a vacancy. For example, if you create a lot of similar job postings for administration jobs, then you could set up a default job posting to use whenever you select Administrator as the job for a vacancy.
How do I ensure that the offer letters follow our enterprise branding and HR policy standards?
You can use offer letter templates or standard descriptions to create offer letters for your business group, organization, jobs, or positions.
How does iRecruitment help my enterprise work with agencies to manage the recruitment process?
Enterprises can use agencies functionality to manage a range of recruitment activities. Agencies can register their candidates with iRecruitment and apply for jobs on their behalf. Enterprises can process agency candidates to fill job openings or hand over the complete placement process to an agency.
Is the candidate data secure when the enterprise works with multiple agencies using iRecruitment?
Yes. Agencies can view data only of their candidates and cannot access details of candidates who are self-registered or from other agencies. For example, agencies can view details of the candidates that they themselves registered or candidates associated with their agencies by managers.
Can I validate the email addresses candidates supply when they register?
You can set up a business event to send an e-mail to candidates when they register, instructing them to reply to the e-mail to confirm that their e-mail address is correct. This enables you to confirm if the candidates have supplied valid e-mail addresses. You can then use Application Programmatic Interfaces (APIs) to delete records of candidates who do not respond within a certain time period.
Does iRecruitment support multi-lingual and multi- currency requirements?
Yes, iRecruitment supports multi-lingual and multi -currency requirements. You can configure the application to address specific local and cultural requirements.
What is High Availability?
When you shut down the iRecruitment instance to carry out maintenance tasks, your job site is not available for candidates to search and apply for jobs. You can use the iRecruitment High Availability functionality to set up an alternate or high availability instance to make the basic candidate job site available. This functionality enables you to switch between the two instances to continuously support the candidate job site.
What are the iRecruitment features accessible through the HA functionality?
The iRecruitment High Availability solution supports only iRecruitment Candidate functionality. You can maintain a basic job site that enables job seekers to apply for jobs and enter basic information such as their e-mail address, first name, and last name.
Can I remove the old data in iRecruitment?
Oracle iRecruitment provides the iRecruitment Purge Old Data process to remove the candidate and applicant data from the database. This process helps you meet any Data Protection statutory requirements in your country. You can select any deletion method from the various options and identify time criteria for deleting the inactive data.
Are there any processes that I should schedule to run regularly for iRecruitment?
You can schedule the Index Synchronization process to run regularly to update the indexes for job postings and resumes.
Introduction
iRecruitment Overview
iRecruitment is a web-based recruitment solution that enables your enterprise to manage all recruitment activities using a single self-service interface and provides an easy-to-use interface for job seekers.
iRecruitment includes a separate homepage for each group of iRecruitment users: site visitors, registered users, managers, recruiters, and agency users. The homepages outline the iRecruitment functions available for each user, and provide direct access to these functions.
iRecruitment for Job Seekers
When job seekers visit your enterprise's job site, they can search for jobs, refer jobs to other individuals, and add jobs to a temporary job basket. They must register with the job site to apply for jobs.
See: Using the Candidate Interface
iRecruitment for Contingent Workers
Contingent workers can search and apply for jobs using iRecruitment. They can track their job applications, interview schedules, communicate with recruiters, and receive job offers online.
Contingent workers can use iRecruitment, if enterprises complete the requisite setup steps. Depending on business requirements, enterprises can enable contingent workers to apply for internal, external, or both internal and external jobs.
iRecruitment for Recruiters and Managers
iRecruitment enables managers and recruiters to manage both their vacancies and applicants directly using a single interface.
The following figure shows the typical path through the recruitment process, highlighting the steps that managers and recruiters can perform in iRecruitment.
A Typical Recruitment Cycle
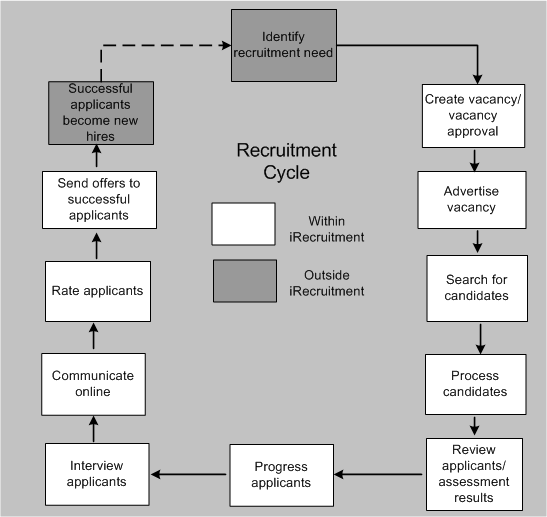
Create and Advertise Vacancies
After your enterprise identifies staffing requirements, managers can create vacancies. They can provide vacancy details such as the job description, skills, and details of the recruiting team. Managers can also associate an assessment with a vacancy, for example, a test to measure the knowledge and skills of applicants. Assessments can be created and administered in more than one language.
Using the Default Job Advert functionality, recruiters can create default job posting information for vacancies. When managers create vacancies, the default job posting details automatically appear on the Create Vacancy page, thus reducing the effort required to create vacancies.
Managers can route their vacancies through an approval process to ensure that vacancy details are correct. Following approval, managers can post the vacancies to the third-party recruiting sites with whom the enterprise has an agreement. iRecruitment automatically posts vacancies to your enterprise's internal and external job sites.
Managers can update vacancy details, for example, to change the location of a vacancy. If your enterprise has multiple vacancies that contain the same information, managers can copy vacancies using the duplicate functionality, and then edit the vacancy information as required.
Search for Candidates
Managers can search for candidates using a variety of search methods. They can:
-
Search for candidates using criteria such as work preferences, skills, and employment status.
-
Search for individual candidates using last name or e-mail ID.
-
Perform keyword searches on the resumes of candidates. For example, they can search for resumes containing a particular skill or qualification.
When managers search for candidates using criteria such as skills, keywords, salary, and work preferences, iRecruitment identifies candidates who match the specified criteria. For example, when managers search for candidates whose skills match those of a particular vacancy, iRecruitment showing for each a skills match percentage. This function enables managers to make informed decisions when processing candidates and applicants.
Process Candidates
Managers can view candidate details and:
-
Allocate a consideration level to indicate their level of interest in the candidates.
-
Invite candidates to apply for their vacancies.
-
Refer candidates to other managers.
-
Reject candidates for a specific vacancy.
To view details of candidates along with application details, managers can use the Candidate Details page or the Candidate Profile page, based on how an enterprise configures iRecruitment:
-
Candidate Details page
The Candidate Details page is a multi-tabbed region page that shows complete details of a candidate along with the application information.
-
Candidate Profile page
The Candidate Profile is a single page interface that provides a comprehensive picture of candidates along with application information. It helps managers to understand the skills match percentage of applicants and analyze the applicant pool.
Review Applicants using Assessment Results
Managers can use assessment or test results to evaluate applicants for vacancies. They can identify applicants who have passed the vacancy test to progress them to the next level of the recruitment process.
Progress Applicants
After managers review applicants, they can progress applicants through the interview process and update applicants' details. They can use the Background Check function to request a background-check to verify information such as the education history, qualifications, and relevant experience of applicants. Managers can use the Mass Update functionality to change the status of multiple applications for a vacancy.
Note: To use the background-check functionality, your enterprise must be registered with a background check vendor.
Interview Applicants
Managers can schedule interviews for applicants. When managers create interviews, they can provide details such as the interview type, date and time, location, category, status, internal and external contact name and numbers, interviewers, notes to candidate, interview notes, feedback and result (recorded when the interview is completed).
Applicants can view scheduled interviews in the My Interviews region of their home page. They can also view the interview details along with the interview notes on the Applications Details page.
Communicate Online
iRecruitment enables communication between the recruitment team members and candidates either individually or as a group. Applicants can verify their job application status and check additional information for vacancies online using the communications module. Hiring managers and recruitment team members can discuss interview feedback. Recruiters can check with candidates their suitable time and date for interviews.
Rate Applicants
Managers can rate applicants for their vacancies based on their performance during the recruitment process. They can sort applicants in the rating order to select applicants for their vacancies.
Send Offers
Managers can create and send offers to successful applicants. They can track applicants responses to offers online and extend the offer duration, if required.
Hire Applicants
To hire iRecruitment applicants, managers or recruiters can initiate the hiring process from iRecruitment and complete the entire hiring process. If enterprises use Oracle SSHR, then they can configure iRecruitment to enable managers to launch the hire applicant process directly from offer details and complete the hire process.
Employee Interface
Use the Employee Candidate Home Page
Employees can search for internal jobs, maintain their accounts, and apply for jobs using the Employee Candidate Home page.
Refer Candidates
Employees can search for vacancies posted on the internal referral site using the Employee Referral function. Employees can create candidate profiles, and refer candidates to vacancies posted on the internal referral site. They can refer candidates to managers who can pursue the candidate for a suitable vacancy.
Perform Interview Tasks
Employees who are interviewers, can view and update interview details using the iRecruitment Employee responsibility. The Application tab of the Candidate Details page displays the applications for which the employee is an interviewer. Employees can update interview details based on their interviewer role. Only primary interviewers can update interview details.
Key Functions of iRecruitment
iRecruitment provides the following features to support the recruitment process in your enterprise.
Analyze the Recruitment Process
The Performance Management Viewer (PMV) status and detail reports supplied with iRecruitment help managers and recruiters to analyze various measures of the recruitment process. You need a full license to modify or create new Discoverer reports.
Use Third-Party Agencies for Recruitment
If you work with recruiting agencies, then you can manage a range of activities using the Agency functionality. You can:
-
Identify one or more agencies to recruit for a vacancy.
-
Specify how long the agencies can access the vacancy, and limit the number of applicants that agencies can submit.
-
Define whether agencies can manage all applicants for a vacancy.
Track Applicant Data for Compliance Purposes
iRecruitment enables enterprises to track applicant data for business requirements, such as:
-
Compliance with the Office of Federal Contract Compliance Programs (OFCCP) regulations for U.S. government contractors.
-
Data analysis for recruitment management.
Enterprises can use the applicant data for internal audit purposes. For example, enterprises can review applicant searches that managers perform to check for EEO compliance.
For information about functional solutions to meet the OFCCP requirements, see Oracle iRecruitment Response to the OFCCP Internet Applicant Rule, an Oracle white paper on My Oracle Support, Note ID 418762.1
Use the iRecruitment High Availability Feature
iRecruitment provides the high availability (HA) functionality to set up an alternate or high availability instance to make the basic candidate job site available when you shut down the iRecruitment instance to carry out maintenance tasks. This functionality enables you to switch between the two instances to continuously support the candidate job site. Using the basic job, site job seekers can apply for jobs and enter basic information such as their e-mail address, first name, and last name.
Virus Checks
Oracle iRecruitment's integration with Symantec AntiVirus engine enables you to perform virus checks on any documents uploaded to your system. You can use this feature to secure your systems from virus attacks.
Integration with Other E-Business Products
Oracle HRMS and Oracle iRecruitment use a single data repository to enable you to share common information for recruitment purposes. This information includes: work structures, competencies, applicant assignments, job requisitions, vacancies, and compensation plans for applicants. Oracle iRecruitment uses Oracle Approvals Management to provide flexible approval processes for vacancies and offers. Integration with Oracle SSHR enables managers to launch the hire applicant process directly from offer details and complete the hire process for iRecruitment applicants. Since iRecruitment uses the standard OA Framework, you can use the personalization options to configure data, content, labels, links, and logos to address the specific goals of your job site.
Key Concepts
The following topics provide conceptual and procedural information about using iRecruitment:
Using the Manager and Recruiter Interface
-
For information on manager and recruiter tasks, see: Overview of Manager and Recruiter Tasks
-
For information on using assessments, see: Creating and Managing Assessments for iRecruitment
-
For information on how to create and manage vacancies, see: Creating and Maintaining Vacancies
-
For information on how to search for vacancies, find candidates, and view applicants, see: Searching for Vacancies to Manage Vacancies and to Process Candidates
-
For information on how to search for candidates, see: Working with Candidates
-
For information on how to search for applicants, see: Working with Applicants
-
For information on how to process candidates and applications using the Candidate Details page, see:
-
For information on how to use the Candidate Profile page, see: Using Candidate Profile
-
For information on iRecruitment Communication functionality, see: Understanding iRecruitment Communication
-
For information on how to create communication messages, see: Creating Topics and Adding Messages for Recruitment Communication and Managing Communication for Multiple Applicants
-
For information on how to manage interviews in iRecruitment, see: Managing Interviews
-
For information on how to create and update interviews, see: Creating and Updating Interviews, and Creating Interviews for Multiple Applicants
-
For information on how to create and send offers to applicants, see: Creating Offers and Sending Offers
-
For information on how to enter an applicant's response for an offer and update an offer, see: Updating Offers
-
For information on how to extend the duration of an offer and complete other offer tasks, see: Maintaining Offers, Withdrawing Offers and Closing Offers
-
For recruitment summary, see: Viewing the Recruitment Summary
Using the Agency Interface
-
For information on how to search for agency candidates, and create details of candidates, see: Working with Candidates -Agencies
-
For information on how to view details of applicants, and progress applicants if you get the permission to manage a vacancy, see: Working with Applicants - Agencies
-
For information on how to search for agency vacancies, and progress applicants, see: Searching for Vacancies - Agencies
Using the Candidate Interface
For information on the tasks that site visitors and registered users can perform in iRecruitment, see: Using the Candidate Interface
Using the Employee Interface
-
For information on how employees and contingent workers can use iRecruitment, see: Using iRecruitment as Employee Candidates or Contingent Workers
-
For information on how to manage employee referrals, see: Managing Employee Referrals
-
For information on how to manage interviews, see: Managing Interview Tasks
Implementation
Implementation Steps for iRecruitment
The following section gives you the implementation steps that are required to enable you to run iRecruitment. For additional information on running iRecruitment in a production environment, please see the detailed chapters in this Implementation Guide.
The number of required implementation steps depend on your installation of Oracle HRMS. The minimum steps are given first. These minimum steps are required to set up and run iRecruitment. You can then carry out the additional steps to implement and configure iRecruitment to suit the specific needs of your enterprise.
Minimum Implementation Steps for iRecruitment
The following section lists the minimum implementation steps that are required for you to be able to use iRecruitment.
-
Install Oracle HRMS
If you have recently implemented Oracle HRMS, you may wish to migrate legacy data to your new Oracle HRMS system. To do this, use Application Programmatic Interfaces (APIs) to load your legacy data from extracted flat files to the Oracle database.
The full list of public APIs and the purpose of each API is available in the Oracle Integration Repository. See: Oracle Integration Repository Overview, Oracle Integration Repository User Guide
For information on how to access and use Oracle Integration Repository, see: Accessing Oracle Integration Repository, Oracle Integration Repository User Guide
For information on how to call APIs, see the technical essay APIs in Oracle HRMS, Oracle HRMS Implementation Guide
Decide which components you want to migrate to the iRecruitment system. You will typically import the following components:
-
Job Postings - create vacancies for each advert and map the text in your adverts to the fields in iRecruitment.
-
Candidates - map the name and address information in your legacy system to the iRecruitment system.
-
Applications - map the work structures in your legacy system to the structures for vacancies in iRecruitment.
You may also want to import other data such as qualifications and competences.
-
-
Install the latest Oracle Human Resources patch
Check that the most up-to-date patch has been applied.
See the readme file for iRecruitment at the time of installation.
-
Install Apache server and Apache
Set up the Apache server as specified in the Oracle Self-Service Web Applications Implementation Manual
See the readme file for iRecruitment at the time of installation.
-
Install and configure Oracle Text
If you do not configure Oracle Text correctly you will still be able to perform text searches, however you will get errors when you try to upload documents.
See: Oracle Text Application Developer's Guide
-
Apply the iRecruitment patch
Make sure that all prerequisites are met, including those for the OSSWA Framework.
See: Oracle Application Framework Documentation Resources, Release 12 (My Oracle Support Note 391554.1)
-
Install compatibility patches for your self - service components
If you are using other self-service products, you may want to check My Oracle Support for information on compatibility patches.
-
Install Oracle Workflow Builder
See the readme file for iRecruitment at the time of installation for the latest version.
-
Set up security to define access to iRecruitment
iRecruitment uses the same security mechanisms as Oracle HRMS applications. By defining user profiles, security profiles, responsibilities, and menu structures, you can control who uses iRecruitment, which information they can access, and how they access it.
If you are an existing Oracle HRMS user, then review security profiles to ensure that the correct access to candidates is setup
The Candidate Security feature of Oracle HRMS enables all users to access iRecruitment candidates by default. This feature takes effect when you install iRecruitment.
You must review your security profiles and consider whether all users can access candidates. For example, you may not want users other than the iRecruitment managers to access candidates.
Depending on your enterprise requirements, you can update all or specific security profiles.
See: Defining Security Profiles, Oracle HRMS Configuring, Reporting, and System Administration Guide
See: Running the Change Candidate Access for Security Profiles Process
-
Set up the Security Performance Enhancement feature, if required
Typically, most of the Oracle HRMS products use the security mechanism that Oracle HRMS provides. Defining which records and information users can access is fundamental to HRMS security. To enhance product performance when person security evaluation happens during processing of voluminous data, Oracle HRMS provides the security performance enhancement feature. You can set up this feature, if required, based on your business needs.
For more information, see: Setting Up the Security Performance Enhancement Feature, Oracle HRMS Configuring, Reporting, and System Administration Guide
-
Add the iRecruitment responsibilities to your users
Oracle iRecruitment includes several standard responsibilities which contain the appropriate functions for different user groups.
See: iRecruitment Responsibilities and User Menus
See: Responsibilities, Oracle HRMS Configuring, Reporting, and System Administration Guide
-
Set up iRecruitment access for site visitors and candidates
-
Assign the iRecruitment External Candidate and the iRecruitment Employee Candidate responsibilities to your guest user (identified by the Guest User Password profile option). This step is required to allow access to the site visitor screens without logging in to the application.
You use the Guest User Password profile option to create a generic user name and password to enable users access iRecruitment. For more information, see: Setting Up a Generic User ID For New User Registration, Oracle Self-Service Human Resources Deploy Self-Service Capability Guide
See: iRecruitment Responsibilities and User Menus
See: Responsibilities, Oracle HRMS Configuring, Reporting, and System Administration Guide
-
Ensure that the IrcVisitor.jsp refers to the IRC_EXT_CANDIDATE responsibility and IrcEmpVisitor.jsp refers to the IRC_EMP_CANDIDATE responsibility. The Responsibilitykey variable in the JSP must contain the correct responsibility key, so that the users access the relevant pages. For example, the supplied IrcVisitor.jsp contains the IRC_EXT_CANDIDATE (iRecruitment External Candidate) responsibility key.
Create the classes and new methods for JSPs if you plan to use copies of the delivered JSP files.
-
Review current settings of these profile options, and update if necessary.
-
IRC: Visitor Homepage Function
-
IRC: Homepage Function
-
IRC: Candidate Permission Set
-
IRC: Registration Responsibility
-
IRC: Registration Business Group
-
-
Set the IRC: Employee Visitor URL profile option only at the responsibility level for the employee candidate responsibility. This setting ensures that employees access the correct URL and not the page for external candidates.
See: Profile Options
-
Check the log-in URL for iRecruitment users.
The URL for connecting to the iRecruitment system varies according to the user group. For example, the internal site visitor URL is different from the external site visitor URL.
External site visitors access the IrcVisitor.jsp. The location of this jsp depends on your applications server and is of the syntax:
http://hostname:port/OA_HTML/IrcVisitor.jsp
Typically employees will access iRecruitment using their portal homepage, however you can enable internal site visitor, to access the IrcEmpVisitor.jsp. The location of this jsp also depends on your applications server and it is the syntax:
http://hostname:port/OA_HTML/IrcEmpVisitor.jsp
You should replace the http://hostname:port/OA_HTML part of the URL with the URL of the html directory on your applications server.
Note: If you have installed other languages, you activate iRecruitment in the required language by adding the following suffix to the log-in URLs:
?L=<language code>
For example, http://hostname:port/OA_HTML/IrcVisitor.jsp?L=F would activate the French language version.
The language codes are available in the table FND_INSTALLED_ LANGUAGES.
If you do not specify a language code, the default (US) is used.
-
Create grants if you are using custom responsibilities for external candidates and employee candidates. Use the Functional Administrator responsibility to create Grants.
iRecruitment supplies predefined grants for the GUEST user that enable site visitors access to the application functions. The grants are associated with the predefined iRecruitment External Candidate and iRecruitment Employee Candidate responsibilities.
-
If you plan to use the custom responsibility for external candidates, then you must create a grant specifically for the GUEST user with the IRC External Site Visitor Permission Set in the custom responsibility context.
-
If you plan to use the custom responsibility for employee candidates, then you must create a grant specifically for the GUEST user with the IRC Employee Site Visitor Permission Set in the custom responsibility context.
For information on creating grants and using permission sets, see: Grants and Permissions Sets Oracle E-Business Suite System Administrator's Guide - Security
-
-
Set the Applications SSO User Creation and Updation Allowed Profile Option for external candidate and ex-employee registration and profile updates.
iRecruitment applies the Applications SSO User Creation and Updation Allowed profile option for ex-employee or external candidate registration and profile updates.
This profile option works independently and does not impact setting of the following profile options:
-
Applications SSO Login Types
-
Applications SSO Type
-
Using the System Profile Values window, select the Applications SSO User Creation and Updation Allowed profile option. Set the Enabled value for the iRecruitment External Candidate responsibility.
Following is the impact of the profile option, if the profile option is set to Disabled:
-
On the iRecruitment Site Visitor page, Register Today button will display an error message: 'Registration is currently disabled'.
-
Register Today button and Register Here link for ex-employees will be visible on the Visitor Home Page, but when users click the button, the following error appears: Registration is currently disabled.
-
On My Accounts Page in the Personal Information tab the email field will not be enabled. Similarly, email field will not be enabled on the first-page in Apply For Job flow.
-
On the My Accounts Page in Login Information tab the change-password fields will not be enabled.
-
-
Assign iRecruitment Employee Candidate or iRecruitment Employee responsibility to your employees
iRecruitment Employee Candidate Responsibility
The iRecruitment Employee Candidate responsibility (IRC Employee Candidate Menu) includes only the iRecruitment Employee Home page (function: IRC_EMP_APL_HOME_PAGE). To enable employees to search and apply for internal jobs and maintain their account, you must grant the IRC Employee Candidate Permission Set (IRC_EMP_CANDIDATE_PSET).
iRecruitment Employee Responsibility
The iRecruitment Employee responsibility (IRC Employee Menu) includes the following functions and employees can perform all recruitment related functions from a single responsibility:
-
Employee Candidate (IRC_EMP_APL_HOME_PAGE): Page to search and apply for internal jobs, and maintain an account.
-
Employee Referral (EMP_REF_HOME_PG_FUNCTION): Page to perform referral functions. See: Managing Employee Referrals
-
Interview (IRC_INTERVIEWER_HOME_PG): Page to manage interview tasks. See: Managing Interview Tasks
You can assign either one of the responsibilities to your employees based on your business requirements.
If your employees use the predefined iRecruitment Employee responsibility they can automatically refer candidates to vacancies posted on the internal referral site and perform the Employee Referral function tasks.
To enable employees to:
-
Use the Employee Candidate features, you must grant them the IRC Employee Candidate Permission Set (IRC_EMP_CANDIDATE_PSET).
-
Use the Interview function, you must grant them the iRecruitment Interviewer Permission Set ( IRC_INTERVIEWER_PSET).
See: iRecruitment Responsibilities and User Menus
Note: If you are on a release level R12.1 or above, you need not run the iRecruitment Create Grants Process. To enable employees to search and apply for internal jobs, you can grant the relevant permission sets discussed in this section. For information on creating grants and using permission sets, see: Grants and Permissions Sets, Oracle E-Business Suite System Administrator's Guide - Security)
-
-
Enable contingent workers to use iRecruitment
Contingent workers can search and apply for jobs using iRecruitment. They can track their job applications, interview schedules, communicate with recruiters, and receive job offers online.
To enable contingent workers to use iRecruitment, complete the following setup steps:
-
Assign the iRecruitment Employee Candidate responsibility (IRC Employee Candidate Menu) to contingent workers. If you are using a custom employee candidate responsibility, then ensure that the custom responsibility is granted the appropriate employee candidate permissions. See: iRecruitment Employee Candidate responsibility
-
Define the IRC: Allow Jobs for Contingent Worker profile option. Depending on your business requirements, you can enable contingent workers to apply for internal, external, or both internal and external jobs. See: Profile Options
-
-
Define the business group for candidate registration
Set the IRC: Registration Business Group to define the default business group for candidate registration. When a candidate registers, the application creates a person record in the selected business group.
See: Profile Options
-
Configure iRecruitment manager menu, if required
-
iRecruitment assigns the following functions to the IRC Manager Menu by default. Managers can:
-
Create new candidates using the Irc Agency Create Candidate function.
-
Add applicants to a vacancy using the Irc Agency Candidate Select function.
To prevent managers from creating candidates and applying on their behalf, you can exclude these functions from the menus associated with the manager responsibilities.
-
-
To restrict access to the agencies functionality and hide agency fields from specific managers you can exclude the Irc CM Show Agency Information function from the IRC Manager menu. This function is available with the IRC Manager menu by default.
-
-
Ensure to set the number generation method for applicants to automatic
When you define information for your business group make sure to set the Applicant Number Generation to Automatic.
See: Entering Business Group Information
If you have set the applicant numbering to Manual, then run the Change Person Numbering to Automatic process for your business group.
See: Running the Change Person Numbering to Automatic Process
-
Check that the work structures in Oracle HRMS meet your requirements
Work structures include the jobs, positions, grades, and pay scales used in your enterprise. You define your work structures using Oracle HRMS.
See: Organization Structures Overview (Oracle HRMS Enterprise and Workforce Management Guide)
-
If you have licensed iRecruitment, set the IRC: Installed profile option to Yes in the System Profiles window of Oracle HRMS.
If you have not licensed iRecruitment, please contact Oracle for information on purchasing a license.
-
Unzip the ircdtd.zip file
The ircdtd.zip is situated in your html directory. Extract the ircdtd file to your html directory. If you do not extract the dtd file you will encounter problems when parsing resumes or initiating background checks.
-
Schedule the iRecruitment Index Synchronization concurrent process
This process ensures the job posting and document indexes are kept up to date and should be scheduled to run as follows:
-
Online index rebuild - to run every 5 minutes
Note: If the online synchronization process starts before the previous one has completed, then the process will display an error. Ensure that you set it to run 5 minutes after completion, and not the start.
-
Full index rebuild - to run each night
To schedule this process, use the iRecruitment HRMS Manager responsibility. Schedule this process to run regularly.
-
Additional Implementation Steps
When you have implemented the minimum steps, you can carry out the following steps which enable you to define additional security options and function-specific implementation requirements.
-
Set up the Recruitment additional organization information flexfield
To access the flexfield, display your business group in the Organization window.
-
Enable and manage applicant tracking, if required
You can record and track applicant data for compliance purposes. Use the Recruitment window in Oracle HRMS to define the applicant tracking functionality for a business group.
See: Entering Recruitment Information
To track changes to applicant profiles, schedule the iRecruitment Applicant Profile Snapshot process.
See: Running the iRecruitment Applicant Profile Snapshot Process
To remove data that is retained for statutory compliance, run the iRecruitment Purge Applicant Tracking Data process.
See: Running the iRecruitment Purge Applicant Tracking Data Process
-
Set the IRC: Suitable Seekers Function, IRC: Job Notification Function and the IRC: Vacancy Approval Function profiles
If you want to use a function other than the default from the suitable candidate, or suitable job notification, then use these profiles to select them. In most cases, you will not need to change these values .
See: Profile Options
-
Create default postings for your work structures
Job postings are the advertisements attached to your vacancies. You can create default postings containing standard information at the organization, business group, job, or position level.
-
Set up details of recruiting sites
If your enterprise has an agreement to post job advertisements with third-party job sites, you can record information about them.
You can use any of the following data transfer methods to send job details to the recruiting sites:
-
Hyper Text Transport Protocol (HTTP)
-
E-mail
-
File Transfer Protocol (FTP)
Note: You can use the FTP method only if the destination server supports Passive File Transfer Protocol (PASV) data transfers. The FTP feature is a beta version and may not work on all servers.
Your decision to use a specific method depends on whether the recruiting site accepts job postings through HTTP, e-mail or FTP. After you identify the posting method, provide the recruiting sites details.
-
-
Create a style sheet to post job details, if required
iRecruitment sends job postings to third-party recruiting sites in the default HR-XML formats:
-
JobPositionPosting.xsl (JobPositionPosting-1_1.dtd), which is compliant with HR-XML 1.1 version.
-
PositionOpening.xsl (PositionOpening.xsd), which is compliant with HR-XML 2.5 version.
If you use the standard HR-XML document, the Username field corresponds to the SenderID column and the Password field corresponds to the Credentials column in the HR-XML document sent to the recruiting site. These style sheets are stored in the OA_HTML directory.
To send a posting in a format other than the default HR-XML format, create your own style sheet using any text editor. Use the DTD of the supplied style sheet as an example. Ensure that the style sheet format is correct, and store the style sheet in the OA_HTML directory.
Note: The HR_XML Consortium certifies the HR-XML used in the job-posting, background-checking, and resume-parsing processes. For more information on the HR-XML certification program, see: http://www.hrcertify.org.
-
-
Write a Java class to define job posting implementation mechanism, if required
iRecruitment provides a default posting implementation Java class: oracle.apps.irc.posting.JobPostingImpl that uses the standard HTTP Post, FTP, or MailTo option to send job posting details to job sites.
To define a different data job posting mechanism, such as Web Services to send job postings to job sites, you must create a Java class that implements iRecruitment's predefined Java interface: oracle.apps.irc.posting.JobPosting. For information on writing a Java class, see: Note ID 1117344.1 on My Oracle Support
Provide the Java class value in the Posting Implementation Class column in the Job Vendor Details page. For more information, see: Creating and Maintaining Recruiting Sites Details
-
Create external assignment statuses
Create external assignment statuses if required. You can use external assignment statuses to assign an alternative name to a status for external users. For example, you may want to create an external name for a status so that the manager sees the status "Pending Interview" or "Interview Passed" while the external user sees just "Interview". To enter an external name, enter the new name in the External Status column of the Assignment Statuses window.
-
Create compensation element lookups
Create compensation element Lookups to be advertised against your vacancies using the IRC_VARIABLE_COMP_ELEMENT Lookup type.
-
Define Lookup values for use with iRecruitment
Ensure that all the Lookups supplied with iRecruitment contain the values required for your enterprise.
-
Add job postings to existing vacancies
To add a posting to an existing vacancy, search for the vacancy in iRecruitment and choose Update. You can then add the posting to the vacancy.
-
Configure the existing messages if required
You configure the delivered messages in the Messages window of the Professional Forms Interface. The prefix for iRecruitment messages is IRC.
See: Messages Window (Oracle E-Business Suite Developer's Guide)
-
Configure the approvals rules if required
You can modify or create new approvals processes using Oracle Approvals Management. iRecruitment is delivered with a number of approval rules that will be applied unless you change your iRecruitment settings.
See: iRecruitment and Oracle Approvals Management (AME)
See: Profile Options
-
If you are using the Candidate Matching functionality:
Set up qualifications and ranks in Oracle HRMS
You can create qualification and qualification types in Oracle HRMS. Make sure that the existing qualifications and qualification types meet your requirements.
See: Creating Qualification Types, Oracle HRMS Workforce Sourcing, Deployment, and Talent Management Guide
-
If you are using the Competencies functionality:
Check the competencies in Oracle HRMS
Check that the competencies in Oracle HRMS meet your business requirements.
You must create global competencies for use in iRecruitment.
See: Creating a Competency, Oracle HRMS Workforce Sourcing, Deployment, and Talent Management Guide
-
Define the skills types for iRecruitment
Edit the IRC_COMPETENCE_TYPE lookup type to include the skill types that candidates can select in the Add Skills page. This lookup type controls the skills types displayed in iRecruitment. If you do not want to display all the lookups defined in the COMPETENCE_TYPE in iRecruitment, then include only the required lookups in the IRC_COMPETENCE_TYPE lookup type. Ensure that the lookups in the IRC_COMPETENCE_TYPE lookup are same as the lookups in the COMPETENCE_TYPE lookup type.
See: Adding Lookup Types and Values, Oracle HRMS Configuring, Reporting, and System Administration Guide
-
Identify the file types that users can upload
iRecruitment enables users to upload documents. For example, candidates can attach resumes and cover letters while registering or submitting job applications in iRecruitment. You can set the IRC_ALLOWED_FILE_TYPES lookup type to define the file types that users can upload. This lookup type definition applies only to the documents such as resumes, cover letters, and other documents that are attached to the candidate's profile and not to the documents such as attachments to vacancies or offers. You can use the IRC_ALLOWED_FILE_TYPES lookup type to prevent users from uploading documents that introduce program codes to damage the system.
-
Set up offers
To enable managers and recruiters to create and progress offers for applicants, set up the offers functionality.
See: Setting Up Offers
-
Set up assessments
To evaluate candidates and applicants during the recruitment process, set up the assessments functionality.
-
If you are using the Background Check functionality:
Register with a background check provider
The Background Check functionality enables a manager to verify applicant information such as education, qualifications, and employment history. To use this functionality, you must register with a background check provider.
For a list of providers, please contact your Oracle sales representative.
-
Enable self-registration for ex-employees
Ex-employees can identify themselves on iRecruitment and the application automatically creates user accounts for the ex-employees. You must take steps to protect the data of ex-employees before you implement this functionality.
To implement this functionality:
-
Evaluate your security structure and place additional checks to protect the data of your ex-employees. Use the API user hook IRC_PARTY_BK6.SELF_REGISTER_USER_A to validate the user registration data. For example, you can make data such as date of birth and national identifier mandatory to confirm that it is the previous employee who registers.
-
Add the IRC Ex Employee Registration function to the IRC External Site Visitor Permission Set menu, to display the registration link for ex-employees on the Site Visitor Registration page.
The ex-employee registration function uses the workflow item type IRC_REG. When an ex-employee provides details for registration, iRecruitment matches the information with the existing records and if it finds the appropriate record, initiates the Registration Request (REG_REQUEST) process within the IRC_REG item type. This process sends an e-mail to the ex-employee about the new user account and the password that they can use to log in to iRecruitment.
-
-
Set the profiles for the background check
Set the following profiles:
-
Enter the URL provided by the partner in the IRC: Background Check Vendor URL profile.
-
Enter the credential provided by the partner in the IRC: Background Checking Senders Credential profile.
See: Profile Options
-
-
If you are using the Resume Parsing functionality:
Register with a resume parsing provider
The Resume Parsing functionality enables iRecruitment users to extract information from a resume. To use this functionality, you must register with a resume parsing vendor.
For a list of providers, please contact your Oracle sales representative.
-
Set the profile option to calculate annualized salary for offers with hourly salary basis
If the Oracle HRMS HR: Base Annual Salary On FTE profile option is not already set, then you can set up this profile option to calculate annualized salary when creating or updating offers. For more information, see: Calculation of annualized salary
-
Set the profiles for resume parsing
Set the following profiles:
-
Enter the URL provided by the partner in the IRC: Resume Parsing Vendor URL profile.
-
Enter the sender ID provided by the partner in the IRC:Resume Parsing Sender ID profile.
-
Enter the credential provided by the partner in the IRC: Resume Parsing Credential profile.
-
Indicate whether you want skills to be extracted during the parsing process in the IRC: Extract Skills profile.
See: Profile Options
-
-
Display notifications of different item types
Set the profile option IRC: Notification List Types to display notifications of different item types on the home pages of managers and candidates.
The delivered iRecruitment workflow item types are HRSSA, HR_SFL, and IRC - WF. These workflows support notifications for vacancies and offers. You can create workflow item types to display notifications other than the predefined ones. You can then add the workflow item types in the IRC: Notification List Types profile option.
See: Profile Options
-
Change color schemes, if required
To alter the layout and color settings of iRecruitment pages, you must use Look-and-Feel Extensions (Custom Skins) that OA Framework provides.
See: Oracle Application Framework Personalization Guide, Oracle Application Framework Documentation Resources, Release 12 (My Oracle Support Note 391554.1)
-
Set posting days to define the number of days for internal job postings
If you want to make the job details available to your employees first, then set the IRC: Internal Posting Days profile option. You specify the number of days that the application posts an advertisement internally before posting the advertisement on the external site.
See: Profile Options
-
Limit the number of document uploads
You can limit the number of documents that the candidates can upload to the iRecruitment database. Set the following profile options:
-
IRC: Document Upload Count Limit
-
IRC: Monthly Document Upload Count Limit
See: Profile Options
Note: If you do not want to limit the number of document uploads, you can leave both the profile options blank.
-
-
Indicate resumes as mandatory for job applications
If your enterprise requires applicants to attach a resume with their job application, then set the IRC: Resume Required profile option to enforce this business requirement. This enables managers to get the required professional details of the applicants for further processing.
See: Profile Options
-
Set up different phone types in the My Account page
To set up different phone type fields in the My Account page, follow these steps:
-
Add the lookup values to the PHONE_TYPE lookup type.
See: User and Extensible Lookups, Oracle HRMS Configuring, Reporting, and System Administration Guide
-
Set the IRC: Phone Types profile option to specify the type of phone number fields for candidates to record.
See: Profile Options
-
-
Identify the default phone type for individuals search, if required
Set the IRC: Preferred Phone Type Display profile option to identify the default phone type that iRecruitment can use when managers or recruiters search for candidates without specifying the phone number on the Candidates: Individuals page. If you do not set this profile option, then iRecruitment uses Home Phone as the default phone type.
See: Profile Options
-
Define whether managers can extend multiple offers
Set the IRC: Allow Multiple Offers for Candidate to determine whether managers can extend multiple offers to applicants.
See: Profile Options
-
Determine whether iRecruitment must create external user accounts for candidates created by managers or recruiters
Set the IRC: Create User Account profile option to determine whether iRecruitment must create external user accounts for candidates created by managers or recruiters.
See: Profile Options
-
Control access to vacancy applications
Set the IRC: Show Applications profile option to determine the vacancy applications that managers can access.
See: Profile Options
-
Enable managers to view employee applicant and ex-employee salary and performance history during the offer process
iRecruitment displays employment history of employee applicants or ex-employees when creating or updating offers, or when viewing candidate details in the Qualifications tabbed region of the Candidate Details page, or the Candidate Profile page. Managers can view employment details such as assignment number, years of service, department, and location.
However, if managers require to view the salary and performance history of employees or ex-employees, you must grant the following permission sets to the managers or recruiters who are assigned the iRecruitment Manager or iRecruitment Recruiter responsibility:
-
iRecruitment Employee Salary Permissionset (IRC_EMP_SALARY_PSET): Displays Salary History
-
iRecruitment Employee Performance Permissionset (IRC_EMP_PERFORMANCE_PSET): Displays Performance History
-
-
Set the profile options to make salary basis and proposed salary fields mandatory or optional for offers
For offers, enterprises can make the Salary Basis and Proposed Salary fields optional or mandatory or base Salary Basis and Proposed Salary on work structure configuration using the IRC: Salary Details Mandatory in Offer profile option.
See: Profile Options
When you set the IRC: Salary Details Mandatory in Offer profile option value to Based on Work Structure Configuration, you must:
-
Create a flex segment for salary details at organization, job, position, grade, and salary basis levels and then, define the segment value at the appropriate work structure level.
-
Enter the flex segment name in the IRC: Proposed Salary Flex Segment Name profile option. To make the Salary Basis and Proposed Salary fields mandatory or optional, iRecruitment validates the flex segment value configured at the work structure levels.
See: Setting up Information for Salary Basis and Proposed Salary Fields in Offers
-
-
Set the profile option to validate proposed salary for applicants when creating or updating offers
When managers create or update offers, iRecruitment validates the salary entered using the vacancy salary range. To validate salary during offer creation or update, define the IRC: Offer Proposed Salary Validation profile option.
Based on your enterprise's requirements, you can decide whether to:
-
Apply the salary validation rule
-
Validate salary offered using the vacancy salary
-
Validate salary offered using the grade rate
See: Profile Options
-
-
Select the business group to display compensation information in corporate currency
Select the business group in the IRC: Corporate Business Group profile option that iRecruitment can use to display compensation information in the corporate currency. In the IRC: Currency Conversion Date profile option, enter the effective date that iRecruitment can consider for currency conversion rate.
See: Profile Options
Set up currency conversion rate to view salary information in corporate currency
When managers and recruiters create vacancies, offers, or view a candidate's desired minimum salary, they can view salary information in corporate currency. Approvers can view salary details in corporate currency before approving or rejecting an offer. A read-only field provides salary information after converting salary into corporate currency. iRecruitment converts the currency using the conversion rates configured in Oracle General Ledger.
Set up the currency conversion rate to display salary information in a common currency using the Conversion Rate Types window of Oracle General Ledger. Set up the Corporate conversion rate to define a standard rate for your enterprise. Oracle General Ledger currency setup is a shared product. Contact your Financials implementation team to get this information. If you do not use Oracle General Ledger, add the GL_GCS_RATES menu or individual functions from the menu to an existing menu that users access through their standard responsibilities. For further information about conversion rates, see the Oracle General Ledger User Guide in the Oracle Financial Applications documentation.
The corporate currency fields for salary are hidden by default. If required, you must display these fields.
On the create, view, update offer, and offer notification pages display the following salary fields to view in corporate currency:
-
Proposed Salary
-
Grade Range
-
Comparatio
-
Annualized FTE Salary
-
Annualized Salary
On the create, update, view vacancy pages, and vacancy notification pages display the Salary Minimum and Salary Maximum corporate currency fields.
On the Candidate Details page, display the Minimum Salary corporate currency field.
-
-
Control the ability of managers to apply for vacancies created by subordinate employees in their supervisor hierarchyy
When a manager applies to a vacancy created by a subordinate employee reporting to the supervisor, a loop is formed and it creates problems in the HR security evaluation. iRecruitment provides the ability to avoid these types of job applications. Enterprises can control the ability of managers to apply for vacancies created by subordinate employees in their supervisor hierarchy using the 'IRC: Allow job application in subordinate hierarchy' profile option.
See: Profile Options
-
Enable access to details of applicants
If required, set the HR: Enable RTM Security profile option to the iRecruitment Manager or iRecruitment Recruiter responsibility to enable users who require access to applicants to view their application and other details. The user can be anyone who is involved in the recruitment process.
See: Profile Options
-
Display the Candidate Details Page or the Candidate Profile Page based on your business requirement
By default, the Candidate Details page (CandAplDetsPG) appears, when managers click the name link in the candidate name or applicant name column in the search results table of the iRecruitment candidate and applicant search pages. The column that displays the Candidate Profile page (CandProfilePG) is hidden by default.
The Candidate Details page is a multi-tabbed region page that shows complete details of a candidate along with the application information. The Candidate Profile page is a single page interface that presents comprehensive picture of a candidate along with application details and helps analyze the applicant pool.
For more information, see:
Pages from where managers or recruiters can navigate to the Candidate Details Page:
-
Candidates: Prospect Pool - CmCandSrchPG
-
Candidates: Individuals - CmPersonSrchPG
-
Candidates: Resumes - DocSrchPG
-
Candidates: Applicants - CmAplSrchPG
-
View Applicants - Apl4vacSrchPG (Vacancies > View Applicants)
-
Manager Home page - MgrHomePG
-
New Applications table
-
Interviews table
-
Recent Offers table
-
-
Applications page - ApplicationsViewPG (Recruitment Summary > Applications column links)
-
Offers page - OffersViewPG (Recruitment Summary > Offers column links)
-
Offers Workbench - OfferSearchPG
-
Find Duplicates - FindDuplicatesPG
Depending on your business requirement, you can display the Candidate Details page or Candidate Profile page.
To display the Candidate Details page or Candidate Profile page, personalize the relevant page and set the Render property to either False or True for the page attributes. For example, to use the Candidate Profile Page in iRecruitment, set the Render property to True for Candidate Profile page and the Render property to False for Candidate Details page properties.
The following table lists pages and properties that you can personalize:
Page Name with Region Name of the Search Results Table Attribute to display the column for the Candidate Profile page Attribute to hide the column for the Candidate Details Page Navigation Candidates: Prospect Pool
CmCandResultsTblRNColumn: (CandidateProfileColumn) Column: (PrPoolcolumn1) Candidates tab > Prospect Pool.
For example, to display the Candidate Profile page, click Personalize Candidates: Prospect Pool. Look for for CandidateProfileColumn, click Personalize and set Rendered to True for iRecruitment Manager. Click Apply and look for PrPoolcolumn. Click personalize and set Rendered to False for iRecruitment Manager. Click Apply and then Return to Application.Candidates: Individuals
CmPersonSrchQueryRNColumn: (CandidateProfileColumn) Column: (IndQrycolumn1) Candidates tab > Individuals and click Personalize Query Region. Candidates: Resumes
DocSrchQueryRNColumn: (CandidateProfileColumn) Column: (DocTabcolumn1) Candidates tab > Resumes and click Personalize Search. Candidates: Applicants
CmAplSrchQueryRNColumn: (CandidateProfileColumn) Column: (CandidateNameColumn) Candidates tab > Applicants and click Personalize Query Region. View Applicants
Apl4vacSrchQueryRNColumn: (CandidateProfileAplColumn) Column: (Apl4vacSrchQueryRNcolumn1) Vacancies tab > enter vacancy name and click Go. Select a vacancy and click View Applicants. Click Personalize "Applicants list for the Vacancy" Manager Home
New Applications table (ApplicantsSummaryTblRN)Message Styled Text : Applicant Name
Destination Function: IRC_CANDIDATE_PROFILEMessage Styled Text : Applicant Name
Destination Function: IRC_CAND_APPL_DETAILSHome tab > click Personalize "Results for the Recent Applicants. Find Message Styled Text: Applicant Name. Click Personalize. To display the Candidate Profile page, change the Destination Function to IRC_CANDIDATE_PROFILE for the responsibility Manager Home
Interviews table (MgrInterviewsTblRN)Message Styled Text : Applicant Name
Destination Function: IRC_CANDIDATE_PROFILEMessage Styled Text : Applicant Name
Destination Function: IRC_CAND_APPL_DETAILSHome tab > click Personalize Interview Manager Home
Recent Offers table (OfferSummaryTblRN)Message Styled Text : Applicant Name
Destination Function: IRC_CANDIDATE_PROFILEMessage Styled Text : Applicant Name
Destination Function: IRC_CAND_APPL_DETAILSHome tab > click Personalize Recent Offers Applications page (ApplicationTblRN) Column: (ApplicantNameCPColumn) Column: (ApplicantNameColumn) Home >4. Recruitment Summary. Click any of the number in the columns of the Applications section. Click Personalize Advanced Table. Offers page (ApplicationTblRN) Column: (ApplicantNameCPColumn) Column: (ApplicantNameColumn) Home > 4. Recruitment Summary. Click any of the numbers in the Offers columns and then click Personalize Advanced Table Offers Workbench page (OfferSrchQueryRN) Column: (CPApplicantNameColumn) Column: (ApplicantNameColumn) iRecruitment Recruiter > Offers Workbench Find Duplicates page
PotentialDuplicatesTblRN
ConfirmedDuplicatesTblRN
NotDuplicatesRNColumn: (FullNameColumnCP) Column:(FullNameColumn) Candidates tab > search for a candidate and click Find Duplicates icon in the Potential Duplicates region. Click Personalize Advanced Table You can use the Candidate Profile feature that Oracle iRecruitment delivers or you can configure some of the components of the Candidate Profile feature according to your business requirements. For example, iRecruitment delivers XML templates to compare profiles of two or three candidates. To compare more than two or three candidates, you can create your own XML templates.
For more information, see: Configuring Candidate Profile Components
-
Make the Find Duplicates function available to specific users
When managers search for applicants or candidates on the following pages, they can click the Find Duplicates icon to find duplicate profiles.
The Find Duplicates column is available by default on the following pages:
-
Candidates: Prospect Pool
-
Candidates: Individuals
-
Candidates: Resumes
-
Candidates: Applicants
-
View Applicants (Vacancies > View Applicants)
See: Finding Duplicate Profiles
If you do not want all managers or recruiters to use the Find Duplicates function, then hide the Find Duplicates column in the appropriate pages of the iRecruitment Manager or iRecruitment Recruiter responsibility.
Grant the Add Potential Duplicate Function to the Find Duplicates feature
When managers or recruiters click the Find Duplicates icon, the Duplicate Profile page that lists the duplicate records of candidates appears. By default, this page does not display the Add Potential Duplicate button.
To make this feature available, you must grant the IRC_FIND_DUPLICATES_PSET permission set to the iRecruitment Manager or iRecruitment Recruiter responsibility or to a specific user. This permission set grants the IRC: Adhoc Duplicate Search Function.
-
-
Configure the Address Style flexfield segments to display global or local address style as required
In iRecruitment, the address style defined to capture the address details is based on the order of the segment list attached to the Address flexfield. Using personalization, you can order the flexfield segments to specify the address style that must be used. For example, if the segment list contains US_CUSTOM before US and US_GLB, the application selects US_CUSTOM.
Complete the following steps to display the address style as required:
-
Using the System Administrator responsibility, query the 'Personal Address Information' descriptive flexfield and verify that the Displayed check box in the Context field section is enabled.
For more information on the Personal Address Information flexfield, see: Oracle HRMS Configuring, Reporting, and System Administration Guide.
-
Enable personalization by setting the following profile options:
Personalize Self-Service Defn
FND: Personalization Region Link Enabled
-
Log in to iRecuritment and navigate to the candidate My Account page. In the Address region, click the personalization link.
-
Search for the Personalize Flex : (FndFlexField) row in the Personalization Structure and click the Personalization icon.
-
In the Segment List, enter the flexfield list in the order that you want the address style to be displayed.
For example, consider the following segment list order:
BE|Street|Num|Box|City|Postal Code||BE_GLB|Address Line 1|Address Line 2|Address Line 3|Postal Code|City||US_GLB|Address Line1|Address Line2|Address Line3|City|County|State|Zip Code||US|Address Line 1|Address Line 2|Address Line 3|City|State|County|Zip_Code||!!US|Country||US_GLB|Country||BE_GLB|Country||BE|Country
Example 1: If a user selects Belgium as the country, as the local format (BE) is first in the order, iRecruitment uses the local format as the address style.
Example 2: If a user selects United States, as the global address format (US_GLB) is in the order before the local format (US), iRecruitment uses the global format as the address style.
Example 3: If a user selects United Kingdom as the country, as there are no flexfield entries for United Kingdom, iRecruitment uses the Generic address style.
Repeat these steps to configure the address styles in the required iRecruitment pages.
-
-
Set up steps to launch the Applicant Hire and Rehire function from iRecruitment
When an applicant accepts an offer, the hiring manager can select the Hire action in the Offers tabbed region of the Candidate Details page to launch the Applicant Hire and Rehire function and complete the hiring process for iRecruitment applicants. The Hire action appears for only those applications where an offer is closed with the close reason of 'Offer Accepted by Applicant'.
If your enterprise uses Oracle SSHR, then you can complete the following steps to enable managers to launch the Applicant Hire and Rehire function from iRecruitment:
-
Display the Hire option in the Actions list
Grant the iRecruitment Hire Permission Set (IRC_HIRE_PSET) to the iRecruitment Manager or iRecruitment Recruiter responsibility or to a specific user. This permission set displays the Hire option in the Actions list of the Candidate Details Offers tabbed region. Managers can initiate the hire process using the Hire option.
Use the Functional Administrator responsibility to create grants. For information on creating grants and using permission sets, see: Grants and Permissions Sets, Oracle E-Business Suite System Administrator's Guide - Security
-
Complete the step required to navigate to the Hire function
To navigate to the Applicant Hire and Rehire function from the Candidate Details page and Candidate Profile page, modify the following functions:
IRC_CAND_APPL_DETAILS
IRC_CANDIDATE_PROFILE
Complete these steps:
-
Navigate to the Form Functions window using the System Administrator responsibility.
-
Query the IRC_CAND_APPL_DETAILS function. Click the Form tabbed region.
-
Click the Parameter field.
-
Select Edit > Edit Field icon to display the value of the field.
-
Set the &pHireFunction parameter value to HR_APPL_HIRE_MGR_SS, for example, &pHireFunction=HR_APPL_HIRE_MGR_SS. Save your changes
Note: If you have defined a custom function other than "HR_APPL_HIRE_MGR_SS", then set the &pHireFunction parameter value to that custom function.
Repeat the steps to modify the IRC_CANDIDATE_PROFILE function.
-
-
-
Set up virus scan
Set up virus scan to check the documents that candidates and managers upload to the database. This helps you to detect infected files and protect your systems from possible virus attacks when you download documents for recruitment purposes.
-
Set the profile option to filter Cross Site Scripting (XSS)
When users upload documents to the database or preview documents, some of the documents may contain cross site scripting (XSS) that may affect your system. To detect and disable XSS, set the IRC: XSS Filter profile option.
See: Profile Options
-
Create resume templates
iRecruitment supplies predefined resume templates for candidates to create resumes online. You can use the predefined templates or create templates to suit your business needs.
-
Set up agencies
If your enterprise has agreements with recruiting agencies, then you define agencies and set up agency users to work with iRecruitment.
See: Setting up Agencies
-
Set up iRecruitment High Availability (HA)
You can set up a secondary (HA) instance of iRecruitment to maintain the iRecruitment candidate job site when the instance that hosts the job site is unavailable.
What Next
When you have installed iRecruitment, you need to carry out the following additional steps:
-
Set up proxy server
Use the following profiles to set up your proxy server:
Note: If you do not use a proxy server, you can skip this step.
-
Applications Server Side Proxy Host and Domain
-
Applications Proxy Port
-
Applications Proxy Bypass Domain
-
IRC: Proxy Authorization Password
-
IRC: Proxy Authorization User Name
See: Profile Options
-
-
Run the location upgrade script
If you are using Geocode data for searching locations, then enter the URL for geocode information in the following profile:
IRC: Geocode Host
Note: You can obtain the value for this profile option by contacting your Oracle Support representative.
Before running the upgrade script, delete the spatial indexes by running the script $IRC_TOP/patch/115/sql/irctxdrp.sql.
This script uses parameters of the HR schema owner name and the HR schema owner password.
Then run the upgrade script $IRC_TOP/patch/115/sql/irlocupd.sql
The script uses three parameters: worker_id, total_workers, and update_name. This enables you to run the script in parallel. For example, if you want to run the script with two processors in parallel, you would run the script in different sessions with the values 1 and 2, and 2 and 2. If you only want to run with a single processor you may just accept the default values. This process may take a long time and depends on a number of factors, such as the volume of data that you have and the speed of the internet connection from your database.
You may have to run this script in future to capture geocode information for locations in countries that may be supported by geocode service. The next time you are run the script in parallel ensure that the update_name is different. For example, run the script in different sessions with the values 1, 2 and RUN2, and 2, 2 and RUN2.
Once the upgrade script has completed, reload your spatial indexes by running the scripts:
-
$IRC_TOP/patch/115/sql/irctxloc.sql. This script uses parameters of the HR schema name, the FND schema name, the APPS schema name, and the Oracle Text schema name, for example, $IRC_TOP/patch/115/sql/irctxloc.sql HR APPLSYS APPS CTXSYS
-
$IRC_TOP/patch/115/sql/irctxadr.sql. This script uses parameters of the HR schema name, the FND schema name, the APPS schema name, and the Oracle Text schema name, for example, $IRC_TOP/patch/115/sql/irctxadr.sql HR APPLSYS APPS CTXSYS
-
$IRC_TOP/patch/115/sql/irctxisc.sql. This script uses parameters of the HR schema name, the FND schema name, the APPS schema name, and the Oracle Text schema name, for example, $IRC_TOP/patch/115/sql/irctxisc.sql HR APPLSYS APPS CTXSYS
If you are not using Geocode data for searching locations: use the Personalization function to hide the Location and Distance From Location (Miles) geocode search fields.
Geocoding Disclaimer
ORACLE MAY INCLUDE, WITHOUT ANY ADDITIONAL FEE, THE PROVISION OF A GEOCODING SERVICE THROUGH A HOSTED SERVICE THAT USES CONTENT PROVIDED BY THIRD PARTIES TO APPLY LATITUDE AND LONGITUDE COORDINATES TO ADDRESSES WITHIN THE TCA SCHEMA. THIS SERVICE IS MADE AVAILABLE TO DEMONSTRATE HOW GEOCODING AND GEOSPATIAL QUERIES COULD BE USED IN BUSINESS DECISIONS, AND IS PROVIDED EXCLUSIVE OF ANY WARRANTY, INCLUDING, WITHOUT LIMITATION, ALL WARRANTIES OF MERCHANTABILITY OR FITNESS FOR A PARTICULAR PURPOSE, OR ANY OTHER WARRANTY, WHETHER EXPRESSED OR IMPLIED. ORACLE DOES NOT WARRANT THAT THE GEOCODING SERVICE WILL BE AVAILABLE, OR THAT IT WILL MEET USERS' REQUIREMENTS, OR THAT ITS OPERATION WILL BE UNINTERRUPTED OR ERROR FREE. THE GEOCODING SERVICE IS PROVIDED SOLELY ON AN "AS IS BASIS."
-
-
Schedule the following concurrent processes
iRecruitment Email Job Seekers Details to Vacancy Owner
This sends e-mail notifications to the managers of open vacancies to inform them of suitable candidates for their vacancy. Schedule this process to run each night, or as often as you want managers to receive notifications.
See: Running the iRecruitment Email Job Seekers Details to Vacancy Owner Process
iRecruitment Email Vacancies to Job Seekers
This sends e-mail notifications to the job seekers to inform them of suitable vacancies. Schedule this process to run each night.
See: Running the iRecruitment Email Vacancies to Job Seekers Process
To schedule these processes, use the iRecruitment HRMS Manager responsibility.
Note: For e-mail notifications to be sent you must also ensure that the Workflow e-mail engine is running.
-
iRecruitment Recruitment Summary
This program populates the recruitment summary data in summary tables. iRecruitment retrieves recruitment data from summary tables. Schedule the iRecruitment Recruitment Summary program to run regularly.
-
Enter the URLs to use in notifications for external and internal candidates
When iRecruitment sends notifications for job invites, referrals, or matching jobs, it identifies the receiver as internal or external using the e-mail address of the person. It inserts the internal URL for internal candidates and external URL for external candidates in the job details link in the notification. This feature enables internal and external candidates to access the appropriate job detail pages.
Note: Internal candidates are employees or contingent workers. External candidates are all other people who are not employees or contingent workers.
To specify internal and external URLs, complete the following steps:
-
Enter the URL of your external web server as the value for the IRC: External Framework Agent profile option.
-
Ensure that the Application Framework Agent profile option value is set to the internal web server URL.
See: Profile Options
-
-
Set the profile option to avoid connection issues when using DMZ instance for iRecruitment
In a DMZ enabled instance for iRecruitment, accessing iRecruitment Style Sheets and DTD from OA_HTML directory may cause issues during candidate registration, resume parsing, background check, and job postings to third-party recruiting sites. If you are using a DMZ enabled instance for iRecruitment, then you can set the IRC: Avoid accessing stylesheets during URL formation profile option to avoid such issues. This profile allows reading the style sheet content directly from the file system instead of reading it through a URL formed using the Application Framework Agent, thereby preventing any connection issues.
See: Profile Options
-
Set Up iRecruitment for external users
Candidates and recruiting agencies who are external users access iRecruitment to complete recruitment tasks such as applying for jobs and creating profiles of agency candidates. For information on how to secure iRecruitment for use outside the firewall, see:
-
DMZ Configuration with Oracle E-Business Suite 12 (Note: 380490.1) on My Oracle Support
-
Enabling SSL in Oracle Applications Release 12 (Note: 376700.1) on My Oracle Support
-
-
Enable partial registration for iRecruitment
If you have implemented multiple E-business suite products, then you can enable external users having an account with any one of the products such as iProcurement, to use their existing username and password to register with iRecruitment. To use this registration feature, set the IRC: Enable Partial Registration profile option.
See: Profile Options
-
Configure the web pages for iRecruitment
You configure the web page layout using the Personalization Framework. If applicable, configure flexfields, instructions and tips, and the delivered logos.
Using personalization, you can:
-
Display required fields
If required by your enterprise, you can display information hidden by default, such as manager's details on the Job Details page, candidate registration date in the search results of the Candidate pages, and vacancy duration dates (creation, start, and end dates) in the search results of the Vacancy page. Also, the Location Code field and the text search Location field are hidden by default for external users. The City Location and the text search Location fields are hidden by default for employees. You can display these fields using the Personalization function depending on the search facilities you want to offer your users.
-
Display the Approvers region or Approval History region on Offer pages as required
Oracle iRecruitment provides the following regions to view information on offer approval:
-
Approvers region: Displays offer approval information such as the offer approver, approver type, approver category, offer approval status, approval date, and offer approval comments if any.
-
Approval History region: Displays offer approval action history, action date, and offer comments, if any. Using this region, managers can track all the actions that happen in an offer approval cycle. For example, they can monitor offers that are reassigned, returned for correction, or require further information.
On the following pages and regions, by default, the Approvers region is displayed and the Approval History region is hidden:
-
iRecruitment Manager/Recruiter home > Recent Offers region > Approvers column > Offer Details page (irc/offers/webui/IrcOfferApproverPG)
-
Recruitment Summary > Offers columns > Offers page > Approvers column > > Offer Details page (irc/offers/webui/IrcOfferApproverPG)
-
Offers Workbench > Approvers column > > Offer Details page (irc/offers/webui/IrcOfferApproverPG)
-
Candidate Applicant Details Page > Offers tab > Offer Details region ( /oracle/apps/irc/offers/webui/OfferDetailsRN)
-
Candidate Applicant Details Page > Offers tab > View Offer history > View Offer History region ( /oracle/apps/irc/offers/webui/OfferHistoryDetsStkRN)
To display the Approval History region, you must complete the following steps using the Personalization feature:
-
Navigate to the relevant page or region using the Personalization feature.
-
Display the Approval History region by setting the Render personalization property to True for the "Stack Layout: Approval History" element.
Note: If you want to hide the default Approvers region, then set the Render personalization property to False for the "Default Single Column: Approvers" or "Default Single Column" elements.
-
-
Display the Application Time Resume and Application Time Resume Preview columns
The Application Time Resume and Application Time Resume Preview columns available on the following pages enable managers or recruiters to view resumes added by applicants at the time of job application:
-
iRecruitment Manager Home (MgrHomePG) > New Applications region
-
View Applicants page (Apl4vacSrchPG)
-
Candidates: Applicants (CmAplSrchPG)
-
Applications (ApplicationsViewPG)
(Navigation: Recruitment Summary > Applications > To Be Processed, In Process, Rejected columns)
The Application Time Resume and Application Time Resume Preview columns are hidden by default on these pages. If required, these columns can be displayed using the OAF Personalization feature.
The following steps explain how to display the Application Time Resume and Application Time Resume Preview columns in the iRecruitment Manager Home page, New Applications region:
-
Enable personalization by setting the following profile options: Personalize Self-Service Defn and FND: Personalization Region Link Enabled.
-
Log in to iRecruitment.
-
Navigate to the iRecruitment Manager Home (MgrHomePG), New Applications region.
-
Click the Personalize "Results for the Recent Applicants" link. The Personalize Region: Results for the Recent Applicants page appears.
-
Select Complete View and click the Expand All link.
-
Scroll down the page.
-
Click the personalize icon in the Message Styled Text: Application Time Resume row. The Personalize Message Styled Text : Application Time Resume page appears.
-
View the default value for the Rendered item. It is set to false.
-
Select true at the appropriate level.
-
Click Apply. The Personalize Region: Results for the Recent Applicants page appears.
-
Click the personalize icon in the Switcher: Application Time Resume Preview row. The Personalize Switcher : Application Time Resume Preview page appears.
-
Scroll to the Rendered row. The default value is false.
-
Select true at the appropriate level and click Apply.
-
Click Return to Application.
Now, you can view the Application Time Resume and Application Time Resume Preview columns. Complete these steps to display the columns in the following pages:
-
View Applicants page (Apl4vacSrchPG)
-
Candidates: Applicants (CmAplSrchPG)
-
Applications (ApplicationsViewPG)
(Navigation: Recruitment Summary > Applications > To Be Processed, In Process, Rejected columns)
-
-
Display the Upload button on the Offer Letter page, if required
When managers create or update offers, they can upload offer letters using the Upload button on the Offer Letter page. The Upload button is hidden by default. If required, you can display the Upload button on the following pages using the Personalization feature:
-
OfferLetterPreviewPG (in the create offer flow)
-
UpdOfferLetterPreviewPG (in the update offer flow)
Set the Rendered property to true for Button: Upload. The value is set to False by default
-
-
Configure additional validation criteria for employee referral
When candidates create their profiles or submit job applications, they can select Employee Referral as source and provide either the e-mail address or employee number as the source referral information. iRecruitment uses this information to verify or validate the employee information.
You can configure additional validation criteria to validate the employee information such as Department Name when candidates select Employee Referral as source in the Registration or Job Application process. For information on how to enable additional validation criteria, refer to this My Oracle Support note: 954140.1 Enabling Additional Validation Criteria for Employee Referrals.
-
Enable the Application Status field
The Application Status field on the Candidates: Applicants page enables managers to search for applications using the application status criteria. Managers can select single or multiple statuses to search for applications. The Application Status field is hidden by default.
Using personalization, you can display the Application Status field. Display the Business Group field as application statuses are dependant on the business group selection.
-
Enable Enterprise Search
Using the Enterprise Search functionality, recruiters and hiring managers can search for vacancies and candidates. Similarly, external candidates can search for jobs. The Enterprise Search region is hidden by default on the home page for managers, recruiters, and candidates. If required, using the Personalization function, you can displays this region for managers, recruiters, and candidates.
Complete the following steps to display the Enterprise Search region on the manager, recruiter, site visitor, and external candidate home pages:
Manager and recruiter home pages
1. Click the Personalize Page link on the Home page (/oracle/apps/irc/vacancy/webui/MgrHomePG ) for managers and recruiters.
2. On the Personalize Page: iRecruitment Manager Home page, click the Complete View option.
3. Click the Personalize icon for the OAHomeAppsSearchRow item.
4. Set the Rendered field to True for the OAHomeAppsSearchRow item.
5. Click Apply to display the Enterprise Search region on the home page for managers or recruiters.
Site visitor and external candidate home pages
Repeat the steps to display the Enterprise Search region on the site visitor (/oracle/apps/irc/candidateSelfService/webui/VisHomePG) and external candidate home (/oracle/apps/irc/candidateSelfService/webui/AplHomePG) pages.
To enable Vacancies and Candidates search on the iRecruitment manager and recruiter home page, complete the following steps:
1. Log on to the Functional Administrator responsibility.
2. Grant the following permission sets to the iRecruitment Manager and iRecruitment iRecruiter responsibilities:
Vacancies (SESG_CTX_HR_IRC_VACANCIES)
Candidates (SESG_HR_IRC_CANDIDATES)
To enable Jobs search on the site visitor and external candidate pages, complete the following steps:
1. Log on to the Functional Administrator responsibility.
2. Grant the Jobs (SESG_HR_IRC_JOBS) permission set to the iRecruitment External Candidate responsibility.
Note: Additionally you must grant the Application Search Menu (APPSSEARCH_MENU) permission to the Guest user.
-
-
Enable the export of interview details
From the Interviews table on their home page, managers, recruiters, and candidate can export interview data to the calendar application that they use. Using the Personalization function, you can enable the Export feature for interviews to help users save interview details and view interview schedules.
You can configure Oracle Workflow Builder to display the iCalendar file (.ics) in the interview notifications for confirmed or rescheduled interviews. Managers and candidates can export the interview details in the iCalendar file to the calendar applications that support the .ics format and monitor upcoming interview events easily in the calendar application.
For information on how to configure the Export feature and include the iCalendar file in interview notifications, refer to this note on My Oracle Support Configuring the iCalendar Export Feature in Oracle HRMS Applications, Note ID: 761563.1
-
Set up searchable flexfield
You can enable managers and candidates to record extra information that can be included in a candidate or vacancy searches.
-
Freeze your flexfields
Freeze all flexfields used in iRecruitment. This stops error messages appearing on the screen telling you that your flexfields have not been frozen.
See: Oracle E-Business Suite Flexfields Guide
-
Set up workflow processes using business events
If required, you can use the Oracle Workflow functionality to create your own workflow processes. By including the delivered business events in your workflow processes, you can define processing and routing logic for iRecruitment events.
-
Enable the RSS Feeds Functionality
Site visitors and external candidates can use the RSS Feed links on the Job search pages to subscribe to the RSS feeds with the job search criteria that they use. RSS feeds help users to monitor job vacancies without having to visit iRecruitment.
To enable the RSS Feeds functionality:
-
Grant the HR RSS Feeds (PER_RI_RSS_FEEDS) permission set to site visitor and external candidate responsibilities.
-
The RSS Feeds link on the following pages is hidden by default. To display the link using personalization, set the Render property for the 'rssRegion' (RowLayout) item to true:
VisitorJob Search Page (VisJobSchPG)
Visitor Advanced Job Search Page (VisAdJobSchPG)
External Candidate Job Search Page (AplJobSchPG)
External Candidate Advanced Job Search Page (AplAdJobSchPG)
-
-
Generate letters, other than offer letters, using Web Application Desktop Integrator (Web ADI)
You can also use the HRMS Web Application Desktop Integrator (Web ADI) to generate form letters such as interview and rejection to send to applicants.
See Data Download and Upload Using Web ADI Overview, Oracle HRMS Configuring, Reporting, and System Administration Guide
See: Requesting Letters/Running the Report, Oracle HRMS Configuring, Reporting, and System Administration Guide
-
Enable the Info Online content container to access Enwisen
You can configure access between Oracle iRecruitment and Enwisen, a third-party information provider to enable end users to access company information hosted on the Enwisen web site. The Info Online content container displays hypertext links to information providers.
See: Info Online Links to Enwisen from Oracle iRecruitment Pages
Configuration Overview
All Oracle Self-Service Applications, including iRecruitment, are built on the Oracle Applications (OA) Framework to enable maximum flexibility. Although the iRecruitment functions are delivered with predefined settings which meet the HRMS requirements of the majority of enterprises with little or no configuration, there are configuration options available if required.
This chapter provides an overview of the different configuration steps for iRecruitment. For detailed information on the set-up and configuration steps, see the following chapters:
-
Implementation Steps
-
Security
-
Configuring Page Layouts
Guidelines for Configuring iRecruitment Functions
The iRecruitment functions have been developed to meet the majority of business requirements and should rarely require modification. However, there are several security and configuration steps that you can carry out if required.
User Access
For each responsibility (or combination of responsibility and user), you need to define a security profile to restrict the user to an appropriate business group and, if required, a subset of a business group. Alternatively, you can use a global security profile to enable your managers and recruiters to work in multiple business groups.
Process Flows
If the iRecruitment functions are workflow-enabled (currently the Vacancy function), you can choose to modify the predefined process flow if required. However, the delivered workflows have been designed to meet the business requirements of most enterprises so modification should rarely be required.
See: Oracle Applications Workflow User's Guide
Profile Options
You must set up several profile options to enable iRecruitment. These profile options include browser proxy settings, resume parsing provider information, and background check information.
For a full list of profile options for iRecruitment, see: Profile Options
HRMS Data
You set up work structures (grade, position, organization, job), qualifications, and competencies for iRecruitment using the Professional Forms interface of Oracle HRMS. This data is then available in iRecruitment.
See: Oracle HRMS Enterprise and Workforce Management Guide and Oracle HRMS Workforce Sourcing, Deployment, and Talent Management Guide
Page Layouts
In most cases, the predefined page layouts contain all the fields that users need to perform a transaction. However, you may decide that some changes are required. For example, you could change the field prompts to match terminology used by your enterprise. You can also add more detailed instructions to the web pages, display selected flexfield segments, and hide fields or sections of web pages.
You modify page layouts using the Personalization Framework.
See: The Personalization Framework
Function-specific Configuration Options
Detailed information on the configuration options for each function is given in the corresponding sections. Each section contains the following information:
-
menu and function names
-
workflow process names and attributes, if applicable
-
profile options
Save For Later
The save for later functionality enables a manager or recruiter to store a vacancy or an offer they are creating or modifying prior to submitting it. They can then complete the creation or modifications at a later date. The vacancy or the offer can be saved for later at any point during the creation or modification process, up until it is submitted.
If the creation or modification of a vacancy or an offer is interrupted, for example if the browser is closed or if the session is timed-out through user inactivity, then this vacancy or the offer is also saved for later.
Managers and recruiters can see the vacancies and offers that they have stored in the Save for Later table on their home page. From here they can resume the work they were doing. The following graphic depicts the save for later process.
Save for Later Functionality
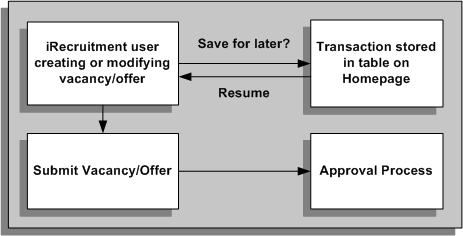
When a manager or recruiter creates or makes a modification to a vacancy or an offer, they can either submit the transaction for approval immediately or save the transaction for subsequent processing. If they submit the transaction immediately, the transaction is subject to the usual approval processes. If they choose to save the transaction for later, it is suspended and the user can restart it or delete it from the Save for Later table on their home page.
If a manager or recruiter has made a modification to an approved vacancy or an offer, saves the change for later, and then deletes the save for later record, the vacancy or the offer remains as it was before the modifications were made.
iRecruitment Profile Options
There are several profile options for use with iRecruitment. The following table lists the required profile options and gives a short description of their functionality.
| Profile | Configurable Levels | Description | Default |
|---|---|---|---|
| Applications Proxy Bypass Domain | Site | Define the proxy exclusion list, if appropriate. You must set the profile option in this format:*.mydomain1.com;*.mydomain2.com.
Note: Make sure you use this syntax or else resume parsing may not work. Only the format with a *. before the domain, and a ; separator will work. |
|
| Applications Proxy Port | Site | Define the port for your proxy server, if appropriate. | |
| Applications Server-Side Proxy Host And Domain | Site | Define the address of your proxy server, if appropriate. | |
| HR: Enable RTM Security | Site, Application, Responsibility, User | Set the profile option to 'Yes' at the iRecruitment Manager or iRecruitment Recruiter responsibility level to provide an access to all the applicants of that vacancy despite of HR security for recruiting team members. The default value is null or blank. If you set the profile value to 'Yes' and if the logged person is a recruiting team member of the vacancy, then using the iRecruitment Manager or iRecruitment Recruiter responsibility, the user can access applicants' details despite of HR security profile rules. If you set the profile option value to No or leave it blank, then iRecruitment applies the HR security profile and vacancy team security rules when providing access to applicants. |
|
| IRC: Agency Name | Responsibility, User | Identifies the agency and the agency users who use iRecruitment. Set this profile option to restrict agency access only to their candidates. For a manager user and the manager responsibility, leave the profile option blank to display all candidates. |
|
| IRC: Allow Jobs for Contingent Worker | Site, Responsibility, User | Defines the kind of jobs that contingent workers can search and apply using iRecruitment. You can select any one of the values:
Note: If you do not set the profile option value or leave it blank, then contingent workers can search and apply for external jobs only. |
|
| IRC: Allow job application in subordinate hierarchy | Site, Application, Responsibility, User | Controls the ability of supervisors to apply for vacancies created by subordinate employees in their supervisor hierarchy.
Null is the default value. |
|
| IRC: Allow Multiple Offers for Candidate | Site, Responsibility | Defines the appropriate setting for managers or recruiters when they extend more than one offer to an applicant. You can select any one of the values:
The IRC: Allow Multiple Offers for Candidate profile option works with the HR: Cross Business Group profile option. If the IRC: Allow Multiple Offers is set to Yes applicants can receive multiple offers from your business group and other business groups. If the Multiple Offers profile is set to No, and:
|
No |
| IRC: Alternate Instance URL | Site, Responsibility | Set this profile option on the primary instance to identify the high availability (HA) instance url: http://hostname:port /OA_HTML//OA_HTML/IrcVisitor.jsp, that should be used when the primary is unavailable. Set this profile option on the HA instance to identify the primary instance url: http://hostname:port/OA_HTML//OA_HTML/IrcVisitor.jsp, that is used during normal operation. To enable employee access to the job site, replace the value IrcVisitor.jsp in the primary and HA instance URLs with IrcEmpVisitor.jsp at the responsibility level. |
|
| IRC: Anti Virus Server | Site | Scans the documents that managers and candidates upload to the iRecruitment database. To scan the documents, enter the name of the server on which Symantec AntiVirus Scan engine is running. | |
| IRC: Avoid accessing stylesheets using URL formation | Site, Application, Responsibility, User | Set this profile option If you are using a DMZ enabled instance for iRecruitment to avoid issues during candidate registration, resume parsing , background check, and job postings to third-party recruiting sites. This profile allows reading the style sheet content directly from the file system instead of reading it through the URL formed using Application Framework Agent. If the profile option is set to Yes, then the application reads the files from the file system, thereby preventing connection issues. If the profile is set to No or not defined, then the iRecruitment XSL Style Sheet and DTD from OA_HTML will continue to be accessed through a URL formed using the Application Framework Agent. |
|
| IRC: Availability Mode | Site | Defines the mode in which the primary and the HA instances run. You use this profile to transition between your primary and HA instance when using the high availability functionality. For information on the values that you can set for this profile, see: Setting the IRC Availability Profile Option |
|
| IRC: Background Checking Vendor URL | Site | URL of background check vendor. Required for Background Check function. | |
| IRC: Background Check Sender Credential | Site, User | Company account name for background checking. | |
| IRC: Candidate Permission Set | Site, Responsibility | Identifies the permission set (menu) that iRecruitment grants to candidates when they register with the job site. The permission set enables candidates to create an account and work with the application. | IRC_EXT_CANDIDATE_PSET at the iRecruitment External Candidate responsibility level IRC_EMP_CANDIDATE_PSET at the iRecruitment Employee Candidate responsibility level |
| IRC: Corporate Business Group | Site, Responsibility | Identifies the business group whose default currency iRecruitment uses to convert currency to corporate currency. Managers and recruiters can view salary details in corporate currency. | |
| IRC: Currency Conversion Date | Site | Use this profile option in conjunction with the IRC: Corporate Business Group profile option. When you set this profile option, iRecruitment uses the conversion rate on the specified date for currency conversion. Enter the date in the DD-MMM format, for example, 10-Oct. If you enter 10-Oct, then iRecruitment uses the conversion rate on the specified date for currency conversion. If this profile option is left blank, then iRecruitment uses the latest conversion date available in the system for currency conversion. |
|
| IRC: Create User Account | Site, Application, Responsibility, and User | Determines whether iRecruitment can create external user accounts for candidates created by managers or recruiters. Set the value to Yes to create user accounts for candidates created by managers or recruiters. Note: If you set the value to Yes, then the Email Address field on the Create Personal Details page becomes mandatory. Using the email specified on the Create Personal Details page, iRecruitment sends email to candidates with the login information. Candidates can log in to the iRecruitment job site and search for jobs, submit job applications, and complete tasks that self-registered candidates perform. |
No |
| IRC: Default Country | Site, Application, Responsibility | Defines the default country when: Parsing resumes: If the application cannot find a country when parsing a resume, it uses the default country address style. Entering address details: When candidates enter their address details, the address style defaults to that of the country entered in the profile option. The candidate can override this style. Using eLocation for distance-from-location searching: If you are using eLocation, a service hosted by Oracle to search locations, the application uses the default country for geo-code location search. Note: If the default country that you specify is not eLocation supported country, the distance-from-location search will not work. |
|
| IRC: Default Max. Applicants | Site, Responsibility, User | Defines the default maximum number of applicants that an agency can submit for a vacancy. This value defaults to the Maximum Applicant Count field in the Create Vacancy: Enter Team Members page. Managers can override this value when they create vacancy details. | |
| IRC: Default Offer Letter Output Type | Site, Responsibility | Defines the default format that iRecruitment uses to create offer letters. For example, select PDF to create letters in the PDF format. | |
| IRC: Document Upload Count Limit | Site, Responsibility | Determines the total number of documents that a candidate can upload to the iRecruitment database. Enter a value for the number of document uploads that you want to limit. For example, if you specify 10, a candidate can load only 10 documents. If you leave this profile option blank, then the candidate can upload any number of documents, provided the total document count does not exceed the number of uploads allowed each month. | 20 |
| IRC: EEO Required Fields | Site, Application, Responsibility, and User | Determines whether candidates must enter gender and ethnic origin when they choose to provide EEO information. You can select any one of the values:
|
Any |
| IRC: Employee Visitor URL | Responsibility | Identifies the URL that iRecruitment uses to redirect logged in employees to, if they access the external job site. Set this profile option only for the employee candidate responsibility. | |
| IRC: Enable Offers Compensation | Site, Responsibility | Indicates whether the benefits functionality is used to complete compensation details for applicant offers. Set to Yes to enable managers to use the Create Offer: Enter Compensation page to assign compensation for applicants. For a simplified offer process that hides the Enter Compensation page, set the value to No. If you set the option value to Yes at the site level, but for example, do not offer compensation benefits to temporary workers, then set this profile to No at the responsibility level. When managers create offers using this responsibility, the offer letter includes only the basic details. |
Yes |
| IRC: Enable Partial Registration | Site, Responsibility | Enables existing E-Business suite account holders to register with iRecruitment using their current username and password. If their information already exists in the database, iRecruitment instead of creating a new account assigns the iRecruitment Candidate responsibility to their account. Set this profile to No at the responsibility level if you are using your custom responsibility for employee candidates. |
Yes at the site level No at the iRecruitment Employee Candidate responsibility level |
| IRC: Extract Skills | Site | Indicates whether skills should be extracted when candidates parse a resume. If you select No, then candidates will have to select their skills manually. | Yes |
| IRC: Extend Offer Duration Function | Site | Identifies the function that enables managers to access the Extend Offer Duration page when they click a link in the offer notification. | IRC_EXTEND_OFFER_DURATION |
| IRC: Extend Offer Duration Transaction Type | Site | Identifies the transaction type used for extend offer duration approvals. If you do not want to use approvals for offer duration extension, then ensure that this profile is left blank. | IRCOFFERAPPROVAL |
| IRC: External Framework Agent | Site | Identifies the URL of your external web server. If you use a different server for external candidates to access the job details, then enter the external server name as the value for this profile option in this format: http://server:port/. iRecruitment uses the external server URL in e-mails to external candidates and in the links for the job posting documents to the third-party recruiting sites. | |
| IRC: Geocode Host | Site | URL for geocode information. | |
| IRC: HA Apply For Job Function | Site | Enables candidates to access the Apply for Job page on the HA instance and submit the job applications. | IRC_HA_APPLY_FOR_JOB_PAGE |
| IRC: HA Information Message | Site, Responsibility | Set this HA profile option to display an instruction message to candidates accessing the candidate job site on the primary instance. This message informs the candidates about the unavailability of the candidate job site after a specific time. You set the time using the profile option IRC: System Down Time. | IRC_HA_SYS_MAINT_MSG for the iRecruitment External Candidate and iRecruitment Employee Candidate responsibilities. |
| IRC: HA Job Search Function | Site, Responsibility | Set this HA profile option to identify the job search page that users can access when they click Search for Jobs on the HA instance, running in the High Availability mode. | IRC_VIS_JOB_SEARCH_PAGE at the iRecruitment External Site Visitor responsibility level. IRC_EMP_VIS_JOB_SEARCH_PAGE at the iRecruitment Employee Site Visitor responsibility level. |
| IRC: HA Login Page Function | Site, Responsibility | Set this HA profile option to identify the login function that directs users from the primary instance to the HA instance. | IRC_VIS_APPLY_LOGIN_PAGE at the iRecruitment External Site Visitor responsibility level. IRC_EMP_VIS_JOB_SEARCH_PAGE at the iRecruitment Employee Site Visitor responsibility level. |
| IRC: HA Redirect Information Message | Site, Responsibility | Set this HA profile option to determine the instruction message that users view about the availability of the alternate candidate job site. | IRC_HA_SYS_NOT_AVAILABLE_MSG at the site level. IRC_HA_MGR_SYS_NOT_AVAIL_MSG at the iRecruitment Manager responsibility level |
| IRC: Homepage Function | Site, Responsibility | Determines the home page function that redirects users (candidates, managers, agency users and , recruiters) to the previous page after they complete or cancel a transaction. | IRC_APL_HOME_PAGE at the iRecruitment External Candidate responsibility level IRC_EMP_APL_HOME_PAGE at the iRecruitment Employee Candidate responsibility level IRC_CM_HOME at the iRecruitment Manager responsibility level IRC_AGENCY_HOME at the iRecruitment Agency responsibility level IRC_CM_HOME at iRecruitment Recruiter responsibility level |
| IRC: Internal Posting Days | Site, Responsibility | Defines the number of days the vacancy details appear on the internal recruitment site before these details appear on the external recruitment site. If your administrator sets this profile, you cannot alter the start date of the external posting in the Create Vacancy: Job Posting page. When the vacancy is approved, the application sets the external posting start date according to the number specified in the profile. | |
| IRC: Installed | Site | Indicates that iRecruitment has been licensed. | No |
| IRC: Job Notification Function | Site, Responsibility | Identifies the function used to show advertisements to users when they click a link in a notification. To displays job details when users click the job link in a notification, set the profile option for the following responsibilities:
|
IRC_VIS_VAC_DISPLAY |
| IRC: Monthly Document Upload Count Limit | Site, Responsibility | Determines the number of documents that a candidate can upload within a period of one month. For example, if you specify 5, a candidate can upload only 5 documents within a calendar month. If you leave this profile option blank, then the candidate can upload any number of documents provided the document upload count does not exceed the total document count. | 10 |
| IRC: Notifications AME Transaction Type | Site, Responsibility | Identifies the Oracle Approvals Management (AME) transaction type used to identify the recipients for the notifications. Provide the correct value if you use a customized AME transaction type for notifications. | IRCNTFAPPROVALS |
| IRC: Notifications Workflow Item Type | Site, Responsibility | Identifies the workflow item type used to send notifications. Provide the correct value if you use a customized workflow to send notifications. | IRC_NTF |
| IRC: Notification List Item Types | Site, Application, Responsibility | Identifies which workflow notifications are displayed on the home pages of managers and candidates. For example, in addition to the default iRecruitment workflow item types you may want to include notifications associated with business events you have set up. Enter the workflow item types that you want to include and use a comma to separate each item type. | IRC_WF, HRSSA,HRSFL, IRC_NTF |
| IRC: Offer Details Approval Transaction Type | Site | Defines which offer approval transaction type is used. If you do not want to use approvals for offers, then you ensure that this profile is left blank. | IRCOFFERAPPROVAL |
| IRC: Offer Duration Measurement | Site, Responsibility | Determines the default measurement value for offer duration. The values are days, weeks, and months. Use the offer duration profile option along with the IRC: Offer Duration Value profile. The IRC: Offer Duration Value profile option section explains how iRecruitment uses the two offer duration profile values to set the offer expiry date. |
|
| IRC: Offer Duration Value | Site, Responsibility | Determines the default period within which applicants must respond to the job offers. The offer duration value along with duration measurement defaults to the Basic Details and Send Offer pages. iRecruitment uses the duration measurement and the measurement value to calculate the offer expiry date while extending the offer. For example, the offer duration value is 5 and the IRC: Offer Duration Measurement value is Days. If a manager extends the offer on 31-Aug-2005, then iRecruitment calculates the expiry data for the offer as 04-Sep-2005 and displays the expiry date on the Send Offer page. You can leave both the profile values blank, if you want managers to set the expiry date for the offers. In this case, you must use the Personalization function to make the Expiry Field enterable. |
|
| IRC: Offer Proposed Salary Validation | Site, Application, Responsibility, User | Defines how salary has to be validated while creating or updating offers. Select any one of the values:
|
Validate against Vacancy Salary Range |
| IRC: Offer Send Method | Site | Defines how offers are sent to candidates. Set to System to send online offers, or set to Hardcopy to direct managers to print offer letters. If you leave the profile blank, then the application defaults to sending offers online. | |
| IRC: Offer Workflow Item Type | Site | Identifies the workflow item type used for offer approvals. | HRSSA |
| IRC: Phone Types | Site | Identifies the type of phone numbers that candidates can record in the Phone Numbers table of the My Account details page. Enter the lookup codes defined in the PHONE_TYPE lookup as values for this profile option. To display the phone type fields correctly, you must enclose each lookup value in a single quotation mark and use a comma to separate the values as in this example: 'W1', X1', 'Y1', 'Z1' | 'H1','W1','M','WF' |
| IRC: Salary Details Mandatory in Offer | Site, Application, Responsibility, User | Determines whether the Salary Basis and Proposed Salary fields become mandatory or optional for offers. Select any one of the following values:
|
Yes |
| IRC: Proposed Salary Flex Segment Name | Site, Responsibility | Identifies the flex segment that iRecruitment uses to make the Salary Basis and Proposed Salary fields mandatory or optional when creating or updating an offer. To make the fields mandatory or optional, iRecruitment validates the flex segment value configured at the work structure levels. Set this profile option only if you select the Based on Work Structure Configuration value for the IRC: Salary Details Mandatory in Offer. Enter the flex segment related to the salary basis and proposed salary that you created for the following descriptive flexfields
For more information, see: Setting up Information for Salary Basis and Proposed Salary Fields in Offers |
|
| IRC: Preferred Phone Type Display | Site, Application, Responsibility, User | Identifies the default phone type that iRecruitment can use when managers or recruiters search for candidates without specifying the phone number on the Candidates: Individuals page. You must enter any one value (lookup code) that you set for the IRC: Phone Types profile option. If you do not set this profile option, then iRecruitment uses Home Phone as the default phone type for individual searches. |
|
| IRC: Proxy Authorization Password | Site | Password for proxy server if required. | |
| IRC: Proxy Authorization Username | Site | Username for proxy server if required. | |
| IRC: Proxy Authorization User Name | Site | User name for proxy server if required. | |
| IRC: Refresh Job Posting | Site, Application, Responsibility, User | Populates the associated job posting content on the Format Job Posting page whenever managers update or duplicate vacancies. If the profile value is set to Yes, then when managers change business group, organization, job, or positing, while updating or duplicating vacancies, iRecruitment displays the associated job posting content. |
No |
| IRC: Registration Business Group | Site, Responsibility | Identifies the business group for candidate registration. When a candidate registers, the application creates a person record in the specified business group. Note that this profile option must be set at the Site level to run the iRecruitment Person Data Migration process. You can set it at the Responsibility level for candidate registration. If you host multiple recruiting sites and have multiple Java Server Pages (jsp) for visitor login, then you can use this profile to register candidates in different business groups. Set this profile for the iRecruitment External Site Visitor responsibilities associated with the Guest user for each site. |
|
| IRC: Registration Test | Site, Responsibility | Identifies the survey or test that iRecruitment presents to candidates during the registration process. If you do not set this profile option at the site level but want external candidates to complete an assessment, for example, then set this profile option at the responsibility level for the iRecruitment External Candidate or your custom candidate responsibility. | |
| IRC: Registration Responsibility | Responsibility | Responsibility that a user is given after registration. | iRecruitment External Candidate or iRecruitment Employee Candidate. |
| IRC: Resume Parsing Sender Credential | Site, User | Password for resume parsing vendor. Required for Resume parsing. Note that not all vendors required this to be set. | |
| IRC: Resume Parsing Sender ID | Site, User | User name for resume parsing vendor. Required for Resume parsing. Note that not all vendors required this to be set. | |
| IRC: Resume Parsing Vendor URL | Site | URL for resume parsing vendor. Set this profile option if you are registered with a resume parsing provider. If you do not set this profile, then the resume parsing functionality, and the text in the Upload Resume Region is hidden from your users and replaced with standard document upload functionality and text. |
|
| IRC: Resume Required | Site, Responsibility | Set this profile option to On Application to ensure that applicants upload their resume with the job application. Otherwise, leave this profile set to No (default value at site level). If you set this to Yes at the site level, but, for example, do not want to force managers to upload a resume when they apply on behalf of a candidate, then you can set this profile to No at their responsibility level. |
No at site level. |
| IRC: Search Criteria Segment Matching | Site, Responsibility | Determines the segments that are matched when your managers perform candidate matching for a vacancy, or when you run the processes: iRecruitment Email Job Seekers Details to Vacancy Owner and the iRecruitment Email Vacancies to Job Seekers. Enter the segment numbers that you want matched, separated with a | symbol. For example: if you want to match attributes 2,5, and 7 set the value as 2|5|7. If you do not set any value for this profile option, the application matches all the active segments. | |
| IRC: Skip Job Assessment | Site, Application, Responsibility, User | Defines whether managers, recruiters, or agency users must complete assessment when they apply for jobs on behalf of candidates. If you set this profile option value to Yes, then iRecruitment does not present the assessment when managers, recruiters, or agency users apply for jobs on behalf of candidates. | |
| IRC: Show Applications | Application, Responsibility | Determines the vacancy applications that managers can access. You can select the following values:
|
Default |
| IRC: Suitable Seekers Function | Site | Identifies the function used to show candidates to managers when they click on a link in a notification. | IRC_CAND_APPL_DETAILS |
| IRC: System Down Time | Site, Responsibility | Set this HA profile option to indicate the beginning of the primary instance down time. The message defined by the IRC: HA Information Message profile option shows this time. You can use whatever time format you like. For example, 15-MAR-2005 5:30 PM or March 15th, 5:30 PM (PST) or 5 PM. |
DD-MON-YYYY HH:MI |
| IRC: Vacancy Approval Function | Site | When a person receives a vacancy to approve, the notification contains a link to a page that displays the vacancy that they have been asked to approve. This profile defines the function for that page. | IRC_VACANCY_APPROVE |
| IRC: Vacancy Approval Transaction Type | Site, Responsibility | Defines which vacancy approvals transaction type is used. To select a transaction type, enter the transaction type ID. If you do not want to use approvals, ensure this profile is blank at all levels. | IRCVACAPPROVAL |
| IRC: View Offer Function | Site | Identifies the function that shows applicants the offer letter when they click a link in the offer notification. | IRC_APPLICATION_DETAILS_PAGE |
| IRC: Visible Preference Default | Site, Responsibility | Controls the default setting for the Allow Account to be Searched check box on the candidate Preferences page. Set the profile option to Yes to display Allow Account to be Searched automatically selected. Otherwise, the check box is deselected by default. Candidates can update the default settings when they create or update their account details.
Important: The default setting must comply with the data privacy rules of the country in which the recruiting organization is operating. |
|
| IRC: Visitor Homepage Function | Site, Responsibility | Identifies the function that displays the site visitor home page when users access iRecruitment using the IrcVisitor.jsp or IrcEmpVisitor.jsp | IRC_VIS_HOME_PAGE at the iRecruitment External Candidate responsibility level IRC_EMP_VIS_HOME_PAGE at the iRecruitment Employee Candidate responsibility level |
| IRC: Workflow Item Type | Site, Responsibility | Defines which workflow item is used in iRecruitment. The IRC_WF workflow manages general notifications in iRecruitment. Notifications are sent when certain actions occur, for example, when a manager refers a candidate to another manager.
Important: iRecruitment no longer uses this workflow for vacancies. |
IRC_WF |
| IRC: XSS Filter | Site | Protects the instance from Cross Site Scripting (XSS) when users upload or preview files that have cross site script enabled in the documents. When you set the profile option value to Enable, iRecruitment scans and filters the documents during the upload and preview stages. By default, the profile value is left blank and the XSS check is disabled. |
If you have previously used the ICX_OA_HTML profile, note that this profile is now obsolete and has been replaced by the profile ICX_PREFIX. This new profile option works in the same way as ICX_OA_HTML, however, the OA_HTML part of the code is now obsolete. For example:
-
ICX_OA_HTML = /OA_HTML/xyz becomes
-
ICX_PREFIX = xyz
Applications SSO Type profile option
For information on this profile option, see: Integrating Oracle E-Business Suite Release 12 with 10g AS Oracle Internet Directory and Oracle Single Sign-On (My Oracle Support Note 376811.1)
Note: The IRC: Recruitment Summary Program Last Run is for information purpose only and stores the date and time of the last completed run of the iRecruitment Recruitment Summary program. This date and time appears on the Report Summary page. You must not modify the profile option value.
iRecruitment and Oracle Approvals Management (AME)
Oracle Approvals Management (AME) is a web-based application which is integrated with Oracle Workflow and which enables you to define business rules to control your approvals processes.
With AME, you use the following components to define your approvals processes. They are associated with a transaction type for a particular application.
-
Attribute - this is a business variable, for example, a salary amount, user ID, or a vacancy status.
-
Condition - a condition compares an attribute value with a set of allowed attribute values. For example, a condition could look at a salary amount. If the salary is greater than a specified value, a particular approver list is created.
-
Approval type and approval specifications - these components define the type of approver list that is generated. For example, to generate a supervisor-based approver list with 5 levels, you use the 'supervisory level' approval type with the 'requires approval up to the first 5 approvers' approval specification.
-
Rules - a rule links the other components together by associating one or more conditions with the approval type and approval rule.
For more information on the components used in AME, see: Oracle HRMS Approvals Management Implementation Guide.
Default Use of AME Configuration in iRecruitment
The default behavior of Oracle iRecruitment is to use a supervisor-based approvals hierarchy which is delivered using AME rules.
The default AME configuration consists of:
-
Transaction types with
-
a number of attributes and conditions and
-
a number of rules specifying that a transaction must be approved by the initiator's immediate supervisor if certain conditions are true.
-
This is based on the standard AME approval type 'chains of authority based on number of supervisory levels'.
For details about the AME components supplied with iRecruitment see: AME Components in iRecruitment
-
The Approvals Process in iRecruitment
Whenever a manager or recruiter creates or modifies a vacancy or an offer, iRecruitment checks to see if an approval is required for the action that has been taken.
The following diagram shows the approvals cycle, starting with the recruiter creating or modifying a vacancy or an offer.
Approval Process in iRecruitment

When a person is required to approve an action, they are sent a notification, which is displayed on their home page. From here they can do one of the following options:
-
Approve
If the approver is happy with the suggested changes they can approve them. If they are the final approver, the changes are committed to the database, and the person submitting the vacancy or the offer is notified that their transaction has been approved. If not the approval is routed to the next person in the approvals hierarchy.
-
Reject
If the approver is not happy with the changes they can reject them. This ends the approval process and the changes submitted for approval are discarded. The person submitting the vacancy is notified of the rejection.
-
Return for Correction
If the approver wants amendments to be made to the change before they approve them, they can select Return for Correction. This ends the approval process and the person who submitted the change is notified of the need for corrections to be made. Once they have made the changes they submit them for approval again.
Dynamic Approvals for Vacancies and Offers
When managers create or update vacancies and offers, in addition to the default approvers, they can add approvers and identify recipients of the transaction notifications in the Add Adhoc Approver region of the Create/Update Offer: Review and Create/Update: Review Vacancy pages. Managers can send a For Your Information (FYI) notification or an approval request. They can use the person or user name to add an approver:
-
Person: Add a person, for example, John Smith
-
User: Add a user, for example, JSMITH
Managers can specify the approver's' position in the approvals chain (the insertion point). They can:
-
Insert a new approver either before or after an existing approver in the list.
-
Add a new approver to the list.
Configuring iRecruitment Approval Levels in AME
You can configure the Vacancy Approval and Offer Approval transaction types to meet local approval requirements.
-
Vacancy Approval Transaction Type
You can add rules, conditions, and attributes to the predefined vacancy approval transaction type. For example, the iRecruitment Create Vacancy rule requires one level of approval at the most for creating or updating a vacancy. To enable a process that varies with the number of openings, for example, you can create a new rule requiring three levels of approval for vacancies with 10 or more openings, and add the rule to the predefined transaction type.
-
Offer Approval Transaction Type
You can add rules, conditions, and attributes to the predefined offer transaction type. By default, the offer approval rule requires one level of approval for offer creation and update. You can modify the default offer approval rule according to your business requirements. For example, you can create a new rule that requires three levels of approvals for offers to senior manager positions and add the rule to the predefined transaction type.
For more information on configuring AME rules, conditions, and attributes, see: Oracle HRMS Approvals Management Implementation Guide.
Some examples of minor changes that you can make to the customized transaction type are shown below.
Example 1
To define a different approval level for the creation of vacancies or offers, for example, to specify that a vacancy or an offer must be approved by a specific number of approvers:
-
The approval level for a vacancy is currently defined in the rule 'iRecruitment Create Vacancy'. You can define a new approval level for the supervisory level approval type that 'requires approval up to the first two superiors at most'.
-
The approval level for an offer is currently defined in the rule 'iRecruitment Offer Approval' You can define a new approval level for the supervisory level approval type that 'requires approval up to the first three superiors at most'.
Example 2
To define a new approval level (if the delivered approvals do not meet your requirements):
-
You create a new approval (for example, 'requires approval up to the first 15 superiors at most') in the 'supervisory level' approval type. You then apply this to whichever rules are required.
Example 3
To define a particular user as the final approver, or final authority (even if they are not the last person in the approval chain):
-
You create a List Modification Condition and specify a user, for example, a manager, as the final approver. You would add this list modification condition to your rules so that the approval chain would stop at this specified approver.
AME Components in iRecruitment
Oracle iRecruitment uses Oracle Approvals Management (AME) to manage the approvals processes. With AME, administrators can create business rules to define approvals hierarchies without the need to write code or customize the application.
Oracle provides standard AME transaction types for iRecruitment. These transaction types include a number of standard conditions, rules, and attributes for use with iRecruitment. If you require additional conditions, rules, or attributes, you can create them using the supplied components as examples.
For more information about Oracle Approvals Management see: Oracle HRMS Approvals Management Implementation Guide
Transaction Types
iRecruitment delivers the following transaction types:
-
iRecruitment uses this transaction type for vacancy approvals.
-
iRecruitment uses this transaction type to approve new offers and offers whose duration is extended.
-
iRecruitment Notification Approvals
This transaction type defines the workflow rules to send notifications when following transactions occur:
-
Managers change the status of job applications
-
Candidates apply for jobs
-
Candidates withdraw applications
-
Candidates request for reconsideration of their terminated applications
-
Managers reconsider terminated applications
-
Recruitment communication occurs
-
Employees create candidate profiles using the Employee Referral function
-
Employees refer candidates
-
Employees apply for jobs on behalf of candidates using the Employee Referral function
-
Managers change the interview status. iRecruitment also sends notifications when primary interviewers update interviews with their feedback
-
Candidates provide incorrect employee referral information
-
Managers update referral information in candidate profiles or job applications
-
iRecruitment Vacancy Approval Transaction Type
The following sections describe the attributes, rules, and conditions supplied with the iRecruitment Vacancy Approval transaction type.
Attributes
The following attributes are supplied with iRecruitment. These are in addition to the mandatory attributes supplied with AME. You can use these attributes to create your own conditions, or as examples for creating your own attributes.
POSTING_ADDITIONAL_DETAILS_CHANGED
This is a boolean attribute type that indicates whether any changes have been made to the Additional Details field in the Job Posting page.
Note: A boolean attribute type returns either True or False
POSTING_BRIEF_DESCRIPTION_CHANGED
This is a boolean attribute type that indicates whether any changes have been made to the Brief Description field in the Job Posting page.
POSTING_DEPARTMENT_CHANGED
This is a boolean attribute type that indicates whether any changes have been made to the Organization Name field in the Job Posting page.
POSTING_DEPARTMENT_DESCRIPTION_CHANGED
This is a boolean attribute type that indicates whether any changes have been made to the Department Description field in the Job Posting page.
POSTING_DETAILED_DESCRIPTION_CHANGED
This is a boolean attribute type that indicates whether any changes have been made to the Department Description field in the Job Posting page.
POSTING_GRAPHIC_CHANGED
This is a boolean attribute type that indicates whether any changes have been made to the Graphic field in the Job Posting page. This field contains a URL for any graphic associated with a job posting.
POSTING_HOW_TO_APPLY_CHANGED
This is a boolean attribute type that indicates whether any changes have been made to the How To Apply field in the Job Posting page.
POSTING_JOB_CHANGED
This is a boolean attribute type that indicates whether any changes have been made to the Job Title field in the Job Posting page.
POSTING_JOB_REQUIREMENTS_CHANGED
This is a boolean attribute type that indicates whether any changes have been made to the Job Requirements field in the Job Posting page.
POSTING_TITLE_CHANGED
This is a boolean attribute type that indicates whether any changes have been made to the Job Posting Title field in the Job Posting page.
VACANCY_BUDGET_MEASUREMENT_TYPE
This is a string attribute type that returns the budget measurement type for a vacancy. Note that this field is not displayed in iRecruitment by default.
VACANCY_BUDGET_MEASUREMENT_TYPE_CHANGED
This is a boolean attribute type that indicates whether any changes have been made to the budget measurement type for a vacancy. Note that this field is not displayed in iRecruitment by default.
VACANCY_BUDGET_MEASUREMENT_VALUE
This is a string attribute type that returns the value in the Number of Openings field in the Primary Details page.
VACANCY_BUDGET_MEASUREMENT_VALUE_CHANGED
This is a boolean attribute type that indicates whether any changes have been made to the Number of Openings field in the Primary Details page.
VACANCY_BUSINESS_GROUP_ID
This is a number attribute type that returns the ID of a business group for a vacancy.
VACANCY_EMPLOYMENT_CATEGORY
This is a string attribute type that returns value in the Employee Status field in the Primary Details page.
VACANCY_FOR_CONTRACTOR
This is a string attribute type that indicates whether a vacancy has been marked as being for a contractor in the Primary Details page.
VACANCY_FOR_EMPLOYEE
This is a string attribute type that indicates whether a vacancy has been marked as being for an employee in the Primary Details page.
VACANCY_GRADE_CHANGED
This is a boolean attribute type that indicates whether any changes have been made to the Grade field in the Primary Details page.
VACANCY_GRADE_ID
This is a number attribute type that returns the ID of a grade for a vacancy.
VACANCY_INSERT_OR_UPDATE
This is a string attribute type that indicates whether a vacancy has just been created (INSERT) or modified (UPDATE).
VACANCY_JOB_CHANGED
This is a boolean attribute type that indicates whether any changes have been made to the Job field in the Primary Details page.
VACANCY_JOB_ID
This is a number attribute type that returns the ID of a job for a vacancy.
VACANCY_LOCATION_ID
This is a number attribute type that returns the ID of a location for a vacancy.
VACANCY_MAXIMUM_SALARY
This is a currency attribute type that returns the maximum salary for a vacancy.
VACANCY_MINIMUM_SALARY
This is a currency attribute type that returns the minimum salary for a vacancy.
VACANCY_ORGANIZATION_CHANGED
This is a boolean attribute type that indicates whether any changes have been made to the Organization field in the Primary Details page.
VACANCY_ORGANIZATION_ID
This is a number attribute type that returns the ID of an organization for a vacancy.
VACANCY_POSITION_CHANGED
This is a boolean attribute type that indicates whether any changes have been made to the Position field in the Primary Details page.
VACANCY_PROFESSIONAL_AREA
This is a string attribute type that returns value in the Professional Area field in the Primary Details page.
VACANCY_STATUS
This is a string attribute type that returns value in the Status field in the Primary Details page.
VACANCY_STATUS_CHANGED
This is a boolean attribute type that indicates whether any changes have been made to the Status field in the Primary Details page.
VACANCY_WORK_FROM_HOME
This is a string attribute type that indicates whether a vacancy has been marked as allowing working from home in the Primary Details page.
VACANCY_RULE_TYPE
This is a string attribute type that identifies which rule applies either SEEDED or CUSTOM.
Conditions
The following conditions are supplied with iRecruitment to support some of the supplied attributes. These conditions can be used in rules to invoke particular approvals processes, or can be used as examples upon which to base your own conditions.
-
POSTING_ADDITIONAL_DETAILS_CHANGED is true
-
POSTING_BRIEF_DESCRIPTION_IS_CHANGED is true
-
POSTING_DEPARTMENT_CHANGED is true
-
POSTING_DEPARTMENT_DESCRIPTION_CHANGED is true
-
POSTING_DETAILED_DESCRIPTION_CHANGED is true
-
POSTING_JOB_CHANGED is true
-
POSTING_JOB_REQUIREMENTS_CHANGED is true
-
POSTING_TITLE_CHANGED is true
-
VACANCY_BUDGET_MEASUREMENT_TYPE_CHANGED is true
-
VACANCY_BUDGET_MEASUREMENT_VALUE_CHANGED is true
-
VACANCY_GRADE_CHANGED is true
-
VACANCY_JOB_CHANGED is true
-
VACANCY_ORGANIZATION_CHANGED is true
-
VACANCY_POSITION_CHANGED is true
-
VACANCY_STATUS_CHANGED is true
-
VACANCY_INSERT_OR_UPDATE in {INSERT}
-
VACANCY_INSERT_OR_UPDATE in {UPDATE}
-
VACANCY_RULE_TYPE in {SEEDED}
Rules
The following table describes the rules that are supplied with iRecruitment. They link one or two of the supplied conditions to an approval type and a rule. For all of the rules supplied the approval type is based on the supervisor hierarchy, and the approval rule is always to require approval up to the first superior at most. All of the supplied rules are of the List Creation type.
| Rule Name | Conditions | Approval Rule |
|---|---|---|
| iRecruitment Create Vacancy | VACANCY_INSERT_OR_UPDATE in [INSERT} VACANCY_RULE_TYPE in {SEEDED} |
Require approval up to the first superior, at most. |
| iRecruitment Update Posting Additional Info | POSTING_ADDITIONAL_DETAILS_CHANGED is true VACANCY_INSERT_OR_UPDATE in [UPDATE} VACANCY_RULE_TYPE in {SEEDED} |
Require approval up to the first superior, at most. |
| iRecruitment Update Posting Brief Description | POSTING_BRIEF_DESCRIPTION_CHANGED is true VACANCY_INSERT_OR_UPDATE in [UPDATE} VACANCY_RULE_TYPE in {SEEDED} |
Require approval up to the first superior, at most. |
| iRecruitment Update Posting Detailed Description | POSTING_DETAILED DESCRIPTION_CHANGED is true VACANCY_INSERT_OR_UPDATE in [UPDATE} VACANCY_RULE_TYPE in {SEEDED} |
Require approval up to the first superior, at most. |
| iRecruitment Update Posting Job Requirements | POSTING_JOB_REQUIREMENTS_CHANGED is true VACANCY_INSERT_OR_UPDATE in [UPDATE} VACANCY_RULE_TYPE in {SEEDED} |
Require approval up to the first superior, at most. |
| iRecruitment Update Posting Job Title | POSTING_JOB_CHANGED is true VACANCY_INSERT_OR_UPDATE in [UPDATE} VACANCY_RULE_TYPE in {SEEDED} |
Require approval up to the first superior, at most. |
| iRecruitment Update Vacancy | VACANCY_INSERT_OR_UPDATE in [UPDATE} VACANCY_STATUS_CHANGED is True |
Require approval up to the first superior, at most. |
| iRecruitment Update Vacancy Budget Type | VACANCY_BUDGET_MEASUREMENT_TYPE_CHANGED is true VACANCY_INSERT_OR_UPDATE in [UPDATE} VACANCY_RULE_TYPE in {SEEDED} |
Require approval up to the first superior, at most. |
| iRecruitment Update Vacancy Budget Value | VACANCY_BUDGET_MEASUREMENT_VALUE_CHANGED is true VACANCY_INSERT_OR_UPDATE in [UPDATE} VACANCY_RULE_TYPE in {SEEDED} |
Require approval up to the first superior, at most. |
| iRecruitment Update Vacancy Grade | VACANCY_GRADE_CHANGED is true VACANCY_INSERT_OR_UPDATE in [UPDATE} VACANCY_RULE_TYPE in {SEEDED} |
Require approval up to the first superior, at most. |
| iRecruitment Update Vacancy Job | VACANCY_JOB_CHANGED is true VACANCY_INSERT_OR_UPDATE in [UPDATE} VACANCY_RULE_TYPE in {SEEDED} |
Require approval up to the first superior, at most. |
| iRecruitment Update Vacancy Organization | VACANCY_ORGANIZATION_CHANGED is true VACANCY_INSERT_OR_UPDATE in [UPDATE} VACANCY_RULE_TYPE in {SEEDED} |
Require approval up to the first superior, at most. |
| iRecruitment Update Vacancy Position | VACANCY_POSITION_CHANGED is true VACANCY_INSERT_OR_UPDATE in [UPDATE} VACANCY_RULE_TYPE in {SEEDED} |
Require approval up to the first superior, at most. |
| iRecruitment Update Vacancy Status | VACANCY_STATUS_CHANGED is true VACANCY_INSERT_OR_UPDATE in [UPDATE} VACANCY_RULE_TYPE in {SEEDED} |
Require approval up to the first superior, at most. |
Example - Using the VACANCY_RULE_TYPE Attribute
To enable you to add rules to the predefined transaction type, iRecruitment provides an attribute VACANCY_RULE_TYPE that you can customize to create a new condition for your rule.
This example shows how to customize the iRecruitment Vacancy Approval transaction type to use different set of rules.
The predefined rule - iRecruitment Create Vacancy has the following conditions:
VACANCY_RULE_TYPE in {SEEDED_RULE}
VACANCY_INSERT_OR_UPDATE in {CREATE_VACANCY}
To customize the transaction to enable a different approval process based on the number of openings (Budget Measurement Value), follow these steps:
-
Create a new condition: VACANCY_RULE_TYPE in {CUSTOM_RULE}.
-
Create new rules with your condition as given in the example:
-
Rule: Create Vacancy Custom
Conditions:
VACANCY_RULE_TYPE in {CUSTOM_RULE}
VACANCY_INSERT_OR_UPDATE in {INSERT}
VACANCY_BUDGET_MEASUREMENT_VALUE <= 9
Actions: Supervisory level: require approvals up to the first superior, at most.
-
Rule: Create Vacancy Custom - large
Conditions:
VACANCY_RULE_TYPE in {CUSTOM_RULE}
VACANCY_INSERT_OR_UPDATE in {INSERT}
10 <= VACANCY_BUDGET_MEASUREMENT_VALUE
Actions: supervisory level: Require approvals up to the first three superiors, at most.
-
-
Change the value of the attribute VACANCY_RULE_TYPE to the static text CUSTOM_RULE.
-
Save your changes and bounce the Apache listener.
After these changes, users would require 3 levels of approval when creating vacancies with 10 or more openings, and would require only 1 level of approval when the number of openings is less than 10. Note that after you change the VACANCY_RULE attribute, none of the supplied rules apply any more. In this example, only create transactions will require approval.
iRecruitment Offer Approval Transaction Type
The following sections describe the attributes, rules, and conditions supplied with the iRecruitment Offer Approval transaction type. You can add additional rules, conditions, or attributes to the predefined transaction type.
Attributes
The following attributes are supplied with iRecruitment. These are in addition to the mandatory attributes supplied with AME. You can use these attributes to create your own conditions, or as examples for creating your own attributes.
OFFERS_APPROVAL _ACTION
This string attribute type indicates whether the offer requires any approval.
SUPERVISORY_NON_DEFAULT_STARTING_POINT_PERSON_ID
This number attribute type indicates the person ID of the approver who is not part of the default supervisor hierarchy chain.
TOP_SUPERVISOR_PERSON_ID
This number attribute type indicates the person ID of the final approver in the offer approval chain.
TRANSACTION_REQUESTOR_PERSON_ID
This number attribute type indicates the person ID of the manager who initiates the offer transaction.
Conditions
The following condition supports some of the supplied attributes. This condition can be used in rules to invoke particular approvals processes. You can create your condition using the supplied one as an example.
OFFERS_APPROVAL _ACTION in {CREATE, EXTEND, UPDATE}
Rules
The following table describes the rule supplied with iRecruitment for offer approval. The rule links one or two of the supplied conditions to an approval type and a rule. For the rule supplied the approval type is based on the supervisor hierarchy, and the approval rule is always to require approval up to the first two superiors at the most. All of the supplied rules are of the List Creation type.
Note: When you install iRecruitment the approval rule is enforced. If you want to use a custom set of rules, then you must create your own transaction type based on the supplied transaction type and add the rules that you want to apply. Then update the profile options IRC: Offer Approval Transaction Type and IRC: Extend Offer Duration Transaction Type to point to your new approval transaction type.
If you do not want to apply any approval rules, then delete the value against the profile options and leave them blank.
| Rule Name | Conditions | Approval Rule |
|---|---|---|
| iRecruitment Offer Approval | OFFERS APPROVAL ACTION in {CREATE, EXTEND, UPDATE} | Require approvals up to the first two superiors, at the most. |
iRecruitment Notification Approvals Transaction Type
The following sections describe the attributes, rules, and conditions supplied with the iRecruitment Notification Approvals transaction type. You can add additional rules, conditions, or attributes to the predefined transaction type.
Attributes
The following attributes are supplied with iRecruitment. These are in addition to the mandatory attributes supplied with AME. You can use these attributes to create your own conditions, or as examples for creating your own attributes.
DESCRIPTION_OF_TRANSACTION
This string attribute type describes the transaction.
IRC_EVENT_NAME
This string attribute type indicates the name of the transaction flow that initiates the notifications event.
IRC_INTERVIEW_FEEDBACK_UPDATE
This boolean attribute type identifies if the interview event has been raised to indicate that the feedback has been updated for a completed interview. In this case, only manager and/or recruiter are notified.
IRC_JOB_APPLICATION_NEW_STATUS
This string attribute type indicates the new status of a job application.
IRC_INCORRECT_EMPLOYEE_REFERRAL_INFORMATION
This boolean attribute type indicates whether the employee referral information provided by candidate is incorrect.
IRC_INTERVIEW_INCLUDE_CANDIDATE
This boolean attribute type indicates whether candidate has to be included in interview recipients list.
IRC_INTERVIEW_STATUS_CONFIRMED_ATLEAST_ONCE
This boolean attribute type whether the status of an interview has been confirmed at least once in the history.
Conditions
The following condition supports some of the supplied attributes. This condition can be used in rules to invoke particular approvals processes. You can create your condition using the supplied one as an example.
IRC_EVENT_NAME in (INTVCRE)
IRC_EVENT_NAME in (COMTOPCRE)
IRC_EVENT_NAME in (APLFORJOB)
IRC_EVENT_NAME in (APLSTACHG)
IRC_EVENT_NAME in (CANDREG)
IRC_EVENT_NAME in (REQREVTER)
IRC_EVENT_NAME in (UPDREF)
IRC_EVENT_NAME in (WTDRAPL)
IRC_INTERVIEW_FEEDBACK_UPDATE is False
IRC_INTERVIEW_FEEDBACK_UPDATE is True
IRC_JOB_APPLICATION_NEW_STATUS in (ACCEPTED)
IRC_EVENT_NAME in (CANDREG, UPDCANDREF)
IRC_EVENT_NAME in (COMTOPUPD)
IRC_EVENT_NAME in (INTVCRE, INTVUPD)
IRC_EVENT_NAME in (INTVUPD)
IRC_EVENT_NAME in (REVTERACK)
IRC_EVENT_NAME in (UPDCANDREF)
IRC_INCORRECT_EMPLOYEE_REFERRAL_INFORMATION is False
IRC_INCORRECT_EMPLOYEE_REFERRAL_INFORMATION is True
IRC_INTERVIEW_INCLUDE_CANDIDATE is True
IRC_INTERVIEW_STATUS_CONFIRMED_ATLEAST_ONCE is True
Rules
The following table describes the rule supplied with iRecruitment for this transaction type. All of the supplied rules are of the List Creation type and belong to the For Your Information category type.
Note: When you install iRecruitment the rules are enforced. If you want to use a custom set of rules, then you must create your own transaction type based on the supplied transaction type and add the rules that you want to apply. You can create only For Your Information category type rules for this transaction type. Update the IRC: Notifications AME Transaction Type profile option to point to your new notifications transaction type.
| Rule Name | Conditions | Approval Rule |
|---|---|---|
| Candidate Registration by Employee - Candidate Rule | IRC_EVENT_NAME in (CANDREG) | Require approval from iRecruitment Candidate Group |
| Application Status Changed - Candidate Rule | IRC_EVENT_NAME in (APLSTACHG) | Require approval from iRecruitment Candidate Group |
| Application Status Changed - Manager Rule | IRC_EVENT_NAME in (APLSTACHG) | Require approval from iRecruitment Recruiter Group Require approval from iRecruitment Manager Group |
| Apply For Job - Candidate Rule | IRC_EVENT_NAME in (APLFORJOB) | Require approval from iRecruitment Candidate Group |
| Apply For Job - Manager Rule | IRC_EVENT_NAME in (APLFORJOB) | Require approval from iRecruitment Recruiter Group Require approval from iRecruitment Manager Group |
| Request Reverse Termination - Default Rule | IRC_EVENT_NAME in (REQREVTER) | Require approval from iRecruitment Manager Group |
| Interview Feedback Updated - Manager Rule | IRC_INTERVIEW_FEEDBACK_UPDATE is True IRC_EVENT_NAME in (INTVW) |
Require approval from iRecruitment Recruiter Group Require approval from iRecruitment Manager Group |
| Candidate Withdraws Application - Manager Rule | IRC_EVENT_NAME in (WTDRAPL) | Require approval from iRecruitment Recruiter Group Require approval from iRecruitment Manager Group |
| Apply For Job - Referrer Rule | IRC_EVENT_NAME in (APLFORJOB) | Require approval from iRecruitment Referrer Group |
| Update Referral in Candidate Profile by Manager - Candidate Rule | IRC_EVENT_NAME in (UPDCANDREF) | Require approval from iRecruitment Candidate Group |
| Update Referral in Job Application by Manager - Candidate Rule | IRC_EVENT_NAME in (UPDREF) | Require approval from iRecruitment Candidate Group |
| Candidate Profile Incorrect Employee Referral - Candidate Rule | IRC_INCORRECT_EMPLOYEE_REFERRAL_INFORMATION is True IRC_EVENT_NAME in (UPDCANDREF) |
Require approval from iRecruitment Candidate Action Performer Group |
| Apply For Job Incorrect Employee Referral - Candidate Rule | IRC_INCORRECT_EMPLOYEE_REFERRAL_INFORMATION is True IRC_EVENT_NAME in (APLFORJOB) |
Require approval from iRecruitment Candidate Action Performer Group |
| Candidate Self Registration Acknowledgement - Candidate Rule | IRC_EVENT_NAME in (CANDREG) | Require approval from iRecruitment Candidate Action Performer Group |
| Communication Topic Created - Candidate Rule | IRC_EVENT_NAME in (COMTOPCRE) | Require approval from iRecruitment Communication Candidate Group |
| Communication Topic Created - Default Rule | IRC_EVENT_NAME in (COMTOPCRE) | Require approval from iRecruitment Communication Recipients |
| Communication Topic Updated - Candidate Rule | IRC_EVENT_NAME in (COMTOPUPD) | Require approval from iRecruitment Communication Candidate Group |
| Communication Topic Updated - Default Rule | IRC_EVENT_NAME in (COMTOPUPD) | Require approval from iRecruitment Communication Recipients |
| Interview Created - Default Rule | IRC_INTERVIEW_FEEDBACK_UPDATE is False IRC_EVENT_NAME in (INTVCRE) |
Require approval from iRecruitment Recruiter Group Require approval from iRecruitment Manager Group Require approval from iRecruitment Interviewers Group |
| Interview Details Changed - Candidate Rule | IRC_INTERVIEW_FEEDBACK_UPDATE is False IRC_EVENT_NAME in (INTVCRE, INTVUPD) IRC_INTERVIEW_STATUS_CONFIRMED_ATLEAST_ONCE is True IRC_INTERVIEW_INCLUDE_CANDIDATE is True |
Require approval from iRecruitment Candidate Group |
| Interview Updated - Default Rule | IRC_INTERVIEW_FEEDBACK_UPDATE is False IRC_EVENT_NAME in (INTVUPD) |
Require approval from iRecruitment Recruiter Group Require approval from iRecruitment Manager Group Require approval from iRecruitment Interviewers Group |
| Interviewers Added Rule | IRC_INTERVIEW_FEEDBACK_UPDATE is False IRC_EVENT_NAME in (INTVCRE, INTVUPD) |
Require approval from iRecruitment Added Interviewers Group |
| Interviewers Deleted Rule | IRC_INTERVIEW_FEEDBACK_UPDATE is False IRC_EVENT_NAME in (INTVCRE, INTVUPD) |
Require approval from iRecruitment Deleted Interviewers Group |
| Reverse Termination Acknowledgement - Candidate Rule | IRC_EVENT_NAME in (REVTERACK) | Require approval from iRecruitment Candidate Group |
| Update Referral in Candidate Profile - Referrer Rule | IRC_EVENT_NAME in (CANDREG, UPDCANDREF) IRC_INCORRECT_EMPLOYEE_REFERRAL_INFORMATION is False |
Require approval from iRecruitment Referrer Group |
| Update Referral in Job Application by Manager - Referrer Rule | IRC_EVENT_NAME in (UPDREF) | Require approval from iRecruitment Referrer Group |
User and Extensible Lookups
The following table contains a list of user and extensible lookups that are used within Oracle iRecruitment.
See: Adding Lookup Types and Values (Oracle HRMS Configuring, Reporting, and System Administration Guide)
| Area | Lookup and Description |
|---|---|
| Documents | IRC_DOCUMENT_TYPE: The type of document being uploaded, such as resume, cover letter, and any other document. IRC_ALLOWED_FILE_TYPES: The file types that users can upload as resumes, cover letters, and other documents. Note: This lookup type definition applies only to the documents such as resumes, cover letters, and other documents that are attached to the candidate's profile and not to the documents such as attachments to vacancies or offers. |
| Notification preferences | IRC_MESSAGE_FREQ: The frequency of the notifications. |
| Candidate Search Criteria, Vacancy Criteria, and Work Preferences | IRC_PROFESSIONAL_AREA: The professional area. |
| IRC_TRAVEL_PERCENTAGE: The amount of travel. | |
| Candidate Search | IRC_VACANCY_SEARCH_DATE: The maximum age of the vacancy that you are looking for. |
| Compensation Elements | IRC_VARIABLE_COMP_ELEMENT: The compensation options that are available to managers when creating a vacancy. |
| Phones | IRC_CONTACT_TIMES: The times at which the person is willing to be contacted. |
| Skill Type | IRC_COMPETENCE_TYPE: Skill types that candidates can select in the Add Skills page. |
| Create Resume | IRC_RESUME_STYLE: Resume styles that candidates can select to create resumes during registration. |
| Offer | IRC_OFFER_DECLINE_REASON: Reasons available to applicants when they decline an offer. IRC_OFFER_POSTAL_SERVICE: Names of shipping companies to send offers. IRC_OFFER_WITHDRAWAL_REASON: Reason that managers or recruiters can select when they withdraw offers to applicants. |
| Interviews | IRC_INTERVIEW_TYPE: Interview type such as first interview or second interview. IRC_INTERVIEW_CATEGORY: Interview category such as technical or personal interview. IRC_INTERVIEW_RESULTS: Indicates interview result such as pass, fail or hold. |
| Referrals | IRC_REFERRAL_CRITERIA: Identifies the employee referral source detail options such as e-mail address and employee number that candidates can provide during the registration or job application process. |
iRecruitment uses Oracle HRMS lookups such as VACANCY_STATUS, APL_ASSIGN_REASON, MAR_STATUS, and REC_TYPE. For more information, see: User and Extensible Lookups, Oracle HRMS Configuring, Reporting, and System Administration Guide
Running the Change Candidate Access for Security Profiles Process
This process enables you to change candidate access settings for your security profiles. This process is intended for use only if you use iRecruitment.
Warning: The process changes the candidate access settings for all security profiles except the default View All security profiles that the system creates automatically when you create a business group. You should be aware of this before you run the process.
System Implications
With the introduction of Candidate Security, the default setting for the View Candidates box in the Define Security Profiles window is All. However, if you use both Oracle HRMS and iRecruitment, you will generally have some security profiles that should allow access to candidates and some that should not allow access. In this case, you can run the Change Candidate Access for Security Profiles process to override the security settings.
For example, if the majority of your security profiles should allow access to candidates, you can run the process with the View Candidates parameter set to All. This would reset the candidate access for all security profiles. Then, you could manually change the View Candidates setting to None for those security profiles that should not allow candidate access using the Define Security Profiles window.
See: Defining Security Profiles, Oracle HRMS Configuring, Reporting, and System Administration Guide
You run the Change Candidate Access for Security Profiles process from the Submit Requests window.
Prerequisites
- This process is not delivered in any request sets or groups. To use the process, you need to add the process to a request group and, if applicable, a request set.
See: Organizing Programs into Request Groups, Oracle E-Business Suite System Administrator's Guide - Configuration
See: Organizing Programs into Request Sets, Oracle E-Business Suite System Administrator's Guide - Configuration
To run the Change Candidate Access for Security Profiles process
-
In the Name field, select Change Candidate Access for Security Profiles.
-
In the View Candidates field of the Parameters window, select one of the following values:
-
All
Select this value to update your security profiles to include candidates.
-
None
Select this value to update your existing security profiles to exclude candidates.
-
-
Choose OK and submit the process.
Running the iRecruitment Person Data Migration Process
You must run the iRecruitment Person Migration process if you are moving from a previous version of iRecruitment to IRC C. When you run this process a person record is created in Oracle HRMS for each of your existing iRecruitment candidates. This means that the details that the candidates' enter using iRecruitment, such as personal details and qualifications, are visible to Oracle HRMS users.
Important: If you are a new customer installing iRecruitment for the first time you do not need to run this process.
When you run the migration process, the process:
-
Creates person records for registered users in the PER_ALL_PEOPLE_F table in the iRecruitment default business group, with the default user person type. It assigns the user person type iRecruitment Registered User to the candidate person record. This type identifies the candidates who have registered through iRecruitment. You can view these multiple person types for the candidate record in the Person Type Usages window.
-
Creates person records for existing iRecruitment applicants who do not have a person record in the iRecruitment default business group in the PER_ALL_PEOPLE_F table.
-
Updates the phones, addresses, previous employers, qualifications, establishment attendances, competencies, documents, job basket items, notification preferences, and vacancy consideration tables with the PERSON_ID for the new person records.
Prerequisite for migration: Before you run the migration process, make sure to set the IRC: Registration Business Group profile option to define the default business group. Oracle HRMS places the candidate details in the specified default business group when you run the migration process.
See: Profile Options
Optional step: If you do not want to use the supplied user person type Candidate , you can specify a user-defined person type for candidates as a default. You set the person type for your default business group. Oracle HRMS creates records using this default person type when you run the migration process.
See: Business Groups: Entering Recruitment Information
You run the process from the Submit Request window.
To run the iRecruitment Person Data Migration process
-
Select iRecruitment Person Data Migration process in the Name field.
-
Choose the Submit button.
Important: Use the Additional Personal Details flexfield to capture additional information after the migration process. The Person Information flexfield is no longer available to you from IRC.C.
Entering Business Group Information
To enter Business Group information
-
In the Organization window, query the Business Group if it does not already appear there. In the Organization Classifications region, select Business Group, choose the Others button, and select Business Group Information.
-
Click in a field of the Additional Organization Information window to open the Business Group Information window.
-
You can enter a short name for the Business Group. This name is no longer used in Oracle HRMS it is provided for compatibility with earlier releases, where it appeared in the header line of each form.
-
Select the method of creating identifying numbers for employees, applicants, and contingent workers. The choices are:
-
Automatic number generation.
If you choose the automatic entry method of number generation you can at a later date decide to switch to global sequencing. Global sequencing enables you to use a single sequence of person numbers for applicants, employees or contingent workers across multiple business groups.
See: Running the Global Sequencing for Person Number Generation Process, Oracle HRMS Enterprise and Workforce Management Guide
You can switch from local automatic numbering to manual numbering for a person type by editing the business group information and selecting Manual.
Note: If you are using Oracle iRecruitment, ensure to set the applicant numbering to Automatic.
-
Manual entry.
If you choose the manual entry method of number generation, but at a later date decide to change to the Automatic method of number generation, you can run the Change Person Numbering to Automatic process.
See: Running the Change Person Numbering to Automatic Process
-
Automatic use of the national identifier (for example, the social security number in the US, and the NI number in the UK). If you choose this option you must ensure that a national identifier is entered for each new person. This option is not available for applicants.
Note: For whichever method of number generation you choose, it is important to be aware that the number is displayed in various windows and reports. Therefore, if you choose the national identifier method, the person's national identifier is displayed.
-
Employee numbering for contingent worker. This option allows you to use the same sequence of numbers for contingent workers as you use for your employees. For example, you enter an employee and the application gives the employee number 101. If the next person entered is a contingent worker they receive the number 102.
-
-
Select the names of the key flexfield structures you want to use in this Business Group.
-
Select the appropriate Legislation Code and default currency. The Legislation Code determines the startup data you can access and the contents of some legislation-specific windows.
Mexico only: Specify MXN as the currency. Do not select MXP.
Important: Selecting the correct legislation code is essential for the correct functioning of Oracle HRMS. You cannot change the legislation code after entering employees against the Business Group.
-
US users: To maintain fiscal year balances in Oracle Payroll if your fiscal year is different from the calendar year, enter the fiscal year start date.
The application does not provide a connection between the fiscal year functionality in Oracle General Ledger and in Oracle HRMS. In Oracle General Ledger you specify how the fiscal calendar is broken down in the Accounting Calendar view. Oracle HRMS calculates a fiscal quarter as a three month period. The application calculates four equal three month periods beginning from the fiscal year start date.
South African users: You must enter the fiscal year start date for your Business Group, or you will not be able to define payrolls later.
-
You can enter a Minimum and Maximum Working Age for the Business Group. When you enter or hire employees, you receive a warning if the person's age is outside this range.
-
Save your work.
Running the Change Person Numbering to Automatic Process
Use this process to change the method of number generation for your employees, applicants or contingent workers from manual to automatic. This process applies to your current business group.
Run the Change Person Numbering to Automatic process from the Submit Request window.
To run the change person numbering to automatic process
-
Select the Change Person Numbering to Automatic process in the Request Name field.
-
Click in the Parameters field if it does not automatically open.
-
Select the person type that you want the method to change from manual number generation to automatic.
-
Choose OK and then Submit.
After the process has run, the first automatic number assigned to a person is one higher than the maximum number already in use.
Business Groups: Entering Recruitment Information
You enter recruitment information at the business group level to define various default values for iRecruitment.
You enter additional information for iRecruitment in the Organization window of Oracle HRMS.
To enter Recruitment information
-
In the Organization window, query the business group. In the Organization Classifications region, select Business Group, choose the Others button, and select Recruitment.
-
Click in a field of the Additional Organization Information window to open the Recruitment information window.
-
Specify how the vacancy code is allocated. The choices are:
-
Manual - the Vacancy Name field is displayed when you create a vacancy. You must manually enter a name for the vacancy.
-
Automatic - the application assigns a unique vacancy name automatically. The Vacancy Name field is not displayed when you create a vacancy.
-
-
Enter the default number of openings for a vacancy. The default number is displayed in the Total Openings field when you create a vacancy. You can overwrite the default value if required.
-
You can specify the organization defaulting method. The choices are:
-
Creator - The default organization for a vacancy is the organization for the person who has created the vacancy (employee who has logged in).
-
Manager - The default organization for a vacancy is the organization for the manager of the vacancy.
You can overwrite these defaults when you create a vacancy. Both methods use the primary assignment.
-
-
Specify the location defaulting method. The choices are:
-
Manager - The default location for the vacancy is the same location as the manager for the vacancy.
-
Position - The default location for the vacancy is the same location as the position for the vacancy.
-
-
You can select a default budget measurement type, for example, FTE or headcount.
To find out more about budgets, see Budgeting Overview, Oracle HRMS Enterprise and Workforce Management Guide
-
Select a default status which is assigned to a candidate when a candidate withdraws an application. If you do not specify a particular status here, the candidate receives the Terminate status.
-
Specify a user-defined person type as a default for candidates who register in iRecruitment. Oracle HRMS creates a record with this default person type when a candidate registers in iRecruitment. If you do not specify a value, the default person type is Candidate.
Note: The user person type that you define here is associated with the External system person type. The internal code for this system person type is OTHER.
-
Select Yes if you want to exclude this business group from the list of business groups available on the Create Vacancy page. You should do this if you do not want managers or recruiters to be able to create vacancies for this business group.
-
Select a default resume template that iRecruitment can use to create resumes for candidates. When candidates register, they can use the default template or select a template of their choice in the Create Resume page.
-
Select Yes to record and track applicant data for compliance purposes. When you enable the applicant tracking functionality, Oracle iRecruitment creates snapshots of applicants who apply for vacancies in that business group. The snapshots include personal information, skills, qualifications, and work preferences.
-
Save your work.
Defining Assignment Statuses (Assignment Window)
You define both primary and secondary user statuses. In the Assignment Statuses window you can define these statuses for both employee and applicant assignments.
Defining Primary User Statuses
-
Delete the contents of the User Status field and type in your preferred name.
To supply additional user statuses for a system status
-
Insert a new record.
-
Type in your user status name.
-
If you are using iRecruitment, you can enter an external status for your applicant assignment user statuses. This status is displayed to candidates in iRecruitment. For example, you may want to create an external status of 'Interview' for applicant assignment user statuses of 'Pending Interview' and 'Interview Passed'. The candidate in iRecruitment would see the external status and the manager would see the user status names.
-
Select a Human Resource system status.
-
For employee assignment statuses, you must also select a Payroll system status. You must do this, even if you do not have Oracle Payroll. If you have Oracle Payroll, the payroll system status controls whether payroll processes the assignment in a payroll run.
Note: If you select a payroll system status of Do Not Process, payroll will still create assignment actions for assignments with this status. It is these assignment actions that will not be processed.
-
Save the new status.
Note: For each system status, you must have one default user status. The system automatically uses the default in certain situations. For example, when you create a new employee assignment, it automatically has the default user status corresponding to the system status Active Assignment. You can override this default.
When you update the assignment statuses, the application saves the changes in the PER_ASS_STATUS_TYPE_AMENDS table instead of the PER_ASSIGNMENT_STATUS_TYPES table.
You cannot delete a user status, but you can prevent its use by deactivating it. To deactivate a user status, uncheck the Active check box.
Defining Secondary Statuses
A user status associated with a system status is called a primary status because it determines how the system processes the assignment. You can also define secondary statuses not associated with a system status. You use secondary statuses for analysis and reporting, but not to control pay processing for assignments.
To create a secondary status
-
Insert a new record.
-
Type in a user status and do not select a system status.
The Type field displays Secondary.
Configuring Candidate Profile Components
The Candidate Profile feature helps managers or recruiters to obtain a comprehensive picture of candidates along with application information and analyze the applicant pool.
You can configure some of the components of the Candidate Profile feature according to your business requirements, if required.
Configuring the Print Profile and Compare Profile Default XML Templates
Managers can print profiles of candidates and applicants. They can also generate comparison reports of candidates and applicants.
Predefined Templates to Print Profiles
Oracle iRecruitment delivers the following predefined templates to print profiles:
-
iRecruitment Print Applicant Profile (IRCAPLTP.rtf)
-
iRecruitment Print Candidate Profile (IRCCANDTP.rtf)
Predefined Templates to Compare Profiles
By default, managers can compare two or three candidates or applicants using the following predefined templates:
-
iRecruitment Comparison Report for 2 Candidates (IRCCCMP2.rtf)
-
iRecruitment Comparison Report for 3 Candidates (IRCCCMP3.rtf)
-
iRecruitment Comparison Report for 2 Applicants (IRCACMP2.rtf)
-
iRecruitment Comparison Report for 3 Applicants (IRCACMP3.rtf)
To enable your managers to compare the profiles of more than two or three candidates or applicants, you must create suitable templates using Oracle XML Publisher. For more information, see: Creating an RTF Template topic in the Oracle XML Publisher Report Designer's Guide
Configuring Region Icons in the Candidate Profile Regions
You can add icons to the Candidate Profile regions using the Personalization function. Each region is shared region and a separate XML document. Place the icons that are going to be used in the Candidate Profile Regions in the OA_MEDIA folder.
Locate the region icon item and navigate to the IconCellRN page element. The IconCellRN element has an Image: Icon item. This item has an Image URI property, which is set to a blank image, by default. To display another image, personalize this property to point to the required image to be used in the region by starting with /OA_MEDIA/ followed by the icon file name of the icon being used for this region.
Personalizing Candidate Profile
This section provides information on personalizing the Candidate Profile regions and region columns.
See: Oracle Application Framework Personalization Guide for more information on personalizing OA Framework pages.
Use the information in the following table to create or rearrange regions on the Candidate Profile page (/oracle/apps/irc/candidateProfile/webui/CandProfileRN):
Note: CandProfileRN represents the entire page.
| Region Display Name | Region Path |
|---|---|
| Candidate Details | /oracle/apps/irc/candidateProfile/webui/CandidateDetailsRN |
| Application Details | /oracle/apps/irc/candidateProfile/webui/CandAplDetailsRN |
| Skills Match Percentage | /oracle/apps/irc/candidateProfile/graphs/webui/SkillsMatchGraphRN |
| Skills | /oracle/apps/irc/candidateProfile/skills/webui/SkillsOverviewRN |
| Jobs Considered For | /oracle/apps/irc/candidateProfile/jobs/webui/JobsConsideredOverviewRN |
| Registration Assessment | /oracle/apps/irc/candidateProfile/candidate/webui/RegistrationAssmntRN |
| Education Qualifications | /oracle/apps/irc/candidateProfile/qualifications/webui/EducationQualsOverviewRN |
| Jobs Applied For | /oracle/apps/irc/candidateProfile/applications/webui/JobsAppliedOverviewRN |
| Resume and Documents | /oracle/apps/irc/candidateProfile/documents/webui/DocumentsOverviewRN |
| Additional Qualifications | /oracle/apps/irc/candidateProfile/qualifications/webui/AdditionalQualsOverviewRN |
| Work Preferences | /oracle/apps/irc/candidateProfile/candidate/webui/WorkPrefOverviewRN |
| Employment History | /oracle/apps/irc/candidateProfile/employment/webui/EmpHistoryOverviewRN |
| Communication | /oracle/apps/irc/candidateProfile/communication/webui/CommunicationOverviewRN |
| Application Status History | /oracle/apps/irc/candidateProfile/applications/webui/AplnAssgHistoryOverviewRN |
| Application Assessment | /oracle/apps/irc/candidateProfile/applications/webui/ApplicationAssmntRN |
| Interviews | /oracle/apps/irc/candidateProfile/interview/webui/InterviewsOverviewRN |
| Offers | /oracle/apps/irc/candidateProfile/offers/webui/OffersOverviewRN |
| EEO Details | /oracle/apps/irc/candidateProfile/applications/webui/EEOOverviewRN |
| Suitability Analysis | /oracle/apps/irc/candidateProfile/applications/webui/SuitabilityAnalysisRN |
| Essential Skills | /oracle/apps/irc/candidateProfile/graphs/webui/EssentialSkillsRN |
| Desirable Skills | /oracle/apps/irc/candidateProfile/graphs/webui/DesirableSkillsRN |
| Salary Expectation | /oracle/apps/irc/candidateProfile/graphs/webui/SalaryDetailsRN |
| Assessment Score | /oracle/apps/irc/candidateProfile/graphs/webui/AssessmentRN |
| Employee Details | /oracle/apps/irc/candidateProfile/employee/webui/EmpDetailsOverviewRN |
| Salary History | /oracle/apps/irc/candidateProfile/employee/webui/SalHistoryOverviewRN |
| Performance History | /oracle/apps/irc/candidateProfile/employee/webui/PerfHistoryOverviewRN |
Other Personalizations
Using personalization, you can change labels, hints, tips, and messages.
See: Oracle Application Framework Personalization Guide, Extensibility chapter.
Setting Up a Searchable Flexfield
Oracle iRecruitment enables you to set up a flexfield to capture additional candidate and vacancy information that can then be used by managers looking for a suitable candidate and by candidates searching for a job.
You must use the Additional Search Criteria Details flexfield to define what information you want to capture and then add these additional fields to the Create Vacancy and the candidate's Work Preference pages. You can then include these same fields in your candidate and vacancy search pages so that the information is available to candidates or managers performing searches.
When you run the concurrent processes to notify managers of suitable candidates or to notify candidates of suitable jobs, or when your managers perform candidate matching for a vacancy, you may not want to include all of the flexfield segments in these searches. For example, imagine you have set up a segment in your flexfield to record Number of Years Experience and have a vacancy that requires 5 or more years experience. If this segment was included when matching candidates to vacancies, only those candidates with exactly 5 years experience would be considered as matches. Those with more than 5 years would not be returned as the search only performs an exact match on the value in the segment. To control which segments are included in these searches you use the IRC: Search Criteria Segment Matching profile option.
Additional Information: The IRC: Search Criteria Segment Matching profile has no impact on searches run from any of the search pages.
To set up a searchable flexfield
-
Define the segments for the Additional Search Criteria Details descriptive flexfield in the Descriptive Flexfields Segments window.
Additional Information: When defining this flexfield Oracle recommends that your segments should not be context sensitive.
See: Defining Descriptive Flexfields, Oracle E-Business Suite Flexfields Guide
-
Personalize the Create Vacancy pages and candidate's Work Preference pages to display the Additional Search Criteria Details flexfield segments.
-
Personalize the following pages to display the Additional Search Criteria Details flexfield segments in the Search criteria region and the results table as required. The Column Name is SearchCriteriaFlex:
-
Vacancy Search
-
Candidate Search
-
Candidates for Vacancy Advanced Search
-
Visitor Job Search
-
Candidate Job Search
-
Candidate Job Advanced Search
To configure the flexfield, see: Oracle Application Framework Personalization Guide, Oracle Application Framework Documentation Resources, Release 12 (My Oracle Support Note 391554.1)
-
-
Set the profile option IRC: Search Criteria Segment Matching in the System Values Profiles window. This profile option determines the segments that are matched when the concurrent processes to notify managers of suitable candidates or to notify candidates of suitable jobs are run, or when your managers perform candidate matching for a vacancy. For example, to include only segments two, three, and five enter 2|3|5.
See: Profile Options
Setting Up Virus Scan
Oracle iRecruitment is integrated with Symantec AntiVirus Scan engine to perform a virus scan and repair the documents that managers and candidates upload to the database. If you are setting this up on an existing installation of iRecruitment you can scan existing documents that are already uploaded to your database. Complete the following steps to set up the virus scan.
To set up virus scan
Set the IRC: Anti Virus Server profile option to specify the server name on which the Symantec AntiVirus Scan engine is running.
See: Profile Options
Note: After you set the profile option, you must bounce your application server so that files are checked before they are uploaded to the database.
The server on which the Symantec AntiVirus Scan engine is running must be accessible from inside your firewall. The Symantec AntiVirus Scan Engine must be running in the Internet Content Adaptation Protocol (ICAP) mode on the standard port of 1344. Oracle recommends that you set the server to scan all files, regardless of their file extension. You should also allow preview mode (default), and run in "Scan and repair or delete" mode (default).
To test integration of iRecruitment with Symantec AntiVirus Scan server
To test the integration with the server on which the Symantec AntiVirus Scan engine is running, run the following command on your application server:
java oracle.apps.per.irc.common.VirusCheck checkFile [file name][virus server name]
For example:
java oracle.apps.per.irc.common.VirusCheck checkFile myfile.doc myserver.mycompany.com
The command performs a virus check on the file, and creates a clean version of the file. The file name of the cleaned version has the _REPAIRED added to it, for example myfile_REPAIRED.doc.
To check existing documents in the database
To check existing files in the database, run the following command on your application server:
java oracle.apps.per.irc.common.VirusCheck checkDB [connection string][apps username] [apps password] {repair}
The connection string is for the database in the form of server:port:instance, for example: mydb.mycompany.com:1521:mydb, and repair is an optional parameter that indicates whether files should be repaired or deleted if they have a virus. If you do not specify this option, then the application just checks the files without taking any action.
For example, to repair the files run the following command:
java oracle.apps.per.irc.common.VirusCheck checkDB mydb.mycompany.com:1521:mydbapps apps repair
When you run the command in the repair mode, the application repairs the infected files. If the application is not able to repair the infected files, it deletes the files from the system.
When you run the check, you can view the status of the files in the console window in the following format:
-
fileName: No virus detected (Number of the file/Total number of files). For example, mydoc.doc: No virus detected (48/419)
-
fileName:Virus detected and repaired
-
fileName:Repairable virus detected but not repaired (not in repair mode)
-
fileName:Unrepairable Virus detected and deleted
-
fileName:Unrepairable virus detected but not deleted (not in repair mode)
-
fileName: Unexpected error
Customizing Resume Templates
Oracle iRecruitment provides predefined resumes templates to enable candidates to create their resumes online. To customize the resume content and style, you can create your own resume templates.
Important: Oracle iRecruitment recommends that you create your own templates using the predefined templates as samples. Do not modify the predefined templates as your changes may be lost during an upgrade.
To customize resume templates
-
Create resume templates in XSL using any text editor or XML editor and store the new resume XSL files in the $HTML_TOP directory. If you want to create a language specific resume template, then place it in the $HTML_TOP/{Language Code} directory, for example, $HTML_TOP/US. If no language specific file exists, the application will then look in the $HTML_TOP directory.
-
Create image files of the resume templates to enable candidates to view a snapshot of the resume styles in the Create Resume page. Use the resume template file name as the image file name. For example, if the resume file name is companyresume1.xsl, then save the image file as companyresume1.gif. Store the image files in the media directory $OA_MEDIA/ directory.
Note: Ensure that the size of the custom resume images is same as the predefined resume images.
-
Edit the IRC_RESUME_STYLE lookup type to include the resume templates. You can then select the default resume in the Additional Recruitment Business Group window. Use the resume file names without the extension as the lookup codes. For example, if the resume file name is companyresume1.xsl, then enter the lookup code as COMPANYRESUME1.
Note: As with all seed data, do not use the IRC prefix for the custom resume file names. The IRC prefix identifies the predefined templates.
See: Adding Lookup Types and Values, Oracle HRMS Configuring, Reporting, and System Administration Guide
-
Restart the Apache listener after creating the resume templates. This ensures that the new resume templates are available to the candidates.
-
Select a default resume template for your business group. The Create Resume page displays the default. Candidates can override the default and select a resume template of their choice.
Note: If you choose to create your own resume styles, you must create a fully valid XSL stylesheet. If your stylesheet is not valid, then the resume generation and registration process will fail with a fatal error.
Security
User Access and Security in iRecruitment
Self-service applications use the same security mechanisms as Oracle HRMS applications. By defining user profiles, security profiles, responsibilities, and menu structures, you can control who uses the self-service applications, which information they can access, and how they access it.
See: Security Overview, Oracle HRMS Configuring, Reporting, and System Administration Guide
The purpose of this chapter is to identify the key concepts relating to self-service user access and security and to provide information on how to apply these concepts to address the needs of your enterprise.
Responsibilities
A responsibility combines low-level elements of user access configuration to control which functions the user can access (User Access to Functions) and on whom they can perform these actions (see User Access to People).
You define responsibilities in the same way as you define responsibilities for Oracle HRMS applications.
Note: When you define your responsibilities, make sure they are available from Oracle Self-Service Web Applications.
Users
You define users for iRecruitment managers in the same way as you define users for other Oracle HRMS applications.
See: Users Window (Oracle HRMS Configuring, Reporting, and System Administration Guide)
The Person field of the Users window is important for self-service applications as it acts as the link between the professional forms interface and the self-service application. This link enables the application to recognize who is using iRecruitment. For example, if a user's name is entered in the Person field, the user's name is displayed on the homepage.
You do not need to create users for registered users (candidates). These users create their own user IDs and passwords using the Registration function. When site visitors become registered users by creating their user ID and password, their name is automatically entered in the Person field of the Users window.
If, however you do need to create external candidates manually, then you must associate the user with a person in the Person field of the Users window and assign the iRecruitment External Candidate responsibility along with the relevant permission sets.
System Profiles
You apply user profiles to control how self-service applications run. You can set profile options at site level, application level, responsibility level, and user level.
See: Profile Options
See: User Profiles, Oracle HRMS Configuring, Reporting, and System Administration Guide
User Access to Vacancies
iRecruitment uses security profiles to control a user's access to vacancy information and their ability to create vacancies. By assigning the appropriate security profile, you can determine the business groups and organizations in which a manager or recruiter can create vacancies.
Important: If you do not define security profiles, then everyone in your enterprise can view vacancies. To control access to iRecruitment, you must create security profiles.
See: Security Profiles, Oracle HRMS Configuring, Reporting, and System Administration Guide
Managers and Recruiters
You should always create security profiles to control manager and recruiter access to vacancy information. For example, you could set up a supervisor-based profile which would restrict managers and recruiters to viewing only the vacancies that are managed by people within their supervisor hierarchy. The supervisor-based security profile dynamically generates the list of vacancies based on the supervisor hierarchy (starting with the current user).
Note: If required, you can override the top-level user in the supervisor hierarchy by specifying a user in the Named User field of the Security Profile window.
Supervisor-based security allows you to set up a single security profile and use it for multiple users. To activate supervisor-based security, flag the Restrict by Supervisor check box in the Security Profile window.
If you set up a global security profile, then you can create and manage vacancies in multiple business groups.
See: Security Profiles, Oracle HRMS Configuring, Reporting, and System Administration Guide
See: Defining a Security Profile, Oracle HRMS Configuring, Reporting, and System Administration Guide
Create Additional Security for Vacancies
In addition to the security managed using a security profile, managers and recruiters can define additional security for the vacancy when creating a vacancy. See: Vacancy Security
Registered Users and Site Visitors
Registered users and site visitors can access vacancy information for all vacancies so there is no need to set a security profile for registered users or site visitors, if a single visitor page is configured.
Manager Access to Vacancy Applications
Managers can view applications to the vacancies that they manage and also access other vacancy applications submitted by applicants based on their security profile, if you set the IRC: Show Applications profile option to Default. For example, John Smith who manages the Plant Manager vacancy is assigned the supervisor security profile. Scott Bird, who is an applicant submits job applications to the Plant Manager vacancy and two other vacancies. When John reviews applications to the Plant Manager vacancy, and navigates to the Candidate Details page of Scott Bird, he can view the application to the Plant Manager vacancy and also access job applications to the other two vacancies.
To restrict managers' access to applications for vacancies that they manage, select the Restrict on Assignment Security value in the IRC: Show Applications profile option. See: Profile Options
You must also select the Restrict on Individual Assignments option in the Security Profiles window when you are setting up security to restrict managers access to the vacancy that they manage. For more information, see: Defining a Security Profile, Oracle HRMS Configuring, Reporting, and System Administration Guide
Therefore, in the example, if both the security profile and profile option are set appropriately, then John Smith can only access the job applications for Plant Manager vacancy and cannot access the other job applications submitted by Scott Bird.
Access to Applicants
If required, set the HR: Enable RTM Security profile option to the iRecruitment Manager or iRecruitment Recruiter responsibility to enable users who require access to applicants to view their application and other details. The user can be anyone who is involved in the recruitment process.
See: Profile Options
User Access to Personal Information
User access to the personal information of candidates is defined by the candidates themselves. When site visitors register with iRecruitment and become registered users (candidates), they can choose whether their information should be made available to your managers. If they choose to publish the information, it is made available to all iRecruitment users with access to the manager functions.
If a candidate does not choose to publish their information, it can only be seen by the managers and recruiters who access the vacancies for which they have applied.
Note: Registered users (candidates) can only access their own personal information.
User Access to Functions
You can control which functions employees, managers, and recruiters can access by creating function exclusions at the responsibility level.
iRecruitment Responsibilities and User Menus
iRecruitment functions are accessible from predefined responsibilities, each with a corresponding top level menu.
In this version of iRecruitment, the predefined responsibilities are:
-
iRecruitment Manager
-
iRecruitment Employee Candidate
-
iRecruitment External Candidate
-
iRecruitment HRMS Manager
-
iRecruitment Agency
-
iRecruitment Recruiter
-
iRecruitment Employee
The additional responsibilities provided by OSSWA (Oracle Self-Service Web Applications) are:
-
Workflow User Web Applications
-
Preferences
See: Oracle Self-Service Web Applications Implementation Manual
Note: These responsibilities are provided as a starting point only. If you need to change any of these responsibilities or menus you should create your own using the predefined responsibilities and menus as examples. Otherwise, your changes may be lost during an upgrade.
User Menus
iRecruitment includes several predefined top-level menus:
-
IRC Employee Candidate Menu
-
IRC External Candidate Menu
-
IRC Manager Menu
-
IRC Agency Menu
-
IRC Recruiter Menu
-
iRecruitment HRMS Navigator
-
IRC Employee Menu
These top-level menus contain submenus for the homepages, tabbed regions, and global menus.
See: Self-Service Menus
iRecruitment Grants
Grants determine the functions that users can access. iRecruitment delivers the following grants:
-
Global Grant for the IRC External Site Visitor Permission Set (IRC_EXT_SITE_VISITOR_PSET) that gives users access to iRecruitment External Site Visitor functions.
-
Global Grant for the IRC Employee Site Visitor Permission Set (IRC_EMP_SITE_VISITOR_PSET) that gives users access to iRecruitment Employee Site Visitor functions.
-
Grant for the GUEST user to the IRC External Site Visitor Permission Set in the iRecruitment External Candidate responsibility context. Responsibility context refers to the user responsibility at runtime.
-
Grant for the GUEST user to the IRC Employee Site Visitor Permission Set in the iRecruitment Employee Candidate responsibility context.
Grants and iRecruitment Responsibilities
To enable enterprises to easily maintain site visitor and candidate pages, iRecruitment supports a single responsibility for both site visitors and candidate users. The responsibilities are:
-
iRecruitment External Candidate for external site visitors and external candidates
-
iRecruitment Employee Candidate for employee site visitors and employee candidates
As site visitors and candidates access the same responsibility, iRecruitment uses the grants model to control the functions that users can access. Users can access a function only if they have a grant to a permission set (menu) with that function.
-
The iRecruitment External Candidate responsibility uses the IRC_EXT_SITE_VISITOR_PSET permission set for site visitors. When the site visitor registers, iRecruitment automatically grants the IRC_EXT_CANDIDATE_PSET permission set for candidates to create an account and work with all the features of the application.
-
The iRecruitment Employee Candidate responsibility uses the IRC_EMP_SITE_VISITOR_PSET permission set for employee site visitors. When the employee site visitors log in, iRecruitment uses the IRC_EMP_CANDIDATE_PSET permission set for the employees.
For information on creating grants and using permission sets, see: Grants and Permissions Sets, Oracle E-Business Suite System Administrator's Guide - Security
Grant Employee Candidate and Interview Permission Sets to the iRecruitment Employee Responsibility
Enable the Employee Candidate Features
To enable employees to search for internal jobs and apply to these jobs, grant the IRC Employee Candidate Permission Set (IRC_EMP_CANDIDATE_PSET) to employees who are assigned the iRecruitment Employee responsibility.
Enable the Interview Function
To enable employees in your organization perform their interview tasks, grant the iRecruitment Interviewer Permission Set (IRC_INTERVIEWER_PSET) to employees who are assigned the iRecruitment Employee responsibility.
For information on creating grants and using permission sets, see: Grants and Permissions Sets, Oracle E-Business Suite System Administrator's Guide - Security)
Self-Service Menus and User Access
iRecruitment uses six types of menu: top-level menus, homepage menus, submenus (subtabbed regions, tabbed regions), hidden submenus, and global menus. The following section looks at each of these menus in detail.
If the delivered menus contain functions that you do not require, you should define function/menu exclusions at the responsibility level. Do not make changes to the delivered menus.
Types of Menus
The following sections describe the types of menus delivered with iRecruitment.
Top-level Menus
The top-level menus define the choices available to the user when they log in to iRecruitment. For example, the top-level menu for the Manager responsibility is the IRC Manager menu.
See: Self-Service Responsibilities and User Menus
Homepage Menus
The homepage menus are the application menus for the user. They contain the functions that a user can access from the homepage. The menus are named as in the following example:
-
IRC <user> Application Menu
-
For example, IRC Employee Candidate Application Menu
-
Submenus (Tab and Subtab)
Submenus group together functions in a logical group. You can add functions to a tab or subtab menu so that they appear on the tabbed (or subtab) regions of the iRecruitment pages. Tabbed regions include Jobs and Home. The submenus are named as in the following example:
-
IRC <user> Home Site Name
-
For example, IRC Manager Side Nav
-
Hidden Submenus (Security)
By attaching a submenu to the top-level menu without defining a prompt, you can assign functions to the responsibility but hide them from the user so that they do not appear on a menu.
All functions that are available within iRecruitment must be added to either a security menu or another type of menu, depending on how they will be accessed. If you do not want a function to appear on a menu, add it to the appropriate security menu. The menus are named as in the following example:
-
IRC <user> Other Functions
-
For example, IRC Recruiter Security Functions
-
Global Menus
The global menus define the functions that are available in the top right-hand corner of the web page in the global menu bar. These menus generally contain links to functions such as Log Out. iRecruitment delivers one global menu for each user type. The menus are named as in the following example:
-
IRC <user> Global Menu
-
For example, IRC Manager Global Menu
-
Defining User Access to Self-Service Functions
To define user access to self-service functions, you need to define a user, assign a responsibility, and assign profile values. The following process takes you through the separate procedures.
Note: It is not necessary for you to complete this procedure for iRecruitment candidates.
If you do not want to use the delivered responsibilities, we recommend that you create a different responsibility for each target group of users.
To define a responsibility for a self-service application:
-
Follow the standard procedure for creating a responsibility.
See: Defining a Responsibility (Oracle HRMS Configuring, Reporting, and System Administration Guide)
-
Define your responsibilities to be available from Oracle Self-Service Web Applications.
-
Consider whether you should create menu or function exclusions to restrict the employee menus.
To set your system profiles
-
Set the system profiles for security groups.
If Security Groups are not enabled, use the System Profile Values window to link your responsibility to a security profile in the appropriate Business Group.
If Security Groups are enabled, you can set the security profile at the user level using the Assign Security Profiles window.
-
Set any additional required profiles.
See: Profile Options
To define a user:
-
Define the people you would like to access Self-Service. There are two ways to do this. You can follow the typical steps for defining a new user and then assign each individual user to a responsibility that enables access to self-service.
Note: You should assign the IRC Employee Candidate responsibilities to all employees.
See: Users Window (Oracle HRMS Configuring, Reporting, and System Administration Guide)
Alternatively, you can set up concurrent programs to automate this manual process.
See: Creating Batch User Accounts with Concurrent Programs (Oracle HRMS Deploy Self-Service Capability Guide)
-
If you manually create a new user, in addition to granting the user the correct responsibility, you must now grant them the correct permission set using the Functional Administrator responsibility. iRecruitment uses the Grants model to determine the functions that users can access.
See: Grants and iRecruitment Responsibilities
For information on creating grants and using permission sets, see: Grants and Permissions Sets (Oracle E-Business Suite System Administrator's Guide - Security)
Configuring Page Layouts
The Personalization Framework
The Personalization Framework, a component of the Oracle Applications (OA) Framework technology, enables you to modify many aspects of the appearance and behavior of self-service web pages which are defined in the MDS Repository. The Personalization Framework is a subset of the Web Applications Dictionary functionality and provides a user-friendly interface for making changes to the definitions held in the MDS Repository.
See: Oracle Application Framework Personalization Guide, Oracle Application Framework Documentation Resources, Release 12 (My Oracle Support Note 391554.1)
Personalization Framework Hierarchy
The Personalization Framework enables you to configure web pages at different levels: function, localization, site, organization, responsibility, and user. The lower level personalizations, for example, user-level personalizations, take precedence over the higher level personalizations, for example, site-level personalizations.
Note: Not all personalization levels may be available for your self-service application. For example, iRecruitment, does not use the organization level.
If you make personalizations at the site level, they will affect all users. For this reason, you should make site level personalizations wherever possible. For example, you may want to include a particular logo in a web page for all users.
If you want a particular personalization to only appear for a certain group of users, then you should do your personalization at responsibility level. For example, you may want to show certain details about a vacancy to employees only, not external users. Many of the iRecruitment screens make use of common regions. This allows you to make a change to a region in one place, and have it reflected throughout the application, for example you may want to hide the brief description field from the job search results table. Doing this personalization at site level will hide it in both the simple job search and the advanced job search. If you do not want to hide it on both screens then you must do a function level personalization, just doing the personalization on the function that you want to change.
There are a number of function level personalizations delivered with iRecruitment.
To enable administration-level personalizations (at the localization, site, organization, function, and responsibility levels), the system administrator must set the personalization profile options for the user in question. The user then logs on to the self-service application and selects a responsibility. If the profile options have been set correctly, the user will see the Personalize Region links on the web page. By clicking on these links, the user can customize the page to the level defined by the system administrator.
Typical administration-level personalizations include:
-
Creating views
-
Changing column labels
-
Hiding/Displaying columns
-
Configuring tables
-
Filtering and sorting data
The system administrator decides whether to enable the Personalization Framework at the different levels. For more information, see: Oracle Application Framework Personalization Guide, Oracle Application Framework Documentation Resources, Release 12 (My Oracle Support Note 391554.1)
Configurable Profile Options
The following table presents a list of configurable profile options.
| Profile | Configurable Levels | Values | Default |
|---|---|---|---|
| Personalize Self-Service Defn (FND_CUSTOM_OA_DEFINITION) | Responsibility, User | Yes/No | No |
| Disable Self-Service Personal (FND_DISABLE_OA_CUSTOMIZATIONS) | Site, Application, User | Yes/No | No |
This profile option enables or disables the global Personalize URL link that appears on each self-service web application page for Admin-level customizations.
If this system profile option is set to Yes, the configurations you make will not be applied, regardless of the level at which you make the configurations. Only the original definition of each self-service page will be displayed.
Configuring Web Pages
It may sometimes be necessary to modify the predefined web page regions to suit your business requirements. You configure your web pages using the Personalization Framework, see: Oracle Application Framework Personalization Guide, Oracle Application Framework Documentation Resources, Release 12 (My Oracle Support Note 391554.1)
To configure web pages
-
Make sure that you are using a responsibility with administration-level customization access.
-
Navigate to the web page you want to configure.
-
Choose the global Personalize link for the web page or the Personalize Region link for a specific region.
Note: If you want to configure the page at site level, you do not need to enter a customization value. If you are configuring at the responsibility or functional level, you must specify which responsibility or function is affected.
The Choose Personalization Context page is displayed.
-
Make your configuration changes.
-
If required, you can hide or display flexfield segments.
-
Save your work.
Setting Up Information for iRecruitment
Creating and Maintaining Default Job Postings
Job postings are the advertisements attached to your vacancies. They provide information about your vacancy requirements, describe how to apply for jobs, and give general details of your enterprise. As a recruiter, you can use the Default Job Postings feature to create a set of default values to use whenever a particular business group, organization, job, or position is selected for a vacancy.
Important: If you are using APIs to upload default job postings, add HTML tags when uploading job postings using APIs. Paragraphs, numbered steps and other types of formatting will only be loaded if HTML tags are added when loading the postings.
Using the default postings functionality:
-
Saves you from reentering all the information when creating vacancy details
-
Reduces the effort required to create vacancies
How default job postings work
When managers select a business group, organization, job, or position when creating vacancy details, the default posting information automatically appears on the Create Vacancy: Format Job Posting page. Managers can edit and format the default details.
Example - Creating Default Postings for Your Business Group
The following figure shows an example of a business group - Vision Corporation with its organizations, jobs, and positions.
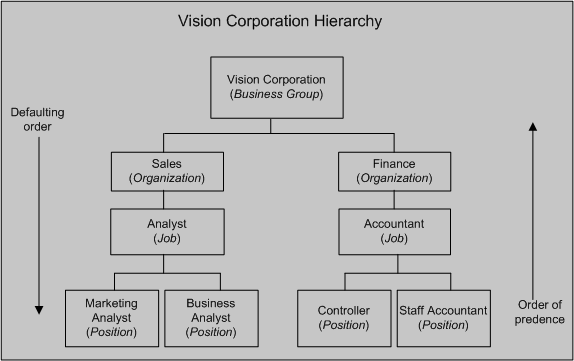
You can define default posting information according to your business needs. Using Vision Corporation Hierarchy as an example, the following points explain different approaches that you can take when creating default posting information.
-
Set up default information for the business group
To use the same posting information for all vacancies in the Vision Corporation business group, create the default posting information for the business group only. If you define the job posting at the highest level and do not create posting information at lower levels, then the default values appear automatically for all vacancies in that business group.
-
Set up default information for organizations and jobs
To use different job posting information for organizations and jobs in the business group, create posting information specific to organizations and jobs. For example, if the posting information is similar for Business Analyst and Marketing Analyst positions, then create default posting information for the Analyst Job. When managers select the Analyst Job when creating vacancy details for the Business Analyst position, the default information defined for the Analyst job, automatically appears for that vacancy.
-
Set up default information for a position
You can create posting information for a position (lowest default level). For example, you can create default information for the Staff Accountant position associated with the Accountant job.
The default job postings at the lower levels override the default job posting set at the higher levels. For example, posting information exists for the Accountant job and Staff Accountant position. When managers select the Accountant job and the Staff Accountant position to create vacancy details, the default posting information defined for the Staff Accountant position appears on the vacancy details page.
-
Set up default information in a hierarchy
You can enter specific information at each level instead of providing complete information at all levels. For example, you can define only:
-
The how-to-apply information for the Finance organization.
-
The job requirements for the Accountant job.
-
Any additional information for the Staff Accountant position associated with the Accountant job.
When managers select the position while creating vacancies, posting information defaults from the organization, job, and position levels.
-
Creating Default Postings
On the Default Job Advert page:
-
Select the posting level and the value for which you want to create a default description.
-
Enter information such as department description, additional job information, and how-to-apply details.
-
To display a graphic on job postings, for example, your enterprise logo, specify the file path of the directory in which you saved the graphic file.
Updating Default Postings
You can make any changes to default job postings that are in use. For example, you might want to change the job requirements or how-to-apply information. You can also delete in-use job postings and add new job postings to jobs, positions, organizations, and the business group. Your changes or deletions do not affect vacancies associated with previous job postings.
Creating and Maintaining Recruiting Sites Details
If your enterprise has an agreement to post job advertisements with third-party recruiting sites, use the Job Posting Vendor Details page to record information about the recruiting sites.
Complete the following information:
-
Enter the recruiting site name that identifies the third-party recruiting site where your enterprise posts the job details.
-
Depending on the data transfer method that your enterprise uses, enter the following details:
-
To send job postings through HTTP, enter the Posting URL specified by the recruiting site. Enter the user name to track those who submit job postings to the recruiting sites. To base the user name on the manager or recruiter who submits the posting, enter one of the following parameters. The application dynamically includes the appropriate details for the person when the posting is made:
#USERID
Sends the person's unique user ID as assigned by the application, for example, 10569.
#USERNAME
Sends the person's login name, for example, JDOE.
#EMAIL
Sends the person's e-mail address, for example, john.doe@abc.com.
-
To send job postings through e-mail, enter the receiver's address as the Posting URL. Enter the address in this format: mailto:{email address}, for example, mailto:firstname.lastname@company.com.
-
To send job postings using FTP, enter the username and password to enable the manager to post job details to the FTP server. This username and password is used to authenticate the user on the FTP server. Specify the Posting URL as FTP URL with the directory that stores the job postings. For example, ftp://fptserver.mycompany.com/inbound_postings.
Note: You can use the FTP method only if the destination server supports Passive File Transfer Protocol (PASV) data transfers. The FTP feature is a beta version and may not work on all servers.
-
-
Specify the style sheet that defines the job-posting format.
iRecruitment provides the following default style sheets:
-
JobPositionPosting.xsl, which is compliant with HR-XML 1.1 standards.
-
PositionOpening.xsl, which is compliant with HR-XML 2.5 standards.
If you leave the Stylesheet field blank, then iRecruitment uses the JobPositionPosting.xsl. To make use of HR-XML 2.5 compliant data, enter PositionOpening.xsl
-
-
Provide other details:
-
Provide the Date From and Date To information to specify how long your job advertisements appear on the recruiting site.
-
Enter the posting cost of the job advertisements for the specified period.
-
-
In the Posting Implementation Class field, enter the Java class that provides the job posting mechanism. You can enter the default implementation class: oracle.apps.irc.posting.JobPostingImpl. Or, you can write an implementation class based on your posting requirements and enter the complete path of the class.
For information about writing custom posting implementation class, see the Write a Java class to define job posting implementation mechanism section in the Implementation Steps topic
Defining and Maintaining Templates for Offer Letters
iRecruitment uses offer templates to create offer letters. When you define a template, iRecruitment uses Oracle XML Publisher, a template-based publishing tool, to merge your template file with the offer data to create an offer letter.
Selecting a Default Template
On the Offer Template Associations page, you can select a default offer template for a business group, organization, job, or position. When a manager creates an offer, iRecruitment uses the default template to create an offer letter.
The following figure shows an example of a business group Vision Corporation with its organizations, jobs, and positions.
You can analyze your recruitment practice to decide whether you want to set a default template for your business group or specify different default templates. Using Vision Corporation as an example, the following points explain different approaches that you can take when setting up default templates for offer letters:
-
Set a default template for the business group
To use the same offer details for all job offers in the Vision Corporation business group, select a default template for the business group. When managers create offers in the Vision Corporation business group, iRecruitment uses the default template set for the business group to create offer letters.
Business Group is the highest level. If you select a default template at the highest level and do not define default templates for organizations, jobs, and positions, then the default template at the business group level is inherited at the lower levels.
-
Set a default template for different levels in the business group
Alternatively, if terms and conditions of job offers vary, then select default templates at the appropriate levels. For example, if job offer details are different in the Sales and Finance organizations, then select different default offer templates for those organizations.
The default templates set at the lower levels override the default offer template set at the higher levels. For example, you select Vision Offer Template as a default template for the Vision Corporation business group and Sales Offer Template as a default template for the Sales organization. When managers create offers for the Sales organization in the Vision Corporation business group, iRecruitment uses the default template set at the organization level (Sales Offer Template) to create offer letters.
Updating Offer Template Associations
You can delete template associations in use and add new templates to jobs, positions, organizations, and business groups. For example, you can add a new template, if there is a change in the company policy or a request for a change from the HR department. Your changes or deletions do not affect offers associated with previous templates.
Setting Up Assessments
Setting Up Assessments
iRecruitment enables you to use assessments to evaluate candidates and applicants during the recruitment process. Follow these steps to set up the assessments functionality:
To set up assessments
-
The OTA Assessment Top Menu appears by default in the IRC Recruiter menu. This menu enables recruiters to:
-
Manage questions and question banks.
-
Manage surveys, tests, and test. sections.
-
See test previews and test statistics.
To enable users of other responsibilities to create and manage assessments:
-
Add the OTA Assessment Top Menu to their corresponding menus.
-
Grant the IRC Assessment Administration Permission Set to those responsibilities using the Functional Administrator responsibility.
For information on creating grants and using permission sets, see: Grants and Permission Sets in the Oracle E-Business Suite System Administrator's Guide - Security.
-
-
Review the following profile options:
-
OTA: Assessment Branding Image
An Oracle Learning Management (OLM) product profile option that controls the display of the product brand name on assessment headers. The profile value is set to IRCBRAND (iRecruitment graphic) by default for the predefined candidate responsibilities. To display a different graphic, for example, the logo of your job site or enterprise, enter the file name of your graphic as the profile option value for predefined or custom candidate responsibilities. Omit any file extension from the name.
-
OTA: Data Source Module
An OLM product profile option that restricts access to assessment data based on the product defined in the profile option. By default, the profile value is set to iRecruitment for the predefined iRecruitment responsibilities so that users view assessment data only from iRecruitment. If you add the Assessment Administration function to any custom iRecruitment responsibility, then you must set iRecruitment as the profile value for that custom responsibility.
-
OTA: Hide Assessment Points
An OLM product profile option to determine whether candidates can view assessment points for test questions. If you set the profile option to Yes, then candidates cannot view the assessment points allocated for the test questions. If you plan to hide the assessments points, then set the OTA: Hide Assessment Points profile option to 'Yes' at the Responsibility level (for example, iRecruitment External Candidate responsibility) or Application level (for example, Human Resources). If you use the custom iRecruitment external candidate responsibility, then you must set the profile option at that responsibility level. When external candidates attempt assessment tests, they cannot view the assessment points. The assessment points are hidden for the external candidates.
-
The following steps summarize how to create and use assessments:
-
Creating assessments
After you set up the Assessments functionality, your recruiters or managers can create surveys and tests to use during the recruitment process.
-
Making assessments available to candidates and applicants
-
To make a survey or test available to candidates during the registration process, set the IRC: Registration Test profile option.
See: Profile Options
-
Managers can select a test when they create vacancy details. iRecruitment presents the test when candidates apply for the vacancy.
See: Creating and Maintaining Vacancies
If an assessment is selected for a vacancy, then iRecruitment presents it when managers or agencies apply on behalf of candidates. Use the IRC: Skip Job Assessment profile option to decide whether managers, recruiters, or agency users can complete assessment when they apply for jobs on behalf of candidates. See: iRecruitment Profile Options
-
Setting Up Offers
Setting Up Offers
To enable managers to create and process offers for applicants, you must complete the following steps:
-
Configure iRecruitment Manager and iRecruitment Recruiter menus, if required.
You can use the default menus that iRecruitment provides to work with the offers functionality or configure the menus to suit your business needs.
-
iRecruitment assigns the Irc CM Home Page Create Offer and Irc Enter Offer Detail functions to the IRC Manager Menu and IRC Recruiter Menu by default. This function enables managers and recruiters to create offers for applicants. If you do not want specific managers to create offers, then you can hide this functionality by excluding the Irc CM Home Page Create Offer and Irc Enter Offer Detail functions from the responsibilities of other managers.
-
iRecruitment assigns the Extend Offer Duration function to the IRC Manager Menu and IRC Recruiter Menu by default. This function enables managers to extend the duration of the offer when the offer expires. If you do not want specific managers to extend the duration of the job offers after the expiry date, then you can exclude the Extend Offer Duration function from the responsibilities of other managers.
-
iRecruitment assigns the following offer functions to the IRC Recruiter Menu by default:
-
Irc Offer Search Workbench: to search offers and make changes to the offer letters.
-
Irc Template Associations Setup Page: to associate offer templates with a business group, organization, job or position to generate offer letters.
-
Irc Track Offer Letter: to enter tracking information such as the shipping and offer number.
If you want your managers to carry out the recruiter tasks, then assign the recruiter functions to the responsibilities associated with the managers.
-
-
-
Review current settings of these profile options, and update if necessary:
-
IRC: Allow Multiple Offers for Candidate
-
IRC: Enable Offers Compensation
-
IRC: Extend Offer Duration Function
-
IRC: Offer Duration Measurement
-
IRC: Offer Duration Value
-
IRC: Offer Send Method
-
IRC: View Offer Function
-
IRC: Offer Workflow Item Type
-
IRC: Offer Details Approval Transaction Type
-
IRC: Extend Offer Duration Transaction Type
See: Profile Options
-
-
Ensure that the following Lookups contain the values required for your enterprise:
-
IRC_OFFER_DECLINE_REASON: Enter the reasons that applicants select when they decline the offer in the Decline Offer page.
-
IRC_OFFER_POSTAL_SERVICE: Enter the names of the shipping companies that your enterprise uses to send offers. The Shipping field on the Track Offer page displays the lookup values.
-
IRC_OFFER_EXPIRATION_DATE: Enter the values that your managers can use to search offers that will close within a specific time, for example within a day or within two weeks. The Offer Expiry Date list on the Offers Search page displays the lookup values.
See: Adding Lookup Types and Values, Oracle HRMS Configuring, Reporting, and System Administration Guide
-
-
Configure the offer approval process, if required.
iRecruitment supplies default offer approval process. You can create your own approval process to meet your business needs.
-
If you create your own approval process, ensure that you:
-
Update the following profile options for the transaction type and workflow process:
-
IRC: Extend Offer Duration Transaction Type
-
IRC: Offer Details Approval Transaction Type
-
IRC: Offer Workflow Item Type
-
-
-
Update the parameters for the Irc Create Offer Review function using the Form Functions window with the new values.
In addition to the default approvers, managers can select additional approvers in the Add Adhoc Approvers region. To enforce default approval rules, you can hide the Add Adhoc Approvers region using the Personalization function.
See: iRecruitment and Oracle Approvals Management (AME)
See: iRecruitment Offer Approval Transaction Type
See: Profile Options
-
-
Create your own offer letter templates if you do not want to use the supplied offer template.
-
Select a default template to generate offer letters for your business group, organization, jobs, or positions. iRecruitment uses the default template to create offer letters when managers create or update offers for applicants.
-
Set up compensation plans to enable hiring or line managers to assign benefits components when they create or update the offers.
See: Setting Up Individual Compensation Distributions for Employees and iRecruitment Applicants
-
Subscribe to the workflow event type IRCOFFER to send notifications to the offer participants such as managers, recruiters, and applicants.
-
Set up equity analysis to enable hiring managers to make an informed decision about salary when they create offers for applicants.
-
Schedule the following concurrent processes:
-
iRecruitment Offer Expiry Notifications
-
iRecruitment Offer Expired Notifications
See: Running the iRecruitment Offer Expiry Notifications Process
See: Running the iRecruitment Offer Expired Notifications Process
Schedule these processes to run daily to notify managers and applicants about offers approaching the closing date and closed offers. Use the iRecruitment HRMS Manager responsibility to schedule these processes.
-
Setting up Information for Salary Basis and Proposed Salary Fields in Offers
Oracle iRecruitment provides enterprises the flexibility to decide if candidates hired through iRecruitment should have their pay administered using Salary Administration or not. For offers, enterprises can make the Salary Basis and Proposed Salary fields optional or mandatory or base Salary Basis and Proposed Salary on work structure configuration using the IRC: Salary Details Mandatory in Offer profile option.
See: Profile Options in iRecruitment
When you set the IRC: Salary Details Mandatory in Offer profile option value to Based on Work Structure Configuration, you must define the IRC: Proposed Salary Flex Segment Name profile option, which identifies the flex segment that iRecruitment uses to make the Salary Basis and Proposed Salary fields mandatory or optional for offers.
You can set up information at the following work structure levels to make the Salary Basis and Proposed Salary fields either mandatory or optional:
-
Organization
-
Job
-
Position
-
Grade
Note that the Salary Basis work structure level impacts only the Proposed Salary field.
To make Salary Basis and Proposed Salary fields optional or mandatory in offers, you must create flexfield segments and define values for these segments at the work structure levels. Before you start implementing these steps, plan your requirements and decide the work structure level that you want to use to make the salary details mandatory or optional.
Setting up Information for Salary Basis and Proposed Salary Fields in Offers
-
Using the Descriptive Flexfield Segments window, create a flexfield segment for the following DFFs. You can define the flexfield segment at any of the work structure levels or at all levels:
Work structure Flexfield Flexfield Segment
ExampleValue Set Organization Add'l Org. Unit Details Salary Details Reqd Yes_No Job Additional Job Details Salary Details Reqd Yes_No Position Additional Position Details Salary Details Reqd Yes_No Grade Additional Grade Details Salary Details Reqd Yes_No Note: You must provide the same flex segment name if you are creating the flex segment at different levels. The flexfield segment given in the table is just an example. When you create a segment, you can name the segment as per your business requirement.
If you decide to make Salary Basis mandatory at any of the work structure levels, then create a flex segment for the Salary Basis work structure to make the Proposed Salary field mandatory or optional. For example, you can make salary basis mandatory at organization, job, position, or grade level and make proposed salary optional by defining a flexfield segment for the Additional Salary Basis Details flexfield:
Work structure Flexfield Flexfield Segment
ExampleValue Set Salary Basis Additional Salary Basis Details Salary Details Reqd Yes_No -
Using the System Profile Values window, enter the flex segment name as the value for the IRC: Proposed Salary Flex Segment Name profile option.
iRecruitment checks the value set for the flex segment at organization, job, position, grade, or salary basis level to make the salary basis and proposed salary basis fields mandatory or optional.
-
Set the value to Yes or No for the flex segment for all or required work structure components:
-
Organization: Impacts the Salary Basis and Proposed Salary fields and defines whether they are mandatory or optional.
To set the flex segment value:
Navigate to the Organization window and select the organization to define the flex segment. Click the additional details icon to display the Add'l Org. Unit Details window. Select Yes or No in the flex segment field.
For example, if you decide that all the offers created in an organization, Vision Corporation must have salary basis and proposed salary, then select Yes for the flex segment field.
-
Job: Impacts the Salary Basis and Proposed Salary fields and defines whether they are mandatory or optional.
To set the flex segment value:
Navigate to the Job window and select the job to define the flex segment. Click the additional details icon to display the Additional Job Details window. Select Yes or No in the flex segment field.
-
Position: Impacts the Salary Basis and Proposed Salary fields and defines whether they are mandatory or optional.
To set the flex segment value:
Navigate to the Position window and select the position to define the flex segment. Click the additional details icon to display the Additional Position Details window. Select Yes or No in the flex segment field.
-
Grade: Impacts the Salary Basis and Proposed Salary fields and defines whether they are mandatory or optional.
To set the flex segment value:
Navigate to the Grades window and select the grade to define the flex segment. Click the additional details icon to display the Additional Grade Details window. Select Yes or No in the flex segment field.
-
Salary Basis: Impacts the Proposed Salary field and defines whether it is mandatory or optional
To set the flex segment value:
Navigate to the Salary Basis window and select the salary basis to define the flex segment. Click the additional details icon to display the Additional Salary Basis Details window. Select Yes or No in the flex segment field.
You can make salary basis mandatory at organization, job, position, or grade level and make proposed salary optional. For example, for the Stores Clerk job, set the Salary Basis as mandatory. Set the value for the Additional Salary Basis Details flex to No for Hourly Salary Basis. When a manager creates an offer for the Stores Clerk job and selects the Hourly Salary Basis, the Proposed Salary field becomes optional.
Note: However, if the Salary Basis field is optional, then the Proposed Salary field also becomes optional, regardless of the Additional Salary Basis Details flex segment set to Yes.
If the flex segment is configured at a higher level for example, for an organization and the flex segment is left blank at the lower levels such as job or position, then the value set at a higher level cascades as a default value to the lower levels. Values set at a lower level, for example, grade, overrides any default from a higher level. The following diagram shows the defaulting order and order of precedence:
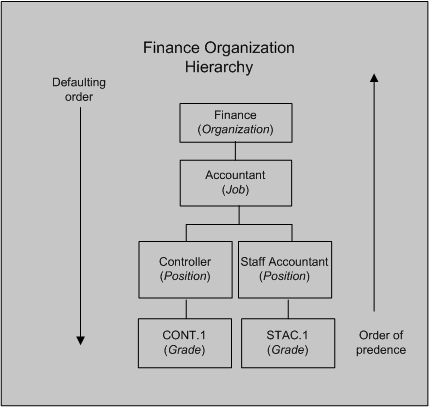
-
Setting Up the Equity Analysis Organization Report for Offers
To enable managers to use the Equity Analysis for Organization report to make an informed decision about salary for an applicant, you must complete the following steps:
To set up the Equity Analysis Organization report for offers
-
Run the following concurrent programs if this is the first time you are using HRMSi or DBI for HR:
Note: If you already use HRMSi or DBI, then you need not run these programs. You would have run these concurrent programs at the time of set up.
-
Update Gregorian Hierarchy in the Time Dimension
Run this program to load the FII_TIME_DAY table with time information. The Offers Materialized view uses this table to display information in real time. Set the Date To parameter at least one year into the future when you run the concurrent program.
-
HRI Load All Supervisor Hierarchies
Run this program to load the Supervisor Hierarchy Summary Table (HRI_CS_SUPH.) with supervisor hierarchy details. The Equity Analysis for Organization report uses these details to display salary information for jobs in the supervisor hierarchy.
-
-
Run the concurrent process HRMSi (Embedded Analytics) Materialized View Refresh to refresh the HRI_MDP_SUP_WRKFC_JX_MV materialized view that updates workforce information.
Prerequisites
These processes are not delivered in any request sets or groups. To use these processes, you need to add the processes to a request group and, if applicable, a request set.
See: Organizing Programs into Request Groups, Oracle E-Business Suite System Administrator's Guide - Configuration
See: Organizing Programs into Request Sets, Oracle E-Business Suite System Administrator's Guide - Configuration
-
Set the profile option HRI: Enable Embedded Analytics to Yes for Application Human Resources at the Application level. You set the profile option to enable the Equity Analysis for Organization region in the Basic Details page.
-
Check that jobs and salary basis are set up correctly in Oracle HRMS to meet your requirements for offers equity analysis. The report uses the job and the hiring manager details to display the salary information.
See: Jobs and Positions, Oracle HRMS Enterprise and Workforce Management
See: Salary Basis, Oracle HRMS Compensation and Benefits Management Guide
-
Set up the currency conversion rate to display salary information in a common currency using the Conversion Rate Types window of Oracle General Ledger. Set up the Corporate conversion rate to define a standard rate for your enterprise. Oracle General Ledger currency setup is a shared product. Liaise with your Financials implementation team to get this information. If you do not use Oracle General Ledger, add the GL_GCS_RATES menu or individual functions from the menu to an existing menu that users access through their standard responsibilities. For further information about conversion rates, see the Oracle General Ledger User's Guide in the Oracle Financial Applications documentation.
-
Schedule to run the following processes to display the latest information. You can schedule the processes to run according to your business needs. For example, you can schedule to run these processes daily or once a week.
-
HRI Load All Supervisor Hierarchies
Note: If you do not use Daily Business Intelligence, then set the Full Refresh parameter to Yes for subsequent runs. If you use Daily Business Intelligence, you must set the Full Refresh parameter to No for subsequent runs. Oracle supports only incremental refresh of supervisor hierarchy if DBI is installed.
-
HRMSi (Embedded Analytics) Materialized View Refresh
-
Customizing Offer Templates
Offer letter templates simplify the offer-letter-preparation task and ensure consistency among offer letters. An offer letter template determines the basic structure of an offer letter and contains document settings such as text entries, page layout, and special formatting.
iRecruitment supplies the following predefined documents to generate offer letters:
-
IRCESOLDD_SD.xml: A data definition source file that contains all the data tags that offer templates can use.
-
IRCESOLT_en.rtf: A sample RTF offer template that you can use to generate offer letters.
Oracle iRecruitment provides these predefined templates as an example reference. You must modify and create new templates according to your business requirements. For example, the predefined template uses Pounds as the default currency value. To use a different currency value, you must create your own offer letter template.
To customize the offer letter details, you can create your own templates. You customize the XML version of the offer template using Oracle XML Publisher.
Important: Oracle iRecruitment recommends that you create your own templates. Do not modify the predefined templates as your changes may be lost during an upgrade.
To customize the offer templates
-
Create a new rich text or PDF format template.
Using the predefined offer template as a sample, create a new offer template and save it as a rich text or PDF format file.
See: Creating an RTF Template and Creating a PDF Template in the Oracle XML Publisher User's Guide
-
Create a new template definition.
Using the predefined template definition as a sample, create a new template definition in the Template Manager for your template design file. When you create the template definition in the Template Manager, you register and upload your template design files.
See: Creating the Template in the Oracle XML Publisher User's Guide
To use the custom templates for offer letter generation, associate the custom templates with your business group, organization, job, or position using the Offer Templates Associations page.
See: Defining and Maintaining Templates for Offer Letters
Running the iRecruitment Offer Expiry Notifications Process
Run the iRecruitment Offer Expiry Notifications process to alert managers and applicants about offers approaching the closing date.
You run the process from the Submit Request window.
To run the iRecruitment Offer Expired Notifications process
-
Select the iRecruitment Offer Expired Notifications process in the Name field.
-
Click in the Parameters field to open the Parameters window.
-
Enter the number of days that the application should consider to track offers approaching the closing date. For example, if you enter 3, the process tracks the offers that close within three days from the offer extended date and notifies the participants. The default value is seven.
-
Click OK.
-
Click Submit.
Running the iRecruitment Offer Expired Notifications Process
Run the iRecruitment Offer Expired Notifications process to inform managers and applicants about the closed offers. If required, managers can extend the duration of the closed offers and send the offers to the applicants again.
To run the iRecruitment Offer Expired Notifications process
-
Select the iRecruitment Offer Expired Notifications process in the Name field.
-
Click Submit to run the process.
Setting Up Compensation Plans for iRecruitment Applicants
Setting Up Individual Compensation Distributions for Employees and iRecruitment Applicants
As a compensation manager, you set up individual compensation distribution (ICD) plans to define the components of an award or allowance. The line manager uses the self-service interface to assign the award - setting the start and end date of the distribution - while the back-office maintains control of the plan's administration. You can set up compensation plans so that hiring or line managers assign benefits components to applicants when they create or update offers in iRecruitment.
Follow these process steps to set up a variety of plans for ICD and iRecruitment offers, such as:
-
Periodic or spot bonuses
-
Sponsored allowances
-
Resettlement compensation
-
Severance Payments
-
Relocation
-
Sign-on bonus
-
New hire stock
-
Other periodic or recurring awards
As a compensation and benefits administrator, you define plans for individual compensation distribution and iRecruitment using the features of standard benefits or Oracle Advanced Benefits following the guidelines in these sections.
Define Plans
You set up plans for individual compensation distribution and iRecruitment by defining the characteristics of the plan and any electable options in the plan. If necessary, you can define participant eligibility profiles to limit the participants who are eligible for the plan or option.
To set up plans for self-service individual compensation distribution and iRecruitment
-
Define the Plan Year start and end dates for the compensation plan. Set up several plan years to account for future plan years.
-
Optional: define a participant eligibility profile to control eligibility for the compensation plan.
If you do not define a participant eligibility profile:
-
ICD finds all employees and contractors reporting to the manager eligible for the distribution.
-
iRecruitment finds all applicants eligible for the compensation plans defined for applicant offers.
Note: Set the participant eligibility profile status to active if you define a profile.
-
-
Set up one or more Plan Types to group the compensation plans you administer.
-
Required: select an Option Type of Individual Compensation Distribution to enable a manager to distribute the award or assign benefits to applicants. When you define Plan Types for iRecruitment, select Enterable Amount or Select List as the option for Self Service Display format. Currently the other self-service options do not apply for iRecruitment plans.
-
Optional for ICD: select a Compensation Category of Compensation for reporting purposes or for system extracts.
You can choose to set up a single plan type for all your compensation plans, or you can define multiple plan types for groupings of plans (Bonus, Allowance, Severance, and others).
Note: You should base the number of plan types you define on your reporting requirements.
See: Defining Plan Types
-
-
Required for iRecruitment: Define reporting groups to group the compensation plans for iRecruitment. Select the purpose as iRecruitment to display the plans on the Compensation page of iRecruitment.
-
Optional: define the options in the compensation plan.
-
Enter a user friendly option name to display in the self service web page.
-
Select the corresponding plan type of each option.
Note: Use options when there is a logical grouping of choices within a plan, such as a car allowance plan with options of BMW, Honda, and Ford. For bonus plans, severances, and allowances, set up each compensation type as a separate plan.
See: Defining Options
-
-
Define compensation plans for ICD and iRecruitment
-
Enter a user friendly plan name to display in the self service web page.
-
Select the plan type of the plan.
-
Set the plan status to active. You can update the status to inactive if you need to temporarily disable the plan.
-
Select a Plan Usage code of May Not Be In a Program.
In the Not in Program tabbed region:
-
Enter a sequence number that indicates the order in which the plan displays in the self service web page relative to other plans in the plan type.
-
Select the currency of the plan for monetary distributions. You do not enter a currency for non monetary allowances, such as cars.
-
Select the Activity Reference Period of the plan. For recurring awards, the activity reference period is the period the manager sees when distributing the award, for example, $100 per period.
For non recurring awards, you can select any activity reference period.
Note: For an iRecruitment plan, ensure that you select frequency specific values such as Per Month or Per Year as the Enrollment rate/frequency. As applicants are not assigned any payrolls, if you select values such as Per Pay Period no plans will be displayed to hiring managers when they create or update offers.
-
-
Link the Plan Years to the plan that you defined in Step 1.
-
If you defined options in Step 5, link the options to the plan.
-
Set the status for each option to active. You can update the status to inactive if you need to temporarily disable an option.
-
-
Link a participant eligibility profile to the plan if you limit eligibility for the plan.
-
For iRecruitment: Define a single life event reason with the iRecruitment type. Oracle iRecruitment uses this life event type to process compensation plans for applicants.
Define Enrollment Requirements
You use the Plan Enrollment Requirements window to control the enrollment method.
ICD only: You can also set up required certifications that the individual must provide before Oracle Payroll distributes the award.
To define enrollment requirements for ICD and iRecruitment plans
Define enrollment requirements for the plan.
-
Query the plan you defined in step 6 above.
-
Select an enrollment method of Explicit.
-
Check the Allows Unrestricted Enrollment check box.
-
Select Current, Can Keep or Choose; New, Can Choose as the Enrollment code.
For ICD Plans
-
If you define coverages, select a Coverage Start Date code of Enterable if you want to let the manager enter the coverage start date. The application distributes the award to Payroll following the date. If you do not want the manager to enter the start date, select any other coverage state date code.
-
Select a Coverage Start Date code of Event to set the start date to the system date when the manager enters the self service web page. Use this code for non-recurring awards. The application distributes the award to Payroll in the following payroll period.
-
Required: select a Coverage End Date code that corresponds to your Coverage Start Date code.
-
Activity Rate Start and End Date codes function similarly to coverage codes. Choose Enterable for recurring allowances; for non-recurring allowances, choose Event.
For iRecruitment Plans
You must define enrollment requirements by specifying coverage and rates start and end codes.
General Tab
-
With the General tab and the Plan tab selected, select the Coverage tabbed region.
-
Enter the enrollment coverage start and end dates to specify when the coverage begins and ends for participants in the plan. For example, select Event as the start date and 1 Day Before Event as the end date code.
-
Select the Rates tabbed region.
-
Enter the rates start and end date codes to specify when the activity rates start and end for participants in this plan. For example, select Event as the start date and 1 Day Before Event as the end date code.
When you set up compensation plans for iRecruitment offers, you must associate the plans with the iRecruitment life event. When a hiring manager completes the basic details of an offer and clicks Continue on the Basic Details page, the application detects that the iRecruitment life event has occurred for the applicant assignment and runs the Participation process. The Participation process evaluates the eligibility for the applicant and displays the appropriate benefit plans in the Compensation page.
Timing Tab
Define the following iRecruitment Life Event in the Life Event region of the Timing tab to allow users to make or change elections.
-
Select Enrollment Type as the life event.
-
Select iRecruitment Life Event as the life event.
-
Select a Coverage Start Date code of Event and select the corresponding code 1 Day Before Event as the end date code.
-
Select Event as the Rate Start Date and select the corresponding code 1 Day Before Event as the end date code.
-
Select As of Event Date as the Enrollment Period Start date code and select a Enrollment Period end date that corresponds to the Period start date such as Thirty Days After Event Date or Sixty Days After Event.
For information on compatible start and end codes, see the white paper, Oracle Applications HRMS Compatible Start & End Date Codes, My Oracle Support Note ID: 247317.1
See: Defining Enrollment Requirements for Not in Program Plans
-
-
Optional for an ICD plan: for Advanced Benefits users, link one or more certifications to the plan if you request or require certification from the participant before you make the distribution.
Oracle HRMS supplies the certification types available with the application.
Note: If you require a certification, the application suspends the payroll distribution of the award until the participant returns the certification. A message displays to the issuing manager indicating that the distribution is suspended.
See: Defining Certifications for Enrollment in a Plan, Oracle HRMS Compensation and Benefits Management Guide
See: Defining an Action Item Due Date (Advanced Benefits), Oracle HRMS Compensation and Benefits Management Guide
-
Optional for ICD: for Advanced Benefits, you can define communication types that the application generates to inform the participant of a suspended distribution.
You set up a system extract to write the applicable information from the communication type to a text file. You can then merge the data from the text file into the body of the participant communication.
See: Defining Communication Types, Oracle HRMS Compensation and Benefits Management Guide
Set Up Activity Rates and Coverages for the Plan
You set up activity rates to define:
-
The amount of a distribution (for fixed rate distributions) or to indicate that the manager enters the distribution amount when the award is assigned in the self-service web page.
Note: You can set up multiple activity rates for an ICD plan; however, you can choose only one rate to display on enrollment to the self-service user.
-
The amount ranges that hiring managers can assign when they create or update offers for applicants in iRecruitment
To set up activity rates for a plan
Optional: set up an activity rate for an ICD/iRecruitment plan or option in the following cases:
-
You do not use coverages.
-
You offer a monetary award and you want to distribute the amount of the award to payroll.
-
You create element entries for the award.
-
You award a non monetary gift (defined as a coverage) and you need to keep records of the taxable benefit.
-
You want to control the maximum amount that can be distributed for a recurring element.
Note: In order to control the maximum distribution amount, you must configure Oracle Payroll using FastFormula.
Follow these guidelines when setting up the activity rate:
-
Set the activity rate status to active.
-
Indicate if the activity rate applies to a plan or to an option in a plan.
-
Select any Activity Type code.
-
Select a Usage code of Standard Contribution/Distribution.
-
Select a Unit of Measure if the award is non monetary.
Note: If the Unit of Measure is monetary, do not select any unit of measure.
-
For ICD only: Select a rate certification type if you want to suspend the rate until the appropriate certification is received and approved.
Define the calculation method for the activity rate.
-
If the award is a flat amount, enter the value of the award.
-
If the award is not a flat amount, check the Enter Value at Enrollment check box. For recurring awards, the value the manager enters at enrollment is per the activity reference period defined for the plan.
-
Check the Assign on Enrollment and Display on Enrollment check boxes.
See: Defining Activity Rates for a Standard Contribution/Distribution
Note: Steps 2 - 3 do not apply to iRecruitment plans.
-
-
Optional for ICD: define a variable rate profile if the activity rate varies according to one or more factors, such as the assignment of the person to whom the manager distributes the award.
You can also use variable rate profiles to define minimum and maximum distributions, increments, and default rates.
See: Defining General Information for a Variable Rate Profile, Oracle HRMS Compensation and Benefits Management Guide
-
Optional for ICD: create a taxable benefit rate for use with non monetary coverages.
You set up a taxable benefit rate for non monetary coverages like you define a standard activity rate, with the following exceptions:
-
Leave the Unit of Measure field blank.
-
Select a Calculation Method of Multiple of Coverage.
-
Uncheck the Enter Value at Enrollment field.
-
Define a multiplier where the number represents the value of one non monetary award.
-
Select a Coverage Operator of Multiply by.
-
Select a Rounding Code of Round to Nearest Hundredth.
-
Uncheck the Display on Enrollment check box.
Note: You may have to define your coverage first before saving this rate.
-
-
Optional for ICD and iRecruitment: create a Maximum Distribution Rate to accompany the standard rate.
You set up a Maximum Distribution Rate like you define a standard activity rate, with the following exceptions:
-
Select an Activity Type of Total Distribution Limit.
-
Leave the Unit of Measure field blank.
-
Leave the Recurring field blank.
-
-
Optional for ICD: define coverages for the plan if:
-
The award is non monetary and you do not want element entries created for the non monetary award.
-
The award is a non monetary gift (which is defined as a coverage) and you need to keep records of the taxable benefit.
-
You do not define standard activity rates.
See: Defining a Coverage Calculation, Oracle HRMS Compensation and Benefits Management Guide
Follow these guidelines when you set up a coverage definition:
-
Enter a name for the coverage.
-
Select a coverage type.
-
Select a Unit of Measure if the Type is not Coverage.
-
On the Calculation Method Tab, select a Calculation Method of Flat Amount.
Note: If you want the user to enter the value during the enrollment check the Enter Value at Enrollment check box. Otherwise, enter the amount.
-
For recurring distributions, the coverage amount is per the activity reference period defined in the plan.
Note: You should set up no more than one coverage per compensation plan or option.
-
To configure ICD web pages, use the Application Dictionary to configure the field labels, hints, tips, and messages that display in an ICD web page. You can also configure menu names, function names, and certain workflow attributes, see: Individual Compensation Distributions (ICD), Oracle HRMS Compensation and Benefits Management Guide
To configure iRecruitment offers pages, including the Compensation page, see: Setting Up Offers
Enter People for Test Purposes
You can enter sample people into the Oracle HRMS database to test your Individual Compensation Distribution plan.
Define a Manager
Using the People window, define a manager with a date of birth, social security number, and address.
-
Enter an Assignment for the manager.
-
Check the Manager check box located in the Miscellaneous tabbed region.
-
Select the manager's GRE in the GRE tabbed region.
Define an Employee
Using the People window, define an employee with a date of birth, social security number, and address.
Note: If you use eligibility profiles, make sure the test employee meets your eligibility requirements.
-
Enter an Assignment for the employee.
-
Select the test manager you created as the employee's supervisor on the Supervisor tabbed region.
-
Select the employee's GRE in the GRE tabbed region.
Create a User Name and Password for the Test Manager
As a system administrator, open the User Types window to define a user name and password for the manager you created.
-
Link the Manager Self Service responsibility to the user name.
-
Save your work and close the window.
Assign an Individual Compensation Distribution to the Employee
-
Using the manager's user name and password, log on to Oracle Self Service HR.
-
Choose the Individual Compensation menu item.
-
Find the Employee you created.
-
Assign the individual an award.
Set Up Employee Self-Service Access to ICD
You can configure ICD for employee self-service access. Use this feature if your enterprise administers charitable contribution plans, savings bond plans, or service recognition plans where you allow the employee to select from one or more awards.
Note: You set up employee self-service plans as you would other plans, using the professional user interface. However, you should include employee self-service plans in their own plan type, so that participants cannot view plans only available to managers.
To set up employee self-service access to ICD
-
Log in to Oracle HRMS using a System Administrator responsibility and open the Form Functions window.
-
Choose the Description tab.
-
Enter a new function name--without spaces--in the Function field.
-
Enter a User Function Name for this function.
-
Select SSWA JSP Function as the function Type.
-
Optional: enter a Description of the function.
-
Choose the Form tab.
-
Enter the following parameter, substituting the function name you entered in Step 3 and your plan type IDs where indicated:
-
pProcessName=HR_INDIVIDUAL_COMP_PRC&pItemType=HRSSA&pCalledFrom=<your new function code>&PLANTYPE=<your plan type IDs separated by commas>
-
-
Choose the Web HTML tab.
-
Enter the following string in the HTML Call field:
-
OA.jsp?akRegionCode=HR_CREATE_PROCESS_TOP_SS&akRegionApplicationId=800
-
-
Save your work.
-
Close the Form Functions window and open the Menus window.
-
Add the function you just created to the Employee Self-Service Menu.
-
Save your work.
See: Defining Communication Types, Oracle HRMS Compensation and Benefits Management Guide
See: Defining When a Communication is Used, Oracle HRMS Compensation and Benefits Management Guide
Defining a Program or Plan Year Period
You use the Program/Plan Year window to record the dates through which programs or plans are in effect.
To define a program or plan year period:
-
Enter the Start and End dates in the Plan region through which this program or plan year period is valid.
In the Limitation region:
-
Choose the Start and End dates that define the limitation year that acts as the reference period used to calculate a participant's yearly compensation.
You typically define a limitation year to determine a participant's yearly contribution ceiling for a benefits plan such as a 401(k) plan in the US.
In the Period region:
-
Select the period Type code that identifies the period type by which you divide the program or plan year, for example fiscal or calendar.
Note: The period type must be Fiscal if you are defining a year other than from 01-JAN to 31-DEC. When the year period is from 01-JAN to 31-DEC the period type must be Calendar.
In the Within Year Periods block:
-
Enter the first day and first month of the within year period and the last day and last month of the within year period in the following fields:
-
Start Day
-
Start Month
-
End Day
-
End Month.
-
-
Select the Unit of Measure by which you are dividing this period.
-
Save your work.
Defining an Eligibility Profile
You use the Participation Eligibility Profiles window to define an eligibility profile with an effective start date of your choice. Before defining the profile, define any derived factors (such as length of service or compensation level), or your own eligibility criteria, that you plan to use as eligibility criteria.
If you want to create your own criteria to include in the eligibility profile, click User Defined Eligibility Criteria and create new criteria, see: Creating your own Eligibility Criteria., Oracle HRMS Compensation and Benefits Management Guide To access these criteria, choose the Other tabbed region, and select User Defined Criteria from the list
You can use eligibility profiles to determine:
-
employee eligibility for compensation and benefits plans
-
entitlements in collective agreements
-
eligibility for grade/step progression
-
eligibility for various work schedules, and so on
The information you can enter differs slightly depending on whether you have accessed this window from the Total Compensation or Collective Agreements area of the application.
Note: If you use the Total Compensation Setup Wizard to set up grade ladders, programs and plans, and Total Compensation Statements, you can create or update eligibility profiles while you are working in the Wizard.
To define an eligibility profile
-
Enter the Name of the eligibility profile you are defining.
-
Enter a Description of this eligibility profile.
-
Select an Assignment Type to which this eligibility profile applies.
For example, you can define an eligibility profile for employee assignments if this profile is only used for employees.
Note: You can only select Employee Assignment Only for profiles to be used with collective agreements.
-
Select the profile Status.
Pending: This eligibility profile is currently proposed, but not active.
Active: This eligibility profile is in use.
Inactive: This eligibility profile is in use but cannot be associated with any new programs, plans, or options.
Closed: This eligibility profile was once Active or Pending, but is no longer in use.
-
Select whether this eligibility profile applies to benefits or collective agreements. If you are defining an eligibility profile for work schedules or grade step progression, then select benefits.
Choose the tabbed region that contains a criteria element that you want to include in your eligibility profile. Choose from:
-
Personal
-
Employment
-
Derived Factors
-
Related Coverages (Not applicable to collective agreements)
-
Other
-
-
Select a criteria element.
For example, you could choose Person Type as one of several eligibility criteria of the Personal type.
Note: When you define more than one value for a criterion, at least one of the values must be present in the person's record for them to be eligible. However, when you use multiple criteria in an eligibility profile (for example, a Work Location and an Organization), the person must meet at least one value for each criterion.
If you use a FastFormula eligibility rule as part of your eligibility profile, the participant must meet the criteria of the rule and one value from any other criteria that you include in the eligibility profile. If you use more than one FastFormula rule, by default the participant must meet the criteria of all the rules. If you change the user profile option BEN:Eligible Profile Rule from AND to OR, the participant need only meet the criteria of one rule.
-
Enter a Seq (sequence) number specifying the order the system processes this criteria element relative to any other criteria in this eligibility profile.
Note: You must assign a sequence number of a higher priority to all criteria that are used to exclude eligibility.
-
Select one or more values for the criteria element you have selected.
-
Check the Exclude field if a person becomes ineligible to participate in the compensation object, or to receive the collective agreement entitlement you associate with this eligibility profile if they meet this criterion.
You typically check the Exclude field when it is easier or faster to define which persons are excluded from eligibility, as opposed to defining which person are eligible.
If you are defining an eligibility profile for a grade ladder, and you want to rank your employees to determine the most eligible person to progress, enter an eligibility Score for this criteria.
The application calculates the eligibility rank based on the total score for all criteria that the person satisfies.
-
For grade ladders, you can also enter an eligibility Weight for a criteria.
The application multiplies the weight by the criteria value. You can only use weights with criteria that contain numeric values. If you enter a score and a weight for a criteria, the application adds the person's score to the weight to arrive at the final number.
-
Repeat steps 6 to 12 for each criteria element that you include in your eligibility profile.
-
Choose the Display All tabbed region to view the criteria elements in this eligibility profile.
-
Save your work.
Defining Plan Types
You use the Plan Types window to date effectively define, update, and delete or end-date plan types.
To define a plan type:
-
Enter a unique Name for the plan type you are defining.
-
Select an Option Type to classify the options you associate with this plan type.
-
For Advanced Benefits users, enter the alphanumeric identifier in the IVR field that participants use to identify this plan type using interactive voice response or telephony technology.
-
Select a Compensation Category that classifies the benefit provided by the plans and options in this plan type.
Note: You can use this information in system extracts that you send to benefits carriers and other third party agents.
-
Select a Self Service Display format of horizontal or vertical to control how you display the plans and options in a self-service enrollment form.
Note: The display format defaults to horizontal.
In the Enrollment block:
-
Enter the Minimum number of plans in this plan type in which an eligible person can be enrolled simultaneously or check the No Minimum field if there is no minimum.
-
Enter the Maximum number of plans in this plan type in which an eligible person can be enrolled simultaneously or check the No Maximum field if there is no maximum.
-
Save your work.
Defining a Reporting Group
You use the Reporting Groups window to define a reporting group and to associate programs and plans with the reporting group. You can also define which regulatory bodies and regulations govern the reporting group.
You can create reporting groups to represent:
-
Groups of programs and plans that you report on as a set by entering the reporting group name as a report parameter.
-
Self-service personnel actions, such as promotions or transfers, and to configure rules for these business processes.
See: Overview of Self-Service Actions, Oracle HRMS Workforce Sourcing, Deployment, and Talent Management Guide
-
Compensation plans for applicants on the Compensation page of iRecruitment.
To define a reporting group
-
Enter a unique Name for the reporting group.
-
Select the Global check box to include plans in the reporting group from any business group.
-
Select the Purpose of the reports that will be generated for this reporting group.
Select the Personnel Action purpose if you are defining a self-service action.
Select the iRecruitment purpose if you are defining plans for iRecruitment applicant offers. The Compensation page displays only reporting groups defined with the purpose of iRecruitment.
-
Enter a Description for the reporting group. The description that you enter for iRecruitment reporting group appears as an instruction text on the Enter Compensation page of iRecruitment.
-
Select the first Program Name if the reporting group is to consist of one or more programs.
Alternatively, select the first Plan Name in the reporting group.
Note: Ensure that you do not include the same plan in multiple reporting groups with the purpose iRecruitment.
Any row (record) in this table can include a Program Name or a Plan Name, but not both simultaneously. While it is unlikely that you would want to use the same reporting group to report at the program and plan levels, you could do so by choosing a Program Name for one record, and then choosing a Plan Name for each subsequent record in the reporting group.
Note: When a plan is selected, the Regulatory Bodies and Regulations button is enabled, indicating that you can define regulatory bodies for, and associate regulations with, that plan.
-
Save your work.
Defining a Benefits Plan
You use the Plans window to date effectively define the plans that you offer to employees and other eligible participants.
To define a benefits plan
-
Set the effective date to the date on which you want to create the plan.
Note: You must create the plan with an effective date on or before the first day of the enrollment period in which it will be used.
-
Enter the Name of this plan starting with a letter of the alphabet (not a number or symbol).
Note: By setting the profile option BEN: Compensation Objects Display Name Basis in the System Profile Values window, you can choose whether compensation object names display in application windows (both in the professional and Self-Service user interfaces) based on the life event occurred on date or the user's session date. The default option value is Session.
-
Select the plan Status.
Pending: No participants are actively enrolled in this plan, but could be in the future if you change its status to Active. Eligibility processes operate on this plan in "evaluate-only" mode, but do not create active records. Select the Pending status when setting up a plan that possibly may not become Active.
Active: Eligible persons currently may be enrolled in this plan.
Inactive: Current participants may remain in this plan, but no new participants may enroll in this plan.
Closed: No participants are enrolled in this plan, nor will any enroll in the future (unless you reactivate the plan).
-
Enter a Short Name if you also refer to this plan by an abbreviation.
-
Enter a Short Code if you also refer to this plan by a code.
You can extract data for a compensation object based on its Short Name or Short Code.
-
Select the plan type for which you are defining a plan in the Type field.
-
For Advanced Benefits users, enter the alphanumeric identifier in the IVR field that participants use to identify this plan using interactive voice response or telephony technology.
-
Choose the Inception Date to specify the calendar date on which you first introduced this plan.
-
Select if this plan must be in a program or may not be in a program in the Plan Usage field.
Note: If you include this plan in a program, benefits eligibility is determined when eligibility is determined for the program. If you do not want to determine participant eligibility for this plan during a specific time period, you can link a required dummy eligibility profile to the plan (for example, a benefits group containing no people) so that no persons are found eligible for the plan.
-
Choose the General tabbed region.
-
Check the Savings Plan field if you are defining a savings plan.
-
Enter the COBRA Payment Day that corresponds to the day of the month on which COBRA payments are due for this plan.
For example, 1 refers to the first day of each month.
-
Select the Primary Funding Method to specify the source of funds for this plan.
Self Insured: You self-insure to fund this plan.
Trust: A financial institution such as a bank maintains a trust to fund this plan.
Split: You self-insure as well as use a trust to fund this plan.
Fully Insured: You set up an annuity to fund this plan.
-
Select a Health Service code to describe the type of health service this plan provides.
-
Select the participant type whose coverage is subject to imputed income taxation in the Subject to Imputed Income field. Choose either participant, dependent, or spouse.
-
Enter a URL in the Web Address field to create a hypertext link from this plan name on an Oracle Self-Service Human Resources benefits enrollment web page to a URL containing information about this plan. This URL can reside on an intranet or the World Wide Web.
-
Select a Family Member Code or rule to indicate the kind of family members that must be recorded in a participant's contact record in order for the participant to be eligible for this plan.
-
Save your work.
Defining a Plan to Determine Eligibility for a Self-Service Action
You can use Compensation and Benefits functionality as a generic engine to determine eligibility for self-service actions. You define a plan to represent a sub action, such as Promotion (Sales) or Promotion (Italy). After defining a plan type with the option type Personnel Action, use the Plans window to define a sub action and link it to a form function. When users choose the function from a menu, the application calculates each person's eligibility for the action.
See: Set Up Eligibility Processing, Oracle HRMS Deploy Self-Service Capability Guide
See: Overview of Self-Service Actions , Oracle HRMS Workforce Sourcing, Deployment, and Talent Management Guide
-
On the Miscellaneous tab, in the Personnel Action Function Name field, select the name of the form function from the LOV.
-
Make sure to activate the Plan Years Not Applicable check box. Plan years do not apply to self-service actions, and this step eliminates needless processing.
Maintaining Plan Related Details
You use the Maintain Plan Related Details window to:
-
Associate a plan year period with a plan
-
Associate a reporting group with a plan
-
Associate reimbursable goods or services with a plan
-
Associate regulations and reporting groups with a plan
-
Associate an organization with a plan
Associating a Plan Year Period with a Plan
You associate a plan year period with a plan to define the period for which the plan is active.
To associate a plan year period with a plan:
-
Enter or query the plan in the Plans window to which you are associating a plan year period and choose the Details button.
-
Choose the Plan Year Periods tabbed region.
-
Enter a Seq (sequence) number to specify the order in which the system processes this plan year period relative to any other plan year period for this plan.
-
Select the plan year period Start date.
The period end date displays based on the start date you select.
-
Save your work.
Associating a Reporting Group with a Plan
You can associate a plan to those reporting groups that you use to report on the plan.
To associate a reporting group with a plan:
-
Enter or query the plan in the Plans window to which you are associating a reporting group and choose the Details button.
-
Choose the Reporting Group tabbed region.
-
Select the Name of a reporting group that you use to report on this plan.
-
Select more reporting groups, as necessary.
-
-
Save your work.
Associating Goods or Services with a Plan
You can associate the goods or services that your enterprise provides as a benefit or has approved for reimbursement as part of a plan.
To associate a good or service with a plan:
-
Enter or query the plan in the Plans window to which you are associating goods or services and choose the Details button.
-
Choose the Goods or Services tabbed region.
-
Select the type of goods or services that you are associating with this plan in the Type field.
-
Save your work.
Associating Regulations with a Plan
You can associate regulations with a plan and the reporting groups that support these regulations.
To associate a regulation or a reporting group with a plan:
-
Enter or query the plan in the Plans window to which you are associating a regulation and choose the Details button.
-
Choose the Regulations tabbed region.
-
Select a Regulation.
-
Select a Reporting Group associated with this regulation.
-
Complete the following fields based on the regulations that govern this plan. These regulations support US non-discrimination legislation.
-
Regulatory Plan Type is used to define the type of regulation that governs this plan, such as Fringe benefit regulations or pension regulations.
-
Contribution Nondiscrimination is used to identify those participants who cause the plan to be out of compliance with contribution nondiscrimination provisions.
-
Key Employee Determination is used to determine those participants who are key in the context of the plan for nondiscrimination testing purposes.
-
Highly Compensated Determination is used to determine those participants who are highly compensated in the context of the plan for nondiscrimination testing purposes.
-
Five Percent Owner is used to determine those participants who are 5% owners of the business.
-
Coverage Nondiscrimination is used to identify those participants who cause the plan to be out of compliance with coverage nondiscrimination provisions.
-
-
Save your work.
Associating an Organization with a Plan
You can associate organizations with a plan, such as third party administrators and benefits suppliers. For example, you can link an organization to a plan when the organization is a benefits supplier to whom you owe a monthly premium.
To define an organization for a plan:
-
Enter or query the plan in the Plans window to which you are associating an organization and choose the Details button.
-
Choose the Organizations tabbed region.
-
Select the name of this Organization.
-
Enter the Customer Identifier this organization uses to identify this plan.
-
Enter the Policy or Group Number this organization uses to identify this plan.
-
Enter the Organization Role that describes the services this organization provides for this plan.
-
Save your work.
Associating Options with a Plan
You use the Maintain Plan Options window to associate an option with a plan.
Advanced Benefits users can define how life event reasons impact a person's participation eligibility for an option in a plan.
To associate an option with a plan:
-
Enter or query a plan in the Plans window.
-
Choose the Options button.
-
Enter a Seq (sequence) number for an option you are associating with this plan if you want the options to display in a particular order in the enrollment window.
Note: Advanced Benefits customers can use sequence numbers to control the interim coverage assigned when an election is suspended.
-
Select an Option you are associating with this plan.
-
Select the Status of the option.
Pending: No participants are actively enrolled in this option, but could be in the future if you change its status to Active. Eligibility processes operate on this option in "evaluate-only" mode, but do not create active records. Select the Pending status when setting up an option that possibly may not become Active.
Inactive: No participants currently are enrolled in this option in this plan, but may be in the future.
Active: Participants currently may be enrolled in this option in this plan.
Closed: No participants are enrolled in this option in this plan, nor will any enroll in the future (unless you reactivate the plan).
-
For Advanced Benefits users, enter the numeric identifier in the IVR field that participants use to identify this option using interactive voice response or telephony technology.
-
Enter the URL for this option in plan in the Web Address field if participants can enroll in this option by using the product's self-service web interface.
-
Enter a URL in the Web Address field to create a hypertext link from this option name on an Oracle Self-Service Human Resources benefits enrollment web page to a URL containing information about this plan. This URL can reside on an intranet or the World Wide Web.
-
Choose the Eligibility tab.
-
For Advanced Benefits users, check the Participation Eligibility Override Allowed field if the standard eligibility criteria that this option inherits from this plan can be overridden.
Checking this field is useful when you want to allow special circumstances for participation in this option, such as a negotiated benefits package for a new hire.
-
For Advanced Benefits users, check the Track Ineligible Person field to cause the system to track persons who are found ineligible for participation in this plan when the Participation batch process is run.
Note: You use the View Participation Information window to view the compensation objects for which a participant is either eligible or ineligible.
Note: You must check this field if you determine benefits eligibility based on temporal factors, such as age or length of service.
-
Choose the Dependent Criteria tab.
-
Select a person type or person type combination in the Eligibility Check field to determine eligibility for this option for these person types.
-
Select if the participant's eligibility for this option is based on dependent eligibility in the Eligibility Check field. Choose one:
-
Participant: The participant is eligible if he or she meets the participant eligibility requirements associated with the option. Eligibility for the option is not based on dependent eligibility.
-
Participant and Dependent: The participant is eligible only if he or she meets the participant eligibility requirements associated with the option, and his or her dependents meet the dependent eligibility profiles and designation requirements associated with the option.
-
Dependent Only: The participant is eligible if the participant's dependents meet the dependent eligibility profiles and designation requirements associated with the option. If you select this value, the system does not check for participant eligibility.
-
-
Select a Family Member Code or rule to indicate the kind of family members that must be recorded in a participant's contact record in order for that participant to be eligible for this option.
Note: Family Members are recorded in the Contact window.
-
Save your work.
Defining Options
You use the Options window to date effectively define, maintain, and delete options.
To define an option
-
Enter a unique Name for the option you are defining starting with a letter of the alphabet (not a number or symbol).
-
Enter a Short Name if you also refer to this option by an abbreviation.
-
Enter a Short Code if you also refer to this option by a code.
You can extract data for a compensation object based on its Short Name or Short Code.
-
Check the Waive Option field if a person's election of this option represents the waiver of coverage.
-
If this option is for a Compensation Workbench plan, select a Salary Component if you want to link the option to a salary component.
At the end of a salary review cycle, a system administrator runs the Compensation Workbench Post Process to update salary components with the new values stored by the compensation components.
In the Required Period of Enrollment block:
-
Enter a Value that represents the length of time in which a person must be enrolled in this option.
-
Select the unit of measure of this value in the UOM field.
-
Select a rule if you use a formula to determine the required period of enrollment for this option.
-
Select one or more plan types you are associating with this option to indicate that plans of this plan type may provide this option.
The option type displays in the Option Usage field to indicate the benefits category for this option.
-
Save your work.
Defining Designation Requirements for an Option
You use the Designation Requirements window to limit the personal relationship types that are covered by an option.
If you do not define designation requirements for an option, a participant can designate a person of any relationship type as the designee for an option.
You can only have one designation profile per option, even if you associate the option with more than one plan.
Note: Regardless of the designation requirements you define, you must check the Personal Relationship field in the Contacts window in order for a contact to display in a participant's list of eligible dependents.
To define designation requirements for an option
-
Enter or query an option in the Options window and choose the Designation Requirements button.
-
Select a Group Relationship for which you are defining designation requirements.
-
Specify if this designation requirement applies to dependents or beneficiaries in the Type field.
-
Enter the minimum and maximum number of designees that can be covered under this option or indicate that there is no minimum or maximum number of designees by checking the appropriate field.
Note: Select a Group Relationship type of No Designees and enter the maximum number of designees as zero for an employee only coverage option.
-
Check the Cover All Eligible field if there is no minimum or maximum number of designees for this option and you want to provide coverage to all designees who meet your eligibility criteria.
-
Select one or more Relationship Types to include with this group relationship.
-
Save your work.
Defining General Characteristics of Life Event Reasons
You use the Life Event Reasons window to date effectively define life events and their associated processing.
To define general characteristics of a life event reason:
-
Set your effective date to the appropriate start date for this life event reason.
-
Enter a Name for this life event reason.
Note: Use a noun for the life event reason name since this life event may appear in communications that you send to participants.
-
Select a life event reason Type. Choose from a variety of types including:
-
Absence: Select this type if you want entry and ending of absences to trigger life events.
-
Checklist: Select this type to trigger HR Checklist events for HR administrators.
-
Compensation : Select this type if you are defining a life event for a Compensation Workbench plan.
-
Personal (Advanced Benefits only): Examples include Marriage, Divorce, and Birth.
-
Scheduled (Advanced Benefits only): Examples include age and length of service changes.
-
Work (Advanced Benefits only): Examples include Change in Job Assignment, New Hire, and Termination.
-
iRecruitment: Select this type if you are defining a life event for compensation plans for iRecruitment applicants.
-
-
If you selected Absence as the Type, select the Life Event Operation Code: Delete Event, Start Event, or End Event. For example, to set up the life event reason that detects entry of an absence end date, select End Event.
-
Select an Evaluation Rule to apply to this life event reason. You can use an evaluation rule to define:
-
How to combine multiple detected life events into one
-
How to fully detect a life event when its detection is complex
-
When to eliminate a previously detected life event.
-
-
Enter a description of the life event in the Description field.
-
Select a Life Event Treatment code if you want to limit the detection of seeded temporal life events. Choose from:
-
Do Not Detect Past Temporal Events: Prevents the detection of past temporal events while the application processes this life event.
-
Do Not Detect Past or Future Temporal Events: Prevents temporal event detection while the application processes this life event. Use this code with the seeded open and administrative events, or any other explicit events, when you do not want to detect temporal events.
-
Never Detect This Temporal Life Event: Prevents the automatic detection of a specific temporal event. Set this code for any seeded temporal event, such as Age Change or Length of Service Change, that you do not want to detect, such as for mid-year changes.
-
-
Select a Timeliness Evaluation code to indicate how the system processes potential life events that fall outside a time period that you define.
By default, the Timeliness Evaluation field is set to Process Potential Life Event Manually.
-
Do one of the following:
-
Enter the number of days after the life event occurred beyond which the system does not process this potential life event in the Timeliness Days field.
By default, Timeliness days is set to 90.
Note: By selecting timeliness evaluation and timeliness days values for user-defined events, you can avoid over writing processed life events during retroactive batch processing.
-
Select a Timeliness Period if the potential life event should be voided or processed manually because it occurred prior to the current calendar year.
-
Select a Rule that controls your timeliness definition.
Note: The Timeliness Days and Timeliness Period fields are mutually exclusive.
-
-
Select an Occurred Date Determination code that controls if the life event is processed according to the date the event occurred or the date the event was recorded in the system.
Note: By setting the profile option BEN: Comp Objects Display Name Basis in the System Profile Values window, you can choose whether compensation object names display in application windows (both in the professional and Self-Service user interfaces) based on the life event occurred on date or the user's session date. The default profile option value is Session.
-
If you want to link a life event reason to a self-service process, select a value in the Selectable for Self Service field to indicate in which processes this life event should be available.
-
All--the life event can be selected in all self-service processes
-
Add/Update/Delete Family Members--the life event can be selected in Self-Service Benefits when the user adds, updates, or end dates a family member contact
-
Add/Update Family Members--the life event can be selected in Self-Service Benefits when the user adds or updates a family member contact
-
Delete Family Members--the life event can be selected in Self-Service Benefits when the user end dates a family member contact
-
Basic Registration--the life event can be selected in the New Employee Registration process
-
COBRA Registration--the life event can be selected in the Non-employee Registration process
-
Basic and COBRA Registration--the life event can be selected in both the New Employee and the Non-Employee Registration processes
Note: In Self-Service Benefits, a user can select life event reasons with a Selectable for Self Service value of All, Add/Update/Delete Family Members, or Delete Family Members as valid reasons for ending a relationship between the primary participant and a dependent or beneficiary.
Note: Do not use the Life Events page in self-service registration if you are the employer of benefits recipients. This page is only for third party benefits providers.
See: Configuring the New Employee and Non-Employee Registration Processes, Oracle HRMS Deploy Self-Service Capability Guide
-
-
Select the appropriate value from the Show Primary Care Providers in Self Service to display or hide primary care providers in Self-Service for this life event. By default, the application displays all the primary care providers in Self-Service for this life event.
-
Select the Check Related Persons Eligibility field if the system generates a related person life event when the primary participant experiences this life event.
If you select the Check Related Persons Eligibility field, complete the Causes Related Person Life Events block as described in step 15
-
Select the Override field if this life event is the overriding life event in the case of the collision of two or more life events.
Note: When two or more overriding life events collide, no life event is selected as the winner. You use the Potential Life Events form to select the winning life event.
-
Select the COBRA Qualifying Life Event field if this life event impacts eligibility for US COBRA benefits.
-
Select the name of the related person life event this life event triggers in the Causes Related Person Life Event field.
Repeat this step for each related person life event that is triggered by this life event.
-
Save your work.
Next Step
Associating a Person Change With a Life Event, Oracle HRMS Compensation and Benefits Management Guide
Defining Activity Rates for a Standard Contribution/Distribution
You create a separate contribution or distribution activity rate calculation for each plan or option in your benefits offering that requires a contribution or distribution. After you link the calculation to the plan or option, you define the calculation.
You date effectively maintain standard contributions and distributions using the Standard Rates window. You can also use Total Compensation Setup Wizard, Oracle HRMS Compensation and Benefits Management Guide to update multiple rates simultaneously.
To define an activity rate for a standard contribution/distribution
-
Enter or query the standard contribution or distribution that you are defining in the Name field.
-
Select the Status of this activity rate.
Pending: This plan or option in plan currently does not use this calculation, but could in the future if you change the Status of this calculation to Active. Select the Pending status when setting up a standard contribution/distribution calculation that possibly may not become Active.
Active: The system currently calculates this standard contribution/distribution for this plan or option in plan.
Inactive: The system currently does not calculate this standard contribution/distribution for this plan or option in plan.
Closed: The system currently does not calculate this standard contribution/distribution, nor will it do so in the future.
-
Choose the General tabbed region if it is not already selected.
-
Select the Level in the compensation object hierarchy at which you are defining the activity rate.
-
Select the Compensation Object for which you are defining the activity rate.
-
Select an Activity Type code that identifies the business function this calculation performs, such as an Employee Contribution or an Employer Payroll Distribution.
-
Select the Tax Type indicating the tax impact of this calculation to participants.
You select this Tax Type primarily for classification purposes; the payroll system is primarily responsible for processing taxability.
-
Select a Usage code that limits the use of this activity rate to a particular kind of contribution or distribution.
-
Select a UOM (unit of measure) to express the result of this calculation if this activity rate is for a non-monetary distribution.
-
Select an Element Determination Rule. The application uses this rule to determine an employee's currency for the worksheet amount rate if you choose a Determination Code of Automatic or do not choose a determination code.
See: Defining Processing Information for a Standard Contribution/Distribution, Oracle HRMS Compensation and Benefits Management Guide
-
Select the Element you defined that corresponds to this activity rate definition.
Note: Set up your elements as a prerequisite to defining your activity rates. If your element definition changes, you must re-attach the element to the rate. For an absence plan, you must also re-select the Extra Input Rule and re-map the input values to formula results.
-
Check the Element and Input Value Required field.
-
Select the Input Value for the activity rate, such as pay value.
-
If you are defining a rate for an absence plan and you need to associate more than one input value with the activity rate, select the Extra Input Rule. This is a formula that calculates the values to be returned to the other input values. When you have finished defining the rate, choose the Extra Inputs button to associate the formula results with the appropriate input values.
-
Check the Uses Variable Rate field if the result of this calculation varies due to some factor or other piece of discreet data about the participant and you associate a variable rate profile with the calculation.
To associate a variable rate profile to this activity rate, see Associating a Variable Rate Profile with a Standard Contribution/Distribution Calculation, Oracle HRMS Compensation and Benefits Management Guide
-
Select the Parent/Child code to specify whether this calculation is a parent activity rate (the primary activity rate) or a child activity rate (dependent upon the parent activity rate).
-
Check the Subject to Imputed Income field if the activity rate for this compensation object is governed by US imputed income regulations.
-
Save your work.
Defining Enrollment Requirements for Not in Program Plans
You use the Plan Enrollment Requirements window to define special enrollment requirements for plans that you do not associate with a program.
To define enrollment requirements for a not in program plan
-
Query the plan for which you are defining enrollment requirements in the Plan field.
The current status of the plan is displayed. For a definition of the plan statuses, see Defining a Benefits Plan.
-
With the General tab and the Plan tab selected, select the Not in Program tabbed region.
-
For Advanced Benefits users, select a Default Enrollment Code or Rule to define how the system processes enrollments when a participant fails to make an election.
See: Enrollment Codes, Oracle HRMS Compensation and Benefits Management Guide
Note: If an option in this plan is the default option, you must still select this plan as the default plan.
-
Save your work.
Setting Up Agencies
Setting Up Agencies
Follow these steps to set up agencies to enable agency users to work with the iRecruitment Agencies functionality:
-
Define agencies as suppliers
Record the information about agencies that your enterprise works with in the Suppliers window of Oracle Services Procurement. Define the agency with the classification of iRecruitment Job Agency to show the agency in the application. If you do not use Oracle Services Procurement, add the Customer and Supplier Setup menu or individual functions from the menu to an existing menu that users access through their standard responsibilities. For further information about the functions in the Customer and Supplier Setup menu, see the Oracle Payables User Guide in the Oracle Financial Applications documentation.
-
Create a person record in Oracle HRMS
Create a person record for an agency or agency user using the People window in Oracle HRMS. Unlike the employee or contingent worker record, this record need not represent an actual person. You could set up one person record for all users at an agency to use iRecruitment. Enter the details that the agency provides and any mandatory information that Oracle HRMS requires. Select Contact as the person type to identify the record as an external person record. You associate this person record with the user record to enable the agency access to iRecruitment.
See: Entering a New Person (People Window), Oracle HRMS Workforce Sourcing, Deployment, and Talent Management Guide
-
Create a user record to enable an agency user to access iRecruitment
Create a user record for an agency user to access iRecruitment. Define the user and assign the iRecruitment Agency responsibility to the user in the Users window of the System Administrator responsibility. In the Person field, select the person record that you defined in step 2. You associate the user record with the person record to identify the agency user who accesses iRecruitment.
Note: Depending on the business need, you can create one user per person or one user for all agency people to access iRecruitment. If you create multiple user records and want all the agency users to access the same functionality, then assign the appropriate responsibility to all the user records.
See: Users Window, Oracle E-Business Suite System Administrator's Guide - Security
-
Set the profile options for agencies
-
To define which agency the agency user belongs to, set the name of the agency as the value for the IRC: Agency Name profile option. Typically you set this profile option at the user level to identify the agency users.
-
To determine the default maximum number of applicants that agencies can submit for a vacancy, set the default value for the IRC: Default Max. Applicants profile option. You can set the value at different levels:
-
To specify the same default value for all your managers set the value at the site level.
-
To specify different default values for the manager responsibility and manager users set the values at the responsibility and user levels.
-
See: Profile Options
-
-
Configure the agency menu, if required
To enable an agency to edit a vacancy, add the following functions to the iRecruitment Agency responsibility. These functions are not available with the IRC Agency Menu by default.
-
Irc Vacancy New Launch Workflow (IRC_VAC_NEW_LAUNCH_WF)
-
Irc Vacancy View (IRC_VAC_VIEW)
-
Irc Vacancy Details - Edit (IRC_VAC_DETS_EDIT)
-
Irc Vacancy Skills - Edit (IRC_VAC_SKILLS_EDIT)
-
Irc Vacancy Team - Edit (IRC_VAC_TEAM_EDIT)
-
Irc Vacancy Posting - Edit (IRC_VAC_POST_EDIT)
-
Irc Vacancy Review - Edit (IRC_VAC_REVIEW_EDIT)
Agency users can use the Update button on the Vacancy page to edit the vacancy information. To enable agency users to navigate to the Home page after submitting the updated vacancy, you must set the IRC: Homepage Function profile option value to IRC_AGENCY_HOME at the iRecruitment Agency responsibility level.
See: Defining Menus, Oracle HRMS Configuring, Reporting, and System Administration Guide.
-
-
Set up the login URL for agency users to access iRecruitment
Agency users access iRecruitment through E-Business suite login page. For information on how to make this login page accessible through a firewall: refer to the white paper
See: DMZ Configuration with Oracle E-Business Suite 12 (Note: 380490.1) on My Oracle Support
iRecruitment High Availability
iRecruitment High Availability
Oracle iRecruitment provides the High Availability (HA) functionality to maintain the candidate job site even if the instance (primary) that hosts the job site is down for maintenance, such as application of patches or hardware updates.
You set up a secondary (HA) instance of iRecruitment that you use when the primary instance is unavailable. The HA instance includes a basic job site that enables job seekers to apply for jobs and enter basic information such as their e-mail address, first name, and last name.
Important: The iRecruitment High Availability solution supports only iRecruitment Candidate functionality. Managers and other users must not use the HA system since any data which they process will not be synchronized with the primary instance.
Features of the High Availability Candidate Job Site
Job seekers can:
-
Search for jobs using search criteria such as data posted and location of the job.
-
View details of vacancies such as organization, location and vacancy requirements.
-
Apply for jobs when they identify suitable vacancies. The HA instance takes the site visitor through a slightly different job application process. When the site visitor applies for a job, they provide details such as their e-mail address, last name, first name, and upload a resume for their job application. iRecruitment checks the e-mail address to see if they are a registered user. If the site visitor is a registered user, then they provide their password to submit the job application. Otherwise, the application prompts the user to enter registration information before they apply for the job.
Candidate Account on the HA Instance
When the site visitor provides the registration details as part of the job application process, the HA instance creates a new user account for the newly registered user. It subsequently recognizes the person as an existing user if the person applies for another job. When the system administrator copies the user details to the primary instance, and runs the iRecruitment HA Process Applications concurrent program, the program creates a new iRecruitment account for the user in the primary instance and makes the actual job application.
Data Synchronization
You must ensure that the latest applicant and vacancy data is available on both the primary and HA instances. The method of data transfer depends on factors, such as the database version and the physical arrangement of the servers and it varies across enterprises. Oracle provides sample scripts to help you transfer the data.
To enable efficient job searches and to display job details, you must keep the tables in synchronization between the primary and the HA instances.
For information on the sample scripts and data synchronization between the instances, refer to the High Availability Streams Processes white paper available on My Oracle Support note number: 299180.1.
Setting the IRC Availability Profile Option
The IRC: Availability profile option defines the mode in which the primary and the HA instances run. You set this profile option on the primary and the HA instances to transition between the two instances to support the candidate job site.
The profile option values are:
This value indicates that the complete iRecruitment functionality is available. This is the default value and you must set it only on the primary instance.
This value indicates that only the limited High Availability functionality is available. Set this value only on the HA instance. When set, site visitors cannot log in or use the complete registration functionality. They can only search and apply for jobs. During the application process, if the person is not an existing iRecruitment registered user, the HA instance prompts the person to register before they apply for a job.
This value indicates that an alternate job site with limited features is available. Select this value on the primary and HA instances in the following scenarios:
Scenario 1: Set this value on the primary instance before the maintenance downtime to indicate the availability of the candidate job site on the HA instance. When you set this value, the primary instance automatically directs the site visitors to the candidate job site on the HA instance. Site visitors who have already accessed the candidate job site on the primary instance cannot log in or register. The job site displays an instruction message that informs site visitors to access the alternate candidate job site to search and apply for jobs. It prompts the users who have already logged in to complete their work and log out. Managers can continue their work and by default will not see any information messages on their pages.
Scenario 2: Set this value on the HA instance when the candidate job site is available again on the primary instance and is in the Full functionality mode. When you set this value, the HA instance automatically redirects the new site visitors to the candidate job site on the primary instance. The HA instance displays an information message to the site visitors who have already accessed the candidate job site to access the job site on the primary instance. Registered users who are in the process of submitting their job applications in the HA instance can complete their work. If the person is not an iRecruitment registered user, the HA instance directs the person to the candidate job site on the primary instance.
This value suspends all user actions on either the primary instance or the HA instance and informs the users that an alternate instance is available to search and apply for jobs. Set this value on the primary and HA instances in the following scenarios:
Scenario 1: Set this value on the primary instance after the instance is in the HA Information mode for a specific period. When you set the profile option to HA Redirect, the primary instance informs the site visitors, or candidates to access the candidate job site on the HA instance to search and apply for jobs. Managers cannot access the HA instance when the primary instance is down for maintenance.
Scenario 2: Set this value on the HA instance after it has been in the HA Information mode for a specific period of time. When you set the profile option to HA Redirect, the HA instance automatically redirects the site visitors and candidates to the job site on the primary instance.
The following table gives a combination of values that you set for the primary and HA instances when switching between the instances.
| Primary Instance | High Availability Instance |
|---|---|
| Full | HA Redirect |
| HA Info | High Availability |
| HA Redirect | High Availability |
| Full | HA Info |
Setting up the High Availability Instance
Follow these steps to set up the high availability instance:
-
Build the HA instance using one of the following methods:
-
Make a full copy of the primary instance.
-
Install a clean instance and create all data required for the iRecruitment Site Visitor functionality such as custom responsibilities, business groups and organizations necessary for security, lookup values, profile options, and any personalizations applicable to the High Availability pages.
You must have a unique URL for each instance to run the primary and HA instances simultaneously. You can either have a different domain name for the HA instance or run HA with the same domain name but on a different port. Make sure you change the Web Agent profiles to reflect the URL.
Note: The URLs for both instances must be full domain names, and not the Internet Protocol (IP) addresses.
-
-
Set the IRC: Alternate Instance profile option for both the HA and primary instances.
For information on IRC: Alternate Instance profile option, see: Profile Options
-
Ensure that all profile options are set to the correct functions to be used in the HA candidate job site.
For information on the IRC: Apply for a Job Function, IRC: HA Job Search Function, and IRC: HA Login Page Function profile options, see: Profile Options
Transition from a Primary Instance to an HA Instance and Back to the Primary
The following steps take you through a complete cycle of using an HA instance when you carry out maintenance and shutdown your primary instance. You must complete the steps in sequence to ensure a smooth transition.
How to Transition from a Primary Instance to an HA Instance and back to the Primary
Prerequisites: Both the primary and HA URLs start off pointing to the same middle-tier instance. Set the values as given in the example:
"primary url" - Primary Machine
"ha url" - Primary Machine
Note that the primary instance is running in the FULL mode.
-
Run your scripts to copy data from the primary instance to the HA instance.
See: Data Synchronization
-
Start the HA instance application server, if it is not already running.
-
Set the IRC: Availability Mode profile option to High Availability on the HA instance.
-
Change your network settings as given in this example:
"primary url" - PrimaryMachine
"ha url" - HAMachine
-
Set the IRC: HA Information Message profile option on the primary instance to inform the users about the downtime of the primary instance.
For information on the IRC: HA Information Message profile option, see: Profile Options
-
Enter the time from when the primary instance will be unavailable in the IRC: System Down Time profile option.
For information on the IRC: HA Information Message and IRC: System Down Time profile option, see: Profile Options
-
Set the IRC: Availability Mode profile option to HA Information at the site level on the primary instance.
-
Set the IRC: HA Redirect Information Message profile option to display appropriate messages to your users and managers. .
See: Profile Options
-
Set the IRC: Availability Mode profile option to HA Redirect on the primary instance. This suspends all users actions on the primary instance.
-
Re-run your scripts to copy any data created since step 1 from the primary instance to the HA instance.
See: Data Synchronization
-
Change your network setting as given in the example:
"primary url" - HAMachine
"ha url" - HAMachine
-
Shut down the primary instance and complete the maintenance tasks.
-
Set the IRC: Available Mode profile option to Full on the primary instance when the maintenance work is complete.
-
Run your SQL script to copy data from the IRC_PENDING_DATA table on the HA instance to the IRC_PENDING_DATA table on the primary instance.
See: Data Synchronization
-
Run the iRecruitment HA Process Applications concurrent program on primary instance to process the data of application users.
-
Change your network setting as given in the example:
"primary url" - PrimaryMachine
"ha url" - HAMachine
-
Set the IRC: Available Mode profile option on the HA instance to the HA Information when the iRecruitment HA Process Applications concurrent program is complete.
-
Set the IRC: Availability Mode profile option on the HA instance to HA Redirect at the site level.
-
Re-run the SQL script to copy any data from the IRC_PENDING_DATA table on the HA instance created since step 13 to the table on the primary instance and run the iRecruitment HA Process Applications concurrent program to process the copied applications.
See: Data Synchronization
-
Change your network setting as given in this example:
"primary url" - PrimaryMachine
"ha url" - HAMachine
Your transition from the primary instance to the HA instance and back again is now complete.
Extending iRecruitment
Workflow Business Events
Workflow business events are trigger points in an application which can be used to drive custom code, for example, workflow notifications, and other workflow processes.
iRecruitment allows you to use workflow business events to define your processing logic. For example, you may choose to create a workflow process to send a notification to a candidate on receipt of an application. Alternatively, you could create a workflow process to notify an HR manager if a vacancy is created.
For more information on the Oracle Workflow Builder and business events, see the following sections in the Oracle Workflow Developer's Guide:
-
Overview of Oracle Workflow
-
Overview of Oracle Workflow Builder
-
Managing Business Events
Oracle provides workflow business events for all APIs used in iRecruitment.
-
For a list of iRecruitment business events, see: Business Events in iRecruitment
The names of the workflow business events are structured as follows:
-
oracle.apps.<product>.<subproduct>.api.<object>.<event>
-
For example, oracle.apps.per.api.vacancy.create_vacancy
or, oracle.apps.per.irc.api.party.create_us
Note: You can also display the list of events using the Workflow Administrator Event Manager responsibility. Select the Find Event Groups function and search for events with the name oracle.apps.per%.
-
-
The full list of public APIs and the purpose of each API is available in the Oracle Integration Repository. See: Oracle Integration Repository Overview, Oracle Integration Repository User Guide
The business events are triggered at the same time as the After Process API user hook. The business event is also able to use all of the data passed to the After Process API user hook.
Workflow Business Events and XML Data
You may choose to include XML data in your workflow processes. This enables you to customize a notification to include a specific vacancy name, for example. The XML data is passed to the workflow business event using the event message (notification). To include XML in your notifications, you include the Get XML Value function in your workflow process.
For more information, see the section, Managing Business Events in the Oracle Workflow Developer's Guide.
Business Events in iRecruitment
The following table lists all the business events supplied with Oracle iRecruitment. For further information on using business events see: Workflow Business Events
| Name | Internal Name |
|---|---|
| Accept Apl Asg | oracle.apps.per.api.assignment.accept_apl_asg |
| Activate Apl Asg | oracle.apps.per.api.assignment.activate_apl_asg |
| Interview1 Apl Asg | oracle.apps.per.api.assignment.interview1_apl_asg |
| Interview2 Apl Asg | oracle.apps.per.api.assignment.interview2_apl_asg |
| Offer Apl Asg | oracle.apps.per.api.assignment.offer_apl_asg |
| Terminate Apl Asg | oracle.apps.per.api.assignment.terminate_apl_asg |
| Update Apl Details | oracle.apps.per.api.application.update_apl_details |
| Create Secondary Apl Asg | oracle.apps.per.api.assignment.create_secondary_apl_asg |
| Update Apl Asg | oracle.apps.per.api.assignment.update_apl_asg |
| Create Competence Element | oracle.apps.per.api.competence_element.create_competence_element |
| Delete Competence Element | oracle.apps.per.api.competence_element.delete_competence_element |
| Update Competence Element | oracle.apps.per.api.competence_element.update_competence_element |
| Create Attended Estab | oracle.apps.per.api.estab_attendances.create_attended_estab |
| Update Attended Estab | oracle.apps.per.api.estab_attendances.update_attended_estab |
| Delete Attended Estab | oracle.apps.per.api.estab_attendances.delete_attended_estab |
| Update Person | oracle.apps.per.api.person.update_person |
| Create Phone | oracle.apps.per.api.phone.create_phone |
| Delete Phone | oracle.apps.per.api.phone.delete_phone |
| Update Phone | oracle.apps.per.api.phone.update_phone |
| Create Previous Employer | oracle.apps.per.api.previous_employment.create_previous_employer |
| Create Previous Job | oracle.apps.per.api.previous_employment.create_previous_job |
| Delete Prev Job Extra Info | oracle.apps.per.api.previous_employment_api.delete_prev_job_extra_info |
| Delete Previous Employer | oracle.apps.per.api.previous_employment.delete_previous_employer |
| Delete Previous Job | oracle.apps.per.api.previous_employment.delete_previous_job |
| Update Previous Employer | oracle.apps.per.api.previous_employment.update_previous_employer |
| Update Previous Job | oracle.apps.per.api.previous_employment.update_previous_job |
| Create Qualification | oracle.apps.per.api.qualifications.create_qualification |
| Delete Qualification | oracle.apps.per.api.qualifications.delete_qualification |
| Update Qualification | oracle.apps.per.api.qualifications.update_qualification |
| Create Rec Activity For | oracle.apps.per.api.rec_activity_for.create_rec_activity_for |
| Delete Rec Activity For | oracle.apps.per.api.rec_activity_for.delete_rec_activity_for |
| Update Rec Activity For | oracle.apps.per.api.rec_activity_for.update_rec_activity_for |
| Create Recruitment Activity | oracle.apps.per.api.recruitment_activity.create_recruitment_activity |
| Delete Recruitment Activity | oracle.apps.per.api.recruitment_activity.delete_recruitment_activity |
| Update Recruitment Activity | oracle.apps.per.api.recruitment_activity.update_recruitment_activity |
| Create Requisition | oracle.apps.per.api.requisitions.create_requisition |
| Delete Requisition | oracle.apps.per.api.requisitions.delete_requisition |
| Update Requisition | oracle.apps.per.api.requisitions.update_requisition |
| Create Vacancy | oracle.apps.per.api.vacancy.create_vacancy |
| Delete Vacancy | oracle.apps.per.api.vacancy.delete_vacancy |
| Update Vacancy | oracle.apps.per.api.vacancy.update_vacancy |
| Create Irc Asg Status | oracle.apps.per.irc.api.asg_status.create_irc_asg_status |
| Delete Irc Asg Status | oracle.apps.per.irc.api.asg_status.delete_irc_asg_status |
| Update Irc Asg Status | oracle.apps.per.irc.api.asg_status.update_irc_asg_status |
| Create Default Posting | oracle.apps.per.irc.api.default_posting.create_default_posting |
| Delete Default Posting | oracle.apps.per.irc.api.default_posting.delete_default_posting |
| Update Default Posting | oracle.apps.per.irc.api.default_posting.update_default_posting |
| Create Document | oracle.apps.per.irc.api.document_api.create_document |
| Delete Document | oracle.apps.per.irc.api.document_api.delete_document |
| Update Document | oracle.apps.per.irc.api.document_api.update_document |
| Create Job Basket Item | oracle.apps.per.irc.api.job_basket_items.create_job_basket_item |
| Delete Job Basket Item | oracle.apps.per.irc.api.job_basket_items.delete_job_basket_item |
| Create Notification Prefs | oracle.apps.per.irc.api.notification_prefs.create_notification_prefs |
| Delete Notification Prefs | oracle.apps.per.irc.api.notification_prefs.delete_notification_prefs |
| Update Notification Prefs | oracle.apps.per.irc.api.notification_prefs.update_notification_prefs |
| Create Registered User | oracle.apps.per.irc.api.party.create_registered_user |
| Create User | oracle.apps.per.irc.api.party.create_user |
| Registered User Application | oracle.apps.per.irc.api.party.registered_user_application |
| Update Registered User | oracle.apps.per.irc.api.party.update_registered_user |
| Create Posting Content | oracle.apps.per.irc.api.posting_content.create_posting_content |
| Delete Posting Content | oracle.apps.per.irc.api.posting_content.delete_posting_content |
| Update Posting Content | oracle.apps.per.irc.api.posting_content.update_posting_content |
| Create Rec Team Member | oracle.apps.per.irc.api.rec_team_members.create_rec_team_member |
| Delete Rec Team Member | oracle.apps.per.irc.api.rec_team_members.delete_rec_team_member |
| Update Rec Team Member | oracle.apps.per.irc.api.rec_team_members.update_rec_team_member |
| Delete Recruiting Site | oracle.apps.per.irc.api.recruiting_sites.delete_recruiting_site |
| Update Recruiting Site | oracle.apps.per.irc.api.recruiting_sites.update_recruiting_site |
| Create Saved Search | oracle.apps.per.irc.api.search_criteria.create_saved_search |
| Create Vacancy Criteria | oracle.apps.per.irc.api.search_criteria.create_vacancy_criteria |
| Delete Saved Search | oracle.apps.per.irc.api.search_criteria.delete_saved_search |
| Delete Vacancy Criteria | oracle.apps.per.irc.api.search_criteria.delete_vacancy_criteria |
| Update Saved Search | oracle.apps.per.irc.api.search_criteria.update_saved_search |
| Update Vacancy Criteria | oracle.apps.per.irc.api.search_criteria.update_vacancy_criteria |
| Create Vacancy Consideration | oracle.apps.per.irc.api.vacancy_considerations.create_vacancy_consideration |
| Delete Vacancy Consideration | oracle.apps.per.irc.api.vacancy_considerations.delete_vacancy_consideration |
| Update Vacancy Consideration | oracle.apps.per.irc.api.vacancy_considerations.update_vacancy_consideration |
| Create Variable Compensation | oracle.apps.per.irc.api.variable_comp_element.create_variable_compensation |
| Delete Variable Compensation | oracle.apps.per.irc.api.variable_comp_element.delete_variable_compensation |
| Create Work Choices | oracle.apps.per.irc.api.search_criteria.create_work_choices |
| Update Work Choices | oracle.apps.per.irc.api.search_criteria.update_work_choices |
| Delete Work Choices | oracle.apps.per.irc.api.search_criteria.delete_work_choices |
| Offer Apl Asg | oracle.apps.per.api.assignment.offer_apl_asg |
| Create Offer Status History | oracle.apps.per.irc.api.offer_status_history.create_offer_status_history |
| Delete Offer Status History | oracle.apps.per.irc.api.offer_status_history.delete_offer_status_history |
| Update Offer Status History | oracle.apps.per.irc.api.offer_status_history.update_offer_status_history |
| Create Offer | oracle.apps.per.irc.api.offers.create_offer |
| Delete Offer | oracle.apps.per.irc.api.offers.delete_offer |
| Update Offer | oracle.apps.per.irc.api.offers.update_offer |
| Create Agency Vacancy | oracle.apps.per.irc.api.agency_vacancies.create_agency_vacancy |
| Update Agency Vacancy | oracle.apps.per.irc.api.agency_vacancies.update_agency_vacancy |
| Delete Agency Vacancy | oracle.apps.per.irc.api.agency_vacancies.delete_agency_vacancy |
| Create Note | oracle.apps.per.irc.api.notes.create_note |
| Update Note | oracle.apps.per.irc.api.notes.update_note |
| Delete Note | oracle.apps.per.irc.api.notes.delete_note |
| Create Template Association | oracle.apps.per.irc.api.template_association.create_template_association |
| Update Template Association | oracle.apps.per.irc.api.template_association.update_template_association |
| Delete Template Association | oracle.apps.per.irc.api.template_association.delete_template_association |
| Create Location Criteria | oracle.apps.per.irc.api.location_criteria_val.create_location_criteria |
| Create Prof Area Criteria | oracle.apps.per.irc.api.prof_area_criteria_val.create_prof_area_criteria |
| IRC Generic Notifications Event | oracle.apps.per.irc.common.notifications |
Publicly Callable Business Process APIs in iRecruitment
Application Programmatic Interfaces (APIs) are a logical grouping of all external process routines. The Oracle HRMS API strategy delivers a set of PL/SQL packages procedures and functions that provide an open interface to the database.
Oracle® Integration Repository, an integral part of Oracle E-Business Suite, is a compilation of information about the numerous interface endpoints exposed by Oracle applications. The full list of public APIs and the purpose of each API is available in the integration repository. See: Oracle Integration Repository Overview, Oracle Integration Repository User Guide
For information on how to access and use Oracle Integration Repository, see: Accessing Oracle Integration Repository, Oracle Integration Repository User Guide
For information on how to call APIs, see the technical essay APIs in Oracle HRMS, Oracle HRMS Implementation Guide
Predefined Notifications
There are a number of predefined notifications supplied with iRecruitment. These notifications are sent when certain actions occur in iRecruitment, for example when a manager refers a candidate to another manager.
To edit the content of these notification messages log on to the application using an Application Developer responsibility use the Messages window.
Daily e-mail to candidates about new vacancies
IRC_EMAIL_SEEKERS_SUBJECT
IRC_EMAIL_SEEKERS_INTRODUCTION
IRC_EMAIL_SEEKERS_CONCLUSION
Manager refers candidates to other managers
IRC_CM_REFER_MSG_SUBJECT
IRC_CM_REFER_MSG_HEADER
IRC_CM_REFER_MSG_FOOTER
Daily e-mail to managers about candidates matching their vacancies
IRC_EMAIL_RECRUITER_SUBJECT
IRC_EMAIL_RECRUITER_INTRO
IRC_EMAIL_RECRUITER_CONCLUSION
Candidate refers a vacancy to another candidate
IRC_VAC_REFER_MSG_SUBJECT
IRC_VAC_REFER_MSG_HEADER
IRC_VAC_REFER_MSG_FOOTER
Manager pursues a candidate
IRC_PURSUE_SEEKER_SUBJECT
IRC_PURSUE_SEEKER_INTRO
IRC_PURSUE_SEEKER_CONC
General e-mail to candidates
IRC_SEEKER_INFO_NOTE_SUBJECT
IRC_SEEKER_INFO_NOTE_TEXT
IRC_SEEKER_INFO_NOTE_HTML
New password is sent to a candidate
IRC_VIS_NEW_PASSWORD_TITLE
IRC_VIS_NEW_PASSWORD_TEXT
IRC_VIS_NEW_PASSWORD_HTML
Mail to a user who registered on the HA instance about their new account
IRC_HA_NOTIF_NEW_USER_SUBJ
IRC_HA_NOTIF_NEW_USER_BODY
IRC_HA_NOTIF_RES_PASS
IRC_HA_NOTIF_MISC_TEXT
Mail to a user who registered on the HA instance about the status of their job application
IRC_APL_JOBAPPL_NOTIF_SUBJECT
IRC_HA_NOTIF_VAC_APPLD
IRC_HA_NOTIF_VAC_NAME
IRC_HA_NOTIF_VAC_FAILED
Mail to a user who registered on the HA instance to upload their resume again
IRC_HA_NOTIF_RES_FAILED
Mail to a manager about an accepted offer
IRC_OFFER_ACCEPTED_MGR_HTML
IRC_OFFER_ACCEPTED_MGR_SUBJECT
IRC_OFFER_ACCEPTED_MGR_TEXT
Mail to an applicant about their expired offer
IRC_OFFER_EXPIRED_APL_HTML
IRC_OFFER_EXPIRED_APL_TEXT
Mail to a manager about an expired offer
IRC_OFFER_EXPIRED_MGR_HTML
IRC_OFFER_EXPIRED_MGR_TEXT
IRC_OFFER_EXPIRED_SUBJECT
Mail to an applicant about their offer approaching the closing date
IRC_OFFER_EXPIRY_APL_HTML
IRC_OFFER_EXPIRY_APL_TEXT
IRC_OFFER_EXPIRY_APL_SUBJECT
Mail to a manager about an offer approaching the closing date
IRC_OFFER_EXPIRY_MGR_HTML
IRC_OFFER_EXPIRY_MGR_TEXT
IRC_OFFER_EXPIRY_SUBJECT
Mail to a manager about an offer on hold
IRC_OFFER_ONHOLD_MGR_HTML
IRC_OFFER_ONHOLD_MGR_TEXT
IRC_OFFER_ONHOLD_MGR_SUBJECT
Offer to an applicant
IRC_OFFER_RECEIVED_APL_HTML
IRC_OFFER_RECEIVED_APL_TEXT
IRC_OFFER_RECEIVED_APL_SUBJECT
Applicant rejects offer
IRC_OFFER_REJECTED_MGR_HTML
IRC_OFFER_REJECTED_MGR_TEXT
IRC_OFFER_REJECTED_MGR_SUBJECT
Offer sent to an applicant
IRC_OFFER_SENT_MGR_HTML
IRC_OFFER_SENT_MGR_TEXT
IRC_OFFER_SENT_MGR_SUBJECT
Application status change
Mail to candidates
IRC_412427_APLSTACHG_CAND_SUB
IRC_412428_APLSTACHG_CAND_BODY
Mail to managers and recruiters
IRC_412429_APLSTACHG_MGR_SUB
IRC_412430_APLSTACHG_MGR_BODY
Apply for jobs
Mail to candidates when managers, recruiters, or employees apply on behalf of the candidates
IRC_412431_APLFORJOB_CAND_SUB
IRC_412432_APLFORJOB_CAND_BODY
Mail to managers or recruiters when candidates, managers, recruiters, or employees apply for jobs
IRC_412433_APLFORJOB_MGR_SUB
IRC_412434_APLFORJOB_MGR_BODY
Mail to a referrer when managers, candidates, or recruiters apply for jobs
IRC_412443_APLFORJOB_REFR_SUB
IRC_412444_APLFORJOB_REFR_BODY
Mail to candidates about incorrect employee referral information in a new job application
IRC_412537_APLREFINC_CAND_SUB
IRC_412538_APLREFINC_CAND_BODY
Manager updates referral information in job application
Mail to candidates
IRC_412535_APLREFUPD_CAND_SUB
IRC_412536_APLREFUPD_CAND_BODY
Mail to referrers
IRC_412449_UPDREF_REFR_SUB
IRC_412450_UPDREF_REFR_BODY
Mail on communication messages
To managers, recruiters, and any other recruiting team members, if included
IRC_412435_COMTOPCRE_DFT_SUB
IRC_412436_COMTOPCRE_DFT_BODY
To candidates
IRC_412523_COMTOPCRE_CAND_SUB
IRC_412524_COMTOPCRE_CAND_BODY
Communication updated or message created
Mail to managers, recruiters, and any other recruiting team members if included
IRC_412437_COMTOPUPD_DFT_SUB
IRC_412438_COMTOPUPD_DFT_BODY
To candidates
IRC_412525_COMTOPUPD_CAND_SUB
IRC_412526_COMTOPUPD_CAND_BODY
Request reconsideration of application
To managers or recruiters
IRC_412439_REQREVTER_MGR_SUB
IRC_412440_REQREVTER_MGR_BODY
Reconsideration of application acknowledgement
To candidates
IRC_412507_REVTERACK_CAND_SUB
IRC_412508_REVTERACK_CAND_BODY
Candidate registration
To candidates when an employee registers
IRC_412445_CANDREG_CAND_SUB
IRC_412446_CANDREG_CAND_BODY
To candidates when candidate self-registration happens
IRC_412453_CANDREG_SELF_SUB
IRC_412454_CANDREG_SELF_BODY
To referrers when candidates fill up or update profile
IRC_412447_CANDREG_REFR_SUB
IRC_412448_CANDREG_REFR_BODY
Mail to candidates about incorrect employee referral information in candidate profiles
IRC_412539_PRFREFINC_CAND_SUB
IRC_412540_PRFREFINC_CAND_BODY
Mail to candidates when managers update candidate profiles
IRC_412533_PROFUPD_CAND_SUB
IRC_412534_PROFUPD_CAND_BODY
Mail to managers and recruiters on interview feedback update
IRC_412451_INTVW_MGR_SUB
IRC_412452_INTVW_MGR_BODY
Mail to managers, recruiters, and interviewers on interview creation
IRC_412516_INTVCRE_DFT_SUB
IRC_412517_INTVCRE_DFT_BODY
Mail to managers, recruiters, and interviewers on interview update
IRC_412518_INTVUPD_DFT_SUB
IRC_412519_INTVUPD_DFT_BODY
Mail to candidates about scheduled interviews or updated interviews
IRC_412521_INTVCMN_CAND_SUB
IRC_412522_INTVCMN_CAND_BODY
Mail to interviewers who are added to an interview
IRC_412501_INTVW_ADINT_SUB
IRC_412502_INTVW_ADINT_BODY
Mail to interviewers who are no longer part of an interview
IRC_412503_INTVW_DLINT_SUB
IRC_412504_INTVW_DLINT_BODY
Mail to managers and recruiters when candidates withdraw applications
IRC_412455_WTDRAPL_MGR_SUB
IRC_412456_WTDRAPL_MGR_BODY
Mail to an employee referrer when a referral applicant accepts an offer
IRC_412441_OFR_ACCEPT_REF_SUB
IRC_412442_OFR_ACCEPT_REF_HTML
IRC_412509_OFR_ACCEPT_REF_TEXT
Mail when a manager withdraws an offer
To an applicant
IRC_412572_OFFER_WITHDRAW_APL
IRC_412573_WITHDRAWAL_APL_HTML
IRC_412574_WITHDRAWAL_APL_TEXT
To a manager, recruiter or vacancy creator
IRC_412575_OFFER_WITHDRAW_MGR
IRC_412564_WITHDRAWAL_MGR_HTML
IRC_412565_WITHDRAWAL_MGR_TEXT
Mail when a manager records an applicant's response when the applicant declines offer after acceptance
To an applicant
IRC_412566_DECLINED_ACCEPT_APL
IRC_412567_DEC_ACCEPT_APL_HTML
IRC_412568_DEC_ACCEPT_APL_TEXT
To a manager or recruiter
IRC_412569_DECLINED_ACCEPT_MGR
IRC_412570_DEC_ACCEPT_MGR_HTML
IRC_412571_DEC_ACCEPT_MGR_TEXT
Using Workflow Business Events
Oracle iRecruitment provides a sample business event: iRecruitment Sample Business Event (IRC_EVT).
The Create Vacancy Sample Process within the IRC_EVT business event can be triggered whenever a vacancy is created and a notification is sent to a specified user to inform them that the event has taken place.
Oracle recommends that you use the delivered business events to create your own workflow processes to suit the particular requirements of your enterprise.
See the Oracle Workflow Developer's Guide for detailed information on:
-
Subscribing to business events
For a list of delivered iRecruitment business events, see: Business Events in iRecruitment.
Info Online Links to Information Provider Websites
Info Online Links to Information Provider Web Sites
Info Online is a generic framework to integrate Oracle Applications with partner applications. Info Online enables users to access information from third-party providers and integrations. Once the links have been enabled, users can access an information provider web site directly from a button or link on an Oracle HRMS window or self-service web page. Depending on the level of configuration available, the link can lead directly to a page relevant to the window or even the record on which the user is working.
For example, someone entering tax information might access a web site providing up-to-date information on tax regulations, or an administrator looking at benefit details for an employee could open a web page providing documentation for that employee's benefit plan.
Note: Info Online was previously known as the Knowledge Integrator.
See: Accessing Information Provider Web Sites
See: Integration between Oracle HRMS Products and Information Providers
Accessing Information Provider Web Sites
Oracle HRMS supports two versions of Info Online. The HR: KI Framework Version profile option value identifies the Info Online version.
Info Online Version 1
If the system administrator sets the profile to Version 1, users can access:
-
RIA (Research Institute of America) through the user interface for some payroll forms
-
Authoria, a provider of health insurance and compensation information, through links on some Benefits self-service web pages
-
My Oracle Support (formerly Oracle Metalink), Oracle's support web site, though the Info Online button from the user interface
Info Online Version 2
If the system administrator sets the profile to Version 2, users can access:
-
My Oracle Support and iLearning on self-service web pages in which the content container has been included
-
Transcentive through the menu link from the professional user interface and self-services pages, after completing the setup steps.
-
Enwisen through Oracle HRMS products after completing the setup steps
-
Any other information provider with whom your enterprise has an agreement.
Accessing Information Providers from Oracle HRMS Interface
Info Online Button on Oracle HRMS Windows
Once the system administrator enables the links between Oracle HRMS and the information provider pages, users access information provider web sites from the user interface by clicking the Info Online button on the Oracle HRMS toolbar, or by selecting Tools > Info Online from the menu (Shift+Control+F7). This button is enabled in windows for which information provider links have been configured and enabled.
Note: Shift+Control+F7 is the key sequence currently mapped to Function 7. Choose Help -> Keyboard on the menu to determine the actual key combination. The Oracle Forms Deployment Guide explains how to change this key assignment in the Oracle Terminal resource file fmrweb.res.
Clicking the Info Online button first opens a list of values, displaying a list of links to any information provider web sites that are enabled for the current window. When the user selects a value from the list, a browser window opens at the appropriate page.
If the user chooses the Info Online button from a window for which no links to information provider web sites are enabled, no list of values appears.
Users can control the behavior of the Info Online button using the Open in New Window option on the Tools menu. When this option is checked, each new search opens in a new browser window. This option allows users to compare results from different queries side by side, but the windows remain open until the user specifically closes them. When this option is unchecked, the page appears in the last browser window opened.
Info Online Content Container on the Oracle HRMS Products' Pages
Users access information provider web sites from the self-service web pages either through links on Benefits pages or through the Info Online content container. The list of applicable topics and providers appear alphabetically in the content container. See: Info Online Content Container
Integration between Oracle HRMS Products and Information Providers
Information Providers
Integration is available between Oracle HRMS and the following information providers:
My Oracle Support
My Oracle Support web site provides access to the latest product information, discussion forums, bug fixes, and patch information for Oracle HRMS, as well as enabling users to contact Oracle Support. Integration is available for all Oracle HRMS windows in the user interface in KI Framework Version 1 and for self-service web pages which include the content container in KI Framework Version 2. This integration is available for all legislations.
See My Oracle Support Note 229585.1 for details of how to set up links from Oracle HRMS to My Oracle Support pages.
Authoria HR
Integration is available between a number of Oracle Advanced Benefits windows and self-service pages and the third-party product Authoria HR in KI Framework Version 1. This integration is available for UK and US legislations. See: Links to Authoria HR, Oracle HRMS Configuring, Reporting, and System Administration Guide
Also see My Oracle Support Note 215637.1 for details of how to set up links from Oracle HRMS to Authoria HR pages.
RIA PCP on Checkpoint
Integration is available between Oracle HRMS US tax windows and third-party information provider RIA's Payroll Compliance Pro on Checkpoint in KI Framework Version 1. This integration is available for US legislations.
See My Oracle Support Note 148468.1 for further details of how to set up links from Oracle HRMS to RIA PCP on Checkpoint.
Transcentive
Integration is available between Oracle HRMS windows and Transcentive, a third-party compensation management solutions provider, in KI Framework Version 2. This integration is available for all legislations.
See My Oracle Support Note 294453.1 for further details of how to set up links from Oracle HRMS to Transcentive.
iLearning
Oracle iLearning is an enterprise learning management system that prescribes, delivers and tracks learning, and monitors and manages the learning process. Integration is available between the Rapid Implementation Workbench web pages and Oracle iLearning in KI Framework Version 2.
See My Oracle Support Note 294453.1 for further details of how to set up links from the Rapid Implementation Workbench web pages to Oracle iLearning.
Enwisen
Integration is available between Oracle HRMS products and Enwisen, a third-party information provider.
See: Info Online Links to Enwisen from Oracle iRecruitment Pages
See: Info Online Links to Enwisen from Oracle Performance Management Pages, Oracle Performance Management Implementation and User Guide
See: Info Online Links to Enwisen from Oracle SSHR Pages, Oracle Self-Service Human Resources Deploy Self-Service Capability Guide
See: Info Online Links to Enwisen from Oracle Time and Labor Pages, Oracle Time and Labor Implementation and User Guide
See: Configuring Links between HRMS Products and Enwisen
See: Oracle white paper Integrating Oracle Applications with Partner Applications on Oracle My Oracle Support Note 294453.1 for further details of how to set up links from Oracle HRMS to Enwisen.
Info Online Content Container
The Info Online content container is an ancillary region that appears on self-service web pages. Topics and providers appear as an alphabetical list of links in the content container.
On clicking a topic, the list of providers who provide content for the topic appears in a new web page. If only one provider exists for the selected topic, the single provider's page opens immediately.
Users can also select a provider from the list in the content container, and view a list of topics offered by that provider.
The More link appears when the number of topics or providers exceeds a predefined limit. The limit of topics or providers is set in the HR: KI Maximum Topics and Integrations profile. If no limit is set, the More link appears when the number of topics or providers exceeds 3. On clicking the More link from the topics or providers region, the complete set of topics or providers appears in a new page.
Configuring Links between Oracle HRMS Products and Information Providers
You can configure links between Oracle HRMS products and information providers to enable users to access content on information provider web sites.
Note: The information that your workforce can access on the information provider web site depends on the agreement with the information provider.
To configure links between Oracle HRMS products and information providers
-
Setting Profiles Options
Set the following profile options to set up links between Oracle HRMS and any information provider web sites:
-
HR: KI Framework Version
-
HR: Extension Agent Enabled
-
HR: Extension Agent Client Timeout
Setting the following additional profile options is optional if you are setting up links between Oracle HRMS and any information provider web sites:
-
HR: Extension Agent
-
HR: Info Online: Open in New Window
-
HR: Info Online: Toolbar Icon
-
HR: KI Maximum Topics and Integrations
-
HR: Servlet Timeout
-
HR: KI Providers Enabled
-
HR: KI Topics Enabled
-
HR: KI User Options Enabled
Additional required and optional profile options exist for individual information providers. See: User Profiles, Oracle HRMS Configuring, Reporting, and System Administration Guide
-
-
Configure links to information providers
After you configure Info Online, you can access configured partners in self service pages through the Info Online content container and in forms through the Info Online icon. You can also access configured partners as a menu link.
For more information on configuring links to information providers, see: Oracle white paper Integrating Oracle Applications with Partner Applications on My Oracle Support Note 294453.1
-
Display the Info Online content container, if hidden by default
The links to information providers are available in the Info Online content container on the Oracle HRMS products' pages. If the content container is hidden by default, then use the Personalization Framework functionality to display the content container on the appropriate applications pages.
Info Online Links to Enwisen
Info Online Links to Enwisen from Oracle iRecruitment Pages
You can configure access between Oracle iRecruitment and Enwisen, a third-party information provider to enable end users to access company specific information or any other relevant information hosted on the Enwisen web site. The Info Online content container on the self-service pages displays hypertext links to information providers.
The Info Online content container that is available on the iRecruitment Manager and Recruiter Home page, is hidden by default. This content container includes the iRecruitment Process link (default link) to access, for example, information on company's recruitment policies.
To enable users to access Enwisen, complete the following steps. Using the Personalization Framework function:
-
Display the Info Online content container.
-
Display the default iRecruitment Process link or configure links to Enwisen according to your agreement with Enwisen.
See: Configuring Links between HRMS Products and Enwisen
Configuring Links between HRMS Products and Enwisen
If your enterprise has an agreement with Enwisen, a third-party information provider to enable your workforce access company specific information or any other relevant information hosted on the Enwisen web site, then you can configure links to Enwisen.
Note: The company information that your workforce can access on Enwisen depends on your agreement with Enwisen.
See: Info Online Links to Enwisen from Oracle iRecruitment Pages
See: Info Online Links to Enwisen from Oracle Performance Management Pages, Oracle Performance Management Implementation and User Guide
See: Info Online Links to Enwisen from Oracle SSHR Pages, Deploy Oracle SSHR Self-Service Capability Guide
See: Info Online Links to Enwisen from Oracle Time and Labor Pages, Oracle Time and Labor Implementation and User Guide
To configure links between HRMS products and Enwisen
The following section lists the basic implementation steps that are required to configure links between Oracle HRMS products and Enwisen.
-
Set the HR: Extension Agent profile option to enable the Info Online functionality.
See: User Profiles, Oracle HRMS Configuring, Reporting, and System Administration Guide
-
Set the HR: Enwisen Login URL profile option.
See: User Profiles, Oracle HRMS Configuring, Reporting, and System Administration Guide
-
Enable the Info Online content container and Topics region by setting an applicable value for the HR: KI Topics Enabled profile option.
See: User Profiles, Oracle HRMS Configuring, Reporting, and System Administration Guide
-
Use the Personalization Framework function to display the Info Online content container on the product pages that support Enwisen integration. The content container is hidden by default on the following pages:
-
iRecruitment
Manager and Recruiter Home page
-
Oracle Self-Service HR
Absence Management page (Manager Self-Service and Employee Self-Service responsibilities)
Personal Information page (Employee Self-Service responsibility)
-
Oracle Performance Management
Performance Management page (Manager Self-Service and Employee Self-Service responsibilities)
-
Oracle Time and Labor
Recent Time Cards page
-
-
Enter the login and authentication details that you receive from Enwisen for Enwisen:Provider integration option on the Integration Options page.
To provide the details:
-
Log on to the Info Online Administrator responsibility.
-
Click the Info Online Options link.
-
Search for the Enwisen:Provider integration option on the Integration Options page.
-
In the Option Name region, set the Enabled and User Visible options to Yes.
Mandatory Details
Provide the following mandatory information:
-
Enwisen Subscriber Name
-
Enwisen TPPassword
-
Enwisen TPUserID
Enwisen Secret Key
In the Enwisen Secret Key field enter the Enwisen authentication key.
-
Additional Implementation Steps
After you implement the basic steps, you can carry out the following steps to define user specific additional security to access Enwisen. For example, depending on your business requirements, you can:
-
Restrict access to information on Enwisen based on criteria such as jobs, positions, or departments. Additionally, you can restrict information to different users such as employees, line managers, and HR personnel.
-
Enable specific users to view data across geographical areas. For example, if your enterprise has a global presence, then the Vice President of the HR team may require access to recruitment policies across geographic locations. You can define security options to enable the vice president to access the required information.
To define additional security when accessing Enwisen:
-
Enwisen requires users to log in to access the provider's site for information. To define additional security depending on your business requirements, you must create a Java class that implements Oracle's predefined Java interface: oracle.apps.per.ki.kiserver.KIDataFetcher. The Java class contains the method to retrieve login values when end users access Enwisen from Oracle HRMS product pages.
For technical details of creating a Java class, see: Oracle white paper Integrating Oracle Applications with Partner Applications on My Oracle Support Note 294453.1
-
Provide the Java class value in the HR: Class Name to Fetch KI Data profile option to enable users to launch Enwisen from Oracle HRMS product pages that support Enwisen integration.
See: User Profiles, Oracle HRMS Configuring, Reporting, and System Administration Guide
Reports and Processes
iRecruitment Reports and Processes
This topic lists the reports and processes supplied with Oracle iRecruitment. Use the iRecruitment HRMS Manager responsibility to run the reports and processes.
iRecruitment Processes
-
iRecruitment Email Job Seekers Details to Vacancy Owner
Run this process to inform the managers of suitable candidates for their vacancies.
-
iRecruitment Email Vacancies to Job Seekers
Run this process to notify candidates about suitable vacancies.
-
iRecruitment General Mail to Job Seekers
Run this process to send general e-mail notifications to registered users.
-
iRecruitment Index Synchronization
Run this process to keep up to date the text indexes for iRecruitment documents and job postings.
-
Run this process if you are moving from a previous version of iRecruitment to IRC C. This process creates a person record in Oracle HRMS for each of your existing iRecruitment candidates.
-
Run this process to remove the candidate and applicant data from the database.
-
iRecruitment HA Process Applications
Run this program to process the applications submitted on the HA instance.
-
iRecruitment Offer Expiry Notifications
iRecruitment Offer Expired Notifications
Run these processes to notify managers and applicants about offers approaching the closing date and closed offers.
-
iRecruitment Applicant Profile Snapshot
Run this process to create snapshots of applicant profiles.
-
iRecruitment Purge Applicant Tracking Data
Run this process to remove the data that is retained for statutory compliance.
-
iRecruitment Recruitment Summary
Run this process to populate the recruitment summary data in summary tables and to enable the application display data faster on the Recruitment Summary page. The performance is faster as iRecruitment retrieves recruitment data from summary tables instead of transaction tables.
iRecruitment Reports
iRecruitment US OFCCP Disability/VEVRAA Audit Report
This report is for US users only.
Run the iRecruitment US OFCCP Disability/VEVRAA Audit Report to generate the Office of Federal Contract Compliance Programs (OFCCP) and veteran external applicant data in the event of a compliance audit.
iRecruitment Processes Available in Oracle HRMS
iRecruitment Create Enrollment Process
The iRecruitment Create Enrollment process is supplied with Oracle HRMS. After you hire iRecruitment applicants as employees, run this process to enroll new hires in the compensation plans included in their offer letters.
Running the iRecruitment Purge Old Data Process
Oracle iRecruitment provides various purge types and activity criteria that enables you to:
-
Notify users that their accounts are to be deleted.
-
Meet data protection legislative requirements by hiding users' identities whilst still retaining some user data for use in statistical or other reporting.
-
Remove person data completely and end date user name.
This process purges iRecruitment data which belong to the following system person types only:
-
EX_APL (Ex-Applicant)
-
OTHER (Candidate, Contact, etc)
-
IRC_REG_USER (iRecruitment Registered User)
The purge options and activity criteria except Application Date, will consider data of users whose person record is shown as iRecruitment Registered User in the Person Type Usage window. The Application Date criterion limits the purge only to ex-applicants associated with iRecruitment Registered User person type and who have not applied for any job within the specific period. The purge process does not delete any data if the person record is associated with any other person types.
You run the process from the Submit Request window.
Caution: If you enable the Applicant Tracking functionality, then ensure that you do not run the 'iRecruitment Purge Old Data' process till you generate reports for audit purposes. For information about the applicant tracking functionality, see:
-
Track Applicant Data for Compliance Purposes in the iRecruitment Overview topic
-
Enable and manage applicant tracking, if required in the Implementation Steps for iRecruitment topic
To run the iRecruitment Purge Old Data process
-
Select the iRecruitment Purge Old Data process in the Name field.
-
Click in the Parameters field to open the Parameters window.
-
Enter the date from when you want to run the purge process. The default is your system date.
-
Select any of the following purge type options:
-
Pre-Purge Notification: Use this option if you want to notify registered users before you purge their data. This option sends a notification requesting users to log into iRecruitment and apply for a job to avoid removal from iRecruitment. You can use this option before you run any of the other purge types.
-
Anonymize: Use this purge option if you want to hide the identity of users, but retain information about them such as qualifications, address details and work preferences. The process replaces the family name of the candidate with the word Anonymous and deletes the first name. It also unchecks the Allow Account to be Searched check box in the candidate's My Account: email Preferences page so that the user record is no longer searchable. After you run this process, users can still log into iRecruitment and update their name details, and change their e-mail preferences again.
-
Anonymize and Partial Purge: Use this purge option to hide the identity of users and to delete sensitive information relating to them. A user's qualifications, previous employment history, address details, job stored in job basket, skills information, work preferences, schools and colleges attended are all deleted when you use this option. The Anonymize feature of this option is the same as that of the Anonymize option explained in the earlier step. After you run this process, users can still log into iRecruitment and update their personal and professional details.
-
Complete Purge: Use this purge option to completely remove user records and all of the data associated with them. Purged users will no longer be able to log into iRecruitment. They have to register again if they want to access the application, other then as a site visitor.
-
-
Select any of the following activity criteria options. This determines the records on which the application will perform the defined purge type.
-
Application Date: You select this option to remove data of ex-applicants who have not applied for any job in the specified period.
-
Login Date: You select this option to remove data of users who have not logged into the application in the specified period.
Note: The purge process uses the login date recorded on the E-Business Suite login page to process data. The process does not consider login through either the iRecruitment JSP page or Single Sign On (SSO) to purge data.
-
Update Date: You select this option to remove data of users who have not updated their account in the specified period.
-
-
In the Months Since Activity field, specify the number of months that the application should consider to purge the data. For example, if you enter 6 for six months, the application will purge records of candidates who have not performed the activity defined in the Activity Criteria in the last six months from the effective date that you specified.
-
Choose the OK button.
-
Choose the Submit button.
For more information on the process, refer to the My Oracle Support note: Information Regarding the iRecruitment Purge Old Data Process (Doc ID 561222.1)
Running the iRecruitment Email Vacancies to Job Seekers Process
Run the iRecruitment Email Vacancies to Job Seekers process to notify candidates about suitable vacancies. The application matches the candidates' work preferences, qualifications, and skills with the jobs and sends e-mail notifications of matching jobs to the e-mail address specified in the candidate's profile.
You run the process from the Submit Request window.
To run the iRecruitment Email Vacancies to Job Seekers process
-
Select the iRecruitment Email Vacancies to Job Seekers process in the Name field.
-
Click Submit to run the process.
Note: You should not change the parameters for this process if you are running it on a live installation. If you are working on a testing environment you can set the Ignore Job Seekers Matching Frequency and the Ignore Job Age parameters to Yes. This will generate more data for your testing purposes.
Running the iRecruitment Index Synchronization Process
To keep the text indexes up to date for iRecruitment documents and job postings run the iRecruitment Index Synchronization process. Oracle iRecruitment uses Oracle Text to perform content-based searches on resumes and job posting details. When candidates upload resumes or managers post new job details, you must synchronize the index at a regular interval to keep the user searches accurate.
You run the process from the Submit Request window.
To run the iRecruitment Index Synchronization process
-
Select the iRecruitment Index Synchronization process in the Name field.
-
Click in the Parameters field to display the Parameters window, if it does not automatically open. The Parameters window displays two parameters:
-
Posting Index indicates index of job postings that managers post.
-
Document Index indicates index of candidates' resumes.
-
-
Select any one of the following options for the Posting Index and Document Index parameters:
-
Online: In the Online mode, the process adds new entries to the index, enabling simultaneous searches.
-
Full: In the Full mode, the process defragments the index, reducing its size, and optimizing the performance. The process does not add new entries to the index.
-
-
Click OK.
-
Click Submit to run the process.
Running the iRecruitment Email Job Seekers Details to Vacancy Owner Process
Run the iRecruitment Email Job Seekers Details to Vacancy Owner process to inform the managers of suitable candidates for their open vacancies. When you run the process the application matches the candidates with jobs based on their work preferences, qualifications, and skills and sends e-mail notifications of suitable candidates.
You run the process from the Submit Request window.
To run the iRecruitment Email Job Seekers Details to Vacancy Owner process
-
Select the iRecruitment Email Job Seekers Details to Vacancy Owner process in the Name field.
-
Click Submit to run the process.
Running the iRecruitment General Mail to Job Seekers Process
Run the iRecruitment General Mail to Job Seekers process to send general e-mail notifications to registered users. For example, if you want to inform users about a job fair you have planned you can use this process to send mass mails. This process sends notifications to registered users who have selected the Receive General Emails check box in the My Account: email Preferences page.
You run the process from the Submit Request window
To run the iRecruitment General Mail to Job Seekers process
-
Select the iRecruitment General Mail to Job Seekers process in the Name field.
-
Click Submit to run the process.
Running the iRecruitment HA Process Applications
Run this program to process the applications submitted on the HA instance. This program processes data copied from the IRC_PENDING_DATA table on the HA instance to the IRC_PENDING_DATA table on the primary instance and keeps the application users' information up to date on the primary instance.
Important: You must run this program only on the primary instance when it is available after maintenance. Ensure that you run this program only after final migration to process all the applications.
Use the iRecruitment HRMS Manager responsibility to run this program. When you run the process, it:
-
Creates new iRecruitment user accounts on the primary instance if the users have registered on the HA instance.
-
Adds or updates resumes if the users have uploaded any resumes on the HA instance. The process updates the IRC_DOCUMENT table. If a previous resume with same file name exists, then the new resume overwrites the previous one.
-
Creates job applications on the primary instance.
-
Updates the users accounts using information parsed from the resume if resume parsing is enabled.
-
Notifies users of the application status indicating whether the applications to the vacancies were successfully submitted or not.
You run the process from the Submit Request window.
To run the iRecruitment HA Process Applications
-
Select the iRecruitment HA Process Applications process in the Name field.
-
Click in the Parameters field to open the Parameters window.
-
Enter the server name of the primary instance to process the details of the application users.
-
Click OK.
-
Click Submit.
Running the iRecruitment Applicant Profile Snapshot Process
If you enable the applicant tracking functionality for a business group, then Oracle iRecruitment creates snapshots of applicant profiles during the job application process. To track changes to applicant profiles, run the iRecruitment Applicant Profile Snapshot process. This process creates snapshots whenever applicants change their details, such as, personal information, qualifications, and work preferences, or upload supporting documents.
You run the process from the Submit Request window.
Important: Schedule this process to run daily to track changes to applicant profiles.
To run the iRecruitment Applicant Profile Snapshot process
-
Select the iRecruitment Applicant Profile Snapshot process in the Name field.
-
Click in the Parameters field to open the Parameters window.
-
Set the Consider Job Applications without Snapshot parameter to specify the applicant profiles that Oracle iRecruitment must consider when creating snapshots.
You can select one of the following options:
-
Yes: iRecruitment creates snapshots of applicant profiles for which snapshot data does not exist. For example, you can create snapshots for the applicant data that you migrate from the High Availability instance to the primary instance. You can also generate snapshots for applicants if you enable the applicant tracking functionality for a new or an existing business group.
When you select Yes, Oracle iRecruitment also reviews the existing applicant profiles and creates snapshots of the changed profiles.
-
No: Oracle iRecruitment reviews the existing applicant profiles and creates snapshots only of the changed profiles. The default value is No.
-
-
Click OK.
-
Click Submit.
Running the iRecruitment Purge Applicant Tracking Data Process
Run the iRecruitment Purge Applicant Tracking Data process to remove the data that you retain for statutory compliance.
This process removes:
-
The applicant snapshots including stored resumes
-
The applicant search criteria and saved searches
-
The applicant profile access records
-
The end dated documents
You run the process from the Submit Request window.
To run the iRecruitment Purge Applicant Tracking Data process
-
Select the iRecruitment Applicant Profile Snapshot process in the Name field.
-
Click in the Parameters field to open the Parameters window.
-
In the Purge Data Older than Months field, specify the number of months that the application must consider to purge the data from the system date. The default value is 24. For example, run the process with the default value to remove the data that is more than two calendar years older than the system date.
Note: For testing purposes, you can enter a decimal value in the 'Purge Data Older than Month' parameter. A value of '0.1' is equal to 3 days.
-
Click OK.
-
Click Submit.
Running the iRecruitment Create Enrollment Process
In Oracle iRecruitment, when managers or recruiters create offers for applicants they can select the compensation plans for applicants. iRecruitment includes these compensation plans in the offer letters to applicants. As an HR administrator, you can run the iRecruitment Create Enrollment process to automatically enroll new hires in the compensation plans included in their offer letters. This program processes the compensation plans associated with an offer and creates the enrollment records for the employee.
Using this program, you can create enrollment records for:
-
An individual person hired for a vacancy.
-
All the employees hired for a vacancy.
-
All the employees hired in a business group.
You run this process from the Submit Request window.
To run the iRecruitment Create Enrollment process
-
Select the iRecruitment Create Enrollment Process in the Name field.
-
Click in the Parameters field to open the Parameters window.
-
Select the business group for which you want to run the process. iRecruitment processes the compensation plans for the new hires in this business group and enrolls them into the relevant compensation plans. The business group information is mandatory.
-
Optionally, you can run the process for a specific vacancy or an employee in the business group.
If you leave these fields blank, then the application creates enrollment records for all the new hires in the business group.
-
Click Submit, and then OK.
After you run the process, you can view the enrollments in the View Enrollment Results window. For more information, see: Displaying Enrollment Results, Oracle HRMS Compensation and Benefits Management Guide
Running the iRecruitment Recruitment Summary Process
The Recruitment Summary report that provides summarized recruitment information by directs, recruiters and organizations handles voluminous data. To improve performance and display recruitment summary details faster when handling huge volumes of recruitment data, run the iRecruitment Recruitment Summary process. This process populates the summary data in the summary tables. The performance is faster as the application retrieves recruitment data from summary tables instead of transaction tables.
Before running the program, ensure that there are no broken supervisor hierarchies. If a broken supervisor hierarchy exists during the process run, then iRecruitment populates the data only up to the supervisor who has a manager.
Schedule this process to run regularly depending on your business needs. You run the process from the Submit Request window.
To run the iRecruitment Recruitment Summary process
-
Select the iRecruitment Recruitment Summary process in the Name field.
-
Click in the Parameters field to open the Parameters window.
-
Enter the number of simultaneous requests or threads that you want the process to run and populate the summary tables. The maximum number of requests is 12.
-
Select the mode to run the process. You can select any one of the values:
-
Full Refresh: If you select this value, then all the existing data is deleted from summary tables and the tables are repopulated with the latest data.
-
Incremental Refresh: If you select this value, then only the modified data and data of failed transactions in the previous run are processed.
-
-
Click OK and then Submit.
The Recruitment Summary page displays the date and time of the last completed process run.
Running the iRecruitment US OFCCP Disability/VEVRAA Audit Report
This report is for US users only. To comply with the Office of Federal Contract Compliance Programs (OFCCP) regulations, Oracle iRecruitment enables external applicants to provide their disability and veteran status.
Run the iRecruitment US OFCCP Disability/VEVRAA Audit Report to generate the Office of Federal Contract Compliance Programs (OFCCP) and veteran external applicant data in the event of a compliance audit.
You run this report from the Submit Request window.
To run the iRecruitment US OFCCP Disability/VEVRAA Audit Report:
-
Select iRecruitment US OFCCP Disability/VEVRAA Audit Report in the Name field.
-
Enter the following parameters:
-
Report Type: Select either Disability Status Data or Veteran Status Data. Selecting Disability Status Data will generate an audit report containing CC 305 form data. Selecting Veteran Status Data will generate an audit report containing veteran status data.
-
Business Group: Select the business group for which you want to run the report. All applicants who submitted either disability or veteran status data that belong to business group selected will be included in the report.
-
Vacancy: This is an optional parameter and you can run the report for applicants belonging to a particular vacancy. Note that the vacancies listed are dependent upon the business group selected earlier.
-
Applicant: This is also an optional parameter and allows you to select a specific applicant for which you need to generate the audit report. This list of values is dependent upon both the business group and the vacancy selected earlier so will be enabled once a vacancy is selected. Note that the list of values for this parameter also considers terminated applicants or ex-applicants. All applicants belonging to the business group selected will be considered when the report is run.
-
Effective Start Date and Effective End Date: Specify the period for which you want to run the report.
-
-
to run the report. Click OK and then Submit.