Enrollment
Enrollment Overview
Oracle Learning Management (OLM) enables administrators to manage and track all enrollments in classes listed in the catalog. You control enrollment through a combination of learner access, self-enrollment permission, and approval options. You can also track successful attendance, maintain learning histories, and set up automatic updates to a learner's competency profile.
Note: The Enrollment area primarily concerns enrollment in classes. For subscription information, see Learning Paths and Learning Certifications
Learners can enroll in classes from Learner Self-Service. Administrators can then track and adjust enrollments, filling waiting lists and notifying enrollees as needed.
OLM facilitates management of a comprehensive workforce training and certification business. Managers and main appraisers can create and manage personalized learning paths, if enabled, to fulfill career and workforce objectives.
Enrollment and HRMS Talent and Performance Management
In conjunction with functionality Oracle HRMS Talent Management (both Core and SSHR), learner competencies are available for career planning as well as candidate placements, performance appraisals, and suitability matching.
See Oracle HRMS Talent Management, Oracle HRMS Workforce Sourcing, Deployment, and Talent Management Guide
Reporting on Enrollment
OLM reports relating to enrollments include:
Key Concepts
Enrollment relies upon several key concepts:
-
Enterprises can control access to categories or folders using the Administrator Access Control feature. Administrators can enroll and subscribe learners to classes, learning paths, and learning certifications that they can access. The ability to search and view learner enrollments and subscriptions depends on the categories that the administrators can access.
-
Enrollment statuses such as Requested and Waitlisted are the heart of the OLM enrollment engine, responding to and causing changes in class status as well as triggering notifications, letters, and other processes. Administrators can also view the evaluation status of learners. For more information, see: Evaluation for Courses and Classes
-
Customer and Worker Enrollments
You can enroll customers (external enrollments) or workers (internal enrollments).
-
When a class is full, OLM automatically creates a waiting list, from which you can choose people when places become available.
-
Automatic Waitlist Enrollments
Activating automatic waitlist enrollments automatically moves the first eligible waitlisted person into a class vacancy.
-
The multiple enrollment pages enable administrators and telesales representatives to enroll or subscribe multiple learners into classes, learning paths, or learning certifications at one time. Users can select enrollees from search-generated lists or copy enrollments from one catalog object to another.
Administrators can automatically enroll learners in classes when they subscribe learners to a learning path. For more information, see: Learning Paths
-
Depending on the class and enrollment statuses, the application warns the prospective enrollee that they are already enrolled in an overlapping class, or prevents them from enrolling.
-
You can record enrollments and results of classes taken outside of the application.
Enrollment Requirements
OLM enables you to enroll individuals and groups of learners both from within and from outside your organization. OLM's integration with Order Management enables your organization's telesales representatives to enroll external customers in classes.
Can you enroll workers and customers in the same class?
Yes, you can enroll both workers (including applicants) and customers (non-employees) in the same class.
How are waiting lists handled?
OLM provides waiting list management to enable you to allocate places in a class as they become available. For example, if you cancel an enrollment when the class status is Full and a waiting list exists, the application can enroll waitlisted learners automatically. If you have not set up automatic waitlist enrollments, you can manually select another learner from the waiting list.
Can you make multiple enrollments?
To save time and limit data entry mistakes, you can make multiple enrollments in a class, or select a group of enrollments and update them all in the same way.
How can you manage priority enrollments?
You can manage priority enrollments by entering a priority level against each enrollment. You (or the application, if automatic waitlisting is enabled) then select people from the waiting list according to their priority.
Can you correspond with learners?
The application delivers to learners and their managers a number of enrollment-related notifications, including enrollment confirmations and completion notices.
You should use workflow notifications, rather than letters, to inform learners, managers, and administrators of enrollment-related events such as waitlisting, placement, and competency profile updates.
Can you enter information about classes not held in OLM?
To maintain complete learning histories for your workers and customers, you can record information about courses they have attended outside your organization.
Enrollment
Enrollment Basics
OLM employs two types of enrollment:
-
For an internal organization, by holding the learner as a worker in Oracle HRMS
-
For a customer, by recording the learner as a customer contact
You can enter enrollments for employees, contingent workers, and applicants you have identified as people in Oracle HRMS or HRMS Foundation. You can also enter enrollments for customers, with enrollees unnamed or set up as customer contacts.
On the Enrollments and Subscriptions page, when you search for a class, learning certification, or learning path and click Add Enrollments, the search parameters default to the Add Enrollments page.
Multiple Enrollments
The multiple enrollment pages enable administrators and telesales representatives to enroll or subscribe multiple learners into classes, learning paths, and learning certifications at one time. To add multiple enrollments to a class, you can select individual learners from a search-generated list, or you can copy some or all learners from an existing class, learning path, or certification.
Note: Based on your enterprise requirements, you can automatically enroll learners in learning path classes. See: Learning Paths
As you select learners, a profile option, OTA: Maximum Enrollments Processed Online, determines the number of enrollments processed immediately; selecting more than the specified number sends the enrollments for processing by the Process Bulk Enrollments concurrent program. If you need the enrollments processed immediately--to ensure that places become filled in the correct order or to give learners quick access, for example--then you should avoid processing more than the number specified. Consider making the enrollments in batches.
Note: Currently, you cannot process bulk enrollments for external learners. You can process bulk enrollments only for internal learners such as employees, contingent workers, and applicants.
The Add Selected Learners page gives you multiple search criteria. Note that while most of the search fields narrow your search results, the three "Include..." check boxes expand your results. You can select learners from a learner group while completing bulk enrolments for a class.
You can update multiple enrollments by changing their class status, for example, from Normal to Cancelled, which cancels the enrollments for the class. You can also record the successful attendance of multiple learners. You cannot enter enrollment justifications while making multiple enrollments.
Important: On the Update Enrollment Status page, you must select the Submit Concurrent Program check box to avoid any performance issues when OLM processes mass enrollment updates that include updates to learner's competencies. Select this check box, if the number of selected enrollment is large and OLM has to record successful attendance for the enrollments including awarding any competencies attached to the catalog object.
Waiting List Management
Waiting list management enables you to allocate places as they become available. For example, if you cancel an enrollment when the class status is Full, you can select a learner from the waiting list.
The application changes the class status to Full when the number of learners occupying places reaches the maximum number of places defined for the class. Enrollments with the status Placed or Attended occupy places; other enrollment statuses (Requested, Waitlisted, and Cancelled) do not.
If an offline class proves to be popular, you might decide to increase the number of places available by changing the venue, or rearranging the seating at the selected venue.
You record this change by increasing the maximum number of learners defined for the class.
See Changing the Class Status or Maximum Attendees
Automatic Waitlist Enrollment
You can enroll waitlisted learners automatically, based on waitlist priority or enrollment dates. This automatic enrollment functionality also helps to prevent overlapping enrollments.
Automatic enrollment for waitlisted learners occurs when a learner has cancelled an enrollment, or after the maximum number of attendees for a class has increased. The application automatically moves the first eligible waitlisted person into the class.
Automatic waitlisting is optional. If you don't want to use the automated waitlist processing, you can continue to use the existing functionality and select a learner from the list of waitlisted learners after a cancellation or an increase in the maximum number of attendees.
Automatic waitlisting requires you to set the Cancel Enrollment concurrent program to run frequently, as often as every five to ten minutes.
To establish automatic waitlisting, you set several user profiles:
-
Activate Automatic Waitlist Enrollments
-
Automatic Waitlist Enrollment Default Booking Status
-
Automatic Waitlist Enrollments: Hours Prior To Class
-
Waitlist Sorting Criteria
See Profile Options
Priority Levels and Justifications
If you have entered more requested enrollments than available places, you must decide which enrollments to place and which to put on a waiting list in case of cancellations. To help you decide which enrollments to place, learners, managers, and administrators can enter a priority level, which assigns a justification for each enrollment.
The priority level, not the justification, determines the order that automatic waitlisting uses to fill places. By default, each justification is attached to one of the priority levels. Administrators can override this linkage by choosing a different priority level for each enrollment, but learners and managers can select only a justification from a predefined list. Once they have chosen and saved an enrollment request, learners cannot change the justification.
If a placed learner cancels, you can choose the highest priority waitlisted learner to fill the place. You can update multiple priority requests to the status Placed, then update the remaining requests to the status Waitlisted.
Overlapping Enrollments
Administrators can enroll learners in offline classes whose dates or times overlap, but receive a warning if the status of the existing enrollment is anything but Cancelled or any user-defined status based on Cancelled.
Administrators receive no warning if the status of the existing enrollment is Cancelled or any user-defined status based on Cancelled.
Learners receive a warning only if they try to enroll in a class in which they are already enrolled.
Enrollment Security
Your system administrator may have set up security to limit your ability to enroll learners by class type or enrollment status.
Some classes may be secure: only those people assigned to the organization that is administering the class can enter and update enrollments in the class.
Enrollment status security prevents users with specified responsibilities from entering, updating, or deleting enrollments of specified statuses.
See: Enrollment Status Security
Enrollment Entry
When you enter a new enrollment, the minimum information you need to enter is the name of the customer or organization that is sponsoring the enrollment, and a learner or contact. By default, the number of places enrolled for the customer or organization is one. If the class originated in Order Management and the places have not already changed, the number of places equals the maximum number of places available for the class.
You can use the multiple enrollments page to enter multiple enrollments for individual learners. You can add learners according to a range of search criteria, and you can copy learners from existing enrollment lists. Use Copy Learners to transfer learners from one class to another, or to enroll successful attendees of one class in a succeeding class.
Caution: If the number of selected learners exceeds Maximum for immediate processing, the enrollments must be processed by a concurrent program, and may not appear in the class list immediately. If the learners need immediate access to the class, be sure to keep the number of selected learners below the Maximum for immediate processing.
Enrollment Updates
You can update enrollments. For more information, see: Enrollment Updates
Create Enrollments with a Past Date in Offline Synchronous Classes
Learning administrators can create enrollments with a past date for learners in offline synchronous classes (classroom based or instructor-led classes). Sometimes, learners attend classes without having enrolled initially. In this scenario, administrators can create past dated enrollments for such learners. For example, a learner attends the classroom based Written Communication class on 20-Jan-2015 without having enrolled initially (the class enrollment end date is 21-Jan-2015). With the system date of 25-Jan-2015, the administrator can create an enrollment for the learner dated 20-Jan-2015.
Note: Learning administrators can create past dated enrollments only for offline synchronous classes, where the system date is later than the class enrollment end date.
To help learning administrators to create enrollments with a past date, OLM enables the following features for offline synchronous classes (classroom based classes or instructor-led classes):
-
The Single Enroll and Bulk Enroll icons post the enrollment start date in the Classes page.
-
The Add Single Enrollment and Add Enrollments buttons post the enrollment start date in the Enrollment region of the Class page.
Customer (External) Enrollments
For customer enrollments, you can reserve multiple places in a class by increasing the number of places beyond one, but these enrollments are always anonymous. Such enrollees cannot take advantage of self-service access, nor can you keep records of individual attendance or performance.
To enable customer personnel to access self-service and to keep records of their attendance and performance, you must create them as customer contacts and as application users, linking the user to the contact record. Note that managers cannot supervise such training through Manager Self-Service, and Order Management telesales representatives cannot enroll these learners as individuals (they can, however, create classes for a customer).
Enrollment History
The Learning History page, available under the Learner tab, enables you to view the classes a learner has attended, both internal and external, as well as the certifications and learning paths to which they have subscribed. To view enrollments for a particular class, go to the Class details page.
Enrollment Communication
OLM offers a range of automatically generated workflow notifications to communicate enrollment information to learners. Notifications include status changes such as waitlisted to placed, class completion, and competency updates.
You can also use the HRMS Web Application Desktop Integrator (Web ADI) to generate form letters you can send to learners.
See Data Download and Upload Using Web ADI Overview, Configuring, Reporting, and System Administration in Oracle HRMS
Restricting Letters By Vacancy or Class
The original automatic letter generation functionality processed all enrollees for the same letter type regardless of which class they enrolled in. The limitation could cause problems for a large enterprise, partly because of the sheer numbers of classes and enrollments and partly because class owners may want to send letters at different times.
A profile--"HR: Restrict Letter by Vacancy or Event [Class]"--enables administrators to generate separate letter requests for each class (under a given enrollment status). This profile serves both HR and OLM Letter Requests (HR restricts them by vacancy). Setting the profile to Yes displays the Class Name field on the Letter Requests form. Choosing a value in the field restricts letter generation to enrollees in the class you choose in the Class Name field. Leaving the field blank causes the application to create a new letter request.
When the profile is set to "Yes", the application creates or updates a letter request automatically whenever an enrollment is created or updated and a letter type exists for the booking status type.
The automatic letter generation is independent of the profile if a letter type already exists for the booking status type (if a letter type exists for the booking status, a letter is always created). The difference in the creation is that when the profile is set to Yes, every automatically created letter request is associated with the class of the enrollment.
If you have created multiple letter types for the same enrollment status, the application creates the letter request based on the last letter type created, according to the letter type ID (since multiple letter types should not be associated with the same enrollment status type).
Class and Enrollment Statuses
OLM provides the following predefined class statuses. These statuses reflect typical stages in the class life cycle and help administrators to track classes:
-
Planned
-
Normal
-
Full
-
Closed
-
Cancel
The following example explains how class statuses work:
Class Life Cycle Management

-
Create a new class with the status Planned.
-
Update the class status to Normal when you have sufficient interest to meet the minimum numbers required to run the class.
-
The application automatically sets the class status to Full when learners have filled all the class places.
-
When you are ready to prevent any new enrollments, you can update the class status to Closed. Once you Close (or Cancel) a class, you cannot enter enrollments of any kind.
Note: You must use only the predefined class statuses. You cannot create own class statuses. When you create or update a class, you select the predefined class status in the Status field in the General region. You select the User Status field in the Administration region for information purposes only. The user status values do not control the behavior of class statuses in OLM. For more information, see: Class and Enrollment Status Setup
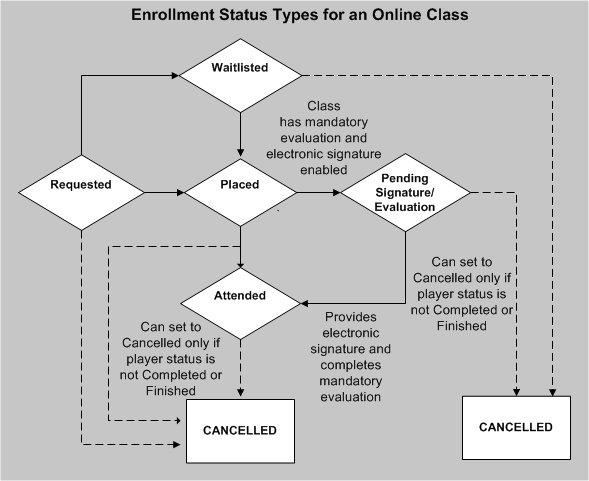
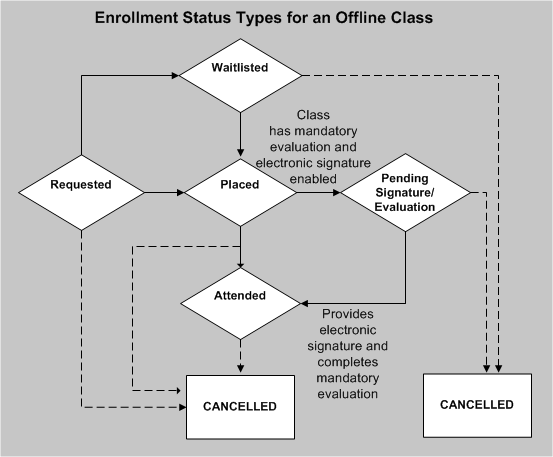
Enrollment Status Types
OLM provides the following predefined enrollment status types:
-
Requested: Learner expresses interest but this has not been approved or confirmed.
-
Placed: Enrollment occupies place in class.
-
Waitlisted: Interest approved or confirmed, but place not yet available. The class is planned or full.
-
Attended: Learner has participated in a synchronous offering.
-
Pending Signature/Evaluation: Applies to classes that require electronic signature or classes with mandatory evaluation.
If a class requires learners to complete mandatory evaluation and provide electronic signature, then learners must complete evaluation after signing.
-
Cancelled
You can use these enrollment status types to track and control the progress of enrollments.
The figures below illustrate how the predefined enrollment status types operate for online and offline classes. In these examples, learners have to provide their electronic signatures and complete evaluation.
If you use the Evaluation functionality, then OLM changes the enrollment status to Attended when learners complete evaluation
If you use the electronic signatures functionality, then OLM changes the enrollment status to Attended when learners complete the electronic signature process.
If you use both Evaluation and electronic signature features, then learners must complete the electronic signature process and evaluation for OLM to change the learner enrollment status to Attended.
Enrollment Status Types for an Online Class
Enrollment Status Types for an Offline Class
Enrollment Statuses
Although OLM provides predefined enrollment status types, during setup you must create enrollment statuses using the predefined Enrollment Status Types to better match the stages you recognize in your business. For example, enter the name Requested (or another name) as the status that you want to appear for enrollments of the type Requested and associate it with the predefined status Requested. You might want to distinguish between cancellations that incur a penalty fee and those for which there is no charge. You might also use different statuses to track management approval of a Requested enrollment. You can create enrollment statuses such as Pending Evaluation and Pending Signature using the Pending Signature/Evaluation predefined enrollment status type.
You can use these statuses to manage waiting lists and cancellations, and to trigger notifications. You can view the history of statuses for each enrollment.
Combining Statuses to Track and Control Enrollments in Classes
The combination of class and enrollment statuses enables you to track and manage enrollments in classes.
Typically, you might follow this sequence of steps:
-
Create a new class with the status Planned.
-
Enter enrollments with the status Requested as learners express an interest in the class.
-
Update the status of these enrollments to Waitlisted when the learners confirm their interest and/or management approves their attendance.
-
Update the class status to Normal when you have:
-
Sufficient Waitlisted enrollments to meet the minimum numbers required to run the class
-
Booked all the resources required
-
-
Update the status of the Waitlisted enrollments to Placed.
When the number of Placed enrollments equals the maximum number of places defined for the class, the application automatically sets the class status to Full.
-
Continue entering Waitlisted enrollments, or close the class.
If a Placed enrollment cancels, you can select a learner from the waiting list to fill the place. When you are ready to close the waiting list and prevent any new enrollments, you can update the class status to Closed. Once you Close (or Cancel) a class, you cannot enter enrollments of any kind.
This is just one possible sequence of class statuses. If you prefer, you can create a new class with the status Normal and enter all enrollments as Placed (or Attended) until the class is Full.
Closing a Class
Even when a class is Full, you can continue entering Requested or Waitlisted enrollments. If you want to prevent any new enrollments, you can set the class status to Closed, which automatically cancels any enrollments with the status Requested. You can then cancel any finance lines associated with these enrollments.
If the class is not full when you close it, you can opt to redefine the maximum number of places for the class to the current number of Placed and Attended enrollments.
Cancelling a Class
When you cancel a class, OLM automatically cancels all enrollments (but none of the associated resource bookings). You can choose which cancellation status to use for the enrollments (if you have defined more than one). You can also choose whether to cancel any finance lines associated with the enrollments.
Changing a Class Status to Planned
Similarly, if you change a class status back to Planned, any enrollments with the status Placed or Attended automatically change to Waitlisted. You can cancel any finance lines associated with these enrollments.
Note: Because reverting a Normal class to Planned can create learner confusion as well as administrative headaches, we recommend that you leave in Planned any class that may not occur.
Which Statuses Occupy Places in a Class?
Only the following enrollment statuses occupy a place in a class:
-
Placed
-
Attended
-
Pending Signature/Evaluation
-
Any statuses based on Placed, Attended, and Pending Signature/Evaluation
When you set a maximum number of places for a class, only the definite bookings (Placed and Attended) take up those places.
How Enrollment and Class Statuses Work for Failed Learners
If a learner fails in an online class, OLM changes the enrollment status to Attended with the default failure reason (Online Failed). This status change allows the learner to complete the evaluation (if any) associated with the class.
If a learner fails a class that has a mandatory evaluation, then OLM assigns the Pending Evaluation status to the learner. After the learner completes the mandatory evaluation, OLM changes the status to Attended with the default failure reason (Online Failed).
If a learner fails a class that has no mandatory evaluation, then OLM assigns the Attended status with the default failure reason (Online Failed).
Enrollment Updates
OLM enables you to update enrollments quickly. For example, if you change a class status from Normal to Planned, you can change any enrollments for the class to Requested. You can also record a learner's successful attendance of a class, or update a learner's competency profile.
A pop-up window appears on the Enrollments and Subscription page when you move the mouse over the status value in the Enrollment Status column of the search results table. You can change all information except the learner name and enrollment number. You can update the enrollment status and select the reason for status change. Fields on this pop-up change based on the enrollment status. For example, if you select the enrollment status of Attended, the following fields appear: Failure Reason, Attendance Results, and Successful Attendance check box. You can also use this pop-up window when you search for enrollments for a class.
Mass Updates
You can apply certain changes to multiple enrollments. For example, after changing a class status from Planned to Normal you can query and place all the waitlisted enrollments. After a class, you can query all the enrollments, change their status to Attended, and mark whether the learners successfully completed the class.
Using Priority Levels
You can make mass updates to enrollments using the priority levels you entered for the enrollment. Search for all learners with a specific priority level, then select the names you want to update.
For example, if you previously entered more requested enrollments than available places, you can use the priority levels to help you decide which enrollments to place and which to put on a waiting list. You could update the highest priority requests to the status Placed, then update the remaining requests to Waitlisted. If a placed learner cancels, you can choose the highest priority waitlisted learner to fill the place.
Mass Updates and Cancellations
When you cancel enrollments using mass update, any enrollments previously cancelled retain any user-created status based on the default status of Cancelled. Similarly, no previously cancelled enrollments transfer to a new class you specify. The class title also remains the same.
Mass Updates and E-signature
See the Enrollment Updates for Evaluation and Electronic Signatures section.
Mandatory Enrollments and Updates
Single Enrollment Update
The Class Name, Organization Name, and Learner Name of a mandatory enrollment record is read-only. As an administrator, you can delete this enrollment record and create a mandatory enrollment for the learner in another class using the Learner Access page.
Mass Enrollments Update
You cannot move learners who are mandatorily enrolled in a class to another class.
Manual Updates to the Learner Status for an Online Class
You can manually update a learner's status for an online class using the Update Player Status button in the Enrollments and Subscriptions page or the Enrollments page of the class. When you click the Update Player Status button, the Update Player Status page appears to enable you to select the appropriate status:
-
Completed
-
Failed
-
Passed
The following rules apply to the selection of a status.
-
The Passed or Failed status for a scored content. The Completed status is not applicable to a scored content.
-
The Completed status for content that is not scored. The Passed or Failed status is not applicable to a content that is not scored.
For a Failed status, you must enter a score that is not greater than or equal to the mastery score of the content. For a Passed status, you must enter a score that is greater than or equal to the mastery score of the content. You cannot update the learner status if the learner has not attempted the content or class or the current status is Completed or Passed.
Enrollment Updates for Evaluation and Electronic Signatures
Evaluation
When you update the enrollment status of learners who attend a scheduled class with mandatory evaluation, you can set the enrollment status to Pending Evaluation. The evaluation becomes active when the instructor or the administrator sets the enrollment status to Pending Evaluation. When the learner completes the evaluation, OLM changes the learner's enrollment status to attended.
Electronic Signatures
When you change the enrollment status of learners in a class that is part of a electronic signature enabled course and click Apply, OLM displays the E-signatures page.
On the E-signatures tabbed region, as an administrator select the signature type, which is the type of signer, for example, reviewer or author. Select Approve or Reject response type. If you select Approve, then OLM saves the enrollment status changes after the esignature process is completed. If you select Reject, then OLM does not save the enrollment status updates. Enter any comments, if applicable. Enter your user name and password to sign the document. Click the Sign icon to complete the electronic signature process. The E-Record tabbed region displays a record of the enrollment status changes that you make.
Administrators cannot set the enrollment status of a learner directly to Attended in a class that is electronic signature enabled. The administrator can set the enrollment status to Pending Signature to obtain the electronic signature of the learner.
When the administrator performs a mass update of enrollment statuses, OLM saves the electronic signature together with one e-record for each one of the learners whose status is updated.
Note: If a class requires learners to provide electronic signature and complete an evaluation, then set the status to Pending Signature and Evaluation. Learners must first provide their electronic signature and then complete the evaluation.
See: Electronic Records and Electronic Signatures (ERES) in OLM
Enrolling Ex-Employees in Classes
Learning administrators cannot enroll ex-employees in any classes using the OLM UI. The setting of the 'OTA:Allow Enrollment when learner has future termination date' profile option does not impact this behavior. Ex-employees cannot be enrolled into any classes after their end or termination date.
Note: To enroll ex-employees, customers can use the public API: OTA_DELEGATE_BOOKING_API.CREATE_DELEGATE_BOOKING with the 'p_date_booking_placed' parameter as a back tracked date.
Active learners include applicants, employees, and contingent workers. Using the OLM UI, Add Single Enrollment and Bulk Enroll: Selected Learners pages, when a learning administrator searches for learners to enroll them into:
-
Asynchronous classes: Learners must have an active assignment as of the system date.
-
Synchronous classes: Learners must have an active assignment as of the synchronous class end date and system date.
-
Planned classes: Learners must have an active assignment as of the system date.
Attendance and Results
You can record the successful attendance or non-attendance of a learner, and the results of the attendance. You can use the multiple update page to record this information for many learners together, one class at a time.
Competency Profiles
You can update a learner's competency profile anytime with competencies the learner has earned by attending an internal or external class. Depending on whether you have set up approval requirements for such updates, workflow notifies learners and their managers of automatic updates or the need for manual updates.
If you have been granted the authority, you can automatically add these competencies delivered by the class, along with the proficiency levels, to a learner's competency profile.
If you add the competencies, OLM uses the start date of the class as the date at which the learner is proficient in the competencies. If the learner already possesses that competency but at a different proficiency level, OLM adds the competency at the new proficiency level from the start date of the class, and ends the competency at the previous proficiency level from the day before. This new proficiency level can be higher or lower than that previously demonstrated by the learner.
You can, of course, override the start date and the proficiency levels. For example, a learner may not be proficient in a competency until midway through a class. If the learner is proficient in the delivered competencies, but not at the level identified for the course, you can override the proficiency level and select the correct one. If the learner has not gained some of the competencies identified for the course, or if the class does not deliver identified competencies, you do not have to apply them to the learner's competency profile.
Assign Competencies for Learning Certifications
When you update the subscription status of employees and learners, you can select the Assign Competence check box for OLM to assign competencies for learning certifications when learners complete certifications. Only if the subscription status is Certified, then you can view the check box. If you select this check box, then certification specific competencies are assigned to the learner based on the Competency Update Settings for the certification. See: Competency Automation
Correction, Cancellation, and Deletion
You might have to correct enrollment details for a variety of reasons: entering a learner or contact name incorrectly, for example, or enrolling the wrong learner in a class. If so, you must delete the enrollment and re-enter it. You cannot return to correct the personal details or enter the correct enrollment agreement.
Before you delete an enrollment, you must check to see if any finance lines exist. If lines exist with the status Not for transfer, you must delete them before you can delete an enrollment. If lines exist with the status Transferred, you cannot delete them.
If you delete an enrollment, you also delete the learner history, so be careful when using this facility. Consider cancelling the enrollment instead. Cancel an enrollment, for example, if the class does not run (or if a learner cancels attendance).
When you cancel an enrollment, the application prompts you to choose whether you also want to cancel any associated finance lines.
External Learning
To record a complete picture of a person's learning history, you can enter information about external learning (if enabled, learners can enter their own external learning, with or without approval, from the Learner Self-Service responsibility). External learning is any learning that does not appear as a class in the OLM catalog, such as an external class or an internal class your enterprise has stored in another learning management system.
You can use this data to assemble a complete picture of a worker's learning history and to identify the types of classes people take that your enterprise does not offer.
Administrators use the Create External Learning page (accessible from the Learning History page) to record the details of any classes attended by employees or customers but not registered as classes in OLM (learners and managers use the External Learning page). To view all the classes already entered for a learner, select Learning History.
Enrolling Customers in Restricted Classes (Secure Customer-Based)
Some customer-based classes might be secured. You can enter and update enrollments in these classes only if you belong to the organization that is administering the class.
If you use Order Management, creating a restricted class automatically enters an enrollment with the number of places equal to the number you specify in the OTA Pricing Attribute. If you want to add enrollments or name the individual enrollees, you must follow the procedures detailed in Using Oracle Learning Management with Order Management.
To enter customers for restricted classes priced per student or no charge
-
Create a class on the Create Class page. Be sure to select Restricted.
-
Select the class in the Customers for Restricted Class window.
-
Select one or more customers for this class, and save your work.
To enter customers and enrollments for restricted classes priced per customer:
-
Create a class on the Create Class page.
-
Select the class in the Customers for Restricted Class window.
-
Select one or more customers for this class.
-
Enter the number of places each customer requires.
-
Select a contact for the enrollments, and enter the enrollment status. You can also select the source of the enrollment.
Entering Financial Information
-
Select an existing finance header in the Invoice field. The customer on the finance header does not need to be the same as the customer for whom the learners work.
Select a Standard header to issue an invoice to the customer.
Creating a Finance Header
-
Choose the Finance button if you have not yet created a finance header for this customer.
-
Create the finance header.
-
In the Customers for Restricted Class window, enter the header number in the Invoice field.
What to do Next
-
Enter an Enrollment: You can use the Add Single Enrollment page to enter individual enrollments for these customers. Note that the application has already created a number of anonymous enrollments equal to the number you specified in the Places field.
Enrollment Reporting
Producing the Registration Report
The Registration report lists all learners (internal and external) scheduled to attend a class. It includes learner and contact names with relevant phone numbers.
Once you have checked the learners listed on the report, you can contact those scheduled to attend a class, but did not.
Limiting Output
You can limit the output to one of the following:
-
One class
-
All classes of a selected type
-
All classes administered from a specified training center
-
Classes that start or end on specified dates
You run this report in the Submit a New Request window.
To run the Registration report
-
Select the report name.
The Parameters window opens.
-
Select a class title to include learners scheduled to attend the class. Only learners with the status Attended appear in the report.
Important: If you are reporting on a single class, leave the other parameter fields blank. To report on classes of a specified type, training center, or dates, leave the Class field blank.
-
Select the class type. Leave blank to view classes of all types (subject to the other parameters you select).
-
Select a training center. Leave blank to view classes for all training centers (subject to the other parameters you select).
-
Enter a start date or an end date to include classes that begin or end on the date specified. Leave blank to view classes for all dates (subject to the other parameters you select).
-
Select OK and Submit Request.
Report Output
The report header includes the business group, report name, and date; the class title and start date; and the offering name and venue. The columns list learner name and phone number, contact name and phone number, enrollment status, finance header, and payment status.
The report prints in landscape orientation and fits on 8.5" x 11" paper.
Producing the Attendance and Signature Sheet Report
The Attendance and Signature Sheet Report enables the instructor to walk into the classroom with a ready-made roster of learners registered for the class. The report includes spaces for the learners to sign in and for the instructor to record the names of walk-ins.
The Attendance and Signature Sheet Report is virtually identical to the Learner Sign-in Sheet report. Only the layout and sorting differ. Use this version unless you want to generate pages to send to individual companies, or if you need learners to sign in for each day of the class, as some companies and laws require.
Run the Attendance and Signature Sheet Report from the Submit Requests window. You can submit this report alone or as part of a Request Set.
To run the Attendance and Signature Sheet report
-
In the Name field, enter or select Attendance and Signature Sheet Report.
-
Click in the Parameters field and select the parameters for the report. See the Report Parameters section for more information.
-
Enter the printer information and number of copies that you want to print.
-
Submit the report.
Report Parameters
The parameters window includes eight optional fields:
-
Class Title
Select a class from the list. Leave this field blank to generate information for all valid classes, subject to the limits you set in the other parameters.
-
Training Center
Select from the list of values to limit the report to a single training center. Leave this field empty to generate information for all valid training centers.
-
Class Start Date
Enter the beginning date of the class(es) to include in the report.
-
Class End Date
Enter the ending date of the class(es) to include in the report.
-
Enrollment Number
To generate a receipt or information for a single enrollment, enter the enrollment number.
-
Optional Column Heading
The optional column provides blank space for your learners to write information such as automobile license numbers. The words you type here become the column heading.
-
Display Payment Confirmation
Enter Yes to display a column that indicates if a learner has paid for the class (the value is Yes or No).
-
Display Trainer Signature
Enter Yes to display a line for the instructor's signature.
Report Output
The report header includes the business group, report name, and date; the class title, start date, and duration; the course name, venue, and instructor, if any. The columns list learner name, company/employee ID, enrollment number, and the optional columns. If you have left the Class field blank, the report subdivides for each course covered. Within each class, the reports sorts alphabetically by learner surname.
The report prints in landscape orientation.
Producing the Learner Sign-In Sheet Report
The Learner Sign-In Sheet report enables the instructor to walk into the classroom with a ready-made roster of learners registered for the course, sorted by each learner's organization, one organization per page. The report includes spaces for the learners to sign in each day of the class (up to five) and for the instructor to record the names of walk-ins.
The Learner Sign-In Sheet report is virtually identical to the Attendance and Signature Sheet report. Only the layout and sorting differ. Use this version to generate pages to send to individual companies, or if you need learners to sign in for each day of the class, as some companies and laws require.
Run the Learner Sign-In Sheet report from the Submit Requests window. You can submit this report alone or as part of a Request Set.
To run the Learner Sign-In Sheet report
-
In the Name field, enter or select Learner Sign-In Sheet.
-
Click in the Parameters field and select the parameters for the report. See the Report Parameters section for more information.
-
Enter the printer information and number of copies to print.
-
Submit the report.
Report Parameters
The parameters window includes eight optional fields:
-
Class Title
Select a class from the list. Leave this field empty to generate information for all valid classes, subject to the limits you set in the other parameters.
-
Training Center
Select from the list of values to limit the report to a single training center. Leave this field empty to generate information for all valid training centers.
-
Class Start Date
Enter the start date of the class(es) to include in the report.
-
Class End Date
Enter the ending date of the class(es) to include in the report.
-
Enrollment Number
To generate a receipt or information for a single enrollment, enter the enrollment number.
-
Optional Column Heading
The optional column provides blank space for your learners to write information such as automobile license numbers. The words you type here become the column heading.
-
Display Payment Confirmation
Enter Yes to display a column that indicates if a learner has paid for the class (the value is Yes or No).
-
Display Trainer Signature
Enter Yes to display a line for the instructor's signature.
Report Output
The report header includes the business group, report name, and date; the class title, start date, and duration; the course name, venue, and instructor, if any. The columns list learner name, company/employee ID, enrollment number, and the optional columns. If you have left the class field blank, the report subdivides for each course covered. Within each class, the reports sorts alphabetically first by company (one company per page), then by learner surname.
The report prints in landscape orientation.
Running the Process Mandatory Enrollments Program
The mandatory enrollment feature enables enterprises to ensure that workers enroll in mandatory training. Administrators can make a class mandatory to a specific learner, learner group, organization, job, position or a combination of these.
See: Learner Access
You can run the Process Mandatory Enrollments program to verify mandatory enrollments and to enroll any new learners.
You can schedule to run the following programs related to mandatory enrollments using the Submit Request window:
-
Process Mandatory Enrollments
-
Process Mandatory Enrollment Multi-Threaded: This program is a multithread version of the Process Mandatory Enrollments program. OLM processes the request using multiple threads and defined chunk size.
Depending on the volume of data to be processed, you can schedule to run the multithread version of the program. For example, if there is a large volume of data to be processed for mandatory enrollments, then the multithread version of the program can be scheduled to run.
To run the Process Mandatory Enrollments program
-
In the Name field, select the Process Mandatory Enrollments or the multithread version of the program.
-
Define the parameters.
-
Enter the following parameters if you are running the multithread program:
-
Chunk Size: Enter the number of records that each thread must process. The default value is 1000.
-
Thread Count: Enter the total number of threads to process the concurrent program. The default value is 3.
-
-
Class name: Select the class for which you want to process mandatory enrollments. If you leave this field blank, then the request processes all the classes.
-
Click OK and then submit the request.
The concurrent program does not enroll learners before the class enrollment start date. If the enrollment end date is available, then it does end enrollment on that date.
When the concurrent program runs, it verifies whether learners meet the enrollment conditions and enrolls learners. For learners who will become eligible at a future date, for example, because of organizational changes, or changes in job or position, the enrollment happens when you run the concurrent program after the changes take place.
Important: If your enterprise uses the mandatory enrollments feature along with eligibility profiles for learner groups, then the Process Eligibility Profiles for Learner Groups program must be run before the Process Mandatory Enrollments program. This action ensures that OLM applies the mandatory enrollment rule for learners meeting the eligibility profile criteria. See: Running the Process Eligibility Profiles for Learner Groups Program
You cannot run the Process Eligibility Profiles for Learner Groups and Process Mandatory Enrollments programs simultaneously.