Reports
Reports
There are many reports within Oracle Time & Labor to gather data about timecards entered through self-service and to gather data about timecards that you have transferred to the professional forms timecard window.
How do you track which workers have not submitted their timecards?
There is a Missing Timecard Report that lists workers who have missing timecards over a specified period. You can control which timecards are reported - for example, you can report on all timecards that have not been approved, or only those that do not exist at all, or those that either do not exist or have not been submitted, and so on. Additionally, you can use the Supervisor Dashboard to track workers who have not entered their timecards.
Can you run a report to verify setup of time management structures and policies?
Yes, there are reports for all the time management structures and policies that detail the various structures and policies you define. For example, you can run a report to list all the work plans and rotation plans defined.
Can you track changes in a timecard after the initial submission?
Yes, you can track changes in a timecard after the initial submission using the Timecard Changes Audit Trail Report. This report provides information such as who modified the timecard, date of modification and the data that was changed. Additionally, the report displays the approval history of the timecards.
Reports and Processes
Oracle Time & Labor Reports
You can run the following reports to gather data about timecards entered through self service.
| Report Title | Description |
|---|---|
| Missing Timecard Report | Lists missing timecards, where you define how to define “missing". See: Running the Missing Timecard Report |
| Retrieval Error Handling Report | Identifies timecards that were not passed to the appropriate application during the retrieval process (for example, timecards that were not passed to BEE during the Transfer Time From OTL to BEE process). See: Running the Retrieval Error Handling Report |
| OTL: Timecard Audit Trail Report | Provides information such as who modified the timecard, date of modification and the time of change. Additionally, displays the approval history of the timecards with change and late audit (CLA) reasons and comments. See:Running the OTL: Timecard Audit Trail Report |
Reports Associated With Oracle Time & Labor Rules
Use the reports listed in the following table to gather data about timecards that you have transferred to the professional forms Timecard window using the Transfer Time from OTL to BEE process, or that you have entered manually in the Timecard window, or that you have created using the Automatic Time Card Generation process.
| Report Title | Description |
|---|---|
| Organization Variance Calculation | Lists all organizations and their variances per pay period. |
| Location Variance Calculation | Lists all locations and their variances per pay period. |
| Earning Variance Calculation | Lists all earnings and their variances per pay period. |
| Actual and Rounded Time Punch | Lists actual time entered on Timecard window and rounded time based on Round Up At entered on Earning Policy. |
| Periodic Late Clock-In Report | Lists late clock in time by employee and calculates total hours the employee was late. |
| OTLR Missing Timecard Report (associated with the application “Oracle Time & Labor Rules" | Lists missing timecards by employee. |
| Manual and Autogen Report | Lists timecards to which you have applied schedule rules, in three groups: manually entered timecards, timecards in error, and all timecards available for payroll and time period. |
| Total Hours to BEE Report | The summary page shows the total of all Timecard Hours, BEE Hours, and Element Entries Hours for the selected payroll and process date. The detail page shows the same information broken down per batch. See: Total Hours to BEE Report |
| Overtaken Vacation and Holiday Report | Shows who is taking excess vacation. The report displays the accrual of vacation and holiday hours, the hours taken, and the hours overtaken for the selected payroll and date. See: Overtaken Vacation and Holiday Report |
| Element Entries Adjustments Report | Lists all timecard updates to element entries for a specified payroll and date. The report shows the employee name and number, element, amount or hours, rate, gross adjustment, and date worked for all adjustments. See: Element Entries Adjustments Report |
Use the reports listed in the following table during implementation to check the time management structures and policies that you have setup.
| Report Title | Description |
|---|---|
| Earning Policy Table Listing | Lists all earning policies entered on the Earning Policy window. |
| Hour Deduction Plcy Tbl List | Lists all hour deduction policies entered on the Hour Deduction window. |
| Shift Diff. Pol. Table Listing | Lists all shift differential policies entered on the Shift Differential window. |
| Premium Elg Policy Tbl Lst | Lists all premium eligibility policies entered on the Premium Eligibility window. |
| Prem. Interaction Plcy Tbl Lst | Lists all premium interaction policies entered on the Premium Interaction window. |
| Holiday Calendar Table Report | Lists all holiday calendars entered on the Holiday Calendar window. |
| Work Plan Table Listing | Lists all the work plans entered on the Work Plan window. |
| Rotation Plan Table Listing | Lists all the rotation plans entered on the Rotation Plan window. |
| Shift Table Listing | Lists all the shifts entered on the Shift window. |
| Project Accounting Table List | Lists all the projects entered on the Project Accounting window. |
| Variance Table Listing | List all the variances entered on the Variance window. |
| Earning Group Table Listing | Lists all the earning groups entered on the Earning Group window. |
| Total Table Entries | Lists totals for each of the tables above (HXT957A - HXT957G). |
| Person/Assignment Table List | Lists employees, their assignments, and their assignment effective dates. |
Running the Missing Timecard Report
Use the Missing Timecard Report to identify which employees are required to submit timecards, but have no timecard reported between selected dates. You can define the term “missing" and select a time range in which to perform your search. You may narrow your search by defining various parameters to select a single timecard or a group of timecards.
You can sort the returned data by defining various levels and options.
Use the Submit Requests window.
To run the Missing Timecard Report
-
Select the Missing Timecard Report from the Submit Request window.
-
In the Parameters window, enter the following:
-
Date From- the date for which the report begins the search.
-
Date To - the date for which the report ends the search.
-
Define Missing - select one of the following options to define the missing timecard criteria:
-
Req. and status not equal to Approved - Report on all required timecards that have not been approved.
-
Req. with no Entries - Report on all required timecards that have no data entered for any days.
-
Req. with no Entries and Working Status - Report on all required timecards that have no data for any days and have a Working status.
-
Req. with no Entries, Working and Rejected Status - Report on all required timecards that have no data for any days and have a Working status or Rejected status.
-
-
-
Select one of the following to narrow the search criteria for missing timecards:
-
Application
-
Organization
-
Location
-
Payroll Assignment Set
-
Payroll Name
-
Person type
-
Supervisor Name
-
Person Name
-
Person Number
-
Assignment Type
-
Supplier
-
-
Select one of the sort options for the returned data.
-
Sort Option One
-
Sort Option Two
-
Sort Option Three
-
Sort Option Four
-
-
Choose OK to close the Parameters window and choose Submit to run the process.
-
Review the report generated by this process.
Note: If your search criteria includes a date range that has been archived, then you may see archived timecards in your results.
Running the OTL: Timecard Audit Trail Report
Run the OTL: Timecard Audit Trail Report to identify and track changes in timecards after the initial submission. This report provides information such as who modified the timecard, date of modification and the data that was changed. Additionally, the report displays the approval history of the timecards.
For more information, see: Creating Timecard Audit Trail Report For Configured Layouts, My Oracle Support Note: 842159.1
To run the OTL: Timecard Audit Trail Report:
-
Select OTL: Timecard Audit Trail Report from the Submit Request Window.
-
In the Parameters window, enter the following:
Mandatory parameters:
-
From Date - the date for which the report begins the search.
-
To Date - the date for which the report ends the search.
-
Delete and Regenerate Data - primarily for performance improvement. If you choose the No option, the request adds the new timecard audit data to the existing data in timecard audit related tables. If you choose the Yes option, all the existing data in audit tables get deleted and regenerated based on the report parameters.
-
Display Records with Working Status - if you choose the No option, the request displays audit details for timecards that are submitted, approved, rejected and deleted. If you choose the Yes option, the request displays audit details for timecards edited with Working status.
Non-mandatory parameters
-
Organization
-
Location
-
Payroll
-
Supervisors
-
Employee
-
-
Choose OK to close the Parameters window and choose Submit to run the process.
-
Review the report generated by this process.
Element Entries Adjustments Report
Use this report to track timecard updates to element entries. The report shows the employee name and number, element, amount or hours, rate, gross adjustment, and date worked for all adjustments for the specified payroll and date.
You run the Element Entries Adjustments report from the Submit Request window.
To run the Element Entries Adjustments report
-
In the Name field, select Element Entries Adjustments. Click in the Parameters field if the Parameters window does not appear automatically.
-
Select the parameters for the process: the name of the Payroll and the Process Date.
-
Choose OK to close the Parameters window.
-
Choose Submit.
Overtaken Vacation and Holiday Report
Use this report to track who is taking excess vacation. The report shows the accrual of vacation and holiday hours, the hours taken, and the hours overtaken for the selected payroll and date.
You run the Overtaken Vacation and Holiday report from the Submit Request window.
To run the Overtaken Vacation and Holiday report
-
In the Name field, select Overtaken Vacation and Holiday. Click in the Parameters field if the Parameters window does not appear automatically.
-
Select the parameters for the report: the name of the Payroll and the Process Date.
-
Choose OK to close the Parameters window.
-
Choose Submit.
Total Hours to BEE Report
Use this report to track non-retro hours from the Timecard window through BEE to element entries. The Total Hours to BEE summary page shows the total of all Timecard Hours, BEE Hours, and Element Entries Hours for the selected payroll and process date. The Total Hours to BEE detail page shows the same information broken down per batch.
You run the Total Hours to BEE report from the Submit Request window.
To run the Total Hours to BEE report
-
In the Name field, select Total Hours to BEE. Click in the Parameters field if the Parameters window does not appear automatically.
-
Select the parameters for the report: the name of the Payroll and the Processing Date. For the Processing Date, use the same date you entered when running the Transfer to BEE process (the period end date for the batch you transferred).
-
Choose OK to close the Parameters window.
-
Choose Submit.
Running the Consolidate Timecard Attributes Report
Use this report to reduce the amount of space your timecard attributes use and, in turn, improve the performance of your application. The report consolidates the timecard attributes you store in the HXT_TIME_ATTRIBUTES table by combining identical attributes, which decreases the number of rows in the table.
Typically, you run this process regularly for short periods of time at a time when it least impacts the use of your application. For example, you could run this report in the evenings when there are fewer people using the application.
You can run this report:
-
For a specified number of hours.
-
Until a specified time.
-
Both for a specified number of hours and until a specified time. In this case, the report terminates either after the specified number of hours or at the specified time of day, whichever is first.
Caution: Before you run this process, it is important to consider the following:
-
The process uses the hxc_time_attributes_usages_bk and hxc_time_attributes_bk tables to audit and store the timecard attribute information. Therefore you need to purge the tables once the Consolidate Timecard Attributes process runs satisfactorily. For example, you could purge the tables after two OTL business process cycles.
-
The process may not be suitable for your system. For example, the process may not be compatible with your custom code
Use the Submit Requests window to run this report.
To run the Consolidate Timecard Attributes Report
-
Select Consolidate Timecard Attributes in the name field.
-
Click in the Parameters field to display the Parameters window, if it does not open automatically.
-
Enter the number of hours you want the report to run. For example, enter 1.5 if you want the report to run for 1.5 hours.
-
Enter the time of day you want the report to terminate.
-
Click OK to run the report. You can view the results from the Requests window.
Running the OTL: Time Entry Detail Report
Use the OTL: Time Entry Detail Report to view how the application processes the details entered in the Self Service page or Time Keeper window based on the time management policies. You can run this report to know how the timecard entered for employees is processed after the Transfer Time from OTL to BEE program is run.
Use the Submit Request window to run the report.
To run the OTL: Time Entry Detail Report
-
Select OTL: Time Entry Detail Report from the Submit Request Window.
-
In the Parameters window, enter the following:
-
Mandatory parameters:
-
From Date - the date for which the report begins the search.
-
To Date - the date for which the report ends the search.
-
-
Non-mandatory parameters
-
Organization
-
Location
-
Payroll
-
Supervisors
-
-
-
Choose OK to close the Parameters window and choose Submit to run the process.
-
Review the report generated by this process.
Archive and Restore
Archive and Restore Overview
You can archive timecards you no longer access to release disk storage space and potentially improve OTL performance.
When you archive a timecard, its detail is moved to archive tables, and summary information remains accessible. The summary information appears in windows that display summary information and in reports to assure users that the timecard exists, even if they cannot update or view the timecard details.
You choose the data you want to archive using a range of dates. For example, to archive the data for January 2004, enter the date range 01-Jan-2004 to 31-Jan-2004. Oracle recommends that you archive timecards for small date ranges, such as a month, because you may need to restore the archived data for audit purposes or legal reasons.
See: Archiving and Restoring Timecards
The following diagram summarizes the archiving process.
Archiving Timecards Process Flow
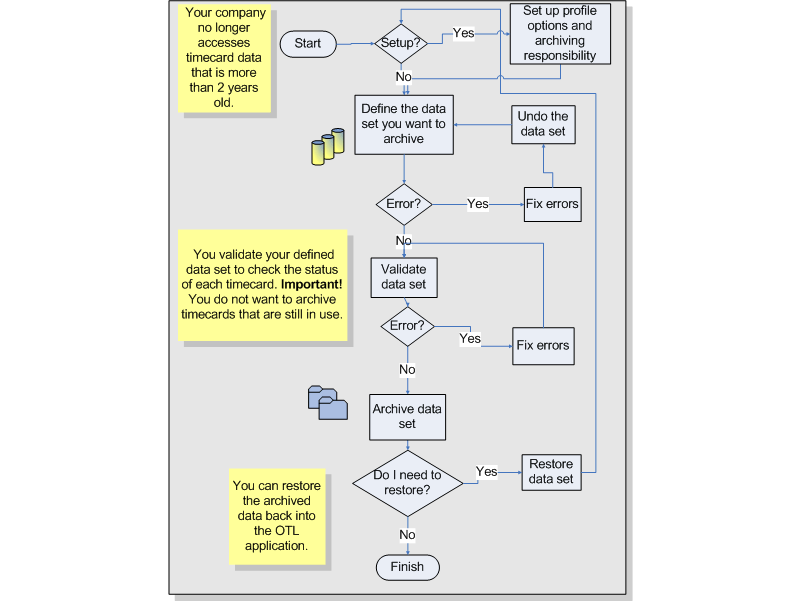
Archiving and Restoring Timecards
Archiving timecards involves identifying timecards you no longer need to access and moving them to archive tables in OTL. Restoring timecards involves identifying timecards you want to reinstate and restoring them to live tables in OTL. You need to restore archived data only if you have archived a data set in error or you need to bring the data back for audit or legal reasons.
See: Archive and Restore Overview
-
Set up the OTL Advanced Process Administrator responsibility, and define the archive profile options.
-
Identify timecards you want to archive using a range of dates in the Define Data Set process. This process groups timecard data from multiple OTL tables, based on the date range you specify.
-
If the Define Data Set process runs with errors, or you decide not to archive the specified timecards, then run the Undo Define Data Set process to ungroup the grouped data.
-
Run the Validate Data Set process to check the status of each timecard in the date range.
-
Archive the data set using the Archive Data Set process. This process moves timecard data to archive tables in OTL. The summary timecard information is still available in windows that display summary information in the OTL application.
-
To restore the archived data, run the Restore Data Set process.
Running the Define Data Set Process
The Define Data Set process is the first step in the overall process of archiving timecard data. The Define Data Set process enables you to identify the timecards you want to archive by selecting a range of dates.
See: Archiving and Restoring Timecards
Note: You can run this process only if you have the OTL Advanced Process Administrator responsibility.
See: Setting Up Timecard Archiving
Note: You must ensure that the Time Entry Rules (TER) reference periods are not spread across multiple archive data sets. Create the data sets to include the complete TER reference periods.
To run the Define Data Set Process
-
In the Submit Request window, select Define Data Set.
-
Enter a unique name for the data set, for example, March 2003. You use this defined data set name throughout the archiving process.
-
Enter the date range. For example, to archive all timecards for March 2003, enter 01-Mar-2003 in the Data Set Start Date field and 31-Mar-2003 in the Data Set End Date field.
The process groups the timecard data from the specified date range in a defined data set.
The data set size also depends on the chunk size you specify in the OTL: Archive Restore Chunk Size profile option.
-
Click Submit to move the data set to temporary tables in preparation for archiving.
Define data set may fail if you attempt to archive too much data at once. Therefore, you are recommended to archive timecards for short periods of time.
If you specify a date range that is already included in a defined data set or that has already been archived, then the process may fail. If you want to overwrite a defined data set, then you must ungroup the original data set first using the Undo Data Set process.
-
If the Define Data Set process returns errors, or you decide not to proceed, then run the Undo Define Set process to ungroup the data set, and fix the errors.
-
If the Define Data Set process runs with no errors, then run the Validate Data Set process to check the status of all timecards in the defined data set.
See: Running the Validate Data Set Process
Refer to the archive and restore flow diagram to see the complete archiving process.
Running the Undo Data Set Process
The Undo Data Set process ungroups the timecard data you defined in the Define Data Set process. Run this process if the Defined Data Set process returns errors. Typically, errors occur in the Define Data Set process if the date range includes too much timecard data for the temporary tables to accommodate.
See: Archiving and Restoring Timecards
Note: You can run this process only if you have the OTL Advanced Administrator responsibility.
See: Setting Up Timecard Archiving
To run the Undo Data Set process
-
In the Submit Request window, select Undo Data Set.
-
Select the data set name you defined in the Define Data Set process.
-
Click Submit.
-
Run the Define Data Set process if you want to continue archiving.
See: Running the Define Data Set Process
Refer to the archive and restore flow diagram to see the complete archiving process.
Running the Validate Data Set Process
Run the Validate Data Set process to check for errors on the timecards in the data set. The process returns errors if timecards are not in a retrieved status. For example, if the process finds a timecard with the status: working, rejected, submitted, approved, or error, then it returns a validation warning message.
See: Archiving and Restoring Timecards
Note: You can run this process only if you have the OTL Advanced Administrator responsibility.
See: Setting Up Timecard Archiving
The validation process may encounter some errors during processing. To restrict the number of errors reported at one time, you can set the OTL: Max Errors in Validate Data Set profile option to a maximum number of errors. The process stops running when it reaches the number of errors you define.
Tip: Run the archive process directly after a successful validation process to ensure the timecard data does not change in the interim.
To run the Validate Data Set process
-
In the Submit Request window, select Validate Data Set.
-
Select the data set you want to validate.
-
Click Submit.
Important: The validation process checks a timecard's status and open notifications only. The process does not report on invalid timecard data.
-
View the error log for warnings. If there are errors, then review the timecards to find out whether they are still active, and run the validate process again.
Tip: If the process produces more errors that you expect, then confirm that you are not archiving a date range that includes active timecards.
-
If there are errors, then fix them before validating again. Otherwise, archive the data set.
See: Running the Archive Data Set Process
Refer to the archive and restore flow diagram to see the complete archiving process.
Running the Archive Data Set Process
Run the Archive Data Set process to archive the defined data set after you run the validation process. The archive process moves timecard data from active tables in the OTL application to archive tables.
See: Archiving and Restoring Timecards
Note: You can run this process only if you have the OTL Advanced Administrator responsibility.
See: Setting Up Timecard Archiving
To run the Archive Data Set process
-
In the Submit Request window, select Archive Data Set.
-
Select the data set you want to archive.
-
Indicate whether the archive process is to ignore any validation errors.
Warning: This option enables you to archive timecards that are in error. Use this option only when you are certain the errors are acceptable.
-
Click Submit.
-
If you archived in error, or you need to restore the data set for audit purposes or legal reasons, then run the Restore Data Set process to move the timecard data from the archive tables to the active tables in the OTL application.
See: Running the Restore Data Set Process
Refer to the archive and restore flow diagram to see the complete archiving process.
Running the Restore Data Set Process
Run the Restore Data Set process to move archived timecard data from the archive tables back to the active tables in the OTL application.
See: Archiving and Restoring Timecards
Note: You can run this process only if you have the OTL Advanced Administrator responsibility.
See: Setting Up Timecard Archiving
To run the Restore Data Set process
-
In the Submit Request window, select Restore Data Set.
-
Select the name of the data set you want to restore.
-
Click Submit.
The process restores the archived data and makes it available in the OTL application.