Time Entry Validation and Approval
Time Entry Validation and Approval
You can define various time entry validation rules and approval processes for time and labor data entered within Oracle Time & Labor.
What validations take place when entering data into the web-based timecard?
Validation of the employee's time entry happens from any or all of the following:
-
Time Entry rules
-
Oracle Projects transaction controls and constraints
-
Oracle Human Resources eligibility criteria on element links
How do you manage separate approval chains for different groups of workers and different types of time entry?
You associate an approval style with each employee using preferences. The approval style defines who approves the employee's timecards for each recipient application. The approver could be a named individual, the employee's supervisor, or more than one person in a workflow, or any other rules you define using a formula.
The approval style also defines which data needs to be approved for each application, and which data changes require resubmission.
Does Oracle Time & Labor allow managers to record timecards for their workers?
A manager can create, edit, and submit timecards for workers based upon the worker's assigned preferences. Managers can also view timecards from prior periods for workers.
This allows managers to record time for absent workers, or workers who may not be available to enter their time before the retrieval cut off date.
How can I track why workers submit late or changed time entries on their timecards?
You can use the Change and Late Audit (CLA) feature in Oracle Time and Labor. This feature enables you to use time entry rules to determine which time entries you require for auditing purposes. You can also define additional validation rules to ensure workers enter a reason for the change or late time entry.
Time Entry Validation and Approval
Overview of Time Entry Rules for Validation
Legislation, collective agreements, or industry practice may set limits on the number of hours your employees can work. When a timecard is submitted, the application checks it against your time entry rules, and issues a business message, error, or warning.
For example, European Working Time Directive rules limit the number of hours worked during a period within a reference period of a certain number of days.
Each time entry rule uses a formula to calculate whether the rule has been broken by the current timecard. You can define as many rules as you require, then group them on the Time Entry Rules Group window. Here, you also define what type of notification is sent for each rule. Once all the groupings are defined, you assign a time entry rule group to an individual or a group of individuals via preferences.
Time Categories
So that you can validate particular types of time (such as overtime, or hours worked on a particular project), you can define time categories. A time category is a group of mapping components that can appear on a timecard - such as elements, projects, or tasks - with one or more specific values for each component. For example, you could define the category Regular Time containing the elements Regular Salary and Time Entry wages.
Mapping components relate to segments you have defined in the OTL Information Types descriptive flexfield. These segments can have a value set associated with them, which define the list of values.
Note: When you are defining categories, you cannot use components that use a table-validated value set containing the $PROFILES$ or $FLEX$ nomenclature.
Time Categories can contain other time categories, as well as individual components. For example, you could define time categories for Sickness and Vacation, then define a third category called Absence that contains these two categories.
Period Maximum
To support the European Working Time Directive, we supply a formula for Period Maximum which will send notification when the hours worked within a time category per period, averaged over a reference period, exceed a predetermined maximum. You define the period maximum, time category, period, and reference period when creating the time entry rule.
For example, you might define a maximum of 40 regular hours per week in a reference period of 14 days. The formula looks at the average number of regular hours worked per period over the reference period. In this example, it looks at the hours worked in the current week and the previous week. Employees who work 35 hours one week and 45 hours the next week have not exceeded the time entry rule because their average hours worked over the 14 days is 40 (that is 35+45)/2). Similarly if they work zero hours one week, and 80 hours the following week, they have not exceeded the rule - but they must work zero hours the next week too.
If you define a reference period that is less than or equal to the period, then it has no effect. So, a rule of 40 hours per week over 5 days, means that the maximum is 40 hours in each 7 day period, without reference to any other period.
If you want to implement other time entry rules, you can configure a copy of the predefined formula, or write a new formula to best suit your enterprise needs.
Time Entry Rules for Approval
When a person submits their timecard for a period, Oracle Time & Labor check the person's approval style. The approval style includes time entry rules for each application. These rules define what data entry or changes require approval for that application.
For example, you could define that all information used by Oracle Payroll must be approved when it is entered or updated, whereas Oracle Projects data only needs to be approved if it exceeds limits that you specify in a formula.
There are two ways to define a time entry rule:
-
You can select a set of fields that must be approved when they are entered or updated. The fields are defined as mapping components, then grouped together into a mapping.
-
You can use a formula that defines the rules. For example, you could use a formula to ensure that all timecards recording more than 40 hours per week over two weeks are submitted for approval. Another formula could ensure that timecards recording more than a certain number of overtime hours are sent for approval. Use a formula if your rules of submission for approval require more than simply monitoring a set of fields for changes.
There are three seeded approval formulas: to check hours against a maximum, to check assignment status, and to route timecards to the override approver selected on the timecard.
You also specify when the application should use each rule:
-
Submission is when the completed timecards for the entire approval period are submitted for the first time.
-
Resubmission is when timecards have been approved and the employee makes changes to any of the time or labor data field.
-
Submission/Resubmission indicates approval is required on initial submission of the timecard and on resubmission when the employee changes the time or labor data after approval.
-
Save indicates approval is required when the worker selects the Save button on the timecard page.
You can define different time entry rules for submission and resubmission. For example, you might want the application to approve the data initially, but require re-approval only if users subsequently change their timecards.
Important: In the current release, all rules must apply to Both (submission and resubmission).
Writing Formulas for Time Entry and Approval Rules
You can create formulas to validate submitted timecards using the Human Resources responsibility. You can also write formulas to define which time and labor entries or changes require approval before an application retrieves the data. For example, you can specify that overtime entries higher than a certain level require approval. You create the time entry and approval rules formulas using the OTL Time Entry Rules formula type.
For each new formula you define, you create a new flexfield context in the OTL Formulas flexfield. For each new context you create, you also create a segment for each formula input you want to enter through the Time Entry Rules window. This setup enables you to select the formula in the Time Entry Rules window for one or more rules, making appropriate entries for its inputs for each rule.
Example
For example, you create a new formula called: USR_OVERTIME_MAXIMUM, which requires the following inputs for a time entry rule:
-
USR_OVERTIME_MAXIMUM
-
USR_OVERTIME_PERIOD
-
USR_OVERTIME_SHIFT_LEVEL
You use this formula to define a number of time entry rules, where each rule specifies the overtime maximum for a specified shift level.
Approval Formulas
Approval formulas use a separate formula type of OTL Approvals. Approval formulas have one mandatory return value called: TO_APPROVE with the value Y (to initiate the approval process) or N (indicating that approval is not required, which allows the timecard to Auto Approve).
OTL uses the approval formulas in the approval process by associating them to a time entry rule. You can select this time entry rule in the Approval Rules region of the Approval Style window.
If you do not specify any rules in the Approval Rules region, then the approval process uses the information in the Approval Styles Components region to execute the components. Additional rules in the Approval region provide a mechanism to choose between an auto approve process or an approval process you define.
If an approval rule returns TO_APPROVE equal to N, then OTL auto approves the timecard. If it returns TO_APPROVE equal to Y, then OTL uses the approval process in the Approval Style Components region.
If you add more than one approval rule in an approval style, then the OTL application executes all the rules, until a rule returns TO_APPROVE equal to Y. The application does not execute subsequent rules once it finds a return with TO_APPROVE equal to Y. If the application does not find a rule that returns this value, then it auto approves the timecard.
You can also associate mappings to time entry rules. The OTL application evaluates the mappings you associate to decide whether or not to execute the rule. This evaluation compares the current value and the value for each component on the timecard you identify by the mapping. If any of the current values are different to the old values, then OTL considers the timecard changed. If the value changes from an empty value to a value or vice versa, then OTL also considers the timecard changed.
If the result of a mapping indicates that OTL should not apply the rule, for example, the components defined in the mapping have not changed on the timecard, then the rule does not execute. If the approval rules do not execute, then the OTL application initiates the approval process defined in the Approval Styles Components region.
Predefined Formulas
The predefined OTL Time Entry Rules formulas are:
-
Seeded formula for Period Maximum (HXC_PERIOD_MAXIMUM). This formula checks the number of hours worked within a time category (or across all categories) does not exceed the specified limit per week (or other period) over a specified reference period (such as 14 days).
You can use this formula in time rules for validation.
Note: European users: You can use or adapt this formula to implement European Working Time Directive (WTD) rules.
-
Approval - Assignment Status Test (Seeded) (HXC_APPROVAL_ASG_STATUS). This formula checks the assignment status of the worker at the end of the approval period against a value specified in the Time Entry Rules window. If the statuses do not match, then the time entries must be approved.
You can use this formula in time rules for approval to specify which assignment statuses do not need special approval.
-
Approval - approval maximum test (Seeded) (HXC_APPROVAL_MAXIMUM). This formula checks whether the number of hours worked in a time category within an application approval period exceeds a maximum entered in the Time Entry Rules window. If it does, then the time entry must be approved.
You can use this formula in time rules for approval.
This is similar to the Period Maximum except the period is fixed (application approval period) and there is no rolling average (reference period).
-
Override Approver WF Person Mechanism (Seeded Approval) (HXC_OVERRIDE_APPROVER_WF_PERSON). This formula checks the override approval style in the default Projects preferences. It sends timecards to the override approver selected on the Timecard Entry page.
-
Assignment Standard Hours vs Time Category (Seeded Formula) (HXC_ASG_STD_HRS_Comparison). This formula validates hours entered on the timecard within selected time categories against an assignment's standard hours. The rule uses the standard hours recorded for the employee's primary assignment.
-
PTO Accrual Balance vs Absence (Seeded Formula) (HXC_PTO_ACCRUAL_Comparison). This formula compares the hours entered on the timecard which decrement the accrual balance as specified in the Accrual plan definition against the PTO Accrual balance.
-
Period Hours vs Time Category (Seeded Formula) (HXC_TIME_CATEGORY_Comparison). This formula validates hours entered on a timecard against the hours defined for a period.
You can copy and configure the predefined formulas, or write your own formulas, according to the following rules.
Formula Inputs and Outputs
Formulas executed from time entry rules (for validation or approval) must be of the following form:
INPUTS ARE resource_id (number)
                                submission_date (text)
                                <other inputs>
        /* Formula Processing */
RETURN <formula result>, <message 1..5>
Outputs
<formula result> is:
-
RULE_STATUS with the value S (success) or E (error) for formulas used for validation.
-
TO_APPROVE with the value Y (to initiate the approval process) or N (indicating that approval is not required) for approval formulas.
<message 1..5> means that the formulas can also return up to five messages, which must be passed back in the optional return values MESSAGE1, MESSAGE2, MESSAGE3, MESSAGE4, MESSAGE5. You define these messages in the Messages window, and they must belong to product HXC.
You specify whether the messages are errors, business messages, or warnings (for validation formulas) in the Time Entry Rule Group window. OTL displays the validation messages when workers save or submit their timecards. OTL sends approval messages as notifications in accordance with your approval workflow setup.
Inputs
You can display up to 15 inputs on the Time Entry Rules window so that you can pass inputs from the time entry rule definition to your formula.
Your formula must also have the following static inputs, which are passed to all OTL formulas.
| resource_id | This is the person id of the person whose timecard is being checked against the rule. |
| submission_date | The first day of the timecard period |
Note: Even if the flexfield context for your formula in the OTL Formulas flexfield has a segment called TIME_CATEGORY, you do not need to add a similar formula input.
You can use the following inputs if the descriptive flexfield context for your formula has a segment called PERIOD which contains a valid HXC_RECURRING_PERIOD (that is, it uses the value set HXC_TCARD_PERIOD), and a segment called REFERENCE_PERIOD, which is a number.
| Timecard Hours | The number of hours that appear on the timecard and are included in the period specified in the PERIOD segment. |
| Duration in days | The duration in days specified or derived from the period specified |
| db_pre_period_start | The start date of the pre timecard period not covered by the timecard |
| db_pre_period_end | The end of the pre timecard period not covered by the timecard. |
| db_post_period_start | The start of the post timecard period not covered by the timecard |
| db_post_period_end | The end of the post timecard period not covered by the timecard |
Use the last four inputs, above, when the period specified in the PERIOD segment is greater than the timecard period. In this case the formula needs to derive, from the database, hours prior to or following the timecard period, which do not appear on the timecard itself.
The predefined formula HXC_PERIOD_MAXIMUM uses a reference period segment. If your formula uses this segment, you can use the following inputs to specify the start and end of the reference period.
| db_ref_period_start | The start of the reference period that is not covered by the timecard |
| db_ref_period_end | The end of the reference period that is not covered by the timecard |
Note: The db_ref_period_start and end inputs are integrated with the db_pre and db_post period start and end inputs. That is, where appropriate these dates are adjusted when the reference hours are found on the time card. Do not specify a REFERENCE_PERIOD in your descriptive flex context without specifying the PERIOD.
Overview of Time Periods for Data Entry and Approval
You can define recurring time periods to determine the frequency of timecard entry and approval. In the Recurring Time Period window, you can select any of the predefined payroll period types (such as Weekly, bi-weekly, monthly) or you can create your own period by using the Duration in Days (such as 3 days, 7 days, 12 days). You can define as many recurring time periods as you require.
There is one predefined recurring, which is Weekly - Starts Sunday.
All the Recurring time periods you define are available for you to use in the two ways:
-
You can select them as timecard entry periods in the Preferences window.
-
You can associate them with an application to define approval periods in the Approval Periods window.
In some implementations, timecards are submitted for approval to an application at the end of the application's time period (such as the end of the payroll period). However, you might want timecards to be approved more frequently. For example, if the payroll period is monthly, you might define a weekly approval period for Oracle Payroll.
If you want to use different approval periods for different groups of employees, you can define more than one set of approval periods. Each set defines approval periods for some or all of the applications you use. You assign a set of approval periods to groups of employees using preferences.
Self Service Line Manager Timecard Entry and Search
Line managers can create, edit and submit timecards for an worker, based upon the employees assigned preferences: the manager is acting on behalf of the worker. Line managers can access workers using the supervisor hierarchy, or using the SSHR My List function to access workers within their security profile.
This function allows managers to record timecards for absent workers, or workers who may not be available to enter their time before the retrieval cut off date.
Administrative Setup
Oracle Time & Labor Line Manager functionality is available as an added menu function and is delivered as: User Function Name - Timecard Mgr (Function - HXC_TIMECARDS_MGR).
Use the delivered HR Self Service Responsibility/Menu as an example to create a client-defined menu, than can include the Oracle Time & Labor menu function. Use Manager Self-Service V4.0. The responsibility uses the Manager Self Service menu; (menu User Name: Manager Self Service, Menu Name: HR_LINE_MANAGER_ACCESS_V4.0).
Add the OTL Function/Prompt to a company-defined Self Service Menu as: Prompt: Time Entry Function: Timecard Mgr.
Additional Information: Use delivered menus and responsibilities as an example only for configuration. Do not modify delivered menus/responsibilities, to ensure delivered menus/responsibilities update properly in future delivered patches.
Assigning the company defined Self Service Line Manager Responsibility to a User enables Line Manager functionality where a manager can select Time Entry to enter/update timecard information. Selecting Time Entry displays the manager's hierarchy of employees reporting to the manager. The manager can use the Hierarchy list, when entering Timecard information, or can use the sub menu function My List to select additional workers.
The Self Service Line Manager functionality allows the manager to see a list of workers displayed in a hierarchy, where the manager can expand the list to see workers reporting to the manager's direct reports. The manager can also use the 'My List' sub menu option to select workers that are not shown in the manager's hierarchy.
A Line Manager can also enter their own timecard information. When the 'My List' sub menu is enabled for a manager, the security profile 'Exclude User' may be used to restrict managers from entering their own timecard information. When the Manager DOES NOT have access to the 'My List' sub menu, then the security profile 'Exclude User ' is NOT taken into account, and therefore the Manager can enter his/her own timecard.
The manager may be limited from entering their own timecard information through line manager functionality by setting an additional parameter on the Timecard Mgr function (Function - HXC_TIMECARDS_MGR). To limit the manager from entering their own data, the parameter - pManagerEnabled is entered at the end of other parameters (connector is &) with an N being 'Not Enabled', and a Y equaling 'Enabled'.
As an example - to disable Line Manager entry of their own time using the Line Manager functionality, the parameter is added as: &pManagerEnabled=N
Search Options
Various search options are available, such as searching for workers using the supervisor hierarchy, or search using employee criteria such as first, and last name, employee number, start date, assignment category, and social security number.
To search for workers using the supervisor hierarchy, you select the desired employee name as it appears within the hierarchy. If a worker does not appear within your hierarchy, you can use My List to search for other workers to whom you have access. Access to other workers is determined by your security profile menu option indicating limited timecard search or superuser timecard search.
You can use My List to add new workers to your list, view their details, or select a worker to process. You may use an advance search, or search on basic search criteria such as Last and First Name, and the person type that you wish to include in this search. Once the search data is returned, you can select individual workers to add to My List.
Time Entry
From the Time Entry page, you can update, delete or view details for a worker. You can also choose to import or create a new timecard for a worker. The worker's preferences determine the appearance of the timecard, and not the preferences of the manager entering the time. Once time entries are complete, you can submit the timecard, and the approval process will proceed as determined within the assigned preferences.
Line managers will be able to enter their own timecard using their line manager function. However, this can be restricted if you do not wish to give the line manager this accessibility.
Contingent workers can act as a self-service line manager and preform the same functions as defined in this section.
Timesheet Dashboard
As a supervisor, you can query the status of the timecards online for a timecard period, location and organization based on supervisor hierarchy. You can monitor your employees' timecards with different status in a chart displaying the distribution of data from the dashboard. Additionally, you can approve timecards that are pending approval, drill down to the employee timecard list and also generate the timecard details in a report format.
Setting Up Time Entry Rules Based On Formulas
Follow these steps if you want timecards to be validated against time entry rules, such as European Working Time Directive rules. Also follow these steps if you are defining time entry rules for approval, using a formula. If you are using one of the supplied formulas, without change, you will not need to perform steps 1, 2, 3, or 4.
To set up time entry rules:
-
Create a new formula or copy and configure a predefined formula. The formula must have a formula type of OTL Time Entry Rules, and must have certain input and outputs.
-
Unprotect the OTL Formula descriptive flexfield by unchecking the Protect check box on the Descriptive Flexfield window.
-
Create a context and segments in this flexfield for your new formula using the Descriptive Flexfield Segments window.
-
In the Descriptive Flexfields window, check the Protect check box again so that the OTL Formulas descriptive flexfield remains a protected field.
-
If your rules are to analyze certain types of time only (such as overtime, or time on a specified project), define these time categories.
-
Define time entry rules on the Time Entry Rules window, including input values for the formula. Each input value you create for the segment corresponds to an input on the Time Entry Rules window. The new field values defined in step 3 will be available for selection. You can define as many rules as necessary to access the new formula.
-
Do one of the following:
-
If you time entry rules are for validation, define time entry rule groups on the Time Entry Rule Groups window. Select the appropriate outcome for each time entry rule. You can define as many rules groups as necessary.
See: Defining Time Entry Rule Groups
-
If your time entry rules are for approval, select them when you define approval styles.
-
-
Assign time entry rules to an individual or a group of individuals using the Preference window:
-
If your time entry rules are for validation, assign a time entry rule group to an individual or group.
-
If your time entry rules are for approval, assign an approval style to an individual or group.
See: Defining Preferences
-
Adding Contexts to the OTL Formulas Flexfield
If you are creating a new formula for time entry rules, you need to create a new context and segments for the OTL Formulas descriptive flexfield. Use the Descriptive Flexfield Segments window.
-
Query the OTL Formulas flexfield.
-
Unfreeze the flexfield by unchecking the Freeze Flexfield Definition check box.
-
In the Context Field Values region, create a new context, which must have the same name as your new formula.
Important: Attention: Do not make any changes to the predefined contexts PERIOD_MAXIMUM, APPROVAL_ASG_STATUS, APPROVAL_MAXIMUM, or OVERRIDE_APPROVER_WF_PERSON because these changes will not be preserved when upgrading Oracle Time & Labor.
-
Choose the Segments button and create a segment for this context for each formula input for which you wish to enter inputs in the Time Entry Rules window. The names of the segments must match exactly the formula input names.
You can create a segment for Time Category to enable creation of time entry rules that evaluate one category of time (such as overtime, or absence). Make this segment optional if you also want to enable creation of time entry rules that evaluate all types of time. There is no corresponding formula input for this segment.
-
Complete your definition of the segments, including any values validation.
See: Defining Descriptive Flexfield Structures.
-
Check the Freeze Flexfield Definition check box and save.
Defining Time Categories
You can define time categories for reporting purposes and to identify the time to be analyzed by time entry rule formulas. For example, you can define categories for particular projects, or for vacation, or overtime.
The following categories are predefined: Premium Hours, Non-Worked Hours, Billable Hours, Non-Billable Hours, and Total1 through Total10. These categories are supplied empty so that you can select the mapping components and subcategories you want to sum to provide totals.
Total1, Total2, and Total3 are used by the predefined timecard layouts to display totals on the timecard summary and approval summary pages. For more information on the totals used in the Summary pages, see: Timecard Layouts
Use the Time Categories window.
To define time categories
-
Enter a unique name for the category.
-
Select an operator.
-
Select either an existing time category, a mapping component, or an alternate name to define the category.
-
The Mapping Component tab enables you to define a time category that considers all entries or specific values for a mapping component. The mapping component uses values you define either individually or in a value set.
-
The Alternate Name tab enables you to categorize dependent values in the time category. For example, you can categorize tasks, which are dependent on projects.
-
The Time Category tab enables you to define a new category that includes previously defined time categories. For example, you can define categories for sickness and vacation, then define a third category of absence that contains these two categories.
-
-
If you select a mapping component, then you must select the value of the component that belongs to this category.
-
Save your work.
Defining Time Entry Rules
You can use time entry rules in two ways:
-
To validate a timecard when it is saved or submitted and display a business message, error or warning. For example, you can check that the employee has not worked more than a specified number of hours per week in the last three weeks.
-
To determine which time entries or changes require approval for each application. For example, you can specify that a timecard must be submitted to the Projects approval workflow if the employee enters or changes any of the Projects time data. You can write a formula to define more complex approval rules, such as requiring approval if an employee enters time above a specified level.
Use the Time Entry Rules window.
To define time entry rules
-
Name the rule.
-
Enter a description for the rule.
-
Select the Usage:
-
Submission is when the completed timecard is submitted for approval.
-
Resubmission is when the timecard has been approved and the employees changes the time or labor data.
-
Submission / Resubmission determines approval is required at the initial submission and when the employee changes the time and labor data after approval.
-
Save is when the worker selects Save on the timecard.
-
-
Do one of the following:
-
Select a formula and enter formula inputs. You enter the formula inputs in the segments of the OTL Formulas flexfield context that you have created for your formula.
-
Select a mapping, which is a group of timecard fields. This tells the approval process to include the timecard for approval if any of these fields have changed.
-
-
Enter the desired From date to indicate when this rule becomes effective. You are not required to enter a To date until the rule is no longer needed.
-
If you want to restrict the rule to your current business group, uncheck the Global check box.
-
Save your work.
Defining Time Entry Rule Groups
Once you have defined time entry rules for validation, you can group the rules together and assign a group to a person or a group of people via preferences. Use the Time Entry Rule Groups window.
To define time entry rule groups
-
Enter the name of the Rule Group.
-
Select the name of the first time entry rule.
The remaining data fields will populate.
-
Select one of the following outcome rules:
-
Business Message - this writes a message to the timecard at the time of submission but does not stop the timecard submission process.
-
Error - this produces an error on the timecard at the time of submission and stops the submission process until the error is corrected.
-
Warning - this produces a warning message on the timecard indicating a rule has been violated but does not stop the submission process.
-
-
Repeat steps 2-3 to continue entering time entry rules for this grouping.
-
Save your work.
Defining Recurring Time Periods
You can use recurring time periods as approval or time entry periods. You can define as many recurring time periods as you require.
The time entry period for Oracle Projects must have the same end date as the projects period.
See: Implementation Options, in the Oracle Projects User Guide
Use the Recurring Time Period window.
Note: You cannot delete a recurring time period if it is associated to a preference or an assignment.
To define recurring time periods
-
Enter the name of the recurring time period.
-
Do one of the following:
-
Select period type
-
Enter duration in days
-
-
Enter a start date to indicate the date the period type begins or the first date of the duration of days.
-
Save your work.
Defining Approval Periods
For each recipient application, you can define the period for approval of time and labor data. You can define more than one set of approval periods if you need to use different approval periods for different groups of employees. You associate sets of approval periods with groups of people using preferences. The approval period set in the default preferences is Weekly Period-Starts Sunday.
Use the Approval Periods window.
To define approval periods
-
Enter a unique name for the approval period.
-
Select the application name.
-
Select the recurring period to associate with the application.
-
Continue to select applications and recurring periods for this set. Select each application once only per set.
-
Save your work.
Approvals
Approvals
Using Oracle Time & Labor you can control when timecards are submitted for approval and who approves them. You can set up multiple approval chains and use different approval rules for each recipient application. Workers' timecards are submitted to the approval processes defined by their Approval Style preference.
When timecards are waiting for approval, the appropriate approver can review them on the Mass Timecard Approval page, or the Advance Worklist page. With inline notifications, an approver can easily approve timecards by reviewing all the details on the timecard in one place.
Approval Periods
You define an approval period to control when timecards are submitted for approval by each application. Often, the approval period is the same as the application period - when an employee submits all the timecards for an application period, the time store automatically starts the approval process for that application. However, you can define an approval period so that timecards are submitted for approval more frequently. For example, for the convenience of approvers, you might define a weekly approval period for payroll, even though the payroll period is monthly.
Approval Styles
You associate an approval style with each employee using preferences. The approval style defines who approves the employee's timecards for each recipient application. The approver could be a named individual, including a contingent worker, the employee's supervisor, more than one person in a workflow, or any other rules you define using a formula.
The approval style defines the data required for approval for each application, and the changes required for re-submission. For example, you might use a formula to specify that a change of 10% or more in total hours requires a worker to resubmit a timecard to the Payroll approval workflow.
Entry Level Approvals
Entry Level Approval allows timecard approvers to see only the time data entries they are responsible for approving. For example, Approver A may be responsible for Projects 1, 2 and 3, while Approver B is responsible for all remaining projects. When a worker submits their timecard for approval, Approver B will not see any time entry data for Projects 1, 2, and/or 3.
Entry Level Approval is set up via the Approval Style window, as an Approval Type. If you select Entry Level Approval as the Approval Style Component type, you must also navigate to the Entry Level Approval Components window to enter additional details. Here, you link to specific time categories to be approved by a specific approver. Time categories can include elements, projects, and tasks.
Entry Level Approval works as any other approval style. The worker enters their time as usual, and the workflow routes the entries to the appropriate approver. The approver can view the data via the Mass Timecard Approval, or the Worklist.
Approval Process
When an employee submits a timecard, Oracle Time & Labor checks the person's application set to determine which applications are interested in this person's time (you assign application sets to people using preferences).
For each application, there is a date when timecards are submitted for approval. This defaults to the end of the timecard period (such as the end of a Projects week, or Payroll month) but you can override it by defining an approval period for the application.
If it is time to submit the timecards for approval, Oracle Time & Labor checks the person's approval style. The approval style defines which data entries or changes require approval for each application. If the employee has enters or updates any of the data that requires approval, Oracle Time & Labor routes the timecard for approval, using the approval method recorded on the approval style for that application.
Override Approvers
The predefined Oracle Projects timecard layout has an Override Approver field. The worker can select anyone in the business group as the override approver. The timecard is sent to this approver only, and the usual approval style is not activated.
You enable the field by setting the following preferences:
-
Enter Override Approver preference to Yes
-
Override Approval Style segment of the Approval Style preference to Projects Override Approver
-
(Optional) Default Approver preference to a name to display a default value for the Override Approver field.
You can restrict the list of values for the Override Approver field by modifying the Overriding Approver view.
See: Oracle Projects Integration Notes
You may wish to define and apply a custom Override Approval Style segment and not use the predefined Projects Override Approver.
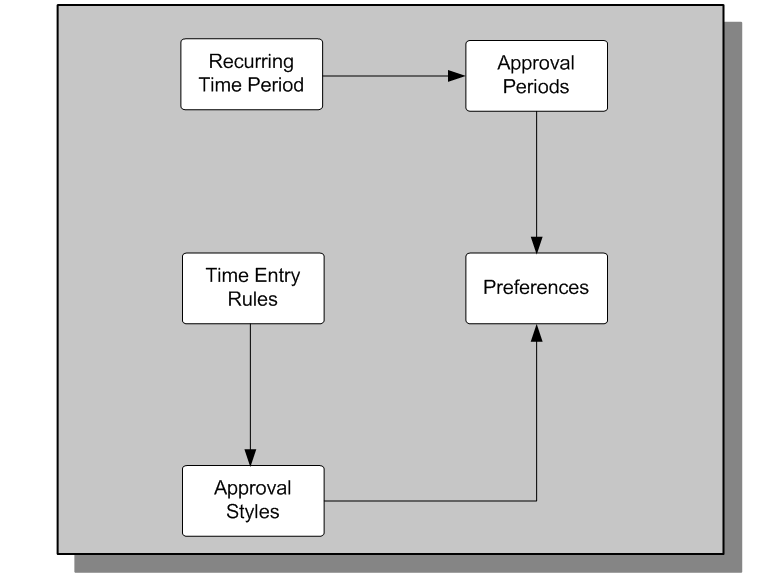
Approval Setup
There are various steps involved in setting up approvals. The diagram below illustrates how the approval definitions relate to each other. You can assign the definitions to a person or a group of people via preferences.
Setting Up Approvals
Approval Styles
You can define approval styles and associate these styles to a person or a group of people using preferences. The two parts to an approval style are:
-
Time entry rules, which determine if a timecard requires approval when submitted or resubmitted.
-
Approval style components - determine the approval method to use for each application.
You can specify the order of approval notifications. For example, an enterprise may have business rules that dictate projects data is approved prior to payroll data. Alternatively, approval can take place in parallel.
If you enable the timeout and resend cycles feature on the Other Attributes tab of the Approval Styles window, then you can:
-
Specify how long the application waits for an approver to take action before it resends a notification.
-
Set up optional notifications for timecard preparers and workers whose timecards are submitted by another person, such as an authorized delegate or timekeeper. For example, you can set up the approval workflow to send a notification to inform timecard preparers that the application approved the timecards that the preparer or another preparer submitted.
You can designate a single method for approval of a person's time, or use several methods so different applications can approve time in different ways. You can define approval to take place using methods for a given application. The methods are:
-
Auto Approve - this method specifies that time and labor data is pre-approved and an approval does not take place.
-
Person - an explicitly specified person.
-
HR Supervisor - the current supervisor of the worker's primary assignment.
-
Formula (Selects Mechanism) - the approval process uses the formula you identify in the Identifier field.
-
Workflow - the approval process uses the workflow process you identify in the Identifier field.
-
Entry Level Approval - the approval process uses the Entry Level Components to determine what entries belong to what approver.
-
Project Manager - for Projects-related time entries, the approval process uses this approval method to identify the appropriate project manager and sends the timecard for approval.
Predefined Approval Styles
There are two predefined approval styles:
-
OTL Auto Approve
-
Approve on Submit
The OTL Auto Approve style uses the Auto Approve method and is the default approval style. The Approve on Submit style is a special style that does not use an approval method. It approves the timecard for all applications in the user's application set when the user submits the timecard.
Workflow Approval Styles
You can define approval styles that uses Oracle Workflow to route timecard to the appropriate person, or people, for approval. There is a simple, predefined workflow that can serve as a template for creating your own workflows for approval. The predefined workflow item type is HXCEMP. This item type contains one process called OTC_APPROVAL_SEEDED_WF, shown in the following diagram.
Workflow Approval Styles
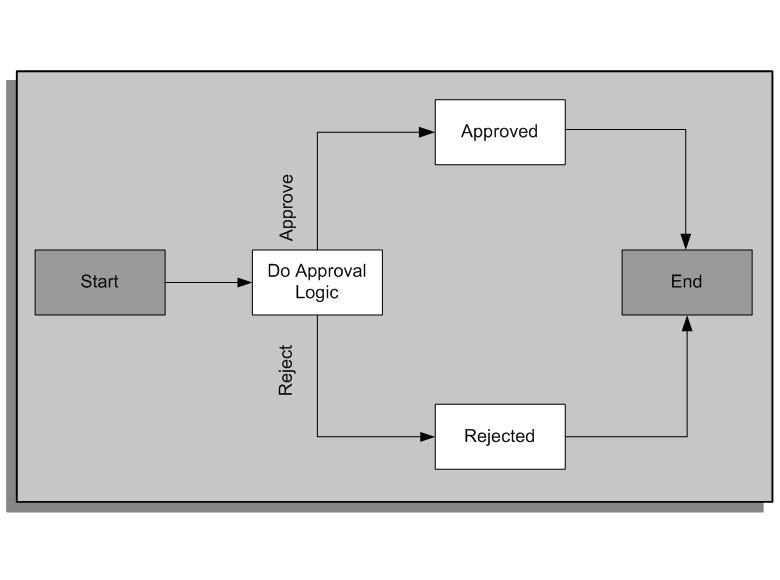
The item type has two attributes: PARENT_ITEM_TYPE and PARENT_ITEM_KEY. The Do Approval Logic function has a return type of Approval.
OTL delivers a server side package called HXC_SEEDED APPROVAL_WF (in files hxcseedaw.pkh and hxcseedaw.pkb, in $HXC_TOP/patch/115/sql), which contains the following procedures: do_approval_logic, approved and rejected. The corresponding nodes in the process call each of these procedures. The do_approval_logic procedure currently just returns an approval status of REJECTED. You can copy it and modify the copy to do more complicated processing.
This is how Oracle Time & Labor handles an approval workflow:
-
The process Find and Notify Approvers, which is part of the item type HXCEMP, sets the PARENT_ITEM_TYPE attribute to HXCEMP and the PARENT_ITEM_TYPE attribute to the item key of the workflow process in progress.
-
It then launches a new workflow process for the item type and process specified in the Approval Styles window, with a new item key (generated from a sequence). In the case of the predefined workflow, the item type is HXCEMP and the process is OTL_APPROVAL_SEEDED_WF.
-
The process is executed. It calls the do-approval-logic procedure, which returns APPROVED or REJECTED (the predefined example returns REJECTED). This result determines which procedure is executed next.
-
The procedure Rejected sets up the attribute WF_APPROVAL_RESULT (which is an attribute of the parent item type HXCEMP) to be REJECTED. It also sets up the attribute APR_REJ_REASON with a comment ('Rejected by Seeded Workflow'). The procedure Approved does the same thing for APPROVED.
-
The HXCEMP workflow is now finished and control is returned to the HXCEMP workflow, in the Find and Notify Approvers process. This process reads the approval result in the WF_APPROVAL_RESULT attribute and finishes approval processing.
Configuring the Predefined Approval Process
First make a copy of the predefined item type and server side package. You can modify your copy of the do_approval_logic procedure, and leave everything else as predefined. You can also modify the hard-coded comments in the procedures Approved and Rejected.
If you want to set up multiple processes, you can create them as part of your copy of the HXCEMP item type. (There is no need to create additional item types, although you can if you want to). Your processes must follow these rules:
-
The internal name of the process must begin with OTL_APPROVAL (otherwise your process will not be visible in the Approval Styles window).
-
The process must use the parent_item_key and parent_item_type attributes to set up the attribute WF_APPROVAL_RESULT to be REJECTED or APPROVED.
-
Similarly, if you want to display comments, the process has to set up the attribute APR_REJ_REASON, in the same way as the predefined package.
Do not change the HXCEMP workflow and its associated server side code.
Defining Approval Styles
Create approval styles to define approval methods for each recipient application. You associate approval styles with people using preferences in the Approval Styles window.
See: Approval Styles
To define approval styles
-
Enter a unique name for the approval style.
Tip: Use a meaningful name to help you identify the appropriate style in the Preferences window. For example, use a name that identifies the workers to whom it applies, or the method of approval (such as Supervisor Approval).
-
Select the Enable client extension option to initiate a search from the workflow to find and execute client extensions.
-
If you want OTL to auto approve timecards, then you can leave the Approval Rules region blank. If you do not want OTL to auto approve timecards, then use this region to set up additional approval rules. The approval rules you specify in this region enable you to provide conditions under which a timecard needs approval.
When the OTL application approves timecards, it uses the information you set up in this window. Therefore, if you set up an approval rule, the application auto approves all timecards except under the circumstances you specify in the rule.
To set up additional approval rules, select a time entry rule and an application that uses this rule. The rule determines whether the application sends a timecard for approval when the timecard is submitted or resubmitted.
See: Defining Time Entry Rules
Additional Information: The rule you select within the Approval Rules region, is either one of the predefined time entry rules, or a time entry rule you defined previously. Time entry rules determine what data entry or changes require approval for a specific application.
-
If the application requires additional rules, select each rule and the application.
-
Repeat steps 2 and 3 for all of the applications.
-
In the Approval Style Components region, select the first application that uses this approval style.
-
If you want to control the sequence in which type of approval is performed, then enter a sequence number. The approval type with the lowest number is performed first. Two applications with the same sequence will have approval processes run in parallel.
-
Select one of the following types of approval for this application:
-
HR Supervisor - the named supervisor from the workers assignment.
-
Person - a named individual which you can select from the list of values.
-
Workflow - use to route timecards to the appropriate person, or people defined within the workflow.
-
Formula (Selects Mechanism) - uses either the predefined approval formula, or a formula you defined previously.
-
Auto Approve - timecard is not routed through an approval process.
-
Entry Level Approval - determines what time entries are routed to what approver.
Additional Information: If you select Entry Level Approval, then see the additional setup steps beginning at step 12.
-
Project Manager - use to route Projects-related time entries to the project manager for approval.
Caution: To avoid workflow errors, ensure you select an approval method for each application in the applications set. If you use the Approve on Submit predefined approval style, then the OTL application does this for you.
-
-
In the Identifier field, select:
-
The name of the approver, if you selected person as the type.
-
The formula, if you selected formula as the type.
-
The workflow, if you selected workflow as the type.
For other types of approval, leave the identifier field blank.
-
-
Enter the start date when each approval rule becomes active. Optionally, enter an end date. You cannot have the same rule for the same application with overlapping dates.
-
Repeat steps 5 to 9 for each application that uses this approval style.
-
Save your work.
If you selected entry level approval in step 7, then continue with the following steps.
-
Choose the Entry Level Approval Components button. The Entry Level Approval Components window displays.
-
Select one of the following default entry level approval styles:
-
Auto Approve
-
Formula (Selects Mechanism)
-
HR Supervisor
-
Person
-
Workflow
-
-
In the Identifier field, select:
-
The name of the approver, if you selected person as the type.
-
The formula, if you selected formula (selects mechanism) as the type.
-
The workflow, if you selected workflow as the type.
For other types of approval, leave the Identifier field blank.
-
-
In the Entry Level Components region, select a time category from the list of values.
-
Select the approval type you wish to associate with the time category.
-
Depending on your selection of approval type, you may need to enter the identifier.
-
If you want to control the sequence of approval, then enter a sequence number. The approval type with the lowest number is performed first. Two applications with the same sequence number will have approval processes run in parallel.
-
Repeat steps 16 to 19 for each time category that you need for this entry level approval.
-
Save your work, and close the Entry Level Approval Components window.
Enter Other Attributes for your Approval Style
Use the Other Attributes tab on the Approval Style window to configure approval workflows to avoid potential delays in the approval process. For example, you can specify how long the application waits for an approver to take action before it resends a notification. You can also configure approval workflows to send optional notifications to the workers who submit their own timecards as well as those workers whose timecards are submitted by another person.
-
Select the Other Attributes tab for the approval style you want to configure.
-
Select the Enable timeout/resend cycles option to use the timeout and resend notification features.
Important: If you use the supervisor hierarchy for your approval workflows, then selecting this option changes the application's response when an approver does not act upon a timecard.
-
Enter the number of times you want the application to send notifications to the same person before it notifies the next person. The value you enter applies to all the timeout and resend cycles.
-
Enter the length of time in minutes you want the application to wait before it resends a notification to the approver, timecard preparer, and the workflow administrator. The value you enter applies to all the timeout and resend cycles.
-
Set up the following optional notifications for workers and timecard preparers whose timecards are submitted by another person.
-
Select the Notify supervisor of approval request option to send a copy of the approvers' notifications to the workers' direct supervisors.
-
Select the Notify worker on submission option to send a notification to workers whose timecards are submitted by another person.
-
Select the Notify worker on auto-approval option to send a notification to inform workers that the application auto-approved their timecards.
-
Select the Notify timecard preparer on approval option to send a notification to inform timecard preparers that the application approved the timecards they submitted (either for themselves or others).
-
Select the Notify timecard preparer on rejection option to send a notification to inform timecard preparers that the application rejected the timecards they submitted (either for themselves or others).
-
-
Select the OTL workflow administrators.
-
The OTL workflow administrator can intervene in the approval process if the approver and timecard preparer fail to act on a timecard waiting for approval.
-
The OTL workflow error administrator can intervene to correct workflow errors, and if necessary, re-initialize a workflow. The OTL workflow error administrator receives a notification for each approval workflow that errors.
-
-
-
Close the Approval Style window.
Change and Late Audit
Change and Late Audit
Change and Late audit enables you to track all changes to new timecards, as well as previously saved and submitted timecards. These changes include modifying a saved or submitted timecard and saving timecards after a defined due date. For example, you may wish to have workers enter a reason why they changed their hours worked on Monday from 8 to 10, or why an hours type was changed to vacation.
You cannot delete timecards or line items on a timecard when using Change and Late Audit. However, if you wish to delete a line item from the timecard, you can enter zero (0) in the hours field. This creates a change record and requires a change reason. Deleting timecards and line items from a timecard eliminates accurate audit trails.
For Self Service users using the Change and Late Audit feature, the Audit Information page automatically appears after a worker selects Review from the time entry page. The Audit Information page requires the worker to enter a reason code for each day of the modified timecard. You may also enter a comment to correspond with the changes made to each line item.
Timekeeper users can use the Change and Late Audit feature to enter change and late-entry reasons for other workers. The Timekeeper Group and Timekeeper Entry windows display the workers for whom timekeepers can enter reasons and comments.
You can use these audit rules to help your company address requirements for the US Defense Contractor Audit Agency (DCAA). This feature is optional, and is not required setup for Oracle Time & Labor.
Change and Late Audit has a default Change and Late Audit preference node. To enable the preference node, assign a preference eligibility criteria. The preference node enables Change and Late Audit to track reasons for all entries made on the self-service timecards.
Note: You can use Change and Late Audit in your own timecard layouts.
The Audit Summary window, used in the Change and Late Audit Flow, is configurable using an ldt file. This enables you to use the audit rules for any entity and show that same entity on the Audit Summary window.
After you configure the Audit window, you can specify the window within the Timecard Layout Preferences.
Additional Information: For additional information on configuring the Audit Summary window, please refer to the Oracle Time & Labor Configurable UI Whitepaper.
Change Audit
Change audit records when a worker or timekeeper makes a change to a saved, rejected, or submitted timecard. This change can include modifying a saved time entry to any field defined by your time categories.
Late Audit
You can define what determines a late entry on the timecard. By default, an entry is late when the entry stop date/time is 24 hours prior to the current date/time. However, using time entry rules, you can define late by start-stop hours, or by the quantity of hours (that an entry misses the deadline).
Reason Code Lookups
Oracle Time & Labor provides the following lookup types for the change and late audit features:
-
HXC_CHANGE_AUDIT_REASONS - This lookup type provides user-defined reason codes for the audit type of change.
-
HXC_LATE_AUDIT_REASONS - This lookup type provides user-defined reason codes for the audit type of late.
Oracle delivers predefined values for change and late audit reasons, however you can define as many reasons as you need, and limit the values you enable within your list of values.
Time Categories
A Time Category is a group of mapping components that can appear on a timecard, such as elements, projects, or tasks, with one or more specific values for each component. You may audit specific projects, by listing specific project codes in the defined time category, or any project by defining a time category with no specific projects. You can define any number of time categories to determine what fields to audit for change and late entries.
For example, you may choose to audit entries that have changes, or additional entries added to a specific project or task. By defining time categories, you can monitor these types of changes.
Time Entry Rules
For Self Service users only, Change and Late Audit Time Entry Rules use formulas to control what is defined as late and what field you wish to monitor when a change is made. There are two predefined time entry rules, with predefined formulas:
-
Change Rule - CLA Change (predefined formula)
-
Late Rule - CLA Late (predefined formula)
You can define a time category for CLA Change (predefined formula) and require a worker to enter a reason why changes are being made to a specific file on the timecard as explained with time categories.
Note: Use reason as the outcome only if the user CLA enabled and there is a complete CLA setup.
For example, you may define a change audit rule to enforce a reason to be entered if any changes are made on the timecard against Project A. To accomplish this change audit rule, you will create a time category for Project A, and define a Change Audit Time Entry Rule with the time category input value equal to the newly defined time category, and assign this time entry rule to a rule group. You can then assign the time entry rule group to a person or group of people via the Change and Late Audit (CLA) preference. Workers who submit timecards with entries for Project A, and then make a change, the change audit rule initiates and the worker must enter a valid reason for making this change.
Note: CLA Late (predefined formula) requires input values for Start-Stop Late Hours and Quantity Hours. Time category is an optional input value and is not required.
Preferences
In Oracle Time & Labor you set preferences to define many of the rules about how individual workers or groups of workers can use the application. There are rules for the time store, and rules about Self Service timecard entry. You can choose which preferences workers can see, and which ones they can edit.
Oracle Time & Labor includes default preferences with predefined values. These cannot be changed or deleted. For more information on assigning preferences, see: Preferences
Use the Change and Late Audit (CLA) preference node to assign your change and late audit rule. The Change and Late Audit preferences are:
-
Delete Timecards - enables you to remove the option for a worker to delete a timecard when using change and late audit. This entry must be No for change and late audit.
-
Layouts - Projects is the predefined timecard layout for change and late audit. However, you can configure other layouts as needed.
-
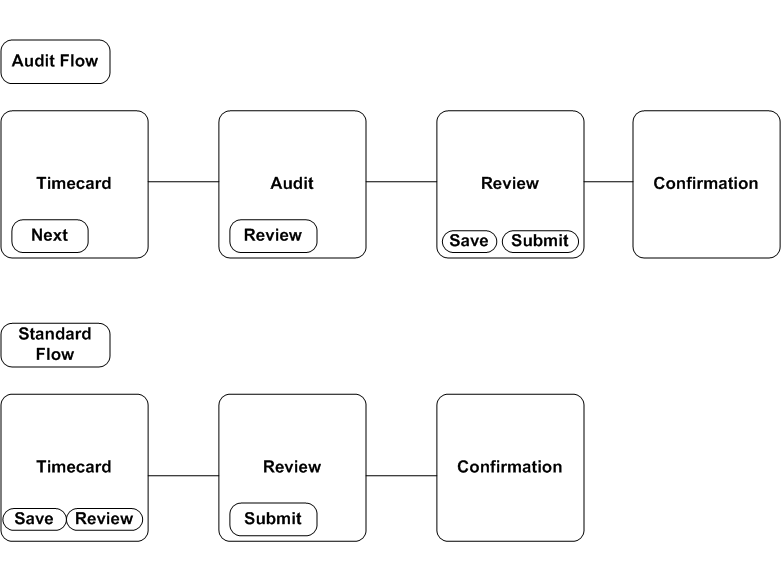
Process Flow - control the page flow in self-service. If set to audit, the flow of the self-service timecard differs from the standard flow.
-
Rule Group - determines your time entry rule group that you can assign to a person or a group of people.
Process Flow
The process flow for change and late audit timecards varies from the standard flow of timecards. The following example displays the differences for change and late audit.
Process Flow
Setting Up Change and Late Audit
This feature enables self-service and timekeeper users to enter change and late-entry reasons in timecards. This process describes how to set up the feature for both types of user.
-
Set up CLA preferences for users of the change and late audit feature.
For a timekeeper to be able to enter CLA reasons for a worker on their behalf, you must set up CLA preferences for both the timekeeper and the worker. The timekeeper sees a person with CLA reasons enabled as an Audit Enabled resource.
See: Defining Preferences
You can set up the CLA preference for timekeepers to send a notification to the worker, the supervisor, or both, to inform them of any updates or changes that the timekeeper makes. This feature enables your workforce to keep track of any updates that the timekeeper makes to their timecards.
-
Define the CLA reasons in the HXC_Change_Audit_Reasons and the HXC_Late_Audit_Reasons lookups.
-
Define time categories to identify the fields to audit for change and late entries.
-
Create your own time entry rules to identify what you define as late, and the fields you want to monitor when a change is made.
The time entry rules apply to Self Service users only.
-
Define a group of time entry rules so that you can assign them to a person or a group of people using preferences.
See: Defining Time Entry Rule Groups for Change and Late Audit
-
Add CLA reasons to timecards. The Timekeeper can enter CLA reasons in the Timekeeper Detail window, and the self-service user can use the Audit Information page.
Defining Reason Code Lookups for Change and Late Audit
You can define reason code lookups for Change and Late Audit to provide user defined reason codes for the audit type of change and late. You can define as many reason code lookups as needed, and limit the values displayed in the list of values.
Use the Application Utilities Lookups window, using the HRMS Manager responsibility.
To define Reason Code Lookups
-
Query the audit type lookup you wish to define; HXC_Change_Audit_Reasons, or HXC_Late_Audit_Reasons.
-
Enter a code for the audit reason. For example, you may wish to have a code of MGR for Manager Request.
-
Enter a meaning for the code, for example Manager Request for the code of MGR.
-
You may enter a description for the code, such as Manager requested change.
-
Enter TK in the Tag field to identify the values you want to display for the Timekeeper user only. Reasons with no value appear for both the Timekeeper and the self-service user.
-
Enter your effective date from date.
-
Select Enable to display the lookup in the list of values. If you leave the enable check box blank, the code will not display.
-
Continue to define reason code lookups for this audit type.
-
Save your work.
-
Query your next audit type lookup and follow steps 2 - 8.
-
Save your work.
Defining Time Entry Rule Groups for Change and Late Audit
Once you have defined time entry rules for change and late audit, you can group the rules together and assign a group to a person or a group of people via preferences. Use the Time Entry Rule Groups window.
To define time entry rule groups
-
Enter the name of the Rule Group.
-
Select the name of the first time entry rule.
The remaining data fields will populate.
-
Select Reason as the outcome rule.
-
Repeat steps 2-3 to continue entering time entry rules for this grouping.
-
Save your work.
Defining Time Categories for Change and Late Audit
A time category is a group of mapping components that can appear on a timecard. You can define any number of time categories to determine what fields to audit for change and late entries.
Use the Time Categories window.
To define time categories
-
Enter a unique name for the category.
-
Select OR as the operator.
-
Select either an existing time category or a mapping component to define the category.
-
If you selected a mapping component, select Specify Value, if you wish to define a specific value of the component.
-
Enter the value of the component that belongs to this category.
-
Continue to select categories or mapping components to complete your definition of the category.
-
Save your work.
Defining Time Entry Rules for Change and Late Audit
Time entry rules use formulas to control what is defined as late and what fields you wish to monitor when a change is made. There are two predefined time entry rules, with predefined formulas. However, you can create your own time entry rules, using the predefined formulas, or using newly created time categories.
Reminder: When entering formula inputs, white fields are optional entry, and yellow fields are required entry.
Use the Time Entry Rules window.
To define time entry rules
-
Name the rule.
-
Enter a description for the rule.
-
Select the Usage:
-
Audit is when the worker selects the next button from the timecard page.
-
Submission is when the completed timecard is submitted.
-
Save is when the timecard is saved.
-
Resubmission is when the timecard has been submitted and the employees changes the time or labor data.
-
Submission/Resubmission is at the initial submission and when the employee changes the time and labor data after submission.
-
-
Do one or both of the following:
-
Select the formula for CLA Change (Seeded Formula) and enter your formula inputs, such as your previously defined time category.
-
Select the formula for CLA Late (Seeded Formula) and enter your formula inputs, such as time category (optional), Start-Stop Late Hours (required), and Quantity Hours (required).
-
-
Enter the desired From date to indicate when this rule becomes effective. You are not required to enter a To date until the rule is no longer needed.
-
If you want to restrict the rule to your current business group, uncheck the Global check box.
-
Save your work.