Common Rule Management Tasks
This chapter focuses on the rule management tasks that are common across all rules in this application.
This chapter covers the following topics:
- Overview of Common Rule Management Tasks
- The Rule Home Page
- Searching for Rules
- Creating Rules
- Viewing and Updating Rules
- Duplicating Rules
- Deleting Rules
- Extracting and Loading Rules
Overview of Common Rule Management Tasks
The rule management tasks that are common to business rules in this and other applications are as follows.
Note: You can perform these tasks from the home page for the type of rule with which you are working. Depending on the rule type, some tasks might not be available.
The procedures for carrying out these tasks are the same for each rule type, except for rule-specific steps explicitly stated in the rule-specific documentation.
The Rule Home Page
The Rule home page is the gateway to all rules and related functionality of the application. From there, you can navigate to other related pages.
On the header of the Rule home page, you can perform simple queries on Folder, Rule Name and Effective Date.
The following table shows the page components.
| Name | Type | Default Value | Required/ Optional | Updatable | LOV, additional information |
|---|---|---|---|---|---|
| Folder | Drop Down | Set in Application Preferences | Required - for filtering the rules under the folder | No – Only able to select from presented list. | N/A |
| (Rule) Name | Text Box | None | Optional – for filtering the rules on Rule Name | Yes | You can specify all or part of a rule name For example, if you want to see only those Rules which start with ‘A' – Enter A in the text field |
| Effective Date | Date Field | None | Optional – for filtering the rules on Version Effective Dates | Yes | Returns those Rules with Version effective dates that correspond with the date you enter |
| Go | Button | N/A | N/A | No | Initiates rule search based on specified criteria. |
| Create Rule | Button | N/A | N/A | No | IInitiates the rule creation process. |
| Expand All | Link | N/A | N/A | No | Displays rules with version information |
| Collapse All | Link | N/A | N/A | No | Displays only the Rule names |
| Focus | Link | N/A | N/A | No | Displays the selected Rule and Version information only. |
| (Rule) Name | Link | N/A | N/A | No | Links to the Rule's basic details |
| Start Date | Display Value | N/A | N/A | No | Version effective start date |
| End Date | Display Value | N/A | N/A | No | Version effective end date |
| Approval Status | Display Value | N/A | N/A | No | Displays whether this Rule version is approved, submitted, or new |
| Approved By | Display Value | N/A | N/A | No | Who approved the Rule version |
| Approved Date | Display Value | N/A | N/A | No | When was the rule version approved |
| Submit | Icon | N/A | N/A | No | Click to have the rule version approved Approved rules can run against production or non-production datasets Unapproved rules can only run against non-production datasets. |
| Revert | Icon | N/A | N/A | No | Click to restore a rule definition to its previous approved state. For example, if you modify an approved rule definition, the approval status automatically changes to Not Approved. If, for some reason, you do not wish to keep the modifications, you can revert these changes to the last approved version. |
| Duplicate | Icon | N/A | N/A | N/A | Initiates process for duplicating rules. Explained later in this document |
| Run | Icon | N/A | N/A | N/A | Initiates process for running Rules Explained later in this document. |
Searching for Rules
Search for a business rule to perform any of the following tasks:
-
Update, duplicate, or delete existing rules or versions
-
Create a new version
-
Define methodologies for products or define other processing assumptions
Procedure
-
Navigate to the rule home page for the appropriate rule type.
Search for the rule, as follows:
-
Select the folder in which the rule is stored.
-
(Optional) Enter the name of the rule.
-
(Optional) Select the effective date.
-
Click Go.
Only rules that match the search criteria are displayed.
Please refer to Overview of Common Rule Management Tasks for more information.
-
Creating Rules
You create a rule to specify the way you want a particular task or business process to be carried out by the application. Creating a rule is a two-step process, in which you first specify the properties for the rule itself, and then specify the properties for the rule version.
Procedure to Create a Rule and Version
-
Navigate to the home page of the rule you want to create.
-
Click Create to display the rule definition page.
-
Select the folder in which you want to store the rule.
-
Enter a name for the rule.
Important: The name of a rule must be unique across all the rules and rule types in the entire database, not just at the folder level.
-
(Optional) Enter a brief description for the rule.
-
Select the required access for other users.
-
Click Continue.
The version definition page is displayed.
-
Type the name of the version for the rule.
-
Select the effective start and end dates using the date picker. Alternatively, you can type them in the space provided.
Important: Each version must have a unique date range, as compared to all other versions for the same rule.
Note: If not specified otherwise in the related profile option, the defaults for the effective start and end dates are January 1, 1900 and December 31, 2500.
-
Specify any other properties or options that may apply for the version that you are creating.
-
Click Finish.
Please refer to Overview of Common Rule Management Tasks for more information.
Viewing and Updating Rules
You can view existing rules and rule versions, and you can update certain properties for rules and versions.
Note the following considerations with regard to updating rules and versions:
-
If you update a rule that has been approved, you must resubmit the rule for approval before it can be run.
-
Rules that have been run are process locked, so you cannot update a rule that has been run except by removing the rule execution results and process lock. However, you can create a new (duplicate) version of a rule that has been run and then edit the new version without having to remove previous results.
Note: Rule and Version names, and Version Effective Dates, are not subject to edit/process locks.
Procedure
-
Navigate to the home page of the rule you want to update.
-
Search for a rule. For further information, see Searching for Rules.
-
Click Update corresponding to the rule or version that you want to update if you are familiar with the rule or version details and would like to update the rule or version directly. Alternatively, click on the rule or version to view details and then click Update on the View page.
Procedure to Update a Rule
-
Update the Name or Description.
-
Click Apply.
-
Duplicating Rules
You can duplicate rules and versions to avoid having to enter data multiple times. This saves time and effort and also reduces mistakes. You can duplicate only the version, or you can duplicate both the rule and the version.
When duplicating a version, the rule-related details cannot be updated. All existing versions for a rule are listed at the bottom of the duplicate page.
When you duplicate the version and the rule, a new rule is created with a copy of the version.
Procedure
-
Navigate to the home page of the rule or version you want to duplicate.
-
Search for a rule. For further information, see Searching for Rules.
-
Click Duplicate corresponding to the version of the rule that you want to duplicate.
Procedure to Duplicate a Version
-
Select Version to create a new version in the same Rule.
-
Enter a unique name for the version.
-
(Optional) Enter a brief description for the version.
-
Select the effective start and end dates using the date picker. Alternatively, you can enter them in the space provided.
Caution: The new version's date range must not overlap with any of the existing version date ranges.
-
Click Finish.
Procedure to Duplicate a Rule and Version
-
Select Rule and Version to create a new rule and a version.
-
Select the folder in which the rule will be stored.
-
Enter a name for the rule.
-
Enter a name for the version.
-
(Optional) Enter a description for the version.
-
Update the effective start and end dates using the date picker. Alternatively, you can type them in the space provided.
-
Click Finish.
Please refer to Overview of Common Rule Management Tasks for more information.
Deleting Rules
You can delete rules that are no longer needed. To delete a rule, you delete all of the versions that are associated with that rule.
Caution: Once deleted, a rule cannot be retrieved.
Restrictions on deleting rules or versions are:
-
You cannot delete rules or versions if you have only Read privileges. Only approvers or users with similar or higher system rights can delete rules or versions.
-
A rule or version that has been approved can be deleted only by having a delete request approved by the approver.
-
You cannot delete rules or versions if their approval is pending. Alternatively, you can delete the approval request and then the rule. However, this works only if you have sufficient privileges.
-
You cannot delete versions associated with Locked Rules. A Locked Rule is one that has been already used in the production environment to generate final results.
Procedure
-
Navigate to the home page of the rule you want to delete.
-
Search for a rule. For further information, see Searching for Rules.
-
Click Delete corresponding to the rule or the version of the rule that you want to delete.
Please refer to Overview of Common Rule Management Tasks for more information.
Extracting and Loading Rules
Enterprise Performance Foundation utilizes iSetup for extracting and loading rules in a folder within a single environment and for extracting and loading rules across multiple environments. For example, you can develop and test business rules in a testing environment and then load those rules to a production environment.
The Extract/Load features can also handle sub-objects. For example, the Enterprise Performance Foundation Mapping Rule type "Retrieve Statistics" is comprised of a mapping rule and a statistic definition. The statistic definition also includes a Condition. When you extract or load the "Retrieve Statistics" rule, both the statistic definition and its condition will automatically be included in the process.
The Extract and Load options are available through iSetup and let you initiate an Extract of a Folder's rules. Using the Load page you can load the extracted rules to the specified user's folder. You can extract, or load the following types of rules:
-
Dimension Member and Dimension Hierarchy Rules (facilitates moving metadata from one environment to another; available through the Enterprise Performance Foundation Administrator responsibility)
-
Condition Rules (available through the iSetup Responsibility)
-
Enterprise Performance Foundation Mapping Rules (available through the iSetup Responsibility)
-
Transfer Pricing Rules (available through the Oracle Transfer Pricing responsibilities such as FTP Supervisor and FTP User)
-
Transfer Pricing rule
-
Prepayment rule
-
Prepayment Table rule
-
Rate Index rule
-
Adjustments rule
-
Alternate Rate Output Mapping rule
-
Transfer Pricing Process rule
-
Prerequisites, Guidelines, and Considerations
In order to extract and load rules successfully, you must first ensure that the following requirements are met and that the systems are set up properly:
-
Both the source and target environments should have the same set of languages installed. When you extract a set of rules, only one language will be extracted at a time.
-
There should be a public database link between the source and target databases to facilitate Dimension and Hierarchy loader programs between environments. The database link should be registered in Enterprise Performance Foundation. For more information, see: Working with Registered Database Links, Oracle Enterprise Performance Foundation User's Guide.
To establish a connection between instances you must copy the DBC file of the remote instance to the source instance, and of the source to the remote instance. For more information, see: Instance Overview, Oracle iSetup User Guide.
-
Only rules with an Approval Status of: New, Approved, or Not Approved can be extracted. Rules with an Approval Status of Submitted for Approval or Submitted for Deletion cannot be extracted.
-
When loading rules between environments, the username in the source environment must be the same as the username in the target environment.
Note: Potentially, any user in the target environment can load the rule and will have Read & Write access to it. However, if the rule was created in the source environment as Read Only, then the user who created the rule will be prevented from updating their rule unless that same user performs the load
-
If the rule already exists as Read Only in the target environment, the load will only be successful if the loading username is the same as the username of the existing target rule.
-
You should have folders with the same names in both environments.
Note: Access privileges to these folders should be set to Read & Write.
-
The global value set combinations in both environments must match.
-
The source and target environments should contain the same dimension members, groups, attributes, attribute Versions, and Hierarchies.
Note: Use the dimension and hierarchy migration tool to extract and load metadata from the source environment to the target environment.
-
All hierarchies used in a rule should also be present in the target load environment. Loading an exported rule from a different environment with a hierarchy must have the same dimension members and hierarchy in place.
-
(Oracle Transfer Pricing only) A Condition rule specified in the Transfer Pricing Process rule Run page is not automatically included as a dependent rule in the load process. You must extract and load a Condition separately to select it in the Transfer Pricing Process rule Run page in the target environment.
In addition, you must extract and load the hierarchies used in the creation of a Transfer Pricing, Prepayment, or Adjustments rule separately before extracting and loading the Transfer Pricing Process rule and its dependent rules.
For the Alternate Rate Output Mapping rule, you must ensure that the selected output columns exist in the target environment and are registered with the appropriate Column Property Assignment.
After loading a Transfer Pricing Process rule that you extracted, you need to select the following parameters again on the Run page in the target environment:
-
Audit Option: 1 Month Rates (Option Cost Only)
-
Processing Tables
-
Condition rule, if you extracted from another environment. If you performed an extract/load within the same environment, and the Condition rule still exists, the selection will be displayed.
You may need to set up some or all of the following components in the target environment before using and running any of the dependent loaded rules. The extract and load of these components is not currently supported:
-
Interest Rate Codes and Historical Rates Data
-
Data Set Groups
-
Patterns, if applicable: Repricing Patterns, Payment Patterns, and Propagation Patterns
-
Currency Rates (if using multi-currency assumptions and processing with Ledger Migration)
-
The Dimension Member and Dimension Hierarchy Migration and Loader Process
The migration and loader process is a simple two-step operation:
-
Login to Enterprise Performance Foundation Administrator in the target environment and migrate the dimension members and/or dimension hierarchies.
-
Login to Enterprise Performance Foundation Administrator in the target environment and load the dimension members and/or dimension hierarchies.
Step 1: Migrate the Dimension Members or Dimension Hierarchies
Follow these steps to migrate Dimension Members or Dimension Hierarchies
-
Login to Enterprise Performance Foundation Administrator in the target environment and navigate to the Process Management tab and select the Requests sub tab.
-
Migrate Dimension Members or Dimension Hierarchies
Note: A registered database link must be in place between the source and target environments.
To Migrate Dimension Members:
-
Schedule a Request by selecting Dimension Member Migration for the Program Name and click Next
-
Set Parameters: select a Source Database, select the Dimension to be migrated and click Next.
-
Enter Scheduling parameters (optional) and click Next.
-
Enter Recipient Notifications (optional) and click Next.
-
Enter Printing styles (optional) and click Next.
-
Review parameters and click Submit.
To Migrate Dimension Hierarchies:
-
Schedule a Request by selecting ‘Dimension Hierarchy Migration' for the Program Name and click Next.
-
Set Parameters: select a Database Link, select a Dimension, enter a Hierarchy from the source environment, enter the Hierarchy Version (optional), enter Dimension Name (optional) and click Next.
-
Enter Scheduling parameters (optional) and click Next.
-
Enter Recipient Notifications (optional) and click Next.
-
Enter Printing styles (optional) and click Next.
-
Review parameters and click Submit.
-
-
Navigate to the Process Management tab and select the View Requests sub tab to monitor the progress of the migration program.
Note: Clicking on the Details hyperlink of the request will display a page where you can view the log generated by the migration.
Step 2: Load the Dimension Members or Dimension Hierarchies
Follow these steps to load the Dimension Members or Dimension Hierarchies
-
Login to Enterprise Performance Foundation Administrator in the target environment and navigate to the Process Management tab and select the Requests sub tab.
-
Load Dimension Members or Dimension Hierarchies
Note: A registered database link must be in place between the source and target environments.
To Load Dimension Members:
-
Schedule a Request by selecting ‘Dimension Member Loader' for the Program Name and click Next.
-
Set Parameters: select Execution Mode, select the Dimension to be loaded and click Next.
-
Enter Scheduling parameters (optional) and click Next.
-
Enter Recipient Notifications (optional) and click Next.
-
Enter Printing styles (optional) and click Next.
-
Review parameters and click Submit.
To Load Dimension Hierarchies:
-
Schedule a Request by selecting ‘Dimension Hierarchy Loader' for the Program Name and click Next.
-
Set Parameters: select the Hierarchy Loader Rule Name, select the Execution Mode, select the Dimension, select the Hierarchy Name, select the Hierarchy Definition Name and click Next.
-
Enter Scheduling parameters (optional) and click Next.
-
Enter Recipient Notifications (optional) and click Next.
-
Enter Printing styles (optional) and click Next.
-
Review parameters and click Submit.
-
-
Navigate to the Process Management tab and select the View Requests sub tab to monitor the progress of the loader program.
Note: Clicking the Details hyperlink of the request will take you to a page where you can view the log generated by the loader.
The iSetup Extract and Load Process
The extract and load process is a simple two-step operation:
-
Login to iSetup in the source environment; extract the rules in a folder by selecting or creating a Selection Set.
-
Login to iSetup in the source environment; select the extract file and load to the source or target environment.
Step 1: Extract the rules in a folder
Note: If Workflow is enabled, only versions with an Approval Status of: New, Approved, or Not Approved can be extracted.
Use the following procedure to extract rules in a folder
-
Login to iSetup and navigate to the Migrations tab and select the Selection Sets sub tab.
-
Create or select an existing Selection Set.
Note: A Selection Set contains the rules that the extract program will use to pull the types of objects in the selected environment.
To create a Selection Set
-
Click Create and select the template to pick which objects will be extracted:
-
Profitability Manager Setups such as Mapping Rules, Conditions, Statistics and Factor Table rules)
-
Oracle Transfer Pricing Setups (such as Prepayment rule, Prepayment Table rule, Rate Index rule, Adjustments rule, Alternate Rate Output Mapping rule, and Transfer Pricing Process rule)
-
-
Click Continue and enter a name for the Selection Set and choose the Source Instance from which the Selection Set will extract the objects.
-
Select the types of rules you want to extract. For example, you can choose Mapping, Conditions, Statistics and Factor Table rules.
-
Click the Filter icon and choose the folder that contains the rules you wish to extract. You must choose a folder for each rule type that you include in the Selection Set.
-
Click Apply to create the Selection Set.
-
-
Click Extract to begin the extract process and then click Create
-
Enter a name for the extract process, and choose the Source Instance and the appropriate Selection Set from the list.
Note: Users have the option to change the Selection Set and Source Instance; however, changing the Selection Set and/or Source Instance may invalidate the filters set at the time of the creation of the Selection Set.
-
Click Continue to navigate to the Schedule page and enter execution details.
-
Click Finish to submit the extract request. You will be returned to the Extracts page where you can view the progress of the extract.
Note: Clicking on the Name hyperlink of the extract will take you to a page where you can view the log generated by the extract.
Note: An extract will generate a .zip file that can only be used in a Load.
Step 2: Load the folder rules to an environment
Note: Loading rules to an environment different from the Source environment will require setting up an Instance Mapping on the Oracle iSetup Administration Tab. For more information, see: Working with Registered Database Links, Oracle Enterprise Performance Foundation User's Guide.
Follow this procedure to load the folder rules to an environment
-
Login to iSetup and navigate to the Migrations tab and select the Extracts sub tab.
-
Search for an active Extract and select.
Note: An Active Extract is an extract that has a Normal Status indicator.
-
Click Load to navigate to the Set Parameters page and enter a name for the load process to be executed.
Note: Users have the option to change the extract load file by updating the Data Source field. Users also have the option to select the target environment for the load, migrating the rules to the target instance. The Target Instance will only display registered DBC file names.
-
Click Next to view the Set Objects Details page. This is an informational page for the objects that will be created/updated in the target environment.
-
Click Next to navigate to the Schedule page and enter execution details.
-
Click Finish to submit the load request. You will be taken to the Loads page where you can view the progress of the load.
-
Clicking on the Name hyperlink of the load will display a page where you can view the log generated by the load.
iSetup Load Rule Behavior
If the rules of a folder have been loaded successfully, subsequent loads of the rules will either overwrite the rules in the folder if they exist for the same effective date range or add itself to the rule when the effective date ranges are different.
An extracted rule cannot be loaded into a rule where it will cross the effective date ranges of any two existing versions within the rule.
Furthermore, an extracted rule cannot be loaded into a rule where it will overwrite the effective date range of a rule that has been used in a calculation (a locked rule).
-
Loads of rules to a different environment follow the same process and requirements as those for an extracted set of rules. You should pay special attention to the following requirements:
-
The username in the target environment should be the same as the username in the source environment (Highly recommended, though not required; it is especially important in the case of rules with Read Only access).
-
The Folder name of the Target environment must be the same as the Folder name of the Source environment.
-
The user must have Read & Write access to the folder of the target environment.
-
The dimensions and dimension members of the target environment must be the same as those in the source environment.
-
The hierarchies of the target environment must be the same as those in the source environment.
Extracts or Loads of rules with sub-objects have the following distinctions:
-
When loading, the user must have Read & Write access to the folder that contains any sub-objects of a rule.
-
If several rules share the same sub-objects, a load of the extract will only create one copy of the sub-object.
-
If several versioned sub-objects fall within the effective date range of the selected parent rule's version, they will be extracted.
-
In general, if an error is encountered during extract, or load of a parent or sub-object, the extract or load will fail for both the parent and all its sub-objects, and the system will write appropriate error messages. This would include the case where no versioned sub-objects fall within the effective date range of the parent version.
-
If the sub-object already exists for the same effective date range, the load of the sub-object will update the sub-object and prefix the name with "Import".
-
If the sub-object already exists in the target environment, and the load effective date of the sub-object is different than the original, loading of the sub-object will adjust the effective dates accordingly.
For example, a rule version in the Test environment is Extracted and then Loaded into the Production environment.
-
Original Rule1 exists in the target Production environment and has one version ("Version1") for 1-Feb-2006 – 28-Feb-2006.
Load rule version (also named "Version1") with an effective date range 1-Jan-2006 – 28-Feb-2006
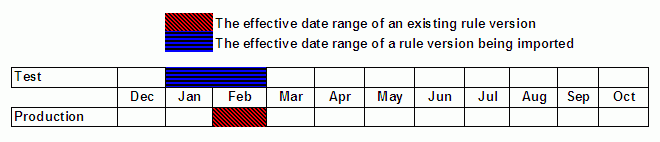
Result: The system will overwrite the target version, creating a version named "(Import) Version1" with the effective date range 1-Jan-2006 – 28-Feb-2006.

-
Original Rule1 exists in the target environment and has one version ("Version1") for 1-Dec-2005 – 28-Feb-2006.
Load rule version (also named "Version1") with an effective date range 1-Jan-2006 – 28-Feb-2006.
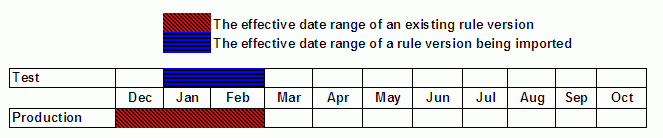
Result: The system will modify the effective date range of the existing target version, changing it to 1-Dec-2005 – 31-Dec-2005 and will write the loaded version (using the name "(Import) Version1"), with the effective date range 1-Jan-2006 – 28-Feb-2006.

-
Original Rule1 exists in the target environment and has one version ("Version1") for 1-Dec-2005 –31-Mar-2006.
Load rule version (also named "Version1") is 1-Jan-2006 – 28-Feb-2006.
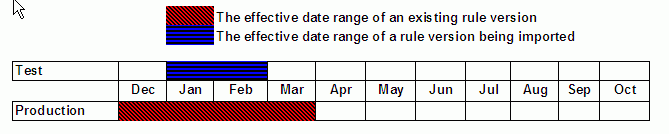
Result: The system will modify the effective date range of the existing target version, changing it to 1-Dec-2005 – 31-Dec-2005, it will write the loaded version (using the name "(Import) Version1") with the loaded effective date range of 1-Jan-2006 – 28-Feb-2006, and it will copy the original target version, naming it "(Copy) Version1" and setting the effective date range = 1-Mar-2006 –31-Mar-2006.

-
-
If the sub-object already exists, the extract of the sub-object cannot be loaded where it will cross the effective date ranges of any two existing versions within the rule.
-
If the sub-object already exists, the extract of the parent and all sub-objects will fail and log an error message if any load requirements would be violated for the parent or sub-object. For example, if the parent or any sub-object would overwrite the effective date range of a version that has been used in a calculation (a locked version), the system will trigger an error