People Budgets and Costing
People Budgets and Costing Overview
HRMS Budgeting Overview
Human Resource budgets enable you to manage personnel costs efficiently. Using Oracle HRMS, you can create and approve budgets that help you:
-
Manage expenditures on HRMS entities
-
Adjust forecasts
-
Plan for future costs
You can estimate expenditures for the following HRMS entities:
-
Job
-
Position
-
Grade
-
Organization
-
Open
Note: The Open budget entity allows you to create a budget for any combination of job, position, grade, or organization. You cannot use control budget features with the Open entity.
You set up your budget based on your organizational culture and business requirements. For commercial enterprises, the fiscal budget is typically based on company revenues, and can change during the fiscal year. For public sector enterprises, such as city governments and educational institutions, budgets must comply with legislation-mandated funding requirements. See the following section, Control Budgeting.
You can correct your budget as funding or expenditures change. You can create a new version of a budget based on an existing version at any time. You can enter budgets directly into the database, or route budget worksheets for approval online. You can monitor money, FTE, headcount, and hours (up to three in a single budget). You can enter fixed amounts for each line item, or calculate the value of each entry as a percentage of the total allocation.
You can specify any date range you want for your budget's fiscal period, and use currency values of any length, with variable decimal point placement. If you budget by position or organization, you can use an organization hierarchy to delegate your budget among organization managers.
HRMS Cost Analysis Overview
Oracle products installed in your organization determine how you can use costing information.
See: Labor Costs in Oracle HRMS
Entries you make in cost allocation flexfield segments enable you to map costing data to general ledger account codes and distribute costs across your enterprise.
See: The Cost Allocation Key Flexfield
HRMS allows you to override default cost allocations on five levels, to account for exceptions and temporary costing arrangements:
-
Payroll
-
Element link
-
Organization
-
Assignment
-
Element entry
Cost data at the payroll level when you always charge your costs to the same company or the same ledger.
See: Data Costed at the Payroll Level
Cost data at the element link level when you define costed, fixed costed, or distributed costing types for earnings and deductions.
See: Data Costed at the Element Link Level
Cost data at the organization and assignment levels when costs are typically allocated to the same cost center.
See: Data Costed at the Organization and Assignment Levels
Cost data at the element entry level when you want costs for an individual element entry, such as a timecard entry, to override costs entered at any other level.
See: Data Costed at the Element Entry Level
RetroCosting ensures that costing information you processed in payroll runs is correct, identifying discrepancies attributable to processing errors or changes to your implementation structure.
Reporting on Cost Analysis
Once you have completed the costing process, you can run the Cost Breakdown report to see the distribution of payroll calculation results, with corresponding General Ledger and labor cost details. You can run two versions of this report:
-
Cost Breakdown Report for Costing Run: shows summarized costing totals for a specified costing process
-
Cost Breakdown Report for Date Range: shows summarized costing totals for a particular consolidation set, payroll set, or payroll over a specified interval
See: Run the Cost Breakdown Report
Control Budgeting
If you mark your budget as a control budget, you can:
-
Integrate your budgeting process with accounting by posting your budget to Oracle General Ledger and/or Grants Management
-
Run reports to compare budget estimates with actual expenditures or get a snapshot of under budgeted line items, at any stage of the budget cycle
-
Enforce business rules that reflect the policies of your enterprise, such as ensuring that funding is available before entering assignments or approving budget reallocations
A successful HRMS Control Budgeting implementation typically requires consultation and coordination with professionals working in other modules:
-
General Ledger (for chart of accounts code combinations)
-
Payroll (for costing structures that generate actuals)
-
Grants Accounting and Labor Distribution (optionally, if your enterprise performs grants accounting)
Budgeted Amounts
You can distribute estimated costs to Oracle General Ledger by linking budget elements to their corresponding chart of accounts codes. Using budget sets, you can parse a budget element and link it with multiple codes, enabling you to account for all funding sources that pay for a given cost. You post your budget to GL by mapping HRMS costing flexfield segments to general ledger account code segments.
See: Defining Budget Characteristics
Budget Sets: In the real world, employee packages consist of many elements, for example, earnings, supplemental earnings, taxable benefits, direct payments, and employer liabilities. You can create as many budget sets as you need to reflect this structure and represent your employee packages, then attach them to the positions in your budget to provide data links to elements and the accounts that pay for them.
See: Defining Budget Sets
Budgeting FTE and Headcount: You can create budgets that monitor or control FTE or Headcount. Use business rules in combination with position FTE or budgeted FTE to ensure that position control issues a warning or halts processing if hiring or promoting a person would put you over allotted FTE. You can also configure the application to recalculate and update Assignment Budget Values for FTE automatically when determining factors change, such as working hours or frequency.
See: Budget and Control Positions Using FTE in Position Control
See: Recalculating Assignment Budget Values
Budgeting Positions: Once you post a position control budget, you can add a position to it and enter budget allocations to the level of the budget period when you define or update the position. Using a default budget set you link to budget characteristics, you can also provide default element and funding source information.
See: Entering Budget Values by Calendar Period in Completing a Budget Worksheet
Actuals and Commitments
HRMS costing and budgeting features work together to enable you to compare budgeted amounts with actuals. When you run Oracle Payroll, HRMS costing processes allocate personnel expenditures to cost centers, general ledger codes, and/or labor distribution codes. HRMS accumulates the balances using pay elements you can also specify in your budget for tracking actuals. You track budget commitments in a similar way, earmarking budget elements for commitment tracking. You can then compare your actual costs to budgeted amounts, commitments, and projections. See the following section, Reporting on Control Budgets.
Integration Considerations
Your implementation team is responsible for planning the required correspondence between budgeted and costed elements. Organizations frequently account for the cost of positions by placing people in multiple assignments, especially organizations that must meet the stringent requirements of grants accounting. Multiple assignments enable you to specify costing percentages in a different way for each assignment.
Here are some of the questions your implementation must address:
-
Which General Ledger Chart of Accounts code combinations are available for your use?
-
Which accounts fund the positions, jobs, organizations, or grades in your enterprise?
-
How do you plan to distribute costs so that actuals generated by payroll runs correspond to budgeted amounts?
-
Does your enterprise use Grants Accounting?
-
Do you need to create multiple assignments and specify costing proportions at the assignment level, in order to meet regulations or reporting requirements?
-
Are you using HRMS costing or Labor Distribution?
-
Is Labor Distribution processing commitments, or is HRMS?
-
Which combination of Payroll-, Link-, Organization-, Assignment-, and Element Entry-level costing best fits the way your enterprise tracks costs?
Reporting on Control Budgets
Oracle HRMS provides reports to enable you to monitor the status of active control budgets. Control budget reports are especially useful during the analysis and adjustment stages of the budget cycle. Run Report Under Budgeted Entities to flag line items whose projected costs exceed budgeted amounts. You can then reallocate resources from over budgeted entities.
Status reports display information about the primary entity (typically positions) for specified time periods, enabling you to analyze budgeted, actual, committed, projected, and balance amounts. You can also view differences between budgeted and actual amounts expressed as a percentage.
For a high level budget summary, run the Position Summary report to display the status of all positions within an organization. If you need to focus on a specific pay element, run the Entity Element Summary report. To view specific positions within an organization, broken out by pay element, run the Position Element Detail report. If you work in a position control organization, run the Organizational Position Summary report based on an organization hierarchy.
Note: You can restrict the scope of most reports to specific types (over budgeted, under budgeted, or both).
Key Concepts
To broaden your understanding of HRMS Budgeting and Costing, see:
Migrating a Budget to Oracle HRMS
Routing Budget Worksheets and Position Transactions
Reallocating and Reserving Budget Resources
Routing and Approval Rules Reference
People Budgets and Costing
Oracle HRMS provides all the features you need to manage your human resource position budgets. You can create a budget for a variety of HR expenditures, from monetary expenditures, such as salary and benefits, to headcount and full-time equivalency, all within the same budget.
Can I maintain budgets for all my Oracle HRMS work structures?
Oracle HRMS enables you to define a budget for jobs, positions, grades, and organizations; you can also define a budget using any combination of these work structures.
Can I manage salary budgets using Oracle HRMS?
Yes. using Oracle HRMS you can add salary estimates to the work structures in your budget. Using budget sets, you can link budget values to the elements you use to record pay values. Management reports enable you to compare actual expenditures against budget.
How do I enter a budget into the application?
You use a budget worksheet to enter budget data into the application. You express this data as an amount or as a percentage of the total allocated amount for the budget. You can also add a position to an existing budget and enter budget data to the period level when you create or update the position.
Can I delegate a budget worksheet to a manager in my organization?
Yes, provided that you budget for positions or organizations, since these work structures enable the use of organization hierarchies. You can start a budget worksheet, then delegate the worksheet to a manager in your organization hierarchy.
Can I route a budget for approval?
Using Oracle Workflow, you can route a budget for approval. You decide your list of approvals based on routing lists, a supervisory hierarchy, or a position hierarchy.
When an approver approves a budget worksheet, you apply the budget worksheet to the database for the budget to become an active budget. Management reports track the difference between actual expenditures and an active budget.
You can also work in non-approval mode if your organization does not require online approval of budgets.
How can I migrate legacy budgets to Oracle HRMS?
Using the Oracle HRMS Concurrent Manager, a system administrator can schedule a batch process to migrate a budget from previous releases of Oracle HRMS to the new budget function. The budget you migrate is pre-approved and does not need to be routed for approval.
Can I reallocate control budget resources from one line item to another?
Oracle HRMS enables you to reallocate excess resources to positions, jobs, grades, or organizations that need them. A web-based interface displays information about budgeted, actual, committed, and available amounts per budget period, enabling you to reallocate budgeted amounts using automatic workflow routing and approval.
How do I validate budgets or reallocations against my organization's business practices?
When you apply your approved budget worksheet or reallocation transaction to the HR database, the application uses business rules you configure or define to compare the values in the transaction with data you provide about positions, budgets, or assignments. You configure each rule to display a warning, halt processing, or ignore the validation failure.
How can you use cost analysis to support your business activities?
You can use Oracle HRMS to:
-
Estimate labor costs from current compensation definitions
-
Project future labor costs by modelling organizational change and salary reviews
You can also use Oracle Payroll to accumulate actual payroll costs for transfer to Oracle General Ledger. When you run a payroll, Oracle Payroll calculates any prorated results if the cost center changed during the payroll period. You can set a dynamic trigger to create prorated cost results that reflect cost center changes.
Budgeting
Using HRMS Budgeting
The following sections provide an overview of how to use Oracle HRMS budgeting features and integrate your budgeting process with Oracle General Ledger, Oracle Grants Accounting, and Oracle Labor Distribution:
-
The Budget Cycle
-
Migrating an Existing Budget to Oracle HRMS
-
Creating and Approving Budgets
-
Reallocating and Reserving Budget Resources
-
Enforcing Policy with Business Rules
-
Control Budgeting in a Grants Environment
The Budget Cycle
For many enterprises, the budgeting process is a time-consuming, cyclical venture. Oracle HRMS provides support for all phases of the budget cycle:
Stages of the Budget Cycle
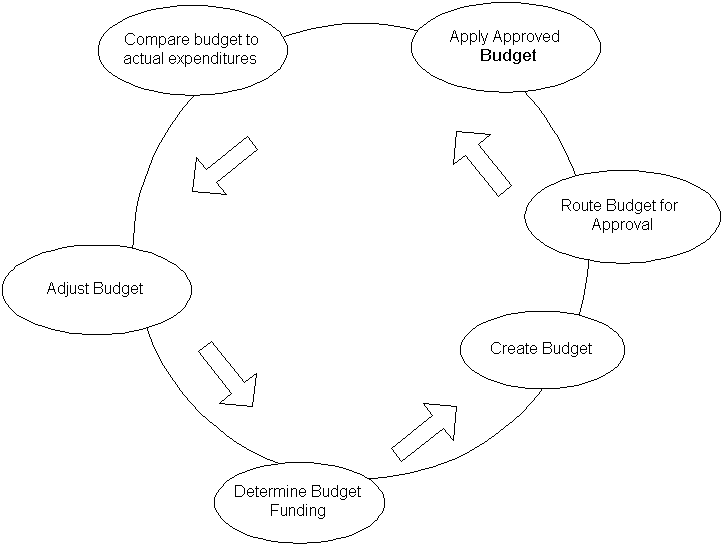
For each stage, Oracle HRMS features are available to help you manage your budget.
-
Budget Funding: Use Oracle General Ledger to report on available funds based on revenue or legislated funding. Run Oracle HRMS control budget reports to determine budget excesses and deficits for the fiscal year.
-
Budget Entry: Use HRMS Budgeting to define the properties of your budget and enter values.
-
Budget Approval: Route budget worksheets for approval using Oracle Workflow. On approval, apply the budget to the database.
-
Budget Analysis: Schedule HRMS control budget reports to compare budgeted amounts with actual expenditures, commitments, and projections.
-
Budget Adjustments: You can correct an active budget during the fiscal year, reallocating resources to other line items as needed, or reserving resources so that you cannot use them.
Migrating an Existing Budget to Oracle HRMS
If your enterprise implemented Oracle HRMS prior to Release 11i, you can migrate legacy budgets to the current version of HRMS. You can use the migrated budget as the basis for a new budget. See Migrating a Budget to Oracle HRMS.
Creating and Approving Budgets
If your enterprise operates in an environment where budgets are subject to an approval process, you can route a budget online through a hierarchy of approvers. On approval, you apply the budget to the database to activate it. See Completing a Budget Worksheet.
In enterprises without a formal approval process, you can enter budget values directly. See Entering Non-Approved Budgets.
Post a control budget to Oracle General Ledger to make it available to your financial organization, or integrate HRMS budgeting with Oracle Grants Accounting.
See Posting a Budget to Oracle General Ledger as a Batch Process.
Reallocating and Reserving Budget Resources
In organizations that maintain strict control over the creation or modification of positions, managers cannot exceed budgeted amounts. Budget reallocation (the ability to transfer available resources from one control budget line item to another during a given budget period) provides some flexibility to an otherwise strict system of controls. When excess money, FTE, hours, or headcount is available, such as when a position becomes vacant or goes unfilled, you can reallocate resources from over-budgeted positions, organizations, grades, or jobs to under-budgeted entities.
You can also reserve resources so you cannot use them, and reallocate resources to non-budgeted entities. See Reallocating and Reserving Budget Resources.
Enforcing Policy with Business Rules
Configurable business rules (also called process rules) enable you to validate position transactions, budget worksheets, and reallocation transactions on approval, ensuring that the proposed actions adhere to organization policy.
The life cycle of a transaction consists of three stages:
-
Initiate
-
Route and Approve
-
Apply to the database
As you see in the figure below, the application invokes process rules when you apply your transaction to the database.
Process Rules
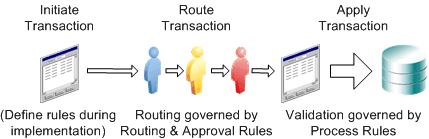
When you apply a business transaction to the database, process rules check the values in the transaction. The rules trigger a warning or error if, for example, budgeted amounts are insufficient to fund a new position, the donated amount in a reallocation is above a specified threshold, or if donated FTE exceeds a specified limit.
See Business Rules.
Control Budgeting in a Grants Environment
Oracle HRMS works with Oracle Grants Accounting to create reservations when you approve and post your budget (funds checking). When you assign a person to a budgeted position and calculate commitments, you automatically relieve reservations and create encumbrances in grants. As payroll runs generate actuals, Grants Accounting records the expenditures against award budgets.
Note: Commitments in HRMS are similar to encumbrances in grants accounting.
Under Budgeted Entity Reporting
For controlled budgets, you can run a report to identify the entities (positions, organizations, jobs, or grades) that the application projects to be under budgeted. The way in which the application calculates whether an entity is under budgeted depends on the budget measurement unit.
The budget measurement units fall into two categories:
-
Cumulative: Money and hours
-
Non-cumulative: All other units such as FTE, headcount, and all user defined budget units.
Calculations for Cumulative Budget Units
If the budget measurement unit is Money then an entity is under budgeted if:
(Budgeted Salary + Reallocated Salary) < (Actual Salary + Commitment Salary)
If the budget measurement unit is 'Hours' then an entity is under budgeted if:
(Budgeted Hours + Reallocated Hours) < (Actual Hours)
Note: Budgeted Amount, Reallocation Amount, Actual Amount and Commitment Amount of the Cumulative Units is calculated by a cumulative process (summation) for a given date range.
When a date range is given with a cumulative unit, the above calculation is run only once for the given date range to find the under budgeted entities
Calculations for Non-cumulative Budget Units
If the budget measurement unit is FTE, Headcount or any other non-cumulative unit, then an entity is under budgeted if:
(Budgeted Amount + Reallocated Amount) < (Actual Amount)
Note: Budgeted Amount, Reallocation Amount, Actual Amount of the Non-Cumulative Units is calculated as the amount defined as of the given date.
When a date range is given with a Non-Cumulative Unit, the above calculation will be run for all possible dates with in the date range to find the Under Budgeted Entities.
Items for Under Budgeted Calculations
Items that are used in the above calculation are explained in detail below:
-
Budgeted Salary is the sum of the values of individual elements for the budget sets defined for the each budget detail and the corresponding controlled budget. The values are prorated if input start date or end date is between the budget elements start and end dates.
-
Reallocated Salary is the value obtained after the funds are reallocated using the budget pool. If the budget unit is Money or Hours or Aggregate then the reallocated amount is prorated.
-
Actual Salary is the sum of each element type for all the assignment actions that lie within the supplied period.
-
Commitment Salary is the sum of the commitment amounts for each assignment and the element type.
-
Budgeted Hours is the sum of the budget values for all the budget periods, for all the budgets falling within the date range you specify. The values are prorated if input start date or end date is between the budget elements start and end dates
-
Reallocated Hours is the value obtained after the funds are reallocated using the budget pool. If the budget unit is Money or Hours or Aggregate then the reallocated amount is prorated.
-
Actual Hours is the sum of the normal hours taking into consideration the frequency for all the assignments.
-
Budgeted Amount is the sum of the budget values for all the budget periods, for all the budgets falling within the date range you specify.
-
Reallocated Amount is the value obtained after the funds are reallocated using the budget pool.
-
Actual Amount is the sum of assignment budget values for all the assignments that coincide with the effective date.
Defining Budgetary Calendars
You define calendars for human resource budgets in the Budgetary Calendar window.
Once you define the calendar you cannot:
-
Change the start date. Set the start date to let you enter any budget history information you want to enter.
-
Define years with an earlier start date than the start of the calendar.
In each calendar you define as many years as you require. You do not create a new calendar for each year. You just add new periods to the calendar.
To define a budgetary calendar
-
Enter the name, and start date for your calendar.
Check that the start date year is early enough to cope with your historic data. Once you define the calendar, you cannot change the start date.
-
Select a period type. If you select Semi-monthly, enter a value between 1 and 28 in the Midpoint Offset field to determine the start date of the second time period each month. For example, if you enter the value 15, the second time period each month begins on the 16th.
-
Save the calendar.
The system automatically creates the time period details. You can alter the default names for each time period.
-
If you want to add years to, or delete years from, the end of the calendar, choose the Change Calendar button.
-
When you have defined your calendars, you are ready to define your budgets.
Renaming Period Types
Budgetary calendars and payroll calendars are based on a period, such as a Quarter or a Year. Standard period types are predefined with the system. If you want to use a different name for a period type, enter the name in the Period Types window.
You cannot remove the names that are already defined, but you can insert a new record and select the appropriate Number Per Year.
To rename a period type
-
Insert a new record.
-
Enter the new name for the period type.
-
Enter the number of time periods to occur per year.
-
Save your new period type.
Defining Budget Sets
Using budget sets, you can link budget entries you record in a budget worksheet to the pay elements you use to record compensation and other values. You can run Oracle HRMS reports to compare a budgeted value for an element to the run result recorded for that element.
You also use budget sets when you migrate a budget from releases of Oracle HRMS prior to Release 11i.
See: Migrating a Budget to Oracle HRMS
Use the Budget Set window to define a default budget set. You can add or delete elements to a set in the budget worksheet.
To define a budget set
-
Enter or query a Budget Set.
-
Choose the Elements tab.
Enter the Default Percentage of the budget entry value that is distributed to the element.
-
Repeat steps 3 and 4 for each element in the budget set.
-
Choose the Funding Sources tab.
-
Choose the left or right arrow button to select an element in the budget set.
-
Do one of the following:
-
If this element is funded from your GL, then click in the Cost Allocation field to open the Cost Allocation Flexfield window and enter the cost allocation code combination by selecting a value for each applicable field
-
If this element is funded by a grant, then enter the Project, Task, Award, Expense, Organization (PTAEO) combination by selecting a value for each applicable field. In future releases of Oracle HRMS, this combination will be validated against your Oracle Grants setup.
Note: The PTAEO fields are only displayed if Oracle Grants is installed.
-
-
Enter a distribution percentage for each funding source record.
-
Save your work.
Entering Assignment Budget Values
At the Business Groups level, you can enter the default value of an assignment for each type of budget you have defined. For particular assignments, you override this default value in the Assignment Budget Values window.
If you have not entered a default value at the Business Group level, you must be careful to enter a value for every assignment. If there is no value entered in the Assignment Budget Values window, that assignment is not counted when calculating actual values for the budget.
Note: If you are using Workforce Intelligence or Oracle HRMS Intelligence, assignments without budget values are included when calculating actual values for the budget.
See: Workforce Intelligence in the Oracle HRMS Configuring, Reporting, and System Administration Guide.
To enter an assignment budget value
-
If necessary, use the DateTrack facility to set the effective date for the assignment budget values. You must re-query the assignment budget values into the window if you change the effective date.
-
Select a budget type in the Units field and enter the value of the assignment for this budget in the Value field. Oracle HRMS displays the effective dates of the assignment budget value in the Effective Dates From and To fields.
Recalculating Assignment Budget Values
When data changes occur that can impact Assignment Budget Values (ABV), such as changes to working hours, frequency, or other terms of work, you can configure the application to update ABV automatically using the Configuration Values function.
For example, if standard working hours are 40 per week, and you enter an assignment with 40 hours per week, FTE is 1. If the worker's hours change to 30 per week, recalculating the budget value changes FTE to 0.75.
Organization policy or legislative requirements can dictate a unique implementation. Company rules or contract terms may calculate FTE in prescribed ways. Some locations may add overtime to standard working hours, or deduct unpaid sick time. The flexibility and scalability of the configuration process enables you to meet business requirements. You decide which ABV to maintain (typically a derived value, such as Full Time Equivalent or Percent Full Time), and how to calculate the value.
A concurrent process (Calculate Assignment Budget Values) also enables you to manually update ABV after performing batch changes, such as mass assignment updates or initializing assignment data during implementation.
See: Running the Calculate Assignment Budget Values Process
Perform three configuration steps for each budget measurement unit you want to maintain automatically:
-
Enable an Assignment Budget Value: Activate maintenance for the budget measurement unit of your choice.
-
Configure Date Collection: Specify the events group and/or custom function you have created to log system events, such as changes to assignment records.
-
Specify a Recalculation Formula: Select a FastFormula you write to calculate the specified ABV.
You can override predefined configurations at the business group level. In Configuration Values, query the module Assignment Budget Value Maintenance.
-
The module uses the configuration type Maintenance Configuration to enable and disable maintenance for a specified budget value unit of measurement.
-
The module uses the configuration type Process Definition Configuration to collect a list of event dates for processing, using an events date source you specify. The list of dates enables the process to recalculate and update ABV for the triggering record as of the effective date, including future changes that impact the budget value.
On the Add Configuration Value page, configure your process definition by specifying:
-
Configuration Name
-
Budget Value Unit Of Measurement
-
Event Dates Source (Event Group and/or Custom Function)
If you have implemented Oracle Payroll, you can define a payroll event group of the type Retro to log system events.
See: Defining Event Groups, Oracle HRMS Payroll Processing Management Guide
For information on defining a custom function, see the PL/SQL User's Guide and Reference.
-
-
On the Add Configuration Value page, specify the budget value formula (QuickPaint FastFormula) you created to calculate the specified ABV.
See: Oracle FastFormula Overview, Oracle HRMS FastFormula User Guide
Enabling an Assignment Budget Value
Configuring Date Collection
Specifying a Recalculation Formula
Setting Up Default Assignment Costing for Budgets
Follow the process below to set up default assignment costing for budgets.
Note: If you write a FastFormula to select default assignment costing accounts and proportions, the formula overrides the default assignment costing for the budget.
See: Writing Formulas for Default Assignment Costing, Oracle HRMS FastFormula User Guide
To set up default assignment costing for budgets
-
Set the following profile option to Yes:
-
HR: Default Assignment Costing
See: User Profiles, Oracle HRMS Configuring, Reporting, and System Administration Guide
-
-
Define a position control budget.
-
Set up funding sources for the positions in your position control budget.
See: Completing a Budget Worksheet
When you link a position to an assignment, the default assignment costing accounts and proportions are calculated from the position control budget.
Defining Budget Characteristics
You use the Budget Characteristics window to define the properties of a budget. Once you define the properties, use the Budget Worksheet or Budget Details window to make budget entries.
Use the Budget Characteristics window to:
-
Select the primary budget entity. You can choose job, position, grade, organization or a combination of these work structures.
-
Select the budget measurement units, for example money or headcount.
-
Define the fiscal period of the budget.
-
Indicate which budget elements you want to use for tracking actuals and commitments.
-
Map Cost Allocation flexfields to Oracle General Ledger account codes if you post the budget to Oracle General Ledger.
Note: The application freezes the budget characteristics once you create a budget worksheet or budget version for that budget.
To define budget characteristics
-
Enter the budget name and select a budget calendar.
-
Check the Control Budget check box if this budget is for control purposes, for example, position control.
Note: You can define only one control budget per budget measurement unit type within a period for a business group.
-
If this is a controlled budget, check the Transfer to Grants check box if you want to transfer budget information to the Oracle Grants management system.
Note: This check box is only displayed if you have Oracle Grants installed.
-
Choose the Budget Characteristics tab.
-
Enter the Fiscal Period for this budget in the From and To fields.
Note: You can enter allocations for budget periods within the fiscal period when you complete the budget worksheet.
-
Select the Currency of the budget. If you do not select a currency the default currency for your business group is used.
-
Optionally, select a default budget set from the list. Position users can use the information in the budget set to provide budget data at the element and funding source level when they create or update positions.
-
Select the Primary Entity of this budget, such as Position.
Select Open to use a combination of Job, Position, Grade, or Organization. You choose the Open entity more infrequently, typically for budgets migrated from earlier versions of Oracle HRMS (11.0 and later). If you choose the Open entity, you need to enter all line items manually (Populate All does not work). You cannot create a control budget using the Open entity, and Report Under Budgeted Entities will not work.
Note: The list of primary entities is seeded with the product and you cannot extend this list.
You must enter budget values in the worksheet for the primary entity. If you select position as the primary entity, you can limit the position to a position in a grade using the budget worksheet.
-
Select the Budget Style.
-
Select Top Down if you enter the total Allocated amount for each budget measurement unit when you complete the budget worksheet. You can distribute the Allocated amount between the line items in the budget version.
-
Select Bottom Up if you do not enter the total Allocated amount for each budget measurement when you complete the budget worksheet. In this case, the application rolls up the value for all the budgeted line items to create the total Allocated amount for the budget version.
-
-
Select an Organization hierarchy if your primary entity is position or organization and you want to delegate the budget to managers in a organization hierarchy.
-
The application displays the version of the organization hierarchy in the Version field.
-
When creating a control budget you must mark the organization hierarchy for position control.
Note: If you do not select an organization hierarchy, the budget worksheet displays all positions and organizations in the business group.
-
-
Select the highest organization for which you are budgeting in the Starting Organization field if you select an organization hierarchy.
Note: You cannot enter budget values for any organizations in the organization hierarchy above the starting organization.
-
If you want to limit the grades that can be selected for budgeting to only those marked as valid for the associated position or job, then check the Valid Grade Required check box.
See: Entering Valid Grades for a Job or Position
Note: If you save a budget as valid grade required, you cannot change it back to an all grade budget.
-
Select the first Budget Measurement Unit for which you are budgeting, such as money or headcount.
-
Oracle HRMS delivers the following seeded measurement units: Money, Hours, Headcount, Full Time Equivalent, and Percent Full Time Equivalent. You cannot extend these units, but you can use the User Types and Statuses window to copy and rename a unit by selecting the BUDGET_MEASUREMENT_TYPE lookup value.
Important: Although it is theoretically possible to set up budgets that measure money, hours, headcount, and FTE for many combinations of entities, fiscal periods, and budget calendars, this approach does not reflect best practice. To achieve meaningful results in reports, Oracle recommends using a given measurement unit with a single entity, fiscal period, and budget calendar. This alignment is essential when you implement Workforce Intelligence reporting, such as Workforce Budget Management.
-
-
Select an aggregation method in the Aggregate field to control how the application rolls up budget totals by budget period for each budget measurement unit.
-
Accumulate defines the total as the value accumulated in the budget period. If you select Money as a budgeting unit, you must select Accumulate as the aggregation method.
-
Average defines the total as the average value for the budget period. You typically use this method for non-monetary units such as FTE or Headcount, where allocations can fluctuate widely from one period to the next.
-
Maximum defines the total as the maximum value for the budget period.
-
-
Save your work.
Defining Budget Elements to Track Actuals and Commitments
You can compare your budgeted amounts to actual expenditures and projected commitments for any fiscal period. In order to track actuals or commitments, you must specify a method as part of your setup:
-
You must specify an Input Value to track actuals.
-
You can choose to calculate commitments based on Input Value, Salary Basis, or a FastFormula rule you define.
Note: If you define a budget element to track both actuals and commitments (Type = "Both"), you must specify Input Value as the method. You can define the same element twice (once for each Type) to specify a different method for calculating commitments.
You calculate commitments from the Concurrent Manager by running the Calculate Commitment batch process.
To define budget elements
-
Enter or query a budget in the Budget Characteristics window.
-
Choose the Elements tabbed region.
-
In the Type field, specify whether you want to use the element to track Actuals, Commitments, or Both.
-
In the Classification field, optionally select a payment classification from the list, such as Earnings, Supplemental Earnings, or Employer Liabilities.
Note: This field filters the Element list to display only those elements matching the selected classification. Since budgets track payments, do not select a deduction classification here.
-
In the Element field, select the element you want to use to track actuals and/or commitments.
-
If you selected Actuals or Both in the Type field, specify an Input Value to track the element.
-
If you selected Commitments or Both in the Type field, do one of the following to specify a calculation method:
-
Select an Input Value to the element, such as Amount or Pay Value.
-
Activate the Salary Basis check box.
-
Select a FastFormula.
-
-
Select a Default Frequency to specify the default unit of time for which you calculate commitments (day, week, month).
-
Optionally, enter an Overhead % to add a percentage of the commitment calculation result to the total commitment amount.
-
Save your work.
Mapping Cost Allocation Flexfields to Oracle General Ledger Accounts
You can transfer a completed budget to Oracle General Ledger. To enable the transfer, map Oracle HRMS cost allocation flexfields to general ledger account codes.
Note: Budget sets enable you to link each budget element to multiple GL account codes. To account for multiple funding sources, attach budget sets to line items in your budget.
You transfer budget worksheets marked for transfer to GL automatically, when you apply the budget to the database. If you use Direct Budgeting (without routing), run the concurrent process Budget GL Posting.
See Posting a Budget to Oracle General Ledger as a Batch Process.
To map cost allocation flexfields to Oracle General Ledger Accounts
-
.Enter or query a budget in the Budget Characteristics window.
-
.Select a GL budget in the GL Budget field.
Note: The application activates the Transfer to GL check box automatically.
You must select a GL budget in the GL Budget field to enable the GL Segment Map tabbed region. The GL budget is empty, ready to receive budget data, because a counterpart with a GL Manager responsibility creates the budget for you.
-
If your budget originates in Oracle Public Sector Budgeting, then Public Sector Budgeting transfers the budget to GL and HRMS Control Budgeting transfers only commitments to GL. If this is the case, activate the Transfer only commitments to GL check box.
-
Choose the GL Segment Map tabbed region.
-
Select an HRMS Costing Segment for each corresponding GL Chart of Accounts segment.
When you post your budget, the funding source distribution percentages you specify per element in your budget sets enable the appropriate allocation amounts to display in GL, broken down by GL account codes.
See Setting Up an Oracle HRMS Budget for Transfer to Oracle General Ledger.
-
.Save your work.
Entering Non-Approved Budgets
If your enterprise does not approve budgets online, you use the Budgets window to define versions of a budget that you created using the Budget Characteristics window.
Note: You enter budgets that are approved online through Oracle Workflow in the Worksheet window.
To enter non-approved budgets
-
Select a Budget Name in the Find Budgets window. Or, find the budget by selecting the fiscal period of the budget in the From Date and To Date fields.
-
Choose the Find button to open the Budgets window.
-
Enter the date range for which you are allocating an amount to a budget measurement unit in the From and To fields.
-
Enter the amount allocated for each budget measurement unit in the budget.
-
Choose the Open button to open the Budget window where you can enter budget values for each line item in the budget.
See: Completing a Budget Worksheet
If a budget is marked as transfer to GL or transfer to Grants, and has not yet been transferred, then the Transfer to GL, or, if Oracle Grants is installed, Transfer to GL/Grants button is enabled.
Note: When you create or update a position, you can add it to a control budget version and enter budget data to the period level on the Budgets tab.
Creating Budget Worksheets
Setting up an Oracle HRMS Budget for Transfer to Oracle General Ledger
You can transfer an active HR budget to Oracle General Ledger so that funds can be reserved in the General Ledger for the HR budget.
As a prerequisite, you must define the GL budget before you define the corresponding HR budget.
Contact your finance department to have a user with a General Ledger responsibility set up the GL budget.
To set up an HR Budget for transfer to Oracle General Ledger
-
Define the budget in Oracle General Ledger.
-
Open the Define Budget window.
-
Enter a budget name.
-
Select a Status of Open to indicate the budget is available for update and entry.
-
Enter the budget period.
-
Choose the Open Next Year button.
-
Save your work and close the Define Budget window.
-
-
Define the budget in Oracle HRMS.
-
Open the Budget Characteristics window.
-
Enter a budget name.
-
Select the GL budget name you set up earlier in the GL Budget field.
-
Complete the budget definition.
-
Map Cost Allocation flexfields to GL account codes
-
Save your work and close the Budget Characteristics window.
-
-
Complete the budget worksheet.
-
Route the budget for approval, if required.
-
Apply the completed budget to the application.
Note: If you enable budgetary control for the GL Ledger associated with this budget, the application automatically posts the budget to the GL if there are no errors. If you do not enable budgetary control, a budgeting user must manually post the data.
-
Review any budget posting errors in the Process Log Navigator window.
Setting Up Budget Worksheets
Use the Worksheet Characteristics window to define the properties of a budget worksheet.
To set up the budget worksheet
-
Enter the Name of the budget worksheet.
-
Select a worksheet Mode. Choose:
-
Edit & Make a New Version to copy an existing budget version to a new version that you can edit.
-
Correct Old Version to correct an existing version of a budget.
-
Start from Scratch to start a new budget worksheet.
-
-
Select a Propagate Method to control how the application re-calculates budget entries if you update the total amount allocated to a budget measurement unit. Choose:
-
Retain Value to leave the budget entry value unchanged when you update the allocated amount.
-
Maintain Percentage to update the budget entry value as a percentage of the allocated amount. For example, if you increase the allocated amount by 10%, the value for each budget entry also increases by 10%.
-
User Preference retains the budget entry value (either an amount or a percentage) and re-calculates the derived value. For example, let's say you budget 500,000 for the positions in an organization. For position 1, the budget is 50,000. If you increase the total allocated amount for the organization to 550,000, the budgeted amount for the position remains 50,000 but the percentage changes from 10% to 9%.
-
-
Select the Budget Name of the budget you are editing.
-
Select the budget Version if you are correcting or copying an existing budget version.
-
Choose the Create Worksheet button to open the Worksheet window and close the Worksheet Characteristics window.
Note: You complete the budget worksheet by entering values or percentages for each line item in the budget. You can save the worksheet to your workflow inbox, route the worksheet for approval, or delegate the budget to another manager in an organization hierarchy.
Completing a Budget Worksheet
Enter budget details for the line items in your budget using the Worksheet window. Or, delegate the budget worksheet to another manager in your organization hierarchy.
See: Delegating Budget Worksheets
To complete a budget worksheet
-
Define the properties of a budget worksheet in the Worksheet Characteristics window or open an existing worksheet from your inbox.
-
Edit the name of the Worksheet, if necessary.
-
Enter the date you will post the budget to the application in the Action Date field.
-
Enter the Start Date and End Date of this budget version.
-
Choose the Worksheet Characteristics button to review the properties of the budget worksheet in view-only mode.
-
Choose OK to dismiss the Worksheet Characteristics window.
-
-
Enter the Allocated amount for each budget measurement unit. As you allocate resources to budget line items, the application calculates the amount available for allocation.
Note: You can enter budget values without first entering the total allocated amount.
-
Choose the Budget tab.
-
Choose the Populate All button to load all line items into the worksheet for the primary budget entity.
-
Choosing Populate All does not load position transactions into the worksheet. You can add position transactions to the worksheet by selecting the position transaction from the list of values. If the application has not updated the position transaction to the application when you apply the budget worksheet, the Apply Budgets process writes an error to the Process Log Navigator.
-
For budgets with a primary entity of job or grade, the Populate All button loads all entities of the selected type in the Business Group.
-
Line items for which you can budget are limited by organization hierarchy if you select an organization hierarchy when defining the characteristics of the budget.
Note: If the worksheet mode is Edit and Make a New Version or Correct Old Version, the Populate All button loads the line items from the selected budget version into the worksheet. Choose the Populate All button before selecting any line items into the worksheet.
-
-
Use the Folder Tool to change the order and width of the columns in the worksheet, hide fields, or rename prompts.
Note: You can use the same folder for multiple worksheets if the budget is of the same primary entity, measurement unit, and budget style.
-
Select one or more line items to include in your budget.
Note: For example, select a position if you are budgeting by position.
-
Enter a budget amount for each line item, or enter a percentage of the total amount allocated for the budget measurement unit.
The application supports the entry of currency values of any length with variable decimal point placement.
Note: You can divide the budget amount for the line item by budget periods in the Budget Details window.
You cannot budget for the same line item twice. Selecting a line item into the worksheet removes the item from the list of available entities.
-
Choose the Apply button to propagate any changes to the total allocated amount throughout the worksheet based on the propagation method you select.
Note: If you change the allocated amount, but do not apply the changes, the application automatically calculates the new totals the next time you open the worksheet after saving it to your inbox, or when you post the completed budget to the application.
Entering Budget Values by Calendar Period
You can divide entries in the budget worksheet into periods. For example, you could divide a position budget of 40,000 into 10,000 per fiscal quarter.
You define budget periods when you set up your budget calendar.
To enter budget values by period
-
Enter a value for each budget line item in the Worksheet window.
-
Choose the Periods button to open the Budget Details window.
-
Choose the Periods tab.
-
De-select the coordination check box if you do not want this window to query the detail records for the budget period when you open the window.
-
Select the Start Date and End Date of the budget period.
-
Enter the budget amount or percentage of the allocated amount for each period.
-
Choose the Next Budget Unit or Previous Budget Unit button to move between budget line items.
Important: While it is theoretically possible to define budget periods, commitment calculations, and payroll periods independently, without considering the relative sizes of the date ranges, this approach does not reflect best practice. Oracle recommends sizing the date ranges to one another proportionaltely. Define the budget period as the largest, then commitment calculation and payroll frequency in decreasing order of size.
For example, you can set up quarterly budget periods of three months in length, calculate commitments on a monthly schedule, and set up a bimonthly payroll frequency. This approach avoids rounding errors, yields the most meaningful results in reports, and is essential when you implement Workforce Intelligence reporting, such as Workforce Budget Management.
See Calculating Budget Commitments
See: Defining a Payroll, Oracle HRMS Payroll Processing Management Guide
-
Save your work.
Entering Budget Values by Budget Set
You can link budget entries for a period to budget sets. Within a budget set, you can distribute budget values by element and by cost allocation flexfield.
To enter budget values by budget set
-
Enter a value for each budget line item in the Worksheet window.
-
Choose the Periods button to open the Budget Details window.
-
Enter the budget amount or percentage of the allocated amount for each period.
-
Choose the Budget Sets tab.
-
Select a Budget Set.
-
Enter the budget amount or percentage of the allocated amount for each budget measurement unit in the budget set.
-
Choose the Budget Set Distribution button to open the Funding Distribution window where you can enter the percentage of the budget measurement unit amount that is distributed to an element in the budget set.
-
Choose the Elements tab.
-
Select an Element Set and Distribution percentage for the element.
-
Choose the Next Budget Set and Previous Budget Set buttons to move between budget sets.
-
Choose the Funding Source tab.
-
Do one of the following:
-
If this element is funded from your GL, then click in the Cost Allocation field to open the Cost Allocation Flexfield window and enter the cost allocation code combination by selecting a value for each applicable field
See: Writing Formulas for Default Assignment Costing, Oracle HRMS FastFormula User Guide
-
If this element is funded by a grant, then enter the Project, Task, Award, Expense, Organization (PTAEO) combination by selecting a value for each applicable field. In future releases of Oracle HRMS, this combination will be validated against your Oracle Grants setup.
Note: The PTAEO fields are only displayed if Oracle Grants is installed.
-
-
Enter a distribution percentage for each funding source record.
-
Choose the Next Element and Previous Element buttons to move between elements in the budget set.
-
Save your work.
Note: When you create or update a position, you can add it to a control budget version and enter budget data to the period level on the Budgets tab.
Delegating Budget Worksheets
You can delegate a budget worksheet to a manager using the Worksheet window if you budget by position or organization.
To delegate a budget worksheet
-
Start a new worksheet or edit an existing worksheet from your workflow inbox.
-
Choose the Delegate tab in the Worksheet window.
-
Select the Organization of the delegate manager.
-
The application displays the first level of organizations in the organization hierarchy beneath the current organization.
Note: You cannot delegate a budget worksheet if the primary budget entity is job, grade, or open because these entities are not linked to organization hierarchies.
-
-
Select the name of the delegate in the Manager field.
Note: You can only delegate a budget worksheet to one person. This person must be identified as a manager in this organization in the Manager field of the Miscellaneous tabbed region in the Assignment window. If the delegated manager does not have a workflow role, the application automatically defers sending a notification.
-
Check the Defer field to delegate the worksheet to a manager without sending a workflow notification.
-
Enter the amount or the percentage of the amount allocated for the budget measurement unit which you are delegating to this manager.
-
Use the following buttons to navigate between organizations. Choose:
-
Populate All to select all organizations beneath the current organization. You can delete organizations from this list without effecting the organization hierarchy.
-
Details to navigate one level below the current organization. Choose Details to see which organizations report to the current organization.
-
Parent to navigate one level above the current organization.
-
Root to navigate back to the starting organization.
-
-
Save your work.
Note: The delegate manager receives a workflow notification and can open the worksheet from the workflow inbox. The delegate manager can edit any line item that has been delegated, including items which have already received a budget entry. Or, the manager can further delegate the worksheet to a subordinate manager.
Posting Completed Budgets
You post a budget to transfer a complete and approved budget worksheet from the HRMS worksheet tables to the HRMS budget tables. After you post a budget, you can begin to run variance reports that track actual expenditures and commitments against budget.
Note: If you enter budgets using the Budgets window instead of the Worksheet window, this indicates that your enterprise does not approve budgets online in Oracle HRMS using workflow. In this case, you do not need to post a completed budget because budget data is entered directly into the budget tables.
To post a completed budget using the Workflow Inbox
-
Open the Routing window.
-
Choose the Apply Transaction field.
-
Choose OK.
-
Open the Process Log Navigator window to view any posting errors.
Managing Budget Processes
Migrating a Budget to Oracle HRMS
If your enterprise maintained budgets in Oracle HRMS prior to Release 11i you can migrate existing budgets to the new budget tables. Migrating an existing budget saves you data entry time when the components of a budget vary little from year to year.
As a prerequisite to migrating a budget, you must define the default budget set that you want to associate with this budget. Budget sets let you map a budget by fiscal period to HRMS elements and cost allocation flexfields.
See: Defining Budget Sets
Once you migrate a budget, you use the Budget Worksheet to copy and edit a new version of the budget.
You run the Migrate Budget Data process from the Submit Requests window. Alternatively, you can migrate budgets using the Budget Migration module available from the Navigator.
To migrate a budget to Oracle HRMS
-
Select the Migrate Budget Data batch process in the Name field.
-
Click in the Parameters field to open the Parameters window.
-
Optional: select the Budget Name of the budget you are migrating.
Note: The budget migration process migrates all legacy budgets if you do not select a specific budget name.
-
Select the default budget set associated with this budget in the Budget Set Name field.
-
Choose OK.
-
Complete the batch process request and choose Submit.
Note: You can view any errors encountered during the batch process in the Process Log Navigator window.
-
Query the budget by name in the Budget Characteristics window.
You can now modify the properties of the migrated budget and create a new budget worksheet based on the values in the old budget.
Note: The application treats migrated budget data as pre-approved. You cannot route a migrated budget for workflow approval. Since migrated budgets have a primary entity of Open, you cannot use a migrated budget for purposes of position control.
Posting a Budget to Oracle General Ledger as a Batch Process
You run the Budget GL Posting batch process to transfer budget worksheet data from Oracle HRMS to Oracle General Ledger.
Note: If you apply the budget worksheet to the database from your workflow inbox, Oracle HRMS automatically transfers the data to the General Ledger and you do not need to run the Budget GL Posting process.
You run reports from the Submit Requests window.
To post a budget to Oracle General Ledger as a batch process
-
Select the Budget GL Posting process in the Name field.
-
Click in the Parameters field to open the Parameters window.
-
Select the Budget Version you are posting to the General Ledger.
-
Select a Validate Mode--either Yes or No--to indicate if you want the application to post the budget to the GL or to validate the budget without posting the data.
-
Select Yes to validate the budget without posting the data to the GL.
-
Select No to post the data to the GL. The application writes any errors encountered during posting to the Process Log Navigator window.
-
-
Choose the OK button.
-
Complete the batch process request and choose Submit.
Calculating Budget Commitments
You run the Calculate Commitment batch process to calculate the projected expenditures for a budget over a budget period.
You run reports from the Submit Requests window.
To calculate budget commitments
-
Select the Calculate Commitment report in the Name field.
-
Click in the Parameters field to open the Parameters window.
-
Select the name of the Budget Version for which you are calculating commitments.
-
Optional: select a position in the budget version for which you are calculating commitments. If you do not select a position, the process calculates commitments for all positions in the budget version.
-
Enter the date range for which you are calculating commitments in the Commitment Start Date and End Date fields.
-
Optional: select the Frequency for which you are calculating commitments, such as weekly or quarterly. If you do not select a frequency, the Calculate Commitment process uses the frequency of the budget calendar you attach to the budget.
-
Choose the OK button.
-
Complete the batch process request and choose Submit.
Posting Budget Commitments to Oracle General Ledger
You run the Commitment GL Posting batch process to transfer budget commitments from Oracle HRMS to Oracle General Ledger.
You run reports from the Submit Requests window.
To post budget commitments to Oracle General Ledger
-
Select the Commitment GL Posting process in the Name field.
-
Click in the Parameters field to open the Parameters window.
-
Select the Budget Version you are posting to the General Ledger.
-
Select a Validate Mode--either Yes or No--to indicate if you want the application to post the budget commitments to the GL or to validate the commitments without posting the data.
-
Select Yes to validate the budget commitments without posting the data to the GL.
-
Select No to post the commitments to the GL. The application writes any errors encountered during posting to the Process Log Navigator window.
-
-
Choose the OK button.
-
Complete the batch process request and choose Submit.
Running the Relieve Commitments Request Set Process
You run the Relieve Commitments concurrent request set process to recalculate commitments and post the results to Oracle General Ledger. The request set combines the Calculate Commitments process and the Commitment GL Posting process.
You should run the Relieve Commitments request set periodically after certain events--such as salary payments, or the hiring or termination of employees--post revised actuals to the General Ledger.
You run this process from the Submit Request Set window.
To run the Relieve Commitments request set
-
Select the Relieve Commitments process in the Request Set field.
-
Click in the Parameters field to open the Parameters window.
-
Select the name of the Budget Version for which you are calculating commitments.
-
Optional: select a position in the budget version if you want to calculate commitments for a single position.
Note: If you do not select a position, the process calculates commitments for all positions in the budget version.
-
Enter the date range for which you are calculating commitments in the Commitment Start Date and End Date fields.
-
Optional: select the Frequency for which you are calculating commitments, such as weekly or quarterly.
Note: If you do not select a frequency, the Relieve Commitment process uses the frequency of the budget calendar you attach to the budget.
-
Choose the OK button.
-
Complete the batch process request and choose Submit.
Reallocating and Reserving Budget Resources
Oracle HR Budgeting enables you to reallocate control budget resources from one line item to another, as you identify excess and deficit amounts. You can also reserve amounts by line item, so you cannot use them. You do this using a web-based interface, available from the Navigator by selecting Budget Reallocation. The following sections describe the steps in the process:
-
Find a Control Budget
-
Create a Reallocation Folder
-
Create a Transaction
-
Identify Donors/Periods/Receivers
-
Route the Folder for Approval
The remaining sections provide information about related activities, including viewing or acting upon pending and approved transactions, configurable business rules, migrating pre-existing reallocations, and troubleshooting in the Process Log.
Find a Control Budget
On the Find Budget page, you search for control budgets that are in effect on a date you specify. You can further restrict the search by specifying an entity (Position, Job, Grade, Organization) or budget measurement unit (Money, FTE, Headcount, Hours, or user-defined Share Type).
Only one control budget can be in effect on a given date for each entity/unit combination, and each budget can allocate up to three units. The application displays the search results in rows, each row displaying information about a budget, entity, and unit.
Create a Reallocation Folder
After selecting a search result row, you can create a new folder to hold transactions relating to the selected budget and entity/unit combination. A folder is a virtual container for your transactions. When you approve a folder, you approve all transactions within it (partial approval is not possible).
Create a Transaction
The Add Transactions, Donors, and Receivers page displays your folder, where you can create a new transaction. The page displays information about Donor and Receiver entities, Unit, Reserved Amount, Transaction Amount, and Transaction Balance.
-
Unit: the budget measurement unit, such as Money or FTE.
-
Reserved Amount: the portion of this line item's allocation that you cannot use, even for the line item itself.
-
Transaction Amount: the total number of units you are transferring.
-
Transaction Balance: the difference between the Donor and Receiver amounts. If a positive number, you have not yet assigned all donated units to Receivers. If a negative number, you have assigned more units to Receivers than you have donated. The transaction balance must be zero before routing or approving the folder.
Identify Donors/Periods/Receivers
Next you select line items with excess resources to donate. In addition to displaying amounts available for donation, the page displays information about the organization, location, and job, as well as budgeted, actual, committed, donated, and received amounts.
You can also view unapproved pending donation amounts. The application does not subtract Unapproved Donation amounts from Available amounts. Nevertheless, future-approved transactions can reduce available amounts before you approve your folder, causing your transaction to fail.
On the Donor Periods page, you can donate amounts at the budget period level. Here you can specify both Reserved and Donated amounts.
Note: Within one transaction, a single donor can transfer to one or more receivers, and multiple donors can transfer to one receiver. Many donors cannot transfer to many receivers.
On the Add Receivers page, you can select entities from a list to receive your donation. Here you also specify the Start and End Dates of the transfer (both of which must fall within the date range of the budget's Fiscal Period), and the amount of the transfer. Receiver entities do not have to be in the selected budget, though they must have the same entity as that of the Donor.
Route the Folder for Approval
The Routing Options page appears when you submit your transaction for approval. There you can save the folder to your Inbox, reject it, forward it to a qualified recipient, or (if you are a designated approver) apply the folder to the database. You configure default routing options and approvers for budget reallocation in Standard Setup, and routing and approval rules for automated workflow in Advanced Setup.
For information about Standard and Advanced Setup in the Transaction Type Wizard, see Transaction Type Wizard.
View Pending Reallocations
Each Search Results row on the Find Budget page gives you the option to view all unapproved transactions relating to the entity/unit combination. Here you can search for reallocation folders by name, or display them all. The application displays information about the transaction amounts and current owners of each folder. You can select one or more folders, and perform the following actions on them:
-
Notify Budget Manager: sends an FYI Notification to all budget managers in your business group. Using the Notify Self option below, any budget manager can take ownership of the folder and work on it.
-
Notify Self: sends the selected folders to yourself. This action always takes ownership of the folder.
-
Delete: removes the selected folders from the system, canceling the transactions.
Notification recipients can link to the folder and work on it.
Note: Though budget reallocation notifications do appear in the Workflow Notifications Inbox, they do not contain links to the folder. To link to the folder, workflow recipients must navigate to the Advanced Worklist, using a Workflow User Web Interface responsibility via Self Service.
View Approved Allocations
In each Search Results row of the Find Budget page, choosing a View Approved Reallocations icon takes you to a page where you can view all approved transactions relating to the entity/unit combination. Here you can view transaction amounts and balances.
Note: One caveat when you work with the Oracle web-based interface: the Select All option selects only those rows on the current page. If your list is too large to display on a single page, Select All will not affect rows on other pages.
Configurable Business Rules
You can define process rules to ensure that budget reallocations adhere to the business practices of your organization. The application invokes process rules and validates reallocation transactions when you apply folders to the database.
For information about configurable business rules, see Business Rules.
For information about available reallocation transaction attributes and their related categories, contexts, and warning messages, see Process Rules Reference.
Migrating Pre-Existing Reallocations
The application migrates any pre-existing budget reallocations automatically, when you install a patch containing the budget reallocation function for the first time. You can review the migrated folders on the View Pending Reallocations page, and notify budget managers, notify yourself, or delete, as described above. Migrated transactions have no owner, but anyone can use the Notify Self option to take ownership.
Caution: The application deletes any pre-existing non-control budget reallocations on installation. If you have reallocated or reserved budget amounts for non-control budgets, make notes of these transfers before installation.
Troubleshooting in the Process Log
Budget Reallocation is available as a View option in the Process Log. Here you can troubleshoot failures to apply reallocation transactions by reviewing error messages and details relating to folders, transactions, donors, and receivers.
For information about troubleshooting in the Process Log, see Using the Process Log.
-
Running the Calculate Assignment Budget Values Process
You run the Calculate Assignment Budget Values process to update budget values you enter against assignments. The process is useful for manually updating derived budget values when you have executed a mass assignment update, or initialized assignment data on implementation. You can restrict the scope of the updates to a given employee, assignment, assignment set, payroll, or contract. The process calculates or recalculates future changes to the budget value as of your specified effective date, using your implementation's prescribed formula.
You might recalculate a derived budget value (FTE or Percent Full Time) because of data changes that affect it (such as working hours, frequency, or other terms of work). You can also configure the application to update budget values automatically, based on system events such as changes to assignment or person records.
See: Recalculating Assignment Budget Values
You run concurrent processes from the Submit Request window.
To update budget values:
-
Select Calculate Assignment Budget Values in the Name field. The Parameters window appears.
-
Select the assignment budget value unit of measure you want to update.
-
Enter the effective date on which you want to begin updating future changes.
-
Specify a Run Type mode of Normal or Verify.
Each mode generates an output file displaying calculation results for each processed date, with error messages.
-
Normal: Calculates and updates.
-
Verify: Calculates, but does not update.
-
-
Optional: specify a parameter to restrict the scope of the update by:
-
employee
-
assignment
-
assignment set
-
payroll
-
contract
-
-
Click OK.
-
Complete the batch process request and choose Submit.
Troubleshooting Using the Process Log
Using the Process Log
The process log displays information that can help you correct errors. For example, you can refer to the log for errors encountered when:
-
Applying a budget from a worksheet
-
Applying budget data to General Ledger
-
Reallocating budget resources
-
Migrating budget data
-
Identifying entities that are under budget
-
Applying a position transaction
-
Copying or updating positions
-
Posting commitments to GL
Use the Process Log window to learn more about an error.
To display error information
-
From the View list, select a data set (such as Position Update).
-
Locate and expand the folder in the left pane for the records you want to view.
A Summary View describes the status of the records listed in the containing folder.
-
If necessary, continue navigating the records to the one that contains the error (designated by a red stop light icon).
If the window where you originally entered the data contained tabbed regions, a separate entry shows the status of the records contained in each tabbed region.
The Detail View helps you further identify a record and correct the error contained in it. For example, if the system validates data for a newly copied position and encounters invalid data in Work Choices, the Detail View displays the Work Choices flexfield so that you can review the data and then correct it.
-
If necessary, return to the window where you originally entered the data and correct the error. After correcting the error, you can apply the data or resubmit the process.
Budget Reporting
Control Budget Reports
You run control budget reports as part of the management stage of the budget cycle, enabling you to compare your estimates with actuals and commitments. With the information that reports provide, you can prepare for the next cycle, adjusting budgets where appropriate.
Summary of Available Reports
HRMS provides the following control budget reports:
| Concurrent Process Name | Results |
| Budget Period Position Detail | Reports on a budget you specify. Includes budgeted, actual, committed, projected, and balance amounts for each position, per measurement unit and budget period. |
| Entity Element Summary | Reports on an element and entity you specify. Includes budgeted, actual, committed, projected, and balance amounts, per measurement unit, in a given time period. You can filter the results to display all, over budgeted, over and under budgeted, or under budgeted entities (entity type). |
| Position Element Detail | Reports on an organization and/or position you specify. Includes budgeted, actual, committed, projected, and balance amounts by position, per measurement unit and pay element, in a given time period. You can filter the results to display all, over budgeted, over and under budgeted, or under budgeted entities (position type). |
| Position Summary | Reports on an organization you specify. Includes budgeted, actual, committed, projected, and balance amounts by position, per measurement unit, in a given time period. You can filter the results to display all, over budgeted, over and under budgeted, or under budgeted entities (position type). |
| Organizational Position Summary | Reports on all organizations in the business group. Includes budgeted, actual, committed, projected, and balance amounts by position, per measurement unit, in a given time period. You can filter the results to display all, over budgeted, over and under budgeted, or under budgeted entities (position type). |
| Report Under Budgeted Entities | Reports all entities lacking sufficient budget for the budget period containing the effective date. Includes budgeted, reallocated, actual, committed, and under budgeted amounts for each under budgeted entity. You can restrict the scope to display a specific organization hierarchy and starting organization. |
Terminology
Most reports are in status report format. Status reports enable you to review budgeted, actual, committed, and projected amounts. Report Under Budgeted Entities, on the other hand, identifies line items in your budget where projected costs exceed budgeted amounts. Status reports tell you the amount of money, FTE, grades, or hours you have allocated and spent per entity, within a given budget version. Report Under Budgeted Entities tells you which entities lack sufficient budget within a given budget period.
Budgeted: The amount you allocated to the line item, derived from the budget itself.
Actual: The amount already paid during the fiscal period as of the effective date, derived from past payroll runs.
Committed: The amount your enterprise obligates itself to pay for the remainder of the fiscal period (subsequent to the effective date). The application calculates commitments by considering assignments, salaries, element entries, commitment elements you have specified, and future payroll runs.
Projected: The total amount you expect to pay to the entity for the entire duration of the budget, derived by adding Actual and Committed amounts.
Variance: The difference between the amount you budgeted and the projected amount, derived by subtracting Projected from Budgeted amounts.
Note: HRMS Budgeting allows you to create multiple budgets that are in effect at the same time. The sole restriction is that only one control budget per budget measurement unit can exist in the same business group on the same date. Therefore, avoid budgeting for the same entities in more than one budget. Control budget reports display rolled-up sums from all budgets in effect, which could result in misleading data.
Running Control Budget Reports
Running Report Under Budgeted Entities
For control budgets, you can identify the entities that the application projects to be under budgeted by running Report Under Budgeted Entities.
For details of how the report calculates which entities are under budgeted, see: Under Budgeted Entity Reporting
After you run the report, the application lists the under budgeted entities in the Process Log Navigator window. A notification is sent to the manager of each under budgeted entity. The manager, in turn, can correct the budget or reallocate amounts, if necessary.
You run reports from the Submit Requests window.
To report on under budgeted entities
-
Select Report Under Budgeted Entities in the Name field.
-
Click in the Parameters field to open the Parameters window.
-
Enter a Batch Name for this under budgeted positions report.
-
Enter the Effective Date for which you want to see the report.
-
Select the Start and End Date of the period on which you want to report.
-
Select the primary entity on which to report. The Open option indicates a budget that uses more than one type of entity.
If you do not select a primary entity, the report includes all entities: Position, Job, Grade, Organization.
-
Select the budget measurement unit.
-
If your primary entity is position or organization, you can select the organization hierarchy and the starting organization for the report.
The report determines the under budgeted entities for all positions or organizations beneath this organization in the hierarchy.
-
Choose the OK button.
-
Complete the batch process request and choose Submit.
Running the Position Element Summary Report
The Position Element Summary Report lists the budget status for an element, in a specified time period, for all positions in the Business Group.
You run reports from the Submit Requests window. After you run the report, the application displays the report in the View Output page accessible from the View Requests window.
To run the Position Element Summary Report
-
In the Name field, select Position Element Summary Report from the list.
-
Click in the Parameters field to open the Parameters window.
-
Specify the Effective Date and Element Name for which you want to review status information.
-
Select the Position Type for which you want to see the report.
-
You can select Over Budgeted Positions, Under Budgeted Positions, Over or Under Budgeted Positions, or All Positions.
-
-
Optionally, enter a Variance Percent.
-
The report displays balances for those positions where the variance percent is equal to or greater than the percent you enter.
-
Variance Percent is not applicable when you select All Positions as the Position Type.
-
-
Enter the Start Date and End Date of the time interval you want to review.
-
Enter a unit of currency for the report.
-
Click OK.
-
Click Submit to complete the batch process request.
Running the Position Element Detail Report
The Position Element Detail Report lists the budget status for all budgeted elements, in a specified time period, for a specific position and organization.
Use the Submit Requests window.
To run the Position Element Detail Report
-
Select the Position Element Detail Report in the Name field.
-
Click in the Parameters field to open the Parameters window.
-
Enter the Effective Date for which you want to report.
-
Enter the Organization Name for which you want the current status.
-
Enter the Position Name for which you want to see the report.
-
Select the Position Type for which you want to see the report.
-
Selections include Over Budgeted Positions, Under Budgeted Positions, Over or Under Budgeted Positions, or All Positions.
-
-
Enter the Variance Percent.
-
The report displays balances for those positions where the variance percent is equal to or greater than the percent you enter.
-
The variance percent is not applicable when you select All Positions as the Position Type.
-
-
Adjust the Start and End Date periods to be included in the report.
-
Enter a unit of currency for the report.
-
Choose the OK button.
-
Complete the batch process request and choose Submit.
Running the Position Summary Report
The Position Summary Report lists the budget status, for a specified time period, of all positions in a specific Organization.
You run reports from the Submit Requests window.
To run the Position Summary Report
-
Select the Position Summary Report in the Name field.
-
Click in the Parameters field to open the Parameters window.
-
Specify the Effective Date on which you want status data.
-
Enter the Organization Name for which you want status.
-
Select the Position Type for which you want to see the report.
-
Selections include Over Budgeted Positions, Under Budgeted Positions, Over or Under Budgeted Positions, or All Positions.
-
-
Enter the Variance Percent.
-
The report displays balances for those positions where the variance percent is equal to or greater than the percent you enter.
-
The variance percent is not applicable when you select All Positions as the Position Type.
-
-
Adjust the Start and End Date periods to be included in the report.
-
Enter a unit of currency for the report.
-
Choose the OK button.
-
Complete the batch process request and choose Submit.
Running the Budget Period Position Detail Report
The Budget Period Position Detail Report lists the status of all Positions that are part of a specific Budget for a specified time period.
You run reports from the Submit Requests window.
To run the Budget Position Detail Report
-
Select the Budget Period Position Detail Report in the Name field.
-
Click in the Parameters field to open the Parameters window.
-
Select the Budget Name for which you want the current status.
-
Choose the OK button.
-
Complete the batch process request and choose Submit.
Running the Staffing Budget Details Report
You can run the Staffing Budget Details report in versions of Oracle HRMS prior to 11.5.1 to compare your actual staffing levels with budgeted levels for a specified range of periods.
Note: Use this report if you do not migrate an existing Oracle HRMS budget to the new budget function. For new budgets, run other reports such as the Budget Period Position Detail report.
You run reports in the Submit Requests window.
To run the Staffing Budget Details report
-
In the Name field, select Staffing Budget Details report.
-
Click in the Parameters field to open the Parameters window.
-
Enter the effective date for which you want to see the report.
-
Select the budget and version.
-
Select the start and end periods to include in the report.
-
Choose the Submit button.
Running the Salary Review Report
Use this report to see current and past salaries, and salary proposals, for some or all of your employees. You can restrict the employees to those assigned to a selected organization, job, position, or grade. You can also restrict the report to showing only employees receiving the maximum salary for their grade (defined by the grade rate). You can use the report to show all salaries (approved and proposed) or to show unapproved salary proposals only.
Note: Use this report if you do not migrate an existing Oracle HRMS budget to the new budget function. For new budgets, run other reports such as the Entity Element Summary report.
You run reports from the Submit Requests window.
To run the Salary Review Report
-
In the Name field, select Salary Review Report.
-
Click in the Parameters field to open the Parameters window.
-
Enter the effective date for which you want to see the report.
-
Optionally select an organization, job, position, and/or grade to restrict the scope of the report to employees assigned to these components.
-
If you want to restrict the report to showing salary proposals, select Yes in the Unapproved Proposals Only field.
-
If you want to restrict the report to showing employees receiving the maximum salary for their grade (defined by the grade rate), or a higher salary, select Yes in the Grade Rate Maximum Only field.
-
Choose the Submit button.
Running the Organizational Position Summary Report
The Organizational Position Summary report provides summary budget information for a specified time interval, for each position-controlled organization in your business group. The application groups the results by budget measurement unit.
You run reports from the Submit Requests window. After you run the report, the application displays the report in the View Output page accessible from the View Requests window.
To run the Organizational Position Summary Report
-
Select the Organizational Position Summary Report in the Name field.
-
Enter the Parameters field to open the Parameters window.
-
Enter the Effective Date for which you want to report.
-
Select a Position Type for which you want to see a report.
-
Selections include All Positions, Over Budgeted Positions, Under Budgeted Positions, and Over or Under Budgeted Positions.
-
-
Optionally, enter a Variance Percent.
-
The report displays those positions where the variance percent is equal to or greater than the percent you enter.
-
The variance percent is not applicable when you select All Positions as the Position Type.
-
-
Enter the Start Date and End Date of the time interval for which you want to view summary information.
-
Choose the OK button.
-
Complete the batch process request and choose Submit.
Running the Entity Element Summary Report
The Entity Element Summary report lists the budget status for a specified pay element and entity in a given period. The application groups the results by entity.
You run reports from the Submit Requests window. After you run the report, the application displays the report in the View Output page accessible from the View Requests window.
To run the Entity Element Summary report
-
In the Name field, select Entity Element Summary Report from the list.
-
Click in the Parameters field to open the Parameters window.
-
Specify the Effective Date, Element Name, and Entity for which you want to review status information.
-
Select an Entity Type from the list.
-
You can select All Entities, Over Budgeted Entities, Over and Under Budgeted Entities, or Under Budgeted Entities.
-
-
Optionally, enter a Variance Percent.
-
The report displays summary information for those entities where the variance percent is equal to or greater than the percent you enter.
-
Variance Percent is not applicable when you select All Entities as the Entity Type.
-
-
Enter the Start Date and End Date of the time interval you want to review.
-
Enter a unit of currency for the report.
-
Click OK.
-
Click Submit to complete the batch process request.
Costing
Labor Costs in Oracle HRMS
At all installations of Oracle HR, you can allocate employee costs to cost centers, GL codes and labor distribution codes. You do this by setting up segments of the Cost Allocation key flexfield to determine the windows in which users can select cost codes.
If your installation does not include Oracle Payroll or Oracle General Ledger, you must consider how to relate information on labor costs entered in Oracle Human Resources to your payroll and financial systems.
If your installation includes Oracle Payroll, you use a post-payroll run process to accumulate payroll costs by cost center, GL account code, and the labor distribution codes in use at your enterprise. For installations that also include Oracle General Ledger you can map the segments of the Cost Allocation key flexfield to the corresponding segments of the General Ledger Accounting flexfield. Another post-payroll run process is available to facilitate the transfer of information on payroll transactions to Oracle General Ledger.
Labor Cost Allocation Example
The Sample Payroll Results table below is based on the flexfield setup described in the previous topic. It displays payroll run results for four employees, using accounts and work structures identified using the Cost Allocation key flexfield. The Example Costing Process Results table shows how the Costing process allocates these payroll results:
-
to accounts and cost centers, for the general ledger
-
to accounts for cost centers and product lines within cost centers, for labor distribution purposes.
Sample Payroll Results table
This table displays sample payroll results for four employees:
| Employee | Cost Center | Product Line | Salary | Wages | Overtime | Union Dues |
|---|---|---|---|---|---|---|
| Employee 1 | Production | H201 100% | 1,000 | 400 | 20 | |
| Employee 2 | Sales | H305 100% | 1,500 | |||
| Employee 3 | Production | H201 50% H202 50% | 2,000 | 600 | 30 | |
| Employee 4 | Sales | H305 20% | 1,000 | |||
| H307 40% | ||||||
| H310 40% |
Sample costing results table:
This table shows the allocation of costs from the sample run results:
| Account Code | Production | Sales | H201 | H202 | H305 | H307 | H310 |
|---|---|---|---|---|---|---|---|
| Salaries | 2,500 | 1,700 | 400 | 400 | |||
| Wages | 3,000 | 2,000 | 1,000 | ||||
| Overtime | 1,000 | 700 | 300 | ||||
| Union Dues Liability | 50 | ||||||
| Clearing (see note below) |
Note: Clearing account contains balancing credits for earnings Salary, Wages and Over-time, and balancing debit for deduction Union Dues.
Labor Cost Allocation Example
Labor Cost Allocation Example
The Sample Payroll Results table below is based on the flexfield setup described in the previous topic. It displays payroll run results for four employees, using accounts and work structures identified using the Cost Allocation key flexfield. The Example Costing Process Results table shows how the Costing process allocates these payroll results:
-
to accounts and cost centers, for the general ledger
-
to accounts for cost centers and product lines within cost centers, for labor distribution purposes.
Sample Payroll Results table
This table displays sample payroll results for four employees:
| Employee | Cost Center | Product Line | Salary | Wages | Overtime | Union Dues |
|---|---|---|---|---|---|---|
| Employee 1 | Production | H201 100% | 1,000 | 400 | 20 | |
| Employee 2 | Sales | H305 100% | 1,500 | |||
| Employee 3 | Production | H201 50% H202 50% | 2,000 | 600 | 30 | |
| Employee 4 | Sales | H305 20% | 1,000 | |||
| H307 40% | ||||||
| H310 40% |
Sample costing results table:
This table shows the allocation of costs from the sample run results:
| Account Code | Production | Sales | H201 | H202 | H305 | H307 | H310 |
|---|---|---|---|---|---|---|---|
| Salaries | 2,500 | 1,700 | 400 | 400 | |||
| Wages | 3,000 | 2,000 | 1,000 | ||||
| Overtime | 1,000 | 700 | 300 | ||||
| Union Dues Liability | 50 | ||||||
| Clearing (see note below) |
Note: Clearing account contains balancing credits for earnings Salary, Wages and Over-time, and balancing debit for deduction Union Dues.
Data Costed at the Payroll Level
Sometimes the labor costs from a payroll should all be charged to a particular company within your enterprise, or all be entered in a particular ledger. In this case, you select the code for the company or ledger from the appropriate segment of the Cost Allocation flexfield when defining the payroll.
Also at the payroll level, you can select codes for suspense accounts. A suspense account is one that collects costs from the payroll if segment entries at lower levels are missing. For example, if an employee receives a Special Production Bonus but there is no GL code for this earnings type to debit in the Cost Allocation flexfield, the cost of the bonus goes into the suspense account.
Entries of sums in a suspense account alert you to missing codes, and provide a way to hold unallocated costs until you can make manual journal entries to the correct accounts. Since codes entered in the Cost Allocation flexfield at levels below the payroll level override any entered at the payroll level, costs go to a suspense account only when the correct account codes are not entered at the element link level.
Data Costed at the Element Link Level
You enter the important costing information for an element on its links. This means that all elements for which you must maintain costing information must have at least one link, even those that receive entries during the payroll run as indirect results of the processing of other elements.
When defining a link for an element, you select a costable type that determines whether the payroll run should collect the results of this link for costing purposes. By default, a link's costable type is Not Costed. For the results of elements that process in payroll runs to be collected for accumulation and transfer, you must change this default to a costable type of either Costed, Fixed Costed or Distributed.
Costable Type: Costed
When processing an element for an employee with a link marked Costed, the payroll run checks for Cost Allocation flexfield entries affecting the employee at every level - payroll, element link, organization, assignment, and element entry. Since earnings types may well receive override entries of information for labor distribution purposes at the lower levels of assignment or element entry, the costable type Costed is likely to be best for the links of elements representing earnings.
Costable Type: Fixed Costed
When processing elements marked for Fixed Costing, the system looks for costing information at the payroll, element link and element entry levels only, not the assignment or organization levels. You can, in fact, override the account code at element entry level. This is because the order of priorities for Fixed Costing is Payroll (highest priority), Element Link and finally Element Entry (lowest priority).
Tip: Deduction amounts are usually irrelevant to labor distribution analyses, so elements representing deductions seldom receive lower level entries of costing information. The costable type Fixed Costing may be best for these elements' links. However, this is optional.
Costable Type: Distributed
For labor distribution analysis, you can distribute employer charges, such as employer payments for social security or employee benefits, as overhead costs to be added to employees' earnings. The links of elements representing employer charges you want to distribute in this way require the costing type Distributed.
For each employee, Oracle Payroll distributes the run results of elements with this costable type proportionally over a set of earnings types you specify. This distribution set of earnings types could include, for example, Wages, Overtime and Shift Pay. When you select Distributed as the costable type of a link, you must also enter the name of the distribution set of earnings over which the run results of the link are to be distributed.
See: Defining an Element or Distribution Set, Oracle HRMS Compensation and Benefits Management Guide
Costing and Balancing GL Accounts
For element links whose run results should go to the General Ledger, you enter in the Costing field of the link, the GL account to debit or credit, and in the Balancing field, the account to correspondingly credit or debit.
For earnings types and non-payroll payments, the GL account to debit (for example, Salaries) goes in the Costing field, and the account to credit (for example, Clearing) goes in the Balancing field. For deductions, the account to credit (for example, Union Dues Liabilities) goes in the Costing field, and the account to debit (for example, Clearing) goes in the Balancing field.
Employer Charge Distribution Example
When you give links for elements representing employer charges the costable type Distributed, the Costing process distributes the employer charges as overhead for each employee, over a set of employees' earnings.
See: Data Costed at the Element Link Level
This example shows how employer payments totalling $100 are distributed over a set of earnings including wages and overtime, for the cost center Production and the product lines H201 and H202. The table below shows the distribution of overhead over costs and product line totals.
Overhead Distribution for the Production Cost Center
Total paid to Production Cost Center as Wages run result: $3,000.0
Total paid to Production Cost Center as Overtime run result: $1,000.00
Total for Earnings types specified for distribution: $4,000.00
Ratio for Wages distribution, Production Cost Center = 3000/4000 = .75
Wages overhead = Pension Charge $100 x .75 = $75.00
Ratio for Overtime distribution, Production Cost Center = 1000/4000 = .25
Overtime overhead = Pension Charge $100 x .25 = $25.00
Overhead Distribution for Product Lines H210 and H202
Total paid for Product Line H201 as Wages run result: $2,000.00
Total paid for Product Line H202 as Wages run result: $1,000.00
Total paid for Product Lines 201 and 202 for Wages: $3,000.00
Ratio for Wages distribution, Product Line H201 = 2000/3000 = 0.6667
Product Line H201 overhead = Total Wages overhead $75 x .6667 = $50.00
Ratio for Wages distribution, Product Line H202 = 1000/3000 = .3334
Product Line H202 overhead = Total Wages overhead $75 x .3334 = $25.00
Total paid for Product Line H201 as Overtime run result: $700.00
Total paid for Product Line H202 as Overtime run result: $300.00
Total paid for Product Lines H201 and H202 as Overtime: $1,000.00
Ratio for Overhead distribution, Product Line H201 = 700/1000 = .7
Product Line H201 overhead = Total Overtime overhead $25 x .7 = $17.50
Ratio for Overhead distribution, Product Line H202 = 300/1000 = .3
Product Line H202 overhead = Total Overtime overhead $25 x .3 = $7.50
Distribution of overhead over cost center and product line totals table
The following table describes the distribution of overhead over cost center and product line totals:
| Account Code | Cost Center | Product Line | Product Line |
|---|---|---|---|
| Production | H201 | H202 | |
| Wages | 3,000 | 2,000 | 1,000 |
| Employer Liability Distribution | 75 | 50 | 25 |
| Overtime | 1,000 | 700 | 200 |
| Employer Liability Distribution | 25 | 17.50 | 7.50 |
Employer Charge Distribution Example
Employer Charge Distribution Example
When you give links for elements representing employer charges the costable type Distributed, the Costing process distributes the employer charges as overhead for each employee, over a set of employees' earnings.
See: Data Costed at the Element Link Level
This example shows how employer payments totalling $100 are distributed over a set of earnings including wages and overtime, for the cost center Production and the product lines H201 and H202. The table below shows the distribution of overhead over costs and product line totals.
Overhead Distribution for the Production Cost Center
Total paid to Production Cost Center as Wages run result: $3,000.0
Total paid to Production Cost Center as Overtime run result: $1,000.00
Total for Earnings types specified for distribution: $4,000.00
Ratio for Wages distribution, Production Cost Center = 3000/4000 = .75
Wages overhead = Pension Charge $100 x .75 = $75.00
Ratio for Overtime distribution, Production Cost Center = 1000/4000 = .25
Overtime overhead = Pension Charge $100 x .25 = $25.00
Overhead Distribution for Product Lines H210 and H202
Total paid for Product Line H201 as Wages run result: $2,000.00
Total paid for Product Line H202 as Wages run result: $1,000.00
Total paid for Product Lines 201 and 202 for Wages: $3,000.00
Ratio for Wages distribution, Product Line H201 = 2000/3000 = 0.6667
Product Line H201 overhead = Total Wages overhead $75 x .6667 = $50.00
Ratio for Wages distribution, Product Line H202 = 1000/3000 = .3334
Product Line H202 overhead = Total Wages overhead $75 x .3334 = $25.00
Total paid for Product Line H201 as Overtime run result: $700.00
Total paid for Product Line H202 as Overtime run result: $300.00
Total paid for Product Lines H201 and H202 as Overtime: $1,000.00
Ratio for Overhead distribution, Product Line H201 = 700/1000 = .7
Product Line H201 overhead = Total Overtime overhead $25 x .7 = $17.50
Ratio for Overhead distribution, Product Line H202 = 300/1000 = .3
Product Line H202 overhead = Total Overtime overhead $25 x .3 = $7.50
Distribution of overhead over cost center and product line totals table
The following table describes the distribution of overhead over cost center and product line totals:
| Account Code | Cost Center | Product Line | Product Line |
|---|---|---|---|
| Production | H201 | H202 | |
| Wages | 3,000 | 2,000 | 1,000 |
| Employer Liability Distribution | 75 | 50 | 25 |
| Overtime | 1,000 | 700 | 200 |
| Employer Liability Distribution | 25 | 17.50 | 7.50 |
Data Costed at the Organization and Assignment Levels
When setting up an internal organization for which most or all labor costs go to the same cost center, select that cost center from the appropriate segment of the Cost Allocation flexfield when defining the organization.
For example, if the labor costs of most of the employees in the Commercial Sales Group go against the cost center Sales, select Sales from the list of cost centers when defining the organization Commercial Sales Group. This means that by default, the system accumulates labor costs for each employee assigned to the Commercial Sales Group for the cost center Sales.
Perhaps the costs of some employees assigned to this group should exceptionally be charged to a different cost center. For these employees, you can enter the correct costing information on their assignments. Entries at the assignment level override entries at the organization level.
There may also be employees regularly assigned to work in this group only part time, who work elsewhere the rest of the time. In cases like these, it is not necessary to give employees two assignments. You can enter a number of cost centers for one assignment, specifying the percentage of labor costs to charge to each:
Cost centers with specified labor costs table
The following table describes cost centers with specified labor costs:
| Proportion | Seg. 1 Cost Center |
|---|---|
| 50% | Sales |
| 50% | Public Relations |
You can also enter other types of costing information at the assignment level. For example, if a Production Department employee regularly works 80% of the time on one product line and 20% on another, you can enter this on the assignment.
Employee labor distribution table
The following table describes the employee labor distribution:
| Proportion | Seg. 3 Labor Dist. Code |
|---|---|
| 80% | H201 |
| 20% | H202 |
Notice that assignment level entries are datetracked, so you can enter changes ahead of time.
Data Costed at the Element Entry Level
When you make entries to elements with links marked as Costed for individual employees using the Element Entries window, or for many employees at once using the BEE windows, you can at the same time supply costing information.
Information entered at this level overrides any information entered at other levels. For example, if an employee has costing information on record in a Cost Allocation flexfield segment at the organization or assignment level, an entry of timecard information in this segment at the element entry level overrides the organization or assignment-level information.
The Cost Allocation Key Flexfield
When implementing and using Oracle HRMS, you make selections from the lists in the Cost Allocation flexfield segments as follows:
-
When defining a payroll, you can select a code for the company or ledger holding the labor costs from the payroll.
-
When linking an element representing an earnings type such as Regular Salary, a deduction such as Union Dues, or an employer charge such as a benefit plan contribution, you select a GL code that the element's results should debit or credit, and a code for the balancing GL account to credit or debit.
Note: As well as making entries to the Cost Allocation flexfield at the element link level, you also enter on each link, essential information about the type of costing the system should do for the link. Available types include Costed, Fixed Costed, and Distributed.
See: Data Costed at the Element Link Level
-
When defining an internal organization or entering an employee assignment, you can select codes for the cost centers, product lines, or other structures for which to collect the labor costs of the organization or assignment.
-
When entering timecard data in Oracle Payroll, you can select codes for accounts, cost centers, product lines, and other items listed in the flexfield segments to show how to collect labor costs for particular hours worked.
The different points at which you can make entries to segments of the Cost Allocation flexfield exist as related entry levels. Ranging from top to bottom, the five entry levels are shown in the table below.
See: Oracle HRMS Cost Allocation Key Flexfield Example
The Cost Allocation Entry Level Table
The following table describes the cost allocation entry levels:
| Entry Level | Windows | Purpose of Entry |
|---|---|---|
| Payroll | Payroll | Identifies company or ledger to which all costs from this payroll should go. |
| Link | Element Link | Identifies a GL account to debit and a balancing account to credit, or for deductions, an account to credit and a balancing account to debit. Other entries can identify any other accounts into which run results of the element should go. |
| Organization | Organization | Identifies structures such as cost centers against which to charge the payroll costs of employees in the organization. |
| Assignment | Assignment Costing | Identifies structures such as cost centers and product lines against which to regularly charge payroll costs of this assignment. |
| Element Entry | Element Entries Batch Lines | Identifies structures such as cost centers and product lines against which to charge payroll costs of an employee assignment for a period. Entries often taken from timecards. |
Important: You enable a qualifier for each segment of your Cost Allocation flexfield to control whether it appears at a given entry level. For example, for the Cost Center segment of your flexfield, which receives entries only at the organization, assignment and element entry levels, you enable the Organization, Assignment and Element Entry qualifiers. This segment then appears only at these levels.
Overrides for the Cost Allocation Flexfield
A key feature of the Cost Allocation flexfield is that entries made to its segments at lower levels override any entries at higher levels. Thus, entries from timecards made in a particular segment at the Element Entry level override any entries to this segment made at the employee assignment, organization, link and payroll levels.
This helps to keep your costing information accurate. For example, if employees temporarily work at cost centers or on product lines different from those entered for their organizations or assignments, they can enter the cost center or product line codes together with their time worked on their timecards. On receipt of this costing information at the element entry level, the system correctly charges their time for the period, using this information rather than any entered at the organization or assignment levels.
Setup of the Cost Allocation Key Flexfield
You must define at least one segment of the Cost Allocation key flexfield; you may define as many as 30 segments. To set up this flexfield, consult the explanations and procedures given in the Oracle E-Business Suite Flexfields Guide.
You can control which segments of the Cost Allocation flexfield appear in each of the windows from which users can make entries to this flexfield.
Display of Flexfield Segments
Oracle HRMS implementors and users make selections from the lists in the Cost Allocation flexfield's segments at different levels, that is, in several different Oracle HRMS windows. However, in a particular window, they usually need to access only certain segments of the flexfield.
When defining a payroll you need only the segment containing the companies or ledgers to which a payroll's labor costs should go. When defining a link for an earnings or deduction element, you may need only the segment containing the list of the costing and balancing GL codes. You are likely need the segment containing the list of cost centers only when defining an organization or employee assignment, or making an element entry.
You control the appearance of a Cost Allocation flexfield segment in a particular window by enabling qualifiers for the segment. When you enable a particular qualifier for a segment, this causes the segment to appear and be available for entry in a particular window, as follows:
| Qualifier | Enables Segment's Appearance in |
|---|---|
| Payroll | Payroll window |
| Element Link | Element Link window |
| Organization | Organization window |
| Assignment | Assignment Costing window |
| Element Entry | Element Entries window |
The following table lists the five levels, and the correct order of processing priority.
| Level | Qualifiers for this Level | Typical Segments Displayed at this Level |
|---|---|---|
| Payroll | Payroll | Company code, ledger |
| Element Link | Element, Balancing | GL account codes for costing and balancing |
| Organization | Organization | Cost centers |
| Assignment | Assignment | Project or product codes, or cost centers that do not map onto organizations |
| Element Entry | Element Entry | Project or product codes (for employees who submit timesheets) |
A code entered at a lower level can override a code entered at a higher level. This means that if a segment is populated at element entry level, it overrides all other levels. You can enable as many qualifiers as necessary for a particular segment.
Oracle HRMS Cost Allocation Key Flexfield Example
The Oracle HRMS Cost Allocation Key Flexfield Example
To construct a simple example of a Cost Allocation flexfield, suppose that the departments of an enterprise each constitute a cost center. Suppose also that the general ledger accounts receiving labor costs are Salaries, Wages, Overtime, Bonuses, Union Dues Liability and Clearing.
The Clearing account in this example represents a single account set up for entry of:
-
Credits, in order to balance debits to accounts for earnings types, for example Salaries, Wages, Overtime and Bonuses
-
Debits, in order to balance credits to accounts for deductions, for example Union Dues Liability.
After running the Payroll and Costing processes, you can make journal entries to credit or debit each individual balancing account, making corresponding debits or credits to the Clearing account.
-
Information to be transferred to the General Ledger includes:
-
The totals of salaries and wages paid in departments and cost centers are entered as debits to the Salaries and Wages accounts, and as balancing credits to the Clearing account.
-
The total of bonuses paid to employees is entered as a debit to the account Bonuses, and as a balancing credit to the Clearing account.
-
The total deducted from employees in Production and Quality Control to pay their union dues is entered as a credit to the Dues Liability account, and as a balancing debit to the Clearing account.
To collect information for transfer to the general ledger, this enterprise can construct a Cost Allocation flexfield with two segments, one for identifying cost centers and one for GL costing and balancing codes, as shown in the table below:
The Cost Allocation two segments table
| Seg. 1 Cost Center | Seg. 2 GL Code |
|---|---|
| Accounting | Salaries |
| Production | Wages |
| Public Relations | Overtime |
| Quality Control | Bonuses |
| Sales | Dues Liability |
| Clearing |
Now suppose that for labor distribution purposes, this enterprise accumulates labor costs not just by cost center and GL account, but also by its product lines, represented by the labor distribution codes H201, H202, H305, H307 and H310. The enterprise requires product line costing information such as the following:
-
Total wages paid to produce product line H201, and to check its quality
-
Total paid for overtime to produce product line H201
-
Total paid for salaries and bonuses to sell product line H201
Since this enterprise uses its GL codes for labor distribution, it does not need another segment to hold a separate list of codes. However, it must add another segment to hold product line codes, as the table below shows:
Cost Allocation product line codes table
| Seg. 1 Cost Center | Seg. 2 GL Code | Seg. 3 Labor Dist. Code |
|---|---|---|
| Accounting | Salaries | H201 |
| Production | Wages | H202 |
| Public Relations | Overtime | H305 |
| Quality Control | Bonuses | H307 |
| Sales | Dues Liability | H310 |
| Clearing |
Similarly, if this enterprise needed to identify for each of its payrolls a particular company or ledger to which all the information on labor costs should go, it could define another segment of the Cost Allocation flexfield such as Company or Ledger, to contain a list of the appropriate codes.
Note: Installations including both Oracle HRMS and Oracle General Ledger should take the GL codes for the Oracle HRMS Cost Allocation flexfield and for the Oracle General Ledger Accounting flexfield from the same table. Installations without Oracle GL can set up their own tables of GL codes, possibly populating these tables from their existing financial systems.
See: User-Defined Tables, Oracle HRMS Configuring, Reporting, and System Administration Guide
Subledger Accounting (SLA)
Oracle Payroll now supports subledger accounting. You can continue to transfer your costs to General Ledger (GL) but you have the additional option of transferring costs to subledgers rather than to General Ledger.
The advantages of using subledger accounting are:
-
You can have multiple accounting representations for a single business event so that you can handle the difference between corporate and local audit requirements more easily.
-
You can take advantage of the added level of precision that subledger accounting provides, but you can still view aggregated results at General Ledger level.
Outline of Subledger Accounting
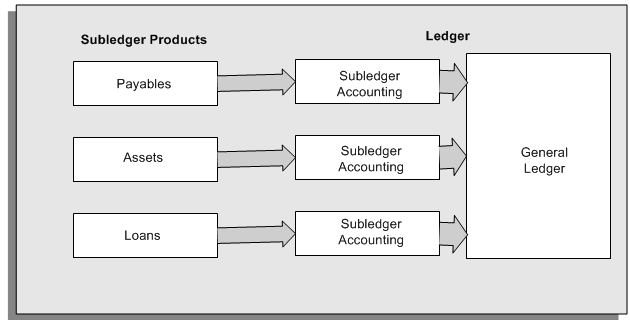
The outline shows that subledger accounting provides an intermediate step between subledger products, and the general ledger. Subledger accounting also:
-
Creates subledger journal entries and subledger journal balances for each payroll cost
-
Holds each journal entry separately rather than summing together costs that have identical cost codes.
Access to Subledger Accounting from Oracle Payroll
The Subledger Accounting menus are accessible from Oracle Payroll:
-
For SLA setup features, navigate to the Subledger Accounting Setups menu (available on the Payroll menu).
See Subledger Accounting Options Setup Overview, Oracle Subledger Accounting Implementation Guide
See Accounting Methods Builder Overview, Oracle Subledger Accounting Implementation Guide
See Post-Accounting Programs, Oracle Subledger Accounting Implementation Guide
See Transaction Account Builder Overview, Oracle Subledger Accounting Implementation Guide
-
For SLA processing, navigate to the User Main menu
(available on the View menu).
Running the Costing Process
Allocating Costing Percentages at Assignment Level
Use the Assignment Costing window to specify a percentage allocation of costs for an employee assignment.
You allocate costing percentages from the Assignment Costing window in Oracle Self-Service HRMS.
To allocate costing percentages at assignment level
-
View the people in your hierarchy and select the Action icon for the employee and assignment combination that you want to cost.
-
Choose the date on which you want your changes to take effect. Select either Changes should take effect on the effective date, or Changes should take effect as soon as final approval is made. Click Continue.
-
View the existing assignment costing information for the employee. You can amend the existing percentages or Add Another Row so that you can enter additional costing information.
You can also remove an existing row by setting an end date for it, or purging the data. If you choose to purge the data, remember that records can have multiple start dates. Make sure that you select the earliest available start date for the record as your start date for the purge. Remember that if you remove a row, you must also adjust the percentage allocations in the remaining rows so that they still total 100.
You can also update or correct a record. If you make a correction, your effective date for the correction must be the start date of the record. However, this effective date can correspond to any of the multiple start dates that exist for this record.
You can search for existing cost code combinations based on Fund, Organization, Object, Activity. Alternatively, click Create to create a new cost code combination.
-
When you have completed your changes, click Next to move to the Summary window. Click Submit to save your changes.
Previewing Cost Allocations
When you are making a series of cost allocations in preparation for running the Costing process, you can preview the overall effect of your changes before you run the Costing process. You can also see a graphical display of the costing allocations. The preview helps you to:
-
See how separate costing entries at different levels combine to give a consolidated costing allocation.
-
Detect potential errors, correct them at an early stage, and complete the Costing process quickly and efficiently when you do run it.
You preview the effect of your changes from the View Cost Allocations window.
To preview cost allocations and identify incorrect costings
-
Select the assignment that you want to cost.
-
Choose the Others button.
-
Select View Cost Allocations
You can now see each of the costed elements for the assignment and their derived values.
-
Choose the Validate button to display any costings that are invalid. If any costings are invalid, the entry in the Cost Allocations column is marked by an X.
-
If you want to see further details about any costing, choose the Details icon. This identifies the segment of the Cost Allocation field on which the error occurred.
-
Correct the invalid entry by navigating to the form containing the invalid segment. Then, preview cost allocations again to confirm that all cost allocations are now valid.
To display a graphical analysis of cost allocations
-
Select the assignment that you want to cost.
-
Choose the Others button.
-
Select View Cost Allocations.
-
Choose the Graphical Analysis tab.
-
Select the segment that you want to view.
-
Choose the Go button to see a pie chart display of the cost allocations for the segment.
Running the Costing Process
The Costing process generates journal entries for your ledgers and costing information relating to labor costs. You can enter start and end dates of the period over which you want to cost payroll runs in order to cost all your runs in one process. Alternatively, you may want to produce a costing run for each payroll run
The Costing process includes all employees with active assignments on the payroll that you specify. This means that you can get accurate costings for those employees who have moved to a different payroll by the time you run the Costing process.
You run the Costing process from the Submit Requests window. You should run Costing before the Transfer to GL process.
-
In the Name field, select Costing.
-
In the Parameters window, select the name of the payroll or consolidation set to run the process for. When you select a payroll, its default consolidation set displays.
-
Enter the start and end dates of the time span for the Costing process to cover.
-
Choose the Submit button.
Running the Costing Summary Report
Use the Costing Summary report to report the summary of:
-
The results of Costing processes within a selected date range
-
Results of a particular Costing process
This report displays the individual Costing Flex segments you defined. It breaks down the cost information based on the unit of measure, displays them for each code you defined, and also includes the partial period accruals.
To run the Costing Summary Report
-
In the Name field, select "Costing Summary Report".
-
Select the Parameters field to open the Parameters window.
-
Specify the begin and end dates for this costing period.
Alternately, you can select a Costing Process you have run previously.
-
Specify the name of the payroll for which the costing summary is required.
-
Select a consolidation set.
-
(US and Canada only) Select a GRE.
-
In the Include Accruals field, specify the Partial Period Accrual Type you want included in the report spreadsheet.
-
(US and Canada only) Indicate either GRE or Payroll Name as the primary sort criteria for this report.
The parameter you do not choose automatically becomes the secondary sort criteria.
-
Specify an file format for this report's output file. You can choose between CSV or HTML formats.
-
If you want to produce this report in Portable Document Format, (PDF), select a template.
-
Choose OK and then Submit.
Running the Cost Breakdown Report
There are two versions of the Cost Breakdown report:
-
The Cost Breakdown Report for Costing Run shows summarized costing totals for a specified costing process.
-
The Cost Breakdown Report for Date Range shows summarized costing totals for a particular consolidation set or payroll over a specified interval.
Both versions show the distribution of payroll calculation results plus corresponding General Ledger and labor cost details.
You run both versions in the Submit Requests window.
To run the report for a Costing Run:
-
In the Name field, select the report name. Then enter the Parameters field to open the Parameters window.
-
Enter the costing process for which you want to generate the report.
-
Choose whether you want to include partial period accruals on your report, by making one of the following selections in the Include Estimate Costing field:
-
Accruals - to display accrued amounts.
-
Accruals and Reversals - to displays accrued amounts and reversals.
-
Neither - to display neither accruals nor reversals.
-
-
If you want to produce this report in Portable Document Format, (PDF), select a template.
-
Choose OK
-
Choose the Submit button.
To run the report for a Date Range
-
In the Name field, select the report name. Then enter the Parameters field to open the Parameters window.
-
Enter the start and end dates for which you want to generate the report.
-
Select the name of either the payroll or the consolidation set for which you want to see information. Additionally, if your legislation allows costing by reporting entities, you can specify whether this costing run should apply to all reporting entities, or to a single reporting entity that you select in the reporting entity field.
-
Choose whether you want to include partial period accruals on your report, by making one of the following selections in the Include Estimate Costing field:
-
Accruals - to display accrued amounts.
-
Accruals and Reversals - to displays accrued amounts and reversals.
-
Neither - to display neither accruals nor reversals.
-
-
If you want to produce this report in Portable Document Format, (PDF), select a template.
-
Choose OK
-
Choose the Submit button
Running the Costing Detail Report (generic)
The Costing Detail report provides pertinent costing allocation details at the element and employee level. This report is capable of providing a complete representation of the entries transferred to Oracle General Ledger; you can collapse this data to look at the total credit and debit values at the GRE or Payroll level.
You run this report from the Submit Processes and Reports window.
To run the Costing Detail (generic) report
-
Select Costing Detail Report (generic) in the Name field.
-
If the parameters window does not open automatically, click in the Parameters field to open it.
-
Select the Parameters for the report. See the Costing Detail Report (generic) Parameters section below for more information.
-
Select OK and Submit.
Costing Detail Report (generic) Parameters
The following parameters exist for the Costing Detail Report:
| Costing Effective Date Begin (required) | Enter the start date for the report. Records processed by costing on or after this date can be picked up for the report. |
| Costing Effective Date End (required) | Enter an end date for the report. Records processed by costing after this date will not be picked up by the report. |
| Selection Criterion | Use the Selection Criterion field to restrict the output of the Costing Detail report. Select either the Element Classification, the Element Name, or the Element Set. The corresponding field in the Parameters window becomes mandatory. If you leave the Selection Criterion field blank, the report includes costing information on all three parameters for all elements. |
| Element Set | If you select the Element Set as the Selection Criterion for the report, then select an element set to include the costing information for that element set. |
| Element Classification | If you select Element Classification as the Selection Criterion for the report, then select an element classification to report the costing information for that element classification. |
| Element | If you select Element as the Selection Criterion for the report, then select an element to report only the costing information for that element. |
| Costing Process | Select the costing process from the list of values to report only the costing information for that run. This is a mandatory field. |
| Payroll | Select a payroll to report only the costing information for that payroll. If you do not select a payroll, then all payrolls are included in the report. |
| Consolidation Set | Select a consolidation set to report only the costing information for that consolidation set. Otherwise, all consolidation sets are included in the report. |
| Government Reporting Entity (Canada, US only) | Select a GRE to report only the costing information for that GRE. Otherwise, all GREs are included in the report. |
| Organization | Select an organization to report only the costing information for that organization. Otherwise, all organizations are included in the report. |
| Location | Select a location to report only the costing information for that location. Otherwise, all locations are included in the report. |
| Employee | Select an employee to report only costing information for the employee. Otherwise, all employees are included in the report. |
| Assignment Set | Select an assignment set to report only the costing information for the specific assignment set. Otherwise, all assignments are included in the report. |
| Accruals | Select either Accrual & Reverse Accrual or Accruals in the Include Accruals field. |
| Output File Type (required) | Select either HTML or Comma Delimited format. If you select HTML, then the output file is displayed in a web browser when opened from the View Requests window. If you select Comma Delimited, then the output file is in .CSV format and can be saved and viewed in a third party application. |
Mapping Cost Allocation to the Accounting Flexfield
If your installation includes Oracle Payroll and Oracle General Ledger, you can run the Transfer to GL process in each payroll period after you have run the Costing process. The Transfer to GL process transfers costing results to the GL Accounting flexfield. Before running this process, you must map segments of the Cost Allocation flexfield to the corresponding segment of the Accounting flexfield for each payroll. To do this, use the GL Map window.
To map Cost Allocation to Accounting flexfield segments
-
Set your effective date to the date from which this mapping should take effect.
-
Query the payroll for which you are performing the mapping. Its period type appears in the Period field.
-
Select the ledger for whose Accounting flexfield you are performing the mapping. Costing information from a payroll can go to only one ledger.
-
Select the name of a Cost Allocation flexfield segment in the Payroll Costing Segment field for which a corresponding segment exists in the Accounting flexfield. Select the name of the corresponding segment in the GL Chart of Accounts Segment field. Repeat this process for all the Cost Allocation flexfield segments for which there is a corresponding segment in the Accounting flexfield.
-
Save your entries.
Running the Partial Period Accrual Calculation Process
If the end of your accounting period occurs before the end of your current payroll period, you may have outstanding costs that have accrued since the end of your last complete payroll period. You can incorporate these accrued costs in your end of period accounting by:
-
Posting estimated costs for the accrued period
-
Reversing these estimated costs when the actual costs become available
You do this by:
-
Running the Partial Period Accrual process on the last day of the accounting period
-
Running the Transfer to GL process, also on the last day of the accounting period.
-
Running the Transfer to GL process again when the actual costs become available at the end of the current payroll period. This cancels your estimates and replaces them with the actual costs.
To run the Partial Period Accrual Calculation Process
-
Enter the name of the payroll for which you want to calculate partial period accruals.
-
Enter the consolidation set name.
-
Enter the period date.
The period date specifies the payroll period that you want to use as a basis for the accruals. The process bases its estimates on runs whose effective date (check date) lies in the payroll period containing the period date you specify here. If you offset your check date (say, a week after the period end date), offset the period date as well. Specify a period date within the pay period containing the check date.
-
Confirm that the accounting date is correct.
This is the effective date (the date on which you will post your estimates to the general ledger), typically the last date of the accounting period.
-
Choose OK.
-
Choose Submit
You have now calculated the estimated costs, and you can transfer them to General Ledger. You have also automatically stored a negation of these estimates and this is used to cancel the estimates and replace them with the actuals when you next run the Transfer to GL process.
Running the Transfer to GL Process
If your installation includes Oracle General Ledger, you can run the Transfer to GL process. This transfers the results of the Costing process for a payroll to the Accounting flexfield of Oracle General Ledger.
It is not necessary for your payroll to use the same currency as your general ledger.
The Transfer to GL process includes all employees with active assignments on the payroll that you specify. This means that you can get an accurate transfer of costs for those employees who have moved to a different payroll by the time you run the Transfer to GL process.
You run the Transfer to GL process from the Submit Requests window.
To run the Transfer to GL process
-
In the Name field, select Transfer to GL.
-
In the Parameters window, select the payroll or consolidation set for which you are running the process. When you select a payroll, its default consolidation set displays.
-
If you want to set the accounting date for the transfer to date earned, then change the TGL_DATE_USED pay action parameter to "E". If you do not do this then the accounting date of the transfer defaults to the check/cheque date of the originating payroll
-
Enter the start and end dates of the period for which you want to transfer Costing process results.
-
Choose the Submit button.
Running the Upgrade Historical Payroll Data to SLA Process
Run this process to migrate any historical costing data to Sub Ledger Accounting (SLA). The application migrates the payroll data from General Ledger (GL) to SLA for all the closed or non adjustable periods of the selected ledger.
Note: You run this process to migrate payroll costing details that have been posted already to General Ledger prior to R12's Sub-Ledger Accounting.
Oracle recommends you to run the concurrent program in a logical sequence for easy reconciliation. For example, upload GL data of 2006 periods to payroll after 2005.
You run this process in the Submit Requests window.
To run the Upgrade Historical Payroll Data to SLA Process
-
In the Name field, select Upgrade Historical Payroll Data to SLA.
-
Select the Parameters field to open the Parameters window.
-
In the Parameters window, select Ledger to indicate the ledger to use to migrate the costing data.
-
Enter the start date and end date for which you want to migrate the historical payroll data.
-
Click OK and then Submit
Running the Transfer to SLA Process
If you use Subledger Accounting, use the Transfer to SLA process to pass your payroll costs to General Ledger. The Transfer to SLA process creates an SLA accounting event for each of your payroll assignment actions. The Subledger Accounting application then notifies you when it has intercepted your accounting events. The notification indicates that you can use the Subledger Accounting application to process your costs and report on them.
Note that you cannot roll back transfers to SLA once SLA has finalized the journal entries.
You run the Transfer to SLA process from the Submit Requests window.
To run the Transfer to SLA process
-
Select your payroll.
-
Select a consolidation set.
-
Select the start date.
-
Select the end date.
-
Choose the Submit button
Running the Costing of Payment Process
Use the Costing of Payment process to provide automatic accounting entries that reduce your dependence on manual journal entries. By default, the Costing of Payment process always costs all payments regardless of whether they are cleared or uncleared. However, the process parameters enable you to override the default so that you can also cost:
-
Uncleared payments only
-
Cleared payments only
You have the flexibility to schedule your costing of payments as follows:
-
Several separate operations: You cost uncleared payments during the payroll cycle and then cost cleared payments separately during the reconciliation cycle.
-
A single operation: You wait until the reconciliation cycle has completed and then cost cleared and uncleared payments in one consolidated operation.
You run the Costing of Payment process from the Submit Requests window.
To run the Costing of Payment process
-
If you want to cost payments for a single payroll, select the payroll name.
-
If you want to cost payments for a consolidation set, select the consolidation set name.
You must choose either a payroll or a consolidation set.
-
Enter the start date and end date to specify the period for which you want to cost payments.
-
Select a payment type. Your selection determines what type of payments get costed when you run the Costing of Payments process.
-
Uncleared payments: Select to cost uncleared payments within the payroll cycle
-
Cleared payments: Select to cost cleared payments within the reconciliation cycle
-
Uncleared and cleared payments: Select to cost uncleared and cleared payments within the reconciliation cycle
-
-
Click OK to confirm that your parameters are correct.
-
Click Submit to run the Costing of Payment process.
When the Costing of Payment process has completed, you can see the results either in the Payroll Process Results window or in the Assignment Process Results window. In either case, results appear as follows:
-
The Costing Breakdown window shows the overall number of costed payments for a payroll and indicates whether the status is complete or pending.
-
The Costing window shows the individual costed values for a payment method.
-
Running the Costing of Payment Summary Report
Run the Costing of Payment Summary report to display the summary of costing data at the selected payroll or GRE level within a selected date range
You can sort summary data either by Payroll or GRE name. The report also display sum of credit and debit values of all payrolls or GREs.
You run the Costing of Payment Summary Report from the Submit Requests window.
To run the Costing of Payment Summary Report
-
In the Name field, select Costing of Payment Summary Report.
-
If the parameters window does not open automatically, select the Parameters field to open the Parameters window.
-
Enter the begin and end dates for the costing period.
-
You must select the costing process that you have run previously.
Note: You can either specify the dates or select the costing process but not both.
-
Specify the name of the payroll for which the costing summary is required, otherwise, all payrolls are included in the report.
-
Select a consolidation set to restrict the report otherwise, all consolidation sets are included in the report.
-
Select a GRE, if applicable.
-
Indicate either GRE or Payroll Name as the primary sort criteria for this report. The parameter you do not choose automatically becomes the secondary sort criteria.
-
Specify a file format for this report's output file. You can choose between CSV or HTML formats. If you select HTML, the output file is displayed in a web browser when opened from the View Requests window. If you select Comma Delimited, the output file is in .CSV format and can be saved and viewed in a third party application.
-
Click OK and then click Submit.
Running the Costing of Payment Breakdown Report
You run the Costing of Payment Breakdown Report to view the costing results consolidated at ledger and account type level. This report displays the costed value for each cost segments for ledger or account type combination. You can view data by currency code and the complete costing of payment values
You run the report in the Submit Requests window.
To run the Costing of Payment Breakdown Report
-
In the Name field, select the report name.
-
If the parameters window does not open automatically, select the Parameters field to open the Parameters window.
-
Specify the start and end dates for the costing period. Any records processed by costing before or after this date will not be picked up for the report.
-
Enter the costing process for which you want to generate the report.
Note: You can either specify the dates or select the costing process but not both.
-
Specify the name of the payroll for which the breakdown of costing information is required, otherwise, all payrolls are included in the report.
-
Select a consolidation set to restrict the information within the report, otherwise, all consolidation sets are included in the report.
-
Select a payment method to report the costing information. When you select the payment method, the payment type ID automatically displays for the selected payment method.
-
Specify a file format for this report's output file. You can choose between CSV or HTML formats. If you select HTML, the output file is displayed in a web browser when opened from the View Requests window. If you select Comma Delimited, the output file is in .CSV format and can be saved and viewed in a third party application.
-
Click OK and then click Submit.
Running the Costing of Payment Detail Report
You run the Costing of Payment Detail report to validate costing of payment results at an assignment or payment level.
You run this report from the Submit Requests window.
To run the Costing of Payment Detail report
-
Select Costing of Payment Detail report in the Name field.
-
If the parameters window does not open automatically, click in the Parameters field to open it.
-
Enter the start date for the report. Any records processed by costing on or after this date can be picked up for the report.
-
Enter an end date for the report. Any records processed by costing after this date will not be picked up by the report.
-
Select a payroll to restrict the costing information for this payroll only, otherwise, all payrolls are included in the report.
-
Select a consolidation set to report the costing information for the consolidation set you select; otherwise, all consolidation sets are included in the report.
-
Select a payment method to report the costing information.
-
When you select the payment method, the payment type ID automatically displays for the selected payment method.
-
Select an employee to the report only costing information for the employee you select; otherwise, all employees are included in the report.
-
Select an assignment set to the report only costing information for the assignment set you select; otherwise, all assignments sets are included in the report.
-
Select either HTML or Comma Delimited format. If you select HTML, the output file is displayed in a web browser when opened from the View Requests window. If you select Comma Delimited, the output file is in .CSV format and can be saved and viewed in a third party application.
-
Click OK and Submit.
RetroCosting
RetroCosting
The RetroCosting process ensures that the costing information entered for payroll processing is correct. It does this by recalculating all costing records using current costing information and then comparing these results with the existing costing information. This identifies any discrepancies between current costing information and existing costing records. Such discrepancies may arise when:
-
The definition of the Costing key flexfield segments has been changed at any level, for example payroll, organization, assignment, element link or element entry.
-
The following changes have been made at element link level:
-
Correction of the costable type of a link from Costed to Not Costed, or from Not Costed to Costed.
-
Corrections to the values of costed links, such as Costed, Fixed Costed and Distributed.
-
Corrections of balancing account codes.
-
Corrections of distribution sets for element links marked as distributed.
-
-
The codes of distribution set member elements have been changed
-
Costing records do not exist because the costing process did not run successfully.
Running the RetroCosting Process
You can use the RetroCosting process to make retrospective costing corrections. This applies where the correct costing amounts have been entered but assigned to the wrong costing code. The need for RetroCosting arises if the original costing code has been incorrectly entered, or if there has been a late change to the costing code. In each instance RetroCosting enables you reassign costs to the correct costing code.
The RetroCosting process does not involve any change to the way in which you transfer costs to GL. After you have applied the RetroCosting process you can transfer costs to GL as you would for non-retroactive costs.
To run the RetroCosting process:
-
Enter retroactive costing changes using DateTrack.
-
If the process is to run for several assignments, create the assignment set.
-
Navigate to the Submit Processes and Reports window and select RetroCosting. Enter the following as process parameters:
-
Payroll Name (optional)
-
Consolidation Set (mandatory)
-
Start Date (mandatory). This is start of the period over which the RetroCosting is to be applied.
-
End Date (mandatory). This is the date on which the retroactive costing data takes effect. The process will include all historic costing from the start date through to the end date.
-
Assignment Set (optional)
-
-
View Process Results
There is an assignment action with the type RetroCosting for each assignment in which there has been a change of costing information.
You can view the retroactive costing records from the Payroll Process Results window:
-
Select the RetroCosting action for the assignment and period.
-
Click on Costing
You can also see RetroCosting process results on the Costing Breakdown Summary Report
-