General Compensation Structures
General Compensation Structures Overview
Using Oracle HRMS, you have all the flexibility you need to model your compensation and benefit packages. You decide exactly what information you want to hold for compensation management and, if you require it, for payroll processing.
This overview outlines the generic concepts and procedures for setting up compensation. However, there are additional considerations for salaries, absences and PTO accruals, benefit plans, collective agreements, and setting up earnings and deductions for payroll processing. These are covered in other areas.
Elements: Define - Administer - Process
Element is an Oracle HRMS term for the components of a compensation and benefits package, such as salary, PTO accrual plan, and health plan. By defining elements, you can structure information relating to employees' compensation and benefits in a highly flexible way.
First, you define elements, then you administer and process them.
Define
Definition includes rules about valid compensation values, who can receive the elements, and how they are processed. You define elements, and associated rules and formulas, as part of your Oracle HRMS implementation. You can define new elements and make certain changes to existing definitions at any time.
Administer
When definition is complete, you administer compensation and benefits by making element entries for your employees. You can quickly record earnings, deductions, time worked and other information by entering elements in batches.
Process
You process earnings and deductions by running payrolls. The payroll run automatically uses the calculations you have written as formulas, and uses other rules (such as processing frequency) that you have defined.
Compensation Objects
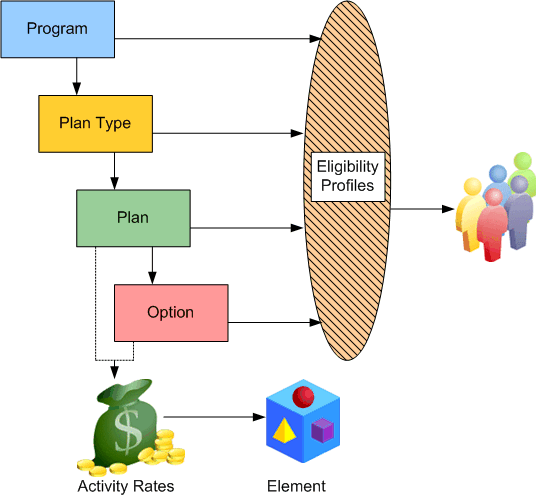
For most benefits and some types of compensation, you define compensation objects as well as elements. You can define a hierarchy of compensation objects, optionally starting with programs at the highest level, to represent a package of benefits you offer, followed by plan types, plans, and options. A plan type is a category of plans, such as a medical plan type. A plan is a specific offering, such as a bonus or a dental plan, and an option is an electable choice within a plan, such as 1 x Salary.
If you use SSHR, defining compensation objects enables you to delegate tasks such as the allocation of salary increases or bonuses to line managers, by issuing budgets. Employees can use self-service to enter voluntary contributions, such as savings plans, or charitable donations. They can also manage their own enrollments in benefit plans, while the back-office maintains control of the plan's administration.
If you use iRecruitment, defining compensation objects enables your hiring or line managers to assign benefits components to eligible applicants when they create or update offers. For example, you can set up plans such as car and relocation.
To speed up implementation, you can use Plan Design Copy to copy a plan or program and all its associated definitions, then you can configure these to create a new plan or program.
Eligibility Profiles
If you have defined compensation objects, you manage participation by defining eligibility profiles and attaching them to the appropriate level of the hierarchy. You can define several profiles for each object, and each profile can contain both required and optional criteria. For example, the profile could specify that eligible employees must work full time, and either have been employed for at least two years, or be assigned to a manager grade.
Activity Rates
You can attach any number of activity rates to a plan or option to specify the contributions made by employee and employer, or the distributions, such as compensation awards. When you define an activity rate, you can associate it with an element. Activity rates support a variety of calculation methods to determine how much a person pays or receives: flat amount, multiple of premium, multiple of elected coverage, and so on. When a participant enrolls in a plan, the enrollment process runs the calculation and enters the result on an element entry for the employee.
General Compensation Structures
Reporting On Compensation Data
Oracle HRMS includes a number of windows and reports for compensation data, such as the Salary Review Report, and the List Employees by Element window.
In SSHR, you can use the Compensation History page to view employee information such as salary changes, bonuses, stock options, monetary compensation grouped by year, ranking, jobs, and non-monetary compensation. If you use Compensation Workbench, this feature supplies several reports for salary changes, bonuses, and stock options.
Oracle HRMS also includes some Discoverer Workbooks to enable you to analyze salary information by organization, supervisor, and job, comparing with grade rate values where appropriate.
See: General Compensation Structures -- Reports, Oracle HRMS Configuring, Reporting, and System Administration Guide
Using System Extract, you can define interfaces to extract compensation data for reporting or transfer to third parties. Oracle HRMS supplies predefined extracts that you can use or configure. See: HR/Payroll Extracts.
Key Concepts
To get the most out of the compensation and benefits functionality of Oracle HRMS, you need to understand the following key concepts:
-
Elements
-
Input values
-
Element links
-
Element classifications
-
Element entries
-
Plan design
-
Eligibility profiles
-
Activity rates
General Compensation Structures
What kinds of compensation information can you record?
All kinds, depending on how much information you require. You decide what types of compensation and benefits you want to track, the information you need to hold for each type, and the rules that determine who receives the compensation and how often it is paid.
Can you monitor the costs of compensation policies?
Yes, you can allocate labor costs to particular departments, products, or projects. You can enter default cost centers for organizations and employees, then override these, if required, when you enter timecard data.
How can you review the effectiveness of compensation packages?
You can compare salaries and other compensation for any groups of employees, for example grouped by organization, position or grade. You can break down salary changes into components, such as Cost of Living, Location Adjustment, or Promotion, to identify any performance-related increases. You can also associate salary changes with performance reviews.
Using HRMS Intelligence, you can compare salary trends, manpower changes, and group skills analyses.
What happens when you need to change compensation policies?
With DateTrack you can make future-dated changes to your information safe in the knowledge that these changes will not become effective in the system until the correct date.
In this way you can use your compensation and benefit information to plan changes ahead of time; analyze the impact of these changes; adjust these changes and generally smooth out the workload that is often associated with major changes in compensation and benefits policy.
How do you manage individual salary packages?
You can define salaries for groups of employees, with default values and validation rules if you require them, and enter individual salary changes for employees at any time. You can associate salary changes with the results of performance reviews, and you can show the composition of any increase by components such as cost of living, and individual performance. You can enter proposed changes to take effect in the future and confirm these later with the click of a button.
What about grade-related pay?
Oracle HRMS handles both pay rates that are directly related to grades, and rates on grade-related pay scales. To relate pay directly to grades, you can specify valid salary ranges or fixed pay rates for each grade. If your employees are paid from a pay scale (perhaps determined by collective agreement), you can associate each grade with several points on a pay scale.
How do you ensure employees receive the compensation dictated by a collective agreement?
You can define entitlement items to represent the compensation and benefits that are subject to a collective agreement. You define an eligibility profile to determine who can receive this entitlement item, and associate both with a collective agreement. Provided that an employee already has an element entry for the compensation or benefit, applying the collective agreement to the employee updates the entry to the values recorded in the collective agreement.
What does Oracle offer for benefits administration?
We offer a choice, to match the varying complexity of benefits administration requirements.
The Standard Benefits feature set lets you define your benefits offering in a hierarchical manner, so that requirements you specify at the program level are inherited by the plans and options in that program. You can use a variety of factors, such as length of service, to define eligibility requirements for participation in a plan. The system supports centralized enrollment by benefit administrators or web-based self-service enrollments. Standard benefits is best for organizations that outsource a significant portion of their benefits administration. System extract features let you export data to third party benefits administrators.
If you administer your own benefits, or your requirements include offering flexible benefit plans, you should implement Oracle Advanced Benefits. This provides the full solution for benefits management, including life event triggered enrollments and communications, online life event processing, processing of flexible spending account claims, and what-if eligibility analysis.
For US implementations, we also continue to offer Basic Benefits, which is a limited feature set that supports administration of benefit plans for employees and their dependents, including COBRA coverage.
Can you be sure that compensation information remains confidential?
Yes, you can. Oracle HRMS security features enable you to choose which users can view compensation information, what types of compensation they need access to, which employees records they can see, and whether they are able to update them.
Can you enter weekly timecard data?
Yes, using Batch Element Entry, you can enter timecard information for a group of employees, using default values as appropriate. You can validate your entries against system rules and external control totals before uploading it to the database in time for the payroll run.
How does Oracle HRMS help reduce data entry errors?
There are three ways:
-
By removing the need to make entries at all, when compensation entries are standard for a group of employees and can be entered automatically.
-
By reducing keystrokes when you use Batch Element Entry to enter batches of entries.
-
By validating all entries using rules you define at setup time.
Can you make one-time changes to entries?
Yes. Some types of compensation or payment (such as expense reimbursements) need only be entered for the period to which they apply. For others, the regular value can be adjusted if you need a different value for one payroll run.
I'm entering compensation details for analysis but not for payroll processing. How do you reduce data entry work to a minimum?
If the same compensation entry applies to a group of employees, the system can enter it automatically. You need to set up the element with standard links. Use Batch Element Entry to start or update other entries in batches.
You can download salary information to a spreadsheet, update it there, and upload the new information to the database.
Can you see a history of all compensation values for an employee over time?
Yes, you can view all changes for one or more types of compensation. For salaries, you can also see new proposed salary changes.
How do you compare compensation for groups of employees?
You can select employees by organization, job, position, or grade and view past and current salaries or new salary proposals. For other types of compensation, you can compare the latest values for all employees in any period of time you choose.
If you use grade rates, you can compare compensation entries for all employees on a certain grade, and also see these values as a percentage of the midpoint defined for the grade.
Elements
Elements: Building Blocks of Pay and Benefits
With Oracle HRMS, you define a working model of your own types of compensation and benefits and the policies or business rules that govern the allocation of these to your employees. You define these types as elements. Elements are the building blocks of pay and benefits, both for HR analysis and payroll processing.
-
Earnings, such as salary, wages, and bonuses
-
Benefits, such as employee stock purchase and pension plans
-
Absences from work
-
Non-payroll payments, such as expense reimbursements
-
Tangible items distributed to employees, such as tools, uniforms, mobile phones, or computers
-
Voluntary and involuntary deductions, as well as pre-tax and tax deductions
-
Employer taxes and other employer liabilities
There is no limit to the number of elements you can define, and all your definitions are datetracked.
How Are Elements Created?
Some elements are supplied predefined with Oracle HRMS, some are available in template libraries, others are generated by the system when you define certain types of compensation and benefits, and the remainder you can define using the Element window to best meet the needs of your own enterprise.
Predefined Elements
The predefined elements are specific to your localization. They typically include deductions for tax and wage attachments. They may also include standard earnings, such as salary. You should not make any changes to these predefined elements.
Template Elements
Using the Configuration Workbench, you can select many earnings and deductions from a template library for your country and industry. Your selected earnings and deductions form a template set that you can load into your business group. The template set includes the elements and the balances, balance feeds, and formulas required for payroll processing. You can configure any of these definitions to match your specific requirements.
Generated Elements
In certain legislations, including North America and the UK, Oracle Payroll users can initiate earnings and deductions, and the system generates the elements you require, along with balances, balance feeds, and formulas. The method of initiating earnings and deductions depends on your localization. Typically you use the Element Design Wizard, Earnings and Deductions windows, or other template windows for specific earnings and deduction types. The processing options you select in the wizard or window determine the rules embedded in the generated elements and formulas. As with template elements, you can configure generated elements and formulas to match any special requirements.
Also, when you create PTO Accrual Plans, the system generates elements for you.
Introduction to Element Definition
The following diagram illustrates the items that you can define or select to control the entry and processing of any earning, deduction, basic benefit, or payment.
Compensation Definition
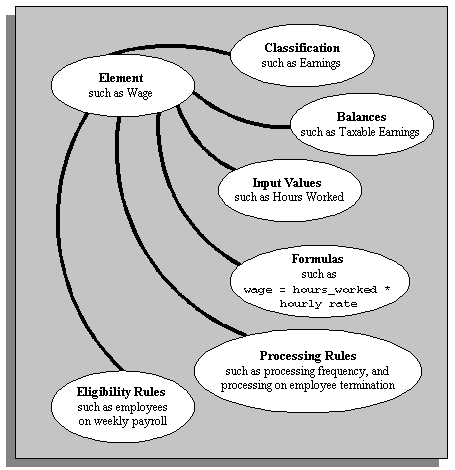
To take a simplified example, you could define an element called Wage, for hourly paid employees. You classify it in the predefined classification Earnings, which determines when it is processed in the payroll run and what payroll balances it feeds.
You specify one input value, Hours Worked, which must be entered in each pay period. (If necessary, you can define up to 15 input values, with fixed values, defaults, or validation.)
You associate a formula with the element, to calculate the wage for the pay period. A simple formula might be hours worked (from the input value) multiplied by hourly rate (which might, for example, be entered in the Grade Rate window).
You define who is eligible for the element by linking it to components of the employee assignment, such as grade, payroll, salary basis, or organization. In this example, the wage element is available to all employees on the weekly payroll.
You can define other processing rules, such as a termination rule. For example, you might specify that the employees' entry of the wage element should not close down on their termination date but remain open for processing of final pay.
Input Values: Flexible Description of Compensation
To give an employee an earning or deduction, you make an element entry. An entry can contain up to 15 items of information, which you define when you create the element. For example, for a company car element, you might want to store car make, model, year, date of issue to the employee, and mileage when issued.
These items of information are called input values. You decide what validation to apply to these values, whether they are required or optional, and the type of information they can accept:
-
Alphabetic characters or words
-
Integers or numbers
-
Money
-
Hours and minutes
-
Date, day, or time
This list of unit types is predefined and you cannot add to it.
Processing Input Values
Input values are so called because they are the inputs to calculations performed by Oracle Payroll. In a payroll run, formulas process the input values and other database information to produce run results.
For example if you have Payroll and your enterprise makes overtime payments, you might write a formula to calculate the payment amounts for each assignment from inputs of the overtime rate and the hours worked for the period. The payroll run then processes each assignment and produces the overtime payment amounts as run results.
Rules for Allocating Compensation
While some elements may represent compensation, equipment, or deductions available to all employees, many elements are available only to certain groups of employees. For example, your enterprise may provide company cars only to employees in the Sales Department.
To determine which employees are eligible for an element, you build links to the assignment components that employees must have to receive entries of the element. Links rule out the possibility of employees getting element entries by mistake.
For example, you might want to give a production bonus only to those employees who work full time in Production and are on the weekly payroll. To do this you would define a link between the element Production Bonus and the combination of the Production organization, the Full-Time assignment category and the Weekly payroll.
Note: When you define a link for a benefit, do not select any assignment components to restrict eligibility for the benefit. Instead use participation eligibility profiles.
Similarly when you define a link for an element that you are going to select as an entitlement item for a collective agreement, do not restrict eligibility using the link. You restrict eligibility using eligibility profiles.
Assignment Components
The assignment components to which you can link elements are:
-
Payroll: If employees on all your payrolls are eligible for an element, you can link it to all payrolls.
-
Salary basis, which establishes the period of time (often hourly or monthly) for which you quote the employee's salary or wages.
-
Assignment category, for example, Full Time-Regular or Part Time-Temporary
-
Organization, for example department or section, in which employees work
-
Location of employee's office
-
Job, for example, Associate Professor or Secretary
-
Grade
-
Groups to which the employee belongs: You set up all the groups that are appropriate for your enterprise. For example, you could decide to group employees by company within a multi-company enterprise, and by union membership.
-
Position, which is a class of job performed in a particular organization, for example, Associate Professor of Chemistry, or Finance Department Secretary.
Multiple Rules of Eligibility
You can define more than one link for each element but there must be no overlap between the eligibility criteria for the links. For example, you could create one link to the combination of grade 'A' and the job 'Accountant'. However, you could not create one link to grade 'A' and a second link to the job 'Accountant'. This would imply that an accountant on grade A is eligible for the same element twice.
If you have more than one link for an element, you can enter different default values, qualifying conditions, and costing information for each eligibility group.
Qualifying Conditions: Minimum Age or Period of Service
An employee might be eligible for an element and yet not receive it because he or she does not meet other qualifying conditions.
Two common qualifying conditions are a minimum age or a minimum period of service in the current assignment. You can define these conditions when you define the element. You can enter or adjust these conditions when you define the element links so that you have different qualifying conditions for different groups of assignments.
These qualifying conditions are checked automatically when you try to enter an element for an employee.
Compensation Entry: Making It Fast and Reliable
To reduce the work of entering compensation information for employees and to reduce the risk of errors, you specify rules about entries when you define an element. For example:
-
You can specify defaults, lookups, minimum and maximum values, or other validation to control what is entered in input values.
-
You also specify the duration of entries, that is, whether they are valid for one pay period only, or whether they persist until further action is taken to end the entry.
-
For some elements, you can even set up automatic entry with default values so that no action is required to ensure that employees get the compensation for which they are eligible.
You can create customized versions of the Element Entries window. A customized version might restrict the elements a user can enter. This enhances speed, usability, and security for specific data entry scenarios. Users can also enter batches of entries using default values to reduce keystrokes and thus speed up data entry and reduce errors.
Duration of Element Entries
Some entries are valid for one pay period only. For example, to produce an employee's wages or overtime pay for a period you process the entries of regular hours worked or overtime hours. You define these elements with the processing type nonrecurring. Notice that pay periods are determined by the payroll to which an employee is assigned. Employees must be assigned to a payroll to receive nonrecurring elements, even if you are entering these for information only and not processing them.
Other entries, such as salary or company car, should persist until you change them, or they reach their end date, or the employee's assignment changes so that he or she is no longer eligible for the element. You define these elements with the processing type recurring.
Element Entry Validity Across Pay Periods
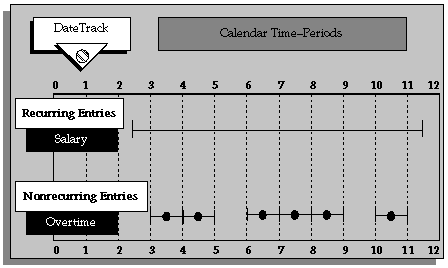
A recurring element entry is normally processed in every pay period, as determined by the employee's payroll. However, you can associate frequency rules with a recurring element to specify in which pay periods it should process. For example, you might deduct a monthly subscription in the second week of each month for weekly-paid employees.
Allowing Multiple Entries
Normally you can only give an employee one entry of an element. This is a useful safeguard against duplication errors. However, when you define an element, you can choose to allow multiple entries. For example, if you enter overtime hours on a weekly basis for monthly-paid employees, you might need to give an employee five entries of an overtime element in each period.
Automatic Entry
If you want all eligible employees to receive a recurring element automatically, you can define standard links to the element. With this link, the element and all its default input value entries go on record for all eligible employees, now and in the future.
For example, suppose your enterprise has an employee Sports Club whose members all agree to pay a fixed subscription each month by payroll deduction. You can set up an employee group called Sports Club on the system and record membership by assigning employees to the group. You can then link a Sports Club Dues element to the Sports Club employee group, mark this link as standard, and enter a default value reflecting the current monthly subscription.
Clearly, you will not choose to create standard links if there are any performance criteria (such as achieving a certain volume of sales) that employees must meet before they qualify for an element.
You can create a standard link if both the element is recurring and multiple entries are not allowed for the element
If you have not defined age or period of service criteria, the start date of the automatic entry is the date the assignment becomes eligible for the element. For example, this might be the employee's hire date, or the date of a promotion or transfer.
If you entered age or period of service criteria for the element, the start date of the automatic entry reflects the date on which the employee meets the qualifying conditions. For example, if a new hire is entitled to a company car after six months, an element entry is automatically created when the employee is entered on the system, and the start date of the entry is six months after the hire date.
If the employee's date of birth is altered on the system, this may change the date on which he or she qualifies for the element. In this case, the start date of the element entry changes automatically.
Default Values and Validation
When you define inputs for an element, you also define the validation for each input value. The validation you define controls the values a user can enter. The options are to:
-
Provide a default value (or several defaults - one for each eligibility group, defined by a link)
-
Provide a minimum and maximum value range
-
Provide a fixed value
-
Provide a lookup list of valid values
-
Validate the input value using a formula
Using the formula option you can model complex business rules for validating entries. For example, for a bonus payment you might want to set a maximum bonus value that depends on length of service and current salary. With Oracle's formula writing tool, Oracle FastFormula, you can include conditional logic to validate input values using different criteria for different employees.
If you define a default value, you can specify that it is a hot default. This means that any changes to the default value not only affect future entries but will also update existing entries, provided that the default was not overridden when the entry was made.
When Assignments Change
When you update an assignment (for example, by promoting or relocating the employee), some changes are made automatically to the assignment's element entries:
-
If the assignment is newly eligible for any elements with standard links, entries of these elements are created automatically.
-
If the assignment is no longer eligible for an element, the existing element entry is ended.
-
If the assignment continues to be eligible for an element but via a different non-standard element link, the existing element entry is ended and a new one created with the same values and costing information as the old entry.
Note: This means that the system ignores any default values, default costing information, and qualifying conditions on the element link associated with the new entry. All values are taken from the old entry instead to provide continuity for the employee. Of course you can change the entry values manually if required.
This does not apply to salary elements that are entered automatically when you approve a salary proposal. In this case the existing element entry is ended and a warning message is issued. You must re-enter and approve the salary proposal following the assignment change. This ensures the integrity of your salary data.
-
If the assignment continues to be eligible for an element but via a different standard element link, the existing element entry is ended and a new one created using the default values on the standard element link.
Batch Entry
Using BEE (Batch Element Entry), you can enter earnings, deductions, timecard data, and other compensation and benefit information in batches. This is especially useful when the same values can be used for many employees. After entering a batch (for as many employees and elements as you require), you can validate it, make corrections, and validate again before transferring the information to the database.
Collective Agreements
If your employees are subject to collective agreements, you can define compensation elements as entitlement items, which form part of the collective agreement. You associate each entitlement item with one or more eligibility profiles to define who is eligible to receive the item and how much they should receive. Alternatively, you can write a formula to determine eligibility and how much eligible people should receive.
You must define and link the element before you apply a collective agreement to employee's assignments. This ensures that, when you apply collective agreement values, the application updates the element entry with the appropriate value (as defined in the Collective Agreement Entitlements window).
Configuring the Element Entries Window
You can create configured versions of the Element Entries window. A configured version restricts the elements a user can enter. For example, one version could be restricted to the element name Timesheet and accessed from a menu entry labelled Timesheet Entries.
Element entry can be restricted by:
-
Element set (that is, a group of elements that you define)
-
Element type (that is, recurring or nonrecurring)
-
Element classification (such as, Earnings, or Direct Payment)
See: CustomForm, Oracle HRMS Configuring, Reporting, and System Administration Guide
Non-Updateable Element Sets
You can prevent users updating the entry values of a set of elements on the Element Entries window. These will typically be elements that you update through legislation-specific forms. You must create a customization element set, and select it for the HR:Non-Updateable Element Set user profile option. You can set this profile option at any level: Site, Application, Responsibility, or User. You can edit the element set after selecting it in the user profile option.
Users will be able to view these elements in the Element Entries window, and they can edit fields such as Reason and Costing, but not the entry values. They cannot use the Update Override and Delete DateTrack modes, because these might remove entry values set elsewhere.
Element Classifications and Processing Sequence
Elements are grouped into primary classifications, such as Earnings and Voluntary Deductions. In a human resources department, you can use the primary classifications to identify groups of elements for information and analysis purposes. In a payroll department, the classifications control processing, including the sequence in which elements are processed and the balances they feed.
Oracle HRMS provides you with these primary classifications and some balances, mainly to reflect tax legislation. They are designed to meet the legislative requirements of your country, so you cannot change them. You can create additional balances to be fed by any of the primary classifications.
Processing Sequence in the Payroll Run
An element's primary classification provides a default processing priority for the element in payroll runs. Lower priority numbers process first.
Most classifications also have a priority range. When you define an element in these classifications, you can overwrite its default processing priority with another number from the range. This is useful if you need to establish the order in which the element processes with respect to other elements in the classification.
Sometimes you must prioritize the processing of certain element entries for an individual employee. For example, you may need to determine the precise order in which deductions taken for wage attachments process for an employee. You can enter a subpriority number for element entries in the Entry Values window.
Canada only: Processing sequence for wage attachments is not determined by subpriority. Instead you can specify Attachment Priority and Prorate Rules in the Further Information field on the Entry Values window.
Secondary Classifications
You can define secondary classifications to feed your own user defined balances. These secondary classifications are subsets of the primary classifications. In some legislations, secondary classifications have been predefined. As with primary classifications, you cannot remove or change any predefined secondary classifications, and you cannot disable any of the predefined balance feeds created for them.
Note: Secondary classifications are not used in the United States, Canada, or Singapore versions of Oracle Payroll at this time.
Mexican implementations use classifications and sub-classifications.
Categories - for US and Canadian Classifications
Most US and Canadian classifications are subdivided into several categories. Categories further define an element's purpose, and can help to determine applicable processing or tax rules. You can define additional categories.
Costing
On the Costing tab of the Element Classifications window, you can view whether elements of this classification are Costable and Distributable. If the classification is Costable, you can select any costing option for elements when you define the element links. If the classification is Distributable, you can create a distribution set from elements of this classification over which you can distribute costs (such as overheads).
You can also view the cost type for elements in the classification, that is, whether they debit or credit the accounts they feed.
Frequency Rules
On the Frequency Rules tab of the Element Classifications window, you can view whether you can define frequency rules for elements of this classification. The payroll run uses a frequency rule to determine in which pay periods it processes a recurring element. On this tab you can also see which date the payroll run uses, by default, to assess frequency rules in your localization. You can select a different date when you define a frequency rule.
Survey of the Classifications
This topic contains the following information:
-
The processing priority range and default priority for each classification.
-
The predefined categories for each classification. You can add more categories, which are defined as Lookups.
-
A description of the function of elements within each classification and category.
When preparing to define your elements, use this information to determine their taxability rule (such as how an earning affects the calculation of ISR, IDW, and Social Security).
Primary Classification Processing Properties and Cost Types
The following table lists the primary classifications for elements. Priority indicates the order of how Oracle Payroll processes each element into a payroll run. Default represents the default priority for that classification. Cost Type indications whether elements of that classification are deductions (D) or earnings (C).
| Classification | Priority | Default | Cost Type |
|---|---|---|---|
| Information | 0 - 500 | 250 | D |
| Non-Payroll Payments | 501 - 1000 | 750 | D |
| Earnings | 1501 - 2000 | 1750 | D |
| Supplemental Earnings | 2001 - 3000 | 2500 | D |
| Imputed Earnings | 3001 - 3500 | 3250 | D |
| Amends | 3501 - 4000 | 3750 | D |
| Pre-Tax Deductions | 4001 - 4500 | 4250 | C |
| Tax Deductions | 4501 - 5000 | 4750 | C |
| Tax Credit | 4501 - 5000 | 4750 | D |
| Employer Taxes | 5001 - 5500 | 5250 | D |
| Involuntary Deductions | 5501 - 6000 | 5750 | C |
| Voluntary Deductions | 6001 - 6500 | 6250 | C |
| Employer Liabilities | 6501 - 7500 | 7000 | D |
Predefined Element Secondary Classifications
Rather than categories, Mexico uses secondary classifications for taxation, tax exemption rules, and IDW calculations. You can assign multiple secondary classifications to an earning.
Refer to the following sections for details on the predefined secondary classifications:
For some states, in order to make an earning subject to state tax, you must attach some classifications to the earnings element, along with the Subject to Employer State Tax classification.
See: State Subject Secondary Classifications
Amends
Amend or indemnification is the payment of the following earnings: Seniority Premium, 3 months salary, 20 days per year of service, and optionally, a Separation Bonus. All elements assigned the Amends classification feed the Amends balance. You can process amends with regular earnings. The tax calculation uses taxation rules for amends when that particular element balance is non-zero. You can mark the Amends element as either Separate Payment or Process Separately.
| Amends Secondary Classification | Description |
|---|---|
| Amends:Subject to State Tax | Use this secondary classification for earnings that are subject to tax in one or more states. The application automatically generates a feed for a balance called Earnings for State Tax, which is used in the state tax calculation together with taxability rules to determine subject earnings for state tax. |
| Indemnities | Use this secondary classification for amends payments towards indemnities. The classification feeds a balance called Indemnities and is used for calculation of subject wages for ISR and state tax. |
| Seniority Premium | Use this secondary classification for amends payments towards seniority premium on employee separation. The classification feeds a balance called Seniority Premium and is used for calculation of subject wages for ISR and state tax. |
Earnings
Use this classification for regular earnings (fixed and variable), absences and leaves, and special earnings paid in addition to earnings for time worked (such as bonuses or sick pay).
Note: When defining an earnings element, you can assign multiple secondary classifications that have the prefix Earnings:. However, you can assign only one secondary classification that does not have the prefix Earnings:.
For an earnings element, you can select only one secondary classification from the following list:
-
Absence due to Disease or Disability
-
Fixed Earnings
-
Paid Leave
-
Unpaid Leave
-
Vacation
-
Variable Earnings
For example:
-
You can assign the following secondary classifications to an earnings element:
-
Fixed Earnings
-
Earnings:Subject to ISR
-
Earnings:Subject to State Tax
-
-
You cannot assign the following secondary classifications to an earnings element because two of the secondary classifications do not have the prefix Earnings:.
-
Fixed Earnings
-
Paid Leave
-
Earnings:Subject to ISR
-
Earnings classification elements represent earnings for time worked (such as salary and hourly wages).
The following table shows the predefined secondary element classifications for the Earnings classification:
| Earnings Secondary Classification | Description |
|---|---|
| Absence due to Disease or Disability | Use this classification for elements used to denote absence due to disease or disability. Elements with this classification feed the Disability Absence balance. This balance is used for reporting. |
| Earnings:Eligible Compensation for Amends (Fixed Basis) | Use this secondary classification to specify if an earning should be included in the fixed basis for Amends. All elements with this classification feed a balance called Amends Fixed Basis Eligible Comp. |
| Earnings:Eligible Compensation for Amends (Variable Basis) | Use this classification to specify if this earning should be included in the variable basis for Amends. All elements with this classification feed a balance called Amends Variable Basis Eligible Comp. |
| Earnings:Eligible Compensation for IDW (Variable Basis) | Use this classification for earnings that contribute to employees' variable IDW. The elements feed a balance called IDW Variable Basis Eligible Comp. For elements with this classification, select "Variable" for IDW Type. |
| Earnings:Eligible Compensation for Profit Sharing | Use this classifications for earnings that should be included in the basis for profit sharing calculation. |
| Earnings:Subject to ISR | Use this classification for earnings that are fully subject to ISR tax. The elements with this classification feed a balance called Earnings for ISR. This balance is used to determine the subject basis for ISR tax.
Note: When defining an Earnings element, you cannot add both "Earnings:Subject to ISR" and "Unpaid Leave." These secondary classifications use the same balance feed. |
| Earnings:Subject to State Tax | Use this classification for earnings that are subject to tax in one or more states. Oracle HRMS automatically generates a feed for a balance called Earnings for State Tax, which is used in the state tax calculation together with taxability rules to determine subject earnings for state tax. |
| Fixed Earnings | Use this classification for fixed earnings. Elements with this classification feed the Fixed Earnings balance. This balance is used for reporting. |
| Paid Leave | Use this classification for paid leave elements. Elements with this classification feed the Paid Leave balance. This balance is used for reporting. |
| Unpaid Leave | Use this classification for unpaid leave elements. Elements with this classification feed the Unpaid Leave balance. This balance is used for reporting.
Note: When defining an Earnings element, you cannot add both "Earnings:Subject to ISR" and "Unpaid Leave." These secondary classifications use the same balance feed. |
| Vacation | Use this classification for vacation elements. Elements with this classification feed the Vacation balance. This balance is used for reporting. |
| Variable Earnings | Use this classification for variable earnings. Elements with this classification feed the Variable Earnings balance. This balance is used for reporting. |
Employer Liabilities
Elements producing non-tax payments that employers make on behalf of their employees belong in the Employer Liabilities classification.
Imputed Earnings
Use this classification for regular earnings (fixed and variable), absences and leaves, and special earnings paid in addition to earnings for time worked (such as bonuses or sick pay).
Elements in the Imputed Earnings classification are for non-cash remuneration, such as personal use of a company-provided car or company-paid premiums for group term life insurance.
Note: When defining an imputed earnings element, you can assign multiple secondary classifications that have the prefix Imputed Earnings:. However, you can assign only one secondary classification that does not have the prefix Imputed Earnings:.
The following table shows the predefined secondary element classifications for the Imputed Earnings classification:
| Imputed Earnings Secondary Classification | Description |
|---|---|
| Gasoline Coupons | Use this secondary classification for elements that denote gasoline coupons. The classification feeds a balance called Gasoline Coupons and is used for calculation of subject wages for state tax. Use this classification for states that do not follow the rules for social foresight earnings. |
| Imputed Earnings:Eligible Compensation for Amends (Fixed Basis) | Use this secondary classification to specify if this earning should be included in the fixed basis for Amends. All elements with this classification feed a balance called Amends Fixed Basis Eligible Comp. |
| Imputed Earnings:Eligible Compensation for Amends (Variable Basis) | Use this secondary classification to specify if this earning should be included in the variable basis for Amends. All elements with this classification feed a balance called Amends Variable Basis Eligible Comp. |
| Imputed Earnings:Eligible Compensation for IDW (Variable Basis) | Use this secondary classification for earnings that contribute to employees' variable IDW. The elements feed a balance called IDW Variable Basis Eligible Comp. For elements with this classification, select "Variable" for the IDW Type. |
| Imputed Earnings:Eligible Compensation for Profit Sharing | Use this classifications for earnings that should be included in the basis for profit sharing calculation. |
| Imputed Earnings:Social Foresight Earnings | Use this secondary classification for earnings that follow the taxability rules for social foresight earnings. Do not use this secondary classification with other earnings classifications that follow different taxability rules. The elements with this classification feed a balance called Social Foresight Earnings. This balance is used to apply taxability rules during calculation of subject earnings for ISR and state tax. |
| Imputed Earnings:Subject to ISR | Use this secondary classification for earnings that are fully subject to ISR tax. The elements with this classification feed a balance called Earnings for ISR. This balance is used to determine the subject basis for ISR tax. Do not use this secondary classification for earnings that are exempt from ISR tax (fully or after a limit). |
| Imputed Earnings:Subject to State Tax | Use this secondary classification for earnings that are subject to tax in one or more states. The application automatically generates a feed for a balance called Earnings for State Tax, which is used in the state tax calculation together with taxability rules to determine subject earnings for state tax. |
| Pantry Coupons | Use this secondary classification for elements that denote pantry coupons. The classification feeds a balance called Pantry Coupons and is used for calculation of subject wages for state tax. Use this classification for states that do not follow the rules for social foresight earnings. |
| Pantry in Kind | Use this secondary classification for elements that denote pantry in kind. The classification feeds a balance called Pantry in Kind and is used for calculation of subject wages for state tax. Use this classification for states that do not follow the rules for social foresight earnings. |
| Restaurant Coupons | Use this secondary classification for elements that denote restaurant coupons. The classification feeds a balance called Restaurant Coupons and is used for calculation of subject wages for state tax. Use this classification for states that do not follow the rules for social foresight earnings. |
| Uniform Coupons | Use this secondary classification for elements that denote uniform coupons. The classification feeds a balance called Uniform Coupons and is used for calculation of subject wages for state tax. Use this classification for states that do not follow the rules for social foresight earnings. |
Information
Many elements do not belong in any of the classifications described above, but nonetheless hold many different types of information you need. These elements belong in the classification Information.
This classification is especially useful for elements that you do not want to process in Oracle Payroll. Such elements might, for example, hold information about tangible items issued to employees, such as cellular phones, identification badges or company cars. Sites that do not include Oracle Payroll use elements in this classification to hold information about employee compensation and benefits.
Non-Payroll Payments
Elements in this classification produce payments made to employees through the payroll system that are not true earnings.
Because payments in this classification are not earnings, they are never subject to taxes and never feed balances of taxable pay. Payments resulting from the processing of Non-Payroll Payments elements always appear separately from earnings in reports and balance totals.
Pre-Tax Deductions and After Tax Deductions
Pre-Tax Deductions are those deductions that reduce the taxable basis for any tax (Federal or state). This kind of deduction is not very common.
Other non-tax deduction elements fall into one of two classifications, either Voluntary Deductions or Involuntary Deductions. Loan repayments, credit union deductions, insurance premiums, and charitable contributions are examples of voluntary deductions. Deductions for court-ordered wage attachments (such as tax levies, child or spousal support, or bankruptcy orders) fall into the classification Involuntary Deductions.
Supplemental Earnings
Use this classification for regular earnings (fixed and variable), absences and leaves, and special earnings paid in addition to earnings for time worked (such as bonuses or sick pay).
Note: When defining a supplemental earnings element, you can assign multiple secondary classifications that have the prefix Supplemental Earnings:. However, you can assign only one secondary classification that does not have the prefix Supplemental Earnings:.
The Supplemental Earnings classification includes a variety of special earnings paid in addition to earnings for time worked.
The following table shows the predefined secondary element classifications for the Supplemental Earnings classification:
| Supplemental Earnings Secondary Classification | Description |
|---|---|
| Aid for Birth | Use this secondary classification for elements that denote payments towards aid for birth. The classification feeds a balance called Aid for Birth and is used for calculation of subject wages for state tax. Use this classification for states that do not follow the rules for social foresight earnings. |
| Aid for Change of Residence | Use this secondary classification for elements that denote payments towards aid for change of residence. The classification feeds a balance called Aid for Change of Residence and is used for calculation of subject wages for state tax. Use this classification for states that do not follow the rules for social foresight earnings. |
| Aid for Death and Funeral Expenses | Use this secondary classification for elements that denote payments towards aid for death and funeral expenses. The classification feeds a balance called Aid for Death and Funeral Expenses' and is used for calculation of subject wages for state tax. Use this classification for states that do not follow the rules for social foresight earnings. |
| Aid for Education | Use this secondary classification for elements that denote payments towards aid for education. The classification feeds a balance called Aid for Education and is used for calculation of subject wages for state tax. Use this classification for states that do not follow the rules for social foresight earnings. |
| Aid for Glasses | Use this secondary classification for elements that denote payments towards aid for glasses. The classification feeds a balance called Aid for Glasses and is used for calculation of subject wages for state tax. Use this classification for states that do not follow the rules for social foresight earnings. |
| Aid for Marriage | Use this secondary classification for elements that denote payments towards aid for marriage. The classification feeds a balance called Aid for Marriage and is used for calculation of subject wages for state tax. Use this classification for states that do not follow the rules for social foresight earnings. |
| Aid for Meals | Use this secondary classification for elements that denote payments towards aid for meals. The classification feeds a balance called Aid for Meals and is used for calculation of subject wages for state tax. Use this classification for states that do not follow the rules for social foresight earnings. |
| Aid for Rent | Use this secondary classification for elements that denote payments towards aid for rent. The classification feeds a balance called Aid for Rent and is used for calculation of subject wages for state tax. Use this classification for states that do not follow the rules for social foresight earnings. |
| Aid for Transportation | Use this secondary classification for elements that denote payments towards aid for transportation. The classification feeds a balance called Aid for Transportation and is used for calculation of subject wages for state tax. Use this classification for states that do not follow the rules for social foresight earnings. |
| Attendance and Punctuality Incentives | Use this secondary classification for elements that denote payments towards attendance and punctuality incentives. The classification feeds a balance called Attendance and Punctuality Incentives and is used for calculation of subject wages for state tax. Use this classification for states that do not follow the rules for social foresight earnings. |
| Christmas Bonus | Use this secondary classification for elements that denote Christmas Bonus. The classification feeds a balance called Christmas Bonus and is used for calculation of subject wages for ISR and state tax. |
| Dominical Premium | Use this secondary classification for elements that denote payments for work done on Sundays. The classification feeds a balance called Dominical Premium and is used for calculation of subject wages for ISR and state tax. |
| Healthcare Reimbursement | Use this secondary classification for elements that denote payments for medical and healthcare reimbursements. The classification feeds a balance called Healthcare Reimbursements and is used for calculation of subject wages for ISR and state tax. |
| Incentives | Use this secondary classification for elements that denote payments for incentives other than attendance and punctuality. The classification feeds a balance called Incentives and is used for calculation of subject wages for state tax. Use this classification for states that do not follow the rules for social foresight earnings. |
| Other Overtime | Use this secondary classification for elements that denote payments of triple overtime. The classification feeds a balance called Other Overtime and is used for calculation of subject wages for ISR and state tax. |
| Overtime | Use this secondary classification for elements that denote payments for Overtime. The classification feeds a balance called Overtime and Holidays Worked with the reporting name of the balance as Overtime and is used for calculation of subject wages for ISR and employer state tax. |
| Holiday Worked | Use this secondary classification for elements that denote payments for work performed on holidays. The classification feeds a balance called Holiday Worked and is used for calculation of subject wages for ISR and employer state tax. |
| Pantry in Cash | Use this secondary classification for elements that denote payments for food. The classification feeds a balance called Pantry in Cash and is used for calculation of subject wages for state tax. Use this classification for states that do not follow the rules for social foresight earnings. |
| Profit Sharing | Use this secondary classification for elements that denote annual profit sharing payments. The classification feeds a balance called Profit Sharing and is used for calculation of subject wages for ISR and state tax. |
| Savings Fund Employer Contribution | Use this secondary classification for elements that denote employer contribution to employee's savings fund. The classification feeds a balance called Employer Contribution to Savings Fund and is used for calculation of subject wages for state tax. Use this classification for states that do not follow the rules for social foresight earnings. |
| Savings Fund Interest and Settlement | Use this secondary classification for elements that denote payments towards savings fund interest and settlement. The classification feeds a balance called Savings Fund Interest and Settlement and is used for calculation of subject wages for ISR and state tax. |
| Scholarship for Children of Workers | Use this secondary classification for elements that denote payments of scholarships to employees' children. The classification feeds a balance called Scholarship for Children of Workers and is used for calculation of subject wages for state tax. Use this classification for states that do not follow the rules for social foresight earnings. |
| Scholarship for Workers | Use this secondary classification for elements that are payments of scholarship to employees. The classification feeds a balance called Scholarship for Workers and is used for calculation of subject wages for state tax. Use this classification for states that do not follow the rules for social foresight earnings. |
| Supplemental Earnings:Eligible Compensation for Amends (Fixed Basis) | Use this secondary classification to specify if this earning should be included in the fixed basis for Amends. All elements with this classification feed a balance called Amends Fixed Basis Eligible Comp. |
| Supplemental Earnings:Eligible Compensation for Amends (Variable Basis) | Use this classification to specify if this earning should be included in the variable basis for Amends. All elements with this classification feed a balance called Amends Variable Basis Eligible Comp. |
| Supplemental Earnings:Eligible Compensation for IDW (Variable Basis) | Use this classification for earnings that contribute to employees' variable IDW. The elements feed a balance called IDW Variable Basis Eligible Comp. For elements with this classification, select "Variable" for IDW Type. |
| Supplemental Earnings:Eligible Compensation for Profit Sharing | Use this classifications for earnings that should be included in the basis for profit sharing calculation. |
| Supplemental Earnings:Social Foresight Earnings | Use this secondary classification for supplemental earnings that follow the taxability rules for social foresight earnings. Do not use this secondary classification with other supplemental earnings that follow different taxability rules. The elements with this classification feed a balance called 'Social Foresight Earnings'. This balance is used to apply taxability rules during calculation of subject earnings for ISR and state tax. |
| Supplemental Earnings:Subject to ISR | Use this classification for earnings that are fully subject to ISR tax. The elements with this classification feed a balance called Earnings for ISR. This balance is used to determine the subject basis for ISR tax. Do not use this secondary classification for earnings that are exempt from ISR tax (fully or after a limit). |
| Supplemental Earnings:Subject to State Tax | Use this classification for earnings that are subject to tax in one or more states. The application automatically generates a feed for a balance called Earnings for State Tax, which is used in the state tax calculation together with taxability rules to determine subject earnings for state tax. |
| Union Quota paid by Employer | Use this secondary classification for elements that denote payments of union quota by employer. The classification feeds a balance called Union Quota Paid by Employer and is used for calculation of subject wages for state tax. Use this classification for states that do not follow the rules for social foresight earnings. |
| Vacation Premium | Use this secondary classification for elements that denote payments of Vacation Premium. The classification feeds a balance called Vacation Premium and is used for calculation of subject wages for ISR and state tax. |
| Worker Social Security Quota paid by Employer | Use this secondary classification for elements that denote employee social security quota paid by employer. The classification feeds a balance called Worker Social Security Quota paid by Employer and is used for calculation of subject wages for state tax. Use this classification for states that do not follow the rules for social foresight earnings. |
Tax Deductions, Tax Credits, Employer Taxes
Deductions for employee tax withholding fall into the classification Tax Deductions.
Tax credits employers pay to employees belong in the Tax Credits classification.
Oracle Payroll comes with all the necessary elements and calculations for tax deductions, tax credits, and most employer taxes already in place.
See: Tax Balances, Oracle HRMS Payroll Processing Management Guide
State Subject Secondary Classifications
The following is a list of valid secondary classifications according to state. To make an earning subject to tax, attach one of these classifications to its element, along with the Subject to Employer State Tax classification.
If a state is not listed, it does not have an employee state tax.
-
EX: Exempt
-
FS: Fully Subject
-
PS: Partially Subject
-
S: Subject
| Classification Name | AGS | BC | BCS | Camp | Chis | Chih | Coah | COL | DF |
|---|---|---|---|---|---|---|---|---|---|
| Aid for Birth | FS | EX | FS | FS | FS | FS | FS | FS | FS |
| Aid for Change of Residence | FS | EX | FS | FS | FS | EX | FS | FS | FS |
| Aid for Death and Funeral Expenses | EX | EX | EX | EX | EX | EX | EX | EX | EX |
| Aid for Education | EX | EX | FS | FS | FS | EX | FS | FS | FS |
| Aid for Glasses | EX | EX | FS | FS | FS | EX | FS | FS | EX |
| Aid for Marriage | FS | EX | FS | FS | FS | FS | FS | FS | FS |
| Aid for Meals | EX | EX | FS | FS | FS | EX | EX | FS | EX |
| Aid for Rent | FS | EX | FS | FS | FS | FS | EX | FS | EX |
| Aid for Transportation | EX | EX | FS | FS | FS | EX | FS | FS | FS |
| Attendance and Punctuality Incentives | PS | FS | FS | FS | FS | FS | PS | FS | FS |
| Christmas Bonus | FS | FS | FS | FS | FS | FS | FS | FS | FS |
| Dominical Premium | FS | FS | FS | FS | FS | FS | FS | FS | FS |
| Employer Contribution to Savings Fund | EX | EX | FS | EX | FS | EX | EX | EX | FS |
| Fixed Earnings | FS | FS | FS | FS | FS | FS | FS | FS | FS |
| Gasoline Coupons | EX | EX | FS | FS | FS | EX | FS | FS | FS |
| Healthcare Reimbursement | FS | EX | FS | FS | FS | EX | FS | FS | EX |
| Imputed Earnings: Social Foresight Earnings | EX | EX | EX | EX | EX | EX | EX | EX | EX |
| Incentives | FS | FS | FS | FS | FS | FS | FS | FS | FS |
| Indemnities | EX | EX | FS | FS | EX | EX | EX | EX | FS |
| Other Overtime | FS | FS | FS | FS | FS | FS | FS | FS | FS |
| Overtime | EX | FS | FS | FS | FS | FS | EX | FS | FS |
| Holiday Worked | FS | FS | FS | FS | FS | FS | FS | FS | FS |
| Paid Leave | FS | FS | FS | FS | FS | FS | FS | FS | FS |
| Pantry Coupons | EX | EX | PS | FS | FS | PS | EX | FS | EX |
| Pantry in Cash | EX | EX | FS | FS | FS | FS | EX | FS | EX |
| Pantry in Kind | EX | EX | FS | FS | FS | FS | EX | FS | EX |
| Profit Sharing | EX | EX | FS | FS | FS | EX | EX | EX | FS |
| Restaurant Coupons | EX | EX | FS | EX | FS | FS | EX | FS | EX |
| Savings Fund Interest and Settlement | EX | EX | EX | FS | FS | EX | EX | EX | FS |
| Scholarship for Children of Workers | EX | EX | FS | EX | FS | EX | FS | EX | EX |
| Scholarship for Workers | EX | EX | FS | EX | FS | EX | FS | EX | EX |
| Seniority Premium | EX | EX | FS | FS | FS | EX | EX | FS | FS |
| Supplemental Earnings: Social Foresight Earnings | EX | EX | FS | EX | FS | EX | EX | EX | EX |
| Uniform Coupons | EX | EX | FS | EX | FS | EX | EX | FS | FS |
| Union Quota paid by Employer | EX | FS | FS | FS | FS | FS | EX | FS | FS |
| Vacation | FS | FS | FS | FS | FS | FS | FS | FS | FS |
| Vacation Premium | FS | FS | FS | FS | FS | FS | FS | FS | FS |
| Variable Earnings | FS | FS | FS | FS | FS | FS | FS | FS | FS |
| Worker Social Security Quota paid by Employer | EX | EX | EX | EX | FS | FS | EX | EX | EX |
| Classification Name | Dgo | Gro | Gto | Hgo | Jal | Mex | Mich | Mor | Nay |
|---|---|---|---|---|---|---|---|---|---|
| Aid for Birth | FS | FS | FS | FS | FS | FS | FS | FS | FS |
| Aid for Change of Residence | FS | FS | FS | FS | FS | FS | FS | S | FS |
| Aid for Death and Funeral Expenses | EX | EX | EX | EX | EX | EX | FS | S | EX |
| Aid for Education | FS | FS | EX | FS | FS | FS | FS | EX | EX |
| Aid for Glasses | FS | FS | EX | FS | FS | FS | FS | FS | EX |
| Aid for Marriage | FS | FS | FS | FS | FS | FS | FS | FS | FS |
| Aid for Meals | EX | FS | EX | EX | FS | FS | EX | FS | FS |
| Aid for Rent | EX | FS | EX | FS | FS | FS | EX | EX | FS |
| Aid for Transportation | S | EX | EX | FS | FS | S | FS | EX | FS |
| ttendance and Punctuality Incentives | PS | FS | PS | FS | FS | FS | PS | PS | FS |
| Christmas Bonus | FS | FS | FS | FS | FS | FS | FS | FS | EX |
| Dominical Premium | FS | FS | FS | FS | FS | FS | FS | FS | FS |
| Employer Contribution to Savings Fund | EX | EX | EX | EX | FS | FS | EX | EX | FS |
| Fixed Earnings | FS | FS | FS | FS | FS | FS | FS | FS | FS |
| Gasoline Coupons | FS | FS | FS | FS | FS | FS | FS | FS | FS |
| Healthcare Reimbursement | EX | EX | FS | FS | FS | FS | EX | FS | FS |
| Imputed Earnings: Social Foresight Earnings | EX | EX | EX | EX | EX | EX | EX | EX | PS |
| Incentives | FS | FS | FS | FS | FS | FS | FS | FS | FS |
| Indemnities | EX | EX | EX | EX | EX | EX | EX | EX | EX |
| Other Overtime | FS | FS | FS | FS | FS | FS | FS | FS | FS |
| Overtime | FS | FS | FS | EX | FS | FS | EX | S | FS |
| Holiday Worked | FS | FS | FS | FS | FS | FS | FS | FS | FS |
| Paid Leave | FS | FS | FS | FS | FS | FS | FS | FS | FS |
| Pantry Coupons | PS | FS | PS | FS | FS | FS | PS | FS | FS |
| Pantry in Cash | PS | FS | PS | FS | FS | FS | PS | FS | FS |
| Pantry in Kind | PS | FS | PS | FS | FS | FS | PS | FS | FS |
| Profit Sharing | EX | EX | EX | EX | EX | FS | EX | FS | FS |
| Restaurant Coupons | FS | FS | S | FS | FS | FS | FS | FS | FS |
| Savings Fund Interest and Settlement | EX | EX | EX | EX | FS | FS | EX | EX | FS |
| Scholarship for Children of Workers | FS | EX | EX | FS | FS | FS | EX | EX | EX |
| Scholarship for Workers | FS | EX | EX | FS | FS | EX | EX | EX | EX |
| Seniority Premium | FS | FS | FS | FS | FS | FS | FS | FS | FS |
| Supplemental Earnings: Social Foresight Earnings | FS | FS | EX | FS | FS | FS | EX | EX | PS |
| Uniform Coupons | EX | FS | FS | FS | FS | FS | FS | EX | FS |
| Union Quota paid by Employer | FS | FS | FS | FS | FS | FS | FS | FS | FS |
| Vacation | FS | FS | FS | FS | FS | FS | FS | FS | FS |
| Vacation Premium | FS | FS | FS | FS | FS | FS | FS | FS | FS |
| Variable Earnings | FS | FS | FS | FS | FS | FS | FS | FS | FS |
| Worker Social Security Quota paid by Employer | EX | EX | EX | EX | EX | FS | EX | EX | EX |
| Classification Name | NL | Oax | Pue | Qro | Q.Roo | SLP | Sin | Son |
|---|---|---|---|---|---|---|---|---|
| Aid for Birth | FS | FS | FS | FS | S | FS | FS | FS |
| Aid for Change of Residence | FS | FS | FS | FS | FS | FS | FS | FS |
| Aid for Death and Funeral Expenses | EX | EX | FS | FS | EX | EX | EX | EX |
| Aid for Education | FS | EX | FS | FS | FS | EX | EX | EX |
| Aid for Glasses | FS | EX | FS | FS | FS | EX | EX | FS |
| Aid for Marriage | FS | FS | FS | FS | FS | FS | FS | FS |
| Aid for Meals | EX | EX | EX | FS | EX | FS | FS | FS |
| Aid for Rent | FS | EX | EX | FS | EX | FS | FS | FS |
| Aid for Transportation | FS | FS | FS | FS | FS | EX | FS | FS |
| Attendance and Punctuality Incentives | FS | FS | PS | FS | FS | FS | FS | FS |
| Christmas Bonus | FS | FS | FS | FS | FS | FS | PS | FS |
| Dominical Premium | FS | FS | FS | FS | FS | FS | FS | FS |
| Employer Contribution to Savings Fund | EX | EX | EX | FS | EX | EX | FS | EX |
| Fixed Earnings | FS | FS | FS | FS | FS | FS | FS | FS |
| Gasoline Coupons | FS | FS | FS | FS | FS | FS | FS | FS |
| Healthcare Reimbursement | FS | EX | FS | FS | FS | EX | S | FS |
| Imputed Earnings: Social Foresight Earnings | EX | PS | EX | EX | EX | EX | EX | EX |
| Incentives | FS | FS | FS | FS | FS | FS | FS | FS |
| Indemnities | EX | EX | FS | EX | EX | EX | EX | EX |
| Other Overtime | FS | FS | FS | FS | FS | FS | FS | FS |
| Overtime | FS | EX | FS | FS | FS | FS | FS | FS |
| Holiday Worked | FS | FS | FS | FS | FS | FS | FS | FS |
| Paid Leave | FS | FS | FS | FS | FS | FS | FS | FS |
| Pantry Coupons | EX | EX | PS | PS | FS | EX | FS | FS |
| Pantry in Cash | EX | EX | FS | FS | FS | EX | FS | FS |
| Pantry in Kind | EX | EX | EX | FS | FS | EX | FS | FS |
| Profit Sharing | EX | EX | EX | EX | FS | EX | EX | EX |
| Restaurant Coupons | FS | EX | EX | FS | FS | EX | FS | FS |
| Savings Fund Interest and Settlement | EX | EX | EX | FS | EX | EX | FS | EX |
| Scholarship for Children of Workers | FS | EX | FS | FS | FS | EX | EX | EX |
| Scholarship for Workers | FS | EX | FS | FS | FS | EX | EX | EX |
| Seniority Premium | FS | EX | FS | FS | FS | FS | FS | FS |
| Supplemental Earnings: Social Foresight Earnings | EX | PS | EX | FS | FS | FS | EX | EX |
| Uniform Coupons | EX | EX | EX | FS | EX | FS | FS | FS |
| Union Quota paid by Employer | FS | FS | FS | FS | FS | FS | FS | FS |
| Vacation | FS | FS | FS | FS | FS | FS | FS | FS |
| Vacation Premium | FS | FS | FS | FS | FS | FS | EX | FS |
| Variable Earnings | FS | FS | FS | FS | FS | FS | FS | FS |
| Worker Social Security Quota paid by Employer | FS | EX | EX | EX | EX | EX | FS | EX |
| Classification Name | Tab | Tamps | Tlax | Ver | Yuc | Zac |
|---|---|---|---|---|---|---|
| Aid for Birth | FS | FS | FS | FS | FS | FS |
| Aid for Change of Residence | FS | FS | FS | FS | FS | FS |
| Aid for Death and Funeral Expenses | EX | EX | EX | EX | EX | S |
| Aid for Education | FS | FS | FS | EX | FS | FS |
| Aid for Glasses | FS | FS | FS | EX | FS | FS |
| Aid for Marriage | FS | FS | FS | FS | FS | FS |
| Aid for Meals | FS | EX | FS | EX | FS | FS |
| Aid for Rent | FS | FS | FS | EX | FS | FS |
| Aid for Transportation | FS | FS | FS | EX | FS | S |
| Attendance and Punctuality Incentives | FS | FS | FS | FS | FS | FS |
| Christmas Bonus | FS | FS | FS | FS | FS | S |
| Dominical Premium | FS | FS | FS | FS | FS | FS |
| Employer Contribution to Savings Fund | FS | EX | FS | EX | FS | S |
| Fixed Earnings | FS | FS | FS | FS | FS | FS |
| Gasoline Coupons | FS | FS | FS | FS | FS | FS |
| Healthcare Reimbursement | FS | FS | FS | EX | FS | S |
| Imputed Earnings: Social Foresight Earnings | EX | EX | EX | EX | EX | EX |
| Incentives | FS | FS | FS | FS | FS | FS |
| Indemnities | FS | EX | EX | EX | EX | S |
| Other Overtime | FS | FS | FS | FS | FS | FS |
| Overtime | FS | FS | FS | EX | FS | S |
| Holiday Worked | FS | FS | FS | FS | FS | FS |
| Paid Leave | FS | FS | FS | FS | FS | FS |
| Pantry Coupons | FS | FS | FS | EX | FS | S |
| Pantry in Cash | FS | FS | FS | EX | FS | S |
| Pantry in Kind | FS | EX | FS | EX | FS | S |
| Profit Sharing | EX | EX | EX | EX | EX | S |
| Restaurant Coupons | FS | FS | FS | EX | FS | FS |
| Savings Fund Interest and Settlement | FS | EX | FS | EX | FS | S |
| Scholarship for Children of Workers | EX | FS | FS | EX | FS | FS |
| Scholarship for Workers | EX | FS | EX | EX | FS | FS |
| Seniority Premium | FS | EX | FS | FS | FS | S |
| Supplemental Earnings: Social Foresight Earnings | FS | FS | FS | X | FS | S |
| Uniform Coupons | FS | FS | FS | EX | FS | S |
| Union Quota paid by Employer | FS | FS | FS | FS | FS | FS |
| Vacation | FS | S | FS | FS | FS | FS |
| Vacation Premium | FS | FS | FS | FS | FS | FS |
| Variable Earnings | FS | FS | FS | FS | FS | FS |
| Worker Social Security Quota paid by Employer | EX | EX | EX | EX | FS | S |
Compensation Policy Changes
It is inevitable that your business rules for compensation and benefits will change over time. You can create new elements and disable existing ones at any time. You can also make certain changes to existing elements and links, as outlined below.
Element definitions, link definitions, and element entries are all datetracked. This lets you track the changes to your compensation and benefit policies without losing any of your historical employee information. The history of your definitions remains in place for validation and reporting, and for future calculations of back pay.
Maintaining Elements
After you have defined and used an element, you can make the following changes:
-
Change a required input value to be not required.
-
Alter the sequence in which input values appear in the Element Entries window.
-
Change the input value validation rules for minimum, maximum, lookup, or formula.
-
Change your specification of which input values create Database Items. Note, however, you cannot remove Database Items if they are used in any formulas or QuickPaint reports.
You cannot remove existing input values or add new ones if you have created any entries for the element. To add an input value to an element before you create any entries, ensure that you set your effective date to the element's start date.
Maintaining Links
Link rules always control the entry of element values at the time of entry. Changes to link rules affect existing entries in different ways, depending on your use of standard links and hot defaults. After you have used an element you can make the following changes to the link rules:
-
Change the input value defaults and validation.
These changes affect all new entries. Changes to hot defaults affect existing entries. The system also uses the new validation rules to check any updates you make to existing entries.
-
Date-effectively end all of the rules that apply to an element and define a new set of rules, which are effective from a later date. For example, suppose you have defined eligibility for a company car based on grade. Following a change of policy you must now define eligibility based on job.
-
You will not be allowed to end the link if any nonrecurring entries exist at the date you want to end the rule. You must delete existing entries before you end the link.
-
You can end the link if recurring entries exist. Any existing entries will be ended automatically when you end the link.
-
-
Change the qualifying conditions of age and length of service that employees must meet to be eligible for the element.
Policy Development
With DateTrack you can also make future-dated changes to your information safe in the knowledge that these changes will not become effective in the system until the correct date.
In this way you can use your compensation and benefit information to plan changes ahead of time; analyze the impact of these changes; adjust these changes and generally smooth out the workload that is often associated with major changes in compensation and benefits policy.
Setting Up Elements
Setting Up Total Compensation Elements
Follow this process to set up elements for items in the compensation package you offer to employees. There are additional steps for setting up the following types of compensation and benefits:
-
Salaries for Salary Administration
-
Absence elements and PTO accrual plans
-
Benefits
Also, there are additional steps if you want to process the elements in a payroll run.
See: Setting Up Total Compensation Elements for Payroll, Oracle HRMS Compensation and Benefits Management Guide
Define Validation and Lookups
Define validation for entries of any new elements you are creating.
-
To restrict compensation entries to a list of valid values, define a new Lookup Type and add Lookup Values for this new lookup.
See: Adding Lookup Types and Values, Oracle HRMS Configuring, Reporting, and System Administration Guide.
-
To validate compensation entries using formulas, write a formula of type Element Input Validation.
See: Writing Formulas for Validation, Oracle HRMS FastFormula User Guide.
-
To create a matrix of values (such as bonus amount against years of service) for use in formulas or QuickPaint reports, set up user tables.
See: Setting Up User Tables, Columns, and Rows, Oracle HRMS Configuring, Reporting, and System Administration Guide
Define Elements and Links
-
Define elements and element input values to record information about employee compensation, benefits, and equipment:
See: Defining an Element.
See: Defining an Element's Input Values.
See also: Defining and Linking an Element for Standard and Advanced Benefits
See also: Deleting an Element
-
Define element links to identify one or more groups of employees who are eligible to receive an element.
See also: Running the Element Link Details Report
-
For elements without Standard links, make entries of your elements for all employee who should receive them.
Defining an Element
Use the Element window to create an element to represent compensation and benefit types or earnings and deductions.
This procedure describes how to define elements using a Payroll responsibility (that is, a responsibility with the HR User Type profile option set to Payroll User or HR with Payroll User). If you are an HR-only user, you will not see certain fields relating to element processing information. You can just ignore the steps that apply to these fields.
Note: Depending on your localization and the types of element you want to create, you may not need to start from scratch in the Element window. Check which earnings and deductions are available in the template library in the Configuration Workbench. If these template elements do not meet your requirements, you may be able to generate earnings and deductions using Earnings and Deductions windows or the Element Design Wizard. You can use the Element window to further configure template elements and generated elements.
-
For the United States and Canada, see: Earnings and Other Payments Overview, Oracle HRMS Compensation and Benefits Management Guide and Deductions Overview, Oracle HRMS Compensation and Benefits Management Guide
-
For Mexico, see: Element Design Wizard
-
For UAE, see: Element Design Wizard, Oracle HRMS Compensation and Benefits Management Guide
-
For Norway: For each element, you must enter the End of Year codes using the list of values provided in the Further Information field.
Dates, Names and Classifications
To enter dates, names, and a classification for the element
-
Set your effective date early enough to handle any historical element entries you want to make. Note that an element cannot be linked or entered until its start date.
-
Enter a unique:
-
Name
-
Reporting name
Start the names with a letter of the alphabet (not a number or symbol). The reporting name is a short identifier for reports and pay advices.
-
-
Enter a description for the element.
-
Select a Primary Classification.
This controls an element's processing priority and the balances it feeds. If you are defining a salary element for Salary Administration, you must select the classification Earnings.
Processing Information
To enter processing information for the element
-
Select the processing type. Select Recurring if an entry of this element applies in every period until the entry is ended, or Nonrecurring if an entry applies in one pay period only. The dates of the pay period are determined by the payroll to which the employee is assigned.
Note: If you are defining a salary element for salary administration, you must select the type Recurring. If you are defining a net-to-gross element you must select the type Nonrecurring.
-
Select a termination rule to determine how entries of the element are processed after termination of the employee:
Note: UK only: Always select Actual Termination for UK proration.
-
Actual Termination if you want recurring entries to close down on the date the employee leaves. For a nonrecurring element, select Actual Termination if you want the entries to close down at the end of the pay period in which the employee leaves, or on the date the assignment ends (the final process date) if this is earlier.
-
Final Close if you want the entries to stay open beyond the employee's leaving date so that you can continue to pay the employee.
If you are a Payroll user, you can also select:
-
Last Standard Process for all recurring and nonrecurring elements if you want their entries to close down on the Last Standard Process date or on the date the assignment ends (the final process date) if this is earlier. The Last Standard Process date defaults to the last day of the pay period in which the employee is terminated, but you can set it to a later period when you terminate an employee.
-
-
Select the Multiple Entries Allowed check box if you want to give an employee more than one entry of the element at the same time. If you are creating a net-to-gross element, you must select Multiple Entries Allowed.
-
Select the Additional Entries Allowed check box if you want to make occasional one-time entries of a recurring element (instead of, or in addition to, a normal recurring entry).
US and Canada only: The Additional Entry Allowed rule is not applicable for US and Canadian installations.
-
Select the Closed for Entry check box if you want to prevent any new entries being made for the element, either temporarily or permanently. This does not affect any existing entries of the element.
Important: Use this feature with caution. When you perform certain important tasks in Oracle HRMS, the application may automatically create or delete element entries. These tasks include hiring and terminating people, and updating assignments. Therefore, if you check Closed for Entry on an element, this might prevent users terminating employees and updating assignments. If there are standard links for the element, it will also prevent users hiring people who are eligible for the element.
HR-only users: Go to Currency.
Oracle Payroll Users:
-
Select the Process in Run check box if you want the element to process in payroll runs.
-
Select the Once Each Period check box to ensure that only the first payroll run of each period processes entries of this element.
Note: If this check box is not available for your localization, you can select a ONCE_EACH_PERIOD skip rule for the element instead.
-
Select the Indirect Results check box if you want the element only to accept entries from indirect formula results. Leave the check box unchecked if you want to accept entries both from indirect formula results and from manual entries in the Element Entries window.
-
Select the Adjustment Only check box if you want to use the element only for creating balance adjustments.
-
Select the Third Party Payments check box if you want to use the element only for creating third party payments.
-
Overwrite the default priority number in the Priority field if you want to determine the order in which the element processes within its classification range. Lower numbers process before higher ones.
If the order of processing within the element classification is not important, you can accept the default priority number, which is the midpoint of the range.
-
Select a formula in the Skip Rule field if you have written a skip rule formula to determine the circumstances in which the element should be processed.
UK only: If you are using different run types, select the ONCE_EACH_PERIOD skip rule for all earnings, to ensure they are not processed by each child run type.
Currency
The default currency for element entry values is the currency defined for the Business Group. You can select a different currency for the element if required.
Advanced Processing Information
Oracle Payroll users only: Use the Advanced tab to enter further processing information if you are defining:
-
An earnings type, such as a bonus, that is to be taxed separately from the normal payroll run. The element can also be paid separately.
-
An earnings type that requires a net-to-gross calculation. For example, this applies to bonus payments that are a fixed net amount. Oracle Payroll calculates the gross amount needed to meet the net pay.
-
UK: A pre-tax deduction that you want to reduce if there is insufficient pay to cover the deduction along with taxes and court orders. This requires iterative processing.
Note: The Advanced tab may not be available for some localizations.
To define an element as a separate payment
-
On the Advanced tab, select the Separate Payment check box.
The Process Separate box is checked automatically.
UK users: Do not select this check box. This functionality is not currently available for UK Payroll.
To define an element to process separately
-
On the Advanced tab, select the Process Separate check box.
To define an element for net-to-gross calculation
-
On the Advanced tab, select the Gross Up check box.
The Iterative Flag and Process Separate boxes are checked automatically.
-
Select DEFAULT_GROSSUP in the Iterative Formula field. This formula controls the iterative calculation of the pay value, adjusting an input value as necessary to get a result that is defined to be close enough to the required net payment.
Note: After saving your element, choose the Iterative Rules button to specify how to use the formula results. Also choose the Exclude Balances button to select which balances are grossed up for the element (meaning that these deductions are paid by the employer).
-
Optionally, enter a value in the Iterative Priority field to determine the sequence in which elements are adjusted during iterative calculations. Elements with lower iterative priority values are adjusted first.
-
Select the Separate Payment box if you want the payment to be made separately from the regular payment. UK Payroll, Irish Payroll: Do not select this check box.
-
Save your work.
To set up iterative processing for a pre-tax deduction (UK)
-
Check the Iterative Flag box.
-
Select PQP_GB_ITERATIVE_ARREARAGE in the Iterative Formula field.
-
Enter an Iterative Priority number in the range 1 to 1500. The element with the lowest iterative priority number is reduced first. If this deduction is reduced to zero and net pay is still insufficient to cover taxes and court orders, the element with the next lowest priority number is reduced, and so on.
Important: Iterative priority numbers must be in the reverse sequence of the processing priority numbers. This means that the element that is processed first is reduced last.
-
Choose Iterative Rules, and select the L_stopper rule.
Advance Pay Processing Information
Oracle Payroll Users only except Ireland. If Advance Pay by Element is enabled in your legislation, use the Advance Pay tab to:
-
Indicate that an element may be processed as an Advance Pay element
-
Establish the processing conditions for your Advance Pay element.
To define an element as an Advance Pay element
-
On the Advance Pay tab, check the Mark as an Advance Pay Indicator check box.
This marks the element as an Advance Pay indicator. This means that when you run the Advance Pay by Element process, it will identify this that this element can be potentially processed as an Advance Pay element according to the processing conditions that you define.
To set the processing conditions for an Advance Pay element
On the Advance Pay tab:
-
Check the Include as an Advance Element check box if you want to process this element as an Advance Pay element.
-
If you want to specify a separate Advance Pay element, select this element from the list of available elements in Use Advance Element. If you leave Use Advance Element blank and do not specify an element, then you do not select a separate advance pay element. You can still process advance payments, but all the entries are held within your current earnings element rather than reported separately in an advance pay element.
-
Check the Deduct Advance Amount check box if you want to show the deduction for the advance in the current payroll period. Every advance payment has a deduction associated with it to bring the overall payroll amounts back into balance. You can use this check box to control the point at which the deduction should be applied.
-
If you want to specify a separate Deduction element, select this element from the list of available elements in Use Deduction Element. If you leave Use Deduction Element blank and do not specify an element, then you do not create a separate deduction element. You can still process deductions for advance payments, but all the entries are held within your current earnings elements rather than reported separately in a deduction element.
Note that when you create either an Advance Pay element, or a Deductions element, you must ensure that it exists for the same period of time as the underlying earnings element, and that the input values match those on the underlying element.
-
Check the Process Advance Entry in Run check box if you want to include this element in a payroll run, If you do not check this box, then the element does not process in a payroll run and is reported as information in your Statement of Earnings report.
Continuous Calculation
For prerequisite steps to set up continuous calculation, see: Setting Up Continuous Calculation, Oracle HRMS Payroll Processing Management Guide
To set up an element for continuous calculation
-
Choose the Recalculation tab and select a RetroPay element. This is an event group that defines the events that trigger proration for this element.
Proration
In some localizations, Oracle Payroll can calculate proportionate earnings amounts whenever payroll-relevant data changes during a payroll period. The Payroll Earnings and Deductions section describes the full setup steps for the relevant localizations. To enable proration for an element, choose the Proration tab.
To set up an element for proration
-
Choose the Proration tab and select a proration group. This is an event group that defines the events that trigger proration for this element.
-
Optionally, select a proration formula. Alternatively you can edit the element's payroll formula to handle proration.
Further Information
-
Enter the Further Information field if:
-
Your Oracle localization team has set up additional fields for element definition
-
You are in the UK, and you use Oracle SSP/SMP
French Payroll:
-
Select a group, which is the name by which this element, and the others in the group, appears as one line on the pay advice.
-
On the pay advice, most earnings and deductions are shown as a base, a rate, and an amount. Select the base unit if you want this displayed on the pay advice.
South African Payroll
-
Enter a clearance number for Statutory Information and Deduction elements, if applicable. This number appears on the tax certificate.
Kuwait Payroll
-
Select a deduction type for the Deductions elements. This information is used by the PIFSS report.
-
-
Choose Input Values to define input values for the element
See: Defining an Element's Input Values
Oracle Payroll Users:
-
Choose Balance Feeds to select balances you want this element to feed
-
Click Balance Feed Control to add or remove secondary element classifications for this element.
Mexico only: Click this button to attach sub-classifications to your element.
-
Choose Frequency Rules to enter frequency rules to determine when the element should be processed.
-
For a net-to-gross element, choose Exclude Balances to select the deductions to be paid by the employer.
-
For a net-to-gross element, or any other element that is processed iteratively, choose Iterative Rules to specify how to use the Iterative Formula results.
Extra Information
Choose the Extra Information button to enter extra attribution for the element. You can link as much attribution as you need to an element.
Note: You can only access Extra Information types if your system administrator has set them up for your responsibility.
Usages
To exclude the element from a run type
-
Choose the Usages button if you want to exclude this element from a run type, or combination of run types.
-
Select the run type or combination of run types from which you want to exclude this element.
Note: For Norway: You must select the Employer Contributions run type to exclude the elements.
-
Select the effective dates for your exclusions.
-
Save your work.
Defining an Element's Input Values
Use the Input Values window to define the input values for the element. You can define up to 15 input values for an element.
Depending on the type of element you have defined, Oracle HRMS may have applied one or more default input values.
North America users: All elements must have the default Jurisdiction input value.
Norway users: All elements that feed the Holiday Pay Base classification must have the Tax Municipality input value. This input value must have the HR_NO_TAX_MUNICIPALITY valueset attached to it.
Payroll users: If you are creating balance feeds for individual elements, ensure you define an input value of the same unit of measure as the balance. Money units must be the same currency.
You can add new input values to a saved element only if you have not entered the element for any employees. To add an input value, you must set your effective date to the element's start date.
To define input values
-
Set your effective date early enough to handle any historical element entries you want to make.
-
Enter or query the element in the Element or Element Link window and choose the Input Values button.
-
Enter the name of the first input value. Remember that if you want to define a pay value to hold run results, you must name it Pay Value.
-
Select the unit type of your input value (money, hours, character, date, number, or time). A Pay Value must have the unit type Money if the element is in a Payments type classification.
-
You can enter numbers in the Sequence field to change the order in which the input values appear in the Entry Values window.
-
Check the Required check box if all entries of the element must have a value for this input.
Note: When you have saved an input value, you cannot change it to be Required. If you have saved it as Not Required by mistake (or you have generated an element that has an input value you want to make required), delete the input value and re-enter it with the correct values. If you are re-entering a generated input value, be careful to enter exactly the same name. You cannot delete the input value if you have made any entries of the element for employees.
-
Check the User Enterable check box if users can enter a value for this input. Uncheck it if you want to ensure that the default value is entered for all employees.
-
Check the Database Item check box if you want the value to be available to formulas or QuickPaint inquiries.
Database Items are simple identifiers that the system uses to find specific items of information in the human resources database. Any spaces in the input value name are converted to underscores in the Database Item name.
Entering Element-Level Defaults
If you enter defaults at the element link level, these override the defaults at element level. If you update an element-level default, remember to check the values on the element links too.
To enter a default for an input value
-
Enter the value in the Default field.
-
If you want existing entries to be updated whenever the default is changed, check the Hot Default check box. The input value must be required if you want to use this option.
A hot default appears in the Entry Values window in quotation marks.
Important: If a user overrides a hot default in the Entry Values window, subsequent changes to the default will not affect the entry. For this reason, you may prefer to use BEE to change defaults for large groups of employees, rather than the hot default feature.
Defining Entry Validation
To enter validation for an input value
-
Do one of the following:
-
Select Warning or Error to determine whether the system warns users that an entry is invalid or prevents them from saving an invalid entry. You cannot select a value if you chose a Lookup because a user cannot enter an invalid value for an input value validated by lookup.
Defining and Linking an Element for Standard and Advanced Benefits
You set up elements for Standard and Advanced Benefits as you would other elements, with certain restrictions noted below. Element setup is the same for Standard and Advanced Benefits.
In the US and Canada, use the Earnings or Deduction window to create an element if you process the element in a payroll run.
Outside the US and Canada--or if you are an HR-only customer in any legislation--use the Element window to create an element.
To define an element for Standard and Advanced Benefits
-
Set your effective date early enough to handle any historical element entries you want to make.
-
Enter a unique element Name.
When you define a standard activity rate, you select the element that corresponds to the rate you are defining.
-
Select the appropriate Classification for the earning or deduction.
-
For Payroll users in the US and Canada, select a Category on the Earnings or Deduction window.
If you are using the Element window, you can select a Category in the Further Element Information flexfield.
-
In the US, optionally select a Benefit Classification.
Note: For any element attached to a standard activity rate, do not select a Benefit Classification of Dental, Medical, or Vision.
-
Select a Termination Rule of Final Close for any element attached to an activity rate.
-
Do not check the Standard Link check box (Earnings and Deduction windows) or the Standard check box (Element and Element Link windows) since you use eligibility profiles to control benefits eligibility.
-
Complete the definition of the element according to your business rules.
-
Save your work.
-
Choose Input Values.
You can define multiple input values for the element, but you can only link one input value to a standard activity rate.
-
Save your work.
Defining an Element Link for Standard and Advanced Benefits
After you define an element, open the Element Link window. Because you create eligibility profiles for Standard and Advanced Benefits, you should limit use of the Element Link window to creating an open link for elements you do not cost.
To define an element link for Standard and Advanced Benefits
-
Set your effective date.
-
In the Element Name field, select the element for which you are defining a link.
-
Save the record without selecting any assignment links to create an open link.
Note: If you define links for costing, your links must not conflict with any eligibility profiles you set up for Standard and Advanced Benefits. Your element must have a valid link at all times.
For more help on element links and costing, see: Defining Element Links
Setting Run Type Exclusions and Triggers
Use the Define Element Type Usages window to specify the elements you want excluded from run types and which one you want to use as the trigger.
These steps are required for any element created through the Element Description window.
Note: If you created an Earnings or Deductions element through the templates or Element Definition Wizard, then Oracle HRMS made these settings for you. Do not change the defaults.
-
In the Name column, create one record for each run type used by your localization.
US Run Types
-
Regular Standard Run
-
Regular Tax Separate Run
-
Regular Separate Payment Run
-
Supplemental Standard Run
-
Supplemental Tax Separate Run
-
Supplemental Separate Payment Run
Canadian Run Types
-
T4/RL1 Regular
-
T4/RL1 Non Periodic
-
T4/RL1 Lump Sum
-
T4A/RL1 Regular
-
T4A/RL1 Non Periodic
-
T4A/RL1 Lump Sum
-
T4A/RL2 Regular
-
T4A/RL2 Non Periodic
-
T4A/RL2 Lump Sum
Mexican Run Types
-
Standard
-
Process Separately
-
Process Separately - Non Periodic
-
Separate Payment
-
Separate Payment - Non Periodic
-
-
For the run type that you want to use to process your element, set the Usage Type value to Trigger.
-
For all other run types, leave their Usage Type values blank or set to Exclude.
Note: Do not set more than one run type to Trigger.
Deleting an Element
Before you delete an element, you must first delete any entries of the element recorded for employees and then any links defined for the element.
Use the following process to delete any elements you defined in the Element window, Earnings or Deduction template, or Element Definition Wizard.
Important: Do not delete any predefined elements.
To delete an element
-
Use the List Employees by Element window to get a list of all employees with entries for the element.
-
For each employee, query the element entry in the Element Entries window, choose Delete Record, and save.
-
Query the element in the Element Link window and, for each link for this element, choose Delete Record, and save.
-
Perform one of the following:
-
If you created this element through the Element Definition Wizard, query this element from within the wizard.
-
If you created this element through the US and Canadian Earnings or Deductions templates, query this element from within the template.
-
If you created this element through the Element window, query this element from that window.
-
-
Delete the element and save.
The system prompts you to either End Date the element or Purge it. Select End Date if you want the element to remain in the system but be effective through a certain date. Select Purge if you made a mistake defining the element and you want to delete it from the system altogether.
Defining Element Links
Use the Element Link window to define groups of assignments that are eligible for an element.
Note: When you define a link for a benefit or for an entitlement item in a collective agreement, do not select any eligibility criteria. Instead use participation eligibility profiles to restrict eligibility for the benefit or entitlement item.
Note: When querying data the Element Link window returns values for Payroll, Location and Position and Organizations, irrespective of the security profile restrictions set, enabling you to view the links already created. You cannot create links for data outside your security profile.
To define an element link
-
Set your effective date to the date you want the eligibility criteria to come into effect.
-
In the Element Name field, select the Element for which you are defining a link.
-
Check the Standard check box if you want all employees who are made eligible by the link to receive the element automatically.
You can only create a standard link if the element is recurring and multiple entries are not allowed by the element definition.
-
In the Eligibility Criteria region, select the assignment components that constitute this eligibility rule. If you want to link to all employees, do not enter any eligibility criteria.
You can link to all payrolls or to a specific payroll. Do one of the following:
-
Leave the Payroll field blank and check the Link to all Payrolls check box if you want employees assigned to any payroll to be eligible. This rule excludes employees who are not assigned to a payroll.
-
Select the name of a specific payroll if you want only employees on that payroll to be eligible for the element. Do not check the Link to all Payrolls check box.
-
Leave both fields blank if assignment to a payroll is irrelevant to eligibility for the element.
-
Costing
To enter costing information for the link
-
Select the Costable Type. The default is Not Costed, meaning that the system maintains no costing information for the element.
-
To allow entry of costing information at all levels, including the assignment and element entry levels, select Costed This is the appropriate selection for most elements representing earnings types.
-
If you do not need to cost the element at organization and assignment levels, select Fixed Costed. This is appropriate for some deductions, which are irrelevant to labor distribution analyses.
-
If you want to distribute overhead costs (such as employer contributions to a pension plan) over other elements, select Distributed.Then select a Distribution Set.
Note: Some element classifications for your legislation may be predefined as Not Costed and you cannot override this.
-
-
Check the Transfer to GL check box if the payroll run results from this link should be transferred to the general ledger.
-
Use the Costing field to select a GL account code and, if present, account codes of labor distribution or other systems in which to collect the run results of this element. Then use the Balancing field to select the GL account that balances this one.
For deductions elements:
-
Select the code for the GL account to credit in the Costing field, and the code for the account to debit in the Balancing field.
For elements in all other classifications:
-
Select the code for the GL account code to debit in the Costing field, and the code for the account to credit in the Balancing field.
Note: Depending on your set up of the Cost Allocation flexfield, the Balancing field may not be enabled.
-
Batch Creation of Element Links
You can use a batch process to create multiple links more efficiently than creating each link individually.
To create element links in a batch operation
-
Check the Create in Batch Mode check box to specify that you want to defer creation of this element link until later when you run the Generate Element Links process. Alternatively, leave the box unchecked if you want to create this element link immediately.
-
View the Link Status to confirm the status of your link:
-
Unprocessed - you have selected this element link for creation as part of a batch, but the Generate Element Links process has not started yet.
-
Processing - the Generate Element Links process is now attempting to create this link.
-
Complete - the Generate Element Links process has completed, and you have successfully created this element link.
-
Incomplete - the Generate Element Links process has completed, but this element link was not included in the processing and you have not yet created the element link. Correct the link definition before rerunning the Generate Element Links process.
-
Error - the Generate Element Links process failed to complete, and you have not yet created the element link. Correct the link definition before rerunning the Generate Element Links process.
-
-
Run the Generate Element Links process to complete the creation of those links that you selected for batch processing.
Qualifying Conditions
To enter qualifying conditions for the link
-
Go to the Qualifying Conditions region. Here you can add or change age or length of service requirements for this particular eligibility rule.
The system checks these conditions when you make an entry of the element. If the employee does not meet the qualifying conditions, you receive a warning.
Input Values
To adjust input values for the link
-
Save your link definition and choose the Input Values button to display the Link Input Values window.
Use this window to:
-
Enter a new default or change one entered at the element level
-
Check the Costed box to maintain costing information for an input value.
-
Change the maximum, minimum or both for an input value. Logically, the new values should be within the range you defined for the element as a whole. However the system does not enforce this.
-
Generating Element Links
Use the Generate Element Links process to create element links quickly. You must first select the links for batch creation when defining them on the Element Links window. Then, run the Generate Element Links process from the Submit Requests window to link to the element entries created.
To generate element links
-
Select one of the following Generate Types to determine whether you want to process:
-
All element links that are not completed and are not processing currently.
-
A single element link. If you make this selection, go on to select the particular element link that you want to create. Note that you are selecting one element link from the range of links that are awaiting processing. You cannot change the characteristics of the link at this point, but you can return to the Element Links window to make changes.
-
-
Click OK
-
Click Submit
Running the Element Link Details Report
Use this report to check the eligibility criteria that have been defined for elements within a classification. You can report on links for the following categories:
-
All elements within a classification
-
Either recurring or nonrecurring elements in the classification
-
Just a single element
You can choose to see only standard or non-standard links, and only active or inactive links. Further, you can choose to see links to a particular job, organization, payroll, or all payrolls.
You run reports from the Submit Requests window.
To run the Element Link Details report
-
In the Name field, select Element Link Details Report.
-
Enter the Parameters field to open the Parameters window.
-
Enter the effective date for which you want to see the report.
-
Select the classification of elements you want to report on. Optionally select an element processing type (recurring or nonrecurring) or an individual element to report on.
-
To report only on standard links, select Yes in the Standard Link field. Select No to report only on non-standard links. Leave blank to report on all links.
-
Select a link status to report only on links that are either active or inactive as of the report's effective date.
-
To report on links to payrolls:
-
For links to one payroll only, select No in the All Payrolls field and select the payroll in the Payroll field.
-
For links to all payrolls, select Yes in the All Payrolls field and leave the Payroll field blank.
-
To see links irrespective of their payroll criteria, select No in the All Payrolls field and leave the Payroll field blank.
-
-
You can also select a job or organization to report on links to these assignment components only.
-
If you want to produce this report in Portable Document Format (PDF), select a template.
-
Choose the Submit button.
Defining an Element or Distribution Set
In the Element and Distribution Set window, you can select element classifications or individual elements to define a set. There are three types of set:
-
Customization set: You can use a Customization set to:
-
Restrict the elements that can be entered or viewed on a configured version of the Element Entries window
-
Specify the elements to be entered for assignments using BEE in the Batch Assignment Entry window.
-
Prevent users updating entry values in the Element Entries window for a group of elements. You select the element set in the HR:Non-Updateable Element Set user profile option.
-
Restrict the elements displayed in the Compensation Activity view in SSHR. You select this element set in the Element Set Name user profile option.
-
-
Run set: You can use a Run set to:
-
Specify the elements that the application must process in a payroll run. This functionality is available only for Oracle Payroll users. If you are creating a Run set for US payroll, and you are using the Enhanced Tax Interface, you must include the US_TAX_VERTEX recurring element (see step 4). If you have not enabled the Enhanced Tax Interface, you must include the VERTEX recurring element.
-
Display accrual balances
-
-
Distribution set: Oracle Payroll users can use a Distribution set to define the elements over which the costs of other elements are to be distributed.
To define an element or distribution set
-
Enter a unique name for the set and select the type: Distribution, Run, or Customization.
-
Save your new set.
-
If you want to include all elements in a classification, choose the Classification Rules button.
-
In the Classification Rules window, select one or more classifications to include. Save the set and close this window.
The elements in the classifications you choose are now listed in the Elements region.
-
If you want to exclude individual elements, place your cursor in the element's row and choose the Exclude Element button.
-
-
If you want to include particular elements from other classifications, choose the Include Element button.
-
Select the element you want to include in the Elements window, and choose the OK button.
Note: After you include a particular element, you cannot go to the Classification Rules window and include the classification to which this element belongs.
-
Save your set.
-
If you want to see a list of the individual elements you have included or excluded from the set, choose the Element Rules button. The Element Rules window is view-only.
Compensation Entry and Reporting
Compensation Entry
To record any form of compensation, benefit, or deduction liability for an employee, you make an element entry. There are several ways to do this:
-
You can use BEE (Batch Element Entry) to enter or update a batch of element entries for many employees, using defaults for fast entry. For example, you can use BEE to enter timecard data and to enroll employees in PTO accrual plans.
-
You can enter salaries, as proposals or confirmed values, on the Salary page.
-
You can enter absences or accrued time taken in the Absence Detail window or in SSHR.
-
You can enroll employees in benefit plans and select the appropriate coverage for themselves and their dependents. There are different windows for enrolling in Flex Programs, Non-flex Programs, Savings Plans, and Miscellaneous Plans. Alternatively, employees can set up their own enrollments, using Self Service HR.
-
You can make or update individual entries of other compensation elements for an employee using the Element Entries window.
At your enterprise, some elements may be defined with standard links so that eligible employees receive an entry automatically. You do not need to do anything to record these forms of compensation for employees.
Dates for Compensation Entries
There are two types of element: recurring and nonrecurring.
Entries for recurring elements remain effective indefinitely, until you update them or the employee ceases to be eligible for the element, for example after a change of work assignment. You can start entries of a recurring element at any point in time. Use DateTrack to set the effective start date of new entry or update. This maintains a complete history of values and the dates they changed.
Entries for nonrecurring elements are one-time entries. They are effective only for the current pay period (defined by the payroll to which an employee is assigned). To make the entry, you set your effective date to any date in the appropriate pay period. Any changes you make to nonrecurring entries are always corrections. There can be no history of changes to these entries within a pay period. However, the entries for each period (if any) are stored as history for an employee.
Compensation Reporting
Oracle HRMS provides a range of reporting mechanisms to monitor and analyze the compensation and benefits data in your enterprise. This topic explains the windows and reports that Oracle HRMS provides to meet your different compensation reporting requirements.
The View Element Entry History for Employees window enables you to view a history of different element entries for an employee assignment.
See: Viewing Element Entry History
The List Employees by Element window provides you with a list of employees with entries to an element in any period of time you choose.
See: Listing Employees by Element
The Salary History window gives you a complete history of approved salary changes for an employee, along with associated performance reviews.
Using the Salary Review Report you can check the current and past salaries for some or all of your employees.
See: Salary Review Report
The Compensation Workbench reports enable you to track how you have distributed compensation and awards to your employees using Compensation Workbench.
See: Reporting in Compensation Workbench
The Compensation History page in SSHR enables you to view the in-progress, current, and historical information about compensation and ranking of your employees, including the history for elements not linked to Compensation Workbench or Individual Compensation Distributions.
See: Compensation History
Using the HR/Payroll Extracts you can extract employee and payroll data, such as the details of earnings, deductions, and information elements for internal reporting and for transfer to third-party providers. The extracts support both XML and ASCII formats, you can generate postscript reports, and export a file to Excel for reporting.
See: HR/Payroll Extracts
Oracle HRMS also includes various Workforce Intelligence reports that help you analyze salary and grade-related information. You can also report on absences and analyze absence trends in your enterprise using the Workforce Intelligence reports in this area.
Related Topics
Reports and Processes in Oracle HRMS, Oracle HRMS Configuring, Reporting, and System Administration Guide
Information Access Overview, Oracle HRMS Configuring, Reporting, and System Administration Guide
HR or Payroll Extracts
The HR/Payroll Extracts feature enables you to extract employee and payroll data, such as the details of earnings, deductions, and information elements for reporting purposes. You can use the extract reports for internal reporting, such as listing all employees in receipt of a bonus, or for transfer to third-party providers, such as pension providers. For example, you can send details of new hires and terminations to a provider on a weekly basis.
You can also make copies of the seeded extracts and modify their layout or add different data elements to suit your reporting requirements. You can view and correct the extracted information before writing the data to a file.
The extracts support both XML and ASCII formats, you can generate postscript reports, and you can export a file to Excel for reporting.
Predefined System Extracts
Oracle HRMS supplies the following predefined system extract definitions:
-
Global HR/Payroll Extract - (full-profile extract) extract the payroll data of your employees. This extract contains identification and demographic information of your employees and reports on payroll data such as earnings, deductions, and other information elements.
-
Global HR/Payroll Information Changes (Single Record) - (extract for changes) report on changes to employee personal and plan details, such as the name change of an employee. You can also report on new hires and terminated employees using this extract. This extract does not include payroll data. It includes only employees whose records have changed, and you can configure which changes trigger the extract. It displays all the changes for each employee as part of a single record, in the same row.
You can either use the predefined extracts or make copies of them and modify the copies to suit your reporting requirements.
The extracts include the assignment details of both the primary and secondary employee assignments.
Mexico Users: For reporting voluntary contributions to SUA, the Mexico HR/Payroll Outbound Interface uses the Global HR/Payroll Extract only as a template. Users must make legislative changes to this extract definition before they can perform these operations. Refer to the "Oracle HRMS for Mexico - Payroll System Extract for SUA - Voluntary Contributions" whitepaper (My Oracle Support ID #336495.1).
US Users: You can also use the following predefined US HR/Payroll extracts. To use these extracts you must create your elements using the Deduction window.
-
US HR/Payroll Extract.
-
US HR/Payroll Information Changes (Single Record). This extract displays all the changes for each employee as a single record.
-
US HR/Payroll Information Changes (Multi-Record). This extract displays each change for each employee as a separate record.
When you are extracting pensions data, the US extracts the US extracts automatically extract data for the additional elements for pension plans, such as Catch-up, After-tax, and ER Match apart from the primary earnings and deduction elements.
Apart from the above generic US extracts you can also use the following preconfigured US extracts to report specifically on Pre-tax EE, Catch-Up, ER Match, Loan Re-Payment and deferred compensations:
-
US HR/Payroll Pension EE Contribution
-
US HR/Payroll Pension EE Def. Comp Pre-Tax Contribution
-
US HR/Payroll Pension CatchUp
-
US HR/Payroll Pension ER Match
-
US HR/Payroll Loan Re-Payment
The following list shows the data elements typically used in the extract reports:
| Employee Data | Extracted from |
|---|---|
| National Identifier | Social Security/National Identifier field on the People window |
| Name (First Name, Last Name, Middle Name, Prefix, and Suffix) | Last, First, Middle, Prefix and Suffix, fields in the Name region of the People window |
| Address (Line 1 - 3, Region 1-3, Town or City, Post Code, Country) | Primary address fields |
| Date of Birth | Birth Date field on the People window |
| Recent Hire Date | Latest Start Date field on the People window |
| Termination Date | Actual termination-date field on the Termination window |
| Marital Status | Status field on the People window |
| Sex | Gender field on the People window |
| Normal Hours | Working Hours field of the Assignment window |
| Employment Category | Assignment Category field on the Assignment window |
| Employment Status | Status field on the Assignment window |
| Projected Compensation | Person base salary |
| Actual Salary | Balance of the regular salary element |
| Payroll Date | Date of the payroll run |
| Employee Number | Person employee number |
| Plan Contr | Run result value of the of the pre-tax deduction element |
| Pay Value | Run result value of the selected element |
| Payroll Frequency | Person payroll period type |
| Sample Balance Value | Value of the balance specified in the formula |
| Sample Element Entry Value | Run result value of the payroll element specified in the formula |
Typical data elements used in the header and footer regions of the extract reports are:
| Header |
|---|
| Creation Date |
| Payroll Date |
| Pay Cycle or Payroll Frequency |
| Group ID |
| The parameters you specify when running the extract process |
| Footer |
| Total Participant Records |
You can change the header and footer information to suit your reporting needs.
Use the Global Pension Change Events Extract to report on changes in:
-
Employee name
-
Employee address
-
Employee status
-
Employee category
-
Employee movements (new hires and terminations)
Note: The Global HR/Payroll Information Changes report displays all the data elements that the predefined extract contains, not just the elements for which you are reporting a change. To include only those data elements for which you are reporting a change, make a copy of the seeded extract and modify the layout accordingly.
Some of the elements have attached formulas. You can make copies of the extracts and modify these formulas to extract the appropriate data. The following table lists those data elements, the extracted values for those data elements and the attached formulas.
| Data Element | Fetched Value | Formula to Edit |
|---|---|---|
| Sample Element Entry Value | The value of any payroll element's input value | PAY_GLOBAL_PEXT_GET_ELE_ENTRY_VALUE |
| Sample Balance Value | The value of any balance specified in the formula | PAY_GLOBAL_PEXT_GET_BALANCE_VALUE |
US Users: If you are using the US extracts, you can update the following formulas to extract the balance or input values you want to extract:
-
PAY_US_PEXT_GET_ELE_ETRY_VALUE
-
PAY_US_PEXT_GET_BALANCE_VALUE
Related Topics
Configuring the HR/Payroll Extracts
Running the HR/Payroll Extracts
Element Entries
Making Manual Element Entries
You enter compensation and basic benefits for employee assignments in the Element Entries window. If employees are assigned to a salary basis, you enter their salaries in the Salary page.
You can use the Element Entries window to make entries or to query existing entries. Use the Period field, Classification field, and Processing Types option buttons to restrict the entries you see when making inquiries.
Several Oracle HRMS features, such as Absence Management, RetroPay, and Salary Administration, create element entries automatically. You cannot update these element entries on the Element Entries window. You must update the source record (such as the absence or salary record) to change the element entry.
The Processed check box shows if Oracle Payroll has processed the entry in the current pay period. Notice that you can change an entry that has been processed. This enables you to correct entries for retropay processing. Changing the entry does not alter the payroll run results so you can consult these for a complete record of payroll processing and payments.
See: Setting Up RetroPay, Oracle HRMS Payroll Processing Management Guide
Note: Your system administrator might have restricted the elements you can enter in this window by element set, classification or processing type.
To enter an element for an employee assignment
-
If necessary, change your effective date to:
-
The correct start date for a recurring element entry
-
Any date in the correct pay period for a nonrecurring element entry
If the pay period is closed at your effective date, you cannot enter any nonrecurring elements that process in payroll runs. If a current or future pay period is closed, you cannot enter any recurring elements that process in payroll runs.
-
-
To reduce the list of elements to choose from, select a classification, a processing type, or both in the first region.
-
In the Element Name field, select an element.
Note: Elements this employee is eligible for by means of a standard link appear automatically.
The system displays a warning message if the employee fails to meet any qualifying conditions of age or length of service.
-
If the Costing field is enterable, you can enter cost codes, for example to indicate the cost center the employee's time should be charged to.
-
You can select a reason for an element entry you make or update. As part of your system setup, you can enter valid reasons for the Lookup Type ELE_ENTRY_REASON.
-
You can check the Override check box to create an entry that overrides all other entries of this element in the current period. You cannot create an override entry if one already exists, or if any of the entries of this element have been adjusted.
-
If you want to create a one-time entry of a recurring element, check the Additional check box.
An Additional entry is valid only for the current pay period, shown in the Effective Dates fields.
You can only check Additional if:
-
The element definition allows additional entries, and
-
An additional entry does not already exist for the assignment in this period, and
-
The employee is assigned to a payroll
-
There is a payroll period defined at your effective date
-
-
Choose the Entry Values button to open the Entry Values window.
-
Enter values in the Entry Values fields. Notice that:
-
Entry to some fields may not be permitted.
-
Some fields may be required.
-
Some fields may have a list of values; others may be validated as you leave the field. You will receive a message if your entry is not a valid value.
-
Some fields may contain default values. If the default value is in quotation marks, it is a "hot default".
Important: You should consider carefully before overriding a hot default. If you override it, then any subsequent changes to the default value on the element or element link definition will notaffect the element entry. However, you can clear your entry if you want the default value to come back into effect.
For Kuwait users only: To enter information about the elements with deduction classification, click on Further Entry Information and enter the following:
-
Reference number, which is the sequence number used while setting up the deduction type
-
Authority for the deduction account
-
Select the type of deduction
-
Total deduction amount for the element
-
Start and end date for the deduction. The deduction process depends on the start and end dates that you select for the element. Oracle HRMS uses these dates for reporting purpose.
-
-
For Mexico users only: To report disability subsidy payments for applicable employees in the CFDI payslip, enter the disability information for Earnings and Supplemental Earnings elements. For these elements, click Further Entry Information and select an appropriate value in the Disability Registration ID field.
See Setting Up Information for the CFDI Payroll Payslip XML Interface, Oracle HRMS Payroll Processing Management Guide (Mexico) and Running the CFDI Payroll Payslip XML Extract, Oracle HRMS Payroll Processing Management Guide (Mexico) for more information.
-
For a non-recurring element, optionally select a date within the current payroll period in the Date Earned field. The entry will not be processed until this date (that is, the Date Earned of the Payroll Run must be on or after this date).
-
To enter information about a third party recipient of a payment resulting from a deduction element, use the Payee Details field. Select the name of the third party payment method set up for this payment.
-
To determine the processing sequence of multiple entries in the payroll run, enter a subpriority number in the Processing Priority field. Lower priority numbers process first.
Note: The Processing Priority field is not available to HR-only users. For more information on user types and the HR:User Type profile option, see: User Profiles, Oracle HRMS Configuring, Reporting, and System Administration Guide.
-
Save your work.
Adjusting a Pay Value
Oracle Payroll users can adjust the Pay Value of any normal recurring payroll element entry. When you open the Entry Values window for an entry of this kind, you will see a Show Adjustment check box in the lower left corner of the window. You do not see this check box until you have saved the entry.
You can adjust a Pay Value by adding an amount to the initial value, subtracting an amount from the initial value, or replacing the initial value with a specified amount. You can also remove an adjustment and return the Pay Value to the initial value.
The following conditions apply to adjusting a Pay Value:
-
You cannot adjust an entry that has been overridden (that is, the Override check box has been checked for an entry of this element in this period).
-
You can make multiple changes to the adjustment before processing but only the single most recent change to the adjustment will be processed.
-
You will not overwrite the Pay Value stored in your database. The Pay Value will still be used in subsequent payroll runs. The adjustment is used in the next processing run.
Important: Do not use this method of adjustment if the element's formula performs essential processing, such as checking limits or iterative processing for a pre-tax deduction. If you select the Replace option, the element's formula is ignored in the payroll run. If you select the Add or Subtract options, the amount you specify is added or subtracted after the formula processing is complete, without regard for any limits set by the formula. US users: Instead, you can replace the Pay Value using the Special Inputs element.
To adjust a Pay Value
-
Query the element entry in the Element Entries window and choose the Entry Values button.
-
Check the Show Adjustment check box.
In the Adjustment pop-up list, you will see a description of the current adjustment.
-
None means that there are no adjustments to the Pay Value.
-
Add means that the adjustment shown has been added to the Pay Value.
-
Subtract means that the adjustment shown has been subtracted from the Pay Value.
-
Replace means that the adjustment shown has replaced the Pay Value.
-
-
To cancel an existing adjustment, select None. Now you can enter a new adjustment, if necessary.
-
To enter a new adjustment, select Add, Subtract or Replace. You can only select Add or Subtract if the Pay Value is numeric.
-
Enter the value to add to, subtract from, or replace the existing Pay Value entry.
-
Save the change.
Deleting Element Entries
You can delete element entries in the Element Entries window.
To delete a nonrecurring element entry
-
Set your effective date to any date within the payroll period for which the entry exists.
-
Click on the entry to select it, choose Delete Record, and save.
To delete a recurring element entry
-
Set your effective date to any date within the payroll period for which the entry exists.
-
Click on the entry to select it and choose Delete Record.
-
Choose Purge in the dialog box that displays, and save.
Note: Your ability to purge element entries is controlled by the user profile option HR: Purge Element Entry Permission, which is set by your system administrator. You may be able to purge all element entries, entries of information elements only, or none.
Deleting Processed Entries
You can delete an element entry that the payroll run has processed. You receive a warning message. This does not remove the payroll run results so you can consult these for a complete record of payroll processing and payments.
To reprocess corrected element entries from the past, run the retropay processes.
See: Setting Up RetroPay, Oracle HRMS Payroll Processing Management Guide.
Listing Employees by Element
In the List Employees by Element window, you can view a list of the employees with entries to an element in any period of time you choose. You can also see the last entry value (in that time period) for each assignment.
Note: If your system administrator has customized this window, you may be restricted to selecting elements of a certain processing type or element set.
To view a list of employees receiving an element
-
Select an element.
-
Select Current Employees, Ex-employees, or both.
-
You can also enter a date range. Both date fields default to your effective date.
-
Choose the Find button.
-
You can enter additional query criteria in the Element Entries region. For example, click in an Entry Value field, choose View > Query by Example > Enter, enter a value, and run the query.
The Element Entries region displays all entries of the element for employees of the type you selected in the chosen time period.
Note: This window does not display datetracked updates to recurring element entries. You only see the latest value (within your chosen time period) of each element entry. The date of the last datetracked update may vary from employee to employee. The Start and End Date fields in the Element Entrues region show the dates of the last update.
Viewing Element Entry History
In the View Element Entry History for Employee window you can view, for a single employee assignment, a history of entries for:
-
One element
-
All recurring elements, all nonrecurring elements, or both
-
Elements from a selected classification
Note: If your system administrator has customized this window, you may be restricted to viewing elements of a certain processing type or element set.
To view element entry history for an employee
-
Enter your selection criteria. You can:
-
Select a classification.
-
Select a processing type.
-
Enter a date range. The end date defaults to your effective date.
-
-
Place your cursor in the Element Name field and run the query.
The window displays all entries of the types of element you selected within the time period, including datetracked updates to entries. New entries are shown in bold to contrast with datetracked updates, which are listed under the initial entry.
-
Select an entry and choose the Entry Values button to view the entry values.
Configuring the HR or Payroll Extracts
Oracle HRMS supplies the following seeded HR/Payroll extract definitions:
-
Global HR/Payroll Extract
-
Global HR/Payroll Information Changes (Single Record)
Mexico Users: For configuration instructions, refer to the "Oracle HRMS for Mexico - Payroll System Extract for SUA - Voluntary Contributions" whitepaper (My Oracle Support ID #336495.1).
US Users: You can also use the following predefined US HR/Payroll extracts:
-
US HR/Payroll Extract
-
US HR/Payroll Information Changes (Single Record)
-
US HR/Payroll Information Changes (Multi-Record)
-
US HR/Payroll Loan Re-Payment
-
US HR/Payroll Pension CatchUp
-
US HR/Payroll Pension EE Contribution
-
US HR/Payroll Pension EE Def. Comp Pre-Tax Contribution
-
US HR/Payroll Pension ER Match
To configure the extracts for your own reporting needs, copy and modify them as follows.
-
Use the copy function within the system extract to copy the predefined extract you want to modify. In the extract Definition window, query the seeded extract definition, enter a prefix in the New Extract Prefix field, and choose the Copy Extract button.
-
Edit the copies of the following sample formulas to perform the processing you require:
Data Element Fetched Value Formula to Edit Sample Element Entry Value The run result value of any payroll element's input value PAY_GLOBAL_PEXT_GET_ELE_ETRY_VALUE Sample Balance Value The value of any balance specified in the formula PAY_GLOBAL_PEXT_GET_BALANCE_VALUE US Users: If you are using the US extracts, update the following formulas to extract the balance or input values you want to extract:
-
PAY_US_PEXT_GET_ELE_ETRY_VALUE
-
PAY_US_PEXT_GET_BALANCE_VALUE
-
-
Modify the extract layout definition to change the data elements that the extracts include and the format of the extract definitions.
See: Defining an Extract Layout, Oracle HRMS Configuring, Reporting, and System Administration Guide
-
Modify the extract criteria profile to change the extract criteria. The extract criteria you select determine the data that the application extracts to your reports.
See: Defining an Extract Criteria Profile, Oracle HRMS Configuring, Reporting, and System Administration Guide
To define the extract criteria profile for the extract for changes, you must enable the change events in the Application Utilities Lookups window. Query the Lookup type BEN_EXT_CHG_EVT and select Enabled for the change event.
-
Create the extract definition to set the parameters for the extract.
Your extract definition includes an extract criteria profile and an extract layout definition that you have already defined. It also includes other parameters needed for the extract batch process, such as the output directory and file name of the extract file.
See: Defining a System Extract, Oracle HRMS Configuring, Reporting, and System Administration Guide
-
If you have more than one element to report on, create an element set and specify the set name as one of the parameters of the extract process. For example, if you want to report on several pension plans together, create an element set.
See: Defining an Element or Distribution Set.
Note: US Users: If you are configuring the US extracts for a pension plan, include only the primary pension elements in the element set. Do not include other pension elements such as Catchup, After-Tax, or ER Match. You can include in the element set only those elements that you created using the Deduction window. The elements you include in the set must be of the same type. You cannot combine 401k, 403b, and 457 elements in the same set.
-
The Global Extracts concurrent programs are currently available for US and UK responsibilities only. To allow other users to run these programs from the Submit Request window, add the relevant programs to the request group for their responsibility.
Running the HR or Payroll Extracts
Using the HR/Payroll extracts you can extract employee and payroll data, such as the details of earnings, deductions, and information elements for reporting purposes.
Use the Submit Request window to run the HR/Payroll extract you require.
To run the Extracts
Mexico Users: To run the extracts, refer to the "Oracle HRMS for Mexico - Payroll System Extract for SUA - Voluntary Contributions" whitepaper (My Oracle Support ID #336495.1).
-
Select Global HR/Payroll Outbound Interfaces in the Name field.
US Users: To run a US HR/Payroll extract select US HR/Payroll Outbound Interfaces.
-
Click in the Parameters field to open the Parameters window.
-
Select the extract you require. You can choose from the following predefined extracts or from the copies of the extracts you have modified.
-
Global HR/Payroll Extract (full-profile extract)
-
Global HR/Payroll Information Changes (Single Record)
US Users: To run a US HR/Payroll extract, choose from the following predefined extracts or from the copies of the extracts you have modified:
-
US HR/Payroll Extract
-
US HR/Payroll Information Changes (Multi-Record)
-
US HR/Payroll Information Changes (Single Record)
-
US HR/Payroll Loan Re-Payment
-
US HR/Payroll Pension CatchUp
-
US HR/Payroll Pension EE Contribution
-
US HR/Payroll Pension EE Def. Comp Pre-Tax Contribution
-
US HR/Payroll Pension ER Match
-
-
Select the appropriate reporting options.
The reporting options available for the full-profile extract are:
-
Details - provides details of each assignment action for an assignment
-
Summary - provides a summary of all assignment actions for an assignment for a given period
The reporting options for the extract for changes are:
-
All Employees - provides details of all employees in the organization
-
Employees Enrolled in Plan - provides details of only those employees who are enrolled in a specific plan
-
-
In the Selection Criteria field, select either Element Name or Element Set.
-
Do one of the following:
-
Select the element name.
Note: US Users: If you are running US extracts, this should be one of the primary deduction elements you would have created for the 401(k), 403(b), and 457 plans.
-
Select the element set name.
-
-
Enter the dates for which you want to generate the report.
-
Select a value for one or more of the following parameters to restrict the employees included in the extract:
-
Payroll
-
Consolidation Set
-
Organization
-
Person Type
-
Location
-
-
Click OK then Submit.
-
View the output in the Extracts Results window.
-
View the change events that have occurred to a person or modify the change event log using the Change Event Log window.
-
Run the Extract Write Process to write the results of the extract to the file you specified in your extract definition.
Compensation Objects
Plan Design
Your plan design defines, categorizes, and helps you to manage the benefits that you offer to your employees and other eligible participants. The plan design is the domain of the benefits practitioner who uses the product to define the structure and elements of the benefits offering and the rules that administer these benefits.
At its core, the plan design determines the benefits that eligible participants may receive. Examples of such benefits include health and welfare plans, savings plans, and group term life insurance.
You structure your benefits offerings according to a hierarchy so that the rules and definitions that are set at the top level (the program) cascade to the benefits at the bottom level (the options in the program).
Your plan design also includes eligibility definitions and enrollment requirements, and the activity rates calculations that determine the contributions and distributions associated with a plan.
Compensation Objects
Central to benefits administration are the compensation objects that you use to define, categorize, and manage the benefits that you offer to eligible participants. The four compensation object types that you use to structure your benefits offerings are programs, plan types, plans, and options.
Defining compensation objects is a key part of your overall plan design that includes defining eligibility and enrollment requirements, plan year periods, activity rates, and other elements of benefits management.
-
The hierarchical structure of compensation objects
-
Viewing a program structure that you have defined
Hierarchical Structure of Compensation Objects
Compensation objects are designed hierarchically so benefits that share similar features can be defined in similar ways. You build this hierarchical structure by defining attributes of the different compensation objects and then linking the components into a hierarchy.
Compensation Object Hierarchy
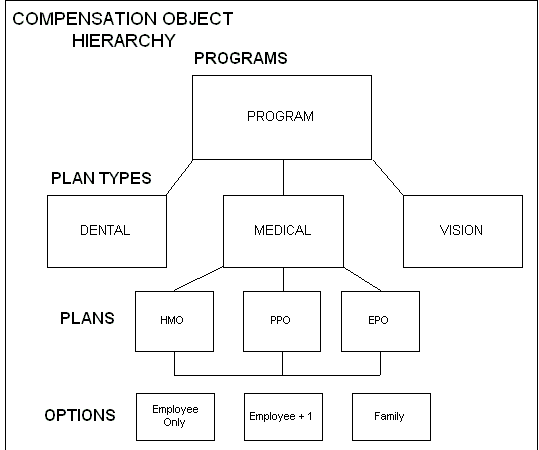
A description of the four compensation objects follows:
Program: A package of benefits offerings. Programs are important because they set the boundaries for the benefits you offer. You define many administrative procedures and rules at the program level.
Plan Type: A grouping of similar benefits offerings to facilitate their management. Example plan types include medical, dental, employee group life insurance, and savings.
Plan: A formally defined benefits offering that a participant can elect, such as a medical plan.
Option: A level of coverage for a participant's election, such as Employee Only for a medical plan, or 2x Salary for a life insurance plan.
Attributes set at the program level are inherited by each level of the compensation object hierarchy. However, if these same attributes are set at a lower level in the hierarchy, the compensation object inherits those attributes set at the lowest level at or above its level. A compensation object never inherits attributes set at a lower level in the compensation object hierarchy.
Program Structure Terminology
Before you set up a benefits program, you should familiarize yourself with fundamental terms that refer to associations between the four compensation objects. Whether or not you choose to link compensation objects together depends on your eligibility rules and the breadth of benefits that you offer to your participants. The table below outlines the programme structure terminology:
Programme Structure Terminology
| Terminology | Description |
| Program | Any program, regardless of whether that program has been associated with any other compensation objects. |
| Plan Type | Any plan type, regardless of whether that plan type has been associated with a program. |
| Plan Type in Program | A plan type that has been associated with a program. |
| Plan | Any plan, regardless of whether that plan has been associated with a program. |
| Plan in Program | A plan that has been associated with a program. |
| Not in Program Plan | A plan that has not been associated with a program. |
| Option | Any option, regardless of whether that option has been associated with a plan. |
| Option in Plan | An option that has been associated with a plan. |
Compensation Object Definition
You define your compensation objects in the order below. As you define objects in the hierarchy, you associate objects together to form your program structure.
1. Define plan types.
2. Define options.
3. Associate options with plan types.
4. Define plans.
5. Associate options with plans.
6. Associate plans with plan types.
7. Identify which plans are not part of a program.
8. Define programs.
9. Associate plans and plan types with programs.
For example, let's say you want to define the medical plans offered by a benefits program you are administering. You first define the plan type of medical. Then, you define the coverage options available for the medical plan type, such as Family and Employee only.
Next, you define the medical plans in the plan type, such as an HMO or a PPO offering. Lastly, you associate the plans or plan type with a program that groups together a variety of plans and plan types into a single benefits offering.
Plan Types
You define plan types as categories of benefits grouped according to the type of benefit provided. Common plan types include medical, employee group life insurance, and savings.
Plan types are used to record administrative rules for all benefits of the same type. When you define a program that groups plans together, you specify parameters that control how plans of the same plan type behave.
Plan types are the most stable of the four compensation objects. Once you define the plan types that you need to support your benefits offerings, you rarely need to modify them.
Options
You can define options for many purposes, but commonly you do so to define coverage available under one or more plans.
Options are re-usable. Once defined, you can associate an option with one or more plans. When you associate an option type with a plan type, you make options of that type available for selection to all plans in that plan type.
For example, you could define the options Employee Only, Employee Plus Spouse, and Employee Plus Family and then associate each option with the plan types of Medical, Dental, and Vision.
Designation Requirements for Options
Some benefits plans require that dependents and beneficiaries covered by an option are a specific familial relation to the primary participant. You can limit the relationship types covered under an option by defining a relationship group that includes specific types of people. Group relationship types include:
-
Children
-
Domestic partner
-
Family
-
Nonpersonal
Within a group relationship, you define which relationship types apply to the group. For the group relationship of Children, you might include the relationship types:
-
Adopted child
-
Natural child
-
Step child
You can also limit the number of dependents covered by an option. A designee that does not meet the designation requirements for an option is not eligible for coverage under that option.
Plans
You define a plan as a formal benefits offering. Your organization may define medical, dental, and savings plans among many others.
Your plan definition consists of:
-
The kind of plan you are defining and its plan type
-
The eligibility profile that controls who is eligible for the plan
-
The plan's activity reference period
-
The options in the plan
-
The plan year
In addition to these definitions, there are a variety of other factors that you include when defining a plan. However, these are some of the most common.
Programs
You define programs in order to group benefits together as a package. Your program definition consists of:
-
The plan types and plans in the program
-
The eligibility profile that controls who is eligible for the program
-
The program year period
-
For Advanced Benefits customers, the life events that enable enrollment in the program
Programs are important because they set the boundaries for what benefits are offered to your employees and other eligible participants. Also, it is at the program level that you define many administrative procedures and rules, such as eligibility requirements that cascade to the plan types, plans, and options in the program.
You define currency types at the program level. A plan in program must inherit the program's currency definition. You cannot associate a plan with more than one program if those programs use different currency types.
For Advanced Benefits users, you can specify the valid reasons for waiving out of waivable plan types in a program. You can then define the waive certification that you accept for each valid waive reason.
Program Structure Display
You use the Hierarchy window to display the program structure that you have created. The program structure shows how plan types, plans and options are grouped hierarchically in your program.
You can display four views of a program's structure. Each view displays data by program year or plan year and by effective date.
Plans in Programs: Displays all programs, and under each program, its plan types, the plans in each of these plan types, and the options in each of these plans. This is the most comprehensive view.
All Plans: Displays all plan types, the plans in each of these plan types, and the options in each of these plans.
Plans Not In Programs: Displays those plans types that contain the not in program plans, the not in program plans in each of these plan types, and the options in these not in program plans.
Options In Plans: Displays all active options, the plans that use these options, and the programs that use these plans.
Program and Plan Year Periods
You define program and plan year periods--as well as fiscal years--using the calendar start and end dates through which programs or plans are in effect.
Once you define a year period, you associate it with the appropriate program or plan.
Integration with Authoria HR (US and UK)
You can establish context-sensitive information access between Oracle HRMS and the third party information product Authoria HR.
Authoria HR uses a common knowledge repository to manage and communicate HR and benefits information. Once you set up a total compensation plan, you can configure links between Oracle HRMS and Authoria HR. End users can click on links in Total Compensation windows and self-service pages to display context-sensitive Authoria HR documentation.
You can configure the following windows in the Professional User Interface for Authoria HR:
-
View Enrollment Results window
-
View Participation Information window
-
Flex Program window
-
Non-Flex Program window
-
Savings Plan window
-
Miscellaneous Plan window
-
Person Life Events window
You can configure the following self-service pages for Authoria HR:
-
Benefits Enrollment Overview page
-
Current Benefits page
-
Confirmation page
-
Benefits Selection page
See Configuring Links Between Oracle Standard and Advanced Benefits and Authoria HR, Oracle HRMS Configuring, Reporting, and System Administration Guide
Reimbursable Goods and Service Types
In addition to traditional benefits offerings, such as health and welfare and savings plans, you can define goods and services that your organization approves for reimbursement.
You can use this feature to define flexible spending account plans or to define other reimbursable goods and services, such as a medical insurance claim form, a monthly invoice from a registered dependent care provider, a cash award, or a wall plaque.
Reimbursement Plans
Flexible Spending Accounts (FSAs) and other plans that reimburse participants for certain incurred expenses have special plan design features. You define information that is specific to reimbursement plans after you perform basic plan set up tasks, such as defining a plan's eligibility requirements.
Note: When you set up the coverage for a flexible spending account, select a coverage calculation method of Same As Annualized Elected Activity Rate so that the participant receives the amount of coverage they elected for the year.
Plan Design Copy
Plan Design Copy enables you to copy program and plan design data that you have already entered into an Oracle HRMS database. The copy process creates a new instance of the compensation object and its associated child records.
Note: The Copy Process does not copy person related records, only plan design data.
You can use Plan Design Copy to save time during your implementation by avoiding repetitive data entry where plan design components are similar or identical. For example, you can copy a base plan, then makes changes to the new plan with the applications windows you used to create the base plan.
Plan Design Copy is available to all Oracle HRMS customers and does not require a license for Self-Service or Advanced Benefits. You can use Plan Copy for any plans that you administer using the Total Compensation data model, including:
-
Standard and Advanced Benefits Programs and Plans
-
Compensation Workbench Plans
-
Individual Compensation Distributions Plans
-
Absence Plans
When you copy a program or plan, the copy process copies the compensation object and plan design data associated with the object stored in benefits tables. For example, if you copy a program, the copy process also copies:
-
Plan types in program
-
Plans in program
-
Options in plan
-
Participant and dependent eligibility profiles
-
Enrollment requirements
-
Life events
-
Standard and variable rate calculations
-
Coverage and premium calculations
-
Flex Credit calculations and benefit pools (Advanced Benefits)
-
FastFormulas (however, the process does not verify the formula or copy any functions called by the formula)
For a list of items that the copy process does not copy, see: Exceptions to the Copy Process
Copy Target
You can copy a compensation object and its child records to the same business group or to a different business group.
You can also export a program or one or more plans into a flat file. Exporting a compensation object is useful if you want to transfer a plan design between database instances, for example, between a test and a production database. You export a plan design by selecting Export to File on the Select Target page.
You import the file into the database through a concurrent request and then complete the transaction using Plan Design Copy.
See: Importing a Plan Design From a File
Reuse of Existing Child Objects
Child objects are components of a plan design that you attach to a higher level object, such as a plan in a program or an activity rate attached to an option.
You can reuse child objects that exist in your target business group. For example, you may want to reuse a plan that is shared between two programs rather than maintaining two versions of the same plan.
You can choose how the copy process functions when duplicate objects exist in the target database. You can:
-
Reuse existing objects if objects with the current namein the source business group exist in the target business group.
-
Reuse existing objects if objects with thenew nameformed by adding a prefix or suffix to the current name exist in the target business group.
-
Create new objects without reusing duplicate objects.
Application of these rules--along with certain exceptions required by the Total Compensation data model--are documented below.
Copy Within a Business Group
When you copy a plan design within a business group, a prefix or suffix is mandatory. Top level objects that you copy (such as a program or plan not in program) must be unique within the business group.
If you reuse objects with the current name in the business group, the copy process:
-
Creates top level objects with a new name based on the prefix or suffix you supply.
-
Generates an error if top level objects exist with the new name based on the prefix or suffix you supply.
-
Reuses child objects with the current name or, if no objects are found, creates child objects with the current name.
-
Creates activity rate objects with the new name.
If you reuse objects when the new name exists in the business group, the copy process:
-
Creates top level objects with the new name.
-
Generates an error if top level objects exist with the new name.
-
Reuses child objects with the new name or, if no objects are found, creates child objects with the new name.
-
Reuses life event reasons and FastFormulas with the new name. If the process does not find an object with the new name, it reuses an object with the current name. If it does not find an object with the current name, it creates an object with the new name.
If you do not reuse existing objects, the copy process:
-
Creates top level and child objects with the new name.
-
Generates an error if top level or child objects exist with the new name.
-
Reuses life event reasons and FastFormulas with the current name, or, if no objects are found, creates objects with the new name.
Copy to a Different Business Group
When you copy a plan design to a different business group, a prefix or suffix is optional.
If you reuse objects with the current name in the different business group, and you do not enter the optional prefix or suffix, the copy process:
-
Creates top level objects with the current name.
-
Generates an error if top level objects exist with the current name.
-
Reuses child objects with the current name or, if no objects are found, creates child objects with the current name.
Note: If the copy process finds a child record with a different name, but the same sequence number (such as for eligibility profiles or options in plan), the process generates an error.
If you reuse objects with the current name in the different business group, and you enter a prefix or suffix, the copy process:
-
Creates top level objects with the new name.
-
Generates an error if top level objects exist with the new name.
-
Reuses child objects with the new name or, if no objects are found, creates child objects with the new name.
-
Creates activity rates with the current name if rates with the current name are not found. If rates with the current name are found, the process creates rates with the new name. If the process finds existing rates with the new name, the process generates an error since activity rate names must be unique.
-
Reuses life event reasons and FastFormulas with the current name or creates objects with the new name.
If you reuse objects when the new name exists in the different business group, the copy process:
-
Creates top level objects with the new name.
-
Generates an error if top level objects exist with the new name.
-
Reuses child objects with the new name or, if no objects are found, creates child objects with the new name.
-
Reuses life event reasons and FastFormulas with the new name. If the process does not find an object with the new name, it reuses an object with the current name. If it does not find an object with the current name, it creates an object with the new name.
If you do not reuse existing objects in the different business group, and you do not enter the optional prefix or suffix, the copy process:
-
Creates top level and child objects with the current name.
-
Generates an error if top level or child objects exist with the current name.
-
Reuses life event reasons and FastFormulas with the current name, or else creates objects with the current name.
If you do not reuse existing objects in the different business group, and you enter a prefix or suffix, the copy process:
-
Creates top level and child objects with the new name.
-
Generates an error if top level or child objects exist with the new name.
-
Reuses life event reasons and FastFormulas with the new name. If the process does not find an object with the new name, it reuses an object with the current name. If it does not find an object with the current name, it creates an object with the new name.
Exceptions to the Copy Process
The copy process does not copy:
-
Non-benefits data, such as HR and Payroll data referenced by your plan design. You must map this data to targets in the new business group as part of the copy process.
-
Regulations
-
Person changes and related person changes for life event reasons. The process copies the top level of your life event reason definition, but you must reselect the table and column names that define the data change.
-
Eligibility and variable rate criteria based on enrollment in another plan, the People Group flexfield, or status as a COBRA Qualified Beneficiary (US).
-
Functions called by FastFormulas you have written. Nor does the process verify the formula. The copy process does, however, copy the formula and its associated code.
Note: If a Lookup Type used in your plan design changes from Extensible to System (due to an application upgrade), and you have added new codes to the Lookup Type, the process will not copy the plan design. In this case, you must remove any codes you have added to the Lookup Type before you can copy the plan design.
Activity Rates and Combination Plans
Because you link activity rates to compensation objects, activity rates must be unique to the compensation object. Therefore, whenever possible, the activity rate is copied with the prefix or suffix that you supply. Activity rates include:
-
Standard rates
-
Flex credits
-
Benefit pools
-
Coverage calculations
-
Actual Premiums
Combinations always include a program (plans in program, plan types in program, or options in program) thus the program must have a unique name.
Special Requirements for Plan Design
Certain types of plans have special requirements that you should know about before you begin to record your plan design in the system. These special plans include flex credit plans, flexible spending accounts, life insurance plans, and imputed income plans.
Flex Credits Plans (Advanced Benefits)
If you are offering a flex credit plan, you must set up a flex credits program, even if there is only one plan for which you offer flex credits.
Flexible Spending Account Plans (Advanced Benefits)
If you want to identify reimbursable goods and services for FSAs, you must set up these accounts as separate plans, rather than as separate options within an FSA plan. You cannot associate goods and services at the option level. Examples of FSAs include US health care and dependent care plans.
Imputed Income Plans (US)
When you administer a plan that is subject to imputed income there are certain requirements that you need to follow during your plan design.
You must create two plans, one that is subject to imputed income and a second plan, called a placeholder plan, that you use to record the imputed income calculation. You can have only one placeholder plan per program, or a placeholder plan can be linked to multiple programs.
-
Select the person type that is Subject to Imputed Income in the General tabbed region of the Plans window. Choose participant, spouse, or dependent based on the person type covered by this plan.
-
Select the person type for which you are recording imputed income in the placeholder plan using the Imputed Income Type field in the Restrictions tabbed region of the Plans window.
-
Select an Age to Use code in the Age tabbed region of the Derived Factors window based on the person type covered by the plan when you define the derived factor.
-
You can define only one imputed income plan in a program.
-
You can associate an imputed income plan with more than one program.
-
You cannot link an eligibility profile to the imputed income placeholder plan.
Note: By default, the imputed income calculation assumes that the employer pays 100% of the benefit, and the benefits system does not subtract employee contributions from the calculation. However, you can set the BEN:Imputed Income Post Tax Deduction profile to Y so that the imputed income process deducts the sum of all standard rates defined as Subject to Imputed Income with a Tax Type of After Tax and an Activity Type of either Employee Payroll Contribution, Employee Individual Contribution, or Employee Plan Contribution.
Life Insurance Plans
If you offer dependent and spousal life insurance, and you limit the level of dependent or spousal coverage as a percentage of the employee's life insurance coverage, system processing requires that you set up three plans (Employee Life Insurance, Spousal Life Insurance, and Dependent Life Insurance) and associate them with corresponding plan types (Employee Life Insurance, Spousal Life Insurance, and Dependent Life Insurance).
Considerations for Associating a Plan with a Program
When you define a benefits plan, it is not necessary that the plan be placed in a program. However, there are advantages to associating a plan with a program. In general, a plan belongs in a program when:
-
Participants typically enroll in the plan at the same time they enroll in other plans in the program.
-
Participation eligibility requirements defined for the program also apply to the plan.
In general, a plan does not belong in a program (termed a "not in program plan") when:
-
Participants typically enroll in the plan at a different time than other plans in the program.
-
Participation eligibility requirements defined for the program differ substantially from those defined for the plan.
-
The benefits the plan provides differ substantially from the benefits provided by other plans in the program.
Currency Definition for Multinational Organizations
You define currency types at the program level. A plan in program must inherit the program's currency definition. You cannot associate a plan with more than one program if those programs use different currency types.
For example, let's say your organization defines two programs, a US Benefits Program and a Canadian Benefits Program. You must define different currency types for these two programs.
Accordingly, you must define two employee stock purchase plans: the US Employee Stock Purchase Plan and the Canadian Employee Stock Purchase Plan to accommodate the different currency types of the programs with which they are associated.
Reporting Groups
A reporting group is a collection of programs and plans that you group together for reporting purposes, such as for administrative use or to meet regulatory requirements.
At the plan level, you can define the regulatory bodies and regulations that govern a reporting group.
For each regulatory body that you link to a plan, you can define how the regulatory body governs that plan. You can also record the date the plan was qualified by the regulatory body and the approved termination date if the regulatory body does not recognize a plan's qualifications after a certain date. An approved termination date is typically defined when a reporting group must be re-evaluated by the regulatory body on a periodic basis.
Since US benefit plans are subject to federal nondiscrimination testing requirements, you may define special FastFormula rules to help determine compliance with these regulations. You can define the following rules:
Contribution Nondiscrimination is used to identify those participants who cause the plan to be out of compliance with contribution nondiscrimination provisions.
Coverage Nondiscrimination is used to identify those participants who cause the plan to be out of compliance with coverage nondiscrimination provisions.
Five Percent Owner is used to determine those participants who are 5% owners of the business.
Highly Compensated Determination is used to determine those participants who are highly compensated in the context of the plan for nondiscrimination testing purposes.
Key Employee Determination is used to determine those participants who are key in the context of the plan for nondiscrimination testing purposes.
Defining Programs
Defining a Benefits Program
You use the Programs window to date effectively create and maintain your program design. Many of the values that you set at the program level cascade to the plan types, plans, and options that you define and associate with this program.
To define general characteristics of a program
-
Enter a unique Program Name starting with a letter of the alphabet (not a number or symbol).
-
Enter a Description of the program.
-
Select the Program Status.
Pending: No participants are actively enrolled in plans in this program, but could be in the future if you change this program's status to Active. Select the Pending status when setting up a program that possibly may not become Active.
Eligibility processes operate on pending programs in "evaluate-only" mode, and do not create active records.
Active: Eligible persons currently may be enrolled in plans in this program.
Inactive: Current participants can remain in plans in this program, but no new participants can enroll in plans in this program.
Closed: No participants are enrolled in any plans in this program, nor will any enroll in the future (unless you reactivate the program).
-
For Advanced Benefits users, enter the alphanumeric identifier in the IVR field that a participant uses to identify this program using interactive voice response or telephony technology.
-
Select a Program Type for this program.
-
Select an Activity Reference Period to specify the time period in which the system expresses activity rates for all plans in this program.
-
Select a Program Group to group this program with other programs for reporting purposes.
-
Select an Enrollment Rate/Frequency. This is the rate that is communicated to participants.
-
Select Estimated Per Pay Period to calculate the element entry based on a fixed number of pay periods, 52 for weekly and 26 for bi-weekly pay periods.
-
-
Select the standard monetary Currency for all plans in this program.
-
Enter a URL in the Web Address field to create a hypertext link from the program name on an Oracle Self-Service Human Resources benefits enrollment web page to a URL containing information about this program. This URL can reside on an intranet or the World Wide Web.
-
For US customers, select the level at which you are administering COBRA programs in the Determine Enrollment Period Level field.
-
Select Program if your COBRA administration rules are set at the program level and apply to all plan types and plans in the COBRA program.
-
Select Plan Type in Program if your COBRA administration rules vary between the plan types in the COBRA program.
-
-
Select a Family Member Code or rule to indicate the kind of family members that must be recorded in a participant's contact record in order for the participant to be eligible for this program.
Defining Eligibility and Override Parameters for a Program
You use the check boxes in the General tabbed region of the Programs window to set eligibility and override parameters for a program.
To define eligibility and override parameters for a program:
-
Check the Participation Eligibility Override Allowed field to enable an override using the Participation Override window.
Checking this field is necessary if you want to allow plan participation under special circumstances, such as a negotiated benefits package for a new hire.
Important: All plans and options in this program inherit this setting unless you specify differently at the plan or option in plan levels.
-
Check the Use All Assignments for Eligibility field to inform the system to consider all of an employee's active assignments (rather than just the primary assignment) when determining eligibility for this program.
-
For Advanced Benefits users, check the Track Ineligible Person field to cause the system to track persons who are found ineligible for participation in this program when the Participation process is run.
Note: You use the View Participation Information window to view the compensation objects for which a participant is either eligible or ineligible.
Note: You must check this field if you determine benefits eligibility based on temporal factors, such as age or length of service.
-
Check the Use All Assignments for Rates field to inform the system to consider all of an employee's active assignments (rather than just the primary assignment) when determining activity rates for the plans and options in this program.
-
Save your work.
Associating Plans and Plan Types with a Program
You use the Plan and Plan Type window to put one or more plans or plan types into a program.
To associate a plan or plan type with a program:
-
Enter or query the program to which you are adding a plan or plan type in the Programs window and choose the Plans and Plan Types button.
-
Choose the Plans tabbed region to add a plan to the program.
-
Choose the Plan Type tabbed region to add a plan type to the program.
Note: When you link a plan type to a program, you must still link the plans in that plan type to the program using the Plans tabbed region.
-
Enter a Seq (sequence) number for a plan or plan type you are associating with this program.
Note: You enter a sequence number to define the order in which the compensation object appears in an enrollment window. Advanced Benefits customers can use sequence numbers to control the interim coverage assigned when an election is suspended.
-
Select the Plan or Plan type that you are associating with this program.
-
For Advanced Benefits users, enter the alphanumeric identifier in the IVR field that participants use to identify this plan or plan type using interactive voice response or telephony technology.
-
Select the Status of this plan or plan type.
Active: Participants can enroll in this plan or the plans in this plan type.
Pending: No participants are actively enrolled in this plan or plan type, but could be in the future if you change its status to Active. Eligibility processes operate on this compensation object in "evaluate-only" mode, but do not create active records. Select the Pending status when setting up a plan or plan type that might not become Active.
Inactive: Current participants can remain enrolled in this plan or the plans in the plan type, but no new participants can enroll.
Closed: No participants are enrolled in this plan or the plans in this plan type, nor will any enroll in the future (unless you reactivate the program).
-
Enter a URL in the Web Address field to create a hypertext link from this plan or plan type name on an Oracle Self-Service Human Resources benefits enrollment web page to a URL containing information about this program. This URL can reside on an intranet or the World Wide Web.
Check the Waivable field in the Plan Types tabbed region if eligible persons can waive participation in all plans of this plan type.
-
For Advanced Benefits users, check the Track Ineligible Person field to cause the system to track persons who are found ineligible for participation in the plans and plan types in this program when the Participation Process is run. If you want to track ineligibility, you must also check the Track Ineligible Person field for the program.
Note: You use the View Participation Information window to view the compensation objects for which a participant is either eligible or ineligible.
Note: You must check this field if you determine benefits eligibility based on temporal factors, such as age or length of service.
-
For Advanced Benefits users, check the Participation Eligibility Override Allowed field if you can override standard eligibility criteria for the plans and plan types in this program.
Checking this field is necessary if you want to allow participation under special circumstances, such as a negotiated benefits package for a new hire.
-
Select a Family Member Code or rule to indicate the kind of family members that must be recorded in a participant's contact record in order for the participant to be eligible for the plans and plan types in this program.
-
Save your work.
Defining Waive Reasons for Plan Types in a Program (Advanced Benefits)
You use the Program Waive Reasons window to specify the valid reasons for waiving out of waivable plan types in a program.
To define waive reasons for a plan type in a program:
-
Enter or query the program for which you are defining plan type waive reasons in the Programs window.
-
Choose the Plan and Plan Type button then choose the Plan Type tabbed region.
-
Select a Plan Type and choose the Waive button.
-
Select a Waive Reason for waiving out of this plan type in this program.
-
Check the Default field if this waive reason is the default when an eligible person is waiving, but does not specify a reason.
-
Choose the Certification button to specify the waive certifications that you accept for a waive reason.
-
Select a Waive Participation Certification Type for this waive reason.
-
Check the Required field if this waive certification must be submitted for a participant to waive this plan type.
-
If special circumstances apply, select a Certification Required When Rule to specify when waive certification is required.
-
-
Check the Preferred field if this certification is preferred, but not required, for waiving out of this waivable plan type.
Check the Lack of Certification Suspends Enrollment field if failure to provide this certification results in a suspended election.
-
Save your work.
Defining Participation Eligibility Criteria for a Compensation Object
You link eligibility criteria profiles to a compensation object to restrict eligibility for that benefit. You can also define participation start and end dates and required waiting periods that control when an eligible person can enroll in a benefit.
You can link participation eligibility criteria to a compensation object at the following levels in the compensation object hierarchy:
-
Program (Program Participation Eligibility window)
-
Plan type in program (Plan Type Participation Eligibility window)
-
Plan in program (Plan in Program Participation Eligibility window)
-
Plan (Maintain Plan Eligibility window)
-
Option in plan (Maintain Options Eligibility window)
Follow the steps below regardless of the level or levels in the compensation object hierarchy at which you define participation eligibility.
See: Compensation Objects
To define participation eligibility criteria for a compensation object:
-
Query or enter the compensation object for which you are defining participation eligibility requirements.
Note: The window in which you query or enter the compensation object varies based on the level at which you define the participation eligibility criteria.
-
Navigate to the appropriate Participation Eligibility window.
-
Select a Participation Start Date code or rule to define when a person becomes eligible for this compensation object.
-
Select a Participation End Date code or rule to define the date on which a person becomes ineligible for this compensation object.
-
Enter the period that an eligible participant must wait before enrolling in the Wait Period Value field.
-
Or, select a waiting period rule.
-
-
Select the unit of measure for the waiting period in the Wait Period UOM field.
-
Select a waiting period Date to Use Code or rule that defines the start date from which the waiting period is calculated.
In the Maximum Enrollment block:
-
Enter a Value that represents the maximum length of time in which a participant can be enrolled in this compensation object.
-
Select the unit of measure of this value in the UOM field.
-
Select a rule if you use a formula to determine the maximum enrollment period for this compensation object.
-
Select a Determination Date Code or rule to indicate if the maximum enrollment period is determined from the participant's enrollment coverage start date or, for COBRA purposes, from the COBRA qualifying event date.
-
Select a value in the Applies To field if you want to limit the persons for whom the maximum enrollment period is applicable.
-
Save your work.
To link an eligibility profile to a compensation object:
-
Query or enter the compensation object for which you are defining participation eligibility requirements.
Note: The window in which you query or enter the compensation object varies based on the level at which you define the participation eligibility criteria.
-
Navigate to the Eligibility window based on the level in the compensation object hierarchy at which you are defining eligibility.
-
Choose the Profiles tab and select an Eligibility Profile that determines eligibility to participate in this compensation object.
-
Check the Required field if a person must meet all of the criteria in this profile in order to be eligible to participate.
Note: If multiple eligibility profiles are defined, a person must satisfy all profiles marked as Required, and at least one that is not marked Required.
-
Check the Score field if you rank a participant's eligibility for this compensation object relative to the total evaluated population.
-
Check the Track Score for Ineligible Person field if you want to compute the person's score even if they do not meet all required eligibility criteria.
-
Choose the Rules tab if you want to use a rule to determine participation eligibility instead of an eligibility profile.
-
Enter a Seq (sequence) number specifying the order in which the system processes this eligibility rule relative to any other eligibility rules for this compensation object.
-
Select an eligibility rule in the Rule field.
-
Check the Derivable Factors Available field if this formula uses derived factors to determine eligibility.
-
Check the Required field if a person must meet all of the criteria in this rule in order to be eligible to participate in this compensation object.
-
-
Save your work.
Associating a Life Event Reason with a Compensation Object (Advanced Benefits)
You link a life event definition to a compensation object to restrict eligibility for that benefit to participants who experience that life event.
You can also define the participation start and end dates and required waiting periods that control when an eligible person can enroll in a benefit based on the occurrence of the life event.
You can link a life event definition to a compensation object at the following levels in the compensation object hierarchy:
-
program (Life Event window)
-
plan type in program (Life Event window)
-
plan in program (Life event window)
-
plan (Maintain Plan Related Details window, Life Events tabbed region)
-
option in plan (Life Event Reason Impact on Eligibility window)
Follow the steps below regardless of the level or levels in the compensation object hierarchy at which you link a life event to a compensation object.
To associate a life event reason with a compensation object:
-
Query or enter the compensation object for which you are defining participation eligibility requirements based on a life event.
Note: The window in which you query or enter the compensation object varies based on the level at which you define the participation eligibility criteria.
-
Navigate to the Life Event window based on the level in the compensation object hierarchy at which you are defining eligibility based on a life event.
-
Select a Life Event.
-
Select a Participation Start Date code or rule to define when a person becomes eligible for this compensation object based on this life event.
-
Select a Participation End Date code or rule to define the date on which a person becomes ineligible for this compensation object based on this life event.
-
Check the Ignore Participation Override field to specify that the system ignore previously overridden participation eligibility results for this life event and re-determine eligibility.
-
Check the Overridable field to allow manual overriding of the eligibility results that the system calculates following this life event.
Checking this field is useful when you want to allow special circumstances for participation, such as a negotiated benefits package for a new hire.
-
Enter the period that an eligible participant must wait after experiencing this life event before enrolling in the Wait Period Value field.
-
Or, select a waiting period rule.
-
-
Select the unit of measure for the waiting period in the Wait Period UOM field.
-
Select a waiting period Date to Use Code or rule that defines the start date from which the waiting period is calculated based on this life event.
In the Maximum Enrollment block:
-
Enter a Value that represents the maximum length of time in which a participant can be enrolled in this compensation object based on the occurrence of this life event.
-
Select the unit of measure of this value in the UOM field.
-
Select a rule if you use a formula to determine the maximum enrollment period for this compensation object.
-
Select a Determination Date Code or rule to indicate if the maximum enrollment period is determined from the participant's enrollment coverage start date or, for COBRA purposes, from the COBRA qualifying event date.
-
Select a value in the Applies To field if you want to limit the persons for whom the maximum enrollment period is applicable based on this life event.
-
Select a Family Member Code or rule to indicate the kind of family members that must be recorded in a participant's contact record in order for the participant to be eligible for this compensation object based on this life event.
-
Choose a value in the Eligible/Ineligible field that indicates if the occurrence of this life event results in a person's being eligible or ineligible to participate in this compensation object.
-
Save your work.
Associating an Organization with a Benefits Program
You use the Organizations tabbed region of the Programs window to identify organizations, such as third party administrators or benefits suppliers, that provide services to your benefits program.
To associate an organization with this program:
-
Query or enter a program in the Programs window and choose the Organizations tabbed region.
-
Select an Organization that provides goods or services for this program.
-
Enter a customer identifier number for this organization in the Customer field.
-
Enter the Policy or Group identifier for this organization.
-
Enter a description of the roles and responsibilities of this organization in the Organization Roles field.
-
Save your work.
Associating Reporting Groups with a Program
You use the Report Groups tabbed region of the Programs window to associate a benefits reporting group with a program.
See: Defining a Reporting Group
To associate a benefits reporting group with a program
-
Query or enter a program in the Programs window and choose the Report Groups tabbed region.
-
Select the Name of the reporting group you use to report on this program.
-
Add this program to more reporting groups by selecting additional groups, as needed.
-
Save your work.
Associating Program or Plan Year Periods with a Program
You use the Periods tabbed region of the Programs window to associate one or more year periods with a program. Year periods are defined using the Program/Plan Year Periods window.
See also: Defining a Program or Plan Year Period
To associate a year period with a program:
-
Query or enter a program in the Programs window and choose the Periods tabbed region.
-
Enter the Seq (sequence number) of the year period you are associating with this program.
-
Select a Start date for this year period.
The End date for this program year period automatically displays.
-
Save your work.
Defining Plan Types
You use the Plan Types window to date effectively define, update, and delete or end-date plan types.
To define a plan type:
-
Enter a unique Name for the plan type you are defining.
-
Select an Option Type to classify the options you associate with this plan type.
-
For Advanced Benefits users, enter the alphanumeric identifier in the IVR field that participants use to identify this plan type using interactive voice response or telephony technology.
-
Select a Compensation Category that classifies the benefit provided by the plans and options in this plan type.
Note: You can use this information in system extracts that you send to benefits carriers and other third party agents.
-
Select a Self Service Display format of horizontal or vertical to control how you display the plans and options in a self-service enrollment form.
Note: The display format defaults to horizontal.
In the Enrollment block:
-
Enter the Minimum number of plans in this plan type in which an eligible person can be enrolled simultaneously or check the No Minimum field if there is no minimum.
-
Enter the Maximum number of plans in this plan type in which an eligible person can be enrolled simultaneously or check the No Maximum field if there is no maximum.
-
Save your work.
Defining Plans
Setting Up Spending Account Plans for Forfeitures (Advanced Benefits)
For spending account plans--or other plans that offer reimbursements or distributions--you can set up Oracle HRMS so that a participant's unspent contributions or credits are forfeited back to your enterprise.
At the end of a plan year (or similarly defined period), Oracle Advanced Benefits customers schedule the Process Forfeitures concurrent request to calculate and record the total forfeited amount for each participant in a spending account plan.
You set up benefits balances--maintained manually using the Benefits Balances window--or use defined balances maintained by Oracle Payroll to record participant contributions and distributions.
Note: Depending on your plan design, the Process Forfeitures concurrent request calculates forfeitures based on either the participant's total contributions for the year or the participant's year to date contributions. The forfeitures process determines the forfeited amount based on the value stored by the balance.
Follow this process to set up a reimbursement plan for forfeiture processing. As a prerequisite, you should have already defined the plan using the Plans window.
To set up reimbursement plans for forfeitures
-
Set up your contribution and distribution balances.
To process forfeitures, each participant must have a separate contribution and distribution balance. Oracle Payroll customers can use defined balances to record totals automatically.
If you do not use Oracle Payroll, you must manually maintain a contribution and distribution benefits balance for each participant.
See: Defining a Benefit Balance for information on setting up a benefits balance.
See: Defining Person Benefit Balances for information on recording benefits balances for a participant.
-
Define a derived compensation level factor for each contribution and distribution balance.
You link the derived factors to the standard contribution and distribution rates you define in step 4.
-
Set up a spending account plan that enables forfeitures.
Use the fields available on the Forfeiture tabbed region of the Plan Reimbursement window to define forfeiture requirements.
-
Define the standard contribution and distribution rates.
-
For contributions, select an activity type of Employee Payroll Contribution
-
In the Total Rate field of the Calculation Method tabbed region, select the derived compensation level factor for the contribution that you defined in step 2
-
-
For distributions, select one of the following activity types: Participant Expense Reimbursement, Participant Payroll Reimbursement, or Participant Reimbursement
-
In the Total Rate field of the Calculation Method tabbed region, select the derived compensation level factor for the distribution that you defined in step 2
-
See: Defining Activity Rates for a Standard Contribution/Distribution
-
-
After the plan year has ended, run the Process Forfeitures concurrent request for a single plan to calculate participant forfeitures.
Note: As a prerequisite, update the balances to make sure that contribution and distribution totals are current and accurate.
See: Running the Process Forfeitures Concurrent Request (Advanced Benefits)
-
View the results of the Process Forfeitures request.
-
View the Process Forfeitures Audit Log and the Process Forfeitures Summary Report for information about errors and process totals
-
Open the Plan Reimbursement window and choose the Forfeiture tab to see the total forfeitures for a plan
-
Open the View Enrollment Results window, query a person, and choose the Rates button to see forfeiture results for a participant
-
Defining a Benefits Plan
You use the Plans window to date effectively define the plans that you offer to employees and other eligible participants.
To define a benefits plan
-
Set the effective date to the date on which you want to create the plan.
Note: You must create the plan with an effective date on or before the first day of the enrollment period in which it will be used.
-
Enter the Name of this plan starting with a letter of the alphabet (not a number or symbol).
Note: By setting the profile option BEN: Compensation Objects Display Name Basis in the System Profile Values window, you can choose whether compensation object names display in application windows (both in the professional and Self-Service user interfaces) based on the life event occurred on date or the user's session date. The default option value is Session.
-
Select the plan Status.
Pending: No participants are actively enrolled in this plan, but could be in the future if you change its status to Active. Eligibility processes operate on this plan in "evaluate-only" mode, but do not create active records. Select the Pending status when setting up a plan that possibly may not become Active.
Active: Eligible persons currently may be enrolled in this plan.
Inactive: Current participants may remain in this plan, but no new participants may enroll in this plan.
Closed: No participants are enrolled in this plan, nor will any enroll in the future (unless you reactivate the plan).
-
Enter a Short Name if you also refer to this plan by an abbreviation.
-
Enter a Short Code if you also refer to this plan by a code.
You can extract data for a compensation object based on its Short Name or Short Code.
-
Select the plan type for which you are defining a plan in the Type field.
-
For Advanced Benefits users, enter the alphanumeric identifier in the IVR field that participants use to identify this plan using interactive voice response or telephony technology.
-
Choose the Inception Date to specify the calendar date on which you first introduced this plan.
-
Select if this plan must be in a program or may not be in a program in the Plan Usage field.
Note: If you include this plan in a program, benefits eligibility is determined when eligibility is determined for the program. If you do not want to determine participant eligibility for this plan during a specific time period, you can link a required dummy eligibility profile to the plan (for example, a benefits group containing no people) so that no persons are found eligible for the plan.
-
Choose the General tabbed region.
-
Check the Savings Plan field if you are defining a savings plan.
-
Enter the COBRA Payment Day that corresponds to the day of the month on which COBRA payments are due for this plan.
For example, 1 refers to the first day of each month.
-
Select the Primary Funding Method to specify the source of funds for this plan.
Self Insured: You self-insure to fund this plan.
Trust: A financial institution such as a bank maintains a trust to fund this plan.
Split: You self-insure as well as use a trust to fund this plan.
Fully Insured: You set up an annuity to fund this plan.
-
Select a Health Service code to describe the type of health service this plan provides.
-
Select the participant type whose coverage is subject to imputed income taxation in the Subject to Imputed Income field. Choose either participant, dependent, or spouse.
-
Enter a URL in the Web Address field to create a hypertext link from this plan name on an Oracle Self-Service Human Resources benefits enrollment web page to a URL containing information about this plan. This URL can reside on an intranet or the World Wide Web.
-
Select a Family Member Code or rule to indicate the kind of family members that must be recorded in a participant's contact record in order for the participant to be eligible for this plan.
-
Save your work.
Defining a Plan to Determine Eligibility for a Self-Service Action
You can use Compensation and Benefits functionality as a generic engine to determine eligibility for self-service actions. You define a plan to represent a sub action, such as Promotion (Sales) or Promotion (Italy). After defining a plan type with the option type Personnel Action, use the Plans window to define a sub action and link it to a form function. When users choose the function from a menu, the application calculates each person's eligibility for the action.
See: Set Up Eligibility Processing, Oracle HRMS Deploy Self-Service Capability Guide
See: Overview of Self-Service Actions , Oracle HRMS Workforce Sourcing, Deployment, and Talent Management Guide
-
On the Miscellaneous tab, in the Personnel Action Function Name field, select the name of the form function from the LOV.
-
Make sure to activate the Plan Years Not Applicable check box. Plan years do not apply to self-service actions, and this step eliminates needless processing.
Defining Eligibility and Activity Rate Requirements for a Plan
Use the Eligibility Rates tabbed region of the Plans window to define participation eligibility requirements and activity rates for a plan.
To define eligibility requirements and activity rates for a plan:
-
Enter or query the plan in the Plans window for which you are defining eligibility and activity rate requirements and choose the Eligibility Rates tabbed region.
-
Check one or more of the following fields in the Eligibility to Participate Information block:
Track Ineligible Person: For Advanced Benefits users, checking this field tracks people who are found ineligible for participation in this plan when the Participation batch process is run.
Note: You use the View Participation Information window to view the compensation objects for which a participant is either eligible or ineligible.
Note: You must check this field if you determine benefits eligibility based on temporal factors, such as age or length of service.
Allows Override: For Advanced Benefits users, indicates that you may override eligibility requirements for this plan.
Checking this field is useful when you want to allow special circumstances for participation in this plan, such as a negotiated benefits package for a new hire.
Participation is Waivable: For Advanced Benefits users, indicates that an eligible participant may elect to waive this plan.
Use All Assignments for Eligibility: Informs the system to consider all of an employee's active assignments (rather than just the primary assignment) when determining participation eligibility for this plan.
-
Select if the participant's eligibility for this plan is based on dependent eligibility in the Eligibility Check field. Choose one:
-
Participant: The participant is eligible if he or she meets the participant eligibility requirements associated with the plan. Eligibility for the plan is not based on dependent eligibility.
-
Participant and Dependent: The participant is eligible only if he or she meets the participant eligibility requirements associated with the plan, and his or her dependents meet the dependent eligibility profiles and designation requirements associated with the plan.
-
Dependent Only: The participant is eligible if the participant's dependents meet the dependent eligibility profiles and designation requirements associated with the plan. If you select this value, the system does not check for participant eligibility.
-
-
Check the Use All Assignments for Rates field to inform the system to consider all of an employee's active assignments (rather than just the primary assignment) when determining activity rates for this plan.
-
Save your work.
Defining Plan Restrictions
You use the Restrictions tabbed region of the Plans window to specify whether a plan is subject to certain US federal regulations, such as Qualified Domestic Relations Orders. You also can also indicate if this plan is used to record flex credits or imputed income or if this is a waive plan.
To define plan restrictions:
-
Query or enter a plan in the Plans window and choose the Restrictions tabbed region.
-
Check the Flex Credits Plan field to identify this plan as the placeholder plan used to record the total flex credits for all plans in a program.
Note: This plan will not appear as an electable choice in the Flex Program enrollment form since a participant cannot elect this plan.
-
Check the Waive Plan field if a person's election of this plan represents the waiver of coverage.
-
Select the Imputed Income Type if this plan is a placeholder plan used to record imputed income totals for all participants, dependents, or spouses covered by a plan that is subject to imputed income.
-
Check the Highly Compensated Rule Applies field if this plan uses rules defined by the US Internal Revenue Service to identify highly compensated employees.
-
Check the Allow Qualified Domestic Relations Order field if this plan is subject to this US regulation.
Thus, a court or similar body may issue an order requiring a participant to provide a portion of this plan's benefits to another person, typically a former spouse.
Important: If you are defining plans outside the US, you can use this field when defining plans that behave similarly to US QDRO plans.
-
Check the Allow Qualified Medical Child Support Order field if this plan is subject to this US dependent coverage regulation.
Thus, a court or similar body may issue an order requiring a participant to provide medical coverage for another person, typically a dependent child.
Important: If you are defining plans outside the US, you can use this field when defining plans that behave similarly.
-
Check the Subject to Health Care Financing Administration field if this plan is subject to health care rate regulations.
-
If you use Oracle Self-Service Human Resources, check the Allow Temporary Identification field if benefits participants can print an enrollment identification card for this plan from their web browser.
-
Save your work.
Defining a Maximum Waiting Period Requirement for a Plan
You use the Participation tabbed region of the Plans window to define the maximum required waiting period for a plan.
To define a maximum waiting period requirement for a plan:
-
Enter or query the plan in the Plans window for which you are defining a maximum waiting period requirement and choose the Participation tabbed region.
-
Enter the maximum waiting period for this plan in the Value field.
Note: You define a maximum waiting period to override a waiting period that you define for a plan. For example, you could define a waiting period which required a participant to work 500 hours before becoming eligible for a plan. You could define a corresponding maximum waiting period of 6 months so that a participant who had worked 6 months, but had not worked 500 hours, would be eligible for the plan.
-
Select a unit of measure for the maximum waiting period in the UOM field.
-
Select a Rule to define the maximum waiting period for the plan, if necessary.
-
Select a code or rule to define the date from which the system calculates the maximum waiting period.
-
Save your work.
Defining a Plan Not in Program
Use the Not in Program tabbed region of the Plans window to define special requirements for plans that you do not associate with a program. Plans that are not in a program must have a plan usage code of May Not Be in Program.
To define special requirements for a plan not in program:
-
Enter a Sequence number for this plan.
-
Select the Currency in which activity rates for this plan are expressed.
-
Select the Enrollment Rate/Frequency. This is the activity rate that is communicated to participants on their payslip and in Self-Service.
-
Select Estimated Per Pay Period to calculate the element entry based on a fixed number of pay periods, 52 for weekly and 26 for bi-weekly pay periods.
-
-
Select an Activity Reference Period to specify the time period in which the system expresses activity rates for this plan.
Note: The Hourly activity reference period is only for plans used by Compensation Workbench. See: Defining a Compensation Workbench Plan.
-
Save your work.
Associating Options with a Plan
You use the Maintain Plan Options window to associate an option with a plan.
Advanced Benefits users can define how life event reasons impact a person's participation eligibility for an option in a plan.
To associate an option with a plan:
-
Enter or query a plan in the Plans window.
-
Choose the Options button.
-
Enter a Seq (sequence) number for an option you are associating with this plan if you want the options to display in a particular order in the enrollment window.
Note: Advanced Benefits customers can use sequence numbers to control the interim coverage assigned when an election is suspended.
-
Select an Option you are associating with this plan.
-
Select the Status of the option.
Pending: No participants are actively enrolled in this option, but could be in the future if you change its status to Active. Eligibility processes operate on this option in "evaluate-only" mode, but do not create active records. Select the Pending status when setting up an option that possibly may not become Active.
Inactive: No participants currently are enrolled in this option in this plan, but may be in the future.
Active: Participants currently may be enrolled in this option in this plan.
Closed: No participants are enrolled in this option in this plan, nor will any enroll in the future (unless you reactivate the plan).
-
For Advanced Benefits users, enter the numeric identifier in the IVR field that participants use to identify this option using interactive voice response or telephony technology.
-
Enter the URL for this option in plan in the Web Address field if participants can enroll in this option by using the product's self-service web interface.
-
Enter a URL in the Web Address field to create a hypertext link from this option name on an Oracle Self-Service Human Resources benefits enrollment web page to a URL containing information about this plan. This URL can reside on an intranet or the World Wide Web.
-
Choose the Eligibility tab.
-
For Advanced Benefits users, check the Participation Eligibility Override Allowed field if the standard eligibility criteria that this option inherits from this plan can be overridden.
Checking this field is useful when you want to allow special circumstances for participation in this option, such as a negotiated benefits package for a new hire.
-
For Advanced Benefits users, check the Track Ineligible Person field to cause the system to track persons who are found ineligible for participation in this plan when the Participation batch process is run.
Note: You use the View Participation Information window to view the compensation objects for which a participant is either eligible or ineligible.
Note: You must check this field if you determine benefits eligibility based on temporal factors, such as age or length of service.
-
Choose the Dependent Criteria tab.
-
Select a person type or person type combination in the Eligibility Check field to determine eligibility for this option for these person types.
-
Select if the participant's eligibility for this option is based on dependent eligibility in the Eligibility Check field. Choose one:
-
Participant: The participant is eligible if he or she meets the participant eligibility requirements associated with the option. Eligibility for the option is not based on dependent eligibility.
-
Participant and Dependent: The participant is eligible only if he or she meets the participant eligibility requirements associated with the option, and his or her dependents meet the dependent eligibility profiles and designation requirements associated with the option.
-
Dependent Only: The participant is eligible if the participant's dependents meet the dependent eligibility profiles and designation requirements associated with the option. If you select this value, the system does not check for participant eligibility.
-
-
Select a Family Member Code or rule to indicate the kind of family members that must be recorded in a participant's contact record in order for that participant to be eligible for this option.
Note: Family Members are recorded in the Contact window.
-
Save your work.
Maintaining Plan Related Details
You use the Maintain Plan Related Details window to:
-
Associate a plan year period with a plan
-
Associate a reporting group with a plan
-
Associate reimbursable goods or services with a plan
-
Associate regulations and reporting groups with a plan
-
Associate an organization with a plan
Associating a Plan Year Period with a Plan
You associate a plan year period with a plan to define the period for which the plan is active.
To associate a plan year period with a plan:
-
Enter or query the plan in the Plans window to which you are associating a plan year period and choose the Details button.
-
Choose the Plan Year Periods tabbed region.
-
Enter a Seq (sequence) number to specify the order in which the system processes this plan year period relative to any other plan year period for this plan.
-
Select the plan year period Start date.
The period end date displays based on the start date you select.
-
Save your work.
Associating a Reporting Group with a Plan
You can associate a plan to those reporting groups that you use to report on the plan.
To associate a reporting group with a plan:
-
Enter or query the plan in the Plans window to which you are associating a reporting group and choose the Details button.
-
Choose the Reporting Group tabbed region.
-
Select the Name of a reporting group that you use to report on this plan.
-
Select more reporting groups, as necessary.
-
-
Save your work.
Associating Goods or Services with a Plan
You can associate the goods or services that your enterprise provides as a benefit or has approved for reimbursement as part of a plan.
To associate a good or service with a plan:
-
Enter or query the plan in the Plans window to which you are associating goods or services and choose the Details button.
-
Choose the Goods or Services tabbed region.
-
Select the type of goods or services that you are associating with this plan in the Type field.
-
Save your work.
Associating Regulations with a Plan
You can associate regulations with a plan and the reporting groups that support these regulations.
To associate a regulation or a reporting group with a plan:
-
Enter or query the plan in the Plans window to which you are associating a regulation and choose the Details button.
-
Choose the Regulations tabbed region.
-
Select a Regulation.
-
Select a Reporting Group associated with this regulation.
-
Complete the following fields based on the regulations that govern this plan. These regulations support US non-discrimination legislation.
-
Regulatory Plan Type is used to define the type of regulation that governs this plan, such as Fringe benefit regulations or pension regulations.
-
Contribution Nondiscrimination is used to identify those participants who cause the plan to be out of compliance with contribution nondiscrimination provisions.
-
Key Employee Determination is used to determine those participants who are key in the context of the plan for nondiscrimination testing purposes.
-
Highly Compensated Determination is used to determine those participants who are highly compensated in the context of the plan for nondiscrimination testing purposes.
-
Five Percent Owner is used to determine those participants who are 5% owners of the business.
-
Coverage Nondiscrimination is used to identify those participants who cause the plan to be out of compliance with coverage nondiscrimination provisions.
-
-
Save your work.
Associating an Organization with a Plan
You can associate organizations with a plan, such as third party administrators and benefits suppliers. For example, you can link an organization to a plan when the organization is a benefits supplier to whom you owe a monthly premium.
To define an organization for a plan:
-
Enter or query the plan in the Plans window to which you are associating an organization and choose the Details button.
-
Choose the Organizations tabbed region.
-
Select the name of this Organization.
-
Enter the Customer Identifier this organization uses to identify this plan.
-
Enter the Policy or Group Number this organization uses to identify this plan.
-
Enter the Organization Role that describes the services this organization provides for this plan.
-
Save your work.
Defining Combinations of Plans and Plan Types
You use the Combinations window to define combinations of:
-
Plans
-
Plan Types
-
Plan Type and Options
Combinations are useful for Advanced Benefits customers who want to calculate flex credits for a pool of compensation objects.
As a prerequisite, you must first define the plans, plan types, and options that you are including in your combination and associate these compensation objects with a program.
To define a combination:
-
Choose one of the following tabbed regions depending on the combination type you are defining.
-
Combination Plans
-
Combination Plan Types
-
Combination Plan Type and Options
-
-
Enter or query the Name of the plan or plan type combination.
-
Select the Program to which you have linked the plans or plan types that you are including in your combination.
-
Check the Applies To field next to each compensation object that you are including in your combination.
Note: The Already Used field appears checked if this plan, plan type, or option is already included in another combination. You can only include a compensation object in one combination.
Defining Waive Reasons for a Plan (Advanced Benefits)
You use the Waiving window to define the conditions under which an eligible person can waive participation in a plan.
To define waive reasons for a plan:
-
Enter or query the plan for which you are defining plan waive reasons in the Plans window.
-
Choose the Waiving button.
-
Select the Waive Participation Reason that supports why a person can elect to waive participation in this plan.
-
Check the Default field if this waive reason is the default reason to use when a participant does not state their reason for waiving a plan.
-
Choose the Waive Certification button to specify the waive certifications that you accept for a waive reason.
-
Select a Certification Type that indicates the kind of certification associated with waiving participation in this plan.
-
Select a rule if you limit the conditions under which certification is associated with waiving a plan in the Certification Required When Rule field.
-
Check the Preferred field if this waive certification is preferred for this plan, but not required.
-
Check the Required field if this certification is required for an eligible participant to waive this plan.
-
Check the Lack of Certification Suspends Waiving field if failure to provide this certification results in the participant's inability to waive this plan.
-
Save your work.
Maintaining Primary Care Providers for a Plan
Based on your plan design, benefits participants may have the option, or be required, to select a Primary Care Provider (PCP) when electing a benefit plan.
You use the Maintain Plan Primary Care Providers window to define restrictions for the selection of a primary care provider. You also use this window to set high level configuration options for web-based PCP database searches that are performed through Oracle Self-Service Benefits.
To maintain primary care providers for a plan:
-
Select the Name of the plan for which you are maintaining primary care provider data.
-
Check the From Repository field if you are using Oracle Self-Service Benefits and the benefits participant selects a primary care provider through a searchable database of providers.
Note: As a prerequisite, you must link an organization to this plan (using the Maintain Plan Related Details window) which has an Organization Role Type of Primary Care Provider Locator.
Note: If you do not check the From Repository field, a participant cannot select a PCP from a list of valid PCPs. The participant must enter the PCP ID number or name in a free form text field.
-
Note: The Can Keep Provider field is reserved for future use.
-
Select a Designation Code to indicate if a participant who enrolls in this plan is required to select a PCP, or if PCP selection is optional.
-
Select a Dependent Designation Code to indicate if a participant who enrolls in this plan is required to select a PCP for each dependent covered by the plan, or if PCP selection is optional.
-
Select a Start Date Code that indicates when the selected provider becomes the participant's primary care provider.
-
Enter the number of times a participant is permitted to change primary care providers per month in the Number of Changes Allowed field.
-
For primary care provider searches, select the maximum Radius in miles which the PCP database should consider when returning the results of a search query.
-
Check the Radius warning field to issue a warning message to the participant indicating that the selected PCP is outside the range allowed by the plan. Checking this field lets a participant override the warning and select a PCP outside the prescribed range.
Note: If you do not check this field, a participant cannot select a PCP outside the radius.
Note: This warning only occurs in the professional forms user interface, not in Self-Service Benefits.
-
Save your work.
-
Choose the Option Restrictions button to open the Plan Primary Care Provider Restrictions window if the Plan has options. It is mandatory to enter the restrictions at the option level for the plans with options in order to retain/drop the PCP in the subsequent life event.
Note: For example, if a participant who elects participant only coverage is not required to select a PCP, but a participant who elects employee plus spouse coverage is required to select a PCP for dependent coverage, you would need to specify designation restrictions at the option level, instead of the plan level.
-
Select the option for which you are specifying PCP designation requirements in the Options field.
-
Select a Designation Code to indicate if a participant who enrolls in this option is required to select a PCP, or if PCP selection is optional.
-
Select a Dependent Designation Code to indicate if a participant who enrolls in this option is required to select a PCP for each dependent covered by the plan, or if PCP selection is optional.
-
Save your work and close the Plan Primary Care Provider Restrictions window.
-
Choose the Plan Restrictions button if the requirements for designating a primary care provider for this plan vary based on the primary care provider type (such as Gynecology or Pediatric Medicine) and the age or gender of the benefits participant.
Note: The Plan Restrictions button is only activated if you check the From Repository field.
-
Select a primary care provider type for which you are specifying PCP designation requirements based on the age or gender of the benefits participant.
You maintain primary care provider types using the Lookup Type BEN_PCP_SPCLTY if your primary care providers are stored in an external repository. Use the Lookup Type BEN_PRMRY_CARE_PRVDR_TYP if your PCPs are not stored in a repository.
-
Enter a Minimum Age if the participant must be of a minimum age or older to select this provider type, such as a geriatric care provider.
-
Enter a Maximum Age if the participant must be of a maximum age or younger to select this provider type, such as a pediatric care provider.
-
Select a Gender Allowed Code of Female or Male to restrict the selection of this provider type to one gender, such as female for a gynecology provider.
Defining Options
You use the Options window to date effectively define, maintain, and delete options.
To define an option
-
Enter a unique Name for the option you are defining starting with a letter of the alphabet (not a number or symbol).
-
Enter a Short Name if you also refer to this option by an abbreviation.
-
Enter a Short Code if you also refer to this option by a code.
You can extract data for a compensation object based on its Short Name or Short Code.
-
Check the Waive Option field if a person's election of this option represents the waiver of coverage.
-
If this option is for a Compensation Workbench plan, select a Salary Component if you want to link the option to a salary component.
At the end of a salary review cycle, a system administrator runs the Compensation Workbench Post Process to update salary components with the new values stored by the compensation components.
In the Required Period of Enrollment block:
-
Enter a Value that represents the length of time in which a person must be enrolled in this option.
-
Select the unit of measure of this value in the UOM field.
-
Select a rule if you use a formula to determine the required period of enrollment for this option.
-
Select one or more plan types you are associating with this option to indicate that plans of this plan type may provide this option.
The option type displays in the Option Usage field to indicate the benefits category for this option.
-
Save your work.
Defining Designation Requirements for an Option
You use the Designation Requirements window to limit the personal relationship types that are covered by an option.
If you do not define designation requirements for an option, a participant can designate a person of any relationship type as the designee for an option.
You can only have one designation profile per option, even if you associate the option with more than one plan.
Note: Regardless of the designation requirements you define, you must check the Personal Relationship field in the Contacts window in order for a contact to display in a participant's list of eligible dependents.
To define designation requirements for an option
-
Enter or query an option in the Options window and choose the Designation Requirements button.
-
Select a Group Relationship for which you are defining designation requirements.
-
Specify if this designation requirement applies to dependents or beneficiaries in the Type field.
-
Enter the minimum and maximum number of designees that can be covered under this option or indicate that there is no minimum or maximum number of designees by checking the appropriate field.
Note: Select a Group Relationship type of No Designees and enter the maximum number of designees as zero for an employee only coverage option.
-
Check the Cover All Eligible field if there is no minimum or maximum number of designees for this option and you want to provide coverage to all designees who meet your eligibility criteria.
-
Select one or more Relationship Types to include with this group relationship.
-
Save your work.
Navigating the Program Structure Hierarchy
You use the View Program Structure window to view the benefit programs that you have defined and the plan types, plans, and options that comprise these programs. Use this window after you have recorded your plan design in the system to make sure you have correctly defined the structure of your benefits programs.
In the hierarchy:
+ A plus symbol to the left of a compensation object indicates that there are lower levels that are not currently displayed.
- A minus symbol to the left of a compensation object indicates that you are viewing a collapsible list that you have expanded fully.
= An equals symbol indicates that you are viewing the lowest level within a collapsible list that you have expanded fully.
Go To modify the definition of a compensation object, select the compensation object and choose the Go (traffic light) button.
You can expand or contract the program hierarchy in the same way that you expand or contract the Oracle Applications Navigator.
-
To expand the view of a compensation object by one level, select the compensation object and choose the Plus (+) button (or double-click on that compensation object).
-
To contract the view of a compensation object by one level, select the compensation object and choose the Minus (-) button (or double-click on that compensation object).
-
To fully expand the view of a compensation object, select the compensation object and choose the Full Plus (+->) button.
-
To fully contract the view of a compensation object, select the compensation object and choose the Double Minus (- -) button.
Defining a Program or Plan Year Period
You use the Program/Plan Year window to record the dates through which programs or plans are in effect.
To define a program or plan year period:
-
Enter the Start and End dates in the Plan region through which this program or plan year period is valid.
In the Limitation region:
-
Choose the Start and End dates that define the limitation year that acts as the reference period used to calculate a participant's yearly compensation.
You typically define a limitation year to determine a participant's yearly contribution ceiling for a benefits plan such as a 401(k) plan in the US.
In the Period region:
-
Select the period Type code that identifies the period type by which you divide the program or plan year, for example fiscal or calendar.
Note: The period type must be Fiscal if you are defining a year other than from 01-JAN to 31-DEC. When the year period is from 01-JAN to 31-DEC the period type must be Calendar.
In the Within Year Periods block:
-
Enter the first day and first month of the within year period and the last day and last month of the within year period in the following fields:
-
Start Day
-
Start Month
-
End Day
-
End Month.
-
-
Select the Unit of Measure by which you are dividing this period.
-
Save your work.
Defining a Reimbursement Plan (Advanced Benefits)
You use the Plan Reimbursement window to define special requirements for plans that offer reimbursable goods and services and to set up spending account plans.
Note: As a prerequisite to defining reimbursement criteria, you must first create the plan using the Plans window. If you limit reimbursements to specific goods or services, you can define these in the Goods and Services window.
You can define the date through which you accept reimbursement requests for the plan and the last date in the plan year for which an expense will be reimbursed.
You can also define the certifications that are required or preferred for reimbursement of a good or service. You can limit the personal and familial relationship types, such as a spouse or a child, whose expenses are reimbursable under the terms of a plan.
To define a reimbursement plan:
-
Query the Plan for which you are defining reimbursement criteria.
-
In the Compare Claims field, select a code to indicate if the application validates a reimbursement request against the participant's current request balance or the coverage elected for the plan year. Choose either:
-
Compare claims to balance accumulated (reserved for future use)
-
Compare claims to coverage elected
-
-
Check the Allows Reimbursement field to indicate that you allow participants to submit reimbursement requests for the goods and services in this plan.
Timing Tab
-
Choose the Timing tab.
-
Select the Plan Year Start Date for the year period you are associating with this reimbursement plan.
The End Date for this year period automatically displays based on the plan years you established during your implementation.
-
Select the date by which Expenses Must Be Incurred On Or Before.
This is the last date in the plan year on which a participant can incur an expense and still have the expense reimbursed. Typically, this is the last day of the year period.
-
Select the date by which a Request Must Be Received On Or Before.
This is the date through which you accept claim reimbursement requests for this year period. For example, your enterprise may accept reimbursement requests for two months after the end of the previous plan year.
Good or Service Tab
Note: Goods and services are required for reimbursement request processing.
-
Choose the Good or Service tab.
-
Select a Good or Service that is reimbursable for this plan.
Use the Goods and Services window to define those items you approve for reimbursement.
-
Check the Recurring Claims field if participants can instruct you to automatically make payments for recurring claims without submitting a reimbursement request for every incurred expense.
Note: This field is reserved for future use.
-
Choose the Certification button to open the Reimbursement Certifications window.
You can define the certifications that you require or prefer to validate a reimbursement request for a good or service.
-
Select a certification Type--such as a paid invoice or a receipt--that you require or prefer to validate a reimbursement request.
You can add to the list of certification types by using the Lookup Type BEN_REIMBMT_CTFN_TYP in the Application Utilities Lookups window.
-
Check the Required field if you deny a claim reimbursement when a participant fails to provide this certification type.
-
If special circumstances apply, select a Reimbursement Certification Rule to indicate those instances where you allow reimbursement when a participant has not submitted a required certification. Use the Lack Certification Allow Reimbursement formula type to write this rule.
-
-
Close the Certifications window.
Relationship Tab
-
Choose the Relationship tab.
-
Select the Relationship Type of the persons related to the primary participant who can also submit reimbursement requests.
-
Save your work.
Forfeiture Tab
-
Check the Forfeitures Apply field if the application forfeits a person's unspent credits for this plan at the end of the plan year.
You run the Process Forfeitures concurrent request to determine a participant's forfeitures.
-
Select Provider as the Distribution Method to forfeit unspent contributions to the plan provider.
-
Select Use Compensation Level Factor as the Contribution Determination Code.
-
For the Distribution Determination Code, select:
-
Use Compensation Level Factor to calculate distributions based on a benefits balance or a defined balance in Oracle Payroll.
-
Use Approved Reimbursement Requests to calculate distributions based on the amount distributed to the participant using the Reimbursement Requests window.
-
-
Enter a GL Account for Debit and Credit to record the Oracle General Ledger accounts you use to track forfeiture totals for the plan.
-
Check Post to GL if you post forfeitures to the Oracle General Ledger credit account you entered in the previous step.
Note: This feature is reserved for future use.
-
After you run the Process Forfeitures concurrent request, you can view forfeiture totals for the plan by clicking the Forfeiture Values button.
-
Open the View Enrollment Results window, query a person, and choose the Rates button to see forfeiture results for a participant.
-
Defining Reimbursable Goods and Service Types
You use the Goods and Services window to define those goods and services that you approve for reimbursement. You then associate one or more goods and services types with a plan.
To define a reimbursable good or service:
-
Enter a Name for the good or service.
-
Select the Type of the good or service.
Use the Lookup Type BEN_GD_R_SVC_TYP in the Application Utilities Lookups window to add to the list of goods and service types.
-
Enter a text Description of the good or service.
-
Save your work.
Plan Design Copy
Copying a Program or Plan
Follow this process to use Plan Design Copy to copy or export a program or a plan.
To copy a program or plan
-
Log in to the Oracle HRMS professional user interface.
-
Choose the Plan Design Copy function from the Navigator.
Home Page
-
Do one of the following:
-
Click the Copy or Export Plan Design link to start a new copy process
-
Click View Plan Design to select a program or plan for viewing. Use this read-only feature to review data before you copy a plan design.
-
Choose an existing copy process from the Process History table and click Continue or Delete
Note: The application displays processes initiated with the responsibility you used to log in to Oracle HRMS.
You can continue a process with a status of Saved for Later, Interrupted, Imported, or Completed.
Process Status If you click Continue . . . Saved for Later The application displays the web page on which you saved the process. Interrupted The application displays the web page before the page you displayed when the process was interrupted. Imported The application displays the Target Details page that lets you select the Business Group into which you want to import the data. Completed The application displays the Select Target page where you select whether to copy or export the data. Process Name and Effective Date
-
-
Enter a name for the copy process.
You can select this copy process by name from the Home Page if you return to the transaction at a later date.
-
Select the effective date to limit the programs and plans available for copying.
Select Programs and Plans
-
Select one or more programs and plans to copy or export.
You can search for a compensation object by program, plan, or program and plans not in program. The search limits results to compensation objects in the business group of your responsibility.
To improve application performance, you should not select more than five programs at a time, depending on the size of your programs.
Select Target
-
Choose one of the following:
-
Copy the selected programs and plans to the same business group.
-
Copy the selected programs and plans to a different business group.
Note: The application restricts the target business groups to those business groups attached to the user's responsibilities. A system administrator can prevent the copying of data between business groups by setting the system profile option BEN: CROSS BUSINESS GROUP FOR PLAN DESIGN COPY to 'N.' The default is 'Y.'
-
Export the selected programs and plans to a file.
You can also export the data to a file by running the export process from the concurrent manager.
See: Exporting a Plan Design to a File
Enter Target Details
-
-
Do one of the following:
-
If you are copying to a different business group, select the target business group.
-
Select the Effective Date to Copy. The copy process assigns the effective date to the new objects in the target business group. The date cannot be earlier than the effective date of the objects in the source business group. Objects with an effective start date after the date entered will retain the same effective start date they had in the source business group. Objects ended prior to the copy date are not copied. If you complete any mapping prior to entering the Effective Date to Copy, you should verify the mappings.
Note: If you do not enter an Effective Date to Copy, the Copy Process uses the existing dates of any copied objects.
-
If you are copying to either the same business group or a different business group, indicate how the copy process treats instances where it finds an object with the same name in the target business group. You can choose to use the existing object (without copying the duplicate object) or create a copy of the object with a prefix or a suffix that you supply.
Note: When you copy a program and create a new program with a prefix or suffix, the copy process searches the target business group for child objects that contain the prefix or suffix, not for child objects with the same name as the original child objects that you copied.
-
If you are exporting to a file, provide the absolute directory path in your applications environment and the file name of the exported file. If you do not enter a directory path, the application writes the export file to the location specified in the environment variables APPLCSF/APPLLOG.
Select Mapping
-
-
Use the Mapping page to select additional plan design components for copying or exporting that are not stored in the base plan design tables.
For example, you must map elements and eligibility and variable rate profiles that use HR assignment criteria.
Note: If an object name matches exactly in the Source and Target business groups as of the Effective Date to Copy, the application automatically maps the object to the Target business group. You can override auto-mapped objects as necessary. The Target business group should have the same Lookup Codes as the Source business group. For example, you should add any Relationship Types to the Target business group that you have added to the Source.
Review
-
Use this page to review the compensation object that will be copied when you click Submit.
You can deselect any program, plan in program, or plan not in program that you do not want to copy.
Select the personalizations you want to copy for the plan you copy from the Task Personalization list.
After you click Submit, the Concurrent Manager runs the copy process and returns a Request ID. You can monitor the process status on the View Request page or the Requests window in the professional user interface.
Confirmation
-
This web page indicates if the copy process was successful. For exports, the Confirmation page provides a concurrent request ID. You can use this ID to view the results of the process in the Concurrent Manager.
Exporting a Plan Design to a File
You can export a plan design to a file and then import the data into another database instance. Use this feature to transfer plan design data between your test and production environments.
Use the Submit Request window.
To export a plan design to a file
-
Select Plan Design Copy - Export in the Name field.
-
Enter the Parameters field to open the parameters window.
-
In the Data File field, enter the absolute directory path and file name in your applications environment to which you want to export your plan design data.
If you do not enter the full directory path, the application writes the export file to the location specified in the environment variables APPLCSF/APPLLOG.
-
Enter a Display Name for this plan design data.
The display name appears in the list of processes when you import the plan design back into Oracle HRMS.
-
Enter the Effective Date of the plan design data that you want to export.
-
Choose the OK button.
-
Complete the batch process request and choose Submit.
You can now run the import process to import the plan design data into a new database instance.
Importing a Plan Design From a File
After you export a program or plan to a flat file, you can import the file back to your Oracle HRMS database. Typically, you would use this feature to transfer plan design data between database instances.
Use the Submit Request window.
To import a plan design from a file:
-
Select Plan Design Copy - Import in the Name field.
-
Enter the Parameters field to open the parameters window.
-
In the Data File field, enter the absolute directory path and file name of the file that you want to import.
If you do not enter the full directory path when you export the file, the application writes the file to the location specified in the environment variables APPLCSF/APPLLOG.
-
Choose the OK button.
-
Complete the request and click Submit.
-
Close the Submit Request window.
-
Open the Plan Design Copy page.
-
Select the imported file from the Copy History table and click Continue.
-
From the Target Details page, select the Business Group into which you are importing the plan design.
-
Complete the plan copy steps by entering target details, mapping to HR and Payroll data, and submitting the copy process.
See: Copying a Program or Plan, steps 8-11 for more information.
Purging Plan Design Copy Data
When you copy a plan design, the application stores the data in transaction tables. If you have run multiple plan copy processes, and if your plan design is large, the volume of stored data may trigger performance issues.
Run the Purge Plan Design Copy Process to delete data from the Plan Copy transaction tables and improve copy performance. To verify the data that you want to delete, you can test the results of the purge process before committing your changes to the database.
Use the Submit Request window.
To purge Plan Design Copy data
-
Select the Purge Plan Design Copy Process in the Name field.
-
Enter the Parameters field to open the Parameters window.
-
In the Process Name field, select the copy process that you want to purge.
Note: If you do not select a specific process, the application purges data based on the other parameters you enter.
-
In the Mode field, select whether to Commit or Rollback the results of the purge process.
Select Rollback if you want to review the results in the process log file without committing the changes to the database.
-
In the On or Prior to Effective Date field, enter the effective date of the purge.
The application purges all data on or before this date that meet the parameters you select.
-
Select a Status (such as Completed or Saved for Later) to limit the purge to copy processes of that status.
-
Select Yes in the Retain Log field to prevent the purge process from deleting the log files of the copy processes that you want to delete.
-
Click OK.
-
Complete the request and click Submit.
Defining a Reporting Group
You use the Reporting Groups window to define a reporting group and to associate programs and plans with the reporting group. You can also define which regulatory bodies and regulations govern the reporting group.
You can create reporting groups to represent:
-
Groups of programs and plans that you report on as a set by entering the reporting group name as a report parameter.
-
Self-service personnel actions, such as promotions or transfers, and to configure rules for these business processes.
See: Overview of Self-Service Actions, Oracle HRMS Workforce Sourcing, Deployment, and Talent Management Guide
-
Compensation plans for applicants on the Compensation page of iRecruitment.
To define a reporting group
-
Enter a unique Name for the reporting group.
-
Select the Global check box to include plans in the reporting group from any business group.
-
Select the Purpose of the reports that will be generated for this reporting group.
Select the Personnel Action purpose if you are defining a self-service action.
Select the iRecruitment purpose if you are defining plans for iRecruitment applicant offers. The Compensation page displays only reporting groups defined with the purpose of iRecruitment.
-
Enter a Description for the reporting group. The description that you enter for iRecruitment reporting group appears as an instruction text on the Enter Compensation page of iRecruitment.
-
Select the first Program Name if the reporting group is to consist of one or more programs.
Alternatively, select the first Plan Name in the reporting group.
Note: Ensure that you do not include the same plan in multiple reporting groups with the purpose iRecruitment.
Any row (record) in this table can include a Program Name or a Plan Name, but not both simultaneously. While it is unlikely that you would want to use the same reporting group to report at the program and plan levels, you could do so by choosing a Program Name for one record, and then choosing a Plan Name for each subsequent record in the reporting group.
Note: When a plan is selected, the Regulatory Bodies and Regulations button is enabled, indicating that you can define regulatory bodies for, and associate regulations with, that plan.
-
Save your work.
Defining Regulatory Bodies for a Plan
You use the Regulatory Bodies and Regulations window to date effectively define the regulatory bodies that approve or govern this plan.
To define a regulatory body for a plan
-
Choose the Plan Regulatory Bodies tab if it is not already selected.
-
Enter the Name of the regulatory body associated with this plan.
In the Dates block:
-
Enter the Approved Termination date on which this regulatory body ceases to recognize this plan's validity.
-
Enter the date this regulatory body qualified this plan in the Qualified field.
-
Select one or more Regulatory Purpose Codes that describe how this regulatory body governs this plan.
-
Save your work.
Defining Regulations for a Plan
You use the Regulatory Bodies and Regulations window to date effectively define the regulations that approve or govern this plan.
To associate regulations with a plan:
-
Choose the Plan Regulations tab if it is not already selected.
-
Select a Regulatory Plan Type.
-
Select the name of the regulation that governs this plan in the Regulation field.
-
Select one or more rules to determine how plan regulations define:
-
Contribution Nondiscrimination
-
Coverage Nondiscrimination
-
Five Percent Owner
-
Highly Compensated Determination
-
Key Employee Determination
Note: These rules reflect US non-discrimination legislation.
-
-
Save your work.
Benefits Eligibility
Eligibility Requirements for Total Compensation
You define eligibility requirements as part of your plan design to determine eligibility for compensation and benefits.
You group eligibility criteria into participant eligibility profiles for primary participants and dependent coverage eligibility profiles for dependents. Eligibility profiles are re-usable. After you create an eligibility profile, you can link it to a compensation object (such as a program, plan, or option), a collective agreement, a grade ladder, or a work schedule to restrict eligibility for these.
Eligibility is determined according to the order of the compensation object hierarchy:
-
Program
-
Plan Type in Program
-
Plan in Program
-
Plan
-
Option in Plan
If a participant is eligible for a program, then the system checks for plan type in program eligibility, and so on down the hierarchy. This allows you to link different eligibility profiles to different benefits that you offer within a program.
Eligible participants are created when you run the Participation batch process (if you are an Advanced Benefits customer) or when you process a participant's election using an enrollment form (if you use Standard Benefits).
Participant Eligibility Profiles
The standard criteria that you can include in an eligibility profile are grouped into five factors:
-
Personal Factors
-
Employment Factors
-
Derived Factors
-
Related Coverages
-
Other Factors
Each factor contains a variety of criteria from which you select one or more criteria values.
For example, let's say you administer a benefit plan with the eligibility requirement that all participants must work in California, Washington, or Indiana. You could define an eligibility profile using the Employment Factor criteria of Work Location. The values for the Work Location criteria would be California, Washington, and Indiana. (You need to define these work locations using the Locations form). A participant must meet one of the criteria values.
Apart from the above standard criteria that Oracle HRMS delivers, you can create your own criteria that meet the particular needs of your organization. For example, if your organization employs deep sea divers and varies benefits to the divers based on how deep they dive, you can create your own depth of diving criteria that you can use in your eligibility profiles.
See: User-defined Eligibility Criteria
See: Defining an Eligibility Profile
Dependent Coverage Eligibility Profiles
You define dependent coverage eligibility profiles to restrict the criteria that a dependent must meet in order to be covered by a benefit. Dependent coverage profiles are often used to exclude certain dependents from receiving coverage under a plan. For example, you can define a plan that excludes coverage for dependents age 21 and over.
Dependent eligibility factors include the dependent's:
-
Relationship (to the primary participant)
-
Age
-
Status (disabled, marital, military, student)
-
Postal zip
-
Other
After you define a dependent coverage eligibility profile, you associate it with one or more programs, plans, or options to limit the dependents covered by that benefit.
Required and Optional Eligibility Criteria
When you select more than one value for an eligibility criterion, at least one of the values must be present in the participant's record for the participant to be eligible for the benefit. In our example above, the participant must have a Work Location of either California, Washington, or Indiana.
However, when you use multiple criteria in an eligibility profile (for example, a Work Location and an Organization), the participant must meet at least one criteria value for each criterion.
Note: If you use a FastFormula eligibility rule as part of your eligibility profile, the participant must meet the criteria of the rule and one value from any other criteria that you include in the eligibility profile. If you use more than one FastFormula rule, by default the participant must meet the criteria of all the rules. If you change the user profile option BEN:Eligible Profile Rule from AND to OR, the participant need only meet the criteria of one rule.
Eligibility Ranking for Grade/Step Progression
For situations where eligibility does not guarantee access to a personnel action or a compensation object (for example, due to limited vacancies or restricted budget), you can rank an employee's eligibility relative to the eligibility of other employees.
During implementation, you can define a score and weight for each criteria in a participant eligibility profile. The application totals the score for all criteria that the person satisfies and assigns the person a rank relative to the total evaluated population.
You enter a score as a flat value for an eligibility criteria. If a person satisfies the eligibility criteria, the application records the score for the person.
A weight is a value that the application multiplies with a criteria value to compute a total. You can only use weights with criteria that contain numeric values.
Scores and weights are independent of one another. You can specify a score for a criteria, a weight, or both a score and a weight.
Currently, this feature is only available for Grade/Step Progression.
Linking an Eligibility Profile to an Object
Because eligibility profiles are re-usable, you define them separately from any object. You link a profile to a compensation object, collective agreement, grade ladder, or a work schedule that you have created, to restrict eligibility for these.
When you link the eligibility profile to the object, you specify if the profile is required. The participant must satisfy all profiles marked as Required and at least one profile that is not marked Required.
Minimum and Maximum Enrollment Periods
As part of your plan design, you can specify the minimum and maximum length of time that a participant is either required or allowed to remain enrolled in a compensation object.
Required Enrollment Periods
Define a minimum enrollment period for those compensation objects that require a participant to remain enrolled for a specified period.
For example, you could define a required enrollment period of two years for a dental plan.
Maximum Enrollment Periods
Define a maximum enrollment period for those compensation objects that place a time limit on length of coverage. Maximum enrollment periods are often used in the US for managing COBRA participation.
If you are an Advanced Benefits customer, the system automatically detects when a participant has reached a maximum enrollment period that you have defined. Standard customers are notified that a participant has reached a maximum enrollment period when an enrollment form is opened and that person's record is queried.
Benefits Groups
When eligibility for a plan varies for a group of persons, you can define a benefits group to explicitly group those persons together. Defining a benefits group is useful for grouping grandfathered participants, or administering highly complex participation eligibility involving a small number of people.
You use the Benefits Groups window to define a Benefits Group and you enter a person into a group using the Person form.
Important: You may assign a person to only one benefits group.
Postal Zip Ranges and Service Areas
You can define a range of postal zip codes that can be used to determine eligibility and activity rates for a benefit. Postal code ranges can be combined into service areas that you can also use as eligibility criteria.
Service areas are a useful means of defining eligibility for a particular geographical region when Work Location is not adequate.
Waiting Periods
You define a waiting period as the period of time that must elapse before a newly eligible person can enroll in a benefit. Waiting periods allow participants to make elections that will become effective at a later date.
You can define waiting periods at the following levels:
-
Program
-
Plan type in Program
-
Plan in Program
-
Plan
-
Option in Plan
Waiting periods you define at a higher level in the compensation object hierarchy cascade to all other compensation objects in the same hierarchy.
When you define a waiting period, you specify the unit of measure in which the waiting period is determined, for example, length of service or hours worked. For waiting period that you define at the plan level, you can set a corresponding maximum waiting period that can be in a different unit of measure, if required.
For example, you could define a waiting period of 200 hours worked before an eligible employee can enroll in a medical plan. You could define a maximum waiting period for the plan of 180 days of service. A person with less than 200 hours worked but with 180 days of service would be eligible for this medical plan based on the maximum waiting period.
Waiting Period Determination Dates
As part of defining a waiting period, you select a waiting period date to use code that determines the comparison date from which the system calculates the waiting period completion date. The waiting period date to use code identifies an event from which the waiting period is calculated, such as a participant's date of hire.
Because waiting periods can also be applied to non-employees, you can select a waiting period date to use code that uses one comparison date for an employee and a second comparison date for a non-employee.
For example, for a medical plan, the system could determine the waiting period for employees based on hire date and for non-employees based on the life event that caused the participation eligibility to be determined. In this scenario, you would select a waiting period date to use code of "If Employee, Date of Hire; Not Employee, Life Event Date."
You can select from the following waiting period comparison dates:
-
Date of Hire
-
Adjusted Service Date
-
Override Service Date
-
Eligibility Begin Date
-
Original Hire Date
-
Life Event Date (Advanced Benefits)
-
Later of the Life Event or Notification Date (Advanced Benefits)
-
FastFormula Rule
Waiting Periods by Life Event
Advanced Benefits customers can vary the waiting period requirement for a benefit by life event reason. You can define one waiting period for the compensation object and another waiting period that applies only in the occurrence of a particular life event. You can define waiting periods by life event at the following levels:
-
Program
-
Plan
-
Option in Plan
Waiting Period Processing
In Standard Benefits, waiting periods are calculated based on your waiting period definition when you open an enrollment form for a person.
For Advanced Benefits customers, waiting periods and eligibility are determined when you run the Participation batch process. The Participation process calculates the waiting period by adding the waiting period value (such as 60 days) to the waiting period comparison date (such as date of hire).
If the Participation process detects a potential life event between the effective date of the Participation process and the waiting period completion date, then no waiting period is determined for that participant. An error is written to the log file indicating that the waiting period must be re-determined after the intervening life event is processed.
The system also checks for temporal life events and does not create a waiting period if it detects a temporal event that will occur between the effective date of the Participation process and the waiting period completion date.
Continuing Eligibility: Benefits Assignments
Because you can use an employee's assignment to determine benefits eligibility, you must maintain assignment information for terminated or deceased employees and their qualified dependents for the purpose of providing continuing benefits.
A benefits assignment is a copy of an employee's primary assignment that is created when one of the following events occur:
-
The employee terminates: when an administrator enters a termination date, the application creates a benefits assignment for the employee and any dependents with an effective date of the actual termination date plus one day.
-
The employee becomes divorced or legally separated: when the status of the worker changes to Divorced, the application creates a benefits assignment for the ex-spouse. The person type usage of former spouse is created for the spouse on the day of the divorce.
-
The employee dies:when an administrator terminates an employee with the Leaving Reason of Deceased, the application creates a benefits assignment for the surviving spouse and any surviving family members. Where appropriate, the action creates person type usage of Surviving Spouse, Surviving Family Member, Surviving Domestic Partner, and Surviving Domestic Partner Child.
Note: The new benefits assignment does not appear until the date after the termination, so you may need to change the system date to view the new assignment.
-
Dependent loss of eligibility (Advanced Benefits): the Maintain Designee Eligibility process checks the eligibility of dependents of the subject employee. The application creates a benefits assignment for the dependent who has lost eligibility.
-
Reduction in hours: the application creates a benefits assignment for an employee and any personal contacts when the employee experiences any life event reason with a type of Reduction in Hours.
Note: Creating a Full Time-to-Part Time life event does not automatically create a Reduction in Hours life event. You must first set up a formula function to evaluate the number of hours from the assignment process results.
You can also manually create a benefits assignment if the application fails to create one, and you can update a system-generated benefits assignment.
Note: You set up the auto-generation of benefits assignments when you define the default payroll for a business group.
You can manually add, purge, and end element entries for benefits assignments, provided these entries are not for elements attached to an activity base rate. (When you make an election change or enrollment override, the application updates the entries of elements attached to an activity base rate.)
Benefits Assignments and Payroll
For US and Canadian customers, benefits assignments must have a payroll with a monthly periodicity since continuing benefits for ex-employees and their dependents are typically administered on a monthly basis. When a benefits assignment is created for an employee, the benefits default payroll that you set up for the business group is automatically linked to the person's benefits assignment. You can change the benefits assignment payroll to another payroll using the Benefit Assignment window.
Note: US and Canadian customers cannot process an employee termination unless the employee's business group has a default payroll.
Customers outside the US and Canada can maintain benefits assignments with a payroll of any periodicity; however, they must have a default payroll for benefits assignments.
See: Defining Benefits Defaults for a Business Group, Oracle HRMS Enterprise and Workforce Management Guide
Eligibility Profile Criteria
You can define from one to dozens of eligibility criteria for an eligibility profile. Criteria are divided into personal criteria, employment criteria, derived factors, and other criteria, as follows.
Note: The criteria that you can select depends on whether you have accessed the Participation Eligibility Profiles window from the Total Compensation or Collective Agreements area of the application.
Personal Criteria
You select personal eligibility criteria from the Personal tab of the Eligibility Profiles window.
Competencies: Uses the first three enabled segments defined for the Competency Key Flexfield for the business group as criteria.
Disability: Uses an employee's disability category as eligibility criteria.
Gender:Uses an employee's gender as eligibility criteria.
Leaving Reason: Uses an employee's termination reason as eligibility criteria. This criteria are often used for continuing benefits eligibility, such as for COBRA in the US
Opted for Medicare: Uses whether or not an employee is enrolled in Medicare as eligibility criteria.
Person Type: Uses a person's person type(s) as eligibility criteria.
Postal Zip: Uses individual zip/postal codes or ranges of zip/postal codes as eligibility criteria.
Qualification Title: Uses a person's qualification title as eligibility criteria.
Service Area: Uses a person's service area, such as a city or other geographical area, as an eligibility criteria.
Tobacco Use: Uses whether or not a person uses tobacco as a variable factor to associate with an activity rate. In countries where it is illegal to hold information about a person's tobacco usage, for example, Italy, this personal factor is unavailable.
Employment Criteria
You select employment criteria from the Employment tab of the Eligibility Profiles window.
Assignment Set: Uses an employee's assignment or a set of assignments as eligibility criteria.
Assignment Status: Uses a person's state of employment (Active, Inactive, or On Leave) as an eligibility criteria.
Bargaining Unit: Uses an employee's bargaining unit (local union group) as eligibility criteria.
Full/Part Time: Uses whether an employee works full-time or part-time as eligibility criteria.
Grade: Uses an employee's grade as eligibility criteria.
Hourly/Salaried: Uses an employee's pay basis, either hourly or salaried, as eligibility criteria.
Job: Uses an employee's job classification as eligibility criteria.
Labor Union Member: Uses whether an employee is a union member as eligibility criteria.
Leave of Absence: Uses an employee's leave of absence reason as an eligibility criteria.
Legal Entity: Uses an employee's legal entity (GRE) as eligibility criteria for a benefit (US only).
Organization Unit: Uses an employee's organization as eligibility criteria.
Pay Basis: Uses an employee's pay basis as eligibility criteria.
Payroll: Uses the employee's payroll as eligibility criteria.
People Group: Uses a person's People group as eligibility criteria.
Performance Rating: Uses an employee's performance rating as criteria.
Position: Uses a person's position as eligibility criteria.
Quartile in Grade: Uses an employee's pay range for a grade, divided by four, to determine the quarter into which the person's salary amount falls.
Range of Scheduled Hours: Uses the number of hours an employee is scheduled to work as eligibility criteria. This is taken from the Working Hours field on the assignment. For employees with more than one assignment, the hours are totaled across all assignments if you check the 'Use All Assignments for Eligibility' check box on either the Programs or Plans window. If you define multiple scheduled hours ranges, the Participation Process evaluates each range as an 'Or' condition.
Work Location: Uses an employee's work location as eligibility criteria.
Derived Factor Criteria
You select derived factor eligibility criteria from the Factors tab of the Eligibility Profiles window.
Age: Uses an employee's age as eligibility criteria.
Combination Age/LOS: Uses an employee's combination age and length of service factor as eligibility criteria.
Compensation Level: Uses an employee's compensation level as eligibility criteria.
Full-time Equivalent: Uses an employee's percent of full-time employment as eligibility criteria. The full-time equivalent source derives from the Assignment Budget Values window.
Hours Worked: Uses an employee's hours worked in a given period as eligibility criteria.
Length of Service: Uses an employee's length of service as eligibility criteria.
Other Criteria
You select miscellaneous eligibility criteria from the Other tab of the Eligibility Profiles window.
Benefits Group: Uses a person's benefits group as eligibility criteria.
COBRA Qualified Beneficiary: Uses whether a person is considered a qualified beneficiary under COBRA regulations to determine eligibility (US only).
Continuing Participation: Used to set the date on which an ex-employee's payment for a continuing benefit must be received.
Participant in Another Plan: Uses a person's participation in another plan as eligibility criteria.
Total Coverage Volume: Uses the total coverage elected for a plan or option in plan by all participants as a variable factor in determining the actual premium owed by a plan sponsor to the benefits supplier.
Total Participants: Uses the total number of participants covered by a plan or option in plan as a variable factor in determining the actual premium owed by a plan sponsor to the benefits supplier.
User Defined Criteria: Displays the user-defined criteria that you created to meet the particular needs of your organization. These criteria are not part of the standard criteria that Oracle HRMS delivers, and you must create these on your own. See: User-defined Eligibility Criteria
Rule: Uses an eligibility rule, instead of an eligibility profile, to refine or augment eligibility criteria for a benefit or collective agreement entitlement.
Related Coverages
The criteria available under the Related Coverages tab are designed primarily for COBRA administration in the US but, you can use them for other purposes.
See: COBRA Eligibility Profiles, Oracle HRMS Compensation and Benefits Management Guide
User-defined Eligibility Criteria
You can create eligibility criteria you need for use in your eligibility profiles, to meet the particular requirements of your organization. You can use these criteria to determine employee eligibility for compensation, benefits, entitlements in collective agreements, personal actions, and so on.
Oracle HRMS comes with numerous standard eligibility criteria that support common industry requirements for defining eligibility, see: Eligibility Profile Criteria.
You can also define various system-calculated eligibility factors, that change over time, as eligibility criteria, see: Derived Factors.
User-defined criteria gives you the additional flexibility to create your own criteria to meet specific needs of your enterprise that the standard and derived factor criteria do not meet.
For example, if your organization employs deep sea divers and varies benefits to the divers based on how deep they dive, you can create Depth of Diving as a new eligibility criterion.
You create these criteria using the Create Eligibility Criteria page or from the User Defined Eligibility Criteria window. You can access the user defined eligibility criteria from the Participation Eligibility Profiles window or the Dependent Coverage Eligibility Profiles window.
See: Creating your own Eligibility Criteria.
You can define eligibility criteria out of person information by specifying the table and column name where the application stores that information. In the above example, if the application stores the details of the depth to which a person can dive in the table PER_ALL_ASSIGNMENTS_F and column attribute 8, you specify these details in your criteria definition to create the Depth of Diving criteria.
Note: You can specify the table and column names that identify your user-defined criteria values, only if you are using the tables PER_ALL_PEOPLE_F and PER_ALL_ASSIGNMENTS_F for participant eligibility. You can create user defined eligibility criteria for dependents for values stored on the PER_ALL_PEOPLE_F table. If you want to use any other table, you must use a formula. To be able to choose the correct values, you must have a basic understanding of the structure of the application tables that hold the required information. For more details on these tables, please refer to Oracle HRMS electronic Technical Reference Manual (eTRM), available on My Oracle Support.
You can also define existing hierarchies such as an organization hierarchy or position hierarchy as criteria for use in your eligibility profiles.
Note: The hierarchies are available only for participants, and not for dependents.
Derived Factors
Derived Factors are system calculated eligibility factors that change over time. You define a derived eligibility factor to use as a criteria element in an eligibility profile for a benefit plan or a collective agreement, or a variable activity rate. You can use the derived factor of age in a dependent coverage eligibility profile.
The product supports the calculation of six derived factors:
-
Compensation level
-
Percent of full-time employment
-
Hours worked in period
-
Age
-
Length of service
-
Combination age and length of service
Compensation Level
You define a compensation level derived factor if you use a person's compensation amount as an eligibility criterion or as a factor in a variable rate profile.
You can select as a compensation source a person's stated compensation, a payroll balance type, or a benefits balance type that you define.
Percent of Full-time Employment
You define a percent of full-time employment derived factor if you determine eligibility or rates based on a person's percentage of full-time work.
You can choose to use a person's primary assignment only or the sum of all their assignments when determining their percent of full-time employment.
Hours Worked in Period
You define an hours worked in period factor if you determine eligibility or rates based on the number of hours a person works in a given period that you define.
You can choose to derive the number of hours worked from a balance type or a benefits balance type.
Age
You define an age factor if you determine eligibility for a person or a dependent based on age. You can define a minimum or a maximum age beyond which a person becomes eligible or no longer eligible for a particular benefit.
You can also define an age factor that derives the age of a participant's spouse.
Note: If you calculate both a participant's age and a spouse's age to determine eligibility or a variable rate - and enrollment restrictions vary for the spouse and the dependent - you must duplicate the seeded Age Change life event reason. A system administrator must then write a Life Event Evaluation rule to determine which Age Change event to detect.
Note: If you are defining a derived factor based on age for a collective agreement you can only use the person's age.
Length of Service
You define a length of service factor if you determine eligibility based on how long a person has worked for your enterprise.
You can choose to calculate length of service from a person's hire date, adjusted hire date, or override service date.
Combination Age and Length of Service
You create a combination age and length of service factor by linking an age factor and a length of service factor that you have defined into a new factor.
Defining an Eligibility Profile
You use the Participation Eligibility Profiles window to define an eligibility profile with an effective start date of your choice. Before defining the profile, define any derived factors (such as length of service or compensation level), or your own eligibility criteria, that you plan to use as eligibility criteria.
If you want to create your own criteria to include in the eligibility profile, click User Defined Eligibility Criteria and create new criteria, see: Creating your own Eligibility Criteria. To access these criteria, choose the Other tabbed region, and select User Defined Criteria from the list
You can use eligibility profiles to determine:
-
employee eligibility for compensation and benefits plans
-
entitlements in collective agreements
-
eligibility for grade/step progression
-
eligibility for various work schedules, and so on
The information you can enter differs slightly depending on whether you have accessed this window from the Total Compensation or Collective Agreements area of the application.
Note: If you use the Total Compensation Setup Wizard to set up grade ladders, programs and plans, and Total Compensation Statements, you can create or update eligibility profiles while you are working in the Wizard.
To define an eligibility profile
-
Enter the Name of the eligibility profile you are defining.
-
Enter a Description of this eligibility profile.
-
Select an Assignment Type to which this eligibility profile applies.
For example, you can define an eligibility profile for employee assignments if this profile is only used for employees.
Note: You can only select Employee Assignment Only for profiles to be used with collective agreements.
-
Select the profile Status.
Pending: This eligibility profile is currently proposed, but not active.
Active: This eligibility profile is in use.
Inactive: This eligibility profile is in use but cannot be associated with any new programs, plans, or options.
Closed: This eligibility profile was once Active or Pending, but is no longer in use.
-
Select whether this eligibility profile applies to benefits or collective agreements. If you are defining an eligibility profile for work schedules or grade step progression, then select benefits.
Choose the tabbed region that contains a criteria element that you want to include in your eligibility profile. Choose from:
-
Personal
-
Employment
-
Derived Factors
-
Related Coverages (Not applicable to collective agreements)
-
Other
-
-
Select a criteria element.
For example, you could choose Person Type as one of several eligibility criteria of the Personal type.
Note: When you define more than one value for a criterion, at least one of the values must be present in the person's record for them to be eligible. However, when you use multiple criteria in an eligibility profile (for example, a Work Location and an Organization), the person must meet at least one value for each criterion.
If you use a FastFormula eligibility rule as part of your eligibility profile, the participant must meet the criteria of the rule and one value from any other criteria that you include in the eligibility profile. If you use more than one FastFormula rule, by default the participant must meet the criteria of all the rules. If you change the user profile option BEN:Eligible Profile Rule from AND to OR, the participant need only meet the criteria of one rule.
-
Enter a Seq (sequence) number specifying the order the system processes this criteria element relative to any other criteria in this eligibility profile.
Note: You must assign a sequence number of a higher priority to all criteria that are used to exclude eligibility.
-
Select one or more values for the criteria element you have selected.
-
Check the Exclude field if a person becomes ineligible to participate in the compensation object, or to receive the collective agreement entitlement you associate with this eligibility profile if they meet this criterion.
You typically check the Exclude field when it is easier or faster to define which persons are excluded from eligibility, as opposed to defining which person are eligible.
If you are defining an eligibility profile for a grade ladder, and you want to rank your employees to determine the most eligible person to progress, enter an eligibility Score for this criteria.
The application calculates the eligibility rank based on the total score for all criteria that the person satisfies.
-
For grade ladders, you can also enter an eligibility Weight for a criteria.
The application multiplies the weight by the criteria value. You can only use weights with criteria that contain numeric values. If you enter a score and a weight for a criteria, the application adds the person's score to the weight to arrive at the final number.
-
Repeat steps 6 to 12 for each criteria element that you include in your eligibility profile.
-
Choose the Display All tabbed region to view the criteria elements in this eligibility profile.
-
Save your work.
Defining Your Own Eligibility Criteria
Oracle HRMS enables you to create as many eligibility profile criteria as you need, in addition to the existing standard eligibility and derived factor criteria, to meet the particular requirements of your organization. You can use these criteria to determine employee eligibility for compensation, benefits, entitlements in collective agreements, personal actions, and so on.
See: User-defined Eligibility Criteria
Use the User Defined Eligibility Criteria window, which you can access from the Participation Eligibility Profiles window, or the Dependent Coverage Eligibility Profiles window, or use the Create Eligibility Criteria page to create your own criteria. The information you can enter differs slightly depending on whether you are creating your criteria from the User Defined Eligibility Criteria window or from the Create Eligibility Criteria page.
Note: You can define eligibility criteria for dependents only from the Dependent Coverage Eligibility Profiles window.
On both page and window you can create subcriteria, enabling you to designate two sets of values for a single criteria. On the Create Eligibility Criteria page you can also mandate that the person's timecard override the values stored in the table or returned by the formula attached to the criteria. For more information, see the white paper Setting Up the RBC/OTL/Payroll Integration (My Oracle Support Note ID 369044.1).
To create your own eligibility criteria
-
Enter the Name, Short Name, and the Description for the new criteria.
-
Specify if the criteria accept a range of values.
-
Specify the Lookup Type or the Value Set that restrict the valid values for your criteria.
-
To use an existing hierarchy, such as an organization hierarchy or position hierarchy, to define the value for the criteria, select the appropriate hierarchy.
-
Specify a particular person information value as the value for your criteria by selecting the table and column names where this information is available or by using a formula.
Note: You can specify the table and column names that identify your user-defined criteria values, only if you are using the tables PER_ALL_PEOPLE_F and PER_ALL_ASSIGNMENTS_F for participant eligibility. User defined criteria for dependents can be created for values stored on PER_ALL_PEOPLE_F If you want to use any other table, you must use a formula. To be able to choose the correct values, you must have a basic understanding of the structure of the application tables that hold the required information. For more details on these tables, please refer to Oracle HRMS electronic Technical Reference Manual (eTRM), available on My Oracle Support.
-
To add a second subcriteria, click the Set 2 tab and repeat steps 2-5.
-
Save your work.
To use these newly created user-defined criteria in your eligibility profiles, in the Participation Eligibility Profiles window, choose the Other tab and select User Defined Criteria from the list. Alternatively, in the Dependent Coverage Eligibility Profiles window, choose the Other tab and select User Defined Criteria from the list.
Defining Derived Compensation Factors
Defining Derived Factors: Compensation Level
You can define a compensation level factor as part of an eligibility profile (to be used in determining benefits participation or collective agreement entitlements) or a variable rate profile. A compensation level factor can be based on either stated salary, balance type, or benefits balance type.
You define compensation level factors in the Derived Factors window. The values you can select in some of the fields depend on whether you have accessed the Derived Factors window from the Total Compensation or Collective Agreements area of the application.
To define a compensation level factor:
-
Enter a Name for this compensation level factor.
-
Select the Unit Of Measure for this compensation level factor.
Select the Source of the compensation level factor.
-
Select the Defined Balance for this compensation level factor if you selected a source of balance type.
-
Select a Benefits Balance Type if you selected a source of benefits balance type.
-
Select the compensation periodicity in the Stated Comp Periodicity field if you selected a source of stated compensation.
Note: If you have installed the Oracle Incentive Compensation patch 4409180 you can select either Oracle Incentive Compensation - Amount Earned or Oracle Incentive Compensation - Amount Paid as the source. If you select any of these sources, then the Incentive Compensation Information region displays, where you can enter the Start and End Dates, and select the Prorate if date range differs from OIC range check box
In the Values block:
-
-
Enter the Minimum amount under which the system does not calculate this compensation level factor.
-
Check the No Minimum field if there is no minimum compensation amount under which the system excludes participants when determining participation eligibility and activity rates.
-
-
Enter the Maximum amount above which the system does not calculate this compensation level factor.
-
Check the No Maximum Compensation field if there is no maximum compensation amount above which the system excludes participants when determining participation eligibility and activity rates.
-
-
Select a Determination Code or Rule to define when the system determines a participant's compensation level.
-
Choose a Rounding Code or Rounding Rule to specify the level to which the system rounds the results of this compensation level factor.
-
Save your work.
Defining Derived Factors: Percent of Full Time Employment
A percent full time factor derives an employee's percent of full time employment. The application uses this information to calculate activity rates, coverage amounts, or to determine participation eligibility for either benefits or collective agreement entitlements.
For example, you could define the 100% percent full-time factor to identify those employees who work 100% full-time (40 hours per week) and thus qualify for most benefits or entitlements.
You define percent full time factors in the Derived Factors window. The values you can select in some of the fields depend on whether you have accessed the Derived Factors window from the Total Compensation or Collective Agreements area of the application.
To define a percent full time factor:
-
Enter a Name for this percent full time factor.
-
Check the No Minimum field if there is no minimum percentage of full-time employment under which the application excludes employees when determining participation eligibility and activity rates.
-
Or, enter a Minimum Percent Value to define the minimum percentage of full-time employment to be used in this calculation.
-
-
Check the No Maximum field if there is no maximum percent of full-time employment beyond which the application excludes employees when determining participation eligibility and activity rates.
-
Or, enter a Maximum Percent Value to define the maximum percent of full-time employment to be used in this calculation.
-
-
Check the Use Primary Assignment Only field to specify that the application considers only an employee's primary assignment when determining percent of full time employment.
-
Check the Use Sum of All Assignments field to specify that the application considers all active assignments when determining percent of full-time employment.
-
Select a Rounding Code or Rule to specify the level to which the application rounds the results of this calculation.
-
Save your work.
Defining Derived Factors: Hours Worked In Period
An hours worked in period factor derives the number of hours a given employee has worked over a given period of time. The application uses this information to determine participation eligibility for either benefits or collective agreement entitlements, activity rates, and coverage amounts.
You define hours worked in period factors in the Derived Factors window. The values you can select in some of the fields depend on whether you have accessed the Derived Factors window from the Total Compensation or Collective Agreements area of the application.
To define an hours worked in period factor:
-
Enter a Name for this hours worked in period factor.
-
Select the calculation source for this hours worked in period factor in the Source field.
Balance Type: The application retrieves hours worked information from a balance.
Benefits Balance Type: The application retrieves hours worked information from a benefits balance.
-
Specify when the application calculates this hours worked in period factor in the Once or Continuing field.
Once: The application only calculates this hours worked in period factor following a life event or for open enrollment.
Continuing: The application calculates this hours worked in period factor each time you run the Participation batch process.
-
Select the Defined Balance for this compensation level factor if you selected a calculation source of balance type.
-
Select a Benefits Balance Type if you selected a calculation source of benefits balance type.
-
Check the No Minimum field if there is no minimum number of hours worked in period under which the application excludes employees when determining participation eligibility and activity rates.
-
Or, enter the Minimum hours worked in period under which the application does not calculate this hours worked in period factor.
-
-
Check the No Maximum field if there is no maximum hours worked in period above which the application excludes employees when determining participation eligibility and activity rates.
-
Or, enter the Maximum hours worked in period beyond which the application does not calculate this hours worked in period factor.
-
-
Select an hours worked Determination Code or Rule that defines how to calculate the hours worked in period.
-
Select a Rounding Code or Rule to specify the level to which the application rounds the results of this hours worked in period factor.
-
Save your work.
Defining Derived Factors: Age
An age factor derives a person's age in order to determine participation eligibility for either benefits or collective agreement entitlements, activity rates, and coverage amounts.
For example, you could define the Retire 65 age factor to identify those employees who are at least 65 years of age and thus qualify for a maximum benefit under your corporation's retirement plan. For collective agreements you could define the Age Less Than 21 age factor to identify those employees who are less than 21 and thus should be placed on a particular grade.
You define age factors in the Derived Factors window. The values you can select in some of the fields depend on whether you have accessed the Derived Factors window from the Total Compensation or Collective Agreements area of the application.
To define an age factor:
-
Enter a Name for this age factor.
-
Select the UOM to specify the unit of measure for this age factor.
-
Select an Age to Use code to indicate the kind of person, such as the participant or the participant's child, for whom you are defining a derived age factor.
Note: Derived factors to be used with collective agreements can only use the employee's age.
-
Select an Age Determination Code or Rule to specify the date the application uses to calculate age.
-
Check the No Minimum Age field if there is no minimum age under which the application excludes employees when determining participation eligibility and activity rates.
-
Or, enter the Minimum age beyond which the application does not calculate this age factor.
-
-
Check the No Maximum Age field if there is no maximum age beyond which the application excludes employees when determining participation eligibility and activity rates.
-
Or, enter the Maximum age beyond which the application does not calculate this age factor.
-
-
Select a Rounding Code or Rule to specify the level to which the application rounds the results of this age factor calculation.
-
Save your work.
Defining Derived Factors: Length of Service
A length of service factor derives the length of service for a given worker in order to determine participation eligibility for either benefits or collective agreement entitlements, activity rates, and coverage amounts.
You define length of service factors in the Derived Factors window. The values you can select in some of the fields depend on whether you have accessed the Derived Factors window from the Total Compensation or Collective Agreements area of the application.
To define a length of service factor:
-
Enter a Name for this length of service factor.
-
Select the unit of measure in the UOM field by which you are defining the length of service factor.
-
Select a Determination Code or Rule that defines how the system calculates an employee's length of service.
-
Check the No Minimum Applies field if there is no minimum length of service under which the system excludes employees when determining participation eligibility and activity rates.
-
Or, enter the Minimum length of service under which the system does not calculate this length of service factor.
-
-
Check the No Maximum Applies field if there is no maximum length of service above which the system excludes employees when determining participation eligibility and activity rates.
-
Or, enter the Maximum length of service beyond which the system does not calculate this length of service factor.
-
-
Select a length of service Date to Use Code or Rule to specify the date from which the system calculates the employee's length of service.
Hire Date: The system always uses the employee's hire date as the start date when calculating length of service.
Adjusted Service Date: The system first uses the employee's adjusted service date if one exists. If there is no adjusted service date, the system uses the employee's hire date.
-
Check the Use Override Service Date field to indicate that the system should override the person's service date when determining eligibility.
Note: You enter the Override Service Date for a person in the Participation Overrides window.
-
Select a Rounding Code or Rule to specify the level to which the system rounds the results of this length of service factor.
-
Save your work.
Defining Derived Factors: Combination Age and Length of Service
A combination age and length of service factor associates two factors you have already defined: an age factor and a length of service factor.
You define combination age and length of service factors in the Derived Factors window. The values you can select in some of the fields depend on whether you have accessed the Derived Factors window from the Total Compensation or Collective Agreements area of the application.
To define a combination age and length of service factor:
-
Enter a Name for the combination age and length of service factor you are defining.
-
Select an Age Factor.
-
Select a Length of Service Factor.
-
Enter the Minimum value for the combination of age and length of service that qualifies a person as eligible for the benefit, collective agreement entitlement, or activity rate with which this factor is associated.
-
Enter the Maximum value for the combination of age and length of service that qualifies a person as eligible for the benefit, collective agreement entitlement, or activity rate with which this factor is associated.
-
Enter an Order Number to specify the order in which the application processes and displays combined age and length of service records.
-
Save your work.
Defining a Dependent Coverage Eligibility Profile
You use the Dependent Coverage Eligibility Profiles window to define an eligibility profile that limits the conditions that enable a dependent to receive coverage under a benefit.
You link the dependent coverage eligibility profile to the compensation object using the Dependent Coverage tabbed region of the Program Enrollment Requirements window. Or, use the Designations tabbed region of the Plan Enrollment Requirements window if the profile is for a plan that is not in a program.
To define a dependent eligibility coverage profile:
-
Enter the Name of the dependent coverage eligibility profile you are defining.
-
Select the Status of this dependent coverage eligibility profile.
Active: This eligibility profile is currently available to associate with a compensation object.
Pending: This eligibility profile is currently proposed, but not yet available to associate with a compensation object.
Inactive: This eligibility profile is in use but cannot be associated with any new compensation objects.
Closed: This eligibility profile was once Active or Pending, but is no longer in use.
-
Select a Regulation to specify a statute or regulation that enables, defines, or restricts the eligibility criteria maintained in the profile.
-
Enter a Description of this profile.
-
Select a Rule to include in this profile if the standard dependent coverage eligibility profile criteria do not fully support your business requirements.
-
Choose the tabbed region that represents the factor by which you want to restrict dependent coverage. Choose from:
-
Relationship
-
Age
-
Status (includes disabled, marital, military, and student status)
-
Postal Zip
-
-
Select the factor by which you are restricting dependent coverage in the Name field. Select one or more factors for each tabbed region, as required by your business rules.
-
Check the Exclude field for a factor in the Age region or the Postal Zip region if a dependent who meets this age or postal zip is excluded from receiving coverage.
-
Save your work.
Defining Other Eligibility Criteria
Defining Benefits Groups
You use the Benefits Groups window to define the groups into which you place various categories of employees and other benefits participants for purposes of eligibility or activity rate restriction.
You assign a person to a benefits group using the Benefits Tabbed region of the People window.
Note: If necessary, you can add the Benefits Tab to the People window. As a system administrator, query the BEN_MANAGER menu in the Menus window and add the HR View Benefits function to the menu.
Note: You may assign a person to only one benefits group.
To define a benefits group:
-
Enter a unique name for this benefits group.
-
Enter a description of the benefits group.
-
Save your work.
Defining Regulations
You define regulations as discrete rules, policies, or requirements that a governmental or policy making body defines regarding the administration of one or more benefits.
To define a regulation:
-
Navigate to the Regulations window.
-
Enter a Regulation Name impacting the administration of one or more benefits.
-
Enter a Statutory Citation Name for this regulation.
-
Select a Regulatory Body such as a governmental or policy making body responsible for this regulation.
-
Select an Administrative Code indicating whether this regulation is issued by or enforced by this regulatory body.
-
Save your work.
Defining Postal Zip Ranges
You date effectively define postal zip ranges that can be used to determine participation eligibility and activity rates.
You also use this window prior to defining service areas. The postal codes populate the list of values of the Postal Zip within Service Area region of the Service Areas window.
The following parameters are on the Postal Zip Ranges window:
-
From Value is the beginning of the zip code range you want to define, inclusive.
-
To Value is the ending value of the zip code range you want to define, inclusive.
To define a postal zip range:
-
Enter a beginning and ending postal code, and save.
Defining Service Areas
You date effectively define service areas for a benefits carrier or third party agent. For instance, you might want to define a service area for a city or other geographical area, and list the service provided.
The following parameters are on the Service Areas window:
-
Service Area region
-
Name is the name of the region you are defining, e.g., "Coastal."
-
Product is the name of the service provided to the region, e.g., "Medical Plan 1"
-
Note: Lookup values for this field are located in BEN_PRDCT.
-
Postal Zip within Service Area region
-
Postal Zip Range is the postal range for the service area
-
To define a service area:
-
Enter or query the name of the service region.
-
Enter the appropriate service or product in the Product field.
-
Enter the zip code range for the service area.
-
Save your work.