Payroll Statutory Deductions and Reporting
Payroll Statutory Deductions and Reporting Overview
Oracle Payroll enables you to calculate an employer's tax liability and deduct the appropriate sums from employee earnings. You can calculate employer and employee tax liabilities for all the taxes and statutory deductions that are applicable to your country. For example, this includes employer liability for state taxes such as State Unemployment Insurance and employee liability for federal, state and local taxes in the US, PAYE and NIC in the UK, PAYE and PRSI in Ireland, Social Security, Unemployment and Complementary Pension in France, Standard and Special tax and Social Insurance in the Netherlands, and so on.
In each instance, Oracle Payroll enables you to enter details of the tax liability and process it at regular intervals.
Reporting on Payroll Statutory Deductions
See: Reports and Processes in Oracle HRMS, Oracle HRMS Configuring, Reporting, and System Administration Guide
Payroll Statutory Deductions and Reporting
Oracle Payroll allows you to process tax and insurance deductions for employers and employees, and helps you comply with the legislative requirements applying to your organization.
Is Oracle Payroll flexible enough to calculate different legislative taxes?
Yes. Oracle Payroll supports many country specific models of taxation, including the local, federal and state tax requirements of organizations operating in the US.
Is the entry of tax details flexible enough to meet my organizational needs?
Yes. You can calculate taxes for different types of employer to represent the diversity of your organization. You can also make retrospective adjustments to allow for overpayments and underpayments.
Is Oracle Payroll capable of processing the latest taxation updates?
Yes. The details of taxation policy and social security entitlements are constantly changing, but Oracle Payroll is always promptly updated so that your processing includes the most recent updates.
Can Oracle Payroll transmit PAYE information electronically? (UK only)
Yes. EDI allows two-way electronic transmission of documents between the Inland Revenue and employers. Oracle UK Payroll has developed a specified formatted file that, if used in conjunction with third party software, can be transmitted electronically to the Inland Revenue.
Can you record P11D details and submit an annual return? (UK Only)
You can use Oracle HR to update your records throughout the year to show all the Class 1A National Insurance contributions for which your organization is liable. You can make this information available to employees so that they can preview their NI liabilities. You can then generate a report to view the final details and you can submit the complete and validated records to the Inland Revenue to comply with all reporting requirements.
Payroll Statutory Deductions and Reporting
India Tax and Deductions Information
Oracle Payroll for India supports the following types of statutory deductions and social insurance:
-
Income Tax
-
Employee State Insurance
-
Professional Tax
-
Provident Fund
-
Labour Welfare Fund
Income Tax
Oracle Payroll calculates income tax based on the planned and actual tax declaration provided by the employees. Employees must declare their tax declaration at the beginning of the tax year. These figures are used to calculate the income tax to be deducted for the employee. Employees can update their declaration at any time, except during the freeze period. Employees submit documents of proof supporting their tax declaration. A payroll administrator validates the documents of proof and updates the tax declaration made by the employee. You can view the employee's tax declaration review status through professional user self-service interface.
Income Tax Calculation Process
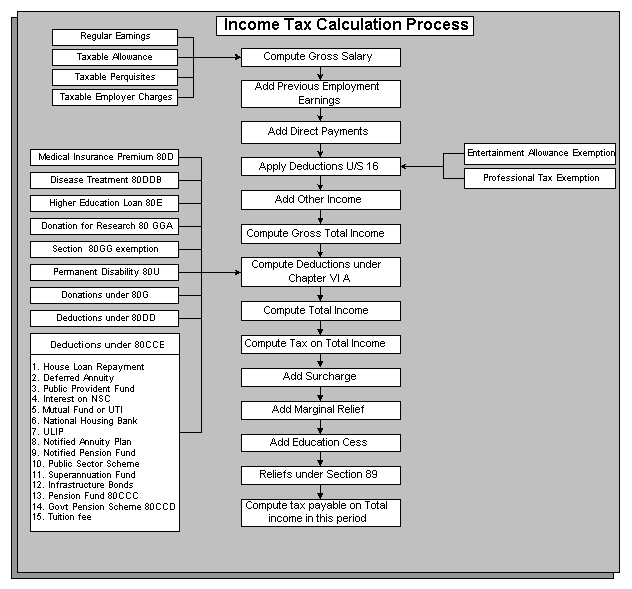
Oracle Payroll supports the following types of earnings for IT calculation:
-
Regular Earnings
-
Bonus
-
Termination Payments
-
Direct Payments
The computation of Section 89 and any termination payments (such as gratuity and others) made in installments are not supported. You can use the element Relief Under Section 89, and write you own fast formulas to support Section 89.
For retrenchment and VRS termination elements, you must define an input value Component Name and default it to Retrenchment or Voluntary Retirement.
Employee Transfer
You can change employee's GRE organization at any time. To change employee's GRE organization, you must map the employee to the new GRE (on the effective date) before you process payroll for the old GRE.
Employee State Insurance
Oracle HRMS for India supports the following ESI calculations and subsequent deductions from the employee's salary:
-
Checking employee eligibility (eligibility is calculated based on the employee's ESI eligible salary)
-
Calculating ESI actual salary
-
Calculating the employee and employer contribution
-
Deducting employee's contribution from the employee's salary for each pay period
-
Calculating ESI during transfers between ESI organizations
See: Setting up Employee State Insurance
Employee Transfers
There are two types of transfers for employees:
-
Employees are transferred within the same ESI organization. Employee details and reporting do not change.
-
Employees are transferred from one ESI organization to the other. The Employer ESI code and the employee's ESI number do change. You assign the new ESI organization to the employee's assignment, and change employee's ESI number in the Further Benefits tab of the People window.
Professional Tax
Some of the state governments levy Professional Tax on any employee working in the state. Employers must register with the state and have a professional tax registration number. Professional Tax deductions differ for each state. You can create multiple professional tax organizations for an employer.
Oracle HRMS for India supports the following Professional Tax calculations:
-
Checking employee eligibility (eligibility depends on the state in which the employee is working. Employers can assign exemptions to the employees)
-
Calculating Professional Tax eligible salary
-
Calculating employee's professional tax deduction (deduction depends on the professional tax rules for the state)
-
Checking for employee's exemption from professional tax
Note: Professional Tax is calculated based on the frequency set at the Business Group level, and deducted monthly from the employee's salary.
Professional Tax deductions are predefined for Andhra Pradesh, Gujarat, Maharastra, Karnataka, Madhya Pradesh, Kerala, two corporations in Tamil Nadu (Chennai and Coimbatore) and Telangana. You can configure the tax slabs for other states by configuring the respective user tables.
Note: Professional Tax calculation frequency is six months for Tamil Nadu and Kerala.
See: Setting Up User Tables, Columns, and Rows, Oracle HRMS Configuring, Reporting, and System Administration Guide and Setting up Professional Tax Deduction
Employee Transfers
You can transfer employees from a PT organization to the other, in the same state or a different state. You must map the respective state level balances (if you are using state level balances), if the employee is transferred to a new state.
Provident Fund
Oracle HRMS for India supports the calculation and deduction of Provident Fund (PF) contributions for employees. Oracle HRMS supports provident calculation for both exempted and un-exempted PF trusts, however, excluded PF trusts can use the predefined Provident Fund elements.
Arrears are also taken into account for PF calculation. Oracle HRMS for India supports Voluntary Provident Fund (VPF) contribution. You can enter either the VPF contribution amount or the VPF contribution percentage. Oracle HRMS for India also supports the calculation of Employee Pension Scheme (EPS) contributions and Employee Deposit Linked Insurance (EDLI).
Employees can enter VPF information during tax declaration through self-service. They can also use the Web ADI functionality to make their updates.
See: Setting up Provident Fund
Employee Transfers
You can transfer employees from one PF Organization to the other, or within the same PF organization. If the transfer occurs within the same PF organization, the calculation of PF does not change.
If you transfer the employee to a different PF Organization:
-
Employee needs a new PF Membership code. You update the code in the Further Benefits Tab of the People form.
-
You store the summary of the following figures summation for each month (and the current pay period), beginning from the transfer date for the new PF organization:
-
Actual salary for PF
-
Employees Contribution
-
EPS Contribution
-
Employers PF Contribution
-
-
The above values are end dated from the transfer date, for the old PF organization.
Employee Deposit Linked Insurance (EDLI)
Oracle HRMS for India supports the calculation of EDLI, if the employer chooses to enable it. You can select if the PF organization supports EDLI in the PF Organization Information window.
See: Entering Provident Fund Information, Oracle HRMS Enterprise and Workforce Management Guide
Labor Welfare Fund (LWF)
Employer, employee, and government contribute a specific amount towards labor welfare fund. Some of the state governments deduct LWF from their employees working in the state. Employers can also choose to contribute the entire LWF contribution on employee's behalf. Employers must register with the state and have a tax registration number. LWF deductions differ for each state.
Oracle HRMS for India supports the following LWF calculations:
-
Checking employee eligibility (eligibility depends on the state in which the employee is working. Employers can assign exemptions to the employees)
-
Calculating employee's LWF deduction (deduction depends on the labor welfare fund rules for the state)
-
Checking for employee's exemption from LWF
Oracle HRMS enables you to calculate the LWF based on the frequency set at the business group level, and deducts the amount from the employee's salary at the end of the contribution period.
For terminated employees, employers can specify whether to compute the LWF calculation at the business group level, and deduct from the employee's salary at the end of the contribution period.
LWF deductions are predefined for Andhra Pradesh, Gujarat, Maharastra, Karnataka, Madhya Pradesh, Kerala, Tamil Nadu,. and Telangana.
Additional Information: The LWF contribution for Maharashtra depends on the employee's salary.
You can configure the frequency for other states by configuring the user table IN_LWF_CONTRIBUTION_AMOUNT. For rest of the states, you can use the configuration template to compute LWF deductions.
See: Setting Up User Tables, Columns, and Rows, Oracle HRMS Configuring, Reporting, and System Administration Guide and Setting up Labor Welfare Fund
Deductions under Section 80CCF
Employees contribute towards long-term infrastructure bonds and be eligible for tax exemptions under the Section 80CCF.
Oracle provides the element Deduction under Section 80CCF to record this amount.
Central Government Health Scheme (CGHS) under Section 80D
Government employees can make CGHS contributions and be eligible for tax exemptions under the Section 80D medical premium deduction exemption. Oracle provides the element Section 80D to record and process these contributions.
Deductions under Section 80EE
Employees can now record a new deduction under Section 80EE in respect of interest on loan taken for residential house property under Chapter VIA Deductions
You can use the predefined element Deduction under Section 80EE to record this information.
National Pension Scheme
Employees can now contribute to National Pension Scheme and be eligible for tax exemptions. To enable employees to record their contributions towards National Pension Scheme, Oracle enables users to record the NPS organization details and associate it with employees.
Employees can declare the amount or percent of contribution through employee self service. They must record the Permanent Retirement Account Number (PRAN) number which the employer uses to send while providing the employee subscriber list to the Point of Presence (POP).
Oracle provides a new element NPS Information for recording the NPS amount. The Investment Declaration page includes a new section 80 CCD(1B) for the contributions to the National Pension Scheme by an employee under corporate subscriber scheme. The contribution of a government employee is reflected under section 80 CCD (1).
Deductions under section VI A
Employees can make the following contributions and claim tax deductions under different sections:
-
Deduction in respect of life insurance premia, contributions to provident fund etc. under section 80C.
-
Deduction in respect of contribution to certain pension funds under section 80CCC.
-
Deduction in respect of employee contribution to certain pension schemes notified by the central government under section 80CCD (1).
-
Deductions in respect of amount paid/deposited to the pension schemes notified by the central government under section 80CCD (1B).
-
Deduction in respect of contribution by the employer to pension schemes notified by the central government under section 80CCD (2).
-
Deduction in respect of health insurance premia under section 80D.
-
Deduction in respect of medical treatment for disabled dependents under section 80DD.
-
Deduction in respect of medical treatment for specified diseases under section 80DDB.
-
Donations under Section 80G - Employee can record donation type and donation amount.
-
Deductions in respect of investments under section 80CCG.
-
Deductions in respect of investments under Section 80EEB.
-
Deduction in respect of interest on loan taken for higher education under section 80E.
-
Total Deduction in respect of donations to certain funds, charitable institutions, etc. under Deduction in respect of interest on loan taken for higher education under section 80E.
-
Deduction in respect of interest on deposits in savings account under section 80TTA.
Reimbursements Overview
Oracle Payroll enables you to pay reimbursements towards expenditure incurred due to professional or personal reasons to employees. You can also calculate the tax on those reimbursements.
You can set up and process various types of reimbursements in HRMS, such as:
-
Accommodation Maintenance
-
Aircraft Expense/Depreciation
-
Club Facilities Expenditure
-
Conference Expenditure
-
Conveyance Expenditure
-
Employees Welfare Expense
-
Entertainment Expenditure
-
Festival Celebrations
-
Free Ticket for Journey
-
Gifts Expenditure
-
Health Club Expenditure
-
Hospitality Expenditure
-
Hotel Expenditure
-
Motorcar Expense/Depreciation
-
Sales promotion Expenditure
-
Scholarships Expenditure
-
Telephone Expenditure
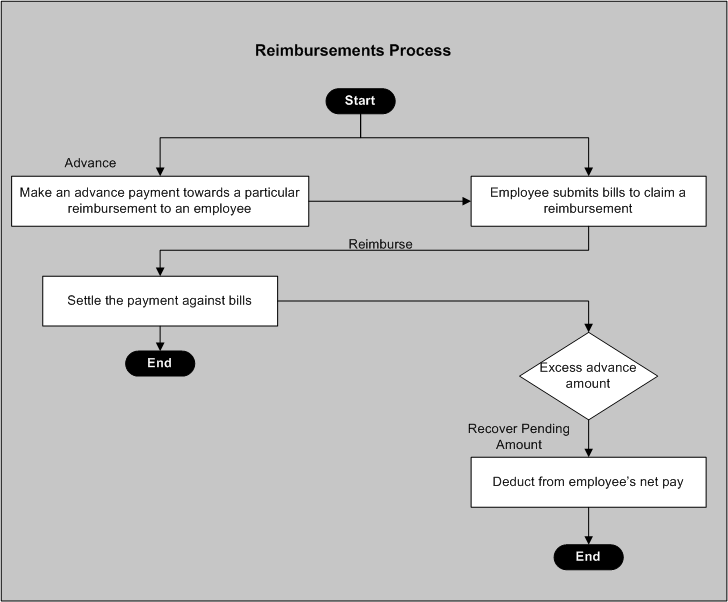
The Reimbursement Business Process
You can process reimbursements by paying an advance to an employee towards expenses, and claiming the amount as reimbursements, or settle the claim based on bills. You can recover the excess advance amount by deducting it from the payment and pay the balance as a reimbursement. For reimbursements that are pending, you can adjust the excess advance amount by deducting it from the employee's net pay.
After you have calculated the reimbursement amount, you can pay the employee by running it in the current month's payroll, add the amount to the employee's net pay and tax the excess amount.
-
You must process all reimbursements as fringe benefits elements except leave travel concession (LTC). You must process LTC reimbursements as Earnings element.
-
You must process medical claims under Employees Welfare Expense category.
Reimbursements Processing
The following figure summarizes the flow of tasks associated with processing reimbursements.
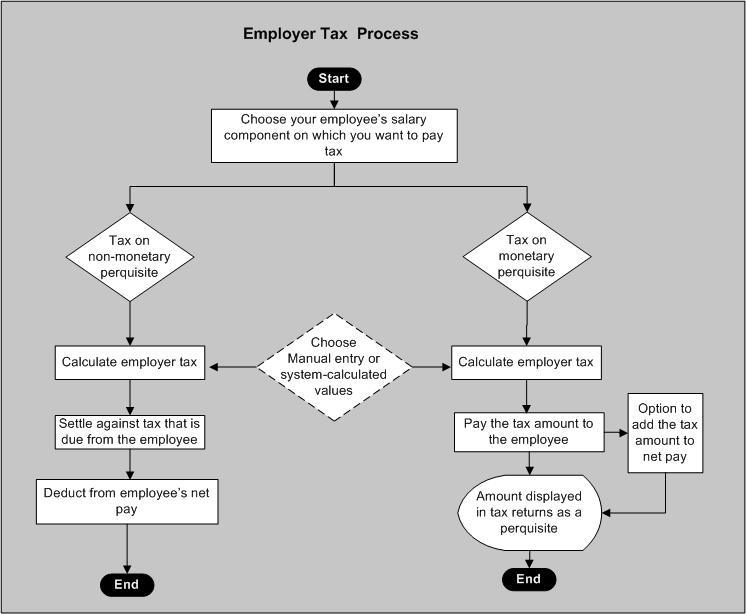
Employer Paid Tax Overview
Oracle HRMS enables you to pay tax on specific salary components of your employee. Using this functionality, you can calculate the average tax rate and use this rate to calculate the tax on the following:
-
Non-monetary perquisites
-
Monetary perquisites
-
Any other income other than perquisites such as earnings
If you are paying tax on your employee's non-monetary perquisite, the tax amount is not a part of an employee's salary according to the tax rules. The application automatically deducts the tax amount from the employee's income tax for that particular payroll.
If you are paying tax on your employee's monetary perquisite or other Earnings other than non-monetary perquisites, the tax amount is again a monetary perquisite according to the tax rules. You must include the tax amount in the income tax calculations.
You can choose to calculate the employer tax by using the default system-calculated values or by manual entry. If you choose to calculate tax manually, the manual entry will overwrite the system calculated values.
Important: You can pay tax on your employee's salary component, on or after 1st April 2006.
Employer Paid Tax : The Business Process
After you have decided to pay tax on behalf of your employee, check for any other employer taxable salary components other than perquisites. Choose between manual entry and the default system calculated values. If you are paying tax on non-monetary perquisites, calculate the employer tax and adjust it against the tax that is due from the employee. If you are paying tax on a monetary perquisite, the employee's income tax returns will display this amount as a perquisite. If the employer tax amount is a perquisite, an employee can choose to add it to net pay.
The following figure summarizes the tasks associated with processing employer paid tax.
Employer Paid Tax Process
Setting up Income Tax Deductions
Before you can set up your income tax, you must create your GRE/Legal entity organization and link it to your employee at the assignment level. The application calculates income tax based on the employee's tax declaration and estimated annual income, and distributes the deduction equally across the remaining pay period of that tax year.
See: Tax Declaration (India), Oracle HRMS Configuring, Reporting, and System Administration Guide
The Taxation Information element triggers a formula which determines the tax that is applicable for the employee and respective deductions.
To set up income tax deductions for your employee
-
Define your earnings elements and select relevant balances.
Define your regular earnings element with the input values Pay Value and Standard Value
See: Defining an Element, Oracle HRMS Compensation and Benefits Management Guide, See: Predefined Elements, Oracle HRMS Compensation and Benefits Management Guide, and Survey of the Classifications, Oracle HRMS Compensation and Benefits Management Guide.
-
Attach the standard value input value of your regular earnings element to the balance Earnings for Projection.
-
Define your allowance and perquisites elements using element template wizard.
-
Create a standard link for the information elements Income Tax Information, Income Information, and Deduction Information and link to all payrolls.
See: Defining Element Links, Oracle HRMS Compensation and Benefits Management Guide
-
In the Element Entries window, create the requirement element entries for the employee.
See: Making Manual Element Entries, Oracle HRMS Compensation and Benefits Management Guide
Setting up Regular Earnings
Oracle HRMS for India calculates income tax and deductions based on regular earnings. Oracle HRMS recommends you create your earnings elements using the Element Design Wizard (EDW). However, if you have existing elements created previously in the Element window, you can continue to use them.
Note: For taxation purpose, Oracle HRMS enables you to setup and process Leave Travel Concession under the classification Regular Earnings.
To set up Regular Earnings element using the Element Design Wizard
-
Create an earnings element using the EDW.
-
Select the primary classification as Earnings.
-
Specify if the earnings is recurring or non recurring.
Note: You must create LTC earnings element as non recurring.
-
For LTC, you can set the Enable Advances flag to Yes if you want to process advance payments.
Note: If you set the Enable Advances flag to Yes, the system creates the following user defined elements:
-
<USER_NAME> Advance: Element to record the advance payment against LTC.
-
<USER_NAME> Recovery: Element to recover pending advance payments.
-
<USER_NAME> Adjust: Element to adjust the advance payment.
The application creates the user defined formula <USER_NAME>_LTC_ADV_CALC, and links it to the Advance element for processing advances.
-
-
Specify the calculation rule by selecting earnings for regular earnings or leave travel concession for LTC earnings.
-
Set the values to No for recurring statutory earnings to create the following corresponding balance feeds:
-
Net Pay
-
Earnings
-
Earnings For Projection
Set the values to Yes for recurring statutory earnings to create the following corresponding balance feeds:
-
ESI Eligible Salary (Standard Value - SV)
-
ESI Computation Salary (Projected Value - PV)
-
PF Computation Salary (PV)
-
PF Computation Standard Salary (SV)
-
Professional Tax Salary (PV)
-
Salary for HRA and related Exemptions (PV)
-
Standard Salary for HRA and Related Exemptions (SV)
-
Salary for Company Accommodation (PV)
-
Standard Salary for Company Accommodation (SV)
-
Salary for Notice Period (SV)
-
Salary for Leave Encashment (SV)
-
Gratuity Eligible Salary (SV)
-
Earnings for Projection (SV)
Set the values to Yes for non recurring statutory earnings to create the following corresponding balance feeds:
-
ESI Computation Salary (PV)
-
PF Computation Salary (PV)
-
Professional Tax Salary (PV)
-
Salary for HRA and Related Exemptions (PV)
-
Salary for Company Accommodation (PV)
Set the values to No for non recurring statutory earnings to create the following corresponding balance feeds:
-
Net Pay
-
Earnings
Create an LTC element with Enable Advances flag set to Yes to create the following corresponding balance feeds:
-
Bills Submitted
-
Employer Contribution for LTC
-
Salary under Section 17
-
Adjusted Advance for Earnings
-
Outstanding Advance for Earnings
-
Earnings
-
Net Pay
Create an LTC element with Enable Advances flag set to No to create the following corresponding balance feeds:
-
Bills Submitted
-
Employer Contribution for LTC
-
Salary under Section 17
-
Earnings
-
Net Pay
Note: You can configure the Add to Net Pay input value in the Advance element, to ensure the advance is added to the net pay and project the advance in the payslip. If you do not want to project the advance in the payslip do not configure the Add to Net Pay input value. This way, you can ensure that the advance is outside the payroll, at the same time, it is still considered in the particular payroll.
-
-
Link the element to the employee.
To set up Regular Earnings using the Element Window
-
In the Element window, create an element for your regular earnings and map it to the primary classification Earnings.
You must define your regular earnings element with the following input values:
-
Pay Value: Holds the actual value of the earnings element.
-
Standard Value: Holds the value to be projected for the earnings element, for the remaining payroll periods of the year.
-
-
Attach the input value Standard Value of the element to the balance Earnings for Projection.
-
To calculate house rent allowance exemption of the employee, feed the following earnings element's input values to the respective balances:
-
Pay Value - feed to the balance Salary for HRA and Related Exemptions
-
Standard Value - feed to the balance Standard salary for HRA and related exemptions
-
-
Attach the element to the employee's assignment.
See: Entering Additional Assignment Details (Assignment Window), Oracle HRMS Workforce Sourcing, Deployment, and Talent Management Guide (India)
Setting up Direct Payments
Oracle HRMS for India uses the element classification Direct Payments to support the calculation of any ad hoc earnings such as taxable reimbursements.
To set up Direct Payments
-
In the Element window, create an element for your direct payments elements and map it to the primary classification Direct Payments.
You must create an input value TDS on Direct Payments, to record the tax deducted at source for the direct payment.
-
Attach the input values of the element to the respective balance:
Input Value Balance Pay Value Direct payments TDS TDS on Direct payments -
Attach the element to the employee's assignment.
See: Entering Additional Assignment Details (Assignment Window), Oracle HRMS Workforce Sourcing, Deployment, and Talent Management Guide (India)
Setting up Bonuses
You can process bonus both as a part of the regular payroll or as a separate payroll run. Oracle HRMS distributes the tax on bonus across the remaining pay periods, if the bonus is run as a part of the regular payroll.
Oracle HRMS enables you to pay employer paid tax on bonus and other standard earnings. See: To set up Employer Paid tax on Bonus and Other Standard Earnings
The following additional steps are required to run bonuses as a separate payroll run.
To set up separate bonus payroll run
-
In the Element window, create an element for bonus with the following input values:
-
Pay Value
-
Bonus Amount
From the Advanced tab, select the Process Separate check box.
See: Defining an Element, Oracle HRMS Compensation and Benefits Management Guide.
-
-
In the Extra Element Information window, select Bonus Tax Information.
-
In the Extra Element Information window, select the tax type for the bonus element:
-
Fixed percentage - to calculate tax based on the percentage entered in the TDS Percentage field.
-
Lump Sum Deduction - to calculate tax based on projected earnings and bonus. The application then deducts the tax as a lump sum amount.
-
Distributed Over Pay periods - to calculate tax based on projected earnings and bonus. The application then distributes the tax over the remaining pay periods.
-
-
Save the element and close the window.
-
In the Formula Result Rules window, attach the formula IN_BONUS_XFER to the bonus element, and attach formula results to the bonus element as given below:
Formula Result Element Input Value Bonus Bonus element (as defined) Pay Value Bonus_amount Bonus Separate Information Bonus Amount Tax_Percentage Bonus Separate Information TDS Percentage TDS_Type Bonus Separate Information TDS Type See: Defining Formula Processing and Result Rules, Oracle HRMS Compensation and Benefits Management Guide
To set up Employer Paid Tax on Bonus and Other Standard Earnings
Follow these steps to process employer paid tax on bonus and other standard earnings using the Payroll Run Type 'Process Separate':
-
Follow steps 1, 2 and 3 described above, and then do the following to pay employer tax on the bonus payment.
-
On the Advance tab, select the Gross Up check box to define an element for net-to-gross calculation, and the Iterative Engine check box to calculate the net pay. Enter the formula DEFAULT_GROSSUP in the Iterative Formula field in the Advance Tab
-
Choose Input Values to define Input Values for the element, and specify the unit as Money:
Input Value Name Required User Enterable Default Unit Pay Value N N Money Bonus Amount N Y Money Additional Amount N N Money Amount N Y Money Remainder N N Money Low Gross N N Money High Gross N N Money Method N N INTERPOLATION Character To Within N N 1 Money See:Defining an Element's Input Values, Oracle HRMS Compensation and Benefits Management Guide
-
Choose the Iterative Rules button to specify how to use the following rules:
Return Name Type Input Values Additional Amount Adjust Additional Amount High_Gross Adjust High Gross Low_Gross Adjust Low Gross Remainder Adjust Remainder Stopper Stop Target_Amount Adjust Amount -
Create the following balance feed:
Balance Name Element Name Input Value Add/Subtract ER Tax on Bonus Monetary Perquisite User Defined Additional Amount Add ER Taxable Earnings User Defined Pay Value Add -
Query for the bonus element in the Formula results window, and set the Name as Standard and Formula as IN_BONUS_XFER.
-
Define the following Formula Results:
Name Type Element Input Value Additional_Amount Indirect result Employer Tax on Bonus Pay Value Bonus Direct Result Pay Value Bonus_Amount Indirect Result Bonus Separate Information Bonus Amount Tax_Percentage Indirect Result Bonus Separate Information TDS Percent TDS_TYPE Indirect Result Bonus Separate Information TDS Type COMPONENT_NAME Indirect Result Employer Tax on Bonus Component Name -
Save the Formula Result Rules information.
-
Create links for the bonus element and attach the element to an assignment. See Defining Element Links, Oracle HRMS Compensation and Benefits Management Guide
-
Run the Payroll.
Setting up Allowances
You can set up the following allowances through the Element Design Wizard:
-
Fixed Allowances: Holds allowances that you can claim for a fixed exemption amount. You can create the following templates under fixed allowances:
-
Children Education Allowance: holds the allowance paid for children education.
-
Hostel Expenditure Allowance: holds the allowance paid for hostel expenditure.
-
Transport Allowance: holds the allowance paid for transport
The nature of Fixed allowances can be recurring or non recurring. However, the default in the system is recurring.
-
-
Actual Expense Allowance: Holds allowances that you can claim based on submission of bills. You can create the following templates under actual expense allowances:
-
Border Area Allowance
-
Compensatory Field Allowance
-
Conveyance Allowance
-
Entertainment Allowance
-
Helper Allowance
-
High Altitude Allowance
-
Highly Active Field Allowance
-
Island Duty Allowance
-
Research Allowance
-
House Rental Allowance
-
Special Compensatory Allowance
-
Transfer Allowance
-
Travel Allowance
-
Tribal Area Allowance
-
Underground Allowance
-
Uniform Allowance
-
Actual Expense allowances can be recurring, non recurring, and also have scenarios where the allowance is recurring but the expense is non recurring in nature such as:.
-
Non Recurring Allowance: A one time expense that an employee claims by submitting bills such as a travel kit for overseas travel.
-
Recurring Allowance and Expense: Continuous expense that an employee claims, such as conveyance and helper allowance. In such circumstances, the allowance and expense are both recurring.
-
Recurring Allowance, Non recurring Expense: In this scenario, the allowance is recurring but the expense is non recurring, such as uniform expense and shoe expense. For example, monthly allowance is given for uniform and shoes but you may not purchase these items every month
To set up Allowances
-
Create an Allowance Element using the EDW.
-
Select the primary classification as allowance.
-
Specify the calculation rule depending on the nature of allowance you are creating. Example, for Fixed Allowance, choose a rule within this type and for Actual Expense Allowance, choose a rule within this type. Specify if the allowance is recurring or non recurring.
-
Set the Enable Advances flag to yes if you are paying an advance. Advance elements are automatically created.
Note: If you set the Enable Advances flag to Yes, the application creates the following user defined elements:
-
<USER_NAME> Advance: Element to record the advance payment against the allowance.
-
<USER_NAME> Recovery: Element to recover pending advance payments.
-
<USER_NAME> Adjust: Element to adjust the advance payment.
-
-
Link the element to the employee.
Note: The predefined formula creates the following user defined formulas based on the entries you make to process the allowance:
-
Fixed Allowance: <USER_NAME>_FIXED_CALC
-
Actual Expense Allowances: <USER_NAME>_ACTEXP_CALC
-
Setting up Perquisites
Oracle HRMS enables you to create perquisite elements through the Element Design Wizard (EDW). You can also set up employer paid tax on perquisites.
You can create the following perquisite elements through the Element Design Wizard:
Note: Create the Perquisites elements with an effective date as 01-APR-2006.
-
Company Accommodation
-
Loan at Concessional Rate
-
Company Movable Assets
-
Transfer of Company Assets
-
Free Education
-
Other Perquisites. Predefined other perquisites are:
-
Domestic Servant
-
Gas/Water/Electricity
-
Shares
-
The wizard creates the input values, balance feeds, processing rules, formula results, and Further Element Entry DFF for the element, according to the options you choose in the element templates.
Note: Only Government Employees must enter the government license fee amount for accommodation as the Rent Paid by Employer input value of the Company Accommodation element.
You can enter an employee's perquisite details in the respective element's input values. The following table lists the input values in each of the perquisite elements:
| Element | Input Value | Description |
| Company Accommodation | Pay Value | Holds the perquisite value. |
| Benefit Start Date | Holds the start date for the company accommodation perquisite. | |
| Benefit End Date | Holds the end date for the perquisite.
Note: You must end date the Company Accommodation Perquisite, by entering the Benefit End Date. This ensures calculating the perquisite value correctly.. |
|
| Place | Holds the population of the city where company accommodation is provided. | |
| Property | Holds the property details. | |
| Cost of Furniture Owned | Holds the cost of the furniture provided by the employer. | |
| Rent of Furniture Leased | Holds the monthly rental value of the leased furniture. | |
| Rent Paid by Employer | Holds the rent paid by the employer towards the accommodation. | |
| Employee Contribution | Holds employee's contribution towards the company accommodation. | |
| Projected Taxable Value | Holds the projected taxable value of the perquisite for the remaining months in the financial year. | |
| Flat Reference No | Details of the accommodation | |
| Furniture Perquisite | Calculated value of the furniture perquisite. | |
| Monthly Cost of Furniture | Holds the monthly cost of the furniture | |
| Employer Contribution | Amount reimbursed by employer. | |
| Loan at Concessional Rate | Pay Value | Holds value of the perquisite. |
| Loan Number | Holds a unique loan number. | |
| Loan Type | Holds the loan type - Housing, Car, Education or Personal. | |
| Loan Principal Amount | The amount of loan taken. | |
| Monthly Installment | Holds the employee's monthly installment. | |
| Loan Duration in Months | Holds the duration for which the loan was taken. | |
| Concessional Interest rate | Holds the interest rate at which employee was given loan. | |
| Taxable Flag | Holds yes if the calculated aggregate principal amount for a tax year exceeds Rs. 20, 000. | |
| Outstanding Balance | Holds the calculated outstanding balance. | |
| Principal Amount Balance | Holds the calculated outstanding loan principal amount. | |
| Projected Taxable Value | Holds the projected taxable value of the perquisite for the remaining months in the financial year. | |
| Company Movable Assets | Pay Value | Holds the perquisite value. |
| Benefit Start Date | Holds the perquisite's beginning date. | |
| Benefit End Date | Holds the perquisite's end date. | |
| Asset Category | Holds the asset's category - Laptop/Computer or Mobile. | |
| Asset Description | Holds the asset details. | |
| Usage | Holds if the asset is owned or hired for temporary use. | |
| Original Cost or Rental | Holds the actual cost of the asset. | |
| Date of Purchase | Holds the purchase date of the asset. | |
| Employee Contribution | Holds employee's contribution towards the benefit. | |
| Projected Taxable Value | Holds the calculated projected taxable value spread across the remaining months in the current financial year. | |
| Transfer of Company Assets | Pay Value | Holds the value of the perquisite. |
| Asset Category | Holds if the asset is Laptop/Computer/Electronic Items, Motor Car or other asset. | |
| Asset Description | Holds the asset details. | |
| Original Cost | Holds the original cost of the asset. | |
| Date of Purchase | Holds the asset's date of purchase. | |
| Employee Contribution | Holds the employee's contribution. | |
| Free Education | Pay Value | Holds the perquisite value for the current month. |
| Relationship | Holds the relation availing free education - Child or Others. | |
| Benefit Start Date | Holds the start date of the perquisite. | |
| Benefit End Date | Holds the end date of the perquisite. | |
| Cost to Employer | Holds the employer's monthly contribution towards free education. | |
| Employee Contribution | Holds the employee's monthly contribution towards free education. | |
| Projected Taxable Value | Holds the projected taxable value of the perquisite for the remaining months in the financial year. | |
| Other Perquisites | Pay Value | Holds the perquisite value for the current month. |
| Cost to Employer | Holds the cost incurred by employer towards the perquisite. | |
| Employee Contribution | Holds the employee's contribution towards the perquisite. | |
| Projected Taxable Value | Holds the projected taxable value of the perquisite for the remaining months in the financial year. | |
| Component Name | Holds the other perquisite name. |
You can create additional perquisites by defining a new table value in the IN_PERQUISITES user table.
See: Setting Up User Tables, Columns and Rows , Oracle HRMS Configuring, Reporting, and System Administration Guide
and Entering Table Values, Oracle HRMS Configuring, Reporting, and System Administration Guide
Note: For Other Perquisites, you must select the perquisite type in the Element Design Wizard.
You can process perquisites in the application for income tax only when you define them as given below.
To set up Perquisites
-
Create a perquisite element using the EDW.
-
Attach the element to the employee's assignment.
See:Entering Additional Assignment Details (Assignment Window), Oracle HRMS Workforce Sourcing, Deployment, and Talent Management Guide (India)
-
To process employer paid tax against this perquisite, set the Employer Paid Tax flag to Yes, and link the Employer Tax Iterations element to the assignment to calculate the employer paid tax amount. For more information on the Iterative Engine, see: Setting Up Elements for Net-to-Gross Processing, Oracle HRMS Compensation and Benefits Management Guide .
Note: You can link the employer paid tax element to override the employer tax values.
-
Run the Payroll using the Run Type 'Employer Tax Run'.
Setting Up Employee State Insurance
Oracle HRMS calculates employee's eligibility for ESI and employee's ESI contribution. You must create a ESI organization and attach to your employee's assignment, before you can set up the ESI deduction for your employees.
See: Entering ESI Organization Information, Oracle HRMS Enterprise and Workforce Management Guide, Creating an Organization, Oracle HRMS Enterprise and Workforce Management Guide, and Entering Additional Assignment Details (Assignment Window), Oracle HRMS Workforce Sourcing, Deployment, and Talent Management Guide
Oracle Payroll calculates the contributions, if the employee is eligible, and stores them in the elements Employee ESI Contribution and Employer ESI Contribution.
To set up ESI for your employee
-
Enter employee's ESI number in the ESI Number field, of the Further Benefits tab in the People window.
See: Entering Additional Personal Information (People Window), Oracle HRMS Workforce Sourcing, Deployment, and Talent Management Guide, (India)
-
Attach your ESI organization to the employee's assignment.
-
Attach the ESI Information element to the employee assignment. The element initiates a formula to check the eligibility of the employee.
-
Map the earnings elements used for ESI calculations to the balances:
-
ESI Eligible Salary: Attach the elements that are used to calculate the employee's eligibility for ESI.
-
ESI Computation Salary: Attach the elements that are used to calculate employee ESI contribution.
-
-
Optionally, if the employee is exempt from ESI, select Reason for Exemption in the ESI information element.
See: Making Manual Element Entries, Oracle HRMS Compensation and Benefits Management Guide
Setting up Professional Tax Deduction
You can set up professional tax deductions for both predefined states and any user-defined jurisdiction.
To set up Professional Tax deduction predefined states
-
Employers must register with the state government and have a Professional Tax Registration number, before setting up Professional Tax deductions for employees. You must create your Professional Tax Organization, select the state for it, and enter the registration number of the organization.
See: Entering Professional Tax Information, Oracle HRMS Enterprise and Workforce Management Guide
-
Enter the details of your organization's representative.
See: Entering Representative Details, Oracle HRMS Enterprise and Workforce Management Guide
-
If required, enter the information for exemption from professional tax at the Business Group level.
See: Entering Professional Tax Exemptions Information, Oracle HRMS Enterprise and Workforce Management Guide
-
Enter the details of the challan through which the professional tax is submitted for the employee.
See: Entering Professional Tax Challan Information, Oracle HRMS Enterprise and Workforce Management Guide
-
Select the frequency to calculate professional tax in the Professional Tax Frequencies window at the Business Group level.
See: Entering Professional Tax Frequencies., Oracle HRMS Enterprise and Workforce Management Guide
-
You must select if you would like to use state level balances at the Business Group level.
See: Entering Statutory Setup Information, Oracle HRMS Enterprise and Workforce Management Guide
If you are using state level balances, Professional Tax Information element feeds to the balance for the state. E.g. For Professional Tax organization in Karnataka, the element feeds the balance Professional Tax Salary for KA. If you are not using state level balances, Professional Tax Information element feeds the balance Professional Tax Salary.
The application provides predefined tables for professional tax rates. The format for the tables is India Professional Tax for XX, where XX is the state code. The following table lists out the user tables for each state:
States and respective User Tables State User Table Andaman & Nicobar Islands Professional Tax Salary for AN Andhra Pradesh Professional Tax Salary for AP Arunachal Pradesh Professional Tax Salary for AR Assam Professional Tax Salary for AS Bihar Professional Tax Salary for BR Chhattisgarh Professional Tax Salary for CG Chandigarh Professional Tax Salary for CH Daman and Diu Professional Tax Salary for DD Delhi Professional Tax Salary for DL Dadra and Nagar Haveli Professional Tax Salary for DN Goa Professional Tax Salary for GA Gujarat Professional Tax Salary for GJ Himachal Pradesh Professional Tax Salary for HP Haryana Professional Tax Salary for HR Jharkhand Professional Tax Salary for JH Jammu and Kashmir Professional Tax Salary for JK Karnataka Professional Tax Salary for KA Kerala Professional Tax Salary for KL Ladakh Professional Tax Salary for LA Lakshadweep Professional Tax Salary for LD Maharashtra Professional Tax Salary for MH Meghalaya Professional Tax Salary for ML Manipur Professional Tax Salary for MN Madhya Pradesh Professional Tax Salary for MP Mizoram Professional Tax Salary for MZ Nagaland Professional Tax Salary for NL Orissa Professional Tax Salary for OR Punjab Professional Tax Salary for PB Pondicherry Professional Tax Salary for PY Rajasthan Professional Tax Salary for RJ Sikkim Professional Tax Salary for SK Tamil Nadu Professional Tax Salary for TN Telangana Professional Tax Salary for TG Tripura Professional Tax Salary for TR Uttaranchal Professional Tax Salary for UA Uttar Pradesh Professional Tax Salary for UP West Bengal Professional Tax Salary for WB -
Set up the elements related to professional tax calculation.
See: Defining an Element, Oracle HRMS Compensation and Benefits Management Guide
-
Attach the Professional Tax Information element to the employee assignment.
See: Entering Additional Assignment Details (Assignment Window), Oracle HRMS Workforce Sourcing, Deployment, and Talent Management Guide
On processing the payroll, the element initiates a formula that checks the eligibility of the employee, and subsequently calculates the Professional Tax deduction for the employee.
See: Predefined Elements, Oracle HRMS Compensation and Benefits Management Guide and Survey of the Classifications, Oracle HRMS Compensation and Benefits Management Guide.
Additional Information: If you have received any reimbursements from the PT authorities, you must use the Professional Tax Adjustment Element and make any adjustments only after you process the payrolls for that frequency (for example, half-yearly frequency).
-
Optionally, if the employee is exempt from professional tax, select Exemption Reason in the Professional Tax information element.
See: Making Manual Element Entries, Oracle HRMS Compensation and Benefits Management Guide
To set up professional tax declaration for user-defined jurisdiction
-
Create a new state code with description for the jurisdiction in the IN_PT_STATES lookup. When entering the code for your jurisdiction, start the code with the code of the state in which the jurisdiction exists.
For example, to define Madhurai corporation in Tamil Nadu, you can use TMNC as the code for the jurisdiction and provide description as Tamil Nadu Madhurai corporation.
See: Adding Lookup Types and Values, Oracle Configuring, Reporting, and System Administration Guide
-
Create a user table with the name India Professional Tax Rate for XX where XX is the jurisdiction code, and then define tax rates in the table.
See: Setting Up User Tables, Columns, and Rows, Oracle HRMS Configuring, Reporting, and System Administration Guide and Entering Table Values, Oracle HRMS Configuring, Reporting, and System Administration Guide
-
Create a balance Professional Tax Salary for XX, where XX is the jurisdiction code, and attach dimensions to it.
See: Balances in Payroll, Oracle Compensation and Benefits Management Guide and Defining User Balances, Oracle Compensation and Benefits Management Guide
-
Feed the balance with the pay value of the earnings element.
-
Define the frequency for deducting professional tax for the jurisdiction at the Business Group level.
See: Entering Professional Tax Frequencies Information, Oracle HRMS Enterprise and Workforce Management Guide
-
Enable state-level usage at the Business Group level.
See: Entering Statutory Setup Information, Oracle HRMS Enterprise and Workforce Management Guide
-
Set up the elements related to professional tax calculation.
See: Defining an Element, Oracle HRMS Compensation and Benefits Management Guide
-
Create an organization with Professional Tax Organization classification and enter state as XX where XX is the code for your jurisdiction.
See: Entering Professional Tax Information, Oracle HRMS Enterprise and Workforce Management Guide
-
Attach the organization to all those assignments that exist for the user-defined jurisdiction.
See: Entering Additional Assignment Details (Assignment Window), Oracle HRMS Workforce Sourcing, Deployment, and Talent Management Guide
Setting Up Provident Fund
Oracle HRMS for India supports the calculation and deduction of provident fund from employee's salary. You must create your Provident Fund organization and enter your PF trust information in the Provident Fund Information window at the organization level.
See: Entering Provident Fund Information, Oracle HRMS Enterprise and Workforce Management Guide
You must feed the Earnings Element to the PF Computation Salary Balance and the PF Computation Standard Salary Balance
To set up Provident Fund for your employer
-
Record employer PF Details such as base number and establishment code for a Factory or Establishment or Registered Company.
See: Entering Provident Fund Information, Oracle HRMS Enterprise and Workforce Management Guide
-
Record the employer representative information who liases with the PF authorities to submit returns.
See: Entering Representative Information, Oracle HRMS Enterprise and Workforce Management Guide
-
Record the external consultant information if your organization engages an external consultant to file PF monthly returns.
See: Entering PF Filer Information, Oracle HRMS Enterprise and Workforce Management Guide
-
Record challan details after you submit your regular monthly contribution, administrative / inspection charges in designated bank branches at the end of every month. Record the Interest Under Section 7Q, Damages Under Section 14B, and Miscellaneous Payments details, if required.
See: Entering PF Bank Details, Oracle HRMS Enterprise and Workforce Management Guide
See: Entering PF Challan Information, Oracle HRMS Enterprise and Workforce Management Guide
See: Entering the PF Challan for 14B Information, Oracle HRMS Enterprise and Workforce Management Guide
See: Entering the PF Challan for 7Q Information, Oracle HRMS Enterprise and Workforce Management Guide
See: Entering the PF Challan for Miscellaneous Payments Information, Oracle HRMS Enterprise and Workforce Management Guide
-
Record the return submission details within the PF Receipt Mapping window for the registered company.
See: Entering PF Receipt Mapping, Oracle HRMS Enterprise and Workforce Management Guide
To set up Provident Fund for your employee
-
In the Further Benefits Information tab of the People Window, enter the employee's NSSN and Provident Fund Number.
See: Entering Additional Personal Information (People Window), Oracle HRMS Workforce Sourcing, Deployment, and Talent Management Guide
-
Attach your Provident Fund Organization to the employee's assignment.
See: Entering Additional Assignment Details (Assignment Window), Oracle HRMS Workforce Sourcing, Deployment, and Talent Management Guide
-
Attach the PF Information element to the employee assignment.
Oracle Payroll creates the following elements entries during the payroll run for the employee:
-
Employee Statutory PF Contribution - In the classification Involuntary Deduction and feeds the balance Employee Statutory PF Contribution.
-
Employee Voluntary PF Contribution - In the classification Voluntary Deduction and feeds the balance Employee Voluntary PF Deduction
-
Employer PF Contribution - In the classification Employer Charges and fed to balance Employer PF Contribution.
-
EPS Contribution - In the classification Employer Charges and fed to balance EPS Contribution.
-
EDLI Contribution - In the classification Employer Charges and fed to the balance EDLI Contribution.
-
-
Map the PF Computation Salary Balance to the Earnings Element and the PF Computation Standard Salary Balance to Earnings element. The pay value of the Earnings element feeds the PF Computation Salary Balance and the standard value of the Earnings element feeds the PF Computation Standard Salary Balance.
-
Optionally, you can enter the employee's Voluntary PF percentage or Voluntary PF amount in the Voluntary PF Amount or Voluntary PF Percent input values of the PF Information Element.
See: Making Manual Element Entries, Oracle HRMS Compensation and Benefits Management Guide
Note: If you enter both voluntary PF amount and voluntary PF percent, the amount overrides the percentage.
-
Record the employee's leaving reasons for display on the PF monthly Print and e-File returns.
Ending Employment, Oracle HRMS Workforce Sourcing, Deployment, and Talent Management Guide
On processing payroll, the application deducts employee, employer PF, and pension contribution for all eligible employees. Employers can then generate print and e-files to enable them to submit their returns to the PF department.
Setting Up Fringe Benefits
Oracle HRMS enables you to create the following categories of Fringe Benefits through the Element Design Wizard (EDW):
-
Accommodation Maintenance
-
Aircraft Expense/Depreciation
-
Club Facilities Expenditure
-
Conference Expenditure
-
Conveyance Expenditure
-
Employees Welfare Expense
-
Entertainment Expenditure
-
Festival Celebrations
-
Free Ticket for Journey
-
Gifts Expenditure
-
Health Club Expenditure
-
Hospitality Expenditure
-
Hotel Expenditure
-
Motorcar Expense/Depreciation
-
Sales promotion Expenditure
-
Scholarships Expenditure
-
Shares
-
Super Annuation Fund
-
Telephone Expenditure
To set up Fringe Benefits through Element Design Wizard
-
Create a Fringe Benefit element.
-
Select the classification as Fringe Benefits.
-
Specify the calculation rule.
-
Choose the category.
-
Set the Enable Advance flag to YES, if you are paying an advance.
-
Set the Is Medical flag to YES if you are claiming medical bills.
Note: You can process Medical Bills under the category Employees Welfare Expense.
-
Link the element to the employee.
To set up Fringe Benefits on Superannuation Fund
-
Create an element for Superannuation Fringe Benefit using the Element Design Wizard.
Note: Do not use the existing elements if you want Fringe Benefit Tax to work on Superannuation.
-
Select primary classification as Fringe Benefit.
-
Specify the category as Superannuation.
-
The Element Design Wizard automatically creates two sets of elements.
For example, if you create an element with the name Element A, then the application creates two elements - Element A and Element A Taxable Value.
-
Element A - holds the Benefit Value up to the maximum amount of Rs 1 lac.
-
Element A Taxable Value - holds the Benefit Value, if the Benefit Value is greater than the maximum amount (Rs 1 lac). The application transfers and adjusts the balance of Element A to feed Element A Taxable Value.
-
-
Map the two elements to two different cost heads. Employers derive the Fringe Benefit Tax on Superannuation by mapping the Element A Taxable Value to the cost head.
-
The application calculates the sum of both accounts as Benefit Amount for the Superannuation.
Setting Up Medical Expenses
Oracle HRMS enables employers to process the medical expenses for employees and their dependants to pay medical expenses as reimbursements. Employees can record and submit medical expenses for employees and their dependents using self-service. See: Medical Expenses (India), Oracle HRMS Configuring, Reporting, and System Administration Guide
You must perform the following steps to process the medical expenses:
To set up medical expenses information
-
Create the Medical Benefit Element using the Element Design Wizard.
-
Link the element to the employee.
See:Defining Element Links, Oracle HRMS Compensation and Benefits Management Guide
-
Enter the element details using the Benefit Element Details window.
See: Entering Benefit Element Details, Oracle HRMS Enterprise and Workforce Management Guide
-
Run the payroll.
Setting Up LTC Expenses
Oracle HRMS for India enables you to process leave travel concession expenses for employees and their dependents at any time during the financial year. Employees are eligible for a tax exemption on their leave travel expenses.
Employees can record and submit leave travel expenses for employees and their dependents using the self-service module.
See: Leave Travel Concession Expenses (India), Oracle HRMS Configuring, Reporting, and System Administration Guide
To process the leave travel concession expenses, perform the following steps:
To set up LTC expenses information
-
Use the predefined modes of travel using the lookup IN_TRAVEL_MODE_CLASS. If you want to add your own user-defined mode of travel use the Application Utilities Lookups window to enter additional values for these Lookup types.
See: User and Extensible Lookups, Oracle HRMS Configuring, Reporting, and System Administration Guide
and Adding Lookup Types and Values, Oracle HRMS Configuring, Reporting, and System Administration Guide
-
Use the Element Design Wizard to create the LTC element with the classification as Earnings and LTC calculation rule, effective from 01 April 2007.
See: Defining an Element, Oracle HRMS Compensation and Benefits Management Guide, Predefined Elements, Oracle HRMS Compensation and Benefits Management Guide, Survey of the Classifications, Oracle HRMS Compensation and Benefits Management Guide, and Setting Up Regular Earnings
-
Link the LTC element to payroll.
See:Defining Element Links, Oracle HRMS Compensation and Benefits Management Guide
-
Enter the LTC element within the Benefit Element Details window at the business group level.
See: Entering Benefit Element Details, Oracle HRMS Enterprise and Workforce Management Guide
-
Before you run the payroll, specify if the employee has availed exemption for LTC during previous employment.
See: Entering Previous Employment Details, Oracle HRMS Workforce Sourcing, Deployment, and Talent Management Guide
-
Run the payroll.
Setting up Scanned Signature for Form 16
If you plan to use the Scanned Signature in Form 16 and Form 12BA, then complete the following steps:
To display Scanned Signature in Form 16 and Form 12BA
-
For each GRE (employer), you must enter the scanned signature file name in the field Scanned Signature Filename.
Navigate to Define Organization > GRE/Legal Entity > Others > Income Tax Information > Scanned Signature Filename (Example: hr_mgr_sign.gif).
See: Entering the Income Tax Details, Oracle HRMS Enterprise and Workforce Management Guide
-
Ensure that you have uploaded the image file in the folder $OA_MEDIA/form16 after creating the folder Form16 under $OA_MEDIA.
-
Ensure that the image file for the scanned signature is of maximum dimensions 180(width) X 68(height) and in .gif format.
Setting up Digital Signature for Form 16
If you plan to mail digitally signed Form 16 to your employees, then complete the following steps:
-
Apply the prerequisite XDO patches. Contact your system administrator for details regarding the patches.
-
Record the Email IDs for employees in the Official Details tab of the People window.
See: Entering Additional Personal Information
-
Using the XML Publisher Administrator responsibility, create a new Data Definition with code as PYINEOYR , if you do not already have one. Then attach the control file (sample given below) as the Bursting Control File to the Data Definition. The control file has the mail server details, the email format and the location of Form 16 template. Use the XML tag names given to create the Control file.
XML is burst at the level: /EOY/GRE/EMPLOYEE
Tag for email address : EMP_EMAIL
Tag for employee number : EID
Tag for employee name : E_F_NAME
Tag for form name : FORM_NAME
A sample Control File is given below. You can modify the e-mail server, port, subject, body, from and reply-to properties
<?xml version="1.0" encoding="UTF-8" ?> <xapi:requestset xmlns:xapi="http://xmlns.oracle.com/oxp/xapi"> <xapi:request select="/EOY/GRE/EMPLOYEE"> <xapi:delivery> <xapi:email server="internal-mail-router.company.com" port="25" from="from_email@company.com" reply-to="reply_email@company.com"> <xapi:message id="123" to="${EMP_EMAIL}" cc="${EMP_EMAIL}" attachment="true" contenttype="html/text" subject="${FORM_NAME} of ${EID}"> Dear ${E_F_NAME}, ${FORM_NAME} attached.</xapi:message> </xapi:email> </xapi:delivery> <xapi:document output="${FORM_NAME}_${EID}" output-type="pdf" delivery="123"> <xapi:template type="rtf" location="xdo://PAY.PYINEOYR.en.US/? getSource=true" config-location= "${DIG_SIGN}"> </xapi:document> </xapi:request> </xapi:requestset> -
For digitally signing the files, modify the file $XDO_TOP/resource/xdo.cfg and add the following properties:
<property name="signature-enable">true</property>
<property name="signature-pkcs12-path"> $PATH_OF_PFX_FILE </property><property name="signature-pkcs12-password"> $PASSWORD </property>
<property name="signature-field-location">top-center </property>
In the example, replace $PATH_OF_PFX_FILE with the location of your signature pfx file and $PASSWORD with the password provided for the file.
For example, if test.pfx file is placed in the path /slot/ems1234/appmgr/apps/apps_st/appl/xdo/12.0.0/resource/
then replace $PATH_OF_PFX_FILE with /slot/ems1234/appmgr/apps/apps_st/appl/xdo/12.0.0/resource/test.pfx
-
You can display additional information/comments in the digital signature in the format:
Digitally Signed by xxxx
Date
Reason
Location
Add the following properties in the cfg files:
<property name="pdf-signature-display-style">detailed</property>
<property name="signature-reason">$REASON</property>
<property name="signature-signed-at">$LOCATION</property>
$REASON and $LOCATION must be replaced with the reason and location.
-
You can modify the position of the signature using the following values for the property signature-field-location:
To display the digital signature in a position of your choice on the page, use the following properties to specify the X and Y co-ordinates on the page:
<property name="signature-field-pos-x">0</property>
<property name="signature-field-pos-y">0</property>
<property name="signature-field-width">140</property>
<property name="signature-field-height">160</property>
Note: Ensure to remove the default signature-field-location property if you want to display the signature at a position of your choice.
-
By default, the digital signature appears on the first page. For displaying the digital signature on any desired page, add the below property with the desired page number:
<property name="signature-page-index">2</property>
-
Set the system-temp-dir property in xdo.cfg to /tmp
<property name="system-temp-dir">/tmp</property>
Set to /tmp the temporary directory under General in the XML Publisher Administrator > Administration > Configuration
-
After generating the reports, remove the digital signature properties in the cfg file, if you do not want to burst other PDF files (such as individual payslips) with digital signature.
By default, the application uses the Digital Signature properties configured in xdo.cfg to display the digital signature on all reports with PDF output. If you want the application to use this configuration only for generating Form 16 and not on the other PDF reports, then you must make a copy of the xdo.cfg file and create a new configuration file, for example xdo_new.cfg and remove the Digital Signature properties from xdo.cfg.
However, if you want to display different digital signatures for multiple business groups or if you do not want to display on other PDF reports, follow the steps given below:
-
The xdo.cfg file setup enables you to send digitally signed Form 16s using email. If you have more than one GRE and want to use a different digital signature for each GRE, then you must create a new file similar to xdo.cfg for each GRE (with different file names).
-
Replace the $PATH_OF_PFX_FILE of each cfg file with the location of the signature pfx file for that GRE and $PASSWORD with the corresponding password.
-
For each GRE/Legal Entity, you must enter the newly created xdo_new.cfg file's absolute path in the new field.
Define Organization > GRE/Legal Entity > Others > Income Tax Information > Digital Signature
For example, if xdo_gre1.cfg file is placed in the path: /slot/ems1234/appmgr/apps/apps_st/appl/xdo/12.0.0/resource/ enter /slot/ems1234/appmgr/apps/apps_st/appl/xdo/12.0.0/resource/xdo_gre1.cfg
-
End of Year Processing and Reporting
Running the Provident Fund Monthly Returns Archive
Run the Provident Fund Monthly Returns Archive process to archive the employee and employer data required for monthly provident fund processing for the specified year. The archive process ensures that the data does not change between printing it and sending it to the Regional Provident Fund Commissioner office (RPFC).
You run the Provident Fund Monthly Returns Archive process from the Submit Requests window.
To run the Provident Fund Monthly Returns Archive process
-
In the Name field, select the Provident Fund Monthly Returns Archive. The Parameters window opens.
-
Select the currency period and month for which you want to archive the data.
-
Optionally, select the business number if you want to run the process only for a specified PF organization. If you do not select a business number, the archive process runs for all available PF organizations.
-
Select the assignment set if you want to restrict the report to a specific set of employees. If you leave this field blank, the process is run for all assignments that match the other parameters that you have specified.
-
Select the return type you want to submit. There are three options:
-
Corrected or Revised Return
-
Regular Return
-
Supplementary Return
-
-
Enter the reference number the bank provides on submission of the original monthly PF returns to the Government. Employers use this reference number to record within the PF Receipt Mapping window and while generating the reports.
-
Click OK and then Submit.
Running the India Provident Fund Monthly Returns e-File
If your enterprise submits Provident Fund monthly returns electronically, then you can generate an e-file of the Provident Fund Monthly report for your employees. You produce the report after completing the payroll runs, and archiving and validating the provident fund data. The India Provident Fund Monthly Returns e-File generates an e-file of the provident fund returns of your employees.
You run the India Provident Fund Monthly Returns e-File from the Submit Requests window.
To run the India Provident Fund Monthly Returns e-File
-
In the Name field, select India Provident Fund Monthly Returns e-File. The Parameters window opens.
-
Select the currency period for which you want to run the report.
-
Select the month for which you want to run the report.
-
Select the return type you want to submit.
-
Select the business number of the PF organization for which you want to generate the e-File.
-
Enter the archive reference number.
-
Optionally, enter the filer license number of the external agency your organization engaged to file your PF returns.
-
Select the NSSN to generate the report. You can generate the e-File for:
-
All employees
-
Employees with NSSN
-
Employees without NSSN
-
-
In the sort order fields, you can specify how to sort the report. Sort order options include:
-
Date of joining
-
NSSN
-
-
Click OK and then Submit.
Running the India Monthly PF Returns Print
If your enterprise submits monthly PF returns using a print copy, you produce the report after completing the payroll runs, and archiving and validating the provident fund data. Run the India Monthly PF Returns Print process to generate a print copy of the returns.
You run the India Monthly PF Returns Print from the Submit Requests window.
To run the India Monthly PF Returns Print
-
In the Name field, select India Monthly PF Returns Print. The Parameters window opens.
-
Select the currency period for which you want to run the report.
-
Select the month for which you want to run the report.
-
Select the return type you want to submit.
-
Select the business number of the PF organization for which you want to generate the print copy.
-
Enter the archive reference number.
-
Optionally, enter the filer license number of the external agency your organization engaged to file your PF returns.
-
Select the NSSN to generate the report. You can generate the e-File for:
-
All employees
-
Employees with NSSN
-
Employees without NSSN
-
-
In the sort order fields, you can specify how to sort the report. Sort order options include:
-
Date of joining
-
NSSN
-
-
Click OK and Submit.
Running the India PF Form 3A Report
The India PF Form 3A report shows the monthly PF summary for an employee, for the specified year.
You run this report from the Submit Requests window.
To run the India PF Form 3A report
-
In the Name field, select India PF Form 3A Report. The Parameters window opens.
-
Select the contribution period for which you want to run the report.
-
Optionally, select the Provident Fund Organization if you want to run the report only for a specified PF organization. If you do not select a PF Organization, the report displays PF summary for all available PF organizations.
-
Select the employee type for which you want to run the report.
-
Optionally, select a PF number if you want to run the report for a specified PF number. If you do not select a PF number, the report displays PF summary for all available PF numbers.
-
Click Submit.
Running the India PF Form 6A Report
The India PF Form 6A report shows the consolidated annual Provident Fund (PF) contributions of all employees in the specified Provident Fund organization.
You run this report from the Submit Requests window.
To run the India PF Form 6A report
-
In the Name field, select India PF Form 6A. The Parameters window opens.
-
Select the contribution period for which you want to run the report.
-
Select the Provident Fund Organization for which you want to run the report.
-
Click Submit.
Running the India Pension Form 7 Report
The India Pension Form 7 report shows the monthly PF summary of an employee, for the specified year.
You run this report from the Submit Requests window.
To run the India Pension Form 7 report
-
In the Name field, select India Pension Form 7 Report. The Parameters window opens.
-
Select the contribution period for which you want to run the report.
-
Optionally, select the Provident Fund Organization for which you want to run the report. If you do not select a PF organization, the report displays PF summary for all available PF organizations.
-
Select the employee type for which you want to run the report.
-
Select the Pension Number of the employee, for whom you want to the run the report.
-
Click Submit.
Running the India Pension Form 8 Report
The India Pension Form 8 report shows the consolidated annual contributions for each employee towards Pension Fund.
You run this report from the Submit Requests window.
To run the India Pension Form 8 report
-
In the Name field, select India Pension Form 8. The Parameters window opens.
-
Select the contribution period for which you want to run the report.
-
Select the Provident Fund Organization for which you want to run the report.
-
Click Submit.
Running the India ESI Form 5 Report
The India ESI Form 5 report lists the employee and employer ESI contributions. The report also includes information about challan filled by the employers while depositing the ESI contribution.
You run this report from the Submit Requests window.
To run the India ESI Form 5 report
-
In the Name field, select India ESI Form 5. The Parameters window opens.
-
Select the contribution period for which you want to run the report.
-
Select the ESI Organization.
-
Optionally, select Yes in the Exempted from ESI Act field to generate the report for all employees contributing to the ESI Organization. Select No to generate the report only for eligible employees.
-
Click Submit.
Running the India Form 12BB report
You run the Form 12BB report to submit the proposed investment tax declarations and expenses made by employees that are income tax deductible.
You run the Form 12BB from the Submit Requests window.
To run the India Form 12BB report
-
In the Name field, select India Form 12BB report. The Parameters window opens.
-
The current assessment year appears by default.
-
Optionally, select the GRE Organization for which you want to run the report. If you do not select a GRE Organization, then the report displays details for all available organizations.
-
To run the report for a specific group of employees, select an assignment set.
-
To run the report for a specific employee, enter the employee number.
-
Click OK and then Submit.
Running the India PT Form III for Maharashtra report
You can generate professional tax returns to submit to the Professional Tax office using the India PT Form III report. You must set up a professional tax organization and enter the professional tax challan details before you generate the Form III report.
See: Entering Professional Tax Information, Oracle HRMS Enterprise and Workforce Management Guide (India) and Entering Professional Tax Challan Information, Oracle HRMS Enterprise and Workforce Management Guide (India)
You run this report from the Submit Requests window.
To run the India PT Form III for Maharashtra report
-
In the Name field, select India PT Form III for Maharashtra report. The Parameters window opens.
-
Select the frequency, year and period details for the report.
-
Optionally, select the Professional Tax Organization for which you want to run the report. The report is generated for all PT organizations if you do not select a PT organization.
-
Click OK and then Submit.
Running the End of Year Archival (India) process
The End of Year Archival (India) process archives employee and employer data for a specific year and employee type by GRE organization. The archival process archives data for Form 16, Form 12BA, Form 24 and Form 27.
Once archived, this data is available for end of year reporting.
See: Employee Annual Tax Return (India)
You run the process from the Submit Requests window.
To run the End of Year Archival (India) process
-
In the Name field, select End of Year Archival (India) process. The Parameters window opens.
-
The assessment year appears by default.
-
Select the assignment set if you want to restrict the report to a specific set of employees. If you leave this field blank, the process is run for all assignments that match the other parameters that you have specified.
-
Select the year and GRE organization for the archival process. The process is run for all GREs if you leave the GRE organization field blank.
-
Optionally, select the employee type you want to archive. You can select to run this process for all employees, active, terminated transferred employees.
-
Click Ok and then Submit.
Running the Employee Annual Tax Returns (India) process
You run the Employee Annual Tax Returns (India) process to generate Form 16 and Form 12BA for employees. You must run the End of Year Archival (India) process before you run the Employee Annual Tax Returns (India) process.
See: Running the End of Year Archival (India) process
You run the process from the Submit Requests window.
To run the Employee Annual Tax Returns (India) process
-
In the Name field, select Employee Annual Tax Returns (India) report. The Parameters window opens.
-
Select the assessment year, GRE and employee type for the report. The report is generated for all GREs and employee types, if you leave the fields blank.
-
Select the report format whether you want to generate prior to 2013 or post 2013 format for the Form 16.
-
Select how you want to generate the reports:
-
View Consolidated Reports
-
Mail Individual Form12BA
-
Mail Individual Form16
-
Mail Individual Annexure-B
Note: Ensure that you record the e-mail address of the employee at the Person level.
Additional Information: If you require generating the Form 16, Form 12BA, and Annexure-B separately, then you must ensure that you submit each concurrent program only after the successful completion of the previous concurrent process.
-
-
Select the assignment set if you want to restrict the report to a specific set of employees. If you leave this field blank, the process is run for all assignments that match the other parameters that you have specified.
-
Select the employee number if you want to run the process for a specific employee. The process is run for all employees if you leave the field blank.
-
Select whether to display the employee's job or position on the reports.
-
Click Submit.
Running the Payroll Reports Archive (India)
The Payroll Reports Archive process archives employee and employer data for end-of-year reporting.
You run the process from the Submit Requests window.
To run the Payroll Reports Archive (India) process
-
In the Name field, select Payroll Reports Archive (India) process. The Parameters window opens.
-
Select the payroll for which you want to run the archive.
-
Select the consolidation set that you want to archive.
-
Select the start and end dates to specify the period for which to generate the reports.
-
Select the assignment set if you want to restrict the report to a specific set of employees. If you leave this field blank, the process is run for all assignments that match the other parameters that you have specified.
-
Click Ok and then Submit.
Viewing Archive Results
The Payroll Archiver preserves payroll run information, so you can use it for accurate payroll reporting or third-party tax filing. You can view the archive results by payroll and by assignment through PUI.
To view Archiver Values by payroll
-
Navigate to the Payroll Process Results window (View | Payroll Process Results).
-
Specify the name, pay period, and action type of the payroll you want to query.
-
Click Find.
-
Select the date you want to view, and click Assignment Process.
-
Select the name of the employee you want to view, and click View Results.
The View Archive Values for the assignment appears.
-
Select any of the "Details" to view them.
To view Archiver Values by assignment
-
Navigate to the Assignment Process Results window (View | Assignment Process Results).
-
Specify the name and pay period for the employee you want to query.
-
Click Find.
-
Select "Magnetic Report" type, and click View Results.
-
In the Line Level Archiver section of the View Archive Values window, you can select any of the "Details" to view them.
Running the Electronic Challan Cum Return Process
Employers can use the India Electronic Challan cum Return process to submit the monthly PF summary for an employees for the specified year electronically.
You run this report from the Submit Request window.
To run the India Electronic Challan Cum Return process
-
In the Name field, select India Electronic Challan Cum Return process. The Parameters window opens.
-
Specify the following mandatory information:
-
the contribution period for which you want to generate the challan
-
the month for which you want to generate the challan. By default the current month appears.
-
the name of the provident fund organization
-
the report whether arrear or electronic contribution report (ECR)
-
-
Optionally, select an assignment set if you want to run this report for a specific group of employees.
-
Click Ok and then Submit.
Quarterly Income Tax Returns
Generating Quarterly Income Tax Returns
Oracle HRMS for India enables employers to generate quarterly income tax returns for all employees for submission to the Income Tax Authority of India. To generate quarterly income tax returns:
-
Run the payroll at the end of the quarter.
-
Run the prepayment process to prepare payments generated by the payroll run.
-
Ensure that each challan detail in the quarterly tax returns includes the TDS details for employee whose TDS has been submitted through that challan. For this, map employee records with the challan number used for submitting the tax.
See: TDS Challan Mapping
-
Archive the payroll to fetch data for generating the Form 24Q e-TDS report.
-
Generate Form 24Q electronic file (e-TDS) for quarterly submission of income tax returns.
TDS Challan Mapping
In Form 24Q, each challan record includes the details of the employees for whom the tax has been deposited through that challan. To display this information, you need to map the Tax Deducted at Source (TDS) details for employees with the challan number used to submit the deducted tax.
To map challan details
-
Use the TDS Challan Mapping SSHR page to search for employee records by entering search parameters in appropriate fields.
Note: Only professional users can access the SSHR page based on security profile access rights.
-
The SSHR page displays the search result in a table. Download the search result to a spreadsheet.
-
Update the TDS details of the employees, if required. For example, if you have deposited the tax deducted on a single payment to an employee through two different challans, you can add another row for the employee specifying tax deposit details through the other challan.
-
Upload the updated employee records to the Oracle HRMS application database.
Oracle HRMS uses Web ADI to download data from the SSHR page to spreadsheet and upload the data from spreadsheet back to the application database.
See: Data Download and Upload Using Web ADI ' Overview, Oracle Configuring, Reporting, and System Administration Guide
See: Creating Integrators in Web ADI, Oracle Configuring, Reporting, and System Administration Guide
See: Uploading Data Using Web ADI, Oracle Configuring, Reporting, and System Administration Guide
Running the Quarterly Returns Archival Process
The Quarterly Returns Archival (India) process archives employee payroll data for a specific quarter. Employers can use this archived data for generating quarterly tax returns through Form 24Q.
You run the process from the Submit Requests window.
To run the Quarterly Returns Archival process:
-
In the Name field, select Quarterly Returns Archive (India). The Parameters window opens.
-
Select the assessment year and the specific quarter for which you want to archive the data. By default, the application displays the current assessment year and the quarter preceding the current quarter.
-
Select the GRE or legal entity for which you want to run the archival process. If you do not select any GRE or legal entity, the application archives data for all the existing GREs or legal entities for the organization.
-
Select the assignment set if you want to restrict the report to a specific set of employees. If you leave the field blank, then the process is run for all assignments that match the other parameters you have specified.
-
Enter the archival reference number for a particular GRE. The application references this number to identify the correct archival process while running the 24Q Corrections report.
-
Click OK and then click Submit to start the process.
Generating Form 24Q e-TDS Report
The Form 24Q e-TDS report displays tax deducted at source for employees for a specific quarter.
You generate the e-TDS file from the Submit Requests window.
To generate the e-TDS file
-
In the Name field, select Employer Quarterly Tax Returns (India). The Parameters window opens.
-
Select the assessment year and quarter for which you want to generate the report.
-
Select the legal entity for which you want to run the report. By default, the application displays only those legal entities for which you have archived the data for the selected assessment year.
-
If you are generating the report for any of the first three quarters, you can indicate whether to include salary details for the employees in the report. If you select Yes, the report includes salary details for Sections 10 and 16, and Chapter VIA.
-
Indicate whether there has been any change in the address of the employer or the employer's representative after the last return to the income tax authority.
-
Click OK and then click Submit to generate the report.
Generating Form 24Q Corrections Report
Oracle HRMS for India enables employers to update or correct any incorrect entries within the quarterly income tax returns for all employees. Employers can then submit the corrected 24Q statements to the Tax Authorities using the 24Q Corrections Report. To generate these corrections to the quarterly income tax returns, you must:
-
Generate Form 24Q electronic file (e-TDS) for quarterly submission of income tax returns.
-
Update or correct any employee or employer information such as deductor or deductee details, PAN, or submission of a new challan. These changes include the C1, C2, C3, C5, C9, and Y types.
See: Entering Additional Personal Information, Oracle HRMS Workforce Sourcing, Deployment, and Talent Management Guide (India)
See: Entering Additional Assignment Information, Oracle HRMS Workforce Sourcing, Deployment , and Talent Management Guide (India)
See: Entering Income Tax Challan Information, Oracle HRMS Enterprise and Workforce Management Guide (India)
-
Run the 24Q Corrections archival process for generating the Form 24Q Corrections report.
-
Generate Form 24Q Corrections report to submit any corrections to the income tax returns.
-
Enter the receipt number that you receive from the TIN authorities for the original or corrected tax statement submitted within the 24Q Receipt Mappings window. The application uses this information to identify and map the corrections made to the Form 24Q for each legal entity.
See: Entering 24Q Receipt Mappings Information, Oracle HRMS Enterprise and Workforce Management Guide (India)
Running the 24Q Corrections Archival Process
The 24Q Corrections Archival process archives any changes to employee or employer information (such as the C1, C2, C3. C5, C9 and Y) for a specific quarter. Employers can use this archived data for generating the Form 24Q Corrections Report that includes the corrections to the Original eTDS 24Q.
You run this report from the Submit Request window.
To run the 24Q Corrections Archival Process
-
In the Name field, select Form 24Q Corrections Archive (India) Process. The Parameters window opens.
-
Select the assessment year and quarter for which you want to archive the data. By default, the application displays the current assessment year and the quarter preceding the current quarter.
-
Select the GRE/Legal Entity for which you want to run the process.
-
Select the date when the original file was submitted.
-
Select the type of correction to run the archival such as C1, C2, C3, C5, and C9. If you do not select any value, the application archives the data for all the correction types except when the correction type is Y. Select Y to run the process to cancel the income tax return statement (Original eTDS 24Q) submitted to the tax authorities.
-
Enter a unique archival number for the 24Q Correction process. You use this reference number within the 24Q Receipt Mappings window to identify the correct archival process when you generate the 24Q Corrections report.
-
Select the receipt number when the correction type is Y to cancel the income tax statement. Record this receipt number within the 24Q Receipt Mapping window to identify the report.
-
Indicate whether there has been any change in the address of the employer or the employer's representative after the last return to the income tax authority.
-
Click OK and then click Submit to run the archival process.
Running the 24Q Corrections Report
Employers submit the Form 24Q Corrections Report to the tax authorities if there are any corrections to the Original 24Q eTDS, such as changes to the employee and employer information or the amount of tax deducted (C1, C2, C3, C5, and C9) or to cancel the tax statement.
You can run this report at any time of the year for any previous quarter or current quarter to identify the correction types based on when you have last archived.
You run this report from the Submit Request window.
To run the 24Q Corrections Report
-
In the Name field, select Form 24Q Corrections Report (India). The Parameters window opens.
-
Select the assessment year and quarter for which you want to archive the data. By default, the application displays the current assessment year and the quarter preceding the current quarter.
-
Select the GRE/Legal Entity for which you want to run the process.
-
Select the date when you submitted the original file.
-
Select the archival reference number of the 24Q Archival process to generate the report. If you do not select any reference number, the application processes the latest archival. You enter this archive number within the 24Q Receipts Mapping window to identify the correct archival process.
-
Click OK and then Submit to generate the report.
Labor Welfare Fund Deductions
Setting Up Labor Welfare Fund
Oracle HRMS enables you to calculate the LWF contributions for employees. You must create a Factory or Shops/Establishment organization and attach to your employee's assignment, before you can set up the LWF deduction for your employees. You can set up Labor Welfare Fund deductions for both predefined states and any user-defined state. The employee and employer LWF Contribution calculations depend on the LWF frequency of the state.
-
Employers must register with the state government and have a registration number, before setting up Labor Welfare Fund deductions for employees. You must create your Factory or Shops/Establishment organization, select the state for it, and enter the registration number of the organization. Ensure to set the location as India Local style for your organization to enable the application to compute the LWF deductions correctly.
See: Entering Factory Information, Oracle HRMS Enterprise and Workforce Management Guide (India)
See: Entering Shops/Establishment Information, Oracle HRMS Enterprise and Workforce Management Guide (India)
See: Setting up Location, Oracle HRMS Enterprise and Workforce Management Guide
-
Define the frequency of contribution for your state at the business group level . Oracle HRMS predefines the employee and employer LWF contribution for the states of Andhra Pradesh, Gujarat, Maharastra, Karnataka, Madhya Pradesh, Kerala, Tamil Nadu, and Telangana.
See: Entering Labor Welfare Fund State Rules Information, Oracle HRMS Enterprise and Workforce Management Guide (India)
You can configure the frequency and employee and employer contributions for other states by configuring the user table IN_LWF_CONTRIBUTION_AMOUNT.
See: Setting Up User Tables, Columns, and Rows, Oracle HRMS Configuring, Reporting, and System Administration Guideand Entering Table Values, Oracle HRMS Configuring, Reporting, and System Administration Guide
-
If required, record the information to calculate the LWF deductions for terminated employees at the Business Group level.
See: Entering Labor Welfare Fund State Rules Information, Oracle HRMS Enterprise and Workforce Management Guide (India)
-
Enter the details of your organization's representative.
See: Entering Representative Details, Oracle HRMS Enterprise and Workforce Management Guide (India)
-
Attach the organization to all those assignments that exist.
See: Entering Additional Assignment Details (Assignment Window), Oracle HRMS Workforce Sourcing, Deployment, and Talent Management Guide (India)
-
Attach the LWF Info Element to the employee assignment to initiate the LWF calculations.
See: Entering Additional Assignment Details (Assignment Window), Oracle HRMS Workforce Sourcing, Deployment, and Talent Management Guide (India)
-
Optionally, record if the employee is exempt from labor welfare deduction. Select the exemption reason in the LWF Information element.
Making Manual Element Entries, Oracle HRMS Compensation and Benefits Management Guide
Oracle predefines the exemption reasons using the user lookup IN_LWF_EXEMPTION. You can configure your exemption reasons using the user lookup IN_LWF_EXEMPTION.
See: Adding Lookup Types and Values, Oracle Configuring, Reporting, and System Administration Guide
-
On processing payroll, Oracle Payroll calculates the contributions, if the employee is eligible, and stores them in the elements Employee LWF Contribution and Employer LWF Contribution.
See: Defining a Payroll
-
If you have any corrections, you must use the LWF Adjustment Element and make any adjustments only after you process the payrolls.
Making Manual Element Entries, Oracle HRMS Compensation and Benefits Management Guide
-
After you compute the LWF calculation, record the details of the challan through which the labor welfare deduction is submitted for the employee.
See: Entering LWF Challan Information, Oracle HRMS Enterprise and Workforce Management Guide (India)
National Pension Scheme
Setting up National Pension Scheme
Employees can contribute to National Pension Scheme and be eligible for tax exemptions. To enable employers set up NPS and process employee contributions, follow the steps given.
-
Record the NPS account information. You can record employee and employer contributions for NPS at the organization level.
See:Entering NPS Account Setup Information, Oracle HRMS Enterprise and Workforce Management (India)
-
Enter the Permanent Retirement Account Number (PRAN) for the employee.
See: Entering Additional Personal Information, Oracle HRMS Workforce Sourcing, Deployment and Talent Management Guide (India)
-
Assign the NPS Organization to the employee.
See: See: Entering Additional Assignment Details Information, Oracle HRMS Workforce Sourcing, Deployment and Talent Management Guide (India)
-
Create the element link for the NPS Information element.
Select the Used for NPS Contribution option as Yes in the Element Design Wizard for the earnings element pay value to calculate the NPS contributions.
If you have any existing Earnings element that are used in NPS calculation, then you must manually feed to the new balances NPS Computation Salary with the Pay Value input and NPS Computation Standard Salary with the Standard Value input.
-
Run Payroll
See: Starting a Payroll Run
-
Verify the employee contributions are entered using the Tax Declaration page
If the NPS declaration is enabled, then employees can use the Deductions under Chapter VIA on the Tax Declaration page to record the Tier-I and Tier-II employee contributions of NPS.
-
Run NPS Contribution Report.
Run this report to send the list of subscribers to point of presence (POP).
Running the NPS Contribution Report
Employers run the NPS Contribution Report to provide a listing of the subscribers to NPS. The report includes the registration number of the head office and branch office, employee's PRAN, employee's contribution to Tier I and Tier II and employer contributions for the specified period.
You run the NPS Contribution report from the Submit Request window.
To run the NPS Contribution Report
-
In the Name field, select NPS Contribution Report. Then select the Parameters field to open the Parameters window.
-
Select the NPS organization.
-
Enter the start date from when you want the report.
-
Enter the end date for the report.
-
Click OK and then Submit.
Setting up for Payroll Dashboard and Readiness Checks
Setting up Payroll Readiness Checks
Payroll Administrator or payroll professional users can perform the following readiness checks for the employees prior to running payroll.
-
PAN Readiness Check - This readiness check is available as a concurrent program. The output displays the list of employees who do not have PAN with additional contact information like payroll name, email, and work/mobile number.
See: Running Employees without PAN in the Business Group (India) Process
-
Tax Declaration Readiness Check - This readiness check is available as a pre-defined option. The output displays the message information the total number of employees who made/not made the tax declaration
-
Employees without Address - This readiness check is available as a concurrent program. The output displays the list of employees who do not have an address.
See: Running Employees without Address in the Business Group (India)
Prior to performing the readiness checks, you must run the applicable processes from the Submit Request window.
For details on Payroll Dashboard and Payroll Readiness Configuration, refer to Oracle Self-Service Human Resources Deploy Self-Service Capability Guide.
Running Employees without PAN in the Business Group (India) Process
You must run this process prior to performing the readiness check for obtaining the list of employees without PAN. The output displays the list of employees who do not have PAN with additional contact information such as payroll name, email, and work/mobile number.
You run this report from the Submit Request window.
To run the Employees without PAN in the Business Group (India) process
-
In the Name field, select Employees without PAN in the Business Group (India). The Parameters window opens.
-
Select the Sort options to sort by employee number, payroll name, or employee full name within the business group.
-
Click OK.
Running Employees without Address in the Business Group (India)
Run this process prior to performing the readiness check for obtaining the list of employees without address. The output displays the list of employees who do not have address.
You run this report from the Submit Request window.
To run the Employees without Address in the Business Group (India) process
-
In the Name field, select Employees without Address in the Business Group (India). The Parameters window opens.
-
Select the Sort options to sort by employee number, payroll name, or employee full name.
-
Click OK.
Setting up the PAN Readiness Check
The PAN Readiness Check is available as a concurrent program. The output displays the list of employees who do not have PAN with additional contact information like payroll name, email, and work/mobile number. Follow the steps given below to set up prior to performing the readiness check using the payroll dashboard.
-
Using the System Administrator responsibility, attach the concurrent program Employees without PAN in the Business Group (India) to the request group of Payroll Professional responsibility. This ensures that the concurrent program Employees without PAN in the Business Group (India) is available in the Readiness Configuration setup.
-
Run the Employees without PAN in the Business Group (India) from the Submit Request window.
-
Using the Payroll Professional responsibility, navigate to Payroll Dashboard > Readiness Configuration page and perform the following steps:
-
Click on Create
-
Select the Process Type as Concurrent Program.
-
Select the Process Name as Employees without PAN (India). This step is required r to view this concurrent program from Payroll Dashboard Readiness Check Details list.
-
Select All Payroll or the selected Payroll based on your requirement.
-
Setting up Address Readiness Check
Payroll administrators can run the readiness check for obtaining the list of employees without address. The output displays the list of employees who do not have address.
-
Using the System Administrator responsibility, attach IN HRMS Reports and Processes to Payroll Professional responsibility.
-
Attach the concurrent program Employees without Address (India) to the request group of Payroll Professional responsibility. This ensures that the concurrent program Employees without Address (India) is available in the Readiness Configuration setup.
-
Run the Employees without Address (India) from the Submit Request window.
-
Using the Payroll Professional responsibility, navigate to Payroll Dashboard > Readiness Configuration page.
-
Click Create.
-
Select the Process Type as Concurrent Program.
-
Select the Process Name as Employees without Address (India).
-
Select All Payroll or Payroll based on your requirement.
-
Setting up the Tax Declaration Readiness Check
The Tax Declaration Readiness Check is available as a pre-defined option. The output displays the message information the total number of employees who made/not made the tax declaration.
-
Using the Payroll Professional responsibility, navigate to Payroll Dashboard > Readiness Configuration page.
-
-
Click on Create.
-
Select the Process Type as Predefined Check.
-
Select the Process Name as Tax Declaration Check (India).
-
Select All Payroll or Payroll based on your requirement.
-