Implementing Site Management
This chapter covers the following topics:
- Overview of Implementing Site Management Chapter
- Site Management Overview
- Creating Sites
- Implementing Integrated Business Partner and Support Sites
- Privacy Policy
- Integrated Site Management Sample Business Flows
Overview of Implementing Site Management Chapter
This chapter describes the how to set up and manage sites in Oracle iStore.
This chapter assumes you have performed the required implementation tasks outlined in the chapters: Verify Mandatory Dependencies, and Implementation Tasks for Oracle iStore.
Site Management Overview
The Oracle iStore Site Administration Application is a complete online store management tool. Several concepts for site management are discussed the sections below. Site setup steps begin in the "Creating Sites" section, later in this chapter.
Introduction to Sites
A cornerstone of online business today is the ability to reach a global customer base. Without this capability, Web stores are restricted to selling to a limited audience, thus severely reducing the market for their products. Oracle iStore addresses this fundamental requirement by providing the ability to create multiple sites which support online business in almost any country, currency, or language.
For an introduction and overview of Oracle iStore, see the chapter, Introduction.
Using Oracle iStore sites, you can:
-
Target different customer segments with different sites and catalogs
-
Support globalization features, such as multiple languages and currencies
-
Brand each site differently
-
Provide different content for the same product on different sites
-
Enable different payment and shipping methods for each site
-
Set different price lists on each site for each user type (guest, B2C, B2B, and Partners)
-
Set attributes at the site level (such as allowing guest users, allowing ATP checks, etc.)
-
Restrict sites via user responsibilities
-
Set organization-level access controls
You can also integrate your sites with the Oracle iSupport and Oracle Partner Management applications -- See the section, "Implementing Integrated Business Partner and Support Sites", within this chapter, to begin understanding the capabilities of this functionality.
Site Concepts
In the context of Oracle iStore, a site is any site that the administrator creates using the Site Administration UI. After you map a site to a customer responsibility and save it, you have created a specialty site. Multiple specialty sites can exist within one site, as each site-responsibility combination is considered a specialty site. All specialty sites within a site utilize the same site parameters. In the Customer Application, specialty sites are listed in the Site Selection Page -- which specialty sites display to users is based on setup parameters, customer responsibility, and any permission checking or access restrictions set up for the sites.
Additional Points
These additional points can aid your understanding of site creation and maintenance:
-
You can create as many sites and specialty sites as you wish, all within a single instance.
-
You can implement sites which support multiple languages and currencies.
-
Each site can have multiple payment types and shipping methods enabled.
-
Each site supports any number of responsibilities. However, you can not use the same responsibility more than once per site.
-
Each specialty site (site-responsibility combination) supports only one customer responsibility.
-
The responsibility associated with a specialty site determines the operating unit (OU) against which any orders are placed (this association is made through the MO: Operating Unit profile option, set at responsibility level). Thus, sites are tied to OUs by the setting of this profile option at the responsibility level.
-
The default Customer Application landing page is called the Site Selection Page. It displays all specialty sites that are accessible to the responsibilities of the users viewing the page, plus all sites that are public and not restricted by responsibility. If the customer can only access one specialty site, Oracle iStore automatically forwards the user to the Site Home Page of that specialty site, and the user does not see the list of specialty sites.
Site Group Navigation Logic and Guidelines
Sites can be categorized into groups for display purposes in the Customer Application. Three seeded groups are available for Oracle iStore and the two other integrating applications for which Oracle iStore offers end-user support, Oracle iSupport and Oracle Partner Management. The seeded group names are: Stores, Support, and Partners. The names of the groups are extensible lookups, allowing you to change the names to whatever names you wish, or to create new group names. The Site Selection Page features a drop-list via which users can filter the groups that display. The groups also can be used for displaying navigation bins in the Customer Application. (Refer to the "See also" points at the end of this section for links to additional information.) Following are some navigation logic points and guidelines to aid your understanding of site groups.
-
If a user filters the list of sites by group and this group has only one site, Oracle iStore automatically forwards the user to the Site Home Page of that site.
-
You can direct users to a group through a URL. If you direct a customer to the Site Selection Page through the URL:
-
The specific group is displayed in the Site Selection Page.
-
If the group contains only one accessible specialty site, the user is forwarded to the Site Home Page of the site.
-
If the URL specifies a non-existent group, all sites are displayed instead of sites within the group.
-
URL direction parameters can have a group code (non-translatable), but not a group name.
-
The group code is case-sensitive and can be lower case. All seeded groups are upper case.
-
If one group is included in only one site, and/or the site only supports one language, when users navigate to the Site Selection Page using a group specified in a URL, Oracle iStore redirects the user to the site within that group automatically.
-
The syntax for directing users to a group should be http://.../OA_HTML/ibeCZzdMinisites.jsp?grp=<group_code>.
-
See the following sections for additional information:
-
"Implementing Integrated Business Partner and Support Sites" within this chapter
-
"Group Picker" within the chapter, Implementing Initial Customer Application Pages
-
"Group Bins" and "Custom Group Bins" in the chapter, Implementing the Catalog
-
"Site Group Names Lookup" in the chapter, Implementing Messages and Prompts
Creating Sites
This section details how to create sites.
Create a Site: Getting Started and Entering Basic Information
You begin the site creation process by entering basic information for a site, such as name, description, and default parameters. To remove a site from operation, you must end-date it.
To start site creation, log in to the Site Administration Application as iStore Administrator, and select Create a Site in the Sites page.
Guidelines
Use the following guidelines as you start building a site:
-
Site Code: Once entered, this code is unique across sites in all instances implemented, and can be used in the Template Mappings Import/Export functionality. See the chapter, Advanced Display, for information on this feature.
-
Start/End Dates: Start and end dates can also be controlled by setting supported responsibility start/end dates.
-
Default Language: This step is expanded in the section, "Create a Site: Assigning Languages", within this chapter.
-
Default Currency: This step is expanded in the section, "Create a Site: Assigning Currencies", within this chapter.
-
Default Walk-in Price List: This step is expanded in the section, "Create a Site: Assigning Price Lists", within this chapter.
-
Catalog Root Section: All sites are referenced against a single parent node (or browsing section), which may or may not have child sections. If the root section has both navigational and featured subsections, the featured subsection won't be displayed in catalog pages. Only the following types of sections should be assigned as site root sections:
-
Sections which contains at least one navigational subsection
-
Sections which are leaf sections (contain only products, not subsections)
-
Sections which only have featured subsections; Oracle iStore does not support this
-
Unpublished or non-active sections, as this will cause incorrect rendering in the Customer UI
See the section, "Creating and Maintaining Sections", in the chapter, Implementing the Catalog, for additional guidelines.
-
-
Allow un-registered users to browse the site: By selecting this flag, all specialty sites within this site will allow guest user access.
-
Allow customers to check item availability: By selecting this flag, you enable customers to check Available to Promise (ATP) information for items in their carts. Do not select this unless you have set up either regular or global ATP.
-
Restrict customer access by responsibility: By selecting this flag, all specialty sites within this site will check customer responsibility as customers approach the default landing page, the Site Selection Page. In this case, only those specialty sites whose supported responsibilities match that of the approaching customer display on the page.
-
Enable Threshold for Payment Types: This is one of the steps to enable the Payment Threshold feature. For more information, see the topics, "Create a Site: Setting Payment Threshold", below, and "Enabling Payment Thresholds" in the chapter, Implementing Payment Types and Shipping Methods.
-
Enable Reporting: The purpose of this flag is to enable site metrics to be visible in Oracle Web Analytics reports. This flag only displays if integration with Oracle Web Analytics has occurred.
-
Enable Traffic Filter: When this flag is checked, visits from IP addresses entered as traffic filters in the Oracle Web Analytics Setup page will not be included in report data. This flag only displays if integration with Oracle Web Analytics has occurred.
-
Viewing sites by status: By default, only active sites appear in the Sites page. To view inactive sites, select Inactive Sites or All Sites from the Search LOV.
-
Customer Application display: None of the fields entered in the site creation page display in the Customer Application.
-
Site ID: Upon creation, your site will be given a unique Site ID number, which you can view in the Update Site: Details page. Site ID is the same as the Minisite ID.
-
Altering parameters after creation: All fields (except Site ID) can be altered after the site is saved.
Create a Site: Assigning Languages
Your implementation will be installed with a single language known as the base language. The base language cannot be changed or deleted from the Site Administration Application. Languages in addition to the base language must be first installed and implemented in Oracle Applications before they will appear in the Site Administration UI. In addition, your implementation must be multiple-organization enabled. See the chapter, Implementing Globalization and Multi-Org Architecture, for more information.
To assign additional languages, in the Site Administration Application, update a site and select the Language hyperlink.
Guidelines
Use the following guidelines as you assign languages:
-
To disable a language, select the radio button of the language and press the Change Status button.
-
The status of the base language cannot be changed.
-
When you disable a language in the Site Administration Application, this does not remove any Display Template or media object mappings you have set up using the language.
Create a Site: Assigning Currencies
Currencies must be set up in Oracle General Ledger before they can be selected in the Site Administration Application. See the Oracle General Ledger User Guide for more information.
To assign currencies, in the Site Administration Application, update a site and select the Pricing hyperlink. The currency selection will not be saved to the database until corresponding price lists are selected and saved.
Create a Site: Assigning Price Lists
Price lists must be set up in the pricing application before they can be selected in the Site Administration UI. Since the iStore Administration Application is not operating unit (OU) aware, the list of available price lists displays all existing price lists. If a price list is set up as OU-specific, then be sure to associate this price list only to sites whose associated customer responsibilities are linked to the OU where the price list is enabled.
Note: The maximum amount field on the Pricing page is a placeholder, and iStore does not enforce this by default. It is provided on the UI only for customization purposes.
To assign currencies, in the Site Administration Application, update a site and select the Pricing hyperlink.
Guidelines
Use the following guidelines as you assign price lists:
-
The price lists selected in the Pricing page are used to fetch prices only when the pricing is site-based (i.e., IBE: Use Price list Associated with Specialty Site is Yes).
-
For each supported currency, choose the price lists for Walk-in Customers (guest users), Individual Customers (B2C users), Business Customers (B2B users), and Partners (Oracle Partner Management end users).
-
If multi-currency price lists are enabled, you can choose the same price list for a different currency.
-
You cannot remove the default currency.
Create a Site: Assigning Payment Types
Payment types must first be set up in Oracle Applications before they can be selected in the Site Administration Application. Only the payment types supported by a site will display in the Customer Application.
To assign currencies, in the Site Administration Application, update a site and select the Payment hyperlink.
Guidelines
Use the following guidelines as you assign payment types:
-
Ask for Purchase Order: If checked, users can enter purchase order numbers during checkout for all specialty sites within this site. This enables the Purchase Order textbox in the checkout pages.
-
Use Purchase Order when Below Payment Threshold: This enables the purchase order textbox for orders that are below the payment threshold specified. If left unchecked and the order amount is below the payment threshold specified, the purchase order textbox will not display, even if the Ask for Purchase Order checkbox is checked.
Create a Site: Assigning Shipping Methods
Shipping methods must be set up in the Oracle Forms Shipping menus before they will display in the Site Administration Application. Only the shipping methods supported by a site will display in the Customer Application.
To assign shipping methods, in the Site Administration Application, update a site and select the Shipping hyperlink.
Create a Site: Assigning Responsibilities (Creating Specialty Sites)
You must assign at least one customer responsibility to a site. Each iteration of a site plus a responsibility makes a specialty site.
To assign responsibilities, in the Site Administration Application, update a site and select the Responsibility hyperlink.
Guidelines
Use the following guidelines as you assign responsibilities:
-
The display names you select in this phase of the site building process appear in the Customer UI as the specialty sites' display names.
-
A single Customer Application responsibility is seeded for the default customer user; it is IBE_CUSTOMER. This responsibility is associated to all available Oracle iStore user types by default during registration. When you create a site, IBE_CUSTOMER is assigned to the site by default.
-
Oracle iStore also supports using Oracle iSupport and Oracle Partner Management responsibilities for Customer Application users. If you wish to assign other responsibilities to customers, you must change user types setup, defining new Oracle CRM User Management enrollments associated to the user types and mapping the corresponding responsibilities to the appropriate sites. See the chapter, Implementing User Management, for more information.
-
You can only use the same responsibility once per site.
Create a Site: Manually Ordering Specialty Site Display Names
Oracle iStore allows you to manually re-order the display order of the specialty sites in the Site Selection Page.
To set display order, in the Site Administration Application, update a site, select the Responsibility hyperlink, and then the Display Order button.
Guidelines
Use the following guidelines as you order display names:
-
If not manually ordered, specialty sites are arranged in case-insensitive, alphabetical order at runtime in the Customer Application.
-
The order is set across all specialty sites in your instance.
-
The profile option, IBE: Use Display Order Feature, must be Yes to use the display order feature (the default value is Yes). See the appendix, Profile Options, for more information on the profile option settings.
Create a Site: Assigning Groups
Oracle iStore allows you to organize specialty sites into groups. Grouping sites is useful for many reasons, as described in the guidelines below.
To assign sites to groups, in the Site Administration Application, update a site, select the Responsibility hyperlink, and then the Assign Groups icon in the appropriate row.
Guidelines
Use the following guidelines as you assign groups:
-
The Site Selection Page in the Customer UI displays the specialty sites within a site according to groups that you place them in. You also can assign a single specialty site to multiple groups.
-
Supplied Group Bins: The following are the seeded group bins :
-
Store -- You can use this group to contain all specialty sites you wish associated with Oracle iStore.
-
Support -- You can use this group to contain all specialty sites you wish associated with Oracle iSupport.
-
Partner -- You can use this group to contain all specialty sites you wish associated with Oracle Partner Management.
-
-
Implementers may wish to set up navigation bins which display the specialty sites within the groups in the catalog pages. See the section, "Group Bins", in the chapter, Implementing the Catalog, for more details.
-
The Site Selection Page can only display groups and the specialty site picker if you set the profile option, IBE: Maximum Columns in Specialty Site Page. See the section, "Setting up Site Selection Page Columns", in the chapter, Implementing Initial Customer Application Pages, for details.
-
If no site is associate to a group, all sites are displayed without categorization in the Site Selection Page, and the Group LOV is not displayed. Additionally, if all sites are associated to only one group, the Group LOV does not display.
-
The site group names are extensible lookups for which you can change values and/or disable. See the chapter, Implementing Messages and Prompts, for more information.
-
Groups can be displayed in navigation bins on site pages.
-
When a specialty site is not associated with a group (or if a group is disabled that had contained sites), it will show up in the uncategorized Others group on the Site Selection Page.
-
If a group name has been disabled, it will not appear in the page.
See also: "Site Concepts" section within this chapter
Create a Site: Setting Organization Access Restrictions
Access restrictions allow you to control a B2B user's access to the Customer Application based on his organization.
To set organization access restrictions, in the Site Administration Application, update a site and select the Access hyperlink.
Guidelines
When you use access restrictions, you do one of the following:
-
Restrict access to a site based on users' organization(s) affiliation.
-
Allow only users from a certain organization(s) to access a site.
Create a Site: Setting Payment Threshold
Payment Threshold functionality allows you to enable only certain payment types in your specialty sites when a user places an order whose amount is under the threshold amount. See the section, "Using Payment Types Threshold", in the chapter, Implementing Pricing.
Implementing Integrated Business Partner and Support Sites
Oracle iStore supports integrating the Customer Application with Oracle iSupport and Oracle Partner Management. This close integration allows comprehensive B2B customer support and extensive B2B cooperative abilities, including:
-
Support for Oracle iSupport and Oracle Partner Management users in the Customer Application
-
Ability to specify price lists for partner users in the Site Administration Pricing page.
-
Fully integrated navigation between Oracle iStore, Oracle iSupport, and Oracle Partner Management applications through a common dashboard in the Customer Application. For example, to access Oracle iSupport or Oracle Partner Management from the Customer Application, users can select any number of implemented Oracle iSupport or Oracle Partner Management links in the Quick Links bin to navigate to specific areas of these integrating applications. To navigate back to the Customer Application, users simply select the Return to Dashboard navigation icon.
-
Configurable Site Selection Page which shows all specialty sites by group and allows filtering by site group
-
Site grouping functionality, allowing implementers to group sites logically on the Site Selection Page to ease navigation, as well as the ability to assign a single specialty site or sites to several groups. For this purpose, group lookups are provided.
-
Seeded group navigation bins that allow users to navigate to other sites within a specific group. These bins can support navigation to custom groups as well.
-
Navigation icon called Sites that customers can access to return to the Site Selection Page from other areas of the Customer Application
-
Ability to keep currency and language context when navigating between participating applications
-
Support for permission and responsibility checking in the Customer Application for users of the integrating applications
-
Ability for B2B users to switch accounts in Oracle iStore pages
-
Common user registration pages and flow for participating applications
-
Support for Partner registration flow and Partner permission checking in the Customer Application
-
Common user profile screens that are configurable by application -- participating applications can display their own user personal information screens by setting an iStore profile option and linking their menu structures
-
Full support for and data consistent with the Oracle Trading Community Architecture model
For more information on the integrations with Oracle iSupport and Oracle Partner Management, see the chapters: Integrating Oracle iStore with Oracle iSupport, and Integrating Oracle iStore with Oracle Partner Management.
Navigation Behavior with Integrated Applications
When integrating your sites with Oracle iSupport and/or Oracle Partner Management, you can expect the following navigation behavior:
-
Login: Users of the integrating applications can log in to their applications through the Oracle iStore Customer Application.
-
Logout from Oracle Partner Management: The Partner Home Page, if implemented, in the Oracle iStore Customer Application is the dashboard of Partner sites created using the Oracle iStore framework. This page targets Oracle Partner Management users, allowing partners to log in and log out only through the Oracle iStore Customer Application framework. Partner users can navigate to the appropriate Oracle Partner Management function and then come back to the portal to log out.
-
Logout from Oracle iSupport: Users can navigate to Oracle iSupport through the navigation bin displayed in the Site Home Page, and users can log out either from the Site Selection Page or from the Site Home Page.
-
Logout target pages: When a user logs out, the following targets and scenarios are supported:
-
Target is the Login page if no public site is defined and only one site is enabled.
-
Target is the Site Selection Page if there are multiple accessible sites available for the user, and the current site doesn't support guest user, or the user hasn't select any site yet.
-
Target is the Site Home page if the current site supports guest users.
-
Additionally, a custom target URL can be defined.
-
-
Navigation icons: The Oracle CRM Technology Foundation (JTT) Login and Logout icons will be hidden in Oracle iSupport and Oracle Partner Management. The following navigation icons will display instead:
-
Login (provided by Oracle iStore)
-
Logout (provided by Oracle iStore)
-
Register (provided by Oracle iStore)
-
Return to Dashboard
-
The Login, Logout, and Register icons call Oracle iStore processing pages and direct users to Oracle iStore pages, following Oracle iStore logic. The Dashboard icon allows users to return to the Dashboard (Customer Application).
-
Quick Links bins: After setup, this bin allows navigation to the integrating applications.
-
Group bins: Navigation to specialty sites within specific groups can be enabled through group bins. Seeded groups are provided. And, you can create additional navigation bins for custom groups by re-using the seeded JSP and modifying the group code of the bin.
-
Currency and language context preservation: When navigating between applications, currency and language context are preserved. For example, if a user accesses a site, selecting U.S. dollar as the currency and French as the language, and then navigates to a different application, the application understands and preserves the session language and currency.
-
Ability to switch accounts: When a user access the Customer Application, the primary account number is set into the cookie. If the user hasn't defined the primary account, the first created account is used. An account switcher, located in the Welcome Bin on the Site Home Page, allows B2B users to switch to a different account assigned to them within their organization. Note that only the account number will display, not the account description. When the user switches accounts, the new value is set again into the cookie. Oracle iStore reloads the page, and the user sees only information (carts, orders, etc.) related to that financial account. The user can only place an order with the current account. If a user changes his primary account in the user Profile pages, the change takes effect only when the user re-logs in.
-
Ability to preserve consistent account information when navigating from Oracle iStore to Oracle iSupport: The user's current account is stored in the session cookie, and the session always refers to the cookie to retrieve the appropriate value in both Oracle iStore and Oracle iSupport applications.
Privacy Policy
Implementers can institute a privacy preference policy in the Customer Application. The policy consists of a hyperlink displayed in the Customer Application pages which then leads users to a page displaying a standard privacy statement. If set up as part of Oracle Web Analytics integration and Web tracking is enabled, users also can view and update their privacy preferences.
Privacy Policy Process Flow
Following is the process flow for the privacy policy in the Customer Application:
-
A user selects the Privacy Statement link present on all Customer Application pages.
-
The user views the contents of the privacy statement.
-
If Oracle Web Analytics integration is complete, users also can view and update their privacy preferences.
-
When done viewing the privacy statement, the user selects a global icon to navigate to other areas of the Customer Application.
Implementing Privacy Policy
Use the steps in this section to set up the Privacy Policy feature.
Step 1 - Set Profile Option
Set the profile option, IBE: Display Privacy Statement, to Yes at site level, to enable the Privacy Statement link.
Step 2 - Map Policy Statement to Media Object
Oracle iStore provides a JSP that includes a media object and the update preferences link. The media object is called: Store Privacy Statement. The programmatic access name is STORE_PRIVACY_STATEMENT. The media object has the following default content: You need to customize this page to display your privacy statement. To provide a unique privacy statement, create an HTML file and map it to the media object. For instructions how to map media objects to files, see the chapter, Implementing Content.
If Oracle Web Analytics is implemented, the template also includes the link, Edit your privacy preferences. Selecting this link takes the user to an Oracle Web Analytics page where he can re-select his preference for being tracked in the sites. See the Oracle Web Analytics Implementation and Administration Guide for more information.
Integrated Site Management Sample Business Flows
The following business flows and related diagrams can aid your understanding of possible integrated application scenarios:
-
"User Navigates to Integrated Applications from Single Shared Site"
-
"Partner Navigates to Integrated Applications from Multiple Sites"
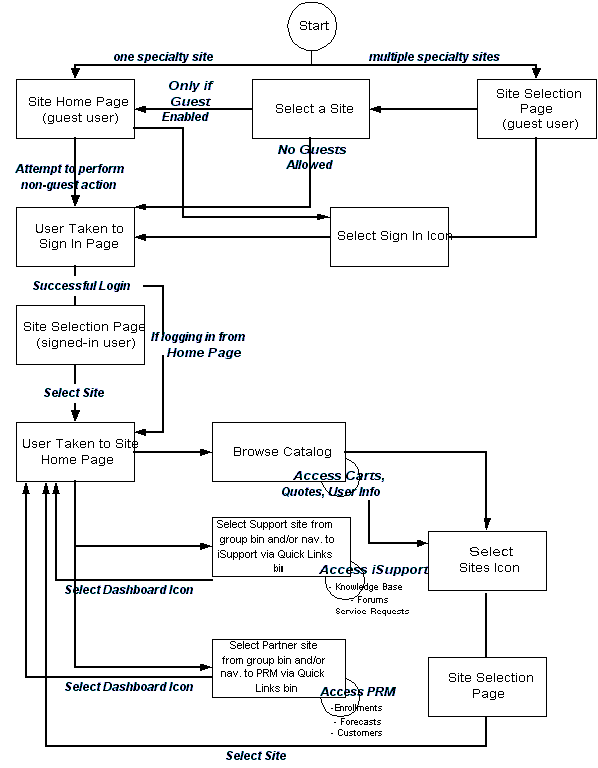
User Navigates to Integrated Applications from Single Shared Site
Note that this sample scenario assumes: Your implementation navigates users to the Site Selection Page by default (see the chapter, Implementing Initial Customer Application Pages, for information on the default landing page options), and that the user is already registered.
-
A user approaches the Web site.
-
If only one site is available to the user, he is forwarded to the Site Home Page as a guest user. From this page, he can log in and access the Site Home Page as a logged-in user.
-
If a multiple sites are available to the user, the user can select a site from the Site Selection Page, and if guest user access is allowed, he is taken to the Site Home Page as a guest user. From here, he can sign in and access the Site Home Page as a signed-in user.
-
The user also can log in from the Site Selection Page. In this case, after login, he is re-directed to the Site Selection Page, where all available sites are displayed. Then he can select a site and access the Site Home Page as a signed-in user.
-
If no guest user access is allowed in any sites, or if the user has elected to log in, then the Login page is displayed.
-
-
Assuming that the site is associated to a responsibility that integrates Oracle iStore, Oracle iSupport and Oracle Partner Management the user can:
-
Select the Partner Program link in the Partner Program Bin and navigate to program enrollments.
-
Navigate to Oracle iSupport through the Quick Links navigation bin displayed under the Support tab. In Oracle iSupport, he can access service requests, the knowledge base, and forums, depending upon how Oracle iSupport is implemented. He can return to the Site Home Page by selecting the Dashboard navigation icon from Oracle iSupport.
-
Navigate to Oracle Partner Management through the Quick Links navigation bin displayed under the Partners tab. In the Oracle Partner Management application, he can access opportunities, customers, and forecasts, depending upon the Oracle Partner Management implementation. He can return to the Site Home Page by selecting the Dashboard navigation icon from Oracle Partner Management.
-
Browse the catalog, potentially adding products to shopping carts and placing orders.
-
Select the Sites navigation icon to access additional sites, if additional sites are available to him.
-
Partner-related functionality is available only when Oracle Partner Management users are implemented.
The following figure shows this flow.
User Navigates to Integrated Applications from Single Shared Site
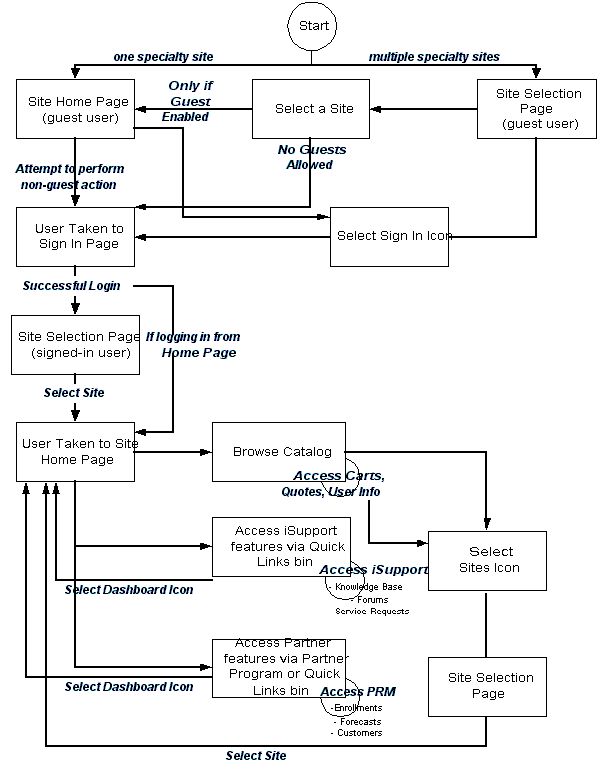
Partner Navigates to Integrated Applications from Multiple Sites
Note that this sample scenario assumes: Your implementation navigates users to the Site Selection Page by default (see the chapter, Implementing Initial Customer Application Pages, for information on the default landing page options), and that the user is already registered.
-
A user approaches the Web site.
-
If only one site is available to the user and guest user access is allowed, he is forwarded to the Site Home Page. From this page, he can log in and access the Site Home Page as a signed-in user.
-
If a multiple sites are available to the user, the user can select a site in a group from the Site Selection Page, and if guest user access is allowed, he is taken to the Site Home Page as a guest user. From here, he can log in and access the Site Home Page as a signed-in user.
-
The user also can log in from the Site Selection Page. In this case, after login, he is re-directed to the Site Selection Page, where all available sites are displayed. Then he can select a site and access the Site Home Page as a signed-in user.
-
If no guest user access is allowed in any sites, or if the user has elected to log in, then the Login page is displayed.
-
-
Assuming integration with Oracle iSupport and Oracle Partner Management is in place, the user can:
-
Browse the catalog, potentially adding products to shopping carts and placing orders.
-
Navigate to Support sites through the Support Group Bin. In the Support site, the user can select links within the Quick Links Bin and access service requests, the knowledge base, and forums, depending upon how Oracle iSupport is implemented. He can return to the Support Site Home Page by selecting the Dashboard navigation icon from Oracle iSupport.
-
Navigate to Partner Sites through the Partners Group Bin. From the Partner Site Home Page, user can select the Partner Program link in the Partner Program Bin and navigate to program enrollments, or navigate to Oracle Partner Management through the Quick Links navigation bin. In the Oracle Partner Management application, he can access opportunities, customers, and forecasts, depending upon the Oracle Partner Management implementation. He can return to the Partner Site Home Page by selecting the Dashboard navigation icon from Oracle Partner Management.
-
Select the Sites navigation icon to access additional sites, if additional sites are available to him.
-
The following figure shows this flow.
Partner Navigates to Integrated Applications from Multiple Sites