Survey Campaign Administration Tasks
Overview of Survey Campaign Administration
Survey Campaigns, Cycles, and Deployments
A survey campaign is a high-level set of instructions for executing a script in a Web browser (as a survey or Web script). All survey campaigns require, as a prerequisite, a script created using the Script Author component of Oracle Scripting. Each survey campaign has one or more processing units, called cycles. Each cycle, in turn, has one or more processing units called deployments. Deployments designate detailed execution requirements including, at minimum, start and end dates and times.
After defining a deployment, it must be explicitly activated. This generates a survey URL, a system-generated string of parameters to allow end users to execute the designated questionnaire script (a survey campaign parameter) in a Web browser.
The operations to define survey campaigns and activate deployments are performed in the Survey Administration console by Oracle Applications users with the Survey Administrator responsibility.
Standard and Targeted Survey Campaigns
The amount and depth of information required to administer survey campaigns, and the application tasks that are prerequisite, depend on which of two types of survey campaigns are required.
Standard survey campaigns are quick and easy to administer. Once a deployment for a standard survey campaign is activated, it is executed when end users click a specified, static URL in a Web browser. There are no dependencies on other applications (other than the script). Standard survey campaigns are typically administered and deployed for use as surveys linked from a Web site, or for Web scripts (in which self-service Web application users click a customized link in the application to execute the script in a Web browser).
Targeted survey campaigns are executed from an e-mail message. The recipients of the e-mail message are members of an Oracle Marketing list. The e-mail distribution (sometimes referred to as a marketing blast) is handled using Oracle One-to-One Fulfillment. The list members that respond to the e-mail message by participating in the execution of the script are referred to as respondents.
Special Administration for Targeted Campaigns
Targeted survey campaigns take advantage of application integration, and require substantial planning. Administration using Oracle Marketing and Oracle One-to-One Fulfillment is required prior to defining a deployment for a targeted survey campaign.
To simplify administration for creating targeted deployments, the Survey Administration console hosts functionality from Oracle Marketing in the Audience tab (for list management functions) and functionality from Oracle One-to-One Fulfillment in the Invitations tab (to create invitations, reminders, and queries, and associate them with a template). These functions can also be performed from within each application's own UI. The Audience and Invitation tabs are not required for administrators of standard survey campaigns.
Once lists are created and invitations and reminders are suitably administered, survey administrators can define deployment details for a targeted survey campaign, which requires list and template information to be specified.
This document includes some task-based steps for setting up lists and templates in support of administering and executing targeted survey campaigns. For detailed information on the use of these applications, refer to the respective product documentation.
General Survey Campaign Administration Tasks
Tasks for administering Oracle Scripting survey campaigns, cycles, and deployments can be accomplished using the Survey Campaigns tab of the Survey Administration console.
Responses to an active survey campaign (saved when scripts are executed in a Web browser) can be viewed from the Survey Administration console. This information is accessible (by cycle and deployment) by selecting the Response View option from either the Update Survey Campaign page or the Update Deployment page.
Tasks for administering list management are considered Oracle Marketing functionality. These tasks can be accomplished using the Audience tab of the Survey Administration console, or from the Oracle Marketing user interface. For more information, refer to Oracle Marketing product documentation.
Tasks for administering master documents (HTML invitations and reminders) and their associated queries, and the template objects with which they are associated, are considered Oracle One-to-One Fulfillment functionality. These tasks can be accessed using the Audience tab of the Survey Administration console, or from the Oracle One-to-One Fulfillment user interface.
Tasks for administering concurrent programs supporting the Scripting Engine Web interface provide the most recent information for survey administration, targeted deployments, and reporting. These tasks are performed from Oracle Forms-based applications as an Oracle Applications user with the iSurvey User responsibility.
This section includes the following topics:
Setting Survey Administration Preferences
You can access the General Preferences page either from the Navigator page or from any page of the Survey Administrator console.
On this page, you can change the following preferences:
| General Preference Category | General Preference | Description | Example |
|---|---|---|---|
| Languages | Current Session Language | Language used in current application session. | American English |
| Languages | Default Application Language | Language used in application pages if no language selected at login. Also, language in which e-mail notifications are received. | American English |
| Accessibility | Accessibility Features | To provide additional accessibility to users of assisted technologies. | No |
| Regional | Territory | Country in which Oracle Applications is in operation. | United States |
| Regional | Date Format | Defines date format for table listings, database queries, etc. | DD-MON-RRRRR (displays as 20-APR-2004) |
| Regional | Timezone | Timezone, based in hours before or after Greenwich Mean Time (GMT) | (GMT -08:00) Pacific Time |
| Regional | Number Format | Determines placeholder usage for thousands place based on standard country usage. | 10,000.00 |
| Regional | Client Character Encoding | Appropriate character encoding for the client computer workstation of logged-in user. | Western European (Windows) |
| Change Password | Known As | First and last name of logged-in user, derived from Known As field from HRMS database. | For user Michael Smith, Mike Smith. |
| Change Password | Old Password | Password used to log into current session. | OLDPASSWORD |
| Change Password | New Password and Repeat Password | New password intended to govern the remainder of this session and all future sessions until changed again. | NEWPASSWORD |
| Start Page | Responsibility | Default responsibility for user at login. | Survey Administrator |
| Start Page | Page | Default start page at login. | Survey Launch Page |
| Notifications | Email Style | Electronic mail settings, enabled if logged-in user has default e-mail address defined. | Do not send me mail. |
Note: You can click Reset to Default to reset default preference values.
Survey Administration Console Tabs
Each of the Survey Administration console pages contains four tabs . These tabs provide access to the following functions:
| Tab | Scripting Function | Tasks You Can Accomplish |
|---|---|---|
| Survey Campaigns | Administer survey campaigns |
|
| Survey Resources | Administer survey resources |
|
| Audience | Administer Oracle Marketing lists for targeted survey deployments |
|
| Invitations | Administer Oracle One-to-One Fulfillment invitations and reminders for targeted survey deployments |
|
The Audience and Invitations tabs provide access to user interfaces owned by other Oracle applications: Oracle Marketing and Oracle One-to-One Fulfillment, respectively:
-
Oracle Marketing provides list management and campaign management functionality.
-
Oracle One-to-One Fulfillment is used for creation, management, deployment and delivery of invitations and reminders.
For survey administration, these two tabs are only required for targeted (list-based) survey deployments. As these products are documented elsewhere, only their functionality specific to using Oracle Scripting is addressed in this document.
Administering Survey Campaigns
From an administration perspective, the survey campaign is a collection of top-level requirements for executing an information-gathering survey campaign by executing a script in a Web browser. To achieve the goals of the campaign, you must create a survey campaign, and define for each survey campaign at least one cycle and at least one deployment. The first cycle for any survey campaign is created at the time of survey campaign creation. Additional cycles can be defined later (while the survey campaign status is open or active).
Defining deployments is a separate process that can be performed either immediately after survey campaign and cycle creation, or later (while the survey campaign status is open or active).
Use the Survey Campaigns tab to create, modify, or view survey campaigns, cycles, deployments, or to view responses for active or closed survey campaigns.
Tasks
You can perform the following tasks:
Concepts
See the topics described in the Survey Administration Concepts section of the Oracle Scripting User Guide.
Performing Survey Campaign and Survey Resource Searches
When searching for survey campaigns or survey resources, you can perform simple or advanced searches, and then save your searches, with all the search parameters you entered, for reuse.
For both survey campaigns and survey resources, the methods for searching and saving searches are similar. In both cases, the saved searches are known as views.
Note: In this section, the terms "saved search" and "view" are used interchangeably.
Survey campaign views can only be used in survey campaign searches; survey resource views can only be used for survey resource searches.
This section consists of the following topics:
Survey Campaign and Survey Resource Search Overview
The diagram shows an overview of the features available when you search for survey campaigns or survey resources.
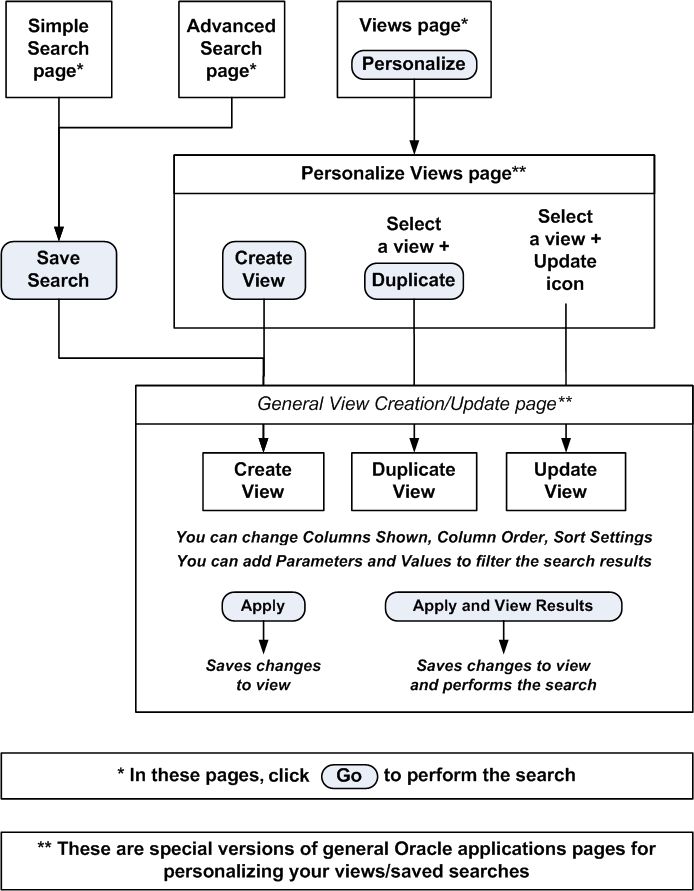
Both the initial Survey Campaigns page and the initial Survey Resources page appear as a Simple Search page with two regions:
-
Search region
-
Results region
You can search for survey campaigns or survey resources using three search pages: Simple Search, Advanced Search, or Views. You can switch between the search pages by clicking the appropriate Simple Search, Advanced Search, or Views button.
A view is a saved search. For simple or advanced searches that you want to repeat in the future, save them as views, and reuse them as needed.
Each of the search pages contains a Go button - when clicked, it performs the search.
The basic search process is as follows:
-
Select the search page that you want to use.
-
Prepare to perform the search as follows:
-
For simple searches, enter the search parameter.
-
For advanced searches, optionally add in extra search parameters from an extensive list, then enter your search parameters.
-
To use views, invoke a previously saved search or view.
-
-
Click Go to perform the search.
-
The results appear in the results region.
See Also
Performing Simple Searches
The Simple Search page enables you to use a key field as a search parameter.
Notes
-
Enter a full or partial value for the key field: Survey Campaign Name for survey campaign searches, or Resource Name for survey resource searches.
-
Click Go to perform the search.
The results appear in the results region of the page.
For details of more extensive searches, seePerforming Advanced Searches.
Saving Your Search
Whether you perform the search or not, you can click Save Search to save your search as a view, so that you can reuse it later. For details, see Creating and Personalizing Views.
See Also
Performing Advanced Searches
The Advanced Search page enables you to search using a more extensive set of search parameters than is available for simple searches. For example, you can add one or more of the following parameters: Base Tech Stack, Created By, Last Updated Date, Prototype, Script Name, Status, and Survey Campaign Name.
You can also specify that all conditions must be satisfied (the default case), or that any single condition is all that is necessary.
Adding Extra Search Parameters
The Advanced Search page contains a set of standard search parameters. You can select further columns from an extensive list to act as extra search parameters, as follows:
-
Click in the Add Another field, and select a column name from the list.
-
Click Add.
The page redisplays with your selected column name, and untitled condition operator and value fields beside it.
Repeat these steps for as many columns as you wish to add to the page as search parameters.
Entering Search Conditions and Performing the Search
-
For each search parameter that you want to search on, formulate a condition, with a condition operator and a value, as follows:
-
Select a condition operator.
The condition operators "is" and "is not" are available for all columns. In addition, for some fields, you can select "contains", "starts with", or "ends with".
-
Select or enter a value to complete the condition.
-
-
Optionally select the radio button to show table data when any condition is met, rather than the default of all conditions.
-
Click Go to perform the search.
The results appear in the results region of the page.
Saving Your Search
Whether you perform the search or not, you can click Save Search to save your search as a view, so that you can reuse it later. For details, see Creating and Personalizing Views.
See Also
Creating and Personalizing Views
Generally, you create a view when you decide to save the search parameters for a simple or advanced search for reuse. You can also create a view from scratch, with no previously entered search parameters.
The general view creation/update page is used to create a new view, duplicate a view, or update a view.
Prerequisites
When creating a view:
-
In the Simple Search or Advanced Search page, you clicked Saved Search, or, in the Views page, you clicked Personalize, then Create View.
When duplicating a view:
-
In the Personalize Views page, you selected a view, then clicked Duplicate.
When updating a view:
-
In the Personalize Views page, you selected a view, then clicked the Update icon.
Entering View Information
The general view creation and update page is an Oracle Applications Framework page, which enables you to customize your survey campaign or survey resource searches and the layout of the search results as follows:
General Properties
-
Name the view, if you are creating or duplicating a view. When updating a view, you can change the view name.
-
Optionally alter the default value, 10, for the number of rows to display in the results region.
-
If you want the current view to be used as the default view each time you log on, check Set as Default.
Column Properties
-
Select the columns which you want to appear in the search results. The values in the Columns Displayed list show the default selection of columns.
Use the Move and Remove links and arrows to move selected columns between the Available Columns list and the Columns Displayed list.
Use the Up and Down arrows to arrange the sequence of the columns in the Columns Displayed list. The columns as arranged from top to bottom will be displayed from left to right in your search results.
-
If you want to customize the headings for a selected column, or if you want to have totaling on numeric columns, click Rename Columns/Totaling and perform those customizations in the page that appears. Note that you can only select totaling for the end columns of the list.
Sort Settings
-
You can select whether you want the results sorted or not. If you decide to have sorted results, you can choose up to three columns to sort by.
Search Query to Filter Data in your Table
-
If you came to this page from a simple or advanced search page, this region is where the simple or advanced search parameters appear.
-
You can alter the entries here, and add further search parameters. For each additional search parameter, select a column name from the Add Another list of values, and click Add.
-
Optionally select the radio button to show table data when any condition is met, rather than the default of all conditions.
Saving the View and Optionally Performing the Search
After entering all the view information, click either Apply or Apply and View Results. The latter option applies the changes, then performs the saved search and displays the results of the search.
See Also
Using Views
Use this procedure to invoke a previously saved search.
Notes
-
In the Views page, select a View, and click Go.
The results appear in the results region of the page.
See Also
Creating Survey Campaigns and Cycles
The survey campaign is a structure that allows you to define the basic parameters for executing a script in a Web browser. The cycle is a child object of the survey campaign.
To create and save a survey campaign, you must:
-
Define a survey campaign name
-
Select the base technology stack
-
Provide a status
-
Identify whether the survey is a prototype
-
Define a cycle name
To meet execution requirements, you must also:
-
Identify the script to execute at runtime
If you want specific survey resources to display, you must also identify those resources. Additionally, you must subsequently create a deployment (as a child to the cycle) and activate the deployment.
For more information, see the Guidelines for Creating Survey Campaigns and Cycles.
Prerequisites
To create a survey campaign in the Survey Administration console:
-
When selecting a base technology stack, Oracle recommends using the OAF technology stack for all new survey campaigns. Oracle Applications are standardizing on this technology stack, which is why Oracle Scripting is undergoing migration to this technology. The JTT technology stack is deprecated in this release, and will be obsolete in a future release of Oracle Scripting.
Login
Log into Oracle applications using the Personal Home Page login, or the Single Sign-On login if implemented.
Responsibility
Survey Administrator
Guidelines for Creating Survey Campaigns and Cycles
-
The fields required to create and save a survey campaign and cycle include: Survey Campaign Name, Base Tech Stack, Status (required to be Open), Prototype status (selected or cleared), and Cycle Name.
-
To execute a survey campaign using the JTT technology stack, the following additional fields are required: Questionnaire Script, Header Section, Error Page, and Final Page. OAF survey campaigns require the same fields, with the exclusion of the survey resources.
-
You cannot change the base technology stack or the prototype status after a survey campaign is activated. To change either of these fields, you will have to recreate the entire survey campaign and all its child objects.
-
The Prototype option is recommended only for test survey campaigns, since its script does not lock, and since an active Prototype survey campaign cannot be converted into a standard locking survey campaign type.
-
An appropriate script serving as the survey questionnaire must be deployed to the applications database from Script Author before you can designate this script as the survey questionnaire.
-
Any survey resources intended for use with the survey campaign must already be defined, as described in the section Administering Survey Resources.
-
Survey campaigns to be executed in the OA Framework technology stack do not require any survey resources. However, if using them, the corresponding physical HTML files for defined survey resources must already be uploaded, or the URL to be used as a resource for error or final pages must already be identified. This process occurs at the time of survey resource definition.
-
Survey campaigns to be executed in the deprecated Java Technology Foundation (JTT) technology stack require, at minimum, a header section, error page, and final page resource defined. While the corresponding physical JSP files for defined survey resources need not exist on the server in order to create a survey campaign, they must reside in the appropriate directory in order to execute the survey questionnaire in a Web browser using the JTF technology stack.
-
Steps
-
From the Survey Administration console, click the Survey Campaigns tab.
-
Click Create.
The Create Survey Campaign page appears.
-
Enter the Survey Campaign Name.
-
Optionally enter a Description field.
-
From the Base Tech Stack list:
-
For survey campaigns intended for execution in the Oracle Applications Framework technology stack, select OA Framework.
Oracle recommends using this technology stack for all new survey campaigns.
-
For survey campaigns intended for execution in the deprecated Java Technology Foundation (JTT) technology stack, select Deprecated - JTT.
The JTT technology stack is deprecated in this release, and will be obsolete in a future release of Oracle Scripting.
Caution: Once you specify the base technology stack in this field and save the survey campaign, this information cannot be changed.
-
-
From the Status list, verify that the survey campaign status is Open.
The Allow Suspend/Resume field applies to the survey campaign, but the Allow Suspend/Resume list of values depends on whether the script associated with the survey campaign is suspendable.
Note: Either select the Questionnaire Script - see step 9 - before Allow Suspend/Resume, or reselect the Allow Suspend/Resume value after selecting the Questionnaire Script.
-
Select the Allow Suspend/Resume field.
You can select from the options: Allow Suspend, Always Suspend, Can't Suspend, when the Questionnaire script associated with the survey campaign is suspendable; if the associated script is not suspendable, the only option is Can't Suspend.
The Always Suspend option allows an administrator to designate a survey that, after being started, can only be suspended, and never marked as complete. This allows the same or other users to always be able to resume the survey.
-
If you want this survey campaign to be defined as a prototype, select the Prototype box.
Prototype and non-prototype survey campaigns differ as follows: the survey questionnaire script is locked when a non-prototype survey campaign is activated, but not in a prototype survey campaign. When a questionnaire script is locked, it cannot be modified again. This ensures data consistency for the results of the survey campaign across each respondent's answers.
Designating a survey campaign as a prototype allows survey campaign administrators more freedom to refine requirements for test survey campaigns by modifying the properties of a script (such as questions and branching) and then allows them to deploy the final version to a non-prototype survey campaign, where it is assured that the data will be consistent.
-
In the Activation Requirements area, click the flashlight icon to search for and select a Questionnaire Script field.
Note: Selecting the Questionnaire Script may affect the options available for the Allow Suspend/Resume field - see step 7.
-
For OA Framework survey campaigns, continue at step 16.
Survey Resources for JTT Survey Campaigns
-
In the Survey Resources area, click the Header Section flashlight icon to search for and select a Header Section resource.
Note: Survey resources must be defined before you can associate them with a survey campaign.
For JTT survey campaigns, header section, error page, and final page resources are required. Footer section resources are optional.
Physical files corresponding to the logically defined JSP survey resources are not required to create a survey campaign, but must be present in order to execute the campaign in a Web browser.
For more information, see Administering Survey Resources.
Note: You can search by either Logical Name - the survey resource name - or Physical Name.
For survey resources that are JSP files, the physical name is the name of the physical JavaServer Page file that must be uploaded to the OA_HTML directory on the applications server prior to survey runtime.
For JTT survey campaigns, only JSP resource types are displayed in the appropriate search pages.
-
Optionally, click the Footer Section flashlight icon to search for and select a Footer Section resource.
-
Click the Final Page flashlight icon to search for and select a Final Page resource.
-
Click the Error Page flashlight icon to search for and select an Error Page resource.
-
For JTT survey campaigns, continue at step 21.
Survey Resources for OA Framework Survey Campaigns
Note: OA Framework survey campaigns do not require survey resources. However, any survey resources to be associated with an OA Framework survey campaign must have been defined previously. For more information, see Administering Survey Resources .
-
If you do not want a Header Section or a Footer Section resource, continue at step 18.
Note: If you select neither a header section nor a footer section resource, no header section or footer section will appear on the HTML page at runtime.
-
Optionally, to designate a Header Section or Footer Section, in the Survey Resources area, click the appropriate flashlight icon to search and select the corresponding resource.
Note: You can search by either Logical Name - the survey resource name - or Physical Name.
For survey resources that are HTML files, the physical name is the name of the physical HTML file uploaded to the applications database at the time of resource definition.
For OAF header and footer sections, only HTML resource types are displayed in the appropriate search pages.
-
If you do not want a Final Page or an Error Page resource, continue at step 21.
Note: If final page or error page resources are not provided, a simple default page for the corresponding function will be displayed by the system at the appropriate time.
-
Optionally, to designate a Final Page or Error Page survey resource, click the appropriate flashlight icon to search and select the corresponding resource.
Note: You can search by either Logical Name - the survey resource name - or Physical Name.
For survey resources that are HTML files, the physical name is the name of the physical HTML file uploaded to the applications database at the time of resource definition.
For survey resources designated as a URL for Redirect, the physical name is the specific URL associated with the survey resource. No validation is performed on the specified URL.
For OAF error page or final page sections, any defined HTML or URL for Redirect survey resource types are displayed in the appropriate search pages.
-
Optionally, for error pages using an HTML resource type only, if you want error information to appear on the top of the designated error page (to help identify the nature of an error encountered at runtime), check the Display Error on Top box.
Specifying the Cycle
-
In the Create Cycle area, in the Cycle Name field, enter an appropriate cycle name for this survey campaign.
-
Click Apply.
The survey campaign and cycle are created, and all defined fields are saved to the database.
The Update Survey Campaign page appears.
This page is similar to the Create Survey Campaign page, but also contains a Deployments area, from which you can define a deployment for the cycle you defined in step 21.
-
To continue from this point to define a deployment, proceed to step 5 of Defining Deployments.
Viewing or Modifying Survey Campaign and Cycle Details
After a survey campaign is created, and before it contains any active deployments, you can view or modify any of its properties except the base technology stack.
After a deployment has been activated, survey campaign and cycle details that you can change include the description, survey resources, and cycle name. If you change the deployment status from active, you can then change the survey campaign status.
For idle or closed survey campaigns, you can change the description, status, questionnaire script, survey resources, and cycle name fields.
Use this procedure to view or modify survey campaign and cycle details.
Prerequisites
A survey campaign must already be created and saved.
Login
Log into Oracle applications using the Personal Home Page login, or the Single Sign-On login if implemented.
Responsibility
Survey Administrator
Steps
-
Click the Survey Campaigns tab.
-
Search for and retrieve the survey campaigns that you want to view or modify. For details, see Performing Survey Campaign and Survey Resource Searches.
-
In the search results list, click Update for the appropriate survey campaign.
-
In the Update Survey Campaign page, view survey campaign details or make changes as desired.
Note: If you want to change the status of an active survey campaign, you must first change the status of any of its active children deployments.
-
The only modifiable property for a cycle is the cycle name. For instructions on how to add or modify cycles, proceed to step 4 of Adding or Modifying a Cycle for an Existing Survey Campaign.
-
Click Apply to save your changes.
Cancelling a Survey Campaign from the Survey Campaigns List
Survey campaigns cannot be deleted when their status is Open.
Use this procedure to change the status of an open survey campaign to Cancelled from the Survey Campaigns list.
Prerequisites
A survey campaign must already be created and saved, but not yet activated.
Login
Log into Oracle applications using the Personal Home Page login, or the Single Sign-On login if implemented.
Responsibility
Survey Administrator
Guidelines
-
After a survey campaign is cancelled, its cycle is also cancelled.
-
After a survey campaign is cancelled, its status cannot be changed.
Steps
-
Click the Survey Campaigns tab.
-
Search for and retrieve the survey campaigns that you want to view or modify. For details, see Performing Survey Campaign and Survey Resource Searches.
-
In the search results list, select a status of Cancelled for each appropriate survey campaign.
-
Click Apply.
Deleting Survey Campaigns and Cycles
Use this procedure to delete one or more existing survey campaigns and cycles.
Prerequisites
-
A survey campaign cannot be deleted if it contains one or more cycles with an active deployment.
-
Only survey campaigns with a status of closed or cancelled can be deleted. You cannot delete open or idle survey campaigns.
Login
Log into Oracle applications using the Personal Home Page login, or the Single Sign-On login if implemented.
Responsibility
Survey Administrator
Steps
-
Click the Survey Campaigns tab.
-
Search for and retrieve the survey campaigns that you want to delete. For details, see Performing Survey Campaign and Survey Resource Searches.
-
In the search results list, select each of the survey campaigns that you want to delete, and click Delete.
Note: To delete multiple survey campaigns in one step, all survey campaigns that you want to delete must appear on the page. If you cannot adjust search criteria to view all relevant survey campaigns, you must search for and delete survey campaigns separately.
When a survey campaign is deleted, its child objects are also deleted.
Adding or Modifying a Cycle for an Existing Survey Campaign
One cycle is defined for each survey campaign upon creating the survey campaign. Survey campaigns can contain any number of cycles.
Use this procedure to modify the cycle name, or to add a cycle to an existing survey campaign.
Prerequisites
A survey campaign and cycle must already be created and saved.
Login
Log into Oracle applications using the Personal Home Page login, or the Single Sign-On login if implemented.
Responsibility
Survey Administrator
Steps
-
Click the Survey Campaigns tab.
-
Search for and retrieve the survey campaigns that you want to modify. For details, see Performing Survey Campaign and Survey Resource Searches.
-
In the search results list, click Update for the appropriate survey campaign.
-
To modify the name of an existing cycle, in the Cycles and Deployments area, do the following:
-
From the View By filter, select Deployment View.
-
Select the cycle name that you want to modify.
-
Click Update Name.
The Update Cycle page appears.
-
In the Cycle Name field, enter the new name that you want to assign to this cycle.
-
Click Apply.
-
-
To add a cycle to this survey campaign, in the Cycles and Deployments area, do the following:
-
From the View By filter, select Deployment View.
-
Click Add Cycle.
The Add Cycle page appears.
-
In the Cycle Name field, type an appropriate cycle name to add to this survey campaign.
-
Click Apply.
-
Defining Deployments
A deployment is a detailed set of execution requirements for conducting a survey campaign or establishing a Web script. At least one deployment must be defined for each cycle for a survey campaign.
Cycles can contain any number of deployments.
After a deployment is created, it must be activated (deployed) before a script can be executed in the Scripting Engine Web interface.
Use this procedure to define a deployment for a cycle.
Prerequisites
A survey campaign and cycle must already be created.
Login
Log into Oracle applications using the Personal Home Page login, or the Single Sign-On login if implemented.
Responsibility
Survey Administrator
Steps
-
Click the Survey Campaigns tab.
-
Search for and retrieve the survey campaigns where you want to define one or more deployments. For details, see Performing Survey Campaign and Survey Resource Searches.
-
In the search results list, for an appropriate survey campaign, click Update.
The Update Survey Campaign page appears
-
If more than one cycle is associated with this survey campaign, then in the Cycles and Deployments area, do the following:
-
From the View By filter, select Deployment View.
-
From the Cycle Name list, select the appropriate cycle.
The Update Survey Campaign page refreshes, showing the deployments specific to the selected cycle.
-
-
In the Deployments area, click Create.
The Create Survey Deployment page appears.
-
In the Deployment Name field, type the name of the deployment you want to create.
-
Verify that the media type listed is WEB.
At this time, no other media type is supported.
-
In the Status field, verify that the Open option is selected.
-
In the Deploy Date and Time field, select a deployment start date and time.
Note: The deployment start date and time cannot be before the current date and time.
-
In the Response End Date and Time field, select the response end date and time for this deployment.
-
In the Deployment Type field:
-
For standard deployments only, verify that the deployment type specified in the Deployment Type field is Standard. If not, select Standard.
Note: Standard deployments - sometimes referred to as "non-list-based" deployments - require no other deployment details.
Proceed to step 24.
-
For targeted deployments only, in the Deployment Type field, select Targeted.
The Create Survey Deployment page refreshes, displaying additional fields applicable to targeted deployments.
Note: Targeted deployments - sometimes referred to as list-based deployments - require extra details:
-
Detailed information to specify a targeted a list of possible survey respondents - functionality provided by Oracle Marketing
-
Details regarding invitations and reminders sent to the targeted list members - functionality provided by Oracle One-to-One Fulfillment.
Proceed to the next step.
-
-
-
In the Hosting Options field, select a hosting option based on your survey campaign requirements, using the following guidelines:
-
Standalone deployments require guest user authentication. These are typically used for targeted survey campaigns, or for surveys or Web scripts that are not associated with self-service Web applications. Upon completion of the script, the Oracle Applications session is terminated. Unless the URL is otherwise customized, the URL for JTT survey campaigns uses the IESSVYMAIN.JSP template, and for OAF survey campaigns uses the OA.JSP template.
-
Menu Based hosting for targeted deployments using the OA Framework base technology stack is not supported.
-
Menu Based deployments require authentication from an existing Oracle Applications session. These are typically used for surveys or Web scripts executed when the user is already logged into an Oracle Applications session and using a self-service Web application; the authentication and database connection information for the current applications session are used to provide the privileges to execute the Scripting Engine Web interface. That application's the tab-based menus are hosted in the survey or Web script user interface. Upon completion of the script, the Oracle Applications session is maintained. Unless the URL is otherwise customized, this uses the IESSVYMENUBASED.JSP template.
-
-
Optionally, if you want to execute the survey using a different Apache Web server or Web server port, then in the Survey URL field, change the survey URL parameters as required.
This field automatically populates with the Web server and port information for the current Oracle Applications session.
If you need to point this to a second Apache Web server (for example, to execute a survey outside the corporate firewall), then type the name of the Web server hostname including domain, port, and reference to HTML bin, ending with a slash. For example, enter:
http://server2.company.com:8888/OA_HTML/
For more information, see the topic Survey URL in the Oracle Scripting User Guide.
-
Click the List Name flashlight icon to search for and select the Oracle Marketing list that identifies the target audience.
-
Click the Invitation Template Name flashlight icon to search for and select the Oracle One-to-One Fulfillment template associated with the desired invitation master document (which in turn is associated with a query).
-
In the Invitation E-mail Subject Heading field, enter the name that you want to appear as the subject line of the outgoing message created using the invitation master document.
For example, enter Please participate in our survey.
-
If no reminders are required, continue at step 22.
-
Click the Reminder Template Name flashlight icon to search for and select the Oracle One-to-One Fulfillment reminder master document.
A template identifies a master document (which in turn is associated with a query). In this case, you want to specify a template associated with the appropriate reminder master document. If survey campaign requirements dictate, this may be the same template used to specify the invitation.
-
In the Reminder E-mail Subject Heading field, enter the name that you want to appear as the subject line of the outgoing message created using the reminder master document.
For example, enter Reminder: survey closes last day of the month!
-
In the Number of Reminders field, enter the integer number which determines how many reminders will be automatically sent to all list members.
Note: Upon request, additional reminders can be sent manually regardless of the value entered in this field.
-
In the Reminder Interval In Days field, enter the integer number which represents, in days, the span of time that will pass between reminders to be sent automatically to all list members.
To determine this value, divide the number of reminders by the duration of the deployment (in days).
-
In the Maximum Responses Per Person field, enter the integer that determines how many times an individual (list member) can participate in a survey or execute a Web script.
This restriction is based on the unique survey URL for a list member, which includes both the deployment identification code and the unique respondent identification code.
Note: This is a required field. If no maximum applies, type 0 in this field.
-
Optionally, in the Target Response Percent field, type an integer between 1 and 100.
This value is an administrator-defined target percentage, used in survey reports accessible by users of Oracle Business Intelligence. Reports compare the target percentage indicated against the total number of responses received for a deployment. Thus, the value is provided as a report metric, and is not used to enforce any survey campaign-level business rules.
-
Click Apply.
To modify deployment details or activate a deployment, proceed to step 6 in Viewing or Modifying Deployment Details.
Viewing or Modifying Deployment Details
Use this procedure to view or modify details for an existing deployment, or to activate a deployment.
If performing this procedure immediately after creating or updating a deployment, start at step 6.
Prerequisites
A survey campaign, cycle, and deployment must already be created.
Login
Log into Oracle applications using the Personal Home Page login, or the Single Sign-On login if implemented.
Responsibility
Survey Administrator
Steps
-
Click the Survey Campaigns tab.
-
Search for and retrieve the survey campaigns that you want to modify. For details, see Performing Survey Campaign and Survey Resource Searches.
-
In the search results list, click Update for the appropriate survey campaign.
-
In the Cycles and Deployments area, if the cycle with which the desired deployment is associated is not displayed, then from the Cycle Name list, select the appropriate cycle.
-
In the Deployments area, from the Deployment Name column, click the appropriate deployment name.
The Update Deployment page appears.
This page has two views.
-
In the deployment view, you can modify deployment information or activate this deployment.
-
In the response view, you can see the results of any responses received for this deployment.
-
-
Select Deployment View.
-
If you want to view or modify deployment details, then do the following:
-
Optionally, to view deployment details specific to targeted deployments (if not already displayed), then in the Deployment Type field, select Targeted.
The Update Deployment page refreshes, displaying additional fields applicable to targeted deployments. For field details, see Defining Deployments.
-
Make any changes as appropriate.
-
When satisfied, click Apply.
-
-
If you want to activate this deployment, click Activate.
Note: This option is only available if the deployment is not already active.
The Update Deployment page refreshes. For an active deployment, the only editable fields include Status and Response End Date and Time.
For active standard deployments, in the Hosting Options area, the Survey Web URL field contains an active hyperlink to the executable deployment, including the message Please click here to take the survey.
-
For active standard deployments, in the Hosting Options area, the Survey Web URL field contains an active hyperlink to the executable deployment, including the message Please click here to take the survey.
-
For active targeted deployments, the Survey Web URL field contains the URL of the current Apache Web server session and port, Oracle Applications directory, and the appropriate JSP page based on hosting option. Since each respondent has an identification code included as a parameter in their unique survey URL, targeted deployments cannot list a single survey URL.
-
For targeted deployments for which the SUBMIT GROUP FM REQUEST FROM IES concurrent program has not yet executed, only the concurrent request ID appears. Once the fulfillment request is executed and the page is updated, the fulfillment request ID also appears.
-
If the fulfillment request ID does not appear, and the Activate button reappears, the concurrent program to submit the fulfillment request has failed.
-
-
If you want to participate in this survey:
-
For standard deployments, access the URL in the Survey Web URL field.
Note: If you access this link using the same Web browser (for example, to test this deployment), you will invalidate your current Oracle Applications session. This will require a subsequent login to view details in the Survey Administration console.
-
For targeted deployments, access an invitation e-mail message sent from the fulfillment server and access the unique URL it contains.
-
Deleting Deployments
Use this procedure to delete one or more deployments. Deleting a deployment does not otherwise affect the parent cycle, or its parent object, the survey campaign.
Prerequisites
-
A deployment must exist as a child to a parent survey campaign and cycle before you can delete the deployment.
-
The deployment must not be active.
Login
Log into Oracle applications using the Personal Home Page login, or the Single Sign-On login if implemented.
Responsibility
Survey Administrator
Steps
-
Click the Survey Campaigns tab.
-
Search for and retrieve the survey campaigns that you want to modify. For details, see Performing Survey Campaign and Survey Resource Searches.
-
In the search results list, click Update for the appropriate survey campaign.
-
In the Cycles and Deployments area, if the cycle with which the desired deployment is associated is not displayed, then from the Cycle Name list, select the appropriate cycle.
-
In the Deployments area, select each deployment that you wish to delete, and click Delete.
Viewing Responses Received
Use this procedure to view individual responses to a script executed in a Web browser.
Prerequisites
-
A survey campaign, cycle, and deployment must already exist.
-
At least one deployment must be active.
-
At least one individual must already have executed the appropriate script in a Web browser. For targeted survey campaign deployments, at least one list member must have responded by taking a survey.
-
You must know the specific survey campaign, cycle and deployment for which you want to review individual responses.
Login
Log into Oracle applications using the Personal Home Page login, or the Single Sign-On login if implemented.
Responsibility
Survey Administrator
Steps
-
Click the Survey Campaigns tab.
-
Search for and retrieve the survey campaigns that you want to modify. For details, see Performing Survey Campaign and Survey Resource Searches.
-
In the search results list, click Update for the appropriate survey campaign.
-
In the Cycles and Deployments area, if the cycle containing the desired deployment is not displayed, then from the Cycle Name list, select the appropriate cycle.
-
In the View By area, select Response View.
The Deployments area displays each deployment for the selected cycle, with response-related statistics.
-
You can view responses for a specific deployment from either the deployment view or the response view:
-
From the deployment view, start by clicking the Update icon for the deployment.
-
From the response view, start by clicking the Deployment Name link.
-
-
In the Update Deployment page, select Response View.
Individual responses received for this deployment (if any) are listed in the Responses table.
-
In the Responses area, click the icon in the Answer column for a response.
The Survey Answers page appears for this respondent. Below information for the survey campaign, cycle, deployment and the response date, the Answers table appears. This table contains an expandable navigation tree for the selected respondent.
-
To expand or collapse all navigation trees for each panel or question for this respondent, click Expand All or Collapse All at any time, as appropriate.
In the fully expanded view, subsequent navigation trees appear for each panel and question. In the fully collapsed view, only respondent information is visible.
-
When collapsed, click the triangle marked with a plus sign to view respondent answer information hierarchically. The hierarchy, from top to bottom, is respondent, panel name, question in panel, answer choice in question (if relevant), and respondent's selected answer.
-
For any panel or question, from the Focus column, click the focus icon to focus in on that aspect of the response.
An uncluttered view of the panel or question appears. Navigation links at the top of the table allow you to navigate back to the parent question or panel.
-
To view all the questions in a panel, click the appropriate panel's navigation tree.
Additional rows appear, one for each question in the panel. Each row contains its own expandable navigation tree to view any answer choices or lookup values included in the question.
-
To view the answer choices available and see which choice the respondent made, click the appropriate question's navigation tree.
The answer choice selected by this respondent has an entry in the Answer column of the table.
Additional rows appear, one for each question in the panel. For each answer choice or lookup value provided in this question, another row appears. For questions with only one possible answer choice, only one row appears.
Sending Reminders Manually to List Members
Use this procedure to manually send a reminder message to a specified list member as part of a survey campaign deployment. This procedure results in initiating a fulfillment request to send out the reminder, just as if the reminder were scheduled. This will not interfere with the schedule for any currently scheduled reminders.
Prerequisites
-
A survey campaign, cycle, and deployment must already exist.
-
At least one deployment must be active.
-
The active deployment must be targeted (include valid list criteria).
-
The active deployment must include reminder information in the deployment definition.
-
You must know, or be able to determine, the list member for whom you want to send reminders.
Login
Log into Oracle applications using the Personal Home Page login, or the Single Sign-On login if implemented.
Responsibility
Survey Administrator
Guidelines
-
A confirmation message when manually sending a reminder does not indicate that the reminder was successfully sent to the list member. Instead, this indicates that the fulfillment request is successfully sent to the fulfillment server.
-
To confirm delivery, sign into Oracle One-to-One Fulfillment as a fulfillment administrator.
Steps
-
Click the Survey Campaigns tab.
-
Search for and retrieve the survey campaigns that you want to modify. For details, see Performing Survey Campaign and Survey Resource Searches.
-
In the search results list, click Update for the appropriate survey campaign.
-
In the Cycles and Deployments area, if the cycle containing the desired deployment is not displayed, then from the Cycle Name list, select the appropriate cycle.
-
In the View By area, select either Deployment View or Response View.
You can view responses for a specific deployment from either the deployment view or the response view:
-
From the deployment view, start by clicking the Update icon for the deployment.
-
From the response view, start by clicking the Deployment Name link.
-
-
In the Update Deployment page, select Response View.
Individual responses received for this deployment (if any) are listed in the Responses table.
-
From the Send Reminder column, click the Send Reminder icon for the appropriate list member.
If successful, a confirmation message appears.
Note: Reminders can only be sent manually for active targeted deployments for which reminder details are established.
Setting Up Invitations and Reminders
Overview of Invitations and Reminders
When an enterprise conducts an Oracle Scripting survey campaign using one or more targeted deployments, members of an Oracle Marketing list are sent an invitation to participate in a survey or Web script. Each invitation is an e-mail message in HTML format, sent from the fulfillment engine (a component of Oracle One-to-One Fulfillment).
If enterprise requirements dictate, and a survey deployment is set up accordingly, subsequent e-mail messages can be sent (either to specific list members, manually, or to all list members, on a scheduled basis), reminding them of their eligibility to participate. These are reminders. Invitations and reminders are fulfillment master documents.
When a list member receives the invitation or reminder e-mail message, and enters the URL into an Oracle Applications-compatible Web browser (or clicks the link from an appropriately configured e-mail client), the designated survey questionnaire script executes in the client's Web browser. List members who respond to the request and execute an Oracle Scripting transaction are known as respondents.
Script execution in this manner comprises use of the Scripting Engine Web interface. Based on the intended purpose of the script and the details of the survey deployment, this is referred to either as executing a Web script or taking a survey.
Administration for Targeted Deployments
From an administration perspective, Oracle One-to-One Fulfillment master document, query, and template administration are required for targeted (list-based) survey campaign deployments. When setting these up, each required HTML master document is created, and then associated with a survey list query. The query contains specific structured query language (SQL) statements which obtain from the Oracle Marketing list, at minimum, the party ID and e-mail address of the list member, and generates a functional, unique survey URL. Each master document is then associated with an Oracle One-to-One Fulfillment template.
When a survey administrator designates that the deployment type is targeted, additional deployment parameters can be defined. Among the required deployment details for a targeted deployment, the administrator specifies the Oracle Marketing list, identifies the template for the invitation, and specifies the e-mail subject line for the invitation. Optionally, if reminders are required, then the reminder template, reminder e-mail subject heading, number of reminders, and reminder interval information is specified.
Administration of master documents, queries, and templates is typically a function of a fulfillment administrator. This section includes a discussion of the theory and suggested Oracle One-to-One Fulfillment administration steps required for executing targeted survey deployments.
The Survey Administration console includes an Invitations tab. This tab hosts some functionality from Oracle One-to-One Fulfillment, including the ability to administer master documents, templates, and queries, and to view status and request history.
Note: You must have the fulfillment administrator role to access this tab; for more information, see Granting JTF Roles.
The full functionality of Oracle One-to-One Fulfillment can be accessed using the Fulfillment Administration console.
For more information on the fulfillment topics in this section, refer to Oracle One-to-One Fulfillment Implementation Guide.
Running Targeted Deployments
When a targeted deployment is activated, a SUBMIT GROUP FM REQUEST FROM IES concurrent request is generated which is scheduled to run at the deployment start date and time. When the start date and time are equal to or past SYSDATE, the Oracle One-to-One Fulfillment Mass Request API is invoked. This API causes information to be sent to the fulfillment server, resulting in the execution of the survey list query. The records returned from the Oracle Marketing list are parsed, and for each list record, the merge data is inserted into an HTML e-mail message which is sent to the appropriate mail server and e-mailed to the list member. As a result, each list member is sent an invitation or a reminder to participate in the survey, including the appropriate survey URL.
This section includes the following topics:
See Also
Oracle One-to-One Fulfillment Terminology
A Template is a high-level definition of one or more Oracle One-to-One Fulfillment master documents, associated queries, and any related collateral. Templates may also include campaign specifications. From an Oracle Scripting perspective, targeted survey deployments call upon a template that identifies an invitation master document (and its associated query). If reminders are also required for the survey deployment, and the text of the reminder document differs from the invitation, a second template defining the reminder master document and its associated query is required. No collateral is typically associated with a survey campaign.
A Master document is a message sent from Oracle One-to-One Fulfillment. These typically include merge fields populated by an associated SQL query. From a survey perspective, master documents are invitation or reminder messages in HTML format that are sent by e-mail from the fulfillment engine to members of a defined Oracle Marketing list.
Merge fields are data elements in an Oracle One-to-One Fulfillment master document surrounded by merge field delimiters. When a fulfillment request is executed, a query is performed to retrieve the merge data from the table columns or views specified in the query. For each record in the list, these merge fields are replaced with the appropriate data obtained by the query, as a separate HTML document sent to the e-mail server for appropriate routing. For each merge field used in a master document, there must be one corresponding request in the query to retrieve the appropriate data. (The converse is not true; in other words, the query can request information that is not used as a merge field.)
Merge fields in any survey list query must include, at minimum, the survey URL. Providing that the data is returned by the associated query, other merge fields can be included in the relevant master document if desired. For example, master documents using the seeded survey list query may also include as merge fields the first and last name, e-mail address, and customer ID (referred to in TCA as the party ID) of the list member.
Queries are database requests for information constructed in structured query language (SQL). Each Oracle One-to-One Fulfillment master document must have an associated query which obtains information populated into the resulting merged document in placeholders called merge fields.
A query must contain a request for each data element included as a merge field in the master document. The query may contain requests for additional data elements as well (providing the requests are valid), regardless of whether the data elements requested in the query are used. For example, you can construct a single query that requests all information used to populate an invitation master document and a reminder master document, even if they include different merge fields.
A single query can be associated with any number of master documents. Return data from a successfully executed query is merged with the master document. In this process, the master document is replicated once for each row returned. For every replicated copy, each merge field placeholder is replaced with its corresponding data element from the query. The amount of merged master documents will match the number of list records in the Oracle Marketing list, one per list member. Each merged document is then sent using e-mail to the e-mail address of each list member by the fulfillment server.
The Seeded Survey List Query is a SQL query entitled IES Template Query for Targeted Survey Deployments. This query is seeded with an appropriate installation of Oracle Interaction Center Family Pack R or later release, or Oracle Scripting release 11.5.10 or later. This query will return, for each list member, the following data elements, all of which may be used as a merge field in an appropriate master document:
| Data Element | Source Table or View | Source Column | Merge Field Name | Description |
|---|---|---|---|---|
| Survey URL | IES_SVY_HOSTING_PROF_V | SURVEY_URL | SURVEY_URL | This provides the JSP template used. Data from this column is concatenated with text strings and values from other columns to construct a valid Survey URL. |
| Survey URL | IES_SVY_DEPLYMENTS_V | SURVEY_DEPLOYMENT_ID | SURVEY_URL | This provides the deployment ID of the active deployment. Data from this column is concatenated with text strings and values from other columns to construct a valid Survey URL. |
| Survey URL | IES_SVY_LIST_ENTRIES_V | RESPONDENT_ID | SURVEY_URL | This provides the respondent ID of the list member, which tracks to a party ID. Data from this column is concatenated with text strings and values from other columns to construct a valid Survey URL. |
| Email address | AMS_LIST_ENTRIES | EMAIL_ADDRESS | EMAILADDRESS | Email address of list member. Usually not included in the master document, but passed to the fulfillment server for appropriate routing. |
| Party ID | AMS_LIST_ENTRIES | PARTY_ID | CUSTOMER_ID | The party_id of the list member, often referred to as a customer ID. |
| First name | AMS_LIST_ENTRIES | FIRST_NAME | FIRST_NAME | Not a required field. The list member's first name. |
| Last Name | AMS_LIST_ENTRIES | LAST_NAME | LAST_NAME | Not a required field. The list member's last name. |
Fulfillment Activities for Targeted Survey Deployments
For ease of administration, survey administrators have access to an Invitations tab in the Survey Administration console. This tab gives access to the Oracle One-to-One Fulfillment functions required for performing survey administration for targeted deployments.
From the Invitations tab, survey administrators can administer fulfillment master documents, templates and queries, and verify fulfillment request status and history.
Some Functions Not Available to Survey Administrators
Administration of fulfillment servers or fulfillment groups is intended to be performed by a knowledgeable fulfillment administrator. As such, these functions (available in the Fulfillment Administration console using the Server and Group tabs) are excluded from the user interface in the Survey Administration console. Additionally, if fulfillment requests have successfully been sent to the fulfillment server but have failed to execute, a fulfillment administrator is required to determine the cause and to correct the error. A targeted deployment with a status of Active indicates only that the fulfillment request was successfully submitted to the server, and does not indicate successful transmission of the invitation or master document e-mail messages.
Since Oracle One-to-One Fulfillment implementation and functionality is a prerequisite of survey operations, a fulfillment administrator should already exist in the enterprise who has access to the Fulfillment Administration console to perform these administration steps.
Required Tasks
From an Oracle One-to-One Fulfillment perspective, you need to accomplish the following tasks to create and administer invitations and reminders:
-
Create and format a master document in HTML
-
Insert merge field references into the master document
-
Upload the master document to MES
-
Create a SQL query to populate merge fields into master document
-
Associate the query to a specific master document
-
Create a fulfillment template that identifies a master document and its associated query
Recommended Order of Steps
Three Approaches
If you have already created an HTML document to serve as your invitation or reminder master document, you can upload this to MES from the Survey Administration console (Invitations tab > Master Document subtab > Upload). Then you can associate the master document with a query you have created or identified, and then create a template that includes that master document (the query is associated at the master document level).
Alternatively, Oracle One-to-One Fulfillment includes a master document editor. Using this feature from the Survey Administration console (Invitations tab > Master Document subtab > Create and Upload), you can quickly and easily perform most tasks associated with the creation of invitation or reminder master documents and their requisite queries. In sequence, you can create a SQL query, validate the query, create and format a customized master document, insert merge fields identified by the query, and automatically associate the query with the master document. Following this, you simply create a template, associating it with your master document.
The third approach is to combine the strengths of the previous two approaches described above by creating a master document using the master document editor (Invitations tab > Master Document subtab > Create and Upload), but associating it with an existing query (instead of creating a new SQL query as part of the master document creation process). For this approach, you must insert custom merge fields into your master document. Each corresponds to the alias or merge field data returned by the associated SQL query. If you want to take advantage of the seeded survey list query, but do not yet have a master document, this approach is appropriate.
Order of Steps
The recommended order of steps for administering invitations and reminders using Oracle One-to-One Fulfillment functionality is as follows:
-
Identify merge fields to be populated in the master document, and identify locations of tables or views in the Oracle Applications database schema from which the merge fields will be populated. At minimum, you must include the survey URL as a merge field.
-
Identify an existing SQL query, or create a SQL query, including a request for any data corresponding to a merge field in the master document. At minimum, the query must include the party ID and e-mail address of the list member, as well as SQL to obtain the appropriate survey URL.
-
If desired, you can use the seeded IES Template Query for Targeted Survey Deployments query, which also includes the first and last names of the list member.
-
Oracle strongly recommends following a defined format for the column aliases and content used for a survey list query. At minimum, syntax from the seeded query indicating column names and aliases for the three required columns (party_id, email_address and the survey URL) must be included in your query to ensure the appropriate data is returned and processed correctly.
-
An example of a query using this format is the seeded IES Template Query for Targeted Survey Deployments. This query includes the three required data elements (party ID, email address, and survey URL), plus the list member's first and last name.
To create a custom query, Oracle recommends that you copy all of the content of the SELECT clause of the seeded survey list query, and add additional columns to the SELECT clause if required. (If not included in your master document, you can remove the SQL to obtain the list member's first and last names.) Then, add additional constraints to the WHERE clause as needed.
-
A single query can be used for any number of master documents, providing that the query retrieves the data for each required merge field in each master document associated with the query.
-
-
Create invitation and reminder master documents in HTML using a text editor or HTML tool of your choice, or the Oracle One-to-One Fulfillment master document editor.
If using the master document editor with an existing query, specify each merge field as a custom merge field by entering the column or alias name in the Custom Merge field and clicking Insert.
-
Upload master documents to MES.
-
If you have a custom HTML master document, upload it from the Survey Administration console (Invitations tab > Master Document subtab > Upload) or from the Fulfillment Administration console (Template tab > Master Document subtab > Upload).
-
If you created your master document using the master document editor feature of Oracle One-to-One Fulfillment, this step is performed automatically.
-
-
Associate each required master document with its query.
-
On the Master Document page, locate the appropriate master document, select the existing query from the Query list, and click Update.
-
If defining the query using the master document editor feature of Oracle One-to-One Fulfillment, the association between master document and query is performed automatically.
-
-
Define templates.
-
One template is required for each master document. If a survey campaign includes invitation and reminder documents with the same text, only one template need be created. If a survey campaign includes invitation and reminder documents with different content, create one template for each master document.
-
To define a template, from the Invitations > Template subtab, click Create, enter a name and optional information, and click Continue.
-
-
Associate template with the required master document.
From the View Template page, in the Master Documents area, search for and select the invitation or reminder master documents you want to associate with this template (as requirements dictate). When satisfied, click Update.
References
For more information, refer to Oracle One-to-One Fulfillment Implementation Guide.
Invitations
Typically, an invitation is an HTML message inviting list members to take a survey. The invitation is referred to in Oracle One-to-One Fulfillment as a master document. Using Oracle One-to-One Fulfillment APIs, invitations can be customized by populating data from RDBMS tables or views.
The HTML invitation contains placeholders called merge fields, in which information from a query is placed by the fulfillment server upon execution. Each invitation must include, at minimum, a unique survey URL. Based on the deployment ID (dID) and respondent ID (rID) numbers, a unique URL is generated for each list member. In this way, if a survey campaign has a business rule to allow list members to only take a survey one time, this rule can be enforced. Other merge fields often used include the list member's first and last name and identifying information such as customer ID number.
Reminders
If required by a survey campaign, reminders can also be sent to list members. Like the invitation, a reminder is an e-mail message identified in Oracle One-to-One Fulfillment as a master document. It can be the same e-mail message initially sent to list members (in which case, only a single template is required), or it can be a different message (requiring a second template to identify the master document and its associated query).
Reminders typically emphasize the response end date of the specific deployment for that survey campaign. Like invitations, each reminder must include the survey URL as a merge field, and must have a corresponding request for that data field in its associated query.
Unlike invitations, reminders are an optional feature. In addition to being sent automatically (based on reminder requirements defined at the deployment level), reminders can be sent by a survey administrator manually upon request.
If using the same template and master document, you have the option of using a different e-mail message subject. If using a separate e-mail master document as the reminder, you may choose to word it differently to emphasize the deadline.
Since queries can be defined once and used many times, you can use for the reminder master document the same query used by the invitation. This is true even if the reminder requires merge fields not used in the invitation master document. For example, in a reminder you may want to emphasize the deadline by which list members must participate in the survey (this equates to the deployment end date). Even if this information was not included in the original invitation, a single query can be shared among the two HTML documents; the only information returned by the query that is required to be included in the invitation is the survey URL.
Sample Invitation Master Document
The following is a sample invitation master document. Master documents for your enterprise may appear substantially different. For example, this sample includes four merge fields (signified below by open and close guillemet characters, otherwise known as angle brackets).
Upon delivery, for each list member, one e-mail message is generated, containing the first and last name of the list member, their customer number, and the unique survey URL for this deployment. All of these merge fields are included in the seeded query IES Template Query for Targeted Survey Deployments (described in the Seeded Survey List Query section). The only merge field required in the master document is the survey URL.
Sample Invitation Text
Following is the sample text of the e-mail message:
-
Dear <<FIRST_NAME>> <<LAST_NAME>>:
Thank you for your recent order on account <<CUSTOMER_ID>>. We appreciate your business, and hope you enjoyed a positive customer experience.
To help us evaluate our product offerings and ensure the highest levels of customer service, please take a moment to participate in this survey regarding your recent purchase. Click <<SURVEY_URL>> to begin (or type this URL into your Web browser).
Sincerely,
Vision Customer Service
Sample Invitation Code
Following is the HTML code of the above e-mail message master document. Note that the open and close guillemet characters which surround merge fields are designated in the HTML sample using ASCII references.
<!DOCTYPE HTML PUBLIC "-//W3C//DTD HTML 4.0 TRANSITIONAL//EN"> <HTML> <HEAD> <META HTTP-EQUIV="Content-Type" CONTENT="TEXT/HTML"> <META NAME="Author" CONTENT="Vision Customer Service"> <TITLE>Customer Service Survey Invitation</TITLE> </HEAD>
<BODY BGCOLOR="WHITE">
<P>Dear «FIRST_NAME» «LAST_NAME»:</P>
<P>Thank you for your recent order on account «CUSTOMER_ID». We appreciate your business, and hope you enjoyed a positive customer experience.</P>
<P>To help us evaluate our product offerings and ensure the highest levels of customer service, please take a moment to participate in this survey regarding your recent purchase. Click «SURVEY_URL» to begin (or type this URL into your Web browser).<P>
<P>Sincerely,</P><BR>
<P>Vision Customer Service</P>
</BODY> </HTML>
Sample Reminder Master Document
The following is a sample reminder master document. Master documents for your enterprise may appear substantially different. In this sample, the reminder uses three of the four merge fields used in the original invitation, and is associated with the same query. Note, however, that a reminder can include different merge fields, as long as the associated query provides that information.
Sample Reminder Text
Following is the sample text of the e-mail message:
Dear <<FIRST_NAME>> <<LAST_NAME>>,
Several weeks ago, you were sent an invitation to participate in our customer satisfaction survey. At the end of this month, we will complete the survey process, and collate the results to see how to best improve customer satisfaction.
If you would like your opinions to be considered, please click <<SURVEY_URL>> to participate in this online survey using your Web browser.
As always, we appreciate your business and look forward to your opinions to enable us to improve our responsiveness.
Sincerely,
Vision Customer Service
Seeded Survey List Query
As of Oracle Scripting release 11.5.10 or later, or Interaction Center Family Pack R or later, Oracle Scripting provides a new seeded query (IES Template Query for Targeted Survey Deployments) that is included in the list of Oracle One-to-One Fulfillment queries.
Upon processing, this query provides data for the <<FIRST_NAME>>, <<LAST_NAME>>, <<CUSTOMER_ID>> and <<SURVEY_URL>> merge fields, as used in the above master document samples.
Each master document may have its own query. Conversely, the same query can be used any number of times for various master documents. To be successful, the query must contain a structured query language (SQL) request for each merge field in each associated master document. A single query may contain multiple SQL requests, including requests for data that are not used in your master document. The SQL in the query must be properly constructed to return the requested data from tables or views, regardless of whether the data is required for your master document.
Following is the content of the seeded query:
select
ale.first_name FIRST_NAME,
ale.last_name LAST_NAME,
'<a href='||ihp.SURVEY_URL||' dID='||asda.survey_deployment_id
||'&rID='||isle.respondent_id||'> here </a>' SURVEY_URL,
ale.party_id CUSTOMER_ID,
ale.email_address EMAILADDRESS
from
IES_SVY_LIST_ENTRIES_V isle,
ams_list_entries ale,
IES_SVY_DEPLYMENTS_V asda,
IES_SVY_HOSTING_PROF_V ihp
where
ale.list_entry_id = isle.list_entry_id
and isle.survey_deployment_id =
asda.survey_deployment_id
and ihp.survey_deployment_id = asda.survey_deployment_id
and asda.survey_deployment_id = :deployment_id
Oracle strongly recommends following the format used above for the column aliases and content in any survey list query.
To customize your own survey query, Oracle recommends the following:
-
Copy all of the content of the SELECT clause of the seeded survey query.
-
Optionally, if list member names are not required, remove the appropriate SQL code requesting this information.
-
Following the format above, in the SELECT clause, add relevant SQL code to return additional merge field data.
-
Following the format above, in the WHERE clause, add relevant SQL code to impose additional constraints on the return data, if required.
New Requirements for Enterprises Upgrading to Release 11.5.10 or Later
Existing Oracle Scripting implementations using targeted survey deployments must modify the query or queries in use when upgrading to this release or later. From release 11.5.10 onward, each survey list query must contain, at minimum, the select clause in the query below. Other fields must be added as necessary.
-
Master documents must be associated with an updated query to ensure continuous, uninterrupted function. If merge fields are restricted to the SURVEY_URL and any or all of the following merge fields (FIRST_NAME, LAST_NAME, and CUSTOMER_ID), you can associate the invitation or reminder master document with the seeded IES Template Query for Targeted Survey Deployments query. No other changes are needed.
-
When creating custom queries, Oracle strongly recommends that you preserve the exact syntax from IES Template Query for Targeted Survey Deployments to ensure that the survey URL will be inserted into the invitation or reminder e-mail message.
-
Master documents that contain merge fields in addition to the three mentioned above will require changes as appropriate. Oracle recommends replacing your current query SELECT statement with the updated language in the seeded query, and then customizing it to select data for the other merge fields or to add new constraints, as required. Then associate this revised query to each master document as appropriate.
Using the Master Document Editor
You can use the Master Document Editor feature of Oracle One-to-One Fulfillment to create a SQL query, create a master document (automatically stored in the MES knowledge repository) to use as an invitation or reminder, associate the query automatically with the master document, and add merge fields enabled by the query to the master document.
Alternatively, if you want to create a new master document but associate it with an existing query, you can create the master document, insert custom merge fields, and then (from the Master Document page) associate the appropriate existing query to a listed master document.
Use the following procedure to create a new master document and associate an existing query with it, or to create a SQL query, create and format a new master document, and include in the master document merge fields from the query.
Login
Log into Oracle applications using the CRM Home Page login, or the Single Sign-On login if implemented.
Responsibility
Survey Administrator or One-to-One Fulfillment Administrator
Prerequisites
-
A fulfillment server must already exist.
-
User must have the JTF_FM_ADMIN role to perform this function.
Steps
-
If using the Fulfillment Administration console, click the Template tab.
-
If using the Survey Administration console, click the Invitations tab.
-
Click the Master Document subtab.
The Master Document page appears.
-
From the Master Document page, click Create and Upload.
The Master Document Editor page appears.
-
In the Master Document Name field, type a unique name for the master document.
-
If you want to define a new master document but associate it to an existing SQL query, continue at step 8.
-
If you want to define a new SQL query, associate the query to this master document, and use merge fields identified in the query in your master document, do the following:
-
In the SQL Merge Field field, click Create Query.
The SQL Editor page appears.
-
In the Query Name field, type a unique name for this query.
-
Optionally, in the Query Description field, type a description for this query.
-
In the SQL Query field, using well-formed structured query language, type or paste the contents for your query. It must include, at minimum, SQL code to obtain a valid survey URL.
For example, to create a query to obtain a list member's first name, last name, e-mail address, party ID, and valid survey URL, copy the contents of the sample query from Seeded Survey List Query, and paste into this field.
-
Click Validate SQL and Save.
The SQL Editor page refreshes. For any merge field that requires a constraint to be defined, you will be directed to enter the constraint value or range.
-
If prompted, enter constraints for each merge field as appropriate. When finished, click Validate SQL and Save.
-
The Master Document Editor page refreshes.
-
The query criteria you entered is visible in the SQL Query area.
-
All merge fields available based on the query you entered are now accessible in the SQL Merge Field list.
-
-
-
If you want the master document to appear in plain text, click Change to Plain text mode.
For example, if your master document contains no images or character-level formatting, or if the recipients of your master document will not be receiving the merged document in e-mail capable of interpreting HTML format, select plain text mode.
-
If you want the master document to contain formatting you can apply using the master document editor's rich text format (RTF) formatting tools, keep the default option. To switch modes from plain text mode, select Change to Rich text mode.
-
In the Master Document Body field, type the text for your master document.
-
At each appropriate location in the body of your master document, add merge fields to your master document as appropriate.
Note: At minimum, your invitation or reminder master document must contain at least one merge field to generate a survey URL.
-
If entering merge fields based on a SQL query you created on this page, then do the following:
-
From the SQL Merge Field list, select the appropriate merge field.
-
Click Insert.
-
Fix any spacing errors in the master document resulting from the inclusion of this merge field.
-
-
If entering custom merge fields, then do the following:
-
In the Custom Merge Field field, type the precise merge field name for a value returned from a query.
For example, type SURVEY_URL.
-
Click Insert.
-
Fix any spacing errors in the master document resulting from the inclusion of this merge field.
Each merge field appears in the master document body. Merge fields are the fields available from a SQL query.
-
-
Verify the content and accuracy of your master document.
-
Optionally, if using rich text mode, apply formatting to your master document by selecting text and clicking the appropriate formatting tools.
-
When you have finished, click Save.
The Master Document Editor page closes. The Master Document page appears. The master document you have just created and uploaded to MES is included in the list.
If you defined a SQL query for this master document, you have successfully completed this task.
If you simply defined a master document, you must now associate an existing SQL query with the new master document by completing the steps below.
-
For the appropriate master document, from the Query column, select the query you want to associate to this master document
For example, to associate the seeded query, select IES Template Query for Targeted Survey Deployments.
-
Click Update.
Verifying Status of a Fulfillment Request
The Oracle One-to-One Fulfillment Request Status page (accessed from the Survey Administration console by clicking Invitations tab > Status subtab) indicates the status of fulfillment requests. A request status of Submitted indicates the fulfillment request has been successfully submitted to the fulfillment engine.
Note: A successfully submitted request does not necessarily signify that the engine succeeded in delivering the master document in question. This status only indicates that the request was sent to the fulfillment engine as appropriate.
When checking the status of requests in the Request Status page, valid states include Submitted and In Process. If the request remains in process for an undue length of time, or if the status displayed is Stalled, consult with a fulfillment administrator.
To verify that the fulfillment engine successfully completed distribution of a fulfillment request, check for an outcome code of Successful in the Request Summary page. Ascertain the status in the Outcome column from the Survey Administration console by clicking Invitations tab > History subtab.
If any status other than Successful displays in the Request History page, consult with a fulfillment administrator.
References
For specific information on implementing, using, or administering Oracle One-to-One Fulfillment, refer to Oracle One-to-One Fulfillment Implementation Guide.
Administering Concurrent Programs for Survey Execution
Concurrent programs are executed using Oracle Concurrent Manager, a Forms-based application built on Oracle Application Object Library (AOL) classes. Concurrent Manager is included in Oracle Applications with an appropriate Rapid Install. Seeded concurrent programs can be scheduled to execute at certain times, or can be administered to execute in near-real time. To schedule or execute concurrent programs supporting Oracle Scripting's survey component, you must access Oracle Forms-based applications with a user assigned the iSurvey User responsibility.
Seeded Concurrent Programs for Survey Execution
Oracle Scripting uses three seeded concurrent programs to support survey component operations. The table below briefly describes these programs:
| Concurrent Program | Survey function supported | Recommended Execution Method |
|---|---|---|
| SUBMIT GROUP FM REQUEST FROM IES Concurrent Program | Targeted survey deployments |
|
| Summarize Survey Data Concurrent Program | Web interface reports available using Oracle Interaction Center Intelligence |
|
| Update Deployment Status Concurrent Program | Survey Administration console table updates | Scheduled (set up to execute on a periodic basis or on specific days, generally once daily) |
Tasks
Concepts
For more information, see the Concurrent Programs Supporting Survey Operations topics in the Oracle Scripting User Guide.
Scheduling or Executing Concurrent Programs
Use the following procedure to schedule or execute concurrent programs supporting survey operations for Oracle Scripting implementations.
Prerequisites
None
Login
Log into Oracle applications using the Personal Home Page login, or the Single Sign-On login if implemented.
Responsibility
iSurvey User
References
-
For specific details on executing or scheduling concurrent programs, please refer to Chapter 5 of Oracle System Administrator's Guide.
-
For more information, see Seeded Concurrent Programs for Survey Execution.
Steps
-
From the Navigator, select Survey Administration > Requests > Run and click Open.
The Submit a New Request window appears.
-
From the Submit a New Request window, select Single Request and click OK.
The Submit a New Request window closes, and the Submit Request window appears.
-
In the Run this Request... area, in the Name field, click the ellipsis points.
The Reports window appears, listing the concurrent programs accessible to this responsibility.
-
To execute the Fulfillment concurrent program, from the Reports window, select SUBMIT GROUP FM REQUEST FROM IES and click OK.
To execute the Summarize Survey Data concurrent program, from the Reports window, select Summarize Survey Data and click OK.
To execute the Update Deployment Status concurrent program, from the Reports window, select Update Deployment Status and click OK.
-
The Reports window closes.
-
The Name field is populated with the selected report type in the Submit Request window.
-
The Parameters window appears and has focus.
-
-
If scheduling or executing the Update Deployment Status concurrent program, no parameters are required. Proceed to step 7.
-
For other concurrent programs, enter the required parameters as prompted.
Note: You must enter parameter information using the appropriate data type. You cannot use the % wildcard character in this field.
See Seeded Concurrent Programs for Survey Execution for parameter information.
Optionally, to complete this field, you can search existing information in the database for each parameter. To do this:
-
Click the ellipsis points next to the parameter field.
The Longlist window appears, indicating that the displayed list is lengthy.
-
In the Longlist window, in the Partial Value field, enter search criteria.
Note: You can use the % wildcard character in this field.
-
If you entered valid criteria, the Longlist window closes and the parameter field in the Parameters window is populated with your selection. The corresponding description field of your selection appears next to the field. To re-query, return to step 6.1.
-
If you entered partial search criteria, refine your search in the resulting window and click OK.
The Parameters window refreshes, populated with your selection.
-
After entering all required parameters, click OK.
The Parameters window closes. The Submit Request window refreshes, populated with your parameter selections.
-
-
If a default choice to execute the concurrent program is selected in the At these Times... area and meets your scheduling or execution requirements, proceed to step 14.
-
If you want to schedule the concurrent program to execute, in the At these Times... area, click Schedule.
The Schedule window appears.
-
If there is a saved schedule you want to use:
-
Click Apply a Saved Schedule.
The Pre-defined Schedules window appears.
-
From the Pre-defined Schedules window, select the appropriate schedule.
-
Click OK.
The Schedule window refreshes, with the Advanced option selected in the Run the Job... area.
-
Optionally, to increment date parameters for each execution of the concurrent program, from the Schedule window, select Increment date parameters each run.
-
Optionally, to save the schedule, from the Schedule window, select Save this schedule.
-
To save and apply schedule details, from the Schedule window, click OK.
-
-
If you want to execute the concurrent program as soon as possible, from the Run the Job... area, select As Soon as Possible and click OK.
-
If you want to execute the concurrent program one time at a specified date:
-
In the Run the Job... area, select Once.
The Schedule window refreshes, displaying a Run At field.
-
Click the ellipsis points in the Run At field.
The calendar window appears.
-
From the calendar window, specify the date and time to execute the concurrent program, and click OK.
-
Optionally, to increment date parameters for each execution of the concurrent program, from the Schedule window, select Increment date parameters each run.
-
Optionally, to save the schedule, from the Schedule window, select Save this schedule.
-
To save and apply schedule details, from the Schedule window, click OK.
-
-
If you want to execute the concurrent program several times periodically:
-
In the Run the Job... area, select Periodically.
The Schedule window refreshes, displaying new fields.
-
In the Start At field, click the ellipsis points.
The calendar window appears.
-
From the calendar window, specify the date and time to start executing the concurrent program, and click OK.
-
If you want the concurrent process to execute periodically for an indefinite period, do not enter a value in the End At field.
-
To specify an end date, in the End At field, click the ellipsis points.
The calendar window appears.
-
From the calendar window, specify the date and time to stop executing the concurrent program, and click OK.
-
In the Re-run fields, specify the value and interval for the period of time between executions.
-
In the Apply the Interval... area, determine the criteria for applying the interval.
-
Optionally, to increment date parameters for each execution of the concurrent program, from the Schedule window, select Increment date parameters each run.
-
Optionally, to save the schedule, from the Schedule window, select Save this schedule.
-
To save and apply schedule details, from the Schedule window, click OK.
-
-
If you want to execute the concurrent program on specific days:
-
In the Run the Job... area, select On Specific Days.
The Schedule window refreshes, displaying new fields.
-
In the Start At field, click the ellipsis points.
The calendar window appears.
-
From the calendar window, specify the date and time to start executing the concurrent program, and click OK.
-
To specify an end date, in the End At field, click the ellipsis points.
The calendar window appears.
-
From the calendar window, specify the date and time to stop executing the concurrent program, and click OK.
-
In the Dates of Every Month area, click once on each day of the month in the calendar on which you want to execute the program. To deselect a calendar date, click it again.
-
In the Days of Every Week area, click once on each day of the week on which you want to execute the program. To deselect a week day, click it again.
-
Optionally, to increment date parameters for each execution of the concurrent program, from the Schedule window, select Increment date parameters each run.
-
Optionally, to save the schedule, from the Schedule window, select Save this schedule.
-
To save and apply schedule details, from the Schedule window, click OK.
-
-
In the Submit Request window, in the Upon Completion... area, check the Save all Output Files box.
-
Optionally, if you want a party to be notified each time the concurrent program is executed, then do the following:
-
In the Upon Completion... area, click Options.
The Upon Completion window appears.
-
Verify that the Save all Output Files box is checked.
-
In the Name column, for each party whom you want to notify upon completion, click the ellipsis points and select the individual from the database.
-
Optionally, to print output files, select a networked printer from the Printer field, and specify the number of copies and default language.
-
To save Upon Completion information, click OK.
The Upon Completion window closes. The Submit Request window refreshes, displaying the selections you made.
-
-
To save and submit the concurrent request, in the Submit Request window, click Submit.
The Decision window appears, providing the request ID of the concurrent request. Note this request number for subsequent tracking.
-
To submit another request, in the Decision window, click Yes, and then enter criteria for the next request in the Submit Request window.
Otherwise, click No. The Decision window and the Submit Request window close. The Navigator appears.
-
Submit another request for concurrent processing by repeating this procedure, or log out of Oracle Applications by selecting File > Exit Oracle Applications.
Checking Concurrent Program Logs
Concurrent program logs can provide clues for the failure of the concurrent program.
For example, when you activate a survey deployment, the SUBMIT GROUP FM REQUEST FROM IES concurrent request is generated (scheduled to run at the deployment start date and time). If the deploy start date and time are in the past, the concurrent program executes immediately. If this concurrent program fails, the concurrent request ID appears on the Update Deployment page, but no fulfillment request ID appears, and the Activate button reappears. In such an event, check the concurrent program logs to determine potential contributing factors for the failure of this request to execute.
Use this procedure to check concurrent program logs.
Prerequisites
None
Login
Log into Oracle applications using the Personal Home Page login, or the Single Sign-On login if implemented.
Responsibility
iSurvey User
Steps
-
From the Navigator, select Survey Administration > Concurrent and click Open.
The Find Requests window appears.
-
If you want to find only completed requests, select My Completed Requests.
-
If you want to find requests in process, select My Requests in Process.
-
If you want to find all requests generated using your Oracle applications user account, select All My Requests.
-
If you want to find a specific request, select Specific Requests, and enter additional search criteria to find the appropriate request.
-
To search a concurrent request by ID, type the concurrent request ID in the Request ID field.
For example, for a failed SUBMIT GROUP FM REQUEST FROM IES concurrent request, obtain the concurrent request ID from the Update Deployment page and type this value.
-
To search a concurrent request by name, type the name of the concurrent request in the Name field.
For example, type SUBMIT GROUP FM REQUEST FROM IES.
-
To search a concurrent request by date submitted, in the Date Submitted field, click the ellipsis points, and specify the appropriate date using the calendar control.
-
To search a concurrent request by date the request was completed, in the Date Completed field, click the ellipsis points, and specify the appropriate date using the calendar control.
-
To search a concurrent request by the request status, from the Status list, select the appropriate status.
For example, select Suspended.
-
To search a concurrent request by the request phase, from the Phase list, select the appropriate phase.
For example, select Inactive.
-
To search a concurrent request based on the Oracle Applications account of the individual requesting the request, in the Requestor field, click the ellipsis points, and search for and select the appropriate user name.
For example, select Inactive.
-
-
Select the Include Request Set States in Query option.
-
Optionally, to sort records returned, from the Order By list, select order criteria.
For example, to sort by concurrent program name, select Name.
-
After entering your search criteria, click Find.
The Requests window appears, populated with the results of your query.
-
Optionally, to ensure you are accessing the correct record, do the following:
-
Click on the row of the appropriate record and then click View Details.
The Request Detail window appears for the selected request.
-
To close the Request Detail window, click OK.
-
-
To view the message log, click on the row of the appropriate record and then click View Log...
A new Web browser window will open, displaying the message log for the selected concurrent program.