Using Graphical Scripts
This chapter covers the following topics:
- Introduction
- Graphical Script Layout
- Overview of Objects and Branches
- Script Author Terminology
- General Canvas Operations
- Working with Graphical Scripts
- Working with Panels
- Understanding Answer Properties and Answer Types
- Working with Answers and Answer Properties
- Working with the Panel Layout Editor
- Working with Groups
- Working with Blocks
- Using Subgraph Information in Blocks and Groups
- Working with Branches
- Working with Database Connections
- Defining Actions
- Defining Commands
- Reusing Commands
- Deploying Scripts
- Recovering from an Expired Session
- Packaging Java Bean or Custom Java Code Into a JAR File
Introduction
In the Script Author, you can create and modify graphical scripts. This chapter provides information on the following graphical script features:
-
The layout of the screen areas in the Script Author when you work on graphical scripts
-
The graphical script elements and their properties
-
The operations to create and maintain graphical scripts
Graphical Script Layout
The main components of the Script Author graphical script layout are the following:
-
Three toolbars
-
The main canvas which displays the visual objects and the branches that represent the script flow
The content of the left hand side of the window is controlled by two tabs, Project and Syntax, that appear at the foot of the window.
With the Project tab selected, the left hand side of the window displays two panes, both untitled:
-
The Explorer pane, that displays an expandable list of the script objects
-
The Object Properties pane, that displays the properties of an object highlighted either in the canvas or in the Explorer pane
The Syntax tab appears automatically when you perform a syntax check, and displays syntax errors.
Clicking on any listed error will cause a section of the canvas to be replaced with the Debug pane. The debug pane lists any available information about the selected problem.
At the very bottom of the Script Author work area, below the canvas and the Project and Syntax tabs, is a status bar. This indicates the status after a defined action such as checking syntax, saving a script, or deploying a script to the database.
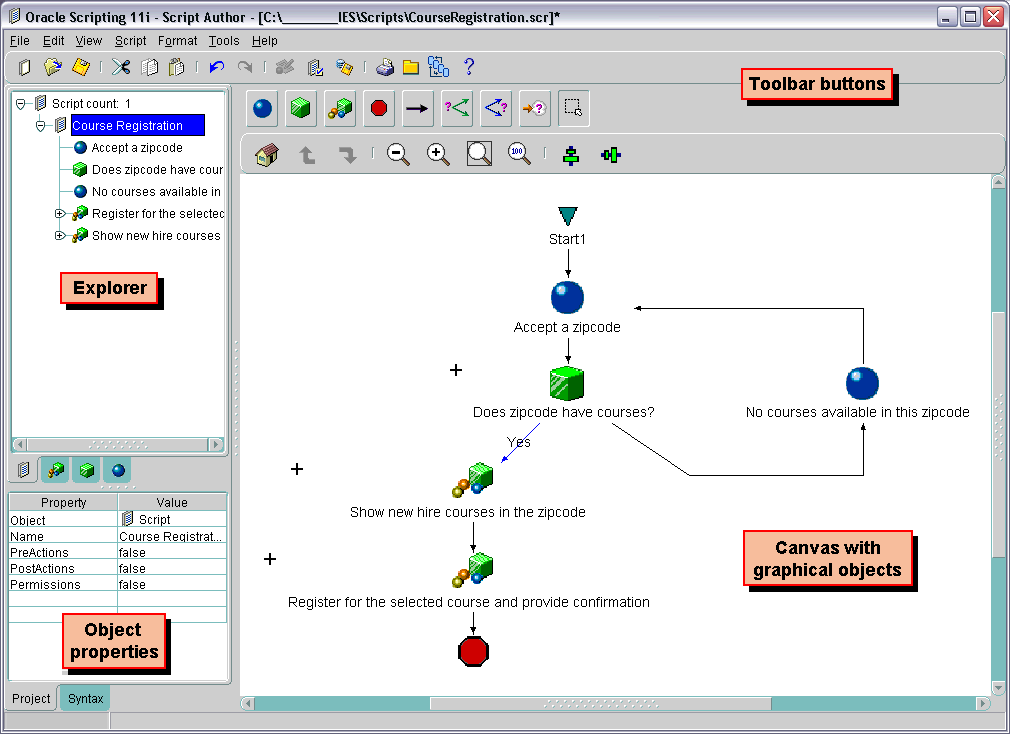
The screenshot that follows shows a graphical script layout with the three toolbars, Explorer pane, Object Properties pane, and a graphical script in the canvas. The graphical script contains two panels, a block whose main purpose is to direct script flow in two different directions, two groups that represent two extra sets of processing contained in their subgraphs (details not visible in the top graph), and a termination node.
Graphical Script Toolbars
The three toolbars used for graphical scripts are the following
Top Toolbar
The top toolbar enables general scripting functions, and also contains icons for standard features, such as cut and paste.
The top toolbar buttons fall into three categories:
Script Buttons
The script buttons are the standard buttons that enable you to create a new script, open an existing script, and save the current script.
General Buttons
The general buttons of the top toolbar enable you to perform the standard operations of cut, copy, paste, undo, and redo on visual script objects in the canvas. There is no limit to the number of operations that you can reverse or redo.
Miscellaneous Buttons
The following image shows the miscellaneous buttons of the top toolbar.
![]()
The table that follows describes the function of each of these buttons.
| Button | Function |
|---|---|
| Panel Layout | Opens up the panel layout window for a highlighted panel. Only enabled when a panel is highlighted. |
| Check Syntax | Checks the script syntax. The syntax errors will appear in the Syntax pane. |
| Deploy Script to Database | Deploys the script to the database. |
| Prints the current canvas graph. | |
| Command Library | Displays commands that can be added to the script. |
| Script Wizard | Launches the Script Wizard part of the Script Author. |
| About Script Author | Displays level information. |
Object and Branch Toolbar
![]()
The Object and Branch toolbar consists of the following:
Canvas Object Buttons
From the Object and Branch toolbar, you create the main visual script objects using the following buttons:
-
Panel Insertion Mode
-
Block Insertion Mode
-
Group Insertion Mode
-
Termination Point Insertion Mode
Click the appropriate button, then click in the canvas: the corresponding object appears.
Note: If you have sticky mode set - see Branch and Toggle Select Mode buttons - you can click one of these canvas object buttons, then click several times in the canvas to create multiple objects of the selected type.
Note: For more details of sticky mode, see Enabling and Disabling Sticky Mode.
Branch and Toggle Select Mode Buttons
To the right of the canvas object buttons on the Object and Branch toolbar are four branch buttons and a single Toggle Select Mode button.
-
Default Branch
-
Distinct Branch
-
Conditional Branch
-
Indeterminant Branch
-
Toggle Select Mode
For general information about branches, see Branches.
Toggle Select Mode
The Toggle Select Mode button is used mainly in conjunction with sticky mode processing to indicate whether any canvas object button has been selected, and to allow for general canvas object editing. For more details, seeEnabling and Disabling Sticky Mode.
Navigation and Alignment Toolbar
![]()
The Navigation and Alignment toolbar consists of the following sets of buttons:
Inter-Graph Buttons
Groups and blocks implicitly contain child graphs. The inter-graph buttons control movement between graphs:
-
Go to root graph
-
Go to parent graph
-
Go to child graph
Zooming Buttons
The Navigation and Alignment toolbar has are four buttons that control the zooming of the current graph, and fitting the graph into the canvas.
-
Zoom Out
-
Zoom In
-
Zoom to Fit Graph in Window
-
Zoom to 100%
Aligning Buttons
You can arrange visual script objects by first selecting them, and then clicking the appropriate aligning button to align them either vertically or horizontally.
-
Align vertically
-
Align horizontally
Overview of Objects and Branches
The main objects in a graphical script are:
-
These are configurable objects, in that their properties are viewable and editable.
The following objects are non-configurable.
Panels, groups, and blocks are processing units that tell the script what to do. These objects must be connected with branches to direct the flow of the script at runtime.
A graphical script can consist of one or more graphs. Each Script Author graph must have one start node, with a default branch leading to the first script object, and at least one termination node.
Panels display information (such as text, an image, a hyperlink, a variable, or question UI controls) to the script user at runtime, and provide a method to accept information (answers) from the script end user.
Blocks are containers that enable you to connect to a database during script execution, (the script can query, update, or insert information in database tables), or to execute an API command.
Groups are used to logically group a section of the script's functionality, access a section of the script in runtime using a shortcut button, or for functionality that is the target of a Java method in runtime associated with an indeterminate branch.
Whenever you create a graph, it automatically contains a start node. Start nodes cannot be explicitly created, nor created, nor do they contain viewable properties. They must be attached using a default branch to the first executable object in the graph.
Termination nodes are objects which indicate the end of processing on a script graph. They are non-configurable, with no viewable properties. Except for graphs that contain an indeterminate branch, every graph must have at least one termination node; each termination node must be attached with a branch to another canvas object.
Branches
A branch is used to connect objects. The type of branch used determines the next object in the script flow.
There are four branch types:
-
Default - unconditional branch which directs flow to the designated object
-
Distinct - branch where destination depends on answer provided to a question
-
Conditional - branch whose destination is reached if a Boolean expression returns a value of true
-
Indeterminate - branch whose destination is evaluated at runtime
Note: The terms indeterminant and indeterminate are used interchangeably in Oracle Scripting.
Note: Two branch types (default and distinct branches) contain all of the information required to direct the flow of the script. The other two branch types (conditional and indeterminate branches) require the script developer to associate a Script Author command with the branch; the return value of the condition or expression for that command (determined at runtime when the branch is reached in the flow of the script) dynamically determines the flow of the script.
For general information about branches and the branch types, see Branches.
Script Author Terminology
The term blob is also used in Script Author as a generic term for panels, groups, and blocks. In this chapter the terms "blob"and "configurable object" are used interchangeably.
Note: Branches are generally not considered as configurable objects, even though some branch properties can be edited.
The term graphical script object is used for any object that appears on a script canvas, that is, any one of the following:
-
A configurable object
-
A branch
-
A start node
-
A termination node
This chapter concentrates on how to use the Script Author to define the attributes and properties of the configurable script objects and branches. More general information about the objects themselves appears in the Understanding Script Author chapter.
General Canvas Operations
As with many visual tools, there are several standard graphical script operations you can perform in the Script Author.
The toolbars enable a variety of functions and operations, some following industry-standard conventions, some more specific to Oracle Scripting objects and processes.
This section describes these operations in general, as a set of notes for each operation or group of operations. These notes contain links to more specific descriptions in other sections as appropriate.
This section consists of the following topics:
Inserting Objects and Branches
The main script objects that you can insert fall into two categories:
-
The main visual script objects: Panel, Group, Block, Termination Node.
-
Branches
The basic process of inserting a main visual script object is:
-
Select the object type on the toolbar.
-
Click on the canvas:
The basic process of inserting a branch is:
-
Select the branch type on the toolbar.
-
Click the canvas object where the branch begins.
-
For a default, distinct, and conditional branch, continue dragging to the destination object; for an indeterminate branch, continue dragging into empty space on the canvas.
Note: Oracle Scripting has a sticky mode feature, that allows for an optimized way of creating several objects and branches of the same type. For details of sticky mode, and how this affects canvas object operations, see Enabling and Disabling Sticky Mode.
See Also
Enabling Automatic Popup of Properties Windows at Object Creation Time
To optimize the process of adding properties to newly-inserted configurable objects (panels, groups, and blocks) and branches, you can select one or both of the following menu options to allow for the automatic popup of the appropriate Properties window when the canvas object is inserted:
-
View > Select the checkbox "Popup on Blob Creation"
-
View > Select the checkbox "Popup on Branch Creation"
Editing Objects and Branches
There are two kinds of editing for all blobs and branches:
-
Industry-standard functions: Cut, Copy, and Paste
-
Specifying the object and branch properties
Note: The Oracle Scripting sticky mode feature has some considerations that affect the editing of objects and branches. For details, see Enabling and Disabling Sticky Mode.
Using Industry-Standard Functions
Cut, Paste, and Copy behave in the standard way: for example you can cut or copy an object, then paste it once or several times in the canvas.
The basic process for these functions is:
-
Right click a canvas object or branch.
-
Select the appropriate option: Edit > Cut, Copy, or Paste.
Specifying Object and Branch Properties
You add and edit properties in a Properties window specific to an object or branch type. You can ensure that the Properties window is automatically launched when the object or branch is created (see Enabling Automatic Popup of Properties Windows at Object Creation Time) or you can launch it manually at any time, as follows:
-
Right click the canvas object or branch.
-
Select either Edit Blob Properties or Edit Branch Properties as appropriate.
For more information, see the following topics:
Deleting Objects and Branches
Apart from start nodes, you can delete any object or branch from a graph.
Note: You can indirectly delete a start node in a subgraph of a block or group, by deleting the parent block or group. You cannot delete the start node of the root graph.
Deleting an object deletes all properties, edges (outgoing branches), and subgraphs associated with the object.
Deleting a branch deletes all properties associated with the branch.
Note: The Oracle Scripting sticky mode feature has some considerations that affect the deleting of objects and branches. For details, see Enabling and Disabling Sticky Mode.
The basic deletion process is:
-
Right click a canvas object or branch.
-
Select Edit > Delete.
Standard User Interface Operations
The Script Author includes a number of common user interface operations that generally follow industry standards. Some are performed entirely within the canvas, others combine canvas operations with one or more toolbar buttons.
Note: In this section, the term object refers to all blobs, nodes, and branches.
Note: Before you perform any of the standard user interface operations in this section, if the Toggle Select Mode button on the Object and Branch toolbar displays a raised image, you must click the Toggle Select Mode button.
Selecting and Deselecting Objects
You can select or deselect one or more objects on a single canvas using standard user interface functions.
-
Select an object by clicking it
-
Select several objects by clicking and dragging a rectangle around them
-
Select individual objects together by depressing the Ctrl or Shift key as you click each individual object
-
Deselect an object by clicking away from it
-
Deselect all selected objects by clicking in empty canvas space
-
Deselect an object from a group of selected objects by depressing the Ctrl key as you click the object that you want to deselect
Moving Objects
You can move any objects that you have selected by dragging them. Any branches connected to objects move with the objects.
Aligning Objects
Select the objects that you want to organize, and click the appropriate Align button in the Navigation and Alignment Toolbar.
Zooming and Fitting Graph to Window
You can increase or decrease the magnification level of the canvas objects by using the Zoom buttons in the Navigation and Alignment Toolbar.
To display all the canvas objects for a graph, use the button Zoom to Fit Graph in Window.
Navigating Between the Graphs of a Script
All graphical scripts have a root graph. Groups and blocks on any graph have subgraphs. You can navigate between the graphs of a script by clicking the appropriate inter-graph button in the Navigation and Alignment Toolbar.
Working with Graphical Scripts
This section consists of the following topics:
Creating New Graphical Scripts
Note: This section concentrates on graphical scripts. For creating new wizard scripts, see Accessing the Script Wizard.
Steps:
-
Select either of the following:
-
Using menu options, File > New
-
New Script toolbar icon
-
-
In the New Script window, select Graphical script.
A new graphical script, with a dummy script name of Untitled1, and with one start node, appears in the Script Author canvas.
Opening Graphical Scripts
Note: This section concentrates on graphical scripts. For opening and working with wizard scripts, see Accessing the Script Wizard.
From within Script Author, graphical scripts can be opened from either of the following:
-
The file system, on any local volume
-
The applications database, whether the scripts are published or deployed.
Within the database, there is a distinction between published scripts and deployed scripts. Published scripts are saved in the database, but not necessarily executable. Deployed scripts are also saved in the database, but can be executed.
Steps:
-
Select either of the following:
-
Using menu options, File > Open
-
Open Script toolbar icon
-
-
In the Open Script window, select Graphical script.
-
In the Script Chooser window, select either File System or Database
-
If you selected File System:
-
Select the script file from the file system, then click Open.
If you selected Database:
-
Select Published or Deployed.
-
Click Refresh List.
-
Select the script from the database, then click Open.
If the script was published or deployed from an earlier version of Script Author, a Warning dialog appears, noting that if you save the file with the same name, you may not be able to open the script in older versions. Click OK to continue.
The designated script appears on the canvas.
-
Saving Graphical Scripts
From Script Author, you can save a graphical script to the file system of a local volume or mounted storage medium.
You can also publish a script to the applications database. Publishing a script simply means storing the script file in the database. A published script is not deployed, that is, it is not executable.
To determine whether a script needs to be saved, examine the title bar of the Script Author applet. If an asterisk (*) appears to the right of the script name, changes have been made to the script that have not yet been saved.
New scripts are automatically labeled Untitled in the title bar. These initially include only a start node. If no asterisk appears, no objects have been added or configured.
Script Name and File Name
All scripts have a script name - which is a script property - and this name identifies the script in the database, and is used when you choose to run the script.
If you save the script to the file system, you must also provide a file name for the script. This is distinct from the script name. For convenience you may make the file name and the script name the same.
You can save a script to a local or network file system using the current name and location (if the script has previously been saved), or you can save a copy of the script to a current or new location, using a different file name.
Note: If you wish to save the script with a different script name, ensure that you change the name of the just-opened script in the global script properties (File > Script Properties).
Note: If you want to save the script to a new file location, change the file name of the script as well (File > Save As).
Steps:
-
Select either of the following:
-
Using menu options, File > Save or File > Save As
-
Save Script toolbar icon
-
-
In the Script Chooser window, select either File System or Database.
-
If you selected File System:
-
In the File Type field, select Oracle CRM script file (.script, .scr).
-
In the File Name field, type the name you want to assign to this script at the file system level.
For ease of use, provide the file name with a file extension of .SCRIPT or .SCR.
When opening a graphical script, Script Author automatically filters out files with no file extension, or with a different extension than these defaults.
If you selected Database:
-
The global script name and language properties automatically populate in the Script Name and language fields. These cannot be changed.
-
-
Click Save.
The script is saved either as a file or in the database.
Guidelines for Saving to the File System
-
When you select File > Save for a previously saved script, the current version of the script automatically overwrites the previous version of the script.
-
When you select File > Save for an unsaved script, or File > Save As for any graphical script, the ScriptChooser window opens. From this window, you can designate a file name and location for the script.
-
For Script Author to be able to automatically recognize a script file, it must end with a .SCRIPT or a .SCR file extension. You can save a script without a file extension or with a different file extension, but you must explicitly change the file type default to All Scripts (*.*) in the ScriptChooser window to recognize file types other than .SCRIPT OR .SCR.
-
Avoid naming a script with special characters (such as spaces, slashes, or backslashes) that are not permitted in the file system of some operating systems.
-
Space characters are allowed, but not recommended. It is preferable to include other characters, such as an underscore (for example, script_name.script).
Guidelines for Saving to the Database
-
When published, scripts automatically take their names and default language from the global script properties. Scripts that have not been explicitly provided with a global script name (or for which a global language has not been selected) will default to a global script name of Untitled and a language of American. Therefore, you must provide your script with a global name and language before you publish it. Otherwise, you overwrite any previous untitled script designated for American English.
Reversing All Changes Since the Last Save to File System
Note: This feature is available only for graphical scripts saved to the file system, not to the database.
When you continually use the "Save" (and not the "Save As") command to save your script to the file system, Oracle Scripting enables two past versions of the file to be available for retrieval, in case you want to restore a previous version of the script.
The most recent version of the file is the "Save" version; the one saved prior to that is the "Backup" version.
Note: If you have both a "Save" and a "Backup" file, and use the "Save" command again from the Script Author:
-
The old "Backup" file is overwritten by the previous "Save" file, which becomes the new "Backup" file.
-
The newly-saved file becomes the new "Save" file.
Prerequisites
A version of the script must have been saved or backed up to the file system.
Steps
-
As you start to edit a script which has been saved previously to the file system, and you want to revert to a previous version of the script from the file system, you can select from the following menu options, when they are available:
-
File > Revert To > Last Save
This restores the script to the last explicitly saved file.
-
File > Revert To > Last Backup
This restores the script to the version of the file saved just before the last explicitly saved file.
-
Importing Scripts
When you import a script, the entire script - the root graph, and all subgraphs - is placed into your current script, as a group, whose name is the script name of the imported script.
If you do not want all the imported objects in your script, you can delete them after the import.
Note: Every Script Author script is customized. It is the script developer's responsibility to ensure that imported scripts function in the target environment.
Note: If a script that you import contains commands referencing custom code (e.g., Java, PL/SQL, Forms, and so on), the corresponding code referenced by the script must be available in the environment in which the script is deployed.
Note: Do not assume imported scripts will function without thorough unit testing.
Steps
-
Choose File > Import....
-
Using the Location field, if applicable, navigate to the local or network location from which you want to import the script.
-
In the File Type field, select Oracle CRM script file (.script).
-
In the Files window, select the script file name and then click Open.
The imported script appears on the canvas as a group.
Exporting Script Groups as Separate Script Files
Exported groups can add modularity and code reuse to your script projects by enabling two separate approaches. When you export the group, you designate a file name and location on a local or network file system, and the group is saved as a separate script.
Thereafter, if you import it into another script, all script objects and commands associated with the original group are now part of the script into which they are imported.
Additionally, if you open the exported group in Script Author, the objects that were contained within the group appear on the root graph of the canvas.
Note: Every script is a customized product. If a group is fully functional when exported, this does not guarantee that the same functionality will be granted to a script into which it is imported without modifications.
Note: If a group that you export contains commands referencing custom code (e.g., Java, PL/SQL, Forms, and so on), the corresponding code referenced by the group must be available to the Scripting Engine in any environment into which the group is imported.
Note: Do not assume exported scripts will function without thorough unit testing.
Steps
-
On the canvas, select a group.
-
From the menu, select File > Export....
-
Using the Location field, if applicable, navigate to the local or network location to which you want to export the group, as a separate script.
-
In the File Name field, type an appropriate file name for the new script.
Note: If you intend to import the script, provide a .SCRIPT file extension, so that the script is visible to the Open dialog without changing script file type settings.
-
Click Save.
The Save window closes. The group is exported as a separate script with the file name you provided. The original script from which you exported the group remains open.
Guidelines
-
The file name you provide to the exported script must be different from the global script name.
-
When opening a script that was exported as a group, the group name becomes the global script name.
-
Whether opening the exported group or importing it, any shortcut property in the original group is not retained in the exported script file.
Printing Graphs
Use this procedure to print a graph displayed on the Script Author canvas.
Steps
-
Select the graph you wish to print.
-
Choose File > Print.
-
Select your print options and then click OK.
Note: To print a subgraph contained within a group or block, you must first click to select the appropriate container object (the parent group or block) and then click the Go down into child graph button.
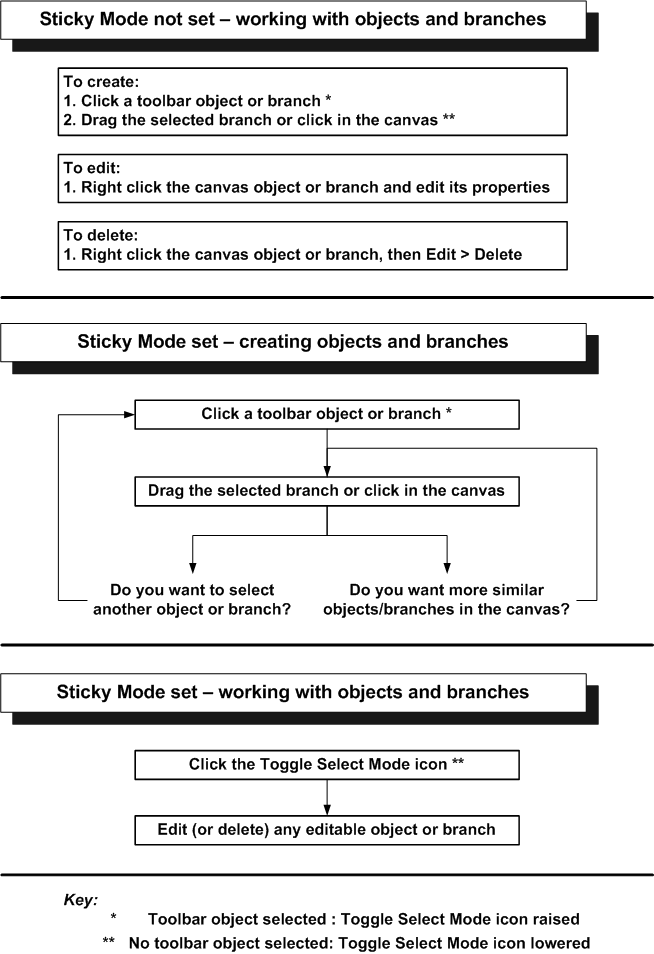
Enabling and Disabling Sticky Mode
The basic principle behind sticky mode is that it enables you to quickly create a number of canvas objects of the same type: you click an object toolbar button once, then click several times in the canvas to create many objects of the selected type.
In every Script Author session, the sticky mode feature is enabled by default. The only way to view, enable, or disable sticky mode is from the File Menu option.
A summary of how sticky mode affects Script Author operations appears in the diagram following.
Enabling and Disabling Sticky Mode
-
Click the File menu option.
-
Enable or disable sticky mode by respectively setting or unsetting the Sticky Mode checkbox.
Creating Objects and Branches in Sticky Mode
The basic principle behind sticky mode is that it enables you to quickly create a number of canvas objects of the same type, by minimizing the number of toolbar clicks. To do this, you must first select a canvas object in the toolbar. That object type remains "stuck" (selected) until you explicitly select another object or branch type from the toolbar.
Each time you click in the canvas, another instance of the "stuck" object type will appear. For example, if you select the panel object in the toolbar, then click three times in the canvas, three panel objects are inserted there.
If your selected object is a branch type, you can create - by dragging - many branches of the selected type in the canvas without re-selecting from the toolbar.
Working with Objects in Sticky Mode
When sticky mode is enabled, you can edit click canvas objects by right clicking them, but you cannot double-click them. To perform general editing and repositioning of canvas objects, you must first click the Toggle Select Mode icon in the toolbar. This deselects any previously-selected object, and you can now work directly on one or more canvas objects.
Working with Objects with Sticky Mode Not Set
When sticky mode is disabled, if you want to create a new canvas object, you must first select the corresponding toolbar icon before clicking in the canvas. You can edit or reposition existing objects, by working directly in the canvas.
Closing Scripts and Exiting Script Author
You can close a script or exit Script Author at any time. If you have unsaved changes, you will be asked whether you want to save the changes.
Steps
-
From the File menu, perform one of the following:
-
Choose Close to close the current script.
-
Choose Exit to leave Script Author.
In either case, if you have made changes to the current script, you are asked if you wish to save the changes, before the script is closed.
-
Defining Global Script Attributes
Global script attributes are attributes which apply to the entire script. There are four types of global script attributes, as shown in the table below.
| Global Script Attribute | Runtime Interface | Description |
|---|---|---|
| Script properties | All | Global script properties include the script name (as recognized by the database), comments, the script language, and boolean properties such as footprinting, answer collection, and suspendability. |
| Script pre- and post-actions | All | Commands that execute at the start or end of a script. |
| Script information area (defined in the Static Panel) | Agent | Displays a panel of information above the script at runtime in the Scripting Engine agent interface only. Data types include text and timers. Information can be about the script itself, or about the current interaction. |
| Shortcut buttons (defined in the Shortcut Panel) | Agent | Displays one or more functional buttons above the script at runtime in the Scripting Engine agent interface only. Buttons can execute any runtime command. Typical uses are as shortcuts (to progress the script to a specified point) or to launch a browser with a specified URL. Oracle Scripting APIs allow shortcut buttons to be dynamically enabled or disabled based on programmed events or conditions relevant to a script session. |
Although not configurable from the Script properties dialog, the Disconnect button and the Suspend button can also be considered global script attributes.
When defined, global script attributes can affect or display data, or control the manner in which scripts appear at runtime.
Some global script attributes (the Disconnect button, the Suspend button, script information area, and shortcut buttons) only appear at runtime to users of the Scripting Engine agent interface.
This section consists of the following topics:
Script Properties
Global script properties control the way scripts behave from a database perspective and at runtime, and affect data that is collected when scripts execute in the Scripting Engine.
The main components of a script that you define in the Script Author are shown in the following diagram.
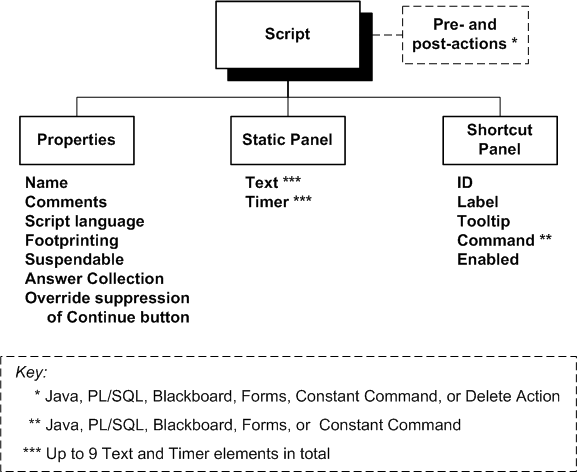
These script properties are all accessible in the Script Author by selecting File > Script Properties or by right-clicking in empty canvas space and selecting File > Edit Blob Properties.
For details of the pre- and post-actions, see Defining Actions.
Notes on Script Properties
Script Name
-
The global script name is distinct from the script name from a file system perspective. If you intend to use the same for both, ensure that you avoid using spaces, slashes, or backslashes, as these characters are not permitted in file names of some operating systems. Using a .SCRIPT or .SCR file extension in the file name is advisable, but not mandatory.
-
When a script is created, it is automatically designated a global script name of "Untitled1." Unless you assign a new global script name, deploying it to the database will overwrite any other unnamed scripts that have been deployed to the database with the same default name and script language properties.
Script Language
-
The Script Author script language setting can be any uni-drectional language supported by Oracle Applications in the FND_LANGUAGES table. The default value is AMERICAN.
-
Changing the script language setting does not translate the GUI elements nor the script elements. To produce a version of a script in another language, you should do the following:
-
Change the Script Name and Script Language.
-
Manually translate all panel text, answer lookup values, panel names or labels, or any customized aspect of the script.
-
Save and deploy the new version of the script.
-
Footprinting
Footprinting is the recording in the Oracle Applications database of the names of each panel in a script transaction that is visited during a script transaction, and the duration of time (in milliseconds) prior to the activation of the next panel.
For more details, see Global Script Properties.
Answer Collection
-
When you enable answer collection at the script properties level, Oracle Scripting, by default, records the responses to questions in any panel provided at runtime by script end users of any Scripting Engine interface.
-
You can override answer collection for individual questions, as follows:
-
From the Answer Entry dialog for a specified answer, Edit Data Dictionary > General Tab > Uncheck the Collectable? checkbox.
-
For more details, see Global Script Properties.
Suspendable
You can allow scripts to be suspended and resumed, in both of the Scripting Engine interfaces.
For more details, see Global Script Properties.
Override Suppression of Continue Button
By default, any Continue buttons created in script panels are suppressed when the script executes in the Web interface. If you want to keep the Continue buttons visible in the Web interface, you can override this suppression.
This parameter does not affect the appearance of scripts executed in the agent interface.
Static Panel
-
The Static Panel defines a script information area that displays, the agent interface only, above each panel at runtime. The script information area can display up to nine elements, each of type Text or Timer.
For more details, see Global Script Properties.
Define the following fields for text and timer elements:
ID: This represents the internal identifier of the element; this is required for Oracle Scripting APIs
Label: An optional field, this contains the label that you want to appear in the script information area at runtime
Command:
For a text element, either define a Constant or a Blackboard command, with the value you want to appear at runtime designated as the return value of the command.
For a timer element, you must define a Java method that invokes the startTimer Oracle Scripting API. To do this, you must leave the timer element Command blank, and associate a timer command that references the timer ID to one or more shortcuts or to a pre- or post-action for the script or for any valid script object.
For more information, see the topic Defining the Script Information Area in the Oracle Scripting Developer's Guide.
Shortcut Panel
-
If one or more shortcut buttons are defined and enabled in the Shortcut Panel, then they appear at runtime in the Scripting Engine agent interface immediately above the panel display area, and below the script information area.
For more details, see Global Script Properties.
-
When you add a shortcut button in the Shortcut Panel, define the following fields in the Shortcut Info Entry Dialog window
ID: This represents the internal identifier of the shortcut
Label: This contains the label that you want to appear on the shortcut button
Tooltip: This contains the Help text that you want to appear when an agent's pointer hovers over the shortcut button.
Command: This contains the command to be executed when an agent clicks the shortcut button.
Enabled: When checked, this enables the shortcut button when the script is launched.
Note: Defining a shortcut button is not the same as defining a shortcut.
Note: A shortcut is a group property, and can be used to associate a target destination for a shortcut button, but shortcuts have other uses also.
Note: For more information, see Defining Shortcuts.
For more information on setting up shortcuts and shortcut buttons, see the section Performing Advanced Graphical Script Tasks of the in the Oracle Scripting Developer's Guide.
Programming the Script Disconnect Button
Although not configurable from the Script properties dialog, the Disconnect button can also be considered a global script attribute.
Use this procedure to program the Disconnect button that appears in the Scripting Engine agent interface. Clicking the Disconnect button at runtime routes the agent directly to this group. The group need not contain any panels, as long as it meets the syntax rules for any group (see Minimum Requirements for Any Graph). If panels are included in this group, they will be displayed each time the Disconnect button is clicked. For a quick exit disconnect feature, simply insert a termination node into this group and attach the start and termination nodes with a default branch.
Prerequisites
-
Provide proper termination for the group.
Steps
-
In the Object and Branch toolbar, click the Toggle Select Mode tool.
-
On the canvas, double-click a group.
The Properties window appears.
-
In the Group tree, select Shortcut.
The Shortcut pane appears.
-
In the Shortcut pane, in the Shortcut field, enter the value WrapUpShortcut.
This must be entered exactly as indicated (this property is case sensitive).
-
Click Apply to apply your work or click OK to save your work and exit the Properties window for the group.
When the Disconnect button is selected at runtime, the first panel of this group (if any) displays.
The objects in the group (if any) and commands associated with them (if any) are executed, each in sequence, until the termination node is reached
Once the termination node on the root graph is reached in the processing of the script, than any global script post-actions execute, and the script session at runtime terminates.
References
Working with Panels
The panel is the only Script Author object that is visible at runtime. The composition of each panel is determined by script developers and script requirements. Panels may contain panel text, images, embedded values, hypertext links, customized HTML tables, and any number of questions and their associated question user interface controls.
Panels may include any number of questions (there are no limits other than practicality).
This section consists of the following topics:
Panel Properties and Attributes
A panel contains the information that is displayed in the script at runtime. Answer controls defined in the panel (using the Script Author) are used to accept information from the user at runtime and advance the flow of the script.
The main components of a panel that you define in the Script Author are shown in the following diagram. The attributes and elements in the diagram are the panel properties that you can view and edit.
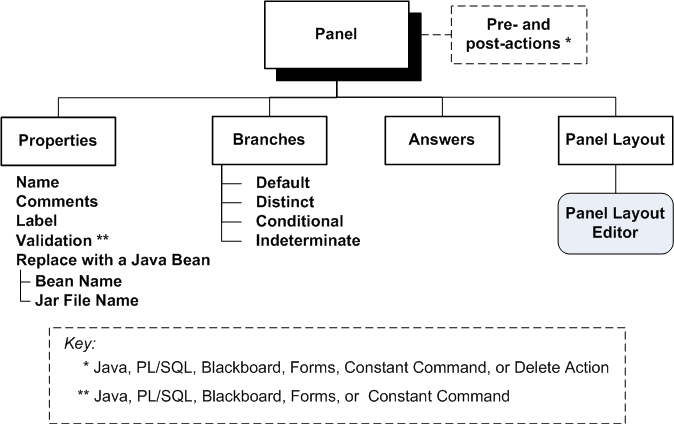
These panel properties and attributes are accessible in the Script Author by right-clicking a canvas panel and selecting File > Edit Blob Properties, or if you have enabled automatic properties popup when creating a new panel, group, or block.
For more information about actions and branches, see:
For information about properties of questions and answers, see:
For information about the panel contents - the text and answer controls that define what appears in the panel at runtime - see Working with the Panel Layout Editor.
Notes on General Panel Properties
Identifies the panel in the Script Author and the database. Also used to track a panel for footprinting purposes.
Each panel is automatically provided with a panel name unique to the current script. Overwrite this value in the Name field with the desired name for the panel.
Label
Identifies the panel at runtime in the Progress Area of the Scripting Engine agent interface.
Comments
Optional descriptive text.
Validation
You add a command here to validate the contents of a panel. The validation occurs as you exit the panel.
Replace with a Java Bean
For details, see Substituting a Java Bean for a Panel.
Inserting Panels
The panel is the only Script Author object that visible at runtime, potentially including the display of panel text, question controls (and, optionally, associated labels), graphics, hyperlinks, or embedded values.
For general information on inserting panels, see Inserting Objects and Branches.
For details of panel properties, see Panel Properties and Attributes.
Notes
-
Ensure you define at least one question for each panel you insert, or the script will not pass a syntax check. In runtime, every panel requires end user interaction (an answer to a question).
Defining General Panel Properties
The basic process of defining the general panel properties is as follows:
-
On the canvas, right-click the panel > Edit Blob Properties.
-
Click Properties.
-
Enter or edit the general panel properties.
For details, see Notes on General Panel Properties.
Button Considerations for Panels
When displayed at runtime, each panel includes a Continue button. At runtime, script end users must click Continue to progress through the script.
Each panel must contain, at minimum, a single question user interface control. In a graphical script, you must explicitly define each question control. (Wizard scripts can automatically insert a Continue button in a panel, if there are no other questions defined.)
When you define a single button question control in a panel, you can provide any value to the button. Oracle recommends using the value Continue (for the value and the display value for the button control). This mimics the button that progresses panels with other question types. If you set the display value to any text string other than Continue, then you can consider this UI control to be the one exception to the rule that each script includes a Continue button.
You can also provide several answer definitions (or lookup values) for a button control. Each displays as a separate button. Clicking on any one at runtime registers that as the end user's selection and progresses the script to the next object, displaying the next panel in sequence. Buttons are designed to appear in a single horizontal row. However, when button values are too long, or if there are many answer choices, or if the window size at runtime is small, the buttons wrap to successive horizontal lines in the panel, displaying in as horizontal rows as is necessary. There is no way to modify this behavior.
If a panel includes more than one question UI control, then you cannot define a button for the panel. However, a Continue button will be automatically generated by the Scripting Engine at runtime for the panel.
Substituting a Java Bean for a Panel
Use this procedure to substitute a Java bean for a panel. In order for the Java bean code to execute, the script must appropriately reference the bean, the bean must be appropriately packaged, and deployed to the applications database.
Note: Java beans are customized components. As such, no support is provided for scripts that have difficulties substituting panels with Java beans. The functionality is provided with the tool to allow unsupported customization.
Prerequisites
-
Write the code for the Java bean.
Steps
-
In the Object and Branch toolbar, click the Toggle Select Mode tool.
-
On the canvas, double-click a panel.
The Properties window appears.
-
In the Panel tree, select Properties.
The Properties pane appears.
-
In the Properties pane, select Replace with a Java Bean.
The Bean Name and Jar File Name fields are enabled.
-
In the Bean Name field, type the full path and name of the Java bean (for example, mybeans.foobean).
-
In the Jar File Name field, type the full path and name of the jar file for the Java bean.
-
Click Apply to apply your work or click OK to save your work and exit the Properties window.
References
Understanding Answer Properties and Answer Types
Caution: In Oracle Scripting, there is a one-to-one relationship between questions and answers. In this section the terms "question" and "answer" are used interchangeably, with the most appropriate term used in context.
This section consists of the following topics:
Answer Properties
You can view and edit answer properties when you add or edit an answer in the Panel Properties window of a panel.
The main properties of each answer appear in different windows, as follows:
See Also
Answer Properties in the Answer Entry Dialog Window
The following diagram shows the answer properties that appear in the Answer Entry Dialog window:
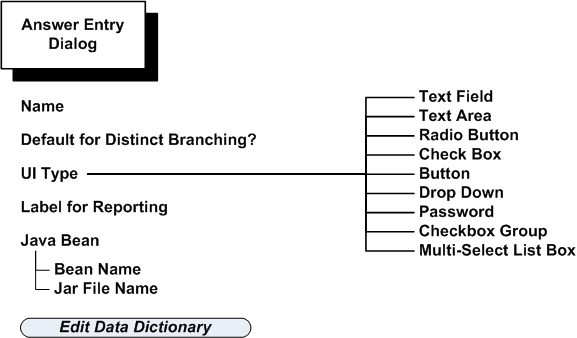
From the Answer Entry Dialog window, more answer properties are available when you click the Edit Data Dictionary button; they appear in the Edit Data Dictionary Window.
Notes on Answer Entry Dialog Properties
The following table lists the answer properties in the Answer Entry Dialog window.
| Property | Data Type | Required? | Function or Description | Restrictions |
|---|---|---|---|---|
| Default for Distinct Branching | Check box | (See Restrictions column.) | Note: Not an option if UI Type is Checkbox Group or Multi-Select List Box. Indicates whether this question will be triggered as the default for distinct branching at runtime. |
Required only when distinct branching is used as an outgoing branch for a panel. Only one question per panel may have this option selected. |
| Name | Text | Yes | Identifies the specific question to the Oracle Scripting application. When a value is provided at runtime, this value is the key to access the response value provided for this question by the application end user. | Supports any text in the current character set. For each panel, the panel name should be unique. |
| UI Type | Drop-down List | Yes (defaults to Text Field UI type if no selection made) | Identifies the answer control which renders at runtime for end user input. Choices include Text Field, Text Area, Radio Button, Check Box, Button, Drop Down, Password, Checkbox Group, and Multi-Select List Box. | One UI type per question. |
| Label for Reporting | Text | Only for single Check Box UI | For all UI types except check box, entering text in the label for reporting results in that text string appearing as a label to the left of the answer at runtime. This label also appears in reports generated for the application. | Check boxes will display this value to the right of the single check box, instead of the lookup's display value. |
| Bean Name | N/A | No | This field, formerly used to identify a Java bean name with which to replace a question, is no longer supported due to conflicts with the WYSIWYG architecture. | Not functional with Oracle Scripting 11.5.6 and later. |
| Jar File Name | N/A | No | This field, formerly used to identify a source code Java archive for a Java bean to replace a question, is no longer supported due to conflicts with the WYSIWYG architecture. | Not functional with Oracle Scripting 11.5.6 and later. |
Answer Properties in the Edit Data Dictionary Window
The Edit Data Dictionary window displays three tabs: General, Table info, and Lookups, each of which has its own properties, as shown in the following diagram.
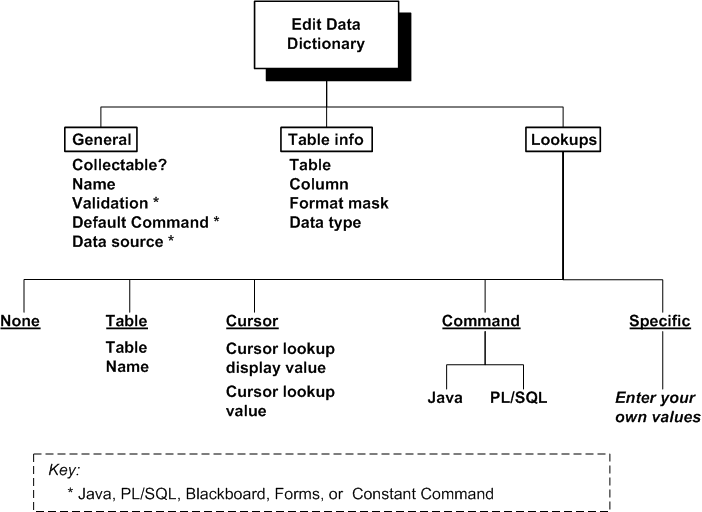
Notes on Edit Data Dictionary Properties
Notes on Edit Data Dictionary Properties
General tab
Collectable?
The script property Answer Collection sets the general rule for a script. You can override this general rule for individual answers with the Collectable? property.
Name
Identifies the answer.
Validation
Specifies a command to perform validation on the answer.
Default Command
Add a command to provide the default answer at runtime. At runtime, the default answer displays initially and when you click Reset to Default.
Data source
A data source is code that pulls data from or sends data to an external application, and is executed when you exit the panel. Oracle recommends that you use the equivalent functionality available through panel post-actions
Table info tab
Table info columns (for answers in Insert and Update block subgraphs)
The Table info area can be used for an answer that belongs to a panel in the subgraph of an Insert or Update block: if you specify Table Name and Column Name, the value of the runtime answer is stored into or replaces the named table and column when the block insert or update is performed.
Table info columns (for answers in Query block subgraphs)
-
The Table info area can be used for an answer that belongs to a panel in the subgraph of a Query block: if you specify Table Name and Column Name, this information, together with the value of the runtime answer, is is used as a query constraint when the block query is performed.
For example:
-
The answer name is OrderQty, and is a Text Field.
-
The table for the query block is Order_Items, with a column Qty.
You want to restrict the query search results to those rows whose quantity is greater than the value entered for the OrderQty answer.
-
In this case, for the OrderQty answer, in the Table info area, specify TableName = Order_Items, Column Name = Qty.
If no other query constraints are defined, either in the subgraph or the Object Dictionary of the query block, Oracle Scripting sets up a query of the form:
SELECT ... from Order_Items where Qty = : OrderQty
-
-
You can use the Format mask in the Table info data to convert queried date columns, as in the following example:
-
The answer name is EnteredDate, and is a Text Field.
-
The table for the query block is Order_Items, and it has a column Order_Date whose column type is Date.
-
In the script, the user enters a value of ''12-DEC-2006' for the EnteredDate answer. Oracle Scripting treats this as a string of characters.
To enable the script to retrieve all orders for that date, in the Table info area, you must define Table Name = Orders, Column Name = Order_Date, and Format Mask = DD-MON-YYYY.
Oracle Scripting will generate a query similar to the following:
SELECT ... from Orders
where to-char(Order_Date, 'DD-MON-YYYY') = '12-DEC-2006';
-
Lookups tab
Table lookups
You can set up a custom table to be used to retrieve lookups. The table must contain the exact columns as shown and described in the following definition:
| Column | Type and Size | Notes |
|---|---|---|
| ANSWER_ID | NUMBER | - |
| ANSWER_VALUE | VARCHAR2 (512) | Answer value that is used internally in Oracle Scripting. |
| ANSWER_DISPLAY_VALUE | VARCHAR2 (512) | Answer value that is displayed in a script. |
| ANSWER_ORDER | NUMBER | Sequence of answers when displayed in a script in the agent interface. |
| ANSWER_ACTIVE | NUMBER | If set to 1, the row is displayed as a lookup choice, else the row is not displayed |
Cursor lookups
Cursor lookups derive from the results of the last database query block executed .
Cursor display lookup value
Actual text shown to the end user to select.
Cursor lookup value
Value passed by the application when selected at runtime.
Command lookups
Use a Java or PL/SQL command to provide the lookups.
Specific lookups
Enter your own lookups. Specify both the Display Value (the text shown at runtime) and the Value (used by the application)
Answer Properties Specific to Answer Types
This section consists of the following:
See Also
Characteristics of Specific Answer Types
Script Author provides nine answer types, consisting of a familiar set of answer controls that render in HTML forms: buttons, checkboxes, radio buttons, text fields, text areas, and password fields. However, some of the characteristics of each may act differently than in a standard HTML page. The table below briefly describes each type.
| Answer Type | End User Action | Supports Null Value? | Supports Multi-Select Values? | Requires Lookup Values? | Requires Label for Reporting? |
|---|---|---|---|---|---|
| Text Field | Keyboard entry | Yes | No | No | No |
| Text Area | Keyboard entry | Yes | No | No | No |
| Radio Button | Click | No | No | Yes | No |
| Check Box | Click | Yes | No | No | Yes |
| Button | Click | No | No | Yes | No |
| Drop Down | Click, drag, click | No | No | Yes | No |
| Password | Keyboard entry | Yes | No | No | No |
| Checkbox Group | Click | Yes | Yes | Yes | No |
| Multi-Select List Box | Click, Ctrl-Click (Option-Click for Macintosh OS) | Yes | Yes | Yes | No |
Usage and Sharing of Answer Characteristics
Each answer behaves according to its own specifications. This section describes how characteristics are used and shared by the various answers.
Questions Where You Enter Data at Runtime
Text field, text area, and password field questions all accept keyboard entry from the user. While the answer control differs in appearance or behavior for each, each type will accept up to 4,000 characters.
Questions Where You Select Data at Runtime From Defined Lookups
-
Radio buttons, check boxes (both individual and checkbox groups), buttons, and dropdown lists (single and multi-select types) all require you to perform an action at runtime (a mouse click or a keyboard command) to select an answer (assuming no default command is defined for the answer). The script designer must define lookup values for these questions.
-
Radio buttons and dropdown lists require you to select an answer at runtime before you click the default Continue button.
Questions Where Null Values are Accepted at Runtime
Single checkbox and both multi-select answer types (checkbox groups and multi-select list boxes) can accept null (unselected) as a valid response.
Questions Where Label for Reporting is Required
Only the single checkbox answer type requires a label for reporting. For any reports generated, this value appears for checkbox question types in the report. At runtime, in a panel, this label is displayed to the right of the checkbox. In contrast, values which appear at runtime for checkbox groups are answer choices (or lookup values).
Questions Where Label for Reporting Does Not Appear on Panel
Only the button answer type does not display any value entered into the Label for Reporting field. In reports generated, this value still appears.
See Also
Guidance on Using Specific Answer Types
Guidance on when to use specific answer types follows below, along with answer type-specific information and recommendations.
| Answer Type | Usage | Design Factors | Runtime Factors |
|---|---|---|---|
| Text Field | Use when soliciting a short text response at runtime. | Default answer type. | You can enter and scroll through text that is longer than the text box space. |
| Text Area | Use when soliciting large amounts of text at runtime, with space for inputting several lines. | Labels are optional, but are recommended, for clarification or if you have several text input controls in the panel. | You can enter and scroll through text that is longer than the text area space. |
| Radio Button | Use for a series of conditions for which only one is allowed. | Requires lookup values. Labels are optional, as the function of this answer type is generally evident. |
You must select one of the options. |
| Check Box | Use to evaluate a simple "true/false" condition. | You must specify a value for the Label for Reporting. Do not specify lookup values. |
At runtime, select the check box if the condition is true, otherwise leave it blank. |
| Button | Use to progress the script to a panel. | A panel with the Button answer type cannot contain any other questions. A panel with the Button answer type will not contain the automatically generated "Continue" button that appears with all other answer types. Requires lookup values. Can have one or more buttons in the panel. Single button: The lookup value in this case is typically "Continue." Multiple buttons: Each lookup value becomes button text at runtime. If Label for Reporting is defined, it is used in generated reports, but does not appear in the panel at runtime. |
Single button: You direct the script to a specific panel, often the next panel. Multiple buttons: You select a button from the horizontal row of buttons to direct the script to a specific panel. |
| Drop Down | Use for a series of conditions for which only one is allowed. Similar to Multi-Select List Box, except Drop Down does not support null values. |
Requires lookup values. Labels are optional, as the function of this answer type is generally evident. |
You must open the drop down field and select a value. |
| Password | Use for short amounts of text to be entered, with entered data appearing as asterisks. | Labels are optional, but are recommended, for clarification or if you have several password input controls in the panel. Oracle recommends that you specify the Validation property in the question's data dictionary (General tab): you enter a command, for example, to verify the number or format of characters input, or to compare a user-supplied password against a validation table. |
If you enter text beyond the allocated space, you can scroll across, but all the data appears as asterisks. |
| Checkbox Group | Use for a series of conditions for which zero, one, or many selections are allowed. | Requires lookup values, which at runtime will appear beside their related checkbox. Label for Reporting, if defined, appears at runtime as a label to the left of the checkboxes and lookup values. Default for Distinct Branching property is disabled, as users can select more than one value. |
Each check box appears with its corresponding lookup value to the right, in a horizontal row, which wraps if enough room is not available. You can leave all the checkboxes blank, to enable the script to continue to the next panel. |
| Multi-Select List Box | Use for a series of conditions for which zero, one, or many selections are allowed. | Requires lookup values. For the ability to select multiple values, you should define more than one lookup value, even though a single lookup value is syntactically correct. Default for Distinct Branching property is disabled, as users can select more than one value. |
Up to three lookup values are visible, with a vertical scroll control to display more if applicable. To select multiple values, hold down the Control key and click once on each desired selection. To select multiple sequential values, you can use the Shift key. |
See Also
Working with Answers and Answer Properties
Caution: Oracle Scripting, there is a one-to-one relationship between questions and answers. In this section the terms "question" and "answer" are used interchangeably, with the most appropriate term used in context.
This section consists of the following tasks related to answers and answer properties:
Adding and Editing Panel Answers
Answers are properties of a panel.
The basic process of defining an answer is as follows:
-
Right click a canvas panel, then select Edit Blob Properties
-
Click Answers, then click Add or Edit as appropriate.
Starting in the Answer Entry Dialog window, and continuing in the Edit Data Dictionary window, you can then enter and select answer properties, as described in Answer Properties.
Reordering and Deleting Panel Answers
When you specify panel answers, you can control the order in which they appear at runtime. You can also delete answers from your list of answers for a panel.
The basic process is as follows:
-
Right click a canvas panel, then select Edit Blob Properties.
-
Click Answers.
-
Select an answer, then click Move Up, Move Down, or Remove as appropriate.
Defining Lookups
For certain answer types, you must define lookups, in order that users can select a value at runtime, for example, a value from a dropdown list, or a specific button. For details, see Answer Properties Specific to Answer Types.
The basic process is as follows:
-
Click Edit Data Dictionary.
-
Click the Lookups tab.
-
To obtain answer choices from a specific table, select Table lookup and define the lookup table name.
This option requires you to define the table in your database as described in Lookups tab
-
To obtain answer choices from the Scripting cursor, select Cursor lookup and define the display value and the lookup value.
This option requires a query to have been performed previously in the script.
-
To obtain answer choices as return values to a command, select Command lookup and define the Java or PL/SQL command to execute that will return the desired values.
-
To hard-code specific values as answer choices, select Specify lookups and then click Add to add one or more of the following pairs of data that describe each lookup:
-
Display Value: this appears in the script panel at runtime.
-
Value: this is stored in the Oracle Scripting database schema when the corresponding answer value is selected at runtime.
-
Reordering and Deleting Specified Lookup Values
When you specify lookup values, you can control the order in which they appear at runtime. You can also delete lookups from your specified list of lookups.
The basic process is as follows:
-
Click Edit Data Dictionary.
-
Click the Lookups tab, then select Specify lookups.
-
Select a lookup, then click Move Up, Move Down, or Remove as appropriate.
Using Answers in Table Insertions and Updates
You can define answers to be written to a database table, as part of the insert or update defined in an insert or update block.
Define this feature, which is available for answers in panels defined in the subgraph of an Insert or Update block, as follows:
-
Specify the Table Name and Column Name into which the runtime answer will be stored when the block insert is performed, or which column will be updated when the block update is performed.
Note: Answers must be listed according to the default order of the columns in the table.
Adding Validation to Answers
Answer validation establishes and enforces business rules for a designated answer in a panel. When the script end user provides a response to the corresponding question at runtime, the Scripting Engine validates the answer provided. If the answer does not meet the criteria specified in validation, then when the user attempts to exit the panel, an error results, and the user is prompted to change the answer before exiting the panel.
You can enforce the answer to be not null, or in a specified range of numbers, in a particular format, or whatever other conditions controlled by the validation command. You can use custom or previously existing validation routines in your script.
Prerequisites
-
If using custom code, write the code for the validation command.
-
If using existing best practice Java methods, identify the appropriate Java method and its required parameters.
Steps
The basic process of adding validation to an answer is as follows:
-
Click Edit Data Dictionary.
-
In the General tab, click Edit beside the Validation field.
-
In the Command field of the Command Properties window, define a Java command for the validation action. For more details, see Defining Commands.
Ensure you include any required parameters.
Using Custom Code
You can define custom validation for an answer by coding a Java method to meet your project requirements, and making this method available to Oracle Scripting. Like all custom code, this is exposed to the Scripting Engine by packaging the appropriately tested and packaged compiled class into a JAR or ZIP file as appropriate. The Java archive is then uploaded to the applications database from the Administration tab of the Scripting Administration console. You must either specify the custom code as global, or map the Java archive to your script.
Using Best Practice Question Validation Java Methods
You can also use existing validation routines available to Oracle Scripting. This requires no custom code. As detailed in Oracle Scripting Developer's Guide, there is a set of best practice Java methods (in the class NodeValidation) that ships with Oracle Applications. When associated as a Script Author Java command for question validation (in the data dictionary for the question), these can be used to validate questions in a script at runtime.
The best practice Java methods include validation that the answer provided to the appropriate question in a panel at runtime meets one of the following criteria:
-
Is a valid date in a specified format (MM/dd/yyyy)
-
Is a date in the future, in a specified format (MM/dd/yyyy)
-
Is a valid time in a specified format (hh:mm:ss am/pm)
-
Is an integer
-
Is an integer in a specified range
-
Is not null (a response is required)
-
Is an invalid value (based on a parameter passed to the command)
Guidelines
-
When defining the Script Author Java command, you must provide the fully qualified class path of the class and method you are referencing.
For example, if using the method validateRequiredField in the best practice class NodeValidation, then in the Command Info area, in the Command field, type oracle.apps.ies.bestpractice.NodeValidation::validateRequiredField.
-
Most of the best practice Java methods take parameters. Refer to the appropriate section of Oracle Scripting Developer's Guide for the list of best practice methods and the parameters required.
For example, if using the method validateRequiredField, two parameters are required: a string called answer and a string called label.
-
The answer parameter defines the name of the panel answer for which you want the validation routine to apply. In the Parameter window, in the Name field, type the answer name.
-
The label parameter defines the label of the answer to appear at runtime in the message window. For example, if validating a field called Customer Number, then in the Parameter window, in the Name field, type label, and in the Value field, type Customer Number. At runtime, if the user attempts to pass this field without providing a value, then a dialog box labeled Message appears, with the message: Please enter a value for: Customer Number.
-
References
Oracle Scripting Developer's Guide
Continue Button Considerations for Answers
Panels with Two or More Answers Include Generated Continue Button
When displayed at runtime in the agent interface, each panel with two or more explicitly defined answers also displays a Continue button. At runtime, you must click the Continue button to progress through the script. Whether developing a script using graphical tools or the Script Wizard, no steps are required to generate this button. It is a function of the Scripting Engine.
Automatic Question Creation for Wizard Script Continue Buttons
For wizard scripts, if you do not specify a question control in a panel, Oracle Scripting automatically creates a question, which displays a Continue button at runtime. The question is named Continue, and has a label for reporting of Continue. In the data dictionary for this question, the specified lookup value is also named Continue (for both the value passed to the application, and the display value).
Explicit Question Creation for Graphical Script Continue Buttons
For graphical scripts, even if a panel has no requirement for a text type or selection type question control, the script still requires a mechanism to progress to the next panel at runtime. Thus, you must explicitly define a Continue button.
Use the Button question control, and specify a question name (for example, Continue). Optionally, you can include a label for reporting.
You must also define, in the data dictionary for the question, a single answer choice (referred to in the graphical UI as a lookup entry) with a value and display value of Continue. To do so, in the question data dictionary, select Specify lookups in the General tab and click Add to access the Lookup entry window.
Restrictions for Answer Property Changes
-
Once the answer properties are saved, changes to Answer properties behave in the following manner in Script Author:
-
Changes to the Default for Distinct Branching option will be recognized, unless the UI Type is one of the multi-select options.
-
Changes to the Name property will be understood by the Scripting Engine regardless of execution interface.
-
The UI Type list is not modifiable from the Answer Entry Dialog window.
-
When you first enter a value in the Label for Reporting field, when you save the changes by clicking OK, a corresponding label is generated in HTML panel text. When you return to the Answer Entry Dialog window and make changes to this value:
-
The new value is updated in the IES schema.
-
The new value appears in subsequent reports showing panel questions and labels.
-
The new value displays in the Answer Entry Dialog window.
-
The new value will not be reflected in the panel layout. You must also edit this value in panel layout HTML manually to reflect changes in the Label for Reporting field.
-
If you want to change either the UI type or the Label for Reporting property of the Answer Entry Dialog window, you must take one of following approaches:
-
Export the panel HTML. Customize the panel HTML code to modify the UI type or Label for Reporting, following appropriate panel and UI type syntax rules. From Script Author, re-import the panel text, replacing the previous question of the same name.
-
Create a new question, applying the appropriate properties. If you wish to provide the newly defined question with the same question name, you must delete the original question prior to checking script syntax, or you will encounter the error message "error: duplicate answer name <question name>".
-
For the Label for Reporting property only, you can change the value in the Answer Entry Dialog window, and also manually edit the panel layout, either using the panel layout editor or by modifying the HTML code.
Note: If you do not change the Label for Reporting value both in the Answer Entry Dialog window and in the panel layout, the values will not be in synch.
-
-
For scripts built for execution in Oracle Scripting 11.5.6 or later, do not fill in any parameters in the Java Bean area of the Answer Entry Dialog window. Replacement of questions within a panel with a Java bean is no longer supported due to conflicts with the WYSIWYG panel rendering architecture.
Note: You can still replace an entire panel with a Java bean. Be aware that doing so is considered unsupported customization. The Java bean is recommended to be fully tested. Java code must be appropriately packaged and fully qualified, and must be deployed to the database. You can deploy custom Java archives in JAR or ZIP format by navigating to Administration tab > Jar Listings subtab using the Scripting Administration console.
Working with the Panel Layout Editor
The panel layout editor is a feature available to graphical scripts through which you can add, modify, and view panel text, apply formatting to text and panel questions, insert graphics, create hypertext links, and add embedded values to display dynamic content.
You can also export panel HTML and import modified or custom panel HTML.
This section consists of the following topics:
When Should You Use the Panel Layout Editor?
Each panel in a script displays at least one answer at runtime, and may contain other elements such as formatted text and graphics.
The appearance or of each panel at runtime is controlled by panel layout HTML, generated in Script Author either by the Script Wizard, or by Script Author graphical tools.
You should first define your answers and their properties in the Answer Entry Dialog window. These answers defined for a panel will then automatically appear in the panel layout.
You can then create, modify or add optional panel content in a graphical script using the panel layout editor.
What Can You Do in the Panel Layout Editor?
In the Panel Layout Editor, you can enter text and then format it in several ways:
-
As a convention, you can choose to indicate that text has two special usages at runtime. Instructional text, which displays as dark blue text, indicates specific instructions to the script end user. Spoken text, which displays as magenta text, indicates text that an agent would speak (using the agent interface) or that a customer or survey respondent would read for communication of primary information for that panel. Oracle Scripting does not enforce the intended usage indicated by the special color fonts.
-
You can also select from a variety of typeface styles, sizes, justification and formatting options.
You can also include some complex functions, such as including embedded values in a panel.
An embedded value returns and displays information from a Script Author command in the panel at runtime. For example, if during the script session you obtain the customer's name, you can subsequently use a blackboard command as an embedded value command to display the customer's name in panel text, customizing the appearance of the script dynamically.
Using the panel layout editor, you can also create hypertext links, create ordered or unordered lists, and insert images into the text.
Example
The following image shows an example of the panel layout editor for a panel.
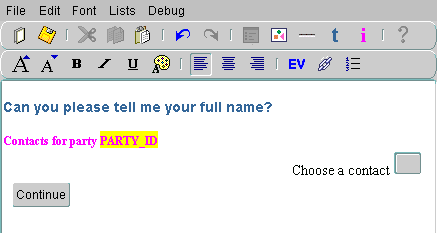
The example includes the following elements:
-
Text, in dark blue, intended to be spoken by the script user at runtime ("Can you please tell me your full name?)
-
Text, in magenta, to be displayed on the screen , but not necessarily to be spoken ("Contacts for party")
-
Text with a yellow background ("PARTY_ID") - this shows an embedded value, whose actual value at runtime is evaluated and displayed through an Oracle Scripting command.
-
Label text ("Choose a contact") immediately to the left of a button.
-
A blank button that serves as a placeholder image for an answer, where in general at runtime the user either enters or selects one or more value.
Note: In this case, the answer appears at runtime as a dropdown list of contacts for the current party, where the user needs to select one value.
Note: The answer properties are defined in the Answers pane for the panel (not shown here).
-
A Continue button
Panel Layout Editor Menu and Toolbars
The menu and top toolbar of the Panel Layout text Editor contain several options and buttons that fulfill many standard functions, such as New, Save, Cut, Copy, Paste, Undo, Redo.
Note: Keyboard shortcuts, such as Ctrl-X for Cut and Ctrl-Z for Undo, that are frequently used in other editing tools, do not apply in the Panel Layout Editor - you must use the menu options and toolbar buttons.
![]()
To the right of the standard function buttons in the top toolbar, the following buttons have specific Oracle Scripting functions:
-
Modify Properties
This is enabled only if you are editing Embedded Values or Hyperlinks
-
Insert Image
-
Insert Horizontal Line
-
Set Spoken Text Font
This is for text intended to be spoken by the script end user, as for example, a service agent.
-
Set Instruction Text Font
This is for text intended as extra information for the script end user, but not usually to be spoken.
Note: The two "Set Text" buttons represent a convention for intended use only. You can choose a special font or leave the text in standard font; Oracle Scripting does not enforce any intended usage at runtime.
The lower toolbar includes several industry-standard text formatting buttons, such as bold, italic, underline, left justify, right justify, and so on.
![]()
To the right of the formatting buttons, the following buttons have specific Oracle Scripting functions:
-
Insert Embedded Value
-
Insert Link
-
Insert List
Note: From the toolbar, the Insert List button enables you to insert a new ordered list.
Note: From the Lists menu option, you can insert new ordered and unordered lists, as well as items into those lists.
Opening the Panel Layout Editor
You can open the panel layout editor in a number of ways.
The basic process is as follows:
-
On the canvas, right-click the panel > Edit Blob Properties.
-
Click Panel Layout.
-
Click Panel Layout Editor button.
You can also open the panel layout editor from the canvas as follows:
-
Click the Toggle Select Mode button in the Object and Branch toolbar.
-
Click the panel, then perform one of the following:
-
Click the Panel Layout icon on the top toolbar.
-
Enter Ctrl + Shift + E.
-
From the menu, select Tools > Panel Layout Editor.
-
Entering and Formatting Panel Text
Note: Before you enter and format panel text in the Panel Layout Editor, Oracle recommends that you define panel question UI controls (answers), and values in the Label for Reporting field, if applicable.
General Text Handling
Type the panel text, then optionally, select text and then format it using one of the following methods:
-
Select a format from the Font menu.
-
To apply a preformatted text style, from the toolbar, click Set Spoken Text Font or Set Instruction Font.
-
From the toolbar, apply font size, style, or foreground (text) color characteristics by clicking on the appropriate icon.
-
To format paragraph-level alignment, from the toolbar, select Left Justify, Center Justify, or Right Justify, as appropriate.
Adding Lists and List Items
If you want to insert a bulleted or a cardinally ordered list, then do the following:
-
Without selecting text first, place the cursor at the appropriate insertion point in the panel.
-
From the Lists menu, select Insert Unordered List or Insert Ordered List, respectively.
A bullet or the number 1. appears, indicating that you have started a list.
(You can also start up a new ordered list by clicking the Insert List toolbar button.)
-
Type or paste text into the list as appropriate. To add new items to the list, on your keyboard, press Return.
-
To add items to lists, you can also select Insert Unordered List Item or Insert Ordered List Item from the Lists menu.
Add as many items and lists as you require.
Special Display Considerations in the Panel Layout Editor
Appearance of Answer Controls
Answer controls, images, and text can be interspersed in the panel layout editor, and formatted as desired. The panel layout editor displays placeholder question controls for any questions that are already defined for that panel.
Text entry question user interface control types (text fields, text areas, and password fields) and single checkbox controls appear the same in the panel layout editor as they will at runtime.
Radio buttons, drop-down lists, multi-select lists and checkbox groups display in the panel text editor showing only a single representative control (a single radio button, an empty list, or a single checkbox, respectively). This provides an indication of how the panel appears at runtime, and allows the script developer to format any question control labels or text.
The actual appearance of these controls can differ at runtime, since any of these question controls can be populated dynamically (for example, from a PL/SQL command, table lookup, or blackboard value command). Thus, these question control types are always rendered dynamically at runtime.
Editing Question Labels
If a label for reporting for a specific question is defined upon the initial definition of a question control using the Answer Entry Dialog window, then this value will also appear in the panel layout editor. However, the only time label content is generated in panel HTML is when the question control is initially saved.
If you subsequently edit the Label for Reporting field for a specific question, the change affects for all question-related and internal label identifiers but does not change the label on the panel layout.
So, if you modify the Label for Reporting field in the Answer Entry Dialog window after the data has first been saved, you must manually return to the panel layout and update the panel label accordingly.
The same is true if you subsequently remove a value initially entered into the Label for Reporting field; the label content will continue to appear in panel text until you manually remove it.
Inserting Embedded Values
Use this procedure to insert an embedded value into the panel.
Embedded values in panels act as placeholders for values that are dynamically entered into the panel text at runtime.
The basic process is as follows:
-
Type some placeholder text.
-
Highlight the placeholder text and then click Insert Embedded Value in the toolbar.
The placeholder text gets a yellow background.
-
With the cursor in the text or with the embedded value text selected, from the toolbar, click Modify Properties.
-
In the Command window, define a Command that returns a value to be displayed in the script panel at runtime.
Example of Creating an Embedded Value
You must provide the known value of a blackboard key "First_name" to populate as the embedded value in a panel at runtime.
In the Panel Layout Editor, you perform the following:
-
Select and highlight your placeholder text, click Insert Embedded Value.
-
Click in the embedded value text, click Modify Properties.
-
From the Command Type menu, select Blackboard Command, and enter First_name in the Command field. The Name field does not influence the blackboard command.
At runtime, as you enter the panel, the value of the blackboard key First_name is displayed in the panel.
Inserting Images
Use this procedure to insert an image into the panel.
The basic process is as follows:
-
Position the insertion point where you want to insert the picture.
-
In the toolbar, click Insert Image.
-
From your local file system or network, locate the .gif or .jpg file that contains the image you want to insert, click the file, then click Open.
The image appears at the insertion point.
Note: The absolute path of the graphic is recorded in the panel HTML. This image will only appear correctly at runtime from workstations that can access the same path to render the image.
-
Optionally, make any layout changes necessitated by placement of the graphic into your panel layout.
Special HTML Considerations for Images in Panels
-
Imported images appear in-line with the text (not in an HTML table). To best control how images appear in a panel layout, you may want to modify the panel HTML to place the image in a table.
-
The panel HTML references the image in the absolute directory path from which it is inserted into the panel. This will only display properly at runtime to individuals who have that specific graphic image physically located in the same precise directory location on their computer's hard drive or network.
To make an image visible to all users of a script, the image must be uploaded to a path accessible to the Oracle Applications Web server at runtime (for example, to $OA_MEDIA on the applications tier). Then, the HTML referencing the graphic image inserted into a script from a local or network location must be exported from the panel layout editor, and modified to reference the image in the appropriate relative path.
The modified panel HTML code is then re-imported into the panel. When the script containing the modified HTML is deployed and executed, the image is available to all script end users at runtime.
Example of Image Related HTML Processing
-
In the panel HTML code, locate the reference to the graphic image file.
For example, if the file imported is a sample GIF image in the temp directory of your C drive, locate <img src="file:///C:/Temp/sample.gif">.
-
Replace the reference with the appropriate URL, adhering to project or company guidelines (such as specifying alternate text and image dimensions).
For example, if you loaded the file onto the OA_MEDIA directory of the Oracle Applications server for Company.com, the revised image reference might appear as follows:
<img src="http://server.company.com:8888/OA_MEDIA/sample.gif" width="200" height="50" alt="sample image">
-
Make any other required modifications to the panel layout HTML file, and save it in HTML format.
-
Import the file into the original panel, replacing the old panel layout contents with the modified HTML. For more details, see Importing HTML Files into the Panel Layout Editor.
Inserting Hypertext Links
Use this procedure to insert a hypertext link into the layout of a panel, and provide a URL for the link's destination at runtime
The basic process is as follows:
-
Highlight the appropriate text and then click Insert Link in the toolbar.
The selected text is blue and underlined.
-
With the cursor in the text or with the text selected, click Modify Properties in the toolbar.
-
In the Hypertext Link window, in the URL field, type the full URL for the hyperlink. Include the protocol (e.g., HTTP://) in the URL field.
For example, type http://www.oracle.com.
Saving Text
Performing a Standard Save
Choose File > Save from the menu.
Saving the Text as HTML
If you want to save the text to an HTML file, then choose File > Export from the menu, and specify a filename with an .html extension.
Note: Saving the text to an HTML file does not save the text to the panel.
Note: When importing panel HTML, only files with a full four-letter .html extension display, unless you explicitly change the File Type option in the Open dialog box to All Files (*.*).
Exporting Panel Text to HTML Files
Use this procedure to save panel text to the file system as an HTML file.
Note: Exporting the text to an HTML file does not save any changes made to the panel layout. If you want to save the modified panel as well as export it, you must explicitly save it in the panel by selecting File > Save.
The basic process is as follows:
-
Select File > Export As.
-
Specify the file name you wish to designate to the exported HTML and the location on your local file system or network where you want the file to be saved, then click Save.
Importing HTML Files into the Panel Layout Editor
Use this procedure to import HTML into the panel layout editor.
Note: Importing an HTML file into the panel layout editor overwrites any content previously in the panel layout editor for the designated panel.
Note: If question user interface controls were previously defined in the panel that have been removed from the panel HTML, then importing the modified HTML will delete those controls from the panel, and any corresponding data dictionary properties associated with the deleted question controls.
Note: If importing panel HTML from one panel into another panel, no data dictionary properties from the first panel are included in your import. You must define data dictionary properties anew for any questions imported into a panel. If re-importing into a panel, any already existing data dictionary properties for questions previously defined in the panel are retained.
The basic process is as follows:
-
Select File > Import.
-
Locate the file that you want to import, click the file, then click Open.
Note: Only files with a full four-letter .html extension display, unless you explicitly change the File Type option in the Open dialog box to All Files (*.*).
The HTML appears in the panel layout editor.
-
Optionally, if you want data dictionary properties associated with any questions that are new to the panel, enter them as appropriate.
Guidelines
Neither the agent interface nor the Web interface of the Scripting Engine support the use of cascading style sheets (CSS). For executing scripts as surveys, any style sheet other than the default CSS specified in JTF properties will be ignored. The agent interface will ignore any style sheets referenced in panel layout HTML.
Customizing the Panel HTML
This section includes the following topics:
Background
The panel layout editor is not intended to be used for complex layout. For example, you cannot create HTML tables using this feature.
To create complex panel layouts, to use or modify HTML tables, or to change the value of automatically generated Continue buttons, it is expected that script developers will use full-function third-party HTML editors to modify panel HTML.
You can also create or edit panel HTML code by hand using a text editor.
Either of these approaches are considered customization. Customizing panel layout is also required for any panel intended to display GIF or JPG images within a panel.
Customizations Involve Importing and Exporting Panel HTML
You can import or export panel layout HTML from the panel layout editor.
If you want to customize panel layout, you have several options:
-
Begin defining panel HTML by adding the relevant question UI controls to a panel in a graphical script, and optionally, entering and formatting text using the panel layout editor, and then export the panel HTML for subsequent modifications.
-
Define all standard aspects of a panel by creating a script in the Script Wizard, and entering all panel aspects as appropriate. Subsequently, graph the script, and export panel content from the panel layout editor.
-
External to Oracle Scripting, generate compliant HTML panel content, and then import the content into a graphical script using the panel text editor.
Regardless of your approach, all customized panel HTML must contain script-specific code, and not interfere with reserved words.
And regardless of the creation method of compliant panel HTML, the custom code must be imported into a graphical script using the panel layout editor, and deployed to the database in order to execute at runtime.
Guidelines
-
Experienced HTML programmers may wish to define panel layouts in HTML instead of using graphical script tools or the Script Wizard, and then import them (panel by panel) into newly created empty panels in a graphical script.
-
Any panel properties not defined in panel HTML (for example, any data item visible in a question's data dictionary) must then be configured for each panel after import into a graphical script.
-
You must follow custom Oracle Scripting syntax and observe rules regarding panels and reserved words.
-
-
There is no method to create or add JavaScript code from Script Author. To add your custom JavaScript code to an existing panel, you must export panel HTML, add the previously tested custom code, and reimport.
-
JavaScript is not supported in the agent interface.
-
JavaScript does not support global functions or functions external to a single panel in the Web interface. JavaScript restrictions are documented in detail in Oracle Scripting Developer's Guide.
-
Panel HTML Contains Script-Specific Code
Special syntax required for Oracle Scripting is enclosed in custom tags and should not be modified. Whether a script is created using the Script Wizard, or with Script Author graphical tools, any panel HTML must conform to certain rules and requirements specific to Oracle Scripting.
This includes:
-
Custom tag names for question UI controls.
-
An HTML table defining all questions, with the name property IES_ControlManifest.
In panel HTML generated by Script Author, a single HTML table named IES_ControlManifest is created to hold all questions. By default, this table includes two columns. Columns and column properties can be modified, but this table must exist with the appropriate name property for panels to appear and function appropriately at runtime.
-
For panels with question UI types other than button, a line of code outside of the IES_ControlManifest table, but just prior to the close body tag. This code results in what is referred to as the Continue button. It is a control with the input value Continue, type property of submit, and the name property IES_CONTINUE.
Sample HTML code for this control is as follows:
<input value="Continue" type="submit" name="IES_CONTINUE">
</body>
If desired, the input value for this control can be modified. No other properties must be changed for this control.
-
For graphical scripts only, you can also define a button control by defining a question UI control of type Button. If using this question control, it must be the only control in the panel. Panels with a button require you to specify one or more sets of answer choices (lookup values) in the data dictionary for that question.
-
For this control, the value property is the variable pbLabel; the name property is derived from the name of the question control in the Answer Entry Dialog window; and the type is submit.
-
Answer choices consist of a value that displays at runtime (the display value) and the value passed to the blackboard as the selected answer at runtime (the value).
-
When used to continue the script to the next panel, type the value Continue for both the display value and the value. This appears at runtime exactly like the automatically generated Continue button (which is generated for panels with other question control types).
-
This control type also supports the inclusion of more than one answer choice. Simply specify multiple sets of lookup values in the question data dictionary. This appears at runtime as multiple buttons, horizontally displayed. Clicking any answer choice button registers the response for that panel at runtime.
-
Because you can include one value or multiple values, this control type is referred to in HTML code as a pushbutton group (pbgroup). Except when specifying HTML code, product documentation refers to this control as a button (or a submit button).
-
In contrast to auto-generated Continue buttons, the HTML code for this control falls within the IES_ControlManifest table.
-
Because it can support multiple answer choices, the HTML code for this control (when exported from the panel layout editor) does not specify display values. The code contains a variable, pbLabel, which is dynamically populated in the panel at runtime. Like the radio button, drop-down, checkbox group, and multi-select list box question UI controls, this value is provided to the Scripting Engine from the question data dictionary at runtime.
-
Sample HTML code for this control is as follows:
<pbgroup>
<input value="pbLabel" name="question name, as entered into the Name field in the Answer Entry Dialog window" type="submit">
</pbgroup>
...
-
Syntax for all question controls is documented in detail in Oracle Scripting Developer's Guide.
What Is Not Supported in Panel Layout HTML
Generally, panel HTML must conform to the HTML 3.2 specification, and should be editable in any HTML 3.2 compatible editor.
Note: Not all tags accessible to HTML 3.2 are supported in Oracle Scripting, and some support is limited.
The following list includes some limitations of Oracle Scripting. This list is by no means all-inclusive.
-
Oracle Scripting does not support the embedding of Applets within panels.
-
Oracle Scripting does not support the use of cascading style sheets (CSS) within panel HTML.
-
Oracle Scripting does not support the SCRIPT tag.
-
Some use of this tag will function but is not guaranteed. Use this tag at your own risk.
-
The use of JavaScript in an HTML page outside of the start and end body tags is not supported.
-
JavaScript is not supported in the agent interface.
-
-
Global variables defined in panel HTML do not persist from panel to panel.
-
Panels containing a button question UI control are not allowed to contain any other question UI controls in the panel.
-
No two controls in the same panel HTML may have the same name.
You must understand how Oracle Scripting functions in order to understand these limitations. Some facts supporting the reasons for the above restrictions are included below.
-
Scripts are designed to execute in at least two Scripting Engine interfaces (one a Java applet, the other is interpreted by a Web browser). The lowest common denominator (the agent interface) is used to enforce uniformity of behavior.
-
The agent interface uses older implementations of Java SWING and other classes to interpret HTML. Until all of Oracle Applications uptakes Java Virtual Machines or Java Runtime Engines that interpret code from more recent HTML specifications, the limit remains HTML 3.2.
-
Because the Scripting Engine agent interface is a Java applet, panel HTML is interpreted by SWING classes, not by a modern Web browser. This explains why JavaScript is not supported by the agent interface.
-
In contrast, panel HTML for scripts executed in the Web interface are interpreted by the Web browser. Thus, you must use an Oracle Applications certified Web browser. Note that HTML is rendered differently in different supported browsers, which can result in viewing differences based upon which compliant Web browser is used to execute a script.
-
When scripts are executed in the Web interface, JavaServer Pages (JSP) execute, and panel HTML is passed to the primary JSP page. Panel content is passed by the Scripting Engine from the panel to the executable JSP, resulting in the stripping out of content prior to and following the open and close body tags.
-
This results in limitations with applets, CSS, and the script tag.
-
Because the Scripting Engine considers only panel HTML content between the open and close body HTML tags, and other information is discarded at runtime, global variables defined in panel HTML do not persist from panel to panel.
-
-
The JSP page controls the script's user interface and appearance at runtime, based in part on:
-
Whether the script is hosted in a self-service Web application (hosted) or not (is a standalone script).
-
Options selected in the survey campaign requirements (including the appearance of optional header and footer sections, and specification of error and final pages or page redirects.
-
Working with Groups
This section consists of the following topics
Group Properties and Attributes
A group object is a container for other objects and branches, and always contains one subgraph, also known as a child graph. That subgraph may contain any type of object, including other groups.
Groups can be nested as many levels as desired; the only limit is practicality. Each group must meet certain requirements (see Minimum Requirements for Any Graph).
Groups are used to:
-
Logically group a section of the script flow - typically, to contain a single function or process
-
Serve as a container for a shortcut, so that at runtime a shortcut button can appear in the GUI that will "jump" the user to that group
-
Restrict the access of certain or all users to a section of the script at runtime
In addition, when a saved script is imported into a new script, it is imported as a group.
The main group properties and attributes appear in the Group Properties window, as shown in the diagram following.
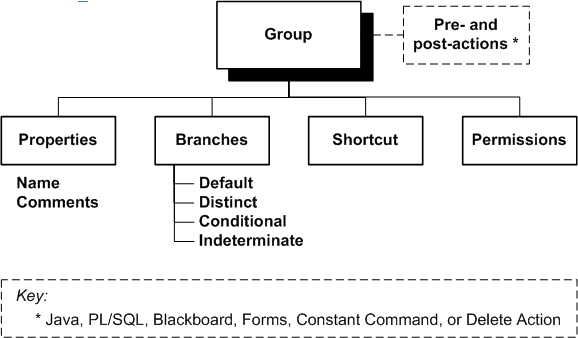
These panel properties are accessible in the Script Author by right-clicking a canvas group and selecting File > Edit Blob Properties, or if you have enabled auto-popup when creating a new panel, group, or block.
For more information about actions and branches, see:
Notes on Group Properties and Attributes
Identifies the group in the Script Author and the database.
Shortcut
If you want the group to be the target or destination of a "jump" from another location of the script, specify a shortcut name. You can only have one shortcut name associated with the group.
For more details about shortcuts, see Defining Shortcuts.
Permissions
You can allow or limit access to the group by specifying permissions, to the level of individual users.
Inserting Groups
For general information on inserting groups, see Inserting Objects and Branches.
For details of group properties, see Group Properties and Attributes.
Using Subgraph Information
The subgraph of the group, which is executed before the group, may contain panels, blocks, and other groups. You can collect information from the subgraph objects to be used in the containing group.
For more information, see Using Subgraph Information in Blocks and Groups.
Defining Shortcuts
A shortcut is a property of a group in Script Author. The shortcut exposes the functionality of the group and its contents to the Scripting Engine, enabling that group to be the target or destination of a "jump" from another location of the script.
This jump occurs when the shortcut is invoked using the Oracle Scripting jumpToShortcut API. This API is associated with the script using a Java command, which can be called as an action, pre-action or post-action anywhere in a script.
The shortcut property of a group is also used by the indeterminate branch. This branch type requires an expression to be defined. This expression is a Java method which, when evaluated, provides a shortcut name as its return value (based on the conditions tested in the method), invoking the shortcut.
Regardless of whether it is called from an action or an indeterminate branch, when the shortcut is invoked, the flow of the script at runtime jumps from the existing object being processed to the group containing the shortcut name that is returned by the command.
Script flow is thus changed, and flow of the script at runtime resumes from the target group. If the destination group contains a panel, that panel is the next to display to the script end user. Otherwise, processing continues of all script objects, and the next panel placed in the revised flow displays at runtime.
Four typical uses of a shortcut are as follows:
-
To associate a target for a shortcut button in the shortcut button area (displays for the agent interface only).
-
To enable the Disconnect button (displays for the agent interface only).
-
To associate a target for a group containing specific functionality which must be accessed after meeting a specified condition in a script (for either runtime interface).
-
To redirect the flow of a script to a new path (starting with the group that contains the shortcut).
Use this procedure to define a shortcut, specifying that group as the target of a jump.
Prerequisites
Insert a group.
Steps
-
In the Object and Branch toolbar, click the Toggle Select Mode tool.
-
On the canvas, double-click a group.
-
In the Group tree, select Shortcut.
-
In the Shortcut pane, in the Shortcut field, type the name of the shortcut.
For example, to define a group as the target after clicking Disconnect in the agent interface, type WrapUpShortcut.
-
Click Apply to save your work and continue, or click OK to save your work and exit the Properties window for the group.
Guidelines
-
If you want to jump to the shortcut in runtime from a shortcut button, define the shortcut button.
-
If you want to jump to the shortcut in runtime based on values or other criteria, define that criteria and associate the criteria with one or more commands in the script.
-
If you created this group to enable the Disconnect button in the agent interface, you must ensure the subgraph created by the group is appropriately terminated, with, as a minimum, a default branch from the start node to a termination node.
Importing Saved Scripts as Groups
When you import a script, the entire script - the root graph, and all subgraphs - is placed into your current script, as a group, whose name is the script name of the imported script.
This procedure is described in the task called Importing Scripts.
Working with Blocks
Using blocks, you can integrate data sources into your script. Block types include insert, query, update, and API blocks.
Using insert, query, and update blocks, you can add to, select from, or update database tables from a script, respectively. You provide the necessary information as you define the block properties; at runtime, Oracle Scripting generates and executes the appropriate SQL command.
Using an API block, you can add any Script Author command (Java, PL/SQL, blackboard, forms, constant, or a delete action) to your script.
When you create a block, you automatically create a subgraph, also known as the child graph. You can either leave the subgraph as a minimum graph (one start node, one termination node), or you can add in panels, blocks, and groups.
The objects in the subgraph are evaluated before the main command of the parent block. This enables you to solicit data that may be passed to the parent block command. You can validate the extra data and even prevent the execution of the parent block command.
This section consists of the following topics:
Block Properties and Attributes
The key block property is Type, and the four allowed values are Query, Insert, Update, and API. The block type value controls which other properties are relevant for the block type; these extra context-sensitive properties are defined in the Object Dictionary associated with the type of block chosen.
The main block properties appear in the Block Properties window, as shown in the diagram that follows.
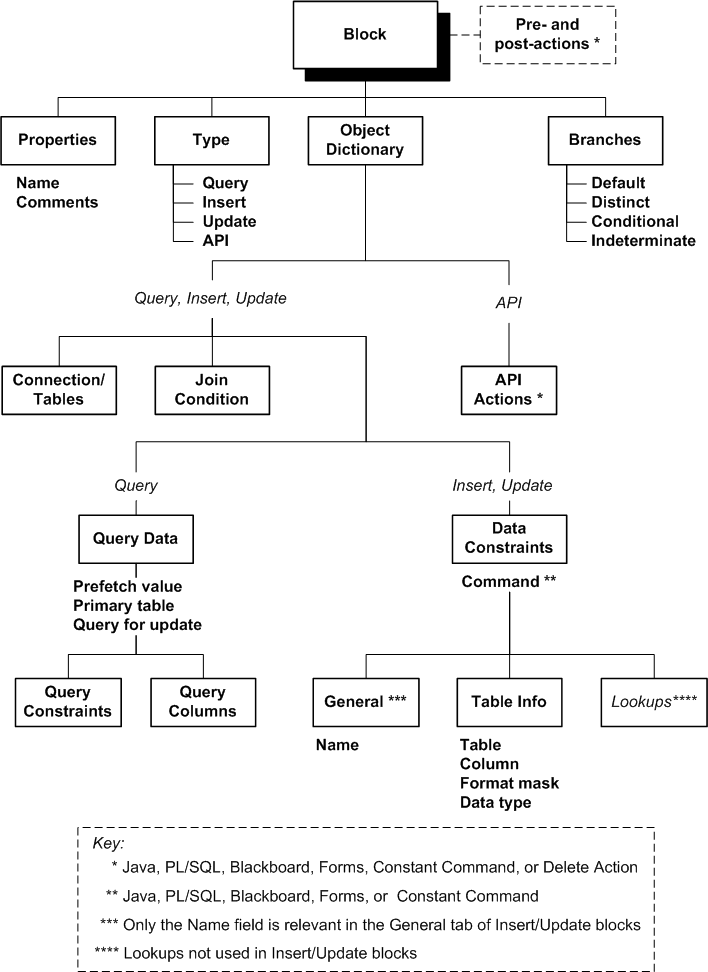
For more information about actions and branches, see:
For each block type, the Object Dictionary contains information relevant to that block type. The information categories are reflected in the tabs and subtabs that appear as you create and edit the block, as follows:
-
Query block categories:
-
Insert and Update block categories:
-
The main components of an API block are Oracle Scripting commands; you can define one or more commands in the API Actions window.
Notes on General Block Properties and Attributes
Identifies the block.
Type
Identifies the block type: Query, Insert, Update, API.
Notes on Block Object Dictionary Properties
This section consists of the following topics:
Connection/Tables tab
Specifies the connection to a database and one or more tables that exist at that database. The connection is either the login connection or a previously-defined remote connection to the target database.
For more information about connections, see Working with Database Connections.
For query blocks, you can specify one or more tables.
For insert and update blocks, you generally specify one table.
Note: List master tables first and then tables related by foreign key.
Join Condition tab
Used to specify primary key and foreign key data and relationships between a master and a detail table when you define two or more tables in the Connection/Tables tab.
When you add a join condition in this tab, three subtabs appear, into which you must enter the appropriate data.
To illustrate the process, assume the following example:
-
Master table is Customers, primary key is Cust_Id.
-
Detail table is Orders, primary key is Order_Id, foreign key Cust_Ref references Cust_Id in the Customers table.
For each master-detail table relationship, you must enter data as shown in the following table (the italicized column shows the values for the example tables):
| Subtab | Values to Enter | Example Values |
|---|---|---|
| Master PK Table | Master table name, and its primary key | Customers, Cust_Id |
| Detail PK Table | Detail table name, and its primary key | Orders, Order_Id |
| Detail FK Table | Foreign key from the detail table (that references the master table primary key) | Cust_Ref |
For multi-column primary and foreign keys, enter the column names on separate lines in the unnamed text area of each subtab.
Note: Where there is only one table defined in the Connections/Tables tab, you can also specify Master PK Table information in the Join Condition tab, but this is optional.
Query Data tab (for Query blocks only)
Prefetch value
Specify the number of rows to be returned for each database query, if you want to improve network performance. The default setting for -1 can be retained.
The row prefetch value is a feature of Oracle JDBC drivers; the default setting returns 10 rows at a time.
Primary table
Used to enable the processing of certain Delete Action commands.
In general, a Delete Action command deletes the row corresponding to the current cursor row from the data retrieved during the last database query. The Primary table field can be used when the last database query was for data from more than one table.
If all the following conditions are true:
-
The cursor data was retrieved from more than one table
-
The tables are connected by primary-foreign key relationships
-
The top table (TT) of the table hierarchy has a Cascade Delete constraint defined
then, in order to allow the Delete Action to delete rows from more than one table, you must set Primary table to the top table of the table hierarchy.
Note: The deletion that occurs during the execution of the Delete Action command does not display a popup window warning you that the record will be deleted. If you have to delete records in scripts, Oracle recommends that you use PL/SQL business API's for processing deletes, in PL/SQL commands or in API blocks.
Query for update
Specifies if this block is to be used to retrieve data, which will be subsequently updated in an Update block.
Query Constraints subtab
-
Specifies conditions to restrict the rows to be returned from the query.
Examples:
1. To limit the rows from a Customers table to those where the Acct_Num column is 12345, enter the following condition:
Customers.Acct_Num = 12345
2. To restrict the rows from a Customers to those where the Cust_Dept column is SALES, enter the following condition:
Customers.Cust_Dept = 'SALES'
3. To restrict the rows from a Customers table to those where the phone number matches a blackboard value (EnteredPhone) retrieved and stored earlier in the script, enter the following condition:
Customers.PhoneNbr = :EnteredPhone
Note: Make sure that, between ":" and "EnteredPhone", there is no space.
4. If your last query retrieved a single row from the table Cust_Info which included the Phone_Number column, enter the following condition:
Customers.PhoneNbr = :Cust_Info.Phone_Number
Note: In these examples, the mechanism by which you specify blackboard values is through bind variables. If bind variables occur in more complex code such as within DECODE statements, make sure each bind variable is followed by a space. For example, enter
DECODE (:ValType ,'X','Do Nothing',:Valtype ) and not
DECODE (:ValType,'X','Do Nothing',:Valtype)
Note: You can insert logical operators (such as, NOT, AND, and OR) either to combine two conditions within one constraint or at the end of a query constraint. If no logical operator is used, then AND is assumed. Use parentheses at the beginning or end of a query constraint to override the rules of precedence.
Query Columns subtab
Specifies the data columns to be returned from the query.
Data Constraints tab (for Insert and Update blocks only)
Command
The command returns the new data value for the insert or update command.
You define the target column for the new data in the Table info subtab.
General subtab
Name
Identifies the data constraint.
After the data constraint command is executed, the value is stored in the blackboard under the name of the data constraint.
Table info subtab
Specifies the target destination of the data value returned by the Data Constraints command.
For insert blocks, this identifies the table and column to insert into. For update blocks, this identifies the table and column whose data will be updated.
API Actions (for API blocks only)
Specifies the command that executes when the block is processed at runtime.
Inserting Blocks
For general information on inserting blocks, see Inserting Objects and Branches.
After creating a block on the canvas, you can then define the function of the block by selecting the block type and specifying further block properties.
For details of block properties, see Block Properties and Attributes.
You can also navigate down to the child graph of the block and create objects there.
Defining Query Blocks
Use a query block to obtain information from one or more database tables. This information can be used for processing within a script, or as a prerequisite to updating a database table through an update block.
The subgraph of the query block, which is executed before the block query, may contain one or more panels. Panels within a block allow the script to collect answers to be used as constraints for the block query.
For more information, see Using Subgraph Information in Blocks and Groups.
Defining Query Block Properties and Attributes
Oracle Scripting generates a SQL Select statement from the properties that you define for the block. An overview of the Select statement elements and where you must define the corresponding properties appears in the following diagram:
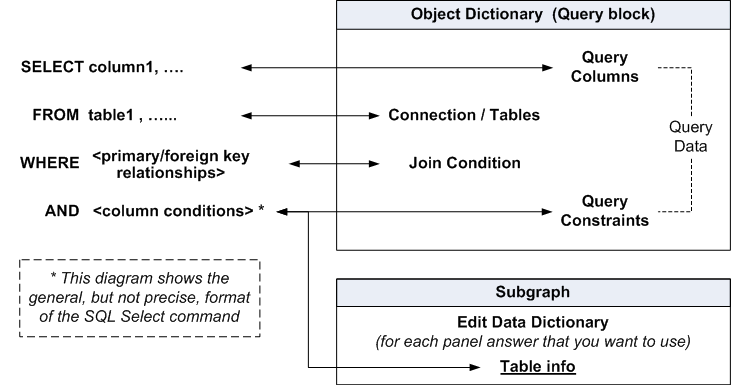
The setting up of the query block's Object Dictionary properties for the SQL Select statement can be summarized as follows:
-
Specify the columns to query in the Query Columns subtab of the Query Data tab.
-
Specify the table information in the Connection/Tables tab.
-
Specify any primary and foreign key relationship for multi-table queries in the Join Condition tab.
-
Specify other constraints in the Query Constraints subtab of the Query Data tab.
Note: You can also specify dynamic constraints that depend on answers retrieved at runtime, by defining Table Info properties for answers in panels of the block subgraph. For more information, see Answer Properties in the Edit Data Dictionary Window.
The full set of query block properties and how to define them appears among the Block Properties and Attributes. Use that topic and the preceding diagram to enter the properties for the query block, after you have inserted the block in the canvas.
Records returned by a query are stored in the scripting cursor. This set of information can be manipulated by Oracle Scripting cursor APIs, or used as answer choices to questions in a panel.
The data in the first record in the cursor can also be displayed in panel text: you can display the individual column values that are part of the record in panel text as embedded values.
If you need to display a record other than the first record in panel text, you can use cursor APIs to manipulate the record pointed to by the cursor.
Information returned by a query is stored and accessed by its table and column name, in format TABLE.COLUMN.
Information returned by a query block is only stored in the cursor until a subsequent query is executed, or until the script session is completed.
Retaining Retrieved Information
To retain information returned by a query, you can use Script Author commands.
-
For example, you can use a blackboard command as a parameter to a Java command to store the information in the scripting blackboard for the full duration of the script transaction, regardless of whether one or more additional queries are performed.
Note: Make sure you use a different blackboard key (and not TABLE.COLUMN) as it could be overwritten by a different query or if the cursor record is traversed.
-
You can also use a PL/SQL command to call a PL/SQL procedure defining a global or local variable. This also keeps the value accessible to the Scripting Engine only for the duration of the script transaction.
-
If necessary, you can use a PL/SQL command to write the values to a custom table. This should be used sparingly, however, as it can impact performance of the script. Such functions are generally recommended to be performed as a post-action to the script, so the impact to script end users is minimized.
Defining Insert and Update Blocks
Note: Insert and update blocks are one way that you can use in Oracle Scripting to interact with database tables. Because of their greater flexibility, Oracle recommends that you call business API's to insert and update data, in PL/SQL commands or in API blocks.
Using an insert or update block, you can gather information and either write to or update records in one or more database tables specified within the data dictionary of the block.
Insert blocks are independent of any other coding.
The general format of the Insert statement generated by Oracle Scripting is:
Insert into TableX (col1, col2, ...,coln) values (val1, val2, ...,valn);
You specify the target columns and the values for those columns within the insert block and its related subgraph.
Update blocks are defined to update data that must have been retrieved by a previous query block.
The general format of the Update statement generated by Oracle Scripting is:
Update TableY set col1=val1, ....,coln=valn where <data constraints>;
The rows to be updated, or their ROWIDs, must exist in the cursor. The update block and its subgraph define both the columns to be updated and their replacement values.
Note: Oracle recommends including code in your script prior to an update block to validate that the prerequisite query returns at least one valid row.
The subgraph of the block, which is executed before the block insert or update, may contain one or more panels. Panels within a block allow the script to collect answers to be used in the block insert or update.
For more information, see Using Subgraph Information in Blocks and Groups.
Defining Properties for the Insert or Update Block
Oracle Scripting generates one or more SQL Insert or Update commands from the properties that you define for the block.
You define the table name for the insert or update in the Connection/Tables tab of the Object Dictionary for the block.
Generally, you specify a single table name in the Connections/Tables tab, and you do not need to enter any properties in the Join Condition tab.
For both inserts and updates, you must define the target columns and the new data values for those columns.
This information can be provided from two places:
-
For columns whose values are provided by the script end user at runtime, as an answer to a panel question, define the target column in the Table info area of the panel answer properties, in the subgraph associated with insert or update block.
-
For other columns, you must specify the following information in the Data Constraints tab of the Object Dictionary of the insert or update block:
-
The target column in the Table info tab
-
The Command that returns the new value for the target column. For more details, see Commands to Provide Column Values.
-
These requirements are summarized in the following diagram.
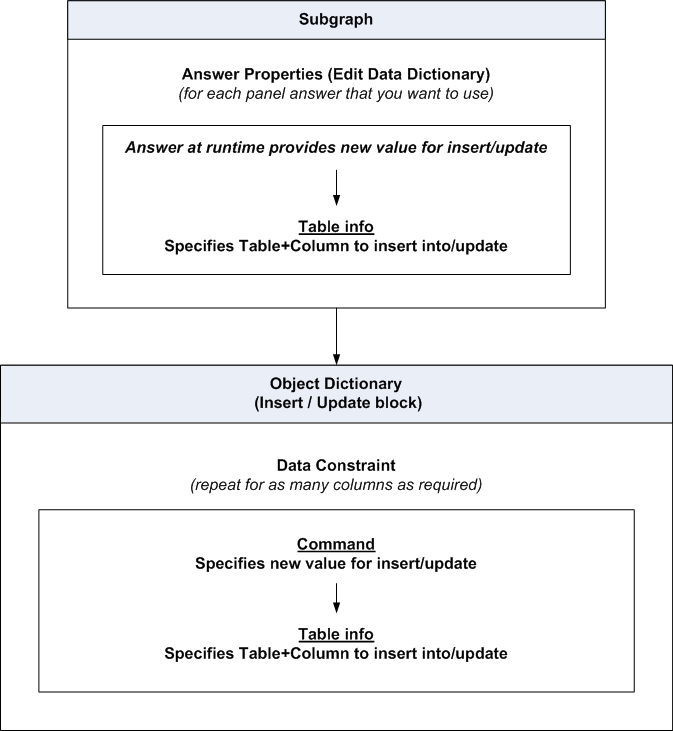
The full set of insert and update block properties and how to define them appears among the Block Properties and Attributes. Use that topic and the preceding diagram to enter the properties for the insert or update block, after you have inserted the block in the canvas.
Commands to Provide Column Values
You must use the Data Constraints tab to define commands to provide column values for the columns to insert or update, in one of the following ways:
-
You can define a blackboard command to obtain information from the blackboard to use in the insert or update.
-
You can define a PL/SQL command to obtain information from a database table or view to use as a parameter for the insert or update.
-
You can define a Java command to obtain the required data to use in the insert or update.
-
You can define a Forms command to obtain the required data from an open form to use in the insert or update . Not all Forms-based applications allow Oracle Scripting to obtain information from the form.
For details, see Defining Commands.
Defining API Blocks
API blocks provide the flexibility of using any type of Oracle Scripting command - Java, PL/SQL, Blackboard, Forms, Constant - or Delete Action, at any point in a script flow.
After you have inserted a block into the canvas, the only block properties required for an API block are the block type, which must be API Block.
Define one or more Commands in the API Actions tab.
For general information about Commands, see Defining Commands.
Using Subgraph Information in Blocks and Groups
The subgraph of any block or group, which is executed before the block or group, may contain one or more panels. These subgraph panels allow the script to collect answers to be used during the execution of the parent block or group.
Use the buttons in the Navigation Toolbar to move between the block and its subgraph.
For query blocks, for example, you can include a panel in the subgraph that requests an account number. You can specify that the account number entered at run time should act as a constraint on the parent block's query, in addition to any constraints explicitly defined for the query block.
For insert and update blocks, for example, you can include a panel in the subgraph that requests a product name. You can specify the product name entered at run time should be either inserted into a database column or that it should update an existing database column.
For groups, as well as for all blocks, you can store panel answers entered at run time into the blackboard, and make them available in the parent block or group.
Especially for insert blocks, you can test that all required data has been provided within the subgraph, using a conditional branch. For example, you can define a Java method as the expression for the conditional branch which tests for a specific condition (the presence of all required information). The conditional branch, created at the end of the flow for objects within the block, leads to the termination node of the block, exiting the block flow (and executing the insert action) only when all required information is accessible. A default branch (with a lower branch order) can direct flow to panels or other objects which request the information until all required data is not yet available.
For groups, as well as for all blocks, you can store panel answers entered at run time into the blackboard, and make them available in the parent block or group.
For more details about the use of panel answers in block subgraphs, see the information about Table info columns in the topic Answer Properties in the Edit Data Dictionary window.
Working with Branches
Branches are generally properties of the configurable object (panel, block, or group) from which they start.
To view and edit branches, first access the Properties window of the start object.
For general information about working with branches, see the following topics:
This section, which contains more specific branch-related tasks, consists of the following topics:
Branch Properties
You can attach branches to panels, blocks, nodes, and groups.
Note: Special considerations apply to start nodes - each start node must have a single default branch - and termination nodes - by their very nature, they can only be the targets of branches.
Within each object, the main properties of branches that you can define appear in the diagram following:
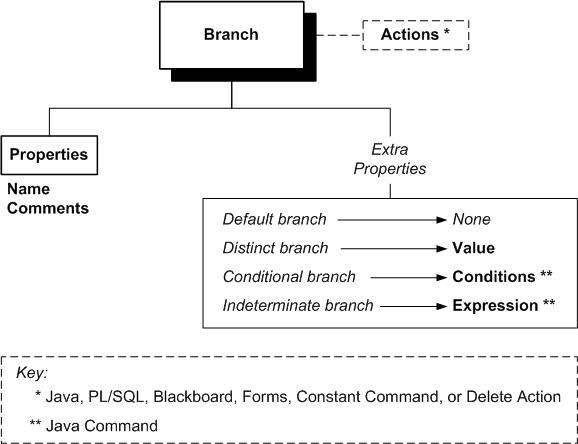
For details of the actions, see Defining Actions.
Guidelines for Defining Branches and Branch Properties
-
Each default, distinct, and conditional branch connects two configurable objects or nodes.
-
From a start node, you can create only a single default branch.
-
A distinct branch can only start from a panel.
The panel must have one answer that is designated as the Default for Distinct Branching. For that answer, you must provide a set of lookup values.
For each distinct branch, you must select a Value from one of the panel answer lookup values. You do not have to have a distinct branch for each lookup value.
-
For a conditional branch, you must specify, in the Conditions field, the name of the Java code that provides the Boolean expression to be evaluated at runtime; the conditional branch is chosen if the code returns the value True.
-
For an indeterminate branch, you must specify , in the Expression field, the name of the Java code that evaluates the destination at runtime. For more details, see Considerations for Indeterminate Branches.
Note: When you add a condition or an expression for a conditional or indeterminate branch respectively, you must select Java Command for the command type in the Command Properties window.
Note: For conditional and indeterminate branches, during a script syntax check, there is no validation to determine whether the custom code referenced by the Java command exists.
However, the referenced custom code must be available in runtime in order for the script to execute. Thus, any custom code must be appropriately uploaded or deployed to the server and accessible by the Scripting Engine so the code can be referenced by the script at runtime.
For more information, contact your systems administrator or refer to the Oracle Scripting Implementation Guide.
Reordering Branches
Below the start node, each object placed on the Script Author canvas in a graphical script is typically connected above and below by appropriate branches, ending with the termination node. Outgoing branches (branches drawn from any object) are displayed in the Branch pane that results by clicking the Branch attribute under any object's Property window.
For each object to which they are attached, the branches are evaluated at runtime in the order that they appear in an object's Branches pane, where you can reorder them.
Note: For a panel with multiple branch types, it is important to ensure that the Default branch is listed last so that other branch types will be evaluated.
To reorder a branch, select it in the Branches pane, and click either Move Up or Move Down as appropriate.
Adding Corners To and Removing Corners From Branches
Note: In order to perform these operations, if the Toggle Select Mode button on the Object and Branch toolbar displays a raised image, you must click the Toggle Select Mode button.
When you create a branch in the canvas by dragging directly from a source to a destination object, the branch appears as a straight line on the canvas. You can create corners in the branch as you create it by releasing the mouse at one or more points before you reach the destination object.
You can add a corner to an existing branch by clicking on any point of the branch and dragging away.
To remove a corner from a branch, click on the corner - a cross-hairs icon appears as you hover directly over it - then either press the Delete key on your keyboard, select Edit > Delete from the menu, or click the Cut toolbar icon.
Changing Destinations of Branches
Note: This procedure requires you to delete the destination object connected to the branch.
If you want to retain that object for use elsewhere, then first select the object, use the Copy command to copy the object, and use the Paste command to place the copy of the object on the canvas.
The basic process of changing the destination of a branch is as follows:
-
Click the Toggle Select Mode button.
-
Select the current destination object of the branch.
-
Select Edit > Delete.
-
Select or create the new destination object.
-
Drag the destination object to the branch.
-
When the branch turns red, release the destination object.
Considerations for Indeterminate Branches
-
Use an indeterminate branch when the destination of the script is uncertain until information is gathered in a script session and evaluated.
Such information can be:
-
End user responses to panel questions.
-
Relative logical conditions such as the time of day or day of the week.
-
Information received into the scripting cursor or the scripting blackboard from a PL/SQL package or a PL/SQL command executed during the session.
-
Any other logic specified in a Java method referenced by a Script Author Java command (including custom code or best practice Java commands).
You must include all the relevant factors in Java code, the return value of which dynamically determines the target destination for the script flow when evaluated at runtime.
-
-
The return value of the Java code must be one of the following:
-
A sibling object, that is, a panel, group or block, on the same graph as the indeterminate branch.
-
The shortcut name of a group at any level of the script.
-
-
To reflect the fact that the destination is unknown until runtime, the indeterminate branch is drawn on the Script Author canvas from the source object to an open point on the canvas; it does not connect to another script object.
-
The indeterminate branch is the only branch type that does not connect two objects. Use of this branch type allows that graph on the canvas to break two syntax requirements: (1) the requirement for every object that will be evaluated at runtime to be connected with branches, and (2) the requirement for the graph containing the indeterminate branch to include a termination node.
-
A termination node is still required if the destination object (the destination object to which flow of the script will progress at runtime) is on the same graph as the indeterminate branch, because the Scripting Engine needs to be apprised of when to end processing for that graph.
Working with Database Connections
The SQL command generated by Oracle Scripting for a query, insert, or update block is defined to execute at runtime either at the same database instance that you log into when starting the Oracle Applications session to use the Script Author applet - the login connection - or on another database - the remote connection.
By default, the initial connection property is set up for the SQL command to use the login connection.
List for Remote Connections
If you want any generated block SQL command to execute remotely, you must first define the remote connection or connections in a Connection List for the script. You can then select the appropriate remote connection for each block as required.
Use the Script Author Connection List (Script menu > Connection List) to define tables or views to which you want to connect to perform SQL actions (or any other database function).
Selecting a Connection for a Block
For any query, insert, or update block, you can then select the appropriate connection in the Connection/Tables tab.
The connection options are:
-
Use Login Connection: The connection to the database instance which was established when your Oracle Applications user logged into Oracle Applications.
-
You do not need to define the login connection using the Connection List.
-
Reuse an existing connection: When you select this option, the connection drop-down list is enabled, in which all connections defined using the Connection List appear.
Note: For remote connections, data changed in one remote connection session cannot be seen in another remote connection session, as the commits are not done until the transaction is finished. The login connection does not have this issue as the same "db session" is shared throughout the script transaction.
Defining Remote Database Connections
Use this procedure to define how Oracle Scripting connects to the database at runtime prior to the execution of the block.
The basic process is as follows:
-
From the top menu, select Script > Connection List.
-
In the Connection tab, click Add, then enter the following data:
-
Connection Name
-
Host Name (include the domain if appropriate)
-
Port Number
-
SID
-
User Name.
-
Password
-
-
You can optionally test the connection in the Test tab
Note: When you import a script into another script, the script connections from the imported script are added to the connection list of the target script.
Defining Actions
Actions are commands that can be added to a script and to any of the configurable script objects and branches. The actions can be one or more of the following:
-
Command types: Java, PL/SQL, Blackboard, Forms, or Constant
-
Delete Action
Pre-Actions and Post-Actions
You can define pre- and post-actions for the following Oracle Scripting elements:
-
Script
-
Panel
-
Group
-
Block
Script pre-actions execute in the Scripting Engine interfaces before the first script panel appears; script post-actions execute after the last panel is executed in the script.
Each panel, group, and block can have both pre-actions and post-actions, which execute correspondingly before and after the runtime evaluation of the specific panel, group, or block.
The basic process of adding a pre- and post-action is as follows:
-
Access the appropriate Properties window for the script, panel, group, or block.
-
Expand Actions, then select Pre Actions or Post Actions
-
Click Add, then enter details in the Command window.
For details, see Defining Commands.
Actions
You can also explicitly attach actions to:
-
Branches
-
API Blocks
Actions attached to a branch execute at runtime as soon as the script flow goes through the branch.
The basic process of adding an action to a branch is as follows:
-
Access the Branch Properties window.
-
Click Actions, click Add, then enter details in the Command window.
For details, see Defining Commands.
Note: You can add an API block to reference a Script Author command instead of associating an action with a branch or a pre- or post-action with a panel, group, or block. This provides the added advantage to script developers of a clear visual indicator that an action is referenced.
The basic process of adding an action to API Block is as follows:
-
Access the Block Properties window.
-
Click Object Dictionary, click Add, then enter details in the Command window.
For details, see Defining Commands.
Defining Commands
You can perform the following tasks:
Defining Java Commands
Use this procedure to define a Java command as an action in Script Author.
The command invokes a public Java method in a specified Java class, and returns the value returned by the invocation, if any, at runtime. The Java command object takes zero or more parameters and returns zero or one value.
Prerequisites
-
Write the code that handles the data exchange.
-
Make the Java class and method available to the Scripting Engine.
Steps
-
Navigate to a Command window.
-
In the Command Type area, select Java Command.
-
In the Command Info area, do the following:
-
In the Name field, type the name of the command.
-
In the Command field, type the command string as follows:
<fully qualified class name>::<method name>
-
-
To list parameters for the command object, do the following in the Parameters area:
-
Click Add.
The Parameters window appears.
-
In the Name field, type the name of the parameter.
-
In the Value field, type the literal string value for the parameter.
-
If you want to add the value as the return value of an executed command, then select Add Value as Command and then click Edit in the Value field.
Note: A command object used as a parameter to another command must return a string value.
-
Click OK to exit the Parameters window.
-
To add another parameter, repeat steps 4.1 through 4.5.
-
-
Click OK to exit the Command window.
-
Save your work.
Guidelines
-
The Command field specifies a fully qualified class path available to the Scripting Engine at runtime. Following this (and two colons) is the specific Java method invoked by the command at runtime.
-
The class and its method are made available to the Scripting Engine by uploading an appropriately packaged class file from the Scripting Administration console.
-
You can also reference Java methods already available to the Scripting Engine (for example, a class and method included in Oracle Scripting best practice Java methods).
-
For information on packaging class files or uploading custom Java, refer to Oracle Scripting Implementation Guide and Oracle Scripting Developer's Guide.
References
-
Oracle Scripting Implementation Guide
-
Oracle Scripting Developer's Guide
Defining PL/SQL Commands
Use this procedure to define a PL/SQL command as an action in Script Author.
The command invokes a PL/SQL stored procedure or function in an Oracle database, and returns the value returned by the invocation, if any. The PL/SQL command object takes zero or more parameters and returns zero or one value.
Prerequisites
-
Write the code that handles the data exchange.
-
Make the stored procedure or function available to the Scripting Engine.
Steps
-
Navigate to a Command window.
-
In the Command Type area, select PL/SQL Command.
-
In the Command Info area, do the following:
-
In the Name field, type the name of the command.
-
In the Command field, type the name of a PL/SQL stored procedure or function in an Oracle database.
-
-
To list parameters for the command object, do the following in the Parameters area:
-
Click Add.
The Parameters window appears.
-
In the Name field, type the name of the parameter.
-
In the Value field, type the literal string value for the parameter.
-
To add the value as the return value of an executed command, select Add Value as Command and then click Edit in the Value field.
Note: A command object used as a parameter to another command must return a string value.
-
In the In/Out list, select the parameter type.
-
Click OK to exit the Parameters window.
-
To add another parameter, repeat steps 4.1 through 4.6.
-
-
In the Connection area, specify the appropriate database connection for this PL/SQL command.
To connect to the same database instance used when logging into Oracle Applications, select Use Login Connection.
To connect to a different database instance, do the following:
-
Select Reuse an existing connection.
-
Select the appropriate existing connection from the connection list.
Note: A database connection must be defined in the Connection List before you select it here. Use the Connection List window to create, modify, and test database connections for each script. For more information, see Working with Database Connections.
-
-
Click OK to exit the Command window.
-
Save your work.
Defining Blackboard Commands
Use this procedure to return a value from the Oracle Scripting blackboard. The Blackboard command object takes no parameters and returns one value.
To return a value, you must specify the blackboard key name. If returning a value from a question earlier in the script, ensure that the flow of the script necessitates the script end user to provide a response.
The key name for any Script Author panel question is the Name value entered into the Answer Entry dialog for a question in a graphical script.
Steps
-
Navigate to a Command window.
-
In the Command Type area, select Blackboard Command.
-
In the Command Info area, do the following:
-
In the Name field, type the name of the command.
-
In the Command field, type the name of the blackboard key name to be returned.
If returning the answer to a panel question, the blackboard key name is the same as the question name. Question names are visible in a graphical script from the panel properties window. In the Panel tree, select Answers; each question defined for the panel is listed in the Answers pane.
-
-
Click OK to exit the Command window.
-
Save your work.
Defining Forms Commands
Use this procedure to define a Forms command as an action in Script Author.
This command invokes a PL/SQL procedure or function defined in an Oracle Forms PL/SQL package on the Oracle Forms server, and returns the value returned by the invocation, if any. The Forms command object takes zero or more parameters and returns zero or one value.
Prerequisites
Write the code that handles the data exchange.
Steps
-
Navigate to a Command window.
-
In the Command Type area, select Forms Command.
-
In the Command Info area, do the following:
-
In the Name field, type the name of the command.
-
In the Command field, type the command string.
-
-
To list the parameters for the command object, do the following in the Parameters area:
-
Click Add.
The Parameters window appears.
-
In the Name field, type the name of the parameter.
-
In the Value field, type the literal string value for the parameter.
-
To add the value as the return value of an executed command, select Add Value as Command and then click Edit in the Value field.
Note: A command object used as a parameters to another command must return a string value.
-
In the In/Out list, select the parameters type.
-
Click OK to exit the Parameters window.
-
To add another parameter, repeat steps 4.1 through 4.6.
-
-
To define a return value, do the following in the Return Value area:
-
Click Edit.
The Parameters window appears.
-
In the Name field, type the name of the return value.
-
Click OK to exit the Parameters window.
-
-
Click OK to exit the Command window.
-
Save your work.
Defining Constant Commands
Constant commands return a constant value. This command object takes no parameters and returns one value.
A constant command can be used to display, at runtime, a value that the script developer determines in advance. For example, if using a script in the agent interface, you can populate a text field in the script information area with the name of a campaign by setting the campaign name as a constant. To do this, associate the constant command in a graphical script as a global script property, using the Command field in the Static Panel property of a script.
Alternatively, you can define a constant value as the default answer to a question. In such an example, define a constant command as the default command to the panel question in the question data dictionary.
Use this procedure to define a constant command as an action in Script Author.
Steps
-
Navigate to a Command window.
-
In the Command Type area, select Constant Command.
-
In the Command Info area, type the name of the command in the Name field.
-
In the Return Value area, do the following:
-
Click Edit.
The Parameters window appears.
-
In the Value field, type the return value.
-
Click OK to exit the Parameters window.
-
-
Click OK to exit the Command window.
-
Save your work.
Defining Delete Actions
Note: The deletion that occurs during the execution of the Delete Action command does not display a popup window warning you that the record will be deleted. In general, if you have to delete records in scripts, Oracle recommends that you use PL/SQL business API's for processing deletes, in PL/SQL commands or in API blocks.
The delete action causes a table row to be deleted from the database, based on the information currently selected in the Scripting cursor.
When you execute a database query from a script using a query block, and one or more rows that match your criteria are returned, the cursor holds the first row. All rows are retained in static memory until the next query is executed (or until the interaction ends). Using the delete action causes the first row of the information stored in the cursor to be deleted from the database.
Note: The delete action is not strictly a command, but is provided in the same interface to make this functionality accessible to script developers in a manner consistent with the application's existing paradigms.
Use this procedure to define a delete action. The delete action takes one value (the command name) and deletes the row selected in the cursor upon execution.
Steps
-
Navigate to a Command window.
-
In the Command Type area, select Delete Action.
-
In the Command Info area, type the name of the command in the Name field.
For a delete action, the command name simply identifies the delete action within Script Author. Regardless of the name, the database row corresponding to the row held in the cursor is deleted upon execution of this action at runtime.
-
Click OK to exit the Command window.
-
Save your work.
Guidelines
-
Scripting APIs are available to advance the cursor, check if the cursor is valid, and so forth. These can be used in combination with the delete action during the development of a script to determine which row of information should be deleted.
-
The delete action will delete the row of information in the database last retrieved by a query, regardless of when in the current script interaction the last query took place. Thus, before including a delete action in a script, it is recommended to ensure that the relevant query is successful (that it will always return rows). Ensuring the validity of a query prior to executing the delete action will preclude deletion of a row returned for the previous query if the following query returns no values in a particular set of circumstances.
-
For ease of maintenance, it is recommended that you insert the delete action as close as possible in the flow of a script to its relevant query.
-
The delete action takes a single parameter in the Name field. The purpose of this field is to identify the delete action within the Script Author. Regardless of the name, the database row corresponding to the row held in the cursor will be deleted. The Name field can also be left blank, but this is not recommended.
References
Oracle Scripting Developer's Guide
Reusing Commands
The full range of Script Author commands (Java, PL/SQL, Blackboard, Forms, and Constant commands) can be defined in the command library, which stores Script Author commands in the applications database.
Once defined in the command library, commands can be copied and modified in the library, removed from the library, and imported into an existing or new script.
Note: To make a command available for reuse in any script, you must first enter your command in the Script Author command library. If you define a command in a specific script instead of the command library, there is no method to copy or move that defined command to the command library.
You can perform the following tasks:
Defining Reusable Commands
Defining a command in the command library makes it available for reuse to script developers using Script Author in the same database instance. Reusable commands are defined using the Command Library window.
Use this procedure to define a reusable command.
Steps
-
From the Tools menu, select Command Library.
The Command Library window appears.
Note: A database connection is required to access or store commands in the database. If your session times out when performing actions in the command library, you will need to revalidate your current session.
-
To begin adding a command to the command library, click Add.
The Command window appears.
-
Enter all command parameters.
The value you type into the Name field in the Command info area is the name by which the command library will list your command.
-
Click OK in the Command window to save your work.
The command is now stored in the library as a reusable command.
-
When you have completed your tasks in the command library, click Close to exit the Command Library window.
-
Save your work.
Copying, Modifying, or Deleting Reusable Commands
Once a command has been added to the command library, it can be copied, modified or deleted from the Command Library window.
Prerequisites
A reusable Script Author command must be stored in the applications database.
Steps
-
From the Tools menu, select Command Library.
Note: A database connection is required to access or store commands in the database. If your session times out when performing actions in the command library, you will need to revalidate your current session.
The Command Library window appears.
-
To copy an existing library command:
-
Locate the appropriate command in the command list.
-
Select the command.
-
Click Copy.
Note: There may be a delay after this request as the command is retrieved from the database.
-
A copy of the selected command appears in the list. Appended to the Script Author command name are the additional characters "_Copy1".
-
-
To edit an existing library command:
-
Locate the appropriate command in the command list.
-
Select the command.
-
Click Edit.
Note: There may be a delay after this request as the command is retrieved from the database.
The Command window for the selected command appears.
-
Make the desired changes to the command and click OK to save your work.
The updated command, as modified, is now stored in the library as a reusable command.
-
-
To delete an existing command from the command library:
-
Locate the appropriate command in the command list.
-
Select the command.
-
Click Remove.
A warning dialog appears, with the message "Remove this command from the library?"
-
Click Yes to continue.
The command library refreshes. The command you selected is no longer listed.
-
-
When you have completed your tasks in the command library, click Close to exit the Command Library window.
-
Save your work.
Importing Reusable Commands Into a Script
After a Script Author command is defined in the command library, it can be reused by any script developer accessing the same database instance. Use this procedure to import a defined command into the current script at a selected location.
Prerequisites
A reusable Script Author command must be stored in the applications database.
Steps
-
From the appropriate location in a graphical script into which you want to import an existing reusable command, navigate to a Command window.
-
Click Use Library Command.
The Choose Command From Library dialog appears.
-
To import an existing library command:
-
Locate the appropriate command in the command list.
-
Select the command.
-
Click OK.
Note: There may be a delay after this request as the command is retrieved from the database.
The Command window for the selected command appears. At this point, you can save the command in the script as it was imported, or modify the command as necessary.
-
-
Modify any command parameters or details if required.
Note: Any modifications you make to the imported command are associated with the specific script into which you imported it, not the command library. To add new commands to the library, you must enter them directly from the Command Library selection from the Tools menu. To modify commands in the library, you must select the command from the command library and edit it directly.
-
Click OK to exit the Command window.
-
Save your work.
Deploying Scripts
You can perform the following tasks:
Checking Script Syntax
Graphical scripts must adhere to certain rules to be viable, executable scripts. These rules are validated, and the script compiled, each time you check the script syntax. Some example of these syntactical rules include the following:
-
Each Script Author object evaluated during execution must have appropriate branching, from the start node to the termination node.
-
Graphs in a script include, at minimum, the root graph. If you include any groups or blocks, these contain separate graphs (subgraphs). Each graph in a script must be properly terminated; in other words, each graph must include a termination node and appropriate branching.
-
Each panel must have at least one question defined.
-
Panels that use distinct branching must have one question selected as the default for distinct branching.
You can check a script's syntax at any time using the following procedure. Script syntax is also automatically checked each time you select the Deploy Script command.
Use this procedure to check the syntax of a graphical script. This procedure does not deploy the script.
Prerequisites
Create or open a graphical script.
Steps
-
Choose Tools > Syntax Check or click the Check Syntax icon in the toolbar.
The Check Syntax icon is a graphic representation of a script with a checkmark.
When the syntax check is complete, a message appears in the status bar. If there are errors, then the Syntax tab is displayed.
-
In the Syntax tab, click on a listed item to view specific contextual error messages (if any).
On the lower portion of the canvas work area, an error pane appears, listing detailed information regarding each syntax error.
-
Fix any errors, and repeat this procedure until the message in the status bar indicates that the syntax check was successful, with no errors.
-
To clear syntax error messages and hide the error pane, right-click in the error pane until you see context-sensitive menu options, and select Hide or Clear.
The error pane closes, providing a larger display area for objects on the canvas.
Deploying Scripts to the Database from Script Author
Deploying a script makes it available to the Scripting Engine for execution at runtime. After this step is successfully executed, the script can be executed using the Scripting Engine agent interface.
If a valid survey campaign deployment referencing this script is subsequently created and activated, you can also execute this script using the Scripting Engine Web interface.
Use this procedure to deploy an open graphical script from Script Author to the Oracle Scripting database schema.
Prerequisites
-
You must have a syntactically correct script.
-
You must be using the Script Author Java applet in a validated Oracle Applications session that has not timed out.
-
Open a script to be deployed in Script Author.
Steps
-
Choose Tools > Deploy Script or click the Deploy Script to DataBase icon in the toolbar.
The Deploy Script to DataBase icon looks like a database and a floppy disk.
-
If there are errors, then the Syntax tab is displayed and the Debug pane appears. (See Checking the Script Syntax.)
-
If there are no errors, the script deploys to the IES_DEPLOYED_SCRIPTS table in the Oracle applications schema.
The status line reads "Deployment to database successful."
Guidelines
-
Deploying a script to the applications database is required before you can execute a script in the Scripting Engine (using either interface).
-
Immediately after deploying a script successfully, you can execute a script using the Scripting Engine agent interface.
-
Before you can execute a script in a Web browser using the Scripting Engine Web interface, you must also administer survey campaign requirements and activate a deployment. For information, see Using the Scripting Engine > Using the Scripting Engine Web Interface.
Deploying Scripts to the Database from the Command Line
Deploying a script makes it available to the Scripting Engine for execution at runtime. After this step is successfully executed, the script can be executed using the Scripting Engine agent interface.
If a valid survey campaign deployment referencing this script is subsequently created and activated, you can also execute this script using the Scripting Engine Web interface.
Use this procedure to deploy a syntactically correct script file from the command line to the Oracle Scripting database schema.
Login and Responsibility
-
You must have access to the applications server, and be able to execute a command line interface.
-
There are no specific Oracle Applications responsibilities required for this task. However, you must have the apps username and password to execute the shell script and deploy the script from the command line.
Prerequisites
-
This command invokes a shell script introduced in Oracle Applications release 11.5.10 or later or Interaction Center Family Pack R or later. You must be using an updated version of Oracle Applications to perform this task.
-
AutoConfig must be executed to generate the shell script so that it is available for this task. This is a one-time step.
-
You must have a syntactically correct script.
-
You must have access to the shell script to execute it from the command line, and you must simultaneously be able to access the script file to deploy it.
Steps
-
Connect using Telnet to the enterprise system, or enter a shell by opening a DOS prompt.
-
Change to the APPL_TOP directory in the Oracle Applications file structure.
-
Ensure that your environment is set correctly.
If necessary, change to the appropriate environment, ensuring that environment variables are set correctly.
-
Using FTP or another method, place the script file or files to be deployed in a location accessible to the shell script. For example, move the script file to the APPL_TOP.
-
For each script file to be deployed, execute the following command:
Note: Use cooper.sh (as below) in your command for UNIX and Linux operating systems; use cooper.cmd if using a Windows operating system.
$IES_TOP/admin/install/<ORACLE SID>/cooper.sh <fully qualified path of script file> <script file> <APPS username> <APPS password>
-
If the deployment is successful, the compiler returns a status code of 0, and you should see the following output:
cooper.sh PASS: deploying <script file>
cooper.sh exiting
-
If the deployment fails, the compiler returns a status code of 1, and you should see the following output:
cooper.sh FAIL: deploying <script file>
cooper.sh exiting
Guidelines
-
Upon executing the shell script, a log file (cooper.log) is generated. If experiencing difficulties, access the log file in the path $IES_TOP/log/cooper.log for information.
-
Possible reasons for failure include incorrect script file name, invalid script (not syntactically correct), incorrect apps-level username, or incorrect apps-level password.
Recovering from an Expired Session
Script Author is a Java applet. This applet is accessed only from a validated Oracle Applications session. When using Script Author, if you leave the application idle, the session can expire when the ICX Session Timeout threshold is exceeded. This causes a timeout for all of Oracle Applications. The user must re-authenticate the Oracle Applications session, as described below.
The amount of time before a session expires is based on environmentally dependent variables (specifically, the ICX Session Timeout system profile option).
You can recover from an expired applications session without losing work, by following the procedure below. If it is your intention to publish the script directly to the database, Oracle recommends that you save the script to a local or network file system temporarily, until you reestablish the script session.
Use this procedure to recover from an ICX Session timeout experienced from a Script Author session.
Prerequisites
You must be in a Script Author session that has timed out, as evidenced by an error message indicating "Your Script Author session has expired."
Steps
-
When you receive the error message indicating that your Script Author session has expired, click OK.
The Error Message window closes. The Script Author canvas is visible. The message area below the canvas contains a message about the session timeout.
-
If you have changes, save the script to the network or local file system.
-
Leaving the Script Author Java applet window open, return to the Scripting Administration console (which is open in a Web browser window).
-
From the Scripting Administration console, click Home.
The session expired login page for your environment appears.
-
Re-authenticate your Oracle Applications session in the same manner you did to start the now-expired session.
For example, if you entered a username and password, reenter that information now.
Note: You must use the same user account (user name or user ID) in order to re-authenticate an existing session.
The login window is replaced by the default responsibility for your current Oracle Applications user account.
-
If your default responsibility is Scripting Administrator, the Scripting Administration console appears.
-
If you have a different default responsibility, navigate through Oracle Applications and select the Scripting Administrator responsibility.
The Home tab is visible, and your Oracle Applications session is restarted.
-
-
Click Launch Script Author.
A new Web browser window opens.
The Script Author applet window appears and has focus.
-
Continue your work.
Packaging Java Bean or Custom Java Code Into a JAR File
Oracle Scriptingi allows the substitution of a custom Java Bean user interface in place of a standard Scripting panel.
Oracle Scriptingi also supports the use of custom Java methods in a script, when the script appropriately references the method using a Script Author command.
In order for a script referencing custom Java (a Java bean or a Java method) to supply that code to the Scripting Engine user interface at runtime, the Java code must first be packaged into a Java Archive (JAR) or WinZip (ZIP) file. Oracle recommends using JAR file format.
Due to a limitation in JDK 1.1.8, there are only two supported methods of packaging a JAR file appropriately. Use either of the following methods to appropriately package custom Java code for execution at runtime.
Note: While an entire panel can be substituted with a Java bean, substituting only a panel answer (or panel node) with a Java bean is no longer supported in Oracle Scripting release 11.5.7 and later, due to the WYSIWYG editing Script Author feature.
The two methods are:
-
Use the command-line "jar" utility from JDK 1.1.8 and specify no compression. For example:
jar -cf0 TestBean.jar ...).
This method is described below.
-
Create the custom JAR file in standard .ZIP or .JAR format (with any PC-standard compression utility) with or without compression. If that utility saves the resulting archive in .ZIP format, then simply rename the file extension from .ZIP to .JAR.
For enterprises making extensive use of custom Java with Oracle Scripting, this method (specifying compression) is recommended to conserve database table space. This method of packaging a JAR file may differ based on the compression utility used. For specifics, see the compression utility manufacturer's documentation.
Prerequisites
-
As with all custom code, the Java bean or Java method must be created by a certified Java developer using any appropriate Java development tool.
-
Oracle recommends compiling custom Java code in support of Oracle Scripting using Java Development Kit (JDK) 1.1.8.
Steps
-
Write the Java source code for the bean or Java method.
-
Compile into one or more .class files using any appropriate method.
-
When using custom Java for Oracle Scripting in the agent interface,, this code must be compiled using JDK 1.1.8.
-
-
Copy or move compiled Java class files into the directory in which you have JAR.EXE (for example, C:\jdk1.1.8\bin; your directory may differ).
-
Open a Command prompt (Start > Run > CMD)
-
Change to the appropriate directory. For example:
cd jdk1.1.8\bin
At the command line, start the JAR utility. For example:
C:\jdk1.1.8\bin>JAR.EXE).
-
Execute the command to include one or more specified class files and include them into a Java Archive, specifying no compression.
Guidelines
The general syntax for the jar command is as follows:
jar <option string> <jar file> <manifest file> <input files>
The option string specifies actions to be performed by the jar utility and is always required. Options are detailed below.
-
The jar file parameter identifies the name of the file to be created by executing the command.
-
A manifest file identifies a file describing the contents of an archive. Specifying a manifest file is irrelevant for the purposes of creating JAR files in support of Oracle Scripting.
-
Input files specify one or more Java beans or class files to be included in the JAR file resulting from executing the command. If multiple input files are specified, separate each in the jar command by one space.
JAR Options
Options for the jar utility include the following:
| Code | Description |
|---|---|
| -c | Creates a new archive using the input files. |
| -t | Lists a table of contents for the archive. |
| -x | Extracts files from an existing JAR file. |
| -u | Extracts files from an existing JAR file. |
| -v | Generate verbose output on standard error |
| -f | Specify archive file name |
| -m | Include manifest information from specified manifest file |
| -0 | Store only; use no ZIP compression |
| -M | Do not create a manifest file for the entries |
Examples
To add a single class file (onefile.class) into a Java archive called destination.jar, type:
C:\jdk1.1.8\bin> jar -cf0 destination.jar onefile.class
To combine two class files (file1.class and file2.class) into a Java archive called destination.jar, type:
C:\jdk1.1.8\bin> jar -cf0 destination.jar file1.class file2.class
After creating your JAR files and deploying them as appropriate, remove any unnecessary files you made or copied to avoid confusion.