Lot and Serial Controlled Assemblies
Creating a Job with Lot/Serial Controlled Assembly
With Oracle Shop Floor Management transactions like Job Creation, Lot Creation, Move transaction, WIP lot transactions you can enter serial numbers for assembly items. To use this functionality, set Oracle Shop Floor Management Network Routings.
Support for Lot and Serial Controlled Assemblies functionality helps you to assign a serial number to each unit of an item to track it, trace each item from the warehouse to the production process and to the shop and track batches of items throughout their movement in and out of inventory.
Note: The serial controlled assemblies with item attribute Serial Generation as Predefined are alone supported.
Transactions are done in the same way as it is done for Lot based jobs, but differs only for serial generation and handling. You have to go to additional user interfaces to perform actions.
Serial Generation during Job Creation and Job Move
-
Create a lot based job from the Lot Based Jobs window.
-
Click on Serial Numbers button.
-
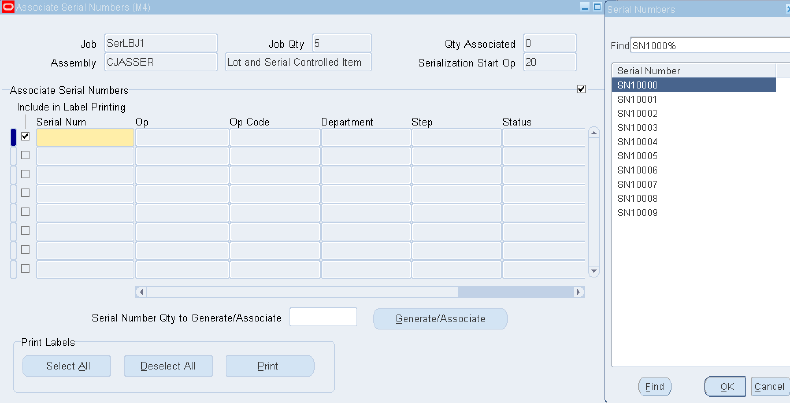
Enter serial numbers to the assembly item in the Associate Serial Numbers window.
-
Click Generate/Associate.
You can assign existing serial numbers with the status 'Defined but not used' and 'Issued out of stores' to the current job. You can also generate new serial numbers.
-
You can modify the serial attributes in the Attributes column.
-
Check 'Include in Label Printing' to initiate the printing of labels for serial numbers on the job if the printing setups are completed in Inventory.
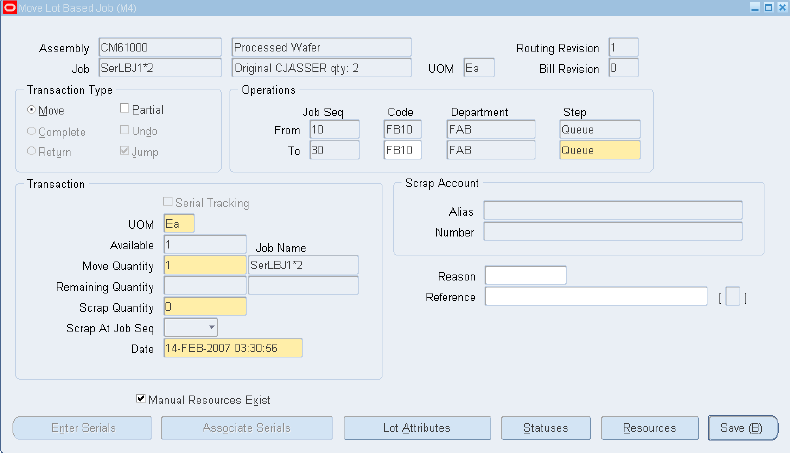
To serial track a job during move transactions
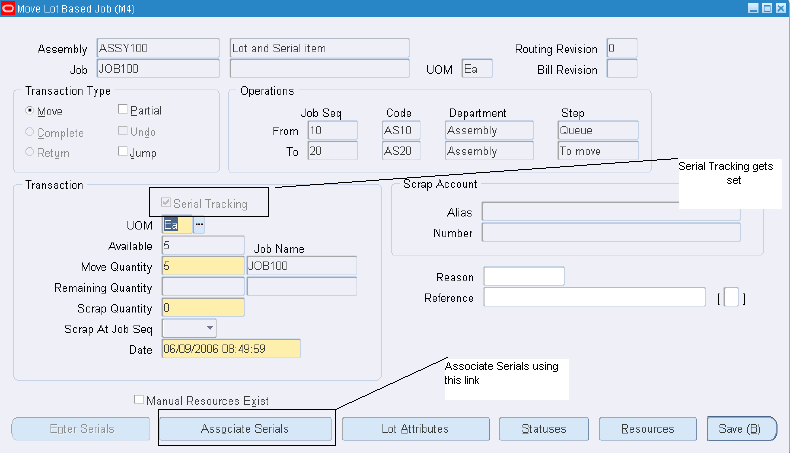
You can start to serial track a job during move transactions from Move Lot Based Jobs window.
-
Select Serial Tracking in the Transaction region to track the job from this move transaction.
When the job is moved out of Queue of a Serialization Start Operation intraoperation step, serial tracking is automatically enabled.
-
Select Associate Serials to generate and associate serials during Move transaction.
-
Click Enter Serials and specify serials to be scrapped during the Move transaction.
-
Click Enter Serials and specify serials for remaining quantity during Partial Move transaction.
Manual Entry and Auto Generation of Serial Numbers
-
You can manually enter serial numbers by specifying serials in the Serial Num column.
-
You can also automatically generate by specifying the quantity in Serial Number Qty to Generate/Associate field.
-
And you can also associate predefined serial numbers to a job.

Executing Manufacturing Transactions
See Performing Lot Move Transactions
Job Move Transactions
Partial Move
-
Navigate to Move Lot Based Job window.
-
Set the Partial check box.
-
Click Enter Serials.
Job Serial Numbers window lists the serials of the job.
-
Select the serial number to be associated with the Remaining quantity of the job.
The balance serials move with the job.

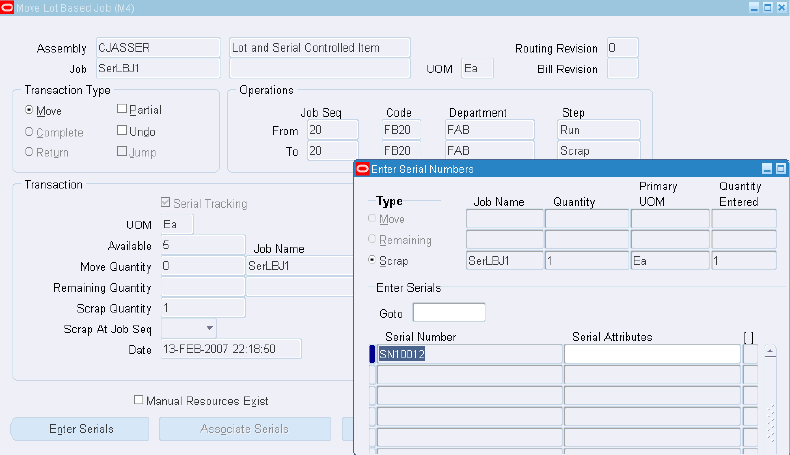
Scrap
-
Navigate to Move Lot Based Job window.
-
Specify the quantity to be scrapped in the Scrap Quantity field.
-
Click Enter Serials to select the serials for the quantity to be scrapped in the JobSerial Numbers window that appears.
-
Click OK.
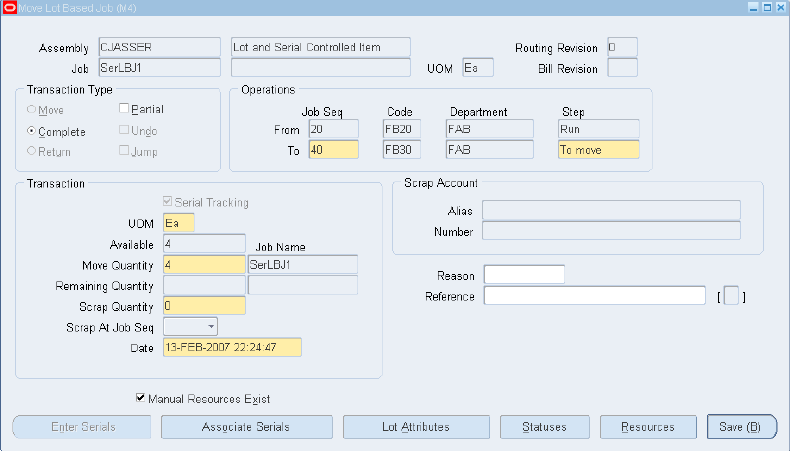
Assembly Completion
-
Navigate to Move Lot Based Job window.
-
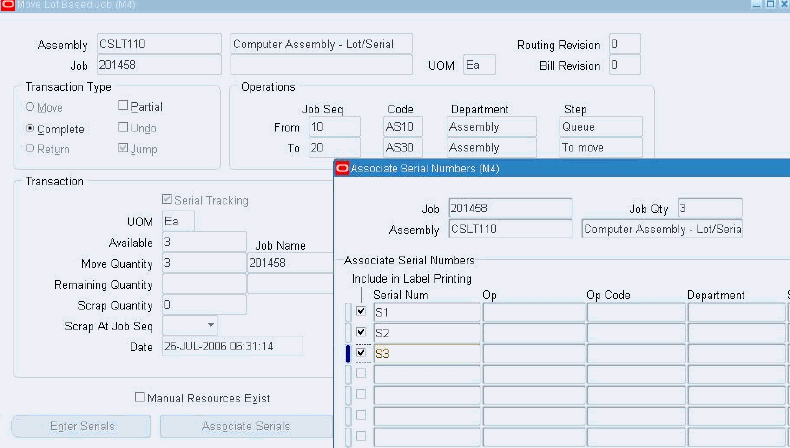
Select Complete as the Transaction Type.
If this is the last operation and if the transaction done is To Move, then the job is complete in the shop floor.
-
Click Associate Serials to check and update the serials.
-
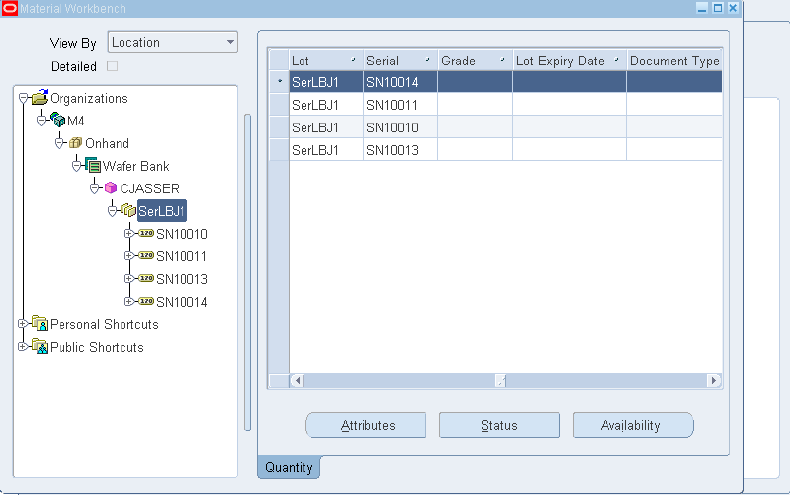
Navigate to Manufacturing Manager: Inventory: On-hand, Availability: On-hand Quantity.
The Query Material page appears.
-
Enter Description.
-
Click Find.
The Material Workbench page appears showing the lot and its serials availability in the Inventory.
Return
You can return the completed assembly to the previous step by this process. You have the ability to return a serial item from an assembly.
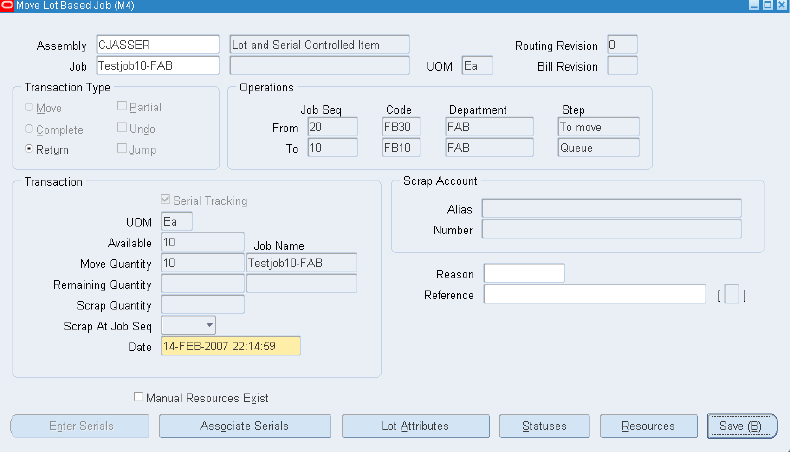
Note: Serial numbers completed during the completion transaction will be returned to the job.
Only those serial item(s) issued during job completion to the assembly can be returned, while returning a serial item from an assembly.
Return transaction will fail if any of the completed serial numbers has its status other than 'Reside In stores'.
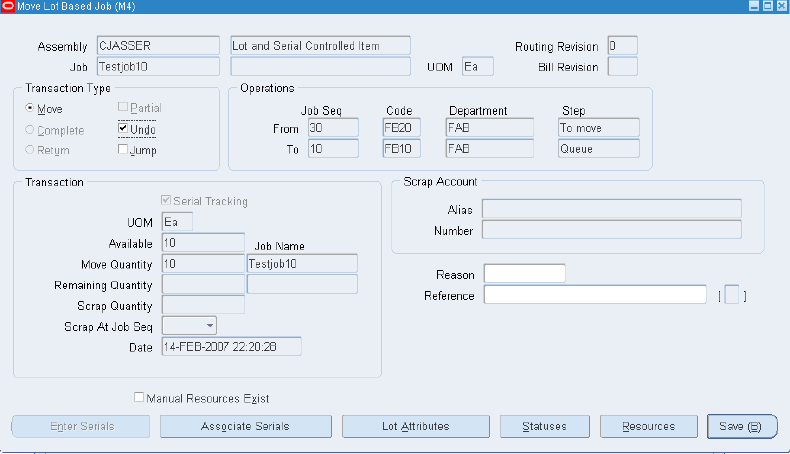
Undo
Click Undo if you want to undo the previous Move transaction.
-
If a serial number for an item is generated during a transaction and that transaction is reversed, then the serial number will also remain with the job. You have the option to delete the serial and generate a new one.
-
Undoing of a move transaction from which the job is serial tracked will revert the status of the serial number from 'In Progress' to assigned.
Jump
-
If you want to jump to an operation, which is not in the job sequence that the assembly will take, then enter the job sequence in the To field of Job Seq and the Step in that operation. Click Jump and Save.
-
You have the choice to serial track from the To operation. Serial Tracking gets mandatory only after executing Serial Start Operation or at Job Completion.
Issuing Lot/Serial Component to a Lot/Serial Assembly
You can optionally link the component serial numbers with assembly serial number when you do Component Issue Transactions (Lot Creation, Backflush, and Material Transaction) using forms.
Backflush
You can enter the component serial numbers to be issued to a lot based job and also link the assembly serial number using the form during backflush transaction.
-
Enter the lot/serial controlled component to be backflushed for the assembly in the Bills of Material window. Select Material Control tab to enter the Supply Type.
-
Navigate to Lot Based Jobs window. Create a job for the assembly and associate serial numbers.
-
Navigate to Move Lot Based Job window and execute a Move transaction.
The component required at this operation is backflushed.
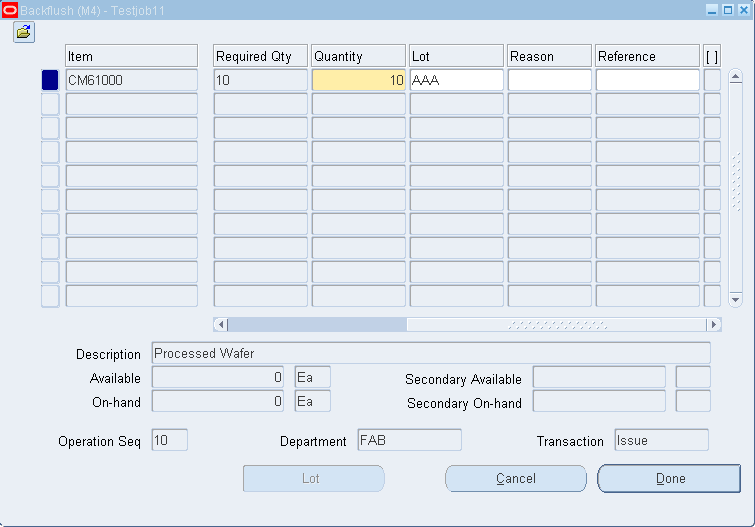
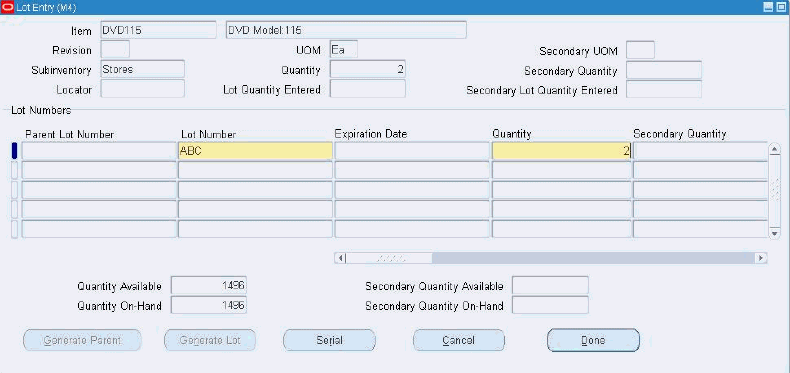
-
Select Lot in the Backflush window.
The Lot Entry window appears.
-
Enter the lot number for the backflushed component.
-
Click Serial in the Lot Entry window.
The Serial Entry window appears.
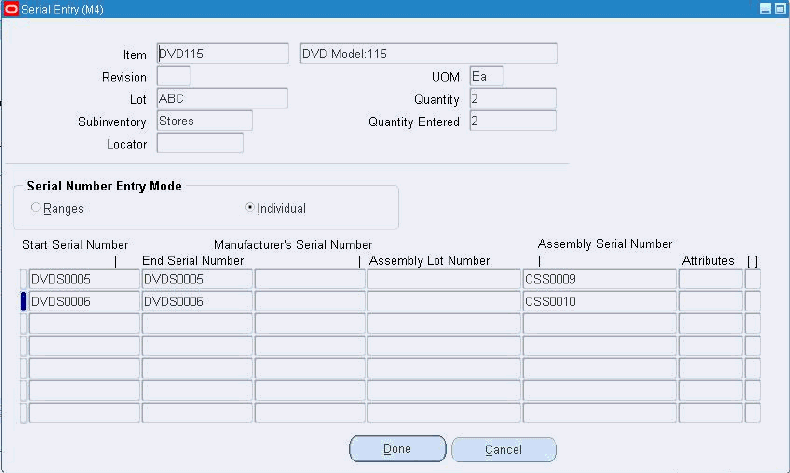
-
Enter Serial numbers for the backflushed component in the Start Serial Number column.
-
You can associate the component serials issued to each of the assembly serials through the column Assembly Serial Number.
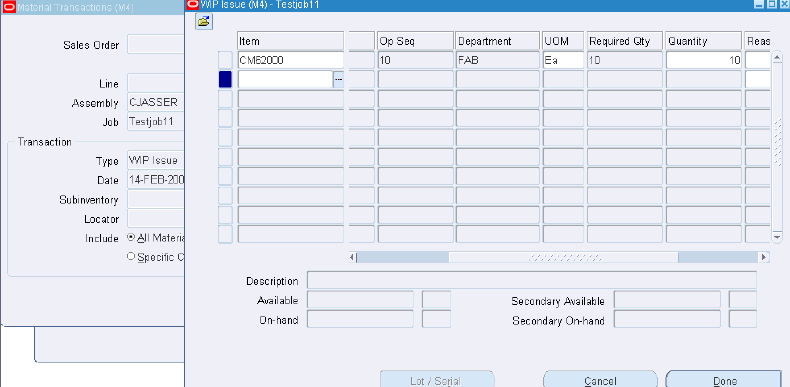
Material Issue
-
To manually issue the material needed for the assembly, select the job and issue the components through the Material Transaction window.
-
Click Continue.
The WIP Issue window appears.
-
Choose Lot/Serial to enter lot details for the issued component.
Lot Creation
-
Navigate to Define Co-products window.
-
Enter a component as Co-Product for the particular component in the Co-Product column.

-
Navigate to Lot Based Jobs window and assign serials to the job.
-
Navigate to Lot Creation window.
-
Select Job Information tab in the Resulting Lots region to enter the job information for the resulting lot and assembly.
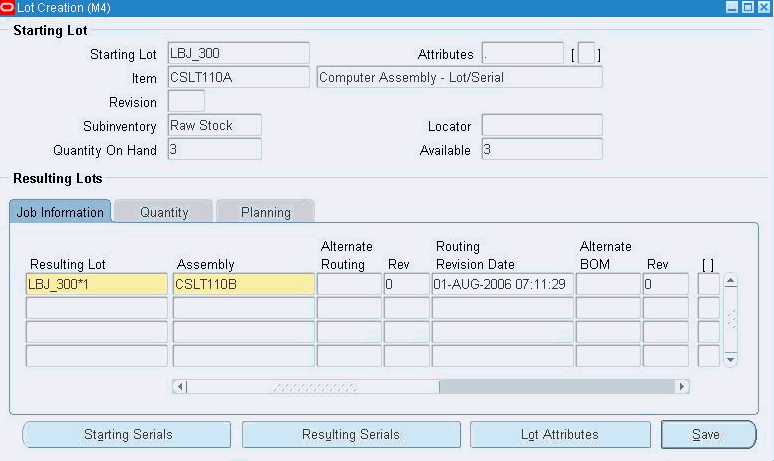
-
Select Quantity tab to view the job quantity details for the Resulting Lot.
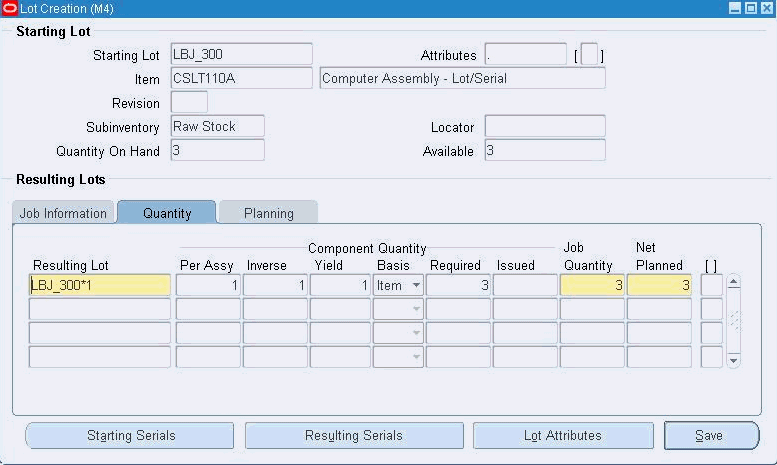
-
Click Resulting Serials to specify serials for the resulting lot.
Note: You have to specify the Resulting Lot's Serials first, only then Starting Lot's Serials can be issued to the resulting Lot's serials.
The Associate Serial Numbers window appears.
-
Assign serials to the resulting job.
-
Click Done.
-
Click Starting Serials to assign serials of the starting lot to the serials of the resulting lot.
The Serial Entry window appears. Issue the serials of the starting lot to the serials of the resulting lot.
-
Click Done.
WIP Lot Transactions
You can do WIP lot transactions for lot based jobs created for serial controlled assemblies using the WIP Lot Transactions form.
See WIP Lot Transactions and Creating WIP Lot Transactions.
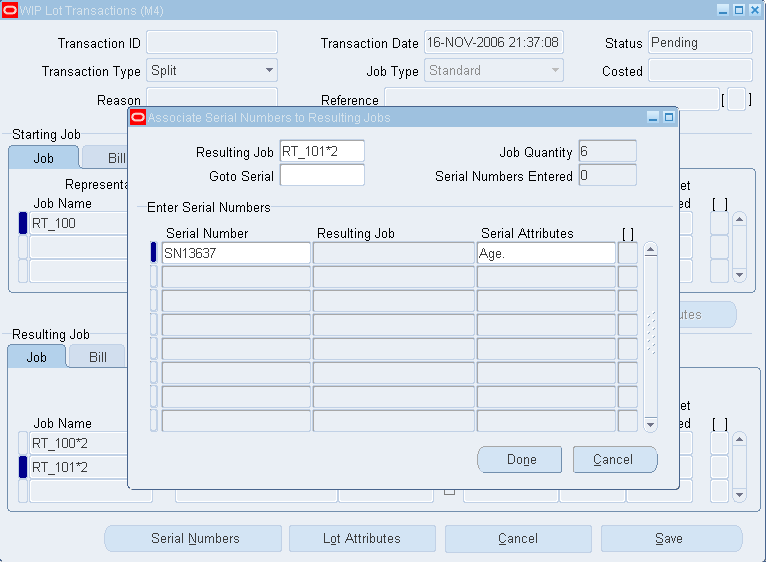
Split
-
Navigate to WIP Lot Transactions window.
-
Select Split as Transaction Type.
-
Split the starting job into required resulting jobs with appropriate resulting quantity.
-
Click Serial Numbers in the Resulting Job region to associate serials to the resulting jobs.
The Associate Serial Numbers to Resulting Jobs window appears.
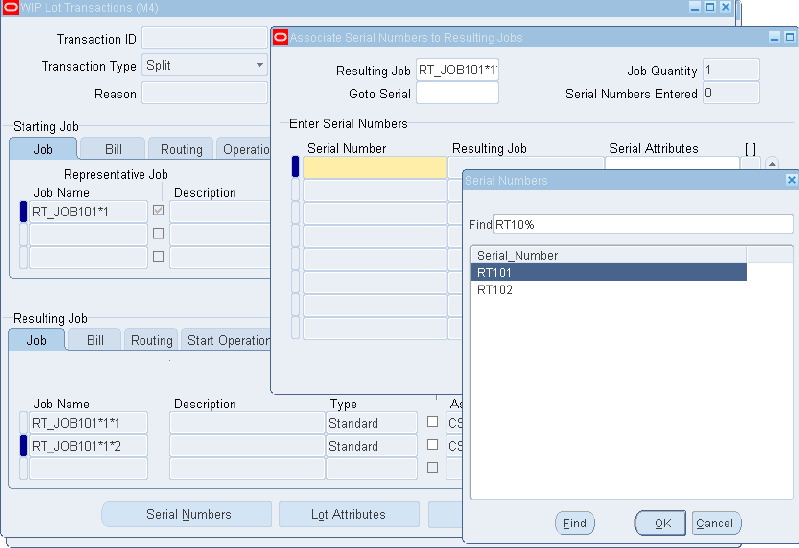
-
Select a serial from the Serial Numbers window for the resulting job chosen.
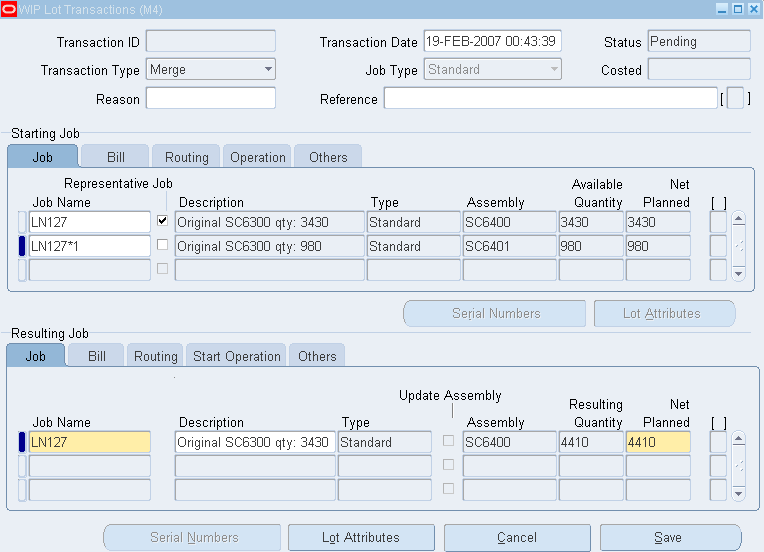
Merge
-
Navigate to WIP Lot Transactions window.
-
Select Merge as Transaction Type.
-
Merge the starting jobs into a resulting job in the Resulting Job region.
-
Click Serial Numbers in the Resulting Job region to assign the serials of the starting jobs to the resulting job.
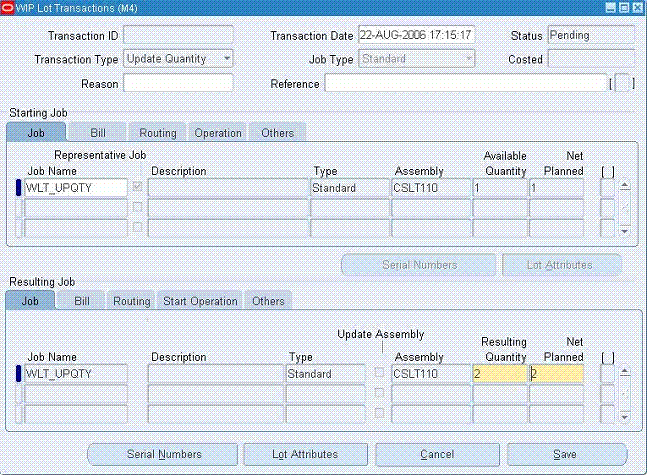
Update Quantity
-
Navigate to WIP Lot Transactions window.
-
Select Update Quantity as Transaction Type.
-
Enter the starting job in the Starting Job region.
-
Update the job quantity in the Resulting Quantity column of the Resulting Job region.
-
Click Serial Numbers to assign serial numbers for the updated quantity.
The Associate Serial Numbers window appears.
-
Click Done to save the transaction.
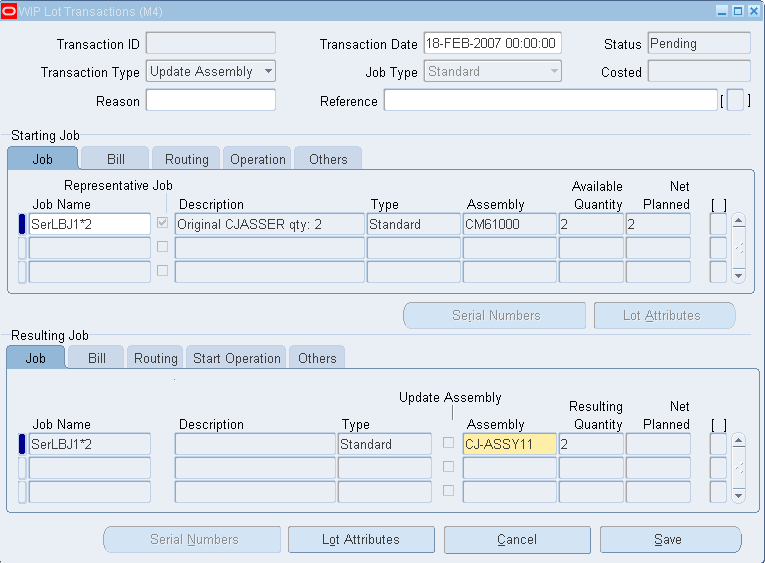
Update Assembly
-
Navigate to WIP Lot Transactions window.
-
Select Update Assembly as Transaction Type.
-
Enter the starting job in the Starting Job region.
-
Update the job assembly in the Assembly column of the Resulting Job region.
Note: You cannot update this with an assembly that is not lot/serial controlled.
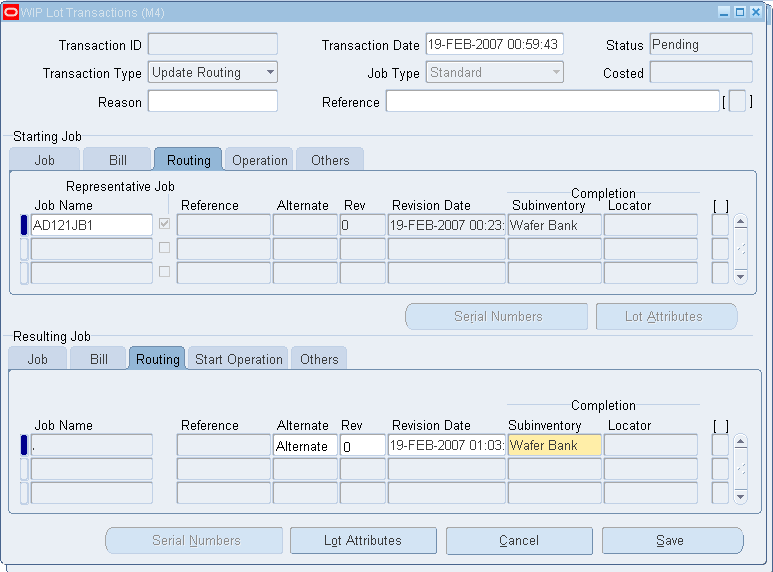
Update Routing
-
Navigate to WIP Lot Transactions window.
-
Select Update Routing as Transaction Type.
-
Enter the starting job in the Starting Job region.
-
Select Routing tab in the Resulting Job region.
-
Update the Alternate column with alternate routing of the assembly.
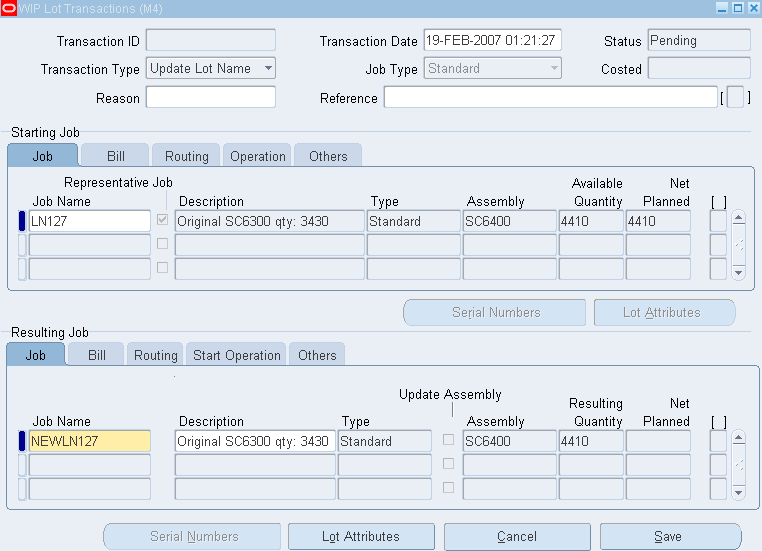
Update Lot Name
-
Navigate to WIP Lot Transactions window.
-
Select Update Lot Name as Transaction Type.
-
Enter the starting job in the Starting Job region.
-
Update the Job Name column in the Resulting Job region with new job name.
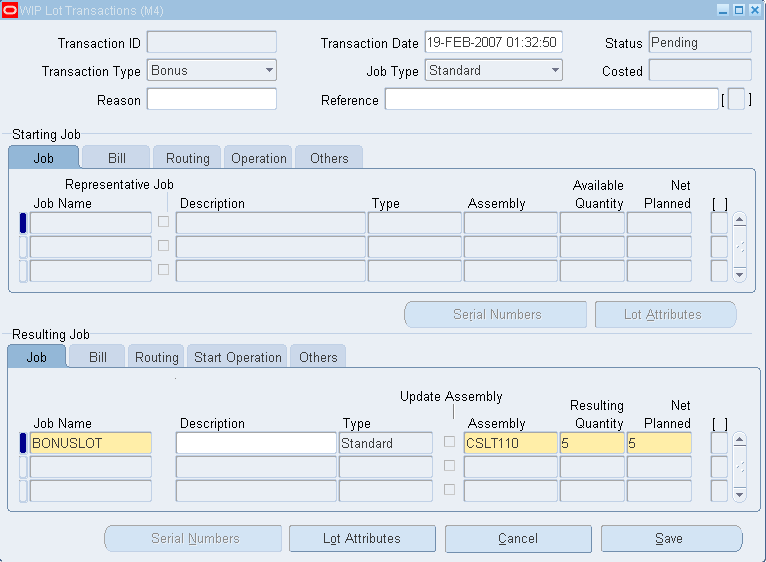
Bonus
-
Navigate to WIP Lot Transactions window.
-
Select Bonus as Transaction Type.
-
Enter the bonus job details for a lot/serial assembly in the Resulting Job region.
Viewing and Updating Serial Numbers in WIP Lot Transactions
To view serial numbers for the starting job
-
Navigate to the WIP Lot Transactions window.
-
Choose Serial Numbers of the Starting Job region. The Associate Serial Numbers window appears.
To view, update serial numbers for the resulting job
-
Choose Serial Numbers of the Resulting Jobs region. The Associate Serial Numbers window appears.
If current operation is at Queue, no component issued to an operation before the current operation is allowed to be linked to the serial numbers corresponding to update quantity assembly serial numbers.
If current operation is at To move, no component issued to the current operation or an operation before the current operation is allowed to be linked to the serial numbers corresponding to update quantity assembly serial numbers.
Split: Choose Serial Numbers of the Resulting Jobs region. Associate Serial Numbers to Resulting Jobs window appears. Re-associate the parent job’s serial number to the child job. You can navigate to a serial number using the Goto Serial field.
Merge: You can reassign serial numbers of starting jobs to child jobs. You cannot merge serial tracked jobs with non-serial tracked jobs. You cannot merge jobs if serial number of the non-representative job already exists for the representative job's assembly.
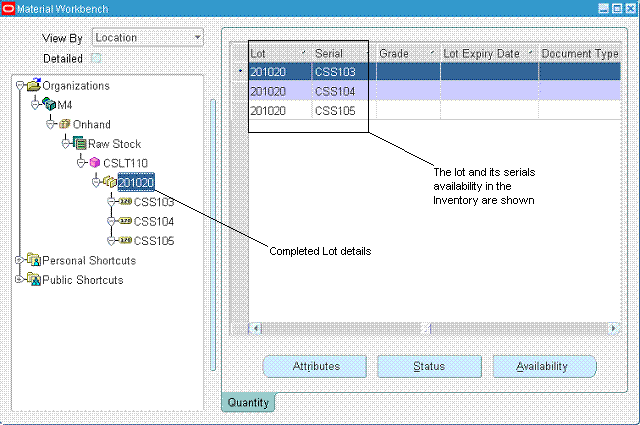
Completing the Job into Inventory
To view lot and serial details in the Material Workbench
-
Navigate to Inventory> On-hand, Availability> On-hand Quantity.
The Query Material window appears.
-
Enter search criteria.
-
Click Find.
The Material Workbench window appears.
You can view the genealogy of the completed lot in the left pane. The right pane shows the lot and its serials available in the Inventory.
Note: Transactions like Job Creation, Lot Creation, Job Move, and WIP Lot can be executed for a lot and serial controlled assemblies through HTML user interfaces.