Lot Transactions
This chapter covers the following topics:
- Overview of Lot Transactions
- Creating a Lot Based Job
- Overview of Sales Order Reservation for Lot Based Jobs
- Overview of Lot Moves
- Performing Lot Move Transactions
- Operation Jumps
- Viewing Status and Resources
- Integration with Oracle Advanced Supply Chain Planning (ASCP)
- Capturing and Modifying Detailed Job Level Plan Recommendations
- Changing the Recommended Path of a Job to an Intended Path for Future Operations
- Viewing Plan Resource Details
- Updating Plan Components
- Updating Plan Phantom Components
- Mass Refresh of Open Jobs
- Refresh BOM/Routing of Open Lot Based Jobs with Revision Dates
- Overview of Advanced Lot Transactions
- WIP Lot Transactions
- Creating WIP Lot Transactions
- Inventory Lot Transactions
- Creating Inventory Lot Transactions
- Lot Attributes in Inventory Lot Transactions
- Creating Lots for New Sectors
- Kanban Replenishment on Lot Based Jobs
- Lot Based Job Reporting
- Lot Based Job Component Pick Release
- Pending Transactions Report
- Integration with Outside Processing
Overview of Lot Transactions
Oracle Shop Floor Management uses WIP lots and Inventory lots to create transactions. WIP lot transactions let you perform various work in process transactions during the production cycle, such as lot split, merge, part number change, and bonus (creating a new lot that is entirely new or from scrap).
The process flow of a lot begins when a WIP lot based job is created for the first sector's primary assembly. The WIP lot is created and released, moves through a series of operations, and is completed into an inventory location where it is an inventory lot. Upon completion, the WIP lot has the sector extension code appended that is assigned to the corresponding item subinventory. You can continue to use the same job name or lot name throughout the production process where the part number changes with each sector. For the bill of material, the part being completed in a sector becomes the primary component of the part being made in the next sector.
The Inventory lot then moves into the next sector. This move consists of creating a new WIP lot for the primary assembly of the next bill level (the next sector), and issuing the primary assembly from the previous sector to this new WIP lot. After WIP lot creation and issue of the primary component, the job moves through a series of operations, and is completed into inventory location. This process is repeated through each sector until the last sector is complete.
If you set the WSM: Create Job Level BOM and Routing Copies profile option to Yes (Option 2), then Oracle Shop Floor Management stores detailed information for each and every job. Making detailed job level changes is available only when you choose Option 2. During manufacturing execution, Option 2 lets you make job level changes as follows:
-
Changing the recommended path of a job to any other valid intended path for future operations.
-
Changing component requirements or specifying component substitutes for future operations.
-
Using alternate resources. This is done through the resource centric workbench.
-
Using the workbench to reassign job operations to different time periods.
-
A new html User Interface (UI) provides detailed planning recommendations on the components, resources, and the network path of a job. Similar changes to the job can also be accomplished through open interface tables.
Note: Lot based jobs are not considered in the Oracle Master Scheduling and MRP, Oracle Order Management, or Oracle Project Management applications.
Note: In OSFM organizations, unique serial numbers should be set within organization and across organizations.
Reuse of Lot Names
With this new functionality you have the choice to create lots with the same name as the earlier sector.
Default Job Name in Lot Creation form
When you create a lot in Lot Creation form, you have the option of job names being defaulted with the same name as that of the parent lot or different name from that of the parent lot. If you set Reuse Job Name to No, then the newly created jobs will have names with the job separator appended to the parent lot name. If Reuse Job Name is set to Yes, then the newly created jobs will be defaulted with the same name as the parent lot, provided there is only one resulting job. If there are multiple resulting jobs, then the first job will have the same name as the parent lot and the remaining jobs will have names appended with job separator.
Note: There is no change in the validation for job creation in any other functional flow.
Job Name appended with Sector Extension
When you cancel a job or perform WIP lot transactions like split, merge, complete scrap, and job completion on a job, the job name will be appended with sector extension.
-
If the parameter Reuse Job Name is set to Yes the job name will be appended with sector extension.
-
If the parameter Reuse Job Name is set to No, then the job name will not be appended with sector extension.
-
While performing assembly returns or updating status of cancelled job to released/unreleased status, the sector extension of the job irrespective of the value set for the Reuse Job Name parameter is trimmed. See: Defining Parameters
Creating a Lot Based Job
After you have completed setup steps for defining your item numbers, assemblies, bills of material, and network routings—the next step is to create a lot based job for the first sector. The Lot Based Jobs window is used to define lots for the first sector of the manufacturing process and links them to assemblies on the shop floor. The lots for the other sectors are created using the Lot Creation window, see: Creating Lots for New Sectors.
You cannot create lot based jobs for serial number controlled assemblies. This restriction applies to the jobs created using windows and interfaces.
Note: Lot based jobs support operation pull, push, and phantom supply types. Other supply types are not currently supported.
Note: Assembly Lot Number field in Lot Entry and Serial Entry window in Material Issue transactions, is not applicable for Lot Based Jobs.
Non-standard Lot Based Jobs
You can create non-standard lot based jobs. Standard jobs control the material, resources, and operations required to build an assembly and collect costs. Non–standard jobs control material and collect costs for miscellaneous activity. These jobs can be used on expense work orders for testing, prototypes, and rework where operation yield costing is not considered. You can perform all transactions on a non-standard lot based job like moves, scraps, jumps, undos, completions, returns, material transactions; all WIP lot transactions like bonus, split, merge, update routing, update assembly, update quantity and update lot name. Non-standard lot based jobs use WIP accounting class type Expense Non-standard Lot Based. See: WIP Accounting Classes, Oracle Work in Process User's Guide.
For non-standard jobs, you can choose whether to specify a subinventory or not. Thus subinventory is defaulted during job creation. If a subinventory is specified, you can complete the job into an inventory lot.
You can perform the update of bom and routing reference id's provided the job in unreleased. To update any reference id, you have to provide the reference id, revision date and the alternate designator.
If you set the WSM: Create Job Level BOM and Routing Copies profile option to Yes (Option 2), then job copies are created. If you set the WSM: Create Job Level BOM and Routing Copies profile option to No (Option 1), then job copies are not created.
See Also
Overview of Setting Up, Oracle Inventory User's Guide
Overview of Setting Up, Oracle Bills of Material User's Guide
To find lot based jobs
-
Navigate to the Lot Based Jobs window.
The Find Lot Based Jobs window displays.
-
Enter your search criteria.
You can query by job name, assembly, accounting class, a range of start dates, a range of completion dates, or job status. You can combine or omit criteria as required.
-
Choose Find to display the Lot Based Jobs Summary window.
-
Select a lot based job and choose one of the following actions.
-
View Genealogy to view historical informations in the Lot Genealogy window, see: Displaying Genealogy and Where used Views.
-
The Operations window is used to view the resource requirement for the lot-based job.
-
The lot-based job provides the resource details for the first operation during job creation and the resource requirement for the other operations are shown whenever the job is moved to this operation.
-
Components to access the Material Requirements window displaying all the components for this job
-
Open to display the details of this job in the Lot Based Jobs window.
-
If you set the WSM: Create Job Level BOM and Routing Copies profile option to Yes (Option 2), then you can choose Plan Details from the Tools menu to open the UI and display the planned operation details.
-
-
If you are creating a new lot, Choose New (A).
Creating Lot Based Jobs
To create lot based jobs
-
Navigate to the Lot Based Jobs window. The Find Lot Based Jobs window displays.
-
If you are creating a new lot, Choose New (A). The Lot Based Jobs window opens.
-
Enter the name of the job in the Job field.
Oracle Work in Process discrete jobs and Shop Floor Management lot based jobs must not use the same value for Job name. In the Job Type field, the value defaults to standard. Oracle Shop Floor Management uses both standard and non-standard jobs.
As you proceed with the manufacturing process, the job name changes as lots are created, split, renamed, and completed. While creating lots, the name cannot exceed 80 characters.
Note: Do not use the same character value for both the job completion separator, and in a segment of the job name. When lots are completed the resulting lot designation is the original lot number, followed by the job separator value, followed by the lot sector extension. Using the same character value creates an error in the resulting lot name.
-
Select the assembly in the Assembly field.
-
Select the job status in the Status field.
When you define a job, its status defaults to Unreleased but can be changed to Release or On Hold.
-
Use the Firm indicator to firm this job.
Firming a job prevents planning suggestions for rescheduling. However, lot based jobs are not considered in the Oracle Master Scheduling and MRP, but are planned in Oracle Advanced Supply Chain Planning. This field is not used by non-standard jobs.
-
In the Quantities region, enter the Job quantity of the job or lot in the Start field.
When you enter a Job start quantity for the Lob Based job using bills and routings, the component material requirements and resource equipment for the First Operation will be exploded into this Job.
You can change the quantity on jobs without transactions.
-
In the MRP net field, the quantity is derived from the job start quantity.
Oracle Shop Floor Management does not integrate with Oracle Master Scheduling/MRP. This field supports Oracle Advanced Planning and Scheduling, applications.
-
In the Dates region, enter a value in either the Start or Completion field.
If you enter a start date, the completion date is forward scheduled. Similarly, if you enter a completion date, the start date is backward scheduled.
-
Save your work.
Note: Lot based jobs create the material and resource requirement for the first operation only. The material and resource requirement is exploded whenever the job is moved to the corresponding operation, including the last operation.
If you are using Option 2 functionality, then you can view all planned operation details by choosing Launch Plan Details from the Tools menu.
To assign an alternate bill of material or revision
-
On the Bill tab in the Alternate field, select the alternate bill of material.
-
You can select an alternate bill of material if an alternate has been defined. See: Primary and Alternate Routings, Oracle Bills of Material User's Guide.
-
In the Revision field, select the bill of material revision.
-
Select the bill of material revision's date and time.
Bill revision and date determine which version of the bill, and therefore which components are on the bill of material.
-
In the Supply Type field, the value defaults to Operation Pull.
Lot based jobs support only operation pull, push, and phantom supply types.
-
Save your work.
To assign the appropriate routing if the job has multiple routings
-
On the Routing tab, select the routing you want to use in the Routing field.
-
Routings must be defined for this assembly, see: Creating a Network Routing.
-
In the Revision field, select the revision number of this routing.
The date of the lot based job can be used to derive the routing revision.
-
In the Revision field, select the date and time if you want to update the values derived from the routing.
-
In the Subinventory field, the location (and locator, if existing) display for where this job completes.
Subinventory fields default from the routing. They are not required for non-standard jobs—you can remove these values if this job will not be completed into inventory.
-
Save your work.
Scheduling Lot Based Jobs
Enter or select either the Start and/or completion date and time. If you enter one date and time, the other date is calculated as per the routing schedule in the primary path.
Note: Lead time is used for scheduling discrete jobs that have no routing defined. Lot based jobs are not scheduled using lead time. Scheduling in lot based jobs is always done based on the resources in the primary path of network routing.
Viewing Component Requirements
To view component requirements
Choose Components. The Material Requirements window displays showing all the components of this job.
If you set the WSM: Create Job Level BOM and Routing Copies profile option to No (Option 1), then you can view component requirements for completed and current operations only. If you set the WSM: Create Job Level BOM and Routing Copies profile option to Yes (Option 2), then you can also view component requirements for future planned operations. The profile value is set as Yes by default and not changeable, hence the Option 2 action is always shown.
Calculating Required Quantity for Components with Negative Quantity Per Assembly
-
Querying the Existing Components of a Job
If the Supply Type of a component is Push, the quantity per assembly is negative, and the job is a Lot Based Job, then the required quantity is calculated as follows:
-
Case 1
If the operation at which the component used is Current Operation and the quantity is in Queue or Run. Also, if the component is at an operation for which the quantity is at Queue or Run, the required quantity displayed is calculated as:
Quantity Per Assembly * Quantity in Queue or Run * Operation Yield
-
Case 2
If the operation is Current Operation and the quantity is at To Move.
If the component is at an operation for which the quantity is at To Move, the required quantity displayed is calculated as:
Quantity Per Assembly * (Quantity Completed – Quantity Scrapped)
Note: The actual quantity output from the To Move operation is only considered and not the yield from that operation.
-
Case 3
If the component is at any of the previous operations, then the required quantity is also calculated in the same way as in Case 2
Quantity Per Assembly * (Quantity Completed – Quantity Scrapped)
Note: The actual quantity output from the previous operation is only considered and not the yield from that operation.
-
-
Updating the Existing Records
You can update the components at any operation; for example, it may be in Run/Queue/To Move.
-
Case 1
If you change the Quantity Per Assembly, then you must proportionately change the displayed Required Quantity.
Caution: Note that you are only changing the display value of the Required Quantity and not the value in the system.
-
Case 2
You can also update the required quantity of the component at any operation.
Note: You cannot update the component details in the Lot Based Job window.
Viewing, Entering, and Updating Lot Attributes
To view, enter, and update lot attributes
-
Choose Lot Attributes. The Lot Attributes window appears and displays the lot number and attributes of this job.
If you are entering or updating lot attributes, then enter or update attributes with appropriate values for Wharehouse Management and Inventory attributes based on the lot attributes setup that you or your system administrator have completed.

-
Choose OK to save and return to the Lot Based Jobs window.
-
Choose Cancel if you do not want to save the lot attribute changes.
If you are only viewing the lot attributes without making changes, then you can choose OK or Cancel.
-
Save your work.
Note: If you do not enter a required segment value, then an error message appears. If you wish to view detailed information for an error message, then you must execute the concurrent request Get Messages using the parameter DB_TO_RUNTIME with a specific Language.
Overview of Sales Order Reservation for Lot Based Jobs
Oracle Shop Floor Management reserves a lot based job for an open sales order created for an assembly item. It also initiates updating of reservations when a lot based job is modified.
To reserve a lot based job against a sales order
-
Create a Lot Based Job.
-
Reserve Lot Based Job in the status Unreleased or Released or On Hold against a Sales Order using Item Reservation form (Inventory: Onhand > Reservation).
-
Enter Sales Order information using the Demand tab in the Item Reservation window.
-
Enter Lot Based Job information selecting the Supply tab in the Item Reservation window.
-
Choose Supply type as Job or Schedule (Lot Based Job) to reserve against a lot based job.
All Lot Based Jobs in Unreleased or Released or On hold status with net quantity greater than zero are eligible for creating reservations.
-
Enter the Lot Based Job in the Header Number field.
Reservations will be transferred from the Job (Lot) to Inventory Lot during assembly completion. Inventory Lot is reserved for the Sales Order.
-
Save your work.
To view lot based job reservations against sales order
Choose Sales Orders button in the Lot based Jobs form. The Sales Order window displays Sales Order information on Reserved Jobs. You can reserve one job to one sales order or multiple sales order. Similarly, you can reserve multiple jobs to one sales order or multiple sales orders.
To initiate updation of reservations
-
When you change the job status from Released to Cancel, the reservation will be deleted.
-
If you change the net quantity of the job to be less than the reserved quantity, the reservation will be updated.
To update reservations during move transactions
-
During moves, if available quantity falls below the net quantity, a warning is shown.
-
During split and merge transactions, you have to manually transfer reservations to new child jobs.
-
Reservation will be transferred to inventory from the lot based job on assembly completion transaction.
-
During assembly return transaction, reservations transferred from job to inventory on assembly completion will be reversed.
To update reservations during WIP lot transactions
-
Split: If one of the resulting lots is same as the starting lot, then Reservation Quantity changes with respect to job Net Planned Quantity of the resulting lot.
If all the resulting lots are different from the starting lots, then the reservation is deleted.
-
Merge: If the starting jobs are of different assemblies, only the representative job’s reservations will be transferred to the resulting job.
If the starting jobs are of same assembly, all the starting job reservations will be transferred to the resulting job.
-
Update Assembly: Existing reservations against the lot based job are deleted during Update assembly transaction.
-
Update Quantity: If the net quantity of the starting job is modified to be less than the starting job’s reserved quantity, then reserved quantity is updated accordingly. If the starting job net quantity becomes zero, the reservation is deleted.
Overview of Lot Moves
Lot based jobs support network routing. Based on the results of an operation, you can define different paths for the next operation. Therefore, two distinct lot based jobs for a particular assembly with the same routing, could move through different manufacturing operations in that routing.
In comparison to the Move Transaction window for discrete jobs in Oracle Work in Process, the Move Lot Based Jobs window is more restrictive in the options when moving the lot through the routing. With the exception of scrap transactions, all move transactions are for the entire lot quantity. When a job is completed, the job name is automatically renamed using the lot sector extension, see: Defining and Viewing Lot Sector Extensions.
Performing Lot Move Transactions
You can move assemblies within an operation or from one operation to the next using the Move Lot Based Job window. This window is modeled after the Move Transactions window in Oracle Work in Process. See: Move Transactions, Oracle Work in Process User's Guide.
You can execute all move transactions with scrap simultaneously during job execution from the move transactions user interface in the Move Lot Based Job window. This reduces the number of transactions, and captures good and bad quantity in the operation.
Guidelines for Combined Move and Scrap Transactions:
-
Generally, move and scrap will not work if the backflush flag in the Routing window on the From operation or the To operation is turned off.
-
If the Jump From Scrap parameter in the OSFM Parameters window is set to ignore operation, then you cannot scrap at the From operation when executing a Jump and Scrap.
-
If the job is at the Queue of an operation and Run is a mandatory intra operation step, then you cannot execute a Move and Scrap in that operation. You must first move to Run, and then Move and Scrap will work.
-
If run of the next operation is mandatory, then you cannot move and scrap in the next operation. Move and scrap is possible in the From operation if the Run in the From operation is not mandatory.
If you set the WSM: Create Job Level BOM and Routing Copies profile option to Yes (Option 2), and you are using Oracle Advanced Planning, then the To Operations field in the Move Lot Based Job window provides guidance on the next recommended operation based on Oracle Advanced Planning inputs, or the user recommendations, whichever is the most recent.
To perform lot move transactions
-
Navigate to the Move Lot Based Jobs window.
-
In the Assembly or Job field, select either an item assembly number or lot job number.
Depending on which value you enter, the defaulting information for the corresponding field displays.
-
Move displays in the Transaction Type region.
Move transaction type indicates moving from one operation to another. Complete transaction type is active only when the job is moving to the last operation and last intra-operation step. See: Move Transaction Types, Oracle Work in Process User's Guide.
Select the Undo Last Move check box if you want the option of cancelling the last move transaction. The Undo Last Move indicator on the Shop Floor Parameter window must be selected to enable this functionality.
-
Select the Partial checkbox if you want to move a job partially to the next operation in sequence, when required, or within an operation from one intraoperation step to another. Partial checkbox is clear by default.
Enter the quantity (from the Available quantity) you want to partially move to the next operation in the Move Quantity field.
The original job with the partial quantity moves to the specified next operation, the split part (child job) of the original job will remain at the same operation level with the difference in the original quantity.
The remaining quantity is displayed in the Remaining Qty field. The checkbox is defaulted for the next move transaction. If the Partial checkbox is checked, the Move Quantity and Remaining Quantity cannot be zero.
You can move a partial quantity of a job during a Move transaction. A new job is created for the remaining quantity, while the partial quantity is moved with the parent job. It is equivalent to a combination of a WIP Split transaction in the background and a Move transaction.
Partial Move is not supported with the Move and Scrap transaction. It is also not supported for jobs at Run interoperation step.
-
In the Operations region, enter operation sequence values in the To row.
Values in the From row are defaulted based on the current status of the lot job. The information for Operation Code, Department, and Operation Step automatically displays, see: Operations, Oracle Bills of Material User's Guide.
The To row permits moves only to those operations which are valid, based on network. However, you can jump to any operation not defined in the network routing. See: Operation Jumps.
-
If there is quantity to scrap, enter Scrap Quantity in the Transaction region.
-
Enter the Scrap At Job Seq to define the operation wherein the quantity should be scrapped. You can scrap at the From operation or the To operation.
Scrap At Job Seq is enabled only for intraoperation moves (from one operation to another.) From and To refer to the operation sequence number, not the intraoperation step.
When executing a move and scrap transaction at the first operation, you cannot scrap and move in one step. This must be completed in two steps, and Lot Genealogy will display as a scrap transaction followed by a move transaction. See: Operations, Oracle Inventory User's Guide.
If the estimated scrap accounting is enabled, and you are moving material to scrap in this transaction, then Alias information displays in the Scrap Account region. Otherwise, it will be a blank field that you can update.
The scrap account alias number is an easily recognized name or label representing an account charged on miscellaneous transactions. This is used for viewing, reporting, and reserving. The scrap account number displays. See: Defining Account Aliases, Oracle Inventory User's Guide.
-
If manual resources exist for the completed operation, then the Manual Resource Exist indicator is selected. If there are Manual resources at the operation that is being completed, then the application notifies you that manual resources exist at the operation so that you can manually charge them. See: Charging Resources with Move Transactions, Oracle Work in Process User's Guide.
-
In the Reason field, select a transaction reason. See: Defining Transaction Reasons, Oracle Inventory User's Guide.
-
In the Reference field, enter any descriptive information to identify transactions, used on standard reports.
-
Choose Save to save the transaction.
-
If the supply type of the component at the operation is Operation Pull, then the Backflush window displays any consolidated component requirements for the move and scrap (if scrap is applicable) as a single transaction, . If the item quantities, and the lot and serial numbers are correct, then choose Done to complete the move and scrap transaction.
Note: You can update the material requirements for the current operation using the Update Material Requirements window. However, if you undo the transaction and execute a forward move to the same operation, then the application backflushes the components according to the BOM option A, and copy tables in option A. Any change in material requirements done before that operation will be lost. You can change material requirements for future operations using the html UI. These material requirement changes will be referenced and never deleted.
To view, enter, and update lot attributes:
Choose Lot Attributes. The Lot Attributes window appears and displays the lot number and attributes of this job.
-
Choose Attributes in the Lot Attributes window. A new Lot Attributes window appears.
-
Select an Attribute from the list of values.
-
Enter parameter and segment values.
-
Choose OK.
-
Save your work.
Operation Jumps
The operation jump functionality enables you to skip operations in a routing, or jump to any operation not defined in the network routing. To use this functionality, set the following parameters:
-
Oracle Shop Floor Management profile option, Allow Operation Jumps is set to Yes. See: Profile Options
-
Work in Process Parameters window, set the Move Transaction Parameter—Allow Creation of New Operations—to Yes
-
Oracle Shop Floor Management Parameters window, set the parameter Jump From Queue according to your need. See: Defining Parameters.
-
Navigate to the Move Lot Based Jobs window.
-
In the Assembly or Job field, select either an item assembly number or lot job number.
Depending on which value you enter, the defaulting information for the From the Transaction Type region, check the Jump check box.
-
In the To row, enter any operation sequence number which is greater than the From operation sequence number.
-
Select an operation code and the step for the operation to which you want to jump.
-
Create remaining transactions as described in Creating Lot Move Transactions.
After completing the jump operation, you can move to any of the operations defined in the original routing to complete the balance of operations.
-
Save your work.
Viewing Status and Resources
To view shop floor statuses:
Choose Statuses. See: Assigning and Viewing Shop Floor Statuses, Oracle Work in Process User's Guide.
To view shop floor resources:
Choose Resources. See: Charging Resources with Move Transactions, Oracle Work in Process User's Guide.
Integration with Oracle Advanced Supply Chain Planning (ASCP)
Oracle Shop Floor Management integrates with Oracle Advanced Planning and Scheduling. Oracle Advanced Planning collects data for lot based jobs on the shop floor and performs high level planning, and suggests creation of new lot based jobs, if required. Lot based jobs contain plan information. This plan information comes from the following three sources:
-
Oracle Advanced Planning modifies plans for existing jobs, or specifies plans for the newly created jobs.
-
You can change the plan information on the lot based job.
You can specify or change the following on a lot based job, one job at a time:
-
Specify or change the path that is planned to be traversed on the network routing. This involves operations that you intend to perform for this job that form a path on the network routing.
-
Specify or change the component that is used for the operations. You can specify substitute components on the routing. You can indicate your preference of which component to use among the alternates that are available.
-
Specify or change the resources used for the operations. You can specify alternate resources on a network routing and can indicate your preference of which resource to use. If the resource has instances, then you can specify the specific instance that would be used for the specific lot based job.
The Oracle Shop Floor User Interface (UI) for capturing and altering planning preferences is an enhancement to the shop floor scheduling process. The UI for capturing and altering planning preferences streamlines the shop floor scheduling process. You can access the UI for capturing and altering planning preferences through a BLAF-compliant web interface.
Capturing and Modifying Detailed Job Level Plan Recommendations
You can capture and modify detailed Oracle Advanced Planning recommendations for job and operation start dates, completion dates, component details, and resource details. You must also choose the primary path planning option in the planning parameters of Oracle APS. The application uses recommendations on component substitutes and alternate resources received from planning and scheduling systems, or you can enter these manually.
Oracle Advanced Planning plans materials and resources for a job based on the primary path of the routing. During execution, you can change the planned execution as follows:
-
Changing the recommended path of a job to any other intended path for future operations.
-
Changing component requirements or specifying component substitutes for future operations.
-
Using alternate resources. This is done through the resource centric workbench.
-
Change planned operation yield.
An HTML User Interface (UI) provides detailed planning recommendations on the components, resources, and the network path of a job. You can use this UI to make any job level changes described above, except changing to alternate resources. See: Rescheduling Jobs, Operations, and Resources in the Gantt Chart
You can also implement all Oracle Advanced Planning recommendations and changes using open interface tables. Interfaces can be used to populate data from third party planning applications.
Changing the Recommended Path of a Job to an Intended Path for Future Operations
You can change the recommended path of a job to any other intended path for future operations using the Update Plan Recommended Path UI window.
To update the plan recommended path
-
Navigate to the Lot Based jobs window and open a job.
-
Select Plan Details from the tools menu.
The Oracle Shop Floor Management HTML Plan Details UI window appears. The Header region displays job details and the Operations region displays operations for the job. In the Operations region, the default view shows the recommended operations in their order on the recommended path. The view can be changed to show all operations.
-
Choose Update Recommended Path in the operations region to make changes to the recommended components and quantities. The Update Recommended Path UI window appears. Select or clear the recommendations to create a new recommended path.
-
Choose Apply to save your changes and return to the Plan Details UI window, or choose cancel to discard any changes.
Viewing Plan Resource Details
You can view details for a recommended resource, and view alternate resources using the Plan Resource Details window from the HTML UI.
To view plan resource details for a recommended resource
-
Navigate to the Lot Based Jobs window and open a job.
-
Select Plan Details from the tools menu. The Plan Details UI window appears.
-
Choose Details from a Routing Operation Sequence. The Plan Operation Details UI displays.
-
Choose Details.
The Plan Resource Details window appears.
Updating Plan Components
You can view and change the recommended plan components using the Update Components UI window.
To update the recommended plan components
-
Navigate to the Lot Based Jobs window and open a job.
-
Select Plan Details from the tools menu. The Plan Details UI window appears.
-
Choose the Details icon for a Routing Operation Sequence. The Plan Resources and Components Details UI window appears.
-
Choose Components to display component information.
-
Select a Component and choose Update.
-
Select a component line and choose Recommend. The Update Components UI window appears.
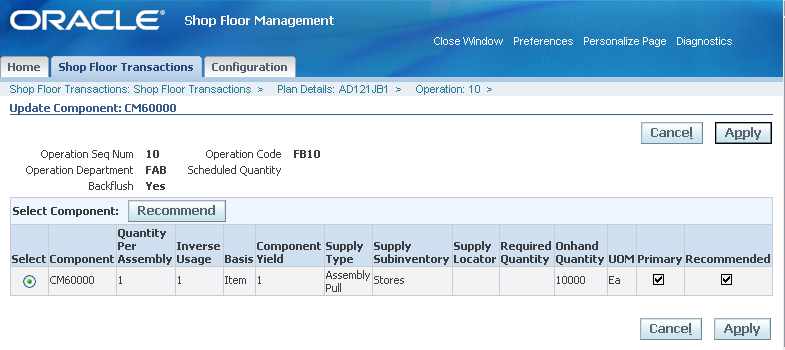
-
Enter any changes to Required Quantity and choose Apply to save your changes. Choose Cancel to discard any changes and return to the Plan Resources and Components window.
Note: If you make changes to the plan details of an operation through the HTML UI, then changes are effective the next time you come to that operation. To make changes to the current operation in real-time, use WIP windows.
Updating Plan Phantom Components
You can use the Update Phantom Component UI window to view and change the recommended phantom components. If you have a BOM with the phantom supply type for one of the components, then you can view phantom details in the UI. If you have substitutes for an item, then you can also choose substitutes. See: Phantoms and Phantom Routings.
See also: Phantoms in Lot Based Jobs, Oracle Bills of Material User's Guide.
To update plan phantom components
-
Navigate to the Lot Based Jobs window and open a job.
-
Choose Plan Details from the Tools menu. The Plan Details UI window appears.
-
Choose the Details icon for a Routing Operation Sequence. The Plan Resource and Components UI window appears.
-
Choose Components to display component information.
-
Select the Phantom component that you want to make changes to, and choose Update.
-
Select a phantom component and choose Recommend. The Update Phantoms UI window appears.
-
Select the Phantom and enter any Required Quantity changes. Choose Apply to save changes, or choose cancel to discard any changes and return to the Plan Resources and Components UI window.
Mass Refresh of Open Jobs
Changes in Bills of Material (BOM) and Routings are not currently distributed to open jobs at the shop floor. By default, this concurrent program does not refresh copies of any open lot based jobs. These changes come into effect only when new jobs are created. If you set the WSM: Create Job Level BOM and Routing Copies profile option to Yes (Option 2), then you can update changes in all open lot based jobs, or a user defined subset of these jobs by using the Refresh Open Job Copies concurrent program. By default, changes are not saved to the open jobs, and you must set the following parameters.
To update open lot based jobs
-
Navigate to the WSM_REFRESH_JOBS Parameters window.
-
Enter Yes or No to Refresh All Open Jobs. (Required)
You can refresh all open jobs with any status except Closed by entering Yes for Refresh All Open Jobs. If this value is Yes, then the application ignores all other search parameters, and refreshes BOM and Routing copies for all open lot based jobs in the current organization. If this value is No, then additional job selection criteria are required.
-
Enter a range of jobs to refresh in the From Job Name and To Job Name fields (Optional).
-
Enter a Job Assembly (Optional).
-
Enter the Job Type (Optional).
-
Enter a Common Bill Item and Alternate Bill Designator (Optional).
-
Enter a Common Routing Item and Alternate Routing Designator (Optional).
-
Enter Yes or No to Select Jobs by Status.
If you select No, then the application refreshes the specified jobs and does not consider job status. If you select Yes, then the application considers each of the job status values that you select.
-
Choose OK.
The WSM_REFRESH_JOBS window displays the request information.
-
Choose Submit.
Note: If the Refresh Open Job Copies concurrent program runs, and the Infinite Scheduler program runs to assign dates on the jobs. If scheduled dates are not available, the Resource Centric Work bench will not show these jobs or operations in the Workbench user interface.
Refresh Open Job Copies updates copy tables, but does not refresh current operation information. Refreshing copy tables is intended to update future operations with changes. Any changes made to the current operation from the User Interface are not captured by the Resource Scheduling Workbench or lot based job. If you intend to make changes to current operations, then you must use WIP windows.
Refresh BOM/Routing of Open Lot Based Jobs with Revision Dates
Refresh BOM/Routing of Open Lot Based Jobs functionality is used to propagate the changes made to bills of material and routing of an assembly to the jobs that were created for the assembly prior to the changes. This enables the jobs to get the new (or changed) details of the BOM/Routing that are refreshed based on the routing revision date.
Previously, the changes made to BOM/Routing were effective as on Routing Revision Date. To update the routing revision date on the job and incorporate the changes, you have to do Update Routing transaction through the OSFM WIP Lot Transaction. But if the changes made to BOM/Routing are not effective as on the Routing Revision Date, then the changes will not be updated on the job.
Refresh BOM/Routing of Open Lot Based Jobs with Revision Dates refreshes all selected jobs based on New Revision Dates or Current Job Revision Dates, depending on the parameters you select. If you update the job's BOM or Routing, then Refresh Job Copies concurrent request runs to successfully update plan details of the job.
Four parameters are added to Refresh BOM/Routing of Open Lot Based Jobs concurrent request, so that you can refresh all selected jobs either as per Job Revision Date or New Revision Date. These parameters (two for BOM and two for Routing) are:
-
Refresh Routing Based On:
This has three values.
-
Job Revision Date: If you select this option, then the job is refreshed based on the job's current Revision Date.
-
New Revision Date-All Jobs: If you select this option, then enter a new date for the New Routing Revision Date parameter. Job's plan details are updated based on the new date.
-
New Revision Date-Job Revision Date less than new date: If you select this option, then enter a new date for the New Routing Revision Date parameter. In this case, the job is refreshed in the following ways:
-
If the job's current revision date is less than New Routing Revision Date, then the application updates the job's plan details based on the New Routing Revision Date.
-
If the job's current revision date is greater than New Routing Revision Date, then the application updates the job's plan details based on the job's current Revision date.
-
-
-
New Routing Revision Date: Enter a New Routing Revision Date to refresh whenever required as described in the previous option.
The two similar parameters for BOM are Refresh BOM Based On and New BOM Revision Date. The preceding descriptions apply for BOM as it is for Routing.
Overview of Advanced Lot Transactions
Oracle Shop Floor Management provides the ability to split lots, merge lots, and perform additional other advanced lot transactions. Lots exist at different production points as either WIP lots or Inventory lots. Two windows, one for the WIP lot and the other for Inventory lot, give you the ability to perform various work in process and inventory transactions so you can divide, combine, rename existing lots, or create new lots from scrapped material. These windows enable you to do the following actions:
WIP Lot Transactions
-
Lot Splitting: divide a lot into two or more resulting lots: split a released lot into two or more resulting lots that can have different resource, material requirements, and different operations.
-
Lot Merging: combine multiple lots of the same item into one resulting lot. The jobs to be merged must be at the same operation, department and intraoperation step. Identical assemblies are not required.
-
Update Assembly: change the item, quantity, or revision of an existing lot and move it to another assembly. The lot number is renamed in these transactions.
-
Bonus: recover scrap quantities to create a new lot, or create an entirely new lot.
Use the WIP Lot Transactions window for these transactions.
Inventory Lot Transactions
Use the Inventory Lot Transactions window for this transaction.
WIP Lot Transactions
WIP Split and Merge functionality provides business solutions on the shop floor so you can do the following tasks:
Lot Splitting: You can divide a lot into any number of child lots. The parent lot can be at any operation in the routing and may have created material, resource and cost transactions. The split lots have a value proportional to the number of units being split away. Scrap and variance due to scrap are associated with the lot number in the scrap transaction. Child lots have their own routings and bills of material, and you can create transactions against different child lots immediately after a split. Backward movement for a split transaction is not allowed. The transaction processing for splits is not linked to the cost processing for splits, as transactions may be entered into the system via the interface at any time. When a lot is split into multiple children, the standard costs collected at the starting job are redistributed to the resulting jobs.
New lot numbers are automatically assigned to the child lots of a split transaction, but can be changed. New lots are independent entities linked by a transaction history associating their genealogy.
The split transaction can update the assembly of the child job while performing the split transaction. This provides greater flexibility and reduces the number of transactions. Support for combined split and update assembly transactions are also available through open interfaces.
Lot Merging: Multiple lots with identical assemblies can be combined to create a single parent lot. Only lots at the same intra-operation step are merged. The new job is now at the operation where the lots were merged.
Lot Bonus: You can increase the work order quantity, and credit a bonus account for the transaction. You can also simulate a recover transaction to start a lot on a given routing at a given step, and credit a bonus for the transaction.
Update Assembly: One product can be translated into another product—that is—change the item, quantity, revision, or routing of an existing lot and move it to another assembly. There are no costing implications in this transaction. You can also switch to an alternate routing on the same operation step.
If the translation is updating the routing, then the WIP lot is updated with an alternate network routing defined for the assembly. When this type of translation is performed at the queue intraoperation step, the operation characteristics correspond to the same operation, if existing, in the new routing. You can also update the routing revision, or routing revision date without changing the alternate designator. It is mandatory to provide the starting operation if the job is at a To Move intraoperation step.
If the user specifies a new BOM revision or BOM revision date during an update routing transaction through the WIP lot transaction interface, then it would be honored and the job would have the revised BOM revision and BOM revision date after the transaction. The job plan operations and components would be based on the new routing revision date and the new BOM revision date. The revision date would be honored both for standard jobs as well as for non-standard jobs. Note that this feature is not supported through forms. Update of BOM alternate is not allowed when carrying out an update routing transaction.
Assigning Starting Operation for Child Lots: A lot can be split into several child lots and processed on different routings, potentially creating other assemblies. Starting operation for the child lots is the same as the parent lot operation at the time of the split. For bonus lots, you can start a child lot at any operation sequence number on a given routing, otherwise it defaults to the queue step at the first operation. The operation history before the split is saved for all lots, used for scrap and standard cost update valuation.
Note: WIP lot transactions proceed when requisitions have been created for the current operation. A warning message appears prompting you to proceed with the transaction, or cancel. If you execute the transaction, then you must cancel the requisitions manually.
In Oracle Shop Floor Management, Move and completion are a job level transaction and user should not allow WIP completion at a Serial level.
Creating WIP Lot Transactions
-
Navigate to the WIP Lot Transactions window.
-
Select a transaction type.
Your choices are Bonus, Merge, Split, Update Assembly, Update Lot Name, Update Quantity, or Update Routing. See: WIP Lot Transactions.
Status defaults to Pending, and is updated to Completed when the transaction is saved. The database does not store any records with a status of Pending.
Select the job type (standard or non standard) for the type of jobs the transaction is to be performed on.
Note: WIP lot transactions cannot be performed across job types.
The Costed field is updated after costing program is executed.
-
In the Reference field, you can enter any descriptive information regarding this transaction.
-
Optionally, you can select the purpose of this transaction in the Reason field.
-
Follow the procedures for the transaction you want to create, Your choices are Bonus, Merge, Split, Update Assembly, Update Lot Name, Update Quantity, or Update Routing.
Note: WIP lot transactions proceed when requisitions have been created for the current operation. A warning message appears prompting you to proceed with the transaction, or cancel. If you execute the transaction, then you must cancel the requisitions manually.
Viewing, Entering, and Updating Lot Attributes
To view lot attributes for the starting lots
-
Choose Lot Attributes. If the starting lot has lot attributes, then the lot attributes window appears with attributes.
-
Choose WMS or INV attribute to view the individual segments of the respective attribute.
-
Choose OK when you are finished viewing the attributes.
To view, enter, and update lot attributes for the resulting lot
-
Choose Lot Attributes.
-
If you are entering or updating lot attributes, then enter and update attributes with appropriate values for WMS and INV attributes based on the lot attributes setup that you or your system administrator completed. The WMS attributes for the resulting lot are inherited from the starting lot only if the source and resulting lot’s assemblies have the same context. In case of a merge transaction, the WMS attributes are inherited from the representative lot of the starting lot. The INV attributes are always inherited from the source lot whether the context of the source and resulting lot is same or not. In case of a merge transaction, the WMS attributes are inherited from the representative lot.
-
Choose OK to save and return to the WIP Lot Transactions window.
-
Choose Cancel if you do not want to save the lot attribute changes.

To create WIP lot bonus transactions
Select the bonus transaction type.
-
In the Resulting Job region, in the Job Information tab, enter the new lot number.
-
Enter a lot number, description, assembly number, quantity, and bonus account number.
-
In the Others tab, the accounting class is defaulted but you can select another one from the list of values. You can start a bonus lot at any operation on the primary path, however, the default is the queue step at the first operation.
-
Optionally, you can change the Start and Completion dates.
-
You can also enter routing and bill of material information in the Routing Information and the BOM and More tabs.
-
Save your work.
To create WIP lot merge transactions
Select the merge transaction type.
-
In the Starting Job region, in the Lot Number field, select the lot numbers of the parent lots you want to merge.
The lot details display: assembly number, operation sequence number, intra-operation step, operation code, quantity remaining in the lot, alternate routing, and start date.
-
Check the Representative Lot check box for one lot in this group whose characteristics will represent the merged lot.
The attributes of the representative lot are used for the resulting merged lot.
-
In the Resulting Job region, in the Job tab, enter the new lot number.
You can also select the name of any of the starting lots you are merging. The parent assembly number is transferred from the original lot number. The quantity in the Resulting Quantity field is the sum of all the original lots.
You cannot update Accounting Class for non-bonus WIP Lot transactions. You cannot update Start and Completion Dates except for any WIP transaction other than bonus where you can provide the start date and completion dates.
-
You can also enter routing and bill of material information in the Routing Information and the BOM and More tabs.
-
Save your work.
To create WIP lot split transactions
Select the split transaction type.
-
In the Starting Job region, in the Lot Number field, select the lot number of the parent lot to split.
The lot details display: assembly number, operation sequence number, intra-operation step, operation code, quantity remaining in the lot, alternate routing, and start date.
-
In the Resulting Job region, in the Job tab, the new lot number displays.
The system automatically assigns a new lot number according to your setup in the Shop Floor Management Parameters window, see: Defining Parameters. When a lot is split, the new resulting lot designation is the original lot number, followed by the lot separator value set in the parameter, followed by sequential numbering.
The representative lot is transferred from the original lot number. Enter the quantity in the Resulting Quantity field.
-
Select the Change Assembly indicator to execute a split and update transaction.
The Change Assembly indicator is active only when you select the split transaction type. The split transaction can now update the assembly of the child job while performing the split transaction. You cannot clear (uncheck) this indicator, therefore, you must exit and open the window.
-
If you select the Change Assembly indicator, then enter a new Assembly and Resulting Quantity.
You cannot update Accounting Class for non-bonus WIP Lot transactions. You cannot update Start and Completion Dates except for any WIP transaction other than bonus where you can provide the start date and completion dates.
-
You can also enter routing and bill of material information in the Routing Information and the BOM and More tabs.
-
Save your work.
To create WIP lot update transactions
Select the update transaction type you want to perform.
Your choices are Update Assembly, Update Lot Name, Update Quantity, or Update Routing.
-
In the Starting Lot region, in the Lot Number field, select the lot number to update.
The lot details display: assembly number, operation sequence number, intra-operation stop, standard operation code, quantity remaining in the lot, alternate routing, and start date.
-
Different fields in the Resulting Lot region need to be updated, depending on which transaction you are creating.
For Update Assembly, in the Job Information tab, select the new assembly number in the Assembly field.
For Update Lot Name, in the Job Information tab, enter the new lot name in the Lot Number field.
For Update Quantity, in the Job Information tab, enter the new quantity in the Resulting quantity field.
Enter the bonus account number in the Others tab.
For Update Routing, add routing data in the Routing Information tab.
You cannot update Accounting Class for non-bonus WIP Lot transactions. You cannot update Start and Completion Dates except for any WIP transaction other than bonus where you can provide the start date and completion dates.
-
You can also enter routing and bill of material information in the Routing Information and the BOM and More tabs.
-
Save your work.
Note: While performing Update Routing or Update Assembly transactions at the Queue intraoperation step, if you have phantom exploded components at the current operation—you must manually reverse the charges.
Inventory Lot Transactions
-
Inventory Lot transactions enable you to split, merge, translate, and transfer inventory lots in Oracle Shop Floor Management. You cannot execute inventory lot transactions for lot and serial controlled items. You have two methods of performing inventory lot transactions:
-
Perform inventory lot transactions using OSFM windows.
-
Perform inventory lot transactions through the Oracle Warehouse Management mobile interface. See: Mobile Interface, Oracle Warehouse Management.
Caution: Different types of attributes, such as Inventory (INV) Item Lot and Warehouse Management (WMS) Item Lot, are not validated when performing inventory lot transactions using the OSFM windows. Item level attributes such as Lot Split Enabled and Lot Merge Enabled are not validated using OSFM windows, although they are enabled for Warehouse Management Mobile Interface.
Inventory lot transactions are not supported for serial controlled assemblies.
When importing using an interface, the import fails and the log file contains an error message.
Lot Splitting: You can divide a lot into any number of child lots. The split lots have a value proportional to the number of units being split away. When a lot is split into multiple children, the costs allocated to the starting lot are reallocated to the resulting lots.
New lot numbers are automatically assigned to the child lots of a split transaction, and can be changed. New lots are independent entities linked by a transaction history associating their genealogy.
Lot Merging: Multiple lots with identical assemblies can be combined to create a single merged lot.
The assemblies for the lot is automatically moved to the current operation.
Lot Translating: Enables users to either change the name of an inventory lot to another name, or convert one product to another product. For example, you can change the lot name, item, revision, or subinventory of an existing lot and move it to another assembly. Lot genealogy captures all transactions.
Lot Transferring: A lot can be moved from one subinventory location to another.
Creating Inventory Lot Transactions
To create inventory lot transactions
-
Navigate to the Inventory Lot Transactions window.
-
Select a transaction type.
Your choices are Split, Merge, Translate, Transfer. See: Inventory Lot Transactions.
-
The Transaction Date displays the current date, and you can change this date.
-
Optionally, you can select the purpose of this transaction in the Reason field.
-
In the Reference field, enter any descriptive information to identify transactions, used on standard reports.
-
In the Starting Lot region, select a lot in the Lot Number field.
The lot details display: item number, quantity, subinventory location, and locator.
In the Resulting Lot region, depending on the type of transaction you are creating, different information is needed to complete the transaction.
-
For split transactions, select the lot to split in the Starting Lot region.
In the Resulting Lot region—the system automatically assigns new lot numbers according to your setup in the Shop Floor Management Parameters window, see: Defining Parameters. When new lots are created, the resulting lot designation is the original lot number, followed by the lot separator value set in the parameter, followed by sequential numbering.
The lot details are transferred from the original lot number: item number, quantity, subinventory location, and locator. Enter the quantity of the new lot in the Quantity field. You can also change the subinventory location.
If a co-product definition is defined, then there should be no date in the future where the split percentages remain undefined. For this reason, you cannot change existing date ranges. If you want to change date ranges, then define new dates that overlap with existing dates.
-
For merge transactions, select the lots to combine in the Starting Lot region.
In the Resulting Lot region, the last lot number you select is the lot number used for all the merged lots. The resulting lot name defaults from the representative lot name of the Starting Lots region. You can indicate the representative lot by selecting the Representative Lot check box of a lot number in the Starting Lots region.
The lot details are transferred from the original lot number: item number, routing revision level, quantity, subinventory location, and locator. The quantity of the all the combined lots is the value in the Quantity field. You can change the subinventory location.
-
For lot translating transactions, select the lot you want to rename in the Starting Lot region.
In the Resulting Lot region—select the new name for the lot. You can change the item number in the Item field and the subinventory location, if required.
-
For lot transferring transactions, select the lot to move in the Starting Lot region.
In the Resulting Lot region—you can change the subinventory location.
-
Save your work.
Lot Attributes in Inventory Lot Transactions
You can do transactions like split, merge, update lot name and update assembly and is supported only in Forms. You can do Inventory Lot Transactions only for Lot Controlled Items and not for Lot/Serial Controlled Items.
You can query the lot and check the details through the Genealogy windows. See: Lot Genealogy.
Split
Lot attributes specified during Job Creation, Execution, or Completion get transferred from the job (WIP lot) to the inventory lot.
Lot attributes of the Starting Lot defaults to the Resulting Lots and you can update them, if required.
-
Navigate to Inventory Lot Transactions window.
-
Select Split as Transaction Type.
-
Enter Lot Number in the Starting Lots region to query.
-
Click Lot Attributes in the Starting Lots region.
The Lot Attributes window appears displaying the Lot Number and the WMS and Inventory lot attributes.
-
Click OK.
-
Enter split lot details.
-
Click Lot Attributes in the Resulting Lots region.
Inventory lot attributes default and update them if required.
Merge
Lot attributes of the Representative Lot are transferred to the Resulting Lot and you can update them if required.
-
Navigate to Inventory Lot Transactions window.
-
Select Merge as Transaction Type.
-
Enter Lot Number in the Starting Lots region.
-
To check the lot attributes, click Lot Attributes in the Starting Lots region.
The Lot Attributes window appears displaying the lot number and the WMS and inventory lot attributes.
-
Click OK.
-
Click Lot Attributes of the Resulting Lots region.
The Lot Attributes window of the resulting lot appears.
-
Check and update the Inventory Lot Attributes.
-
Click OK.
Translate
Update Lot Name
Lot attributes are transferred to the Resulting Lot and you can update them if required.
-
Navigate to Inventory Lot Transactions window.
-
Select Translate as Transaction Type.
-
Enter Lot Number in the Starting Lots region.
-
To check the lot attributes, click Lot Attributes in the Starting Lots region.
The Lot Attributes window appears displaying the lot number and the WMS and inventory lot attributes.
-
Click OK.
-
Update the Lot Name of the resulting lot in the Resulting Lots region.
-
Click Lot Attributes.
The Lot Attributes window appears.
-
Update the inventory lot attributes for the updated lot name.
Update Assembly
Inventory lot attributes get transferred to the Resulting Lot and can be updated, if required.
-
Update the assembly of the resulting lot in the Item column of the Resulting Lots region.
-
Click Lot Attributes.
The Lot Attributes window appears.
-
Update inventory lot attributes.
Creating Lots for New Sectors
The Assemblies manufactured in the first sector are getting completed into the respective subinventories. Now this lot is ready for the subsequent use in the next sector. The next step is to define the jobs in the subsequent sectors using the Lot Creation window. When a lot based job is created using lot the creation feature, it is assumed that the starting component is issued to this job. Therefore, the starting component is pushed into this job ignoring the supply type defined for the component in the first operation.
To create lots on the shop floor
-
Select an Inventory lot number in the Starting Lot field.
Information displays for subinventory location, locator number, item number and description, revision number, quantity on hand, and quantity available to transact.
-
In the Job Information tab, the resulting job name will be defaulted based on the Reuse Job Name parameter. When multiple jobs are created, the first job name will be defaulted based on the Reuse Job Name parameter and the remaining jobs will be defaulted with the starting lot number, followed by the New Lot Separator value, followed by sequential numbering. You can also define the revision number and revision date for bill of material and routing in order to use the component and operations effectivity.
Information displays in the following fields and can be changed: Accounting Class, Completion Subinventory and Locator.
Note: Please note that the starting component with phantom supply type in the first operation of the subsequent sector assembly bill of material is not allowed. Therefore, the Lot Creation window does not permit you to create the lot based job with phantom supply type material in the first operation.
If you define two components in the first operation, then only one is pushed into this job based on the starting lot selected.
Using Substitutes during Lot Creation
You can also create a lot based job from a substitute item. For example, Item A is an assembly item and Item B is the component for Item A. In the event of nonavailability of Item B, you can identify an alternate item or a substitute item for Item B from Bills of Material of Item A. You can enter an inventory lot number for this alternate or substitute item and create a lot based job for Item A.
When you enter a lot number in the lot creation form, all other information of that starting lot default. In the resulting lot assembly, you can select the assembly of the substitute component for which the lot based job is being created.
-
Substitute component should be at the first operation and it should not be a phantom component, i.e., Supply Type of primary component of the substitute component should not be phantom in bills of material.
-
If the same component is present as substitute and primary component at the first operation, then it is treated as primary component.
-
If the same component is a substitute of two primary components in the same bills of material, then it is treated as a substitute of primary component with minimum sequence number in bills of material.
ADSUBCMP1 is a primary component in BOM of ASSY2 and CM61000.
ADSUBCMP1 is a susbstitute component in BOM of ASSY1.
You can now create a lot by issuing primary as well as substitute components.
-
-
In the Quantity tab—The Job Quantity for this job is derived based on starting lot quantity available under this lot number, and you can change the job quantity. You can also create multiple jobs for different assemblies and quantities. The application creates multiple jobs and pushes this lot into the jobs. You can also create a job with less than the defaulted quantity. If you create a job using less than the starting lot quantity in the subinventory, then the remaining quantity of the starting lot remains in the subinventory, and you can use this for subsequent job creation. You can also issue a starting component for the quantity more than or less than the component required quantity suggested by the application. In this case, you can enter the required value in the Component Quantity Issued field. In addition, the following information is available in this tab:
-
Component usage per assembly
-
Component requirement for the job quantity
-
Start Job Quantity
-
MRP Net
You can change some of theses values depending on the transactions performed for this lot.
-
-
In the Planning tab, Start Date and Completion Date values display and can be changed. Choose the Co-Products Supply check box to indicate that resulting lots are used as co-product supply.
If the inventory lot from which the new WIP lot is created, and the new WIP lot have the same attribute context, then lot attributes will be copied to the new WIP lot. If they have different context, then enter lot attributes as follows.
To view lot attributes for starting lots
-
Choose Attributes.
If the starting lot contains attributes, then the lot attributes window appears.
-
Choose WMS or INV attributes to view individual segments of the attribute.
-
Choose OK when you are finished viewing the attribute.
To view, enter, and update lot attributes for the resulting lot
-
Navigate to the WIP Lot Transactions window.
-
Choose Lot Attributes.
Note: If you are entering or updating lot attributes, then enter and update attributes with appropriate values for WMS and INV attributes based on the lot attributes setup that you or your system administrator have performed. The WMS attributes for the resulting lot are inherited from the starting lot only if the source and resulting lot’s assemblies have the same context. In case of a merge transaction, the WMS attributes are inherited from the representative lot of the starting lot. The INV attributes are always inherited from the source lot whether the context of the source and resulting lot is same or not. In case of a merge transaction, the WMS attributes are inherited from the representative lot.
-
Choose OK to save your work and return to the WIP Lot Transactions window, or choose cancel to discard changes.
Note: If you are only viewing lot attributes and are not making changes, then you can choose OK or Cancel to return to the WIP Lot Transactions window.
Kanban Replenishment on Lot Based Jobs
Kanban is a pull based replenishment process in a manufacturing system. You can create lot based and discrete jobs to replenish empty kanbans. In addition, Kanban supports creation of lot based jobs by selecting the starting inventory lot during Kanban replenishment process.
The following are major features of Kanban support on lot-based jobs:
-
During Kanban replenishment process, you can choose the starting inventory lot for the item attached to first operation. This is similar to lot-based job creation using the Lot Creation window.
-
Use the Honor Kanban Size parameter to create a lot based job quantity equal to kanban size when components are pushed from an inventory lot during kanban replenishment. If this check box is not selected, lot based jobs are created for the maximum number of assemblies which can be built using the selected component lot. If the check box is selected, the application will honor the kanban lot size.
-
After a job is created using Kanban replenishment, you can query the Lot Based Job window to view Kanban information.
-
If the assembly from replenishment lot based job is completed, then the supply status of a production Kanban is updated to Full.
-
Shop Floor Management allows jobs with a Kanban reference to be merged with another job with a different kanban reference (case 1), or a job with a kanban reference with a job without any reference (case 2). In the first case, one of the jobs is the representative lot, for that wip lot the net effect from a kanban standpoint is the same as a quantity update. But for a non-representative lot, the quantity become zero and the corresponding Kanban card status is set to Empty, and the job should not be referenced. In the second case, if the Kanban reference job is the representative lot, then the net effect from a Kanban standpoint is the same as a quantity update for that job. Otherwise, the quantity becomes zero, the corresponding Kanban card status is set to Empty, and the job should not be referenced. See: Defining Kanban Pull Sequences, Oracle Inventory User's Guide.
Lot Based Job Reporting
The following Oracle Work in Process reports support lot based job reporting:
Discrete Job Data Report, Oracle Work in Process User's Guide.
Discrete Job Listing Report, Oracle Work in Process User's Guide.
Discrete Job Routing Sheet, Oracle Work in Process User's Guide.
WIP Accounting Classes Report, Oracle Work in Process User's Guide.
WIP Outside Processing Report, Oracle Work in Process User's Guide.
Discrete Job Shortage Report, Oracle Work in Process User's Guide.
Job lot Composition Report, Oracle Work in Process User's Guide.
Discrete Job Value Report, Oracle Work in Process User's Guide.
WIP Value Report, Oracle Work in Process User's Guide.
Lot Based Job Component Pick Release
To run the Lot Based Job Component Pick Release (SRS) report
-
Navigate to the Lot Based Job Reports window.
-
Select the Lot Based Job Component Pick Release (SRS) report from the Name list of values.
-
Enter Days Forward.
-
Enter the Pick Slip Grouping Rule from the list of values.
-
Optionally, enter Print Pick Slips for the list of values.
-
Optionally, enter Plan Tasks from the list of values.
-
Choose OK.
-
Choose Submit to run the report.
Pending Transactions Report
If there are pending transactions associated with a lot based job, then the lot based job cannot be closed. You can report on all pending transactions for a given set of jobs and review to take appropriate action before launching the close job program. The close job program provides selection criteria with an option to eliminate jobs with pending transactions. The Pending transaction report can be used during period closing.
To run the Pending Transactions Report
-
Navigate to the Lot Based Job Reports window.
-
Select the Pending Transactions Report from the Name list of values. The Parameters window appears.
-
Enter report parameters.
-
Choose OK.
-
Choose Submit to run the report.
Integration with Outside Processing
Outside Processing enables you to include supplier-sourced components and resources in the manufacturing process. Key features of outside processing for lot based jobs include the following:
Setup
Setup is needed for Inventory, Bills of Material and Cost Management, Purchasing, and Work in Process. See: Outside Processing, Oracle Work in Process User's Guide.
Requisition Creation Time: To enable outside processing (OSP), you need to set requisition creation time in the WIP parameters window. In WIP discrete jobs, the At Job and Schedule Release setting creates purchase requisitions for all OSP operations in the routing, while the At Operation setting creates purchase requisitions only when a job reaches the queue of an OSP operation. In Shop Floor Management, you may not know the next operation in advance (i.e. due to network routing and jump transactions), therefore, purchase requisitions are only created at the queue of an outside processing operation. To support this, At Job and Schedule Release and At Operation behave identically for Shop Floor Management. The recommended setup for the parameter is At Operation.
Note: For Manual setting, all purchase requisitions must be created manually. See:
Outside Processing, Oracle Work in Process User's Guide
OSP Resource, Department, Item: An OSP operation requires one or more OSP resources, which in turn must be associated with departments with a location. In addition, a separate OSP item must be created to receive and charge the outside work (this item is associated with the resource). When creating the OSP item, the Purchasing Tabs of the Item window must have OSP-related settings (i.e. Purchased, Purchasable, Outside Processing Item must be checked.) The list price must be specified in the purchasing master organization for generating purchase orders. See: Outside Processing, Oracle Work in Process User's Guide.
Routing: To associate an OSP resource with a routing (either directly or using standard operations), you must specify a charge type (either at the resource, the standard operation or the routing level). For Shop Floor Management, charge type PO Receipt should be used for OSP operations. PO Move, which moves any received quantity to the queue of the next operation in WIP discrete jobs, is not supported (i.e. error message appears in jobs with this setting). Withlot based jobs, the next operation is not predetermined and partial receipts should not be moved until the entire quantity is received. See: Outside Processing, Oracle Work in Process User's Guide.
Outside Processing Scenarios
Automatic creation of purchase requisitions generally occurs when a job moves forward to or starts at the queue of an OSP operation (there are exceptions, such as Undo back to an OSP operation queue).
You should expect a warning message at the queue of an OSP operation when performing a transaction that would invalidate one or more purchase requisitions. You should manually cancel or update purchase requisitions for such transactions. Note that these warning messages appear even for purchase requisitions that have not yet been completely processed by the purchasing transaction manager(i.e. are still in purchase requisition interface tables) as well as for purchase orders.
As discussed in routings setup, charge type PO Move is de-supported. You are allowed to create operations in a routing with charge type PO Move, but are not able to start at or move to PO Move OSP operations.
Job Creation/Update
-
Lot Based Job Creation/Lot Creation: Starting a job at an OSP results in automatic purchase requisition creation. For the define Lot Based Job and Lot Creation windows, the starting operation, which is always the first operation of the routing, would need to have an OSP resources for this to occur. Creating a lot based job to start at a PO Move OSP operation gives an error and not allow the transaction to be saved (applies for both released and unreleased status).
-
Lot Based Job Update: Creating a job as unreleased status will not result in purchase requisition creation, but upon changing the status to released, a purchase requisition is created if the starting operation is OSP. Increasing job quantity through the Lot Based Job window at an OSP operation causes a new purchase requisition to be created for the additional quantity. Changing job status from released to unreleased where the first operation is OSP would mean that a purchase requisition should no longer exist and will result in warning.
Note: Going forward for lot-based job, for the first operation, the need by date would be same as the scheduled completion date of the first operation. For lot based job first unit completion date is same as last unit completion date of any operation. For subsequent OSP operations (not first in the routing) too, need by date would be calculated based on the scheduled completion date of the operation. Currently it is being calculated by adding lead times to SYSDATE.
WIP Lot Transactions
-
Split/Merge: Performing WIP lot transactions that have new resulting jobs, such as split or merge, would mean that purchase requisitions or purchase orders for the starting jobs would need to cancelled manually. Note that instead of canceling all purchase requisitions or purchase orders for starting jobs and creating new purchase requisitions for resulting jobs, you can keep existing purchase requisitions or purchase orders by updating their distribution. Also note if a purchase requisition, purchase order is kept because a starting job retained quantity and became a resulting job, then the quantity listed on that purchase requisition or purchase order would need to be updated manually.
-
Update Routing/Assembly: Updating the routing or assembly for a job to start at an OSP results in purchase requisition creation. If you are leaving the queue of an OSP operation, this would imply a purchase requisition is being abandoned in the old routing and would need to be manually cancelled. Attempting to update routing or assembly to start at a PO Move OSP operation will result in an error message and will not save.
-
Update Quantity: Increasing job quantity through the WIP Lot Transactions window at an OSP operation causes a new purchase requisition to be created for the additional quantity.
-
Bonus: For a bonus WIP lot transaction, we can start at any operation queue and expect automatic creation of a purchase requisition if an OSP resource is present. Starting a bonus job at any operation which has a resource of charge type PO Move result in an error.
Move Transactions
-
Move: Moving a job to the queue of any OSP operation results in the automatic creation of purchase requisitions. Moving to a PO Move OSP operation results in an error. You can move from an OSP operation without formally receiving the OSP item.
-
Jump: Jumping to the queue of an OSP operation, both inside and outside the routing, results in the creation of a purchase requisition. A jump from an OSP operation queue (with Charge Jump From Queue set to OFF) results in a warning to manually cancel purchase requisitions. Jumping to a PO Move OSP operation results in an error.
-
Undo: Performing an undo back to an OSP operation queue does not result in purchase requisition creation. An undo at an OSP operation result in a warning, since a purchase requisition may be abandoned.
Defining Network Routings
A warning is given if an outside processing resource of charge type PO Move is associated with an operation in the Network Routing window.