Setting Up
This chapter covers the following topics:
- Overview of Setting Up
- Related Product Setup Steps
- Setup Flowchart and Checklist
- Setup Steps
- Defining Parameters
- Defining and Viewing Lot Sector Extensions
- Defining Standard Operation Details
- Attaching Files to Job Operations
- Setting Up Shop Floor Management Attributes
- Profile Options
- Concurrent Programs
Overview of Setting Up
This section contains an overview of the steps to complete setting Oracle Shop Floor Management. For instructions on how to complete each task, see the setup sections indicated in each step.
Setup involves several phases, including setting up other applications including Oracle Inventory, Oracle Bills of Material, and Oracle Work in Process. You may not need to perform some of the steps below if you've already performed a common-application setup.
Set Up Oracle Applications Technology
The setup steps in this chapter describe how to implement Oracle Applications specific to Oracle Shop Floor Management. You need to complete several other setup steps, including:
-
Performing system-wide setup tasks, such as configuring concurrent managers and printers
-
Managing data security, which includes setting up responsibilities to allow access to a specific set of business data and transactions, and assigning individual users to one or more of these responsibilities
Related Product Setup Steps
Oracle Shop Floor Management requires that Oracle Bills of Material, Oracle Cost Management, Oracle Inventory, and Oracle Work in Process are set up first.
Oracle Inventory
Set up Oracle Inventory as described in Overview of Setting Up, Oracle Inventory User's Guide. Ensure that all the following steps have been completed:
-
Create your organizations
-
Define your organization parameters
-
Define items and item costs
-
Define your units of measure
-
Define your subinventories
-
Define your stock locators
-
Define WIP supply types
Oracle Bills of Material
Set up Oracle Bills of Material as described in Overview of Setting Up, Oracle Bills of Material User's Guide. Ensure that all the following steps have been completed:
-
Define resources
-
Define your departments
-
Define your standard operations
-
Create your workday calendar
Oracle Cost Management
Set up Oracle Bills of Material as described in Overview of Setting Up, Oracle Cost Management User's Guide. Ensure that all the following steps have been completed:
-
Define your cost types and cost elements
-
Define your default WIP accounting classes for categories
-
Define resources, material sub-elements, overheads, and overhead defaults
Oracle Work in Process
Set up Oracle Bills of Material as described in Overview of Setting Up, Oracle Work in Process User's Guide. Ensure that all the following steps have been completed:
-
Define WIP accounting class types
-
Define WIP parameters
Setup Flowchart and Checklist
Some of the steps outlined in this flowchart and setup checklist are:
-
Required
-
Required Step With Defaults
-
Optional
Required Step With Defaults refers to setup functionality that comes with pre-seeded, default values in the database; however, you should review those defaults and decide whether to change them to suit your business needs. If you need to change them, you should perform that setup step. You need to perform optional steps only if you plan to use the related feature or complete certain business functions.
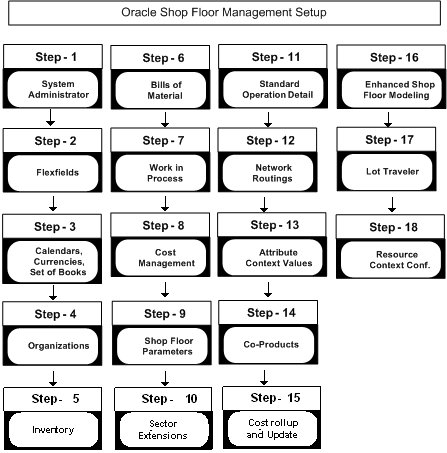
Setup Checklist
The following table lists setup steps. After you log on to Oracle Applications, complete these required steps to implement Oracle Shop Floor Management.
| Step No. | Step |
|---|---|
| Step 1 | Set Up System Administrator |
| Step 2 | Set Up Key Flexfields |
| Step 3 | Set Up Calendars, Currencies, and Set of Books |
| Step 4 | Set Up Organizations |
| Step 5 | Set Up Oracle Inventory |
| Step 6 | Set Up Oracle Bills of Material |
| Step 7 | Set Up Oracle Work in Process |
| Step 8 | Set Up Oracle Cost Management |
| Step 9 | Define Oracle Shop Floor Management Parameters |
| Step 10 | Define Sector Extensions |
| Step 11 | Define Standard Operation Details |
| Step 12 | Create Network Routings |
| Step 13 | Define Attribute Context Values |
| Step 14 | Define Co-Products |
| Step 15 | Perform Cost Rollup and Cost Update for Assemblies |
| Step 16 | Enhanced Shop Floor Modeling |
| Step 17 | Lot Traveler |
| Step 18 | Resource Context Configuration |
Setup Steps
Step 1: Set Up System Administrator (Required)
This step is performed while setting up different Oracle Applications products and involves the following tasks:
-
Define responsibilities. See: Oracle System Administration, Oracle E-Business Suite System Administrator's Guide
-
Set up printers (optional). See: Setting Up Your Printers, Oracle E-Business Suite System Administrator's Guide
Step 2: Set Up Key Flexfields (Required)
You need to coordinate the flexfields of other applications you have set up before defining key flexfields here. See: Oracle E-Business Suite Flexfields Guide.
Step 3 (Required): Set Up Calendars, Currencies, and Set of Books
This step is performed while setting up different Oracle Applications products. This step involves the following tasks:
-
Set up calendars by defining period types, accounting calendar, transaction calendar, and workday calendar
-
Define currencies and currency rates
-
Assign your set of books to a responsibility
-
Set up accounting code combinations
See: Oracle General Ledger User's Guide.
Step 4: Set Up Organizations
You may not need to perform this step if you have already installed and set up Oracle inventory or performed a common-applications set up. This step involves the following tasks, for more information.
-
Define organization lookups
-
Define business groups
-
Define organizations
-
Define human resources organizations
-
Define legal entities organizations
-
Set up inventory organizations
-
Define organization hierarchies
-
Assign business groups and operating units to responsibilities
Step 5: Set Up Inventory
This step includes defining Oracle Inventory components including:
-
Define organizations
-
Define items
-
Define units of measure
-
Define subinventories
-
Define stock locators
-
Define WIP supply types
Note: Organizations for Oracle Shop Floor Management should meet the following conditions: Standard Costing Method, Inventory Parameters Lot Uniqueness set to None, and WIP Parameter Default Lot Number Type set to Job Name.
Step 6: Set Up Oracle Bills of Material
This step includes defining Oracle Bills of Material components including:
-
Define BOM parameters
-
Define resources
-
Define department classes
-
Define your departments
-
Define your standard operations
-
Create your workday calendar
Note: Lot based jobs support operation pull, push, and phantom supply types—other supply types are not currently supported.
Step 7: Set Up Oracle Work in Process
This step includes defining Oracle Work in Process components including:
-
Define WIP accounting classes
The WIP accounting class types used for Oracle Shop Floor Management are Lot Based Standard Discrete and Expense Non-standard Lot Based. See:
-
Define WIP parameters
Note: Organizations for Oracle Shop Floor Management should set WIP Parameters Default Lot Number Type to Job Name, and Requisition Creation time to At Operation.
Step 8: Set Up Oracle Cost Management
This step includes defining Oracle Cost Management components including:
-
Define cost types
-
Define your default WIP accounting classes for categories
-
Define resources, material sub-elements, overheads, and overhead defaults
-
Define costs for your item numbers
Note: Oracle Shop Floor Management only uses the standard costing method.
Step 9: Define Oracle Shop Floor Management Parameters
This step defines default values for the transactions you are creating including:
-
Designations for lots created
-
Designations for jobs completed
-
Define accounts for miscellaneous transactions
-
Define default WIP Accounting class for lot based jobs and non-standard lot based jobs
-
Define co-product supply for lot based jobs
-
Define options for Move In, Move Out, and Move To Next_Op
See: Defining Parameters, and WIP Accounting Classes, Oracle Work in Process User's Guide
Step 10: Define Sector Extension Code
Sector extension codes are associated with assemblies and subinventories. These codes are appended to the job name when the assembly is completed to the subinventory.
Note: Subinventories are valid stocking points when they are associated with sector extension codes.
See: Defining and Viewing Lot Sector Extensions.
Step 11: Define Standard Operation Details
This step defines the steps within an operation that are mandatory, and the location used for stocking points. See: Defining Standard Operation Details.
You can configure Move In, Move Out, and Move To Next Operation based on Standard Operation level or Organization level (see Step 9).
Step 12: Create Network Routings
In this step you create a network of operations which include primary paths and alternate paths. You can define a separate routing for each item. See: Creating a Network Routing
Step 13: Define Attribute Context Values
In this step you define context values for Shop Floor Management attributes. See: Setting Up Shop Floor Management Attributes
Step 14: Define Co-Products
Co-product functionality gives you the ability to define an item as the primary component of several end items; the bill of material of the end items are automatically created. See: Defining Co-Products
Step 15: Perform Cost Rollup and Cost Update for Assemblies
Oracle Shop Floor Management provides operation yield costing that enables you to include operation yields in the cost rollup of an assembly. This step updates those calculations into the cost of your products. See: Bills and Cost Rollups, Oracle Cost Management User's Guide
Step 16: Enhanced Shop Floor Modeling
Shop Floor Modeling provides configuration for operator access and responsibility exclusions that enable you to identify yourself and your related responsibilities in a multiple user window.
Dispatch lists are configured to your varying requirements. Entries in the scheduled dispatch list are sorted in the scheduled order in which they are picked up for work on that resource.
You can configure Move In, Move Out, and Move To Next Op based on Standard Operation level or Organization level.
The job is put on hold when the yield goes below the lowest acceptable yield set for that operation.Low Yield is a situation when the actual scrap quantity in an operation is higher than the quantity derived from the Lowest Acceptable Yield.
Additionally, Shop Floor Modeling provides you with codes and descriptions for Scrap, Bonus and in case a resource is down.
Step 17: Lot Traveler
Shop Floor Modeling provides a snapshot of the manufacturing data on the job progress. Specifically on operations, quantity, start and completion dates, and the details the lot has undergone. Additionally it also provides information on future operations.
Lot Traveler is shown in a different way for split and merge transactions. For a split lot, the lot traveler shows only operations that are performed after the split transaction. For a merged lot, the lot traveler shows operations that are performed prior to merge transaction also.
Step 18: Resource Context Configuration
Shop Floor Modeling also provides Resource Context Configuration. This configuration is based on two context types:
-
Resource based: 'Resource as a context' enables you to capture and view resource statuses such as Up, Down and Acknowledge Down.
-
Operation based: 'Operation as a context' enables you to capture and view resource statuses such as Up, Down, and Acknowledge Down. Operation based configurations enable you to view details for all resources defined for that operation.
Defining Parameters
The Oracle Shop Floor Management parameters define operation movement and default values for the transactions you are creating.
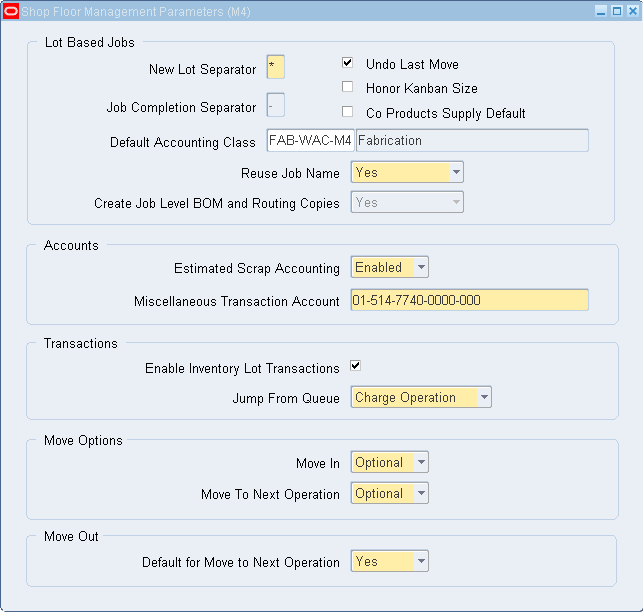
Shop Floor Parameters
To define Shop Floor Management parameters
-
Navigate to the Shop Floor Management Parameters window.
-
In the Lot Based Jobs region, set the value you want to use when lots are created and completed.
-
In the New Lot Separator field, the default value is a dash character (-) and can be changed to any value. When lots are created, split, or renamed—the resulting lot designation is the original lot number, followed by this value, followed by sequential numbering. See: WIP Lot Transactions, Inventory Lot Transactions
-
In the Job Completion Separator field, the default value is a dash character (-) and can be changed to any value. When lots are completed the resulting lot designation is the original lot number, followed by this value, followed by the lot sector extension. See: Create Lot Move Transactions.
Note: Do not use the same character value in both the job completion separator, and in a segment of the job name. This creates an error in the resulting lot name.
After you save your work, you can change these values if the jobs have not been completed.
-
The Undo Last Move indicator lets you undo the last move transaction. This indicator must be selected for the functionality to be defaulted on the Move Transaction window. See: Create Lot Move Transactions
-
Honor Kanban Size parameter is used to determine whether to create a lot based job quantity equal to kanban size when components are pushed from an inventory lot during kanban replenishment. If this indicator is not selected, then lot based jobs are created for the maximum number of assemblies which can be built using the selected component lot. If the indicator is selected, then the application will honor the kanban lot size.
-
In the Co Products Supply Default field, the default value is empty, but can be selected. If the indicator is selected, then planning will take into consideration supply for the co-products.
-
In the Default Accounting Class field, enter the accounting class to be used as the default accounting class in the Lot Based Jobs window. If no other rules, like getting the accounting class based on the item or subinventory association, return an accounting class then this default accounting class will be used.
-
The Reuse Job Name parameter gives you the option to use an existing job name while creating new lots. You can choose either Yes or No from the list box. You can update this parameter whenever you want. It works independently and does not have any impact on other parameters.
While defining OSFM parameters for a new organization or setting this parameter for the first time for an organization that already has OSFM parameters, it will be defaulted to Yes and you can opt for your choice and save it. See: Overview of Lot Transactions
When the parameter value is Yes, then the sector extension is appended to the job name, when the job is completed or cancelled. When the parameter value is No, it is not appended.
-
The Create Job Level BOM and Routing Copies field reflects the setting of the site level profile WSM: Create Job Level BOM and Routing Copies, which is applicable to all OSFM enabled organizations. See WSM: Create Job Level BOM and Routing Copies.
-
-
In the Accounts region, enter defaults for estimated scrap and miscellaneous transactions.
-
The Estimated Scrap Accounting field is used to disable scrap and operation yield calculations. The default value is Enabled, and the values are as follows:
Enabled: The application calculates Operation Yield Accounting and Estimated Scrap Absorption when creating transactions for lot based jobs. The Scrap Account field is required when defining a department in the Departments window.
Disabled: Operation Yield Accounting and Estimated Scrap Absorption are not calculated. The Scrap Account is not a required field in the Departments window; you can enter an account number at the time of the scrap transaction.
Note: For an organization, which has Estimated Scrap Accounting enabled, the application defaults the scrap absorption accounts defined in the department for Scrap and Bonus accounts and uses them for Scrap and Bonus transactions in MoveOut page.
For an organization, which has Estimated Scrap Accounting disabled, you should personalize the MoveOut page to enable the accounts region and enter Scrap/Bonus accounts during scrap and bonus transactions.
Caution: This action is only for HTML UI and there is no change for Forms UI.
-
In the Miscellaneous Transactions Account field enter the account to be used when issuing or receiving material.
-
-
In the Transaction region, set the value you want to use when the transactions are complete.
-
If you do not have Oracle Warehouse Management installed, select the Enable Inventory Lot Transactions indicator. This indicates that the Oracle Shop Floor Management Inventory Lot Transactions API is used for importing transactions into Oracle Applications.
-
If Oracle Warehouse Management (WMS) is installed, then Warehouse Management System users are encouraged to use WMS for Inventory Lot Transactions. You can run these transactions through the Warehouse Management System mobile (RF) user interface. You can view Inventory Lot Transactions performed in Warehouse Management in the Lot Genealogy window.
-
The Jump from Queue field is used to specify if material, resources and overhead charges of an operation are to be charged when you jump from queue of the operation. The default value is Charge Operation.
Ignore Operation: Ignores the operation, therefore material resources and overhead charges at the From operation are not charged.
Charge Operation: Materials, resources and overhead is charged at the From Operation.
-
-
In the Move Options region, set to Optional or Always for Move In and Move To Next Op fields.
-
The Move In transaction is used to move a lot from Queue intraoperation to Run intraoperation, where the lot will be picked up and worked on.
-
Move To Next Op transaction enables you to transfer a lot from the To Move intra-operation to the Queue of the next operation.
If your Organization requires tracking Move In and Move To Next Op, then you can choose them from your system.
Always: Move In or Move To Next Op is a required step for every operator.
Optional: If Move In is Optional, you can choose to perform the Move In or directly perform the Move Out transaction. If Move To Next Op is Optional, during Move Out transaction, you can either stay at the current operation or move directly to the next operation.
Never: Move In or Move To Next Op is never performed and is covered by Move Out transaction.
-
-
In the Move Out region, set the default value to either Yes or No.
-
The Move Out field reports completed work and results, while transferring a lot from the Run intraoperation to To Move intraoperation or next operation Queue intraoperation.
-
If Move To Next Op is Yes, then moving to next operation as part of Move Out transaction defaults to Yes, otherwise by default it stays in the current operation (No).
-
-
Save your work.
Defining and Viewing Lot Sector Extensions
A different item number is associated with the lot for each stage on the shop floor. The relationship between the item numbers for these different stages is stored in a multi-level bill of material. A lot sector is a level of the bill that converts Inventory lot components into a lot based job. When the job is completed it becomes an Inventory lot for the next lot sector.
Note: The profile option WSM: Complete Job Sector Lot Extension Level defines the extension appended to the lot sector. See: Profile Options
To define and view the Lot sector extension codes
-
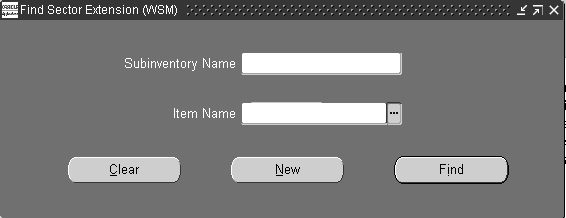
Navigate to the Sector Extensions and Item/Subinventory Association window.
The Find Sector Extension window displays. You can query lot sector extensions by subinventory name, item name, or both.
-
If you are searching for an existing lot sector extension, enter search criteria and choose Find. Choose New to create a new record.
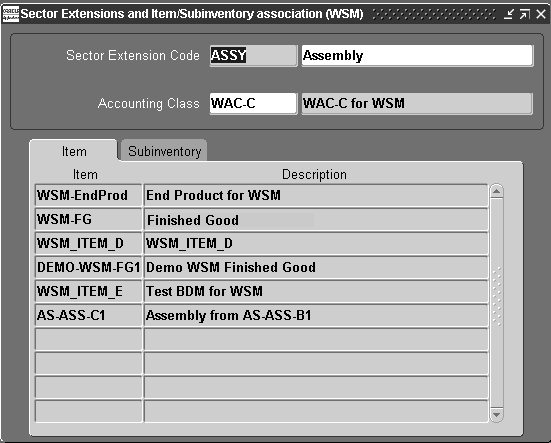
The Sector Extension and Item/Subinventory window displays.
-
Enter a unique value in the Sector Extension Code field, and a description.
-
Select an accounting class from the Accounting Class Code list of values window.
-
In the Item tab, select the item numbers to assign to this lot sector.
-
In the Subinventory tab, select the subinventory location associated with this sector extension. See: Assigning Items to a Subinventory., Oracle Inventory User's Guide
-
Save your work.
Note: Subinventories are valid stocking points when they are associated with sector extension codes. An item or subinventory is associated with only one sector extension.
Defining Standard Operation Details
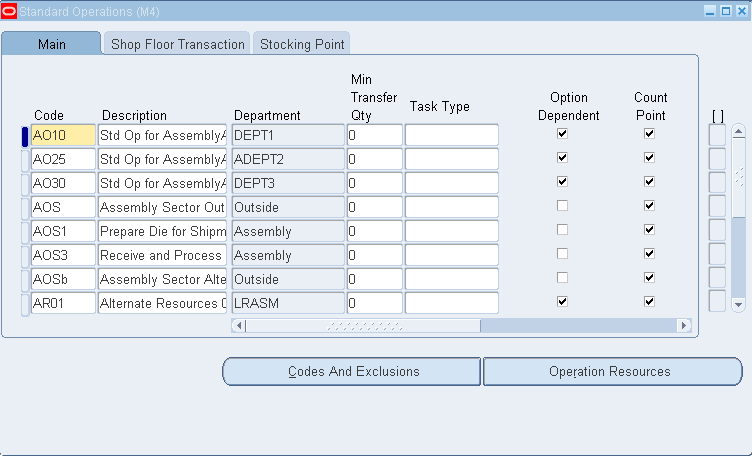
Operation code information for standard operations is defined on the Standard Operation Details window. This window sets the intraoperation steps that are mandatory and subinventory location used as the stocking point.
Note: The fields in the Operation Details form have been moved to BOM Standard Operation form and it has been obsoleted.
-
Navigate to the Standard Operation window.
-
Select an operation code in the Standard Operation field.
-
Select Main tab to enter Description, Department, Minimum Transfer Quantity and Task Type. Check the fields that are mandatory for your operation.
-
Select Shop Floor Transaction tab. Check the steps that you want as mandatory within an operation. See: Intraoperation Steps, Oracle Work in Process User's Guide.
Note: For Shop Floor UI, checked implies mandatory and unchecked implies optional, while for WIP Parameters intraoperation setup, checked implies allowed (optional) and unchecked implies disallowed (never). Also, note that it is a standard operation-level setup in Shop Floor, whereas WIP Parameters setup is at organization level.
-
Select Stocking Point tab Subinventory field, select the default location that completed material from this operation that is to be placed.
If this subinvenory is locator controlled, the Stock Locator field is enabled.
-
Choose Codes and Exclusions to enter Bonus Codes, Scrap Codes and Responsibility Exclusions for this operation.
Note: The Code that appears here is the Meaning of the Code that you have defined in the Lookup windows of Resource/Scrap/Bonus Downcodes.
Minimum Transfer Quantity is not relevant for lot based jobs.
-
Choose Operation Resources to add resources and details on scheduling and costing for the resource.
-
Save your work.
Attaching Files to Job Operations
You can attach explanatory files, such as text, images, spreadsheets and video files to lot-based job operations. If you define the attachment to the operation in the Standard Operations window, then it is linked to the routing when created in the Routing Network window. You can delete and add new files as required.
Note: Similar type of attachments can be done for jobs also.
When a job is created in the Lot Based Job window, the attachment of the first operation is automatically copied from the network routing. Attachments are also copied from the network routing during lot move transactions, splitting lots, and updating routings or assembles. If you are performing an operation jump in a network routing, attachments are copied from the operation as defined in the Standard Operations window.
Note: Until Patchset H, the first and last operation is copied into the job. Going forward, only the first operation is copied into a Lot Based Job.
Related Topics
Attachments, Oracle E-Business Suite User's Guide.
Attaching Files to Jobs, Schedule, and Operations, Oracle Work in Process User's Guide.
Setting Up Shop Floor Management Attributes
Lot attributes are key information elements that you can track with lot numbers. There are many attributes that you can track using Shop Floor Management. Lot attributes are entered as descriptive flexfields, and you can track attributes by item, and define attributes for validation requirements.
See: Set Up Item Attributes, Oracle Warehouse Management User's Guide.
Lot and Serial Attribute Setup, Oracle Warehouse Management Implementation Guide.
Lot Attributes
To define lot attribute context value
-
Navigate to the Descriptive Flexfield Segments window.
-
Select the flashlight icon from the tool bar, and then select the Oracle Inventory Application with the Title, Lot Attributes.
-
Unfreeze the Flexfield Definition by deselecting the Freeze Flexfield Definition indicator.
-
In the Context Field Values region, select a row, then click the New icon. A blank row is added for you to create an attribute group.
-
Enter the attribute group name in the Code field.
-
Optionally, enter a Description for this attribute group.
-
Select Segments to add attributes to the attribute group you just created.
-
Enter a Number to sequence the data.
-
Define the Name of the specific attribute. The Window Prompt defaults to this name.
-
Select a Column value.
-
Select a Value Set, or optionally, choose New to create a new one.
-
If the Displayed indicator is selected, then this attribute appears for you when defining data for an asset within the Asset Group (for example, CARS) associated with the attribute group (for example, NAMEPLATE) that this attribute (for example, Make) resides in.
-
Optionally, select the Enabled indicator to enable the attribute for availability when defining assets.
-
Save your work, and return to the Descriptive Flexfield Segments window.
-
Select the Freeze Flexfield Definition indicator. Failure to do this prevents you from querying the segments from the Attribute window.
-
Save your work.
You can capture attributes of a Work in Process (WIP) lot during job execution. See Capturing Attributes.
-
Choose Submit to run the report.
Profile Options
During your implementation, you set a value for the profile option used in Oracle Shop Floor Management to specify how the application controls access and processes data.
Generally, your system administrator sets up and updates profile option values. The Oracle Applications System Administration User's Guide contains more information on profile options.
The table uses the following values to describe profile option controls for columns User, System Admin User, System Admin Resp, System Admin App, and System Admin Site:
-
Yes: You can update the profile option.
-
View Only: You can view the profile option value in the Profiles window, but you cannot change it.
-
No: You cannot view or change the profile option value.
The table displays the recommended settings for these profile options.
| Profile Option | User | System Admin. User | System Admin. Resp. | System Admin. App. | System Admin. Site | Required | Default Value |
|---|---|---|---|---|---|---|---|
| WSM: Allow Operation Jumps | View Only | Yes | Yes | Yes | Yes | Optional | Yes |
| WSM: Create Job Level BOM and Routing Copies | View Only | View Only | View Only | View Only | View Only | Optional | Yes |
| WSM: Complete Job Sector Lot Extension Level | View Only | View Only | View Only | View Only | Yes | Optional | |
| WSM: Maximum Number of Import Lot Job Workers | View Only | View Only | View Only | View Only | Yes | Optional | 10 |
| WSM: Maximum Number of Rows Processed By a Lot Based Job Worker as a Batch | Yes | Yes | Yes | Yes | Yes | Optional | 1000 |
| TP: WSM: Open Interface Successful transactions archive days | Yes | Yes | Yes | Yes | Yes | Optional | 365 |
WSM: Allow Operation Jumps
Controls whether operation jumps can be performed in the Move Transactions window. User Values are:
-
Yes: Enables you to skip operations or jump to any standard operation defined in the network routing
-
No: You are not allowed to skip operations or jump other operations in the network routing
WSM: Create Job Level BOM and Routing Copies
A site level profile option WSM: Create Job Level BOM and Routing Copies determines the behavior of OSFM.
The value for this profile option is always Yes, which implies Option 2 behavior.
Option 2 behavior is the mode where individual job copies of BOM and routing are created at job level.
WSM: Complete Job Sector Lot Extension Level
Controls whether to use the Item level or Subinventory level sector extension when a job is completed. See: Defining and Viewing Lot Sector Extensions User Values are Item or Subinventory:
-
If a sector lot extension is defined at both Item and Subinventory level, and this profile is set to Subinventory, the job appends the sector lot extension from the subinventory.
-
If the profile is set to Item or is not defined, the job appends the sector lot extension from the item level.
WSM: Maximum Number of Import Lot Job Workers
Controls the maximum number of workers that can be launched in parallel to process the Lot Based Job Import records.
WSM: Maximum Number of Rows Processed by a Lot Based Job Worker as a Batch
Controls the maximum number of rows in the Lot Based Job Import interface that can be processed as a batch by each worker launched to import lot based jobs.
WSM: Open Interface Successful Transactions Archive Days
Controls when the Move processor deletes the successfully processed lot move interface rows. User Value defaults to 365 Days. User Values are entered in Days.
Concurrent Programs
Upgrade To Use Lot Based Copy Routing
Run the concurrent program executable Upgrade To Use Lot Based Copy Routing to upgrade to the new Shop Floor Management behavior (Option 2). You cannot revert to the old behavior (Option 1) once you upgrade.
This request will create copies for all Released, Unreleased, On Hold, Complete and Closed Jobs in all OSFM enabled organizations.
This request generates a list of jobs for which copies are created.
If copies of all the affected jobs are successfully created, then this program exits successfully, or it will rollback all copies created and display a warning message asking you to run the program again.