Environment for Planners and Demand Plan Manager
This chapter covers the following topics:
- Logging In as a Planner or Demand Plan Manager
- Navigation List
- Notifications List
- Document Workspace
- Activity Log
- Getting Help
- Exiting Demand Planning
Logging In as a Planner or Demand Plan Manager
When you log in with the Demand Planner or Demand Plan Manager responsibility, you access the Demand Planning page.
To log into Oracle Demand Planning as a planner or Demand Plan Manager:
-
In your Web browser, enter the URL for Oracle Applications. Your system administrator should provide this information.
Result: The Oracle Applications login window opens.
-
Enter your user name and password and choose Connect.
Result: If you have multiple user responsibilities, a list of responsibilities appears.
-
Select a responsibility: Demand Planner or Demand Plan Manager.
Result: If there is more than one demand plan, a list of plans appears.
-
Select the plan that you want to work with, scroll to the bottom of the page and choose Start Demand Planning.
Result: The Demand Planning page for the plan opens.
Login tips
Following are some guidelines for logging in:
-
Ensure that cookies are enabled for your browser.
-
If the system prompts you to download files to your machine for local storage, accept the files. This will enable the browser to load Web files only once.
-
If you encounter errors, try clearing your browser's cache and restarting the browser.
-
Bookmark your start page for easy access.
-
Maximize your browser window. This ensures that the application will run at full size.
-
Change settings for optimum screen resolution.
-
If you will be using a language other than English, ensure that your browser is set to that language.
-
Sessions have a maximum idle time that is set by an administrator. Your session will terminate automatically if it is idle for this time period.
Interface for Demand Planner and Demand Plan Manager
The Demand Planning page is the interface for demand planners and managers. The page is comprised of two frames: the document workspace in the right frame and the Navigation List and Notifications List in the left frame.
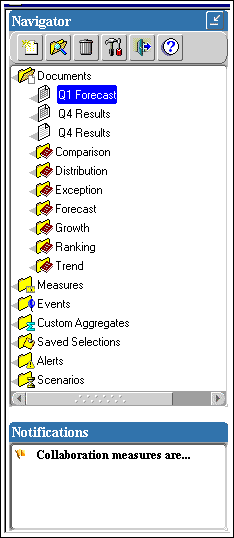
Navigation List
The Navigation list, located in the upper left of the Demand Planning page, enables you to work with Demand Planning objects such as documents, measures, custom aggregates, saved selections, alerts, and scenarios.
Example: Navigation list
A few examples of the objects listed in the Navigation List are:
-
Documents like forecasts and forecast results, forecast comparison lists, exception messages, etc.
-
List of measures saved selections
-
Custom aggregates
-
Saved scenarios
-
Saved events
Navigation tools
The Navigation toolbar appears at the top of the Navigation List. The toolbar buttons enable you to perform the functions listed below.
-
New: Create a new document (ad hoc report, ad hoc graph, worksheet), or other object (measure, custom aggregate, saved selection, document folder, alert).
-
Find: Search for an object by name.
-
Delete: Delete a document (ad hoc report, ad hoc graph, worksheet) or other object (measure, custom aggregate, saved selection, document folder, alert).
-
Tools: Displays a menu which includes the following functions:
-
Activity Log — View activities for your assignment or role.
-
Events Calendar — View information about events that are associated with the demand plan.
-
Refresh Open Documents — Choose this command to refresh open reports or graphs to reflect changes made to data in an open worksheet.
-
Advanced Locking — Selecting this command displays the Advanced Locking dialog box, which has options that enable you to accomplish the following tasks: set standard locks, set cycle persistent locks, reset locks, and reset all locks for an entire measure.
-
Collaboration — The Collaboration command enables demand planning managers and demand planners to share data by sending and receiving stored measures. The Collaboration submenu has the following commands:
Send Measures — Accesses the Send Measures dialog box. For the Demand Planning manager, the Send Measures dialog box is a quick way to get data to the planners without having to run a Distribute to Planners batch job.
For demand planners, this dialog box provides the means of either sharing the planner’s entire write scope of a measure, or further limiting what portion of the measure to share.
Receive Measures — Accesses the Receive Measures dialog box. By using the Receive Measures dialog box, a planning manager can view the planners' data edits before the final submission.
View Collaboration History — Accesses the Collaboration History dialog box, which provides a view of actions that are related to sharing data. You can also sort the information and clear the log. Some of the information displayed includes the action that occurred, measure sent, measure received, measure downloaded from the Demand Planning Server, measure distributed to users, measure uploaded to the Demand Planning Server, measure affected by the action, and the timestamp.
-
Import Data — This command enables you to import data from a flat file into an editable measure. You access the File to Import dialog box. You should see the section on importing data into a measure, since there are format restrictions on the data you import.
-
Submit Measure — When demand planners submit final forecast numbers for each scenario in the demand plan, they use this command to access the Submit Measures dialog where the measures are selected to be submitted to the shared database for a scenario. You only see this command if you are logged in as a demand planner.
-
Select Upload Measure — This is the command that the Demand Plan Manager uses to upload submitted and reviewed measures to the Demand Planning Server. Only the Demand Plan Manager sees this function on the Tools menu.
-
Share — Select this command to access the Share Objects dialog box, which enables planners and plan managers to share documents, documents, folders, saved dimension selections, and custom aggregates.
-
Planning Percentage Worksheet — Open a worksheet that enables you to view and edit dependent demand and planning percentages. (This option only appears if dependent demand has been enabled in the Demand Planning Server, and the fact tables hold parent-child dependency relationships from the Bill of Materials.)
-
-
Arrange Documents: Enables you to manipulate your workspace when you have opened multiple documents. You can use one of these commands from the submenu: Tile Windows, Cascade Windows, Minimize All Windows.
-
Exit:: Exit the application.
-
Help: Display online Help for planners and the Demand Plan Manager.
Navigation List objects
The following list includes the objects that might appear in your Navigation List.
-
accuracy measures
-
ad hoc graphs
-
ad hoc reports
-
alerts
-
custom aggregates
-
events
-
event groups
-
folders
-
formula measures
-
predefined reports
-
saved selections
-
scenarios
-
stored measures
-
worksheets
Notifications List
The Notifications List displays messages that have been generated by Oracle Workflow. You might see two types of notifications:
-
When there is an alert for your attention, a notification concerning the alert is displayed in the Notifications List.
-
If another planner or the Demand Plan Manager has sent data that is within the scope of your assignment, a notification that collaboration measures are ready to be received is displayed in the Notifications List.
Document Workspace
The Document Workspace displays open documents.
Oracle Demand Planning enables you to work with the following types of documents:
-
Worksheets — Display data in tabular format and enable you to modify data for editable measures.
-
Planning Percentages Worksheets — Where it is possible to calculate dependent demand, these worksheets display planning percentages for products, models, and options and enable you to modify the data.
-
Ad hoc reports — Display data in tabular format.
-
Ad hoc graphs — Display data in graphical format.
-
Predefined reports — Pre-seeded documents, set up by the Demand Plan Administrator, that run predefined analyses including evaluations of forecast accuracy.
Document Toolbars
When you create a new document or open an ad hoc report, graph, worksheet or predefined report, a set of buttons is displayed on a toolbar at the top of the document. These tools enable you to perform functions that are specific to the document type.
Using Multiple Documents
Oracle Demand Planning has a multi-document interface that enables you to open as many as 10 documents simultaneously.
For information on how to open and use multiple documents, see the section on the document workspace in the chapter on using worksheets.
The list below represents an arrangement that opens at least one document of each type, with the exception shown at the end of the list.
-
One worksheet
-
One planning percentages worksheet
-
One graph
-
Up to seven ad hoc reports
-
One predefined report (under the conditions described below)
You cannot have a predefined report and a worksheet of either kind open concurrently.
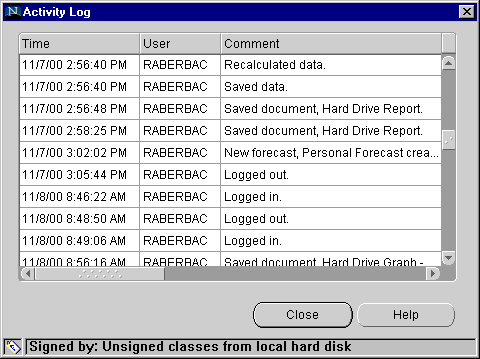
Activity Log
The Activity log enables you to view a list of your activities for your assignment or role. The Activity log documents the following actions:
-
Logging in and out
-
Recalculating data
-
Saving documents
-
Submitting measures
-
Creating comments
-
Creating measures
Note: Remember that the Activity log display the measure submission process, but not the measure uploading, which is a batch process.
Viewing the Activity log
You can view the Activity log at any time.
To view the Activity log:
-
Access the Demand Planning page as a planner or Demand Plan Manager.
-
On the Navigation list toolbar, choose the Tools button.

-
From the submenu, choose Activity Log.
Result: The Activity log opens.
Example: Activity log
The planning engine sorts the activity log by time. The activity log window would list your assignment or role activities in a descending order of date and time.
Getting Help
To view information that is page-specific, choose the Help button.
You can also access online help for Oracle Demand Planning from the Demand Planning page and view version and system information.
To access online Help from the Demand Planning page:
-
Choose the Help button, located on the Navigation toolbar.

-
Result: A menu appears.
-
Choose Demand Planning Help.
-
To print Help, use your browser's print function.
-
To exit Help, close the Help window.
To access version and system information from the Demand Planning page:
-
Click the Help button, located on the Navigation toolbar.
-
Result: A menu appears.
-
Choose About Demand Planning.
Result: The application name, release, and build number are displayed.
-
Choose System Information.
Result: The application name, release, and build number are displayed.
-
To save system information to a text file, choose Save As and specify the file name and path.
-
To exit, choose OK.
Exiting Demand Planning
When your work is complete, you can exit Oracle Demand Planning. Exiting terminates the application. If you have modified a document or other object, you will be prompted to save it.
To exit Oracle Demand Planning:
Choose the Close button on the Navigation toolbar.
![]()
Alternatively, you can use the browser's close button (X), located in the upper right corner of the screen. This exits the application and closes the browser.