Selecting Data
This chapter covers the following topics:
- About Selecting Data
- Selecting Values From a List
- Selecting Values by Level
- Selecting Values by Family Relationship
- Selecting Values by Attribute
- Selecting Values that Match a Character String
- Selecting Values that Meet a Value Condition
- Selecting Values that Meet a Measure Condition
- Selecting Top and Bottom Values
- Selecting Time Values by Range
- Sorting Selected Values
- Saving Value Selections
About Selecting Data
When you work as a Demand Planner or Demand Plan Manager, you select data for documents, custom aggregates, and saved selections. You can choose values from a list, use tools to establish selection criteria, or combine list and tool operations.
Data selection tools
Choose the Select Data tool on a Document toolbar or when you are working with a saved selection or custom aggregate definition.
![]()
When you open the Select Data dialog box opens, the Selector toolbar appears. The toolbar buttons enable you to perform the listed below.
-
Apply Saved Selection - Apply a previous saved selection of values to an open ad hoc report, ad hoc graph, or worksheet.
-
Save Current Selection - Save selected values as a custom saved selection.
-
Choose Values by Level - Select values at a specified level in a hierarchy.
-
Choose Values by Family - Select values that have a specified family relationship.
-
Choose Values by Attribute - Select values that share specific attributes.
-
Choose Matching Values - Select values that match one or more character strings.
-
Choose Values Meeting Values Condition - Select values based on the way in which values in one measure compare to the values in another measure.
-
Choose Top/Bottom Values - Select the largest and smallest values.
-
Choose Values by Range - Select values that match or fall within specified dates
-
Sort - Sort selected values.
-
Undo - Undo previous step
-
Redo - Restore previous step.
Selector Undo and Redo Buttons
When you work as a Demand Planner or Demand Plan Manager, you select data for documents, custom aggregates, and saved selections. You can choose values from a list, use tools to establish selection criteria, or combine list and tool operations.
Using Undo and Redo
In addition to the buttons for the Selector tools, the toolbar in the Select Data dialog box includes buttons for Undo and Redo.
These command buttons are especially useful when you are building a complex list of dimension values to use in a report, graph, or worksheet.
The symbols on the buttons are a back facing arrow for Undo, and a front facing arrow for Redo.
In the Selector toolbar, the Undo button is enabled after a selection is made. When you choose Undo you restore the selection to the values that were chosen in the previous step.
If you are involved in a process involving multiple steps, you can continue clicking Undo to restore the selection to the values from earlier steps. Each click of the button, in essence, moves you backwards one step in the procedure.
Checking Redo restores the selection to the values that were available before Undo was clicked.
Selecting Values From a List
You can choose a dimension and select one or more values from a list of values for that dimension.
To select values from a list:
-
Do one of the following:
-
If you are working in an open document, choose the Select Data button on the Document toolbar and choose a dimension from the popup menu.
-
If you are working within a custom aggregate or a saved selection definition, choose a dimension in the Dimension box and choose the Selector button.
Result: The Select Data dialog box opens. The dimension that you chose appears in the Select values for box.
-
-
If the current dimension includes one or more hierarchies, in the Organize by box, you can select the hierarchy that you want to work with.
Result: The values in the Available box might change depending on which hierarchy you choose.
-
Move values between the Available and Selected boxes until the Selected box contains the dimension values that you want.
For information about searching for values, expanding the value list, and adding values to and removing values from the Selected box, see "Techniques for selecting values from a list".
-
You can order values in the Selected box according to how you want your selections to appear.
For more information, see "Sorting Selected Values".
-
Choose OK to apply your selections.
Result: If you are selecting values for a document, the values that you chose are displayed in the document. If you are selecting values for a custom aggregate, the values appear in the Members list. If you are selecting values for a saved selection, the values appear in the Selections list.
Techniques for selecting values from a list
Searching for values in the Available box
You can use the Find button to search for a value by name. The Find button is located under the Available box. It resembles a pair of binoculars.
![]()
If you selected a hierarchy in the Organize by box, the system will search only within that hierarchy. If you did not select a hierarchy, the system will search the values in all hierarchies.
Expanding and collapsing values in the Available box
You can view data at various levels by expanding and collapsing aggregate dimension values. For example, if the list displays a geography that includes lower level values, you can expand the list to show component geographies. You can subsequently collapse the list to reaggregate the display.
An aggregate value is preceded by a plus sign (+), indicating that it can be expanded.
An expanded value is preceded by a minus sign (-), indicating that it can be collapsed. Choose the plus sign to expand a value. Choose the minus sign to collapse a value. You can also use the Expand All and Collapse All buttons to expand or collapse all values. These buttons are located under the Available box, next to the Find Value button. The Expand All and Collapse All buttons resemble large plus and minus symbols.
Adding values to the Selected box
You can add one or more values in the Available box to the Selected box as follows:
-
To add a single value, double-click the value
or
Highlight the value and choose the single arrow button that points to the Selected box.

-
To add multiple nonsequential values, press and hold the CTRL key, choose each value that you want to add, and then choose the single arrow button that points to the Selected box.
To add multiple sequential values, select the first value that you want to add, press and hold the SHIFT key, select the last value that you want to add, and then choose the single arrow button that points to the Selected box. You can also select the values to add by clicking and dragging the mouse.
-
To add all values, choose the double arrow button that points to the Selected box.

Removing values from the Selected box
You can remove values from the Selected box as follows:
-
To remove a single value, double-click the value
or
Highlight the value and choose the single arrow button that points to the Available box.
-
To remove multiple nonsequential values, press and hold the CTRL key, choose each value that you want to remove, and then choose the single arrow button that points to the Available box.
To remove multiple sequential values, select the first value that you want to remove, press and hold the SHIFT key, select the last value that you want to remove, and then choose the single arrow button that points to the Available box. You can also select the values to remove by clicking and dragging the mouse.
-
To remove all values, choose the double arrow button that points to the Available box.

-
You can also choose the values that you want to remove, click the right mouse button, and choose Remove from the popup menu.
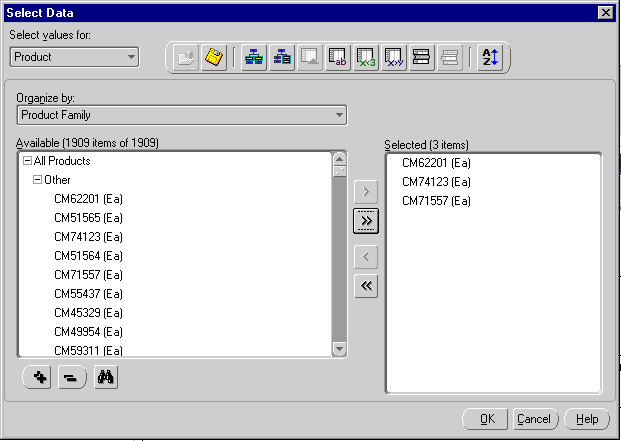
Example: Selecting values from a list
The Select Data dialog box displays the selections made for the product dimensions. For example, if the user selects four values in the Product dimension, then the choices would appear in the Selected box.
Selecting Values by Level
When you are working with a hierarchical dimension, you can limit selections to values at a particular level of the hierarchy. For example, in a Geography dimension you might select values at the Customer level.
To select values by level:
-
Do one of the following:
-
If you are working in an open document, choose the Select Data button on the Document toolbar and choose a dimension from the popup menu.
-
If you are working within a custom aggregate or a saved selection definition, choose a dimension in the Dimension box and choose the Selector button.
Result: The Select Data dialog box opens. The dimension that you chose appears in the Select values for box.
-
-
In the Organize by box, select the hierarchy that you want to work with.
Result: The values in the Available box might change depending on which hierarchy you choose.
-
Choose the Choose Values By Level button on the toolbar.

-
Result: The Choose Values By Level dialog box opens for the dimension with which you have chosen to work.
-
In the Action box, specify how you want the new values to affect the values in the Selected box of the Select Data dialog box:
-
To replace any values that are already in the Selected box with just the values that you specify in this dialog box, choose Select.
-
To add the new values that you specify in this dialog box to any values that are already in the Selected box, choose Add.
-
To retain only the values already in the Selected box that match the values that you specify in this dialog box, choose Keep.
-
To remove the values that you specify in this dialog box from the values that are already in the Selected box, choose Remove.
-
-
In the Level box, select one or more levels.
-
You can choose Preview to preview the values that will be selected as a result of your choices.
-
You can order the values in the Selected box according to how you want your selections to appear.
For more information, see "Sorting Selected Values".
-
Choose OK to apply your selections.
Result: The Select Data dialog box reopens. The values that you chose are displayed in the Selected box.
The Choose Values By Levell dialog box displays the values you selected by level. For example, if you select geography values at the Region and District levels, the selected values would be displayed in the above mentioned dialog box.
Selecting Values by Family Relationship
When you are working with a hierarchical dimension, you can select values according to their familial relationship with other values in the hierarchy. For example, in a Geography dimension you might select descendants of Massachusetts and New York.
To select values by family:
-
Do one of the following:
-
If you are working in an open document, choose the Select Data button on the Document toolbar and select a dimension from the popup menu.
-
If you are working within a custom aggregate or a saved selection definition, choose a dimension in the Dimension box and choose the Selector button.
Result: The Select Data dialog box opens. The dimension that you chose appears in the Select values for box.
-
-
In the Organize by box, select the hierarchy with which you want to work,
Result: The values in the Available box might change depending on which hierarchy you choose.
-
Choose the Choose Values By Family button on the toolbar.

-
Result: The Choose Values by Family dialog box opens for the dimension that you have chosen.
-
In the Action box, specify how you want the new values to affect the values in the Selected box of the Select Data dialog box, as follows:
-
To replace any values that are already in the Selected box with just the values that you specify in this dialog box, choose Select.
-
To add the new values that you specify in this dialog box to any values that are already in the Selected box, choose Add.
-
To retain only the values already in the Selected box that match the values that you specify in this dialog box, choose Keep.
-
To remove the values that you specify in this dialog box from the values that are already in the Selected box, choose Remove.
-
-
In the family of box, select the value whose family members you want to choose.
You can accept the default value or choose the Ellipsis button to access a dialog box where you can select one or more alternate values.
-
In the operator box, select the term that determines how the value or values that you select in the next step will relate to the values that you chose in the previous step. You can choose at the level (the default), or you can select using the relationship.
-
In the relationship type box, select one or more relationships that will determine how the selected values are related to the value you chose in the previous step.
-
You can choose Preview to preview the values that will be selected as a result of your choices.
-
You can order the values in the Selected box according to how you want your selections to appear.
For more information, see "Sorting Selected Values".
-
Choose OK to apply your selections.
Result: The Select Data dialog box reopens. The values that you chose are displayed in the Selected box.
For example, if the user selects Self and Immediate Children as the relationship for selecting product values, they would be displayed in the Choose Values by Family Values dialog box.
Selecting Values by Attribute
You can select dimension values that share related characteristics. For example, in a Product dimension you might select item level attributes such as color. Or, you might select items which have been identified with an attribute that marks them as a key value driver.
Note: In order to select data by attribute, the attributes must have been defined for the dimension in the Demand Planning Server. If the Attribute tool is unavailable when you are selecting data for a dimension, then you can assume that there are no attributes for that dimension.
To select values by attribute:
-
Do one of the following:
-
If you are working in an open document, choose the Select Data button on the Document toolbar and choose a dimension from the popup menu.
-
If you are working within a custom aggregate or saved selection definition, choose a dimension in the Dimension box and choose the Selector button.
Result: The Select Data dialog box opens. The dimension that you chose appears in the Select values for box.
-
-
If the current dimension includes one or more hierarchies, in the Organize by box you can select the hierarchy that you want to work with.
Result: The values in the Available box might change depending on which hierarchy you choose.
-
Choose the Choose Values By Attribute button on the toolbar.

-
Result: The Choose Values by Attribute Values dialog box opens.
-
In the Action box, specify how you want the new values that you are selecting to affect the values in the Selected box of the Select Data dialog box, as follows:
-
To replace any values that are already in the Selected box with just the values that you specify in this dialog box, choose Select.
-
To add the new values that you specify in this dialog box to any values that are already in the Selected box, choose Add.
-
To retain only the values already in the Selected box that match the values that you specify in this dialog box, choose Keep.
-
To remove the values that you specify in this dialog box from the values that are already in the Selected box, choose Remove.
-
-
If you selected a hierarchy in the Organize by box, the Level box contains levels for that hierarchy. Select one or more levels at which you want to choose values. Use CTRL + click or SHIFT + click to select multiple levels.
-
In the where box, select an attribute.
-
In the is box, select one or more values for the attribute. Use CTRL + click or SHIFT + click to select multiple values.
-
You can choose Preview to preview the values that will be selected as a result of your choices.
-
Choose OK.
Result: The Select Data dialog box reopens. The values that you chose are displayed in the Selected box.
-
You can order values in the Selected box according to how you want your selections to appear.
For more information, "Sorting Selected Values".
Using Attributes to Select Values in a Scope
Oracle Demand Planning supports a planning process that is collaborative, meaning that many demand planners can view common slices of demand data.
Only one demand planner, however, has edit responsibility for each slice of data. Planners have an Assignment scope and a View scope. View scope items are not editable, although there are situations when View scope items can be automatically included in a slice when Assignment scope items are dependent on them.
When a full distribution process to planners is complete, attributes are created or are updated as necessary if they already exist. An attribute named Scope is created for each dimension in the plan. Each dimension value in each dimension will have a value for the attribute, the possible values being Assignment and View.
These attributes can be used in the Selector (Select Data dialog box) to select only dimension values that are in your Assignment (edit) scope.
Procedure: to Select Values in Your Assignment Scope
-
With a worksheet open, click the Selector button on the Document toolbar to access the Select Data dialog box.
-
Choose a dimension with which to work, such as Product.
-
Click the Choose Values by Attribute button to access the Choose Values by Attribute dialog box.
-
Select an action in the Action box. To see the values in your Assignment scope, for example, you could use Select.
-
In the Levels box, select a level in the dimension hierarchy. If you wanted to see the types of product values in your scope, for example, you could select Product Category.
-
In the Relation box, select Scope.
-
In the Attributes box, select Assignment.
-
If you choose the Preview button, you will be able to display all the product categories that are in your Assignment scope.
-
If you choose OK, you will return to the Select Data dialog box, where the product categories will be listed in the Selected box.
Selecting Values that Match a Character String
You can select dimension values that contain, begin with, end with, or exactly match one or more character strings. For example, in a Product dimension you might select products that contain the characters “mini” and “maxi.”
To select values that match a character string:
-
Do one of the following:
-
If you are working in an open document, choose the Select Data button on the Document toolbar and choose a dimension from the popup menu.
-
If you are working within a custom aggregate or a saved selection definition, choose a dimension in the Dimension box and choose the Selector button.
Result: The Select Data dialog box opens. The dimension that you chose appears in the Select values for box.
-
-
If the current dimension includes one or more hierarchies, in the Organize by box you can select the hierarchy that you want to work with.
Result: The values in the Available box might change depending on which hierarchy you choose.
-
Choose the Choose Matching Values button on the toolbar.

-
Result: The Choose Matching Values dialog box opens for the dimension that you have chosen.
-
In the Action box, specify how you want the new values that you are selecting to affect the values in the Selected box of the Select Data dialog box, as follows:
-
To replace any values that are already in the Selected box with just the values that you specify in this dialog box, choose Select.
-
To add the new values that you specify in this dialog box to any values that are already in the Selected box, choose Add.
-
To retain only the values already in the Selected box that match the values that you specify in this dialog box, choose Keep.
-
To remove the values that you specify in this dialog box from the values that are already in the Selected box, choose Remove.
-
-
If you selected a hierarchy in the Organize by box, the Level box contains levels for that hierarchy. Select one or more levels at which you want to choose values.
-
In the that box, select the term that specifies how the values must match the characters that you will enter. You can choose terms such as contain, start with, end with, or are identical.
-
In the lines box, select the option that specifies how you want Oracle Demand Planning to search for matching values:
-
any of the lines — Retrieves dimension values that match any of the entries in the values to match box. This is equivalent to the boolean OR operator.
-
all of the lines — Retrieves dimension values that match all of the entries in the values to match box. This is equivalent to the boolean AND operator. This option is available only when the option in the lines box is contains.
-
-
In the values to match box, enter one or more alphanumeric strings that you want to match. Use separate lines to enter multiple values.
-
You can limit the match to values with a specific type of dimension label.
For all dimensions, you can select Long Name or Dim Value. For a custom measure, you can also select Short Name.
-
If the values must also match the case in the characters box, select Match case.
-
You can choose Preview to preview the values that will be selected as a result of your choices.
-
You can order the values in the Selected box according to how you want your selections to appear.
For more information, see "Sorting Selected Values".
-
Choose OK to apply your selections.
Result: The Select Data dialog box reopens. The values that match your specifications are displayed in the Selected box.
Selecting Values that Meet a Value Condition
You can select dimension values that relate to a numeric value in a specific way. For example, in a Geography dimension you might select geographies where Booking History, Quantity for a selected product and time period exceeds a specified amount.
To select values that meet a value condition:
-
Do one of the following:
-
If you are working in an open document, choose the Select Data button on the Document toolbar and choose a dimension from the popup menu.
-
If you are working within a custom aggregate or a saved selection definition, choose a dimension in the Dimension box and choose the Selector button.
Result: The Select Data dialog box opens. The dimension that you chose appears in the Select values for box.
-
-
If the current dimension includes one or more hierarchies, in the Organize by box, you can select the hierarchy that you want to work with.
Result: The values in the Available box might change depending on which hierarchy you choose.
-
Choose the Choose Values Meeting Value Condition button on the toolbar.
-
Result: The Choose Choose Values Meeting Value Condition dialog box opens for the dimension that you chose in Step 1.
-
In the Action box, specify how you want the new values that you are selecting to affect the values in the Selected box of the Select Data dialog box, as follows:
-
To replace any values that are already in the Selected box with just the values that you specify in this dialog box, choose Select.
-
To add the new values that you specify in this dialog box to any values that are already in the Selected box, choose Add.
-
To retain only the values already in the Selected box that match the values that you specify in this dialog box, choose Keep.
-
To remove the values that you specify in this dialog box from the values that are already in the Selected box, choose Remove.
-
-
If you selected a hierarchy in the Organize by box, the list box contains levels for that hierarchy. Select one or more levels at which you want to choose values.
-
In the measure box, select the measure on which to base the condition.
You can accept the default measure that appears in the box, or choose the Ellipsis button to access a dialog box where you can select an alternate measure.
-
In the operator box, choose the operator that specifies how the data values for the measure that you selected in Step 6 must relate to a value.
-
In the value box, enter a numerical value to which the values in the measure will be compared. If you chose the between or outside operator, you must specify two values.
-
The Dimensions box displays default qualifying dimension values for the comparison.
You can accept the default values that appear in the box, or you can select an alternate qualifying value for a dimension. To select an alternate value, highlight the dimension whose value you want to change and choose the Dimension Values button.
-
You can specify additional conditions for the comparison as follows:
-
To exclude missing values from the values that you are selecting, choose Exclude missing values.
-
To exclude zero values from the values that you are selecting for a numeric measure, choose Exclude zero values.
-
-
To exclude zero values from the values that you are selecting, choose Exclude zero values.
-
You can choose Preview to preview the values that will be selected as a result of your choices.
-
You can order the values in the Selected box according to how you want your selections to appear.
For more information, see "Sorting Selected Values".
-
Choose OK to apply your selections.
Result: The Select Data dialog box reopens. The values that you chose are displayed in the Selected box.
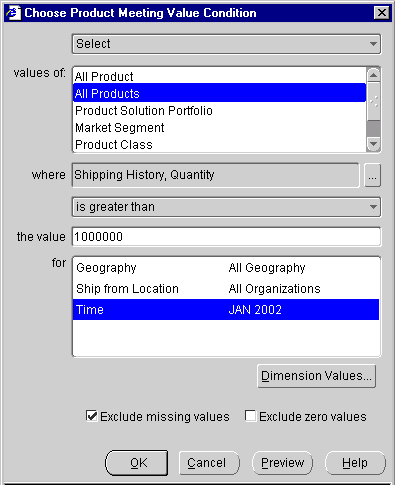
Example: Selecting values that meet a value condition
The Choose Values Meeting Value Condition dialog box helps you to select values based on criteria. For example, you can select all products where Shipping History, Quantity is greater than 1,000,000 for all geographies in January, 2002 for all organizations and ship from locations.
Selecting Values that Meet a Measure Condition
You can select values based on the way in which the values in one measure compare to the values in another measure. For example, in a Geography dimension you might select geographies where Sales Forecast, Quantity is 10% greater than Booking History, Quantity for a specified product and time period.
To select values that meet a measure condition:
-
Do one of the following:
-
If you are working in an open document, choose the Select Data button on the Document toolbar and choose a dimension from the popup menu.
-
If you are working within a custom aggregate or a saved selection definition, choose a dimension in the Dimension box and choose the Selector button.
Result: The Select Data dialog box opens. The dimension that you chose appears in the Select values for box.
-
-
If the dimension includes one or more hierarchies, you can select a hierarchy in the Organize by box.
Result: The values in the Available box might change depending on which hierarchy you choose.
-
Choose the Choose Values Meeting Measure Condition button on the toolbar.

-
Result: The Choose Values Meeting Measure Condition dialog box opens for the dimension that you selected in Step 1.
-
In the Action box, specify how you want the new values that you are selecting to affect the values in the Selected box of the Select Data dialog box, as follows:
-
To replace any values that are already in the Selected box with just the values that you specify in this dialog box, choose Select.
-
To add the new values that you specify in this dialog box to any values that are already in the Selected box, choose Add.
-
To retain only the values already in the Selected box that match the values that you specify in this dialog box, choose Keep.
-
To remove the values that you specify in this dialog box from the values that are already in the Selected box, choose Remove.
-
-
If you selected a hierarchy in the Organize by box, the Level box contains levels for that hierarchy. Select one or more levels at which you want to choose values.
-
In the first measure box, select the measure on which to base the condition.
You can accept the default measure that appears in the box, or choose the Ellipsis button to access a dialog box where you can select an alternate measure.
-
In the where box, choose an operator that specifies how the data values in the measure that you selected in Step 6 must relate to a comparison measure.
You can choose is equal to, is not equal to, is greater than, is greater than or equal to, is less than, is less than or equal to, is between, or is not between.
-
In the Comparison box, select the measure whose values will be compared to those of the measure in the measure box.
You can accept the default measure that appears in the box, or choose the Ellipsis button to access a dialog box where you can select an alternate measure.
-
To include an additive or subtractive value in the comparison, proceed as follows:
-
If you choose less than or greater than in Step 7, select plus or minus. If you chose within or not within in Step 7, plus or minus is the only selection.
-
In the value box, enter the value to be added or subtracted when the measure values are compared.
-
If the value is a percentage, choose percent.
-
-
The Dimensions box displays default qualifying dimension values for the comparison.
You can accept the default values that appear in the box, or you can select an alternate qualifying value for a dimension. To select an alternate value, highlight the dimension whose value you want to change and choose the Dimension Values button.
-
You can specify additional conditions for the comparison as follows:
-
To exclude missing values from the values that you are selecting, choose Exclude missing values.
-
To exclude zero values from the values that you are selecting, choose Exclude zero values.
-
-
You can choose Preview to preview the values that will be selected as a result of your choices.
-
You can order the values in the Selected box according to how you want your selections to appear.
For more information, see "Sorting Selected Values".
-
Choose OK to apply your selections.
Result: The Select Data dialog box reopens. The values that you chose are displayed in the Selected box.
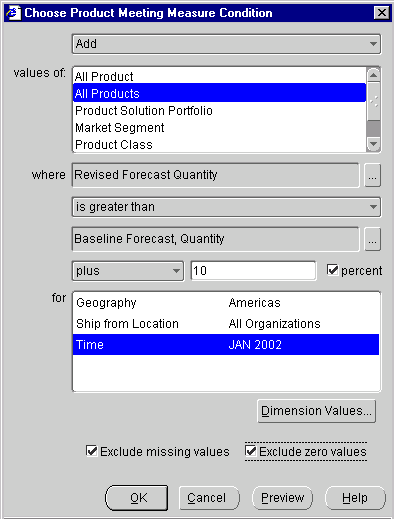
Example: Selecting values that meet a measure condition
The Choose Values Meeting Measure Condition dialog box allows you to select values based on measure conditions. For example, you can select products where Revised Forecast, Quantity is greater than Baseline Forecast, Quantity plus 10% in January 2002 for the Americas in all organizations.
Selecting Top and Bottom Values
You can specify a number or percentage of values that you want to select from the top, bottom, or top and bottom values for a measure. For example, in a Product dimension you might select the top ten products based on Booking History, Quantity for a specified geography and time period.
To select values top and bottom values:
-
Do one of the following:
-
If you are working in an open document, choose the Select Data button on the Document toolbar and choose a dimension from the popup menu.
-
If you are working within a custom aggregate or a saved selection definition, choose a dimension in the Dimension box and choose the Selector button.
Result: The Select Data dialog box opens. The dimension that you chose appears in the Select values for box.
-
-
If the dimension includes one or more hierarchies, in the Organize by box you can select the hierarchy that you want to work with.
Result: The values in the Available box might change depending on which hierarchy you choose.
-
Choose the Choose Top/Bottom Values button on the toolbar.

-
Result: The Select Top/Bottom Values dialog box opens for the dimension that you chose in Step 1.
-
In the Action box, specify how you want the new values that you are selecting to affect the values in the Selected box of the Select Data dialog box, as follows:
-
To replace any values that are already in the Selected box with just the values that you specify in this dialog box, choose Select.
-
To add the new values that you specify in this dialog box to any values that are already in the Selected box, choose Add.
-
To retain only the values already in the Selected box that match the values that you specify in this dialog box, choose Keep.
-
To remove the values that you specify in this dialog box from the values that are already in the Selected box, choose Remove.
-
-
If you selected a hierarchy in the Organize by box, the Level box contains a list of levels for that hierarchy. Select one or more levels at which you want to choose values.
-
In the measure box, specify the measure for which you want to select values.
You can accept the default measure that appears in the box, or choose the Ellipsis button to access a dialog box where you can select an alternate measure.
-
To include top values in your selection, in the top box, enter the number or percentage of top values to select. To indicate that the value that you entered is a percentage, choose percent.
-
To include bottom values in your selection, in the bottom box specify the number or percentage of bottom values to select. To indicate that the value that you entered is a percentage, choose percent.
-
The Dimensions box displays default qualifying dimension values for the top/bottom selections.
You can accept the default values that appear in the box, or you can select an alternate qualifying value for a dimension. To select an alternate value, highlight the dimension whose value you want to change and choose the Dimension Values button.
-
To exclude missing values from the values that you are selecting, choose Exclude missing values. To exclude zero values, choose Exclude zero values.
-
You can choose Preview to preview the values that will be selected as a result of your choices.
-
You can order the values in the Selected box according to how you want your selections to appear.
For more information, see "Sorting Selected Values".
-
Choose OK to apply your selections.
Result: The Select Data dialog box reopens. The values that you chose are displayed in the Selected box.
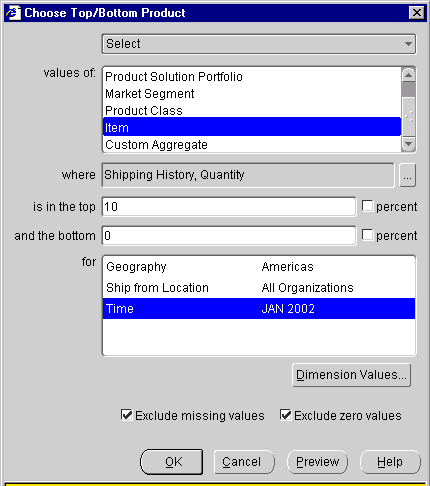
Example: Selecting top and bottom values
The Choose Top/Bottom Values dialog box allows you to select top and bottom values based on specific criteria. For example, you can select the top 10% of product items, based on Shipping History, Quantity for the Americas in January for all organizations.
Selecting Time Values by Range
When selecting values for the time dimension, you can specify a time range within which to limit value selections. For example, you might choose time values from January 2002 through June 2002 at the month level.
To select time values by range:
-
Do one of the following:
-
If you are working in an open document, choose the Select Data button on the Document toolbar and choose a dimension from the popup menu.
-
If you are working within a custom aggregate or a saved selection definition, choose a dimension in the Dimension box and choose the Selector button.
Result: The Select Data dialog box opens. Time appears in the Select values for box.
-
-
If the Time dimension includes one or more hierarchies, in the Organize by box you can select the hierarchy that you want to work with.
Result: The values in the Available box might change depending on which hierarchy you choose.
-
Choose the Choose Values by Range button on the toolbar.

-
Result: The Choose Time By Range dialog box opens.
-
In the Action box, specify how you want the new values that you are selecting to affect the values in the Selected box of the Select Data dialog box, as follows:
-
To replace any values that are already in the Selected box with just the values that you specify in this dialog box, choose Select.
-
To add the new values that you specify in this dialog box to any values that are already in the Selected box, choose Add.
-
To retain only the values already in the Selected box that match the values that you specify in this dialog box, choose Keep.
-
To remove the values that you specify in this dialog box from the values that are already in the Selected box, choose Remove.
-
-
In the Interval box, choose one of the following:
-
a range of — Selects all time values between and including a starting value and an ending value at a level that you choose.
-
the latest — Selects a number of latest time values at a level that you choose.
-
the next — Selects a number of future time values at a level that you choose.
-
-
If you selected a range of in Step 5, proceed as follows:
-
In the Level box, choose the level at which to select time values.
-
In the from box, specify the beginning of the time range.
You can accept the default value or choose the Ellipsis button to access a dialog box, where you can select an alternate value.
-
In the to box, specify the end of the time range. Alternatively, you can choose to latest value to extend the range to the latest time period at the level you specified in the Level box.
You can accept the default value or choose the Ellipsis button to access a dialog box, where you can select an alternate value.
-
-
If you selected the latest in Step 5, proceed as follows:
-
In the value box, enter the number of time periods for which you want to select the latest values.
-
In the Level box, choose the level at which to select time values.
-
-
If you selected the next in Step 5, proceed as follows:
-
In the value box, enter the number of periods for which you want to select the future time values.
-
In the Level box, choose the level at which to select time values.
-
-
You can choose Preview to preview the values that will be selected as a result of your choices.
-
You can order the values in the Selected box according to how you want your selections to appear.
For more information, see "Sorting Selected Values".
-
Choose OK to apply your selections.
Result: The Select Data dialog box reopens. The values that you chose are displayed in the Selected box.
Example: Selecting time values by range
The Choose Time By Range dialog box allows you to select time values by a specific range. For example, you can select a range of time values at the quarter level.
Sorting Selected Values
Once you have selected values, you can arrange them in the Selected box in the order in which you want them to appear. You can use the following techniques to sort values:
-
Use the Sort tool on the Data Selection toolbar to specify sorting criteria.
-
Drag and drop values to specific positions.
-
Click the right mouse button and select an option for changing the relative position of a value or values.
To use the Sort tool to sort values:
-
Choose the Sort button on the Data Selection toolbar.

-
Select a sort option. Depending on the dimension and whether you selected a hierarchy when you chose the values, the following options are available:
-
name — Sorts values in alphabetical by name. You can choose A to Z or Z to A.
-
data value — Sorts values numerically based on a specified measure and qualifying dimension values for that measure. You can choose high to low or low to high.
-
hierarchy — Sorts values based on their position in a hierarchy. Values are grouped by family. You can choose top to bottom or bottom to top.
-
level — Sorts values based on level. All values at a given level are displayed. You can choose top to bottom or bottom to top.
-
time — For the time dimension, sorts values by time period. You can choose earliest to latest or latest to earliest.
-
-
You can choose Preview to preview the results of the sort.
-
Choose OK to apply your selections.
Result: The Select Data dialog box reopens. The selected values are sorted according to your specifications.
To use drag and drop to order values:
-
Choose one or more values and drag them to a new position.
As you move the selection, a black bar appears to help you identify the current position.
-
When the black bar is under the desired location, release the selection.
To use a right mouse button function to order values:
-
In the Selected box, click the right mouse button on the value whose position you want to change.
Result: A popup menu appears, listing options for changing the value's position. The options vary depending on the current position of the value.
-
Choose the option that specifies how you want to position the value:
-
To place the selected value first in the list, choose Move to top.
-
To place the selected value last in the list, choose Move to bottom.
-
To place the selected value below another value in the list, choose Move below, choose the target value, and then choose OK.
You can also choose Remove to remove the selected value from the selected list.
-
Saving Value Selections
A saved selection is a set of dimension values that you save to use again in other documents. Saved selections are useful when you want to quickly retrieve a group of values without repeating the steps that you followed to select them. Selections that are saved as steps) also provide the ability to dynamically update your analyses.
Once you define a saved selection, you can replace the dimension values in an open ad hoc report, ad hoc graph, worksheet, or predefined report with the saved selection.
The following procedure describes how to create a saved selection when you the process of selecting values for a dimension.
To save selected values as a saved selection:
-
Choose the values that will comprise the saved selection.
You can select individual values. You can also use the buttons on the Data Selection toolbar to select values by specific criteria.
-
When your selections are complete, choose the Save Current Selection button on the toolbar.

-
Result: The Save a Selection for Dimension dialog box opens.
-
In the Save a Selection for Save a Selection for Dimension dialog box, enter information for the saved selection as follows:
-
In the Save current selection as box, enter a name for the saved selection, up to 70 characters long.
-
In the Description box, you can enter optional text to describe the components of the saved selection.
-
Specify how to save the selection:
-
Save steps — Saves the script that drives the selection criteria, rather than the actual values. Select this option when you anticipate applying the same criteria repeatedly over a long period of time, but expect that the values that comprise the selection might change.
-
Save members — Saves the actual dimension values. A member selection is always comprised of the same values, regardless of when the selection is applied. Select this option when you want to examine data for the same dimension values on an ongoing basis.
For more information about these options, see "Defining Saved Selections".
Note: If you used the drag and drop method or a right mouse button function to sort values for the selection, you will not be able to save steps.
-
-
-
Choose OK to save the selection.
Result: The saved selection will be appear as an object in the Saved Selections folder for the dimension.