Work Order Billing
This chapter covers the following topics:
- Introduction
- Setting Up Work Order Billing
- Billing Work Orders
- Creating a Billable Work Order
- Associating Items and Activities to a Price List
- Initiating Billing
- Creating an Invoice
Introduction
While maintaining an asset or servicing a customer request, you can bill a third party customer for the work that they performed. This chapter discusses Work Order Billing, including the following topics:
Setting Up Work Order Billing
While maintaining an asset or servicing a customer request, you can bill a third party customer for the work that they performed. The cost of the work performed is based on the material and resource requirements (Bill of Material) of the Work Order, or the cost of the Activity associated with the Work Order.
This section includes the following topics:
Billing Work Orders
After the setup tasks are complete (See: Setting Up Work Order Billing), you can bill third parties and customers the work performed, while maintaining an asset or servicing a customer request. The cost of the work performed is based on the Work Order's material and resource requirements (Asset Bills of Material and Asset Routes), or the cost of the Activity that is associated with the Work Order.
This section includes the following topics:
Creating a Billable Work Order
Work Order Billing requires completed, billable Work Orders. First, create a Work Order that is associated with billable material, resources, and/or a billable Activity. After the Work Order is released, you can apply material and resources to it. Finally, after the Work Order is completed, the status is changed to Complete - No Charges. The Work Order is ready to bill.
To set up a billable work order
-
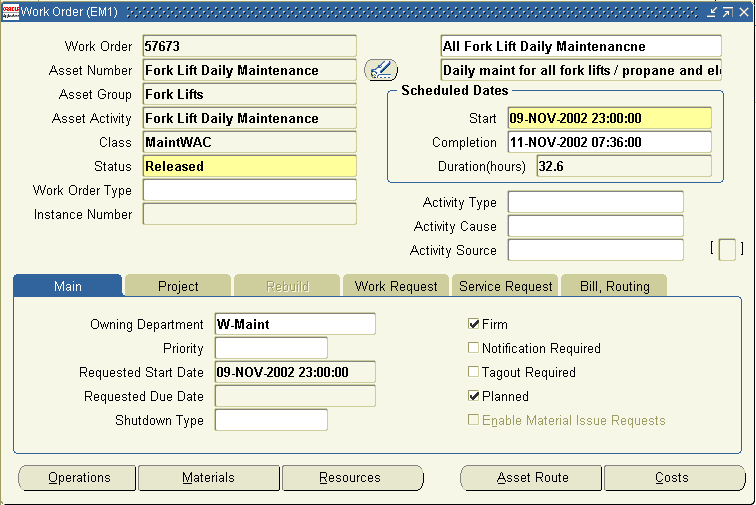
Navigate to the Work Orders window and create a Work Order.
Work Orders
-
If you are billing by requirements, add the previously defined billable material to the current Work Order's Bill of Material, as operation 10. See: Setting Up Billable Material and Defining Inventory Material Requirements. Add the previously defined billable resource to the current Work Order's routing, as operation 10. See: Setting Up a Billable Resource and Defining Resource Requirements.
-
If you are billing by activity, add the previously defined Activity to this Work Order. See: Setting Up a Billable Activity.
-
Release the current Work Order. See: eAM Work Order Statuses.
-
Issue some material (not all) and charge some resources (not all) to the current Work Order (See: Transacting Material and Transacting Resources, respectively).
-
Complete the current Work Order. See: Work Plans.
-
Update the status of the Work Order to Complete - No Charges. See: eAM Work Order Statuses. You can bill Work Orders at a Closed status, as well.
-
Save your work.
Associating Items and Activities to a Price List
Material, Resources, and Activities require association with a price list, before you can bill them.
To add items and activities to a price list
-
Navigate to the Advanced Pricing - Price Lists window.
Advanced Pricing - Price Lists

-
Add your material and resource items and/or your Activities to the price list.
-
Save your work.
Related Topics
Setting Up Item Costs and Prices
Initiating Billing
If a Work Order is at a Complete - No Charges or Closed status, you can select it for billing.
To bill by requirements
-
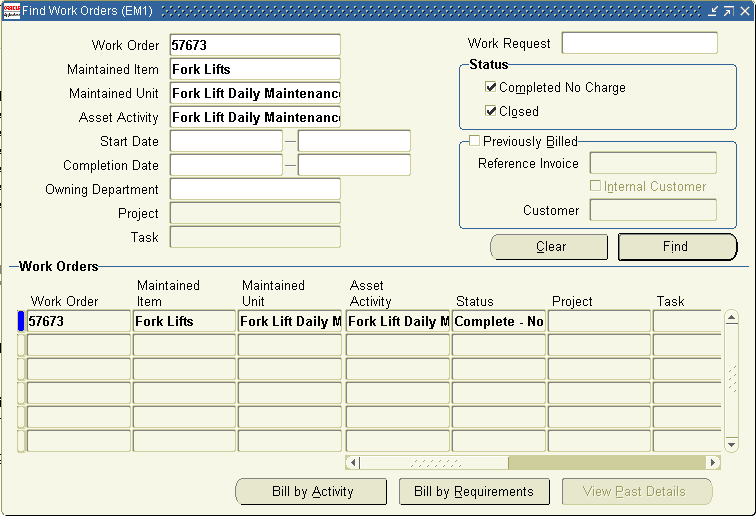
Navigate to the Find Work Orders window.
Find Work Orders
-
Select the Work Order you wish to bill.
-
Choose Find.
-
Choose Bill by Requirements.
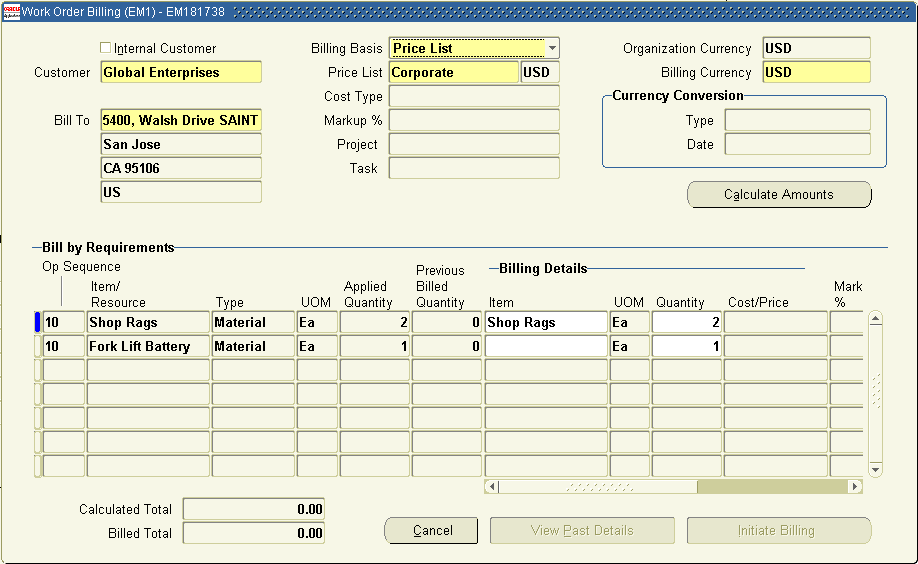
Work Order Billing
-
Within the Work Order Billing window, select a Customer.
-
Select a Bill To for the current customer.
-
Select a Billing Basis. Valid values are Price List and Cost Plus.
-
If you select Cost Plus, select a Cost Type and Markup %. For example, choose a Frozen Cost Type, if you defined a frozen cost for the material and resource items. See: Setting Up Item Costs and Prices. The Markup % defaults with a 0% value, but you can optionally update it.
-
If you select the Price List Billing Basis, select a Price List. All billable items appear on the selected price list, if they are Customer Order enabled (See: Setting Up Item Costs and Prices).
-
-
Choose Calculate Amounts. The unit rates are calculated for each billable item. The total amount of each billable item is a function of the unit rate, and the billed quantity.
-
If you previously chose a Cost Plus Billing Basis, the unit rate is calculated from the item cost and markup.
-
If you previously chose a Price List Billing Basis, the unit rate is retrieved from the price list that is associated with the item (See: Associating Items and Activities to a Price List). If multiple rates exist for the item, the system defers to the Price List setup (See: Setting Up Item Costs and Prices).
-
-
Within the Bill by Requirements region, enter the Quantity to bill, for each billable item. This quantity should be no greater than the difference between the Applied Quantity and Previous Billed Quantity.
The Applied Quantity is what the Work Order used; for material, the Applied Quantity is the material issued to the Work Order. For resources, the Applied Quantity equals the resources charged to the Work Order.
-
Optionally enter the Markup %, for each billable item.
-
To indicate the lines that you want to bill, for each billable item, you can optionally select the individual Bill check boxes. To bill all lines, select the top check box; this automatically selects all check boxes.
-
Choose Initiate Billing to execute the billing process and populate the billing information within the Accounts Receivables interface tables.
-
Choose OK on the confirmation note, indicating that billing has successfully completed.
To bill by an activity
-
Navigate to the Find Work Orders window.
Find Work Orders
-
Select the Work Order you wish to bill.
-
Choose Find.
-
Choose Bill by Activity.
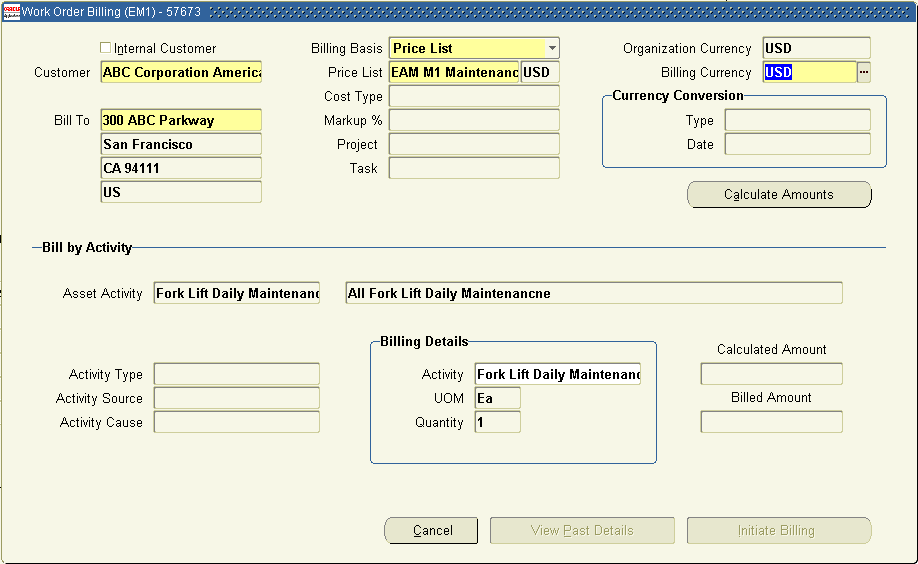
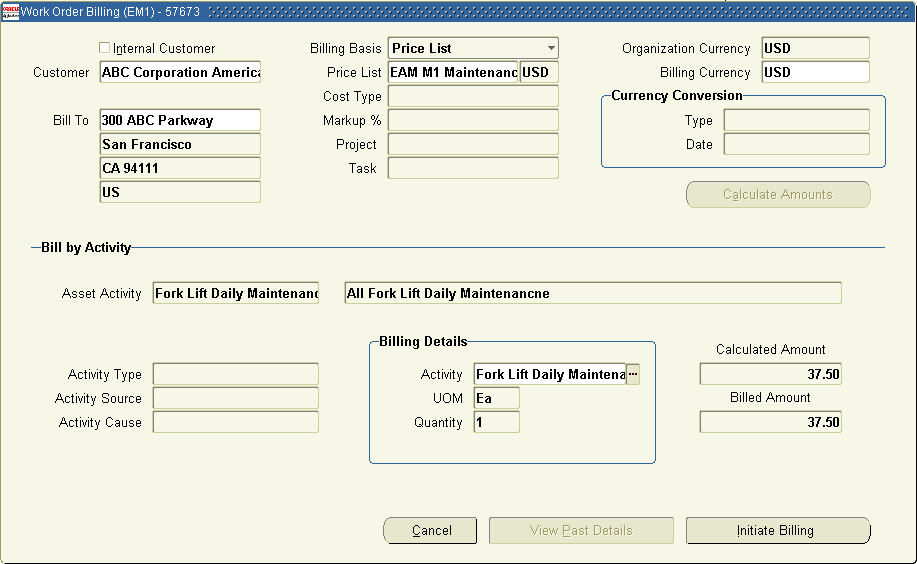
Work Order Billing
-
Within the Work Order Billing window, select a Customer.
-
Select a Bill To for the current customer.
-
Select a Billing Basis. Valid values are Price List and Cost Plus.
-
If you select Cost Plus, select a Cost Type and Markup %. For example, choose a Frozen Cost Type, if you defined a frozen cost for the material and resource items. See: Setting Up Item Costs and Prices. The Markup % defaults with a 0% value, but you can optionally update it.
-
If you select the Price List Billing Basis, select a Price List. All billable items appear on the selected price list, if they are Customer Order enabled (See: Setting Up Item Costs and Prices).
-
-
Choose Calculate Amounts. The unit rates are calculated for each billable item. The total amount of each billable item is a function of the unit rate and the billed quantity.
Work Order Billing
-
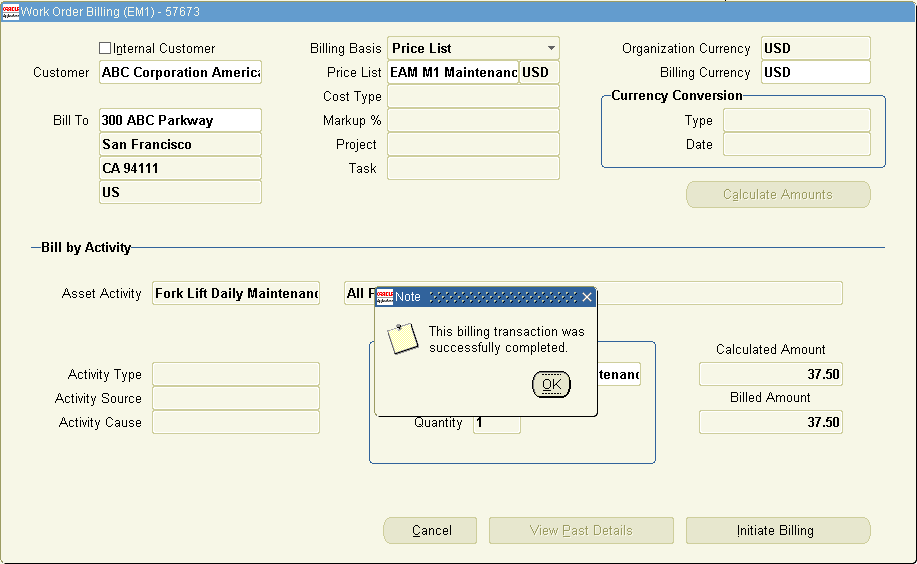
Choose Initiate Billing.
Billing Initiated
-
Choose OK.
-
Optionally choose View Past Details to view what was billed.
Past Invoice Details
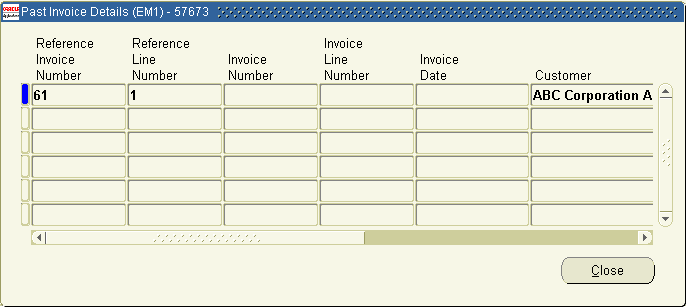
If you billed by Activity, one line appears. If you billed by requirements, multiple lines may appear.
-
Choose Close to return to the Find Work Orders window.
Creating an Invoice
After billing is initiated, you can create invoices. First, a source is defined in Oracle Receivables to identify where your invoicing activity originates. The batch source also controls invoice defaults and invoice numbering. Next, ensure that a Work Order Billing flexfield code exist. Finally, you can run the AutoInvoice concurrent process to create invoices. You can set this program to automatically run, or execute it from the menu.
To ensure a batch source exists
-
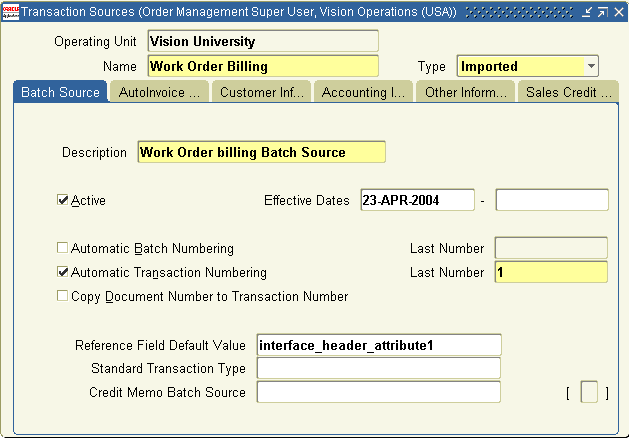
Navigate to the Transaction Sources window.
Transaction Sources
-
Query on Work Order Billing in the Name field, to ensure that it exists. If it does not exist, perform the following steps:
-
Enter Work Order Billing in the Name field.
-
Select Imported from the Type list of values. Because this is an Imported transaction batch source, the system automatically numbers the batch with the batch source name - request ID.
-
Enter a Description.
-
Enter the range of Effective Dates. The start date defaults as the current date, but you can change it. If you do not enter an end date, this transaction batch source is active indefinitely.
-
To automatically number new transactions created using this source, check the Automatic Transaction Numbering check box and enter a Last Number. You can use automatic transaction numbering with both Imported and Manual sources.
-
Optionally, to assign the same number to both the document and transaction, for transactions assigned to this source, check the Copy Document Number to Transaction Number check box.
-
Save your work. For information on all remaining fields, See: Transaction Batch Sources, Oracle Receivables User's Guide.
-
To ensure a Work Order Billing flexfield code exists
-
Navigate to the Descriptive Flexfield Segments window.
Descriptive Flexfield Segments
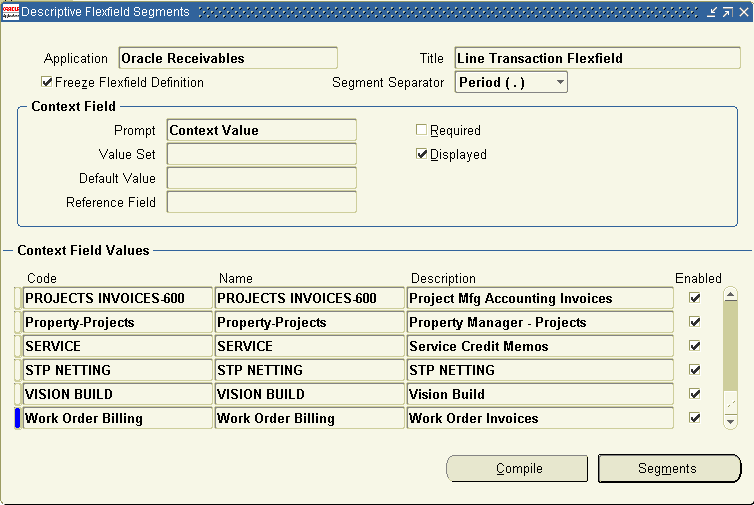
-
Query on the Line Transaction Flexfield within the Oracle Receivables Application. If Work Order Billing does not exist as a Code within the Context Field Values region, perform the following steps:
-
Enter Work Order Billing in the Code field.
-
Enter Work Order Invoices in the Description field.
-
Select the Enabled check box.
-
Choose Segments.
-
Ensure that, at least, the following segments are defined: Work Order, Work Order Id, Invoice Number, and Line Number.
-
Save your work.
-
To create invoices
-
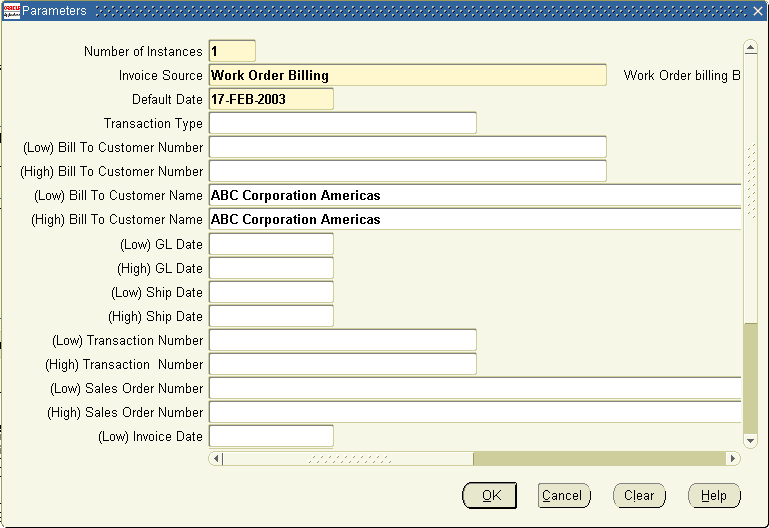
Navigate to the Run AutoInvoice window.
-
Select AutoInvoice Master Program, from the Name list of values.
Parameters
-
Enter the Number of Instances. An instance refers to how AutoInvoice groups and processes your transactions. Submitting a greater number of instances enables you to import transactions into Receivables faster. You can submit a maximum of 15 instances.
Tip: Enter a number of instances based on how many CPUs are available. Use the following formula to determine the number of instances to enter:
(Number of Available CPUs) – 1 = Number of Instances
For example, if you have five CPUs, submit four instances of the AutoInvoice Master program.
-
Select the Work Order Billing Invoice Source.
-
Enter a Default Date. The Default Date must be in an open or future period. Depending on how you defined your transaction batch source, AutoInvoice uses the Default Date if the GL date is not provided or if the date provided is in a closed period. See: Determining Dates, Oracle Receivables User's Guide.
-
Choose OK.
-
Choose Submit.
Related Topics
Transaction Batch Sources, Oracle Receivables User's Guide
Running AutoInvoice, Oracle Receivables User's Guide