Setting Up
This chapter provides Enterprise Asset Management administrators necessary setup information. You can also refer to the Oracle Enterprise Asset Management Implementation Guide for additional information, such as APIs and Profile Options.
This chapter covers the following topics:
- Before You Begin
- Oracle Enterprise Asset Management Setup Overview
- Organization Setup
- Setting Up Organizations
- Enabling Organizations for Enterprise Asset Management
- Setting Up Install Base Parameters
- Setting Up Services Fulfillment Manager Parameters
- Defining eAM Parameters
- General eAM Setup
- Setting Up Areas
- Defining Departments and Resources
- Defining Department Approvers
- Defining Miscellaneous Documents
- Setting Up Electronic Records and Signatures
- Defining Lookups
- Asset Setup
- Using the Activity Workbench
- Rebuildable Item Setup
- Non-Stock Direct Item Setup
- Preventive Maintenance Setup
- eAM Planning and Scheduling
- Defining a Master Demand Schedule Name
- Defining a Material Requirements Plan Name
- Defining Plan Options
- Quality Integration Setup
- Creating Collection Elements
- Creating eAM Quality Collection Plans
- Creating eAM Quality Collection Plans for a Supplier
- Outside Processing Integration Setup
- Setting Up Outside Service Processing
- Setting Up Direct Items
- Cost Management Integration Setup
- Setting Up Cost Categories
- Setting Up Purchase Order Category Associations for Direct Items
- Setting Up eAM Cost Management
- Setting Up Zero Cost Rebuild Item Issue
- Process and Discrete Manufacturing Integration Setup
- Organization Setup
- Associating Assets with Production Equipment
- Encumbrance Accounting
- Project Manufacturing Integration Setup
- Project Definition
- Property Manager Integration Setup
- Setting Up eAM Prerequisites
- Executing the Export Process
- Executing the Asset Number Interface
- Service Integration Setup
- Creating Maintenance Service Request Types
- Enabling Service Requests for Assets and Rebuildables
- Enabling eAM Specific Fields
- Oracle Time and Labor Integration Setup
- Defining Persons as Users
- Creating Eligibility Criteria
- Work Order Billing Setup
- Setting Up Parameters
- Setting up Costs for the Cost Plus Billing Basis
- Setting up Prices for the Price List Billing Basis
- Service Attribute Setup
- Setting Up Billable Material
- Setting Up a Billable Resource
- Setting Up a Billable Activity
Before You Begin
As you plan your implementation of Oracle Enterprise Asset Management (eAM), Oracle recommends that you consider the implementation issues discussed in this section. By carefully planning your implementation, you can save time and reduce errors.
Overview of Setting Up
This section contains a checklist that includes each task to complete the implementation of Oracle Enterprise Asset Management. It lists the steps required to implement Oracle Enterprise Asset Management, along with advanced implementation topics for you to consider. The setup checklist is organized into several subsections.
When installing Oracle Enterprise Asset Management, the installation process automatically creates five responsibilities: Oracle Enterprise Asset Management, Maintenance User Workbench, Maintenance Super User, Self-Service Work Requests, and Self Service Time and Expenses. The Oracle Enterprise Asset Management is a super user responsibility. It includes the necessary functions to set up and implement Oracle Enterprise Asset Management.
Before setting up Oracle Enterprise Asset Management, set up the users and assign their appropriate responsibilities for the implementation.
Related Product Setup Steps
Oracle Enterprise Asset Management setup includes various setup steps within Oracle Applications products. These steps are discussed in detail in the Overview of Setting Up sections of the respective Oracle Product users guides.
Setting Up Underlying Oracle Applications Technology
Ensure that you complete the following setup steps, including:
-
Performing system-wide setup tasks, such as configuring concurrent managers and printers
-
Managing data security, which includes setting up responsibilities to enable access to a specific set of business data and complete a specific set of transactions, and assigning individual users to one or more of these responsibilities
-
Setting up Oracle Workflow
Additional Information: If you plan to use work requests for reporting maintenance problems in Oracle Enterprise Asset Management, and those work requests need approval by a maintenance department user, then you should set up Oracle Workflow.
Oracle Enterprise Asset Management Setup Overview
Oracle Enterprise Asset Management (eAM) may have unique setups for each organization, including parameters, user defined lookups, and attributes. During the implementation process, the implementation team should discuss system and user options for Enterprise Asset Management. Users implementing Enterprise Asset Management should also have determined the structure of their organizations and user access via the Oracle System Administrator responsibility. This chapter covers the following topics:
-
Preventive Maintenance Setup, Oracle Enterprise Asset Management User's Guide
-
Oracle Time and Labor Integration Setup, Oracle Enterprise Asset Management User's Guide
Organization Setup
Organization setup is required before you can set up any additional Enterprise Asset Management information. Tasks include:
Setting Up Organizations
A valid organization is a requirement for Enterprise Asset Management setup. Decisions are made during implementation as to which organizations are enabled for Enterprise Asset Management. If the decided upon organizations already exist, you can skip this section and proceed to Enabling Organizations for Enterprise Asset Management.
To set up organizations
-
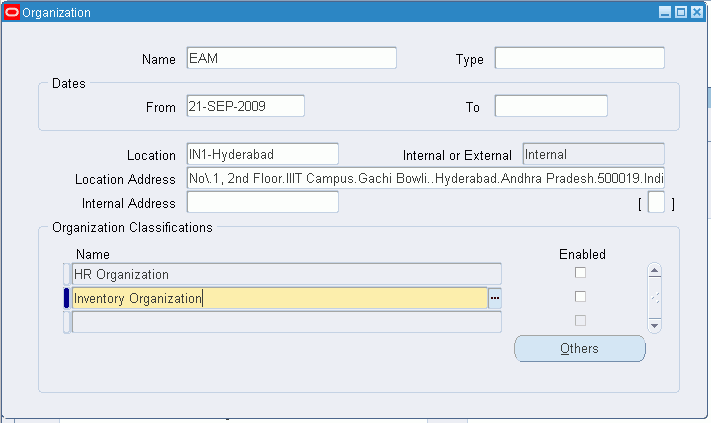
Navigate to the Organization window.
Organization
-
Enter an organization Name, for example, Seattle Maintenance.
-
Select an organization Type. For information on Type, Dates region fields, Location, Internal or External, Location Address, and Internal Address fields, see: Creating an Organization, Oracle Human Resources User's Guide.
-
Save your work. A valid location must be set up before you can save (See: Creating an Organization, Oracle Human Resources User's Guide).
-
In the Organization Classifications region, establish this organization as an Inventory Organization. Select Inventory Organization from the Name list of values.
Additional Information: An eAM organization must be classified as an Inventory Organization. You can classify an eAM as other product organizations, as well.
-
Save your work.
Related Topics
Creating an Organization, Oracle Human Resources User's Guide
Enabling Organizations for Enterprise Asset Management
Before you begin implementing Enterprise Asset Management (eAM), decide which organizations are eAM enabled. A valid organization must exist before you can enable the organization for Enterprise Asset Management (See: Setting Up Organizations).
To define an Enterprise Asset Management enabled organization
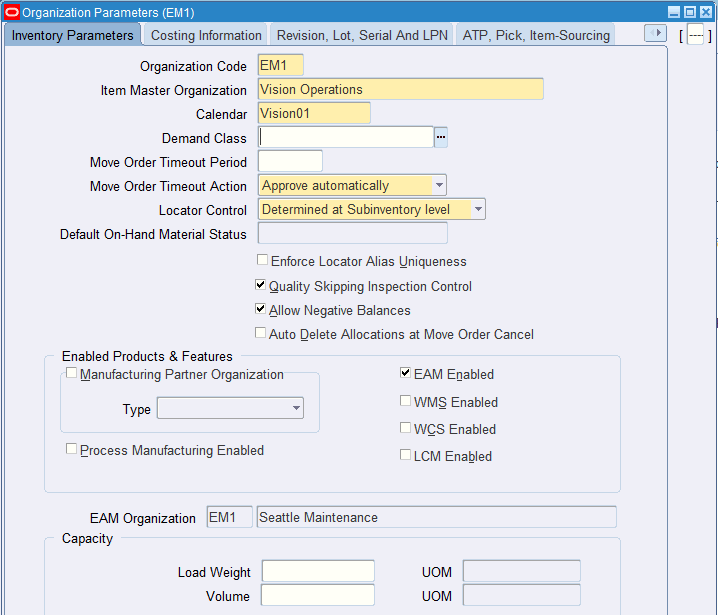
You can create a new Enterprise Asset Management enabled organization, or convert an existing organization to an Enterprise Asset Management enabled organization. Oracle recommends that you keep Enterprise Asset Management organizations separate from production organizations. Enterprise Asset Management parameters are on the Inventory Parameters tab, within the Organization Parameters window.
-
Navigate to the Organization Parameters window.
Organization Parameters
-
Enter a valid organization code. For information on how to create an organization, See: Setting Up Organizations.
-
Select the EAM Enabled check box to enable Enterprise Asset Management for this organization. You cannot clear this check box after Enterprise Asset Management items or Enterprise Asset Management parameters are defined in the current organization.
-
If Enterprise Asset Management is enabled for the current organization, the EAM Organization value defaults and is disabled; the current organization code defaults.
For organizations that are not Enterprise Asset Management enabled, you can populate the EAM Organization field with an Enterprise Asset Management enabled organization code. The designated eAM organization maintains equipment items for the designated production organization. For example, if the current organization is a production organization, this is how you would identify a maintenance organization that is associated with the production organization (See: Overview of the Process and Discrete Manufacturing Integration, Oracle Enterprise Asset Management User's Guide). You can update this field, if asset equipment association does not exist in this organization.
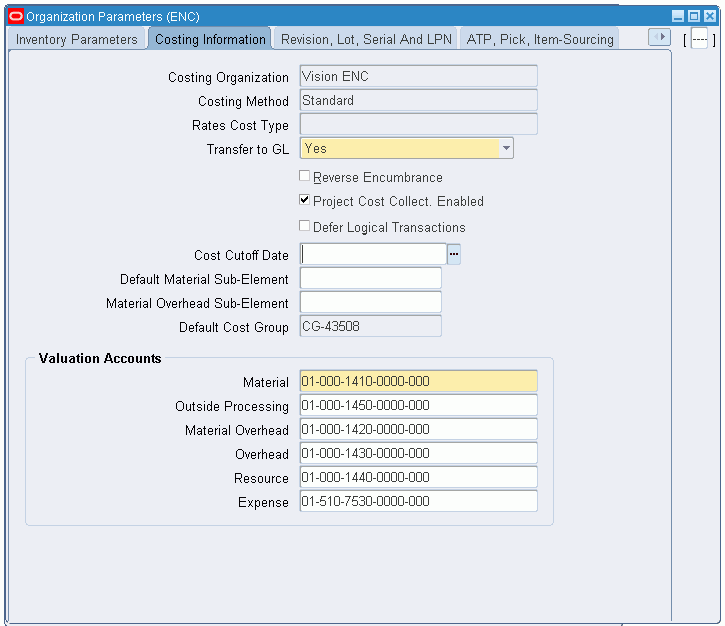
-
If you are using encumbrance accounting, you must enable this feature.
Navigate to the Costing Information page.
Costing Information
-
Select the Reverse Encumbrance option.
-
Save your work.
Related Topics
Organization Parameters Window, Oracle Inventory User's Guide
For more information regarding encumbrance accounting, see Encumbrance Accounting
Setting Up Install Base Parameters
Oracle Enterprise Asset Management is integrated with Oracle Install Base. Therefore, the Install Base parameters must be set up to ensure that assets are created correctly in eAM.
Creating an Internal Party
- Before you set up the parameters for Oracle Install Base, you must first create an internal party. The internal party will be used to complete the Install Base setup.
-
Navigate to the Customer Support - Asset Maintenance responsibility.
-
Click the Contact Center link.
-
Enter contact or customer details in the header section of the page.
-
Click the Party Information tab.
-
Press the F11 key. This action enables you to access fields in the page.
-
Enter all applicable information for the internal party.
-
Save your work.
Follow these steps to create an internal party:
You must perform the following steps in Oracle Install Base:
-
Navigate to the Install Base Administrator responsibility.
-
Under the Setups menu, click the Install Parameters link.
-
Set up the Install Parameters for Install Base.
Additional Information: See the Oracle Install Base Implementation Guide for assistance on how to set up the Install Base parameters.
See "Set Up Installation Parameters", Setup Steps within Oracle Install Base, Oracle Install Base Implementation Guide.
-
Make sure that the Freeze check box has been selected.
If it is unchecked, then select the check box.
-
Save your work.
Setting Up Services Fulfillment Manager Parameters
Several transactions originating from Inventory and Order Management are processed in Install Base, and these transactions must be serialized.
In order to guarantee the serialization of the transactions, you must perform the following steps to ensure that asset transfers are performed correctly in eAM:
-
Navigate to the SFM System Administrator responsibility.
-
Navigate to Administration, and then click the Queue Console link.
-
Click the Services button.
-
Select the SFM Event Manager Queue Service value.
-
Enter a value of 1 for both the Actual and Target to ensure that the Services Fulfillment Manager is up and running.
-
Save your work.
Related Topics
See "Ensure the Serializability of Transactions Processed in Oracle Install Base," Implementation and Setup for New Users, Oracle Install Base Implementation Guide.
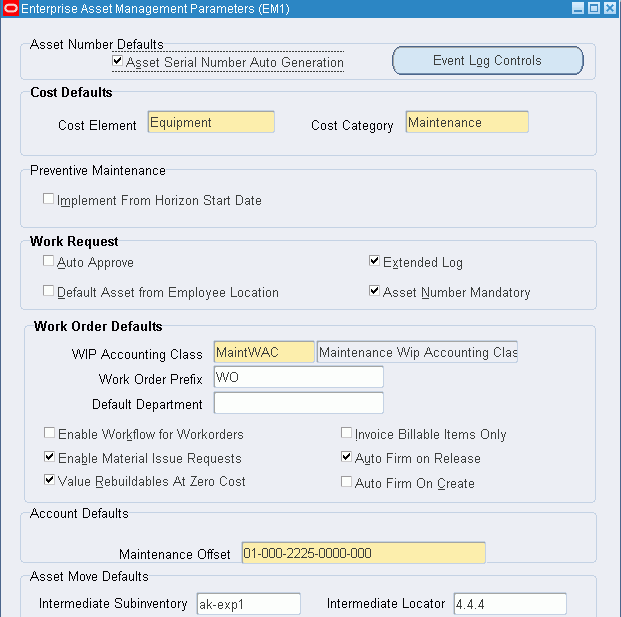
Defining eAM Parameters
After you have established an Enterprise Asset Management enabled organization, set up specific Enterprise Asset Management parameters that determine organization level defaults for individual transactions. Setup information such as asset number defaults, cost defaults, work request information, and work order defaults.
Important: Before creating eAM Parameters, first create an Asset Subinventory in the current eAM-enabled organization (Inventory > Setup > Organizations > Subinventories). See: Creating Subinventories, Oracle Inventory User's Guide.
To define Enterprise Asset Management parameters
-
Navigate to the Enterprise Asset Management Parameters window.
Enterprise Asset Management Parameters
-
Optionally indicate whether this organization has system generated asset numbers within individual asset groups. See: Defining Asset Groups. You can specify the starting serial number within the Organization Parameters window or the Master Item window, when defining asset groups. If the starting serial number is defined for the asset group, this definition overwrites the starting serial number within the Organization Parameters.
-
Optionally choose Event Log Controls to enable system events that are logged within the current organization. You can select the Log Enabled check box next to the events that you want logged for your assets. See: Asset Operational Logging, Oracle Enterprise Asset Management User's Guide.
-
The Cost Defaults region represents default cost information for future Work Orders, without defined cost elements within the work order.
Select an Enterprise Asset Management Cost Element to indicate how to capture cost overheads and any miscellaneous resource costs. Valid values are Equipment, Labor, and Material. See: Overview of eAM Cost Management, Oracle Enterprise Asset Management User's Guide.
-
Select a Cost Category to use as the default for departments that do not have a cost category defined. Department costs are then posted to the appropriate cost elements. Values are Maintenance, Operations, Contract, and any other values that you might have added within the extensible lookup table. See: Overview of eAM Cost Management, Oracle Enterprise Asset Management User's Guide.
-
In the Preventive Maintenance region, optionally select the Implement From Horizon Start Date check box to bypass past due work order suggestions when executing the Preventive Maintenance process. If this check box is selected, suggested work orders, from the Horizon Start Date forward, are executed.
-
Indicate whether work requests are automatically approved upon creation, or if every user, with the responsibility assigned to the asset's current owning department, receives a notification via Workflow (See: Oracle Applications Workflow and Defining Department Approvers). This notification appears within self service, within the responsibility you use to log in.
If the Auto Approve check box is selected, work requests are created with an Awaiting Work Order status. If the check box is not selected, work requests are created with an Open status.
Note: A work request status must be Awaiting Work Order before you can associate it with a Work Order. The Awaiting Work Order status indicates that the work request is approved.
-
Optionally select the Default Asset from Employee Location check box to indicate the default asset information when creating a work request. If this check box is selected, the Asset Number information defaults as the Location number exported from Oracle Property Manager. Oracle Property Manager is a separate product.
-
If you choose the Extended Log check box, the system keeps an audit trail of records when defining or updating work requests.
-
Optionally select the Asset Number Mandatory check box to indicate that the Asset Number field is mandatory when creating a work request.
-
Select the WIP Accounting Class default to ensure that Work Orders generated within Enterprise Asset Management have an established account code structure assigned to accept charges incurred by that work order.
The WIP accounting class codes available are of type, Maintenance. If a Maintenance type WIP accounting class does not exist, you can define a new one. If you are using encumbrance accounting, you must include a budget account to capture encumbrance amounts. (See: Defining WIP Accounting Classes, Oracle Work in Process User's Guide).
Note: Cost Management handles maintenance work orders as nonstandard expense jobs.
-
Optionally enter a Work Order Prefix.
A prefix enables your organization to identify routine work orders.
-
Optionally select a Default Department.
Oracle recommends that you select a default department. This department defaults to maintenance work orders as they are entered. If a department does not exist on a work order, you cannot release it.
-
Select the Enable Workflow for Work Orders check box to initiate approval processes for work orders and work permits. Work orders and work permits might require approvals or notifications at different stages in their lifecycles. Workflow automates this process. You can set up business events and event subscriptions (or use seeded events and subscriptions) within Oracle Workflow to indicate what events trigger Workflow. Seeded events that you can enable to trigger workflow are: Work Order creation, Work Order release approval, Work Order completion, Work Order status change, Operation completion, Work Permit release approval, Work Permit status update. See: Setting Up Oracle Workflow, Oracle Workflow User's Guide and Setting Up the Business Event System, Oracle Workflow User's Guide and Planning Your Organization's Approval Process, Oracle Approval Management User's Guide).
-
Indicate whether Material Issue Requests are enabled.
If this check box is selected, the Enable Material Issue Requests check box on eAM Work Orders defaults as selected.
-
Within the Work Order Defaults region, select the Value Rebuildables at Zero Cost to indicate that rebuildable components charge at zero cost (See: Setting Up Zero Cost Rebuild Item Issue). If this check box is selected, rebuildable items issued out of the subinventory expense account are issued at zero cost.
-
Indicate whether only billable items are invoiceable.
If the Invoice Billable Items Only check box is selected, only billable items can invoice; however, the item needs to be invoiceable (Invoiceable Item and Invoice Enabled check boxes selected within the Master Item window. See: Invoicing Attribute Group, Oracle Inventory User's Guide) and the Billing Type check box needs to be selected (See: Work Order Billing Setup).
If the Invoice Billable Items Only check box is not selected, any item can be invoiced if it is invoiceable within the Master Item window (Invoiceable Item and Invoice Enabled check boxes selected within the Master Item window). See: Invoicing Attribute Group, Oracle Inventory User's Guide.
-
If you select the Auto Firm on Release check box, the dates on the work order cannot automatically reschedule, after the work order is at Released or On Hold statuses.
You can still manually reschedule a resource on the work order, thereby updating the dates on its corresponding operation and work order.
-
If you select the Auto Firm on Create check box, the dates on the Work Order cannot automatically reschedule, even in Draft and Unreleased statuses.
You can still manually reschedule a resource on the work order, thereby updating the dates on its corresponding operation and work order.
-
Within the Account Defaults region, select a Maintenance Offset account.
You can create or break a parent and child (hierarchy) relationship that exists between an asset number and a rebuildable serial number, manually using the Configuration History page. This account records what is sent to Inventory when a Rebuildable is removed from an Asset, and then transferred into inventory.
For example, if the relationship is broken, the Asset or Rebuildable is sent to either Scrap or Inventory. If the Rebuildable is sent to Inventory, the accounting is as follows:
Debit Inventory
Credit Maintenance Offset
-
Within the Asset Move Defaults region, select a default Intermediate Subinventory and Intermediate Locator value.
Only the expense subinventories associated with your organization are available for selection.
This intermediate subinventory is the default subinventory to which all the assets undergoing miscellaneous receipt transactions are received while performing the Asset Move transfer. The Intermediate Locator value indicates the number assigned to the expense intermediate inventory.
See Using the Asset Move Workbench, Oracle Enterprise Asset Management User's Guide
-
Save your work.
General eAM Setup
General Enterprise Asset Management Setup tasks include the following:
Setting Up Areas
Use areas to logically sort assets by the zones in which they reside. Areas divide the maintenance plant or facility into zones, which help to track and account for assets. Areas are later associated with assets.
To set up Areas
-
Navigate to the Area window.
Area
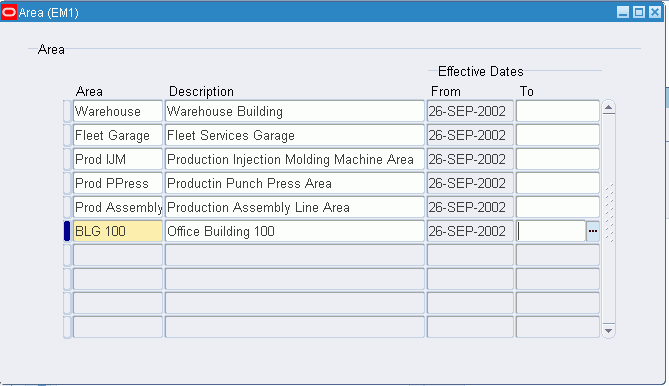
-
Using the Add icon on the tool bar, add an area.
-
Enter a Description for this location.
-
The Effective From Date defaults as the system date, but you can optionally update it. Optionally select an Effective To Date to indicate an expiration of the area.
-
Save your work.
Defining Departments and Resources
A department represents a crew within your organization. A crew may include people, machines, or suppliers. Departments are also used to collect costs, apply overhead, and compare load to capacity. Assign a department to each operation of a routing and assign resources that are available for that department. The department assigned to each operation of a routing also becomes the assigned department of the corresponding operation within the Work Order, assuming the Work Order is using the routing.
Resources are defined before departments. For information on defining resources, See: Defining a Resource, Oracle Bills of Material User's Guide. When you define a department, you specify available resources. A resource represents a craft. You can enter multiple resources for each department. For each resource, you can specify the shifts that the resource is available. For each resource shift, you can specify capacity modifications that change the available hours per day, units per day, or workdays.
To define departments (crews) and resources (crafts)
-
Navigate to the Departments window.
Departments
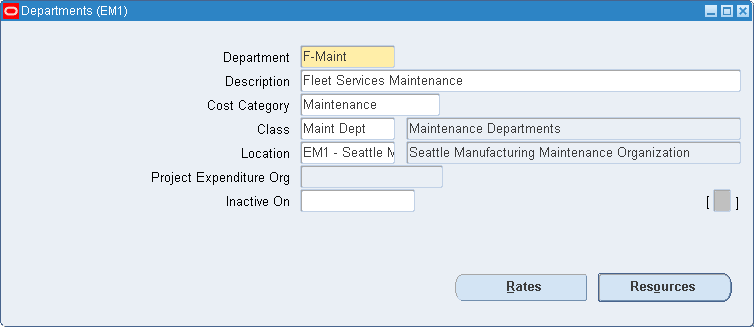
-
Enter the Department name, unique to the Organization.
-
Optionally select a department Class (See: Creating Department Classes, Oracle Bills of Material User's Guide).
-
Select a Location. Enter a location for a department if it is the receiving department following outside processing (See: Overview of eAM Contractor Services, Oracle Enterprise Asset Management User's Guide and Outside Processing, Oracle Work in Process User's Guide).
-
Enter a Project Expenditure Organization.
-
Optionally enter an Inactive On date on which you can no longer assign this department to routing operations.
For instructions on all remaining fields, See: Defining a Department, Oracle Bills of Material User's Guide (Bills of Material, Routings, Departments).
-
Click the Resources button to add resources or crafts to the current department.
Resources
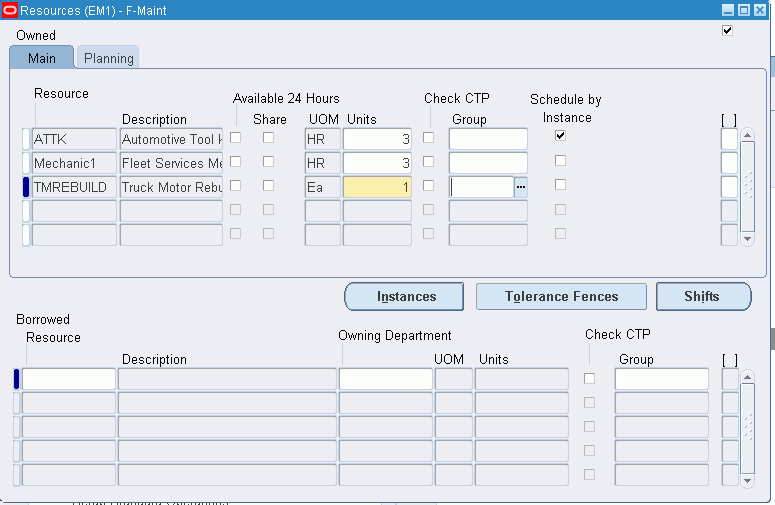
-
Enter the Resource to assign to the current department.
-
Optionally, for owned resources, indicate whether the resource is available 24 hours per day. You cannot assign shifts to a resource that is available 24 hours per day.
-
For owned resources, indicate whether this department can share the resource and capacity with other departments.
-
Enter the number of capacity Units (resource units) available for this department, for example, the number of machines for a machine resource.
Each resource can assign to any number of departments; multiple resources can be assigned to each department.
-
Optionally select the Check CTP check box to indicate that this resource is used in a Capable to Promise (CTP) check (See: Capable to Promise, Oracle Master Scheduling/MRP and Supply Chain Planning User's Guide).
-
Optionally enter a resource Group for the resource in this department.
-
Optionally select the Schedule by Instance check box to indicate whether the department resource should be scheduled at the instance level (specific employee name or piece of equipment).
-
For borrowed resources, enter the Owning Department.
-
Select the Planning tab. Optionally enter an Exception Set. The exception sets that you assign help to identify capacity problems (See: Planning Exception Sets, Oracle Capacity User's Guide).
-
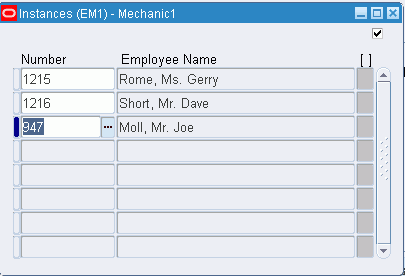
Choose Instances to add employees or equipment to the current resource. An instance is a specific employee name or piece of equipment. See: People and Assignments, Implementing Oracle HRMS.
Instances
-
Choose Shifts for owned resources that are not available 24 hours per day. This enables you to assign and update shift information for the resource and define capacity changes for a shift.
Shifts
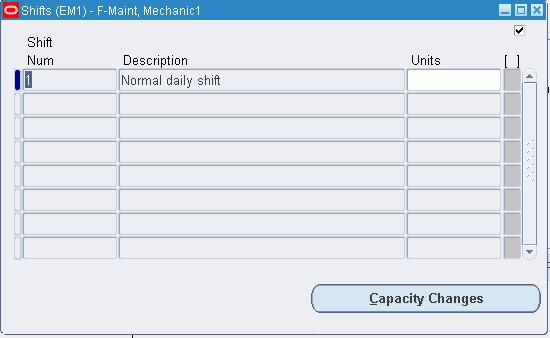
-
Select a Shift Number.
The shifts available are those assigned to the workday calendar and assigned to the current organization.
-
Choose Capacity Changes to define capacity changes for a shift.
For more information, See: Assigning Resources to a Department, Oracle Bills of Material User's Guide (Bills of Material, Routings, Departments).
-
Defining Department Approvers
With a responsibility assigned to the current asset's owning department, you can set up department approvers so that Work Request notifications are sent to each approver, via Oracle Workflow (See: Defining Departments and Resources and Defining Asset Numbers, and Oracle Applications 12 Workflow). Approvers can view these notifications on the Enterprise Asset Management Self Service Maintenance Home Page (See: Home, Oracle Enterprise Asset Management User's Guide). Everyone who receives the notification can access the work request to change its status, or add additional information to the Work Request log. After one user approves the Work Request, the notification is removed from the users' notification lists, and the work request status transitions from Open to Awaiting Work Order.
A work request can be rejected. If an approver rejects a work request, the notification is removed from that approver's notification list. You can re-assign a notification to another user for approval or additional information; for example, the originator might need to provide additional information on the work request.
To define Department Approvers
-
Navigate to the Department Approvers window.
-
Select a Responsibility Name. A department is assigned to one responsibility.
Department Approvers
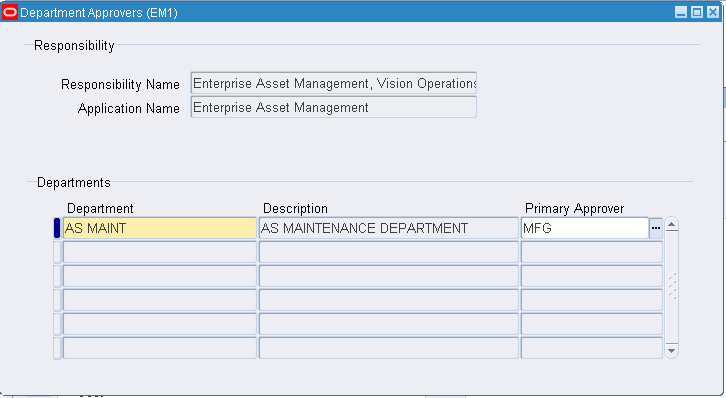
-
In the Departments region, select a Department. You can select an unlimited number of departments.
-
Optionally select a Primary Approver for the department from the Name list of values. The list of values contains all users within the current responsibility. If the Primary Approver is not specified, the notification is sent to all users with the particular responsibility.
-
Save your work.
Related Topics
Work Requests, Oracle Enterprise Asset Management User's Guide
Home, Oracle Enterprise Asset Management User's Guide
Defining Miscellaneous Documents
You can create text and files, such as spreadsheets, graphics, and OLE objects. You can attach these documents to a maintenance Work Order, asset, or operation.
To define miscellaneous documents
-
Navigate to the Miscellaneous Documents window.
Miscellaneous Documents
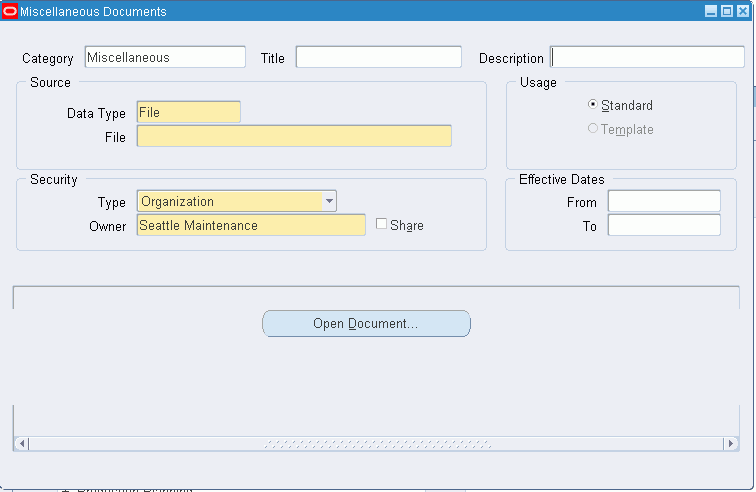
-
Select a Data Type. Valid values are File, Short Text, and Web Page.
-
If the Data Type is File, attach the appropriate file. If the Data Type is Web Page, enter the relevant URL. If the Data Type is Short Text, insert the text in the Text field.
For information on all fields, See: Working With Attachments, Oracle Applications User's Guide.
Setting Up Electronic Records and Signatures
During Work Order completion, you can require Electronic Signatures and Electronic Records. These are provided using the Oracle ERES framework. Electronic Signatures ensure that the person processing the transaction verifies their identity by providing their User Identification and password, during the transaction. Electronic records provide a permanent snapshot of the transaction data that the user is verifying.
To set up electronic records and signatures
-
Navigate to the Electronic Records page (ERES Administrator: Setup > Configuration Variables).
Electronic Records
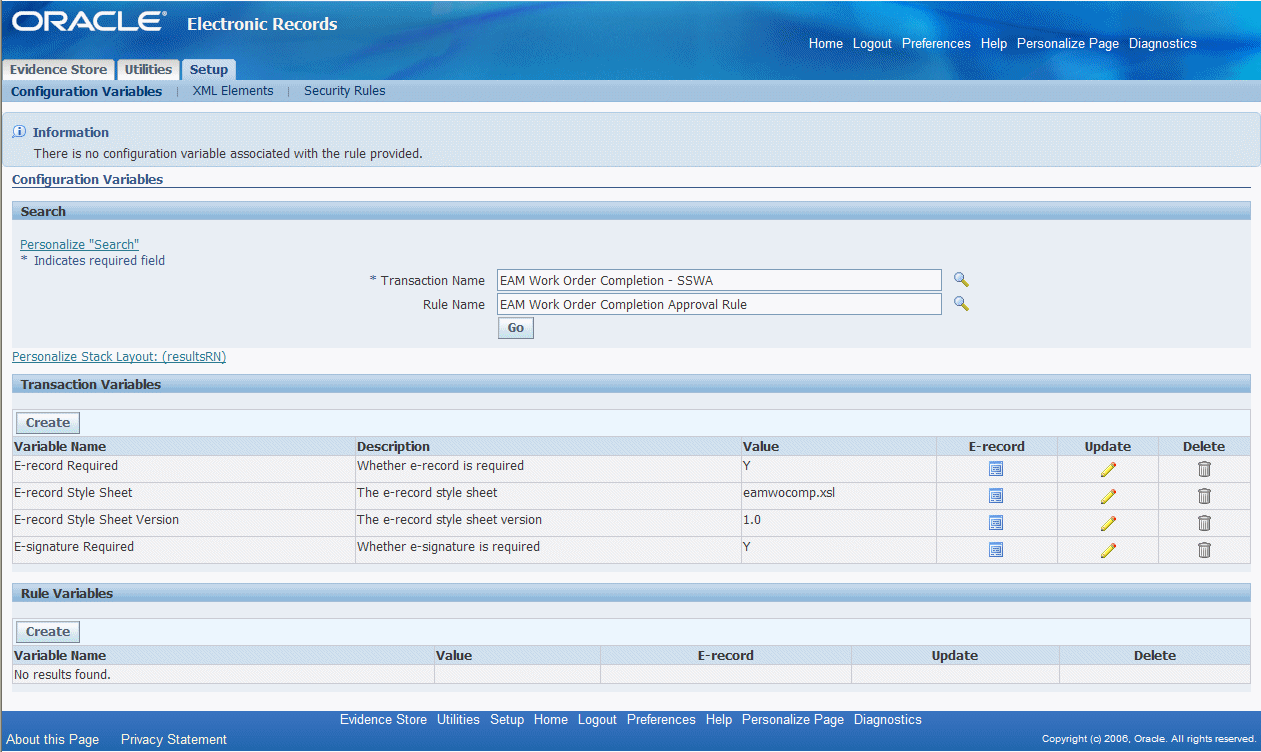
-
Select EAM Work Order Completion - SSWA from the Transaction Name list of values.
-
Optionally select a Rule Name.
-
Choose Create to create Variable Names.
-
Select E-record Required from the Transaction Name list of values. Set this value to Y.
-
Select E-signature Required from the Transaction Name list of values. Set this value to Y.
-
-
Choose Apply.
Defining Lookups
Lookup codes must be decided upon and defined during the implementation process. Lookup codes fall within three categories: extensible, user defined, or system defined. If a lookup code is extensible, the existing lookup codes cannot be modified, but you can add new codes to the table. If lookup codes are user defined, all codes may be modified. If lookup codes are system defined, the existing codes cannot be modified, and new codes cannot be added to the table.
You need to define Asset Lookups, Work Request Lookups, and Work Order Lookups.
This section includes the following topics:
Activity Types
Activity Types are used to describe the type of maintenance work that is performed on an asset (See: Defining Activities, Oracle Enterprise Asset Management User's Guide). For example, Inspections, Lubrications, Overhauls, Calibration, and Repetitive work. Activity Types are extensible (See: Defining Lookups, Oracle Enterprise Asset Management User's Guide).
To define activity types
-
Navigate to the Oracle Manufacturing Lookups window.
Oracle Manufacturing Lookups
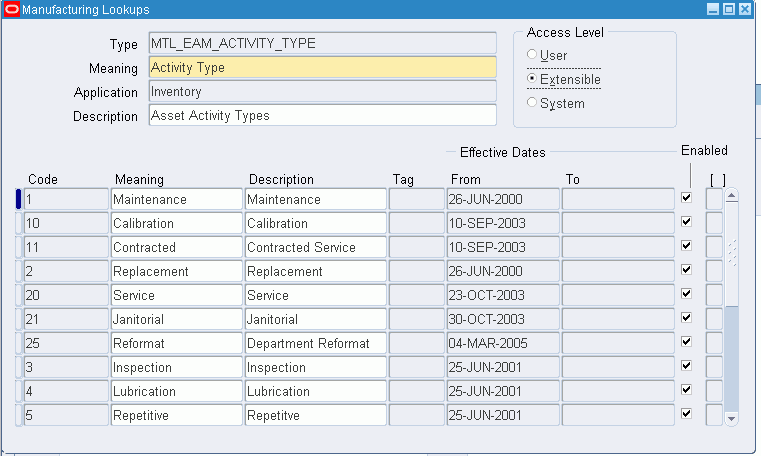
-
Select the flashlight Find icon.
-
Select MTL_EAM_ACTIVITY_TYPE from the Type list of values.
-
Enter a numeric Code. Oracle recommends that you enter values in increments of 10, enabling you to easily add codes later.
Warning: Do not use alpha codes. Entering alpha codes causes database errors in the application.
-
Enter the Meaning of the code, for example, Lubrication.
-
Enter a Description for the code.
-
Optionally enter a Tag to categorize lookup values. This field is for informational purposes.
-
The Effective From Date defaults as the system date, but you can update this. Optionally enter a Effective To Date to indicate an expiration of the code.
-
Select the Enabled check box to enable this code for Enterprise Asset Management.
-
Save your work.
Activity Causes
Activity Cause codes are reasons for an asset failure. For example, Preventive, Normal Wear, Rework, and Breakdown. This information enables you to understand the dynamics that affect an asset's ability to perform. They establish critical data that is used for reporting and analysis of asset failure causes and the frequency of such conditions. Asset Cause Codes are referenced when setting up an Activity (See: Defining Activities, Oracle Enterprise Asset Management User's Guide). Activity Cause codes are extensible (See: Defining Lookups, Oracle Enterprise Asset Management User's Guide).
To define activity cause codes
-
Navigate to the Oracle Manufacturing Lookups window.
Activity Cause Codes

-
Select MTL_EAM_ACTIVITY_CAUSE from the Type list of values.
-
Enter a numeric Code. Oracle recommends that you enter values in increments of 10, enabling you to easily add codes later.
Warning: Do not use alpha codes. Entering alpha codes causes database errors in the application.
-
Enter the Meaning of the code, for example, Breakdown.
-
Enter a Description for the code.
-
Optionally enter a Tag to categorize lookup values. This field is for information purposes.
-
The Effective From Date defaults as the system date, but you can update this. Optionally enter a Effective To Date to indicate an expiration of the code.
-
Select the Enabled checkbox to enable this code for Enterprise Asset Management.
-
Save your work.
Activity Sources
Activity source codes are reasons activities are executed. For example, warranty compliance, OSHA compliance, or military specification requirements. Activity source codes are referenced when setting up an activity (See: Defining Activities, Oracle Enterprise Asset Management User's Guide). Activity source codes are extensible (See: Defining Lookups, Oracle Enterprise Asset Management User's Guide).
To define activity source codes
-
Navigate to the Oracle Manufacturing Lookups window.
Activity Source Codes
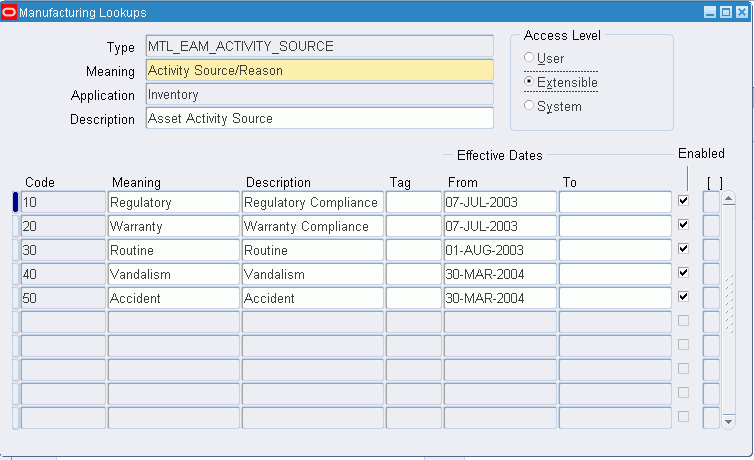
-
Select MTL_EAM_ACTIVITY_SOURCE from the Type list of values.
-
Enter a numeric Code. Oracle recommends that you enter values in increments of 10, enabling you to easily add codes later.
Warning: Do not use alpha codes. Entering of alpha codes causes database errors in the application.
-
Enter the Meaning of the code, for example, Breakdown.
-
Enter a Description for the code.
-
Optionally enter a Tag to categorize lookup values. This field is for information purposes.
-
The Effective From Date defaults as the system date, but you can update this. Optionally enter a Effective To Date to indicate an expiration of the code.
-
Select the Enabled check box to enable this code for Enterprise Asset Management.
-
Save your work.
Asset Activity Priorities
Activity priority codes indicate asset activity priority levels, for example, Low, Medium, and High. Activity priorities are extensible (See: Defining Lookups, Oracle Enterprise Asset Management User's Guide).
To define activity priorities
-
Navigate to the Oracle Manufacturing Lookups window.
Activity Priorities
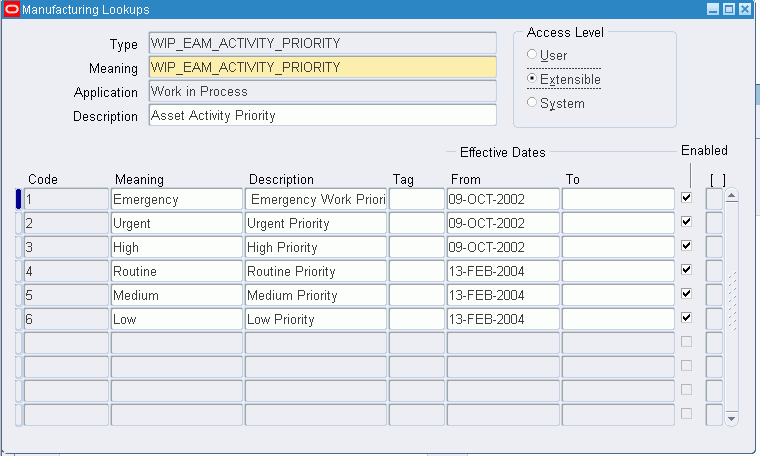
-
Select WIP_EAM_ACTIVITY_PRIORITY from the Type list of values.
-
Enter a numeric Code. Oracle recommends that you enter values in increments of 10, enabling you to easily add codes later.
Warning: Do not use alpha codes. Entering of alpha codes causes database errors in the application.
-
Enter the Meaning of the code, for example, High.
-
Enter a Description.
-
Optionally enter a Tag to categorize lookup values. This field is for information purposes.
-
The Effective From Date defaults as the system date, but you can update this. Optionally enter a Effective To Date to indicate an expiration of the code.
-
Select the Enabled checkbox to enable this code for Enterprise Asset Management.
-
Save your work.
Asset Failure Source Types
Failure is reported on a work order. Each work order represents one single failure occurrence (event) for the asset specified on the work order (See: Failure Analysis Overview, Oracle Enterprise Asset Management User's Guide). You can optionally add more codes, specifying different source types. For example, you may specify different types of work orders with different source types. Asset failure source types are user-defined (See: Defining Lookups, Oracle Enterprise Asset Management User's Guide).
To define asset failure source types
-
Navigate to the Oracle Manufacturing Lookups window.
Asset Failure Source Types
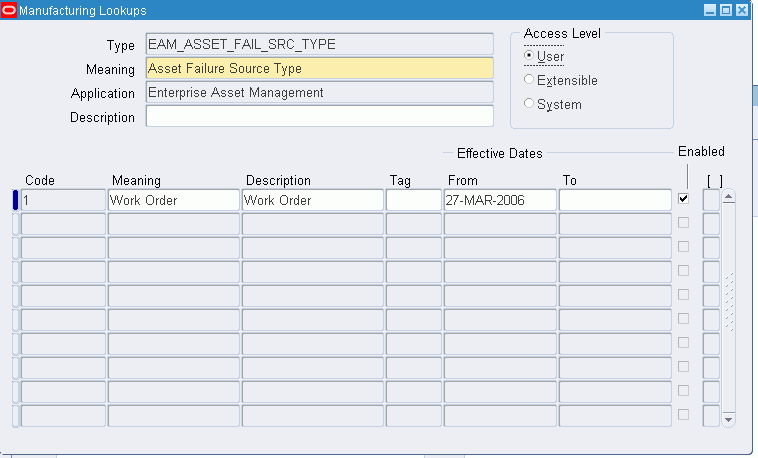
-
Select EAM_ASSET_FAIL_SRC_TYPE from the Type list of values.
-
Enter a numeric Code. Oracle recommends that you enter values in increments of 10, enabling you to easily add codes later.
Warning: Do not use alpha codes. Entering alpha codes causes database errors in the application.
-
Enter the Meaning, for example, Preventive Maintenance Work Order.
-
Enter a Description.
-
Optionally enter a Tag to categorize lookup values. This field is for information purposes.
-
The Effective From Date defaults as the system date, but you can update this. Optionally enter a Effective To Date to indicate an expiration of the code.
-
Select the Enabled checkbox to enable this code for Enterprise Asset Management.
-
Save your work.
Asset Import Scope Codes
The eAM Asset Number Open Interface enables you to import asset numbers into eAM, using a batch process. You can optionally import Asset Number attributes. You can create new asset numbers and attributes, or update existing asset numbers and attributes. See: eAM Asset Number Open Interface, Oracle Enterprise Asset Management Implementation Guide. Define the process' parameter scope codes. Asset import scope codes are user-defined (See: Defining Lookups, Oracle Enterprise Asset Management User's Guide).
To define asset import scope codes
-
Navigate to the Oracle Manufacturing Lookups window.
Asset Import Scope Codes

-
Select EAM_ASSET_IMPORT_SCOPE from the Type list of values.
-
Enter a numeric Code. Oracle recommends that you enter values in increments of 10, enabling you to easily add codes later.
Warning: Do not use alpha codes. Entering alpha codes causes database errors in the application.
-
Enter the Meaning, for example, With Attributes.
-
Enter a Description.
-
Optionally enter a Tag to categorize lookup values. This field is for information purposes.
-
The Effective From Date defaults as the system date, but you can update this. Optionally enter a Effective To Date to indicate an expiration of the code.
-
Select the Enabled check box to enable this code for Enterprise Asset Management.
-
Save your work.
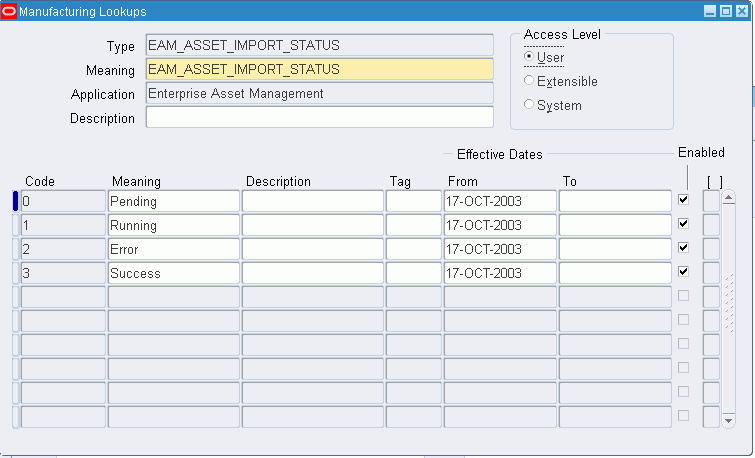
Asset Import Statuses
The eAM Asset Number Open Interface enables you to import Asset Numbers into eAM, using a batch process. You can optionally import Asset Number attributes. You can create new Asset Numbers and attributes, or update existing Asset Numbers and attributes. See: eAM Asset Number Open Interface, Oracle Enterprise Asset Management Implementation Guide. Define the process' import statuses. Asset Import Statuses are user defined (See: Defining Lookups, Oracle Enterprise Asset Management User's Guide).
To define asset import statuses
-
Navigate to the Oracle Manufacturing Lookups window.
Asset Import Statuses
-
Select EAM_ASSET_IMPORT_STATUS from the Type list of values.
-
Enter a numeric Code. Oracle recommends that you enter values in increments of 10, enabling you to easily add codes later.
Warning: Do not use alpha codes. Entering alpha codes causes database errors in the application.
-
Enter the Meaning, for example, Success.
-
Enter a Description.
-
Optionally enter a Tag to categorize lookup values. This field is for information purposes.
-
The Effective From Date defaults as the system date, but you can update this. Optionally enter a Effective To Date to indicate an expiration of the code.
-
Select the Enabled checkbox to enable this code for Enterprise Asset Management.
-
Save your work.
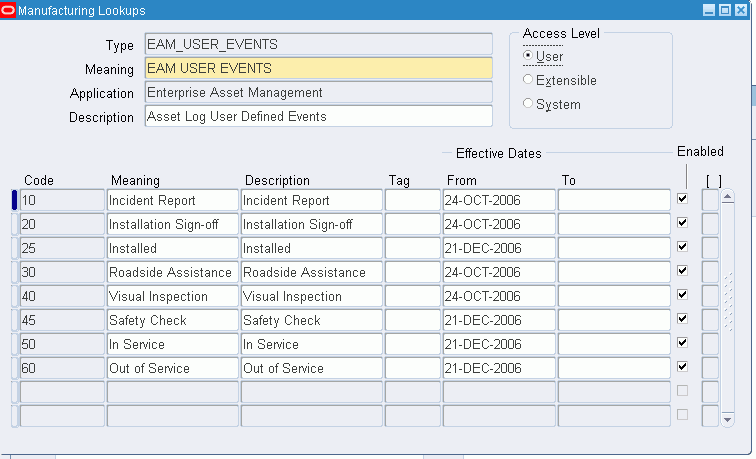
Asset Log User-defined Events
You can define events, and associate them to work order statuses. A Work Order might require approvals or notifications at different stages of its lifecycle. Workflow automates this process. You can initiate Workflow to generate notifications, approvals, transactions, and update a work order status. These statuses are used within your customized workflow (See: Setting Up Oracle Workflow, Oracle Workflow User's Guide and Setting Up the Business Event System, Oracle Workflow User's Guide). Asset Log User-defined Events are user-defined (See: Defining Lookups, Oracle Enterprise Asset Management User's Guide).
To define asset log user-defined events
-
Navigate to the Oracle Manufacturing Lookups window.
Asset Log User-Defined Events
-
Select EAM_USER_EVENTS from the Type list of values.
-
Enter a numeric Code. Oracle recommends that you enter values in increments of 10, enabling you to easily add codes later.
Warning: Do not use alpha codes. Entering alpha codes causes database errors in the application.
-
Enter the Meaning of the code.
-
Enter a Description.
-
The Effective From Date defaults as the system date, but you can update this. Optionally enter a Effective To Date to indicate an expiration of the code.
-
Select the Enabled checkbox to enable this code for Enterprise Asset Management.
-
Save your work.
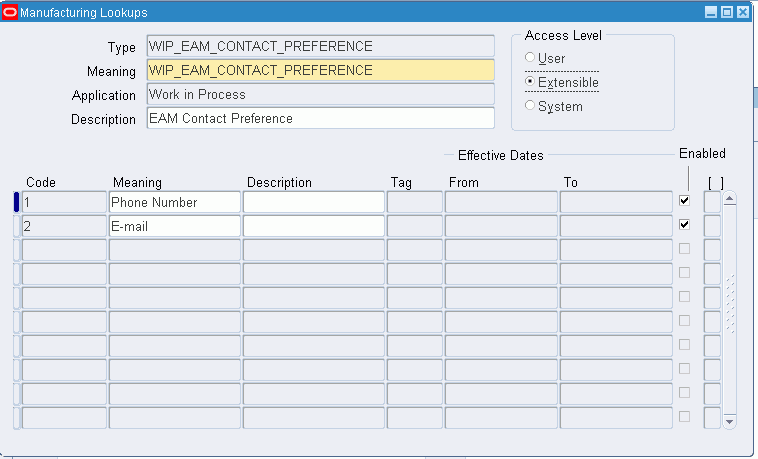
Contact Preferences
You can set up Contact Preferences. Contact preferences are extensible (See: Defining Lookups, Oracle Enterprise Asset Management User's Guide).
To define contact preferences codes
-
Navigate to the Oracle Manufacturing Lookups window.
Contact Preferences
-
Select WIP_EAM_CONTACT_PREFERENCE from the Type list of values.
-
Enter a numeric Code. Oracle recommends that you enter values in increments of 10, enabling you to easily add codes later.
Warning: Do not use alpha codes. Entering alpha codes causes database errors in the application.
-
Enter the Meaning of the code.
-
Enter a Description.
-
The Effective From Date defaults as the system date, but you can update this. Optionally enter a Effective To Date to indicate an expiration of the code.
-
Select the Enabled checkbox to enable this code for Enterprise Asset Management.
-
Save your work.
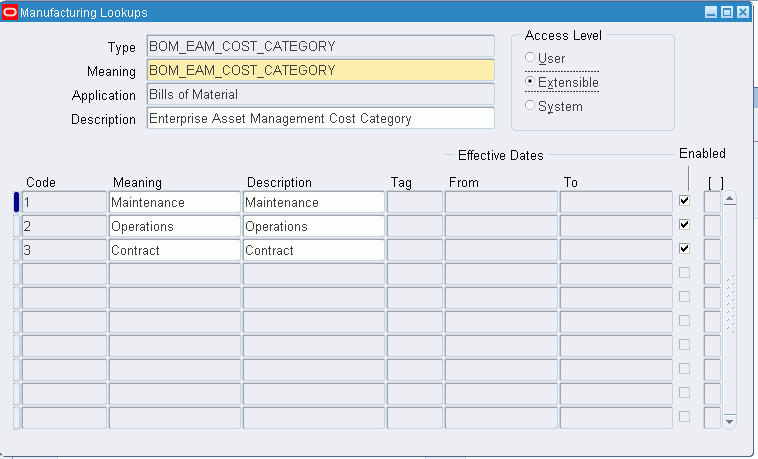
Cost Category Codes
Cost Category codes are used as the default for departments that do not have a cost category defined. Department costs are then posted to the appropriate cost elements. Valid values are Maintenance, Operations, Contract, and any other values that you might add within this extensible lookup table. See: Overview of eAM Cost Management, Oracle Enterprise Asset Management User's Guide.
To define cost category codes
-
Navigate to the Oracle Manufacturing Lookups window.
BOM Cost Category Codes
-
Select BOM_EAM_COST_CATEGORY from the Type list of values.
-
Enter a numeric Code. Oracle recommends that you enter values in increments of 10, enabling you to easily add codes later.
Warning: Do not use alpha codes. Entering alpha codes causes database errors in the application.
-
Enter the Meaning of the code, for example, High.
-
Enter a Description for the code.
-
Optionally enter a Tag to categorize lookup values. This field is for information purposes.
-
The Effective From Date defaults as the system date, but you can update this. Optionally enter a Effective To Date to indicate an expiration of the code.
-
Select the Enabled checkbox to enable this code for Enterprise Asset Management.
-
Save your work.
Criticality Codes
Criticality codes suggest the importance of an asset to an organization, for example, High and Low. An asset that has a direct impact on production or that is difficult to replace may be considered a critical asset. Asset criticality codes help you to determine the urgency of requested work. Asset criticality codes are referenced when defining an asset (See: Defining Asset Numbers, Oracle Enterprise Asset Management User's Guide). Asset Criticality Codes are extensible (See: Defining Lookups, Oracle Enterprise Asset Management User's Guide).
To define asset criticality codes
-
Navigate to the Oracle Manufacturing Lookups window.
Asset Criticality Codes
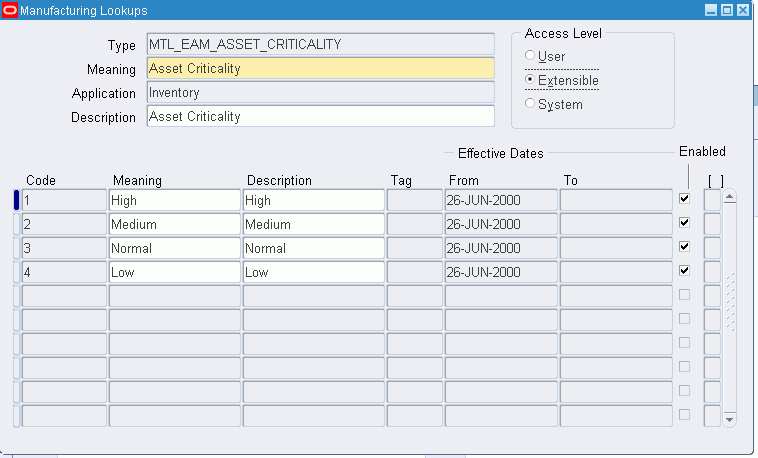
-
Select MTL_EAM_ASSET_CRITICALITY from the Type list of values.
-
Enter a numeric Code. Oracle recommends that you enter values in increments of 10, enabling you to easily add codes later.
Warning: Do not use alpha codes. Entering alpha codes causes database errors in the application.
Warning: Oracle recommends that you do not create more than 250 asset criticality codes in order to avoid performance issues.
-
Enter the Meaning of the code, for example, High.
-
Enter a Description for the code.
-
Optionally enter a Tag to categorize lookup values. This field is for information purposes.
-
The Effective From Date defaults as the system date, but you can update this. Optionally enter a Effective To Date to indicate an expiration of the code.
-
Select the Enabled checkbox to enable this code for Enterprise Asset Management.
-
Save your work.
Failure Code Types
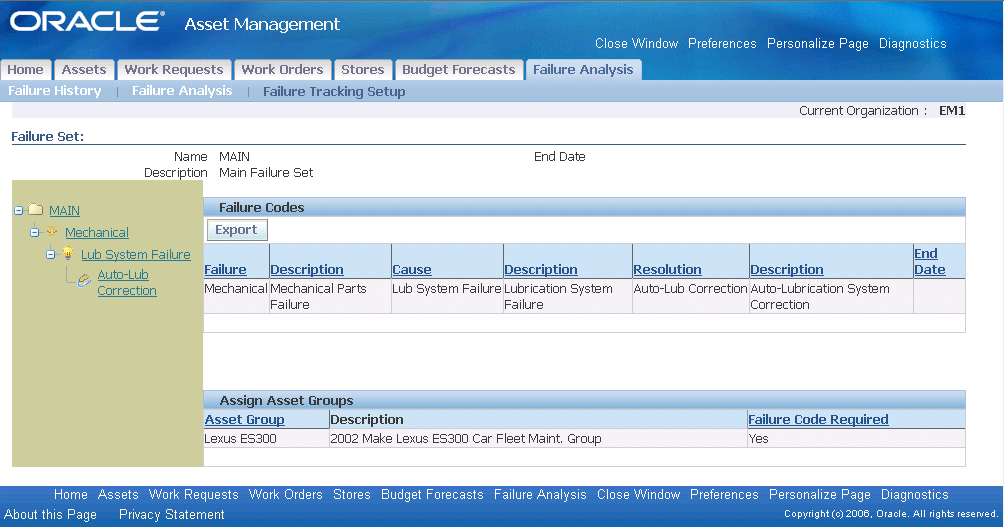
Failure codes, Cause codes and Resolution codes are organized into multiple tree structures called Failure Code Sets, which are then assigned to asset groups. Each set provides asset group-specific information on the possible failures of an asset group, the possible causes of each failure, and the possible resolutions for each cause. Assets within an asset group inherit the assigned Failure Code Set. At the work order level, Failure Tracking codes are entered to report a failure, its cause, and resolution. (See: Failure Analysis Overview, Oracle Enterprise Asset Management User's Guide). You can optionally update Failure Code Types' meanings.
To define failure code types
-
Navigate to the Oracle Manufacturing Lookups window.
Failure Code Types
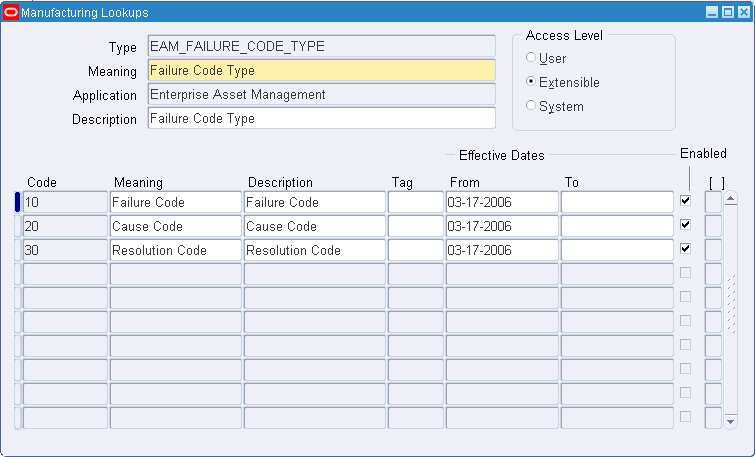
-
Select EAM_FAILURE_CODE_TYPE from the Type list of values.
-
Optionally update the Meaning, for example, Failure Code.
-
Enter a Description
-
Optionally enter a Tag to categorize lookup values. This field is for information purposes.
-
The Effective From Date defaults as the system date, but you can update this. Optionally enter a Effective To Date to indicate an expiration of the code.
-
Select the Enabled check box to enable this code for Enterprise Asset Management.
-
Save your work.
Work Request Statuses
Work Request Approval is the process of changing a Work Request status from Open to Awaiting Work Order. Maintenance Work Orders are linked to Work Requests with a status of Awaiting Work Order. When defining the Enterprise Asset Management parameters (See: Defining eAM Parameters, Oracle Enterprise Asset Management User's Guide), if the Auto Approve check box is selected, Work Requests are created with an automatic status of Awaiting Work Order, for that organization. If the check box is not selected, Work Requests are created with a status of Open; any user who receives the notification (See: Defining Department Approvers, Oracle Enterprise Asset Management User's Guide) can change the Work Request status to Awaiting Work Order. A plant or facility might need to include additional statuses. Currently, the workflow cannot be customized to work with user-defined Work Request statuses. Work Request Approval statuses are extensible (See: Defining Lookups, Oracle Enterprise Asset Management User's Guide).
To define Work Request statuses
-
Navigate to the Oracle Manufacturing Lookups window.
Work Request Statuses
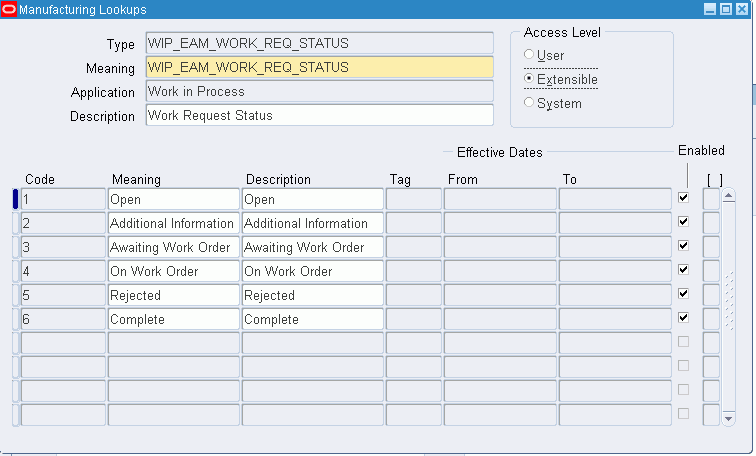
-
Select WIP_EAM_WORK_REQ_STATUS from the Type list of values.
-
Optionally add additional Codes to the pre-existing list of codes. The codes that are pre-existing cannot be deleted, however their Meanings can be modified.
Warning: Do not use alpha codes. Entering alpha codes causes database errors in the application.
-
Enter the Meaning of the code, for example, Open.
-
Enter a Description for the code.
-
Optionally enter a Tag to categorize lookup values. This field is for information purposes.
-
Optionally enter Effective From and To Dates to indicate an expiration of the code.
-
Select the Enabled check box to enable this code for Enterprise Asset Management.
-
Save your work.
Work Request Types
Work Request Types describe and categorize Work Requests. For example, Manual, System, Routine, Capital, and Furniture. Work Request Types are extensible (See: Defining Lookups, Oracle Enterprise Asset Management User's Guide).
To define a Work Request type
-
Navigate to the Oracle Manufacturing Lookups window.
Work Request Types
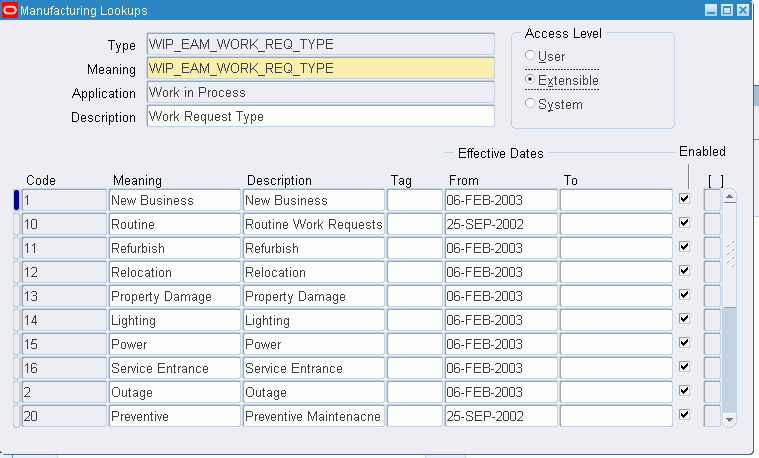
-
Select WIP_EAM_WORK_REQ_TYPE from the Type list of values.
-
Enter a numeric Code. Oracle recommends that you enter values in increments of 10, enabling you to easily add codes later.
Warning: Do not use alpha codes. Entering alpha codes causes database errors in the application.
-
Enter the Meaning of the code, for example, Manual.
-
Enter a Description for the code.
-
Optionally enter a Tag to categorize lookup values. This field is for information purposes.
-
The Effective From Date defaults as the system date, but you can update this. Optionally enter a Effective To Date to indicate an expiration of the code.
-
Select the Enabled checkbox to enable this code for Enterprise Asset Management.
-
Save your work.
Work Order and Work Request Priority Codes
Work Order Priority Codes contribute to the organization and execution of Work Orders. For example, High, Medium, and Low, or 1,2, and 3, respectively. Typically, a priority is assigned by the people entering Work Requests and Work Orders. The planner or supervisor compares this priority to the asset criticality (See: Asset Criticality Codes, Oracle Enterprise Asset Management User's Guide). These codes are entered when creating Activity associations, Work Orders, and Work Requests. Typically, a priority is assigned by the person that enters the Work Request and its related Work Order. Priority specified during Activity association becomes the Work Order priority when a Work Order is created, using the Activity Association (See: Routine Work Orders, Oracle Enterprise Asset Management User's Guide and Work Requests, Oracle Enterprise Asset Management User's Guide). Work Order Priority Codes are extensible (See: Defining Lookups, Oracle Enterprise Asset Management User's Guide).
To create work order priority codes
-
Navigate to the Oracle Manufacturing Lookups window.
Priority Codes

-
Select WIP_EAM_ACTIVITY_PRIORITY from the Type list of values.
-
Optionally add additional codes to the pre-existing list of codes. The codes that are pre-existing cannot be deleted, however their Meanings can be modified.
Warning: Do not use alpha codes. Entering alpha codes causes database errors in the application.
-
Enter the Meaning of the code, for example, High.
-
Enter a Description for the code.
-
Optionally enter a Tag to categorize lookup values. This field is for information purposes.
-
The Effective From Date defaults as the system date, but you can update this. Optionally enter a Effective To Date to indicate an expiration of the code.
-
Select the Enabled check box to enable this code for Enterprise Asset Management.
-
Save your work.
Work Order Reconciliation Codes
Reconciliation Codes detail how Work Orders and operations were completed. These codes usually fall within two categories: Completed as Planned or Partial Completion. You can further define the condition within these two types of completion statuses. These codes enable you to evaluate Work Orders by percentage completed or delayed, and if they were delayed, the reason for the delay. Reconciliation Codes are extensible (See: Defining Lookups, Oracle Enterprise Asset Management User's Guide).
To define Work Order reconciliation codes
-
Navigate to the window.
Work Order Reconciliation Codes
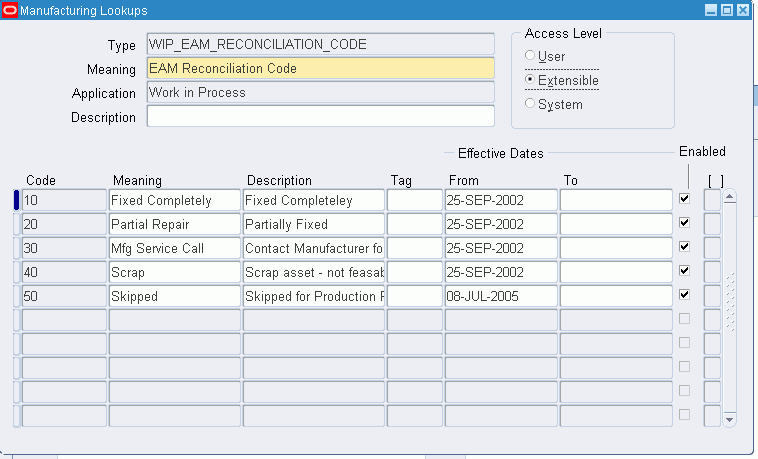
-
Select WIP_EAM_RECONCILIATION_CODE from the Type list of values.
-
Enter a numeric Code. Oracle recommends that you enter values in increments of 10, enabling you to easily add codes later.
Warning: Do not use alpha codes. Entering alpha codes causes database errors in the application.
-
Enter the Meaning of the code, for example, Fixed Completely.
-
Enter a Description for the code.
-
Optionally enter a Tag to categorize lookup values. This field is for information purposes.
-
The Effective From Date defaults as the system date, but you can update this. Optionally enter a Effective To Date to indicate an expiration of the code.
-
Select the Enabled check box to enable this code for Enterprise Asset Management.
-
Save your work.
Work Order Types
Work order types enable you to differentiate work orders. For example, Routine, and Rebuild. Maintenance management can use this information to sort and monitor work activity for reporting and budgeting. Work order types are referenced in the activity and work order.
Work order types are created manually or automatically. For example, rebuildable work orders are created automatically or manually (See: Rebuild Work Orders, Oracle Enterprise Asset Management User's Guide). Preventive maintenance work orders are created automatically, based on meter readings (See: Preventive Maintenance Work Orders, Oracle Enterprise Asset Management User's Guide).
Work order types are extensible (See: Defining Lookups, Oracle Enterprise Asset Management User's Guide).
To define work order types
-
Navigate to the Oracle Manufacturing Lookups window.
Work Order Types
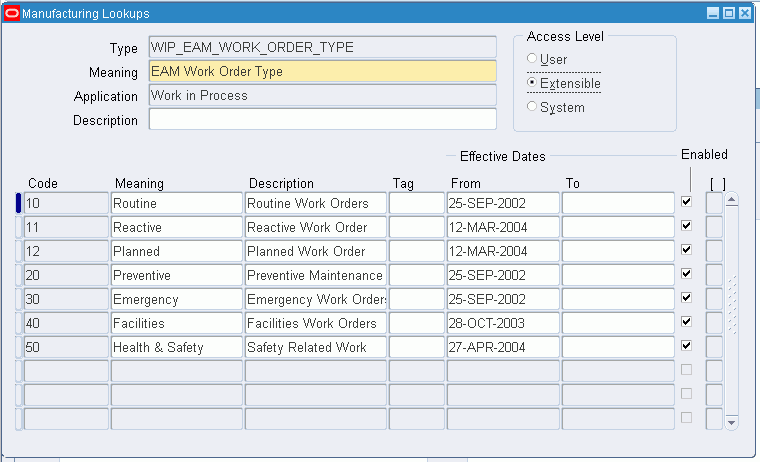
-
Select WIP_EAM_WORK_ORDER_TYPE from the Type list of values.
-
Enter a numeric code. Oracle recommends that you enter values in increments of 10, enabling you to easily add codes later.
Warning: Do not use alpha codes. Entering alpha codes causes database errors in the application.
-
Enter the Meaning of the code, for example, Routine.
-
Enter a Description for the code.
-
Optionally enter a Tag to categorize lookup values. This field is for information purposes.
-
The Effective From Date defaults as the system date, but you can update this. Optionally enter a Effective To Date to indicate an expiration of the code.
-
Select the Enabled check box to enable this code for Enterprise Asset Management.
-
Save your work.
Asset Setup
Asset Setup includes the following tasks:
Setting Up Category Codes
Category codes are used as naming conventions for assets by creating classes and subclasses. They are user defined, and used to logically group assets, simplifying the search for Asset Numbers.
For example, Cranes are classified by several different types, such as Overhead Cranes, Jib Cranes, and Mobile Cranes. You can query using the class CRANE, which displays all assets defined as Cranes within that organization. If you enter CRANES.JIB, the system would then narrow the results to just those assets defined as Jib Cranes. With both queries, you can identify assets based on familiar names, rather than numbers.
Category codes are first defined, then added to the Enterprise Asset Management Category Set. After they belong to this category set, they are associated with Asset Groups, which tie to individual assets. See also: Defining Categories and Defining Category Sets, Oracle Inventory User's Guide.
To set up category codes
-
Navigate to the Find Categories window. You can find existing category codes, or create new ones.
-
Choose New.
Categories
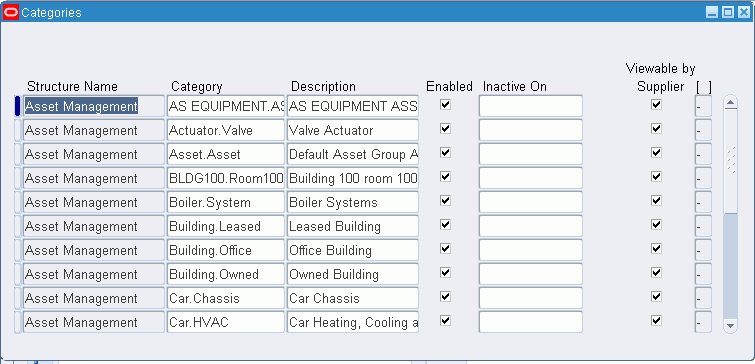
-
Select the Asset Management category to create a new Class.Subclass from the Structure Name list of values.
-
Enter in a new Category, for example TRUCK.FRKLFT.
-
Add a long Description for this category.
-
Optionally select the Enabled check box to indicate that this category is enabled.
-
Optionally enter an Inactive On date.
-
Optionally select the Enabled for iProcurement check box to indicate that this category is enabled for iProcurement.
-
Optionally select the Viewable by Supplier check box to indicate that this category is viewed by the Supplier.
-
Save your work.
To set up category sets
To associate Category Codes (TRUCK.FRKLFT) with an Asset Group, first define the item category relationship using the Category Sets menu option.
-
Navigate to the Category Sets window.
Category Sets
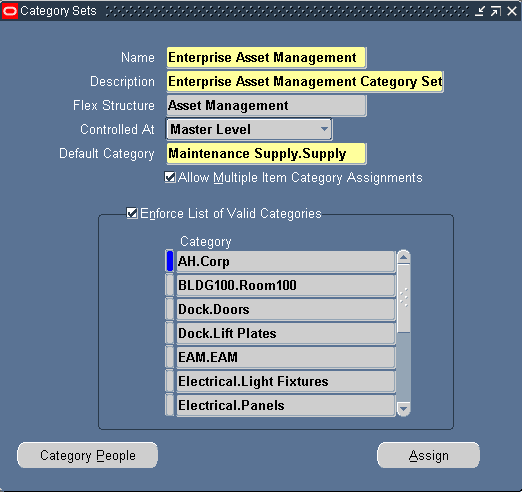
-
Select the flashlight icon from the tools menu, then select Enterprise Asset Management.
-
A description defaults; you can optionally change it.
-
Select Asset Management from the Flex Structure list of values.
-
Indicate the Controlled At level. Valid values are Master Level, and Organization Level.
-
Enter a Default Category code for the Category Set.
-
If you select Allow Multiple Item Category Assignments, you can define a series of categories, such as Crane.Jib, and Crane.Overhead, that are associated to a single Asset Group.
-
If you select Enforce List of Valid Categories, you are preventing users from entering incorrect categories that are not associated with the Asset Group associated with the asset being created.
-
Enter the Category Codes that you want to associate with this category set.
-
Select Assign to display a table enabling you to associate the categories with an Asset Group.
-
Save your work.
Defining Asset Groups
During implementation, Asset Group (Asset Group or Rebuildable Item) names should be established. Asset Groups represent groups of assets that are virtually identical. Generally, an Asset Group is defined for each Manufacturer and Model Number combination (Make, Model, and Year). Examples include Acme Model 123 Pump and Ford F150 2002 Truck.
Note: If you have assets in your organization that are virtually identical (for example, the same manufacturer and model), consider creating an asset group for those assets.
Note: The Asset Groups window does not support electronic signatures. If you create an asset group, the record does not contain your electronic signature.
To set up asset groups
-
Navigate to the Asset Groups window.
Asset Groups

-
Enter the name of the Asset Group.
-
Enter a Description for this Asset Group, up to 240 characters.
-
Select the @Asset Group Template to quickly apply attribute values, and to ensure that the appropriate attributes are applied.
Note: You can create Asset Groups using the template described above, or you can copy an Asset Group from an existing Asset Group (See: Defining Items, Oracle Inventory User's Guide).
The following table presents the necessary attribute values that are applied automatically to the Asset Group, when using the template:
Asset Group Attributes Attribute Value User Item Type Asset Group Item Status Active Inventory Item Enabled Transactable Disabled Serial Number Generation Predefined Effectivity Control Model/Unit Number EAM Item Type Asset Group -
In the Serial Generation region, select Predefined for the Generation value.
-
Define a Starting Prefix and Starting Number for this Asset Group. If Serial Generation is set at Item Level for the Organization, the system defaults the prefix, along with the starting number sequence, when a new Asset Number is created for this Asset Group.
-
Save your work.
To access failure analysis information
You can access the Failure Set page to view failure tracking codes that are assigned to the current Asset Group.
-
From the Asset Groups window, select Maintain Failure Set from the Tools menu. If the asset group does not have an associated Failure Set, this menu option is disabled. See: Defining Failure Codes and Sets, Oracle Enterprise Asset Management User's Guide and Failure Analysis Overview, Oracle Enterprise Asset Management User's Guide.
-
Close the window.
To associate asset groups with multiple organizations
-
From the Asset Groups window, select Item Details from the Tools menu.
-
Select the Organization Assignment tab.
-
Enter additional organizations in the available table.
-
After saving your work, you can create Assets for this Asset Group.
Defining Activities
Activities provide you with a standard template of jobs, which are applied to Work Orders, such as Routine or Preventive Maintenance. After these Activity Templates are created, they are associated with one or more Asset Numbers or Rebuildables (See: Activity Association Templates and Rebuildable Item/Activity Association). They are also associated to a maintenance BOM (See: Setting Up Activity Bills of Material) and activity routing (See: Defining Asset Routes), containing the materials and resources needed for operations, respectively. When Work Orders are created for assets associated to the Activity, the material and resources associated with the current Activity automatically copy to the Work Orders created.
There are three methods you can use to create an Activity. You can create an Activity within the Master Activity (Master Item) window, create Activities from the Activity Workbench, and create Activities from within a Maintenance Work Order.
To set up activities within the Master Activity window
-
Navigate to the Activity (Master Item) window. The Master Item window is used to create Asset Groups, Activities, and rebuildable.
Master Item
-
Enter the name of the activity in the Item field.
-
Enter a Description for this activity, up to 240 characters.
-
Use the @Activity template to quickly apply attribute values, and to ensure that the appropriate attributes are applied.
-
Select Tools from the Tools menu, and then select Copy From.
-
Select the @Activity template.
Note: You can create Activities using the template described above, or you can copy an Activity from an existing Activity (See: Defining Items, Oracle Inventory User's Guide).
The following table presents the necessary attribute values that are applied automatically to the Activity, when using the template:
Activity Attributes Attribute Value User Item Type Activity Item Status Active Inventory Item Enabled EAM Item Type Activity -
-
Select the Asset Management tab.
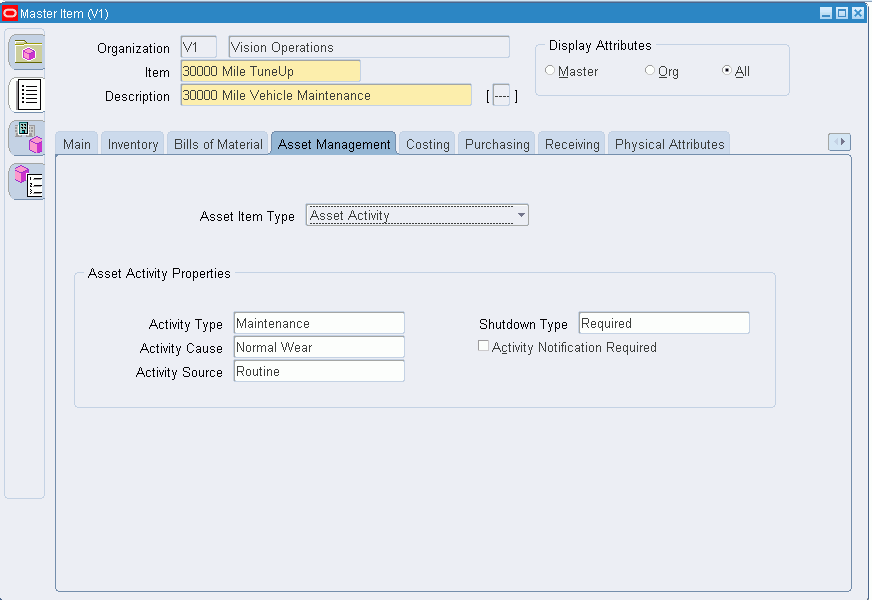
In the Activity Property region, optionally enter an Activity Type to indicate the type of maintenance for this Activity. It is used when defining a Work Order. It should remain generic, and should not describe the job in detail. For example, Inspection, Overhaul, Lubrication, Repair, Servicing, or Cleaning.
-
Optionally select an Activity Cause to specify what situation caused this work to generate. For example, Breakdown, Vandalism, Normal Wear, or Settings.
-
Optionally select an Activity Source. Activity Source codes are reasons activities are executed. For example, Warranty Compliance, OSHA Compliance, or Military Specification Requirements. See: Activity Sources.
-
Optionally select a Shutdown Type. This indicates whether a shutdown is necessary to perform this maintenance activity. For example Required, and Not Required. This field is for information purposes.
-
Optionally select an Activity Notification Required value to indicate whether the asset requiring work is mobile, and should be brought into the shop for repairs. This field is for information purposes.
-
Save your work. After saving your work, this activity can be associated with an asset (See: Activity Association Templates).
To associate activities to multiple organizations
-
From the Master Item window, select TOOLS from the Tools menu.
-
Select the Organization Assignment.
-
Enter additional organizations in the available window.
-
Save your work.
To associate Assets with activities
After you have defined Asset Groups (See: Defining Asset Groups), Assets (See: Defining Asset Numbers), and Activities, you can associate the Activities with assets and/or rebuildables. However, you can streamline the creation of Activities and associations using an Activity Association Template (See: Activity Association Templates). Assets are associated with Activities before entering the Activity into a Preventive Maintenance Schedule.
Note: The Activity Workbench is generally used to streamline your Activity setups, including Asset Number/Activity associations (See: Using the Activity Workbench). Also, you can streamline the creation of Activity associations using an Activity Association Template. For example, when you create an Asset Group, and then Asset Numbers within that group, you do not need to utilize the Association window to associate those Asset Numbers with an Activity. If you create an Activity Association Template, the Activity that you associate with the current Asset Number's Asset Group automatically determines the Activity that is associated with the current Asset Number (See: Activity Association Templates).
You can also use Oracle Web Services to automatically create, update and search for asset activity associations. These public interfaces enable you to more easily convert data from another instance or another system. These web services are annotated and available in the I-Repository along with other public Oracle APIs. (See: Oracle Manufacturing APIs and Open Interfaces Manual for more information on APIs.)
-
Navigate to the Activity Association window.
Activity Association
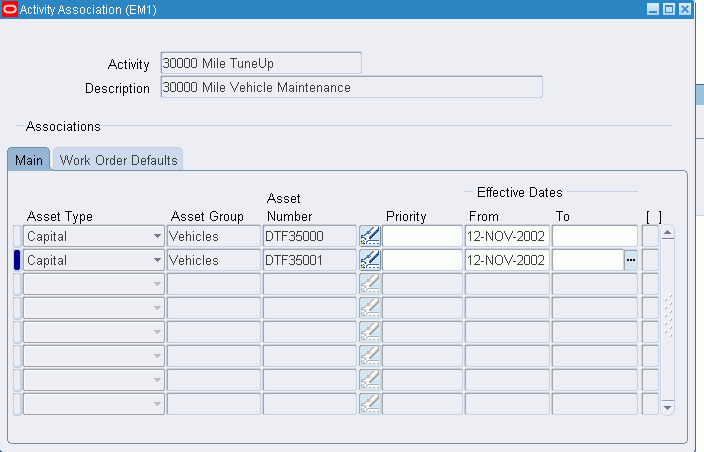
-
Select an Activity.
-
Within the Main tab, select Asset or Rebuildable from the Item Type list of values. This field works directly with the Asset Group and Asset Item fields. If Asset is selected, the Asset Group refers to the Asset Group, and the Asset Number refers to the Asset Number. If Rebuildable is selected, the Asset Group refers to the Rebuildable Item, and the Asset Number refers to the specific serial numbers for the current Rebuildable Item.
-
Select an Asset Group. If Asset is populated in the Item Type field, Asset Groups are available.
-
Select an Asset Number. Asset Numbers associated with the previously selected Asset Group are available. Asset Numbers are always serial controlled. If you had selected a Non-serialized Rebuildable in the Asset Group field, then an Asset Number value is not required.
-
Optionally select a Priority Code. This field is for information purposes.
-
Optionally enter Effective Dates. If the Effective From field is left blank, it defaults to the system date. If the Effective To field is left blank, it defaults to NULL.
-
Within the Activity tab, the Activity Cause defaults from the Activity definition (See: Defining Activities), specifying what situation caused this work to generate. For example, Breakdown, Vandalism, Normal Wear, or Settings. Optionally you can select an Activity Cause.
-
The Activity Type defaults from the Activity definition (See: Defining Activities). This code indicates the type of maintenance activity to perform for this Activity. It is used when defining a job or a standard job. This code should remain generic, and should not describe the job in detail. For example, Inspection, Overhaul, Lubrication, Repair, Servicing, or Cleaning. Optionally you can select an Activity Type.
-
Optionally select the Tagging Required check box to indicate whether tag out procedures are required. The Area may need securing for operations required for carrying out a Work Order. Tags are generally printed and placed on an asset, warning the plant that the asset is shutdown, and should not be started. This check box helps the planner isolate those jobs that require a tagout. This is for information.
-
The Owning Department responsible for this activity or asset defaults from the Asset Number definition (See: Defining Asset Numbers). Optionally you can select an Owning Department. This is normally a Planner or Supervisor.
-
Optionally select a Shutdown Type. This indicates whether a shutdown is necessary to perform this maintenance activity. For example Required, and Not Required. This field is for information purposes. This value defaults from the Master Activity information that was created within the Master Item window. See: Defining Activities.
-
Optionally select a WIP Accounting Class. You can update the value that defaults from the Enterprise Asset Management Parameters information, for the current organization. See: Defining eAM Parameters.
-
Optionally select an Activity Source. Activity Source codes are reasons activities are executed. For example, Warranty Compliance, OSHA Compliance, or Military Specification Requirements. See: Activity Sources. This value defaults from the Master Activity information that was created within the Master Item window. See: Defining Activities.
-
Save your work.
Activity Association Templates
Activities provide you with a standard template of jobs, which are applied to Work Orders, such as Routine or Preventive Maintenance. After these Activity Templates are created, they are associated with one or more Asset Numbers or Rebuildables (See: Activity Association Templates, Oracle Enterprise Asset Management User's Guide and Rebuildable Item/Activity Association, Oracle Enterprise Asset Management User's Guide). They are also associated to a maintenance BOM (See: Setting Up Activity Bills of Material, Oracle Enterprise Asset Management User's Guide) and activity routing (See: Defining Asset Routes, Oracle Enterprise Asset Management User's Guide), containing the materials and resources needed for operations, respectively. When Work Orders are created for assets associated to the Activity, the material and resources associated with the current Activity automatically copy to the Work Orders created.
You can streamline the creation of Activity associations using an Activity Association Template. For example, when you create an Asset Group, and then Asset Numbers within that group, you do not need to utilize the Association window to associate those Asset Numbers with an Activity. If you create an Activity Association Template, the Activity that you associate with the current Asset Number's Asset Group automatically determines the Activity that is associated with the current Asset Number.
Note: The Activity Workbench is generally used to streamline your Activity setups, including Activity Association Templates (See: Using the Activity Workbench, Oracle Enterprise Asset Management User's Guide).
To create activity association templates
-
Navigate to the Activity Association Template window.
Activity Association Template
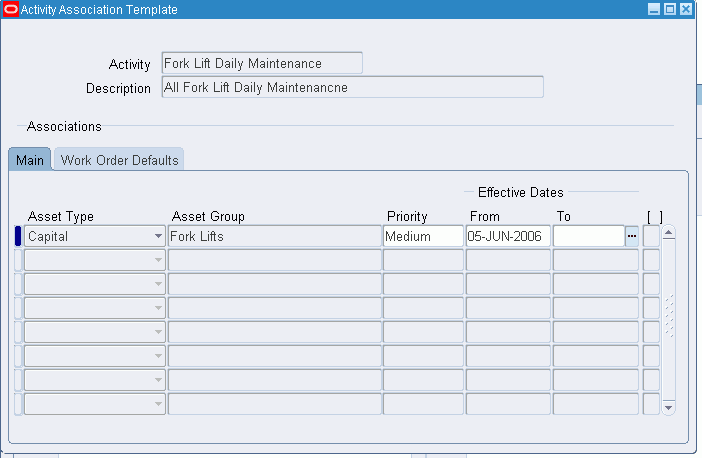
-
Select a valid Activity. The Activity needs to already have been created within the Master Item window.
-
Within the Main tab, select an Item Type of Asset or Rebuildable.
-
Select an Asset Group. After this record is saved, this Asset Group is associated with the current activity. Each asset number created within the current asset group is automatically associated with the current activity.
-
Optionally select a Priority code. This value defaults from the Master Activity information created within the Master Item window.
-
Optionally enter Effectivity Dates for this Activity Template.
-
Within the Activity tab, optionally select an Activity Cause. This value specifies what situation caused this work to generate. For example, Breakdown, Vandalism, Normal Wear, or Settings. This value defaults from the Master Activity information created within the Master Item window. See: Defining Activities, Oracle Enterprise Asset Management User's Guide.
-
Optionally select an Activity Type to indicate the type of maintenance for this Activity. It is used when defining a work order. It should remain generic, and should not describe the job in detail. For example, Inspection, Overhaul, Lubrication, Repair, Servicing, or Cleaning. This value defaults from the Master Activity information created within the Master Item window. See: Defining Activities, Oracle Enterprise Asset Management User's Guide.
-
Optionally select the Tagging Required check box to indicate whether tag out procedures are required. The Area might need to be secured for operations required for carrying out a work order. Tags are generally printed and placed on an asset, warning the plant that the asset is shutdown, and should not be started. This check box helps the planner isolate those jobs that require a tagout. This is for informational purposes only.
-
Optionally select an Owning Department. This value defaults from the Enterprise Asset Management Parameters information for the current organization. See: Defining eAM Parameters, Oracle Enterprise Asset Management User's Guide.
-
Optionally select a Shutdown Type to indicate whether a shutdown is necessary to perform this maintenance activity. For example Required, and Not Required. This field is for informational purposes. This value defaults from the Master Activity information that was created within the Master Item window. See: Defining Activities, Oracle Enterprise Asset Management User's Guide.
-
Optionally select a WIP Accounting Class. This value defaults from the Enterprise Asset Management Parameters information for the current organization. See: Defining eAM Parameters, Oracle Enterprise Asset Management User's Guide.
-
Optionally select an Activity Source. Activity Source codes are reasons activities are executed. For example, Warranty Compliance, OSHA Compliance, or Military Specification Requirements. See: Activity Sources, Oracle Enterprise Asset Management User's Guide. This value defaults from the Master Activity information that was created within the Master Item window. See: Defining Activities, Oracle Enterprise Asset Management User's Guide.
-
Save your work.
Setting Up Attributes
You can define common characteristics data specific to Asset Groups, such as Facility Information, Engineering Specifications, Regulation Requirements, Horsepower, Voltage, and Square Footage, by creating Attribute Groups using descriptive flexfields. After the Attribute Group is created, you can then assign it to an Asset Group. This enables you to define additional characteristics data when defining an asset associated with the Asset Group. This provides extensive query capabilities. Attribute groups are descriptive flexfields, defined by segments and values.
For example, you can define an Attribute Group, Front Loader Nameplate data. This group can then be associated with the CARS Asset Group. When defining an asset within the CARS Asset Group, you can optionally utilize the attributes to specify nameplate data (specified data such as make, year, and model) for the asset. This creates a simplified way of entering specified data (See: Defining Asset Numbers, Oracle Enterprise Asset Management User's Guide) related to a specific Asset Group.
To set up attributes
-
Navigate to the Descriptive Flexfield Segments window.
Descriptive Flexfield Segments
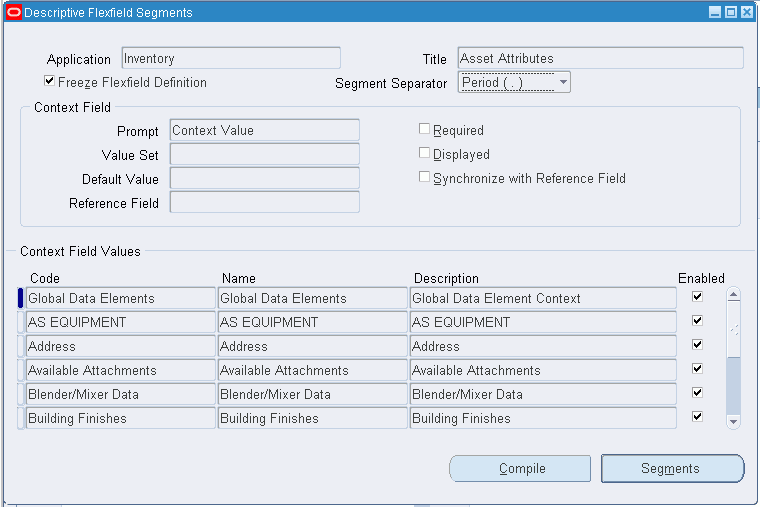
-
Select the flashlight icon from the tool bar, and then select the Oracle Inventory Application with the Title, Asset Attributes.
-
Unfreeze the Flexfield Definition by clearing the Freeze Flexfield Definition check box.
-
In the Context Field Values region, select a row, then click the New icon. A blank row is added for you to create an attribute group.
-
Enter the attribute group name in the Code field.
-
Optionally enter a Description for this attribute group.
-
Select Segments to add attributes to the attribute group you just created.
Segments Summary
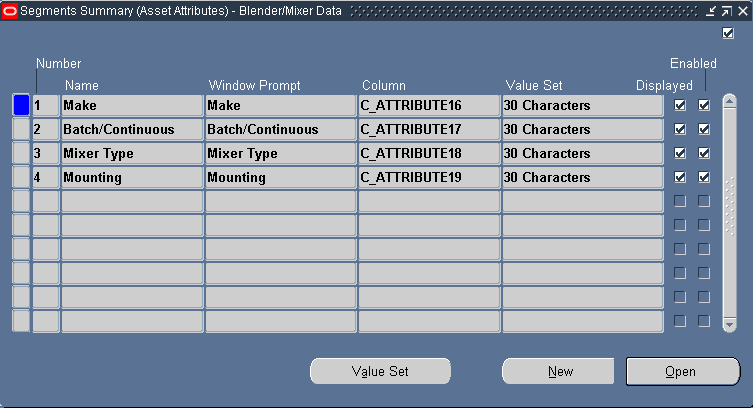
-
Enter a Number to sequence the data.
-
Define the Name of the specific attribute. The Window Prompt defaults to this name.
-
Select a Column value.
-
Select a Value Set, or optionally choose Value Set to create a new one.
-
If the Displayed check box is selected, this attribute appears for you when defining data for an asset within the Asset Group (for example, CARS) associated with the attribute group (for example, NAMEPLATE) in which this attribute (for example, Make) resides.
-
Optionally select the Enabled check box to enable the attribute for availability when defining assets (See: Defining Asset Numbers, Oracle Enterprise Asset Management User's Guide).
-
Save your work, and return to the Descriptive Flexfield Segments window.
-
Select the Freeze Flexfield Definition check box. Failure to do this prevents you from querying the segments from the Attribute window.
-
Save your work.
To associate the Attribute Group with an Asset Group
-
Navigate to the Attributes Assignment window.
In the below example, any asset created within the Fork Lift Asset Group has the Fork Lift Classifications attribute group available as an option for data entry.
Attributes Assignment
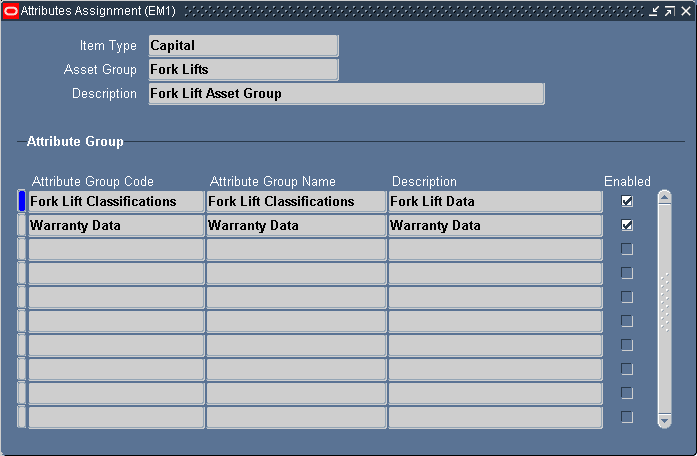
-
Select an Asset Group. See: Defining Asset Groups.
-
Select an Attribute Group Code.
You can have an unlimited number of Attribute Groups associated with an Asset Group.
-
Save your work.
Defining Asset Documents
You can attach existing documents to an asset, and create text to associate with an asset. You can attach text, URLs, or files, such as spreadsheets, graphics, and OLE objects. When creating a work order for an asset with attachments, you can attach the asset's attachments to the Work Order. For this to function, the appropriate attachment category, Asset Attachments (1), must be associated with the attachment function, EAMWOMDF (See: Working With Attachments, Oracle Applications User's Guide.
To define asset documents
-
Navigate to the EAM Asset Documents window.
EAM Asset Documents
-
Select a Data Type.
-
If the Data Type is File, attach the appropriate File. If the Data Type is Web Page, enter the relevant URL. If the Data Type is Short Text, insert the text in the text field.
For information on all fields, See: Working With Attachments, Oracle Applications User's Guide.
Defining Asset Numbers
Enterprise Asset Management provides three methods in which you can enter a new asset. You can create them individually, by copying information from an existing asset, utilize the multiple asset entry method, or use the Import Asset Number interface.
You can also use Oracle Web Services to automatically create, update and search for asset numbers. These public interfaces enable you to more easily convert data from another instance or another system. These web services are annotated and available in the I-Repository along with other public Oracle APIs. (See: Oracle Manufacturing APIs and Open Interfaces Manual for more information on APIs.)
Warning: You cannot use “_” or “%” when creating an asset number using Oracle eAM.
In addition, when an asset is received and delivered to Inventory, an asset number is created automatically.
Prerequisites
You must set up the following task prior to defining asset numbers in Oracle eAM:
-
Define asset groups. See: Defining Asset Groups, Oracle Enterprise Asset Management User's Guide
To define assets individually
-
Navigate to the Define Asset Number window.
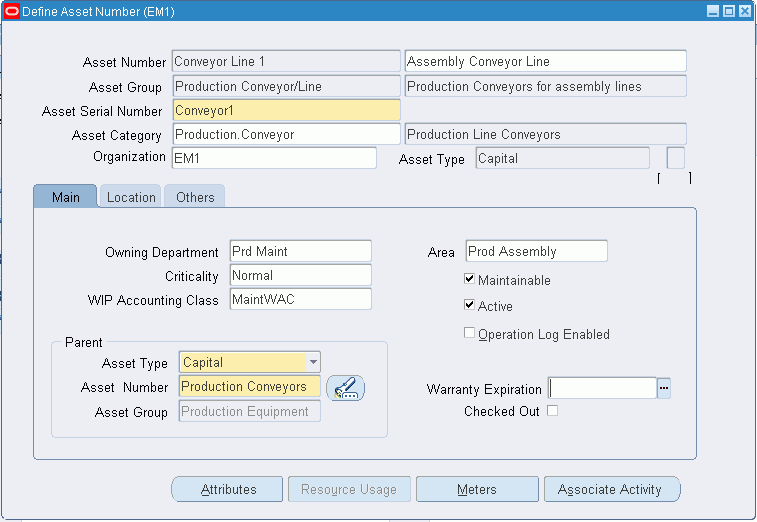
-
Enter an Asset Number if you do not have them automatically generated, or accept or modify the default, if you have automatic number generation enabled (See: Defining eAM Parameters, Oracle Enterprise Asset Management User's Guide).
After an asset is saved, it cannot be deleted. The asset can be deactivated if there are no open work orders or work requests for the asset, and if the asset is not part of an asset hierarchy.
-
Optionally enter an Asset Description, up to 240 characters.
-
Select an Asset Group. This asset group is associated with this asset.
Note: After an Asset Group is associated with an asset and then saved, it cannot be changed.
-
Enter a value in the Asset Serial Number field, or accept the default value that appears if automatic number generation is enabled.
Note: The Asset Serial Number can be modified to be identical to the Asset Number.
The Asset Serial Number might have a non-unique value across organizations, but the Asset Number must be globally unique, regardless of the defaulting value. When an asset number generates automatically at receipt by the Deliver to Inventory transaction, it defaults to the Item Instance number. You can change it, as long as it is a globally unique number.
-
Optionally associate this asset to an Asset Category. This is the Class and Subclass code, such as CRANE.OVERHEAD or BUILDING.FLOOR. See: Setting Up Category Codes and Sets, Oracle Enterprise Asset Management User's Guide.
-
Optionally, change the defaulted Organization. This organization may be different than the eAM-enabled organization that maintains the asset. You can define an Asset Group and Asset Number directly in the production organization.
You can define an Asset Group in an organization that is not eAM-enabled, if it is associated with an eAM-enabled organization in its Organization parameters.
In this Define Asset Number window, you can define an asset number for asset groups defined in the eAM-enabled organization itself, and also for asset groups that are defined in organizations that are maintained by the eAM organization, by specifying the organization is this field. The list of values includes the eAM-enabled organization, as well as all organizations that are not eAM-enabled but are associated with the eAM-enabled organization in their Organization Parameters.
-
Within the Main tab, optionally select an owning Department for this asset to represent the crew responsible for the asset. Notifications regarding work requests are sent to the Primary Approver of the work request's associated asset's current owning department (See: Defining Department Approvers, Oracle Enterprise Asset Management User's Guide and Defining Asset Numbers, Oracle Enterprise Asset Management User's Guide).
-
Optionally select a Criticality code to indicate the importance of the asset to the organization. This field is for information purposes.
-
Optionally select a WIP Accounting Class to identify the Expense cost elements associated with the work performed, such as materials, labor, and resources.
-
Optionally enter the area where this asset resides. This is a user-defined listing of logical areas of work. For example, North Plant, East Wing, or Area 1 (See: Setting Up Areas, Oracle Enterprise Asset Management User's Guide).
-
Indicate whether this asset is maintainable. If the Maintainable check box is selected, you can create work requests and work orders for this asset.
For example, you can create an asset for cost-tracking purposes. For example, you might want to view the cost for all top level assets in an asset hierarchy, but you do not want to maintain those assets. In this situation, do not select this check box.
Note: After work orders are created for this asset, you cannot clear this check box unless those work orders are at Complete, Canceled or Closed statuses.
-
Optionally select the Active check box to indicate that the asset is functioning, for example, maintenance work orders can be created for this asset. This check box change when you activate or deactivate an asset from the Tools menu.
-
Indicate whether Asset Operational Logging is enabled for this asset. If you select the Operation Log Enabled check box, you can view all current and past asset operational information, such as Check Out, Check In, associated work requests and work orders. You can remove or add a child asset, remove a parent asset, activate or deactivate the asset, transfer the asset to another location, and receive or issue the asset into/from Inventory. By default, logging is turned off for an asset. See: Asset Operational Logging, Oracle Enterprise Asset Management User's Guide.
-
Within the Parent region, optionally select a parent Asset Number to establish asset hierarchy information. Work order costs roll up through the Parent/Child hierarchies defined, and can roll up to any level within an asset hierarchy. This enables you to review all cost associated with an asset or asset hierarchal view.
Note: When a child asset is transferred to another eAM organization, it is still included in the parent hierarchy. The organization that the asset currently resides in appears in parentheses. Transferring the asset does not remove the asset from the asset hierarchy. You must remove the asset manually, to remove the asset from its hierarchy.
-
The Checked Out check box indicates whether the current asset is checked in or out. You can check out an asset to view asset details, enter collection plan data, enter meter information, and optionally create a work request, within Maintenance Super User. This check box is protected against update. See: Asset Operational Logging, Oracle Enterprise Asset Management User's Guide.
-
Within the Location tab, the Subinventory and Locator fields are view-only, displaying the subinventory location of this asset within Inventory and its Locator segments. If this asset if received into Inventory, these fields are populated.
You can specify the geocode information with details of latitude, longitude and direction for the asset. This information is used to display the assets in the chosen map viewer.
-
Optionally select a Location Code to specify a physical location for this asset. The Address field simultaneously populates with the selected Location Code's associated Address. The previously defined area is organization-specific and not associated with a physical location.
If your asset does not reside in a subinventory, you can specify an external location for it. You can only select an external location that is defined as a HZ location. You may optionally define external locations with a location code.
Valid Location Codes are defined within Oracle Install Base.
-
The Address defaults as the populated Location Code's associated address. You can optionally select a different address. If the current asset is in stores, the address of the Location's organization appears (See: Stores, Oracle Enterprise Asset Management User's Guide).
-
Optionally select a Production Organization. The list of values displays the production inventory organizations maintained by the current asset's organization. See: Enabling Organizations for Enterprise Asset Management, Oracle Enterprise Asset Management User's Guidefor information on designating eAM organizations to maintain equipment items for designated production organizations.
-
Select an Equipment Item. This is mandatory if you populated the Production Organization field. Items that were defined with an equipment template (See: Item Templates, Oracle Inventory User's Guide ), or with the Equipment item attribute enabled (See: Physical Attributes, Oracle Inventory User's Guide ), are available.
-
Enter an Equipment Serial Number. This is mandatory if you populated the Production Organization field. This is the specific name of the component within the Equipment Type, defined above, if an asset resides directly in the Production Organization, and its asset group is defined directly in the Production Organization as Equipment. You can view the Production Organization and the Asset Serial Number, but you cannot update them.
-
Optionally enter the Number if Oracle Fixed Assets is installed. This represents a fixed Asset Number that belongs to a fixed asset category, associated with the asset.
-
The Property Management fields, Location Name and Location Code, default from a Property Manager export process (Export Locations to Enterprise Asset Management), if Oracle Property Management is installed. These fields are disabled. These values cannot be changed.
Note: Before the above information is passed from Property Manager into Enterprise Asset Management, Asset Groups need to first be established. See: Defining Asset Groups, Oracle Enterprise Asset Management User's Guide.
-
Optionally choose Location Details to view or update Property Manager field information.
-
Optionally select Attributes to enter attribute values for the asset (See: Setting Up Attributes, Oracle Enterprise Asset Management User's Guide).
Existing, enabled attribute groups appear (See: Setting Up Attributes, Oracle Enterprise Asset Management User's Guide). These attribute groups are optional. You do not need to enter values for all existing attribute groups. From this window, you cannot generate attribute groups.
Asset Attributes
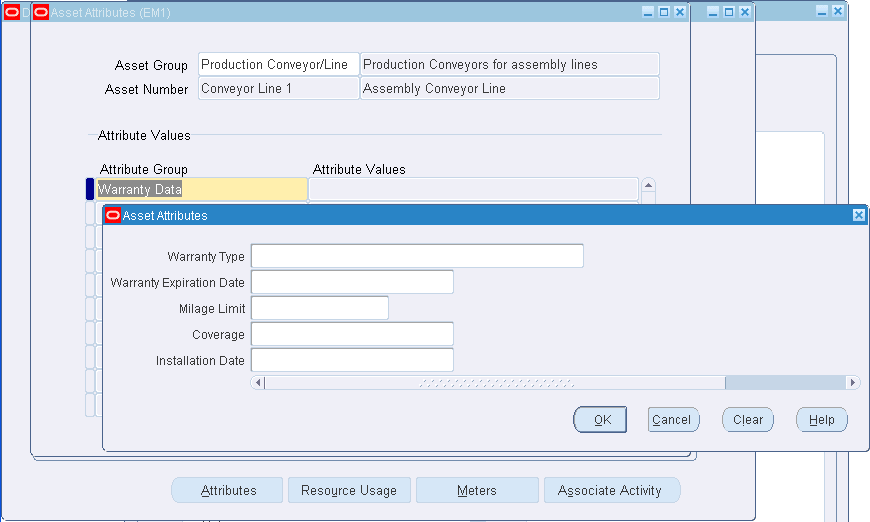
-
You can choose Resource Usage if the fields in the Production Equipment region are populated. This enables you to view production work orders using the equipment that corresponds with this asset number as a resource.
Resource Usage

-
Optionally select Associate Activity to directly associate this Asset with an Activity. See: Activity Association Templates, Oracle Enterprise Asset Management User's Guide.
Activity Association
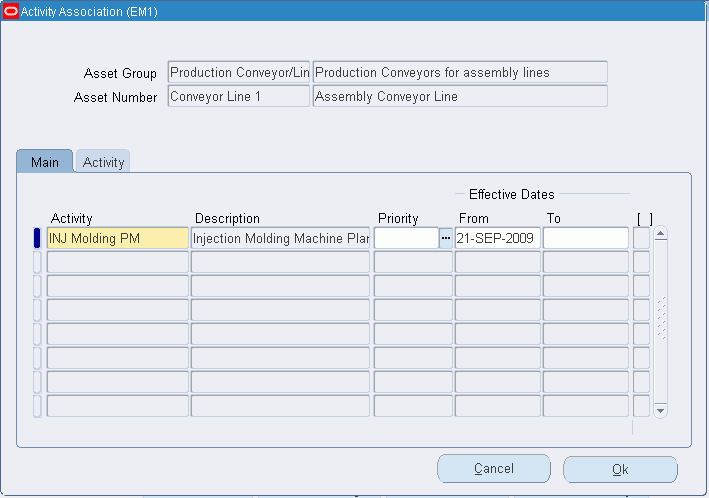
-
Optionally enter file, URL, or text attachments to this asset by choosing the paperclip Attachments icon. You can then choose Document Catalog to add asset specific documents. See: Defining Asset Documents, Oracle Enterprise Asset Management User's Guide.
-
Save your work.
To copy assets from existing assets
You can copy asset information from existing assets. When using this method, everything copies to the new asset, including attributes and attachments. Equipment Serial Numbers are not copied. You are prompted to enter the Equipment Serial Number, when saving.
-
Navigate to the Define Asset Number window.
-
Select an Asset Group. This Asset Group is associated with this asset.
-
Enter an Asset Number if you do not have them automatically generated, or accept or modify the default, if you have automatic generation enabled (See: Defining eAM Parameters, Oracle Enterprise Asset Management User's Guide). After an asset has been saved, it cannot be deleted. The asset can be deactivated if there are no open Work Orders or Work Requests for the asset, and if the asset is not part of an asset hierarchy.
-
Optionally enter an Asset Description, up to 240 characters.
-
From the Tools menu, select Copy Asset Number from.
-
Select the desired Asset.
-
Optionally associate this Asset to an Asset Category. This is the Class and Subclass code, such as CRANE.OVERHEAD, or BUILDING.FLOOR. See: Setting Up Category Codes and Sets, Oracle Enterprise Asset Management User's Guide.
-
Select an owning Department for this asset. E-mail notifications, regarding Work Requests, are sent to the Primary Approver of the Work Request's associated asset's owning department (See: Defining Department Approvers, Oracle Enterprise Asset Management User's Guide and Defining Asset Numbers, Oracle Enterprise Asset Management User's Guide).
-
Save your work.
To access failure analysis information
You can access the Failure Set page to view failure tracking codes that are assigned to the current Asset Number.
-
From the Define Asset Number window, select Maintain Failure Set from the Tools menu. If the Asset Number does not have an associated Failure Set, this menu option is disabled. See: Defining Failure Codes and Sets, Oracle Enterprise Asset Management User's Guide and Failure Analysis Overview, Oracle Enterprise Asset Management User's Guide.
-
Close the window.
To deactivate an asset
-
Navigate to the Define Asset Number window.
-
Select the flashlight Find icon to display the Find Asset Number window.
-
Select an Asset Number to deactivate.
-
From the Tools menu, select De-Activate Asset Number.
-
Save your work.
To activate an asset
-
Navigate to the Define Asset Number window.
-
Select the flashlight Find icon to display the Find Asset Number window.
-
Select a Deactivated Asset Number to activate.
-
From the Tools menu, select Re-Activate Asset.
-
Save your work.
Defining Asset Routes
You might need to perform an Activity on multiple Asset Numbers. To eliminate the possibility of creating multiple Work Orders for the same Activity, you can define Asset Routes. You can define a Preventive Maintenance schedule for your Asset Route to specify when an Activity should be scheduled for the Asset Route. You can define day interval rules for Asset Routes.
To define asset routes
-
Navigate to the Define Asset Route window.
Define Asset Route
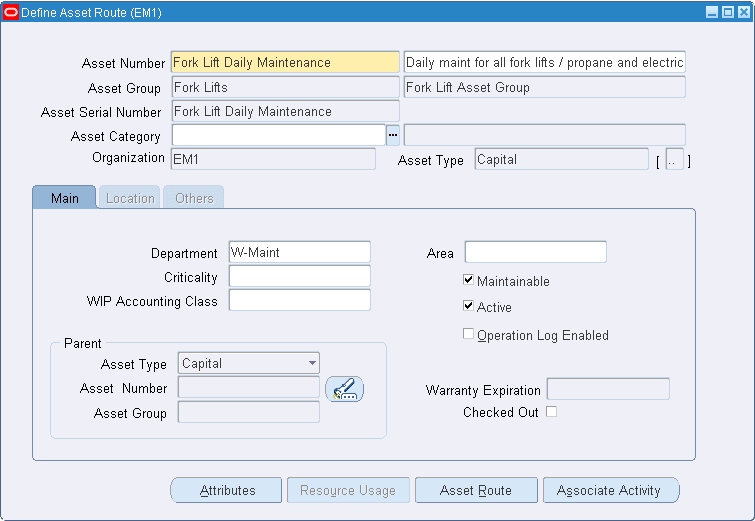
-
Enter the name of the Asset Route in the Asset Number field.
-
Select an Asset Group.
-
The Asset Serial Number defaults to the Asset Number. You can optionally select the next serial number for the current organization.
The Asset Serial Number might have a non-unique value across organizations, but the Asset Number must be globally unique, regardless of the defaulting value.
-
Optionally associate this Asset Route to an Asset Category. This is the Class and Subclass code, such as CRANE.OVERHEAD or BUILDING.FLOOR. See: Setting Up Category Codes and Sets, Oracle Enterprise Asset Management User's Guide.
-
Within the Main tab, optionally select an owning Department for this Asset Route. This represents the crew responsible for the asset. Notifications, regarding Work Requests, are sent to the Primary Approver of the Work Request's associated asset's current owning department (See: Defining Department Approvers, Oracle Enterprise Asset Management User's Guide and Defining Asset Numbers, Oracle Enterprise Asset Management User's Guide).
-
Optionally select a Criticality code to indicate the importance of the Asset Route to the organization. This field is for information purposes.
-
Optionally select a WIP Accounting Class to identify the Expense cost elements associated with the work performed, such as materials, labor, and resources.
-
Optionally enter the Area where this Asset Route resides. This is a user defined listing of logical areas of work. For example, North Plant, East Wing, or Area 1 (See: Setting Up Areas, Oracle Enterprise Asset Management User's Guide).
-
Indicate whether this Asset Route is maintainable. If the Maintainable check box is selected, you can create Work Requests and Work Orders for this Asset Route.
-
Optionally select the Active check box to indicate that the asset route is functioning. This check box change when you activate or deactivate an asset route from the Tools menu.
-
Choose Asset Route to display the Asset Route window.
Asset Route
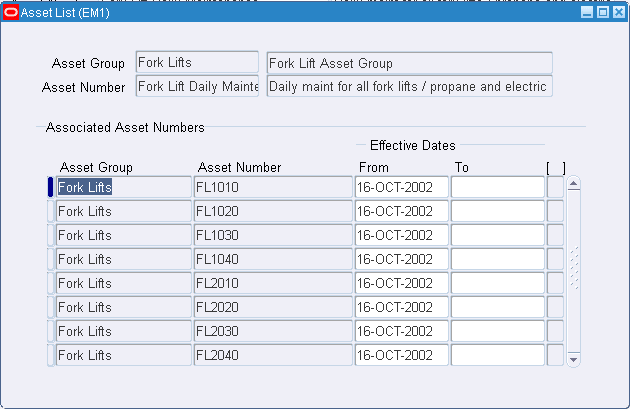
-
In the Associated Asset Numbers region, select an Asset Group.
-
Select an Asset Number. Asset Numbers associated with the previously selected Asset Group are available.
You can associate an unlimited number of Asset Numbers.
-
Optionally enter Effective Dates. If the Effective Date From field is left blank, the system date defaults.
-
Save your work.
Note: Asset Numbers can associate with Asset Routes. An Asset Route cannot associate with another Asset Route.
Setting Up Asset Bills of Material
You can identify and select the required items that make up an asset. A bill of material (BOM) is used to list all items and components that make up a particular asset, and is defined for each asset group. The items defined on an asset BOM are standard inventory components (See: Defining Items, Oracle Inventory User's Guide).
Note: Even if you are not using Project Manufacturing applications, Project Parameters are defined for your eAM enabled organization to successfully create Asset Groups. This is required because an Asset BOM is of type Model/Unit Effective and this BOM type is currently allowed if PJM organization parameters are set up for the eAM enabled organization to which the Asset Group has been assigned. To define Project Parameters, open the Project Parameters window using Project Manufacturing Super User responsibility and without entering any data in the window, save the record. If you plan to use Project Manufacturing, see: Project Manufacturing Integration Setup, Oracle Enterprise Asset Management User's Guide for information on defining Project Parameters.
To set up an Asset BOM:
-
Navigate to the Bills of Material window.
Bills of Material
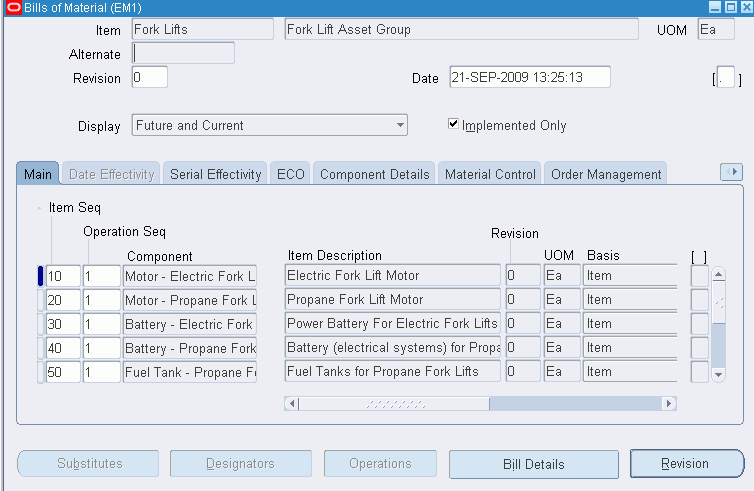
-
Select an Asset Group from the Item list of values.
-
Within the Main tab, the Item Sequence and an Operation Sequence values default.
-
Enter the inventory Component to make up the Asset Number.
-
Enter the Quantity of that component necessary for the asset.
-
Select the Serial Effectivity tab.
Bills of Material - Serial Effectivity
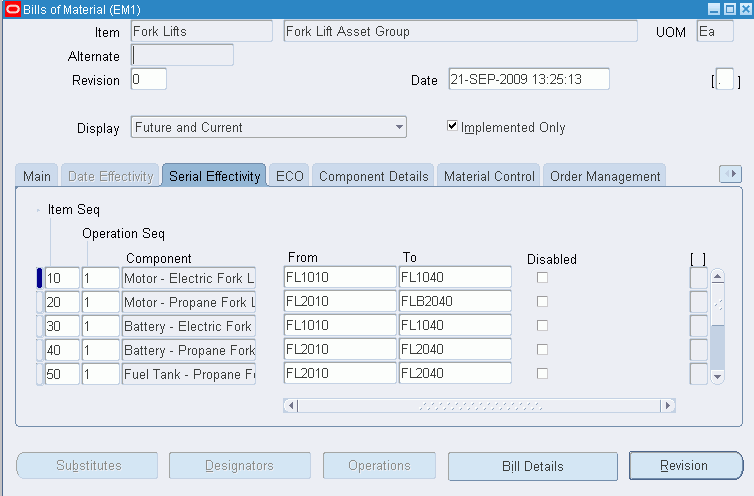
-
Select the Asset Number (Asset Numbers are always serialized) that the inventory items are associated with, in the From and To fields. Asset Numbers associated with the current Asset Group are available.
If the Component is installed in all Asset Numbers within the Asset Group, enter 0 in the From field, and leave the To field blank.
-
Optionally select the Material Control tab, and enter a subinventory location or source locator for this asset BOM. If the Auto Request Material option is selected at the BOM level, material allocation will be initiated when the work order is released, and the source subinventory and source locator values you enter will override these values in the Inventory sourcing rules. If the Auto Request Material option is not selected, you can specify a source subinventory and source locator for your material when you perform a material request or a One-Step Material Issue.
Material Control
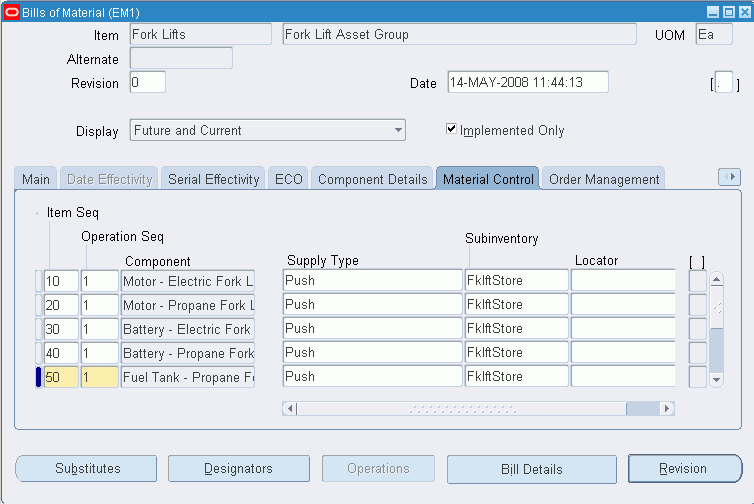
-
Save your work.
For information on all remaining fields, See: Creating a Bill of Material, Oracle Bills of Material User's Guide.
Related Topics
Defining Activities, Oracle Enterprise Asset Management User's Guide
Using the Activity Workbench, Oracle Enterprise Asset Management User's Guide
Rebuildable/Activity Association, Oracle Enterprise Asset Management User's Guide
Using the Activity Workbench
You can use a central workbench to manage your organization's activity functions. Using the Activity Workbench, you can view, create (See: Defining Activities), query, and manage all of your activities. From this central workbench, you can view, create, and update maintenance routes, maintenance BOMs, Preventive Maintenance schedules, and suppressions associated with your activities. You can create various copy functions within a single activity, across multiple Activities, as well as between work orders and activities or asset activity associations. You can view or update Last Service for the asset activity association, as well as view cost estimates for the activity. These copy functions save time and standardize processes across your organization.
This section includes the following topics:
Defining Activities
There are three methods you can use to create an activity:
-
Within the Master Activity (Master Item) window.
-
From the Activity Workbench.
-
Within a maintenance work order.
To set up activities using the Activity Workbench
-
Navigate to the Activity Workbench window.
-
Choose Launch.
Activity Association
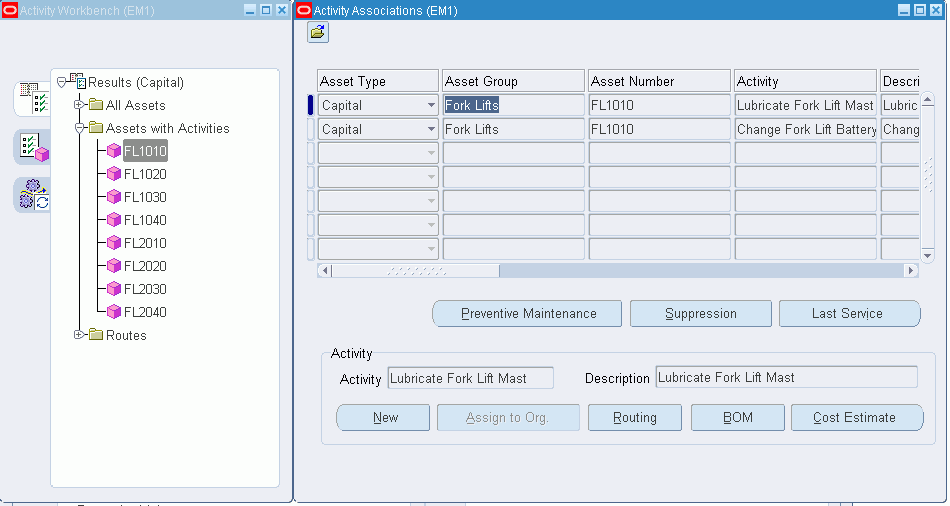
-
To create an activity, select New.
Create Activity
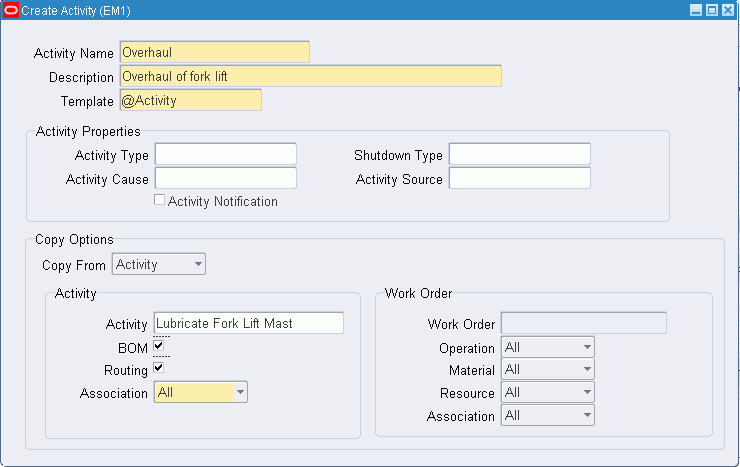
-
Enter an Activity Name.
-
Enter an Activity Description.
-
Choose an activity Template. This automatically links the properties associated with an Activity. The @Activity template is created for you. You can create your own Activity Templates, as well.
-
Within the Activity Properties region, optionally select an Activity Type (See: Activity Types, Oracle Enterprise Asset Management User's Guide). The value defaults from the Template properties above.
-
Within the Activity Properties region, optionally select an Shutdown Type. The Shutdown Type is user defined, and indicates whether an activity shutdown is required. For example, the Shutdown Type can refer to whether the Asset Activity association shutdown is required before the activity is performed. The value defaults from the Template properties above. This field is for information purposes.
-
Within the Activity Properties region, optionally select an Activity Cause (See: Activity Causes, Oracle Enterprise Asset Management User's Guide). The value defaults from the Template properties above.
-
Within the Activity Properties region, optionally select an Activity Source (See: Activity Sources, Oracle Enterprise Asset Management User's Guide). The value defaults from the Template properties above.
-
The Activity Notification check box is informational until a future release.
-
You can optionally create an activity by copying it from another activity or a work order. Within the Copy Options region, select the entity to copy information from. Valid values are Activity and Work Order. If you select Activity, the values within the Activity region are relevant, and the values within the Work Order region are irrelevant. If you select Work Order, the values within the Work Order region are relevant, and the values within the Activity region are irrelevant.
-
Within the Activity region, if Activity is populated in the Copy From field, optionally select an Activity name. This is the Activity from which you are copying.
-
Within the Activity region, if Activity is populated in the Copy From field, optionally select the BOM check box to indicate that the Maintenance Bill of Material, associated with the current Activity within the Activity region, copies to the new Activity Name.
For example, in the screen shot, the Maintenance Bill of Material, associated with the 3000 Mile Truck Maint, copies to Oil Change.
-
Within the Activity region, if Activity is populated in the Copy From field, optionally select the Routing check box to indicate that the routings associated with the current Activity within the Activity region copies to the new Activity Name.
For example, in the screen shot, routings that are associated with the 3000 Mile Truck Maint copy to Oil Change.
-
Within the Activity region, if Activity is populated in the Copy From field, select All or None from the Association list of values.
-
All: All asset and rebuildable associations related to the current activity within the Activity region copy to the new activity.
-
None: No asset and rebuildable associations related to the current activity within the Activity region copy to the new Activity.
-
-
Within the Work Order region, if Work Order is populated in the Copy From field, select an existing maintenance work order.
-
Within the Work Order region, if Work Order is populated in the Copy From field, select All or None from the Operation list of values.
-
All: All operations associated with the current work order, populated in the Work Order field, copy to the new Activity.
-
None: No operations associated with the current work order, populated in the Work Order field, copy to the new Activity.
-
-
Within the Work Order region, if Work Order is populated in the Copy From field, select All, Issued, or None from the Material list of values.
-
All: All material associated with the current work order, populated in the Work Order field, copies to the new Activity.
-
Issued: Material issued to the current work order, populated in the Work Order field, copies to the new Activity.
-
None: No material associated with the current Work Order, populated in the Work Order field, copies to the new Activity.
-
-
Within the Work Order region, if Work Order is populated in the Copy From field, select All, Issued, or None from the Resource list of values.
-
All: All resources associated with the current Work Order copy to the new Activity.
-
Issued: Resources issued to the current Work Order copy to the new Activity.
-
None: No resources associated with the current Work Order copy to the new Activity.
-
-
Within the Work Order region, if Work Order is populated in the Copy From field, select None, Current, or All from the Association list of values.
-
None: No Assets and Rebuildables, associated with the current Work Order, associate with the new Activity.
-
Current: An Asset and/or Rebuildable, associated with the current Work Order, associates with the new Activity.
-
All: All Assets and/or Rebuildables, associated with the current Work Order's Activity, associate with the new Activity.
-
-
Save your work. After saving, the new Activity is automatically assigned to the current organization.
Navigating the Activity Workbench
The Activity Workbench enables you to manage all of your organization's Activity functions. Before launching the Activity Workbench, you can narrow your data selection; the Activity Workbench provides a query capability as you enter the Activity Workbench. The top portion of the window enables you to query by Asset Type, Asset Number, Asset Group, Area, Asset Category, Owning Department, and provides you the choice of including children assets within asset hierarchies. The bottom portion of the window enables you to query by Activity, Activity Type, Activity Source, Shutdown Type, and Activity Cause. You can also select data that is between specified Effective dates.
To navigate the Activity Workbench
-
Navigate to the Activity Workbench window.
-
Optionally narrow your data selection by selecting criteria within the Activity Workbench window. If you make selections, you can view those selections after you launch the Activity Workbench.
-
Choose Launch.
-
Optionally select the Results (Capital) tab.
Results (Capital) tab, Activity Workbench
-
Optionally expand the Results (Capital) folder.
-
Optionally expand the All Assets folder to display all Asset Numbers, based on your chosen selection criteria. You can select an asset and view related Activity information within the corresponding Activity Associations window. Within the corresponding Activity Associations window, you can associate Activities with the current asset.
-
Optionally expand the Assets with Activities folder to display all Asset Numbers that are currently associated with one or more Activities, based on your chosen selection criteria. You can select an asset and view its related Activity information within the corresponding Activity Associations window. Within the corresponding Activity Associations window, you can view, create, or update preventive maintenance schedule definitions, create or update Suppression definitions, view or update last service information, view the parts list, and view or update the maintenance routing.
-
Optionally expand the Routes folder to display all Asset Routes that are currently associated with one or more Activities, based on your chosen selection criteria. You can select an Asset Route and view related Activity information within the corresponding Activity Associations window.
-
-
Optionally select the Results (Rebuildable Inventory) tab.
Results (Rebuildable Inventory) tab, Activity Workbench
-
Optionally expand the Results (Rebuildable Inventory) folder.
-
Optionally expand the All Rebuildables folder.
-
Optionally expand the Serialized folder to display all Rebuildable Serial Numbers, based on your chosen selection criteria, within the Activity Workbench window. You can select a Rebuildable Serial Number and view related Activity information within the corresponding Activity Associations window. Within the corresponding Activity Associations window, you can associate Activities to the current Rebuildable Serial Number.
-
Optionally expand the Non-serialized folder to display all Non-serialized Rebuildables, based on your chosen selection criteria, within the Activity Workbench window. You can select a Non-serialized Rebuildable and view related Activity information within the corresponding Activity Associations window. Within the corresponding Activity Associations window, you can associate Activities to the current Serialized Non-rebuildable.
-
-
Optionally select the Rebuildables with Activities folder.
-
Optionally expand the Serialized with Activities folder to display all Rebuildable Serial Numbers that are currently associated with one or more Activities, based on your chosen selection criteria, within the Activity Workbench window. You can select a Rebuildable Serial Number and view related Activity information within the corresponding Activity Associations window. Within the corresponding Activity Associations window, you can create or update preventive maintenance schedule definitions, create or update Suppression definitions, view or update last service information, view the parts list, view or update the maintenance routing, and view cost estimations for a Rebuildable Serial Number and Activity combination.
-
Optionally expand the Non-serialized with Activities folder to display all Non-serialized Rebuildables that are currently associated with one or more Activities, based on your chosen selection criteria, within the Activity Workbench window. You can select a Non-serialized Rebuildable and view related Activity information within the corresponding Activity Associations window. Within the corresponding Activity Associations window, you can create or update preventive maintenance schedule definitions, create or update Suppression definitions, view or update last service information, view the parts list, view or update the maintenance routing, and view cost estimations for a Rebuildable Serial Number and Activity combination.
-
-
Optionally select the Results (Activities) tab.
Results (Activities) tab, Activity Workbench
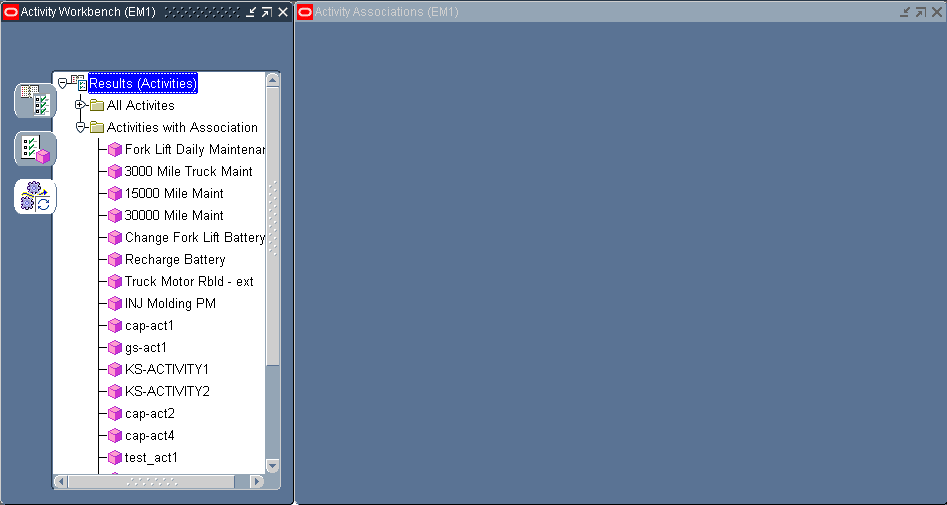
-
Optionally expand the All Activities folder to display all valid Activities, based on your chosen selection criteria, within the Activity Workbench window. You can select an Activity and view its related Activity information within the corresponding Activity Associations window, if an association exists. You can associate an Asset Number with the current, selected Activity using the corresponding Activity Associations window. You can select an Activity within the Activity Workbench pane, and then view its related information within the corresponding Activity Associations window. For a selected Activity, you can create a new Activity, create or update its associated Maintenance Routing, create or update the associated Maintenance BOM, and view cost estimations.
-
Optionally expand the Activities with Association folder to display all Activities that are associated with an Asset Number, based on your chosen selection criteria, within the Activity Workbench window. You can select an Activity within the Activity Workbench pane, and then view its related information within the corresponding Activity Associations window. For a selected Activity, you can create a new Activity, create or update its associated Maintenance Routing, create or update the associated Maintenance BOM, and view cost estimations.
To create or update a PM schedule definition
You can view, create or update a Preventive Maintenance (PM) Schedule definition for Activity/Asset Number and Activity/Asset Route combinations.
-
Within the Activity Workbench pane, select any one of the three tabs: Results (Capital), Results (Rebuildable Inventory), or Results (Activities).
Activity Workbench
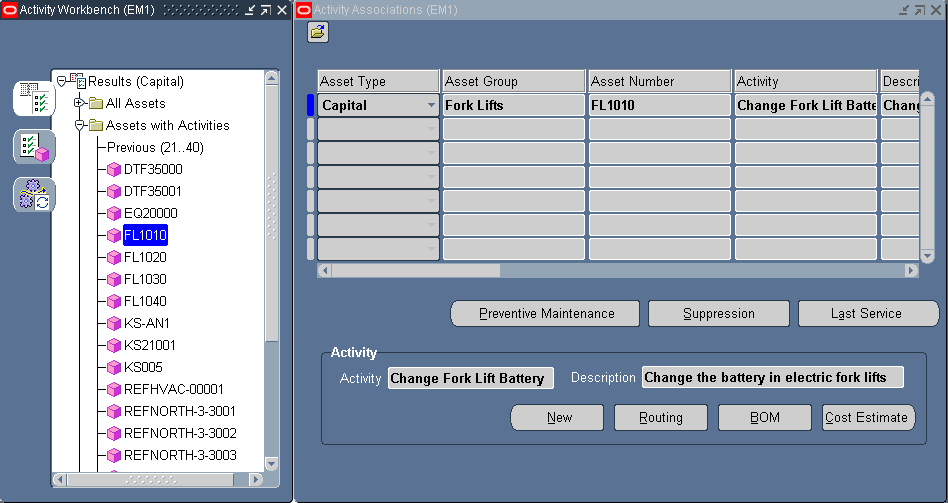
-
If you selected Results (Capital), expand either the Assets with Activities or Routes folders, then select an Asset Number or Route, respectively. You cannot create or update a PM Schedule definition for an Asset Number that is not associated with an Activity.
If you selected Results (Rebuildable Inventory), expand the Rebuildables with Activities folder, expand either the Serialized with Activities or Non-serialized with Activities folder, then select a Serialized or Non-serialized Rebuildable, respectively. You cannot create or update a PM Schedule definition for an Asset Number that is not associated with an Activity.
If you selected Results (Activities), expand the Activities with Association folder, then select an Activity.
-
Choose Preventive Maintenance. The PM Schedules window displays all PM Schedule definitions for the current Activity/Asset Number or Activity/Asset Route combination.
-
Optionally choose New to create a new PM Schedule definition.
-
Optionally choose Last Service Information to create or update Last Service Information.
-
Optionally choose Suppression to create or update a suppression definition, associated with the current Activity/Asset Number or Activity/Asset Route combination.
-
Optionally select a PM Schedule definition, and then choose Open to view its details.
PM Schedules
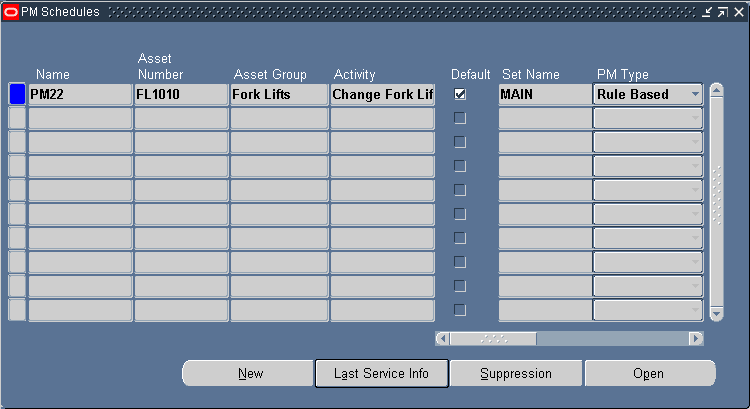
-
-
Close the window.
-
Save your work.
To create or update an activity suppression
You can view, create, or update suppression definitions for Activity/Asset Number and Activity/Asset Route combinations.
-
Within the Activity Workbench pane, select any one of the three tabs: Results (Assets), Results (Rebuildables), or Results (Activities).
-
If you selected Results (Assets), expand either the Assets with Activities or Routes folders, then select the Asset Number or Route, respectively. You cannot create or update a suppression definition for a Asset Number that is not associated with an Activity.
If you selected Results (Rebuildables), expand the Rebuildables with Activities folder, expand either the Serialized with Activities or Non-serialized with Activities folder, then select a Serialized or Non-serialized Rebuildable, respectively. You cannot create or update a suppression definition for a Asset Number that is not associated with an Activity.
If you selected Results (Activities), expand the Activities with Association folder, then select an Activity.
-
Choose Suppression.
Suppression
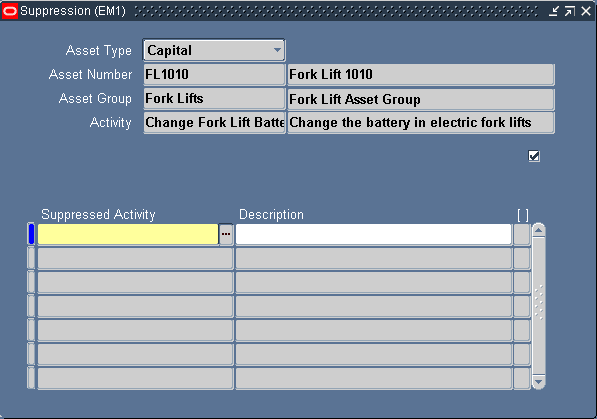
-
Add or update the Suppression Activity associated with the current Activity.
-
Save your work.
To view or update last service information
You can view or update last service information for Activity/Asset Number and Activity/Asset Route combinations.
-
Within the Activity Workbench pane, select any one of the three tabs: Results (Assets), Results (Rebuildables), or Results (Activities).
-
If you selected Results (Assets), expand either the Assets with Activities or Routes folders, then select the Asset Number or Route, respectively.
If you selected Results (Rebuildables), expand the Rebuildables with Activities folder, then expand either the Serialized with Activities or Non-serialized with Activities folder, and finally select a Serialized or Non-serialized Rebuildable, respectively.
If you selected Results (Activities), expand the Activities with Association folder, then select an Activity.
-
Choose Last Service to view or update last service information.
Last Service Information
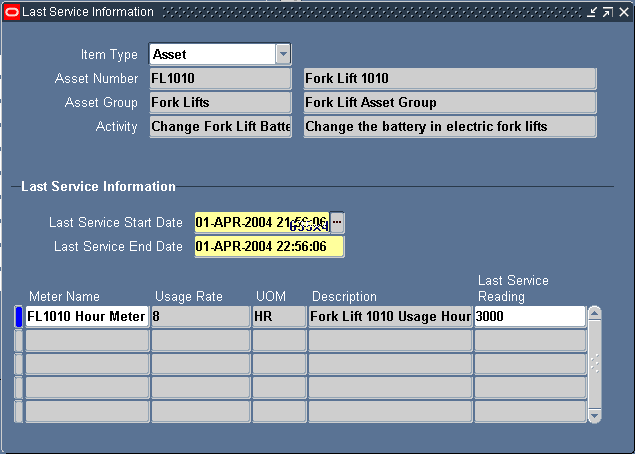
-
Save your work.
To view estimated cost information
You can view estimated cost information for an Activity. Estimating Activity costs is often necessary for planning and budgeting purposes.
-
Within the Activity Workbench pane, select any one of the three tabs: Results (Assets), Results (Rebuildables), or Results (Activities).
-
If you selected Results (Assets), expand either the Assets with Activities or Routes folders, then select the Asset Number or Route, respectively.
If you selected Results (Rebuildables), expand the Rebuildables with Activities folder, then expand either the Serialized with Activities or Non-serialized with Activities folder, and finally select a Serialized or Non-serialized Rebuildable, respectively.
If you selected Results (Activities), expand the Activities with Association folder, then select an Activity.
-
Choose Cost Estimate to view the Activity's cost estimation information.
Activity Cost
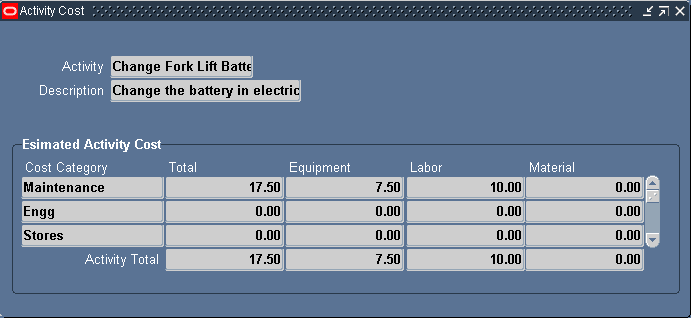
Setting Up Maintenance Bills of Material
You can identify and select the required items used by an Activity. A bill of material (BOM) is used to list all inventoried or Direct Items needed to perform a particular Activity, and is defined for each Activity. For example, you might have an Activity titled, Fork Lift Daily Maintenance. The items necessary to perform this Activity include water, fork lift lubrication oil, filled propane tanks, and shop rags. As Maintenance BOMs are created, they are associated to an Activity (See: Defining Activities, Oracle Enterprise Asset Management User's Guide).
When a work order is created for an activity, the Maintenance BOM corresponding to the Activity explodes to the work order (See: Defining Activities, Oracle Enterprise Asset Management User's Guide); all components specified in the maintenance BOM are copied to the work order as material requirements.
To set up a maintenance BOM
-
Navigate to the Activity Workbench window.
-
Choose Launch.
Activity Workbench
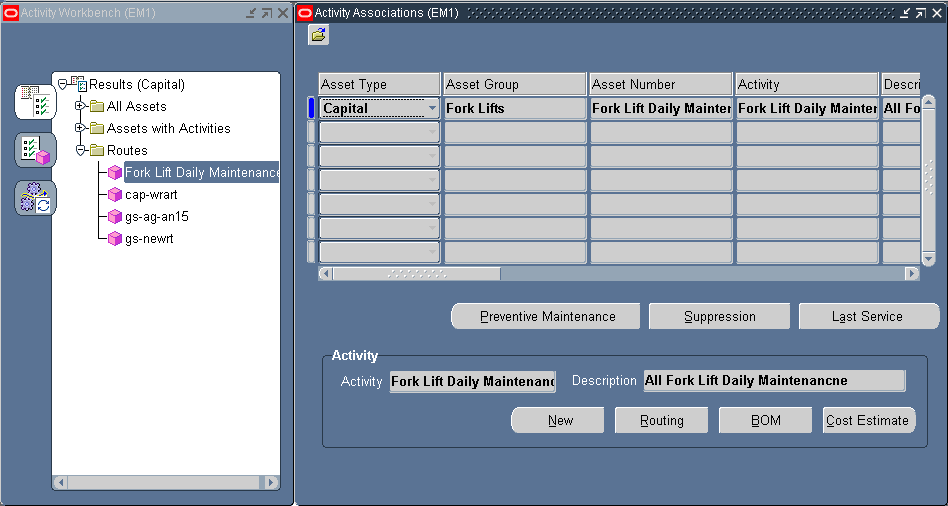
-
Within the Activity Workbench pane, select the Activity for which you wish to define the Bill of Material.
-
Choose BOM.
Bills of Material
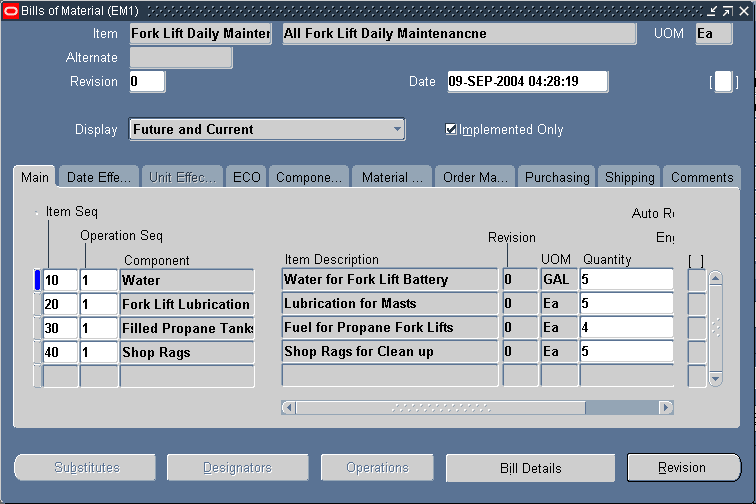
-
Select an Activity from the Item field list of values.
-
Select the Main tab. The Item Sequence defaults.
-
Enter the Operation Sequence that this Component (material item necessary for the operation sequence, NOT rebuildable item) is needed for (See: Defining Maintenance Routes, Oracle Enterprise Asset Management User's Guide).
-
Enter necessary Components and their Quantities that are required to perform the activity. You can enter an unlimited number of inventory and non-inventory, direct items.
Note: The Purchasing tab is enabled for Maintenance and Asset Bills of Material, and contains attributes specific to non-stockable, inventory items.
-
Optionally select the Auto Request Material check box to indicate that requisitions and purchase orders are created automatically, for the current component or Direct Item, when the work order is released.
-
Optionally select the Date Effectivity tab to specify effectivity dates per component.
-
Save your work.
For information on all remaining fields, See: Creating a Bill of Material, Oracle Bills of Material User's Guide
For information on defining activities using the Activity Workbench, See: Defining Activities, Oracle Enterprise Asset Management User's Guide.
Associating Asset Numbers with Activities
After you have defined asset groups, asset numbers, and activities, you can associate the activities with assets and rebuildables. However, you can streamline the creation of activities and associations using an activity association template. Assets are associated with activities before entering the activity into a preventive maintenance schedule (See: Entering PM Scheduling Definitions).
Note: You can streamline the creation of Activity associations using an Activity Association Template. For example, when you create an Asset Group, and then Asset Numbers within that group, you do not need to utilize the Association window to associate those Asset Numbers with an Activity. If you create an Activity Association Template, the Activity that you associate with the current Asset Number's Asset Group automatically determines the Activity that is associated with the current Asset Number (See: Activity Association Templates, Oracle Enterprise Asset Management User's Guide).
-
Defining Asset Groups, Oracle Enterprise Asset Management User's Guide
-
Defining Asset Numbers, Oracle Enterprise Asset Management User's Guide
-
Defining Rebuildable Serial Numbers, Oracle Enterprise Asset Management User's Guide
-
Defining Activities, Oracle Enterprise Asset Management User's Guide
-
Activity Association Templates, Oracle Enterprise Asset Management User's Guide
To associate Asset Numbers (capital or rebuildable inventory) with Activities using the Activity Workbench
-
Navigate to the Activity Workbench window.
Activity Workbench

-
Select Asset or Rebuildable from the Item Type list of values. The item type determines the type of Asset Number you are associating with the Activity.
-
Optionally narrow your data selection by selecting the Asset Number you intend to associate with an Activity.
-
Optionally narrow your data selection by selecting and Activity.
-
Choose Launch.
Activity Workbench and Activity Associations
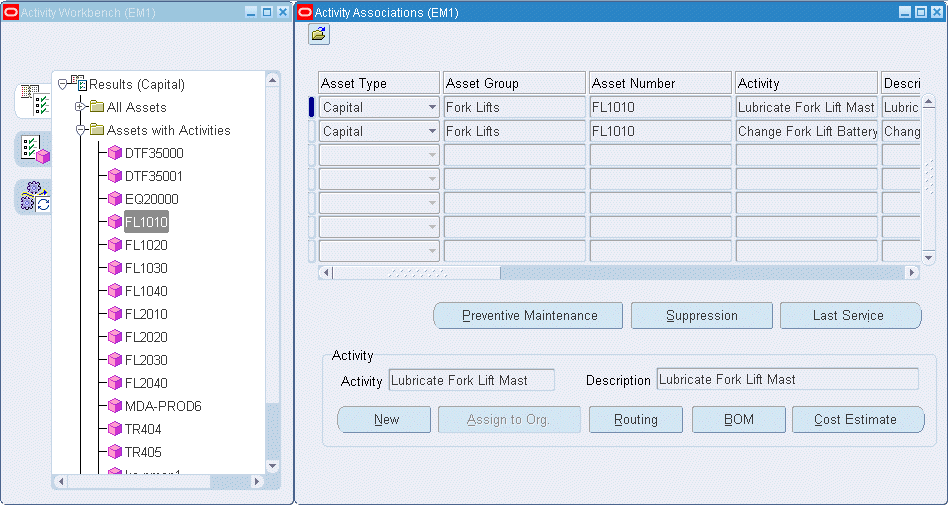
-
Depending on the Item Type chosen while performing step 2, select the corresponding tab within the Activity Workbench pane. For example, if you selected an Item Type of Asset, select the Results (Assets) tab. If you selected an Item Type of Rebuildable, select the Results (Rebuildables) tab.
-
Expand the All Assets (within the Results (Assets) tab) or All Rebuildables (within the Results (Rebuildables) tab) folder. If you specified an Asset Number while performing step 3, that Asset Number appears.
-
Select an Asset Number by highlighting it. The Activity Associations window appears. If the Asset Number is already associated with one or more Activities, those rows display within the window.
-
Select the next available row and then select an Asset Group.
-
Select an Asset Number. Asset Numbers associated with the previously selected Asset Group are available. Asset Numbers are always serial controlled. If you had selected a Non-serialized Rebuildable in the Asset Group field, then the Asset Number field is not required.
-
Select an Activity.
-
When an asset is transferred from one organization to another, its maintenance may be handled by a new eAM organization. Any activities that are assigned to the asset are visible in the Activity Workbench, within the new eAM organization. Activities that are not currently assigned to the new organization are displayed in blue.
Choose Assign to Org to assign the selected activities to the new organization.
-
Save your work.
Defining Maintenance Routes
Operations are the instructions or tasks to perform a repair. Because each operation is associated with a department, each operation contains assigned resources, for example, trades people, outside service providers, and equipment (See: Defining Departments and Resources, Oracle Enterprise Asset Management User's Guide). A Maintenance Route is the set of operations or jobs necessary to perform an Activity. When a Work Order is created for an Activity, the Maintenance Route corresponding to the Activity explodes to the Work Order (See: Defining Activities, Oracle Enterprise Asset Management User's Guide); all operations specified in the Maintenance Route are copied to the Work Order as its operations.
Maintenance Routes are not Asset Routes. For information on Asset Routes, See: Defining Asset Routes, Oracle Enterprise Asset Management User's Guide.
Enterprise Asset Management operations differ from manufacturing operations because manufacturing operations are performed sequentially, whereas eAM operations are not performed sequentially. In Enterprise Asset Management, operations may not be sequential. You can specify that one operation is dependent on another. Also, it is possible that two unrelated operations can happen concurrently. One operation can depend on multiple operations. Multiple operations can depend on one operation. The dependency may not be totally connected.
To define a maintenance route
-
Navigate to the Activity Workbench window.
-
Choose Launch.
Activity Workbench
-
Within the Activity Workbench pane, select the Activity for which you wish to create the Routing.
-
Choose Routing.
Routings
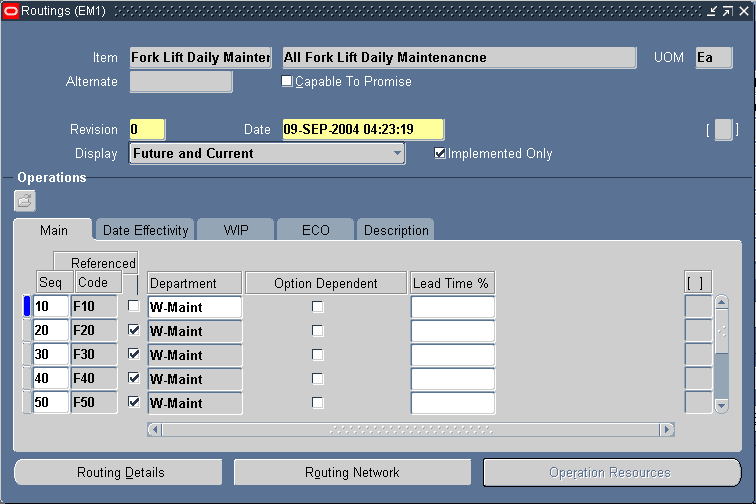
-
Select an Activity from the Item list of values.
-
Within the Main tab, enter an operation Sequence, or let the system automatically generate it for you, according to your profile setup (See: Item and Operation Sequence, Oracle Bills of Material User's Guide).
-
To copy or reference standard operations into a routing, use the operation Code list of values. You can define a new standard operation by selecting Standard Operations from the Tools menu.
If you use a standard operation code, the operation information for that code is copied into the current operation. You can then update that information as desired (See: Creating a Standard Operation, Oracle Bills of Material User's Guide).
-
Select a Department where the operation is performed.
-
Select the Referenced check box to indicate that any changes to standard operations are reflected in the routing. If the standard operation is selected, this check box is selected by default.
-
The Effective date defaults to the system date, but you can optionally change this (See: Effective Date Fields, Oracle Bills of Material User's Guide).
-
Optionally enter a Disabled date to indicate the current operation's expiration.
-
Select the Description tab. Enter a Description for the current operation.
-
Optionally choose Routing Network to view the operation dependencies for the current asset route.
Maintenance Routing Network
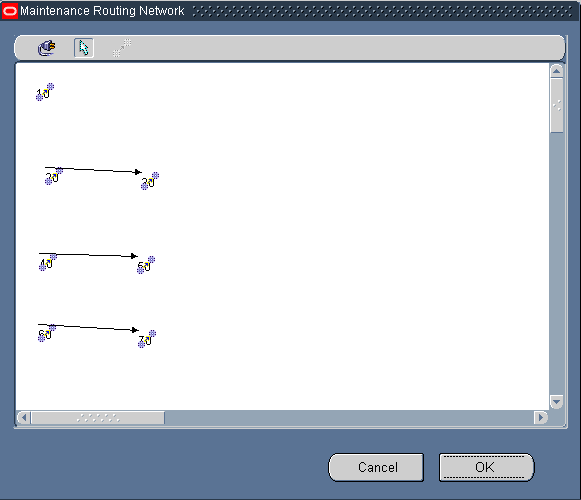
You can schedule operations to execute in parallel, sequence, or through dependent steps. In the screen shot above, for example, Operations 20, 30, 40, and 50 are dependent on Operation 10, since there is a line connecting the operations. These operations also run in parallel to each other. The operation numbers identify the sequence that they are performed (See: Preparing Work Order Operations, Oracle Enterprise Asset Management User's Guide).
-
Optionally select an operation, then choose Operation Resources to view the resources associated with the current department attached to this operation (See: Defining Departments and Resources, Oracle Enterprise Asset Management User's Guide). Optionally you can modify the resources listed (See: Assigning Operation Resources, Oracle Bills of Material User's Guide).
Operation Resources
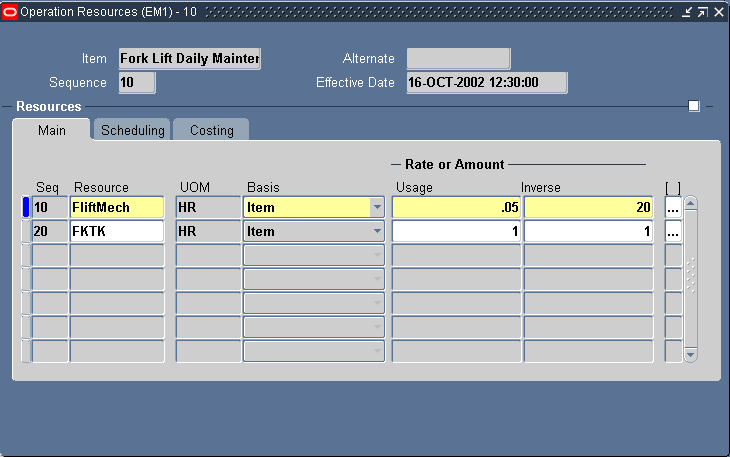
-
Save your work.
For information on all remaining fields, See: Creating a Routing, Oracle Bills of Material User's Guide
For information on defining Activities using the Activity Workbench, See: Defining Activities, Oracle Enterprise Asset Management User's Guide.
Creating Activity Templates
You can streamline the creation of Activity associations using an Activity Association Template. For example, when you create an Asset Group, and then Asset Numbers within that group, you do not need to utilize the Association window to associate those Asset Numbers with an Activity. If you create an Activity Association Template, the Activity that you associate with the current Asset Number's Asset Group automatically determines the Activity that is associated with the current Asset Number.
While creating an Asset Activity association within the Activity Workbench, you also have the option of creating an Activity Template at the same time.
To create an Activity Template
-
Navigate to the Activity Workbench window.
-
Choose Launch.
Activity Associations
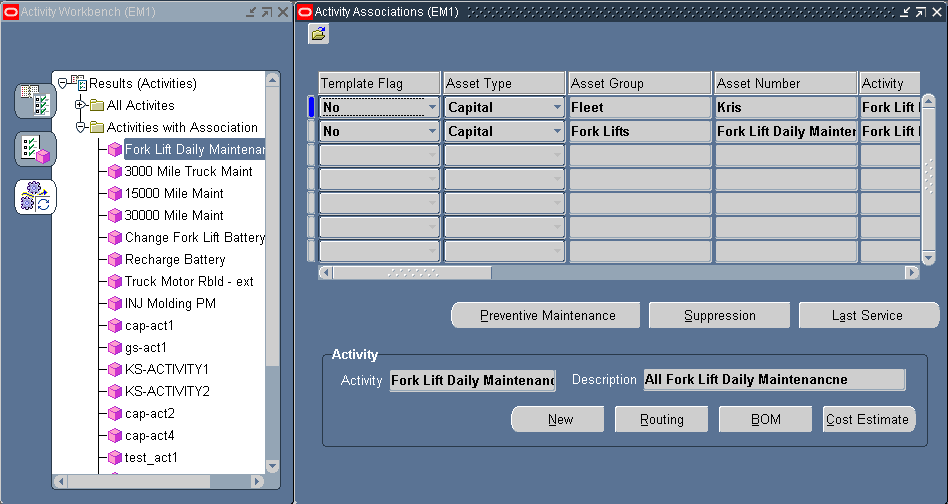
-
Select the Results (Activities) tab.
-
Optionally expand the All Activities folder to display all valid Activities, based on your chosen selection criteria, within the Activity Workbench window. You can select an Activity and view its related Activity information within the corresponding Activity Associations window, if an association exists. You can associate an Asset Number with the current, selected Activity using the corresponding Activity Associations window. You can select an Activity within the Activity Workbench pane, and then view its related information within the corresponding Activity Associations window. For a selected Activity, you can create a new Activity, create or update its associated Maintenance Routing, create or update the associated Maintenance BOM, and view cost estimations.
-
Optionally expand the Activities with Association folder to display all Activities that are associated with an Asset Number, based on your chosen selection criteria, within the Activity Workbench window. You can select an Activity within the Activity Workbench pane, and then view its related information within the corresponding Activity Associations window. For a selected Activity, you can create a new Activity, create or update its associated Maintenance Routing, create or update the associated Maintenance BOM, and view cost estimations.
-
Select Yes from the Template Flag list of values to indicate that this Activity and asset association is also an Activity Association Template. If you select No, an asset and Activity association is created.
-
For information on all remaining fields within the Activity Associations window, See: Associating Asset Numbers with Activities, Oracle Enterprise Asset Management User's Guide.
-
Save your work.
Related Topics
Defining Activities, Oracle Enterprise Asset Management User's Guide
Preventive Maintenance Setup, Oracle Enterprise Asset Management User's Guide
eAM Cost Estimation, Oracle Enterprise Asset Management User's Guide
Activity Association Templates, Oracle Enterprise Asset Management User's Guide
Rebuildable Item Setup
Rebuildable Item Setup tasks include:
Defining Rebuildable Items
Items that are installed, removed, and refurbished are referred to as Rebuildable Items. Examples of Rebuildable Items include motors, control boxes, and computer boards. Rebuildable Items might need to be removed or refurbished while a parent Asset is maintained. Rebuildable Items are inventory items; you have the option to serialize them.
To set up rebuild items
-
Navigate to the Rebuild Items window.
Rebuild Items
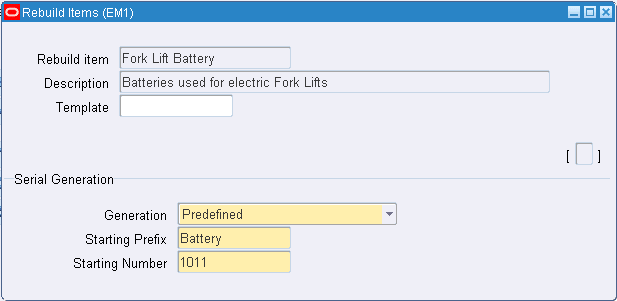
-
Enter the name of the Rebuild Item.
-
Enter a Description for this Rebuild Item, up to 240 characters.
-
Select the @Rebuildable Template to quickly apply attribute values, and to ensure that the appropriate attributes are applied.
Note: You can create Rebuild Items using the template described above, or you can copy a Rebuild Item from an existing Rebuild Item (See: Defining Items, Oracle Inventory User's Guide).
-
In the Serial Generation region, select Predefined for the Generation value.
-
Define a Starting Prefix and Starting Number for this Rebuild Item. If Serial Generation is set at Item Level for the Organization, the system defaults the prefix, along with the starting number sequence, when a new Serialized Rebuild is created for this Rebuild Item.
-
Save your work.
To access failure analysis information
You can access the Failure Set page to view failure tracking codes that are assigned to the current Rebuild Item.
-
From the Rebuild Items window, select Maintain Failure Set from the Tools menu. If the Rebuild Item does not have an associated Failure Set, this menu option is disabled. See: Defining Failure Codes and Sets, Oracle Enterprise Asset Management User's Guide and Failure Analysis Overview, Oracle Enterprise Asset Management User's Guide.
-
Close the window.
To associate rebuildable items to multiple organizations
-
From the Rebuild Items window, select Item Details from the Tools menu.
-
Select the Organization Assignment tab.
-
Enter additional organizations in the available table.
-
After saving your work, you can associate this Rebuildable Item with an Activity (See: Rebuildable Item/Activity Association, Oracle Enterprise Asset Management User's Guide).
Defining Rebuildable Serial Numbers
To set up rebuildable serial numbers individually
-
Navigate to the Define Rebuildable Serial Number window.
Define Rebuildable Serial Numbers
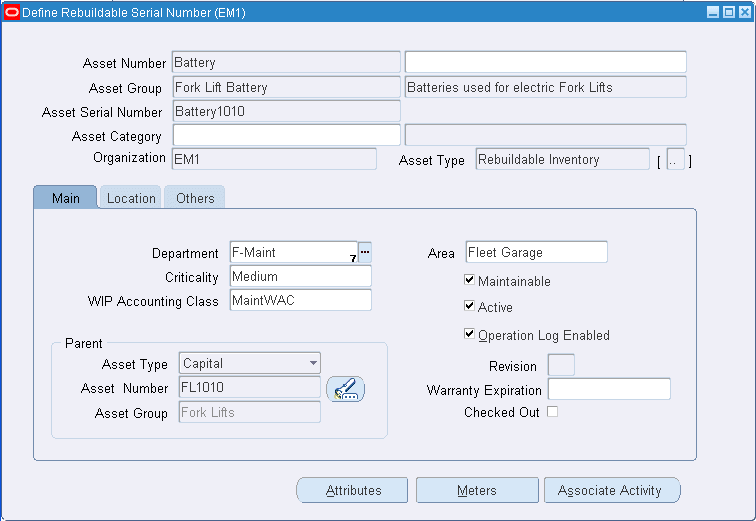
-
Enter an Asset Number (Rebuildable Serial Number) if you do not have them automatically generated. Accept or modify the default Asset Number, if you have automatic generation enabled (See: Defining eAM Parameters, Oracle Enterprise Asset Management User's Guide).
-
Select an Asset Group. This is the Asset Group (Rebuildable Item) you are associating with the Rebuildable Serial Number you are currently creating.
Note: After an Asset Group (Rebuildable Item) is associated with a Rebuildable Serial Number and then saved, you cannot change it.
-
The Asset Serial Number (Rebuildable Serial Number) defaults to the Asset Number. You can optionally select the next serial number for the current organization.
The Asset Serial Number might have a non-unique value across organizations, but the Asset Number must be globally unique, regardless of the defaulting value.
-
Optionally associate this Rebuildable Serial Number to an Asset Category. This is the Class and Subclass code, such as CRANE.OVERHEAD or BUILDING.FLOOR. See: Setting Up Category Codes and Sets, Oracle Enterprise Asset Management User's Guide.
-
Optionally enter a description for the Rebuildable Serial Number of up to 240 characters.
-
Within the Main tab, optionally select an owning Department for this Rebuildable Serial Number. This represents the crew responsible for the Rebuildable Serial Number. Notifications, regarding Work Requests, are sent to the Primary Approver of the Work Request's associated Asset Number's current owning department (See: Defining Department Approvers, Oracle Enterprise Asset Management User's Guide and Defining Asset Numbers, Oracle Enterprise Asset Management User's Guide).
-
Optionally select a Criticality code to indicate the importance of the Asset Number to the organization. This field is for information purposes.
-
Optionally select a WIP Accounting Class to identify the Expense cost elements associated with the work performed, such as materials, labor, and resources.
-
Optionally enter the Area where this Asset Number resides. This is a user defined listing of logical areas of work. For example, North Plant, East Wing, or Area 1 (See: Setting Up Areas, Oracle Enterprise Asset Management User's Guide).
-
Indicate whether this asset is maintainable. If the Maintainable check box is selected, you can create work requests and work orders for this asset.
For example, you can create an asset for cost-tracking purposes. We may want to see the cost for all top level assets in an asset hierarchy, but we do not want to maintain those assets. In this situation, do not select this check box.
Note: After work orders are created for this asset, you cannot clear this check box unless those work orders are at Complete, Canceled or Closed statuses.
-
Optionally select the Active check box to indicate that the asset is functioning, for example, maintenance Work Orders can be created for this asset. This check box change when you activate or deactivate an asset from the Tools menu.
-
Indicate whether Asset Operational Logging is enabled for this asset. If you select the Operation Log Enabled check box, you can view all current and past asset operational information, such as Check Out, Check In, associated Work Requests and Work Orders. You can remove or add a child asset, remove a parent asset, activate or deactivate the asset, transfer the asset to another location, and receive or issue the asset into/from Inventory. By default, logging is turned off for an asset. See: Asset Operational Logging, Oracle Enterprise Asset Management User's Guide.
-
You can optionally associate the current Rebuildable Serial Number with a parent capital asset or parent rebuildable.
-
Select an Asset Type. Valid values are Capital and Rebuildable Inventory.
-
If you selected a Capital Asset Type, optionally select a parent Asset Number. If you previously selected a Rebuildable Inventory Asset Type, optionally select a Rebuildable Serial Number from the Asset Number list of values.
-
If you selected a Capital Asset Type, optionally select a parent Asset Group. If you previously selected a Rebuildable Inventory Asset Type, optionally select a Rebuildable Item from the Asset Group list of values.
-
-
The Checked Out check box indicates whether the current asset is checked in or out. You can check out an asset to view asset details, enter collection plan data, enter meter information, and optionally create a Work Request, within Maintenance Super User. This check box is protected against update. See: Asset Operational Logging, Oracle Enterprise Asset Management User's Guide.
-
Within the Location tab, the Subinventory and Locator fields are view-only, displaying the subinventory location of this asset within Inventory and its Locator segments. If this asset if received into Inventory, these fields are populated.
-
Optionally select a Location Code to specify a physical location for this asset. The Address field simultaneously populates with the selected Location Code's associated Address. The previously defined Area is organization-specific and not associated to a physical location.
Valid Location Codes are defined within Oracle Install Base.
-
The Address defaults as the populated Location Code's associated address. You can optionally select a different address. If the current asset is in stores, the address of the Location's organization appears (See: Stores, Oracle Enterprise Asset Management User's Guide).
-
Optionally select a Production Organization. The list of values displays the production inventory organizations maintained by the current asset's organization. See: Enabling Organizations for Enterprise Asset Management, Oracle Enterprise Asset Management User's Guidefor information on designating eAM organizations to maintain equipment items for designated production organizations.
-
Select an Equipment Item. This is mandatory if you populated the Production Organization field. Items that were defined with an equipment template (See: Item Templates, Oracle Inventory User's Guide ), or with the Equipment item attribute enabled (See: Physical Attributes, Oracle Inventory User's Guide ), are available.
-
Enter an Equipment Serial Number. This is mandatory if you populated the Production Organization field. This is the specific name of the component within the Equipment Type, defined above.
-
Select the Others tab to optionally enter the Fixed Asset region information, if Oracle Fixed Assets is installed. This is Enterprise Asset Management's integration with Fixed Assets. Enter a Category, which is a grouping of fixed assets, defined within Oracle Fixed Assets. This category is tied to a set of books, and must be the same set of books that is assigned to the current Enterprise Asset Management organization. See: Setting Up Asset Categories, Oracle Fixed Assets User's Guide.
-
Optionally enter the Number if Oracle Fixed Assets is installed. This represents a fixed asset number that belongs to a fixed asset category, associated with the asset.
-
The Property Management fields, Location Name and Location Code, default from a Property Manager export process (Export Locations to Enterprise Asset Management), if Oracle Property Management is installed. These fields are disabled. These values cannot be changed.
-
Before the above information is passed from Property Manager into Enterprise Asset Management, asset groups (rebuildable items) need to first be established. See: Defining Rebuildable Items, Oracle Enterprise Asset Management User's Guide.
-
Optionally choose Location Details to view or update the Property Manager field information.
-
Save your work.
-
Optionally select Attributes to enter attribute values for the asset (See: Setting Up Attributes, Oracle Enterprise Asset Management User's Guide).
Existing, enabled attribute groups appear (See: Setting Up Attributes, Oracle Enterprise Asset Management User's Guide). These attribute groups are optional. You do not need to enter values for all existing attribute groups. From this window, you cannot generate attribute groups.
-
Optionally choose Meters to associate the current rebuildable serial number to one or more meters.
-
Optionally choose Associate Activity to associate the current rebuildable serial number to an activity.
Additional Information: To establish this Rebuildable Serial Number in Inventory, you must execute any receipt transaction, such as a Miscellaneous Receipt or a Purchase Order Receipt.
Rebuildable Item/Activity Association
After you have defined rebuildable items and activities, you can associate activities to the rebuildable items. For example, you may have a Rebuild Engine Activity, and an Engine Rebuildable Item. After you create a rebuild work order for the engine, the associated Rebuild Engine Activity attaches its associated maintenance BOM (material) and maintenance routing (resources) to the work order.
Note: Activity association for Rebuildable Serial Numbers are streamlined by using Activity Association Templates. If an Activity Template is defined for a Rebuildable Item, the activity association automatically creates when a new serial number is created for that item, within the maintenance organization.
-
Rebuild Work Orders, Oracle Enterprise Asset Management User's Guide
To associate Rebuildable Items with Activities
-
Navigate to the Activity Association window.
Activity Association
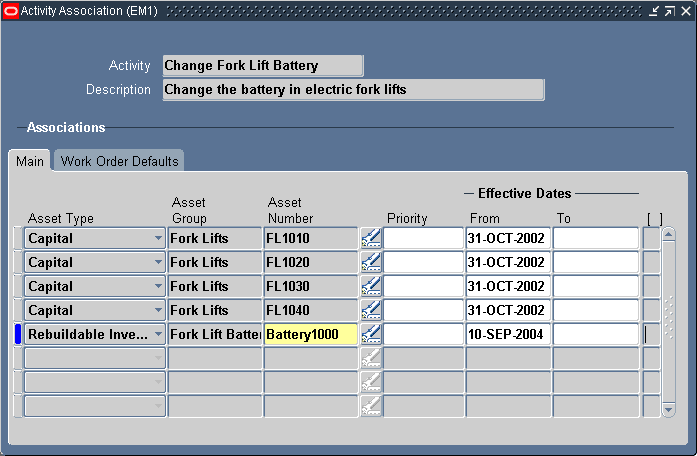
-
Select an Activity.
-
Within the Main tab, select Rebuildable from the Item Type list of values.
-
Select a Rebuildable Item from the Asset Group list of values.
-
If the Rebuildable Item is serial number controlled (See: Defining Rebuildable Items), select a Rebuildable Serial Number from the Asset Number list of values.
-
Optionally select a Priority Code. This field is for information purposes.
-
Optionally enter Effective Dates. If the Effective From field is left blank, the system date defaults. If the Effective To field is left blank, it defaults as NULL.
-
Within the Activity tab, the Activity Cause defaults from the Activity definition (See: Defining Activities), specifying what situation caused this work to generate. For example, Breakdown, Vandalism, Normal Wear, or Settings. Optionally you can select an Activity Cause.
-
The Activity Type defaults from the Activity definition (See: Defining Activities). This code indicates the type of maintenance activity needed to perform for this Activity. It is used when defining a job or a standard job. It should remain generic, and should not describe the job in detail. For example, Inspection, Overhaul, Lubrication, Repair, Servicing or Cleaning. Optionally select an Activity Type.
-
Optionally select the Tagging Required check box to indicate whether tag out procedures are required.
-
The Owning Department field is used when associating asset numbers to activities (See: Activity Association Templates).
-
Save your work.
Defining Rebuildable Bills of Material
You can identify and select the required items that make up a Rebuildable Serial Number. A bill of material (BOM) is used to list all items and components that make up a particular asset or rebuildable, and is defined for each Rebuildable Item. The items defined on a Rebuildable BOM are standard inventory components and/or non-inventory, direct items (See: Defining Items, Oracle Inventory User's Guide).
Note: If you are not using Project Manufacturing applications, Project Parameters are defined for your eAM enabled organization to successfully create Rebuildable Items. This is required because a Rebuildable BOM is of type Model/Unit Effective and this BOM type is currently allowed if PJM organization parameters are set up for the eAM enabled organization to which the Rebuildable Item has been assigned. To define Project Parameters, open the Project Parameters window using Project Manufacturing Super User responsibility and without entering any data in the window, save the record. If you plan to use Project Manufacturing, see: Project Manufacturing Integration Setup for information on defining Project Parameters.
To set up a rebuildable BOM
-
Navigate to the Bills of Material window.
Bills of Material
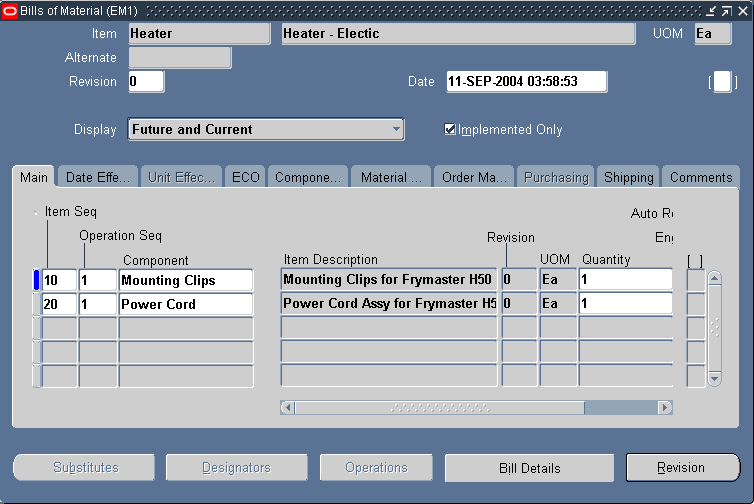
-
Select a Rebuildable Item from the Item list of values.
-
Within the Main tab, the Item Sequence and Operation Sequence values default.
-
Enter the inventory or non-inventory Component to make up the Rebuildable Serial Number.
-
Enter the Quantity of that component necessary for the Rebuildable Serial Number.
-
Save your work.
Related Topics
Defining Items, Oracle Inventory User's Guide
Associating Asset Numbers with Activities
Defining Subinventories, Oracle Inventory User's Guide
Defining Stock Locators, Oracle Inventory User's Guide
Creating a Bill of Material, Oracle Bills of Material User's Guide
Non-Stock Direct Item Setup
Non-Stock Direct Items can represent items that are not stocked in inventory, such as services that are purchased from a supplier. Non-Stock Direct Items are not stocked in inventory; they are defined in the Item Master as an inventory item, Purchased, Purchasable, and the Stockable check box cleared. See: Purchasing Attribute Group, Oracle Inventory User's Guide. These items are contrived as "one off", bought directly from a vendor for a specific Work Order and Operation. These items are delivered directly to the Shop Floor for maintenance Work Order execution.
You can add only coded items (i.e. Inventory Stockable and Non-Stockable-Direct items) to the Maintenance Bills of Material BOM. (See: Defining Direct Item Material Requirements, Oracle Enterprise Asset Management User's Guide).
To set up Non-Stock Direct Items, access the Master Item window within Oracle Inventory, and apply the @Non Stocked Item template. See: Defining Items, Oracle Inventory User's Guide. Description Based Direct Items are not set up within Oracle Inventory.
If direct items exist on a Bill of Material, they default as material requirements when creating a Work Order for that asset; however, you can add additional direct item material requirements to an existing Work Order.
To set up a Non-Stock Direct Item
-
Navigate to the Master Item window.
Master Item
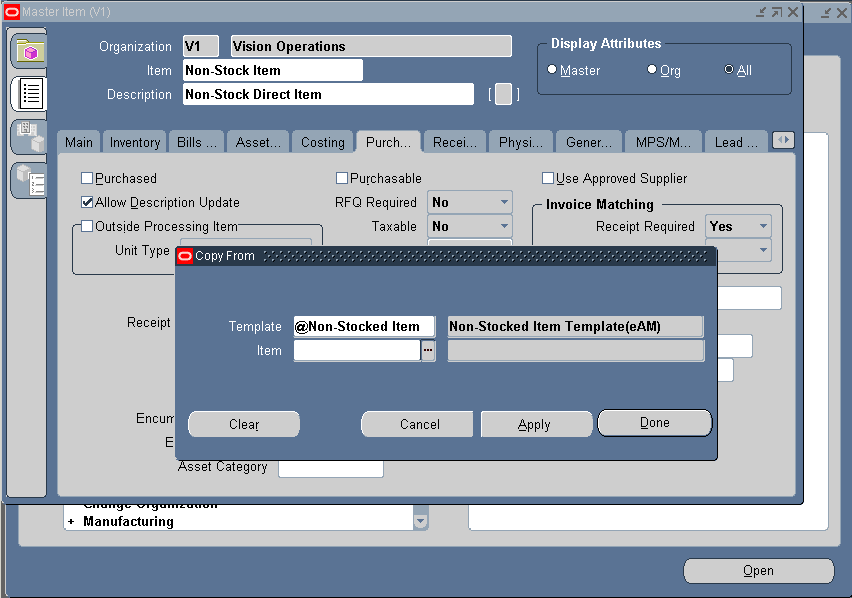
-
Enter the non-stock direct Item name.
-
Enter a Description.
-
From the Tools menu, select Copy From.
-
Select the @Non-Stocked Item Template.
-
Choose Apply.
-
Choose Done.
-
Save your work. The Stockable check box is clear and the Purchased and Purchasable check boxes are selected.
Related Topics
Defining Rebuildable Bills of Material
Setting Up Maintenance Bills of Material
Setting Up Asset Bills of Material
Defining Items, Oracle Inventory User's Guide
Preventive Maintenance Setup
eAM can generate Work Orders automatically based on meter readings, runtime and/or calendar days. An example of meter-based preventive maintenance is your car's oil changes. Most car manufacturers recommend that you change your engine oil every 3,000 miles or six months, whichever comes first.
To set up the above scenario, you would first define your car's odometer as a meter. Next, you would associate that meter to an asset (your car), using the Asset Meter Association window. After you have associated the meter to the asset, you can associate the Maintenance Activity (oil change) that should occur, based on the meters you have defined. This is done via Preventive Maintenance Scheduling.
This section includes the following topics:
Project and Task Setup
Work Orders can associate with a Project, Task or Seiban number, at the time of implementing PM suggestions to work orders. The Forecast Work Order window is customizable.
Defining Meter Templates
There are two ways to create meters. You can create them within the Meter window, or create them first using the Meter Template window, and then next instantiating them when defining an asset. If you create Meters using the Meter window (See: Defining Meters), associate that meter definition with individual Asset Numbers manually. If you utilize the Meter Template definition functionality, you can associate that Meter Template with Asset Groups. After the association is created, when an Asset Number (Asset Numbers or Serialized Rebuilds) is created within that Asset Group (Asset Group or Rebuildable Item), the system automatically creates a new instance of the meter, associated with the specific Asset Number. This enables you to streamline your meter setup. However, the meters are not created retroactively; it applies to Asset Numbers created after the Meter Template was created.
Defining Meter Templates
To define Meter Templates
-
Navigate to the Meter Template window.
Meter Template
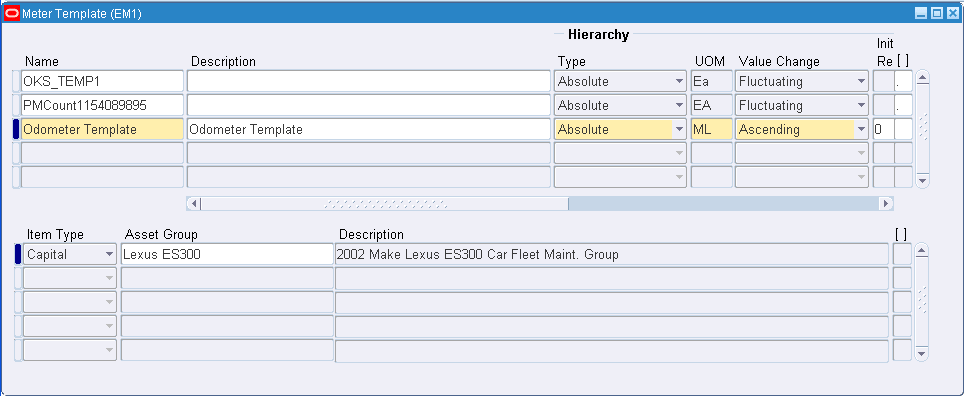
-
Enter a unique meter template Name.
-
Enter the template's Description.
-
Select the meter Type.
When entering meter readings for the current meter, if the meter is an Absolute type, the Value field is enabled. If the meter is a Change type, the Change field is enabled.
-
Select a unit of measure (UOM). After the meter is created, this field is disabled.
-
Select whether the meter readings is Ascending, Descending, or Fluctuating. A fluctuating meter reading is one that can go up and down, for example, a temperature gauge. As production units pass through meters, meter readings increment. Another example of an ascending meter is a car odometer. Some liquid dispensers start full and record decreasing readings as material is used.
Note: If the meter is fluctuating, it is not used in Preventive Maintenance scheduling.
-
Optionally enter an Initial Reading. This is automatically used as the first meter reading entered, or each new instance of the meter that is created and associated with an Asset Number (or Serialized Rebuild) via the Meter Template.
-
If you select the Used in Scheduling check box, the meter is used in Preventive Maintenance Scheduling. If there are any scheduling rules associated with this meter, you cannot clear this check box. If this is a fluctuating meter, this check box is disabled. If the Used in Scheduling check box is selected, the Usage Rate (per day) and Number of Past Reading fields are mandatory.
-
Optionally select the Required check box to indicate whether readings for the meter are required during work order completion, regardless of whether a work order was generated from Preventive Maintenance or if it was created manually.
You can select or clear this check mark at any time; it impacts only future meter readings. However, if the meter is a Primary Failure Meter for any current asset/meter association, you cannot clear the check box.
-
Enter a usage Rate (per day). This field works in conjunction with the Number of Past Readings field to provide daily meter usage estimates, based on historical readings. It supplies the system benchmark data that is used to set the occurrence of scheduled PMs. Rate per day is referred to in the absence of a sufficient value in the Number of Past Readings field.
This field is mandatory if you have selected the Used in Scheduling check box.
-
Enter a value for the Number of Past Readings. This value designates how many readings prior the scheduler should go to for calculating the usage rate. If there is an insufficient number of readings (for example four, instead of the required five), the system continues the calculation based on the usage Rate per day.
This field is mandatory if you have selected the Used in Scheduling check box.
Note: If you enter a value of 1, the system perpetually calculates at the usage Rate per day.
-
Select the meter template effective dates. If left blank, the meter is effective all of the time. You can disable a meter effective on a specific date by selecting a To date.
-
Save your work.
To associate Meter Templates with Asset Groups
If you utilize the Meter Template definition functionality (See: Defining Meter Templates), you can associate that Meter Template with Asset Groups, within the same Meter Template window. After you create the association, when a new Asset Number (Asset Numbers or Rebuildable Serial Numbers) is created within that Asset Group (Asset Group or Rebuildable Item) a new instance of the corresponding meter is automatically created. This enables you to streamline your Meter setup.
-
Select an Item Type. Valid values are Capital or Rebuildable.
-
Select an Asset Group. If you previously selected Capital, Asset Groups are available for selection. If you previously selected Rebuildable, Rebuildable Items are available for selection.
-
Save your work. After saving, every Asset Number defined as part of the current Asset Group automatically associates with the Meter Template; you do not need to create this association manually.
Defining Meters
Alternatively, you can create Meters using the Meter window. Manually associate the meter definition with individual Asset Numbers. If you utilize the Meter Template definition functionality, you can associate that Meter Template with Asset Groups (See: Defining Meter Templates).
Defining Meters
To define a meter within the Meter window
-
Navigate to the Meter window.
Meter
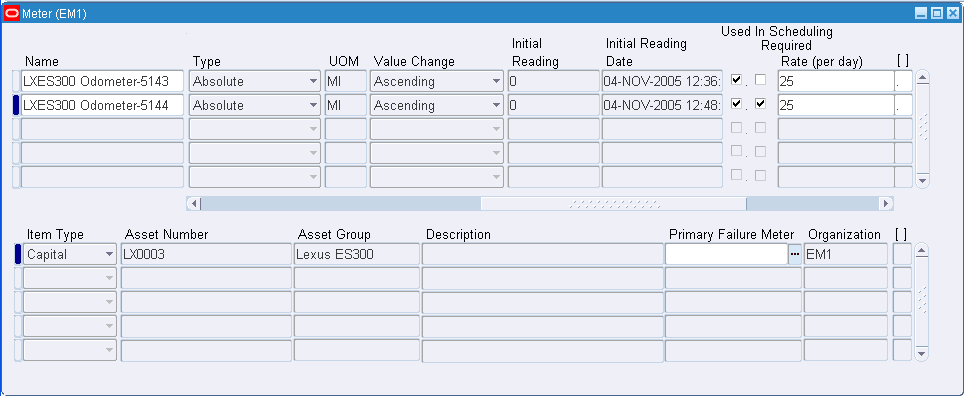
-
Enter a unique meter Name.
-
Enter a Description for this meter.
-
Optionally select a Source Meter from the list of values. As the Source Meter's readings are updated, the associated target meter (current meter) is updated automatically. Companies can associate a Source Meter to an Asset Number/Meter association. The Source Meter reading subsequently feeds corresponding meters that are associated with assets within the Meter Hierarchy.
For example, some companies must track units, using a Meter, to a parent asset (truck). These units should then trickle down to all children components of that parent asset (transmission, tires, belts). Each child component has different Meters to track the units and history on the individual components. If the transmission is replaced, the Rebuild Replacement process enables you to remove the replaced transmission from the meter hierarchy and add the new transmission to the hierarchy. From that point, meter readings logged to the truck should also update the transmission's child meter with those units. Any time a reading is logged to the truck, it will update the transmission child Meter with those units.
-
Select the meter Type.
When entering meter readings for the current meter, if the meter is an Absolute type, the Value field is enabled. If the meter is a Change type, the Change field is enabled. A Change type meter is used to measure incremental changes in meter readings. The incremental amount is added to the current meter reading. After meter readings are entered for a Change Meter, you cannot change the type to Absolute.
-
Select a unit of measure (UOM), associated with this meter. After the meter is created, this field is disabled.
-
Select whether the meter readings are Ascending, Descending, or Fluctuating. A fluctuating meter reading is one that can go up and down, for example, a temperature gauge. As production units pass through meters, meter readings increment. Another example of an ascending meter is a car odometer. Some liquid dispensers start full and record decreasing readings as material is used.
Note: Fluctuating meters are not used in Preventive Maintenance scheduling.
After the meter is created, this field is disabled.
-
Enter an Initial Reading. This is automatically used as the first meter reading entered, or each new instance of the meter that is created and associated to a Asset Number via the Meter Template.
-
If you select the Used in Scheduling check box, the meter is used in Preventive Maintenance Scheduling. If there are any scheduling rules associated with this meter, you cannot clear this check box. If this is a fluctuating meter, this check box is disabled. If the Used in Scheduling check box is selected, the Usage Rate (per day) and Use Past Reading fields become mandatory.
-
Optionally select the Required check box to indicate whether readings for the meter are required during work order completion, regardless of whether a work order was generated from Preventive Maintenance or if it was created manually.
You can select or clear this check mark at any time; it impacts only future meter readings. However, if the meter is a Primary Failure Meter for any current asset/meter association, you cannot clear the check box.
-
Enter a usage Rate (per day). This field works in conjunction with the Number of Past Readings field to provide daily meter usage estimates, based on historical readings. It supplies the system benchmark data that is used to set the occurrence of scheduled PMs. Rate per day is referred to in the absence of a sufficient value in the Number of Past Readings field.
This field is mandatory if you have selected the Used in Scheduling check box.
-
Enter a value for the Number of Past Readings. This value designates how many readings prior the scheduler should go to for calculating the usage rate. If there is an insufficient number of readings (for example four, instead of the required five), the system continues the calculation based on the usage Rate per day entered.
This field is mandatory if you have selected the Used in Scheduling check box.
Note: If you enter a value of 1, the system perpetually calculates at the usage Rate per day.
-
Select the meter Effective Dates. If left blank, the meter is effective all of the time, after it is created. If you select a future date, the meter is disabled until that date. You can disable a meter effective on a specific date by selecting a To date.
-
Save your work.
To associate meters with capital assets and/or serialized rebuilds
Meter Association creates the relationship between the meter definition and the capital Asset Number and/or Serialized Rebuild.
-
Select an Item Type of Capital, if you are going to associate the current meter with an Asset Number. Select Rebuildable if you are associating the current meter with a Serialized Rebuild.
-
Select an Asset Number (or Serialized Rebuild). The Asset Group (or Rebuildable Item) defaults.
-
Optionally select a Primary Failure Meter to indicate the default meter that is used for failure analysis. This meter's readings are used to calculate meter-based MTBF and MTTR. See: Failure Analysis Overview, Oracle Enterprise Asset Management User's Guide.
You can select a Primary Failure Meter for any meter with the Required check mark selected. Only one meter can be selected at a time, for an asset.
-
Save your work.
Defining Set Names
A PM schedule for an Activity and an Asset Number or Asset Group must uniquely belong to a Set Name. Multiple PM Schedules for the same Asset Number or Asset Group and Activity combination are created across Sets. However, out of those PM Schedules, one can be identified as the Default and used for generating Work Orders. Other PM Schedules in other Sets can be used for simulation purposes. Every Set Name has an end date. Every PM schedule that belongs to the Set Name must have its effective-to date before the end date of the PM Schedule's Set Name. Before assigning a Set Name to a PM schedule, you need to define Set Names within the Set Name Definition window. If you do not want to create Set Names, you can assign PM schedules to set, MAIN; it already exists.
PM schedules might contain assets that transferred from one organization to another. The asset's destination organization can update and use the PM schedules that are assigned to a global PM set. However, you can only view, within the destination organization, PM schedules that are assigned to the asset's originating organization's local PM sets.
Defining Set Names
To define Set Names
-
Navigate to the Set Name window.
Set Name
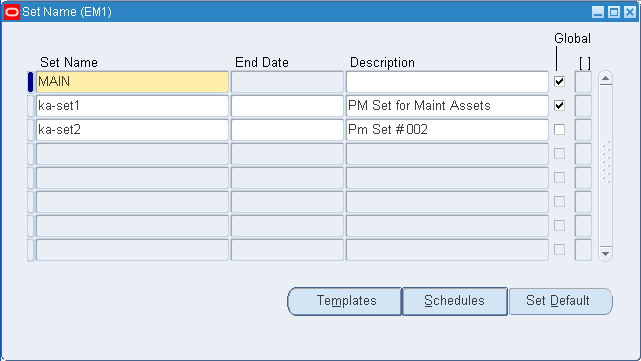
-
Enter the Set Name.
-
Optionally enter an End Date. Every PM schedule that belongs to the Set Name must have its effective-to date before the End Date of the PM Schedule's Set Name. If you leave this field blank, the current Set Name does not expire.
-
Optionally enter a Description for this Set Name.
-
Optionally select the Global check box to indicate that the set is visible globally. If this check box is clear, the set is confined to the current organization.
Note: You can change this setting from Global to local, if the set is not used in an PM schedules of another organization's assets.
-
Optionally choose Templates to add, change, delete, or view Preventive Maintenance Schedule Templates, associated with the current Set Name (See: Preventive Maintenance Schedule Templates).
-
Optionally choose Schedules to create PM Schedule Definitions, associated with the current Set Name (See: Defining a Preventive Maintenance Template, Oracle Enterprise Asset Management User's Guide).
-
Optionally choose Set Default to identify all schedules within this set as Default. PM Schedules identified as Default automatically generates Work Orders, by the PM Scheduler process. PM schedules that are not identified as Default can generate Work Order suggestions, by the PM Scheduler process. The generated suggestions cannot be converted into Work Orders. You can create an unlimited number of Set Names within this window.
-
Save your work.
Defining a Preventive Maintenance Template
An Activity and Asset Number combination can be associated with Runtime, Day Interval Rules, or a list of dates, defining when an Activity should be scheduled for an Asset, Serialized and Non-Serialized Rebuildables, or an Asset Route. Day Interval rules and List of Dates rules are supported for Non-Serialized Rebuildables and Asset Routes. The Preventive Maintenance (PM) Scheduler process creates suggested Work Order dates based on these rules. A planner can then view these forecasted Work Orders, and generate them as necessary.
There are two ways to create PM schedule definitions for Rebuildable Serial Numbers and Assets. You can create them individually within the Preventive Maintenance Schedules window (See: Entering Preventive Maintenance Schedule Definitions, Oracle Enterprise Asset Management User's Guide), or streamline the process of creating them using a PM Template. A PM Template is a schedule, defined for an Asset Group (Asset Group or Rebuildable Item)/Activity association. If you utilize the PM Template functionality, a new PM Schedule is automatically created for a newly created Asset Number (asset or rebuildable) for the Asset Group. All PM Template attributes are copied over to the PM Schedule for the Instance. You can optionally modify the values of the PM Instances created.
Before a PM Template is created, the following prerequisites must exist:
-
Meter Template Definition (See: Defining Meter Templates, Oracle Enterprise Asset Management User's Guide)
A Meter Template definition is required if the PM Template is based on Runtime Rule
-
Activity Definition (See: Defining Activities, Oracle Enterprise Asset Management User's Guide)
-
Meter Template Association (See: Associating Meter Templates with Asset Groups, Oracle Enterprise Asset Management User's Guide)
A Meter Template Association is required if the PM Template is based on Runtime Rules.
-
Activity Association Template (See: Activity Association Templates, Oracle Enterprise Asset Management User's Guide)
Creating Preventive Maintenance (PM) Templates
To create a PM Template
-
Navigate to the Find Preventive Maintenance Schedules window. This window enables you to enter information to narrow your search for query mode.
Select Yes in the Generate Next WO field if you want the PM Scheduler to be able to create the next work order only if the previous work order has been completed for this work order completion date.
To define a new PM Template, select the New button.
Preventive Maintenance (Template Definition)
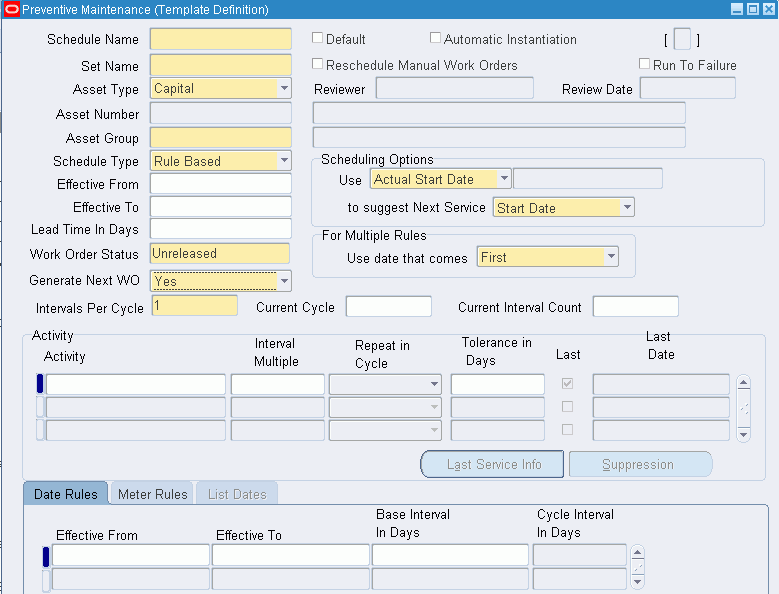
-
Enter a PM Template name in the Schedule Name field.
-
Enter a Set Name. A PM schedule for an Activity and Asset Group must uniquely belong to a Set Name (See: Defining Set Names, Oracle Enterprise Asset Management User's Guide). Every Set Name has an end date. Every PM schedule that belongs to the Set Name must have its Effective To date before the end date of the PM Set Name. Before assigning a Set Name to a PM schedule, define Set Names within the Set Name Definition window. If you do not want to create Set Names, you can assign PM schedules to set, MAIN; it already exists.
PM schedules might contain assets that transferred from one organization to another. The asset's destination organization can update and use the PM schedules that are assigned to a global PM set. However, you can only view, within the destination organization, PM schedules that are assigned to the asset's originating organization's local PM sets. You can copy these PM schedules to a global, local set or to your organization's local set.
-
Select an Asset Type. Valid values are Capital and Rebuildable Inventory. If Capital is selected, the Asset Group fields refer to the Asset Group. If you select Rebuildable Inventory, the Asset Group fields refer to the Rebuildable Item.
-
Select an Asset Group.
-
Select a Schedule Type. Valid values are Rule Based and List Dates. If you select Rule Based, the Day Interval Rules and Runtime Rules tabs are enabled to enter information. If you select List Dates, you can define information within the List Dates tab.
-
The Effective dates default from the current Activity association, if they exist. Optionally select or update the Effective From and Effective To dates.
-
Optionally enter a Lead Time In Days.
Lead time in a Preventive Maintenance Schedule is different than lead time associated with Work Order creation. The Preventive Maintenance process suggests Work Orders to be created or scheduled, starting from the last service day of the Asset to the cutoff day you specified while running the process. If a Lead Time In Days is specified, the Preventive Maintenance process predicts work for those extra days beyond the cutoff date. This provides the maintenance department advanced visibility for maintenance work that is typically predicted in the next planning process. The maintenance department can prepare for such work in the current planning period.
-
Optionally select a Work Order Status that best fits your business process. When Preventive Maintenance Work Orders are generated, (See: Generating Work Orders, Oracle Enterprise Asset Management User's Guide) they are created with this specified status. You can optionally update this status within the Maintenance Workbench (See: Using the Maintenance Workbench, Oracle Enterprise Asset Management User's Guide).
-
Optionally select Yes in the Generate Next WO field if you want to enable the scheduler to create the next work order only if the previous work order has been completed for the work order completion date.
-
Optionally select the Default check box to indicate that the current PM schedule definition generates Work Orders. If this check box is not selected, Work Order suggestions will not generate. You can have only one Default PM for an Asset Item/Activity combination.
-
Optionally select the Automatic Instantiation check box. If this check box is selected, a new instance of the current PM schedule template is created for each new Asset (Asset Number or Rebuildable Serial Number).
-
Optionally select the Reschedule Manual Work Orders check box. If this check box is selected, non-firm, unreleased manual work orders are considered during PM scheduling.
-
If the Run To Failure check box is selected, the Preventive Maintenance Scheduler does not automatically schedule Asset Numbers within this Asset Group and Activity association, although you can create manual Work Orders. This is relevant for Asset Numbers that cost more to maintain than the Asset Number itself. You might also check this box for forecasting and budgeting reasons. For example, your asset is a conveyor belt. It is common in maintenance environments to let this asset wear out completely before replacing it. You estimated that the life of this asset is 18 months, and have set up a schedule for a replacement Work Order every 18 months. In reality, you found that the belts have ended up wearing out every 12 months, affecting your cost budget.
You may select this check box and clear it later. For example, you might associate an Asset Number to an Activity, but maybe you cannot currently maintain or schedule this Asset Number. You may have future plans to maintain this Asset Number.
If this check box is selected, PMs created as a copy of this PM Template generate Work Orders for the corresponding asset in the Maintenance Workbench (See: Using the Maintenance Workbench, Oracle Enterprise Asset Management User's Guide).
-
In the Scheduling Options region, indicate how the PM Scheduler process calculates Work Order dates. The Use field works in conjunction with the to suggest Next Service field. The date field indicates the Last Service date
-
Actual Start Date to Start Date: The PM Scheduler process uses the Last Service Actual Start Date, and calculates scheduled start dates. This is a forward scheduling method.
-
Actual Start Date to End Date: The PM Scheduler process uses the Last Service Actual Start Date, and calculates the scheduled end dates. This is a backward scheduling method.
-
Actual End Date to Start Date: The PM Scheduler process uses the Last Service Actual End Date, and calculates the scheduled start dates. This is a forward scheduling method.
-
Actual End Date to End Date: The PM Scheduler process uses the Last Service Actual End Date, and schedules the scheduled end dates. This is a backward scheduling method.
-
Scheduled Start Date to Start Date: The PM Scheduler process uses the Last Service Scheduled Start Date, and calculates scheduled start dates. This is a forward scheduling method.
-
Scheduled Start Date to End Date: The PM Scheduler process uses the Last Service Scheduled Start Date, and calculates the scheduled end dates. This is a backward scheduling method.
-
Scheduled End Date to Start Date: The PM Scheduler process uses the Last Service Scheduled End Date, and calculates the scheduled start dates. This is a forward scheduling method.
-
Scheduled End Date to End Date: The PM Scheduler process uses the Last Service Scheduled End Date, and schedules the scheduled end dates. This is a backward scheduling method.
-
Base Date: You must enter a date as the basis for the PM calculation. As your intervals change, you might want to update the Base Date so that your PM work orders are generated at your choice intervals. It is recommended that you change the Base Date to the Last Service Date if your scheduling interval changes, to ensure that the new scheduling is impacted only from that point and forward. Actual and scheduled work order dates are not considered when you use the Base Date or Base Meter options.
-
Base Meter: You must enter a Meter, as well as the initial interval. The PM engine uses that initial reading as the anchor for its calculation. Actual and scheduled work order dates are not considered when you use the Base Date or Base Meter options.
-
-
In the Multiple Rules region, indicate how the predicted due dates are determined for multiple rules.
-
First: The due date is set to the first due date of all rules.
-
Last: The due date is set to the last due date of all rules.
For example, below is a Runtime Rule that includes two meters, Meter1 and Meter2.
Schedule Based On Example Interval Effective From Effective To Meter 100 0 10,000 Meter1 50 0 2,500 Meter2 If you specify First Due Date in the Scheduling Based On region of the PM Template, between the two meters, the first meter that hits the due reading triggers the service. In this case, if Meter1's reading reaches the interval of 100 first, the service happens before Meter2's reading reaches its interval of 50. Conversely, you can choose Last Due Date in the Scheduling Based On region. In this case, even if Meter1 reaches its due reading, the service is not scheduled until Meter2 has also reached its due reading.
This region is disabled if the current PM schedule definition's Scheduling Type field is populated with List Dates.
-
-
In the Activity region, select one or multiple activities. Activities associated with asset groups are eligible for defining a Schedule Template.
A Maintenance Planner can create a single PM schedule for multiple activities on an Asset Template. You can list multiple activities to perform on an asset that share a common base interval of either a date, meter, or both. Each maintenance activity on the schedule generates work orders, based on a multiple of the base interval occurring. The group of maintenance activities on one PM schedule represents a cycle of activities. Base Interval refers to the minimum of a space of time (such as 90 days), or meter reading (such as 7,500 miles) between when PM activities included in one PM schedule should be performed. It can be considered a common denominator among the multiple activities included in one PM Schedule that share a common base interval. A cycle is a complete round of maintenance activities performed on an asset that share a common base interval of a meter or time period, or both, or a multiple of the shared intervals.
After the cycle of activities completes, the cycle restarts. For example, you can define a PM schedule for two activities that have a common Base Interval of 7,500 miles. The first activity is an oil change, and is scheduled every 7,500 miles. The second activity, a tune-up, is scheduled for every fourth interval or 30,000 miles. The work order for the oil change generates on each occurrence of the 7,500 mile interval and the work order for the tune-up generates on the fourth interval occurrence.
When an asset transfers to another organization, the schedule that is associated with the local PM Set is viewable within the new organization. For example, the PM Set Name, Local, is created in organization, EM1. A PM schedule is defined in EM1 for Asset Number, #1554877, and is associated with Local (Set Name). Asset Number #1554877 is transferred to another eAM-enabled organization, EM2. A planner in this new organization (EM2) can view the PM schedule that is associated with the Local PM set. However, it is view-only; it cannot be updated. The associated Activity appears in blue, to indicate that the activity definition has not yet been assigned to EM2. In this scenario, to use the PM schedule, the planner must either assign the schedule's Activity to the current organization, EM2, or update the schedule's PM Set Name from Local to a global set or a local PM set that was defined in EM2.
Note: You can define an unlimited number of activities, however, it is recommended that you keep it simple.
-
Optionally indicate the Interval Multiple of the Base Interval. This field works with the Repeat in Cycle field to determine how many intervals for an activity to repeat.
-
Optionally select the Repeat in Cycle value to determine if the activity interval repeats in the cycle. If you select Yes, the Interval Multiple field determines how many times the activity interval repeats. If you select No, the activity is scheduled once for each cycle.
-
Optionally enter a Tolerance In Days to indicate a minimum interval in days that suggested Work Orders' dates are spaced from each other.
-
Within the Date Rules tab, optionally enter Effective From and To dates to specify the rule's expiration.
-
Enter a Base Interval In Days. For example, if you enter the number three, a Work Order suggestion is created every three days.
You can optionally create variable Date Rules. For example, you would like Work Order suggestions created every three days in January, and every four days in February. The window below illustrates this example:
-
Within the Meter Rules tab, optionally select a Meter Name to indicate that Preventive Maintenance scheduling is based on a Meter Rule. If you have previously set up a Date Rule, you can base the scheduling on a Runtime Rule, as well. Meter Templates associated with this Asset Group (See: Associating Meter Templates with Asset Groups, Oracle Enterprise Asset Management User's Guide), and with the Used in Scheduling check box selected in the meter template definition, are available.
For example, trucks of a specific Make and Model need to be scheduled for an oil change every 30 days, or every 1000 miles.
Date Rule Field Value Last Service Start/End Date December 26, 2001 Interval In Days 30 Meter Rule Field Value Last Service Reading 3000 Interval 1000 Latest Meter Reading 3100 (found within meter reading history) Latest Meter Reading Date January 1, 2002 (this can be found via meter reading history) Usage Rate 25 miles per day (calculated, based on Linear Regression's Least Square formula. In a least-squares model, the best-fitting line for the observed data is calculated by minimizing the sum of the squares of the vertical deviations from each data point to the line. For example, if a point lies on the fitted line exactly, then its vertical deviation is zero.) If the Meter Rule is taken into account, the next due date is February 6, 2002 (January 1 2002 + [(3000 + 1000 - 3100)/25 = January 1, 2002] +36 days), and every 40 days after that. This is calculated as the interval (1000 miles) divided by the usage rate (25 miles per day).
The PM Scheduler process compares the above suggested dates from the runtime interval rule, to those of the date rule: Base Date of December 26, 2001 + every 30 days.
The Work Orders ultimately created by the PM Scheduler process are those of the earliest or latest dates, depending on how the Schedule Based On region is populated. If you selected First Due, the earliest suggestion is used for Work Order creation. The opposite is also true.
-
The Interval and UOM fields work together. For example, for every 2000 miles, this Asset Number needs an oil change.
The UOM defaults from the Meter Template definition of the current Meter Template.
You can optionally create multiple Runtime Rules. For example, from zero to 10,000 miles, you would like your asset serviced every 3,000 miles. From 10,000 to 50,000 miles, you would like your asset serviced every 2,000 miles.
-
Optionally enter the Last Service Reading in the Last Service Information window. This field is also automatically updated with the meter reading information recorded at Work Order completion (See: Work Order Completion, Oracle Enterprise Asset Management User's Guide).
Note: The Preventive Maintenance Scheduler (See: Generating Work Orders, Oracle Enterprise Asset Management User's Guide) automatically calculates the meter usage rate, based on historical data, which is then used to predict the next meter due date. Refer to the example below.
-
If you populated List Dates within the Schedule Type field, select the List Dates tab to define the specific due dates that Work Orders should transpire.
For example, you want asset, Car1, serviced on May 1 and November 1 every year for the next three years. In this case, you would create a List Dates type schedule definition, and list all the due dates within this tab. The PM Scheduler process creates suggested Work Order dates on those specified dates.
-
Save your work.
Entering Preventive Maintenance Schedule Definitions
Schedule definitions are implemented to create scheduled Work Orders, based on Day Interval Rules, and/or Runtime Rules. Schedules can also be based on a list of specific dates by using List Date rules. List Date rule based PM schedules cannot have Runtime or Day interval rules. Runtime or Day Interval Rule based PM schedules cannot have List Date rules. You can create a Preventive Maintenance Schedule Definition on an Asset Group (Non-serialized Rebuildable)/Activity combination, Asset Number/Activity combination, or an Asset Route/Activity combination.
If a meter is entered in a runtime interval rule, the following prerequisites must exist before creating a Preventive Maintenance Schedule:
-
Meter Definition (See: Defining Meters, Oracle Enterprise Asset Management User's Guide)
A Meter definition is required if the PM schedule is based on Runtime Rules.
-
Activity Definition (See: Defining Activities, Oracle Enterprise Asset Management User's Guide)
-
Meter/Asset Association (See: Associating Meters with Asset Numbers, Oracle Enterprise Asset Management User's Guide)
A Meter/Asset Association is required if the PM schedule is based on Runtime Rules.
-
Asset Group (Non-Serialized Rebuildable) or Asset Number/Activity Association (See: Associating Asset Numbers with Activities, Oracle Enterprise Asset Management User's Guide)
Defining Preventive Maintenance (PM) Schedules
To define a Preventive Maintenance schedule for an asset number
-
Navigate to the Find Preventive Maintenance Schedules window. This window enables you to enter information to narrow your search for query mode.
Select Yes in the Generate Next WO field if you want the PM Scheduler to be able to create the next work order only if the previous work order has been completed for this work order completion date.
To define a new schedule, click the New button.
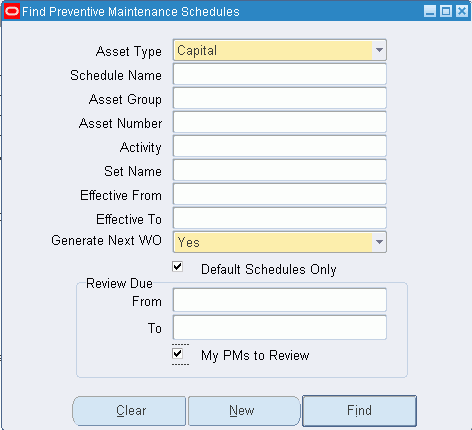
Preventive Maintenance (Schedule Definition)
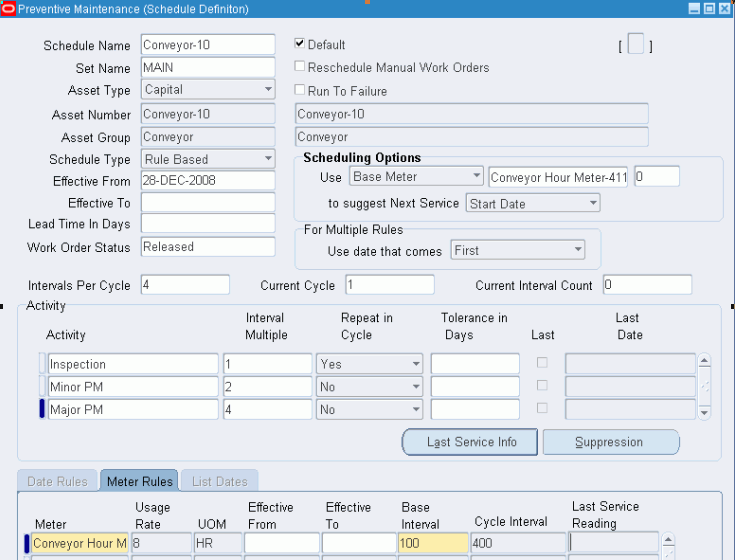
-
Enter a Schedule Name.
Important: If your PM schedule requires more than one activity and if the activities use different cycles, we recommend that you create separate PM schedules.
-
Enter a Set Name. A PM schedule for an Activity and an Asset Number or Asset Group must uniquely belong to a Set Name (See: Defining Set Names, Oracle Enterprise Asset Management User's Guide). Every Set Name has an end date. Every PM schedule that belongs to the Set Name must have its Effective To date before the end date of the PM Set Name. Before assigning a Set Name to a PM schedule, define Set Names within the Set Name Definition window. If you do not want to create Set Names, you can assign PM schedules to set, MAIN; it already exists.
PM schedules might contain assets that transferred from one organization to another. The asset's destination organization can update and use the PM schedules that are assigned to a global PM set. However, you can only view, within the destination organization, PM schedules that are assigned to the asset's originating organization's local PM sets. You can copy these PM schedules to a global, local set or to your organization's local set.
-
Select an Asset Type. Valid values are Capital and Rebuildable Inventory. If Capital is selected, the Asset Number and Asset Group fields refer to the Asset Number and Asset Group, respectively. If Rebuildable Inventory is selected, the Asset Number and Asset Group fields refer to the Rebuildable Serial Number and Rebuildable Item, respectively. If a Non-Serialized Rebuildable Item is entered in the Asset Group field, the Asset Number field is not required.
-
Select an Asset Number. Assets that are maintainable and associated with Activities are available. The Asset Group field populates with the Asset Group associated with the current Asset Number. If you wish to define a PM Schedule for a Non-serialized Rebuildable, enter the Asset Group; the Asset Number field does not apply.
For assets that transferred from one organization to another, PM schedules that are defined for assets within their originating organizations are also visible within their destination organizations.
-
Select a Schedule Type. Valid values are Rule Based and List Dates. If you select Rule Based, the Day Interval Rules and Runtime Rules tabs are enabled to enter information. If you select List Dates, you can define information within the List Dates tab.
-
The Effective dates default from the current Asset Activity association, if they exist. Optionally select or update the Effective From and Effective To dates.
-
Optionally enter a Lead Time In Days.
Lead time in a Preventive Maintenance Schedule is different than lead time associated with Work Order creation. Lead time within a Preventive Maintenance Schedule covers the time between the end date of the first execution of the Preventive Maintenance Schedule process, and the start date (system date) of the second execution of the Preventive Maintenance Schedule process. For example, a department executes the Preventive Maintenance Scheduler process every two months; the end date of each Preventive Maintenance Scheduler process is the end of every other month. However, due to circumstance, the meter data is not ready until the middle of the month. Therefore, the Preventive Maintenance Scheduler process starts in the middle of the month, instead of at the beginning, creating a lapse between the first and second Preventive Maintenance Scheduler executions. Lead time is used to cover this lapse.
-
Optionally select Yes in the Generate Next WO field if you want to enable the scheduler to create the next work order only if the previous work order has been completed for the work order completion date.
-
Optionally select a Work Order Status that best fits your business process. When Preventive Maintenance Work Orders are generated, (See: Generating Work Orders, Oracle Enterprise Asset Management User's Guide) they are created with this specified status. You can optionally specify a different status for each PM schedule. You can also update this status, using the Maintenance Workbench (See: Using the Maintenance Workbench, Oracle Enterprise Asset Management User's Guide).
-
Optionally select the Default checkbox to indicate that the current PM schedule definition generates Work Orders. If this checkbox is not selected, Work Order suggestions will not generate. You can have only one Default PM for an Asset Item/Activity combination.
-
Optionally select the Reschedule Manual Work Orders checkbox. If this checkbox is selected, non-firm, unreleased manual Work Orders are considered during PM scheduling.
-
If the Run To Failure checkbox is selected, the Preventive Maintenance Scheduler does not automatically schedule this Asset Number and Activity association, although you can create manual Work Orders. This is relevant for Asset Numbers that cost more to maintain than the Asset Number itself. You might also check this box for forecasting and budgeting reasons. For example, your asset is a conveyor belt. It is common in maintenance environments to let this asset wear out completely before replacing it. You estimated that the life of this asset is 18 months, and have set up a schedule for a replacement Work Order every 18 months. In reality, you found that the belts have worn out every 12 months, affecting your cost budget.
You can select this checkbox and clear it later. For example, you might associate a non-maintainable asset to an activity, but maybe you cannot currently maintain or schedule this asset. You might have future plans to maintain this Asset Number.
If this check box is selected, the work orders for this asset do not appear in the Maintenance Workbench at the time of PM Scheduling (See: Using the Maintenance Workbench, Oracle Enterprise Asset Management User's Guide).
-
For new PM schedule definitions, the default value for the Reviewer is based on the user login information, and the Review Date field defaults to the current system date.
If you are updating a PM schedule definition, the Reviewer field indicates the last reviewer of the PM Schedule, and the Review Date field indicates the date on which the last review occurred. When updating the schedule definition, the Reviewed Date can be changed.
-
In the Scheduling Options region, indicate how the PM Scheduler process calculates work order dates.
The Use field works in conjunction with the to suggest Next Service field. The date field indicates the Last Service date.
-
Actual Start to Start Date: The PM Scheduler process uses the Last Service Actual Start Date, and calculates scheduled start dates. This is a forward scheduling method.
-
Actual Start Date to End Date: The PM Scheduler process uses the Last Service Actual Start Date, and calculates the scheduled end dates. This is a backward scheduling method.
-
Actual End Date to Start Date: The PM Scheduler process uses the Last Service Actual End Date, and calculates the scheduled start dates. This is a forward scheduling method.
-
Actual End Date to End Date: The PM Scheduler process uses the Last Service Actual End Date, and schedules the scheduled end dates. This is a backward scheduling method.
-
Scheduled Start Date to Start Date: The PM Scheduler process uses the Last Service Scheduled Start Date, and calculates scheduled start dates. This is a forward scheduling method.
-
Scheduled Start Date to End Date: The PM Scheduler process uses the Last Service Scheduled Start Date, and calculates the scheduled end dates. This is a backward scheduling method.
-
Scheduled End Date to Start Date: The PM Scheduler process uses the Last Service Scheduled End Date, and calculates the scheduled start dates. This is a forward scheduling method.
-
Scheduled End Date to End Date: The PM Scheduler process uses the Last Service Scheduled End Date, and schedules the scheduled end dates. This is a backward scheduling method.
-
Base Date: You must enter a date as the basis for the PM calculation. As your intervals change, you might want to update the Base Date so that your PM work orders are generated at your choice intervals. It is recommended that you change the Base Date to the Last Service Date if your scheduling interval changes, to ensure that the new scheduling is impacted only from that point and forward. Actual and scheduled work order dates are not considered when you use the Base Date or Base Meter options.
-
Base Meter: You must enter a Meter, as well as the initial interval. The PM engine uses that initial reading as the anchor for its calculation. Actual and scheduled work order dates are not considered when you use the Base Date or Base Meter options.
-
-
In the For Multiple Rules region, indicate how the predicted due dates are determined for multiple rules.
-
First: The due date is set to the first due date of all rules.
-
Last: The due date is set to the last due date of all rules.
For example, below is a Runtime Rule that includes two meters, Meter1 and Meter2.
Schedule Based On Example Interval Effective From Effective To Meter 100 0 10,000 Meter1 50 0 2,500 Meter2 If you specify First in the Multiple Rules region of the PM schedule definition, between the two meters, the first meter that hits the due reading triggers the service. In this case, if Meter1's reading reaches the interval of 100 first, the service happens before Meter2's reading reaches its interval of 50. Conversely, you can choose Last in the Multiple Rules region. In this case, even if Meter1 reaches its due reading, the service is not scheduled until Meter2 has also reached its due reading.
This region is disabled if the current PM schedule definition's Scheduling Type field is populated with List Dates.
-
-
Optionally enter a value for the Intervals Per Cycle field. This field represents the number of base intervals that comprise the complete cycle. For example, 12 monthly intervals would comprise a 1-year cycle, and four 7,500 miles base intervals would comprise a 30,000-mile cycle.
The system automatically updates these fields:
-
Current Cycle: The current execution cycle of a Preventive Maintenance cycle for an asset. This field is automatically updated by the system when preventive maintenance work orders generated out of a given schedule are completed.
-
Current Interval Cycle: The current execution interval within a current running cycle. This field is automatically updated by the system when preventive maintenance work orders generated out of a given schedule are completed. It is advisable not to change the current cycle and current interval count after initial definition, unless really required to do so. These fields can be disabled for edit by users through function based menu exclusions.
-
-
Within the Activity region, select one or multiple Activities. Activities associated with Asset Numbers or Non-serialized Rebuilds are eligible for scheduling.
A Maintenance Planner can create a single PM schedule for multiple activities on an Asset. You can list multiple activities to perform on an asset that share a common base interval of either a date, meter, or both. Each maintenance activity on the schedule generates work orders, based on a multiple of the base interval occurring. The group of maintenance activities on one PM schedule represents a cycle of activities. After the cycle of activities completes, the cycle restarts. For example, you can define a PM schedule for two activities that have a common Base Interval of 7,500 miles. The first activity is an oil change, and is scheduled every 7,500 miles. The second activity, a tune-up, is scheduled for every fourth interval or 30,000 miles. The work order for the oil change generates on each occurrence of the 7,500 mile interval and the work order for the tune-up generates on the fourth interval occurrence.
When an asset transfers to another organization, the schedule that is associated with the local PM Set is viewable within the new organization. For example, the PM Set Name, Local, is created in organization, EM1. A PM schedule is defined in EM1 for Asset Number, #1554877, and is associated with Local (Set Name). Asset Number #1554877 is transferred to another eAM-enabled organization, EM2. A planner in this new organization (EM2) can view the PM schedule that is associated with the Local PM set. However, it is view-only; it cannot be updated. The associated Activity appears in blue, to indicate that the activity definition has not yet been assigned to EM2. In this scenario, to use the PM schedule, the planner must either assign the schedule's Activity to the current organization, EM2, or update the schedule's PM Set Name from Local to a global set or a local PM set that was defined in EM2.
Note: You can define an unlimited number of activities, however, it is recommended that you keep it simple.
-
Optionally indicate the Interval Multiple of the Base Interval. This field works with the Repeat in Cycle field to determine how many intervals for an activity to repeat.
-
Optionally select the Repeat in Cycle value to determine if the activity interval repeats in the cycle. If you select Yes, the Interval Multiple field determines how many times the activity interval repeats. If you select No, the Activity is scheduled once for each cycle.
-
Optionally enter a Tolerance In Days to indicate a minimum interval in days that suggested Work Orders' dates are spaced from each other.
-
Optionally choose Last Service Info to enter the last service information for the current Asset Number/Activity association. Enter Last Service start and end dates. These dates are used by the Preventive Maintenance Scheduler as a starting point for calculating the next due date for a suggested Work Order. After the Preventive Maintenance Scheduler suggests a Work Order, and that Work Order is completed, this date resets to the completion date. Last service information is always regarding the Asset Number/Activity association, and independent of the association's PM schedule definition.
The Last Service Reading cannot be greater than the last meter (if the meter is ascending), or less than the last meter reading (if the meter is descending).
Last Service Information
-
Within the Date Rules tab, optionally enter Effective From and To dates to specify the rule's expiration. This tab is enabled if Rule Based is populated in the Schedule Type field.
-
Enter a Base Interval In Days. For example, if you enter the number three, a Work Order suggestion is created every three days.
You can optionally create variable Date Rules. For example, you would like Work Order suggestions created every three days in January, and every four days in February.
Date Rules Example
-
Optionally within the Meter Rules tab, select a Meter Name to indicate that Preventive Maintenance scheduling is based on a Meter Rule. If you have previously set up a Date Rule, you can base the scheduling on a Meter Rule, as well. Meters associated with this Asset Number (See: Associating Meters with Asset Numbers, Oracle Enterprise Asset Management User's Guide), and with the Used in Scheduling checkbox selected in the meter definition, are available.
For example, a Truck 01 Asset Number is scheduled for an oil change every 30 days, or every 1000 miles.
Date Rule Field Value Last Service Date December 26, 2001 Interval In Days 30 Meter Rule Field Value Last Service Reading 3000 Interval 1000 Last Service Reading Date January 1, 2002 (this can be found via meter reading history) Usage Rate 25 miles per day (calculated as the total of the meter readings value changes, divided by the total of the meter reading date intervals) If the Meter Rule is taken into account, the next due date is February 10, 2002 (January 1 2002 + 40 days), and every 40 days after that. This is calculated as the interval (1000 miles) divided by the usage rate (25 miles per day).
The PM Scheduler process compares the above suggested dates from the meter rule, to those of the date rule: Base Date of December 26, 2001 + every 30 days.
The Work Orders ultimately created by the PM Scheduler process are those of the shortest interval and earliest dates: December 26, 2002 + every 30 days.
Note: Meter Rules are not applicable for Non-Serialized Rebuildables.
-
The Interval and UOM fields work together. For example, for every 2000 miles, this Asset Number needs an oil change.
The UOM defaults from the meter definition of the current meter.
You can optionally create multiple Meter Rules. For example, from zero to 10,000 miles, you would like your asset serviced every 3,000 miles. From 10,000 to 50,000 miles, you would like your asset serviced every 2,000 miles.
-
You cannot enter the Last Service Reading. This field is automatically updated with the meter reading information recorded at Work Order completion (See: Work Order Completion, Oracle Enterprise Asset Management User's Guide).
Note: The Preventive Maintenance Scheduler (See: Generating Work Orders, Oracle Enterprise Asset Management User's Guide) automatically calculates the meter usage rate, based on historical data, which is then used to predict the next meter due date. Refer to the example below.
-
If you populated List Dates within the Schedule Type field, select the List Dates tab to define the specific due dates that Work Orders should transpire.
For example, you want asset, Car1, serviced on May 1 and November 1 every year for the next three years. In this case, you would create a List Dates type schedule definition, and list all the due dates within this tab. The PM Scheduler process creates suggested Work Order dates on those specified dates.
-
Save your work.
Multiple Activity PM Schedule Definition - Fixed Meter Example
Parameters for Conveyor PM Schedule
-
Inspection every 100 hours of operation
-
Minor PM for every 200 hours of operation
-
Major PM for every 400 hours of operation
-
Scheduling Option: Base Meter
The following are the steps you will perform:
-
Enter the meter name and define the scheduling starting point to the right of the meter.
The system will define default values for the following:
-
Intervals per Cycle
-
Current Cycle
-
Current Interval Count
-
-
Enter the required activities, taking the following into consideration:
-
The Activity “Inspection” is scheduled after 100 hours of operation: (Interval Multiple (1) x Base Interval (100)).
-
The Activity “Minor PM” is scheduled after 200 hours of operation.
-
The Activity “Major PM” is scheduled after 400 hours of operation.
-
Repeat in Cycle determines if an activity can occur multiple times during a cycle, in this example the Inspection can occur multiple times within the cycle, the Minor PM will not be planned at the 400 hour interval.
-
-
Enter the meter name with a base interval of 100.
-
Save your work.
Analysis of Example
The program will update Current Cycle and Current Interval Count when PM work orders are completed. For example at 210 hours of operation, two Inspection work orders and one Minor PM work order have been generated and completed. The Current Interval Count has been updated to (2). The Current Interval Count provides a count within the Current Cycle, the Current Interval Count is updated to (1) with the start of each new cycle.
The Current Cycle provides a count of the number of times a PM Set (Inspection, Minor PM and Major PM) has been completed. In this example, the Current Cycle remains (1), the Current Cycle will be updated to (2) with the completion of the PM Set and the start of a new cycle.
When forecasting work orders for the next 30 days, note that the activity “Minor PM” is not included in the forecast but the Activity “Inspection” is included, the “Repeat in Cycle” controls if an activity will occur within a Cycle. For the activity “Inspection” the Repeat in Cycle is “Yes”, for the activity “Minor PM” the Repeat in Cycle is “No”, the “Minor PM” will be generated once per cycle.
To define a Preventive Maintenance schedule for an asset route
Preventive Maintenance Schedules can be defined based on Asset Routes. See: Setting Up Asset Routes.
-
Navigate to the Preventive Maintenance Schedules window.
-
Select Asset from the Item Type list of values.
-
Select an Asset Route from the Asset Number list of values.
-
See: Preventive Maintenance Scheduling, Oracle Enterprise Asset Management User's Guide, for instructions on the remaining fields.
Note: You can define Date Rules and List Dates for Asset Routes. You cannot define Meter Rules.
To create a suppression activity
You can suppress other Activities with the current Activity in the scheduling definition. You can enter suppression activities for an Asset Number/Activity combination.
For example, there are two activities associated with a Truck 01 asset: Oil Change (to be performed every five months), and Major Service (to be performed every 12 months). A major service on a Truck 01 includes an Oil Change. Therefore, a suppression definition needs to be defined; the Activity, Major Service, suppresses the child activity, Oil Change.
-
From the Preventive Maintenance Schedules window, choose Suppression.
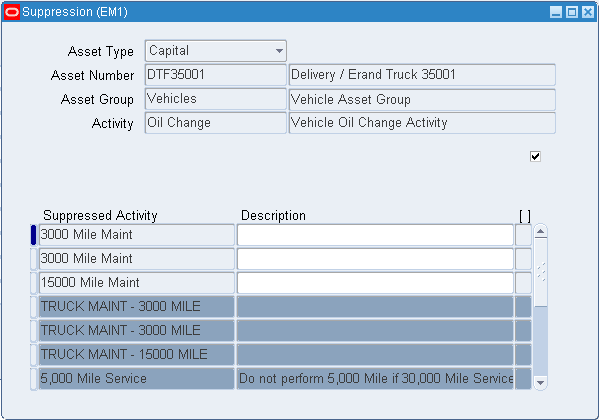
-
Choose a Suppressed Activity. Activities associated with the Asset Numbers are available.
Note: One Activity association can suppress multiple Activity associations. One Activity association can be suppressed by one Activity association.
-
Optionally enter a Description for this suppression.
-
Save your work.
Note: Suppression is applicable to an Activity association and can also be defined from the Activity Workbench and Suppression window.
Related Topics
Entering Meter Readings, Oracle Enterprise Asset Management User's Guide
Generating Work Orders, Oracle Enterprise Asset Management User's Guide
eAM Planning and Scheduling
Oracle Enterprise Asset Management utilizes work orders to create demand for asset maintenance. Operations within work orders are completed using the work orders' associated material and resource requirements (See: Overview eAM Work Management, Oracle Enterprise Asset Management User's Guide). Cost savings and work management efficiencies can be achieved by generating predictive work activities, and then using a planning process to balance the work load for resource management.
The process is as follows:
First, a Master Demand Schedule is created. This Master Demand Schedule is then attached to Material Requirements Planning (MRP) options. MRP is launched, creating planned work order suggestions. You can use the Planner Workbench to implement the suggestions into purchase requisitions or manufacturing orders. Using the Purchasing AutoCreate feature, purchase orders are created from the requisitions. After the purchase orders are received into inventory, you can issue material into a maintenance work order.
This section includes the following topics:
eAM Planning
Oracle eAM utilizes Material Requirements Planning (MRP) to calculate net material requirements from gross material requirements, by evaluating:
-
The master schedule
-
Bills of material
-
Scheduled receipts
-
On-hand inventory balances
-
Lead times
-
order modifiers
Material Requirements Planning then plans material replenishment by creating a set of recommendations to release or reschedule orders for material, based on net material requirements. MRP assumes infinite capacity is available to meet the material requirements plan.
The following illustration depicts how eAM uses Material Requirements Planning. First, a Master Demand Schedule (MDS) is created. This schedule is then attached to MRP Plan Options. Next, the MRP is launched, creating suggestions for purchasing requisitions. Finally, these suggestions are implemented. They are purchased, and then received into inventory. After the material is in inventory, it can be issued to a maintenance work order.
eAM Material Requirements Planning

This section includes the following topics:
eAM Scheduling
Oracle Enterprise Asset Management (eAM) utilizes the Oracle Manufacturing Scheduling application to schedule work orders and operations. The scheduling process calculates work order and operations scheduled duration and dates, based on the forward or backward scheduling goal (See: Routine Work Orders, Oracle Enterprise Asset Management User's Guide), and Work in Process parameters. The concurrent program is triggered after a work order is released (See: eAM Work Order Statuses, Oracle Enterprise Asset Management User's Guide). The work order is automatically moved to a Pending Scheduling status, until the concurrent program finishes scheduling. At that time, the work order is moved back to a Released status.
The Scheduler Workbench enables a planner to graphically view and reschedule single work orders and operations. It provides you with a visual display of work orders. You can interactively reschedule work orders, operations, and resources.
Important: You have the eAM Scheduler (infinite scheduler) available to you; this scheduler is not constraint-based.
Additional Information: Oracle eAM uses the Infinite Scheduler for automatic scheduling. The Infinite Scheduler considers only the calendar and shift setups for scheduling. It does not consider shift exceptions or take the resource loads and availability into consideration. The Resource Availability form is a view to display information on the availability and considers exceptions so that you can perform manual scheduling accordingly.
Defining a Master Demand Schedule Name
Before you define a master schedule manually or load a schedule from another source, you must first define a master demand schedule name. You can also set several options for each name.
To define a Master Demand Schedule name
-
Navigate to the MDS Names window.
Master Demand Schedules
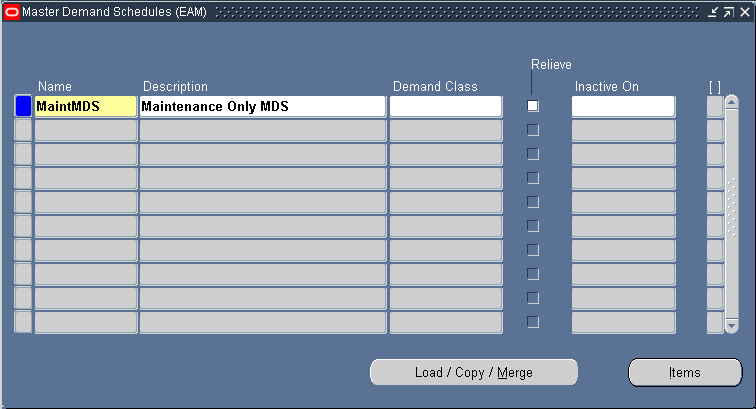
-
Enter a Name and Description for the schedule.
-
Save your work.
Related Topics
Defining a Schedule Name, Oracle Master Demand Scheduling/MRP and Oracle Supply Chain Planning User's Guide
Defining a Material Requirements Plan Name
Master Demand Schedule names trigger the material requirements planning process. A master demand schedule name must be created to perform material requirement planning for maintenance Work Orders.
To define a MRP name
-
Navigate to the MRP Names window.
MRP Names
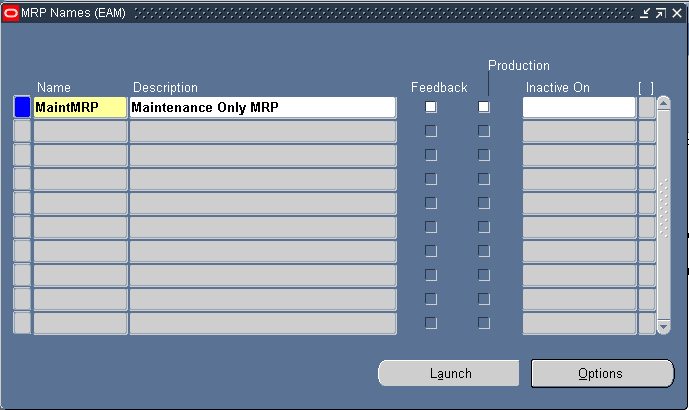
-
Enter an alphanumeric Name to identify a unique material requirements.
-
Optionally enter a Description of the MRP name.
-
Optionally select the Feedback check box to monitor the quantity of the planned order that has been implemented as maintenance Work Orders, purchase orders, or purchase requisitions. This provides the planner visibility of the plan's status at any point in time.
-
Optionally select the Production check box to enable a plan to automatically release planned orders. See: Auto-release Planned Orders, Oracle Master Demand Scheduling/MRP and Oracle Supply Chain Planning User's Guide.
-
Optionally enter an Inactive On date on which to disable the plan.
As of this date, you can no longer update the plan, nor use the plan name in the planning process. You can still view information and run reports for disabled names.
-
Save your work.
Related Topics
Overview of Planning Logic, Oracle Master Demand Scheduling/MRP and Oracle Supply Chain Planning User's Guide
Defining MRP Names, Oracle Master Demand Scheduling/MRP and Oracle Supply Chain Planning User's Guide
Defining Plan Options
You can enter plan options for any plan. If you are launching the planning process for this plan name for the first time, the plan options you defined in the setup parameters are displayed. Otherwise, the plan options you chose, for the last launch of the planning process, are displayed.
Supply Chain Planning users can also launch a DRP and supply chain MRP and master production schedule (MPS) plan (See also: Reviewing or Adding Plan Options, Oracle Master Demand Scheduling/MRP and Oracle Supply Chain Planning User's Guide).
To enter plan options
-
Navigate to the Plan Options window.
Plan Options
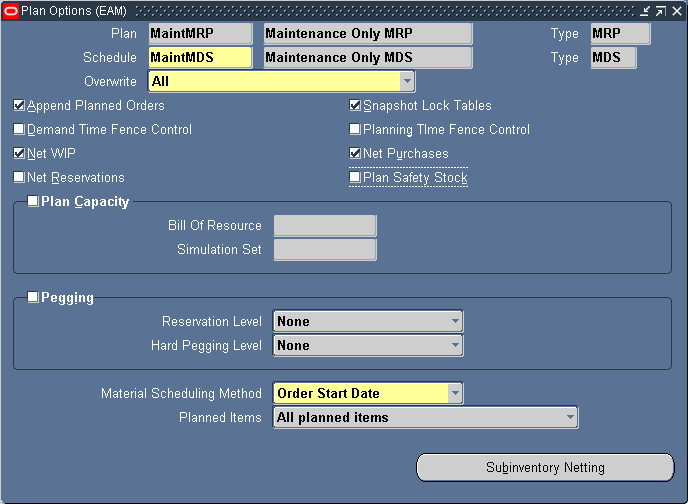
-
Select a material requirements Plan.
-
Select a master demand Schedule.
-
Select MRP from the Type list of values.
-
Select an Overwrite option:
All: For a master production schedule (MPS) plan, overwrite all entries and regenerate new MPS entries based on the source master demand schedule. For an MRP, overwrite all MRP firm planned orders for MRP items. This option is displayed when you generate a plan for the first time.
Outside planning time fence: For a master production schedule (MPS) plan, overwrite all MPS entries outside the planning time fence. For an MRP, overwrite all planned orders and firm planned orders outside the planning time fence.
None: Do not overwrite any firm planned order for MPS or MRP plans.
-
Select the Append Planned Orders check box to append new planned orders. See: Reviewing or Adding Plan Options, Oracle Master Scheduling/MRP and Oracle Supply Chain Planning User's Guide for information regarding situations that cause new planned orders to append.
-
Select the Net WIP check box to indicate that the planning process considers standard discrete jobs, non-standard discrete jobs, or repetitive schedules when planning items during the last plan execution.
-
Select Net Reservations to indicate that the planning process considers stock designated for a specific Work Order when planning the items during the last execution of the plan.
-
Select Net Purchases to indicate that the planning process considers approved purchase requisitions when planning the items during the last execution of the plan.
-
Select Plan Capacity to indicate whether the planning process calculates safety stock for each item during the last plan execution.
-
Specify the Bill of Resource (for MPS plans) and, Optionally a Simulation Set. See: Capacity Modifications and Simulation, Oracle Capacity User's Guide and Overview of Bills of Resources, Oracle Capacity User's Guide.
-
-
Select Pegging to calculate graphical pegging information. See: Overview of Graphical Pegging, Oracle Master Scheduling/MRP and Oracle Supply Chain Planning User's Guide. The planning process then traces supply information for an item to its corresponding end demand details, which you then can view in a graphical display.
-
If you are working in a project environment, set a Reservation Level and, Optionally a Hard Pegging Level. See: Reviewing or Adding Project MRP Plan Options, Oracle Master Scheduling/MRP and Oracle Supply Chain Planning User's Guide.
-
-
Select a Material Scheduling Method.
Operation Start Date: Schedule material to arrive in Inventory for availability on the start date of a specific operation.
Order Start Date: Schedule material to arrive in Inventory for availability on maintenance Work Order start date.
-
Specify which Planned Items you want included.
All planned items: Include all planned items in the planning process. You would choose this option to be certain that all items are planned, including those you add to a Work Order or schedule, that are not components on any bill of material. Use this option to avoid missing items you want to plan. For items you do not want to plan, define them with an MRP planning method of Not Planned when defining an item in Inventory.
Demand schedule items only
Supply schedule items only
Demand and supply schedule items
-
Save your work.
Related Topics
Launching the Planning Process, Oracle Enterprise Asset Management User's Guide
Viewing Suggested Demand, Oracle Enterprise Asset Management User's Guide
Reviewing or Adding Supply Chain Plan Options, Oracle Master Scheduling/MRP and Oracle Supply Chain Planning User's Guide
Quality Integration Setup
A maintenance work order goes through various steps in its lifecycle (See: eAM Work Order Statuses, Oracle Enterprise Asset Management User's Guide). One of the steps in the lifecycle is Completion. When completing a maintenance work order, if the Asset Number has associated, mandatory quality collection plans, you need to enter quality results for the work order. A list of quality collection plans associated with the completion transaction appears during the completion process.
While creating a collection plan, you have the option of adding collection triggers to the plan. Triggers are restrictions that you define for a collection plan. For example, work orders for assets that belong to the TRUCK Asset Group require the entry of quality results for the collection plan. Data collection is initiated if all collection trigger conditions are satisfied.
Quality Setup tasks for Enterprise Asset Management include the following:
Creating Collection Elements
Collection elements are the basic building blocks of collection plans, the data structures that you use to collect Quality results. Before you can collect quality data, you must first create a collection plan. Begin by creating collection elements, which define the characteristics of the product or process that you want to monitor, record, and analyze. See: Overview of Collection Elements, Oracle Quality User's Guide.
When you define collection elements, you are creating data fields that you can use in collection plans to collect quality results. After you create a collection element, it is available as a selection on a list of values that you can choose from when you set up collection plans. You can create an unlimited number of user-defined collection elements, or you can use any of Quality's predefined collection elements (See: Predefined Collection Elements, Oracle Quality User's Guide) in your collection plans; for example, Asset Num, Asset Serial Number (Asset Serial Number was known as Asset Number in previous releases), Asset Group, Activity, and Work Order. You can also create collection elements by copying them from one collection plan to another.
To define collection elements
-
Navigate to the Collection Elements window.
Collection Elements
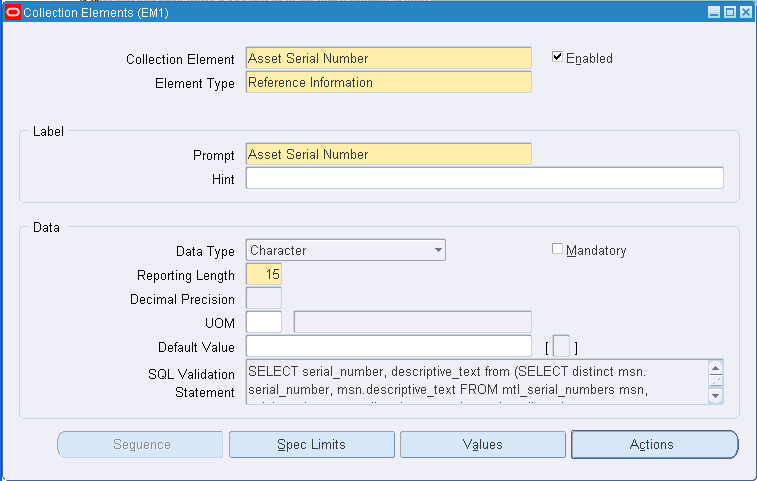
Note: The steps listed below describe how to define Collection Elements one-at-a-time in the Collection Elements window. You can also define several collection elements simultaneously using the Collection Elements Summary window. See: Combination Blocks, Oracle Applications User's Guide.
Note: The following Collection Elements are included with Oracle Enterprise Asset Management; you do not need to define them: Asset Group, Asset Num, Asset Serial Number (the asset's Inventory Serial Number), Activity, Maintenance Work Order, Maintenance Operation Sequence.
-
Select the Collection Element name.
The collection element can contain alphanumeric characters, spaces, underscores, and single quotation marks. You cannot use words that are reserved for column names, such as NAME, OCCURRENCE, and ORGANIZATION_ID. See: Reserved Words, Oracle Quality User's Guide.
-
Select the Enabled checkbox to enable the collection element. You can add enabled collection elements to collection plans.
-
Select its collection Element Type. See: Collection Element Types, Oracle Quality User's Guide.
-
Enter text for the data entry Prompt.
The prompt is the label for the collection element field displayed in the Results region of the Enter Quality Results window. Prompts also become the column headings on reports and online inquiries. The default prompt is the name of the collection element, but you can overwrite it.
-
Optionally enter a Hint.
Hints are additional text that appears in the message line, as you enter quality results, to guide you during data entry. See: Message Line, Oracle Applications User's Guide.
-
Select the collection element's Data Type.
You can select any data type, however, you cannot change it after you define the collection element. The available data types are Character, Number, Date, Comment, and Sequence.
Important: Oracle eAM Self-Service Applications do not support the use of sequence data type collection elements.
-
Optionally select the Mandatory check box to indicate that a value must always be entered for this collection element, when entering quality results. A mandatory collection element can be redefined as non-mandatory when added to a collection plan.
-
Enter the Reporting Length.
The reporting length specifies how much space is allocated for this collection element's quality results values on reports, inquiries, and in the Enter Quality Results window.
Note: The reporting length does not determine the amount of space used to store quality results values in the quality data repository. Results values can be up to 150 characters in length.
-
If the Data Type is Number, enter the Decimal Precision.
If you define specification limits for this collection element, entering the decimal precision (refers to the number of places after the decimal point) here controls the decimal precision of the specification limit values that you can define.
-
Optionally select a UOM. See: Overview of Units of Measure, Oracle Inventory User's Guide. Units of measure can be entered for any collection element, regardless of data type.
-
Optionally enter a Default Value for the collection element.
When you set a default value for the collection element (generally, the most commonly used value for the collection element), it is automatically entered when you enter quality results. You can overwrite this value. See: Default Value Assignment Rules, Oracle Quality User's Guide.
-
Optionally enter the SQL Validation Statement.
This statement is used for validation when you enter quality data. You can base a collection element's data validation on any table in the Oracle database. To do this, you can define a SQL validation statement that Quality uses for validation when you collect quality data. This SQL statement must be a SELECT statement in which you select two columns. For example, if you have entered machine numbers in the database table, you can cross-validate machine numbers entered as you collect quality results against the numbers. See: SQL*Plus User's Guide and Reference.
For example, to validate machine numbers from a table called 'machine_numbers' stored in the database, enter the following SQL validation statement:
SELECT machine_number, machine_description
FROM machine_numbers
WHERE NVL(disable_date, SYSDATE+1) > SYSDATE
AND organization_id=:parameter.org_id
ORDER BY custom_machine_number
Note: To constrain the SQL Statement to the current organization, you can use the variable, ':parameter.org_id' for the current organization id. To constrain the SQL Statement to the current user's id, you can use the variable, ':parameter.user_id' for the current user's id.
If you define both a SQL validation statement and a list of collection element values, the list of values is used for validation; the SQL validation statement is ignored.
Related Topics
Overview of Collection Elements, Oracle Quality User's Guide
Collection Element Types, Oracle Quality User's Guide
Predefined Collection Elements, Oracle Quality User's Guide
Collection Element Values, Oracle Quality User's Guide
Defining Collection Element Actions, Oracle Quality User's Guide
Defining Collection Element Alert Actions, Oracle Quality User's Guide
Viewing Collection Elements, Oracle Quality User's Guide
Creating eAM Quality Collection Plans
You create collection plans to identify the data that you want to collect, and what actions you want to take based on the quality results that you collect. You can use collection plans to model your test or inspection plans, and you can create an unlimited number of plans to support your enterprise-wide quality data collection and analysis needs. Collection plans are invoked manually for direct results entry, or automatically as you complete a Work Order.
To collect quality data, you must set up a data collection structure called a collection plan. Collection plans are composed of collection elements, their values and specifications, and any actions that you want to initiate in response to quality results. There are some considerations that you must make before you set up collection plans. You first must create collection element types, then the individual collection elements that comprise the plan.
You can attach illustrative or explanatory files to collection plans, in the form of text, images, word processing documents, spreadsheets, or video. Attachments are used to document instructions and corrective action procedures. They are viewed by operations personnel during quality data collection. See: Attachments for Collection Plans, Specifications, and Result Lines, Oracle Quality User's Guide and Viewing Attachments Associated with Quality Results, Oracle Quality User's Guide.
To review a collection plan
-
Navigate to the Collection Plans window.
Collection Plans
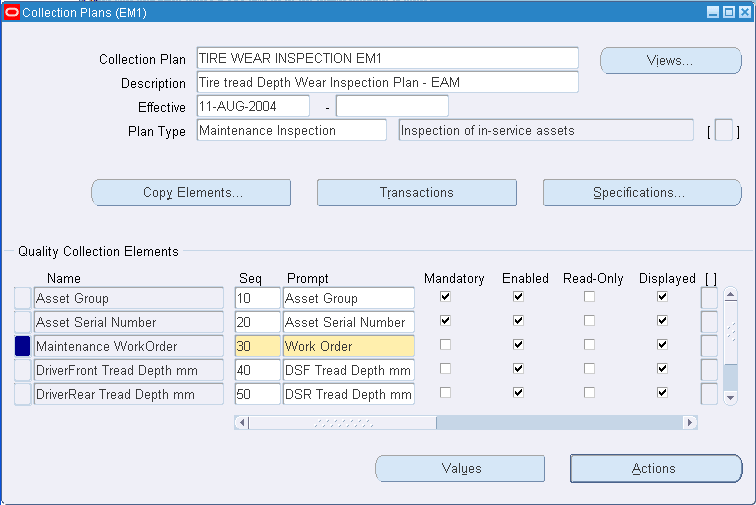
Note: To assist you as you create collection plans, you can select the Summary/Detail option from the View Menu, and run a query to view existing collection plans in summary format. See: Combination Blocks, Oracle Applications User's Guide.
-
Select a valid Collection Plan. To create a new collection plan, See: Creating Collection Plans, Oracle Quality User's Guide.
-
Choose Transactions. You can create collection plans that are specifically used to collect quality data during transactions performed in other applications (See: Collection Plans for Transactions, Oracle Quality User's Guide).
Collection Transactions
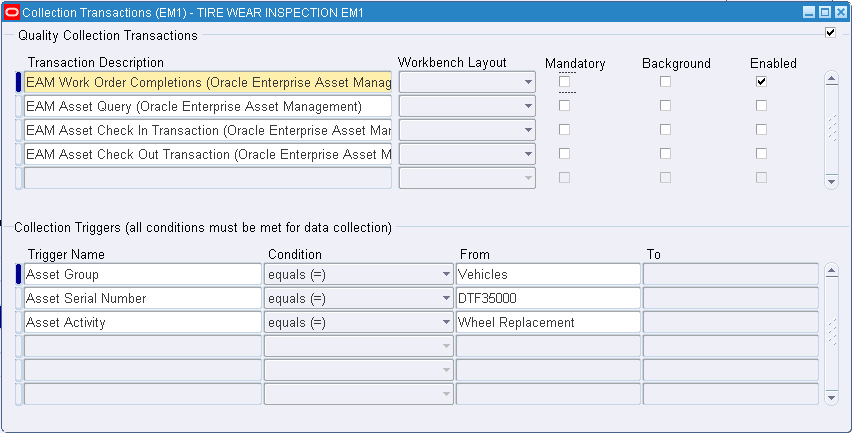
-
Select EAM Work Order Completion or Asset Query from the Transaction Description list of values.
-
EAM Asset Query: Enables quality results collection for an asset, independent from any transaction on the asset.
-
EAM Operation Completions: Enables quality results collection for a Work Order's operation pertaining to operation completion or during operation completion (See: Operation Completion, Oracle Enterprise Asset Management User's Guide).
-
EAM Work Order Completions: Enables quality results collection for a Work Order pertaining to Work Order completion or during Work Order completion (See: Work Order Completion, Oracle Enterprise Asset Management User's Guide).
-
EAM Asset Check In Transaction: Enables you to record quality information, describing the condition of the asset, during a Check In procedure (See: Asset Tracking, Oracle Enterprise Asset Management User's Guide).
-
EAM Asset Check Out Transaction: Enables you to record quality information, describing the condition of the asset, during a Check Out procedure (See: Asset Tracking, Oracle Enterprise Asset Management User's Guide.
-
-
Optionally indicate whether this collection plan requires the entry of quality results at Work Order completion. If you select the Mandatory check box, you must save at least one quality data record before saving the Work Order completion transaction.
Note: eAM supports Quality collection during operation completion transactions, as well as Standalone Asset Query. Valid Transaction Description values are EAM Operation Completions and EAM Asset Query, respectively.
-
Optionally select the Background check box.
If you select this check box, you can collect quality results for context reference elements (See: Reference Information Collection Element Type, Oracle Quality User's Guide).
Note: The following Collection Elements are included with Oracle Enterprise Asset Management; you do not need to define them: Asset Group, Asset Number, Activity, Maintenance Work Order, Maintenance Operation Sequence.
Without invoking the Enter Quality Results window, background data collection is initiated when you save the work order completion transaction.
The system then finds, selects, and initiates the appropriate collection plan or plans.
If collection triggers are defined for background data collection, data collection is initiated if all collection trigger conditions are satisfied (you define triggers for transactional data collection in the Collection Transactions window).
Several collection plans can collect data in the background during the same transaction.
When this is the case, the results for context elements on all of these collection plans are automatically saved when the parent transaction is saved.
-
Select the Enabled check box.
-
Optionally select a Trigger Name.
Valid trigger values are Activity, Asset Group, Asset Number, Asset Serial Number, and Maintenance Work Order. Triggers are restrictions that you define for this collection plan. In the above example, Work Orders for the JP1 asset require the entry of quality results for the collection plan.
Note: If a trigger is not defined, then all work orders will require quality collection results; the collection plan is applicable to all assets.
-
If you selected a Trigger Name, select a Condition.
-
Select a From value.
For example, if you selected Asset Group as the Trigger Name, Asset Groups are available. Optionally you can enter a To value to create a range condition. For example, if the trigger is Work Order, you might enter a range of Work Order numbers.
-
Save your work.
Related Topics
Adding Collection Plan Attachments, Oracle Enterprise Asset Management User's Guide
Triggering a Work Request, Oracle Enterprise Asset Management User's Guide
Collection Plans for Transactions, Oracle Quality User's Guide
Overview of Collection Plans, Oracle Quality User's Guide
Overview of Quality Self-Service, Oracle Quality User's Guide
Collection Plan Types, Oracle Quality User's Guide
Collection Plan and Import Results Database Views, Oracle Quality User's Guide
Collection Elements in Collection Plans, Oracle Quality User's Guide
Defining Collection Plan Element Values, Oracle Quality User's Guide
Associating Specification Types with Collection Plans, Oracle Quality User's Guide
Defining Collection Plan Element Actions, Oracle Quality User's Guide
Updating and Deleting Collection Plans, Oracle Quality User's Guide
Viewing Collection Plans, Oracle Quality User's Guide
Creating eAM Quality Collection Plans for a Supplier
eAM enables you to create Quality collection plans that are optionally mandatory for a supplier to enter crucial Quality data, via iSupplier Portal, before the supplier can complete an Outside Service Processing operation.
To create and eAM quality collection plan for a supplier
-
Navigate to the Collection Plans window.
Collection Plans
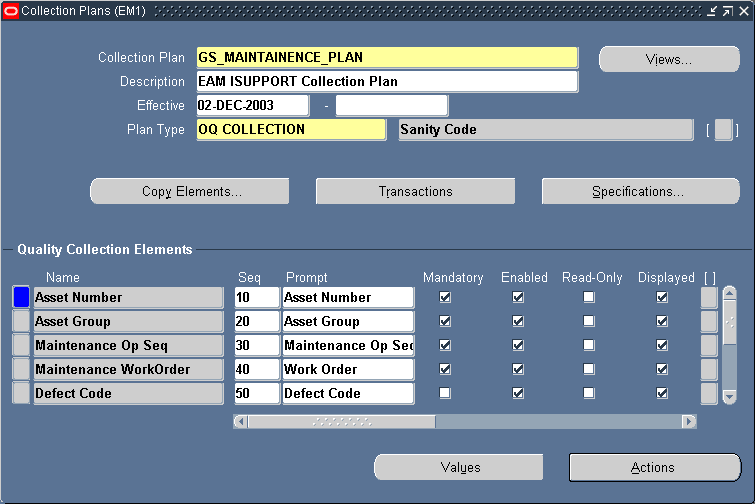
Note: To assist you as you create collection plans, you can select the Summary/Detail option from the View Menu, and run a query to view existing collection plans in summary format. See: Combination Blocks, Oracle Applications User's Guide.
-
Select a valid Collection Plan. To create a new collection plan, See: Creating Collection Plans, Oracle Quality User's Guide.
-
Choose Transactions. You can create collection plans that are specifically used to collect quality data during transactions performed in other applications (See: Collection Plans for Transactions, Oracle Quality User's Guide).
Collection Transactions
-
Select EAM Operation Completions from the Transaction Description list of values.
-
Optionally select the Mandatory check box to indicate that this collection plan requires the entry of quality results at Operation completion. If this check box is selected, the supplier must enter quality data before completing the Outside Services operation.
-
Save your work.
Related Topics
Creating eAM Quality Collection Plans
Adding Collection Plan Attachments, Oracle Enterprise Asset Management User's Guide
Triggering a Work Request, Oracle Enterprise Asset Management User's Guide
Overview of Collection Plans, Oracle Quality User's Guide
Overview of Quality Self-Service, Oracle Quality User's Guide
Collection Plan Types, Oracle Quality User's Guide
Collection Plan and Import Results Database Views, Oracle Quality User's Guide
Collection Elements in Collection Plans, Oracle Quality User's Guide
Defining Collection Plan Element Values, Oracle Quality User's Guide
Associating Specification Types with Collection Plans, Oracle Quality User's Guide
Defining Collection Plan Element Actions, Oracle Quality User's Guide
Updating and Deleting Collection Plans, Oracle Quality User's Guide
Viewing Collection Plans, Oracle Quality User's Guide
Outside Processing Integration Setup
Contractor services are defined as work services provided by an organization or person who is not an employee of your company. Contractors are paid for their work based on an agreed upon contract or agreement. For example, a contractor service is a painting service. It is also important to associate the purchasing transactions, such as the requisition and purchase order, to the Work Order. In order for this to execute, you must complete the appropriate steps in Purchasing and Enterprise Asset Management.
Outside Service Processing provides the functionality to create items that are contractor services, such as landscaping, include these items on a Work Order, and execute the related purchasing transactions as the Work Order is released. By creating a contract service as an Outside Service Processing item, the purchasing requisition is created when the Work Order is Released. The additional purchasing transaction, including the creation of the purchase order, the approval, and invoicing process, are then managed by Purchasing. This optional process ensures that the actual charges are applied to the Work Order. The supplier accesses the purchase order and maintenance Work Order via iSupplier Portal. Within iSupplier Portal, the supplier can view all open and closed outside service operations and their associated maintenance Work Orders. The supplier can enter mandatory collection plan results, before completing the outside operation (See: Oracle iSupplier Portal, Oracle iSupplier Portal User's Guide).
The other option is to enable Standard Rate. This applies predetermined standard rates, for contractor services, to the Work Order.
Outside Processing Setup tasks for Enterprise Asset Management include the following:
Setting Up Outside Service Processing
Purchasing recognizes items, while eAM recognizes resources. As a result, you must link the contractor service item to a resource, for the purchase order to link to the Work Order. This is associated via the Resources window. Additionally, the resource must associate with a department. The department must specify the location where the services are to deliver. This must be a valid location for the organization.
For each contractor service resource, you can determine whether the rate charged to the Work Order is a standard rate or the actual amount, based on the purchase order price. This is set up within the Resources window, and may vary for each resource.
To set up purchasing information
-
Navigate to the Financials Options window.
-
Select the Supplier-Purchasing tab.
Financials Options

-
The options you define in this region, except for Inventory organization, are used as default values for the Purchasing region of the Suppliers window (See: Suppliers, Oracle Payables User's Guide). The supplier values default to new supplier sites for the supplier, which default to new purchasing documents for the supplier site.
-
Select Ship-To and Bill-To Locations. These are the names of the ship-to/bill-to location for the system default values. If the name you want is not available, use the Location window to select a new location (See: Setting Up Locations, Using Oracle HRMS - The Fundamentals).
-
Select an Inventory Organization. You can associate each of your purchasing operating units with one inventory item master organization. Your eAM Organization (See: Enabling Organizations for Enterprise Asset Management) should point to this item master. When you associate your purchasing operating unit with an inventory organization, items you define in this organization become available in Purchasing. You can choose an inventory organization that uses the same set of books as your Purchasing operating unit. Do not change the inventory organization after you have already assigned on to Purchasing.
-
Optionally select a Ship Via code. This is the freight carrier you use with suppliers. If the type of freight carrier you want is not available, use the Freight Carriers window to define a new shipping method. The value you enter here is the value in the Description field of the Freight Carriers window in Purchasing.
-
Select a FOB. If the type of FOB you want is not available, use the Oracle Purchasing Lookups window to define a new FOB.
-
Select a Freight Terms code. The fright terms for a supplier identify whether you or your supplier pays for freight charges on goods you receive. You can define new freight terms in the Oracle Purchasing Lookups window.
-
Save your work.
To set up outside services as items
Create an item for each outside service, such as landscaping services.
-
Navigate to the Master Item window.
Master Item
-
Enter the item Name for the contractor service. For example, Landscape Service.
-
Select Copy From within the Tools menu.
-
Select @Outside Processing Item from the Template list of values.
-
Choose Apply.
-
Choose Done.
-
Within the Purchasing tab, ensure that the Outside Processing Item check box is selected.
-
Select the Resource Unit Type.
Resource: Costs are based on the resource standard rate.
-
Select a Default Buyer.
-
Enter a List Price for this contractor service.
-
Select Each for the Unit of Issue. This is the unit of measure you use to issue the item from inventory.
-
Within the Receiving tab, select Direct from the Receipt Routing list of values.
-
Save your work.
-
Select the Organization Assignment tab on the left side of the window, then assign this item to the eAM organization.
-
Save your work.
To link outside service items to resources
You must define outside resources and link them to outside items in order to automatically generate purchase requisitions for outside services. When you assign outside resources to a department, you also specify a usage rate or amount that determines the quantity you are requisitioning and/or charging to Work Orders.
-
Navigate to the Resources window.
Resources
-
Select a unit of measure (UOM). This value is the default unit of measure for all transactions, for the current resource.
-
Verify that the Enabled check box is enabled for outside processing.
-
Enter the outside services Item that was entered in Inventory and associate it with the eAM resource.
-
Select the Costed check box to include this outside resource in your Work Order cost. When you define a resource with a charge type of PO Receipt, Cost Management automatically defaults Outside Processing as the cost element.
-
Enter an Absorption Account. You must define an absorption account for each outside resource. The absorption account defaults from the organization's receiving account, which is debited when an outside processing item is received and is subsequently credited when the item is delivered to eAM. The debit goes to the outside processing account associated with the accounting class of the Work Order when the item is delivered to eAM.
-
Optionally enter a Variance Account. You must define a purchase price variance account for each outside resource you define. This account defaults from the organization's purchase price variance account.
If you select the Standard Rate check box while performing the next step, the Variance Account is mandatory.
-
Optionally select the Standard Rate check box to charge the standard, non-purchase order amount to the Work Order. Clear the Standard Rate check box to charge the Work Order with the actual purchase order amount.
-
If you selected the Standard Rate check box, choose Rates to enter your standard rates.
Resource Costs
-
Enter a Cost Type of Value. This is dependent on the costing method defined for your eAM organization.
-
Enter a Resource Unit Cost.
-
Save your work and close the window.
-
To link the outside service resource to a department
-
Navigate to the Departments window.
Departments
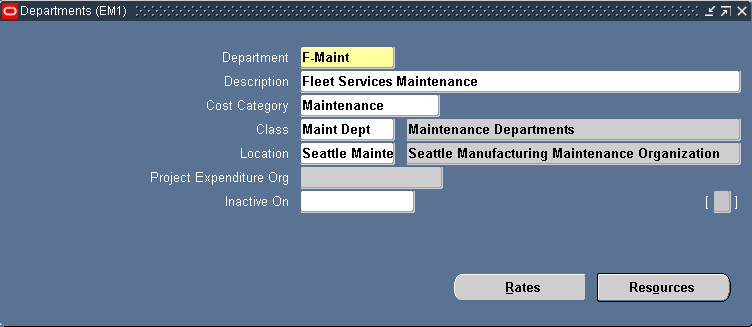
-
Select the Department to associate with the outside service resource.
-
Select a Cost Category for this department. If this is left blank, then the costs related to this department are charged, based on the eAM parameter settings (See: Defining eAM Parameters).
-
Select a valid Location. This is mandatory.
-
Choose Resources.
Resources
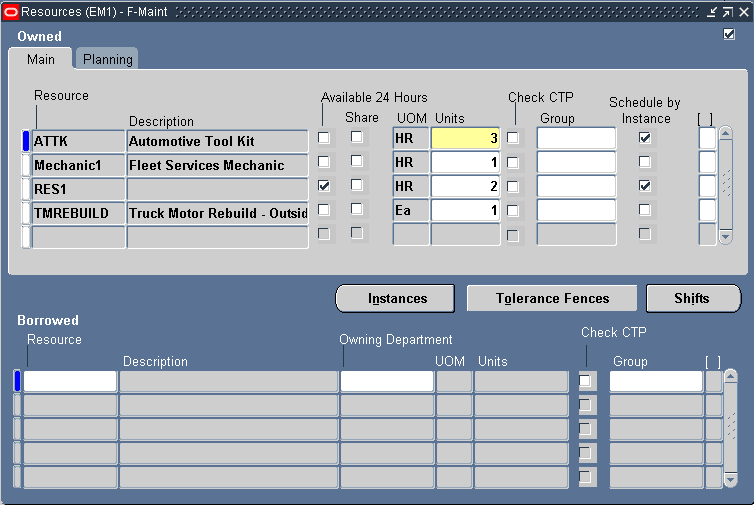
-
Select the outside service Resource.
-
Optionally indicate whether this resource is Available 24 Hours a day. You cannot assign shifts to a resource that is available 24 hours a day.
-
Optionally indicate whether this department can share this resource and capacity with other departments.
-
Enter the number of capacity Units (resource units) available for this department.
-
Save your work.
For information on all remaining fields, See: Defining a Resource, Oracle Bills of Material User's Guide.
To define WIP parameters
-
Navigate to the Work in Process Parameters window.
Work in Process Parameters
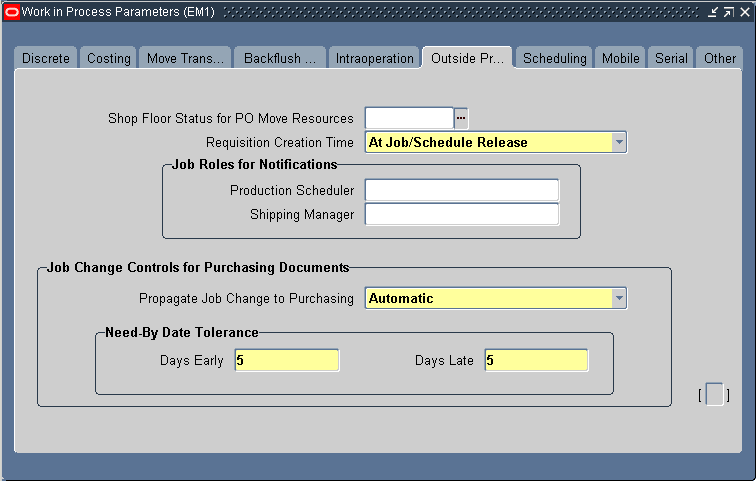
-
Select the Outside Processing tab.
-
Select a value for Requisition Creation Time.
At Job/Schedule Release - This enables automatic creation of a purchase order requisition, for contractor services, when the Work Order is Released.
Manual - Choose Manual to manually create requisitions. With this selection, requisitions are not automatically created.
At Operation - Oracle recommends that you do not select At Operation. Within eAM, At Operation is equivalent to selecting Manual.
-
Save your work.
Related Topics
Supplier - Purchasing Financials Options, Oracle Payables User's Guide
Setting Up Direct Items
You can add Direct Items to a maintenance Bill of Material (BOM) (See: Setting Up Maintenance Bills of Material). When the Maintenance BOM is associated with a work order, you can add more Direct Items to its material requirements list before it is released (See: Defining Inventory Material Requirements, Oracle Enterprise Asset Management User's Guide). The system automatically creates Requisition/Purchase Orders (if the Auto Request Material check box is selected within the Maintenance BOM), for the associated Direct Items, when the work order is released for execution. The supplier can view the maintenance work order detail information within Work Order Details page, via iSupplier Portal.
To set up purchasing information
-
Navigate to the Financials Options window.
-
Select the Supplier-Purchasing tab.
Financials Options
The options you define in this region, except for Inventory organization, are used as default values for the Purchasing region of the Suppliers window (See: Suppliers, Oracle Payables User's Guide). The supplier values default to new supplier sites for the supplier, which default to new purchasing documents for the supplier site.
-
Select Ship-To and Bill-To Locations. These are the names of the ship-to/bill-to location for the system default values. If the name you want is not available, use the Location window to select a new location (See: Setting Up Locations, Using Oracle HRMS - The Fundamentals).
-
Select an Inventory Organization. You can associate each of your purchasing operating units with one inventory item master organization. Your eAM Organization (See: Enabling Organizations for Enterprise Asset Management) should point to this item master. When you associate your purchasing operating unit with an inventory organization, items you define in this organization become available in Purchasing. You can choose an inventory organization that uses the same set of books as your Purchasing operating unit. Do not change the inventory organization after you have already assigned on to Purchasing.
-
Optionally select a Ship Via code. This is the freight carrier you use with suppliers. If the type of freight carrier you want is not available, use the Freight Carriers window to define a new shipping method. The value you enter here is the value in the Description field of the Freight Carriers window in Purchasing.
-
Select a FOB. If the type of FOB you want is not available, use the Oracle Purchasing Lookups window to define a new FOB.
-
Select a Freight Terms code. The fright terms for a supplier identify whether you or your supplier pays for freight charges on goods you receive. You can define new freight terms in the Oracle Purchasing Lookups window.
-
Save your work.
Related Topics
Setting Up Asset Bills of Material
Setting Up Maintenance Bills of Material
Defining Rebuildable Bills of Material
Supplier - Purchasing Financials Options, Oracle Payables User's Guide
iSupplier Portal User's Guide
Cost Management Integration Setup
Costs are generated as maintenance work is executed and completed. These costs roll up through the Parent/Child hierarchies defined within Enterprise Asset Management, and can roll up to any level within an asset hierarchy. Labor, Material, and Equipment charges can further classify into several maintenance cost categories.
All work is captured and retained by Enterprise Asset Management. You can reference work that has been completed to review operations, resources, and costs. This information can help you understand the scope of work and the process by which it is completed.
This section includes the following topics:
eAM Costing Methods and Mappings
eAM supports four perpetual costing methods: standard, average, FIFO, and LIFO. As a foundation, eAM uses the following five basic cost elements provided by Cost Management (See: Cost Elements, Oracle Cost Management User's Guide):
-
Material
-
Material Overhead
-
Resource
-
Resource Overhead
-
Outside Processing
Asset management requires different cost classifications. eAM provides these cost classifications, while maintaining the integrity of the basic costing rules. The five cost elements above are translated into cost elements that are familiar to maintenance managers.
eAM classifies work done on maintenance Work Orders into cost categories. By default, eAM has defined three cost categories: Contract, Operations, and Maintenance.
You can define additional cost categories, if needed. Each cost category is further classified into three cost elements: Equipment, Labor, and Material.
-
Material - Costs from material transactions.
-
Labor - Costs from labor resource transactions.
-
Equipment - Costs from equipment resource transactions.
Material charges are classified as Material cost elements. Resource charge of type person is classified as a Labor cost element. Resource charge of type machine is classified as Equipment cost element. All other resource types are classified by the default cost element in the eAM Parameters (See: Defining eAM Parameters).
For each department, a maintenance cost classification is identified to reflect the above breakdown. The cost category for the Material cost element is the cost category of the department assigned to the routing of the operation. For the Labor cost element, it is the cost category of the resource's owning department. For the Equipment cost element, it is the cost category of the asset's owning department.
eAM Mappings
The three cost elements (Material, Labor, and Equipment) are mapped to the five basic cost elements (Material, Material Overhead, Resource, Resource Overhead, and Outside Processing) provided by Cost Management.
The following diagram illustrates that the eAM Material cost classifications are mapped to Material, Material Overhead, and Outside Processing. Labor and Equipment cost classifications are mapped to Resource, Resource Overhead, and Outside Processing.
Cost Element Mappings
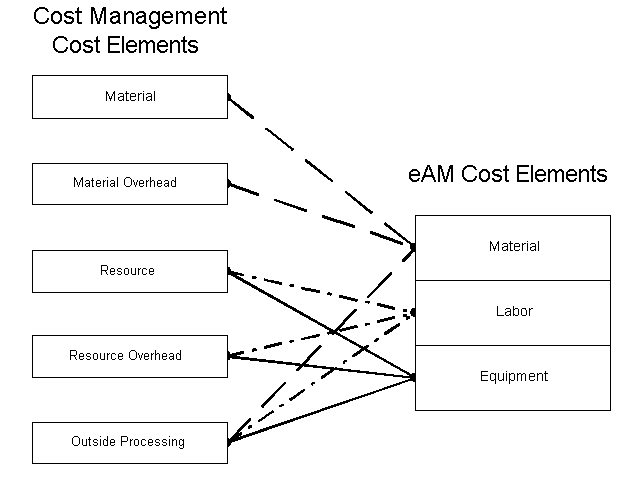
Setting Up Cost Categories
Cost Category codes are used as the default for departments that do not have a cost category defined. Department costs are then posted to the appropriate cost elements. Valid values are Maintenance, Operations, Contract, and any other values that you might have added within this extensible lookup table. See: Overview of eAM Cost Management, Oracle Enterprise Asset Management User's Guide.
By default, eAM has defined three cost categories: Contract, Operations, and Maintenance. However, you can define additional cost categories, if needed. After you have added the cost categories, they are available in the Cost Category list of values, within the Enterprise Asset Management Parameters window (See: Defining eAM Parameters).
To define additional cost categories
-
Navigate to the Oracle Manufacturing Lookups window.
Cost Category Lookups
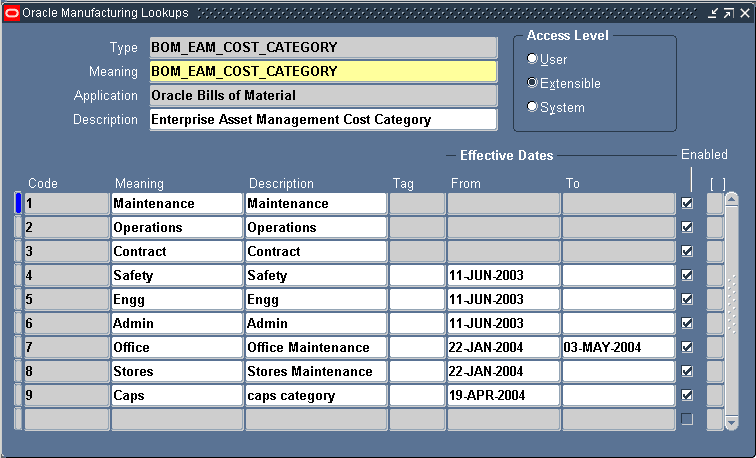
-
Select BOM_EAM_COST_CATEGORY from the Type list of values.
-
Enter a numeric value in the Code field. Oracle recommends that you enter values in increments of 10, enabling you to easily add codes later.
Warning: Do not use alpha codes. Entering alpha codes causes database errors in the application.
-
Enter the Meaning of the code, for example, High.
-
Enter a Description for the code.
-
Optionally enter a Tag to categorize lookup values. This field is informational.
-
The Effective From Date defaults as the system date, but you can update this. Optionally enter a Effective To Date to indicate an expiration of the code.
-
Select the Enabled check box to enable this code for Enterprise Asset Management.
-
Save your work.
Setting Up Purchase Order Category Associations for Direct Items
You can specify whether direct items are material, labor, or equipment charges on a work order, based on the user-specified Purchasing Category on the requisition or purchasing line. Purchasing Categories are associated with a maintenance cost element and its respective valuation account. If an association is not set up, direct items are charged as material on the work order.
Direct Items may be Non-Stock or Description-based. Non-Stock Direct Items are defined within Oracle Inventory (See: Non-Stock Direct Item Setup, Oracle Enterprise Asset Management User's Guide), and the Purchasing Category for this type of Direct Item defaults from the Purchasing Category Set's Item Assignments.
For projects, you can assign direct items to a Direct Item Expenditure Type, other than the one assigned at the organization level. This is performed, based on the Direct Item Expenditure Type associated with the Purchasing Categories used on the requisition or purchasing line.
To set up associations for purchasing categories used for direct items
-
Navigate to the Find Category Associations window.
-
Choose New.
Category Associations
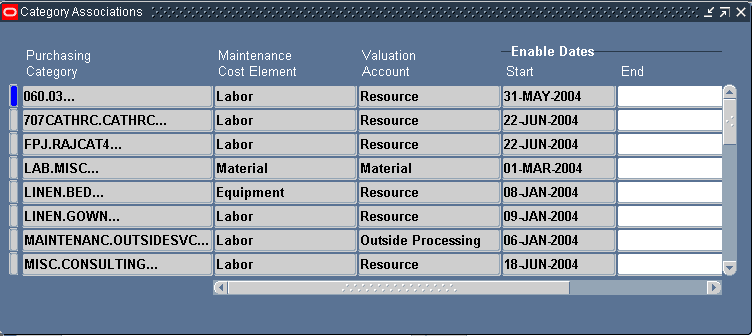
-
Select a Purchasing Category. See: Defining Category Sets, Oracle Inventory User's Guide.
-
Select a Maintenance Cost Element.
-
Select a Valuation Account. If the Maintenance Cost Element is Material, you can choose the Material Valuation Account. If the Maintenance Cost Element is Labor or Equipment, you can select either of the Resource or Outside Processing Valuation Accounts.
-
Select a Start Date.
-
Optionally select an End Date. A Purchasing Category may have one existing association at a time. If you want to assign a different association for a category, select an End Date.
-
Select a Direct Item Expenditure Type if your organization uses Oracle Projects. This is a required step.
-
Save your work.
Related Topics
Defining Items, Oracle Inventory User's Guide
Defining Categories, Oracle Inventory User's Guide
Defining Category Sets, Oracle Inventory User's Guide
Setting Up eAM Cost Management
You can reference work that has been completed to review operations, resources, and costs. This information can help you understand the scope of work and the process by which it is completed. To capture costs for all work within eAM, some key setups must be in place:
-
Define a default cost element.
-
Define a default cost category.
Follow these steps to define these key setups.
-
Define a default cost element (Material, Labor, or Equipment) when setting up the eAM Parameters. See: Defining eAM Parameters. This is used when no predefined mapping exists to the cost elements in eAM. For example, department overheads are not linked to a particular eAM cost element for cost analysis. Therefore, the default cost element carries the cost for analysis. Also, outside processing types of Currency, Amount, and Miscellaneous are not linked to a particular eAM cost element. When one of these types is used in outside processing, the costs are allocated to the default cost element (See: eAM Costing Methods and Mappings).
-
Define a default cost category when setting up the eAM Parameters. This defaulted cost category is used if there is no cost category defined for the departments.
To define a default cost element and cost category
-
Navigate to the Enterprise Asset Management Parameters window.
Enterprise Asset Management Parameters
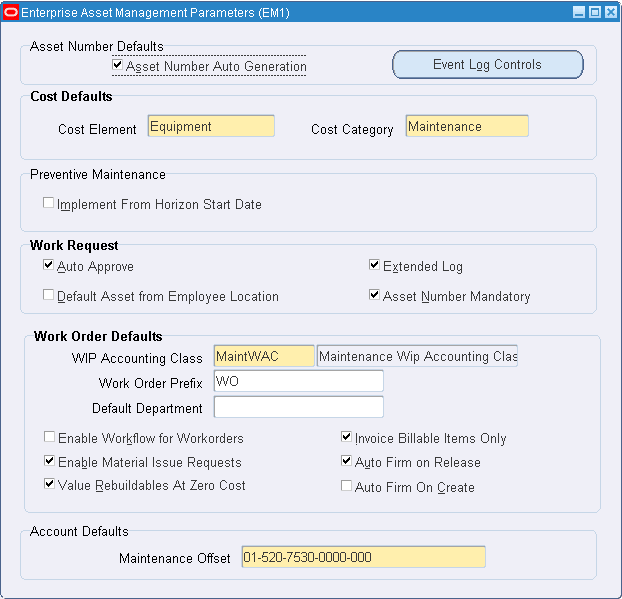
-
In the Cost Defaults region, select an eAM Cost Element to indicate how to capture cost overheads, and any miscellaneous resource costs. Valid values are Equipment, Labor, and Material.
-
Select a Cost Category to use as the default for departments that do not have a cost category defined. Department costs are then posted to the appropriate cost classification.
To define a cost category by department
-
Navigate to the Departments window.
Departments
-
Select a Cost Category.
Note: It is not required to provide a cost category for a department (crew). However, if you do not provide a cost category for a department (crew), costs for that crew are allocated to the defaulted cost category specified in the eAM parameters (See: Defining eAM Parameters). Each time costs for that element are charged to a Work Order, this default cost category is used for reporting and analysis.
Related Topics
Defining Departments and Resources
eAM Cost Estimation, Oracle Enterprise Asset Management User's Guide
Viewing Cost Information, Oracle Enterprise Asset Management User's Guide
Transferring Invoice Variances, Oracle Enterprise Asset Management User's Guide
Setting Up Zero Cost Rebuild Item Issue
eAM Work Order costing supports both WIP Component Issues and the return of rebuildables from/to expense subinventories at their current or zero cost. You can issue rebuildable components from the Expense Subinventory to the maintenance Work Order at zero cost and/or return rebuildable components to the Expense Subinventory at zero cost.
Enterprise Asset Management parameters determine organization level defaults for individual transactions. Set up Work Order default information to establish how rebuildables are valued in the current organization.
To set up zero cost rebuild item issue
-
Navigate to the Enterprise Asset Management Parameters window.
Enterprise Asset Management Parameters
-
Within the Work Order Defaults region, select the Value Rebuildables at Zero Cost to indicate that rebuildable components charge at zero cost.
-
Save your work.
Related Topics
Process and Discrete Manufacturing Integration Setup
Enterprise Asset Management integrates with Process and Discrete Manufacturing, enabling your maintenance environment to identify Enterprise Asset Management asset relationships with production equipment. This feature associates an asset or many assets to the production equipment located in a discrete or process manufacturing organization. After establishing, you can view the resource usage (maintenance work orders, batches, or FPOs) emanating from production, associated with a maintainable asset. In discrete manufacturing organizations, you can view maintenance equipment downtime requirements and their affect on capacity during production planning and scheduling.
This section includes the following topics:
Organization Setup
In order for eAM to integrate with process or discrete manufacturing, determine which process or discrete manufacturing organization is associated with your eAM organization.
Process Manufacturing organizations are never the same as eAM organizations; they are mutually exclusive. Although it is possible, Oracle does not recommend commingling eAM and discrete manufacturing organizations. They should have separate organization codes.
To associate a process or discrete manufacturing organization with an eAM organization
-
Navigate to the Organization Parameters window, and select a valid process enabled or discrete manufacturing organization from the Organization Code list of values.
Organization Parameters
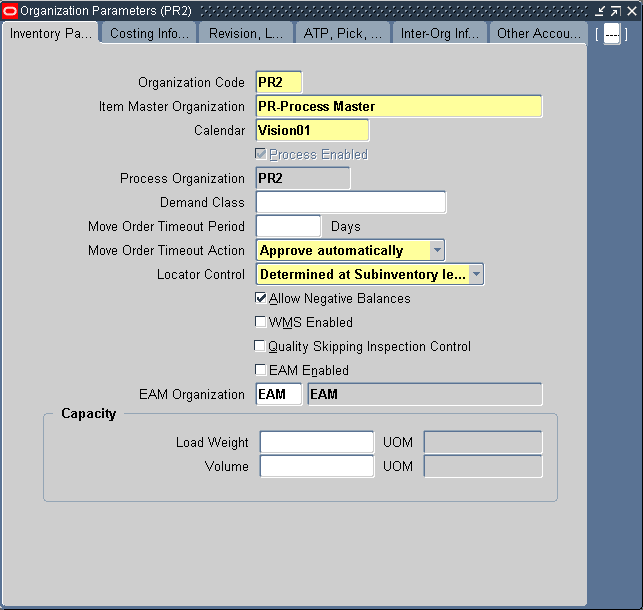
-
Enter an EAM Organization to associate with the current Organization Code. This eAM organization is now linked to the organization code you selected above.
Related Topics
Creating an Organization, Oracle Human Resources User's Guide
Associating Assets with Production Equipment
You can link an asset to production equipment defined within a process or discrete organization, as well as asset equipment defined within an eAM organization. This relationship is defined while defining or updating assets within eAM.
To associate an asset with production equipment
-
Navigate to the Define Asset Number window.
Define Asset Number
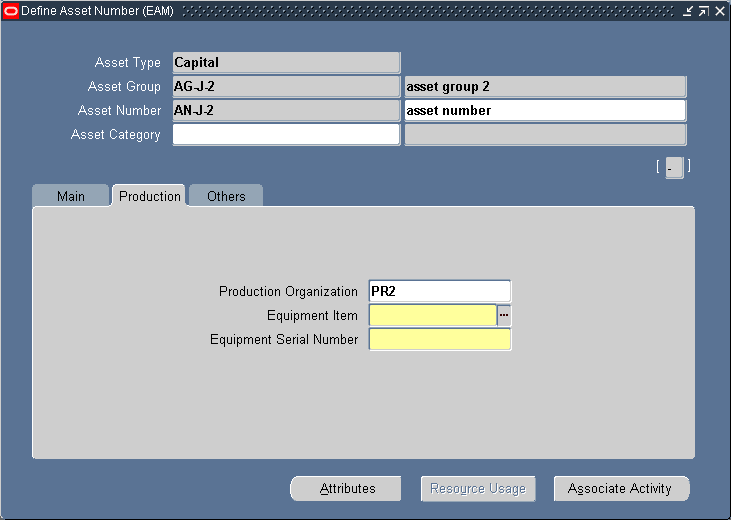
-
Select an Asset Number that you want to link to production equipment.
-
In the Production tab, select a valid Production Organization.
The list of values displays those process and discrete organizations that have the current eAM organization selected as their maintenance organization (See: Organization Setup).
-
Select an Equipment Item. This is mandatory if you populated the Production Organization field. Items that were defined with an equipment template (See: Item Templates, Oracle Inventory User's Guide), or with the Equipment item attribute enabled (See: Physical Attributes, Oracle Inventory User's Guide), are available.
-
Enter an Equipment Serial Number. This is mandatory if you populated the Production Organization field. This is the specific name of the component within the Equipment Type, defined above.
Related Topics
Viewing Resource Usage, Oracle Enterprise Asset Management User's Guide
Encumbrance Accounting
Enterprise Asset Management enables you to use encumbrance accounting for purchase requisitions and purchase orders associated with work orders with a destination type of shop floor.
Prerequisites
You must perform the following setup tasks before you can use encumbrance accounting:
-
Ensure that your eAM organization is associated with an operating unit that allows encumbrance accounting.
-
Select the Reverse Encumbrance option on the Organization Parameters - Costing Information tab.
-
Include a budget account in the maintenance WIP accounting class for encumbrance accounting.
Related Topics
See Encumbrance Accounting, Oracle Enterprise Asset Management User's Guide
Project Manufacturing Integration Setup
Enterprise Asset Management supports a variety of ways to define work breakdown structures. The methods include, using third party project management systems (with on-line integration), project templates, Seiban number wizard, copy, and manual entry. Work breakdown structures are commonly needed for program management. To support financial project management an reporting, the combination of Oracle Projects and Oracle Project Manufacturing enables budgeting, project costing and tracking, project billing, project revenue recognition, project cash forecasting, and project cost collection, including multi-currency and tax regulations.
To support project supply chain management and execution, Project Manufacturing provides functionality for project sales management, project advanced supply chain planning, project procurement, project execution, and project quality management.
The following diagram illustrates the eAM Project Manufacturing process. First, a maintenance Work Order is linked to a project or task. If a requisition or purchase order is created for that Work Order, the commitments for the Work Order's associated project or task are updated. The Project Cost Collector process (See: Project Cost Collector, Oracle Cost Management User's Guide) then passes the costs to the Work Order's associated project WIP accounting class accounts, rather than the WIP accounting class associated with the eAM asset or eAM organization.
Resources and Material charge against a Work Order. The Work Order is associated with a Project. The charges are transferred to the Project expenditures via the Cost Collector process.
eAM Project Manufacturing

This section includes the following topics:
Project Definition
You can inquire on an existing, or copy a new project from a template or existing project. To create a new project, See: Project Definition (Assigning Project Parameters), Oracle Project Manufacturing User's Guide. Associate this project number with a planning group, a cost group, and a default WIP accounting class.
To inquire on an existing project
-
Navigate to the Find Projects window.
Find Projects
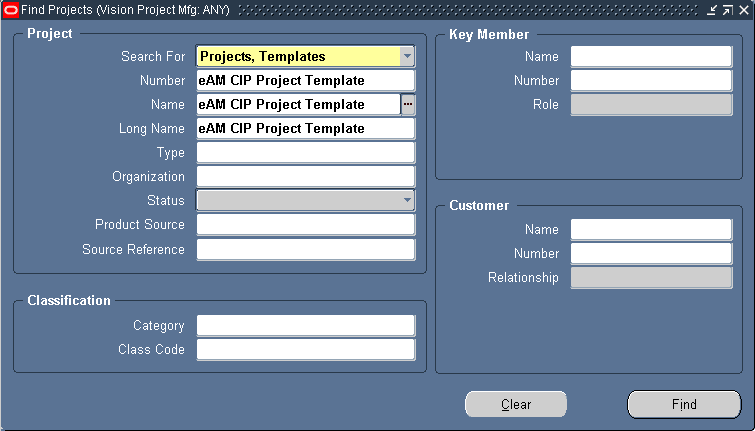
-
Select a project Number.
-
Choose Find.
-
Choose Open.
Projects, Templates
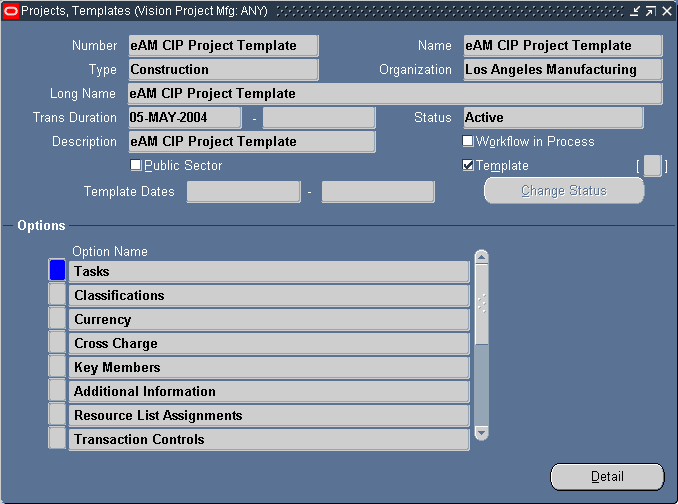
-
Optionally you can view detailed task information by choosing Detail (See: Viewing Project Details, Oracle Project Manufacturing User's Guide).
To assign project parameters
-
Navigate to the Project Parameters window.
Project Parameters
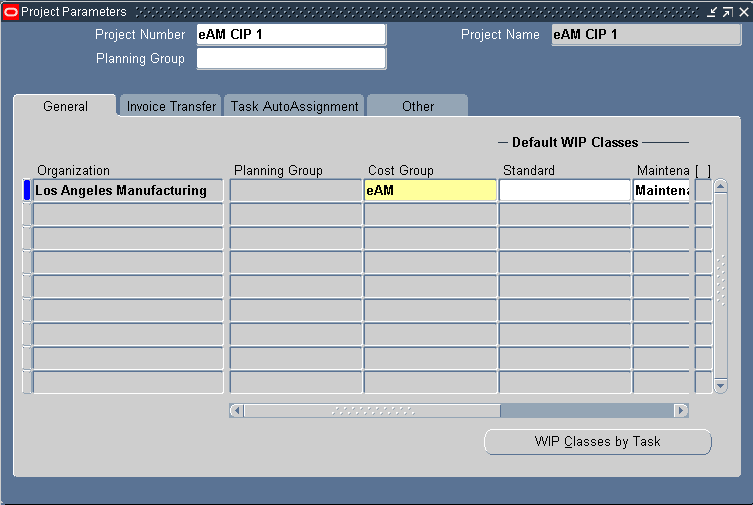
-
Select a valid Project Number.
-
Optionally select a Planning Group.
-
Select a Cost Group.
If the current organization has selected Average as its primary costing method in the Organization Parameters window, the Cost Group field is required. The list of values includes the Common Cost Group and the user defined cost groups. The list of user defined cost groups includes those cost groups with valid accounts and with Project selected in the Cost Group window (See: Project Cost Groups, Oracle Cost Management User's Guide). You must assign the project to its own Cost Group to keep weighted average costing at the project level.
Associate a Maintenance type WIP Accounting Class to this Cost Group. See: Project Cost Groups, Oracle Cost Management User's Guide.
-
Optionally assign a Maintenance WIP Accounting Class to the current project. You can select any Maintenance type WIP Accounting Class that is associated with the selected Cost Group.
-
Optionally select the name of the Planning Group with which you want to associate your project.
If you plan material requirements by a group of projects, rather than by each individual project, you need to define a planning group and to assign all the projects to this planning group. If you plan material requirements by a single project, you do not need to associate the project with any planning group (See: Defining Planning Group Lookups, Oracle Master Scheduling/MRP and Oracle Supply Chain Planning User's Guide).
-
Select the Other tab.
-
Select Maintenance from the Direct Item Expenditure Type list of values. This expenditure type enables the Cost Collector process to pass costs for direct items to project maintenance work orders.
This is a required step.
-
Save your work.
Related Topics
Associating a Work Order with a Project, Oracle Enterprise Asset Management User's Guide
Creating Purchase Orders from Requisitions, Oracle Enterprise Asset Management User's Guide
Updating the Commitments for a Project, Oracle Enterprise Asset Management User's Guide
Viewing Commitments, Oracle Enterprise Asset Management User's Guide
Project Definition, Oracle Project Manufacturing User's Guide
Assigning Project Parameters, Oracle Project Manufacturing User's Guide
Project Cost Groups, Oracle Cost Management User's Guide
Defining Project Cost Groups, Oracle Cost Management User's Guide
WIP Accounting Classes, Oracle Work in Process User's Guide
Project Manufacturing Parameters, Oracle Project Manufacturing User's Guide
Property Manager Integration Setup
The eAM and Property Manager integration enables eAM assets to correspond with locations defined in Property Manager. The information transferred from Property Manager are the three-level land or building hierarchies, and the associated Location Codes within Property Manager. eAM also provides user-defined Area codes, enabling you to logically sort assets by where they are physically located. However, Area codes in eAM do not equal locations in Property Manager. See: Setting Up Areas, Oracle Enterjprise Asset Management User's Guide.
This section includes the following topics:
-
Setting Up eAM Prerequisites, Oracle Enterjprise Asset Management User's Guide
Setting Up eAM Prerequisites
The following must be defined within eAM before the Export Locations to Enterprise Asset Management concurrent request process can export locations into eAM:
-
Asset Group (See: Defining Asset Groups)
-
Organization (See: Organization Setup)
-
Owning Department (See: Defining Departments and Resources)
Executing the Export Process
Locations from Property Manager are always exported as a hierarchy. The first time that you execute the process, the starting node of the hierarchy is specified as the top level of building or land hierarchies. Thereafter, any level within the building or land hierarchy is specified.
After the process has executed, any changes within Property Manager's building or land hierarchies are automatically changed within eAM's corresponding asset hierarchies.
The Export Locations to Enterprise Asset Management process executes from the Property Manager responsibility. This process can execute in both create and update modes.
To execute the Export Locations to Enterprise Asset Management process
-
Navigate to the Submit Request window.
Submit Request
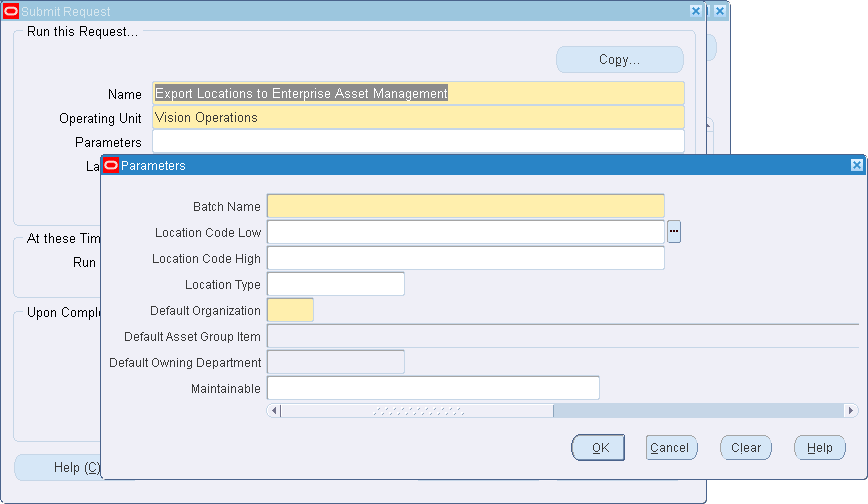
-
Select Export Locations to Enterprise Asset Management.
-
Enter the following parameters:
-
Batch Name: The Batch Name identifies each export process by name.
-
Location Code Low: This code, defined in Property Manager, is the starting node of the building or land hierarchies. This code reflects the Enterprise Asset Management Asset, and is normally entered into one Enterprise Asset Management Asset Group per transfer.
-
Location Code High: This code, defined in Property Manager, is the ending node of the building or land hierarchies. This code reflects the Enterprise Asset Management Asset, and is entered into one eAM Asset Group per transfer.
-
Default Organization: Select the eAM enabled organization. This code is defined within eAM. See: Organization Setup.
-
Default Asset Group Item: Select the Asset Group (defined within eAM). The eAM assets are created in this Asset Group. See: Defining Asset Groups.
-
Owning Default Owning Department: This is the designated maintenance department to associate with the exported asset/location within eAM.
-
Maintainable: Select whether the asset/location is maintainable within eAM.
-
-
Choose OK.
-
Choose Submit.
Related Topics
Property Manager Integration, Oracle Enterprise Asset Management User's Guide
Submitting a Request, Oracle Applications User's Guide
Executing the Asset Number Interface
Locations are set up in Property and are exported to Enterprise Asset Management (eAM) with a two-step process. This allows you the opportunity to modify data before it is exported to eAM. First, push the location records from Property Management to eAM (See: Executing the Export Process). After submission of the concurrent process, the Property Management Location information are entered into the EAM Asset Interface table and are accessed via the Pending Asset Number window within eAM. You can update all relevant information, including Asset Group, Asset Number, Owning Department, and WIP Accounting Class, for this information, before submitting the interface process.
To view pending asset numbers
-
Navigate to the Pending Asset Number window.
Pending Asset Number
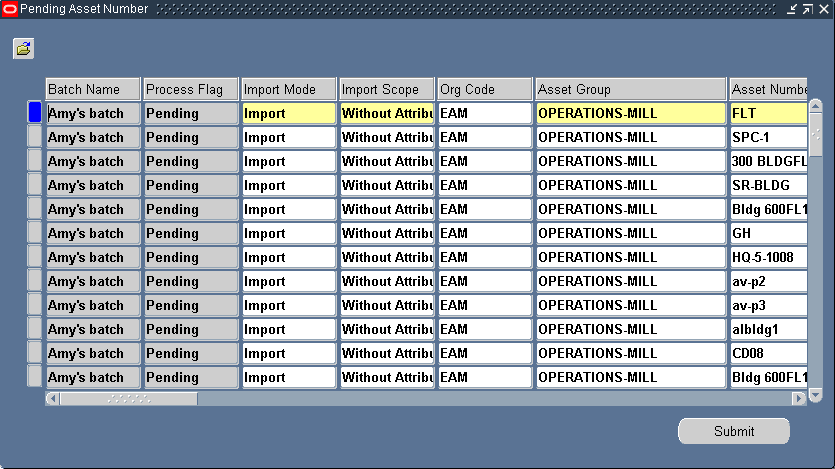
-
Update the information, as necessary.
-
Choose Submit to update your changes.
Related Topics
Service Integration Setup
Use service requests to report and request maintenance service for unplanned maintenance demand on internal assets and rebuildable items. service requests that are classified as type Maintenance are used to identify requests for eAM maintenance. For example, when an employee notices that a printer is broken, the employee can create a service request, even though a technician is scheduled to regularly check the printer monthly. You can create both service and work requests for capital assets and rebuildables, simultaneously, within one eAM organization.
If a valid asset or rebuildable serial number is entered on the service request, the owning department for the serial number defaults. (See: Defining Asset Numbers), and the service request is visible within the eAM Maintenance Workbench. The Owning Department can then approve the service request and create a work order, or reject the service request and notify the service request owner to cancel it. However, customers or employees who report problems are often not aware of the asset or rebuildable's serial number requiring maintenance. In this situation, a default department is used as the Owning Department. You may customize an eAM Workflow process to identify appropriate default owning departments and department approvers. Within Oracle Service, an agent can create a request for maintenance, provide a problem summary, and provide any additional information, such as an incident address or notes.
A planner creates a work order and then releases it to execute. The planner can choose to create one or multiple work orders for a single service request. When a work order is complete, the service request owner updates the service request status to Closed.
A support agent can view all work order information for each work order created for a service request. You can create eAM work orders for Service and/or Work Requests, or associate requests to existing work orders.
You can customize a workflow process that creates notifications to eAM personnel that indicate service requests requiring work and approval.
Note: Oracle Service must be installed to utilize service request functionality.
This section includes the following topics:
-
Creating Maintenance Service Request Types, Oracle Enterprise Asset Management User's Guide
-
Enabling Service Requests for Assets and Rebuildables, Oracle Enterprise Asset Management User's Guide
Creating Maintenance Service Request Types
Within Oracle Service, create at least one Maintenance Service Request Type. You can define multiple Service Request Types, if necessary.
To create a Maintenance service request type
-
Navigate to the Service Request Type window.
Service Request Types
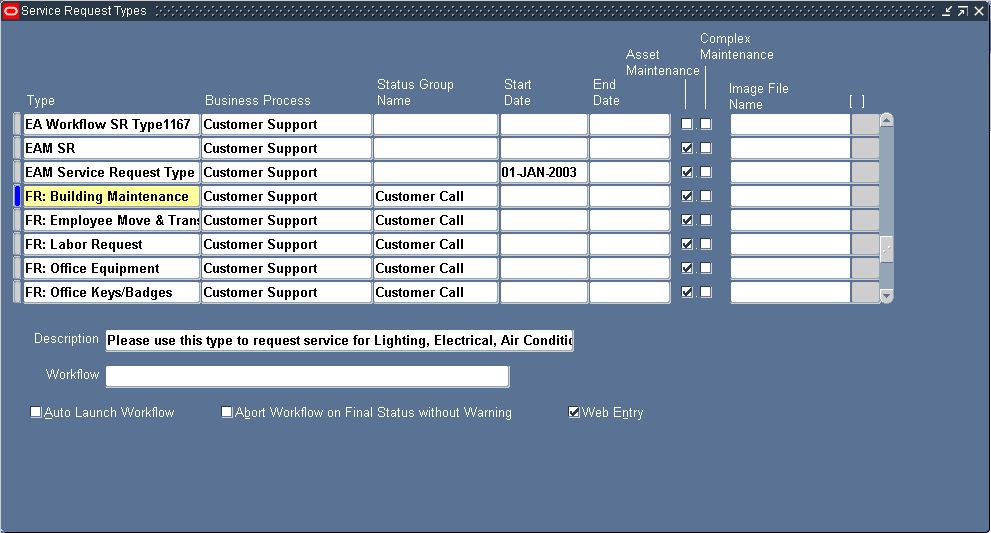
-
Enter the name of the Service Request Type.
-
Select Customer Support, from the Business Process list of values.
-
Optionally select effective dates for this request type.
-
Select the Asset Maintenance check box to indicate that this Service Request Type is of type Maintenance (viewable in eAM). Maintenance Type Service Requests are viewable in eAM.
-
Save your work.
Enabling Service Requests for Assets and Rebuildables
To set up Service Request functionality for Asset and Rebuildable Serial Numbers, enable Asset Groups and Rebuildable Items for Service Requests, respectively.
To enable Service Requests for asset groups and rebuildable items
-
Navigate to the Master Item window.
Master Item
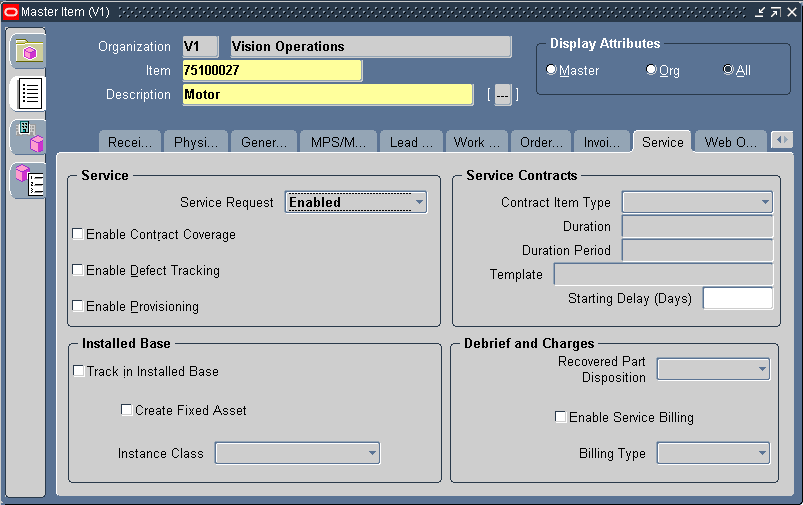
-
Select an Asset Group or Rebuildable Item.
-
Select the Service tab.
-
Select Enabled, from the Service Request list of values.
-
Save your work.
Enabling eAM Specific Fields
The Service Request window enables a customer support agent to view pertinent information for an entered Service Request, such as associated Work Orders and their statuses. It is necessary to have this important information visible at all times, within the Service Request window. You can customize which fields and records appear (See: Customizing the Presentation of Data in a Folder, Oracle Applications User's Guide).
Utilize Oracle's folders functionality to ensure that key eAM-specific fields are visible for maintenance Service Requests. By default, eAM specific fields are hidden. This folders feature provides you a user-defined display of retrieved information, such as:
-
Columns displayed
-
Width of columns displayed
-
Sequence of columns
-
Prompts associated with columns
-
Sequence of records
You can prevent users from creating or modifying folders with profile option, FLEXVIEW: ALLOW_CUSTOMIZATION.
To display eAM-specific fields in the Service Request window
-
Navigate to the Service Request window.
Service Request
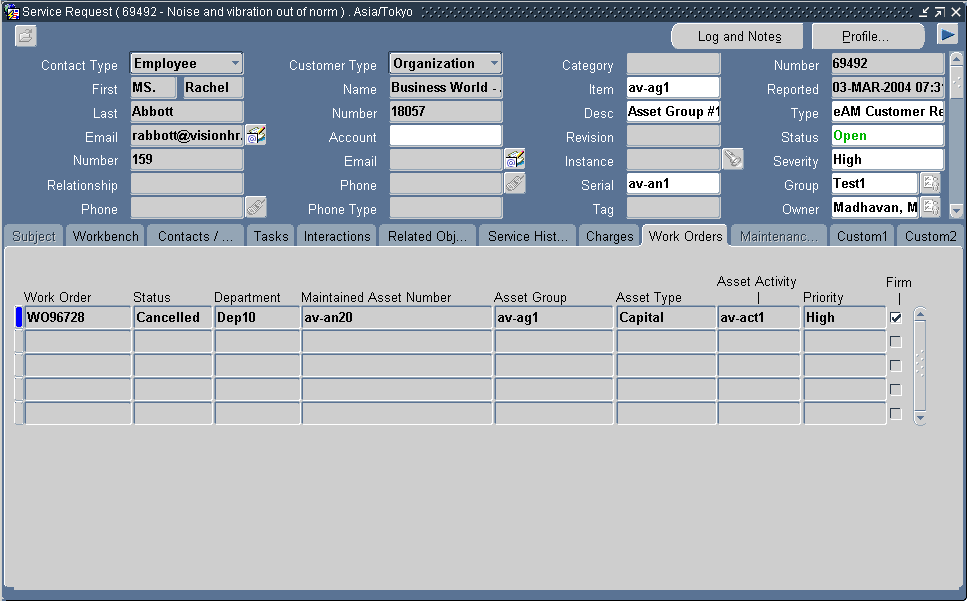
-
From the Folder menu, select an existing, or create a new, Folder definition.
-
Save your work.
Related Topics
Customizing the Presentation of Data in a Folder, Oracle Applications User's Guide
Oracle Applications 12 Workflow
Oracle Time and Labor Integration Setup
Oracle Time and Labor (OTL) is the repository in which time is entered by employees working in a particular organization. Employees working on Oracle Enterprise Asset Management (eAM) work orders enter their time using OTL Self-Service. Information collected is stored in OTL Time Store, and is composed of a series of business rules and processes. eAM extracts information from the Time Store and charges eAM work orders for the time spent by employees that work on them.
There are multiple steps within the integration flow. First, timecard information is entered for a specific Work Order, within Oracle Time Store (a piece of Oracle Time and Labor). That information is then extracted from Oracle Time Store to Oracle Enterprise Asset Management. This extraction dynamically creates a resource transaction within Oracle Enterprise Asset Management. Finally, the Cost Manager process is executed. This process charges the resource transaction. After this process executes, you can view the actual costs for the period that you charged, within the Work Order.
The process is as follows:
OTL Process Flow
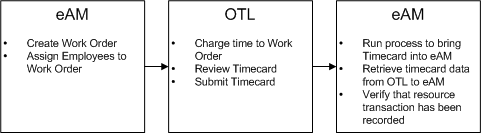
This section contains the following topics:
Setting Up Overview
There are two required setup procedures for this integration. The first is to establish employees needing to use this functionality as Persons within Oracle Human Resources (See: Oracle Human Resources User's Guide). After established, those Persons are assigned to respective Users, within Enterprise Asset Management. The second setup procedure consists of creating Preference Values, and then linking those values to eligibility criteria.
This section contains the following topics:
Defining Persons as Users
Establish employees needing to use this functionality as Persons within Oracle Human Resources (See: Oracle Human Resources User's Guide). After established, those Persons must be assigned to respective Users, within Oracle Enterprise Asset Management (eAM).
To define Persons as Users within eAM
-
Navigate to the Users window.
Users
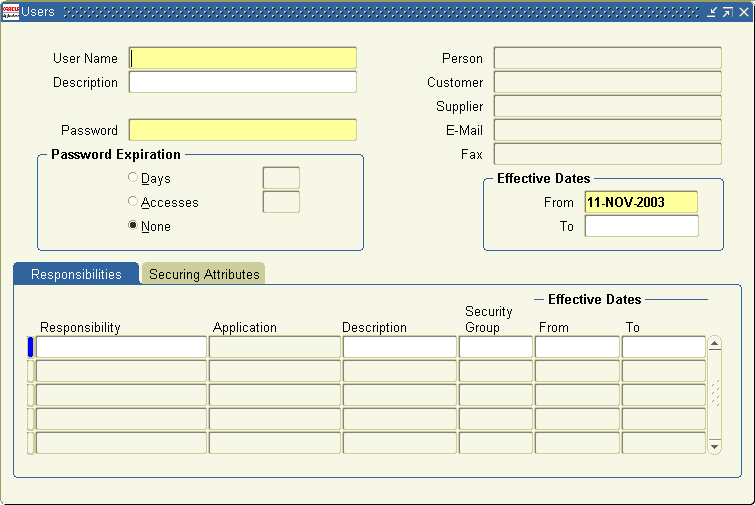
-
Enter a User Name.
-
Select the Person that was created in Oracle Human Resources.
-
Enter a Password.
-
Within the Responsibilities tab, select the appropriate Responsibilities to assign to this User. The responsibilities, US OTL Administrator and Self Service Time and Expenses, are seeded but the Administrator needs to manually assign them to the Person/User.
-
Save your work. Repeat steps one through five for all appropriate Persons.
Creating Eligibility Criteria
You need to create Preference Values, and then link those values to eligibility criteria.
Note: Preferences are seeded, but the preferences must be assigned to the user.
To create eligibility criteria
-
Navigate to the Preferences window.
Preferences
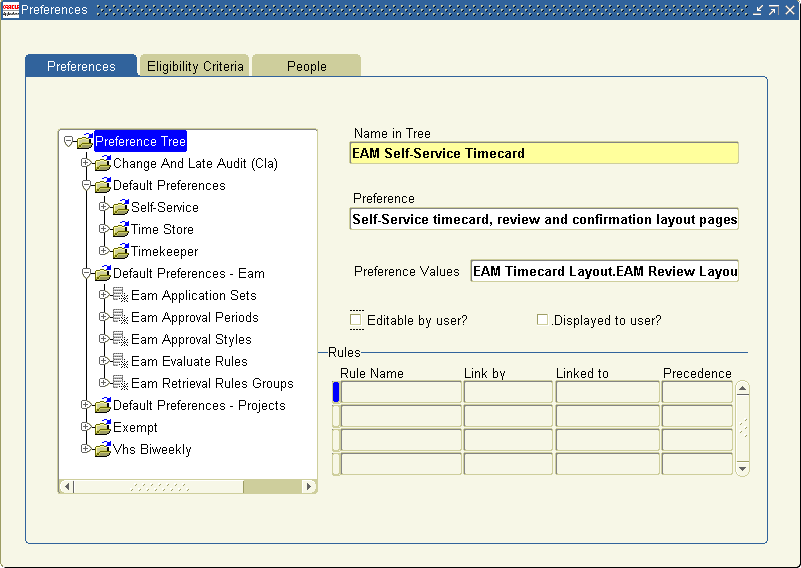
-
Select the Preference Tree node, then choose New.
-
Enter the name of your tree.
-
Select the Self-Service timecard, review and confirmation layout pages Preference.
-
Within the OTL Preferences window, select EAM Timecard Layout from the Timecard Layout list of values.
OTL Preferences
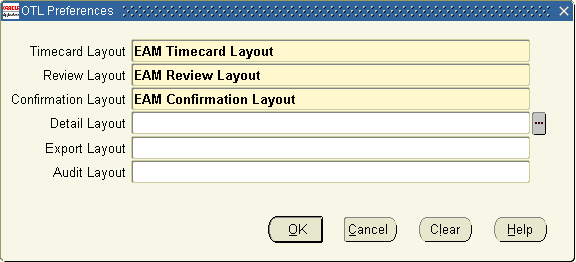
-
Select EAM Review Layout from the Review Layout list of values.
-
Select EAM Confirmation Layout from the Confirmation Layout list of values.
-
Choose OK.
-
Save your work. After saved, you have created a new node on the Preference Tree. Expand this new node, and select Eam Self-Service Timecard.
Preferences
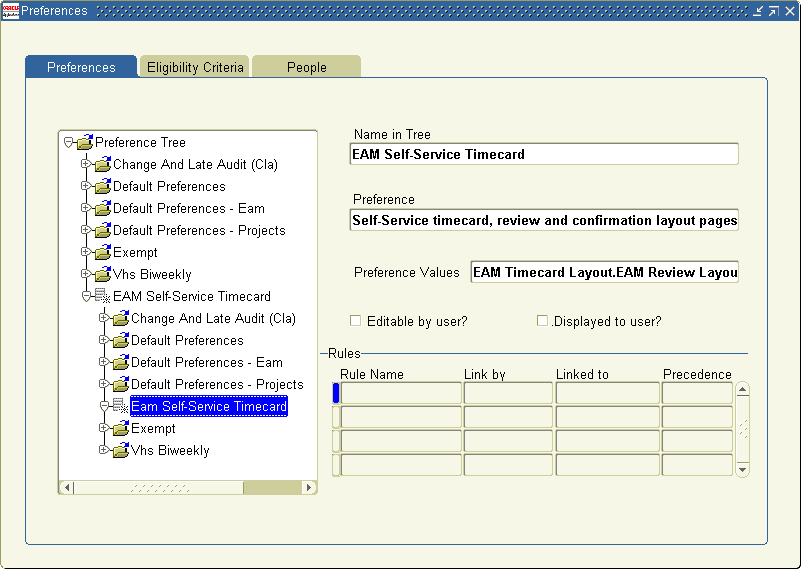
-
To create eligibility criteria for timecard entry, select the Eligibility Criteria tab.
-
Enter the Name of the rule. You can have one rule for everyone, or multiple rules to create different eligibility criteria for different groups.
-
Select EAM Self-Service Timecard from the Name of Branch list of values. This value was previously defined during steps one through nine.
-
Select Person, Organization, or All People from the Link by list of values. If you are creating one rule for all users, select All People.
-
Enter a Precedence value. Valid values are all positive numbers. If you have multiple rules, the rule with the highest precedence is displayed first, and so on. For example, an employee can view the time card with a rule precedence value of 95, versus the timecard with a rule precedence value of 94.
-
Save your work.
Related Topics
Time and Expenses, Oracle Enterprise Asset Management User's Guide
Work Order Billing Setup
While maintaining an asset or servicing a customer request, you can bill a third party customer for the work that they performed. The cost of the work performed is based on the material and resource requirements (bill of material) of the work order, or the cost of the activity associated with the work order.
This section includes the following topics:
Setting Up Item Costs and Prices
The Billing Basis is either Cost Plus or Price List. The Billing Basis affects your item setup procedures. If you want the flexibility of using both billing basis types for an item, you need to set up both costs and prices for that item. An item is an Activity, Material, or Resource.
This section includes the following topics:
Setting Up Parameters
You can optionally create the ability to change the billable material on a Work Order at the time a bill is created.
To enable the change of billable material functionality
-
Navigate to the Enterprise Asset Management Parameters window.
Enterprise Asset Management Parameters
-
Optionally select the Invoice Billable Items Only check box. If selected, you can change the billable material at the time the bill is created.
If selected, this check box indicates that you want to invoice only billable items. Billable items are those that have a populated value within the Billing Type field, within the Service Tab, of the Master Item window. Billing Type is relevant only if you have this check box selected. Also, selecting this check box means that you can choose a different item to bill. See: Service Attribute Setup, Oracle Enterprise Asset Management Implementation Guide.
-
Save your work.
Setting up Costs for the Cost Plus Billing Basis
The cost plus method utilizes costs associated with an item. The item should have a cost defined for it. First, you need to ensure that the appropriate item attributes are set up correctly for the item.
To set up an item's attributes
-
Navigate to the Master Item window.
Master Item
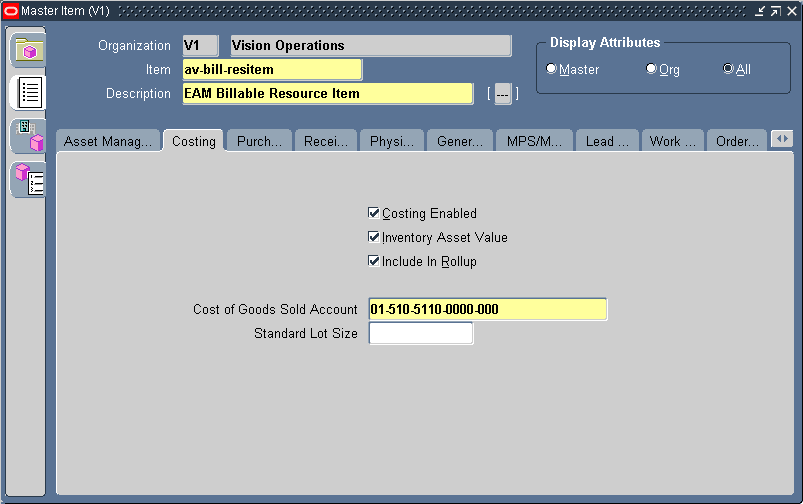
-
Optionally select the Costing Enabled check box to report, value, and account for any item costs. You need to select this check box if you are using the cost plus billing method.
-
Optionally select the Inventory Asset Value check box. You need to select this check box if you are using the cost plus billing method.
-
Save your work.
To set up costs for an item
-
Navigate to the Item Costs Summary window.
Item Costs Summary
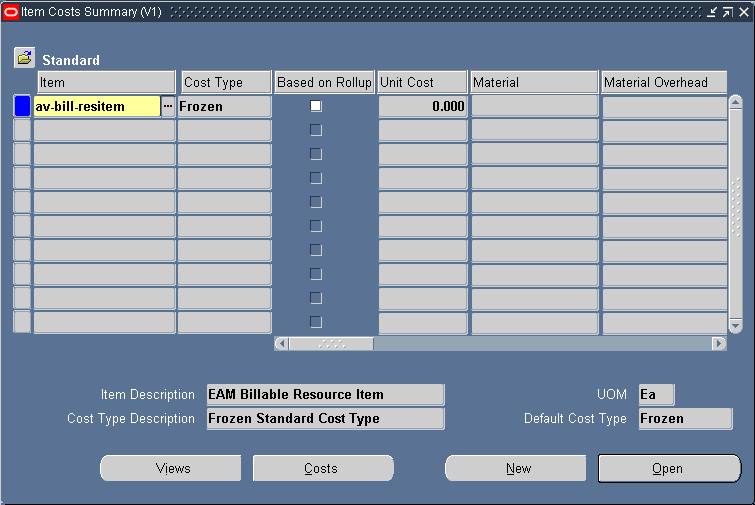
-
Choose Costs.
Item Costs
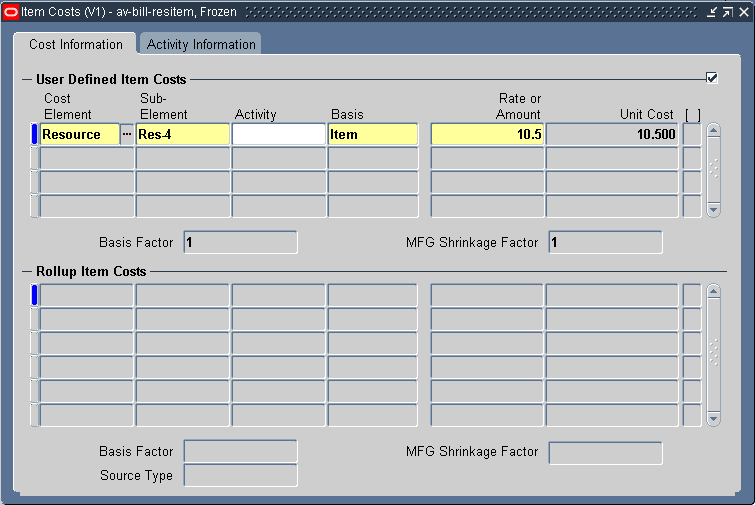
-
Enter cost information for your item.
-
Save your work.
Related Topics
Costing Attribute Group, Oracle Inventory User's Guide
Defining Item Costs, Oracle Cost Management User's Guide
Setting up Prices for the Price List Billing Basis
The price list method uses a specified price list. The specified item should have at least one entry in the price list. First, you need to ensure that the appropriate item attributes are set up correctly for the item.
To set up an item's attributes
-
Navigate to the Master Item window.
Master Item
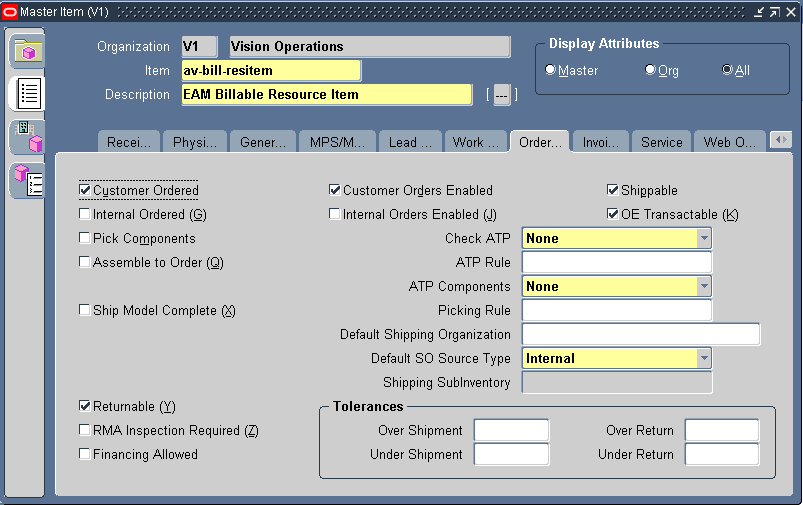
-
Optionally select the Customer Ordered check box in order to create a price within the price list. You need to select this check box if you are using the price list billing method.
-
Save your work.
To set up prices for an item
-
Navigate to the Advanced Pricing - Price Lists window.
Advanced Pricing - Price Lists
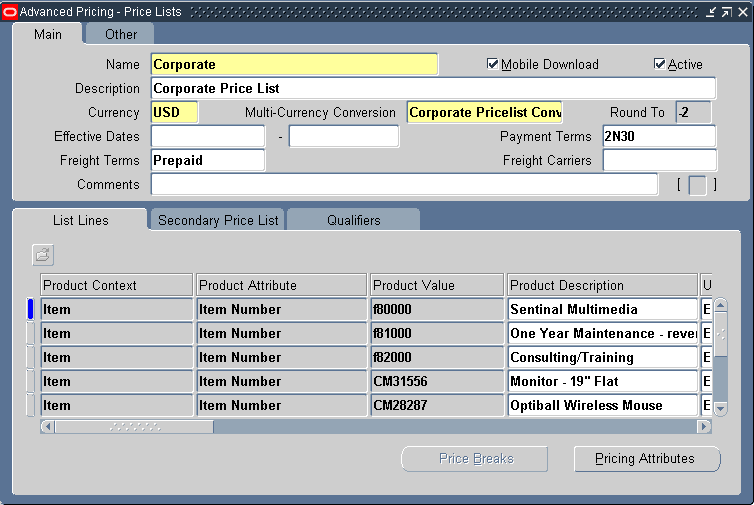
-
Enter price information for your item.
The same item can repeat multiple times in the price list, with varying values for Start Date, End Date, and Precedence. For example, it is invalid to have overlapping date ranges, if the Precedence is the same.
-
Save your work.
Related Topics
Order Entry Attribute Group, Oracle Inventory User's Guide
Service Attribute Setup
Set the Billing Type for each item that you want billable. The Billing Type field within the Master Item window must be populated if you have selected the Invoice Billable Items Only check box, within the Enterprise Asset Management Parameters window. See: Setting Up Parameters.
To set up the Billing Type attribute
-
Navigate to the Master Item window.
Master Item
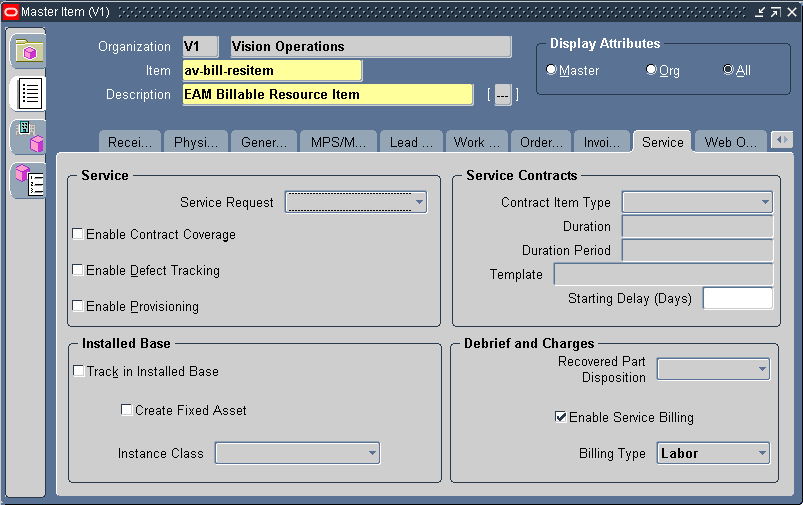
-
Select the Service tab.
-
Optionally select a Billing Type of Expense, Labor, or Material. This field must be populated if you have selected the Invoice Billable Items Only check box, within the Enterprise Asset Management Parameters window. See: Setting Up Parameters.
-
Save your work.
Setting Up Billable Material
To create billable material, first set specific attributes within the Master Item window. Next, assign the resource item to your organization. Decide whether you are pricing this item using the Cost Plus or Price List method, or both, and perform the additional setup for those methods (See: Setting Up Item Costs and Prices). Finally, define costs and prices for your item.
To set up billable material
-
Navigate to the Master Item window.
Master Item
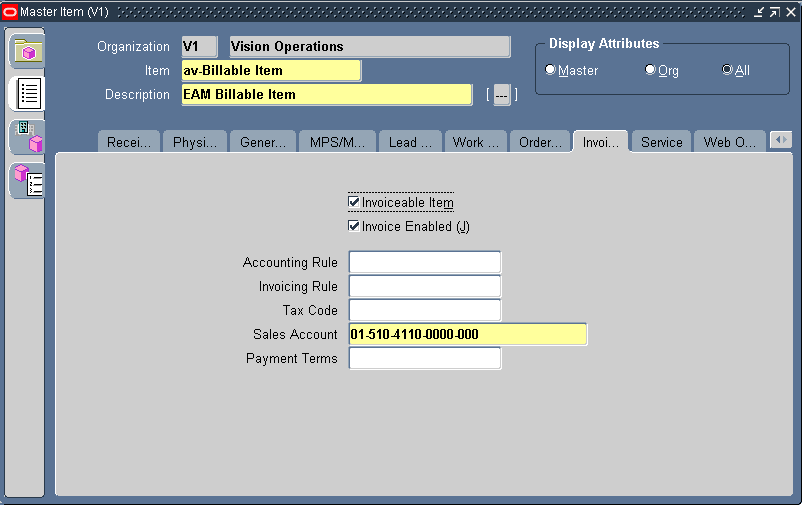
-
Select the Invoicing tab.
-
Optionally select the Invoiceable Item check box to indicate that the current material item can invoice. You can select this attribute at the Master Organization level.
-
Optionally select the Invoice Enabled check box to indicate that invoices are enabled for the current material item.
Note: For the current material item, you need to ensure the Billing Type is populated with Material, within the Service tab. See: Service Attribute Setup.
-
Assign the current item to your organization.
-
Save your work.
Setting Up a Billable Resource
To create a billable resource, you need to first create a resource item by setting specific attributes within the Master Item window. Next, you need to assign the resource item to your organization. Decide whether you are pricing this item using the Cost Plus or Price List method, or both, and perform the additional setup for those methods (See: Setting Up Item Costs and Prices). Next, you need to define a resource and associate the resource item to the resource. Finally, assign the resource to a department.
To set up a billable resource
-
Navigate to the Master Item window.
Master Item
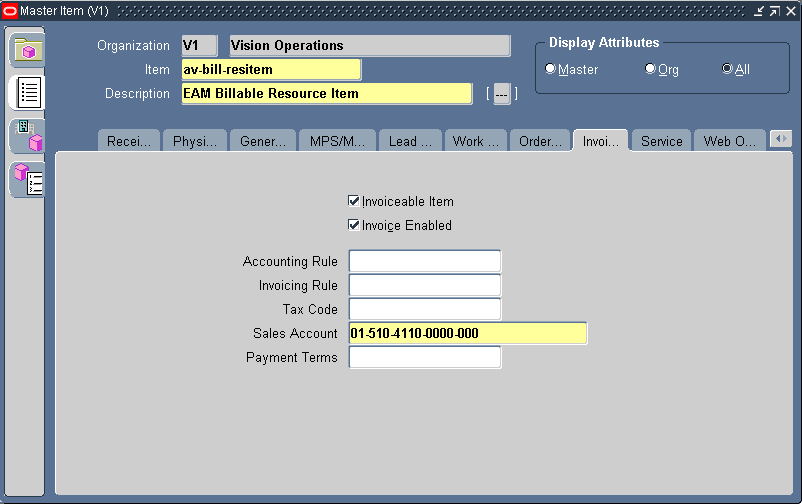
-
Select the Invoicing tab.
-
Optionally select the Invoiceable Item check box to indicate that the current resource item can invoice. You can select this attribute at the Master Organization level.
-
Optionally select the Invoice Enabled check box to indicate that invoices are enabled for the current resource item.
Note: For the current resource item, you need to ensure the Billing Type is populated with Labor, within the Service tab. See: Service Attribute Setup.
-
Assign the current item to your organization.
-
Save your work and close the window.
-
Navigate to the Resources window.
Resources
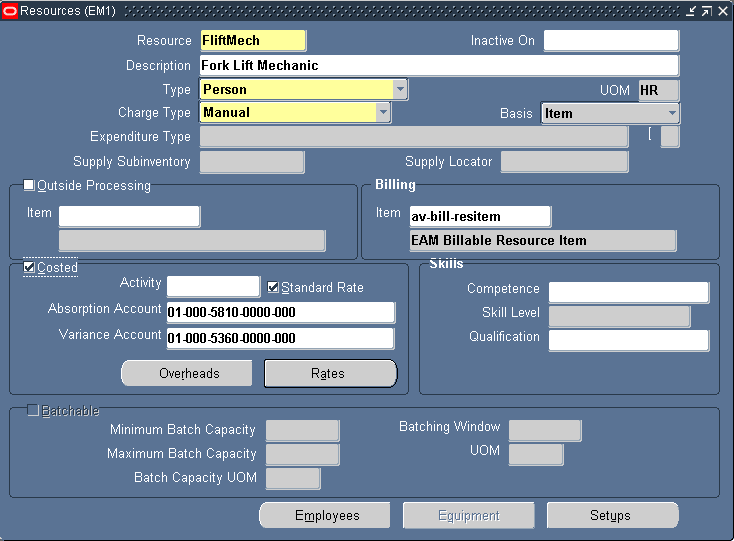
-
Enter the name of the Resource within the Resource field.
-
Within the Billing region, select the resource item you created within the Master Item window to ensure that the resource is available for billing.
Note: Rates defined in the Resources window are not used for billing. For billing rates for the resource item, See: Setting Up Item Costs and Prices, Oracle Enterprise Asset Management User's Guide.
-
Save your work.
-
Assign the current resource to a department. See: Defining Departments and Resources.
-
Save your work.
Setting Up a Billable Activity
To create a billable activity, first set specific attributes within the Master Item window. Next, decide whether you are pricing this item using the Cost Plus or Price List method, or both, and perform the additional setup for those methods (See: Setting Up Item Costs and Prices). Finally, associate the activity to the asset group/asset number that is used to create the work order.
To set up a billable activity
-
Navigate to the Master Item window.
-
Select the Invoicing tab.
-
Optionally select the Invoiceable Item check box to indicate that the current activity item can invoice. You can select this attribute at the Master Organization level.
-
Optionally select the Invoice Enabled check box to indicate that invoices are enabled for the current activity item.
-
Assign the current item to your organization.
-
Save your work.
Related Topics
Initiating Billing, Oracle Enterprise Asset Management User's Guide