Shop Floor Control
This chapter explains how assemblies are moved, controlled, and tracked on the shop floor.
This chapter covers the following topics:
- Overview of Shop Floor Control
- Electronic Signature Support in Oracle Manufacturing
- Setting Up Shop Floor Control
- Overview of Routings and Operations
- Adding and Updating Operations
- Deleting Operations
- Midpoint Rescheduling
- Viewing Operations
- Viewing Job and Schedule Operations
- Move Transactions
- Performing Move Transactions
- Operation Pull Backflush Transactions
- Backflushing Pull Components
- Move Completion/Return Rules
- Performing Move Completion/Return Transactions
- Viewing Move Transactions
- Processing Pending Move Transactions
- Finding Pending Move Transactions
- Shop Floor Statuses
- Assigning and Viewing Shop Floor Statuses
- Shop Floor Management
- Scrapping Assemblies
- Dispatch Reports
Overview of Shop Floor Control
Shop floor control helps you manage the flow of production inside your plant. Effective shop floor control can lead to due date performance that ensures meeting your customer service goals. The purpose of this section is to help you understand how Oracle Work in Process provides tools for shop floor control. In particular, it describes the complete life cycle of shop floor control from setup through execution.
Basic Business Needs
Oracle Work in Process provides you with the features you need to satisfy the following basic shop floor control needs. You can:
-
Define work in process routings that model the manufacturing process
-
Track assembly movements throughout the shop floor
-
Track the status of assemblies within an operation
-
Use transaction information from shop floor collection devices and other external systems
-
Collect product and process quality information as you move assemblies
-
Enter alternate units of measure and quantities in move transactions
-
Dispatch assemblies by operation or within an operation
-
Backflush components automatically based on transactions
-
Charge resource time and overhead automatically
-
Track and repair rejected assemblies separately from normal assemblies
-
Scrap assemblies from the manufacturing process
-
Create requisitions for operation outside resources
-
Track assemblies at outside vendors
-
If Oracle Shop Floor Management is installed, you can create network routings with primary and alternate paths
-
Create electronic signatures in compliance with Federal Food and Drug Administration regulations when performing material transactions, assembly moves, and assembly completions
Major Features
Move Transactions
You can move assemblies within operations (intraoperation moves) and between operations (interoperation moves). You can also complete and return assemblies from and to jobs and schedules using move transactions. Move transactions automatically update operation completion quantities, charge appropriate resources and overheads, and backflush pull components. See: Move TransactionsOverview of Move Transactions.
Open Move Transaction Interface
You can load move transaction information from external systems - such as barcode readers and manufacturing cell controllers - into the Open Move Transaction Interface table. When this data is processed, it is validated, and invalid records are marked so that you can correct and resubmit them. See: Open Move Transaction Interface.
Shop Floor Statuses
You define and assign shop floor statuses. You can control move transactions by assigning these statuses to intraoperation steps on the work in process routing. You can view these statuses during move transactions. See: Assigning and Viewing Shop Floor Statuses and Defining Shop Floor Statuses.
Dispatch Reporting
You can use dispatch reports to help you prioritize work at specific operations, production on specific lines, and to locate assemblies on the shop floor. See: Dispatch Reports.
Outside Processing
You can automatically create purchase requisitions for resources assigned to outside processing operations. You can also control the movement of assemblies to and from your suppliers. See: Overview of Outside Processing Outside Processing Parameters and Resource Charge Types.
Managing Rework Production
You can use Reject intraoperation steps, rework operations, or non-standard discrete jobs to rework problem assemblies. You have complete control over the material requirements and operations you use to complete rework. See: Rework Production.
Managing Scrap
You can scrap assemblies at any point during the production process. See: Assembly Scrap.
Mobile Manufacturing
If Oracle Mobile Supply Chain Applications is installed, the Mobile Manufacturing component enables you to perform work in process material transactions using a mobile client device networked with a computer system. This includes:
-
Moving assemblies from one operation or intraoperation step to another.
-
Completing assemblies and jobs
-
Scrapping or rejecting assemblies, and reversing transactions
-
Resource transactions enabling you to change or add resources
-
Viewing transaction information including job status, completions, scrap quantities, and schedule dates
-
If Oracle Warehouse Management is installed, you can use License Plate Number functionality for tracking completions
Electronic Record Support
Oracle Manufacturing provides electronic record (e-records) support in compliance with Federal Food and Drug Administration's (FDA) code regulation 21 CFR Part 11. Manufactured product data is electronically captured and has a complete audit trail. The Work in Process transactions supported in electronic signature support include material transactions, assembly moves, and assembly completions. See: Electronic Signature Support in Oracle Manufacturing
Related Topics
Overview of Resource Management
Explaining License Plate Management, Oracle Warehouse Management User's Guide
Electronic Signature Support in Oracle Manufacturing
The Oracle E-Records application supports Federal Food and Drug Administration's (FDA) code regulation 21 CFR Part 11. This regulation supports the creation of electronic records to monitor activities by regulated industries such as food, pharmaceuticals, and medical devices. These industries are subject to audit, retention of records, and capture of legally binding signatures.
Oracle Manufacturing support of these features enables compliance for companies falling under FDA regulation and similar global regulations. Manufactured product data is electronically captured and has a complete audit trail.
The e-records and e-signatures (ERES) framework uses Oracle Workflow business events and Oracle XML Gateway. This framework enables you to define event metadata to specify the reporting format for the event.
Setup
For setup information, see the Oracle E–Records Implementation Guide and the Oracle E–Records Developer’s Guide. Setup for Work in Process involves the following:
-
Set the Transaction Processing profile options to online mode. See: Profile Options
-
Install Oracle Workflow in order to initiate the e-signatures (EDRPSIGF) workflow for sending notifications. The Workflow Business Event system is used to define an e-signature event and associate synchronous e-signature subscription to the event.
Work in Process E-Signature Transactions
The Work in Process transactions creating electronic signatures include material transactions, assembly moves, and assembly completions.
Material Transactions: The process is enabled when issuing a component from inventory, or returning a component to inventory. This includes the following transaction types:
-
WIP component issue
-
WIP component return
-
WIP negative component issue
-
WIP negative component return
Move Transactions: The process is enabled when you move assemblies within a routing, complete assemblies from a routing operation, or return completed assemblies from inventory to an operation routing. Quality results are included in the e–record. The following transaction types are included:
-
Move
-
Complete
-
Return
Completion Transactions: The process is enabled when you complete an assembly and return it to inventory, or return a completed assembly from inventory to a job. Quality results are included in the e–record. This includes the following transaction types:
-
WIP assembly completion
-
WIP assembly return
Related Topics
Evidence Store, Oracle E-Records Implementation Guide
Implementing E-Records, Oracle E-Records Implementation Guide
Setting Up Shop Floor Control
The following lists processes that need to be set up to perform shop floor functions.
-
For a listing of out-of-product setups that affect shop floor processing see: Setup Prerequisites
-
For a listing of setups within Work in Process that affect shop floor processing see: Setup Check Listt
-
For additional information about parameters that affect shop floor processing see: WIP Parameters
-
Material Parameters
-
Intraoperation Steps Parameter
-
Move Transaction Parameters
-
-
For a listing of profile options that affect shop floor processing see: Profile Option Summary
Overview of Routings and Operations
You can define operations and routings in Oracle Bills of Material. Operations and routings are the basis of shop floor control.
Routings
Routings are the procedure used to manufacture a particular item. It includes the operations to be performed, their sequence, the work centers involved, tooling, operator skill levels, and inspection operations. An assembly will be considered to have a routing if at least one operation is attached. See: Overview of Routings, Oracle Bills of Material User's Guide
Operation Sequence
Routings define the step-by-step operations required to manufacture an assembly. Routing operations describe a specific portion of the manufacturing process. Work in process routing operations help you locate (through the assigned department) assemblies on the shop floor and identify the quantity complete or remaining at an operation. See: Operations, Oracle Bills of Material User's Guide.
Resource Requirements
You can associate multiple resources with a routing operation. For each resource, you can determine if you want to include that resource in scheduling calculations. Resources can be charged and scheduled on an item-by-item or lot basis. The system calculates the time required for all scheduled resources at an operation to get the operation start and end dates and times. The system then calculates the time required for all operations to get the job and repetitive schedule start and end dates and times. See: Overview of Resource Requirements.
Resource Charge Types
You can determine how operation resources are charged. You can automatically charge resources as you move assemblies in Work in Process and as you enter purchase receipts for outside processing resources in Oracle Purchasing. You can also manually charge resources. See: Resource Charge Types.
Outside Processing
You can define outside processing resources and assign them to routing operations. See: Overview of Outside Processing.
Specify Where Material is Used
You can specify at what operations materials are required in the routing. Thus, you only issue (push) or backflush (pull) material where and when it is needed.
Backflush Operations
You can use the operation backflush option to specify at what point in the routing Operation Pull components are backflushed. Pull components at non-backflush operation are not backflushed when assemblies are completed at the operation. Instead, they are backflushed when a backflush operation later in the routing is completed. It is often useful to postpone backflushing at time-critical operations.
Autocharge/Count Point Operations
You can specify whether an operation is a count point and whether it should be automatically charged. The autocharge and count point options for an operation work together. See: Count Point and Autocharge Fields, Oracle Bills of Material User's Guide.
Minimum Transfer Quantities
You can define minimum transfer quantities for your operations. If you move fewer assemblies than the minimum quantity, a warning is displayed but you can complete the transaction.
Establish Standard Costs
You specify the resources required to build an assembly when you define a routing. Resources have costs associated with them. By defining the routing with specific resources, you establish standard resource costs for any item that uses the routing.
Alternate Routing
You can choose an alternate routing for an assembly when you define a discrete job or repetitive schedule. See: Primary and Alternate Routings, Oracle Bills of Material User's Guide
Routing Revision
You can use routing revisions to control date effective revisions on a routing. You specify the routing revision and the revision date for the assembly when you define discrete jobs and repetitive schedules. See: Item and Routing Revisions, Oracle Bills of Material User's Guide.
Engineering Routing
You can set your WIP:See Engineering Items profile option to Yes so that you can use engineering routings.Engineering Bills of Material and Routings, Oracle Engineering User's Guide.
Network Routing
If Oracle Shop Floor Management is installed, you can create flexible or network routings. While discrete jobs use standard routings, lot based jobs use network routings. These comprise a collection of operations which include primary and alternate paths. The relationships established in a network routing provide all possible combinations of sequence and operations a job may follow.
Operation Progress Reporting
You can enter a subjective progress percentage value on any job operation. The system uses these entries—and calculates the percent complete for the entire job, based on a weighted average of scheduled hours. The calculation logic is system provided. Oracle Project Manufacturing uses this progress percentage value for project tasks, which can then be rolled up to the project level for earned value. Work order completion percent information is available through a Project Manufacturing API. See: Adding and Updating Operations
Related Topics
Creating a Network Routing in the Engineering User's Guide
Creating a Routing, Oracle Bills of Material User's Guide
Overview of Routings, Oracle Bills of Material User's Guide
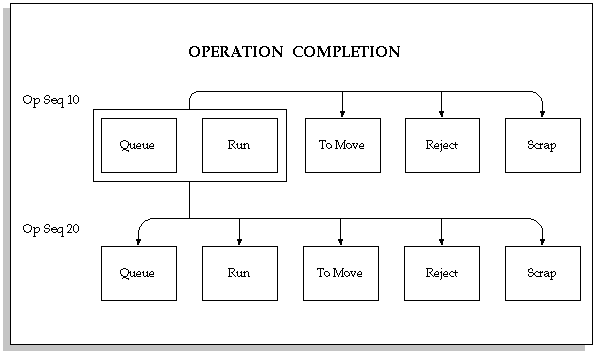
Intraoperation Steps
Intraoperation steps are used to control move and resource transactions within and between operations and to track assemblies within operations. You can only move assemblies to intraoperation steps that are enabled. See: Interoperation Steps Parameter.
The five intraoperation steps - Queue, Run, Reject, To Move, and Scrap - are defined as follows:
| Variable | Description |
|---|---|
| Queue | Assemblies in the Queue intraoperation step of an operation are waiting for you to perform work on them. Queue is the default intraoperation step for every operation in a routing. When you release jobs and repetitive schedules, the assembly quantity is automatically loaded into the Queue intraoperation step of the first operation. You can move assemblies from the Queue intraoperation step to any other enabled intraoperation step. |
| Run | Assemblies in the Run intraoperation step are ready to be worked on. You can move assemblies from the Run step to any other enabled intraoperation step in the routing. |
| To Move | Assemblies in the To move intraoperation step of an operation have been completed and are waiting to be moved to the next operation. You can move assemblies from the To Move intraoperation step to any other enabled intraoperation step in the routing. Before you can use the Completion Transactions window to complete assembles from jobs and schedules with routings, you must move these assemblies into the To Move intraoperation step of the last operation. For this reason, the To Move intraoperation step is automatically enabled for all final routing operations. See: Assembly Pull Backflush Transactions. Assemblies in the To Move step are considered complete for the operation. |
| Reject | Assemblies in the Reject intraoperation step of an operation have been rejected and are waiting to be repaired (reworked) or scrapped. You can move assemblies from the Reject intraoperation step to any other enabled intraoperation step in the routing. Assemblies in the Reject step may not be usable, but they are considered complete for the operation because components and resources have been consumed in their production. |
| Scrap | Assemblies in the Scrap intraoperation step are considered unusable. This step is for those assemblies whose yield loss you want to consider as a variance on the discrete job or repetitive schedule. (In some industries, scrap is considered yield loss.) You can incur this variance immediately by entering a scrap account as you move assemblies into this step. However, you can wait until the job is closed (standard and non-standard asset discrete jobs) or the period is closed (repetitive schedules and non-standard expense discrete jobs) to incur the variance. Oracle Planning does not consider assemblies that in Scrap steps as supply or demand in the planning process. Assemblies in the Scrap intraoperation step are usually not usable. They are considered complete for the operation because components and resources have been consumed in their production. They can be recovered from scrap by moving them to another intraoperation or operation step. |
Complete/Incomplete Operation Steps
Assemblies are considered incomplete at an operation if they are in the Queue or Run intraoperation steps. Assemblies are considered complete at an operation if they are in the To Move, Reject, or Scrap intraoperation step. When assemblies are completed at an operation, the system automatically backflushes Operation Pull components and charges resources. See: Operation Completion Moves.
Using Intraoperation Steps
The intraoperation steps that you enable and use depend on your manufacturing environment and your information requirements.
Manufacturing Environment
For example, if you are a `pull' manufacturer you might enable just the Run and To Move intraoperations. You would do this to simplify the process of pulling assemblies into the Run step of an operation from the To Move step of a prior operation.
Conversely, if you are a `push' manufacturer you might enable just the Queue and Run intraoperation steps. You would do this to simplify the process of pushing (issuing) components to assemblies in the Queue intraoperation step of the operation before you moving them to the Run step of the same operation.
Processing Times
As you move assemblies from one intraoperation or interoperation step to another the dates and times of these transactions are recorded. For example, you can use this information to help you determine how long assemblies spend waiting to be worked on (Queue time) and how much time they are actually being worked on (Run time).
Related Topics
Overview of Discrete Job Close
Period Close, Oracle Cost Management User's Guide
Open Move Transaction Interface, Oracle Integration Repository at http://irep.oracle.com
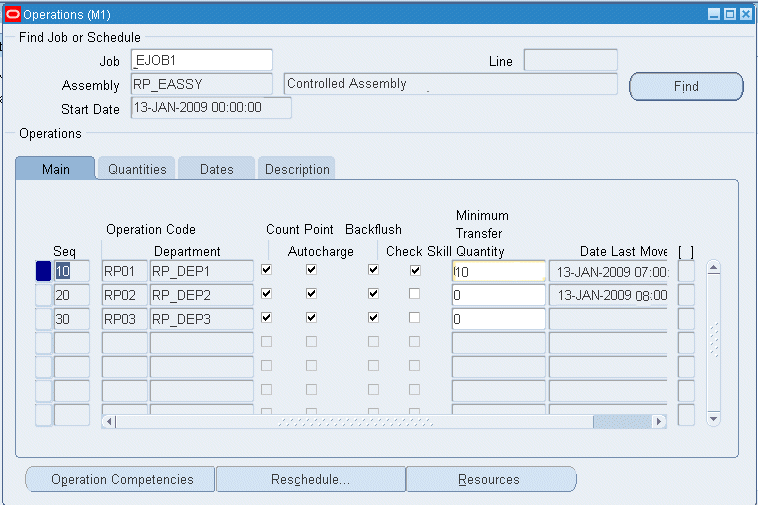
Adding and Updating Operations
You can add operations to discrete jobs with statuses of Unreleased, Released, Complete, or On Hold—and add operations to repetitive schedules with statuses of Unreleased. You can also add operations to jobs and repetitive schedules with or without routings.
You can create a routing for a job or schedule that does not have a routing by adding operations to it. When you add the first operation, the system automatically defaults an operation sequence of 1 for the new operation and assigns job or schedule material requirements to this operation. If the job or schedule is already released, the system also loads the job or schedule quantity into the Queue intraoperation step of the new operation.
Note: If you add an operation to a job or repetitive schedule, reschedule to correctly reflect the start and completion dates.
Operations of discrete jobs can be updated if the status is Unreleased, Released, Complete, or On Hold. You can update the operations of repetitive schedules with statuses of Released, Complete, or On Hold if no other active schedules for the assembly are on the line.
Note: Operation dates for repetitive schedules of any status cannot be changed.
You can attach illustrative or explanatory files—in the form of text, images, word processing documents, spreadsheets, video—to operations. See: About Attachments, Oracle E-Business Suite User's Guide.
To add or update an operation
-
Navigate to the Operations window.
-
If you select a line and assembly, choose the repetitive schedule by selecting the first unit start date of that schedule. If you have selected a discrete job, the system displays the scheduled start date of the job.
Optionally, choose Find n to populate the Operations region.
-
From the Main tabbed region of the Operations region, select the Operation Sequence number.
-
Optionally, select the Operation Code of a standard operation.
If you add a standard operation by selecting its Operation Code—the Department, Count Point, Autocharge, Backflush, Minimum Transfer Quantity, Check Skill, and Description are defaulted. Resource requirements associated with the standard operation are also defaulted.
You can update the operation codes of unreleased discrete jobs.
If the Operation Code is blank, you must manually define the operation.
-
Departments are used for charging resources at an operation and are required.
If you add a standard operation, the system displays the Department of that operation as the default. If there are resources assigned to the standard operation, resources are not updateable.
-
Enable the Count Point check box to make the operation a count point operation. See: Count Point and Autocharge Fields, Oracle Bills of Material User's Guide.
-
Operations you must always perform (critical, time-sensitive), should be made count point operations. Operations not always performed should be made non-count point operations.
-
When you perform move transactions, the system defaults to the next count point operation as the To operation sequence. For example—three operations at sequences 10, 20, and 30 are defined as count point, non-count point, and count point respectively. When you select operation 10 as the From operation, the system automatically defaults operation 30, the next count point operation, as the To operation. You can override this default and choose operation 20, if required.
-
Non-standard operations added are automatically created as count point operatios. If you add a standard operation, the system displays the count point option of that operation as the default.
-
-
Enable the Autocharge check box for charging move transactions. See: Count Point and Autocharge Fields, Oracle Bills of Material User's Guide.
The Autocharge flag controls both resource and backflush charging when moving assemblies. It determines whether both resource and material are charged when you skip an operation:
-
The count point, autocharge, and backflush flags work together. Operations can be:
-
Count point and autocharge
-
Non-count point and non-autocharge
-
Non-count point and autocharge.
Note: They cannot be count point and non-autocharge.
-
-
If you add a standard operation, the system displays the autocharge option as the default. If you add an operation that is not a standard operation, the system specifies it as a count point operation.
-
Operations used to charge resources and material should always be specified as autocharge. See: WIP Move.
-
It is recommended that rework or optional operations are defined as non-autocharge. If the operation is optional and you do not move quantity into it—resource and material are not charged.
For example, three operations at sequences 10, 20, and 30 are defined respectively as autocharge, non-autocharge, and autocharge operations. When you move assemblies from the Queue intraoperation step of operation 10 to an intraoperation step that completes assemblies at operation 30 (To Move, Scrap, or Reject), resources and material at operations 10 and 30 are charged, but those at operation 20 are not. To charge resources and material to operation 20, you must move assemblies into a completion intraoperation step (To Move, Scrap, or Reject) of that operation. See: Intraoperation Steps.
-
-
Enable the Backflush check box for backflush operations.
Operation pull components assigned to backflush operations are automatically backflushed (pulled) from inventory when assemblies are moved and completed at that operation. Operation pull components assigned to non-backflush operations prior to the backflush operation are then backflushed.
If you add an operation that is not a standard operation, the system automatically makes the operation a non-backflush operation.
Note: The last operation in a routing must always be a backflush operation. Otherwise, materials are not backflushed from inventory if the last operation is a non-backflush operation and prior operations are non-backflush with operation pull components.
-
Enter the Minimum Transfer Quantity.
If adding a standard operation, the value defaults from Bills of Material. If you add an operation that is not a standard operation, the system displays 0 as the default. See: Creating a Standard Operation, Oracle Bills of Material User's Guide.
If you attempt to move fewer than the minimum transfer quantity, a warning message displays.
-
Enable the Check Skill check box if you are validating operator skills for an operation.
The labor skills validation feature is applicable only for operation moves transacted in Manufacturing Execution System for Discrete Manufacturing, and not operation moves transacted in Work in Process windows. If adding a standard operation, the value defaults from Bills of Material. This field enables the Operation Competencies button for navigating to the Operations Competencies window to enter required skill level values. See:
-
Moving and Completing Assemblies, Oracle Manufacturing Execution System for Discrete Manufacturing User's Guide
-
Labor Skills Validation Setup, Oracle Manufacturing Execution System for Discrete Manufacturing User's Guide
-
-
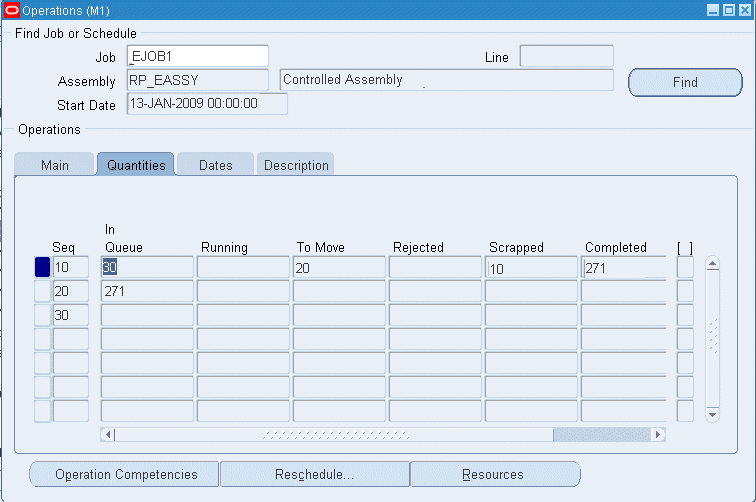
In the Quantities tabbed region, you can enter a value in the Progress % field.
These entries are used to calculate the percent complete for the entire job, based on a weighted average of scheduled hours. Oracle Project Manufacturing uses this value for project tasks, which can then be rolled up to the project level for earned value.
-
In the Dates tabbed region, you can manually schedule and reschedule a discrete job operation by changing dates. The job must have a status of Unreleased, Released, Complete, or On Hold.
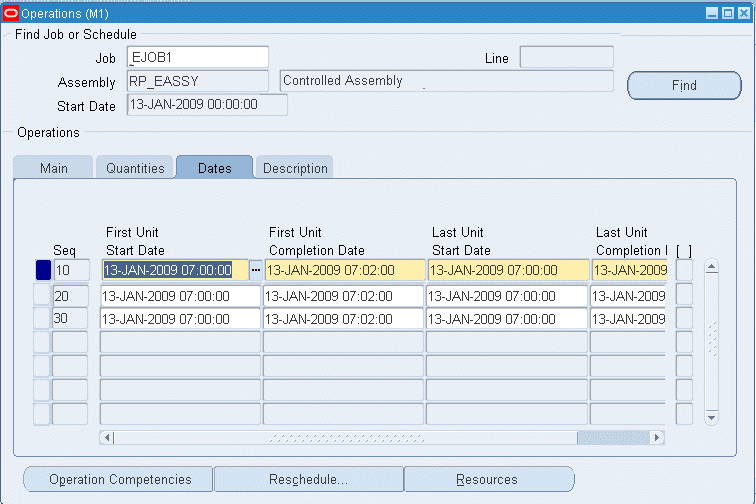
You can change the First Unit Start Date (FUSD), the First Unit Completion Date (FUCD), Last Unit Start Date (LUSD), and the Last Unit Completion Date (LUCD) to any date. Changing the dates of an operation does not affect the dates of the operations that precede or follow.
Note: If you change the LUCD of the last operation to a date that is greater than the job completion date, the job completion date is updated to the LUCD. If you change the FUSD of the first operation to a date earlier than the job start date, the job start date is updated to the FUSD.
-
In the Description tabbed region, enter the operationdescription.
If you add a standard operation, the system displays the description of that operation as the default.
-
Save your work.
-
Select the following to navigate to other windows:
-
Operation Competencies to enter competencies and skill levels required if using the labor skills validation feature in Manufacturing Execution System for Discrete Manufacturing move transactions. See: Creating a Standard Operation, Oracle Bills of Material User's Guide, and Creating a Routing, Oracle Bills of Material User's Guide
-
Reschedule to midpoint reschedule a discrete job, see: Midpoint Rescheduling
-
Resource to update operation resource requirements, see: Adding and Updating Resource Requirements
-
Related Topics
Overview of Routings and Operations
Overview of Routings, Oracle Bills of Material User's Guide
Creating a Routing, Oracle Bills of Material User's Guide
Deleting Operations
You can delete operations from jobs and repetitive schedules regardless of the status of the job or schedule. However, you cannot delete an operation if any of the following conditions exist:
-
assemblies have been completed for the operation
-
resources have been charged at the operation
-
pending move and resource transactions exist for the operation
-
quantities exist in any intraoperation step of the operation
-
purchase requisitions (either approved or unapproved) or purchase orders exist for outside processing resources assigned to the operation
You also cannot delete an operation from a repetitive schedule with a status of Released, Complete, or On Hold if there are other active schedules for the assembly on the line.
If you delete an operation, the system reassigns its material requirements to the first operation in the routing or to operation sequence 1 if there are no other operations in the routing.
Note: If you delete an operation from a job or repetitive schedule, you may want to reschedule the job or repetitive schedule to correctly reflect the start and completion dates.
To delete an operation
-
Select the Job or Line and Assembly.
-
If you select a line and assembly, choose the repetitive schedule by selecting the first unit start date of that schedule. If you have selected a discrete job, the system displays the scheduled start date of the job.
-
Choose the Find button to populate the Operations region.
-
In the Operations region, select which operation to delete by selecting its operation Sequence.
-
Choose Delete Record from the Edit Menu.
-
Save your work.
Midpoint Rescheduling
You can use midpoint rescheduling to reschedule around a bottleneck job operation. When you midpoint reschedule jobs, job start and completion dates and times are automatically updated. The start and completion dates of all other job operations, including operations you added that are not part of the original routing, are also updated. Material and resource requirement dates are also updated.
Prerequisites
- Define at least one discrete job. See: Defining Discrete Jobs Manually and Defining Repetitive Schedules Manually.
To midpoint reschedule operations
-
Select the discrete Job.
-
Choose the Find button to populate the Operations region with the job's operations.
-
Select the Operation.
You can choose any operation since any operation can be a bottleneck operation.
-
Choose the Reschedule button. The Reschedule window appears.
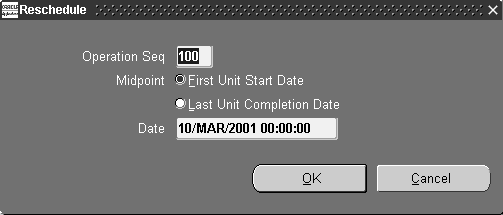
-
Choose either of the following options:
First Unit Start Date: Reschedules the operation from its first unit start date (FUSD) and time.
Last Unit Completion Date: Reschedules the operation from its last unit completion date (LUCD) and time.
-
Enter the reschedule Date and time.
The reschedule date and time becomes the new FUSD or LUCD and time of the operation. Operations that are before the operation being rescheduled are backward scheduled from this date and time. Operations that are after it are forward scheduled. Job start and completion dates and times as well as resource and material requirement dates and times are also updated.
-
Choose OK to save your work.
To manually reschedule a job or schedule operation
Related Topics
Viewing Operations
You can view operation information in a variety of ways. You can view all operations associated with a specific job or repetitive line and assembly. You can also view operations across jobs and schedules.
To find and view operations
-
Navigate to the View Operations window. The Find Operations window appears.
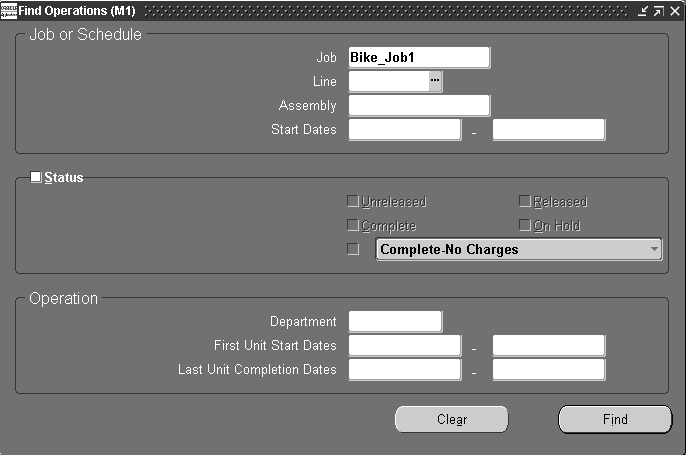
You can view operations for jobs and repetitive schedules that start on a specific date or within a range of start dates. You can view all operations for jobs and schedules of a specific status (Unreleased, Complete, Released, On Hold, Complete-No Charges). You can view all operations for a specific department. Lastly you can view all operations that have first unit start or last unit completion dates with specific dates or within a range of dates.
-
Enter any combination of search criteria and choose the Find button. The results display in the View Operations window.
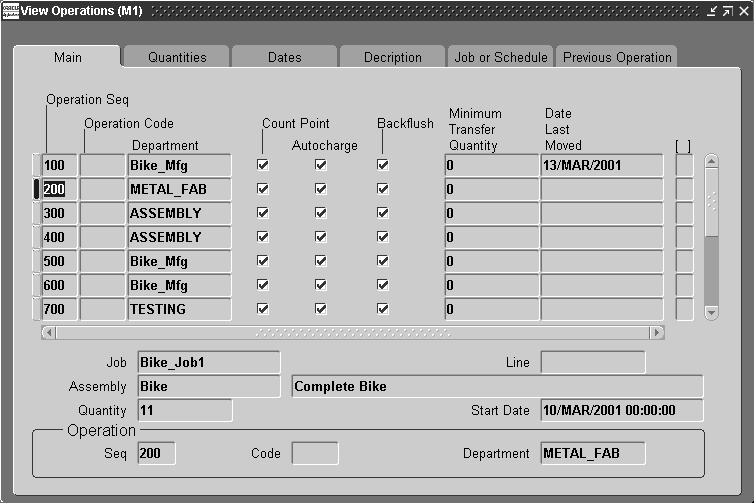
You can view the following information in the View Operations window's tabbed regions:
Main: Operation Sequence, Operation Code and Department; Count Point, Autocharge and Backflush flags; Minimum Transfer Quantity and Date Last Moved
Quantities: In Queue, Running, To Move, Completed, Rejected, Scrapped, Progress %, and for repetitive lines/assemblies the Quantity Ahead and the Days Ahead
Note: The Completed quantity is the sum of assemblies in the Scrap, Reject, and To Move intraoperation steps. Remaining quantity is the sum of assemblies in the Queue and Run intraoperation steps. You can view Scrap and Reject quantities using the Operations window. See: Adding and Updating Operations.
Dates: First Unit Start Date, First Unit Completion Date, Last Unit Start Date, and Last Unit Completion Date
Description: Description
Job or Schedule: Job, Line, Assembly, Start Date, and Status
Previous Operation: Sequence, Department, Last Unit Completion Date, and Quantities In Queue, Running, To Move, and Completed Quantities
You can also view, if entered, descriptive flexfield information. See: Setting Up Descriptive Flexfields.
Viewing Job and Schedule Operations
As you do the following, you can view operations and operation material and resource requirements for the current discrete job or repetitive schedule by choosing the Operations button:
To view the operations for the current job or schedule
-
After choosing the Operations button, the Operations window (in View Only Mode) appears. You can view the following information for each operation using the window's tabbed regions:
-
Main region: Count Point option, Autocharge option, Backflush option, Minimum Transfer Quantity, Date Last Moved
-
Quantities region: In Queue, Running, To Move, Rejected, Scrapped, Completed, and Progress %.
-
Dates region: First Unit Start Date, Last Unit Start Date, First Unit Completion Date, and Last Unit Completion Date
-
Description region: Description
Note: You can also view operations across jobs and schedules. See: Viewing Operations.
-
To view operation specific material requirements
-
From the Operations window, select an Operation sequence then choose the Components button.
The component materials, if any, required at the selected operation are displayed.
To view the operation resource requirements
-
From the Operations window, Choose the Resources button. The Resource Requirements window appears.
The resources, if any, required at the selected operation are displayed.
Move Transactions
You can move assemblies within an operation (for example, from Queue to Run) or from one operation to the next. You can move assemblies backward and forward within the routing.
Move Transactions Process Diagram

You can move the assemblies that you are building from one operation and/or intraoperation step to another using the Move Transactions window. See: Interoperation Moves You can move assemblies forward and backward within and between operations. Moving assemblies into the To Move, Reject, or Scrap intraoperation step of an operations completes those assemblies at that operation. When assemblies are completed at an operation, the system automatically backflushes Operation Pull components and charges resources. See: Operation Completion Moves
Processing for move, scrap, reject, move and complete, and return and move transactions enable the parent assembly record to process even if backflush records fail. In background processing for standard completion and return transactions, once the move completion manager picks up a record for processing, backflushing occurs in the same commit cycle. This prevents the possibility of processing transactions if backflushing fails.
Note: If Oracle Mobile Supply Chain Applications is installed, the Mobile Manufacturing component enables you to perform all work in process move transactions using a mobile client device networked with a computer system. See: Assembly Transactions, Oracle Mobile Supply Chain Applications User's Guide.
Assembly Move Completion and Move Return Transactions
If function security permits, you can complete assemblies from any routing operation into inventory or return completed assemblies from inventory to any routing operation from the Move Transactions window. See: Security Functions and Assembly Move Completion and Move Return Transactions.
Resource Charges
Move transactions that complete assemblies at autocharge operations, automatically charge resources and overhead at that operation. If assemblies are completed at an operation, and Manual resources are assigned to that operation, the system notifies you that these resources exist. To charge these resources, use the Resources button to access the Resource Transactions window. See: Charging Resources with Move Transactions
Assembly Scrap
You can also scrap defective assemblies by moving them into a scrap intraoperation step. If you enter scrap account number or scrap account alias when you scrap assemblies, the cost of the scrapped assemblies is removed from the job or repetitive schedule. If you do not enter a scrap account or select an alias, the cost of the scrap remains in the job or schedule until job or period close. See: Scrapping Assemblies.
Outside Processing Resource Charges
When you move assemblies into the Queue intraoperation step of an operation that has either PO Move or PO Receipt resources assigned to it (or when the job is released, depending on your setup), the system automatically creates a purchase requisition in Oracle Purchasing. When you receive assemblies back from an outside processing supplier in Oracle Purchasing, PO Receipt or PO Move resources are automatically charged at the standard or the actual rate. Purchase requisitions are also automatically created when you release a job or repetitive schedule if there are PO Move or PO Receipt resources at the first operation. See: Overview of Outside Processing.
Ad Hoc Operations
You can also add 'ad hoc' operations to discrete job using the Move Transactions window. However, you can only add operations if the Allow Creation of New Operations parameter is set and the TP:WIP:Move Transactions profile option is set to on-line processing. See: Move Transaction Parameters and Profile Option Summary.
Shop Floor Statuses
You can view shop floor statuses when performing move transactions. Statuses are removed from intraoperation steps when the quantities at those operations drop to zero.
Related Topics
Interoperation Moves
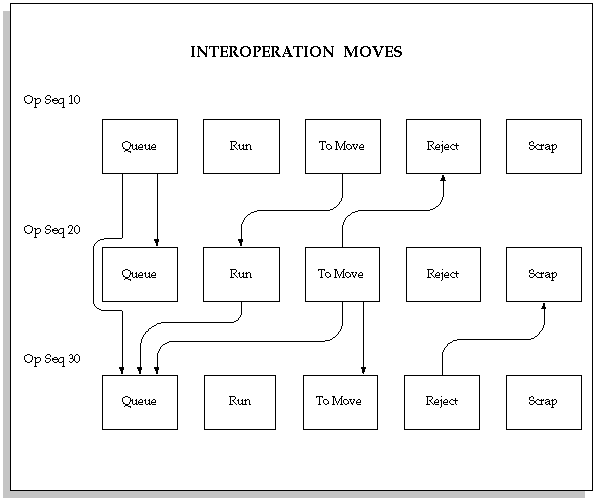
When you move assemblies from one operation to another you are performing an interoperation move. You can move assemblies from any enabled intraoperation step to another. For example, you can move assemblies from operation sequence 20 to operation sequence 30, or from operation sequence 50 back to operation sequence 30.
Normally, moves follow the forward sequence defined by the routing. You can, however, move assemblies from any operation to any other - even preceding operations. For example, if you intend to move 5 assemblies from operation 10 to 20, but you mistakenly 10, you can correct your mistake by moving 5 assemblies back from operation 20 to 10. The system automatically reverses resource and overhead charges, and component backflushes when you move assemblies backward in the routing.
You can add operations using the Operations window. You can also use the Move Transactions window to add 'ad hoc' operations to discrete jobs. However, you can only add operations as you move discrete assemblies if the WIP Allow Creation of New Operations parameter is set and the TP:WIP:Move Transactions profile option is set to on-ine processing.
You can move assemblies to outside supplier operations. You receive these assemblies back using either the Enter Receipts window in Oracle Purchasing or the Move Transactions in Work in Process window.
The following figure illustrates the flow of interoperation move transactions:
Related Topics
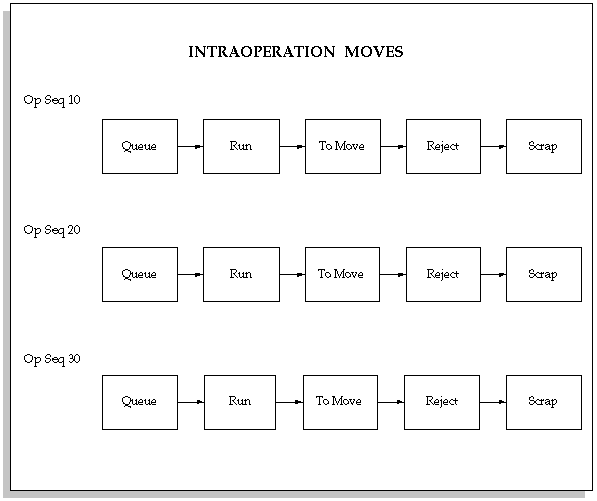
Intraoperation Moves
When you move assemblies from one intraoperation step of an operation to another intraoperation step of the same operation you are performing an intraoperation move. You can move assemblies from any enabled intraoperation step - Queue, Run, To move, Reject, or Scrap - as required. Intraoperation steps are enabled using the WIP Enabled Intraoperation Steps parameter.
The follow figure illustrates the flow of intraoperation move transactions:
Related Topics
Entering Receipt Header Information, Oracle Purchasing User's Guide
Operation Completion Moves
You can complete assemblies at operations by:
-
Moving assemblies from the Queue or Run intraoperation step of an operation to the To Move, Scrap or Reject intraoperation steps of the same operation
-
Moving assemblies from the Queue or Run intraoperation steps of an operation to the To Move, Scrap or Reject intraoperation steps of a subsequent operation
Assemblies are not completed at Operations by:
-
Moving assemblies between the To Move, Scrap, and Reject intraoperation steps of the same operation
-
Moving assemblies from the To Move, Scrap, or Reject intraoperation steps of the one operation to the Queue or Run intraoperation step of a subsequent operation
You can complete any number of assemblies from any operation in a routing. For example if you have 49 assemblies at operation 10, and 51 at operation 20 you can complete the assemblies at operation 10 before completing those at operation 20 and vice versa. You also can over-complete assemblies
You also can over-complete assembly quantities if they are within the defined tolerance limit, if you have selected the Overcompletion check box on the Move Transaction window, which enables this functionality. See: Assembly Over-completions.
If there are WIP Move resources at an operation that is being completed, the system automatically charges these resources at their standard rate. If there are Operation Pull components at this operation, these components are automatically pulled from inventory. If there are Manual resources at the operation that is being completed, the system notifies you that Manual resources exist at the operation so that you can manually charge them. If you perform a move transaction that reverses an operation completion, the system automatically reverses any associated material and resource charges. See: Resource Charge Types.
Related Topics
Operation Pull Backflush Transactions
Move Completion/Return Transactions
If the WIP_WIPTXSFM_NO_CMP (Move Transactions: No Completion Transactions) form function parameter is set to allow completions, you can use the Move Transactions window to simultaneously move and complete assemblies from and return and move assemblies to discrete jobs and repetitive schedules. See: Form Function Parameters.
Assembly move completions automatically issue components with a supply type of Assembly Pull to the job or repetitive schedule, reduce the number of assemblies in the To move intraoperation step of the last operation of the job or repetitive schedule routing, and increase the quantity completed on the job or repetitive schedule
Assembly move returns move the assemblies first to the To Move intraoperation step of the last operation then to the operation sequence and step that you specify.
Over-completions
If the Allow Overcompletions form function is included on your menu, you can move, but not return, more assemblies than exist at an operation. This allows you to over-complete more assemblies than are specified for the job or repetitive schedule.
The assemblies that are over-completed are moved through each of the job or schedule operations. This ensures that Operation and Assembly Pull components are backflushed and resources are properly charged. Push components associated with the assembly's routing must, however, be manually issued using the WIP Material Transactions window.
Completions into License Plate Numbers
If Oracle Warehouse Management is installed, you can perform assembly completions and work order-less completions into license plate numbers. License plate numbers identifiers for tracking the contents of containers in receiving, work in process, inventory, shipping, and in-transit. Information for each container can be tracked both inbound and outbound. The container's genealogy provides content and transaction history for each license plate. See: Explaining License Plate Management, Oracle Warehouse Management User's Guide
Note: For work order-less return transactions, you must first unpack the LPN before performing the assembly return transaction.
Kanban Replenishment
The supply status of a production kanban is updated to Full when the first assembly from replenishment job or repetitive schedule is move completed.
Related Topics
Work in Process Security Functions
Assembly Pull Backflush Transactions
Performing Move Completion and Move Return Transactions
Completing and Returning Assemblies
Kanban Planning and Execution, Flow Manufacturing User's Guide
Pull Sequence Window, Flow Manufacturing User's Guide
Accessing the Planning Region, Flow Manufacturing User's Guide
Accessing the Production Region, Flow Manufacturing User's Guide
Production Line Moves
You can track the production of repetitive assemblies by production line. When you move assemblies being built on a production line, the system groups all transactable repetitive schedules for that assembly on that line. In other words, you can move assemblies and charge resources across multiple schedules.
The system automatically allocates move and resource transaction quantities to schedules on a first in-first out basis. For example, if you have 2 released schedules for 100 assemblies each and you move 150 assemblies, the system automatically allocates 100 to the earliest schedule and 50 to the next. When you move repetitive assemblies backward, for example from operation 40 to 30, move quantities are allocated to the last schedule on a last in-first out basis.
Open Move Transaction Interface
You can load move transaction information into the Open Move Transaction Interface table from external sources such as bar code readers, factory floor machines such as cell controllers, and other manufacturing execution and quality control systems. The move transaction manager, launched in Oracle Inventory, processes and validates this information to ensure accuracy and compatibility with Oracle Applications information.
Note: Move transaction records are automatically inserted into the Open Move transaction Interface when receipts that involve PO Move resources are entered in Oracle Purchasing. If the Move Transaction Manager has not been launched, these records are not processed.
Move transaction information that fails validation or processing is marked. You can use the Pending Move Transactions windows to view, update, and resubmit this information. If associated WIP Move resource transactions fail, they can be viewed, updated, and resubmitted using the Pending Resource Transactions window.
Note: If you are completing an assembly quantity that is greater than the job start quantity (over-completing quantities), you must explicitly specify the over-completion transaction quantities when you use the Open Move Transaction Interface, as they will not be derived by Work in Process.
Related Topics
Processing Pending Move Transactions
Transaction Managers, Oracle Inventory User's Guide
Launching Transaction Managers, Oracle Inventory User's Guide
Open Move Transaction Interface, Oracle Integration Repository at http://irep.oracle.com
Move Transaction Options
Move transactions can be launched from the following windows:
-
Move Transactions. See: Performing Move Transactions and Performing Move Completion and Move Return Transactions.
-
Receipt Transactions. See: Entering Receipt Header Information, Oracle Purchasing User's Guide.
Move transactions can also be imported through the Open Move Transaction Interface. See: Open Move Transactions Interface.
Related Topics
Move Transaction Types
When you enter move transactions in the Move Transactions window you must choose one of the following transaction types:
You can specify which move transaction type is used as the default transaction type in the Move Transactions window using the TP:WIP:Move Transactions profile option. See: Profile Options.
Note: You cannot complete or return lot controlled assemblies with move complete and move return transactions. You also cannot complete or return serial number controlled assemblies unless the Oracle Inventory Serial Generation attribute for the assembly is set to Dynamic entry at sales order issue.
Related Topics
Assembly Completions and Returns
Performing Move Transactions
You can perform move transactions for discrete jobs and repetitive schedules with routings. You can also perform move transaction for non-standard discrete jobs that have assemblies and routing references. See: Move Transactions.
Prerequisites
- Release a discrete job or repetitive schedule with a routing or routing reference. See: Releasing Discrete Jobs and Releasing Repetitive Schedules.
- Confirm that the From intraoperation step has a shop floor status that allows you to move assemblies from one intraoperation step to another. See: Assigning and Viewing Shop Floor Statuses.
To select a sales order, line/assembly or job to transact
-
Navigate to the Move Transactions window.
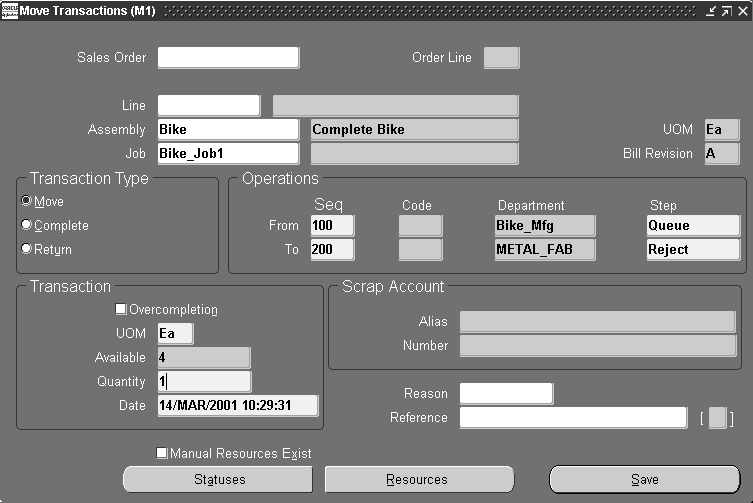
-
Select a Sales Order, repetitive Line and Assembly, Assembly, or Job. The cursor defaults to one of these fields based on how you have the TP:WIP:Move Transaction First Field profile option set.
You can only select a discrete job or a repetitive line and assembly for a repetitive schedule if the job or schedule has a status of Released or Complete.
To perform an interoperation or intraoperation move
-
Select the Move Transaction Type. See: Move Transaction Types.
-
Select the From operation Sequence number.
This is the operation sequence number from which you want to move assemblies.
-
Select the From operation Step.
This is the intraoperation step from which you want to move assemblies. You must enter a value in this field if you entered a value in the From Op Seq field. You can move assemblies only from intraoperation steps that contain assemblies. See: Intraoperation Steps.
You can enable or disable intraoperation steps using the Interoperation Steps parameter. See: Interoperation Steps Parameter.
You cannot move assemblies from an intraoperation step if it has been assigned a shop floor status that prevents moves. You can optionally prevent moves from an operation and intraoperation step to an operation and intraoperation step if a No Move intraoperation step exists between the two. This is done using the Allow Moves Over No Move Shop Floor Statuses parameter. See: Move Transaction Parameters.
Note: You can view statuses by choosing the Statuses button.
-
Select the To operation Sequence number.
The system defaults in the next count point operation as the To operation sequence. For example, suppose you have three operations at sequences 10, 20, and 30 defined as count point, non-count point, and count point respectively. When you select operation 10 as the From operation, the system automatically defaults operation 30, the next count point operation, as the To operation. You can override this default and choose operation 20, if required.
If you move assemblies between operations (interoperation), the To operation sequence must be the different from the From operation sequence. You can select any operation on the routing including preceding operations.
If you move assemblies within an operation (intraoperation), the To operation sequence must be the same as the From operation sequence. For example, you can move assemblies from the Queue to Reject intraoperation step of the same operation.
-
Select the To operation Step. This can be any operation step in any operation sequence.
If you are entering an interoperation move, the To Operation step can be any intraoperation step in an operation before or after the current operation step.
If you are entering an intraoperation move, the To Operation step can be any intraoperation step before or after the current intraoperation step.
Moves into the To Move, Scrap, or Reject intraoperation steps of an operation, whether transacted as intraoperation or interoperation moves, complete assemblies at that operation.
-
Select the UOM. See: Overview of Units of Measure, Oracle Inventory User's Guide.
You can use any valid, alternate unit of measure for the assembly you are moving.
-
If you selected Move as the transaction type, the Overcompletion check box is enabled. Select the check box to specify over-completion.
Note: You must select the check box before you enter the over-completion quantity. The transaction quantity must be greater than the quantity at the From operation or the available quantity, and it must be within tolerance levels.
The Overcompletion check box is disabled if you are performing a return transaction or a reverse move transaction, for example moving assembles from operation 30 to 20 or from the To Move intraoperation step to the Queue intraoperation step. It is also disabled if the From interoperation step is Scrap or Reject.
-
Enter the transaction Quantity.
The transaction quantity defaults to either the minimum transfer quantity, the available quantity, or not at all depending on how the TP:Move Transaction Default Quantity profile option is set. See: Profile Option Descriptions.
If you enter a quantity that is less than the minimum transfer quantity, a warning is displayed but you are allowed to continue. If you selected an alternate unit of measure for the assemblies, you must enter the transaction quantity in the alternate unit of measure.
If you have the TP:WIP:Move Transaction profile option set to Online processing, you cannot move more assemblies than exist in an operation step. If this option is set to Background processing, however, you can move any number of assemblies, but the quantity is validated in the background. You can correct any errors using the Pending Move Transactions window. See: Processing Pending Move Transactions.
If you have more than one repetitive schedule released for a specified assembly, the system displays the aggregate quantity of these schedules and allocates quantities across schedules using a FIFO (first in-first out) algorithm. Thus transactions against the oldest repetitive schedules are processed first.
-
Enter the transaction Date and time.
The date and time must fall within an open accounting period and cannot be greater than the current date and time or less than the release date of the job or the release date of the earliest valid repetitive schedule. Valid repetitive schedules have statuses of Released or Complete.
-
Optionally, select the Reason code. See: Defining Transaction Reasons, Oracle Inventory User's Guide.
-
Optionally, enter the transaction Reference.
References can be used to identify transactions on standard reports. They can be up to 240 characters of alpha numeric text.
-
If Oracle Quality is installed and one or more qualified mandatory collection plans exist, Oracle Quality is invoked and the Find Collection Plans window appears. If no mandatory collection plans are found you can optionally invoke Oracle Quality by choosing the Quality button from the toolbar or the Enter Quality Results option from the Tools menu. See: Entering Quality Results for Move Transactions, Oracle Quality User's Guide.
-
Choose the Transact button.
To scrap assemblies
-
See: Scrapping Assemblies.
To add an operation and move assemblies into this operation
-
Enter a From operation Sequence number.
-
Enter a From operation Step.
-
Enter a To operation Sequence number for the new operation.
-
Enter an operation Code or Department for the new operation sequence.
-
Enter a To operation Step for the new operation.
-
Follow steps 6 through 11 above.
To backflush pull components
To charge manual resources
-
Choose the Resources button. See: Charging Resources with Move Transactions.
To view shop floor statuses
-
Choose the Statuses button. See: Assigning and Viewing Shop Floor Statuses.
Related Topics
Operation Completion Move Transactions
Performing Move Completion and Move Return Transactions
Overview of Resource Management
Operation Pull Backflush Transactions
Operation pull backflush transactions automatically pull inventory for all Operation Pull components defined at the operation. They also pulls components for all non-backflush operations between the current operation and the last completed backflush operation. Whether the backflush occurs automatically during a move transaction is determined by the whether the operation is or is not defined as a backflush operation. See: Operations, Oracle Bills of Material User's Guide. and Creating a Standard Operation, Oracle Bills of Material User's Guide.
Backflush Operations
You cannot backflush at operations that are specified as non-backflush operations. If you assign Operation Pull components to non-backflush operations these components are backflushed at a backflushing operation later in the routing. The last operation in the routing should always be defined as a backflush operation to ensure that all Operation Pull components are backflushed by the end of the routing.
Count Point and Autocharge Operations
When you define operations in Oracle Bills of Material, you can specify whether an operation is a count point and whether resources at that operation should be automatically charged during a move transaction. You can update this information in Work in Process using the Operations window. Operations that are non-count point/autocharge operations must be defined as backflush operations. See: Count Point and Autocharge Fields, Oracle Bills of Material User's Guide.
Negative Requirements Backflushes
When Operation Pull components that have negative requirement quantities are backflushed, they are returned to instead of supplied from inventory.
Related Topics
Lot and Serial Number Backflushing
Operation Completion Transactions
Backflushing Pull Components
As you perform move and completion transactions, the system automatically backflushes pull components not under lot, serial number, or lot and serial. Reversing these transactions returns backflushed components back to their subinventories. See: Backflush Transactions
Pull components under lot control can also be automatically backflushed if the Work in Process parameter Lot Selection Method is set to one of the automatic methods, and there is sufficient inventory. Components under serial number or lot and serial control require manual entry of the applicable lot and serial numbers. See: Lot and Serial Number Backflushing.
Operation and Assembly Pull components are not automatically backflushed when you complete assemblies at an operation or complete job or schedule assemblies into inventory if:
-
The operation that assemblies are being completed at is not a backflush operation
-
The components are under serial number or lot and serial number control
-
The Work in Process parameter Lot Selection Method is set to Manual
-
There is insufficient inventory in the supply subinventory
Note: Backflush transactions that do not complete because there is insufficient inventory can be resubmitted using the Pending Transactions window in Oracle Inventory. See: Viewing Pending Transactions, Oracle Inventory User's Guide.
Pull components that are not backflushed can be manually issued using the WIP Material Transactions window. See: Issuing and Returning Specific Components.
Prerequisites
- If you want the ability to over or under issue pull components for assembly moves, completions, and mobile work order-less completions—enable the Allow Quantity Changes During Backflush, in the Work in Process Parameters window. This gives you the ability to make changes to the quantity for components requiring lot and serial number entry. See: Material Parameters
- To default lot numbers when there are multiple backflush transactions for the same component on the same job—set the Lot Selection Method parameter to Transaction History, and choose a value in the Alternate Lot Selection Method parameter. This enables you to retain lot numbers used in the previous transaction.
To backflush or return backflushed components under lot, serial, or lot and serial control
-
Perform a move, scrap, reject, or assembly completion to display the Backflush window.
The Backflush window automatically appears only if you are backflushing lot or serial controlled pull components.
In the Item field, records requiring additional information for lot or serial number are highlighted in the color red. If an item needs serial number information, the Lot/Serial button is enabled as Serial. If an item needs lot number information, the button is enabled as Lot.
This window displays item information such as Description, Available, On-hand, Operation Sequence, Department, and Transaction type. There are also fields displaying information if the item is using dual unit measure control:
-
Secondary Available—the quantity available to issue in the secondary unit of measure
-
Secondary On Hand—the current on hand quantity in the secondary unit of measure
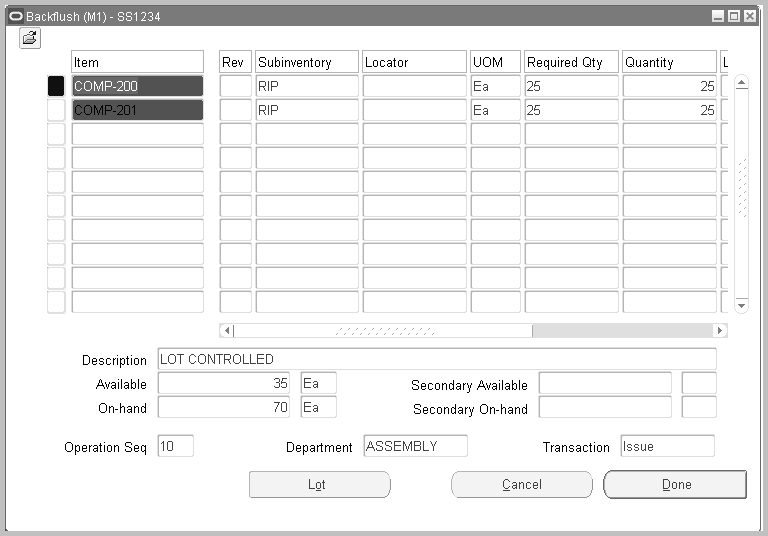
-
-
You have the option to select another Subinventory and, if required, the supply Locator. See: Supply Subinventory and Locator Fields, Oracle Bills of Material User's Guide
-
You have the option to select another unit of measure in the UOM field.
You can use any valid, alternate unit of measure for the component you are backflushing. See: Overview of Units of Measure, Oracle Inventory User's Guide.
-
In the Quantity field, the default is the required quantity. If you have enabled the Allow Quantity Changes During Backflush parameter—you can change the quantity. Otherwise, you must transact the Quantity Required value..
If you are transacting components in their primary unit of measure under lot control and the required quantity is a non-integer, you can only transact up to the largest integer. If you enter an alternate unit of measure for the assemblies, you must enter the transaction quantity in the alternate unit of measure.
-
For lot controlled items, select a value in the Lot field.
For items under lot and serial control, the Lot/Serial button is enabled to select lot ad serial number values.
If the Lot Selection Method parameter is set to Transaction History, you can default lot numbers from previous transactions for the same component on the same job.
-
Optionally, select the Reason code. See: Defining Transaction Reasons, Oracle Inventory User's Guide.
-
Optionally, enter the transaction Reference.
References can be used to identify transactions on standard reports. They can be up to 240 characters of alpha numeric text.
-
Choose the Lot/Serial button to assign lot and serial numbers.
If the item is under lot and serial control, the button is first enabled as Lot to access the Lot Entry window. After the lot information is entered, the button is then enabled as Serial to access the Serial Entry window. See: Assigning Lot Numbers, Oracle Inventory User's Guide and Assigning Serial Numbers, Oracle Inventory User's Guide.
-
Choose Done to save your work.
Related Topics
Overview of Backflush Transactions
Performing Move Completion and Move Return Transactions
Move Completion/Return Rules
The following rules are enforced when performing assembly move completion and move return transactions:
-
In background processing for standard completion and return transactions, once the move completion manager picks up a record for processing, backflushing occurs in the same commit cycle. This prevents the possibility of processing transactions if backflushing fails.
-
Discrete jobs and repetitive schedules require routings. A non-standard discrete job requires an assembly and routing reference.
-
Default completion subinventories and locators, if required by the subinventory, are specified for the following:
-
Standard discrete jobs
-
Repetitive line/assemblies that are used to build repetitive schedules
-
Non-standard discrete jobs with routing references
-
-
Assemblies under lot control can be completed from and returned to discrete jobs only if you have specified a lot number for the job. The item's Serial Generation attribute in Oracle Inventory is set to dynamic entry -At sales order issue. Assemblies under lot control cannot be completed from or returned to repetitive schedules. See: Defining Discrete Jobs Manually
-
Assemblies cannot be completed from or returned to a discrete job or repetitive schedule if the To Move intraoperation step of the last operation on the routing has a shop floor status that disallows move transactions
-
When a job or schedule with outside processing operations is changed to complete, closed, or canceled status - an informational warning message displays if open purchase orders or requisitions exist for any of the operations.
-
If open reservations exist—unlink the sales order reserved to the assembly, or reduce the quantity to equal the completed quantity— before changing a job or schedule status to completed, closed, or canceled.
-
You cannot return more assemblies to jobs or schedules than exist in inventory unless the Oracle Inventory Allow Negative Balances parameter is set. See: Default Inventory Parameters, Oracle Inventory User's Guide.
Performing Move Completion/Return Transactions
You can complete assemblies into inventory from jobs and schedules using move completion transactions. You can also return completed assemblies back to jobs or repetitive schedules using move return transactions.
Note: Function security controls whether assembly move completion and move return transactions are allowed. You can also control whether the Move Transaction Type defaults to Complete using the WIP:Move Completion Default. See: Profile Options and Work in Process Security Functions.
Prerequisites
- Release a job or repetitive schedule. See: Releasing Discrete Jobs and Releasing Repetitive Schedule.
- Confirm that the From intraoperation step has a shop floor status that allows you to move assemblies from one intraoperation step to another. See: Assigning and Viewing Shop Floor Statuses.
To select a job, repetitive schedule, or sales order
-
Navigate to the Move Transactions window.
-
Select a Sales Order, repetitive Line and Assembly, Assembly, or Job. The cursor defaults to one of these fields based on how you have the TP:WIP:Move Transaction First Field profile option set. See: Profile Option Descriptions
You can only select a discrete job or a repetitive line and assembly for a repetitive schedule if the job or schedule has a status of Released orComplete.
You can reserve over-completion quantities from jobs linked to sales orders. Enter the sales order number, otherwise the over-completion is unreserved excess inventory. See: Linking Sales Orders and Discrete Jobs.
To move and complete assemblies or return and move assemblies
-
Choose the Complete or Return Transaction Type. See: Move Transaction Types
If you are completing assemblies, information from the last operation of the job or schedule is automatically defaulted into the operation To fields - Sequence, Code, and Department - and the To Move intraoperation step is defaulted for the To Step.
If you are returning assemblies, information from the last operation of the job or schedule is automatically defaulted into the operation From fields - Sequence, Code, and Department - and the To Move intraoperation step is defaulted for the From Step.
-
If you are completing assemblies, select the complete From operation Sequence and intraoperation Step.
-
Select the UOM. See: Overview of Units of Measure, Oracle Inventory User's Guide.
You can use any valid, alternate unit of measure for the assembly you are moving.
-
Enter the transaction Quantity.
If you are completing assemblies, you can complete a greater quantity than the job or schedule start quantity, subject to the tolerance level set. For example, if you have 49 assemblies at operation 10, and 51 at operation 20 you can complete the assemblies at operation 10 before completing those at operation 20.
If you are returning assemblies, you can return fewer but not more assemblies than the number of assemblies that have been completed from a standard Discrete job. You can return more assemblies than completed to non-standard Discrete jobs and to Repetitive schedules. You cannot return more assemblies than are in inventory unless the Allow Negative Balances parameter is set in Oracle Inventory. See: Organization Parameters Window, Oracle Inventory User's Guide.
If you enter a quantity that is less than the minimum transfer quantity for the operation, a warning is displayed but you are allowed to continue.
If you selected an alternate unit of measure, you must enter the quantity in the alternate unit of measure.
-
Enter the transaction Date and time.
The date and time must fall within an open accounting period and cannot be greater than the current date or less than the release date of the job or the earliest valid repetitive schedule.
-
Optionally, select the Reason code. See: Defining Transaction Reasons, Oracle Inventory User's Guide.
-
Optionally, enter the transaction Reference.
References can be used to identify transactions on standard reports. They can be up to 240 characters of alpha numeric text.
-
Choose Save to save your work.
To backflush pull components
Related Topics
Assembly Move Completion Transactions
Overview of Resource Management
Viewing Move Transactions
You can view move transactions for an individual job or repetitive schedule (line/assembly). You can also view move transactions across jobs and schedules.
To find and view move transactions
-
Navigate to the View Move Transactions window. The Find Move Transactions window appears.
You can query to find move transactions by Transaction Date or date range, by Job, by production Line, by Assembly, by a range of Departments, and by a range of Steps. For example, you might query to find all move transactions that scrapped assemblies (To Step = Scrap).
-
Enter any combination of search criteria and choose the Find button. The results display in the View Move Transactions window.
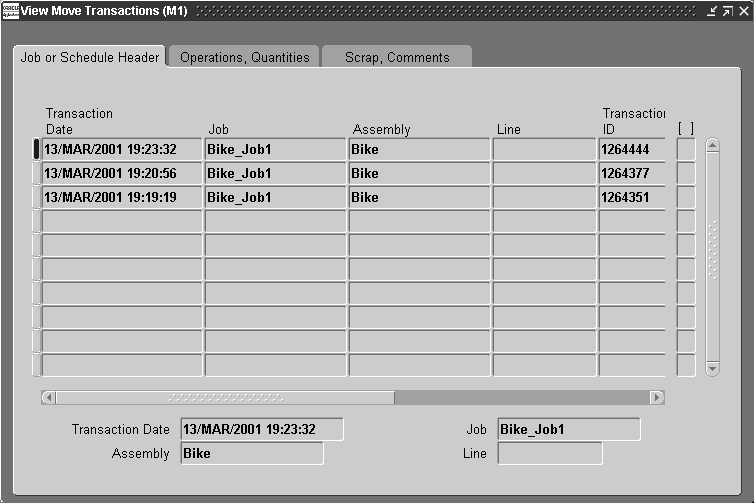
You can view the following move transaction information in the Move Transaction window's tabbed regions:
Job or Schedule Header: Transaction Date, Job, Assembly, production Line, Transaction ID
Operations, Quantities: From Operation (Sequence, Department Step), To Operation (Sequence, Department, Step), Transaction (UOM, Quantity), Primary (UOM, Quantity), and Overcompletion (Transaction Quantity, Primary Quantity)
Scrap, Comments: Scrap Account, Reason, Reference
You can also view, if entered, descriptive flexfield information. See: Setting Up Descriptive Flexfields.
Related Topics
Searching for Information, Oracle E-Business Suite User's Guide
Processing Pending Move Transactions
You can view, update, delete, and resubmit Move transaction records that have failed validation and remain in the Open Move Transaction Interface table (WIP_MOVE_TNX_INTERFACE). You can also resubmit transactions whose concurrent process has failed and have a processing phase of Complete and process status of Error. You can view error messages associated with failed records. Error messages can assist you in updating failed records before resubmission.
Prerequisites
- Launch the Move Transaction Manager. See: Transaction Managers, Oracle Inventory User's Guide and Launching Transaction Managers, Oracle Inventory User's Guide.
To view pending Move transaction records
-
Navigate to the Pending Move Transactions window. The Find Pending Move Transactions window appears.
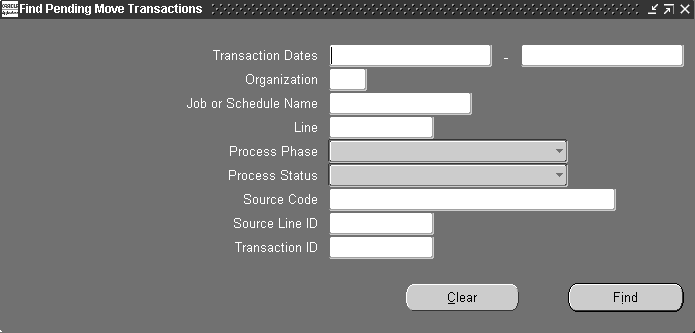
You can search for records by Transaction Date range, by Organization, by Job or Schedule Name, and production Line. You can also search for records that have a specific Process Phase (Move validation, Move processing, or Backflush setup, Process Status (Pending, Running, or Error), Source Code, Source Line ID, or Transaction ID.
-
Enter any combination of search criteria and choose the Find button. The Pending Move Transactions window appears with the results of your query.
To view pending Move transaction records
-
For each pending record displayed, you can view the following information using the Pending Move Transactions window's tabbed regions:

Processing: Group ID, processing Phase, processing Status
Source: Source Code, Source Line (if applicable), Created By
Concurrent Request: Request ID, Phase, Status, Message
Job or Schedule Name: Organization, Job or Schedule Name, Line
Operations: From Operation Sequence, Department, and Step and To Operation Sequence, Department, and Step
Transaction: Transaction ID, UOM, Quantity, Overcompletion Quantity, Date and Time, Type
Comments and Scrap Account: Reason, Reference, and Scrap Account
You can also view the descriptive flexfield information entered for the transaction record. See: Setting Up Descriptive Flexfields.
To view error details for failed Move transactions
-
In the Pending Move Transactions window, select the failed record.
-
Choose the Errors button. The Pending Move Transactions Error window appears.
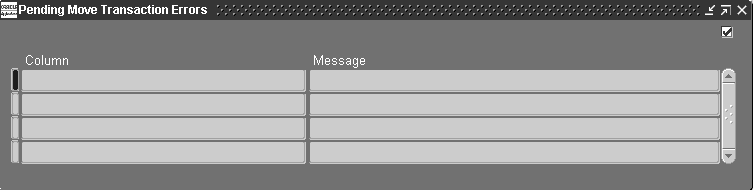
All errors for the selected record are displayed. Column indicates the name of the column in the Move interface table that failed validation. Message indicates why the transaction failed. Using these messages you can determine what fields need to be updated.
Messages that are not specific to a Column, for example processing errors, may also be displayed. In such cases, a Message but no Column is shown.
To update failed Move transaction records
-
Select the record to update.
You can update records with a processing status of Error.
-
In the Source tabbed region, enter the Source Code, the Source Line, or both.
When you insert records into the Open Move Transaction Interface table, you can optionally identity a record's source using the source code and source line. For example, you can enter a different source code and source line for records from a bar code reader versus those from a radio frequency device.
-
Select the Created By identifier.
The name of the user that created the transaction is displayed. This field can be updated.
-
In the Job or Schedule Name tabbed region, select the Organization.
You can only select enabled organizations. See: Creating an Organization, Oracle Human Resources User's Guide.
-
Select the Job or Schedule Name.
If you select a schedule name, you must enter a production line. If you select a Discrete job, and the line field contains a value the system prompts you to delete the line value.
-
In the Operations tabbed regions, select the From Operation Sequence.
You can enter any operation defined for your job or schedule.
-
Select the From Operation Step.
You can update this field with any intraoperation step currently enabled for your organization. See: Intraoperation Steps.
-
Select the To Operation Sequence. You can enter any operation sequence that has a valid department for your organization and job or Repetitive schedule.
-
Select the To Operation Step.
You can select any operation step that is enabled for your organization. If you select the Scrap intraoperation step and the WIP Require Scrap Account parameter is set, you must enter a scrap account. If you update the To Operation step from Scrap to another, non-scrap step and the scrap account field has a value, you must clear the scrap account field.
-
Select the Move transaction Type: Move transaction, Move and Complete, Return and Move. See: Move Transaction Types
-
In the Transaction tabbed region, select the UOM.
You can use any valid, alternate UOM for the assembly you are moving. See: Overview of Units of Measure, Oracle Inventory User's Guide.
-
Enter the transaction Quantity.
If you enter an alternate unit of measure for the assemblies, you must enter the quantity in the alternate unit of measure. You can update this field with any number.
-
If you are over-completing an assembly quantity, the over-completion quantity is displayed in the field. You can manually change it.
-
Enter the transaction Date and time.
The date and time must fall within an open accounting period and cannot be greater than the current date or less than the release date of the job or the earliest valid Repetitive schedule.
-
In the Comments and Scrap Account tabbed region, select a transaction Reason code. See: Defining Transaction Reasons, Oracle Inventory User's Guide.
-
Enter the transaction Reference.
References can be used to identify transactions on standard reports. They can be up to 240 characters of alpha numeric text.
-
If the To intraoperation step is Scrap and the WIP Require Scrap Account parameter is set, you must enter a scrap account Number or an account Alias. If you do not specify that a scrap account is required, it is optional. See: Move Transaction Parameters and Defining Account Aliases, Oracle Inventory User's Guide.
If you subsequently change the To intraoperation step from Scrap to an intraoperation step other than Scrap, you must clear the Scrap Account number or Account Alias.
-
Save your work.
To resubmit individual failed Move transaction records
-
In the Pending Move Transactions window, check the transaction's Resubmit check box.
You can resubmit transactions of any processing status. If you leave the check box unchecked you can still update your transaction record but the transaction manager does not process it again when polling the Move interface table.
-
Save your work to resubmit the transaction.
When you resubmit a record, the system nulls the Transaction ID, Group ID, and concurrent Request ID and changes the processing status to Pending. The resubmit level of the Move Transaction Manager determines at what specific start date and time or at what specific intervals transactions are processed.
To select and resubmit all failed Move transaction records
-
In the Pending Move Transactions window, chose Select All for Resubmit from the Tools menu. .
You can deselect selected transactions as required.
-
Save your work to resubmit the transactions.
When you resubmit transactions, the system nulls their Transaction IDs, Group IDs, and concurrent Request IDs and changes their processing Statuses to Pending. The resubmit level of the Move Transaction Manager determines at what specific start date and time or at what specific intervals transactions are processed.
To delete pending Move transaction records
-
In the Pending Move Transactions window, select the transaction.
-
Choose Delete from the Edit Menu
You can delete failed records that have a processing status of Error regardless of their processing phase. When you delete transaction records, their corresponding error messages are also deleted.
Related Topics
Open Move Transaction Interface
Performing Move Completion Transactions
Finding Pending Move Transactions
You can find pending move transactions for jobs or schedules or repetitive lines and assemblies.
You can find pending move transactions by a range of Transaction Dates, Organization, Job or Schedule Name, production Line, Process Phase (Move validation, Move processing, or Backflush setup), Process Status (Pending, Running, or Error), Source Code, Source Line ID, and Transaction ID. You can limit or expand your selection by combining selection criteria.
To find pending move transactions
-
Navigate to the Pending Move Transactions window. The Find Pending Move Transactions window appears.
-
Enter any combination of search criteria and choose the Find button. The Pending Move Transactions window appears with the results of your query.
Related Topics
Processing Pending Move Transactions
Shop Floor Statuses
Shop floor statuses help you control assembly move transactions on the shop floor. You can define as many shop floor statuses as are required.
You can restrict moves transactions by assigning `no move' shop floor statuses to intraoperation steps within job and repetitive schedule operations. Shop floor statuses can be used to restrict the movement of an assembly out of a `no move' intraoperation step. For example, you can define a `no move' shop floor status, such as QAHold then assign this status to the applicable intraoperation step to prevent moves until the problems are resolved.
Shop floor statuses can also be used to restrict moves over `no move' intraoperation steps and out of operations that have outside processing resources assigned to them. These two optional uses of shop floor statuses are controlled by WIP parameters and are described below.
Restricting Moves Over No Move Intraoperation Steps
When the WIP Allow Moves Over No Move Shop Floor Statuses parameter is not set, the system checks all autocharge operations and To Move, Run and Queue intraoperation steps between the From and To operations and intraoperation steps for `no move' statuses. The system also checks the statuses of intervening intraoperation steps at the From and To operations if those operations are direct charge. If a status that can prevent moves is found, the move is disallowed. Direct charge operations between the From and To Operations and statuses at Scrap and Reject intraoperation steps do not prevent moves.
Note: The Move Transactions: Allow Skipping Over No Move Statuses security function can be set to override `no move' shop floor statuses. See: Security Functions.
Parameter On
If the WIP Allow Moves Over No Move Shop Floor Statuses parameter is set, standard shop floor status logic is applied and only moves from intraoperation steps that have `no move' statuses are prohibited. In this example, you cannot move assemblies from the To Move intraoperation step of operation 20, from the Scrap intraoperation step of operation 30, and from the Run and Reject intraoperation steps of operation 40.
Note: You can move assemblies from these operations and intraoperation steps after disabling or deleting their `no move' statuses.
Parameter Off
If the WIP Allow Moves Over No Move Shop Floor Statuses parameter is not set, both standard shop floor status and `no move' logic are applied. Again, you cannot move assemblies from the To Move intraoperation step of operation 20, from the Scrap intraoperation step of operation 30, and from the Run and Reject intraoperation steps of operation 40. In addition, the following moves are also prohibited:
-
You cannot move assemblies from the Queue intraoperation step of operation 10 to the Scrap intraoperation step of operation 20 because of the `no move' shop floor status at the To Move intraoperation step of operation 20, a direct charge operation.
-
You cannot move assemblies backward from the To Move intraoperation step of operation 40 to the Queue intraoperation step of operation 40 because of the intervening `no move' at the Run intraoperation step.
-
You cannot move assemblies from the Queue intraoperation step of operation 10 to the To Move intraoperation step of operation 40 because of the `no move' status at the Run intraoperation step of operation 40.
-
You cannot move and complete assemblies from the Queue intraoperation step of operation 10 to the To Move intraoperation step of the last operation, operation 40, because of the `no move' status at the Run intraoperation step of operation 40.
The following move transactions, however, are not prohibited:
-
You can move and complete assemblies from the To Move intraoperation step of operation 40 because the `no move' status at the Reject intraoperation step of operation 40 is not considered.
-
You can move assemblies from the Queue intraoperation step of operation 10 to the Queue intraoperation step of operation 30 Queue because `no move' status at the To Move intraoperation step of operation 20 is on the intraoperation step of an intervening direct charge operation.
-
You can move assemblies from the Queue intraoperation step of operation 10 to the Reject of operation 30 because the intervening `no move' status at the Scrap intraoperation of operation 30 is not considered.
-
You can move assemblies from the Queue intraoperation step at operation 10 into the Run intraoperation step of operation 40 because you can move into an operation and step with a `no move' status without restrictions.
Note: Move transactions loaded through the Open Move Transaction Interface are also checked for no move statuses.
Shop Floor Status for PO Move Resources Parameter
Selecting a `no move' shop floor status sets the Shop Floor Status for PO Move Resources parameter. When this parameter is set, as you move assemblies into the Queue intraoperation step of an outside processing operation, the specified `no move' shop floor status is automatically assigned to the To Move (Queue) intraoperation step. Assemblies are only moved out of this operation and step when a purchase order receipt transaction in Oracle Purchasing launches the move transaction.
Using this parameter ensures that the same number of assemblies are moved into and out of Queue at an outside processing step. Problems in tracking work in process and cost variances are thus avoided.
Related Topics
Assigning and Viewing Shop Floor Statuses
Assigning and Viewing Shop Floor Statuses
You can assign shop floor statuses to any intraoperation step associated with a job or repetitive line/assembly. Shop floor statuses that are assigned to a repetitive line/assembly are valid for all repetitive schedules being built on that production line.
You can assign multiple statuses to an intraoperation step. You cannot, however, assign the same shop floor status to more than one intraoperation step within the same operation. For example you could not assign the same status to the Queue and To Move intraoperation steps of operation sequence 30. You can update shop floor statuses at any time.
Statuses are removed from intraoperation steps when the quantities at those operations drop to zero.
Viewing Shop Floor Statuses
You can view the shop floor statuses that you have assigned to jobs and repetitive schedule operations. You can view statuses directly using this window or indirectly by choosing the Statuses button as you perform move transactions. Viewing statuses as you transact allows you to check the status of intraoperation steps before you attempt to move assemblies into or out of them.
Prerequisites
- Define shop floor statuses. See: Defining Shop Floor Statuses.
- Define at least one job or repetitive schedule that has a routing. See: Defining Discrete Jobs Manually and Defining Repetitive Schedules Manually.
To assign/update shop floor statuses
-
Navigate to the Assign Shop Floor Statuses window.
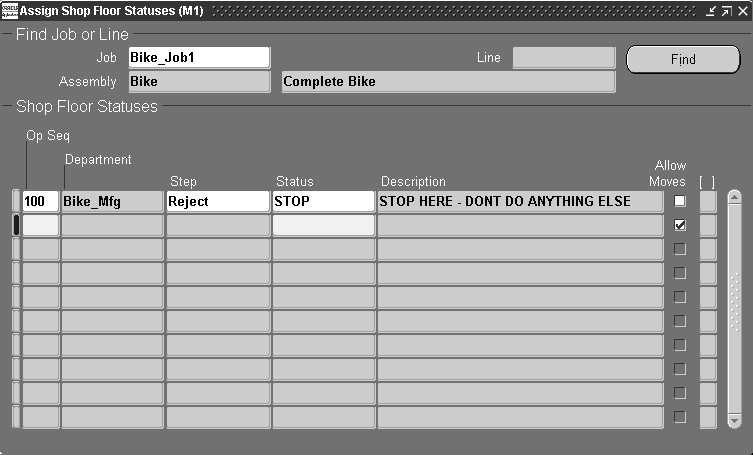
-
Select the discrete Job or the production Line and repetitive Assembly.
You can assign shop floor statuses to jobs or repetitive schedules that have the following statuses: Unreleased, Released, Complete, or On Hold.
-
Choose Find to display all shop floor statuses you have previously assigned to the job or repetitive line/assembly.
-
Select the Operation Sequence of the job or repetitive schedule. You can assign shop floor statuses to any operation in the routing of the job or repetitive schedule. This includes operations you defined using the Operations window.
The department associated with the operation sequence is displayed.
-
Select the intraoperation Step to which you want to assign or update a shop floor status. You can only choose an enabled intraoperation step. See: Intraoperation Steps Parameter.
-
Select the shop floor Status for the intraoperation step. You cannot enter a shop floor status with an inactive on date less than or equal to the current date.
-
Save your work.
Shop Floor Management
You can use Work in Process to manage outside supplier processing, rework production, and perform assembly scrap. It also provides you with several reports that can help you manage the activities on the floor.
In this section, you will find overviews of each of these topics.
Outside Processing
You can use the closed loop system provided by Oracle Inventory, Oracle Purchasing, and Oracle Work in Process to do the following:
-
Define outside processing resource requirements for your discrete job and repetitive schedule routings
-
Automatically generate purchase requisitions, charge for outside resources, and complete assemblies
-
Receive assembly items back from outside processing suppliers and automatically charge your outside processing resource costs
-
Control and track progress at outside processing operations
Outside processing is described in detail in the Overview of Outside Processing.
Related Topics
Rework Production
Rework may be necessary when production problems arise. You can often rework or repair defective assemblies to make them usable. Work in Process provides several options for handling rework. The method you choose depends on the product you are building, your manufacturing process, and the nature of the problem.
The options available are as follows:
-
Reject intraoperation steps
-
Rework operations
-
Non-standard discrete jobs
When it is possible to rework defective assemblies at their present routing operation, they can be moved into the Reject intraoperation step of that operation. This isolates them from known 'good' assemblies at that operation.
The system views assemblies moved into the Reject intraoperation step from the Queue or Run intraoperation step of the same operation as complete at that operation and updates operation completion information, backflushes pull components, and charges resource costs and overheads accordingly.
You can now perform the rework. When rework is complete you can move the repaired assemblies to the Queue, Run, or To move intraoperation step of the next operation.
If you do not want to rework defective assemblies at their present operation, you can alternatively move them to the Reject intraoperation step of a prior operation. This avoids recreating an operation completion (Queue or Run to Reject and Queue, Run, or To Move to the next operation) at the current operation.
If necessary, you can move irreparable assemblies into the Scrap intraoperation step of the current operation. Moves from the Reject to the Scrap intraoperation step, do not complete assemblies since rejected assemblies are already considered complete. See: Intraoperation Steps.
When you regularly rework certain assemblies, you may find it convenient to add 'rework' operations to the primary routings of these assemblies. You can then move assemblies that need rework into these operations. Good assemblies bypass these operations.
Rework operations should be set to count point off/autocharge off so that when good assemblies bypass them, the system does not automatically transact operation completions for these operations. In other words, you only need to move assemblies into these operations if they require rework.
You can also use non-standard jobs to perform rework activities. Before defining non-standard jobs for rework, you must first complete the defective assemblies by receiving them into a non-nettable rework subinventory. This subinventory helps you to isolate these assemblies from the known good assemblies.
Once you determine the proper rework steps for these assemblies, you can define a non-standard discrete and add the operations and components required for the rework. You can also create a rework routing that specifically addresses this type of rework. See: Rework Assemblies.
Assembly Scrap
You can scrap unusable, partially completed assemblies from jobs and repetitive schedules by moving them into the Scrap intraoperation step of an operation.
You scrap assemblies by moving them into the Scrap intraoperation step of an operation. You can, if necessary, recover scrapped assemblies by moving them out of the Scrap intraoperation step. You can also move assemblies back to the Scrap intraoperation step of the previous operation from the Queue or Run intraoperation step of the current operation if no work has been completed at the current operation. See: Intraoperation Steps.
The system views assemblies moved into the Scrap intraoperation step from the Queue or Run intraoperation step of the same operation as complete at that operation and updates operation completion information, backflushes pull components, and charges resource and overhead costs accordingly.
You can optionally specify whether Scrap transactions require a scrap account or alias using the WIP Require Scrap Account parameter. If you enter a scrap account or alias as you move assemblies into a Scrap intraoperation step, the scrap account is debited and the job or repetitive schedule elemental accounts, as determined by the accounting class, are credited for the cost of the assembly through the scrap operation. This removes the cost of the scrapped assemblies from the job or repetitive schedule. If you do not provide a scrap account, the cost of the scrap remains in the job or schedule until job or period close. If you recover assemblies from scrap, the scrap account is credited and the job or repetitive schedule elemental accounts for the cost of this assembly through this operation are debited. For more information about how assembly cost transactions are costed see: Manufacturing Average Cost Transactions in the Cost Management User's Guide.
For standard discrete jobs, the planning process does not consider assemblies in Scrap intraoperation steps as scheduled receipts, nor does the planning process use these scrapped assemblies when calculating MPS relief. For standard discrete jobs, the planning process deducts scrapped assemblies from the MRP net quantity to determine the available supply. The planning process does not deduct scrapped assemblies from supply on non-standard discrete jobs or repetitive schedules.
Planning, Scheduling, and Picking
When assemblies are scrapped on a routing, component and item-based resource requirements for future operations are reduced—reflecting that fewer assemblies are moving to those operations. Reduced requirements are considered when processes like planning, scheduling, or component picking are run after the scrap transaction occurs.
The assembly scrapped at an operation does not move forward to the succeeding operations, and the number of the assemblies that move through those later operations is not the same as the initial job quantity. Therefore, the actual material requirement at operations succeeding the scrap operation is less than the value calculated during job creation.
Planning modules consider the Cumulative Scrap Quantity column value in the WIP Operations table for material requirements. The value in this column, for the current operation, is the total number of assemblies scrapped in previous operations. For every scrap transaction, all the operations succeeding the scrap operation has this scrap quantity added to this value. Similarly, whenever a Return from Scrap is performed, the cumulative scrap quantity of the succeeding operations is reduced by the returned quantity. For example:
-
A job is created with operations 10, 20, 30, 40, and 50.
-
In operation 10 Queue, there is a quantity of 10.
-
Four assemblies are moved to operation 30 and are scrapped. The Cumulative Scrap Quantity value is updated for the operations after 30—that is, 4 each operations 40 and 50.
-
If 2 assemblies are moved from 30 Scrap to 40 Queue, the Cumulative Scrap Quantity value is adjusted for the succeeding operations 40 and 50.
This table demonstrates these transactions.
| Operation | Queue | To Move | Rejected | Scrapped | Cumulative Scrap Quantity |
|---|---|---|---|---|---|
| 10 | 6 | - | - | - | - |
| 20 | - | - | - | - | - |
| 30 | - | - | - | 2 | - |
| 40 | 2 | - | - | - | 2 |
| 50 | - | - | - | - | 2 |
When you move assemblies into the Scrap intraoperation step of an operation that has operation pull components assigned to it, the system backflushes these components, even if the operation is defined as a non-backflush operation. Operation pull components waiting at prior, non-backflush operations are also backflushed.
When you move assemblies into the Scrap intraoperation step of an operation that has assembly pull components assigned to it, the system backflushes these components and all assembly pull components at prior operations.
If you recover assemblies from scrap, by moving assemblies out of instead of into a Scrap intraoperation step, the backflush transactions described above are reversed.
Note: When you scrap assemblies at an operation, the operation and assembly pull components that would have been consumed at subsequent operations are not backflushed.
Related Topics
Operation Pull Backflush Transactions
Scrapping Assemblies
You scrap assemblies by moving them into a scrap intraoperation step as part of an intraoperation or interoperation move transaction. If you enter a scrap account number or alias, the cost of the assembly through the scrap operation is removed from the job or schedule. See: Assembly Scrap.
Prerequisites
- Release a job or repetitive schedule. See: Releasing Discrete Jobs and Releasing Repetitive Schedule.
- Confirm that the From intraoperation step has a shop floor status that allows you to move assemblies from one intraoperation step to another. See: Assigning and Viewing Shop Floor Statuses.
To select a sales order, line/assembly or job to transact
-
Navigate to the Move Transactions window.
-
Select a Sales Order, repetitive Line and Assembly, Assembly, or Job. The cursor defaults to one of these fields based on how you have the TP:WIP:Move Transaction First Field profile option set. See: Profile Option Summary.
You can only select a discrete job or a repetitive line and assembly for a repetitive schedule if the job or schedule has a status of Released or Complete.
To perform an intraoperation scrap move
-
Select the From operation Sequence and intraoperation Step.
-
Select the To operation sequence and intraoperation step.
The To intraoperation step must be Scrap. See: Intraoperation Steps.
-
Select the UOM. See: Overview of Units of Measure, Oracle Inventory User's Guide
You can use any valid, alternate unit of measure for the assembly you are moving.
-
Enter the transaction Quantity.
If you selected an alternate unit of measure, you must enter the quantity in the alternate unit of measure.
-
Enter the transaction Date and time.
This date and time must fall within an open accounting period. It cannot be greater than the current date or less than the release date of the job or the earliest valid repetitive schedule.
-
If the WIP Require Scrap Account parameter is set, you must enter a scrap account number or an account Alias. If you do not specify that a scrap account is required, it is optional. See: Move Transaction Parameters and Defining Account Aliases, Oracle Inventory User's Guide
If you subsequently change the To intraoperation step from Scrap to an intraoperation step other than Scrap, you must clear the scrap account Number or Account Alias.
For more information about how scrap transactions are costed see: Manufacturing Average Cost Transactions in the Cost Management User's Guide, and Work in Process Standard Cost Transactions, Oracle Cost Management User's Guide.
-
Optionally, select the Reason code. See: Defining Transaction Reasons, Oracle Inventory User's Guide.
-
Optionally, enter the transaction Reference.
References can be used to identify transactions on standard reports. They can be up to 240 characters of alpha numeric text.
-
Choose the Transact button.
To backflush pull components
Related Topics
Overview of Resource Management
Assigning Lot Numbers, Oracle Inventory User's Guide
Assigning Serial Numbers, Oracle Inventory User's Guide
Dispatch Reports
There are a number of reports that can help you prioritize your shop floor activity, including: