Task Auto Assignment
This chapter covers the following topics:
- Overview of Task Auto Assignment
- Task Auto Assignment Process
- Task Auto Assignment FlexSequence
- Task Auto Assignment Rules Window
- Defining Material Task Assignment
- Resource Task Assignment
- WIP Material Task Assignment
- Copy Task Auto Assignment Rules
- Setup for Common Project in Task Auto Assignment
Overview of Task Auto Assignment
Task Auto Assignment enables you to manage manufacturing activities by project and to collect manufacturing costs by tasks. Task Auto Assignment provides a flexible way to specify how to allocate material and resource costs to different tasks within a project. For example, when you establish the work breakdown structure for a project, you might decide to track certain procured items by a specific task and others by a different task. You might also decide to designate different tasks for different manufacturing departments to track specific resource and overhead costs.
Additionally, a one-time setup feature, FlexSequence, enables you to change the seeded hierarchy of the attributes in the Task Auto Assignment window.
Related Topics
Task Auto Assignment Flex Sequence
Task Auto Assignment Rules Window
Setup for Common Project in Task Auto Assignment
Task Auto Assignment Process
After Inventory and WIP transactions are costed and before they are cost collected, Task Auto Assignment assigns a task to each transaction based on rules defined in the Task Auto Assignment Rules window. When the transaction costs are transferred to Oracle Projects, costs are collected under the desired task. The Task Cost Collector calls Auto Assignment Rules during cost transfer.

Related Topics
Overview of Task Auto Assignment
Task Auto Assignment Flex Sequence
Task Auto Assignment Rules Window
Setup for Common Project in Task Auto Assignment
Task Auto Assignment FlexSequence
Use the Task Auto Assignment FlexSequence window to define how to display materials, resource costs, and WIP Materials on the Task Auto Assignment Rules window. You enter the sequence number, attributes and the corresponding prompts that display on the Task Auto Assignment Rules window. You control which attributes display and the corresponding rank according to task allocation on the Task Auto Assignment Rules window.
-
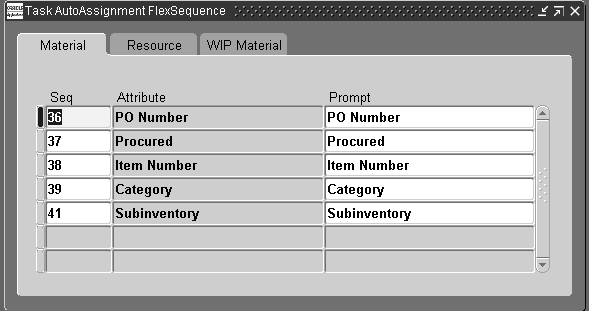
Navigate to the Task Auto Assignment FlexSequence window. The Task Auto Assignment FlexSequence window opens with the material tab highlighted.
-
Enter a Sequence Number on the Material Tab. The Sequence number determines the order the attributes display on the rules window.
-
Select an Attribute from the list of Values. The available choices are as follows:
-
Category
-
Item Number
-
PO Number
-
Procured
-
Subinventory
The prompt field populates automatically with the attribute name. However you can change the prompt if desired.
-
-
-
Select the Resource Tab.

-
Enter a Sequence Number on the Resource Tab. The Sequence number determines the order the attributes display on the rules window.
-
Select an Attribute from the list of values. The available choices are as follows:
-
Operation
-
WIP Prefix
-
Assembly
-
Department
The prompt field populates automatically with the attribute name. However you can change the prompt if desired.
-
-
-
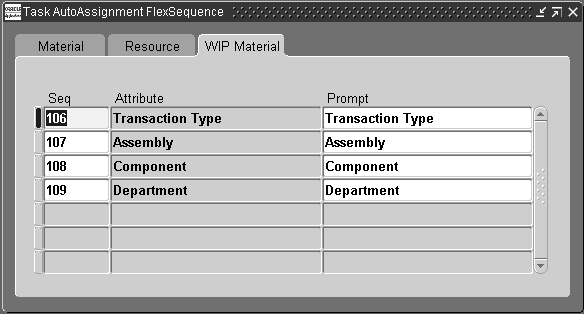
Select the WIP Material Tab.
-
Enter a sequence number on the WIP Material tab. The sequence number determines the order the attributes display on the rules window.
-
Select an Attribute from the list of values. The available choices are as follows:
-
Component
-
Assembly
-
Category
-
Subinventory
-
WIP Job Prefix
-
Department
-
Operation
-
Transaction Type
The prompt field populates automatically with the attribute name. However you can change the prompt if desired.
-
-
-
Save your work.
Related Topics
Overview of Task Auto Assignment
Task Auto Assignment Rules Window
Components, Oracle Bills of Material User's Guide
Operations, Oracle Bills of Material User's Guide
Defining a Department, Oracle Bills of Material User's Guide
Overview of Items, Oracle Inventory User's Guide
Defining Subinventories, Oracle Inventory User's Guide
Overview of Item Categories, Oracle Inventory User's Guide
Overview of Purchase Orders, Oracle Purchasing User's Guide
Task Auto Assignment Rules Window
The Task Auto Assignment Rules window enables you to define task assignment rules for material, resource, and WIP material transactions for a given organization. The choices are as follows:
-
Material Task Assignments- The system uses this information to assign a task number for inventory and material overhead transactions. You can select any combination of the following:
-
Item
-
Purchase Order Number
-
Item Category
-
Procured
-
-
Resource Task Assignments- The system uses this information to assign a task number for WIP resource transactions. You can select any combination of the following:
-
Department
-
Operation
-
Assembly Item
-
WIP prefix
-
-
WIP Material Assignments- The system uses this information to assign a task number for WIP Material Transactions such as WIP Materiel Issue, or WIP Material Completion. You can select any combination of the following:
-
Component
-
Assembly
-
Category
-
Subinventory
-
WIP Prefix
-
Department
-
Operation
-
Transaction type of issue or completion
-
Defining Material Task Assignment
The Material Task Assignment tab enables you to associate a task with an item, purchase order number, item category, subinventory, and procured flag. Task Auto Assignment examines these factors and finds a rule that matches the material transaction. It then assigns a task to the transaction. Material transactions include miscellaneous receipt, miscellaneous issue, project transfer, purchase order receipt, purchase order return, WIP material issue, WIP material return, and WIP completion.
If more than one rule matches the values of these attributes, Task Auto Assignment looks for the rule that corresponds to the highest priority attribute. Attributes decrease in priority from left to right. For example, suppose you have defined two rules for project 1 in your Los Angeles organization. Both rules contain an Item Number A, but one rule is based on a procure flag and the other on a subinventory name.
| Task | Item | P.O. Number | PO Flag | Category | Subinventory |
|---|---|---|---|---|---|
| T1 | A | X | |||
| T2 | A | Stores |
When you deliver a purchase order for item A into subinventory Stores, Task Auto Assignment matches the transaction with the first rule and assigns task T1 to the transaction. It picks the first rule, even though both contain matching fields, because the attribute procure flag has been assigned a higher priority than the attribute subinventory. The system uses the second rule when a project transfer is done.
To assign tasks to material transactions
-
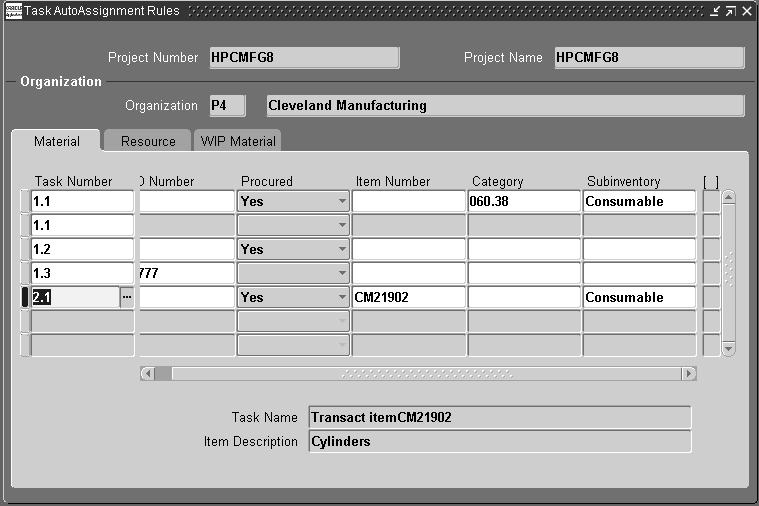
Navigate to the Material tab in the Task Auto Assignment Rules window.
-
Select a Project Number.
-
Select an Organization.
The LOV includes only organizations that have the project control level set to Project and Project Cost Collection enabled for that inventory organization.
-
Select a Task Number.
This number must correspond to a task defined in Oracle Projects.
-
Optionally, enter a value for one or more of the following fields:
-
PO Number- This is the purchase order number defined in Oracle Purchasing. The LOV for this field shows only purchase order numbers with no receipts.
-
Item Number- This number refers to the item number defined in Oracle Inventory.
-
Category- This is the Inventory Category of the item.
-
Subinventory- This is the destination subinventory used in a transaction.
-
PO Flag- This value can be set to Yes or null. If set to Yes, the system assigns cost for procured items to the corresponding task.
Note: You cannot enter values in both the Item Number field and the Category field for the same rule since you associate only one Inventory Category to an item. You cannot enter values in both the Procured field and the P.O. Number field for the same rule.
-
-
-
Save your work.
Resource Task Assignment
The Resource Task Assignment tab enables you to associate a task with an operation, WIP prefix, assembly, and department. For example, you might use different prefixes for different types of work orders. Regular work orders may have a prefix of Wxxx, while rework orders have the prefix RWxxx. Task Auto Assignment examines the values entered in these fields and finds a rule that matches a resource transaction. It then assigns the task to the resource transaction.
If more than one rule matches the transaction, Task Auto Assignment looks for the rule that corresponds to the highest-priority attribute. Attributes decrease in priority from left to right. For example, suppose you have defined two rules for project 1 in your Los Angeles organization. Both rules contain an operation code Final Inspection, but one rule is based on a WIP prefix and the other on a department code.
| Task | Operation Code | WIP Prefix | Assembly | Department Code |
|---|---|---|---|---|
| T1 | Final Inspection | WIP | ||
| T2 | Final Inspection | AS2 |
When you perform a resource transaction for WIP2305 in the Final Inspection operation in the AS2 department, Task Auto Assignment matches the transaction with the first rule and assigns task T1 to the transaction. The reason it picks the first rule, even though both contain matching fields, is that WIP prefix has a higher priority than Department Code.
To assign WIP labor and overhead tasks
-
Navigate to the Task Auto Assignment Rules window.
-
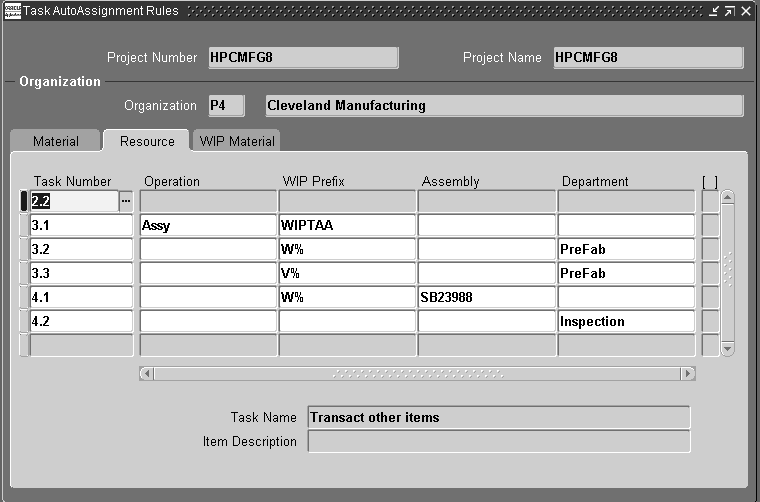
Select the Resource tab.
-
Select a Project Number.
-
Select a Task Number.
This number corresponds to a task defined in Oracle Projects.
-
Optionally, select a value for one or more of the following fields:
-
Operation- A specific standard operation associated with the task.
-
WIP Prefix- This enables you to assign specific tasks based on WIP Prefix. Only non-released jobs show in the LOV. You can also enter a job number created in Oracle Work in Process.
-
Assembly- If you want to assign the task to a particular assembly, enter the assembly item number in this field.
-
Department- The department associated with the task.
-
-
-
Save your work.
WIP Material Task Assignment
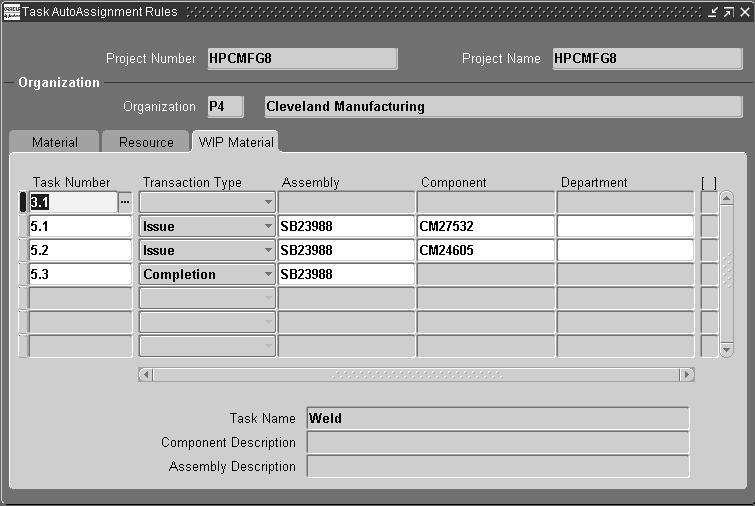
The WIP Material tasks assignment tab enables you to enter rules for assigning tasks to WIP Material transactions for a given project and organization. This allows you so associate a task with a component, assembly, subinventory, WIP Prefix and transaction type of issues or completion. If you do not setup WIP material rules, the system defaults to basic material rules.
To assign tasks to project manufacturing transactions:
-
Navigate to the Task Auto Assignment Rules window.
-
Select the WIP Material Tab.
-
Select a Project Number.
-
Select a Task Number.
This number corresponds to a task defined in Oracle Projects.
-
Optionally, select a value for one or more of the following fields:
-
Component- A component item associated with the assembly item.
-
Transaction Type- Select a transaction type of Issue or Completion. Issue transactions are component issues and returns, and negative component issues and returns. Completion transactions are assembly completions and returns. If you select a transaction type of completion, the Component, Standard Operation, and Department fields are disabled.
-
Operation- The specific standard operation associated with the task.
-
WIP Prefix- This enables you to assign specific tasks based on WIP Prefix. Only non-released jobs show in the LOV. You can also enter a job number created in Oracle Work in Process.
-
Assembly- If you want to assign the task to a particular assembly, enter the assembly item number in this field.
-
Department- This department associated with the task.
-
Category- This is the Inventory Category of the transacted item. If you enter a category for the item, you cannot enter a Component item, or an assembly item.
-
Subinventory- This is the destination subinventory for the transacted item.
-
Related Topics
Defining a Department, Oracle Bills of Material User's Guide
Creating a Standard Operation, Oracle Bills of Material User's Guide
Defining Discrete Jobs Manually, Oracle Bills of Material User's Guide
Components, Oracle Bills of Material User's Guide
Copy Task Auto Assignment Rules
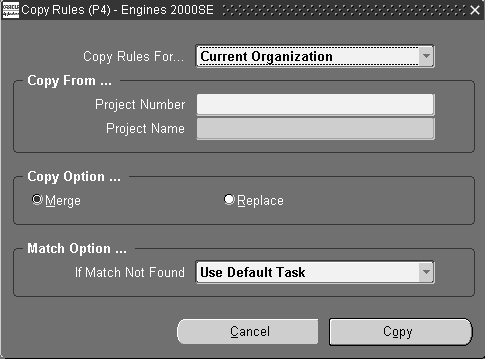
If two projects contain a similar task structure, you can copy Task Auto Assignment Rules from one project to another.
To copy task auto assignment rules
-
Navigate to the Copy Rules window.
-
Select the desired Copy Rules For option from the drop down menu. Choices are as follows:
-
Current Organization- Copies the rules to the project for the current organization.
-
All Organizations- Copies the rules to the project for all organizations.
-
-
-
Enter the project number from which to copy the Task Auto Assignment Rules.
-
Select the desired Copy Option. Choices are as follows:
-
Merge- Combines the rules for the two projects.
-
Replace- Replaces the current rules with the copied rules.
-
-
-
Select the desired Match Option from the drop down list. The choices are as follows:
-
Use Default Task-If the task structures for the project are not identical, the system uses the default task of the current project to copy a rule.
-
Skip Rule- If the task structures for the project are not identical, the system does not copy the rule.
-
-
-
Choose Copy to copy the rules to the current project.
Related Topics
Task Auto Assignment Flex Sequence
Task Auto Assignment Rules Window
Setup for Common Project in Task Auto Assignment
Setup for Common Project in Task Auto Assignment
You can optionally set up a common project to hold the cost of manufacturing transactions that are not associated with a specific project. This enables you to budget for common costs and view commitments, actual and budgeted cost for your common project on the standard Project Status Inquiry.
You can assign a common project if Cost Collection is enabled for the inventory organization and Project Reference Enabled check box is checked. You can set up a different common project for each inventory organization. You specify the common project number on the PJM Organization Parameters window.
Task numbers for the common project are entered n the PJM Organization Parameters window for an inventory organization. Default rules for the Common Project are derived from the values entered in the PJM Organization Parameters and available in the Task Auto Assignment Rules window. When you run the Cost Collector, the common project is assigned to all transactions related to common items and the task number are assigned based on the rules set up in the Task Auto Assignment Rules window.
For example, in Inventory Organization Los Angeles:
Common project in the PJM Organization Parameter = P2-Common
Task Auto Assignment Rules set up are as follows:
| Task | PO Number | PO Flag | Item | Category | Subinventory |
| 3.0 |
The rule above results in all material transactions for common items to be assigned to task 3.
| Task | Operation | WIP Prefix | Assembly | Department |
| 2.0 |
The rule above results in all resource transactions for common items to be assigned to task 2.
When you perform a receiving transaction for a common (non-project) purchase order, and run the Cost Collector, the material transaction are assigned the project P2-Common and the task 3.0 based on the above setup.
| Task | Comp. | Txn Type | Op. | WIP Prefix | Dept | Cat. | Subinv | Assem |
|---|---|---|---|---|---|---|---|---|
| 1.0 |
The rule above results in all WIP Material transactions for common items to be assigned to task 2.
Related Topics
Task Auto Assignment FlexSequence