Graphical Line Designer Workbench
This chapter covers the following topics:
- Overview of the Graphical Line Designer Workbench
- Navigating on the Graphical Line Designer Workbench
- Accessing Graphical Line Designer Workbench Windows
- Adding a New Item Routing
- Deleting a Routing
- Copying and Common Flow Routings
- Copying a Routing to a Different Flow Line
- Viewing Routing Revisions
- Using the Routing Details Window
- Creating the Graphical Network
- Defining a Network Connection
- Modifying the Line Operation Tree and Process Tree
- Modifying Line Operations, Processes, Events, and Connections
- Creating Routings in the Template Routings View
- Mass Changes on Item Routings
- Component Assignments on the Bill of Material
- Specifying Cost Rollup Resource Information
Overview of the Graphical Line Designer Workbench
The Graphical Line Designer Workbench offers an integrated user interface for performing product synchronizations. This workbench enables the automatic creation of standard processes, standard events, and standard operations by using defaulted information. The features in the Graphical Line Designer Workbench include:
-
Ability to drag and drop icons onto a canvas to add processes, events and line operations to the item routing
-
Processes, events, and line operations added to a routing are also automatically added to the line as a standard entity
-
Routing calculations are automatically performed every time a change is made to the routing
-
Information fields for Quality, value added, and process efficiency
-
Ease of use features for drawing size changes, and graphical view of network planning percentage connections under 100 percent
Events, Processes, and Line Operations
Events represent the detailed work content of your line. You can assign resources and time to events.
Processes are generally logical groupings of events that represent what is being done on the shop floor before going to flow. They can equal the discrete routing operations (assembly, welding, machining, test, and so forth). They can also be at an even lower level than that—especially in an assembly environment (assemble fan, add engine, inspect welds, and so forth). You may want to define processes first to give you a chance to take a look at the balance of your shop before moving to flow, using the Mixed Model Map Workbench. It gives you a starting point to divide or group work to equal takt. You are not required to define processes.
Operations are balanced groupings of events, and represent the workstations on your flow line. They may be more detailed than processes such as when one process is divided into several operations. Or, operations may be more generic such as when several processes are grouped into a single operation. This may be the case in a low volume assembly shop. Operations must be defined in order to be able to scrap assemblies through work order-less completions, to use the flow workstation, and to perform feeder line synchronization.
Related Topics
Navigating on the Graphical Line Designer Workbench
Accessing Graphical Line Designer Workbench Windows
Creating the Graphical Network
Navigating on the Graphical Line Designer Workbench
The Graphical Line Designer Workbench comprises two panes. The left pane is the tree hierarchy and the right pane displays the graphical network.
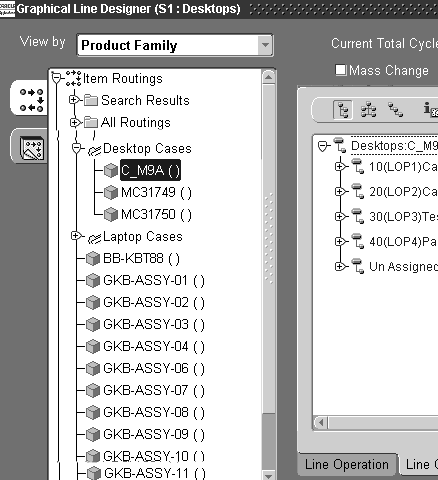
The View By list box allows you to change the way you view data in the tree—your choices are by Item, Product Family, or Common Routing.
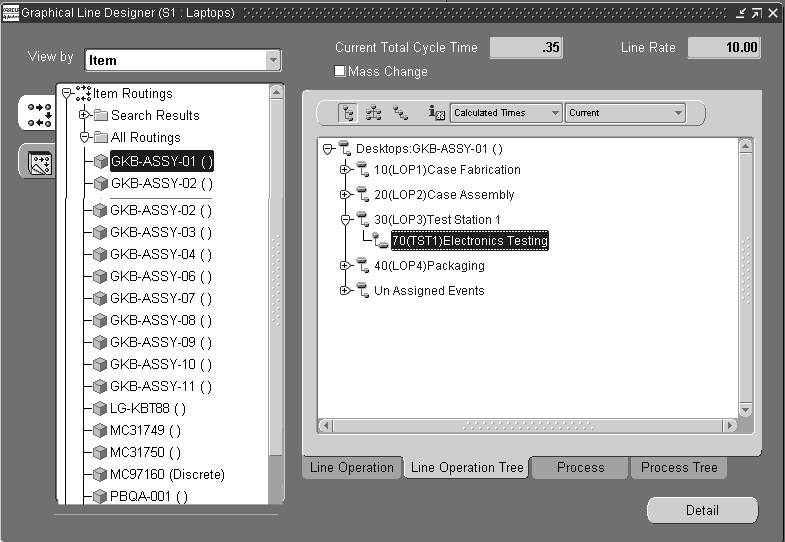
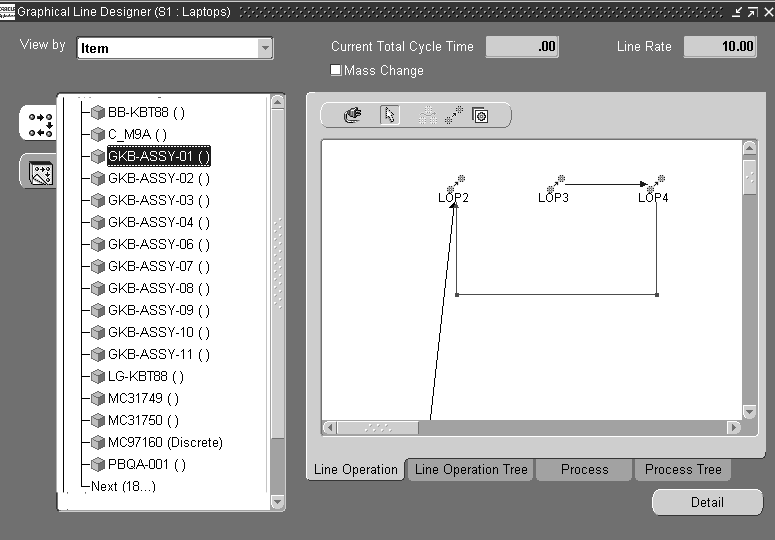
There are two tree tabs located to the left of the tree hierarchy that enable you to toggle between the Item Routings and Template Routings views on the right pane. The Item Routings tab displays the routings for all items assigned to the designated line, while the Templates tab gives access to product family routings that can be used as templates for copying information into routings. The right pane contains the data that is associated with the selected item on the tree. When an item is selected, four tabs at the bottom of the window provide access to windows displaying Line Operation network, Line Operation Tree, Process network, and Process Tree.
Resizing the Detail Pane
You can change the size of the detail pane, enabling you to have a larger working canvas area when creating and modifying the graphical network.
To resize the Graphical Line Designer Workbench window:
-
Select the button between the navigation tree and the detail pane, to maximize the window.
When you maximize the window size in this method, the navigation tree is not displayed. This button enables you to toggle between the full screen and divided pane sizes.
-
You can also resize the detail pane by resizing the entire workbench. Select the resize icon.
This method maximizes the window size, and also displays the navigation tree. This icon enables you to toggle between the full screen and smaller pane sizes.
Workbench Toolbars
In the right pane canvas, there are two toolbars containing icons used for creating and modifying your graphical network. One toolbar displays when you are in the Line Operation or Process window.
![]()
This toolbar contains icons for:
-
Connector: Enables you to create links between entities on the canvas
-
Pointer: Allows you to move existing entities on the canvas
-
Process: Enables you to add a new process to the routing
-
Line Operation: Enables you to add a new line operation to the routing
-
Event: Enables you to add a new event to the routing
The other toolbar displays when you are in the Operation Tree or Process Tree window.
![]()
It contains three icons that allow you to change the display view of the tree including:
-
Vertical Style: The tree is displayed in an up-and-down format by routing, line, line operation code, and description.
-
Organizational Chart Style: The tree is displayed in a hierarchical box format. The routing is at the top level, the lines, line operation codes, and descriptions are graphically displayed below the routing.
-
Interleaved Style: The tree is displayed in an indented hierarchical box format. The routing is at the top level and displayed on the left of the pane; the line, line operation codes, descriptions are graphically displayed to the right of the routing.
-
Showtime: Toggles the view of the event, line operation and process times when viewing the data in a tree format.
This toolbar also contains two menu boxes. One box allows you to choose views on the pane by either current, future and current or all events on the routing.
The Times box has two selections: Calculated Times and User Times. This enables you to choose either to view the operation time that is calculated by the system or entered in manually.
Tools Menu and Pop-up Menus
The Graphical Line Designer Workbench enables you to access other manufacturing functionalities. These options are available, depending upon the current active window and other conditions, in the Tools menu and pop-up menus.
The Tools Menu
Standard Events: Accesses the Standard Events window. It displays all standard events for a particular line. See: Defining Flow Manufacturing Standard Events.
Standard Processes: Accesses the Standard Processes window. It displays all standard processes for a particular line. See: Defining Flow Manufacturing Standard Processes.
Standard Line Operation: Accesses the Standard Line Operations window. It displays all standard line operations for a particular line. See: Defining Flow Manufacturing Standard Line Operations.
Mixed Model Map: Accesses the Mixed Model Map Workbench enabling you to generate a mixed model map. See: Overview of the Mixed Model Map Workbench.
Resource Where Used: Accesses the Resource WhereUsed window in Oracle Bills of Material for viewing the operation and routings that use a particular resource. See: Viewing a Resource Usage, Oracle Bills of Material User's Guide.
Routing Revisions: Accesses the Routing Revisions window to view the changes for a particular routing. See: Viewing Routing Revisions.
Switch to Primary: Allows you to switch the selected alternate with the primary routing.
Items: Accesses the Master Item window in Oracle Inventory where you can define and update items and the attributes associated with them. See: Defining Items, Oracle Inventory User's Guide.
Product Family Members: Accesses the Product Family window, enabling you to group products that have a similarity in resource usage, design, and manufacturing processes. See: Assigning Product Family Members, Oracle Bills of Material User's Guide.
Bills of Material: Accesses the Bills of Material window that contains information on the parent item, components, attachments, and descriptive elements. See: Creating a Bill of Material, Oracle Bills of Material User's Guide.
Indented Bills: Accesses the Indented Bill of Material window in Oracle Bills of Material where you can view an indented (multilevel, exploded) manufacturing or engineering bill of material. See: Viewing an Indented Bill of Material, Oracle Bills of Material User's Guide.
Lines: Accesses the Production Lines window in Oracle Work in Process. See: Defining Production Lines, Oracle Work in Process User's Guide.
Departments: Accesses the Departments window in Oracle Bills of Material. See: Defining a Department, Oracle Bills of Material User's Guide.
Item Selection List: Accesses the Apply Changes window for creating mass changes, edits, and deletions on multiple flow lines. See: Mass Changes on Item Routings.
Set Resource Cost Rollup: Accesses the Set Resource Cost Rollup window used to specify if an event is included in the cost rollup. See: Specifying Cost Rollup Resource Information.
Pop-up Menus
You can access windows and functions in the pop-up menus by right-clicking on an icon in the right pane, or a node in the tree hierarchy.
The following choices are available, depending upon the currently active window and other conditions, by right-clicking on an operation, process, event, or connection icon in the right pane:
-
Cut: Allows you to remove an operation, process, event, or any connection to it from the item routing.
-
Paste: Allows you to restore an operation, process, event, or connection you have just cut from the item routing.
-
Delete: Allows you to permanently remove the operation, process, event, and any connections to it from the item routing.
-
Properties: Accesses the Operation, Process or Event window. For example, if you select an event, the Event window opens.
-
Standard: Accesses the Standard Line Operations, Standard Processes or Standard Events window, depending on the entity that you have selected. For example, if you select a process, the Standard Processes window opens.
The choices available in the pop-up menu in the tree hierarchy include the applicable Tools menu, Workbench menu options, and the following additional menu options in the tree hierarchy:
-
New: Accesses the Add Item Routing window enabling you to create new routings. See: Adding a New Item Routing
-
Routing Details: Accesses the Routing Details window enabling you to view specifics or to add information to a routing. See: Using the Routing Details Window
-
Copy/Common Routing To: Accesses the Copy Routing window used to copy that items's routing to other items, or create routings that are common to it. See: Copying and Common Flow Routings
-
Copy Routings To: Accesses the Copy Routings window enabling you to copy a routing to a different flow line. See: Copying a Routing to a Different Flow Line
-
Component Assignments: Accesses the Update Component window, where you can associate the components on the bill of material with the routing events where they are consumed. See: Component Assignments on the Bill of Material
-
Delete: Accesses the Delete Routing window to delete a routing from your navigation tree. See: Deleting a Routing
Accessing Graphical Line Designer Workbench Windows
To access windows for creating product synchronizations
-
Select the Graphical Line Designer from the Flow menu.
The Select window displays.
-
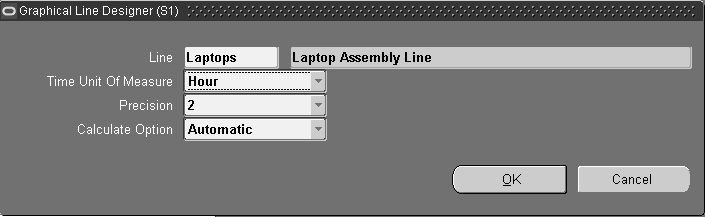
In the Line field, select the assembly line you want to view on the workbench.
-
In the Time Unit of Measure field, select the unit of measure you are using for routing calculations.
Your choices are hour, minute, or second.
-
In the Precision field, select a value for the number of decimal places you want to display in routing calculations.
Your choices are 1, 2, 3, 4. For example, if you enter 2—two decimal places display.
-
Select a Calculate Option for calculating the Current Total Cycle Time. This value displays on the workbench. Your choices are:
-
Automatic—Current Total Cycle Time is automatically calculated every time there is a change or update.
-
Deferred—Current Total Cycle Time calculation is only initiated manually, when you select Calculate on the workbench.
-
-
Choose OK.
The Graphical Line Designer displays.
In the initial view, the Item Routing tree tab is selected and the tree hierarchy is collapsed. The two tree tabs located to the left of the tree hierarchy allow you to toggle between the Item Routings and Template Routings views on the right pane.
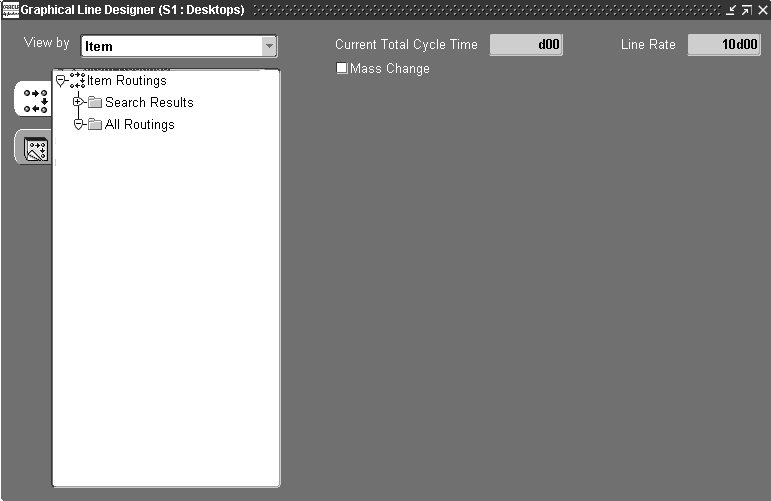
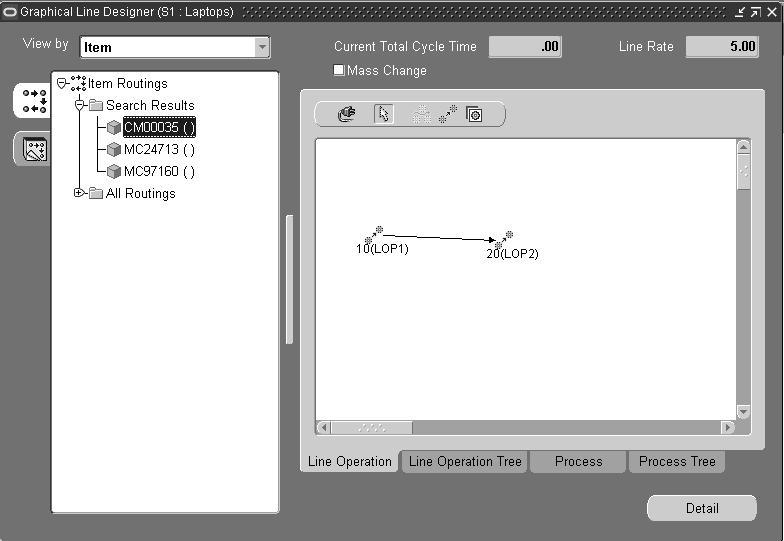
The Item Routings tab displays the routings for all items assigned to the line designated. In the initial view the right pane is blank, when you select an item, the graphical network displays.
-
The View By list box is used to select the way you want to view data in the tree.
-
The Current Total Cycle Time field displays for this item. It is calculated automatically every time you change tabs, add entities on the routing, or change items. See: Calculating Total Product Cycle Time
-
The Line Rate value defaults from the line definition.
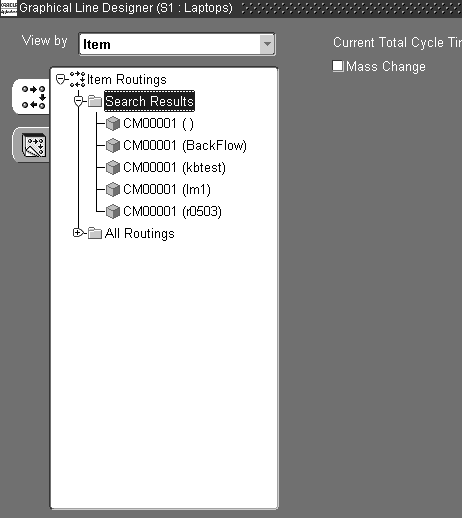
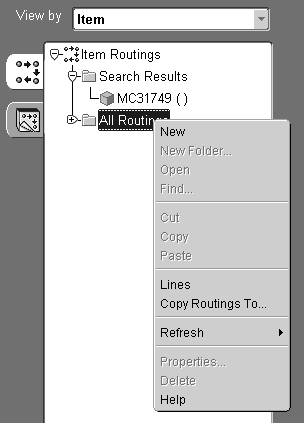
In the Item Routing node, you can search for routings using the Search Results node, or view all the routings in the All Routings node.
-
-
In the View By list box, select to view data in the tree by Item, Product Family, or Common Routing.
If you choose product family and the items are assigned to a product family, the product family displays in between the line and item.
-
If you want to find a specific record, or range of records, select the Search Results node and right-click with your mouse to display the pull-down menu.
-
Select Search to display the Search Items window.
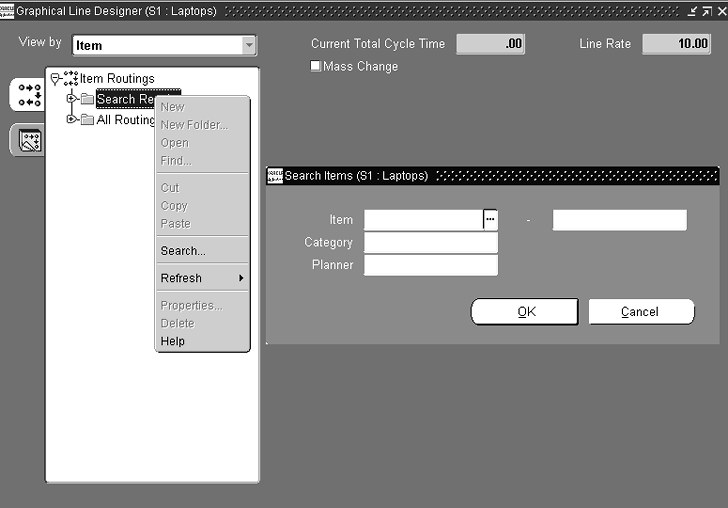
-
Enter search criteria; you can search by item, category, planner, or any combination of these values.
-
Choose OK to display the results of your query under the Search Results node.
-
To display information in the right pane, select a node detail on the tree.
The graphical network displays a view of the line operation network in the first window tab, Line Operation.
You can add, change, delete, or move the icons in the graphical network. See: Creating the Graphical Network
-
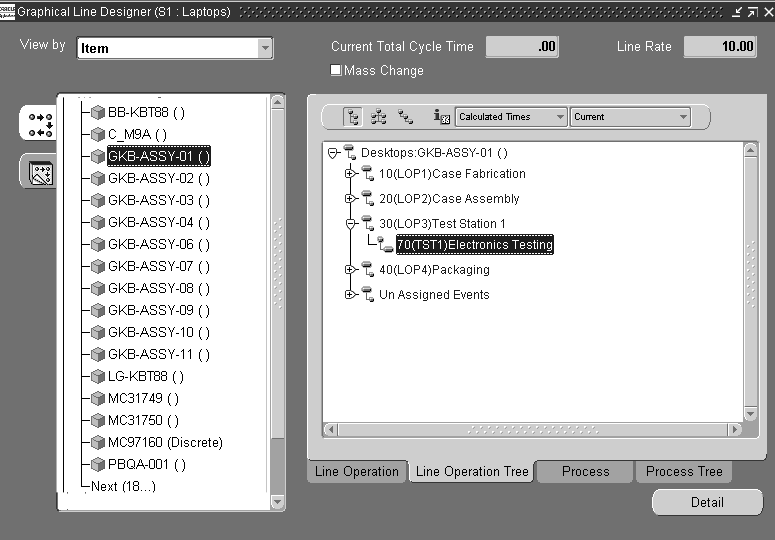
Select the Line Operation Tree tab.
-
Left-click with your mouse to select a node detail on the tree hierarchy.
In the right pane the top level of the routing for this item displays.
-
Expand the items on the routing to display the operations in the routing.
You can change the tree format to one of three styles. See: Workbench Toolbars The icons in the tree will change to match those on the toolbar for the three entities. The last node at the bottom of the tree is named Unassigned Events. This a place holder for all the events that are on the routing but are not assigned to any line operation. For example, an event may be unassigned because you defined processes first, and have not assigned the events to the operations.
You can add, change, delete, or move the icons in the tree. See: Modifying the Line Operation Tree and Process Tree
The code and description are listed for each line operation and event.
The toolbar enables you to view the line operations and events on the routing by current, future and current, or all events. You can also see the times associated with each line operation and event.
-
Select the Process tab.
The graphical network displays a view of the process.
You can add, change, delete, or move the icons in the graphical network. See: Creating the Graphical Network

-
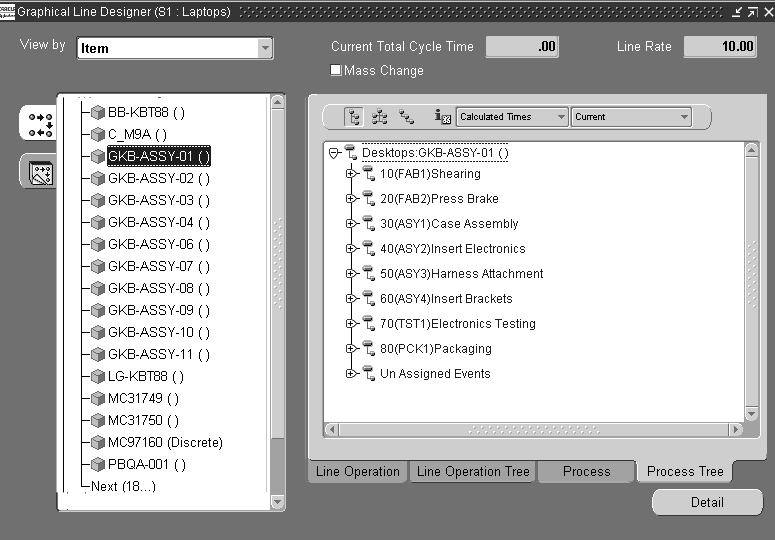
Select the Process Tree tab.
-
Select a node detail on the tree hierarchy, and left-click with your mouse.
In the right pane the top level of the routing for this item displays.
-
Expand the items on this routing to display the processes in the routing.
You can change the tree format to one of three styles. See: Workbench Toolbars The icons in the tree will change to match those on the toolbar for the three entities.
The last node at the bottom of the tree is named Unassigned Events. This a place holder for all the events that are on the routing but are not assigned to any process. For example, an event may be unassigned because you defined the operations first, and have not assigned the events to the processes.
You can add, change, delete, or move the icons in the tree. See: Modifying the Line Operation Tree and Process Tree
The code and description are listed for each process and event.
The toolbar has an option that enables you to see the times associated with each process and event.
Adding a New Item Routing
The Add Item Routing window enables you to create new routings on the Graphical Line Designer Workbench. You have three options in creating routings. You can create a routing as an entirely new routing, copy it from another item or a template, or assign a common routing as a reference for the new routing.
To add a new item routing
-
Navigate to the Graphical Line Designer Workbench.
-
Select the top node on the tree hierarchy, Item Routings, and right-click with your mouse.
The pop-up menu displays.
-
Choose New.
The Add Item Routing window displays.
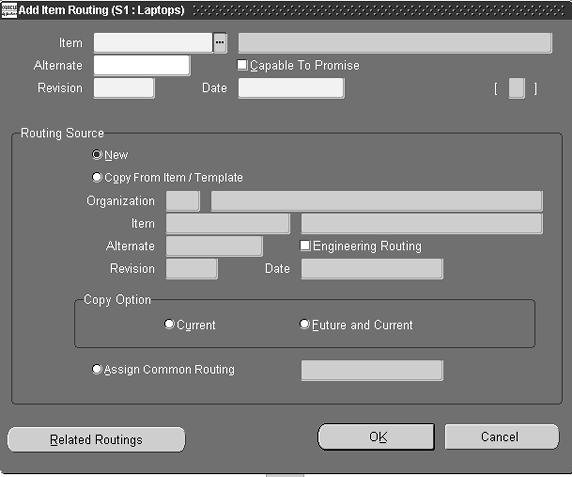
-
To create a new routing, select an item from the list of values in the Item field, and enter any appropriate information in the Alternate, Capable to Promise, Revision, and Date fields.
See: Creating a Routing,, Oracle Bills of Material User's Guide
-
To create a routing by copying one from another item or a template, choose Copy From Item/Template in the Routing Source region.
Your current Organization information displays.
In the Item field, select the routing to be used as a template from the list of values. See: Creating Routings in the Template Routings View
Enter the any appropriate information in the Alternate, Revision, Engineering Routing, and Date fields.
Select a Copy Option, your choices are:
-
Current: operations effective on the revision date
-
Future and Current: includes current and all future operations
-
-
To create a routing from a common routing, choose Assign Common Routing.
Any two items that are of the same bill type can share common bills and routings. See: Referencing Common Bills and Routings, Oracle Bills of Material User's Guide.
-
Select the routing you want to use from the list of values.
-
Optionally, you can choose Related Routings to view a list of the other routings that have been defined for this item on all the lines in this organization.
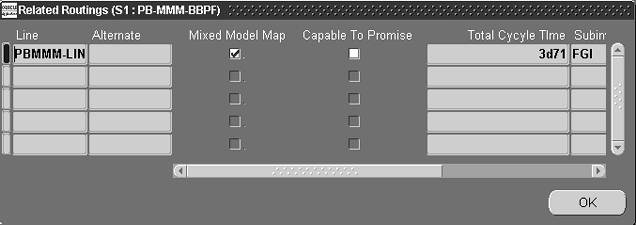
-
Choose OK to close the Related Routings window.
-
Choose OK to close the Add Item Routing window.
The new routing appears at the bottom of the routings list on the tree hierarchy, and it is highlighted. If this is a new routing, the right pane canvas is blank. If the routing was created from a template or a common routing, the right pane displays the inherited routing information.
-
Save your work.
Deleting a Routing
You have the option to delete a routing from the navigation tree by selecting a default delete group, or creating a new one. All operations are deleted when a routing is deleted. Any links to attachments are also severed.
To delete an item routing:
-
Navigate to the Graphical Line Designer Workbench.
-
Select the top node on the tree hierarchy, Item Routings, and right-click with your mouse.
-
Choose Delete from the pop-up menu to display the Delete Routing window.
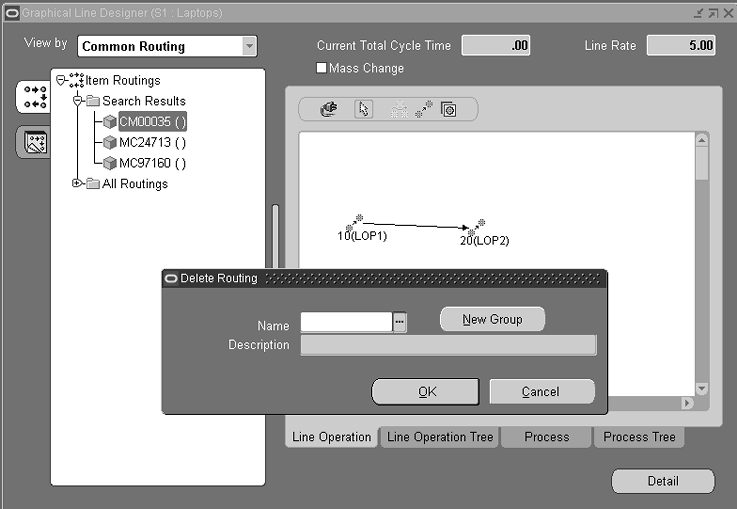
-
In the Name field, select the name of a Delete Group. The description displays for this group.
-
You also have the option to create a new Delete Group. Choose New Group to display fields for creating a new delete group.
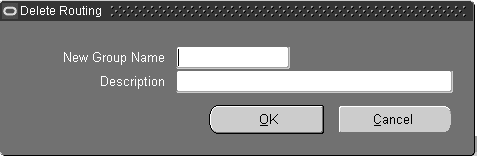
-
Enter a value in the New Group Name and Description fields.
-
Choose OK to save the New Delete Group Name.
-
Choose OK to save your work.
-
Navigate to the Deletion Groups window to delete the routing. See: Deleting Items, Bills, Routings, Components, and Operations, Oracle Bills of Material User's Guide
Copying and Common Flow Routings
You can select an item on the navigation tree, and then copy that items's routing to other items—or create routings that are common to it.
Note: If an item already has a primary routing, the copy common transaction is not created.
You can also copy a routing to another flow line. When you select items and copy the routing to another flow line—all relevant standard operations, processes, and events are duplicated. See: Copying a Routing to a Different Flow Line
To copy or common a flow routing
-
Select the node detail for the item you want to copy to other items, then right-click with your mouse.
The pop-up menu displays.
-
Select Copy/Common Routing To.
The Copy Routing window displays. The Source region displays the Item name and description.
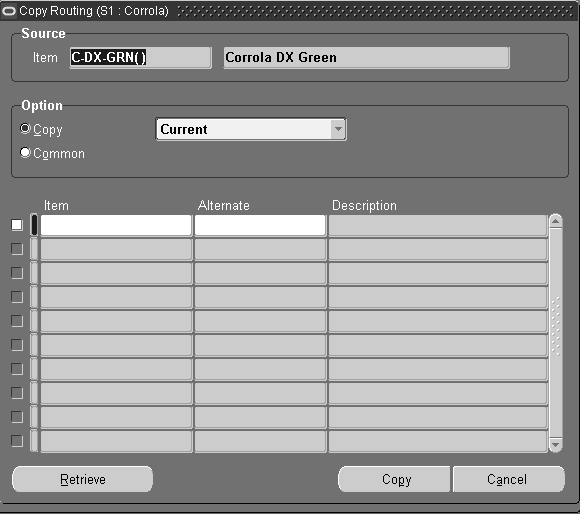
-
In the Option region, choose either Copy or Common.
-
Use Copy for copying this item's routing to one or more items. Select Current, or Future and Current to indicate the effective date. The system uses the effective date on the Routings window for the operation code.
-
Use Common to create one or more routings that are common to this routing.
-
-
In the multi-row Item region, select the items and, if applicable, alternate designators, where the Source item is copied.
-
To add multiple items, choose Retrieve.
Add Item Retrieve window displays. This window restricts your search for items according to your specifications.
-
Select your search criteria.
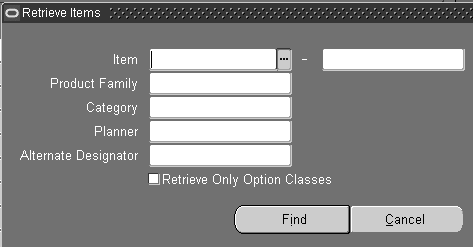
You can search by any combination of values including item, product family, category, planner, or alternate designator.
If this routing is for a Configure to Order model you can search for items by option class. Choose Common in the Option region, and enable the Retrieve Only Option Classes box. The system retrieves items for all option classes under the model and criteria specified.
-
Choose OK to display the list on the Copy routings window.
-
Choose Copy.
You will receive a confirmation message when the transaction is completed. You can view the copied routing for the item on the hierarchical tree and right pane of the Graphical Line Designer Workbench.
Copying a Routing to a Different Flow Line
You can copy a routing to a different flow line, enabling you to maintain multiple design models. All standard operations, processes, and events on the selected routing are copied to the line. When you perform the copy function:
-
Both flow lines must be within the same inventory organization
-
You have the option to duplicate the bill of material
-
Only current and future versions of the routing and bill of material are copied
-
When copying a referenced routing, the original routing referenced is copied
To copy a routing to another flow line
-
Navigate to the Graphical Line Designer Workbench.
-
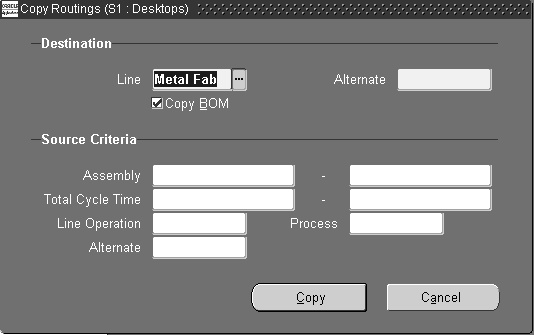
Select the All Routings node, and right-click with your mouse to display the pop-up menu.
-
Select Copy Routings To.
The Copy Routings window displays.
-
In the Destination region, select the line where the data will be copied.
-
In the Alternate field, enter the alternate destination designator.
Flow routings names must be unique; the alternate designator is the new identifier for this copied routing. Either select an existing alternate designator from the list of values, or enter a new alternate name.
-
Optionally, you can copy the bill of material information by checking the Copy BOM check box.
-
In the Source Criteria region, specify the assembly to be copied in the Assembly field. Or select a range of criteria for copying.
You can specify a range by assembly name, total product cycle time, alternate designator, or line operation and process.
-
Choose Copy
The selected routing information is copied to the destination line with the given alternate designator and includes standard line operations, processes, events, and event resources.
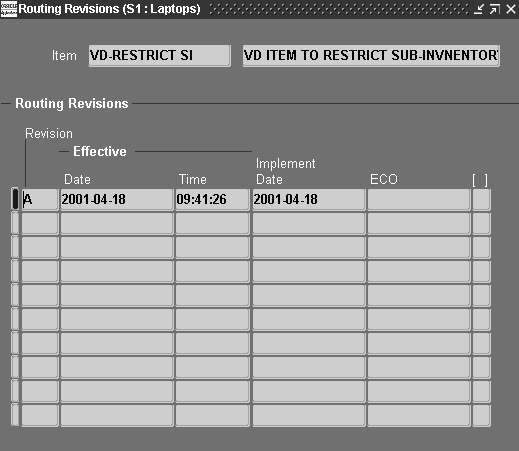
Viewing Routing Revisions
The Routing Revisions enables you to view all the revisions and changes for a particular routing.
To view the revisions for a specific routing
-
Select a routing detail on the tree hierarchy
-
From the Tools menu or the pop-up menu, select Routing Revisions.
The Routing Revisions window displays. This window lists all the revisions and information for a specific routing. See: Creating a Routing Revision, Oracle Bills of Material User's Guide.
To change your routing from an alternate routing to a primary routing
-
Select a routing on the tree hierarchy that is an alternate routing.
The tree hierarchy displays alternate routings by designating the alternate name in parenthesis on the tree.
-
From the Tools menu or the pop-up menu, select Switch to Primary.
The Switch to Primary window appears with the alternate designation displaying. You can choose this routing, or select another routing from the list of values.
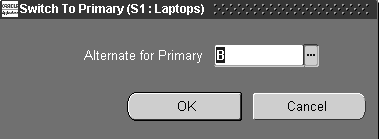
-
Save your work.
See: Switching Between Primary and Alternate Routings, Oracle Bills of Material User's Guide
-
Using the Routing Details Window
You can access the Routing Details window for a particular routing to view specifics or to modify information.
To view or modify routing details
-
Navigate to the Graphical Line Designer Workbench.
-
Left-click with your mouse to select a node detail on the tree.
The graphical network displays a view of the line operation in the first window tab, Line Operation.
-
Choose Detail.
The Routing Details window displays.
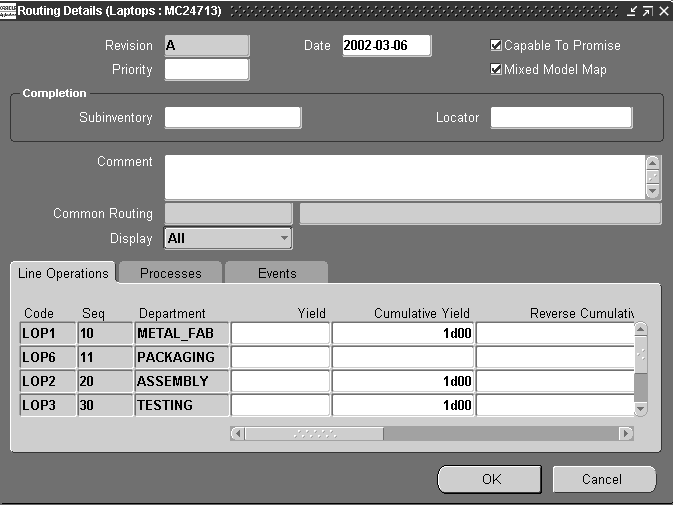
You can change several of the fields on this window including: Date, Capable to Promise, Mixed Model Map, Priority, Subinventory, Locator, Comment, and Display. See: Creating a Routing Revision, Oracle Bills of Material User's Guide .
In the tabbed region, you can also modify Yield, User Labor, or User Machine Times for any line operation, process, or event.
-
Save your work.
The routing calculations are performed automatically.
Creating the Graphical Network
Product Synchronization is the process of defining your product's process flow. This is done through the flow routing where you are able to define processes, events and operations for your flow line. The Graphical Line Designer Workbench provides icons in the toolbar that you can drag and drop onto the right pane canvas to create the product synchronization. This graphical interface allows you to create, delete, cut, and paste line operations, processes, events—and their connections. You can also add new item routings, see: Adding a New Item Routing
To add a new line operation on the Graphical Line Designer Workbench
-
Select the Line Operation tab to display this window in the detail pane.
-
Select the Operation icon from the toolbar.
This icon is only available in the Line Operation window of the workbench.
-
Left-click with your mouse on the right pane, in the section of the canvas where you want to locate this line operation.
The Line Operation window displays.
-
Enter the Display Sequence and Code values.
You have the option of entering a new code in the Code field, this creates a new standard line operation code which is added to the routing. Or you can select a code from the list of values, which adds the existing standard code to the routing.
-
Subinventory and Locator values default from the referenced standard operation. You have the option to enter values if there is no referenced standard operation.
-
Enter values in the Routing Specific Details region.
If the Referenced check box is checked, the information displayed for the Descriptions field is referenced from the standard line operation. To edit, deselect the referenced check box.
Information displays for Yield, Cumulative Yield, User Machine Time, Elapsed User Time, Net Planning Percent, Cumulative Yield, Reverse Cumulative Yield, and Process Efficiency values for machine and labor
See: Operation Yields Calculations
You can access the Line Operation window through the pop up menu if you want to modify this data for a standard line operation.
-
Choose OK to close the window and perform routing calculations.
The new line operation displays on the canvas.
-
Save your work.
To add a new process on the Graphical Line Designer Workbench
-
Select the Process tab to display this window in the right pane.
-
Select the Process icon from the toolbar.
This icon is only available in the Process window of the workbench.
-
Left-click with your mouse on the right pane, in the section of the canvas where you want to locate this process.
The Process window displays.
The information in the top region of the window is defaulted from where you positioned the icon on the workbench. You can change Display Sequence and Description information.
-
Enter values in the Routing Specific Details region.
If the Referenced check box is checked, the information displayed for the Description field is referenced from the standard process. To edit, deselect the referenced check box.
For information on Net Planning Percent, Cumulative Yield, and Reverse Cumulative Yield, see Operation Yields Calculations
You can access the Standard Processes window through the pop up menu if you want to modify this data for a standard process.
-
Choose OK to close the window and perform routing calculations.
The new process displays on the canvas.
-
Save your work.
To add a new event on the Graphical Line Designer Workbench
-
Select either the Line Operation or Process tab to display one of these windows in the right pane.
-
Select the Event icon from the toolbar.
This icon is only available in the Line Operation and Process windows of the workbench.
-
Left-click with your mouse on an existing line operation or process in the right pane.
The Event window displays.
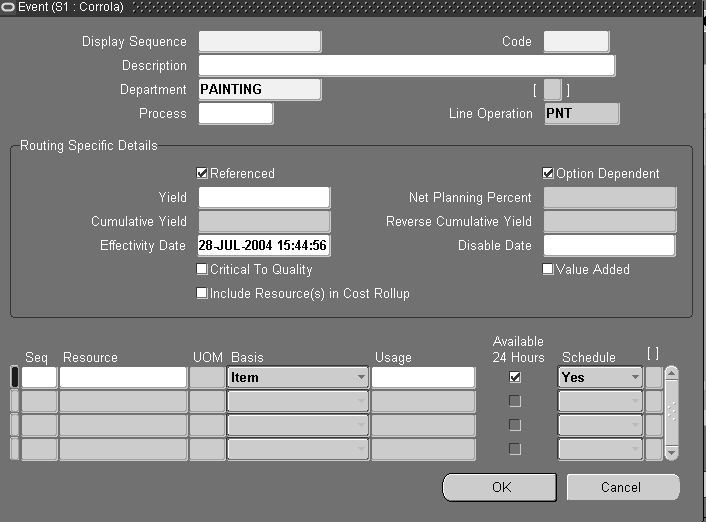
-
Enter values in the Routing Specific Details region including Yield, Effectivity Date, and Disable Date.
If the Referenced check box is checked, the information displayed for the Description field is referenced from the standard event. To edit, deselect the referenced check box.
For information on Net Planning Percent, Cumulative Yield, and Reverse Cumulative Yield, see Operation Yields Calculations
You can access the Standard Events window through the pop up menu if you want to modify this data for a standard process.
-
Use the Option Dependent box to indicate if this event is dependent on the choice of an optional component.
-
Enable the Critical to Quality box if this is a quality related task.
-
Enable the Value Added box if this event adds value to the Process. Resource Efficiency calculations for the process or line operation consider this setting.
-
The Include Resource in Cost Rollup box is used to specify if the event is included in the cost rollup. This flag can be updated here, or from the Set Resource Cost Rollup window. See: Specifying Cost Rollup Resource Information
-
Optionally, indicate whether the resource is available 24 hours a day. You cannot assign shifts to a resource that is available 24 hours a day.
-
Choose OK to close the window and perform routing calculations.
The new process displays on the canvas.
-
Save your work.
Defining a Network Connection
The Network Connection window is used when adding or modifying a connection on the Graphical Line Designer. This window is accessed through the pop up menu on the right pane.
Note: Network planning percentage connections under 100 percent display on the detail pane of the graphical network.
To add a network connection on the Graphical Line Designer Workbench
-
Navigate either to the Line Operation network or Process network window on the right pane of the Line Designer.
-
Select the Connections icon from the toolbar.
This icon is only available in the Line Operation and Process windows of the workbench.
-
Left-click and hold with your mouse on the right pane, on the process or line operations where you want to start this connection—and drag the line to the process or line operation you want to it to join.
The Network Connection window displays. In the Operation From and To fields, the operation codes that you connected on the canvas automatically display.
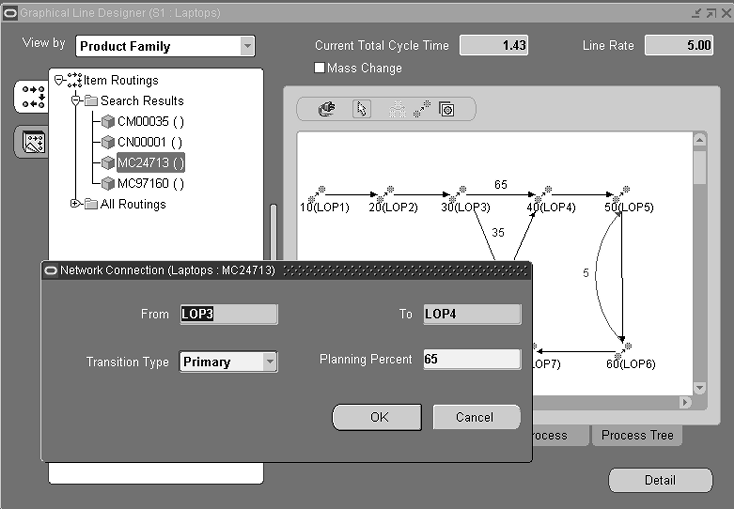
-
You can use the defaulted values in the Transition Type and Planning Percent fields, or enter other values.
Transition type values are primary alternate, and rework.
The planning percent is the percentage of product that follows this network path. If the planning percent for the network connection is less than 100 percent, the value displays on the graphical network detail pane.
-
Choose OK to close the window and perform routing calculations.
The new connection displays on the canvas.
-
Save your work.
Modifying the Line Operation Tree and Process Tree
The Line Operation Tree and Process Tree windows display your product synchronizations for your routing network in a tree hierarchy format. The Graphical Line Designer Workbench enables you to modify the routing network tree—you can create, delete, cut, and paste line operations, processes, and events.
To modify components on the Line Operation Tree and Process Tree
-
Select either the Line Operation Tree or Process Tree tab to display the hierarchical view of the routing network.
-
Left-click with your mouse to select a node detail on the tree hierarchy.
In the right pane the top level of the routing for this item displays.
-
Expand the items on the routing to display the operations or processes in the routing.
The code and description are listed for each line operation and event.
You can change the tree format to one of three styles. The toolbar has an option that enables you to see the times associated with each line operation and event. See: Workbench Toolbars
The last node at the bottom of the tree is named Unassigned Events. This a place holder for all the events that are on the Routing but are not assigned to any line operation or process. For example, an event may be unassigned because you defined processes first, and have not assigned the events to the operations.
-
Select a detail on the tree and right-click to display the pop up menu.
The pop up menu displays, depending on the conditions, several options: Cut, Paste, Delete, Properties, and Standard.
-
Select an event and drag it to another line operation.
Routing calculations are automatically performed.
-
Save your work.
Modifying Line Operations, Processes, Events, and Connections
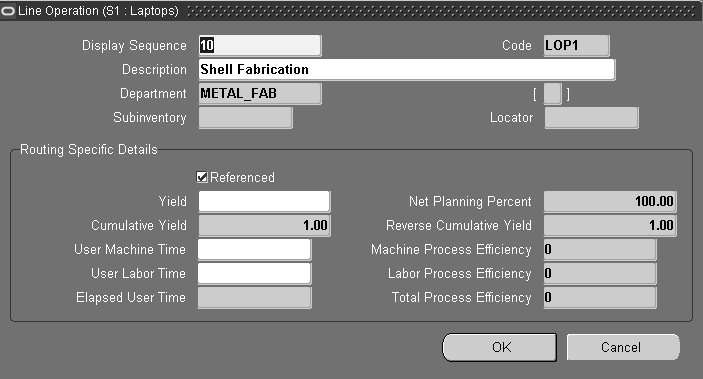
The Line Operation window is used when adding or modifying a line operation on the Graphical Line Designer. It contains routing specific details. This window is accessed through the pop up menu on the right pane.
To modify a line operation on the Graphical Line Designer Workbench
-
Navigate to the Line Operation Tree or Line Operation network window on the right pane of the Line Designer.
-
Select the line operation you want to modify on the right pane canvas.
If you are adding a new line operation, see: Creating the Graphical Network
-
Right-click on the operation icon in the right pane to display the pop up menu.
-
Select Properties.
The Line Operation window displays. The information is defaulted from the icon on the workbench. You can change Display Sequence, Yield, User Machine Time, User Labor Time information. To change the description, uncheck the Referenced box. See: Creating the Graphical Network
-
Choose OK to close the window and perform routing calculations.
-
Save your work.
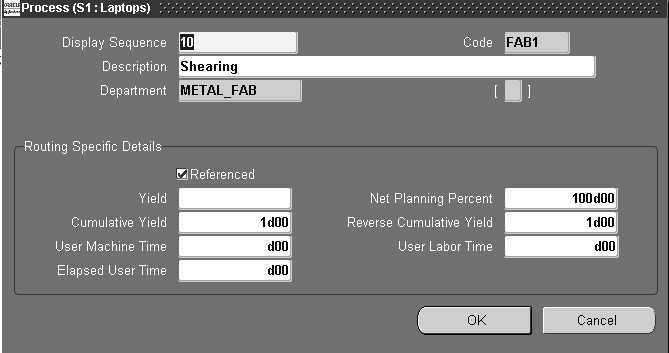
The Process window is used when adding or modifying a process on the Graphical Line Designer. It contains routing specific details. This window is accessed through the pop up menu on the right pane.
To modify a process on the Graphical Line Designer Workbench
-
Navigate to the Process Tree or Process network window on the right pane of the Line Designer.
-
Select the process you want to modify on the right pane canvas.
If you are adding a new process, see: Creating the Graphical Network
-
Right-click on the process icon in the right pane to display the pop up menu.
-
Select Properties.
The Process window displays. The information is defaulted from the icon on the workbench. You can change Display Sequence, Yield, User Machine Time, User Labor Time information. To change the description, uncheck the Referenced box. See: Creating the Graphical Network
-
Choose OK to close the window and perform routing calculations.
-
Save your work.
The Event window is used when adding or creating an event on the Graphical Line Designer. It contains routing specific details. This window is accessed through the pop up menu on the right pane.
To modify an event on the Graphical Line Designer Workbench
-
Navigate either to the Line Operation Tree or Process Tree window on the right pane of the Line Designer.
-
Select the event you want to modify on the right pane canvas.
If you are adding a new event, see: Creating the Graphical Network
-
Right-click on the event in the right pane to display the pop up menu.
-
Select Properties.
The Event window displays. The information is defaulted from the icon on the workbench. You can change Display Sequence, Effectivity Date, and Disable Date information. If you uncheck the Referenced box, you can change description and resource information. See: Creating the Graphical Network
-
Choose OK to close the window and perform routing calculations.
-
Save your work.
The Network Connection window is used when adding or creating a connection on the Graphical Line Designer. This window is accessed through the pop up menu on the right pane.
To modify a network connection on the Graphical Line Designer Workbench
-
Navigate either to the Line Operation network or Process network window on the right pane of the Line Designer.
-
Select the connection you want to modify on the right pane canvas.
-
Right-click on the icon in the right pane to display the pop up menu. See: Tools Menu and Pop-up Menus
-
Select Properties.
The Network Connection window displays and you can change the values, see: Defining a Network Connection
Note: Network planning percentage connections under 100 percent display on the detail pane of the graphical network.
-
Save your work.
Creating Routings in the Template Routings View
The Template Routings tree tab provides access to Product Family Routings that can be used as templates for copying elements to an item routing you are creating. You can define a routing for a product family the same way as performed in the Item Routings view of the workbench, and can perform all the same functions as in the routings region.
Using product family routings as templates
-
Choose the Template Routings tree tab.
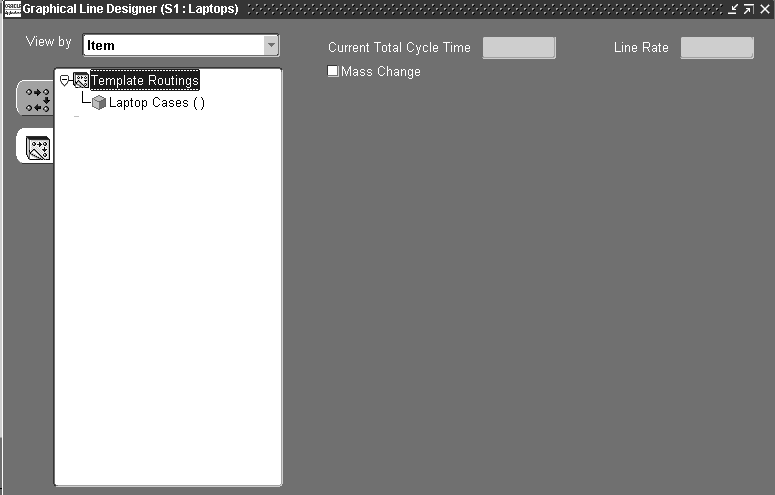
-
Select Template Routings node detail on the tree, and left-click with your mouse.
The Template Routings tab displays the routings for all Product Families assigned to the line designated. In the initial view the right pane is blank.
-
Select New from the popup menu.
Or you can create a new product family routing. In the Add Item Routing window, use the option to create an entirely new routing. See: Adding a New Item Routing
After you select a routing, a blank Line Operation window displays in the right pane. This blank window is the canvas used as a template.
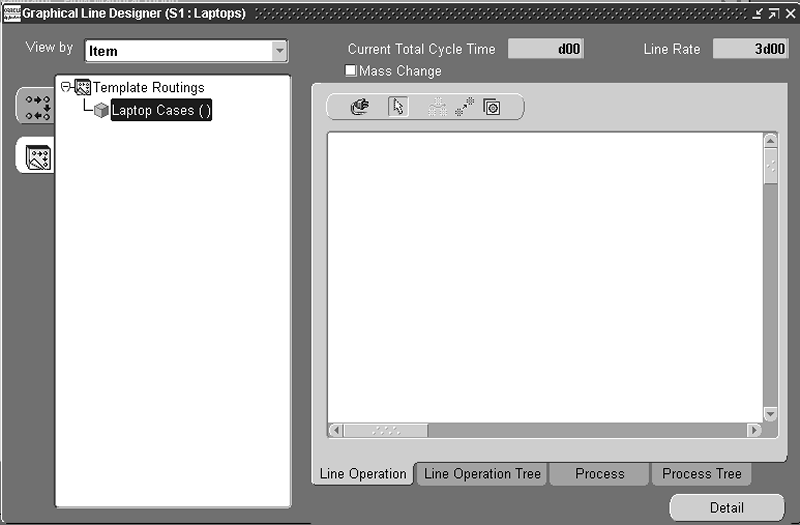
-
Use the toolbar to add icons to create a routing network. See: Creating the Graphical Network
-
Save your work.
This routing is now available to use when creating a new routing, see: Adding a New Item Routing
Mass Changes on Item Routings
You can simultaneously make changes, edits, and deletions to multiple flow routings. Work performed in the graphical pane can be updated for all items on the line, or in the product family. To enable this functionality, check the Mass Change check box on the graphical pane of the Graphical Line Designer Workbench. Mass change functionality is only available in the Line Operation and Process windows of the Graphical Line Designer Workbench:
-
In the View by Item mode, you can mass change all item routings on that production line.
-
In the View by Product Family mode or the Template Routing tree tab view, you can mass change routings that belong to the same product family.
-
In the View by Common Routing mode or the Template Routing tree tab view, you can mass change routings that belong to the same common routing.
Changes are still created by selecting an icon or menu item, and making the changes on the related line operation, process, event, or connection property window. However, in the mass change mode, you can also:
-
Populate changes to a range of other item routings after you save the transaction
-
Update operation information for user machine time, user labor time, and yield
-
Revise outgoing network connections from the node for planning percentages
To make mass changes to item routings
-
Navigate to the Graphical Line Designer Workbench.
-
Check the Mass Change check box on the graphical pane.
-
Select the line operation, process, event, or connection icon, and make the changes in the related window. See: Creating the Graphical Network
-
Choose OK on the related line operation, process, event, or connection window to save the transaction and display the Apply Changes window.
When first viewed in a session, this window does not display data. The applied values from your query default for the subsequent operation changes.
You can also access this window from the Tools menu by selecting Item Selection List.

-
Enter the specific items you want to change, and any applicable alternate designators.
-
You can also search for item routings by choosing Retrieve to display the Retrieve Routings window.
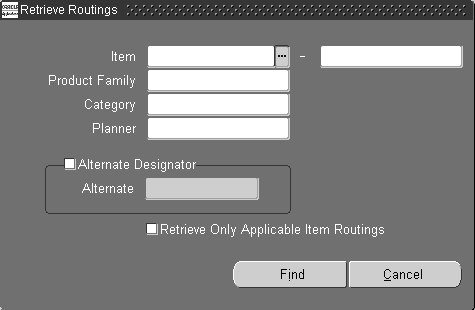
-
Select search criteria in Retrieve Routings window.
You can search by item or range of items, product family, category, planner, and alternate designator.
-
Check the Retrieve Only Applicable Items check box to display only eligible item routings.
Eligible item routings are in context to the changes:
-
For event changes or deletions, routings with line operations or processes referencing that specific event. When adding the event, routings with line operations or processes that do not already have that event.
-
For line operation and process changes, routings with those specific line operations and processes.
If you do not select this check box, and all search criteria fields are empty—when you choose Find all items routings display.
Note: Even though you can display all routings, updates occur only on applicable routings.
-
-
Choose Find to display your search on the Apply Changes window.
Uncheck the items you do not want included in the mass update.
-
Choose Apply to create the mass update transaction.
You can view the routing changes on the graphical pane of the Graphical Line
To update operation user time and yield information
-
Navigate to the Graphical Line Designer Workbench, and check the Mass Change check box.
-
Select an operation, and right-click with your mouse to display the pop-up menu.
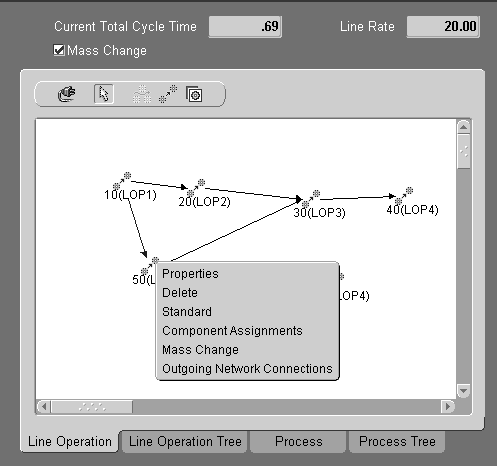
-
Select Mass Change to display the Operations window.
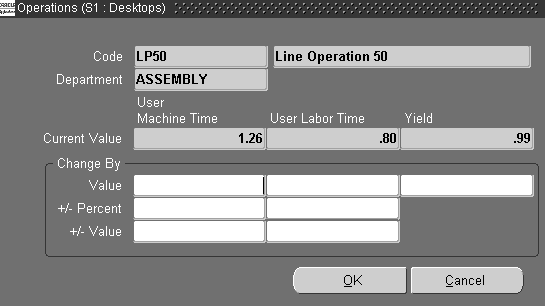
-
In the Change By region, enter applicable changes for the Value fields.
You can enter a new value in the Value field for User Machine Time, User Labor Time, and Yield.
Alternately, for the User Machine Time and User Labor Time columns, you can enter either a value or percentage to add or subtract from the current value. For example:
If the Current Value for User Machine Time on operation LP50 is 1.26 And you enter .4 in the +/- Value field The system adds .4 to 1.26, to equal 1.66
When you apply your change, the system updates the User Machine Time on operation LP50 to 1.66—in all instances where it occurs on the selection list of item routings.
-
Choose OK to display the Apply Changes window.
-
Select your edit list criteria.
You can choose Retrieve to display the Retrieve Routings window for your search criteria; and use the Retrieve Only Applicable Items check box for eligible items. Choose Find to display your search on the Apply Changes window, and uncheck any items you do not want included in the mass update.
-
Choose Apply to update your changes.
Eligible items are those with values in the applicable fields for the selected operation.
Note: Even though you can display all routings, updates occur only on applicable routings.
To update outgoing network connections
-
Navigate to the Graphical Line Designer Workbench, and check the Mass Change check box.
-
Select a node on the graphical pane, and right-click with your mouse to display the pop-up menu.
-
Select Outgoing Network Connections to display the Network Connections window.
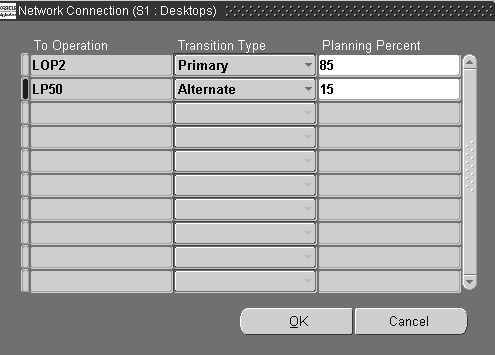
-
Enter changes in the Planning Percent fields.
Network planning percentage connections under 100 percent display on the detail pane of the graphical network. The total planning percent must equal 100 in order to update item routings.
-
Choose OK to display the Apply Changes window.
-
Select your edit list criteria.
You can choose Retrieve to display the Retrieve Routings window for your search criteria; and use the Retrieve Only Applicable Items check box for eligible items. Choose Find to display your search on the Apply Changes window, and uncheck any items you do not want included in the mass update.
-
Choose Apply to update your changes.
Eligible item routings are those with same the geometry match including:
-
The same specified network connection
-
The same outgoing network connections defined for the To Operation
-
Transition type and destination must match the current item routing
-
If you check the Match Planning Percentage check box, the planning percents must match and not exceed 100
Note: Even though you can display all routings, updates occur only on applicable routings.
-
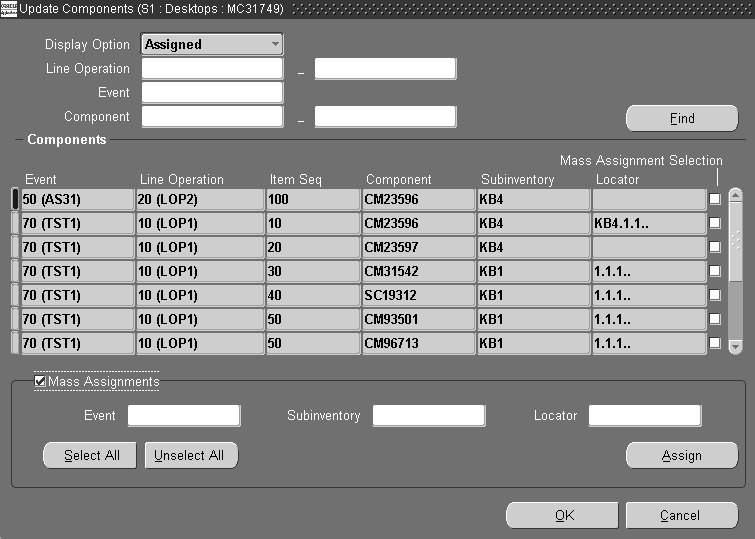
Component Assignments on the Bill of Material
You can associate the components on the bill of material with the routing events where the components are consumed. This association links one or more sub-inventory and locator combinations to line operations—and then automatically updates the material control portion of the parent bill of material.
These transactions are performed on the Update Components window. This window is accessed from the Graphical Line Designer Workbench by selecting the item routing in the hierarchical tree; or the line operation, process, or event in the graphical pane. A bill of material must exist for the selected routing in order to display this window.
To assign components to a bill of material
-
Navigate to the Graphical Line Designer Workbench.
-
Select either an item routing on the hierarchical tree; or a line operation, process, or event in the graphical pane.
-
Right-click with your mouse to display the pop-up menu, and select Component Assignments.
The Update Component window displays.
Information defaults on the Components region of the window depending on your selection. For example, if you access the window from the line operation or process—the line operation and any associated events display. If you access the window from the event—the line operation and all instances of this event display. And if you select the item routing, all lines and events display.
-
You can also use the upper region of the window to enter criteria for a new query.
-
In the Display Option field, choose the display mode, within the context of other specified parameters, for the Components region of the window. Your display choices are:
-
Assigned—retrieves components assigned to any event for this specified routing.
-
Unassigned—retrieves components that are not currently assigned to any event in this specified routing. This mode enables you to assign components to the routing.
-
All—retrieves all components both assigned and unassigned.
-
-
Optionally select a value, or range of values in the Line Operation field.
-
Optionally select a value in the Event field.
-
Optionally select an item number, or range of components in the Components field.
-
-
Choose Find to displays the results of your query. on the Components region.
-
Optionally, you can manually change the Event, Subinventory, and Locator values for any component listed.
The component attributes are displayed for event, line operation, item sequence, component name, subinventory location, and locator.
-
Check the Mass Assignments check box if you want update the records in your query in mass update mode.
Several different mass update transactions are available including:
-
Activates the Mass Assignment Selection check boxes for each component on the Components region. Select components by checking the Mass Assignment Selection check boxes in individual rows. This field is disabled when the Mass Assignments check box is not checked.
-
Choose Select All to activate all the records on the window.
-
Choose Unselect All to deactivate all the records on the window.
-
-
The Mass Assignments check box also enables the Mass Assignments region on the window. You can enter values in the Event, Subinventory, and Locator fields.
-
Check the records in the Components region you want to update.
-
Choose Assign to update the applicable records and fields on the Components region.
-
Choose OK to update the component assignment to the bill of material for the item routing selected
All specified components on the window are updated on the item routings's bill of material. The Graphical Line Designer Workbench displays again.
If you selected Mass Change on the Graphical Line Designer Workbench—the Apply Changes window displays. See: Mass Changes on Item Routings on page 4-43
-
Save your work.
-
Select Bills of Material from the Tools menu to view the update in the Bills of Material window.
Specifying Cost Rollup Resource Information
The Set Resource Cost Rollup window is used to specify if an event's resources are included in the cost rollup. If you include an event in the rollup, the checkbox on the Event's window is enabled. See: Creating the Graphical Network This window provides a method for creating a mass change for events on a particular item routing.
To set resources for cost rolllup
-
Navigate to the Graphical Line Designer Workbench.
-
Select an item routing on the hierarchical tree, and choose Set Resource Cost Rollup from the Tools menu.
The Set Resource Cost Rollup window displays, showing all the events and line operations for this routing.
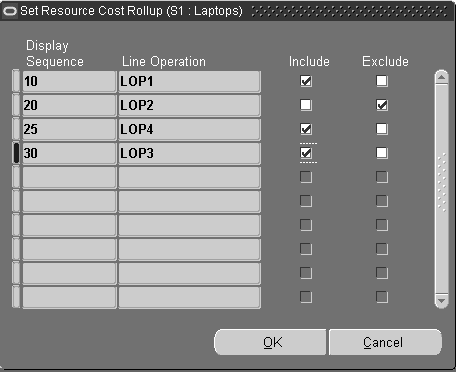
-
Enable the Include box for the event and line operations you want included in the cost rollup. Use the Exclude box for events you do not want calculated in the cost rollup.
-
Choose OK.
-
Save your work.
Related Topics
Rolling Up Supply Chain Costs, Oracle Cost Management User's Guide