Flow Sequencing
This chapter describes Flow sequencing, the process of determining when items are built on the production line to create Flow schedules.
This chapter covers the following topics:
- Overview of Flow Sequencing
- Setting Up Flow Sequencing
- Viewing and Defining Sequencing Attributes
- Viewing Sequencing Rules
- Defining Sequencing Rules and Constraints
- Viewing and Updating Production Lines
- Assigning Production Lines and Rules
- Creating Sequencing Tasks
- Entering Sequencing Task Parameters
- Selecting Production Lines for a Task
- Filtering Demands for a Sequencing Task
- Viewing Results and Submitting a Sequencing Task
- Updating Line Task Parameters
- Moving Demand
- Updating Demands
- Splitting Demands
- Resequencing Tasks
- Viewing Sequencing Tasks
- Sequencing Task Details and Results
Overview of Flow Sequencing
Sequencing is the process of determining the order assembly items are built on a production line, in a time horizon. Flow manufacturing environments comprise a mixture of different assembly items, or mixed models, built on the same production line. The sequence assembly items are built determines the efficiency of the line, and the efficiency determines the productivity of the manufacturing organization. Flow Sequencing is a module for considering your demands and determining a sequence for building assembly items. You use attributes, constraints, and group them into rules for assigned production lines.
In sequencing tasks, constraints are used to decide the best sequence of production. Depending on the production mix—constraints are a combination of many factors including resources, components, and physical dimensions. The Flow Sequencing concurrent program takes the sequencing task as input, and creates Flow schedules to meet production demands. Flow sequencing process begins with the initial data setup. This includes setting up attributes and constraints into rules, and assigning to production lines. After the setup, the process consists of two tasks:
-
Specifying parameters including:
-
Date horizon, schedule group, and source of data
-
Production lines
-
Demand
-
Viewing and adjusting demand
-
-
Submitting the sequencing task
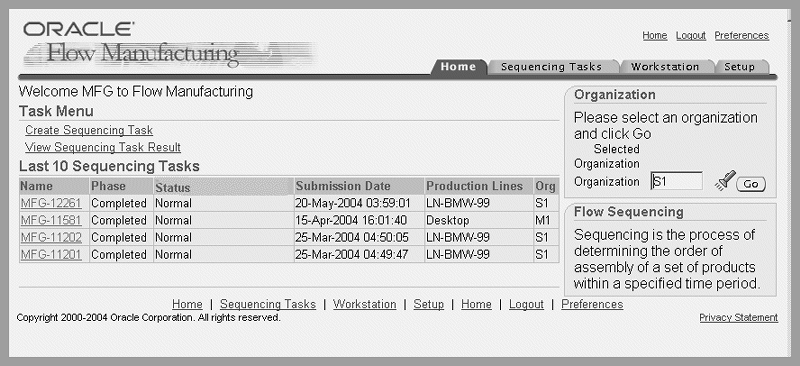
Flow Manufacturing Sequencing is setup, tasks created, and submitted in the Flow Manufacturing Sequencing and Execution pages. Attributes, constraints, rules, and production lines are set up in the Setup tabbed region. Tasks are created in the Sequencing Tasks tabbed region, and later submitted when your adjustments are finalized. You first select an organization in order to navigate to the other pages. The Home page enables you to:
-
View up to the last ten sequencing tasks generated. These are displayed in a table displaying showing the task Name, Phase, Status, Submission Date, and the Production Line assigned, and Organization. See: Viewing Sequencing Tasks
-
Navigate to the Task Summary detail page. See: Sequencing Task Summary
-
Create a new task. See: Creating Sequencing Tasks
Setting Up Flow Sequencing
The Setup tabbed region of the Flow Manufacturing Sequencing and Execution page is used to set up your attributes, constraints, rules, and assign them to production lines.
Attributes
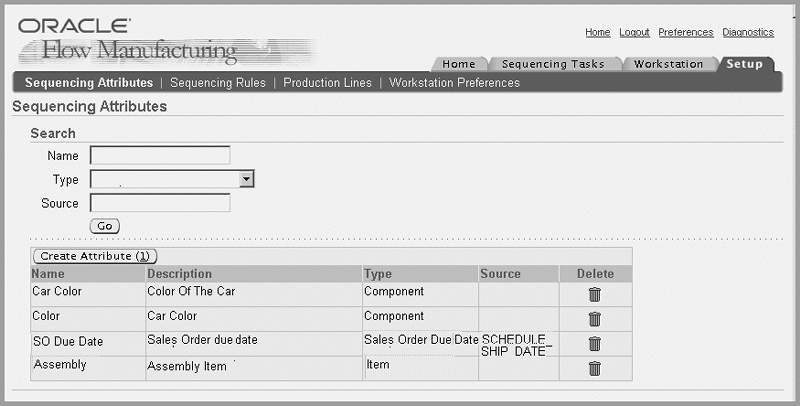
Attributes are a characteristic of your demand. For example—on an automobile production line, you can specify an attribute type as Component, and name it Color.
Attribute types can be one of several classes including entity, property, and date attribute types.
Note: You have to specify category set for item category attribute type.
Entities are their names such as Item or Line Operation—where the name of the item or line operation is the attribute type.
Property types require data attributes from the source table. For example, the Flow Schedule Property attribute requires an attribute from the Flow Schedule Property table—such as ALLOCATED_FLAG or DEMAND_CLASS.
Date types also require data attributes from the source table—the specific date type needed for the attribute. For example, the Sales Order Due Date attribute requires an attribute from the Sales Order table—such as PROMISE_DATE or REQUEST_DATE.
The types of attributes in Flow Sequencing are:
-
Component
-
Flow Schedule Property
-
Item
-
Item Category
-
Item Customized
-
Item Property
-
Line Operation
-
Model
-
Planned Order Customized
-
Planned order Due Date
-
Planned Order Property
-
Product Family
-
Sales Order Customized
-
Sales Order Due Date
-
Sales Order Property
Constraints
A constraint is a restriction enforced on an attribute. For example—in an automobile production line, you have an attribute specified as Color. A constraint is created on the Color such as the required transition—first red is manufactured, then black.
Constraints have priorities attached to them, and the priority is unique within a rule. The sequencing process always attempts to honor constraints from the lowest to the highest priority.
Note: It is good practice to define priorities in increments of 10.
A value of zero indicates a hard constraint. If these constraints are broken—or violated—Flow Sequencing stops.
Note: Constraint types do not apply to every attribute type.
Category list shows categories that are assigned to category set, which is defined while creating the attribute.
Constraints types are:
-
Required Transition: For the constrained attribute, a certain value must be immediately followed by another certain value on production line. For example, on a product assembly line—constraint A must be followed by B; otherwise it is a violation.
-
Forbidden Transition: For the constrained attribute, a certain value must not be followed by another certain value. For example, on a product assembly line—constraint A must not be followed by B; otherwise, it is a violation.
-
Grouping: For the constrained attribute, a certain value is on the production line as a group of certain size (or multiple of that size).
-
Attribute-level grouping: If an attribute value is not specified, the constraint applies to every value of the constraint attribute.
-
Unlimited grouping: The group size is not specified, the constraint is a different value in one group.
-
-
Spacing: For the constrained attribute, a certain value must be separated by other values and a specified distance.
-
Attribute-level spacing: if an attribute value is not specified, the constraint applies to every value of the constraint attribute. Spacing distance is always required.
-
-
Capacity: Within any day, or the whole horizon, the number of occurrences of a certain attribute value cannot exceed a certain limit. There are three types of capacity constraints:
-
Daily limit – the limit is defined for each every day.
-
Horizon limit – the limit is defined for the whole sequencing horizon.
-
Component Availability – the limit is from checking ATP of a certain component. In this case, the attribute can only be component,
-
-
Ordering: Within the sequencing horizon, the values of one or more attributes appear in either ascending, or descending, order. For example, constraint Order price descending, engine power ascending—will first order price in descending order, and engine power in ascending order.
-
Due Date: All demands must be scheduled before the corresponding due date (for example, sales order promise date).
-
Conditional Transition: For the constrained attribute, a certain value must be immediately followed by itself, or another certain value on production line. For example, constraint A must be followed by itself or B—means that on a production line—every A must be followed by a A or B assembly; otherwise it is a violation.
Rules
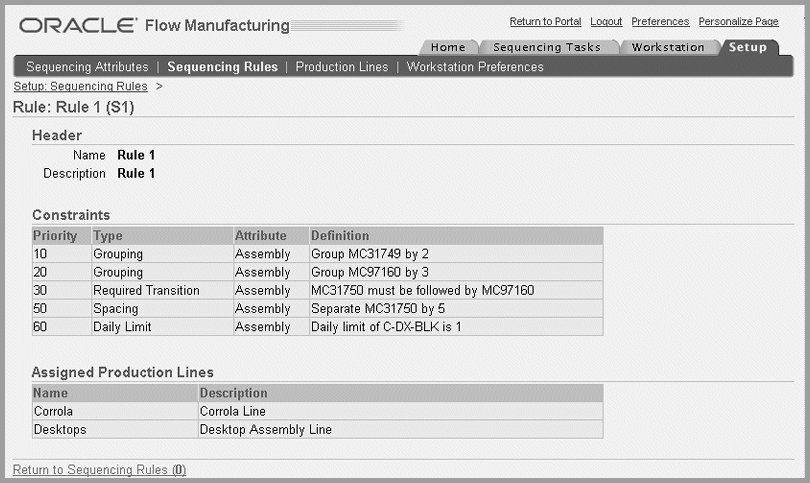
Rules are a grouping of prioritized constraints defined for the attributes. Rules are assigned to specific production lines. For example, Rule 1 consists of two prioritized constraints:
| Priority | Constraint | Attribute | Description |
|---|---|---|---|
| 10 | Required Transition | Assembly Item | Assembly 1 must be followed by Assembly 2 |
| 20 | Group | Assembly Item | Group assembly 3 |
On an automobile production line, you have an attribute specified as Color, a constraint created for the required transition. Then you can create another constraint for spacing— one of every 4 automobiles is red, the rest are black. Then group the constraints into a rule, and name it Rule 1.
Production Lines
A rule is a collection of constraints, and associated with one or more production lines.
For example, on an automobile production line, you have an attribute specified as Color, a constraint created for the required transition. Then you can create another constraint for spacing—one of every 4 automobiles is red, the rest are black. Then group the constraints into a rule, and named Rule 1—and associate it with a specific production line.
Viewing and Defining Sequencing Attributes
-
In the Flow Manufacturing Sequencing and Execution Home page, select a value in the Organization field and choose Go.
-
Select the Setup tabbed region.
-
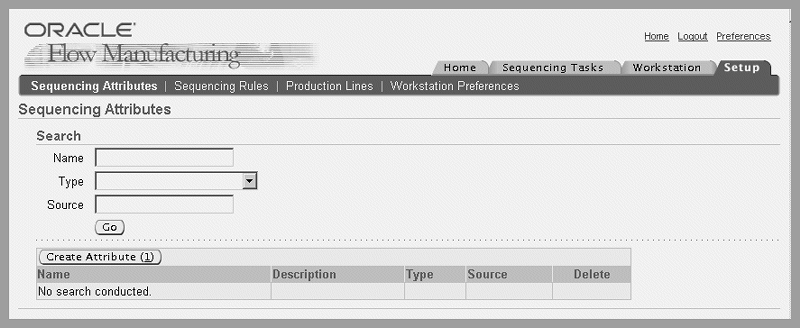
Select Sequencing Attributes to display the Sequencing Attributes page.
-
To view existing attributes, enter values in the Search region to filter your search, or leave these fields blank to display all defined attributes.
You have the option to enter:
-
Name—a unique identifier for the attribute
-
Type—such as Item, Model, or Product Family. See: Attributes
-
Source—this is a table column field for property type attributes.
-
-
-
Choose Go to display the results of your search criteria.
To define sequencing attributes
-
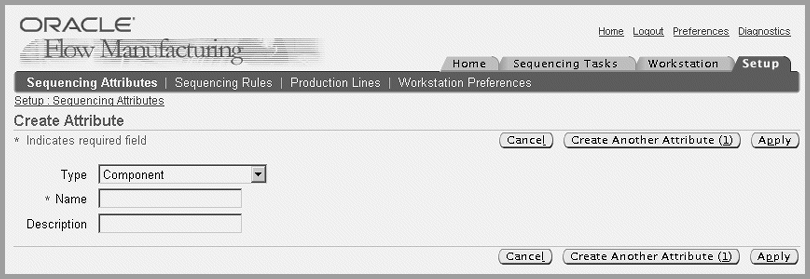
Choose Create Attribute to display the Create Attribute page.
-
In the Type field, select an attribute type.
See: Attributes
-
Enter a unique Name, and optionally a Description for this attribute.
-
If you are creating more than one attribute, choose Create Another Attribute to define another record.
-
Choose Apply to save your work.
A confirmation page displays when all your records are saved.
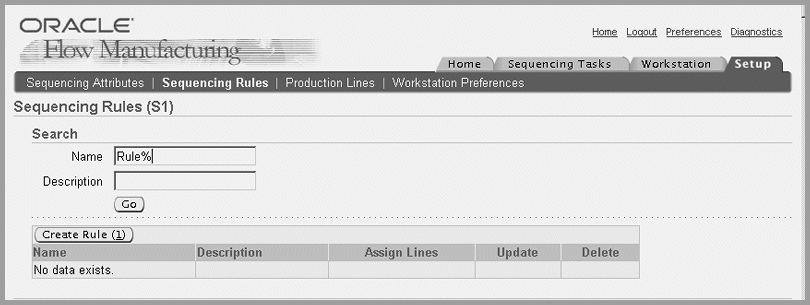
Viewing Sequencing Rules
-
In the Flow Manufacturing Sequencing and Execution Home page, select an organization in the Organization region, and choose Go.
-
Select the Setup tabbed region, and choose Sequencing Rules to display the Sequencing Rules page.
-
Enter values in the Search region to filter your search, or leave these fields blank to display all defined sequencing rules.
You have the option to enter Name and Description values.
-
Choose Go to display the results of your search criteria.
This page displays a list of rules according to your search criteria. You can also view details of a rule, assign lines, and update the rule with new information. See: Assigning Production Lines and Rules, and Constraints

-
Select a rule in the Name field to display the Rule detail page.
This page displays the Constraints attached to the rule, and the assigned production lines. See: Rules
Defining Sequencing Rules and Constraints
Rules are a grouping of prioritized constraints, the constraints use priorities to determine the sequence of production.
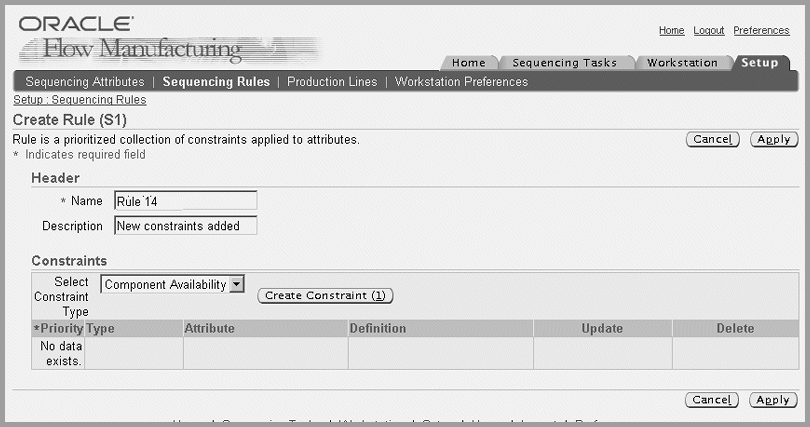
To define a sequencing rule
-
Choose Create Rule to display the Create Rule page.
-
Enter a unique value for this rule in the Name field, and optionally a description of this rule.
-
In the Constraints region, select constraint values from the Select Constraint type box.
-
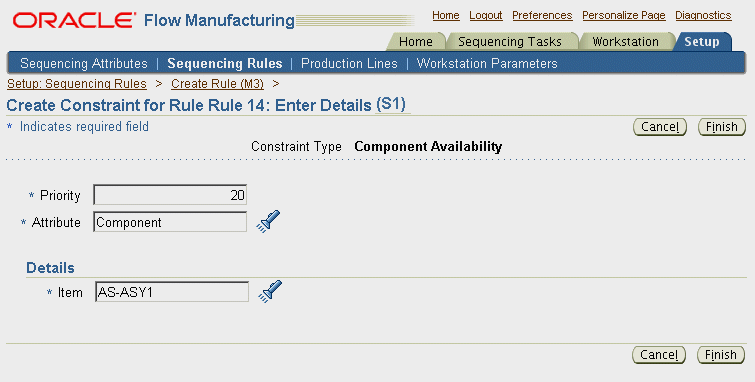
Choose Create Constraint to display the Create Constraint page.
-
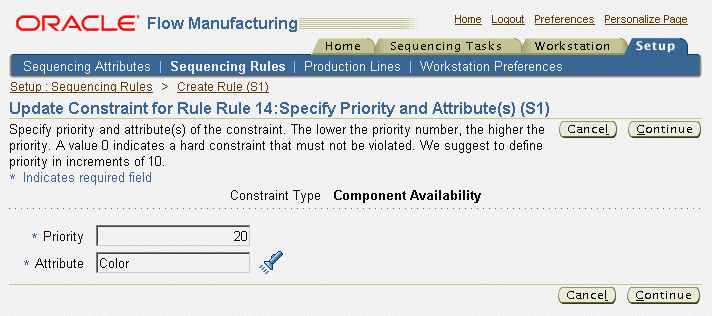
Enter a value in the Priority field, and select an attribute.
When you select an attribute, the Details field displays on the page.
Note: The lower the priority number indicates a high priority. A value of zero indicates a hard constraint that must not be violated. It is good practice to define priorities in increments of 10. See: Constraints
-
Select a component item number for this constraint.
-
Choose Finish to save your work.
The new constraint displays in the Constraints region of Create Rule page.

-
To modify constraints displayed in this list, select a constraint and choose Update. The Update Constraint for Rule page displays.
You have the option to modify the Priority and Attribute fields.
-
Choose Continue to display the Update Constraint Details page.
-
You have the option to change the item on this page.
-
Choose Finish to save your work. The updated constraint displays in the Constraints region of Create Rule page.
-
If you want to delete any of the constraints created for this rule, choose Delete for the selected rule.
-
Choose Apply to save your work
Viewing and Updating Production Lines
Flow manufacturing environments comprise a mixture of different items built on the same production line. You consider your demands and determining a build sequence. Rules are associated and assigned to one or more production lines.
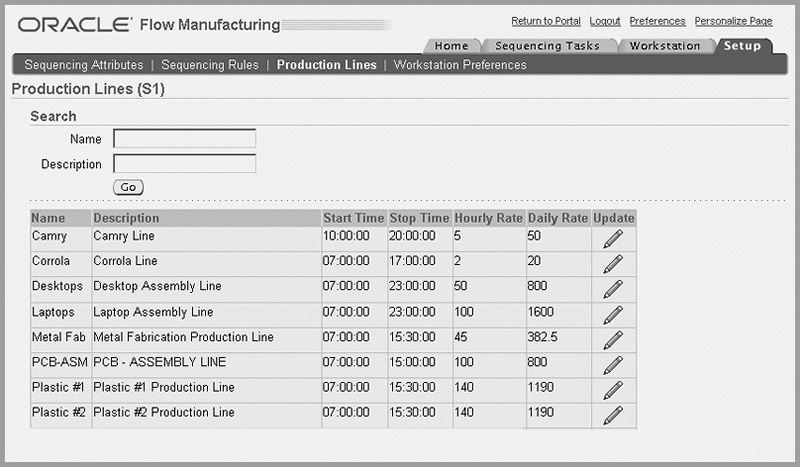
To view production lines
-
In the Flow Manufacturing Sequencing and Execution Home page, select a value in the Organization field and choose Go.
-
Select the Setup tabbed region.
-
Select Production Lines to display the Production Lines page.
-
You have the option to enter values in the Search region to filter your search. Enter values in the Name or Description fields. You can also leave these fields blank to display all defined production lines.
To update production line information
-
Navigate to the Production Lines page.
-
Search for the record to update.
-
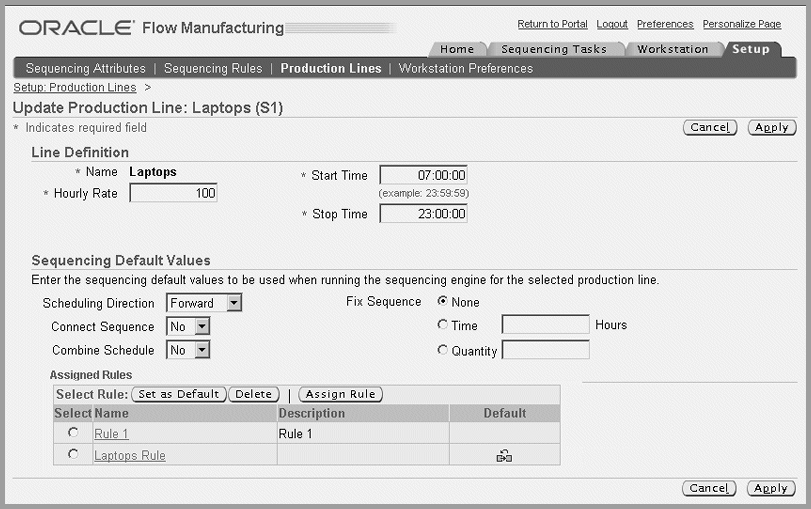
Select the production line and choose Update.
The Update Production Line page displays.
-
In the Line Definition region, you are required to enter values in the Hourly Rate, Start Time, and Stop Time fields.
Note: These values are defaulted from the Production Lines window.
-
In the Sequencing Default Values region, you can enter default values for when running the Sequencing Concurrent program for this line. In the Scheduling Direction box, you have the option to change the scheduling from Forward or Backward.
-
The Connect Sequence field is used to connect this sequencing task to a previous sequencing task. Your choices are Yes or No.
This option enables you to sequence between days within the horizon, and gives you the option to connect the sequences with existing sequences without violating constraints.
-
The Combine Schedules field is used to combine similar concurrent demand into one schedule. Your choices are Yes or No.
-
The Fix Sequence field is used to prevent the resequencing of existing Flow schedule when new demand is added to the schedules, or a portion of the schedules are resequenced. Your choices are:
-
None—Indicates all existing schedules are resequenced.
-
Time—Existing schedules with a completion time less than or equal to this value are not resequenced.
-
Quantity—Flow schedules up to the specified quantity are not resequnced.
-
-
-
In the Assigned Rules region, you can update rule information for this production line. If you want to change the default rule, select the rule in the table, and choose Set as Default. The default symbol displays in the Default field.
-
To delete a rule assigned to this line, select the rule and choose Delete.
-
To assign another rule to this production line, choose Assign Rule.
The Assign Rule to Production Line page displays. See: Assigning Production Lines and Rules
-
Choose Apply to save your work.
Assigning Production Lines and Rules
Rules are used for calculating the best sequence for schedule creation. You can assign production lines to specific rules, or assign rules to production lines.
To assign a rules to a production line
-
Navigate to the Production Lines page, and Search for the record to update.
-
Select the production line, choose Update to display the Update Production Line page.
-
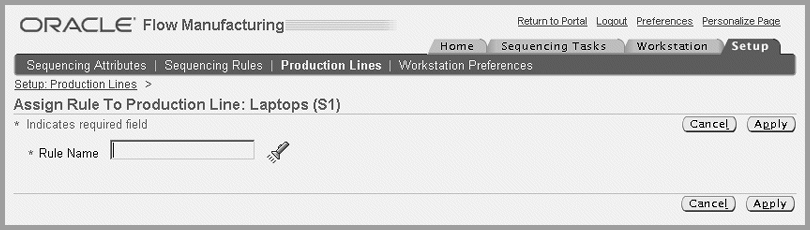
In the Assigned Rules region, choose Assign Rule.
Assign Rule to Production Line page displays.
-
Enter a search string in the Rule Name field and choose Search.
The Search and Select page displays with the results of your search.
-
Select a record. The record displays on the Assign Rule to Production Line page.
-
Choose Apply to assign this rule to your production line.
The rule displays in the Assigned Rules region of the Update Production Line page.
-
Choose Apply to save your work.
To assign production lines to a rule
-
In the Flow Manufacturing Sequencing and Execution Home page, select a value in the Organization field and choose Go.
-
Select the Setup tabbed region.
-
Choose Sequencing Rules.
-
Display the appropriate rules. See: Viewing Sequencing Rules
-
Choose Assign Lines to display the Assign Production Lines to Rule page.
In the Rule region, the name and description of the rule displays.
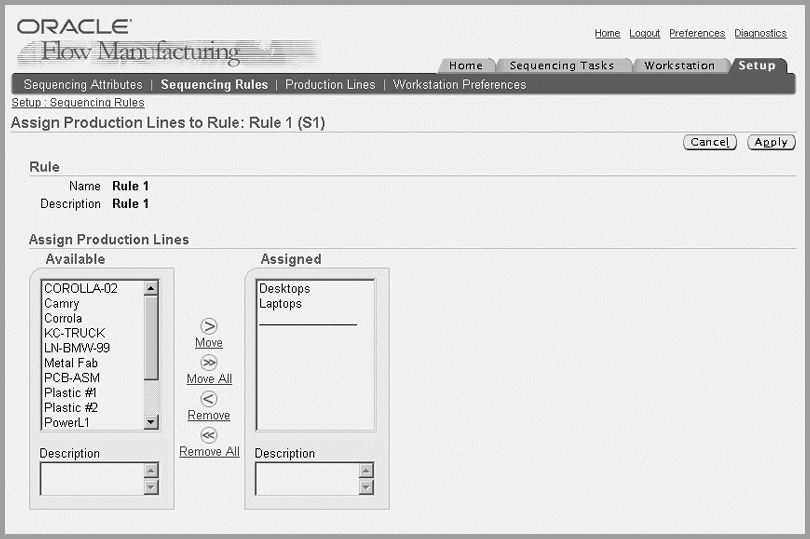
-
In the Assign Production Lines region, select production lines from the Available box, and move them to the Assigned box.
You can move all the production lines, remove lines, or remove all the production lines in the Assigned box.
-
Choose Apply to save your work.
Creating Sequencing Tasks
The Sequencing Task pages display a chronology of steps, or a train, showing where you are in the process. The train displays Enter Parameters, Select Lines, Filter Demands, and Adjust and Submit:
-
The first step is to enter parameters for the sequencing run. You create a name for the task, and specify the horizon dates, any applicable schedule group, and data used to create new schedules—or if the task is resequencing existing schedules.
-
The next step is to select the production lines used in this run.
-
In the Filter Demands step, you specify demand dates. The Filter Demands page has two regions—the first is for selecting demand date. The Optional region is used to add additional filter information such as assembly, customer, and attribute. For example, you may want to consider all sales orders of a specific due date, and then specify the particular customer and assembly number. This page is not used if you are resequencing existing schedules.
-
The Adjust and Submit Sequencing page enables you to view the relevant production lines and sales orders, along with the remaining capacity and quantity to sequence. You can update information, and delete production line demand attached to this task. The last step is submitting the task. The sequencing concurrent request is triggered when a task is submitted and Flow schedules are generated.
Results of the sequencing run display on the Flow Manufacturing Sequencing and Execution Home, Task Summary, and Task Detail pages.
Note: Flow schedules are viewable on the Line Scheduling Workbench.
Related Topics
Entering Sequencing Task Parameters
Selecting Production Lines for a Task
Filtering Demands for a Sequencing Task
Viewing Results and Submitting a Sequencing Task
Sequencing Task Details and Results
Entering Sequencing Task Parameters
The Sequencing Task pages display the train of steps to complete. When you navigate to the Entering Sequencing Task Parameters page, Enter Parameters is highlighted. This page is used to specify information needed to create a unique task. You can also select a previous task's parameters on the Sequencing Task summary page, rename the task, and create a new submission. See: Viewing Sequencing Tasks
To enter sequencing task parameters
-
Navigate to the Entering Sequencing Task Parameters page.
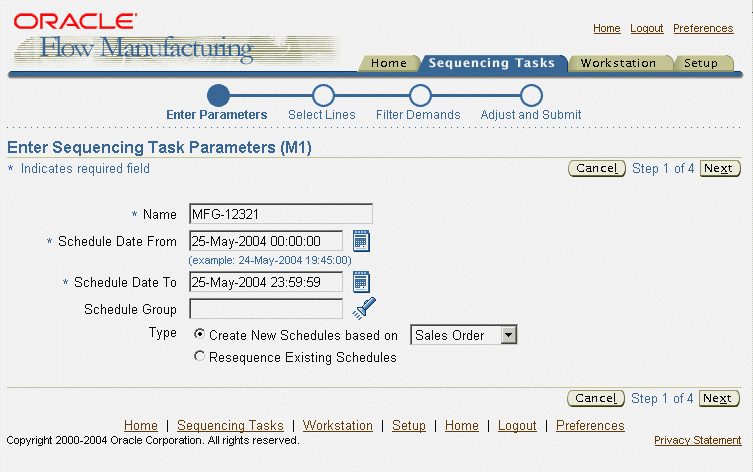
-
Select a Name for this sequencing task.
This must be a unique value, the default value is User Name and the sequential number following the last task created.
-
Select values in the Schedule Date To and From fields.
-
Optionally, you can enter a Schedule Group
-
In the Type region, choose whether you are Creating New Schedules, or Resequencing Existing Schedules.
If you are creating new schedules, select the data used to create new schedules. Your choices are either Sales Order or Planned Order.
-
Choose Next to display the Select Production Lines page.
Selecting Production Lines for a Task
When you navigate to the Enter Production Lines page, Select Lines is highlighted in the step train.
To select production lines for a sequencing task
-
Navigate to the Enter Production Lines page by choosing Next from the Enter Parameters page.
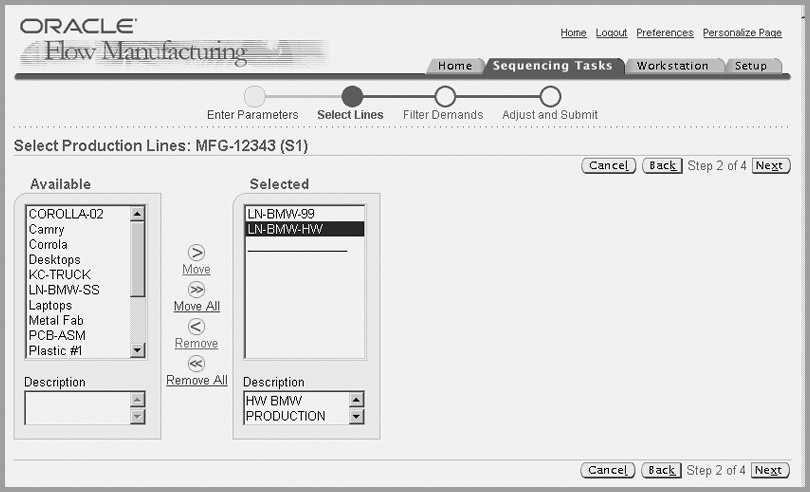
-
Select lines from the Available box, and move to the Selected box.
You can move all the production lines, remove lines, or remove all the production lines in the Assigned box.
-
Choose Next to display the Filter Demands page.
Filtering Demands for a Sequencing Task
You specify demands dates for creating Flow schedules, and any other criteria used for this task. This can include assembly part numbers, customer, and sales order attributes.
Note: This page is not used if you are resequencing existing schedules because that information was previously entered.
Honor Planning Recommendations and Include Alternate Routings Check Boxes
Flow Manufacturing can be configured to honor the lines recommended by Planning for the planned orders. Planned orders are not treated in the same way as sales orders and they do not appear on all the lines that have routing for the assembly. You can see only those planned orders as demand that are recommended by planning on the selected lines. You will not be able to see planned orders if the assembly has routing on the selected line, unless planning recommends them on the line.
When you create schedules from Planned Orders from Flow Sequencer, you can filter planned orders based on planning recommendations. As a result planned orders of an assembly will not be shown for all the lines on which the assembly has routing. This helps you to avoid selecting two or more lines having routing for the same assembly. Thereby it prevents you from creating schedules for the same demand that is scheduled twice for double the quantity than the actual planned order quantity.
Include Alternate Routings check box filters demands for planned orders. This is also selected along with Honor Planning Recommendations check box for the planned orders. This will be the same from both the Line Scheduling Workbench (LSWB) and Sequencer.
The following list presents the combined behavior of these check boxes:
-
Honor Planning Recommendations unchecked/Include Alternate Routings checked
By default shows planned orders of all the assemblies that have routing on the selected line.
-
Honor Planning Recommendations checked/Include Alternate Routings checked
Shows only planned orders that planning has recommended on the selected line.
-
Honor Planning Recommendations unchecked/ Include Alternate Routings unchecked
Shows planned orders of assemblies that have primary routing on the selected line.
-
Honor Planning Recommendations checked/Include Alternate Routings unchecked
Shows all the planned orders which planning has recommended on the selected line if the assembly of the planned order has primary routing on the selected line.
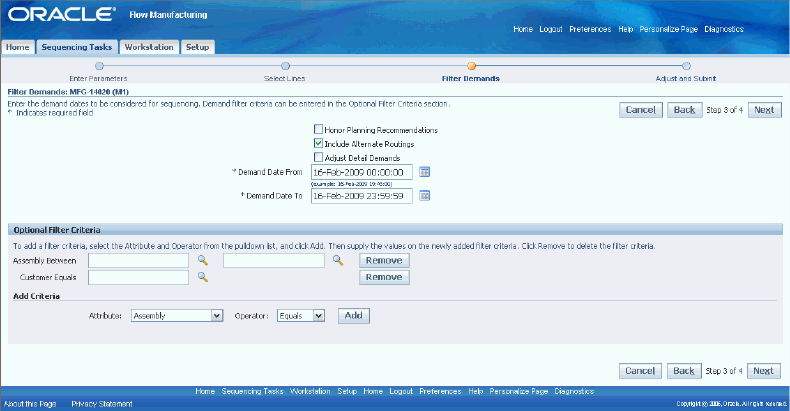
To filter demands for a sequencing task
-
Navigate to the Filter Demands page by choosing Next from the Enter Production Lines page.
-
Select Honor Planning Recommendations check box to see only those planned orders as demand type that are recommended by planning on the selected lines.
This enables you to avoid planned orders getting scheduled more than once. If you do not want to honor planning recommendations, you can uncheck the Honor Planning Recommendations check box.
-
If you want to display sales order information on the Adjust and Submit Sequencing Task page, enable the Adjust Detail Demands box.
-
Select dates in the Demand Date From and To fields.
-
In the Optional Filter Criteria region, you can select additional sales order attributes with a formula operator. The operator values are Equals or Between. In the Add Criteria region, select the attributes in the Attribute box, and the operator in the Operator box.
-
Choose Add to display these sales order attributes on this page.
For example, you can select the attribute, Assembly Part Number, and the operator Between. This enables you to list a range of assembly part numbers in your filter criteria.
Or you can select the attribute, Customer, and the operator Equals. This enables you to add a specific Customer's sales orders.
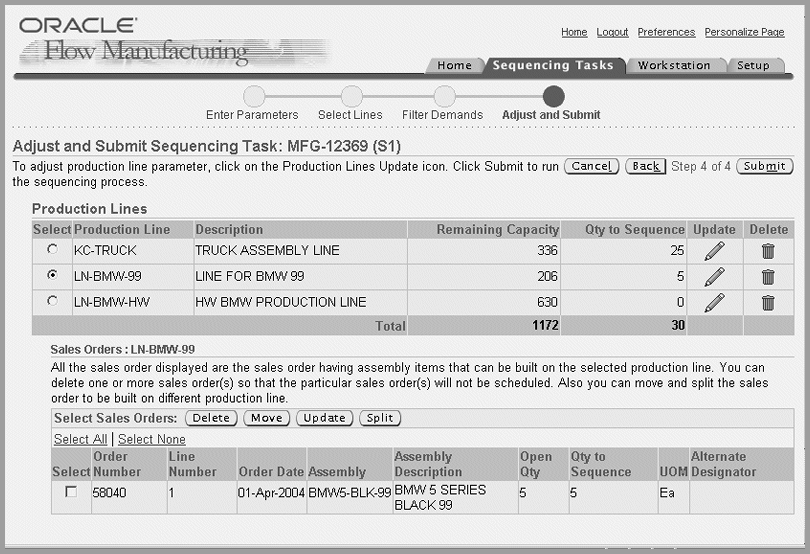
Viewing Results and Submitting a Sequencing Task
The Adjust and Submit Sequencing page is used to view the remaining capacity and demand for this sequencing task. If you enabled the Adjust Detail Demands box, on the Filter Demands page, demand data displays in the Selected Orders.
This page enables you to update task parameter lines, delete production line demand from this sequencing task, and update sales order demand information. You can also delete, move, or split the sales orders attached to this task.
To edit sequencing task results
-
Navigate to the Adjust and Submit Sequencing Task page by choosing Next from the Select Production Lines or Filter Demands pages.
Note: If you are resequencing existing schedules, the Filter Demands page is not used, and this page displays after the Select Production Lines page.
The Production Lines region displays Production Line, Description, Remaining Capacity, and Quantity to Sequence fields:
-
Remaining capacity is the capacity for the line. The value is calculated from the existing Flow schedules and the line capacity total.
-
The Quantity to Sequence value is calculated from the filter criteria you selected.
-
-
To update line task parameters, select a production line. Then choose Update to display the Update Line Task Parameters page.
-
To delete a production line from this task, select a production line and choose Delete.
-
In the Select Sales Order region, you have the option to delete, move, update, or split sales orders that are attached to the task. To remove a sales order from consideration, select the order number and choose Delete.
-
To move a sales order to another production line, select the order number and choose Move. See: Moving Demand
-
To update the sales order demand or change the routing, select the order number and choose Update. See: Updating Demands
-
To divide the demand between multiple Flow schedules and other production lines, choose Split. See: Splitting Demands
-
To submit this sequencing task to create Flow schedules, choose Submit.
The sequencing engine concurrent request is triggered when a task is submitted. See: Sequencing Concurrent Program
Sequencing Concurrent Program
The last step is submitting the task. The sequencing engine is a concurrent request. The request takes all information specified in the sequencing task, and generates Flow schedules.
The result of the sequencing is a series of Flow schedules—build sequences indicate the order of production.
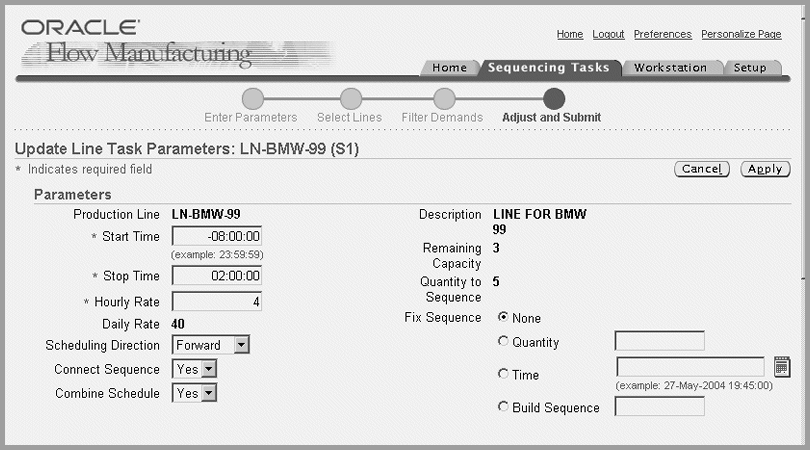
Updating Line Task Parameters
After you enter sequencing task information, and view information on the Adjust and Submit Sequencing Task page—you have the option to change the original parameters. You can modify the time, rate, default sequencing direction, and constraints on this page. You can also choose to combine schedules, and to connect with existing schedules.
To update line task parameters
-
On the Adjust and Submit Sequencing Task page, in the Production Lines region, select a line.
-
Choose Update to display the Update Line Task Parameters page.
-
Enter a Start and Stop Time range. These fields are required.
-
Enter the Hourly Rate of this line. This field is required.
-
In the Scheduling Direction box, you have the option to change the scheduling from Forward or Backward.
-
The Connect Sequence field is used to connect this sequencing task to a previous sequencing task. Your choices are Yes or No.
This option enables you to sequence between days within the horizon. When sequencing for a specified horizon, this flag gives you the option to connect the sequences with existing sequences without violating constraints.
-
The Combine Schedules field is used to combine similar concurrent demand into one schedule. Your choices are Yes or No.
-
The Fix Sequence field is used to prevent the resequencing of existing Flow schedule when new demand is added to the schedules, or a portion of the schedules are resequenced. Your choices are:
-
None—Indicates all existing schedules are resequenced.
-
Quantity—Flow schedules up to the specified quantity are not resequnced.
-
Time—Existing schedules with a completion time less than or equal to this value are not resequenced.
-
Build Sequence—Flow schedules up to the specified build sequence are not resequenced.
-
-
Choose Apply to save your work.
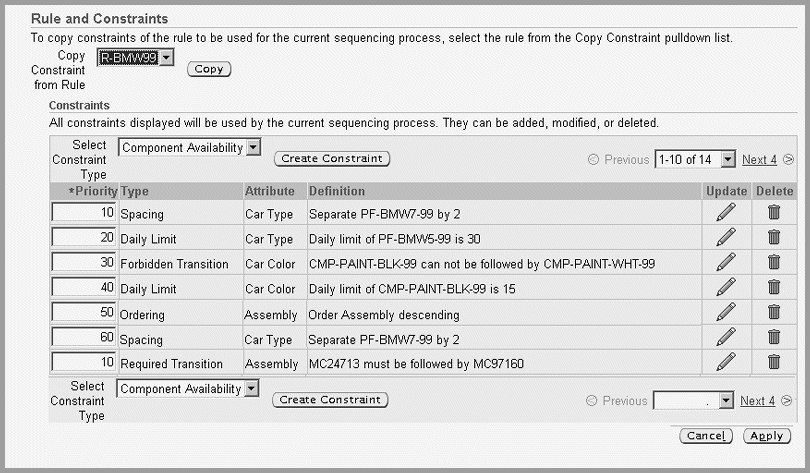
-
In the Rules and Constraints region, you can use the Copy Constraint from Rule box to select a rule, and use that rule's constraints. Choose Copy to copy the constraints to your current process.
The copied constraint displays in the Constraints region. The Constraints region displays all constraints in the current sequencing task. You can change priority—and create, modify, or delete constraints.
-
To change the priority level of the constraint, enter the new priority value in the Priority field. Choose Apply to save your changes.
-
To create a new constraint for this task, choose Create Constraint to display the Update Constraint page. See: Defining Sequencing Rules and Constraints
-
To delete a constraint, select the constraint and choose Delete.
-
To update a constraint listed on this page, choose Update.
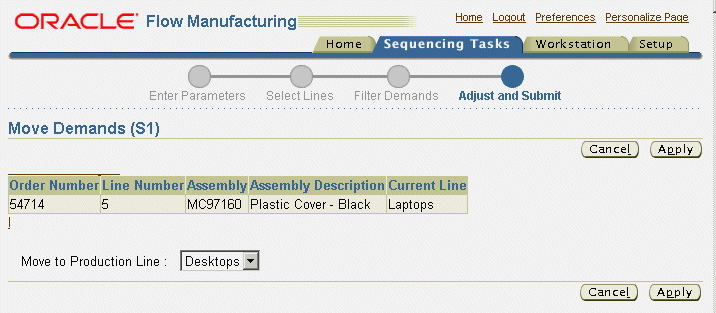
Moving Demand
You may want to move demand to another production line. You can only move demand to an alternate routing, for a production line selected, when you created the sequencing task. See: Selecting Production Lines for a Task
To move demands on a sales order
-
On the Adjust and Submit Sequencing Task page, in the Order region, select an order.
-
Choose Move to display the Move Demands page.
This page displays the sales order information including fields for Order Number, Line Number, Assembly number, Assembly Description, and the Current Line for this demand.
-
In the Move to Production Line box, select the production line where you want to move this line.
-
Choose Apply to save your work.
You will return to the Adjust and Submit Sequencing Task page displaying the updated information.
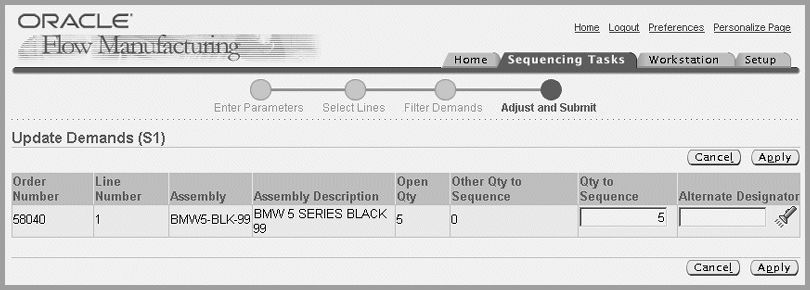
Updating Demands
Demand is based on the assembly's primary routing. The Update Demands page enables you to change either one or both of the values for the quantity to sequence, and the routing. The alternate routing must exist for the same line as the primary routing.
To update demand and routing information
-
On the Adjust and Submit Sequencing Task page, in the Order region, select an order.
-
Choose Update to display the Update Demands page.
This page displays the order information including fields for Order Number, Line Number, Assembly number, Assembly Description, Open Quantity, and Other Quantity to Sequence.
-
To change the demand for this order, enter a new value in the Quantity to Sequence field.
-
To change the routing to an alternate routing, select a value in the Alternate Designator field.
-
Choose Apply to save your work.
You will return to the Adjust and Submit Sequencing Task page displaying the updated information.
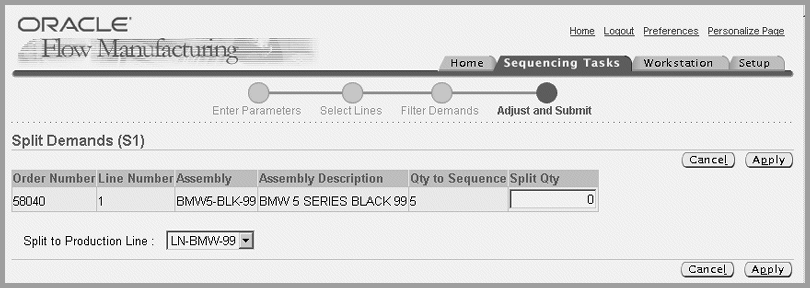
Splitting Demands
You can optimize production by dividing sales order line quantities to create multiple schedule, or splitting a quantity and moving it to another production line. You can only split demand to an alternate routing, for a production line selected, when you created the sequencing task. See: Selecting Production Lines for a Task
To split demands on a sales order
-
On the Adjust and Submit Sequencing Task page, in the Order region, select an order.
-
Choose Split to display the Split Demands page.
This page displays the sales order information including Order Number, Line Number, Assembly number, Assembly Description, and Quantity to Sequence fields.
-
In the Split Quantity box, enter the quantity you want to put on a new Flow schedule.
-
In the Split to Production Line, you have the option to select another production line for this new Flow schedule.
The alternate routing must exist first to change the routing path
-
Choose Apply to save your work.
You will return to the Adjust and Submit Sequencing Task page displaying the updated information.
Resequencing Tasks
The sequencing concurrent program considers existing flow schedules within the specified sequencing horizon—the From Start Date Time to the To End Date Time—and re-sequences them. The resequencing of existing schedules is used in the following situations:
-
Correct existing schedules to modify the number of hours in production, or the quantity.
-
Relieve overloaded Flow schedules.
Flow schedules with scheduled Completion Date equal to the Start Date Time are not considered to be within the horizon. A Flow schedule is within the horizon if the Completion Date is greater than horizon Start Date Time, and no later than horizon End Date Time.
You should not resequence if the concurrent program for that schedule is still running, the broadcast sequence is sent, the traveler is printed, or the feeder line has started.
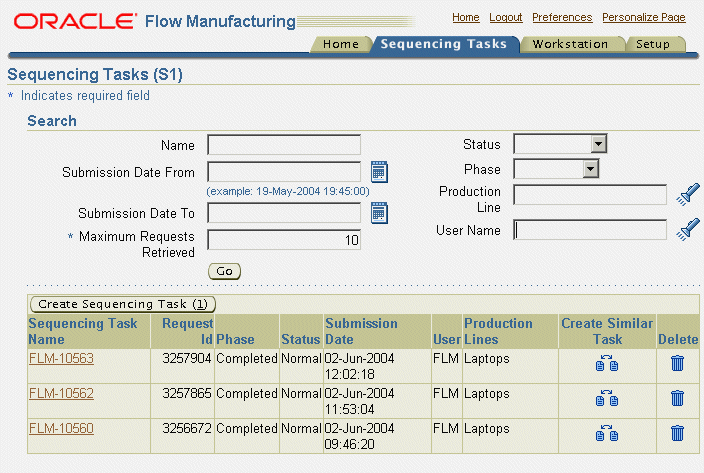
Viewing Sequencing Tasks
The Sequencing Tasks Search page displays a table with the last ten sequencing tasks from the Home page, for the organization selected. This page enables you to filter your search, and access pages to create a new task or delete a task. You can navigate to the summary and detail pages for the search results.
To search for sequencing tasks
-
Navigate to the Sequencing Tasks Search page.
-
Select search criteria to filter your search.
You can select criteria in the following fields: sequencing task Name, Submission Dates From and To, concurrent request Status, concurrent request Phase, Production Line, and User Name.
-
Choose Go to display the results of your search.
If you do not select any criteria, all sequencing task records display. Records display in a table view.
-
Choose Create Sequencing Task to create a new task. See: Creating Sequencing Tasks .
-
You can select a task in the Sequencing Task Name field to view the summary information of the task. See: Sequencing Task Summary The summary page navigates to the details page, see: Sequencing Task Details and Results
-
If you want to create a task using some or all of the parameters of an existing sequencing task, choose Create Similar Task.
This navigates to the Entering Sequencing Tasks Parameter page. The default name displays, you can modify the necessary information. See: Entering Sequencing Task Parameters
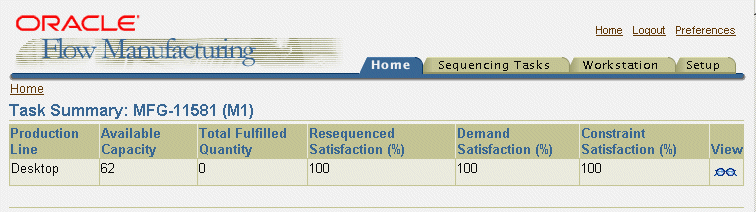
Sequencing Task Summary
The Task Summary page displays summary data for an individual task and production line—including the available capacity for the line, the quantity fulfilled—and the percentage of resequencing, demand, and constraint accomplished. Choose View to see the details, see: Sequencing Task Details and Results
Sequencing Task Details and Results
The Task Detail page is a view only, printable page displaying the results from your sequencing run. This page contains regions for:
-
Sequencing Task Parameters
-
Constraints
-
Results Summary
-
Unfulfilled Demand
-
Violated constraints
-
Violated Flow Schedules
-
Other Exceptions
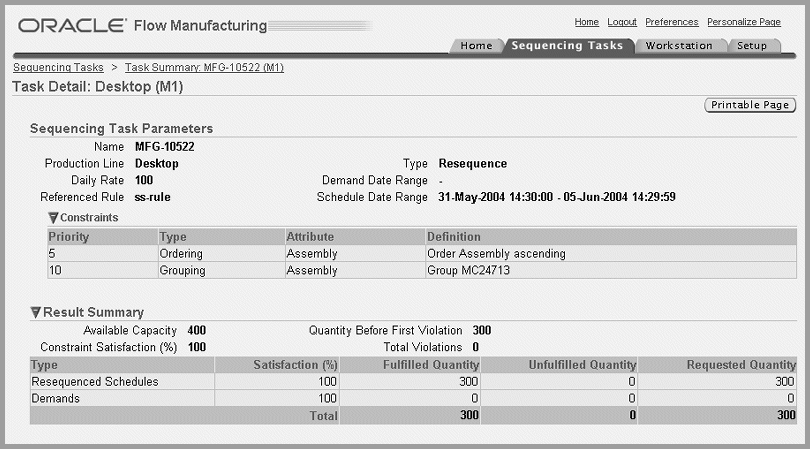
The Sequencing Task Parameters region displays setup details for the production line, and parameters entered for the task. This includes production line, daily rate, rule, constraints, demand type, and dates for demand and schedule ranges. The Constraints region displays a list of constraints for this rule and can be used in comparing results in the Violated Constraints list.
The Results Summary region provides a view of production line actual capacity considered on this specific run. It excludes the capacity fixed. For example, if the option is to fix schedules starting at the time 10:00 am, and the line time is 8:00 am to 4:00 pm, it considers the capacity from 10:00 am to 4:00 pm.
The Constraint Satisfaction percentage displays. For example, 80 percent signifies that of a total of 100 lines, the Flow schedules created on the first 80 lines do not have any violations.
The Unfulfilled Demand region provides the details for the Demand Satisfaction listed in the summary view. For example, 80 percent signifies that out of 100 quantity demands, 80 of them are scheduled.
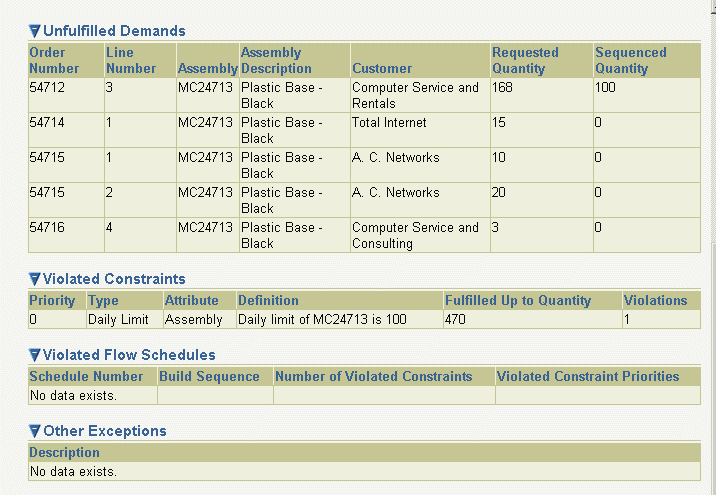
The Violated Constraints region lists the constraints broken in this sequencing run. Constraint violations are pushed to the end of the sequencing horizon.
The Violated Flow Schedule region displays a list of schedule numbers, their build sequences, the number of constraints violated, and the priorities of the constraints. The sequencing program fails when a hard constraint is violated on any newly created schedules. Violations are ignored on existing schedules. The priority level designates if the constraint is classified as a hard constraint—a constraints that must be fulfilled. If these constraints are broken—or violated—Flow Sequencing stops. A value of zero indicates a hard constraint.

The Other Exceptions region displays any other explanations for Flow schedules not created. For example, the exception message of Invalid Build Sequence Range indicates that no build sequences available in order to create Flow schedules.