Flow Execution Workstation
This chapter describes the Flow Execution Workstation—used to track the flow of shop floor work, view schedule and line operation information, and complete schedules.
This chapter covers the following topics:
- Overview of the Flow Execution Workstation
- Setting Your Preferences
- Initializing the Flow Execution Workstation
- Viewing Schedule Information
- Viewing Event Information
- Completing Line Operations
- Completing Schedules
- Viewing Resources
- Attaching and Viewing Instructions
- Viewing Detail Properties
- Viewing Components and Replenishing Kanban Cards
- Updating Component Requirements
- Assigning Lot and Serial Numbers on the Workstation
- Integration with Oracle Quality
- Customized Properties Region
- Engineering Change Order Alerts
Overview of the Flow Execution Workstation
The Flow Execution Workstation is a web based workstation providing a comprehensive set of features for tracking the flow of work, completing assemblies, and viewing details of component and resource information. The workstation has regions for schedules, events, component details, property information, and instructions. The features include the ability to:
-
View current shop floor manufacturing work
-
View a line operation's open schedules and events
-
View detailed information on the components and resources required for line operations and events
-
View kanban information for components and request replenishment
-
View operating instructions, diagrams, and other information attached to assemblies and events
-
Complete line operations and schedules
-
Assign lot and serial number information
-
Specify alternate or rework routing paths while performing completions
-
Customize personal display of information
-
Check eligible Oracle Bills of Material engineering change orders (ECOs) for line operation or event component changes
-
Create a region to display your own customized parameters not included in the workstation pages.
-
Integration with Oracle Quality pages to enter quality data and new plans
Setting Your Preferences
Data display on the workstation is controlled by preferences selected in the Workstation Parameters page. Parameters and the corresponding behavior are defined for organization, production line, or line operation. The preference for a parameter setting determines the data entry mode, the display of regions and fields on your pages, ECO checking, and the ability to enable other workstation locations.
When you enter parameters in the Flow Execution Workstation, the system first searches for records with the most detail specified at the line operation level. If the operation level parameter is not defined, it searches one level up at the line level. If production line is not specified, the system uses the organization level defaults.
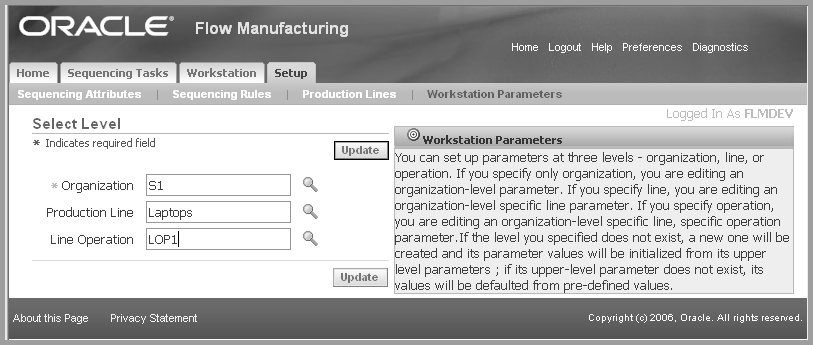
To set or view preferences in the Flow Execution Workstation:
-
In the Flow Manufacturing Sequencing and Execution Home page, select the Setup tabbed region.
-
Select Workstation Preferences to display the Select Preferences page.
-
Specify preference parameters.
You are required to select an organization, line and operation are optional:
-
Organization: If only organization is specified, the data preference is defined at the organization level only.
-
Production Line: If organization and line are specified, the data preference is defined for a specific organization and production line combination.
-
Line Operation: If organization, production line, and line operation are specified; the data preference is defined for a specific organization, line, and line operation combination.
-
-
Choose Update to display the Update Workstation Parameters page.
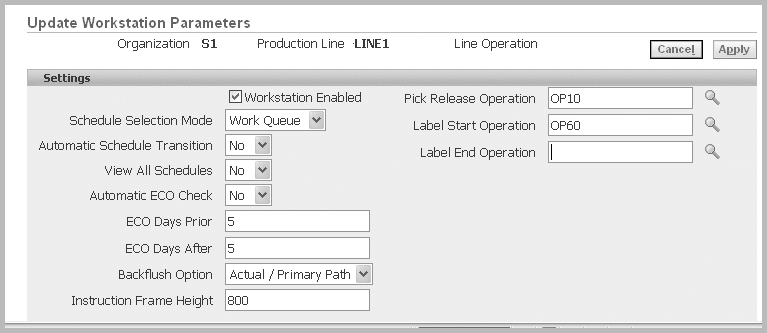
If the parameter or parameter combination specified does not exist as a preference, a new one is created using default values. You can change the values for either new or existing preferences on the Workstation Parameters page.
-
Set your preference for the Workstation Enabled box.
This parameter specifies if the workstation is used at this particular organization, line, or operation. If set to:
-
Enabled: The workstation displays applicable Flow schedules and the operator is required to choose Line Operation Completion.
-
Disabled: A workstation is not used at this specific organization, line, or operation.
-
-
In the Settings region, Schedule Selection Mode, select how schedules display on the workstation. Your choices are:
-
Work Queue: You can provide search criteria, and display the resulting list of schedules and their corresponding events.
-
User Entered: You can search, enter, or scan (using a mobile device) a specific schedule number to open the Line Operation page.
-
-
If the Schedule Selection Mode is set for Work Queue mode, set the Automatic Schedule Transition field.
Used to specify navigation options for line operations. Your choices are:
-
Yes—after choosing Complete Line Operation, the next available schedule displays on the page.
-
No—after choosing Complete Line Operation, the Work Queue page displays listing the available schedules for the next transaction.
Note: The Used Entered mode does not use this setting because the next available schedule is always user specified.
-
-
Use the View All Schedules field to filter the schedule display for a particular workstation.
-
Yes: All uncompleted schedules for the current line operation are displayed.
-
No: Only completed schedules for the previous line operation are displayed.
-
-
In the Automatic ECO Check, indicate if you want the system to automatically check for eligible Engineering Change Orders. Otherwise, you can check for ECOs manually. Select Yes or No.
-
When you check for ECOs, you can indicate a range of days to check before and after the ECO Effective Date. In the ECO Days Prior and ECO Days After, enter the number of days.
Only Implemented ECOs in the date range are considered. See: Engineering Change Order Alerts
-
The Backflush Option parameter sets the method for material backflushing:
-
Actual/Primary—Components are backflushed only for completed operations or operations on the primary path of the routing.
-
All—All components on all events are backflushed.
-
-
In the Instruction Frame Height field, set the view size of attachments on the pages. Enter a pixel value to increase or decrease the size of the display. See: Attaching and Viewing Instructions
-
If this preference is defined at the line level, you can define specific transactions performed at line operation completion. These fields are available only at the line level preference.
-
Pick Release Operation: Operation where the Pick Release process is called. See: Component Pick Release, Oracle Work in Process User's Guide
-
Label Start and End Operation: Label printing capabilities are available at the time of completion for various types of manufacturing information. If you have defined label types at the flow line Start or flow line operation, labels are printed. See: Compliance Labeling Setup, Oracle Warehouse Management User's Guide.
-
-
In the Line Operation and Event tabbed regions—select how you want the page regions, tabbed regions, and instructions to display on the pages. In Page Regions, choose the regions that display on the Line Operation and Event pages.
Select categories from the Available box—and move to the Selected box. For example:
-
In the Line Operation tabbed region, if the Events and Tabs are in the Selected box—the Line Operation page displays an Events region, and tabbed region.
-
If the Events, Instructions, and Tabs are in the Selected box—the Line Operation page displays the Events region, the Instruction region, and tabbed region.
-
In the Event tabbed region, if the Components and Tabs are in the Selected box—the Event page displays a Components region, and tabbed region.
See: Viewing Schedule Information and Viewing Event Information
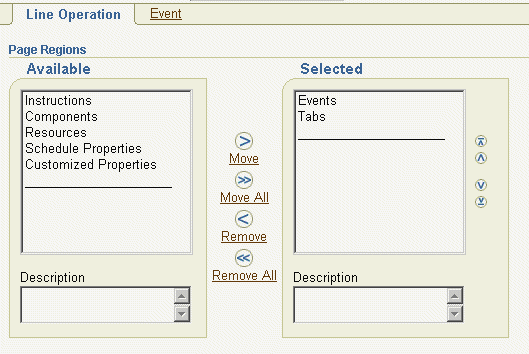
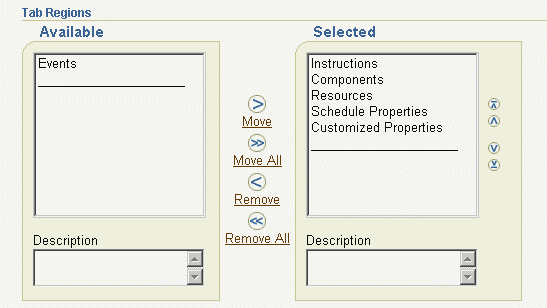
The regions available for line operations and events page regions are Instructions, Components, Resources, Schedule Properties, and Customized Properties, Tabs, Events (for Line Operation only). The order listed in the Selected box, is the order they display on the page. Use the Arrow tool to change the order.
Regions are displayed only in one mode. That is, a region is only displayed either as a region on a page, or a region on a tabbed region. It is not displayed in both areas.
-
-
In Tab Regions, choose the regions to display on the Line Operation and Event pages.
Select Regions from the Available box—and move to the Selected box. The order listed in the Selected box, is the order they display on the tabbed region. Use the Arrow tool to change the order.
-
In the Instructions boxes, select entity attachments to automatically display in the Instructions region.
Select attachment sources from the Available box—and move to the Selected box. The order listed in the Selected box, is the order they display on the page. Use the Arrow tool to change the order. See: Attaching and Viewing Instructions, and Attachments, Oracle E-Business Suite User's Guide
Note: All Available attachments are viewable. The Selected attachments automatically display.
-
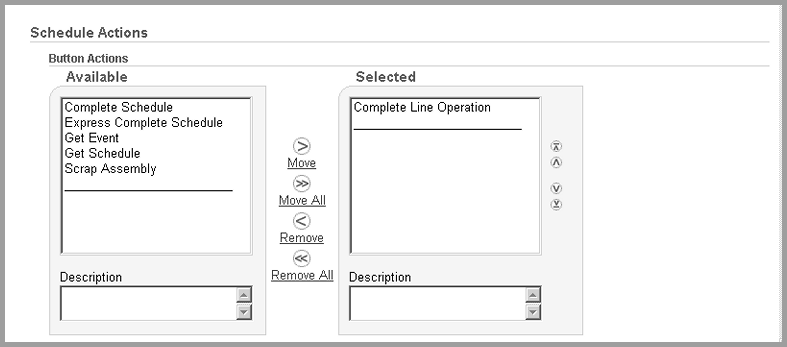
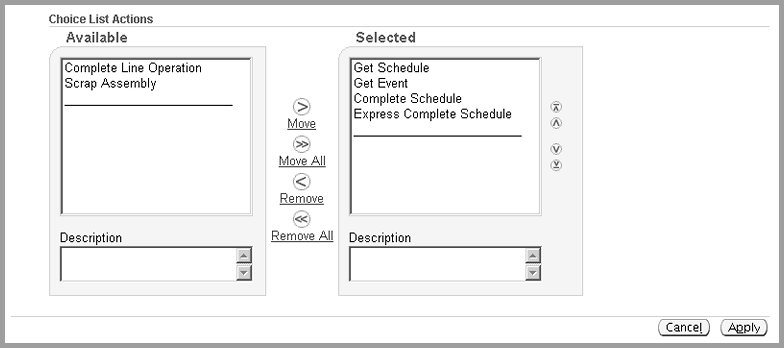
In the Schedule Actions tabbed region, select how you want your actions to appear on the Work Queue, Line Operation and Event pages. This preference specifies whether the listed actions are viewed on the page as buttons in the Button Actions region, or as a drop-down list of values in the Choice Actions region. For the Choice actions, the order the actions are listed in the selected box determines the order the actions are listed in all choice lists.
The values in the Scheduled Actions region are Complete Line Operation, Complete Schedule, Get Event, Get Schedule, Express Complete Schedule, and Scrap Assembly. Select categories from the Available box—and move to the Selected box.
Actions are displayed only in one mode on a page, that is, either as a button or drop-down list.
-
Choose Apply to save your work.
Initializing the Flow Execution Workstation
The Flow Execution Workstation is initialized by selecting an organization, production line, and line operation. The preference determines if the workstation displays a listing of Flow schedules (the Work Queue)—or you manually enter or scan information (the User Entered mode). See: Setting Your Preferences
The Work Queue mode opens the Work Queue Search page where you can select search criteria. From these results, select a schedule from the Work Queue list to access the Line Operation page. The User Entered mode navigates directly to the Line Operation page for the line and operation entered.
The Line Operation page enables you to view individual schedules, operations, events, and instructions. You can complete schedules and line operations, and enter quality results.
To view and enter Flow schedule details in the Workstation
-
Navigate to the Flow Execution Workstation.
The Flow Execution Workstation Startup page displays for selecting schedule parameters.
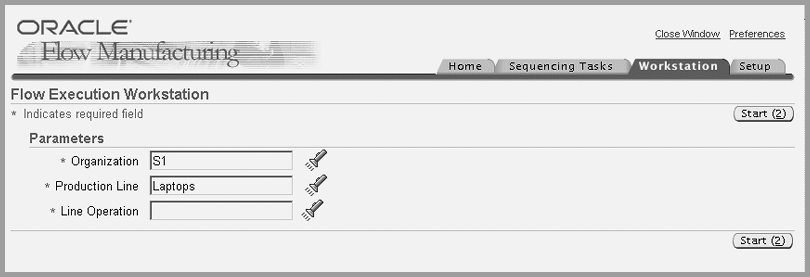
-
Select parameters for Organization, Production Line, and Line Operation.
The Workstation preference for the organization, line, and operation determines the entry mode: If the mode is:
-
Work Queue: You can provide search criteria, and display the resulting list of schedules and corresponding events. See: Work Queue Mode
-
User Entered: You can search, enter, or scan a specific schedule number to open the Line Operation page. See: User Entered Mode
-
Work Queue Mode
To access Flow Execution Workstation pages in Work Queue mode:
-
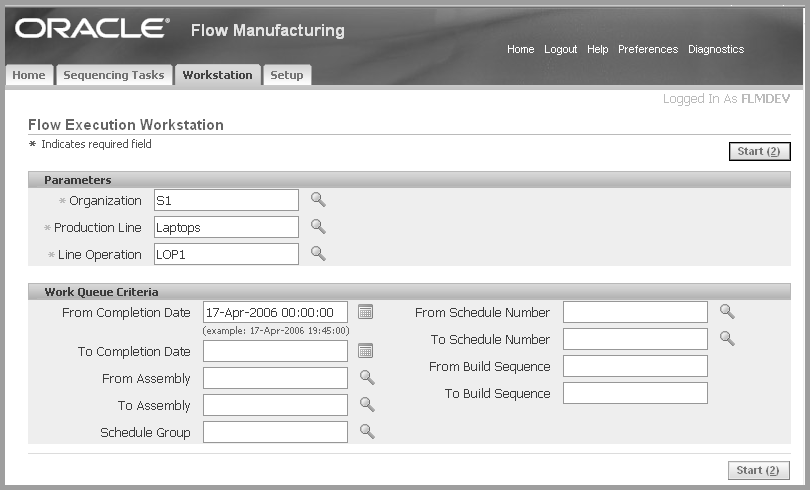
Navigate to the Flow Execution Workstation, and select parameters to display the Flow Execution Workstation Startup page.
-
The Work Queue Criteria page displays. Select any criteria for filtering your flow schedule search.
You can define your search by selecting values, or a range, in the following fields—Completion Date, Assembly, Schedule Group, and Build Sequence.
-
Choose Start to display the Work Queue page.
The work queue consists of a list of schedules and events for a selected schedule. You can perform completions of line operations and schedules from the work queue.
Note: You can handle schedules that have operations with no events in the Flow Execution Workstation. You can identify the schedules with no events in the Flow Execution Workstation by an icon and a message column. By default these columns are hidden and you have to enable them for display through personalization.
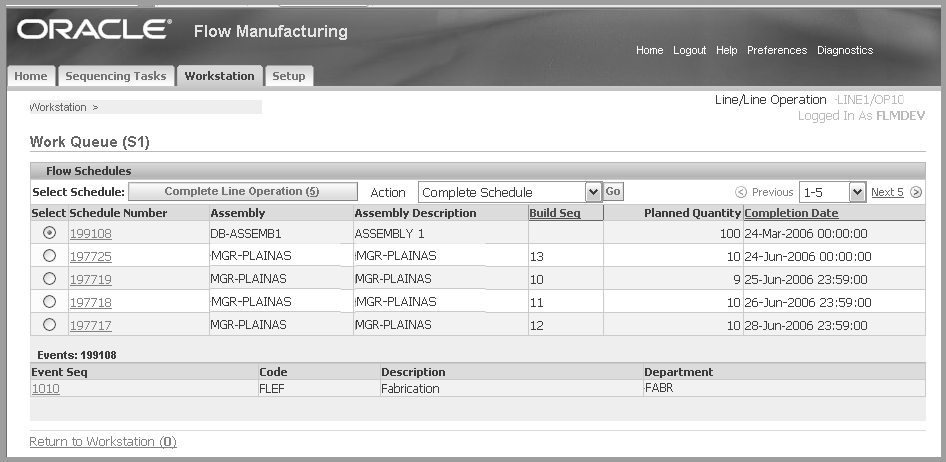
In the Flow Schedules region, this page displays Schedule Number, Assembly Part Number, Assembly Description, Build Sequence, Planned Quantity, and Completion Date.
-
Planned Quantity field value is the quantity created when the schedule is created; it does not change.
-
Completion Date field value is the scheduled completion date of the flow schedule; it does not change with the actual completion of line operation or flow schedule.
The fields in the Events region are Event Sequence, Operation Code, Event Description, and Department. See: Viewing Event Information
-
-
To navigate to the Line Operation page, select the schedule link for specific schedule.
You can also select a schedule by enabling the radio button in the Select column, and selecting the Get Schedule action. See: Viewing Schedule Information
-
To navigate to the Event page, select a schedule by enabling the radio button in the Select column—click on the appropriate event link.
You can also select an event by enabling the radio button in the Select column, and selecting the Get Event action. See: Viewing Event Information
-
To complete schedules or line operations from this page—select a record and choose Complete Line Operation, Complete Schedule, or Express Complete Schedule.
When a schedule is completed, it is no longer shown on the work queue. See: Completing Line Operations, and Completing Schedules
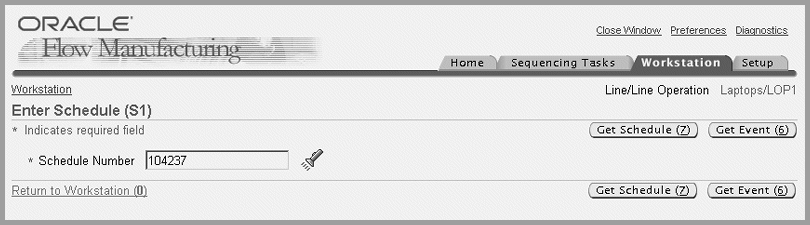
User Entered Mode
To access Flow Execution Workstation pages in User Entered mode
-
Navigate to the Flow Execution Workstation, and select parameters to display the Flow Execution Workstation Startup page.
-
Choose Start to display the Enter Schedule page.
-
In the Schedule Number field, search, enter, or scan a specific schedule number.
-
Choose either Get Schedule or Get Event to access the schedules and events for this Flow schedule.
See: Viewing Schedule Information and Viewing Event Information
Viewing Schedule Information
The Line Operation page displays schedule information in the General region. This includes fields for Schedule Number, Assembly Description, Build Sequence, Assembly Item, Scheduled Quantity, and Open Quantity.
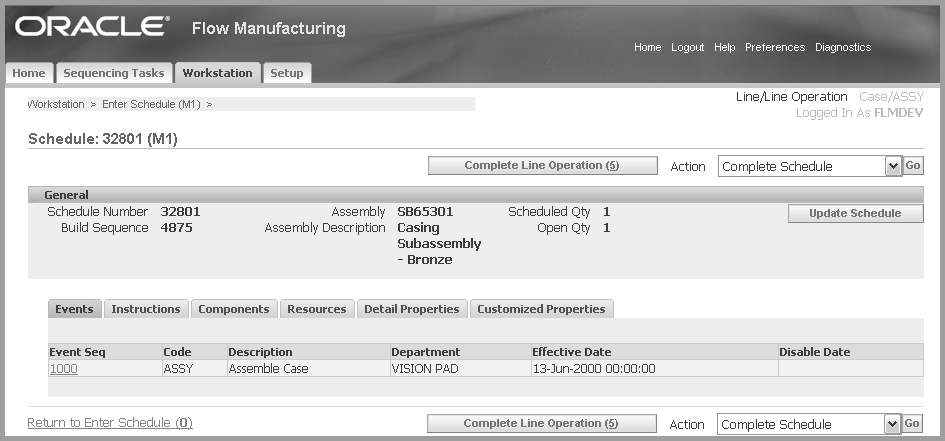
Other information is displayed as a region or tab, depending on the preference setting. This includes events, instructions, components, resources, detail properties, and customized properties. See: Setting Your Preferences
The Line Operation page enables you view and perform transactions for Flow schedules including:
-
Updating schedule information, See: Updating Flow Schedule Information
-
View the schedules corresponding event information. See: Viewing Event Information
-
View details of resources attached to events, for this line operation and schedule. See: Viewing Resources
-
View detail information about the line schedule. See: Viewing Detail Properties
-
View and replenish components using Kanban cards See: Viewing Components and Replenishing Kanban Cards
-
Complete schedules and line operations. See: Completing Line Operations , and Completing Schedules
-
Enter quality data results for mandatory or optional collection plans, at specific points on a routing. See: Integration with Oracle Quality
-
View attached instructions and documents pertaining to the assembly and schedule. See: Attaching and Viewing Instructions
-
View a region of custom parameters created to fit your business needs. See: Customized Properties Region
Updating Flow Schedule Information
You can update values on your flow schedule on the Update Schedule page. The schedule information appears in the Update Schedule header region of the page, the changeable fields appear in the Schedule Details region.
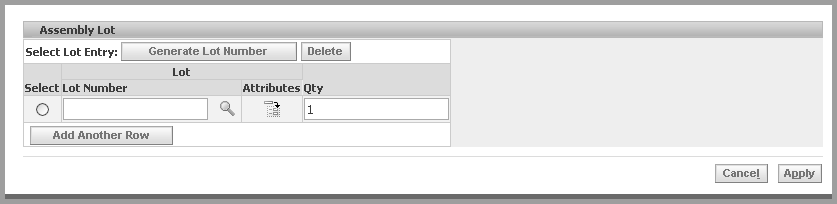
For assemblies under lot control, the Assembly Lot region appears for entering lot numbers. For assemblies under serial control, the Assembly Serial region appears. Both of these region enable you to select and generate numbers for the Scheduled Quantity value listed.
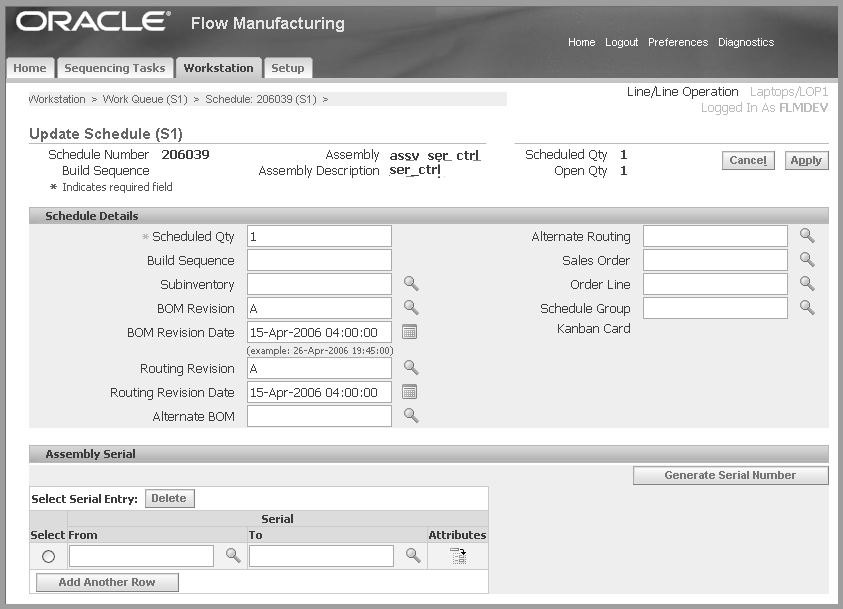
To update schedule information
-
On the Schedule page, choose Update Schedule to display the Update Schedule page.
-
Change the appropriate information. You can update the following fields: Schedule Quantity, Build Sequence, Subinventory, BOM Revision, BOM Revision Date, Routing Revision, Routing Revision Date, Alternate Routing, Sales Order, Order Line, Schedule Group, and Kanban Card.
-
For lot controlled assemblies, the Assembly Lot region appears to select lot numbers.
-
Select the list of values of generated lot numbers in the Select From and To fields.
-
If lot numbers have not been generated, choose Generate Lot Numbers to access the request program.
-
-
For serialized assemblies, the Assembly Serial region appears to select serial numbers.
-
Select the list of values of generated serial numbers in the Select From and To fields.
-
If serial numbers have not been generated, choose Generate Serial Numbers to access the Generate Serial Numbers request program.
-
-
Choose Apply to save your work.
Viewing Event Information
The Event page displays the event sequence information in the General region. This includes the corresponding Flow schedule, the item Assembly number, Assembly Description, Build Sequence, and Schedule Quantity.
Other information is displayed as a region or tab, depending on the preference setting. This includes instructions, components, resources, detail properties, and customized properties. See: Setting Your Preferences
The Event page enables you view and perform transactions for Flow schedules. Navigate between consecutive events by choosing Next. This enables you to display sequential events in order performed, until the line operation is completed.
-
View details of resources attached to events, for this line operation and schedule. See: Viewing Resources
-
View detail information about the line schedule. See: Viewing Detail Properties
-
View and replenish components using Kanban cards. See: Viewing Components and Replenishing Kanban Cards
-
Update Component Information, see: Updating Component Requirements
-
View a region of custom parameters created to fit your business needs. See: Customized Properties Region
-
Complete schedules and line operations. See: Completing Line Operations , and Completing Schedules
-
Enter quality data results for mandatory or optional collection plans, at specific points on a routing. See: Integration with Oracle Quality
-
Check ECOs to insure you have the correct changes for work as it progresses. See: Engineering Change Order Alerts.
-
Display a table of all attached instructions and documents pertaining to the production line. You can then view each individual document. See: Attaching and Viewing Instructions
Completing Line Operations
You can perform line operation completions from either the Work Queue, Line Operation, or Event pages.
Completions for line operations with one destination, and no existing mandatory Oracle Quality plans, are performed automatically when you choose Complete Operation. If the line operation has a network of choices—that is primary, alternate, and rework operations—the Line Operation Completion page appears to select the path. This page also appears if quality plan data is required for the operation. You can then access the Enter Results page on the Quality Workbench.
To perform a completion for a line operation
-
Navigate to the Flow Execution Workstation.
-
If your preference is Work Queue mode, you can complete line operations from the Work Queue page, the Line Operation page, or Event page. Select a record for completion.
-
If your preference is in the User Entered mode, completions are performed in the Line Operation or Event page.
-
-
Choose Complete Line Operation.
For line operations with one destination and no existing quality plans, the completion transaction is performed. The Work Queue mode no longer displays the completed line operation. A confirmation message displays.
For line operations with several routing options or existing quality plans, the Line Operation Completion page displays.
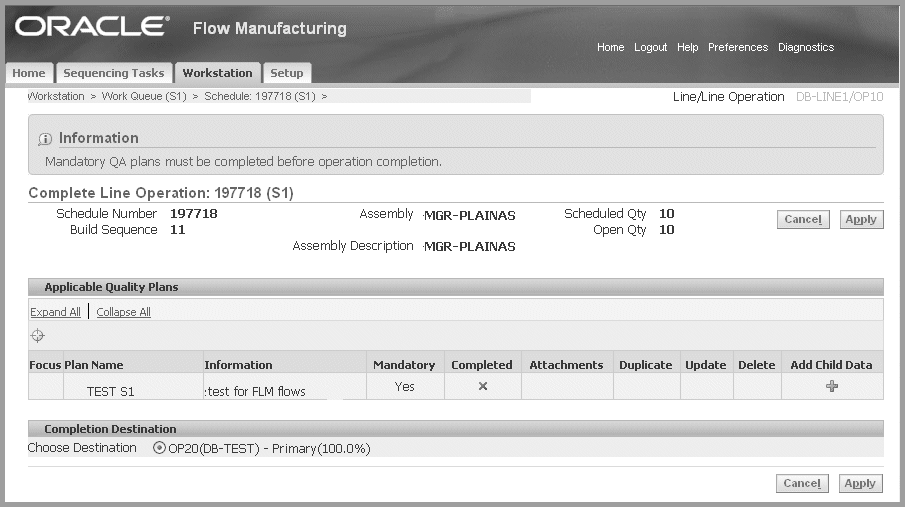
-
If quality information needs to be entered, a message appears. The collection plan information displays in the Applicable Quality Plans region including Plan Name, Information, Mandatory flag, and status information.
Access the Enter Results page on the Quality Workbench by choosing Add Child Data. See: Entering Quality Results, Oracle Quality User's Guide
-
If this line operation has a choice of destinations, choose the destination. Options are primary, alternate, and rework operations.
-
Choose Apply to save your work.
A confirmation message appears when the line operation is completed.
Related Topics
Integration with Oracle Quality
Completing Schedules
You can perform assembly completion directly from the workstation. Completions are performed on the Work Queue, Line Operation, and Event pages. There are two types of completions:
-
Complete Schedule—Used when information is required to perform the completion transaction, or when the schedule assembly or component details need to be reviewed prior to completion.
-
Express Complete Schedule—Used when default information enables an automatic completion transactions.
You can also assign lot and serial numbers at the time of completion. For items under lot and serial control, the Assembly Lot and Serial region appears on this page. The information here is defaulted from recorded information. This region enables you to access the Serial Detail or Lot Detail pages, and generate lot and serial numbers, and assign lot and serial numbers.
To perform a completion for a schedule
-
Navigate to the Flow Execution Workstation.
-
If your preference is Work Queue mode, you can complete schedules from the Work Queue, Line Operation, or Event pages.
-
If your preference is in the User Entered mode, completions are performed in the Line Operation or Event pages.
-
-
Select a record for completion.
-
Select Express Complete Schedule if required values are set as defaults for Quantity, Unit of Measure, and Subinventory. The completion transaction is performed.
-
Select Complete Schedule if you need to enter required information such as Quantity, Unit of Measure, Subinventory, or other values.
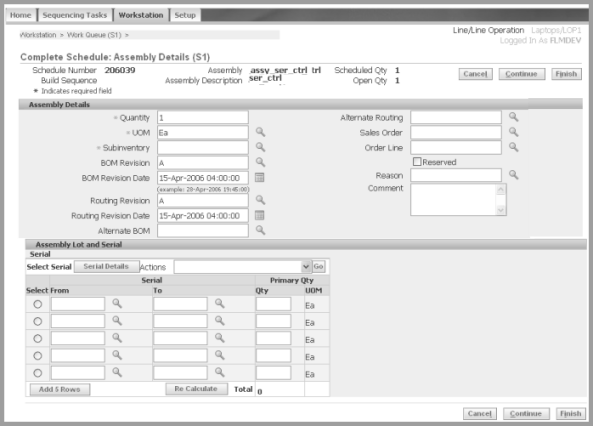
The Complete Schedule: Assembly Details page appears.
-
Select the values required for this transaction, you can change the following fields:
-
Quantity: Defaults to the schedule number quantity
-
Unit of Measure
-
Subinventory: Select a Completion Subinventory. If a completion subinventory is specified on the routing, it is defaulted but can be changed.
-
BOM Revision
-
BOM Revision Date
-
Routing Revision
-
Routing Revision Date
-
Alternate BOM
-
Alternate Routing
-
-
If you have selected a Sales Order and Order Line, you can enable the Reserve option to create a reservation.
-
Optionally, you can select a value in the Reason field, and enter text in the Comment field.
-
For items under lot control, the Assembly Lot and Serial region appears with a Lot area and any existing recorded information. Select a record in the table and choose Lot Details to display the Lot Detail page.
This page displays the lot's detail information, attributes, and descriptive flexfield data.
-
If lot numbers have not been generated, you have the option to create your records with the following choices for generation in the Actions box:
-
Generate Lot Number
-
Generate Lot and Serial Numbers
-
Generate Serial Numbers
-
-
Select generated lot numbers in the Select Lot field. Existing parent lot information appears.
-
Enter the appropriate values in the Primary and Secondary Quantity fields.
-
Choose Re Calculate to calculate the Available Quantity.
-
The Assembly Lot and Serial region appears for items under serial control with a Serial area and any existing recorded information. Select a record in the table and choose Serial Details to display the Serial Detail page.
This page displays the serial number's detail information, attributes, and descriptive flexfield data.
-
If serial numbers have not been generated, you have the option to create your records with the following choices for generation in the Actions box:
-
Generate Lot Number
-
Generate Lot and Serial Numbers
-
Generate Serial Numbers
-
-
Select generated serial numbers in the Select Serial From and To fields, and enter the quantity.
-
Select Finish to save your work and create the completion transaction.
-
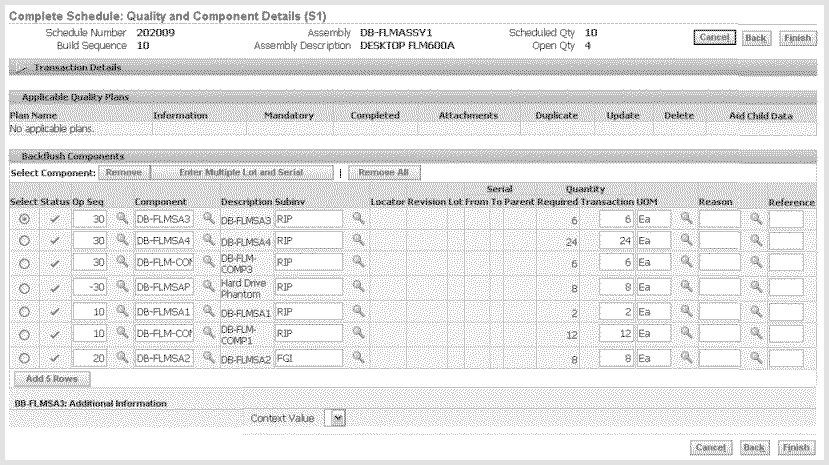
Select Continue to access quality plans, or change component backflush information.
The Complete Schedule: Quality and Component Details page appears. You can also assign lot and serial number records on this page.
-
To access available quality plans, choose Add Child Data in the Applicable Quality Plans region. See: Entering Quality Results, Oracle Quality User's Guide
-
To assign lot or serial numbers for applicable components, enter the lot and serial information. To assign multiple ranges of lot and serials, select Enter Multiple Lot and Serial.
Lot and serial numbers defaulted from existing recorded information. For recording lot and serial information, see: Assigning Lot and Serial Numbers on the Workstation
-
To change component and backflush information, you can update fields in the Backflush Components region, see: Updating Component Requirements
-
Choose Finish to save your work and create the completion transaction.
Related Topics
Work Order-less Completions , Oracle Work in Process User's Guide
Generating Serial Numbers, Oracle Inventory User's Guide
Lot Control, Oracle Inventory User's Guide
Viewing Resources
The Resources region provides the details of resources attached to events for a selected schedule. Resources include employees, machines, outside processing services, and physical space. A list of resources is displayed in view-only mode and includes information for event sequence, resource sequence, type, code, description, basis, usage, and availability.
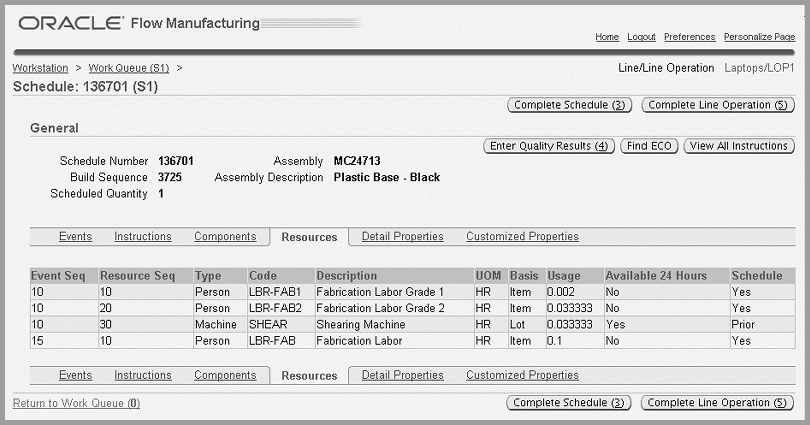
This feature enables you to track what is actually being used at the line operation, and to view the time an assembly spends at an operation. The information is derived from the Resources and Operation Resources windows in Oracle Bills of Material.
Related Topics
Defining a Resource, Oracle Bills of Material User's Guide
Assigning Operation Resources, Oracle Bills of Material User's Guide
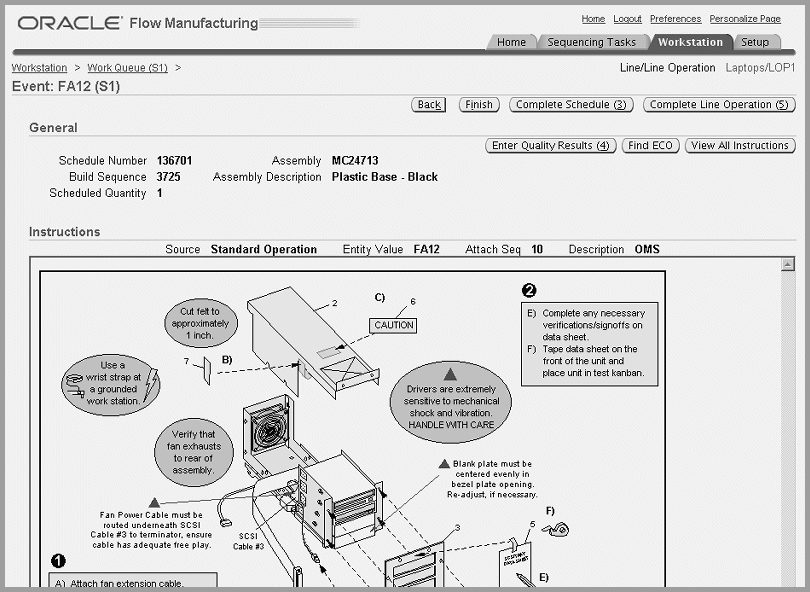
Attaching and Viewing Instructions
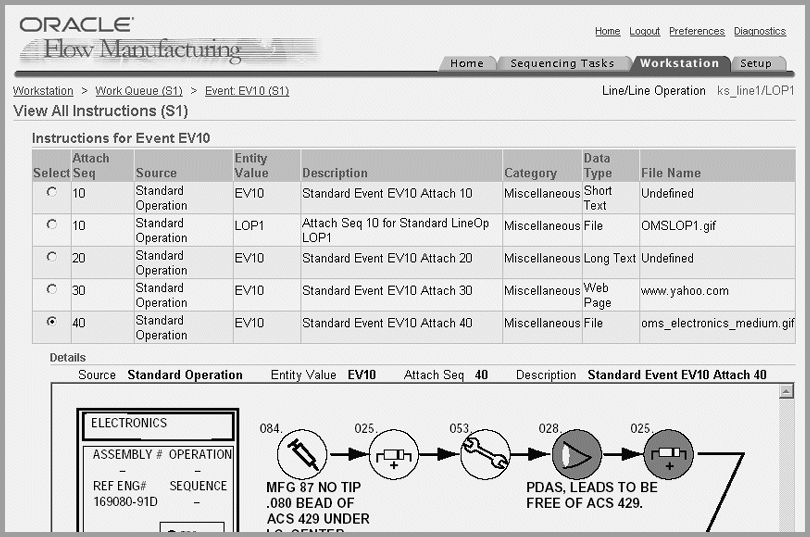
The Flow Execution Workstation provides the ability to display attached instructions and documents pertaining to your production. This can include procedures, diagrams, and assembly instructions. Instructions are viewable from the Schedule and Event pages. The attachment displays in a frame, the size can be changed in the Workstation Parameters page. If more than one attachment exists, documents are displayed in a table format. You can specify the order of display in the table.
Instructions and documents are attached to entities in their specific product application. For example, an instruction for an item is attached in the Master Item window in Oracle Inventory. Instructions for a standard line operation are attached in the Standard Line Operation window in Oracle Bills of Material. See: Attachments, Oracle E-Business Suite User's Guide
Setup
In specific product applications, attach the instructions and documents.
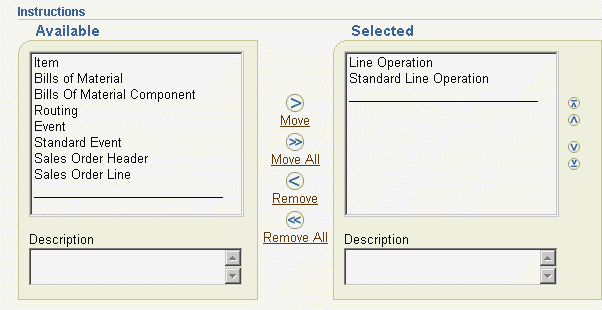
You can attach instructions to the following entities for display in the Flow Execution Workstation:
-
Item
-
Bills of Material
-
Bills Of Material Component
-
Routing
-
Event
-
Standard Event
-
Sales Order Header
-
Sales Order Line
-
Line Operation
-
Standard Line Operation
See: System Items, Oracle Inventory User's Guide
To set up instruction views in the Flow Execution Workstation:
-
In the Flow Execution Workstation, navigate to the Workstation Parameters page for the parameter preference. See: Setting Your Preferences
-
In the Instruction Frame Height field, you have the option to change the size of the view. This is a pixel value.
-
In the Instructions boxes, select where to display the instructions and attachments.
Select attachment source from the Available box—and move to the Selected box. The order listed in the Selected box, is the order they display on the page. Use the Arrow tool to change the order. This enables you to specify the priority view of the attachments. For example, at the line operation level, you can set your display at that line operation, but also all the documents attached to the events under that line operation.
-
Choose Apply to save your work.
To view instructions
-
Navigate to the Schedule or Event page.
If only one instruction attachment exists at the schedule or event level, it is shown in a frame automatically on the page.
-
If more than one attachment exists, a table displays the list of instructions. Select a record to navigate to the instruction frame.
-
Select View All Instructions to display a list of all instructions attached to a schedule.
Viewing Detail Properties
The Detail Properties region displays all the line, schedule, bill of material, and assembly information about a particular Flow schedule. The information in this region is derived from the data created when the Flow schedule is created.
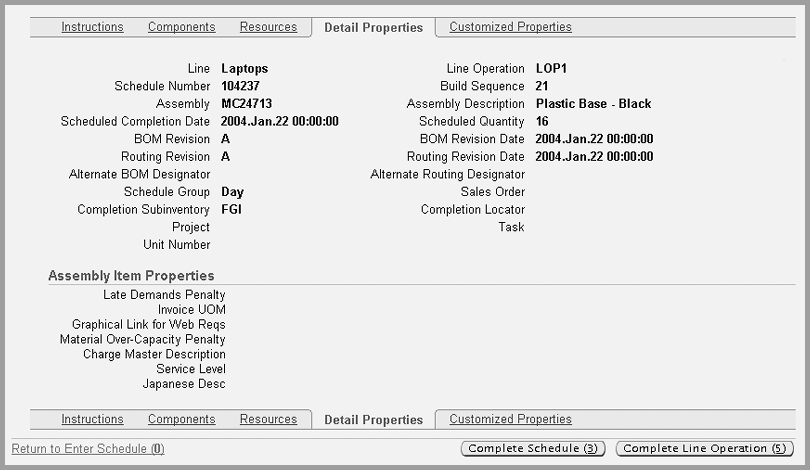
Existing descriptive item flexfield data also displays. You can use the System Items Flexfield for reporting item information. See: System Items, Oracle Inventory User's Guide
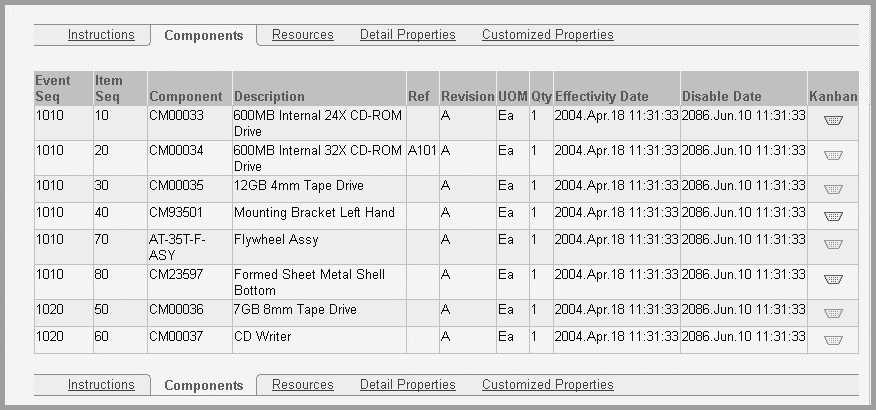
Viewing Components and Replenishing Kanban Cards
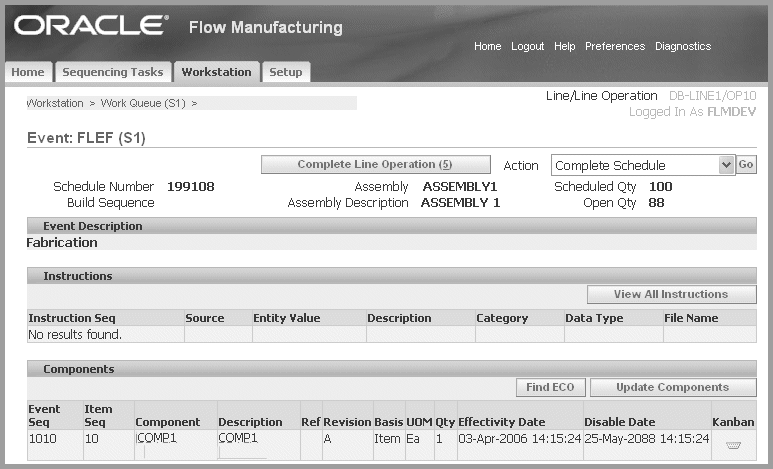
You can view and replenish components in the Components region. This region displays field information for Event Sequence, Item Sequence, Component Description, Reference, Revision, Unit of Measure, Quantity, Effectivity Date, and Disable Date.
The Replenish Kanban Card page can be accessed for a specific component by selecting the Kanban Cards Exist icon. The Replenish Kanban Card page displays both eligible and ineligible kanban cards defined for a particular component.
You can update components on the Update Components page, accessed from the Event page. The Components region displays as Recorded Components when the backflush transaction is recorded.
To replenish Kanban cards
-
Navigate to the Components region, select the component for replenishing by choosing the Kanban Cards Exist icon.
The Replenish Kanban Cards page displays.
-
In the Cards Available for Replenishment region, select components by checking the Select box for the card numbers you want to replenish.
-
Choose Replenish.
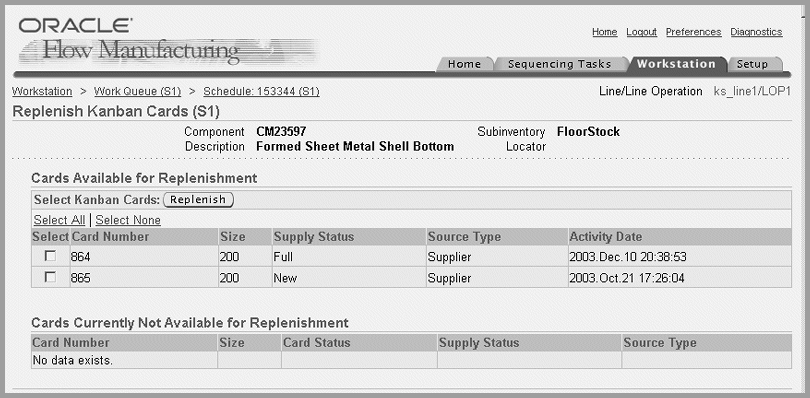
When you transaction is performed, the record you selected displays in the Cards Currently Not Available for Replenishment Region.
Updating Component Requirements
You can update your component requirements for a flow schedule on the Update Components page accessed from the Event page. This page enables you to assign lot and serial numbers, add or delete components, change subinventory locations, and quantity values.
When the backflush transaction is recorded, the Components region appears as Recorded Components region for the operation you are viewing.
To update components on a flow schedule
-
In the Event page, select Update Components to display the Update Components page. Schedule information displays in the header region of the page. The Backflush Components region is the area used to change component information.
-
To add components, choose Add Another Row
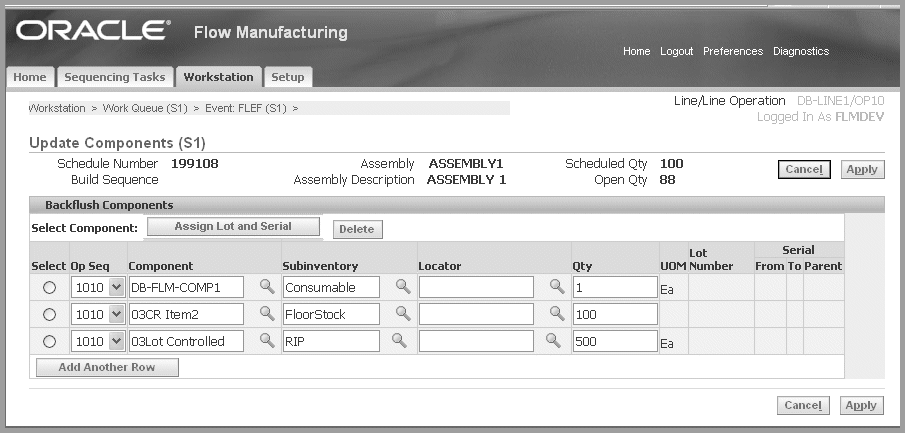
-
You can change or select information in the following fields: Component, Subinventory, Locator, and Quantity.
-
Single lot and serial number or single range serial numbers can be assigned through the Update Components page. Select Assign Lot and Serial Number to create multiple, or out of range, lot and serial number records for applicable components. When lot or serial tracking for components is enabled, the lot and serial number columns are updateable. See: Assigning Lot and Serial Numbers on the Workstation
-
Select Apply to save your work.
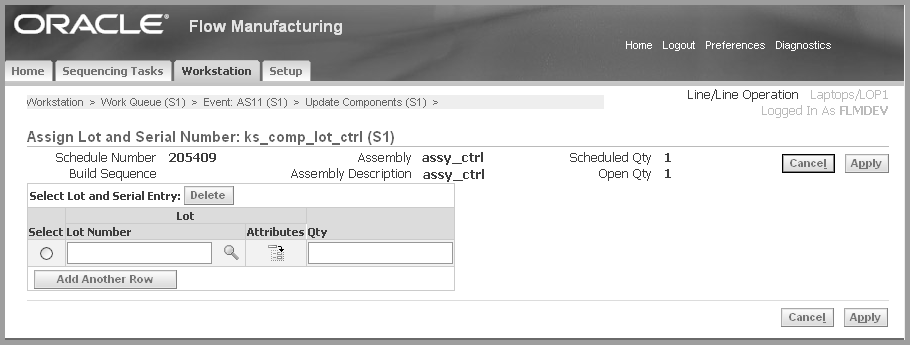
Assigning Lot and Serial Numbers on the Workstation
You can assign lot and serial number records for components. The Component Lot Serial Update page is accessed from the Update Components page.
To assign lot and serial numbers on the workstation
-
From the Update Components, select Assign Lot and Serial. The Assign Lot and Serial Number page appears.
If lot or serial numbers are assigned, the applicable numbers display in the Select Lot and Serial Number Entry boxes. You can delete these records or change the quantity.
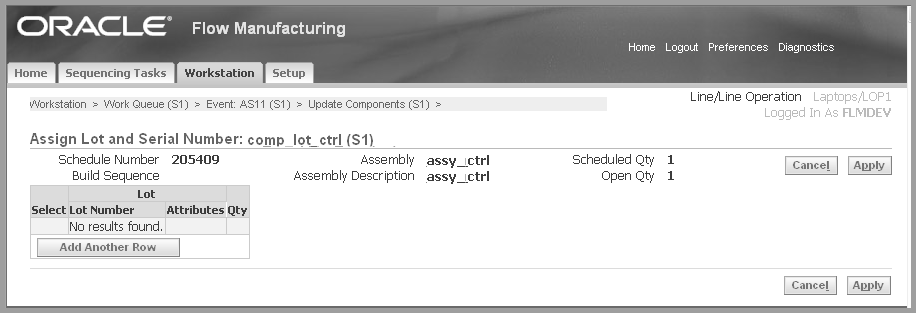
-
For items under lot control, the Lot box appears. Choose Add Another Row to select lot numbers.
-
Select a value from the list of values in the Select Lot Number box, and enter a quantity.
-
Optionally, choose the Attributes icon to access the Lot Attributes page to view or change information.
-
-
For items under serial control, the Serial box displays. Choose Add Another Row to select serial numbers.
-
Select a value from the list of values in the Select Serial Number box, or enter a range of numbers. Enter a quantity.
-
Optionally, choose the Attributed icon to access the Serial Number Attributes page to view or change information.
-
-
Choose Apply to save your work.
Related Topics
Setting Up Lot Control, Oracle Inventory User's Guide
Maintaining Item Lot Information, Oracle Inventory User's Guide
Setting Up Serial Number Control, Oracle Inventory User's Guide
Assigning Serial Numbers, Oracle Inventory User's Guide
Integration with Oracle Quality
If collection plans exist for line operations or schedules, you can access Oracle Quality to enter quality data. You can enter results for mandatory collection plans, or optional collection plans, at specific points on a routing. Line operations and schedules cannot be completed if there are remaining mandatory collections plans. If the collection plan is mandatory, the Line Operation Completion page displays when you choose Complete Schedule or Complete Operation. To access available Quality plans, choose Add Child Data in the Applicable Quality Plans region.
When the collection plan data is entered, and the completion transaction is saved, the quality data is also saved. See: Entering Quality Results, Oracle Quality User's Guide
Note: Add Child Data is enabled when Oracle Quality is enabled for the organization, and a collection plan exists for the line operation.
Customized Properties Region
You can create a region of new parameters, customized to fit your business needs. These are fields that do not already exist on the Schedule and Detail Properties pages, and parameters not delivered with the Flow Execution Workstation.
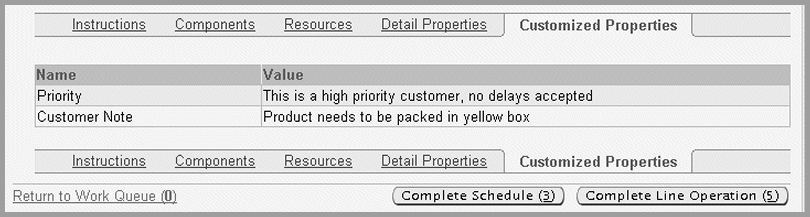
This region has Name and Value fields. For example, you may want to add a Name designated as Priority, with a corresponding Value as specified as High Priority.
The custom parameters are added using an applications program interface (API)— Flow Manufacturing, Execution Utility.
Engineering Change Order Alerts
You can check for engineering change orders (ECOs) related to your assembly. Changes include adding, changing, or disabling components. The information is accessed from the Schedule and Event pages. The ECOs that are eligible for display include:
-
Bill of Material ECOs, not routing ECOs
-
Status is Implemented
-
Components are used at current line operation or event only
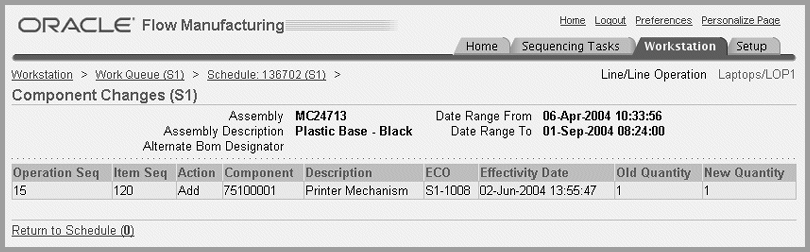
This functionality is set up in the Automatic ECO Check field in the Workstation Preferences page. See: Setting Your Preferences
Eligible ECOs can be flagged for a range of dates. This enables you to have the correct changes for work as it progresses on the shop floor. For example, if you have a value of 2 in the ECO Days Prior field, and a value of 3 in and ECO Days After field—the system considers ECOs in a range of 5 days. This is 2 days before today's date, and 3 days after the scheduled completion date.