Line Scheduling Workbench
This chapter covers the following topics:
- Overview of Line Scheduling Workbench in Flow Manufacturing
- Defining Scheduling Rules
- Define Scheduling Rules Window
- Line Scheduling Workbench Options Window
- Viewing Unscheduled Orders
- Viewing, Creating, and Modifying Flow Schedules
- Creating Flow Schedules
- Flow Schedule Summary Window
- Flow Schedule Details Window
- How Scheduling is Calculated
- Line Scheduling Workbench Tools Menu
- Roll Flow Schedules
- Deleting Flow Schedules
- Other Features
Overview of Line Scheduling Workbench in Flow Manufacturing
Line scheduling is the process of sequencing and scheduling the work to be done on your balanced flow lines. You create flow schedules to represent the volume and mix of products to be produced. The objective of line scheduling is to synchronize production as tightly as possible to customer demand, as well as establishing an achievable pace and consistent flow of products throughout the production process and supply chain.
The Line Scheduling Workbench is used by schedulers to create and manage flow schedules. You can simulate the assignment of work to production lines, and schedule work on specific lines. While you can view all scheduled orders (such as discrete jobs, repetitive schedules, and flow schedules) through the workbench windows, the only type of work you can create and schedule in the workbench is a flow schedule. The following illustration shows the process flow for line scheduling.
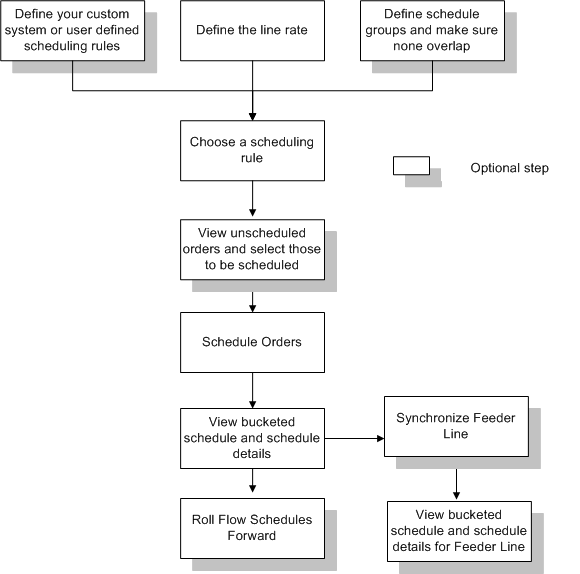
The Line Scheduling Workbench Options window is the interface to the other planning windows in line scheduling. The functions available through the workbench are:
-
Viewing Unscheduled Orders
You can view unscheduled orders in the Line Scheduling Workbench Unscheduled Orders window. You have the option to display the unscheduled planned orders or sales orders. These unscheduled orders can be converted into flow schedules.
-
Creating and Maintaining Flow Schedules
You can create and modify schedule quantities and dates of flow schedules.
-
Prioritizing and Sequencing Flow Schedules
You can schedule your flow schedules either by using the scheduling rules provided, or ones that you have defined.
-
Flow Schedule Completion
You can perform completion transactions for scheduled flow schedules when production is finished.
-
Mixed Model Map
The Mixed Model Map is used to monitor your line design by balancing a line against a specified statement of demand.
-
Roll Flow Schedules
You can roll flow schedules forward, based on under completions and overcompletions, in order to adjust future production.
-
Deleting Flow Schedules
You can delete flow schedules in order to provide a clean slate for new schedule generation.
-
Checking the Availability of Components
You can access the ATP Results window to view component availability.
-
Viewing Resource Load in Relationship to Available Capacity
You can view a graphical representation of the required load of the line and its associated resources.
Defining Scheduling Rules
A scheduling rule determines the logic used to set the timing of the flow schedules. The rule is comprised of an algorithm and the criteria used in sequencing the flow schedules. Oracle Flow Manufacturing provides several types of scheduling rule options. Pre-defined scheduling rules combine a system algorithm with sequencing criteria. In addition, there are two methods to create your own rules.
Scheduling Rule Options
-
Pre-defined scheduling rules combine a system algorithm and one sequencing criteria. Five pre-defined rules are provided.
-
System-Defined Rules
User-defined scheduling rules allow you to combine a system algorithm with one or more of the system provided criteria.
-
User-Defined
You can also create your own rules defined by modifying the custom line scheduling procedure that is executed at the time of scheduling flow lines.
Scheduling Algorithms
Three algorithms are provided for line scheduling:
No Level Loading
Flow schedules are sequenced according to criteria, and the demand is placed in the days of the scheduling horizon. Starting with the first available day, demand is scheduled until capacity is reached.
Criteria Order is used to determine the sequence of the flow schedules. Beginning with the demand with lowest sequence (or highest priority), demand scheduled in ascending order.
Level Daily Rates
Flow schedules on each day are sequenced based on the demand ratio. In this algorithm the production rate for each item is calculated for each day. Therefore, items with higher demand have a higher production rate. That rate is then used on each day of the scheduling horizon.
Production rate for an item on a particular day is determined by multiplying the available capacity on that day by the demand ratio for the item.
Mixed Models
In this algorithm the production rate for different items is calculated in order to establish a production rule pattern for a mix of items. The rule pattern is repeated within a day and across the scheduling horizon.
Sequencing Criteria
You can sequence flow schedules using one or more of the following values:
-
Order Entry Date
-
Order Priority
-
Order Promise Date
-
Order Request Date
-
Order Schedule Date
-
Production Sequence Forward
-
Production Sequence Reverse
The criteria is listed in the order of priority. For example, you can sequence by Order Request Date and Order Entry Date. The Order Request Date has priority 1, the Order Entry Date has priority 2. If two different flow schedules have the same order request date, then the order with the earliest order entry date is scheduled first.
Criteria are only applied to unscheduled sales orders. For unscheduled planned orders, the generated Planned Order Due Date value is the only criteria used for sequencing.
Related Topics
Define Scheduling Rules Window
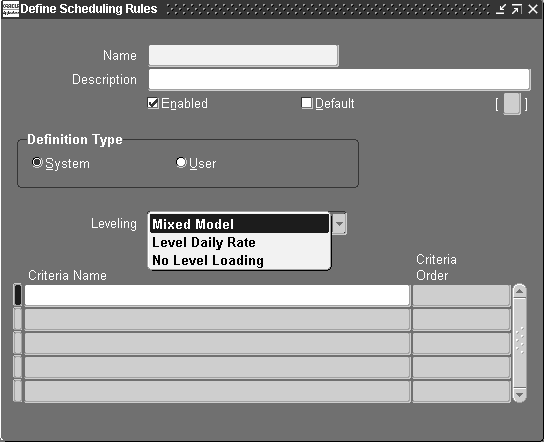
Define Scheduling Rules Window
You can view scheduling rules and sequencing criteria, as well as define your own custom rules in this window.
To view existing scheduling rules
-
Navigate to the Define Scheduling Rules window.
-
From the Query menu choose Enter, and then choose Run.
Use the Arrow keys to page through the list of scheduling rules.
To define system-defined or user-defined scheduling rules
-
Navigate to the Define Scheduling Rules window.
-
Enter the name of the scheduling rule in the Name field.
If you are creating a custom rule, this value is user-defined. The following rules are provided in the system:
-
Mixed Model - mixed model by order request date
-
Level Daily Rate- level daily rate by order request date
-
Request Date- order request date with no leveling
-
Schedule Date - order schedule date with no leveling
-
Promise Date - order promise date with no leveling
-
Production Sequence Forward - order schedule date, order production date sequence in ascending order with no level loading
-
Production Sequence Reverse - order schedule date, order production date sequence in descending order with no level loading
-
-
Enter the description of the rule in the Description field.
For rules you create, it is beneficial to have the name and description reflect the algorithm being used.
-
Uncheck the Enabled check box if you are disabling an existing rule, otherwise leave it marked.
This is a Yes/No flag indicating whether this rule is currently in use.
-
Select the Default check box if this rule is to be your default scheduling rule.
This is Yes/No flag indicating if this is the default rule. The default rule is used unless it is overridden; there can only be one default rule for scheduling.
-
If this is a system-defined rule, choose the System Defined option button. Otherwise, if this rule is to be defined by a user procedure, proceed to Step 9.
This option button enables the region for rules using system provided algorithms and sequencing criteria.
-
Select an algorithm in the Leveling box.
The system algorithm values in this box are:
-
No Level Loading–sequencing is calculated only by priority criteria
-
Level Daily Rate–the calculation is the ratio of total demand for each item, multiplied by the line rate
-
Mixed Model–daily demand is calculated from different products and different lot sizes
-
-
In the Criteria Name box, select criteria values from the list of values.
Enter one or more values in order of priority. For example, if you select Order Request Date first, and then Order Entry Date–the order with the earliest request date and earliest order entry date is scheduled first.
-
Order Entry Date
-
Order Priority
-
Order Promise Date
-
Order Request Date
-
Order Schedule Date
-
Production Sequence Forward
-
Production Sequence Reverse
-
-
For user procedures, choose the User Defined option button.
This option button sets the rule to user-defined. To add custom line scheduling logic, modify the Custom_Schedule procedure (MRPPCLSS.pls/MRPPCLSB.pls).
-
Save your work.
Line Scheduling Workbench Options Window
The Line Scheduling Workbench Options window is the starting window from which to access line scheduling options. From this window you can access the other windows to view unscheduled orders, create flow schedules, view and modify existing schedules.
Honor Planning Recommendations and Primary Routing Only Check Boxes
The following list presents the combined behavior of these check boxes:
-
Honor Planning Recommendations checked/Primary Routing Only unchecked
Shows only planned orders that planning has recommended on the selected line.
-
Honor Planning Recommendations unchecked/Primary Routing Only checked
Shows only planned orders of assemblies that have primary routing on the selected line.
-
Honor Planning Recommendations unchecked/Primary Routing Only unchecked
By default shows planned orders of assemblies that have routing on the selected line.
-
Honor Planning Recommendations checked/Primary Routing Only checked
Shows all the planned orders which planning has recommended on the selected line if the assembly of the planned order has primary routing on the selected line.
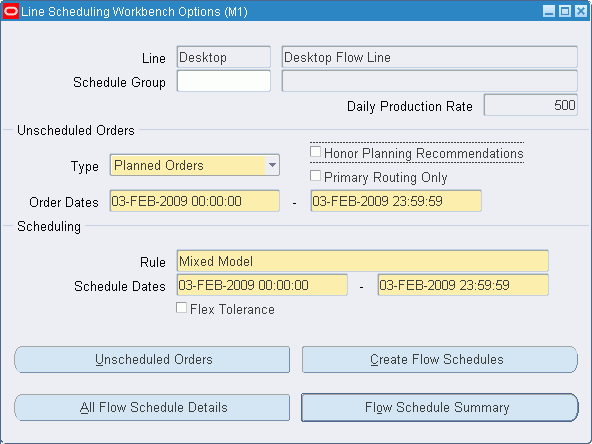
To view unscheduled orders, create flow schedules, or modify existing schedules
-
Navigate to the Line Scheduling Workbench Options window by selecting an organization and production line.
The Line Scheduling Workbench Options window displays information on the selected line. You can access the other windows using the defaulted information, or you can enter other values.
The Daily Production Rate is information for this production line. It is the calculation of the Hourly Production Rate multiplied by the number of work hours for this line.
-
Optionally select a Schedule Group value.
The Schedule Group is defined in Work in Process. The value entered here is used as a default for any schedules created.
-
In the Unscheduled Orders region, select the Type and Order Date ranges for unscheduled orders.
You can select Sales Orders or Planned Orders. Sales orders are created from Order Management transactions; Planned Orders are created from all of your planning production.
If you select Planned Orders, then select Primary Routing Only check box to see planned orders for assemblies that have primary routing on the selected line.
Select Honor Planning Recommendations along with Primary Routing Only check box to filter planned orders based on planning recommendations. As planning can recommend lines that have assemblies with alternate routings, this helps you to filter those orders with demand type as Planned Orders.
Note: If you create multiple plans marked as production – the Production flag is checked on the Master Production Schedules window or the MRP Names window– you can create duplicate flow schedules.
Note: Flow schedules are created from planned orders in the Line Scheduling Workbench—not releases from the Planner Workbench.
The Order Dates range determines which orders are displayed on the Unscheduled Orders window, and signifies the period of time to consider demand for scheduling. It refers to either schedule ship date of sales orders, or due dates of planned orders.
-
In the Scheduling region select a scheduling rule.
-
Select beginning and ending date values.
Flow schedules are created for the date ranges that you select. See: How Scheduling is Calculated
-
Check the Flex Tolerances check box if you want to enable flexible tolerance fences in your scheduling calculations.
Flexible tolerance fences provide temporary increases to capacity to handle increases in orders. The line rate is adjusted by the tolerance fence percentage before scheduling rules are applied. Tolerance fences are set up when creating line definition. See: Defining Production Lines and Tolerance Fences, Oracle Work in Process User's Guide
-
Choose one of the following for line scheduling functions:
Unscheduled Orders: Displays the Unscheduled Orders window showing all demand that has not been converted into Flow schedules. See: Viewing Unscheduled Orders
-
All Flow Schedule Details: Displays the Flow Schedule Details window enabling you to view and modify flow schedules at the detail level of the assembly. This function displays all open Flow schedules without regard to the schedule dates. See: Flow Schedule Details Window
-
Create Flow Schedules: Creates new Flow schedules using the values selected on the Line Scheduling Workbench Options window. See: How Scheduling is Calculated
-
Flow Schedule Summary: Displays the Flow Schedule Summary window for viewing existing schedules. See: Flow Schedule Summary Window
-
Viewing Unscheduled Orders
The Unscheduled Orders window is used to view unscheduled demand - demand that has not been converted into Flow schedules. You can change certain values and create Flow schedules directly from this window. You can also use criteria to filter your unscheduled orders, and create Flow schedules according to that criteria. See: How Scheduling is Calculated.
To view unscheduled orders
-
Navigate to the Line Scheduling Workbench Options window and enter values, or use the default information.
-
Choose Unscheduled Orders to display the Find Unscheduled Orders window.
-
Enter search criteria, or leave all fields blank to retrieve all records that fit the criteria set in the Line Scheduling Options window.
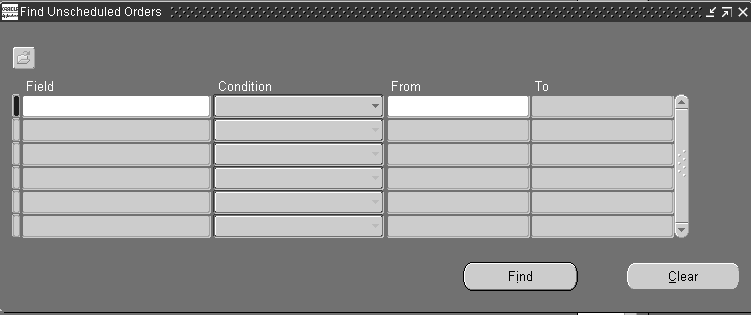
-
To filter your search, enter a search string by selecting Field values and an operator in the Condition field.
You can use one string or several strings.
You can also select the Folder menu to customize your display and save your Find criteria.
See: Customizing the Presentation of Data in a Folder, Oracle E-Business Suite User's Guide, and Searching for Data, Oracle E-Business Suite User's Guide
-
Choose Find.
The Unscheduled Orders window shows all orders for the selected order type, date range, and filter criteria.
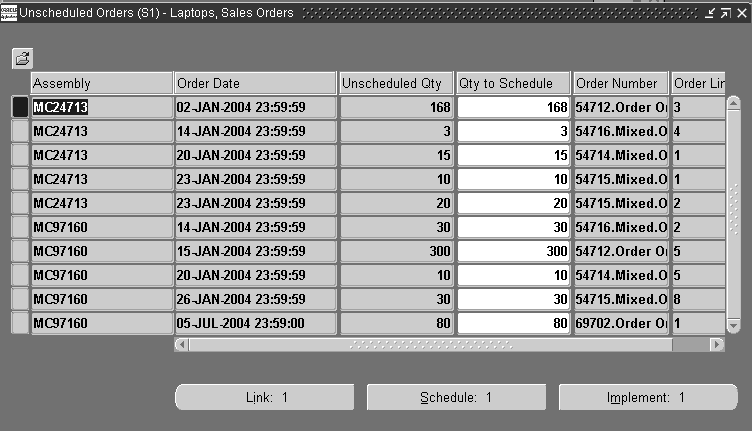
This window displays fields for assembly number, order date, the unscheduled quantity, the quantity available to schedule, sales order number, and corresponding sales order lines.
-
Choose Link to link Flow schedules to sales order lines. See: Linking Sales Orders to Schedules
-
Choose Schedule to create schedules for records selected. The Flow Schedule Summary window displays to view schedule information of planned and completed quantities at an aggregate level. This method enables you to create Flow schedules according to filtering criteria, schedule rule, and line capacity.
-
Choose Implement to create schedules for all unscheduled orders selected. These orders are scheduled without regard to the line capacity or scheduling rules. See: How Scheduling is Calculated
Linking Sales Orders to Schedules
Flow schedules are created from sales order demand, planned order demand, or created manually. Manually created schedules or schedules that have had the demand type removed do not reference a sales order. The linking functionality enables you to establish a reference to sales orders during Flow schedule creation - if one does not already exist, or if it is linked to a planned order. This functionality is accessed from the Unscheduled Orders window.
Note: To consume the sales order demand, select the Consume Order check box. This will consume the sales order into flow schedules created from planned orders and these planned orders will not appear as unscheduled orders. But if you want to schedule it separately, then do not select the check box and the planned orders whose flow schedules are linked to the sales order appear as unscheduled orders.
By default the Consume Order check box is not displayed, as it is a folder field. To display the field, select the field from the folder. By default, the check box is unchecked
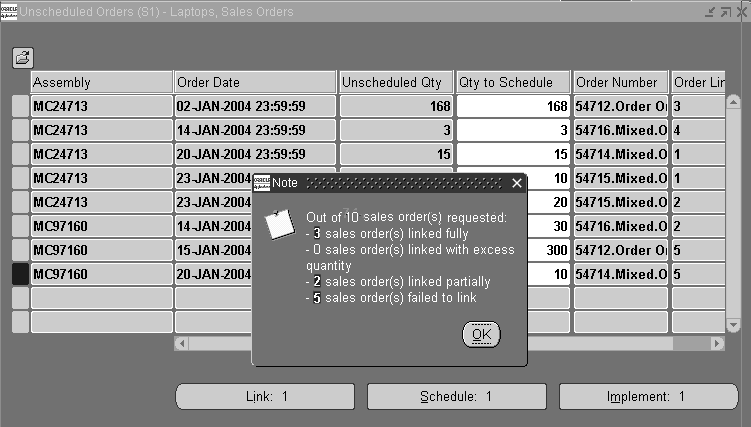
When you choose Link from the Unscheduled Orders window, sales order quantities are matched to selected schedule quantities that fall within the date range specified. A Note window displays the linking results:
-
Sales orders linked fully
The quantity in the sales order line matches total quantity in the Flow schedules.
-
Sales orders linked with excess quantity
The quantity in the sales order line is less than the total quantity in the Flow schedules.
-
Sales orders linked partially
The quantity in the sales order line is greater than the total quantity in the Flow schedules. Flow schedules fulfill partial quantity of the sales order line.
-
Sales orders failed to link
Sales order is not linked to any Flow schedule.
For example, you may have sales order and unscheduled order quantities as demonstrated in the following table. The linking process matches sales order demand with unscheduled demand resulting in some linked orders, and others not linked.
| Unscheduled Sales Order Demand | Flow Schedule Quantities not Linked | Matched Quantities |
|---|---|---|
| Order1, 6 each | FS1, 2 each | Order1, FS1. 2 |
| - | FS2, 2 each | Order1, FS2, 2 |
| - | FS3, 3 each | Order1, FS3, 3 |
| Order2, 4 each | FS4, 2 each | Order2, FS4, 2 |
| - | FS5, 2 each | Order2, FS5, 2 |
| Order3, 6 each | FS6, 2 each | Order3, FS6, 2 |
| Order4, 8 each | - | Order4, 0 |
| Order1, 6 each | FS1, 2 each | Order1, FS1. 2 |
In this example, the Note window displays these results:
-
1 sales order linked fully (Order2)
-
1 sales order inked with excess quantity (Order1)
-
1 sales order linked partially (Order3)
-
1 sales order failed to link (Order4)
Viewing, Creating, and Modifying Flow Schedules
You access both flow schedule summary and detail information from the Line Scheduling Workbench Options window. This allows you to view, create, and change flow schedules. The Flow Schedule Summary window shows schedule information grouped by assembly and date, showing the planned and completed quantities at an aggregate level. You can then navigate to the Flow Schedule Details window for more information on the assembly and its components.
Note: Oracle Project Manufacturing feature of model/unit effectivity is supported in the Line Scheduling Workbench. If this feature is enabled, the Unit Number field is visible when viewing unscheduled orders and passed on to new flow schedules created. See: Model/Unit Effectivity, Oracle Project Manufacturing Implementation Manual.
Related Topics
Creating Flow Schedules
You can create flow schedules the following ways:
-
Use the Create Flow Schedules button on the Line Scheduling Workbench Options window. When you choose this button, flow schedules are created for all unscheduled orders that fall within the date ranges if the capacity is adequate.
Note: If the scheduling rule is set to Do Not Schedule, unscheduled orders are converted to flow schedules according to order dates. All unscheduled orders in the specified date range are converted to flow schedules – schedule dates, capacity, and sequencing criteria are ignored.
-
Use the Implement button on the Unscheduled Orders window. Flow schedules are created for all unscheduled orders that you have selected on this window. These orders are scheduled without regard to the line capacity or scheduling rules.
-
Choose Schedule on the Unscheduled Orders window. This method enables you to create Flow schedules according to filter criteria.
-
Modify the schedule on the Flow Schedules Summary window. If a schedule quantity is added to a day that does not already have a flow schedule, one is created.
-
You can add a new record on the Flow Schedules Details window.
To create flow schedules from the Line Scheduling Workbench Options window
-
Note: Do not use FLM-INTERNAL as prefix for schedule number when you manually create flow schedules from line scheduling workbench.
Navigate to the Line Scheduling Workbench Options window.
-
You can use the default information on this window, or enter values. See: Line Scheduling Workbench Options Window.
Flow schedules for a given line are sequenced within a Schedule Group, schedules without a schedule group are sequenced together.
The Order Date ranges are used for the period of time to consider demand for scheduling. Flow schedules are created for unscheduled orders that fall within this date range – if the capacity is adequate.
-
Choose Create Flow Schedules.
Flow schedules are created from unscheduled orders by considering the following elements:
-
The demand for the order type within the specified date range in the Unscheduled Orders window.
-
The orders topmost in priority, based on sequencing criteria
-
The line capacity for the date range. If there is not enough capacity, the order remains unscheduled.
The results of this process are shown in the Flow Schedule Summary window.
If you choose Unscheduled Orders, you can see the orders that were not converted into flow schedules.
-
-
Save your work.
To convert unscheduled orders to flow schedules
-
Navigate to the Unscheduled Orders window.
-
Select the records to implement into flow schedules.
You can make any modifications or adjustments to the details of your records. You can select multiple assemblies on this window for viewing on the detail window.
Flow schedules are created for all unscheduled orders that you have selected on this window. These orders are scheduled without regard to the line capacity or scheduling rules
-
Choose Implement.
-
Choose OK. Otherwise, to cancel this transaction, choose Cancel.
-
Choose Yes to view the Flow Schedule Details window with the new schedule record. Choose No to view the Unscheduled Orders window.
After the new schedule is created, the demand does not appear on the Unscheduled Orders window.
-
Save your work.
-
Choose Schedule to create schedules for records selected. The Flow Schedule Summary window displays to view schedule information of planned and completed quantities at an aggregate level. This method enables you to create Flow schedules according to filtering criteria, schedule rule, and line capacity.
To create flow schedules by modifying information on the Flow Schedules Summary window
-
Navigate to the Flow Schedules Summary window.
Only schedules without details (such as schedule group, project, or task) can be modified at the summary level. If details exist, the Flow Schedule Details window appears.
-
Enter the new planned quantity, or scroll to the date you to modify and update quantity. You can only modify the Total Planned Quantity, not the completed or variance value.
-
Save your new record.
If a schedule quantity is added to a day that does not already have a flow schedule, a new record is created for that day.
Note: If the quantity is changed to 0, the flow schedule is deleted – but you cannot delete flow schedules with partial or full completion status.
To create flow schedules by adding a new record on the Flow Schedule Details window
-
Navigate to the Flow Schedule Details window.
-
Enter the record information and save your record.
You can add flow schedules only for the line you have specified on the Line Scheduling Workbench Options window.
Flow Schedule Summary Window
The Flow Schedule Summary window is used to view and manage flow schedules at an aggregate level. This window shows all flow schedules, discrete jobs, and repetitive schedules at a summary level.
Note: Only flow schedules can be maintained through this window. Repetitive schedules and discrete jobs are displayed but cannot be modified.
To view or modify flow schedules at a summary level
-
Navigate to the Line Scheduling Workbench Options window.
-
You can use the default information on this window, or enter values. See: Line Scheduling Workbench Options Window.
Schedule quantities can be modified in both the summary and detail windows. However, only schedules that do not have details (such as schedule group, project, or task) can be modified at the summary level.
-
Choose Flow Schedule Summary
The Flow Schedule Summary window shows schedules, in a bucketed format, from the start dates selected on the Line Scheduling Workbench Options window. You can scroll back or forward in this window.
Three types of order information can be viewed. You can select the types displayed on this window through Preferences in the Tools Menu. See: Preferences
-
Planned quantity is calculated when the flow schedule is created, this amount can be changed.
-
Completed quantity is updated when you perform a completion on this schedule.
-
Variance is the difference between Planned and Completed quantities.
-
-
To modify a flow schedule quantity, change the Planned quantity in the date column selected. However, only schedules that do not have details (such as schedule group, project, or task) can be modified at the summary level.
The Total and Total Planned Quantity for this assembly reflect the changes you just made.
This window offers the feature of spreading weekly quantities across the valid workdays. Enter a value in the Total field, and choose Tab.
The new total quantity will spread even across all the workdays and display in the window.
-
Save your work.
-
You can access the following windows:
-
Unscheduled Orders: Displays the Unscheduled Orders window. See: Viewing Unscheduled Orders
-
Details: Displays the Flow Schedule Details window for the assemblies and dates selected. The number after the word.Detail indicates how many records are selected. You can select multiple assemblies on this window for viewing on the detail window. See: Flow Schedule Details Window
-
Flow Schedule Details Window
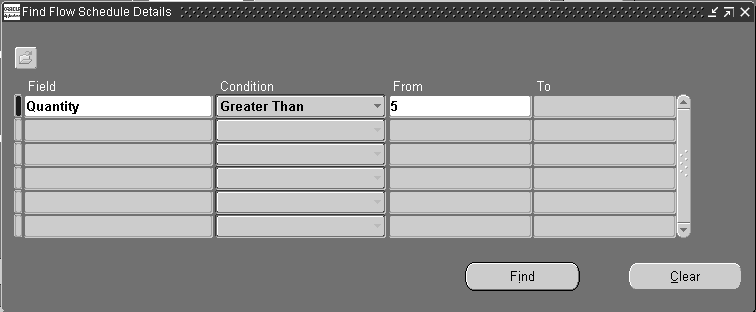
The Flow Schedule Details window enables you to view and modify Flow schedules at the detail level of the assembly. You can access this window from the Line Scheduling Options or Flow Schedule Summary windows. If you are navigating from the Line Scheduling Options window, you can filter your search by entering field and operator values. All details within criteria specified display on the Flow Schedule Details window. If you are accessing this window from the Flow Schedule Summary window, only the schedules selected display.
Note: Only flow schedules can be maintained through this window. Repetitive schedules and discrete jobs are displayed but cannot be modified.
To view or modify flow schedule details
-
Navigate to the Line Scheduling Workbench Options window.
-
Enter values, and choose All Flow Schedule Details. See: Line Scheduling Workbench Options Window
The Find Flow Schedule Details window displays.
-
Enter search criteria, or leave all fields blank to retrieve all records.
-
To filter your search, enter a search string by selecting Field values and an operator in the Condition field
You can use one string or several strings.
You can also select the Folder menu to customize your display and save your Find criteria.
Customizing the Presentation of Data in a Folder, Oracle E-Business Suite User's Guide, and Searching for Data, Oracle E-Business Suite User's Guide
-
Choose Find.
The Flow Schedule Details window displays information according to your search criteria.
To select specific Flow schedule details from the summary window
-
Navigate to the Flow Schedule Summary window, select one or more assemblies.
-
Choose Details.
The Flow Schedule Details window displays information on the assemblies selected in the summary window.
To view or modify Flow schedule details
-
Navigate to the Flow Schedule Details window.
This window displays fields for Assembly, Build Sequence, Completion Date, Quantity, Completed Quantity, Order Number, Order Line, Order Requested Date, and Unit Number.
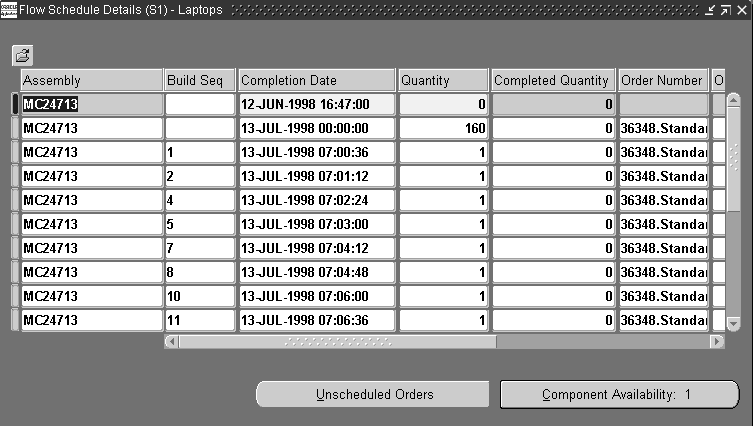
-
You can modify some values including Build Sequence, Completion Date, and Quantity fields.
-
Save your work.
-
You can access the following windows:
-
Unscheduled Orders: Displays the Unscheduled Orders window. See: Viewing Unscheduled Orders
-
Component Availability: Displays the ATP Results window to show the status of material used on your lines. See: Component Availability
Component availability checking is permitted only for items with the Check ATP item attribute set to Yes. See: Order Management Attribute Group, Oracle Inventory User's Guide
-
How Scheduling is Calculated
Scheduling rules determine the timing of the flow schedules using the following logic in the calculation routine:
-
Sequence is determined by the criteria in the rule.
Demand is sequenced using the criteria in the scheduling rule. The priority of each criteria determines the order in which it is applied.
-
The first flow schedule created goes to the first available date in the scheduling horizon.
Flow schedules are created for orders starting with the first available due date that has capacity. Flow schedules are not created for orders than cannot be scheduled within the scheduling horizon.
-
This process of attaining the line rate for each day continues until the end of the scheduling horizon.
Capacity is calculated for the day using the line rate, subtracting the existing workload (flow schedules, discrete jobs, repetitive schedules) for that day. When available capacity for the day is attained, schedules are slated for the next day until the end of the scheduling horizon.
-
If you are using flexible tolerance fences, scheduling begins after the last day indicated from the Days in Advance value.
Tolerance fences provide temporary increases to capacity above their normal operating rate to handle rises in orders.
Calendar Shifts Crossing Non-Work Days
Oracle Flow Manufacturing supports shifts that cross calendar days, as long as the start of the shift falls on a working day. To accomplish this, ensure that the Oracle Bills of Material Workday Calendar, the line definition, and the scheduling window you use in the Line Scheduling Workbench are synchronized. For example, you can specify the workday calendar is setup for the days Monday - Friday, and three shifts:
-
Shift 1—7 am to 3 pm
-
Shift 2—3 pm to 11 pm
-
Shift 3—11 pm to 7 am
The line definition is then set up to work from 7 am to 7 am. To schedule all shifts for Friday, ensure that the current schedule on the Line Scheduling Workbench is set to Saturday at 7 am. The Line Scheduling Workbench then schedules through 7 am, Saturday—even if Saturday is a non-work day.
You cannot start a shift on a non-work day. For example, if you have a shift starting at 11 pm on Sunday, the Line Scheduling Workbench cannot schedule for the first hour of the shift. See: Using the Workday Calendar, Oracle Bills of Material User's Guide
Algorithms
The scheduling rule is comprised of an algorithm and the criteria used in sequencing the flow schedules. Oracle Flow Manufacturing provides three algorithms described here.
-
No Level Loading
If you select a scheduling rule that has no level loading, the criteria defined in the scheduling rule is used to prioritize and sequence the orders. Orders are scheduled with capacity considerations beginning with the first available date of the scheduling date range. If the entire quantity of the sales order cannot be satisfied on a date, the remaining quantity is scheduled on subsequent days where capacity is available.
-
Level Daily Rate
If you choose to schedule for each day using the level daily rate, each item is scheduled at a rate in regard to the demand ratio of the item. The demand ratio of an item equals the total demand of the item divided by the grand total demand.
-
Mixed Model
This algorithm establishes a pattern to manufacture items in order to meet demand. The pattern distributes units according to the demand of each item for each day.
Line Scheduling Workbench Tools Menu
The following are functions available in the Tools Menu for maintaining flow schedules. This menu is available through any of the windows in the Line Scheduling Workbench.
-
Completions
-
Mixed Model Map
-
Preferences
-
Roll Flow Schedules
-
Delete Flow Schedules
Completion of Flow Schedules
You can complete flow schedules through the Work Order-less Completions window. Choose Completions from the Tools menu to display the window. The details of the schedules you selected are defaulted in the Work Order-less Completions window.
Related Topics
Performing Work Order-less Completions, Oracle Work in Process User's Guide
Mixed Model Map
You can access the Mixed Model Workbench from the Tools menu. The Mixed Model Map Workbench helps you to create and monitor your line design by balancing a line against a specified forecast.
You can use the Mixed Model Map to compare line information with demand requirements. This provides information to adjust resources on the line to meet the demand. The output of the Mixed Model Map will give you the line rate.
Preferences
The Preferences window is used to change the quantity types that show on the Flow Schedule Summary window.
The Planned quantity is originally calculated when the flow schedule is created using the rule and available capacity. The Completed quantity is updated when you perform a completion on this schedule. The Variance is the difference between Planned and Completed quantities.

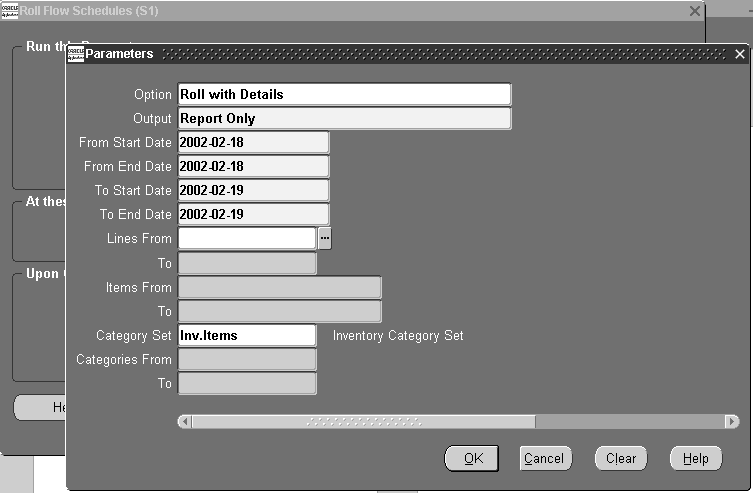
Roll Flow Schedules
You must maintain flow schedules so that production schedule information is accurate; and planning information such as Available-To-Promise and demand for components is current. The Roll Flow Schedules program is designed to allow you to adjust future schedules based on actual performance in the past. You adjust the quantity on future production schedules based on the completion quantities and past production. You can change schedules for a line, a range of lines, or for all lines at once.
Note: Planning calculations do not consider flow schedules with past due dates. Use the Roll Flow Schedules window to update your flow schedules in order to keep planning accurate.
Note: The Feeder Line Synchronization program ignores flow schedules created from the Roll Flow Schedules program. You must roll schedules on both the parent and feeder lines.
Three options are available for adjusting schedules: Close All Past Schedules, Roll With Details, and Spread Evenly Without Details.
Close All Past Schedules
This option closes all open past due schedules.
Note: Schedules are automatically closed when the completion quantity is greater than or equal to the planned quantity.
Closed flow schedules cannot be changed or rolled with details, and they are denoted with gray fields. You can close individual or a group of schedules. For example, a customer might reduce the order quantity because a delivery date can not be made. The original schedule is closed and the program does not roll the excess quantity no longer needed.
Roll With Details
This option rolls any open schedules within the specified date range to a single date. The new schedules maintain the original schedule details including the order information, build sequence, and alternate bill of material or routing information. The rolled schedules are scheduled at specific times if no schedules exist on the rolled to date.
Note: The original schedules are closed after the roll. Therefore the same schedule cannot be rolled multiple times, nor can you change the original schedule once it has been rolled. The schedule number from the original schedule is rolled to the new schedule.
Spread Evenly Without Details
You can spread schedules without order information evenly across multiple days, for use in a repetitive environment, allowing you to:
-
Calculate variance and roll by line and item
-
Consider both the planned quantity and the completed quantity when rolling overcompletions
-
Schedule specific times for the rolled schedules if no schedules exist on the specific rolled day
Note: When rolling flow schedules without details, if you roll the same flow schedules multiple times, it is possible to create excess supply.
To roll flow schedules forward
-
Select Roll Flow Schedules from the Tools menu.
The Roll Flow Schedules Parameters window appears.
-
Select an Option.
Your choices are:
-
Close All Past Due Schedules
-
Roll With Details
-
Spread Evenly Without Details
-
-
Select an Output option.
The values for Output are:
-
Report Only: creates a report but does not update your flow schedules. This could be used to simulate the effects on your schedule.
-
Report and Update creates a report and rolls the dates forward on your schedules.
-
-
Select a range of Start and End Dates From.
Flow schedules that do not have completion dates within this range are not rolled forward. You cannot enter a date in the From Start Date greater than today.
-
Select a range of Start and End Dates To.
-
You can select a range of flow schedule lines to consider in the Lines From and To fields.
Note: If you do not specify lines, item numbers, or categories all flow schedules that fall within the specified date ranges are rolled forward.
-
Select a range of assembly items to consider in the Items From and To fields.
-
Select a range of Category Sets From and To.
-
Choose OK.
-
Choose Submit Request.
Related Topics
Submitting a Request, Oracle E-Business Suite User's Guide
Deleting Flow Schedules
You can delete flow schedules in order to provide a clean slate for new schedule generation. Flow schedules can be deleted as long as the following conditions are true:
-
There has been no completion performed, that is, the quantity completed must equal 0.
-
The schedule is open.
-
There is no pending completion against it in Material Transactions Interface.
If the deleted flow schedule is associated with a sales order, then that portion of the sales order is again considered as an unscheduled sales order.
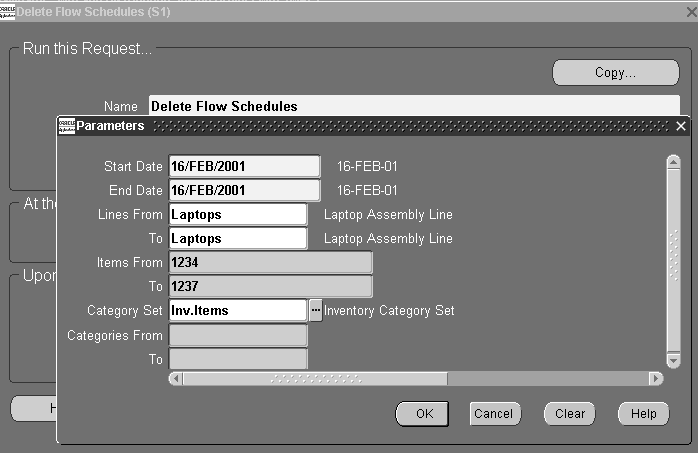
To delete flow schedules
-
Select records on the Detail or Summary windows, and choose Delete.
-
You can also select Delete Flow Schedules from the Tools menu.
The Delete Flow Schedules Parameters window appears.
-
Select a range of Dates Start and From.
Flow schedules that do not fall within this range of dates are not deleted.
-
Optionally, select a range of Lines From and To.
Note: If you do not specify lines, item numbers, or categories all eligible flow schedules that fall within your specified date ranges are deleted.
-
Optionally, select a range of Items From and To.
-
To delete flow schedules by category, select a value in the Category Set field, and enter a range of categories Category From and To.
-
Choose OK.
-
Choose Submit Request.
Related Topics
Running Reports and Programs, Oracle E-Business Suite User's Guide
Defining Category Sets , Oracle Inventory User's Guide
Other Features
You can access Available To Promise information through the ATP Results window and view the status of material used on your flow schedules. Component availability checking is permitted only for items with the Check ATP item attribute set to Yes. See: Order Management Attribute Group, Oracle Inventory User's Guide
To display the ATP Results window
-
Navigate to the Flow Schedule Details window.
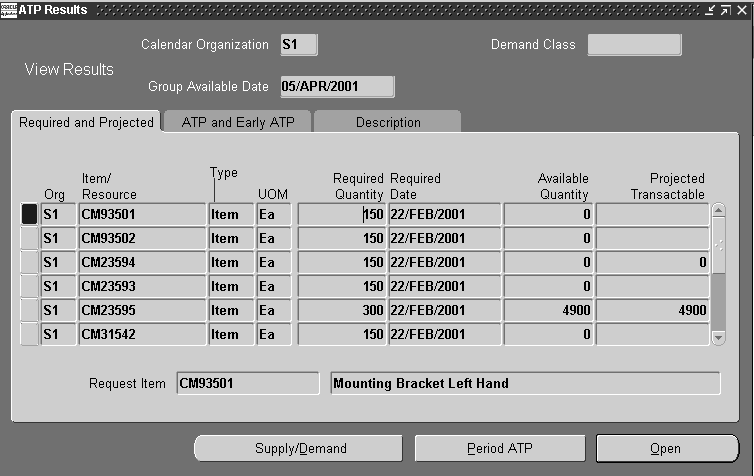
-
Select assemblies for viewing component information.
-
Choose Component Availability.
The ATP Results window appears. The components for each flow schedule are listed individually on separate rows.
Closed flow schedules should be purged on a periodic basis to remove unneeded records and maintain database performance. A concurrent program purges according to parameters specified.
Flow schedules are purged if they meet the following criteria:
-
Status of the flow schedule is closed
-
Scheduled completion date of the flow schedule is in a closed accounting period
-
All material transactions have been purged
To purge flow schedules
-
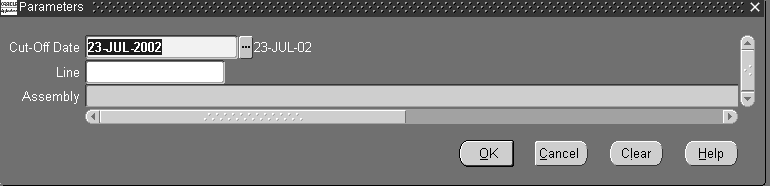
Navigate to the Purge Flow Schedules window.
The Parameters window displays.
-
Select the effective date to use for purging schedules in the Cut-Off Date field.
Flow schedules with a completion date prior to the cutoff date are purged.
-
Optionally, you can select a value in the Line field to purge specific flow lines.
-
You can also select a specific assembly in your purging criteria.
-
Choose OK to display the Purge Flow Schedule request window.
-
Choose Submit to create this request.