Implementation Considerations
This chapter discusses strategies for you to consider using during Oracle E-Records implementation.
This chapter covers the following topics:
- Using Additional Attributes
- Modifying a Stylesheet to Include Descriptive Flexfields
- Enforcing Nonconformance, Disposition, and Corrective Action Request Approvals
- Capturing Non-Seeded Collection Elements in Nonconformance, Disposition, and Corrective Action E-Records for History Collection Plans
- Creating a Device History Record
Using Additional Attributes
Oracle provides seeded attributes for each discrete manufacturing transaction, but you may have special circumstances that require the addition of a new attribute. The following example explains in detail how to define and use a new attribute.
Example of Using a Newly Defined Attribute
Manufacturing plant M1 requires an e-record for each bill of material created for an engineering item. Bills of material created for manufacturing items require both an e-record and an e-signature, though. Use the Eng Item field value in the Bills of Material window to determine if an e-signature is necessary.
The following steps describe how to define a new attribute and use it to enforce the requirement explained above. For a more detailed setup example, see: Setting Up E-Records: A Discrete Manufacturing Example.
-
Navigate to Oracle Approvals Management (see: Approvals Management Application Administrator Windows and Navigation Paths).
-
Set the Transaction Type to BOM ERES Bill of Materials Creation.
-
Select the Attributes tab.
Review the list of attributes to see if the attribute you need exists. If not, choose Add Attribute.
-
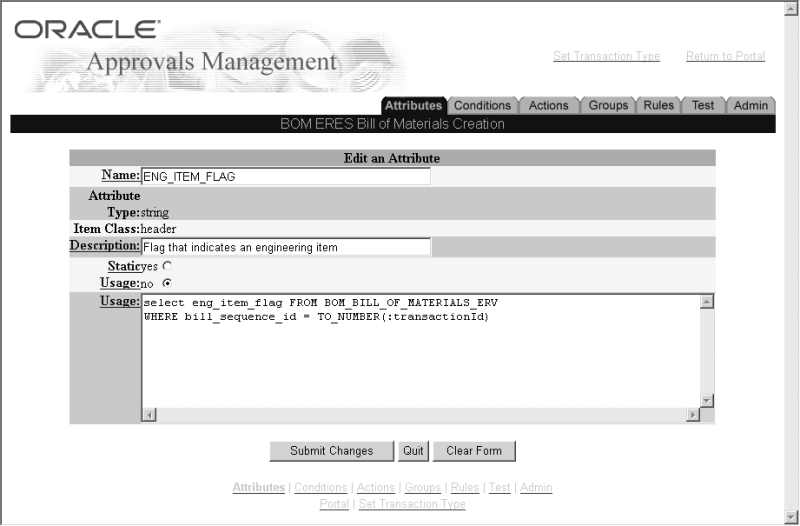
Use the following values when adding the attribute:
-
Item Class = header
-
Name = ENG_ITEM_FLAG
-
Attribute Type = string
-
Description = Flag that indicates an engineering item
-
Static Usage = no
-
Usage = select eng_item_flag FROM BOM_BILL_OF_MATERIALS_ERV WHERE bill_sequence_id = TO_NUMBER(:transactionID)
Note: This SQL string selects the Eng Item field value.
-
-
Select the Conditions tab.
Create two new conditions using the following values. A condition for Organization Code = M1 already exists.
Field Name Condition 1 Field Values Condition 2 Field Values Attribute ENG_ITEM_FLAG ENG_ITEM_FLAG Attribute Value Y N 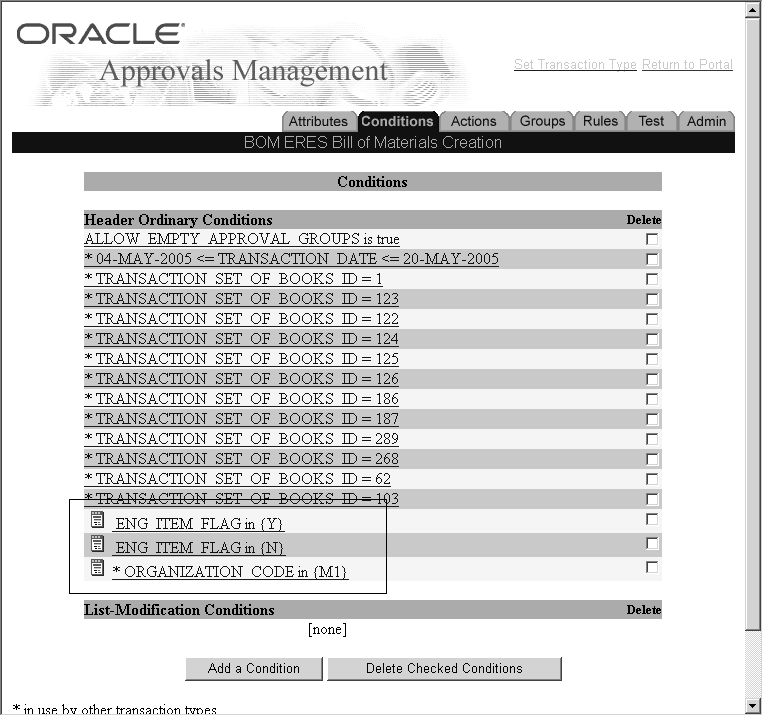
-
Select the Rules tab.
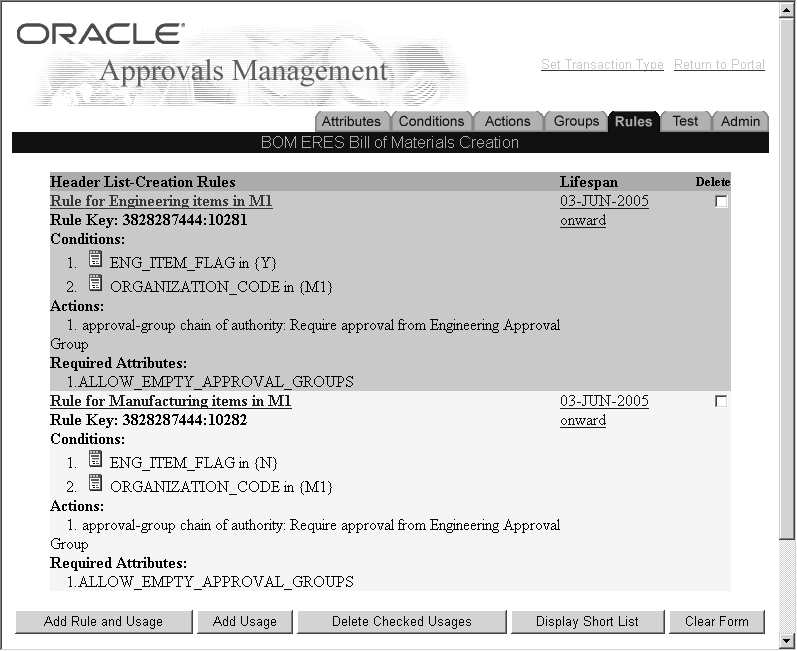
Add two new rules using the following values.
-
If no field value is given in the table below, then use the field's default value.
-
These rules use a predefined approval group, Engineering Approval Group. For more information about creating Approval Groups, see: Approval Groups, Implementing Oracle Approvals Management, at http://metalink.oracle.com. Search on Metalink Note #282529.1.
Field Name Rule 1 Field Values Rule 2 Field Values Description Rule for Engineering items in M1 Rule for Manufacturing items in M1 Action Types chain of authority includes an approval group chain of authority includes an approval group approval-group chain of authority Actions Require approval from Engineering Approval Group Require approval from Engineering Approval Group Header Attributes ENG_ITEM_FLAG
ORGANIZATION_CODEENG_ITEM_FLAG
ORGANIZATION_CODEHeader Conditions ENG_ITEM_FLAG in {Y}
ORGANIZATION_CODE in {M1}ENG_ITEM_FLAG in {N}
ORGANIZATION_CODE in {M1}Note: When defining an approval rule, you must specify an approval group, even if you do not need to collect e-signatures (approvals) for the transaction. Oracle E-Records ignores the approval group if the configuration or variable rule does not require an e-signature.
-
Dene the Rule Variables for the BOM ERES Bill of Materials Creation Transaction
-
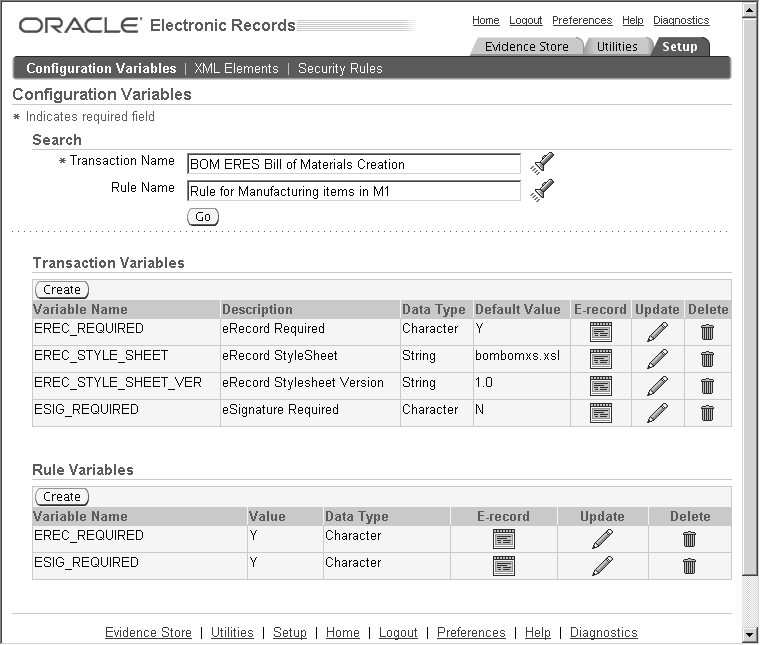
Navigate to the Configuration Variables page (see: ERES Administrator Windows and Navigation Paths). Search on the BOM ERES Bill of Materials Creation transaction.
The default values for the transaction variables follow:
-
EREC_REQUIRED = Y
-
EREC_STYLE_SHEET = bombomxs.xsl
-
EREC_STYLE_SHEET_VER = 1.0
-
ESIG_REQUIRED = N
-
-
Search on the BOM ERES Bill of Materials Creation transaction with the Rule for Engineering items in M1 rule.
-
Create two rule variables:
-
EREC_REQUIRED = Y
-
ESIG_REQUIRED = N
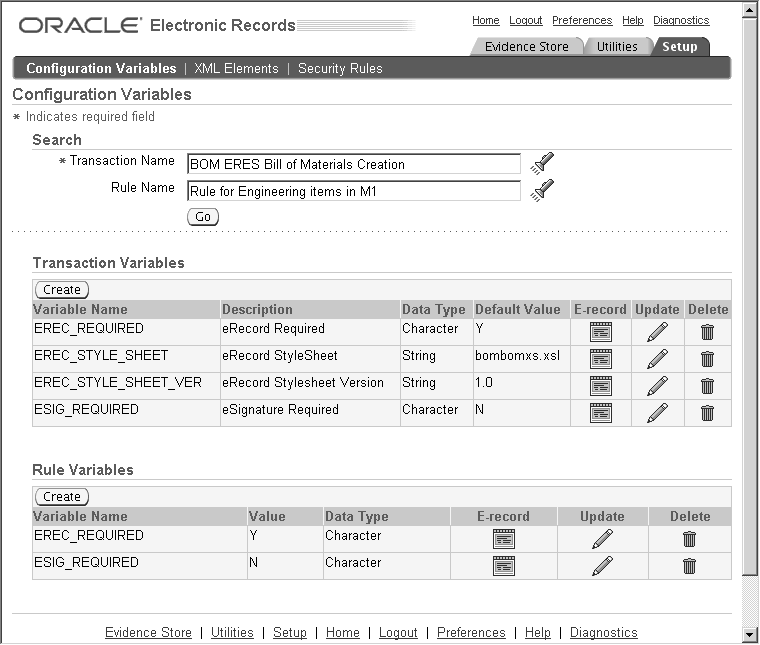
Note: Since the transaction variable default values for EREC_REQUIRED and ESIG_REQUIRED are the same, it is not necessary to create the above two rule variables. However, if the transaction variable default values were ever to change, this guarantees that the variables applied for the rule conditions remain the same.
-
-
Search on the BOM ERES Bill of Materials Creation transaction with the Rule for Manufacturing items in M1 rule.
-
Create two rule variables:
-
EREC_REQUIRED = Y
-
ESIG_REQUIRED = Y
-
Enter an Engineering Bill of Material
-
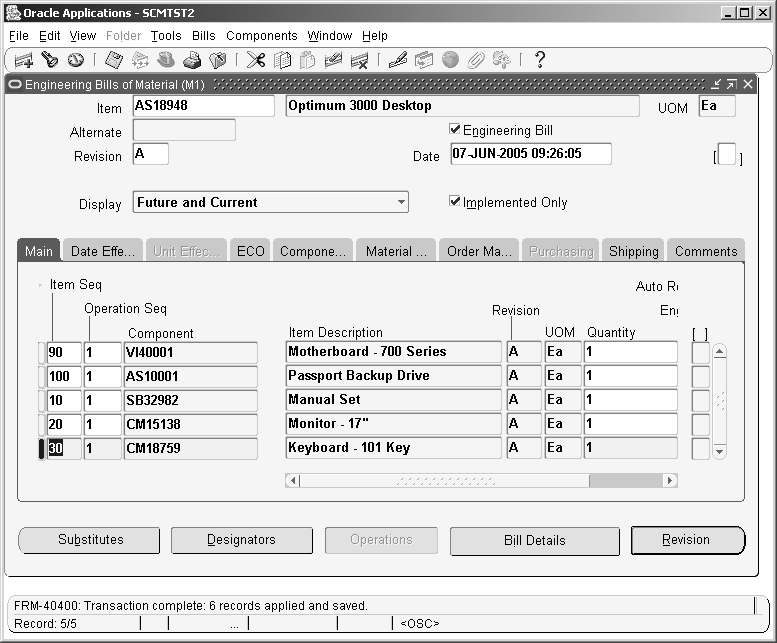
Navigate to the Engineering Bills of Material window (see: Manufacturing and Distribution Manager Windows and Navigation Paths).
Enter a bill of material for an engineering (prototype) item.
Note: Verify that an item is an engineering item by ensuring that the Engineering Item check box in the Engineering Item window, Bills of Material tab, is checked.
-
Optional. Navigate to the Evidence Store (see: ERES Administrator Windows and Navigation Paths). Search for and view the ECO Creation e-record you created.
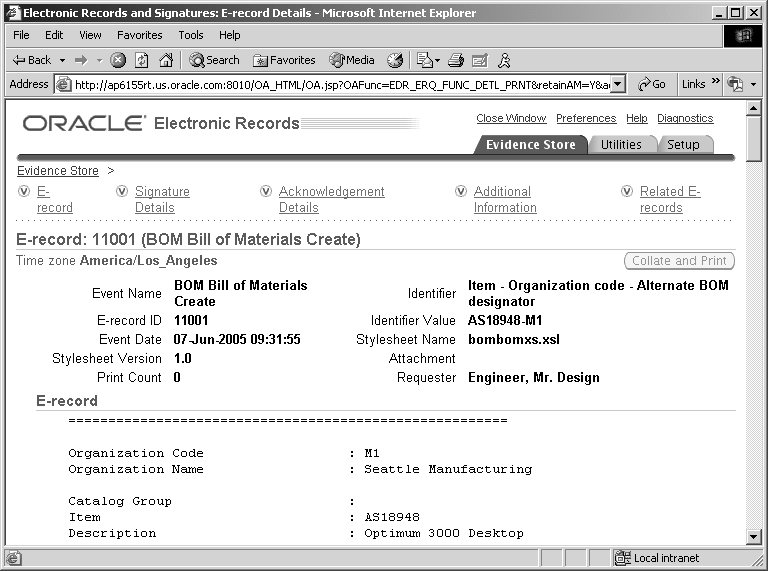
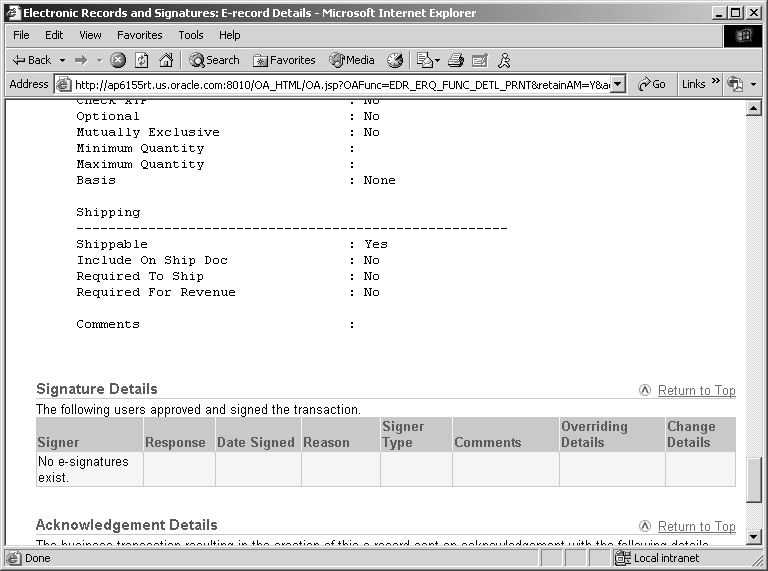
Notice that this e-record does not include e-signatures.
Enter a Manufacturing Bill of Material
-
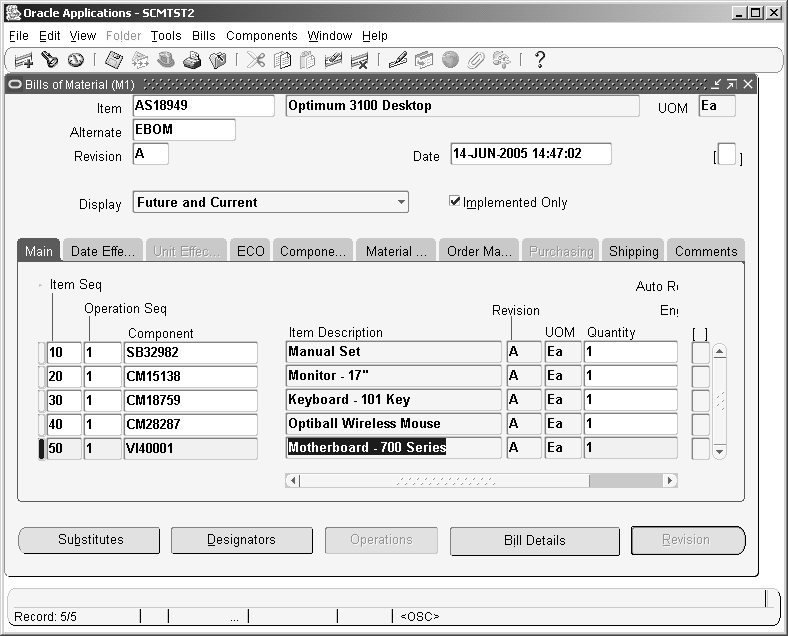
Navigate to the Bills of Material window (see: Manufacturing and Distribution Manager Windows and Navigation Paths).
Enter a bill of material for a manufacturing item.
Note: Verify that an item is a manufacturing item by ensuring that it exists in the Organization Item window.
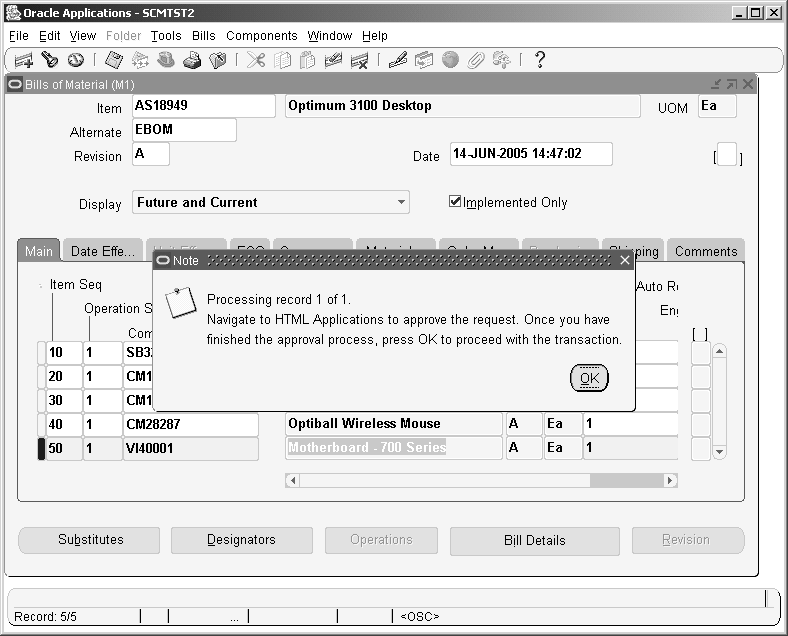
The following online e-signature request appears:
Note: Navigate to HTML Applications to approve the request. Once you have finished the approval process, press OK to proceed with the transaction.
-
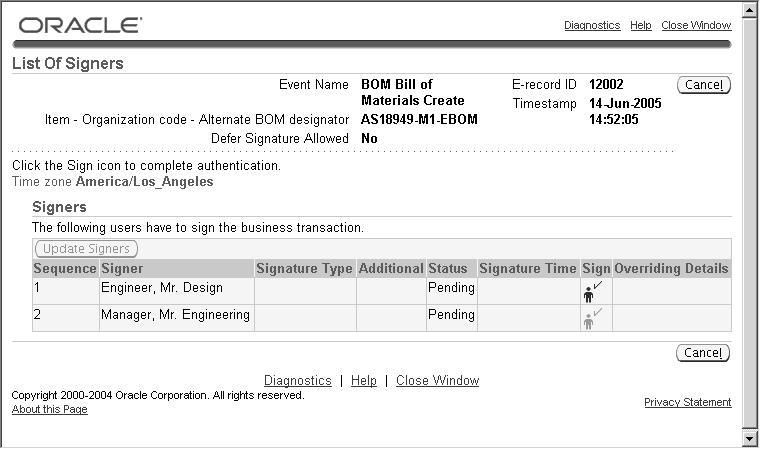
The List of Signers page opens.
Obtain all required e-signatures.
-
Return to the Bills of Material window. Choose OK to proceed with the transaction.
The transaction is saved.
-
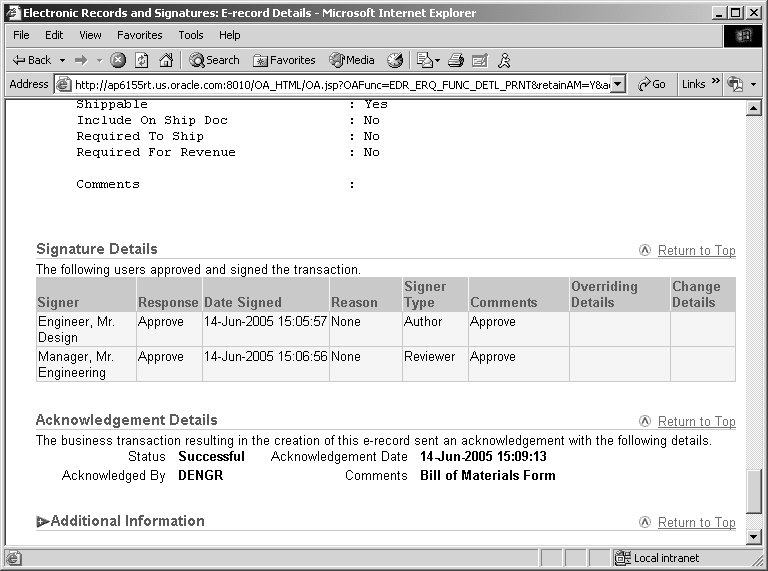
Optional. Navigate to the Evidence Store (see: ERES Administrator Windows and Navigation Paths). Search for and view the BOM Bill of Materials Create e-record you created.
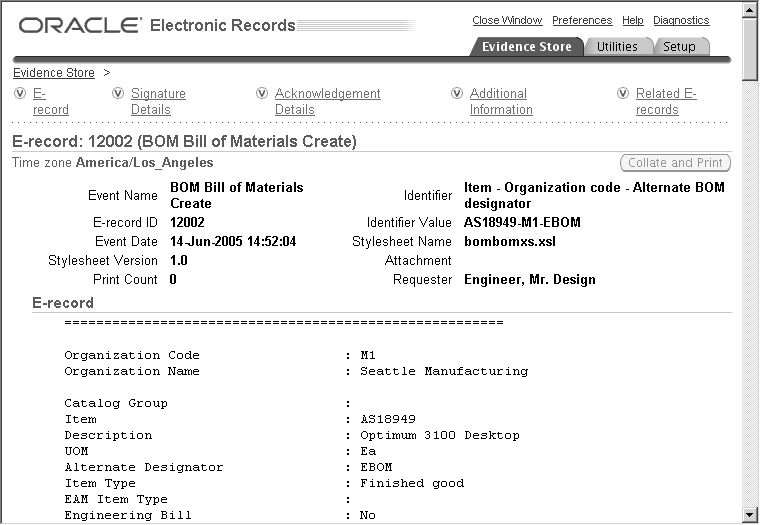
Notice that this e-record contains e-signatures.
Modifying a Stylesheet to Include Descriptive Flexfields
You can modify the standard stylesheets provided with Oracle E-Records if you want to include descriptive flexfield values in your e-records. The following example adds a descriptive flexfield to the Collection Plans window, then modifies the stylesheet for the QA ERES Collection Plan Creation transaction so that the e-record displays the descriptive flexfield value.
Example
Create a Descriptive Flexfield
-
Navigate to the Descriptive Flexfield Segments window (see: Application Developer Windows and Navigation Paths).
In this example, define a descriptive flexfield for the Collection Plans window using the following values:
-
Application = Quality
-
Title = Collection Plans
See Defining Descriptive Flexfield Structures, Oracle E-Business Suite Flexfields Guide, for more information about setting up descriptive flexfields.
-
-
Choose Segments, then New.
In the Segments window, define the descriptive flexfield using the following values:
Number Name Description Column Value Set 120 Quality Inspection Standard Quality Inspection Standard ATTRIBUTE1 120 Characters 121 Inspection Instruction Document Inspection Instruction Document ATTRIBUTE2 120 Characters 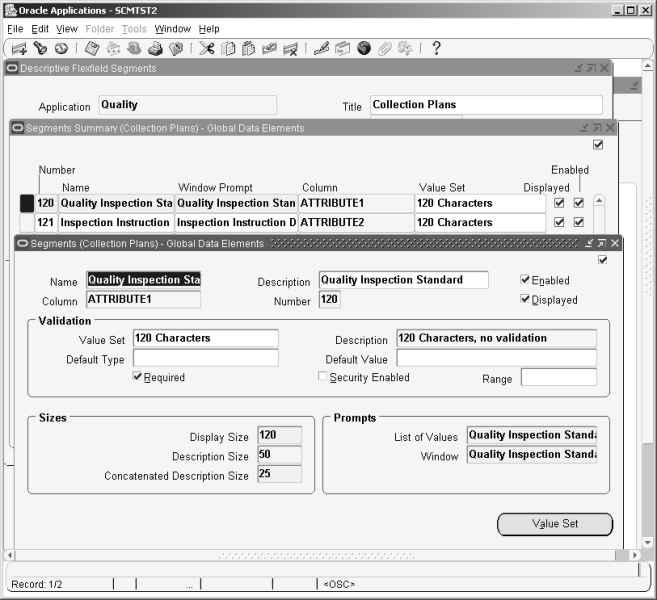
-
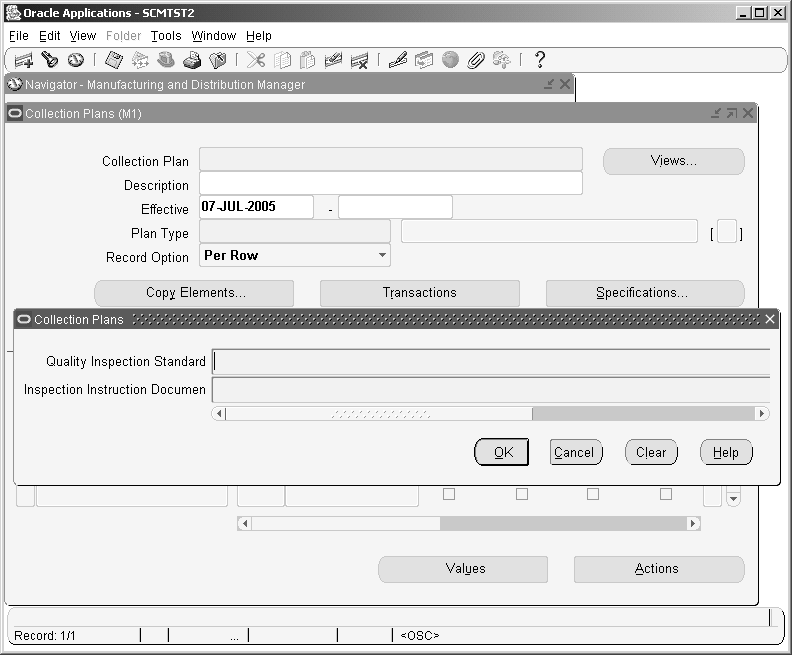
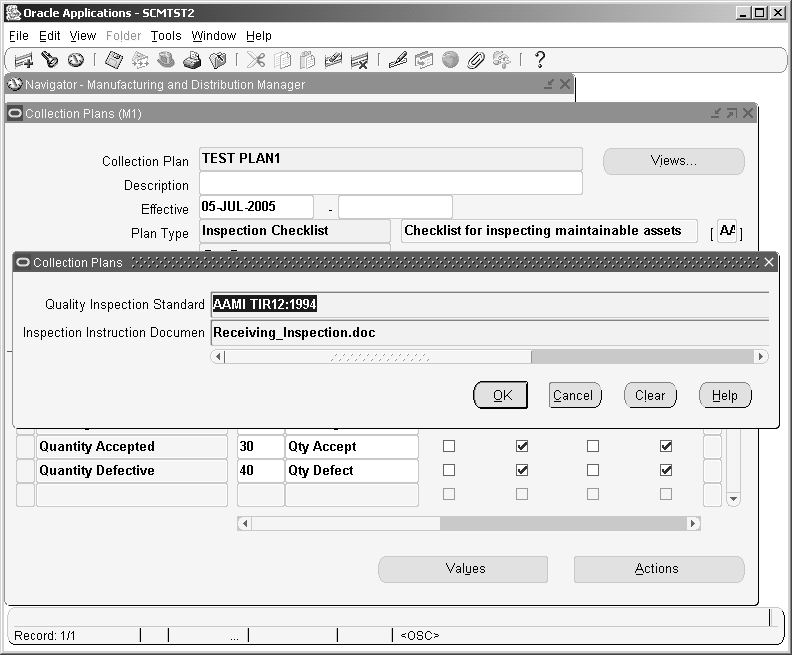
Navigate to the Collection Plans window (see: Manufacturing and Distribution Manager Windows and Navigation Paths). Verify that the new descriptive flexfield segments, Quality Inspection Standard and Inspection Instruction Document, exist.
-
Locate and download the stylesheet you want to modify.
The stylesheet for the QA ERES Collection Plan Creation transaction provided with Oracle E-Records is named qa_plans.xsl.
Tip: Download the provided stylesheets from $APPL_TOP/ <product directory>/11.5.0/html. $APPL_TOP is an environment variable and depends on your environment. In this example, download qa_plans.xsl from $APPL_TOP/qa/11.5.0/html.
-
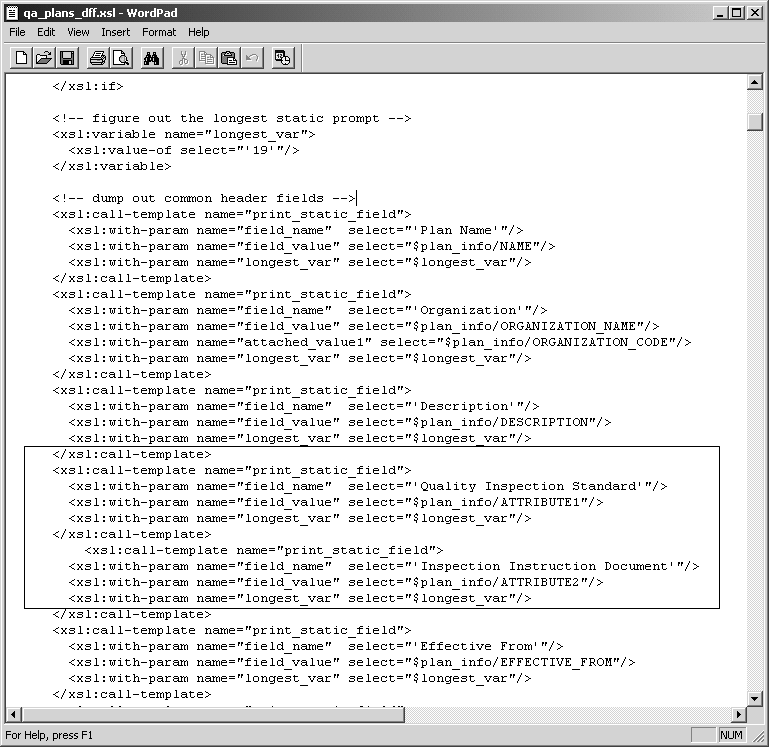
Use a text editor program, such as Microsoft Notepad or WordPad, to change the stylesheet.
In this example, add two new lines, between Description and Effective From, named Quality Inspection Standard and Inspection Instruction Document. Select the ATTRIBUTE1 and ATTRIBUTE2 columns since these are the columns where the descriptive flexfield segments are mapped.
-
Save the stylesheet with a new name.
In this example, the new name is qa_plans_dff.xsl.
-
Navigate to the Subscriptions page (see: Workflow Administrator Pages and Navigation Paths).
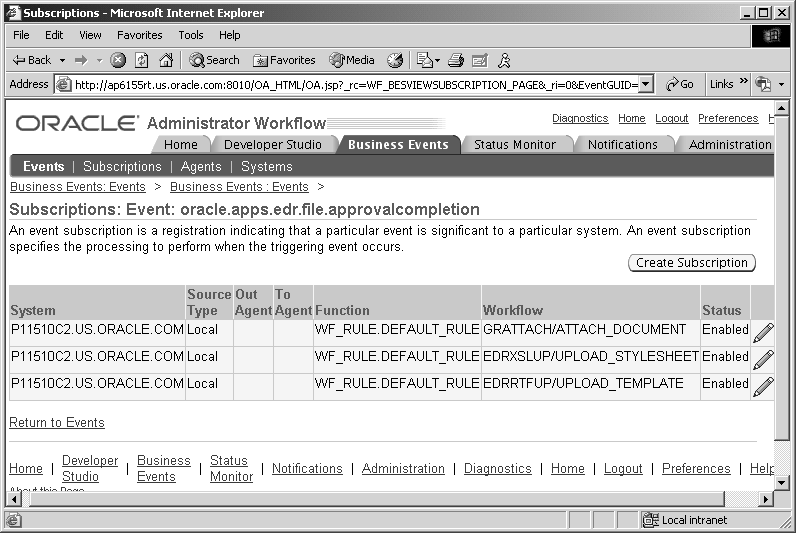
To upload the new stylesheet, you must enable the subscriptions to two business events:
-
ERES File Approval Event (oracle.apps.edr.file.approve)
-
EDR File Approval Complete (oracle.apps.edr.file.approvalcompletion)
For the EDR File Approval Complete event, enable the subscription to the UPLOAD_TEMPLATE workflow process.
For the ERES File Approval Event, enable the subscription to the PSIG_ESIGN_PAGE_FLOW workflow process.
-
-
Navigate to the Files Approval page (see: Approvals Management Application Administrator Windows and Navigation Paths). Choose Upload File.
-
On the File Upload page, select the following field values for this example:
-
Category = EDR E-record Templates
-
Product = QA
-
Template Type = XSL
-
File = qa_plans_dff.xsl
-
If File Exists = Version Existing File
-
Version Label = 1.0
-
Description = Collection Plans XSL modified to include the descriptive flexfields
-
-
Choose Apply.
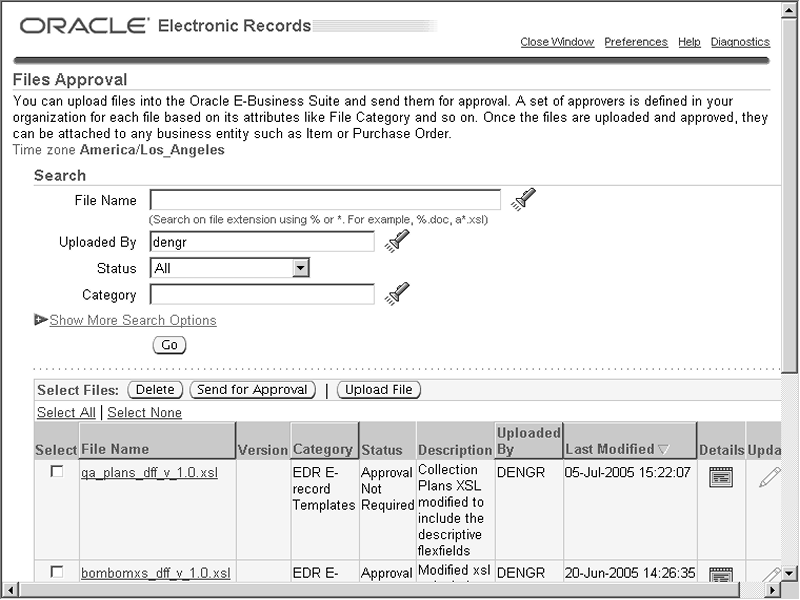
You can now view the new file, qa_plans_dff_v_1.0.xsl, in the Files Approval page. Notice the status of New.
-
Select the row containing qa_plans_dff_v_1.0.xsl, then choose Send for Approval.
Notice that the status changes to Approval Not Required.
Tip: If you require an approval for the new stylesheet, you must set up an approval rule for the EDR ERES File Approval transaction in Oracle Approvals Management. See Setting Up E-Records: A Discrete Manufacturing Example, for an example of how to set up an approval.
Link the New Stylesheet to a Transaction
-
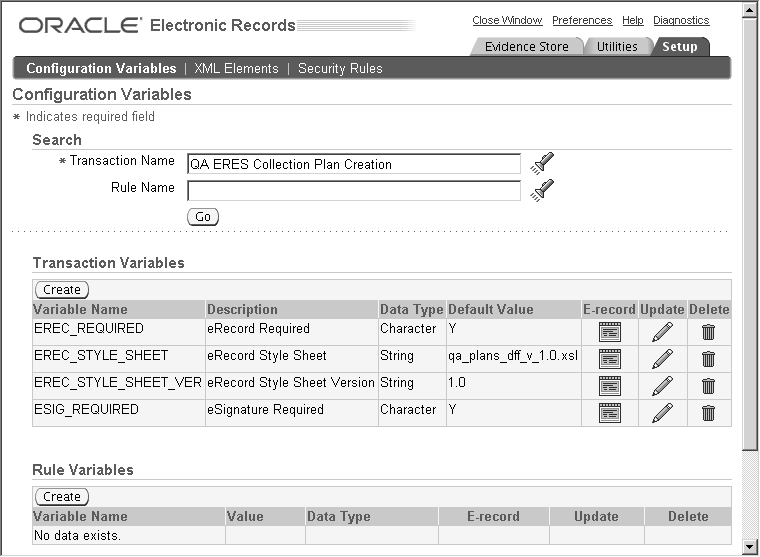
Navigate to the Configuration Variables page (see: ERES Administrator Windows and Navigation Paths). Search for the transaction using the new stylesheet.
For this example, find the configuration variables for the QA ERES Collection Plan Creation transaction.
-
Update the variable EREC_STYLE_SHEET with the new stylesheet.
Enter qa_plans_dff_v_1.0.xsl in the Default Value field.
Create an E-record Using the New Stylesheet
-
Navigate to the Collection Plans window (see: Manufacturing and Distribution Manager Windows and Navigation Paths).
Enter a collection plan.
-
Navigate to the Evidence Store (see: ERES Administrator Windows and Navigation Paths) to view the e-record created.
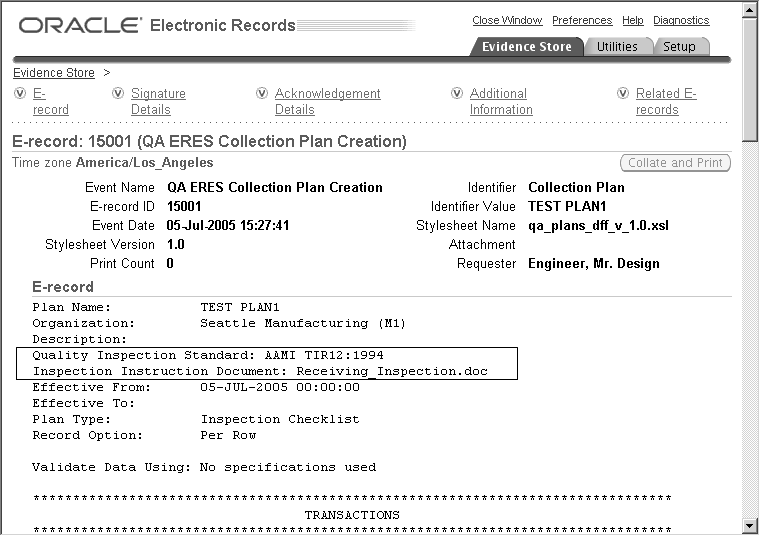
Notice the descriptive flexfield lines Quality Inspection Standard and Inspection Instruction Document in the header of the QA ERES Collection Plan Creation e-record.
Related Topics
Uploading Documents, Oracle E-Records Implementation Guide
Uploading Documents into the Evidence Store, Oracle E-Records Implementation Guide
Managing Templates Using iSign, Oracle E-Records Implementation Guide
Setting Up E-Records: A Discrete Manufacturing Example
Enforcing Nonconformance, Disposition, and Corrective Action Request Approvals
If nonconformances, dispositions, and corrective action requests require an e-signature, the user must enter Yes in the eSignature Required collection element when entering quality results (see: Setup Exception - Setting the eSignature Required Collection Element to Yes). You can use the Assign a value to a collection element action to automatically assign Yes in the eSignature Required collection element result field based on values entered in other collection element result fields, such as Nonconformance Type or Nonconformance Status, for example. This eliminates the need for the user to initiate the e-signature process. For more information on using the assign a value action, see: Defining Assign A Value Actions: User-Defined Formulas, Oracle Quality User's Guide.
Capturing Non-Seeded Collection Elements in Nonconformance, Disposition, and Corrective Action E-Records for History Collection Plans
The stylesheet provided for use with all of the Oracle Quality nonconformance, disposition, and corrective action transactions is based on the seeded collection plan templates (see: Seeded Template Collection Plan Details, Oracle Quality Implementation Guide). This stylesheet, qa_ncm.xsl, enables e-records for nonconformance, disposition, and corrective action transactions to capture only the data entered in the seeded collection plan template collection elements.
Most users copy, then modify the seeded collection plan templates to meet their needs. These modifications could include the addition of new collection elements to the nonconformance, disposition, and corrective action collection plans. To capture the new collection element data in an e-record, you must modify the seeded stylesheet, qa_ncm.xsl. The process of modifying this stylesheet is similar to the process described in Modifying a Stylesheet to Include Descriptive Flexfields.
The following example describes how to include non-seeded collection elements that are displayed in the history plans in the nonconformance, disposition, and corrective action e-records.
Example
Create a modified versions of the Oracle Quality nonconformance, disposition, and corrective action seeded collection plan template (see: Seeded Template Collection Plan Details, Oracle Quality Implementation Guide). The modified collection plans include the non-seeded collection element Cause Code for the corrective action request history collection plan. Remove the seeded collection element Section Violated.
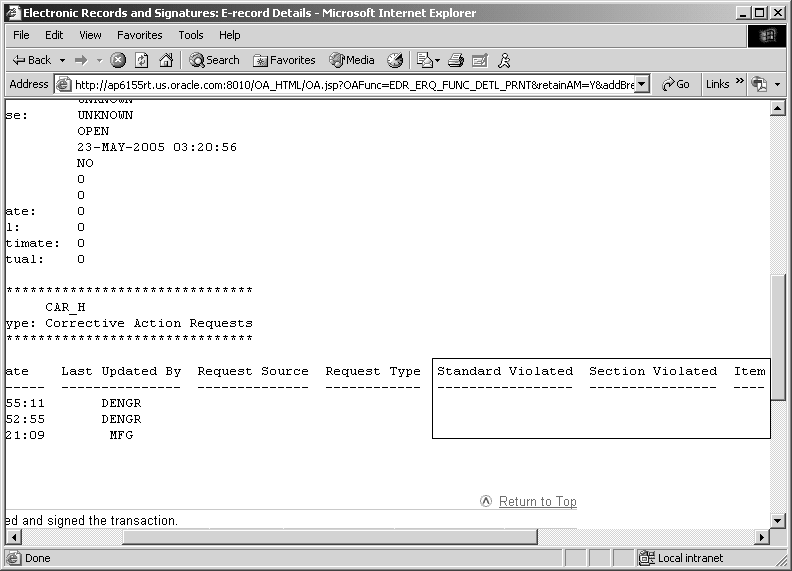
While reviewing nonconformance, disposition, and corrective action e-records, notice that the e-records are not capturing Cause Code, which should appear between the Standard Violated and Item collection elements. Instead, the Section Violated collection element appears in that location of the e-record.
Modify the Stylesheet
-
Follow the instructions in Modify the Stylesheet, to modify the qa_ncm.xsl stylesheet.
-
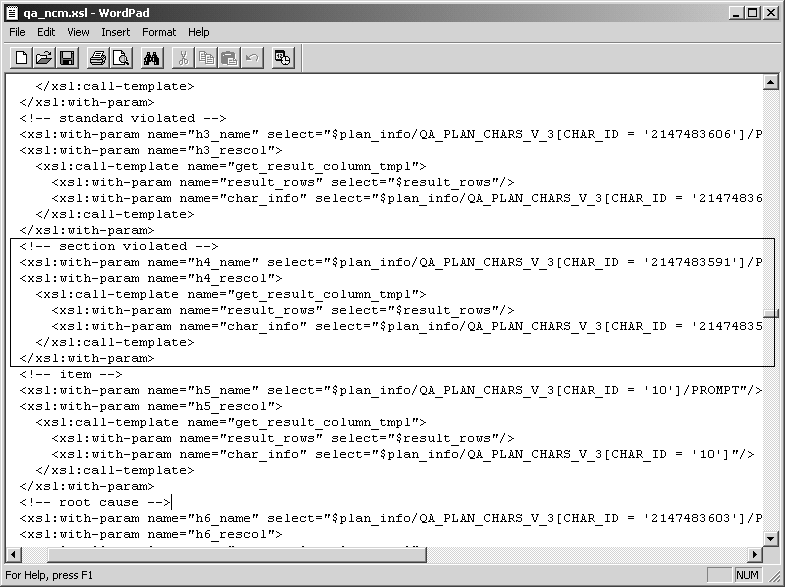
Search for section violated. Notice that the CHAR_ID for the Section Violated collection element equals 2147483591. The CHAR_ID is a unique identifier for a collection element. The qa_ncm.xsl stylesheet uses CHAR_ID to identify the collection elements to include in the history portion of the e-record.
-
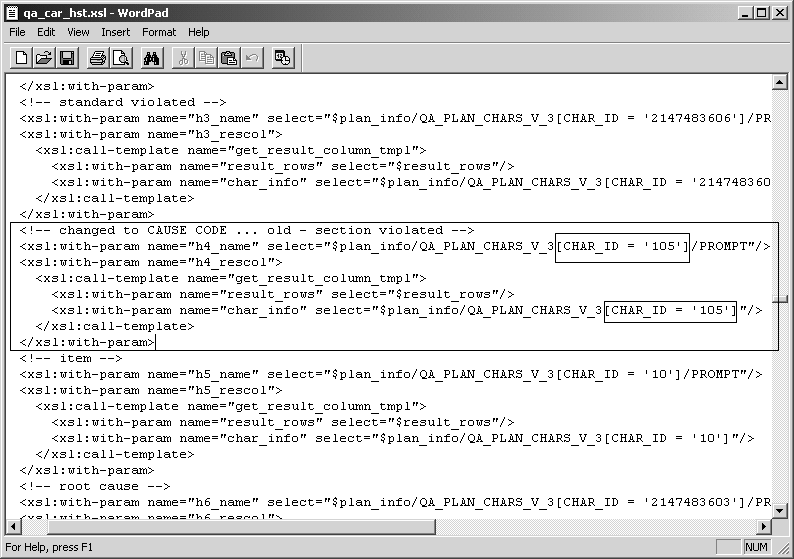
Replace the Section Violated CHAR_ID with the Cause Code CHAR_ID, 105.
In this example, save the modified stylesheet as qa_car_hst.xsl.
Tip: Follow these steps to find the CHAR_ID value of a collection element:
-
Navigate to a collection element field. You can find the field by navigating to the Collection Plans, Enter Quality Results, or Update Quality Results window (see: Manufacturing and Distribution Manager Windows and Navigation Paths), then finding the collection plan containing the collection element.
-
With the cursor in the collection element field, select (M) Help > Diagnostics > Examine.
-
Choose the Field list of values button and select CHAR_ID from the list.
The Value field now displays the CHAR_ID value.
You can also find the CHAR_ID value by using SQL to query the CHAR_ID from the QA_CHARS table.
-
Upload the New Stylesheet
-
Follow the instructions in Upload the New Stylesheet, to upload the qa_car_hst.xsl stylesheet.
Once you upload qa_car_hst.xsl, the name changes to qa_car_hst_v_1.0.xsl.
Link the New Stylesheet to a Transaction
-
Follow the instructions in Link the New Stylesheet to a Transaction, to link the qa_car_hst_v_1.0.xsl stylesheet to all nonconformance, disposition, and corrective action transactions.
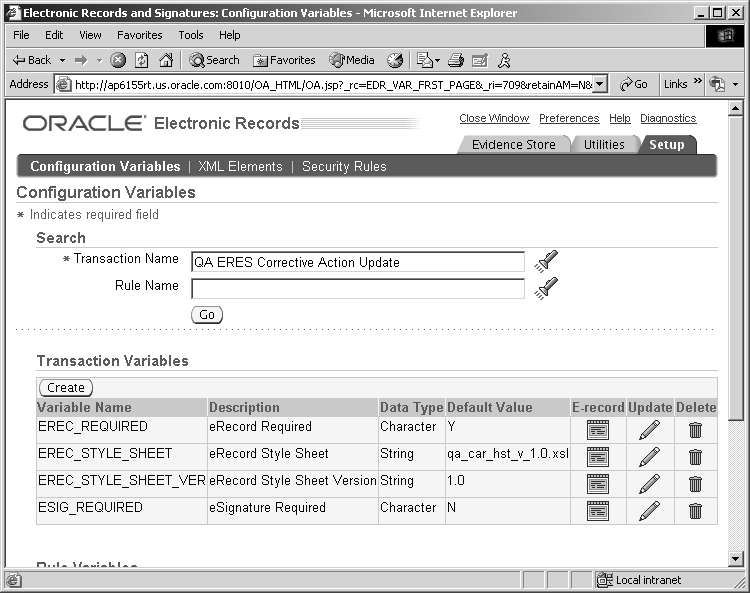
Create an E-record Using the New Stylesheet
For this example, update a corrective action request.
-
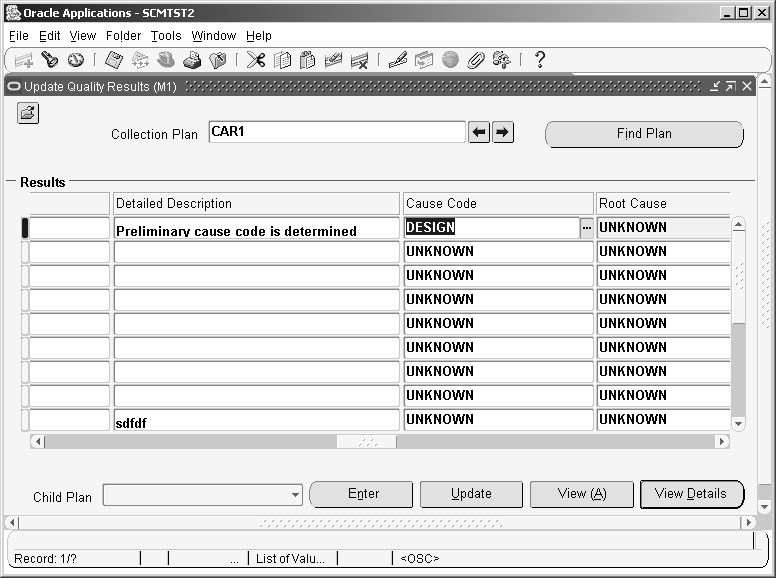
Navigate to the Update Quality Results window for corrective action requests (see: Manufacturing and Distribution Manager Windows and Navigation Paths).
-
Update quality results in the CAR1 collection plan, including entering Design in the Cause Code collection element.
-
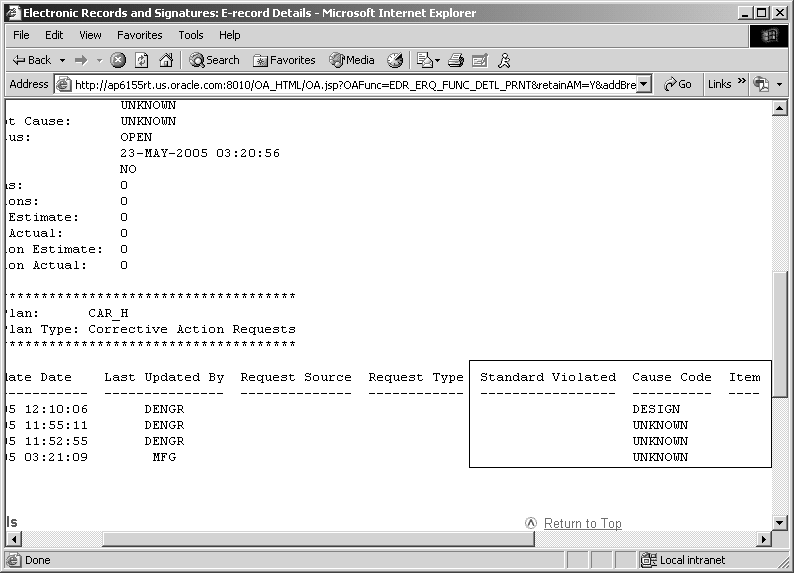
Navigate to the Evidence Store (see: ERES Administrator Windows and Navigation Paths) to view the e-record created, E-record ID 16003.
Notice that the Cause Code column, with the value of Design in the first row, now appears where the Section Violated column previously appeared in the QA ERES Corrective Action Update e-record.
Creating a Device History Record
The medical device industry requires device history records to track an item's manufacturing history. A device history record compiles all of the manufacturing records for an item. You can create a document that functions as a device history record by collating the required e-records, then printing them together in one document. Refer to Printing E-records, Oracle E-Records Implementation Guide, for instructions on collating and printing e-records.
Note: The specific requirements for a device history record can vary. The method for creating a device history record described below may not meet all requirements.
Device History Record Example
A medical device company manufactures serial controlled assembly Z1000 at manufacturing plant M1. Z1000 is assembled from two lot controlled items, Z3000 (Supply Type = Push), and another component, Z2000 (Supply Type = Assembly Pull). Perform a quality check of Z1000 after manufacturing completion.
In order to print a document that can function as a device history record for this example, perform the following prerequisites:
-
Ensure that you have authority to print e-records. The system administrator must grant you authority using the profile option EDR: E-record Print Granted (see: Enabling Profile Options, Oracle E-Records Implementation Guide).
-
Enable the E-Records functionality for the following three transactions (see: Implementing E-Records, Oracle E-Records Implementation Guide, E-records and E-signatures for Oracle Work in Process, Oracle Quality User's Guide, and Setting Up E-Records: A Discrete Manufacturing Example):
-
WIP Job Material Transaction
-
WIP Job Assembly Move
-
WIP Job Assembly Completion
-
-
Create a quality collection plan and associate it with the WIP Completion transaction (see: Quality Data Collection During Transactions, Oracle Quality User's Guide).
Now, perform the following steps:
-
Create and release a discrete job to manufacture Z1000 in manufacturing plant M1 (see: Defining Discrete Jobs Manually, Oracle Work in Process User's Guide and Releasing Discrete Jobs, Oracle Work in Process User's Guide).
In this example, job 127931 was created.
-
Issue the Push component Z3000 to the job (see: Issuing and Returning All Push Components, Oracle Work in Process User's Guide).
In this example, e-record ID 1004, viewable in the Evidence Store (see: Evidence Store, Oracle E-Records Implementation Guide), shows the details of this transaction, the lot information, and the e-signatures.
-
Perform an interoperation move transaction (see: Performing Move Transactions, Oracle Work in Process User's Guide).
In this example, move the partially assembled Z1000 from operation 10 to operation 20. This transaction automatically issues Z2000 into work in process from inventory since Z2000 has a supply type of Assembly Pull. E-record ID 1005 shows the details of this transaction, the lot information, and the e-signatures.
-
Complete the job of assembling Z1000 and collect the mandatory quality results (see: Completing and Returning Assemblies, Oracle Work in Process User's Guide and Entering Quality Results Directly, Oracle Quality User's Guide).
In this example, e-record ID 1006 shows the details of this transaction, including lot and serial information and e-signatures.
-
In the Evidence Store, search for these three e-records (1004, 1005, and 1006). Search using criteria that finds all three e-records at once. For example, search on a date range that includes all three e-records (see: Evidence Store, Oracle E-Records Implementation Guide).
-
Select the three e-records and choose Collate and Print (see: Printing E-records, Oracle E-Records Implementation Guide).
View the printed document for this example at Example of Collated and Printed E-Records.