Understanding the Shipments Workbench
This chapter covers the following topics:
Understanding the Shipments Workbench
The Shipments Workbench provides the entry points for the Landed Cost Management application.
Shipments Workbench
The page contains several components:
-
Inventory Organization Context
-
Display field
-
Find Shipments section
-
Shipments, Line Groups, or Shipment Lines table
-
Create Shipment page
-
Update Shipment page
-
View Shipment page
-
Actions field
Inventory Organization Context
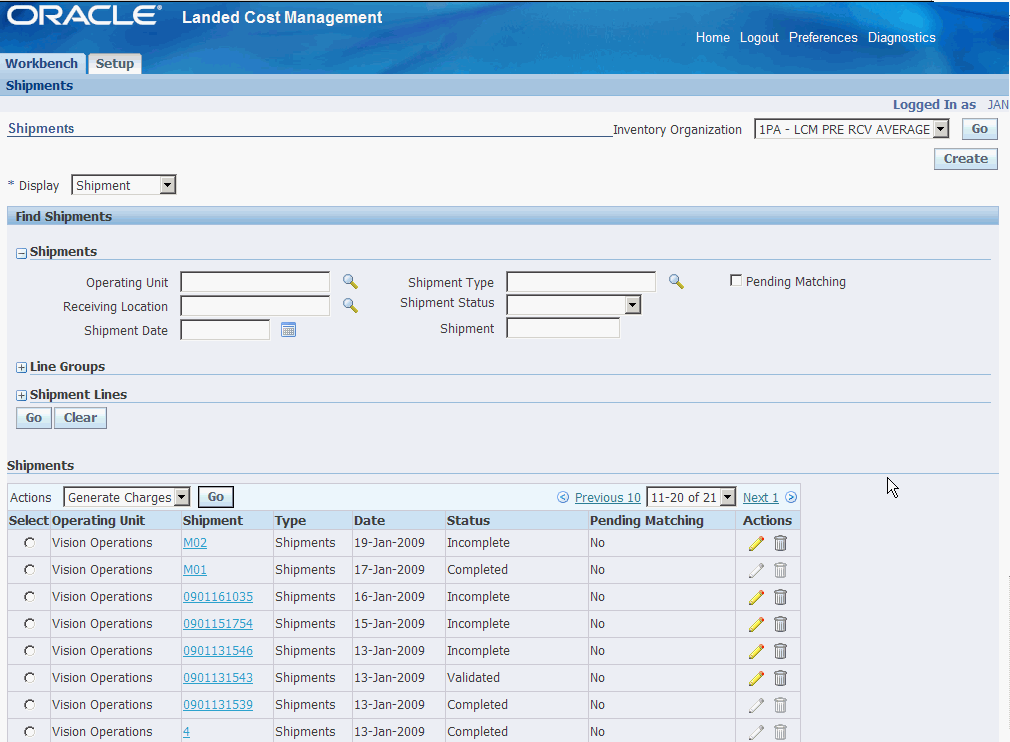
Shipments Workbench (initial page)

When you first access the Shipments Workbench, the Shipments Workbench appears with only the Inventory Organization context available for entry. The selection of the Inventory organization drives the way the rest of the Shipments Workbench functions.
After you select the Inventory organization the complete Shipments Workbench appears. From there you can search for shipments and have the existing shipments appear at the bottom of the workbench in a table format. From the table and Actions field you can then access the rest of the pages that are included in the Shipments Workbench.
If you select an Inventory organization that has pre-receiving in LCM enabled then a Create button will appear on the Shipments Workbench. The Create button is only utilized when you are using Landed Cost Management as a pre-receiving application. Otherwise, this Create button will not appear.
When you click the Create button the Create Shipment page appears. Using the Create Shipment page you create the Landed Cost Management shipment (header and lines).
Display Field
Shipments Workbench (Display field)
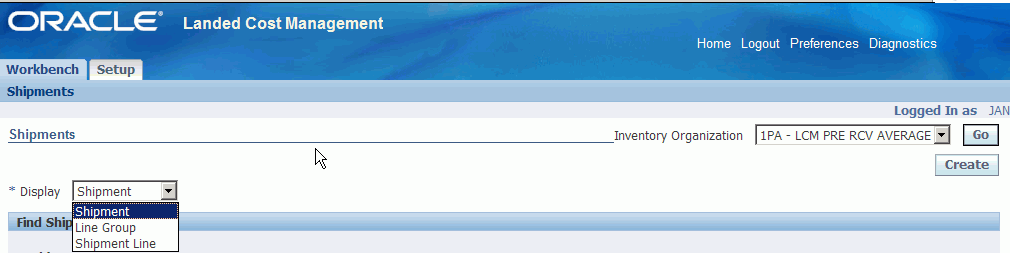
The Shipments Workbench enables you to select the type of information that you can display in the shipments table at the bottom of the page. The Display field at the top of the workbench provides three options. They are:
-
Shipment
-
Line Group
-
Shipment Line
Shipment
When you select Shipment for the Display option, the table at the bottom of the page appears and displays information related to shipments. That table is titled "Shipments" with this display option.
Shipment Workbench (Shipments table)

The fields that display in the table for each line are: Operating Unit, Shipment number link, shipment Type, Date, Status, Pending Matching (yes or no) and Update and Delete icons.
Line Group
When you select Line Group for the Display option, the table at the bottom of the page appears and displays information related to shipment line groups. That table is titled "Line Groups" with this display option.
Shipment Workbench (Line Groups table)
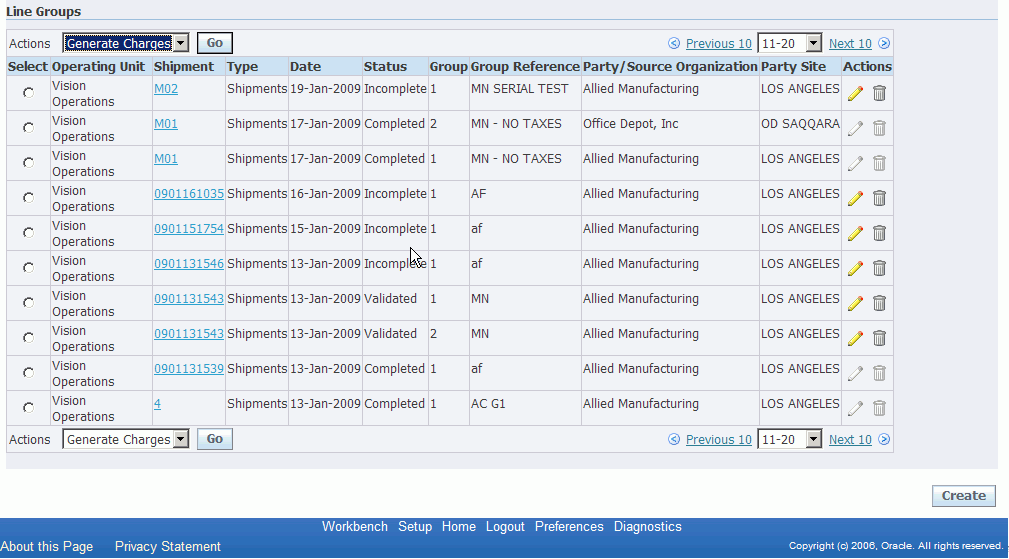
The fields that display in the table for each line are: Operating Unit, Shipment number link, shipment Type, Date, Status, line Group, Group Reference, Party/Source Organization, Party Site, and Update and Delete icons.
Shipment Line
When you select Shipment Line for the Display option, the table at the bottom of the page appears and displays information related to shipment lines. That table is titled "Shipment Lines" with this display option.
Shipments Workbench (Shipment Lines table)
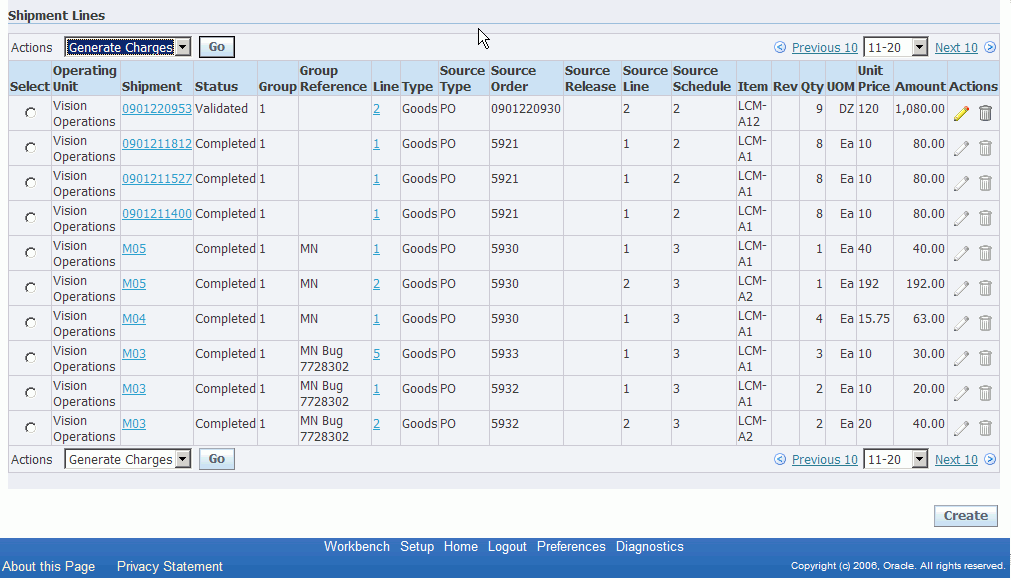
The fields that display in the table for each line are: Operating Unit, Shipment link, Status, line Group, line Group Reference, Line link, shipment line Type, Source Type, Source Order (purchase order number), Source Release (purchase agreement release), Source Line, Source Schedule, Item, item Rev, Qty, UOM, Unit Price, Amount, and Update and Delete icons.
Find Shipments section
Shipments Workbench (Find Shipments section)
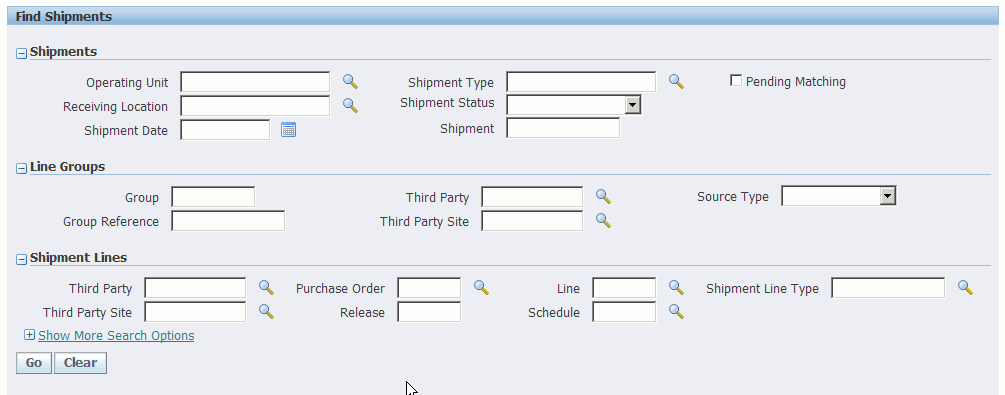
The Find Shipments section is used to enter search criteria when retrieving existing shipments, line groups, or shipments lines. Depending on the Display field option you select you can enter different search criteria information. After you enter search criteria and click Go all the information that matches the search criteria appears in the table at the bottom of the page.
It is not a requirement to enter any search criteria. To retrieve all shipments, line groups, or shipments lines just click the Go button.
Shipments, Line Groups, or Shipment Lines Table
The table at the bottom of the Shipments Workbench displays shipments, line groups, or shipment lines depending on the Display field option chosen.
If the display option is Shipment or Line Groups, from this table you can access the Update Shipment page by clicking the Update icon or the View Shipment page by clicking the Shipment number link.
If the display option is Shipment Line, from this table you can access the Update Shipment Line page by clicking the Update icon or the View Shipment Line page by clicking the Line number link or the Shipment Number link.
You can also use the Delete icon to delete a shipment, line group, or shipment line.
Create Shipment Page
The Create Shipment page is accessed by clicking the Create button on the Shipments Workbench. The Create Shipment page contains two tabs a Header tab and a Lines tab.
Note: The Create button is only available for Inventory organizations that have the Pre-Receiving in LCM check box selected.
For information on selecting the Pre-Receiving in LCM check box, see Setting Up Receiving Options
Create Shipment page (Header tab)
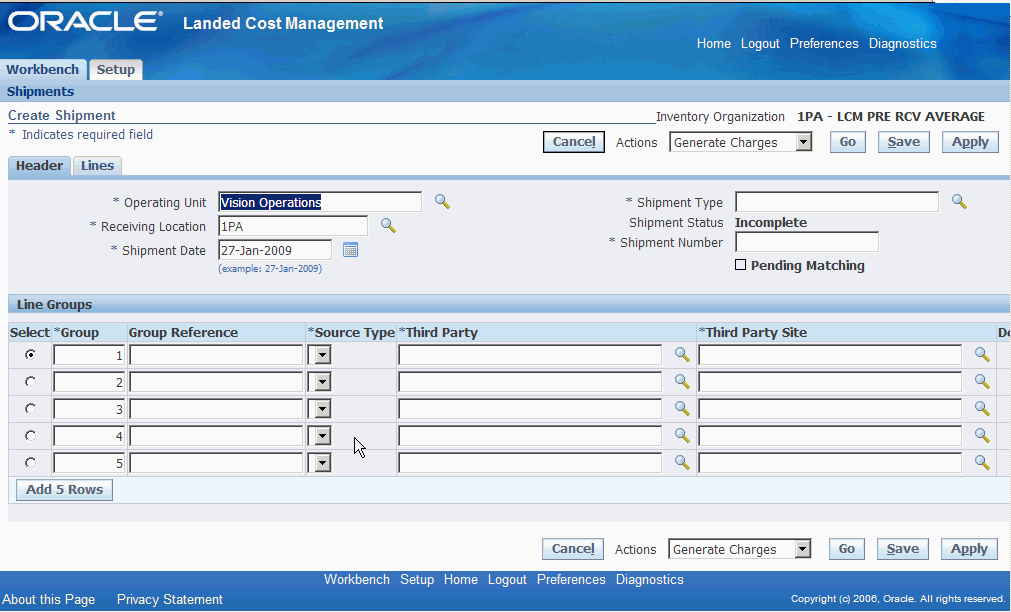
Using the Header tab you define the header information and line group details for the shipment.
Create Shipment page (Lines tab)
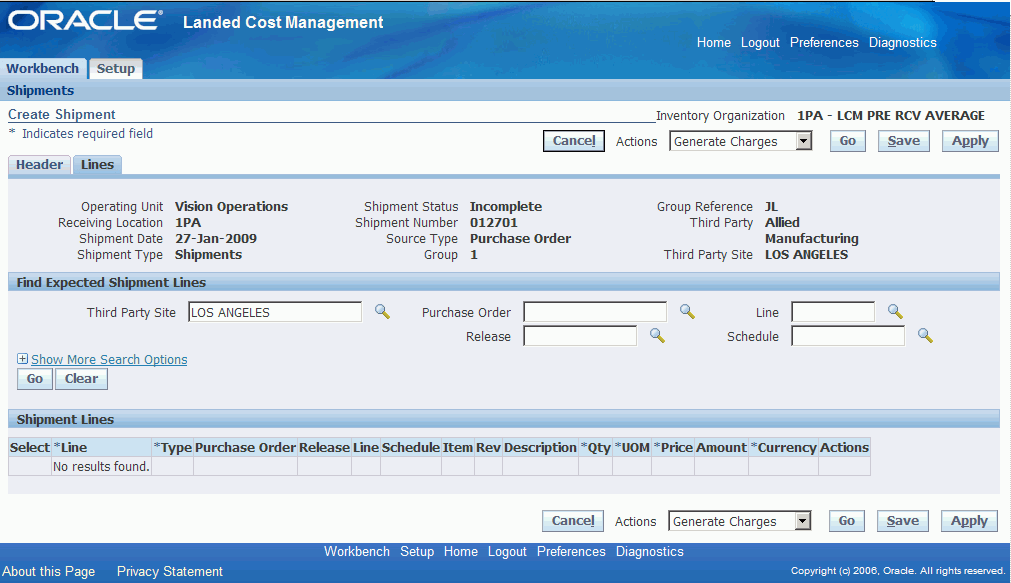
Using the Lines tab you define the shipment lines for the shipment.
This page utilizes the Actions field. After you create a shipment, the actions that are performed against the shipment using the Actions field are an integral part of the Landed Cost Management processing. These actions include processes such as, generate charges and calculating landed cost.
For more information on the Actions field, see the Actions field section in this chapter.
For more information on creating shipments, see:
Update Shipment Page
The Update Shipment page is accessed by clicking the Update icon on the Shipments Workbench. The Update Shipment page contains two tabs a Header tab and a Lines tab.
Update Shipment page (Header tab)
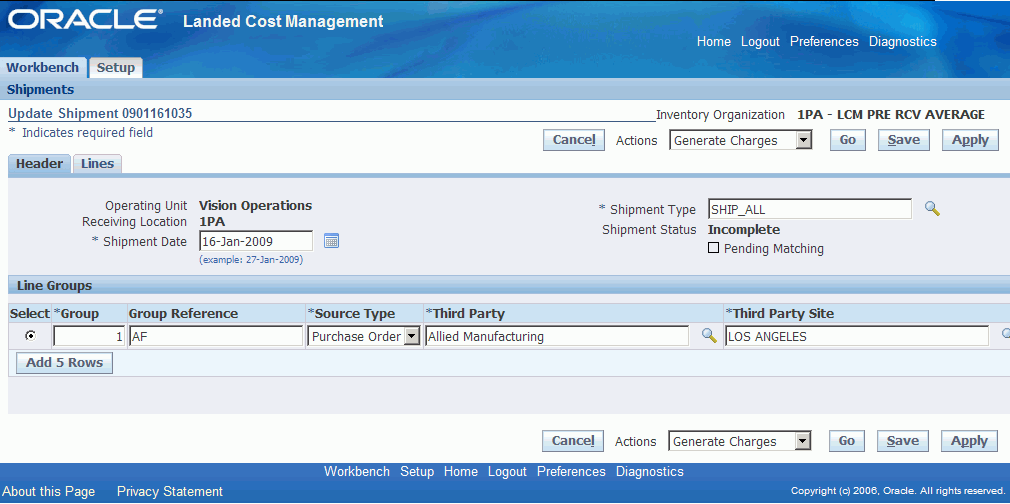
Using the Header tab you can maintain the header information and line group details for the shipment.
Update Shipment page (Lines tab)
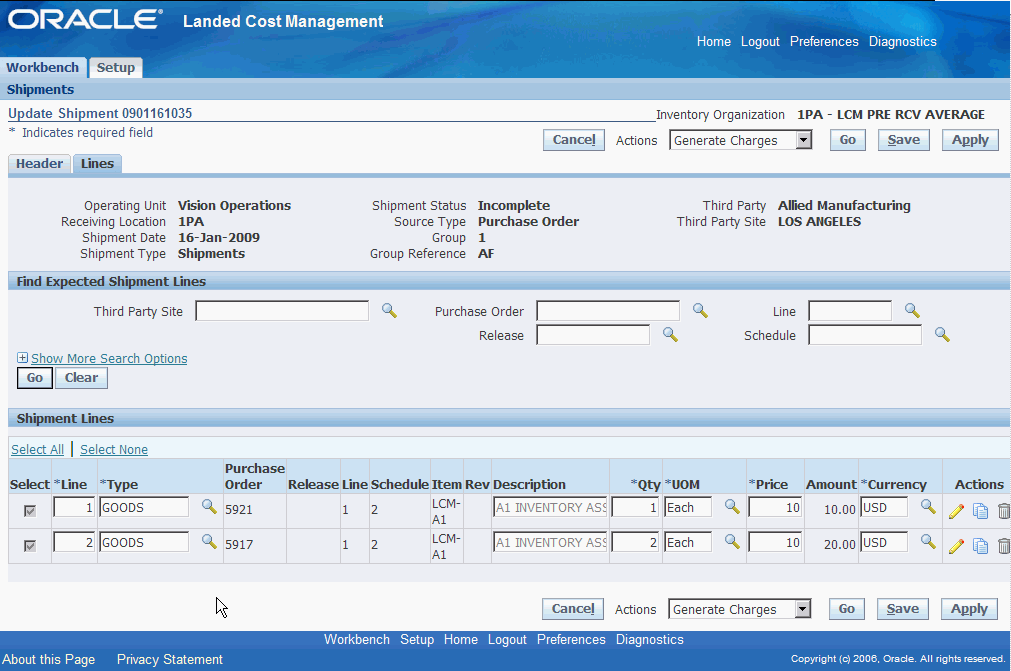
Using the Lines tab you can maintain the shipment lines for the shipment.
This page utilizes the Actions field in it processing. The Actions field has the same options that are available on the Create Shipment page.
For more information on the Actions field, see the Actions field section in this chapter.
The Create Shipment - Lines page and Update Shipment - Lines page are very similar and the functionality of the two pages works basically the same.
The Update Shipment - Lines page displays all the information pertaining to the shipment lines.
For more information on updating shipments, see:
View Shipment Page
The View Shipment page is accessed by clicking the Shipment number link on the Shipments Workbench. The View Shipment page contains two tabs a Header tab and a Lines tab.
View Shipment page (Header tab)

Using the Header tab you can view the header information and line group details for the shipment.
View Shipment page (Lines tab)
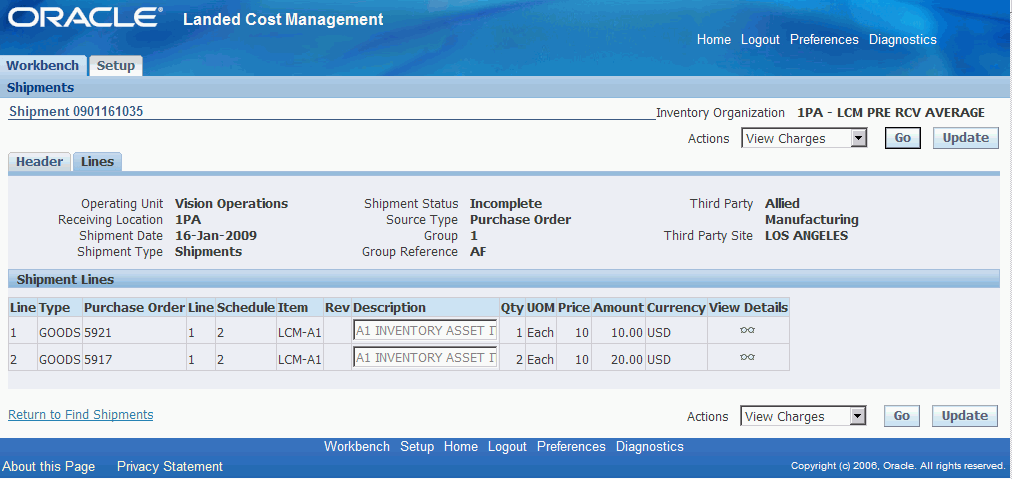
Using the Lines tab you can view the shipment lines for the shipment.
This page utilizes the Actions field. The Actions that are available from this page are only for viewing information such as, viewing charges, viewing associations, and for viewing landed cost.
For more information on the Actions field, see the Actions field section in this chapter.
For more information on viewing shipments, see:
Actions Field
Update Shipment page (Actions field)
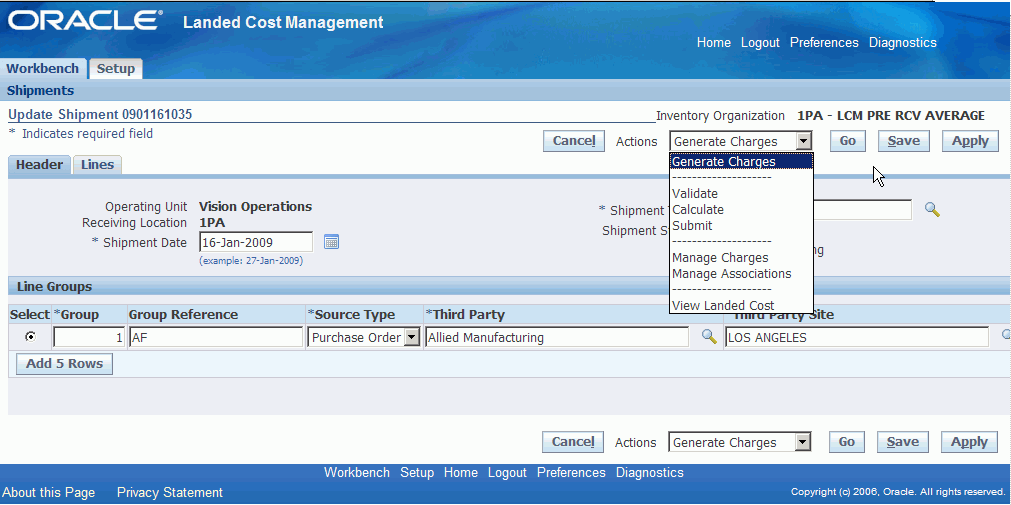
The Actions field resides on several pages in the Shipments Workbench. Depending on the page, the Actions field can contain different options. Each action either initiates a process for the shipment or transfers you to another page where certain information can be viewed and maintained. This table lists the pages and the actions that are available from each page:
| Page | Actions |
|---|---|
| Shipments Workbench |
|
| Update Shipment and Create Shipment |
|
| View Shipment |
|
For more information on how to use each one of these actions, see:
Understanding the Shipment Status
As a Landed Cost Management shipment progresses through its life-cycle, the shipment status is used to indicate where the shipment is in its progression. The shipment status is a simple way to know what actions or processes have occurred against a shipment.
This table describes the shipment statuses and how they are used in Landed Cost Management:
| Action/Process | Shipment Status |
|---|---|
| Initial creation of a shipment in Landed Cost Management | Incomplete |
| After the Generate Charges process is performed for a shipment | Incomplete |
| After the Validate process is performed for a shipment |
|
| Changes are made to a validated shipment that requires validation to be performed again. For example, a change in shipment line quantity or amount. | Validation Required |
| After the Submit process is performed for a shipment | Completed |