Administrator Role
Overview of the Administrator Role
The MOC Administrator role is used to setup and maintain master data for the Manufacturing Operations Center application. It is also used to calculate meter readings and sustainability consumption. Following is a brief overview of the tasks under this role:
-
Contextualization setup: Used to setup contextualization method for equipment.
-
Tag setup: Used to associate tags to equipment and MOC entities, and define rules for adding the business context through the contextualization setup.
-
Sustainability aspect setup: Used to setup sustainability aspect and its corresponding usage categories and emission codes.
-
Site setup: Used to setup site.
-
Site sustainability setup: Used to setup the association of site to sustainability aspect and define the sustainability aspect sources and emission factors.
-
Equipment setup: Used to setup equipments.
-
Tag equipment mapping setup: Used to associate tags to equipment.
-
Resource setup: Used to setup resources.
-
User-defined entities setup: Used to setup user defined entities.
-
Shift setup: Used to create shift templates and generate shifts for site and its entities.
-
Hierarchy setup: Used to setup and build hierarchy.
-
Meter setup: Used to setup meters.
-
Meter entity association: Used to associate meter to entities.
-
Lookups setup: Used to setup lookup values.
-
Extensible attributes setup: Used to create attribute groups and attributes and associate to classifications and create pages.
-
Run Requests: Used to run the MTH: Process and Populate MOC Entity Sustainability Aspect program that calculates meter readings and sustainability aspect consumption.
-
Events
Refer to the Oracle Manufacturing Operations Implementation Guide for detailed information on setting up sustainability, site sustainability, equipment, resources, user defined entities, shifts, hierarchy, meters and lookups.
Related Topics
Creating Equipment Contextualization Information
Setting Up Extensible Attributes for MOC Entities
Running the MTH: Process and Populate MOC Entity Sustainability Aspect
Setting Up Tags
A tag is the metadata configured in PLC or other device connector providing data at the program interval. MOC requires specific tags for obtaining the operation details and business context. There are two types of tags. Business context tags provide work order, operation, product, and equipment details. Data tags provide value of output, scrap, rework, quantity, and completed quantity.
Tag metadata is imported into MOC through Oracle Warehouse Builder mapping by loading data from the comma-separated values (csv) templates. See: Tag Setup, Oracle Manufacturing Operations Center Implementation Guide
To define tag data information
-
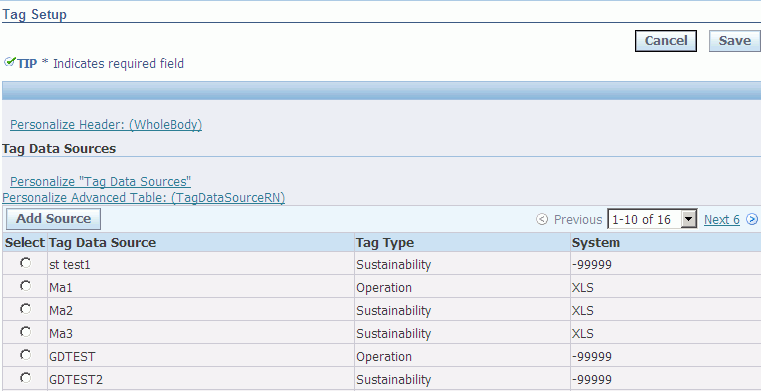
Navigate to the Tag Setup page. If you have already imported the tag metadata using the csv template, then they display on this page.
-
To add a new Tag Data Source, Click Add Source.
-
Enter the name of the new tag data source in the Tag Data Source field.
-
Select the Type of the tag. Options are Operation and Sustainability.
-
Select the System for the tag. The list of Source Systems that you set up while setting up the MOC application display in the list of values for this field. Refer to the “Setting Up Source Systems” chapter of the Oracle Manufacturing Operations Systems Implementation Guide for more information.
-
Save your work.
To add tags to a tag data source
-
Select a Tag Data Source to which you want to add tags.
-
Click Add.
-
Enter the following information for a tag:
-
Tag Code is the code for the tag.
-
Tag is the name of the tag.
-
Description is a brief description of the tag.
-
-
Select the Data Type for the tag. Options are Alphanumeric and Numeric. Numeric displays by default.
-
Select the Reading Type for the tag. Options are Cumulative and Incremental. Cumulative displays by default.
-
Select the Order in which the readings for the tag are recorded. Options are Ascending and Descending. This field is enabled only if you select Cumulative as the Reading Type. If you select Cumulative as the Reading Type, then Ascending displays by default.

-
Enter a Reset Value. Reset Value is the value at which the tag reading recording must be reset. This field is enabled only if you select Cumulative as the Reading Type.
-
Enter an Initial Value. Initial Value is the starting value that you expect to receive from a tag meter recording. This field is enabled only if you select Cumulative as the Reading Type. Zero is the default value.
-
Enter a Reading Interval (in minutes) as the time interval at which the tag readings must be recorded. You can enter a reading interval only for a tag of the sustainability type tag data source.
-
Status displays as Active by default. To inactive a tag, click Inactivate.
-
Click Save.
Note: A tag can be associated to an equipment record only once, but can be associated to multiple equipment.
To update a tag
-
Select a tag.
-
Click Update. Edit the following fields:
-
Tag
-
Description
-
Reading Type
-
Order. This field is enabled for a Cumulative reading type tag only.
-
Reset Value. This field is enabled for a Cumulative reading type tag only.
-
Initial Value. This field is enabled for a Cumulative reading type tag only.
-
Reading Interval. This field is enabled for Incremental reading type tag of a Sustainability type tag data source.
-
-
Click Save.
Mapping Tags to Equipment
Oracle Manufacturing Operations Center enables you to map tags to equipment using the Tag Mapping page. You map a separate tag for each equipment output.
To map tags to equipment
-
Navigate to the Tag Mapping page.
-
Select the Site Name. All the Sites defined in the MOC application display in the list of values (LOV).
-
Select Equipment Name of the equipment to which you want to map tags.
-
Click Go. If tags are already mapped to the selected equipment, then they display.
-
Click Add to map a tag.
-
Enter the Tag Code that you want to map to the equipment. All the tags in the Tag Master display in the LOV. This is a required field.

-
Optionally, enter a Data Element for the tag.
-
Optionally, enter Attribute Group Name and Attribute Name. You can choose from a list of attribute groups and attributes that you define using the Extensible Attributes page as part of setting up the MOC application. Refer to the topic “Setting Up Extensible Attributes” chapter of the Oracle Manufacturing Operations Implementation Guide for more information.
-
Click Submit.
Note: You can associate a tag to either to an entity or an attribute belonging to an attribute group. MOC does not allow an association to both an entity and attribute.
Running the MTH: Process and Populate MOC Entity Sustainability Aspect
Run the MTH: Process and Populate MOC Entity Sustainability Aspect to calculate the carbon emission and electricity usage costs for an entity. When you run the concurrent program the data obtained from the meter readings is processed to calculate the sustainability aspect consumed, the cost of and the carbon emission due to the consumption.
To run the MTH: Process and Populate MOC Entity Sustainability Aspect
-
Navigate to the Parameters window.
-
Enter the Process Mode as:
-
INIT to run the process in Initial mode.
-
INCR to run the process in Incremental mode.
-
-
Enter the Meter Calculation Start Date.
-
Click Submit.
-
Note the Request ID number.
-
Choose View from the menu and select Requests to view the status of your request in the concurrent program manager.
-
When your request ID is complete with a Status of Normal, click View Details to view the details of the run.
Creating Equipment Contextualization Information
Contextualization is the ability to take highly granular tag data collected from shop floor transactions and convert it into meaningful business data for analyzing. The contextualization rules engine enables users with various levels of sophistication on the shop floor to add the business context to the data tags. There are two tag types used:
-
Business Context Tags–tags that provide work order, operation, product, and equipment details.
-
Data Tags–tags that provide value of output quantity, scrap quantity, rework quantity, reject quantity, completed quantity, equipment status, and attribute tags.
The Equipment Contextualization page is used to associate a contextualization method for equipment and to define the mandatory or optional context for the business related to that equipment. The following three methods are used to add the business context:
Tag Based Contextualization
Business context such as work order, operation, and item is derived from the tags that are configured in the PLC for that equipment from the shop floor. The business context tags and the data tags are received into MOC with using the same group identifier for this type of contextualization.
Schedule Based Contextualization
Business context is derived from the equipment production schedule. If this contextualization method is selected, MOC uses the data tags from the equipment to select business context of:
-
Work order and operation from the equipment production schedule
-
Product from production material produced
-
Equipment based on the setup of the tag to equipment association is done
-
Shift based on the reading time
Manual Contextualization
Context is determined through data entered manually and is not derived from the Manufacturing Operations Center hub. The Manual Contextualization page on the Tag Data Workbench under the User role enables you to manually enter and edit context for all active tags that have not been summarized in the Equipment Summary tables.
To select equipment for contextualization
-
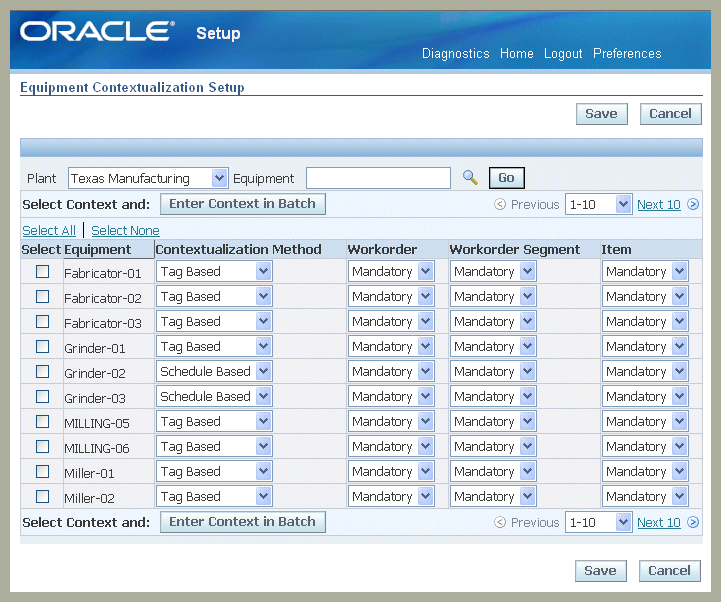
Navigate to the Equipment Contextualization Setup page.
-
Select a value in the Plant field.
-
In the Equipment field, select a specific record and then select Go. You can also leave the field null and select Go to display all the equipment records for the plant.
The results table displays all the equipment associated to this plant record.
-
To edit equipment contextualization values, select equipment records and select a Contextualization Method. Choices are:
-
Tag Based—context is determined through tag readings of the equipment.
-
Schedule Based—context is determined through schedule data in the Equipment Production Schedules table.
-
Manual—context is determined through data entered manually.
-
-
In the Workorder field, indicate whether a business context is Mandatory or Optional for the selected equipment.
Workorder context is determined from either the tag or the equipment production schedule.
-
In the Workorder Segment field, indicate whether a business context is Mandatory or Optional for the selected equipment.
-
In the Item field, indicate whether a business context is Mandatory or Optional for the selected equipment.
-
Save your work.
To change multiple records using the same contextulization rule
-
Select equipment records to create similar contextualization rules.
-
Select Enter Context in Batch to display the Batch Equipment Contextualization Update page.

-
Select the appropriate values in the following fields for the batch update:
-
Contextualization Method
-
Workorder
-
Workorder Segment
-
Item
-
-
Select Enter in Batch to return to the Equipment Contextualization Setup page.
-
Save your work to create the batch update for the selected records.
Related Topics
Adding Reason Codes
You can use tags to display reasons for downtime status and scrap quantity. You can define a list of all reason codes and reason meanings for Manufacturing Operations Center (MOC) plants, at the Instance level in FND_LOOKUPS, and equipment level in the Equipment Reason Setup user interface. In the Tag Mapping setup for the reason tag, map the tag to a data element (Equipment Downtime Reason and Scrap Reason).
You can set up Reason Codes using FND Lookup. Lookup types seeded by Manufacturing Operations Center include:
-
MTH_SCRAP_REASON (for setting up scrap reasons)
-
MTH_EQUIP_DOWNTIME_REASON (for setting up downtime reason)
Add reason codes in the Application Object Library Lookups window from the Development Manager responsibility. You can also set up reason codes using the Lookups menu from the MOC Administrator's responsibility.
To add reason codes
-
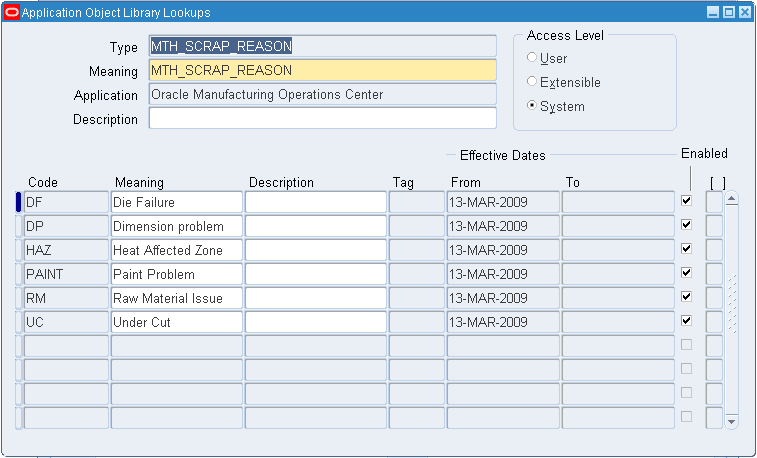
Navigate to the Application Object Library Lookups window.
-
In the Type field, query by example MTH_SCRAP_REASON, MTH_EQUIP_DOWNTIME_REASON, or MTH_EQUIP_IDLE_REASON. The window displays all Reason Codes associated with these types.
-
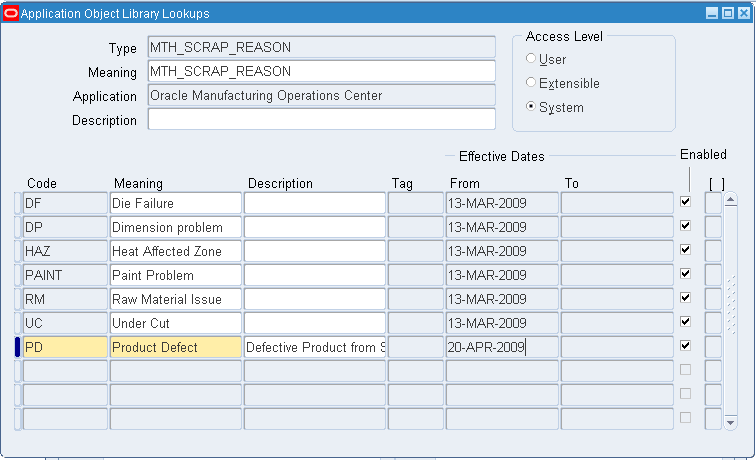
Click a new (empty) row to add a new code.
-
Enter a Code.
-
Enter a Meaning for the code.
-
Enter an optional Description.
-
Enter an Effective date range. The From date defaults to the current date.
-
The Enabled indicator defaults to Enabled.
-
Save your work.
Related Topics
Viewing and Adding Reason Codes
Setting Up Equipment Reason Codes
You must add equipment reason codes prior to adding events. Reason codes define the Equipment Down event types with associated reasons.
Equipment can be down and unavailable due to planned preventive maintenance activities. MOC updates the equipment shift for each equipment item, taking into account planned downtime.
MOC captures the expected uptime for each equipment item when the equipment is down due to unplanned downtime, or when equipment is idle. The application helps to identify equipment availability for production.
To set up equipment reason codes
-
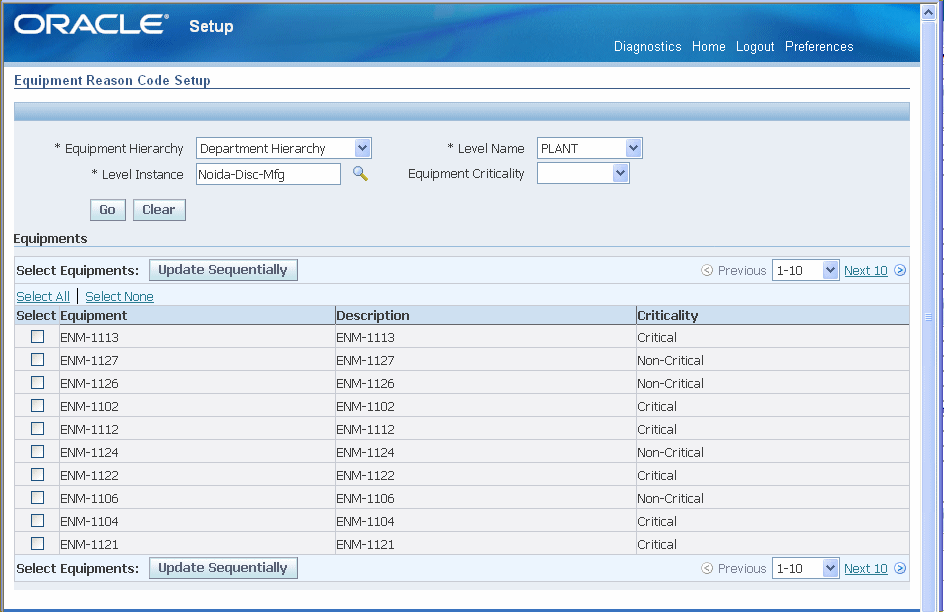
Navigate to the Equipment Reason Code Setup page. Use the Equipment Reason Code Setup page to set up equipment downtime reason codes. You can define the following reasons for equipment:
-
Downtime Reasons and Expected Uptime
-
Idle Time Reasons and Expected Uptime
-
Scrap Reasons
-
-
Select an Equipment Hierarchy from the List of Values (LOV).
-
Select a Level Name from the LOV..
-
Select a Level Instance.
-
You can optionally select an Equipment Criticality value from the LOV.
-
Click Go to perform your search. Based on the search criteria, the page displays the Level Instance and equipment for the selected Level in the Equipment Hierarchy.
-
Select one or more equipment rows and click the Update Sequentially button to navigate to the Update Equipment Reason Code Sequentially page. You can add Downtime reasons, Idle Time reason, and Scrap reasons for your equipment. You can also define Expected Uptime for each Downtime and Idle Time reason code.
To add or update equipment reason code sequentially
-
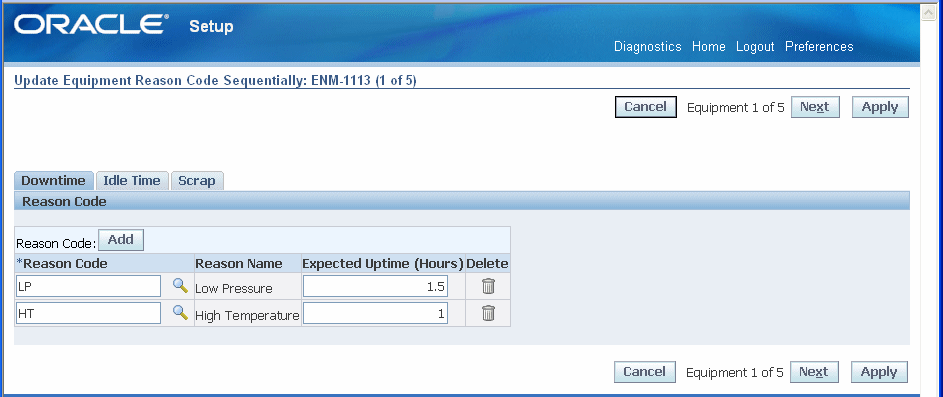
From the Update Equipment Reason Code Sequentially page, select the Downtime tab to add or update equipment downtime reason codes and expected uptime.
-
Enter a Downtime Reason Code, or select a code from the search page.
-
Enter a value for Expected Uptime (Hours).
-
Click the Next button to enter Downtime reasons for the next equipment item that you selected, or click Apply to save your work.
-
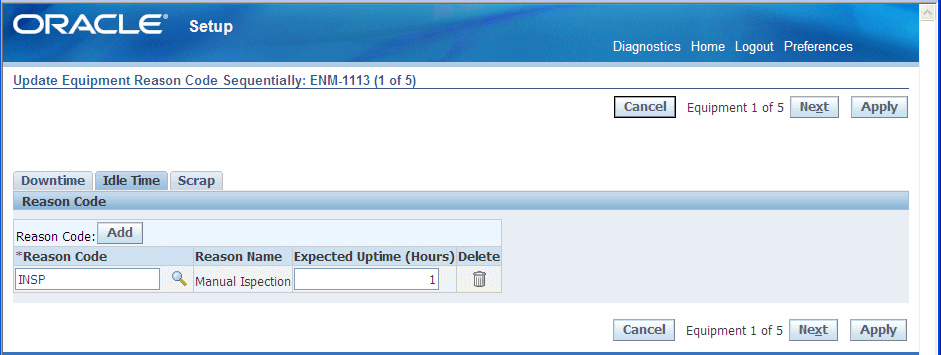
Select the Idle Time tab to enter equipment idle time reason and expected uptime.
-
Enter an idle time Reason Code, or select a code from the search page.
-
Enter a value for Expected Uptime (Hours).
-
Click the Next button to enter Idle Time reasons for the next equipment item that you selected, or click Apply to save your work.
-
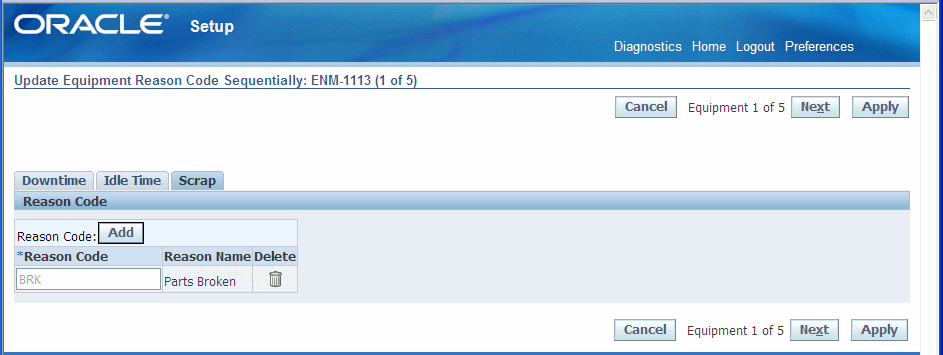
Select the Scrap tab to enter equipment scrap reasons.
-
Click Add to enter a new scrap reason.
-
Enter a Reason Code, or select a code from the search page.
-
Click the Next button to enter Scrap reasons for the next equipment item that you selected, or click Apply to save your work.
Setting Up Events
Oracle Manufacturing Operations Center (MOC) provides a workbench to generate and process events based on event types. The events are created based on Oracle Warehouse Builder pluggable mapping, and is defined as an event type. Based on the event type, action is taken by PL/SQL.
MOC supports collection of data from external OPC systems, and by using Event Management Framework, the application routes events and takes appropriate actions.
Update Equipment Event Action Sequentially Page
Use this page to add and update Event Types and Event Actions. You can also add notifications when events occur. You can add and update event types and actions for equipment items in order of selection from the Events Setup page. You can also view event actions previously added for equipment items (rows).
To set up events
-
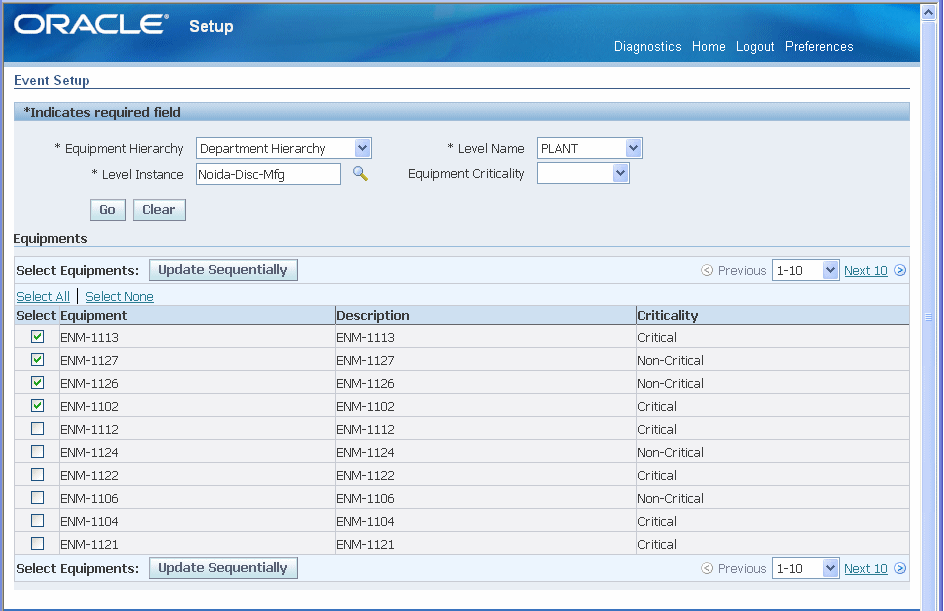
Navigate to the Event Setup page. Use the Event Setup page to set up event actions for event types. You can select the following actions against an event type by equipment items:
-
Seeded action such as creating work requests in eAM
-
Calling custom APIs or PL/SQL scripts
-
Sending e-mail notifications
-
Sending mobile alerts
-
-
Select an Equipment Hierarchy from the List of Values (LOV).
-
Select a Level Name from the LOV.
-
Select a Level Instance.
-
You can optionally select an Equipment Criticality value from the LOV.
-
Click the Go button to perform your search. Based on the search criteria, the page displays the Level Instance and equipment for the selected Level in the Equipment Hierarchy.
-
Select one or more equipment rows and click the Update Sequentially button to navigate to the Update Equipment Event Action Sequentially. You can add or update event actions for each equipment row selected.
To add or update equipment event actions
-
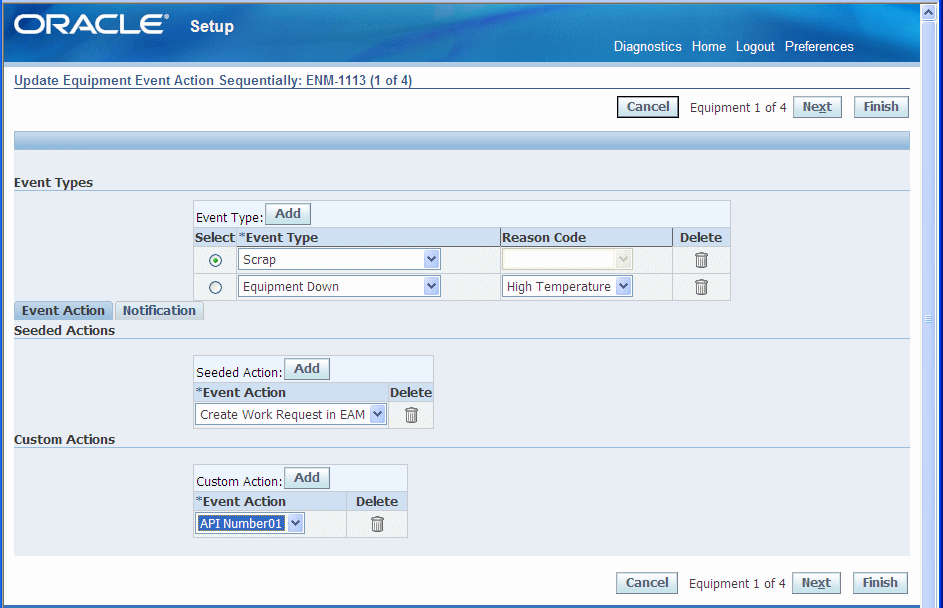
From the Update Equipment Event Action Sequentially page, click the Add button in the Event Types region to add a new Event Type. If an event action was previously defined for an event type and you return to this page, then the earlier definition appears and you can modify the actions, if required.
-
Select an Event Type from the LOV.
-
Select a Reason Code from the LOV (if applicable.) The Reason Code LOV is enabled only for the Equipment Down event type.
-
Click the Add button to add Event Types.
-
Select the Event Action tab. The Seeded Actions region appears.
-
Click the Add button to add a seeded event action.
-
Select a seeded Event Action from the LOV.
-
Select the Name and the appropriate indicators for the notification method.
-
Click the Add button in the Custom Actions region to add custom event actions
-
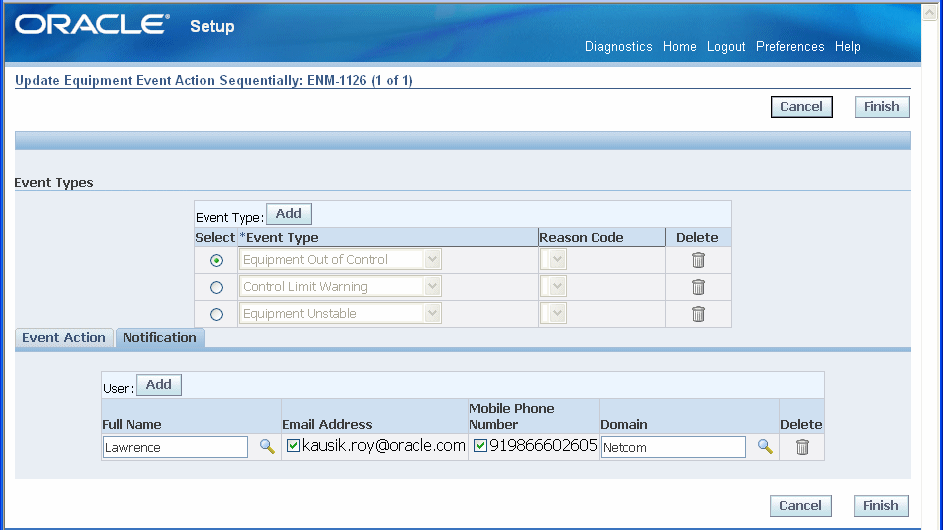
Select the Notification tab to add event notifications.
-
Click the Add button to add new notifications.
-
Enter notification details for the selected event.
-
Click Finish to save your work.
-
Click the Next button to add event actions for the next equipment item that you selected, or click Finish to save your work.
Setting Up Extensible Attributes for MOC Entities
Oracle Manufacturing Operations Center supports an extensible attributes framework to capture specific attributes for manufacturing entities. The extensible attributes framework helps in setting up and capturing parameters that are unique for your business environment, plant, equipment, items, work orders, batch operations and user-defined entities. The extensible attributes setup consists of the following steps:
-
Setting up profile options for item and equipment entity classifications
-
Defining classifications for Others entity type
-
Creating attribute groups
-
Creating attributes
-
Associating attribute groups to classifications
-
Creating attribute pages
Entities and Classifications
Shop floor or manufacturing entities are business objects in Oracle Applications with unique characteristics and processes. MOC supports item, equipment, work order, batch operation, and miscellaneous custom entities.
Entities are grouped into classification to define the type of attributes they can monitor. For example, boiler equipment in the shop floor are classified into one group which is the resource Boiler. You can define this classification using attribute metadata such as Pressure, Temperature, and so forth. Each MOC entity type page contains two tabbed regions: Classifications and Attributes. Entity pages open with all the classification values displaying in the search results table region. You can filter this list.
Classifications are defined based on the hierarchy of the entities. The hierarchy level is determined by the information in the following table:
| Entity | Classification Source Creation | Values |
|---|---|---|
| Item: | Profile Option–MTH:Item Classification for Extensible Attributes | Hierarchy Name. The level is always Level 9 for the hierarchy selected. |
| Equipment: | Profile Option–MTH:Equipment Classification for Extensible Attributes | Hierarchy Levels. |
| Work Order: | Work order type | Discrete or Process Manufacturing work order types only. |
| Other:. | No classification | N/A |
| Batch Operations | Work order | Work Order Number |
Attributes and Attribute Groups
Attribute groups are a grouping of similar attributes used to monitor an entity. For example, Specifications is a seeded attribute group for the Equipment entity containing the attributes Parameter, Upper Control Limit, and Lower Control Limit. Oracle Product Information Management functionality is used for attribute creation.
Similar attributes can be categorized in an attribute group, such as a collection of items similar in type or function. You can:
-
Group attributes based on business functions
-
Define and use an unlimited number of attribute groups
-
Create attribute pages for ease of viewing attributes
Attribute Pages
An attribute page is a view used to display, create, and edit different attributes from the various attribute group categories. An attribute page is a way of categorizing attribute groups and displaying them separately in these categories based on different functional areas. You can create attribute pages for each item, equipment, work order, batch operation, user-defined entity and other values of your entities—and assign corresponding attribute groups to these pages.
Refer to the Oracle Manufacturing Operations Center Implementation Guide for more information.
Related Topics
Viewing Classifications for Shop Floor Entities
Viewing and Creating Attribute Group Data for Entities
Viewing and Creating Attribute Pages for Entities
Viewing Classifications for Shop Floor Entities
Manufacturing Operation Center entities are grouped into classifications, and associated to attributes that define specific characteristics for items in your organization. MOC supports item, equipment, work order, user-defined entities, batch operation, and other miscellaneous entities:
-
Equipment classifications can designate the machine or plant location where manufacturing activity is performed on the shop floor.
-
Item entity classifications can be group by categories such as product or line type, ABC classes, or cost structure.
-
Other entity classifications are created on the Extensible Attributes Workbench per your requirements for miscellaneous categories in your organization.
-
Work Order classifications designate Work in Process work order types, choices are discrete or process types.
To view entity classifications
-
Navigate to the specific Entity page.
MOC provides Entity: Batch Operation, Entity: Equipment, Entity: Item, Entity: Others, Entity: User Defined and Entity: Work Order.
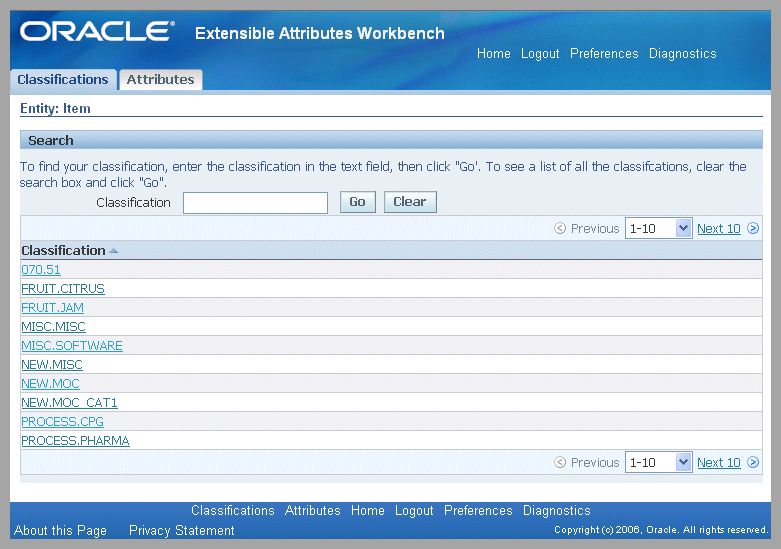
There are two tabbed regions: Classifications and Attributes. The page opens with all the classification values displaying in the search results table region. Classifications are created in several different areas depending on the entity type, see: Setting Up Extensible Attributes for MOC Entities
You can filter your list by entering a value in the Classification field and selecting Go.
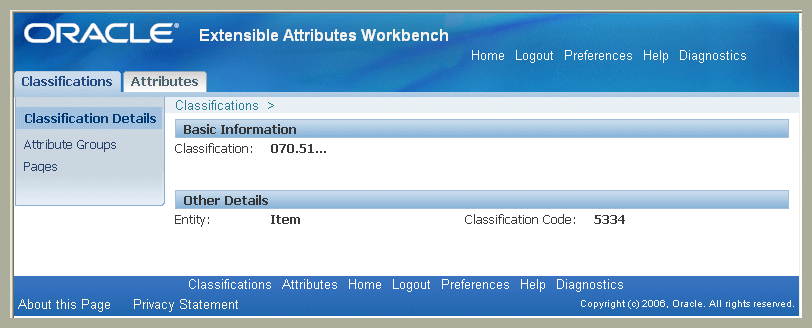
-
Select a value link in the Classification column to navigate to the Classifications Details page.
This page displays the following values in the Basic Information and Other Details regions:
-
Classification—name for this grouping
-
Entity—type of entity
-
Classification Code
This page enables you to navigate to associated attribute groups and attribute pages for this item classification.
-
To create and update Others entity classifications
-
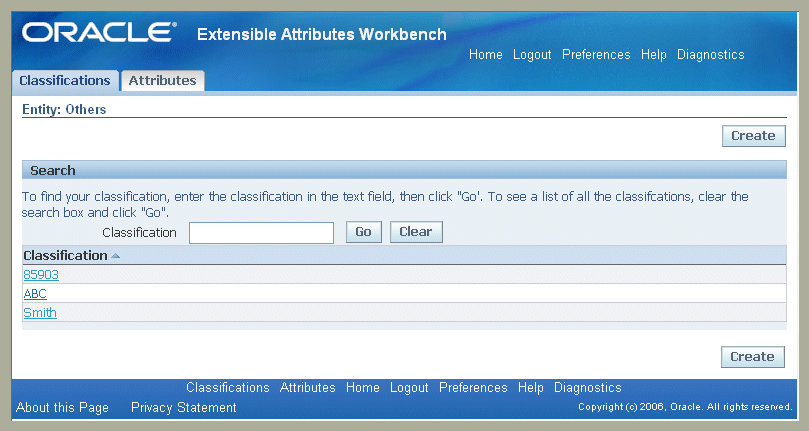
Navigate to the Entity: Others page.
The page opens with all the Classification values displaying in the search results table region.
-
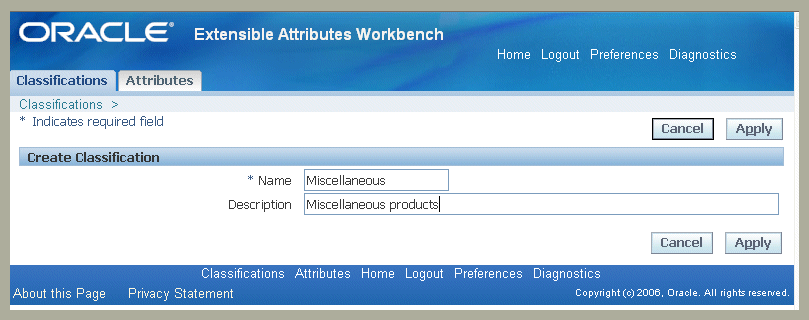
Select Create to create a new classification record.
-
On the Create Classification page— enter values in the Name and, optionally, Description fields.
-
Select Apply to save your work.
To update an Other entity classification record
-
Navigate to the Update Classification page.
-
Change the appropriate information in the Name and Description fields.
-
Select Apply to save your work.
Related Topics
Setting Up Extensible Attributes for MOC Entities
Viewing and Creating Attribute Group Data for Entities
Viewing and Creating Attribute Pages for Entities
Viewing and Creating Attribute Group Data for Entities
Manufacturing Operation Center Equipment entities are associated to attributes that capture specific characteristics for functional areas in your organization. Similar attributes can be categorized in an attribute group, and you can define an unlimited number of attribute groups that fit your business environment.
To view all attribute groups created for specific entities
-
In the specific Entity page, select the Attributes tabbed region.
This includes the Entity: Batch Operation, Entity: Equipment, Entity: Item, Entity: Others, Entity: User Defined, and Entity: Work Order pages.
All the existing attribute groups for the specific entity type selected appear in the results table.
You can filter the display by using a combination of values and conditional qualifiers in the following fields: Attribute Group Display, Attribute Group Description, Attribute Group Descriptions, Behavior, Business Entity, Database View, and Internal Name.
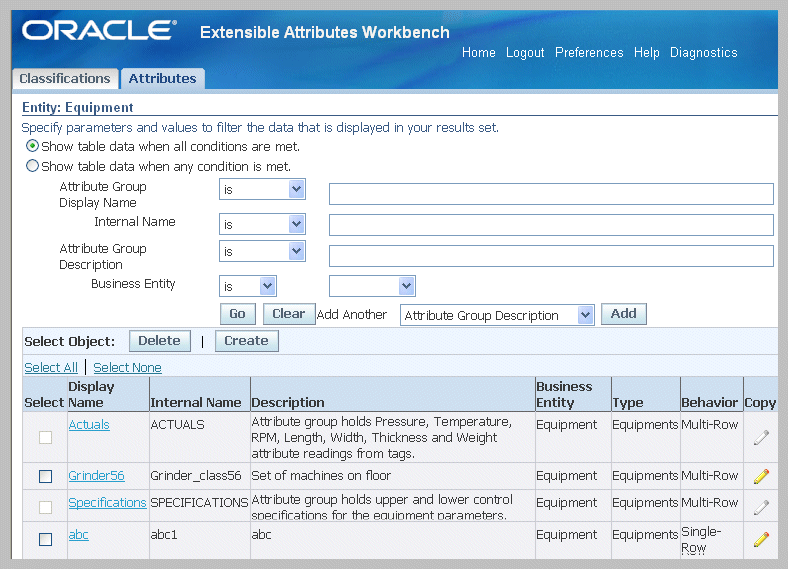
This page enables you to select:
-
A record link in the Display Name column to navigate to the Attribute Group Details page
-
Create to navigate to the Create Attribute Group for Equipments page
-
Copy to create a new attribute group using information in an existing record
-
To view and add attribute groups to a shop floor entity
-
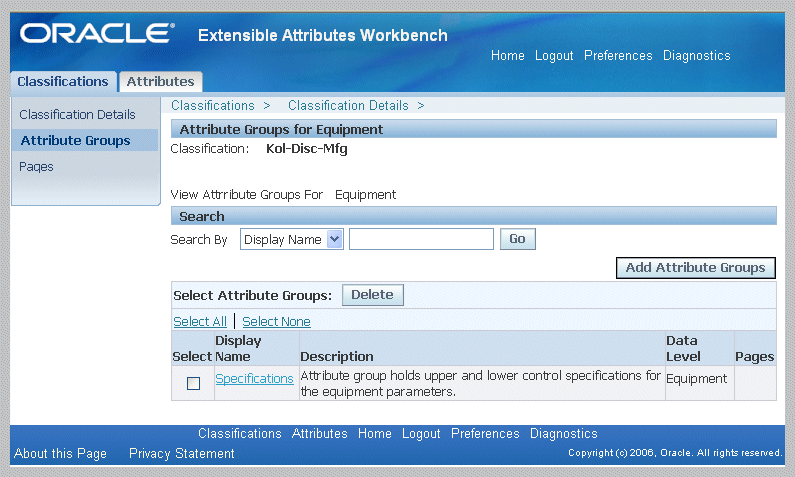
On the specific Entity Classification Details page, select Attribute Groups to display the Attribute Groups for an entity page.
All attribute groups associated to this equipment entity appear.
You can filter the results by using values for Display Name or Description. This page enables you to:
-
Navigate to the Attribute Group Details page.
Select an attribute group value link.
-
Add attribute groups to this specific entity.
-
-
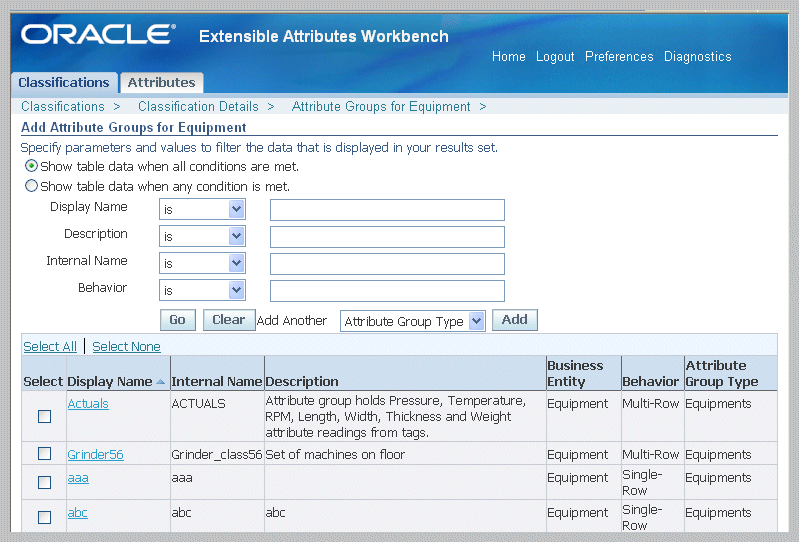
Select Add Attribute Groups to associate attribute groups to the entity selected.
Depending on the entity is selected, the following pages appear:
-
Add Attribute Groups for Batch Operation
-
Add Attribute Groups for Equipment
-
Add Attribute Groups for Item
-
Add Attribute Groups for Others
-
Add Attribute Groups for User Defined Entities
-
Add Attribute Groups for Work Order
On the Add Attribute Groups page you can filter the display by using a combination of Attribute Group Type, Behavior, Display Name, Description, and Internal Name.
-
-
In the results table, select the attribute group records you want to add to the selected entity.
-
Select Apply to save your work.
The records appear on the refreshed Attribute Groups for this entity page.
Related Topics
Setting Up Extensible Attributes for MOC Entities
Viewing Classifications for Shop Floor Entities
Viewing and Creating Attribute Pages for Entities
Viewing and Creating Attribute Pages for Entities
Attribute pages can be created for each entity for ease of use in data entry and viewing. You can assign multiple attribute pages to a specific entity attribute group. For each page, you can choose the attributes displayed and the specific order listed.
To view and create Attribute Group Pages
-
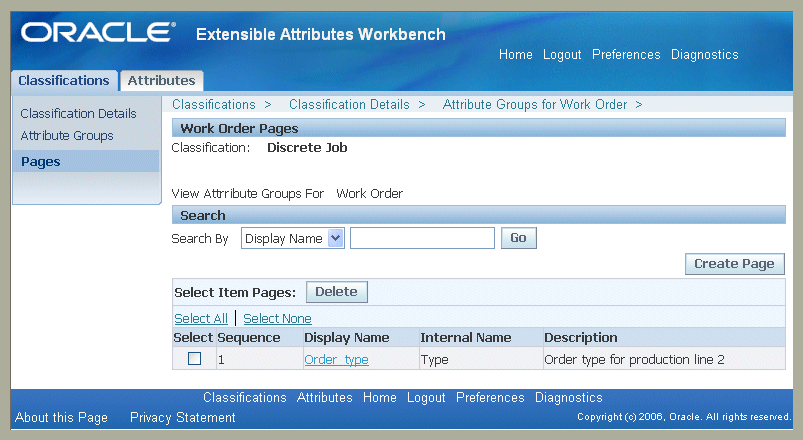
Select Pages to display attribute pages created for this entity classification.
This includes Batch Operation Pages, Equipment Pages, Items Pages, Others Pages, User Defined pages, and Work Order Pages.
The attribute group pages for the specific entity selected appear in the results table.
You can search records on the entity Pages by Display Name or Description.
-
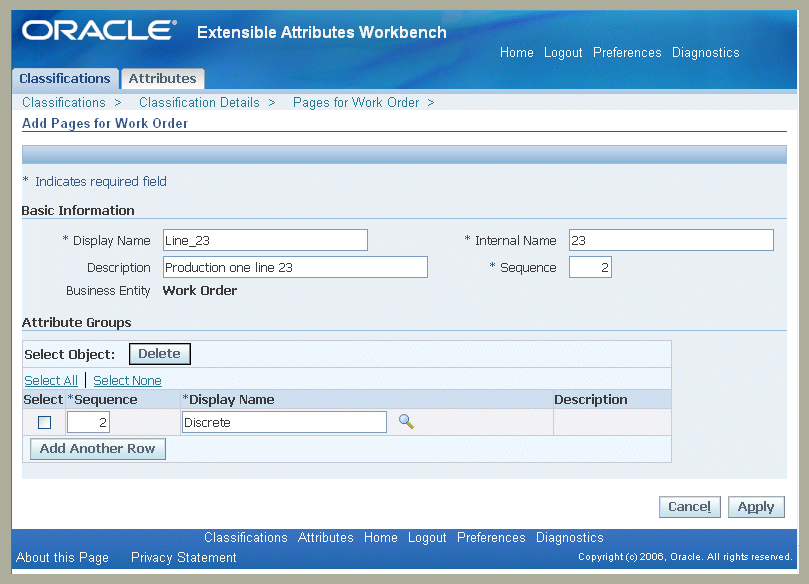
Select Create to create a new page for this entity.
The Add Pages for the select entity type appears.
-
Enter the following data in the Basic Information region:
-
Display Name—name displayed on the page.
-
Description—a description of the attribute category.
-
Internal Name—internal name for the page, this value cannot be updated once a page has been created.
-
Sequence—sequence number for each page associated with an attribute group, the sequence number determines the order pages are listed.
-
-
In the Attribute Groups region, select Add Another Row to add attributes groups to this page. To add an existing attribute group:
-
Enter a Sequence number
-
Select an existing Display Name value
-
-
Select Apply to save your work.
The attributes for this entity, and the display sequence appear in the Pages region.
Related Topics
Setting Up Extensible Attributes for MOC Entities