Managing Parameters
This chapter covers the following topics:
Managing Parameters
Use the parameter list definition pages to define and manage parameter lists and parameters.
To manage parameter lists and parameters
Navigate to the parameter list definition pages from the Oracle E-Business Suite Navigator by choosing either Desktop Integration Manager: Define Parameter or a custom responsibility and menu path specified by your system administrator.
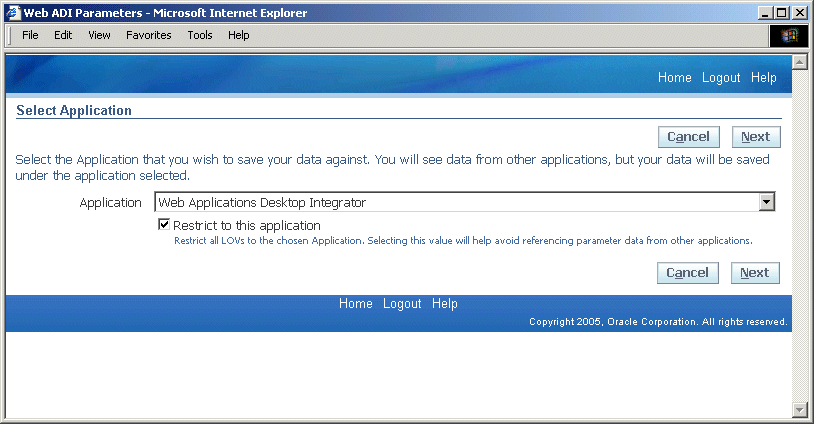
Select Application Page
-
Select the application that owns the parameter list, against which the parameter data will be saved.
-
To restrict all the lists of values in the subsequent pages to display only values from the selected application, select the Restrict to this Application option. Selecting this option helps ensure that you do not reference data from other applications in this parameter list if you want to maintain the list solely in a single application.
-
Select Next.
Define Parameter List Page
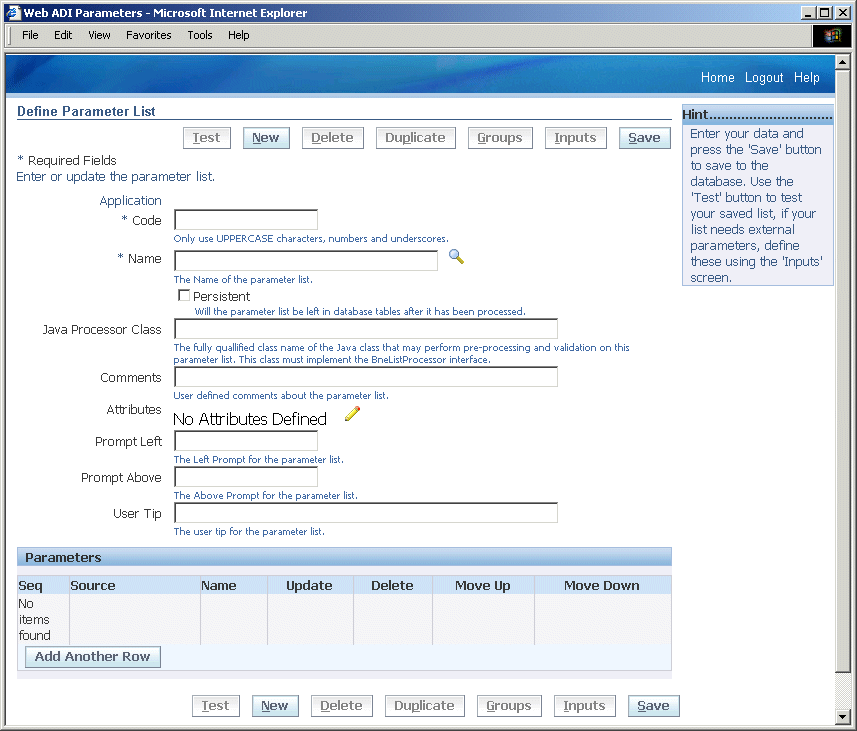
In the Define Parameter List page you can create a new parameter list.
-
If no parameter list is currently displayed, enter the information for the new parameter list in the blank fields and select Save.
-
If another parameter list is displayed, first select New to clear the page. Then enter information for the new parameter list and select Save.
-
-
To view or update an existing parameter list, select the display name of the parameter list you want in the Name field. See: To define a parameter list.
To define a new parameter list by copying the definition of an existing list, first display the definition of the existing list and then select Duplicate. Enter the name, application, and unique code for the new list, and select Save.
-
To define parameter groups for the currently displayed parameter list, select Groups. See: To define parameter groups.
-
If the currently displayed parameter list requires external API parameters, select Inputs to enter test data for those parameters before testing the parameter list. See: To define inputs.
-
To test how the currently displayed parameter list will appear, select Test. See: To test a parameter list.
-
To delete the currently displayed parameter list, select Delete.
To define a parameter list
In the Define Parameter List page, to create a new list, enter a unique code to identify the parameter list. The code can include only the following characters:
-
Uppercase letters from A through Z
-
Numerals from 0 through 9
-
The underscore character (_)
Note: To preserve consistency, you cannot update the application or code for an existing parameter list.
-
-
In the Name field, enter the display name of the parameter list.
-
If you want the parameter list to remain in the Oracle Web Applications Desktop Integrator database tables after the list has been processed, select the Persistent option. If you do not select this option, the parameter list is deleted from the database tables after the list has been processed.
-
Optionally enter the fully qualified class name of a Java class that can perform pre-processing and validation on this parameter list. This class must implement the BneListProcessor interface.
-
Optionally enter comments about the parameter list.
-
The Define Parameter List page indicates whether any attributes are defined for the parameter list. To create or update attributes for the parameter list, select the Update List Attributes icon. See: To define attributes.
-
Optionally enter a prompt to appear to the left of the parameter list if it appears in the header region of the document.
-
Optionally enter a prompt to appear above the parameter list if it appears in the lines region of the document.
-
Optionally enter a tip to provide users further guidance on the parameter list.
-
Select Save.
-
In the Parameters region, select Add Another Row to add a new parameter to the parameter list. See: To define a parameter.
-
To update a parameter definition, choose the update icon for that parameter. See: To define a parameter.
-
To delete a parameter from the list, choose the delete icon for that parameter.
-
To change the position of a parameter in the sequence, choose the move up icon or the move down icon for that parameter.
To define attributes
Use the Define Attributes page to define attributes for a parameter list, a parameter, or a parameter group.
Define Attributes Page
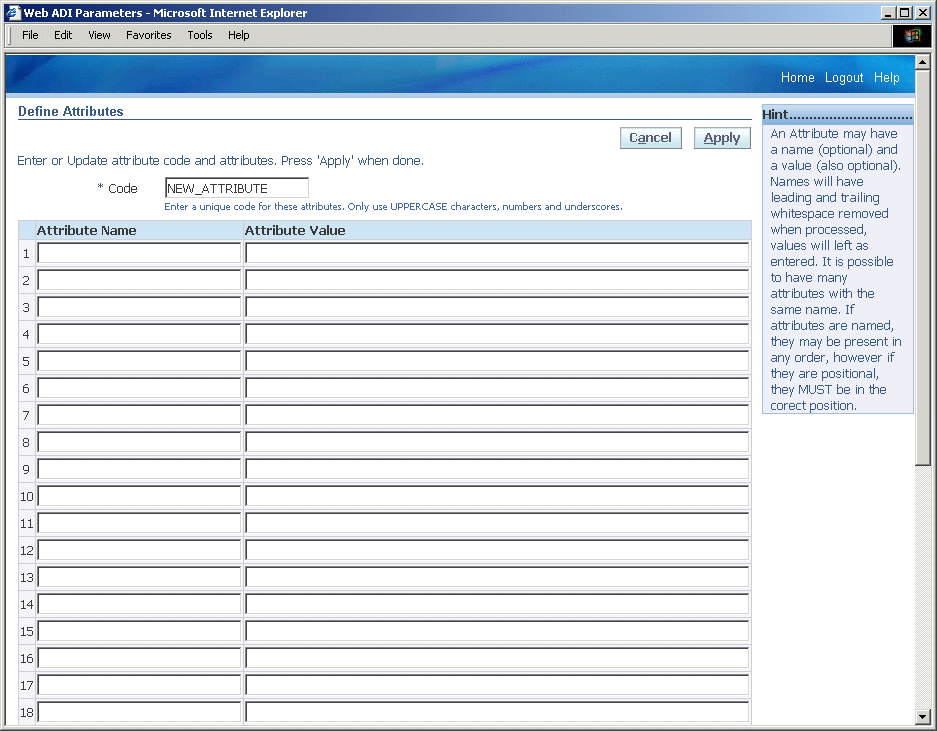
Enter a unique code to identify the attributes. The code can include only the following characters:
-
Uppercase letters from A through Z
-
Numerals from 0 through 9
-
The underscore character (_)
-
-
To define an attribute, enter an attribute name, an attribute value, or both. You can define multiple attributes with the same name. If you define named attributes, then you can enter the attributes in any order. However, if you define positional attributes, meaning you only enter attribute values and do not provide attribute names, then you must define the attributes in the correct position.
You can define up to 30 attributes.
Note: Oracle E-Business Suite Desktop Integration Framework removes leading and trailing spaces from attribute names when processing the names. However, attribute values are preserved exactly as you enter them.
-
Select Apply.
To define a parameter
The Define Parameter page displays the parameter list to which this parameter belongs and the sequence number for the parameter.
Define Parameter Page
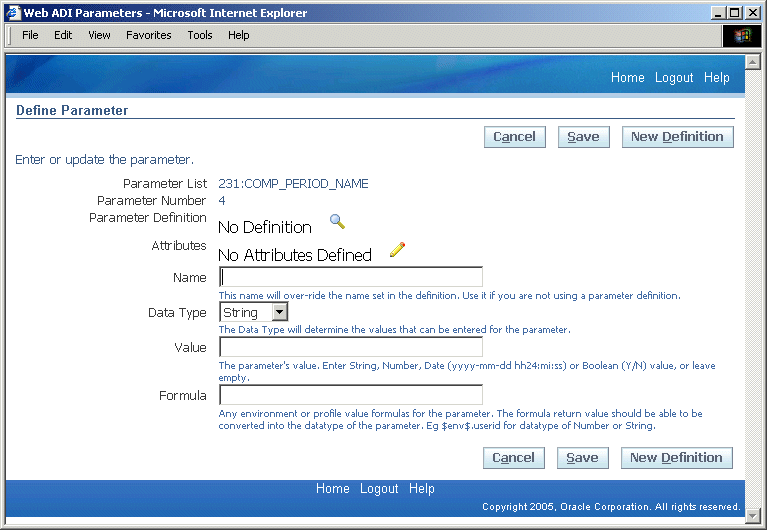
To base the parameter you are adding on an existing parameter metadata definition, select the parameter definition you want.
-
To create a new parameter metadata definition, select New Definition.
-
To update an existing parameter metadata definition, select the parameter definition you want and then choose the Update Parameter Definition icon.
-
-
The Define Parameter page indicates whether any attributes are defined for the parameter. To create or update attributes for the parameter, select the Update Parameter Attributes icon. See: To define attributes.
-
Enter a name for the parameter. If you are using an existing parameter definition, the name you enter here overwrites the previous name for the definition. Usually you should only enter a name when you are creating a new parameter not based on an existing definition.
-
Select the data type for the parameter.
The data type can be String, Number, Date, or Boolean.
-
Optionally enter a default parameter value.
-
For a date parameter, enter the value in the following format: yyyy-mm-dd hh24:mi:ss
-
For a Boolean parameter, enter either Y or N.
If you enter a value, you must also enter a description for the parameter. If you do not enter a parameter value, then the description is optional.
-
-
Optionally enter any environment variable or profile option value formulas to derive the default value for the parameter. The formula should return a value that can be converted into the data type of the parameter. For example, a possible formula for a parameter with a data type of Number or String could be: $env$.userid
-
Select Save.
To define parameter metadata
The Define Parameter Metadata page displays the application to which the parameter definition belongs.
Define Parameter Metadata Page
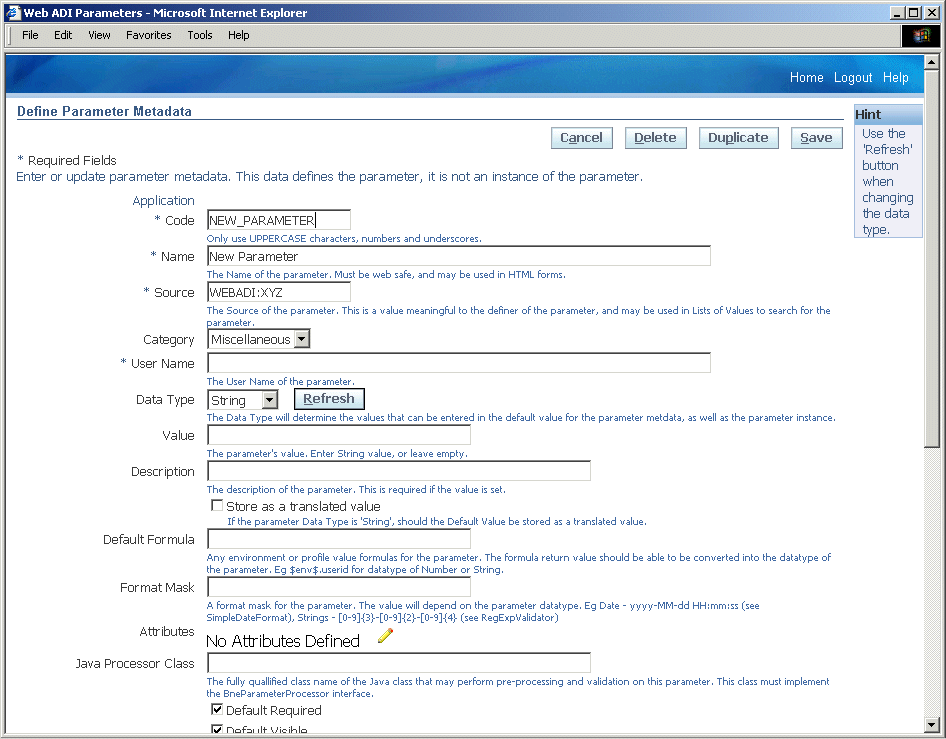
Enter a unique code to identify the parameter definition. The code can include only the following characters:
-
Uppercase letters from A through Z
-
Numerals from 0 through 9
-
The underscore character (_)
-
-
Enter a display name for the parameter. The display name must be web safe and must be in a format that is suitable for display in HTML forms.
-
Enter a source for the parameter. You can use the source to search for this parameter definition in lists of values in other Oracle E-Business Suite Desktop Integration Framework pages.
-
Select the category to which the parameter belongs.
-
Miscellaneous
-
Position
-
Appearance
-
Behavior
-
Data
-
Field
-
-
Enter a user name for the parameter.
-
Select the data type for the parameter: String, Number, Date, Boolean, or Key Flex. Then choose Refresh to update the subsequent fields based on the selected data type.
-
For a key flexfield parameter, select the application to which the flexfield belongs, enter the flexfield structure code, and enter the flexfield number.
-
Optionally enter a default parameter value.
-
For a date parameter, enter the value in the following format: yyyy-mm-dd hh24:mi:ss
-
For a Boolean parameter, select either None, True, or False.
-
For a key flexfield parameter, enter the concatenated flexfield value.
If you enter a value, you must also enter a description for the parameter. If you do not enter a parameter value, then the description is optional.
-
-
For a string parameter, if you want to store the default value as a translated value, select the Store as a Translated Value option.
-
Optionally enter any environment variable or profile option value formulas to derive the default value for the parameter. The formula should return a value that can be converted into the data type of the parameter. For example, a possible formula for a parameter with a data type of Number or String could be: $env$.userid
-
Optionally enter a format mask for the parameter. The value for the format mask depends on the parameter data type. For example, a format mask for a date parameter could be: yyyy-MM-dd HH:mm:ss
An example format mask for a string parameter could be: [0-9]{3}-[0-9]{2}-[0-9]{4}
-
The Define Parameter Metadata page indicates whether any attributes are defined for the parameter. To create or update attributes for the parameter, select the Update Parameter Attributes icon. See: To define attributes.
-
Optionally enter the fully qualified class name of a Java class that can perform pre-processing and validation on this parameter. This class must implement the BneParameterProcessor interface.
-
Select whether a default value is required for the parameter.
-
Select whether the default value for the parameter is visible to users.
-
Select whether users can modify the parameter value to a value other than the default.
-
Select the validation type for the parameter: None, Fnd Lookups, Value Set, or Bne Query.
-
Depending on the selected validation type, enter the lookup type, value set, or query against which you want to validate the parameter value. If you selected the validation type None, leave the Validation Value field blank.
-
Enter the maximum size for the parameter value. The default value is 100.
-
Enter the display size for the parameter value. The display size must be equal to or less than the maximum size. The default value is 100.
-
Select the display type for the parameter.
-
For a string parameter, you can select List Box, CheckBox, Radio Buttons, Text Field, or Password Field.
-
For a number or date parameter, you can select List Box, Radio Buttons, Text Field, or Password Field.
-
For a Boolean parameter, you can select List Box, CheckBox, Radio Buttons, or Text Field.
-
A key flexfield parameter must use the Text Field display type.
-
-
If you selected the display type Radio Buttons, select whether the display style of the radio buttons should be vertical or horizontal. For all other display types, leave the display style set to None.
-
Optionally enter a prompt to appear to the left of the parameter if it appears in the header region of the document.
-
Optionally enter a prompt to appear above the parameter if it appears in the lines region of the document.
-
Optionally enter a tip to provide users further guidance on the parameter.
-
Optionally enter a key used to access this parameter on a page. The access key is typically used with the <ALT> key.
-
Optionally enter a URL that the application can call to provide users additional help on this parameter.
-
Select Save.
To create a new parameter definition by copying the currently displayed definition, select Duplicate. Enter the user name, application, and unique code for the new parameter definition, and select Save.
-
To delete the currently displayed parameter definition, select Delete.
To define parameter groups
If validation of one parameter depends on the value of another parameter, or if several parameters are validated the same way, you can associate those parameters with each other by defining a parameter group and perform validation for all parameters in the group together. You can still also perform validation on each parameter individually if necessary.
The Select Groups page displays any parameter groups defined for the parameter list.
Select Groups Page
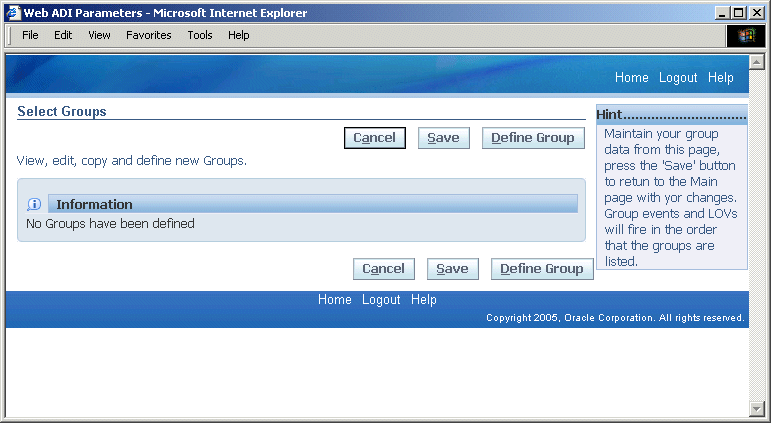
To define a new parameter group, select Define Group.
Define Parameter Group Page
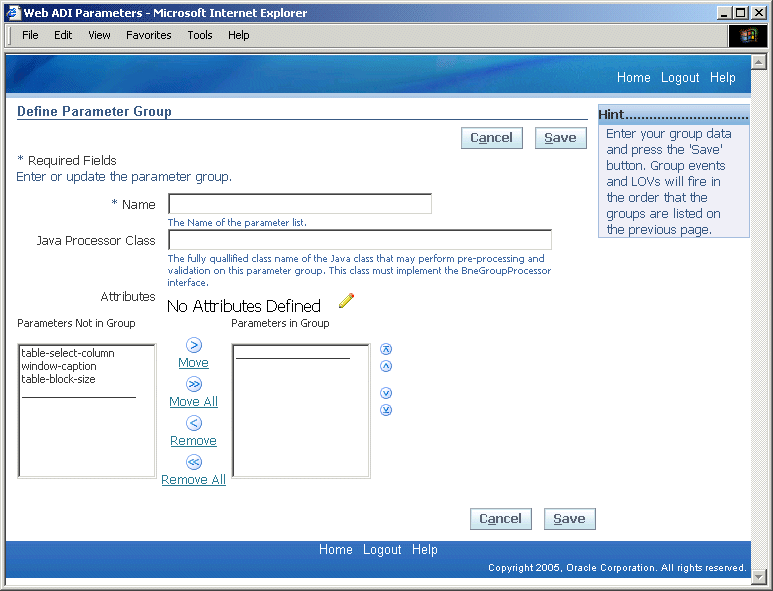
In the Define Parameter Group page, enter a name for the parameter group.
-
Optionally enter the fully qualified class name of a Java class that can perform pre-processing and validation on this parameter group. This class must implement the BneGroupProcessor interface.
-
The Define Parameter Group page indicates whether any attributes are defined for the parameter group. To create or update attributes for the parameter group, select the Update Group Attributes icon. See: To define attributes.
-
Select the parameters you want in the Parameters Not in Group list and move them to the Parameters in Group list.
-
Select Save.
-
In the Select Groups page, to update a parameter group, choose the update icon for that group.
To define a new parameter group by copying the definition of an existing group, choose the duplicate icon for that group. Enter a unique name for the new group, and select Save.
-
To delete a parameter group from the list, choose the delete icon for that group.
-
To change the position of a parameter group in the sequence, choose the move up icon or the move down icon for that group.
Oracle Web Applications Desktop Integrator will execute group events and lists of values in the sequence in which the parameter groups are listed here.
-
Select Save.
To define inputs
Use the Define Inputs page to provide test data for any external API inputs that a parameter list requires before you test how the parameter list will be rendered.
Define Inputs Page
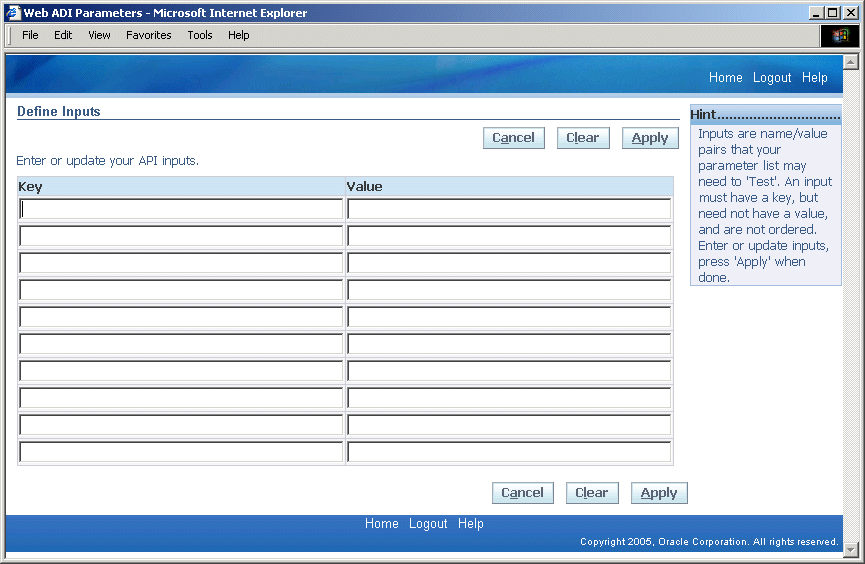
For each input, enter the key and optionally enter a test value.
You can enter the inputs in any order. You can enter up to 10 inputs.
-
To delete all inputs and clear the list, select Clear.
-
To save the list of inputs, select Apply.
To test a parameter list
The Parameter List Test Render page shows how the parameters in the list will be rendered in the desktop application.
Parameter List Test Render Page
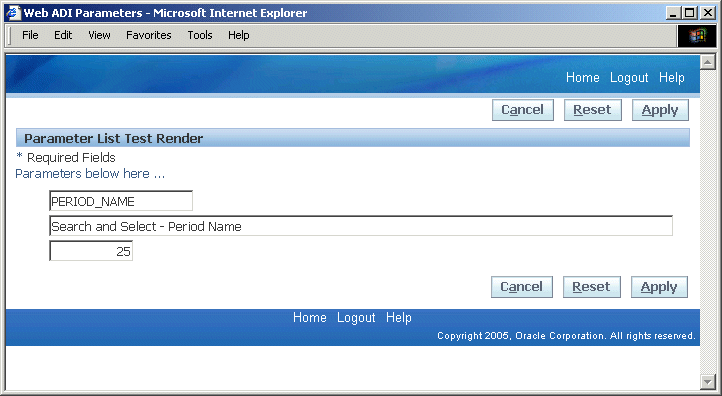
Enter valid test values in the parameter fields and choose Apply.
-
If the validation succeeds according to the parameter list definition, then Oracle E-Business Suite Desktop Integration Framework displays the Define Parameter List page again.
-
If there are any errors in the validation or in the parameter list definition, then Oracle E-Business Suite Desktop Integration Framework displays an error message.
-
-
In the Parameter List Test Render page, choose Reset to clear any test values and reset the parameter fields to their default values. You can then enter new values and choose Apply to test again.
-
If necessary, update the parameter definitions to correct any errors.