Implementing Supplier Profile Management
This chapter covers the following topics:
- Overview of Supplier Profiles and Management Groups
- Supplier Profile Creation Flow
- Implementing Supplier Management Groups
- Setting up Supplier Profile
- Running the Business Classification Re-certification Notification Program
Overview of Supplier Profiles and Management Groups
Maintaining supplier profile information online can ease the administrative burden faced by trading partners. With Supplier Lifecycle Management, suppliers can access and update their profile online. Buyers use this information to directly modify supply base information in their purchasing and payables system. Maintaining supply base information online results in a significant reduction in the volume of forms and direct contact between the two organizations.
Supplier Management Groups
Supplier management groups allow you to combine one or more operating units into a single management group for the purpose of administering supplier accounts. Each supplier management group can have multiple buyer administrators to balance the supplier administration workload among several different buyer administrators. This enables each administrator to be responsible for maintaining a subset of the buying organization's operating unit information.
Companies frequently segregate their business operations to ensure effective management. These segregations are done by geography or line of business, or established for administrative or legal reasons. For example, a manufacturer might have several production departments, only one of which deals with distributors in Europe, or a financial services company might have a separate division for each type of consulting service that it offers. These operational organizations are called operating units. While business may be divided into multiple operating units, the management and administration of the supply base may be organized into groups of operating units. Operating units are typically distinguished from one another by, among other things, the supplier sites and the supplier contacts with which the buying personnel for that operating unit interact.
Suppliers can add or update their company information (for example, they open a new office and therefore add a new address). Buyer administrators can view all supplier information, but they can only update operating units that belong to their supplier management group.
When creating supplier management groups, you select which operating units comprise the group, so the makeup of the different supplier management groups should be carefully planned. It is possible that more than one team of administrators could be maintaining the supplier details for the same operating unit, and therefore this operating unit could potentially be included in more than one supplier management groups. However, use of such overlapping supplier management groups is not recommended.
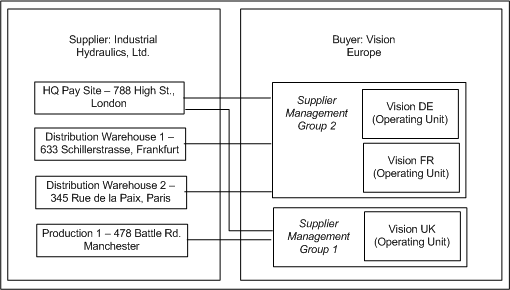
The following example shows a typical buying organization divided into a number of operating units. Different operating units deal with particular parts of the pan-European supplier Industrial Hydraulics, Ltd. Thus, two supplier management groups have been defined so that the relevant details about Industrial Hydraulics can be updated into the appropriate operating units. One contains the headquarters site and the other contains the London, Frankfurt, and Paris sites.
Supplier Profiles
On approval of a new supplier registration, Supplier Lifecycle Management application saves a company profile for that supplier. Supplier profiles contain company information such as tax IDs, Dun and Bradstreet number, supplier addresses, contact names, descriptions of goods and services provided by the supplier, classification details such as ownership status (for example, minority-owned), bank account details, terms and conditions. Suppliers maintain the information and update it as needed. To reduce errors and delays, suppliers must ensure that their company information is correct and up to date. See Supplier Directory Services in Oracle Supplier Management User’s Guide.
Extended Supplier Profile
You can create user-defined attributes (UDAs) for one or more business entities such as supplier party, party site, and supplier site. These attributes are aggregated in user-defined attribute groups. You must associate attribute groups with a particular business entity type. For example, an attribute group called ‘Supplier Monitor Product Attributes’ created for a business entity “Supplier Party” must apply only to those suppliers that supply monitors.
A supplier party UDA can be associated with a certain type of supplier party based on the following:
-
Product and Service categories such as monitors, building materials, and electronic tubes.
-
Supplier type such as component manufacturer, distributor, and contract manufacturer.
-
Business classification such as women owned, small business, and minority owned.
-
Custom classifications such as premium, gold, and platinum.
-
Common: This association makes the UDA applicable to all supplier parties.
An attribute group for capturing party site details can be associated with certain type of party sites based on:
-
Country such as US, China, and India.
-
Address Purpose such as RFQ, Payment, or Purchasing.
-
Common: This association makes the UDA applicable to all party sites.
An attribute group created for capturing supplier site details can be associated with certain type of supplier sites based on:
-
Country such as US, China, and India.
-
Common: This association makes the UDA applicable to all supplier sites.
For each user-defined attribute, you can optionally specify a value set, with data type and validation rules to be applied when the user inputs data. Once created, you can reuse value sets for different attributes. It is recommended that you create value sets before defining your attribute groups. An attribute group can be multi-row or single-row. Multi-row attribute groups enable association of multiple sets of attribute values with the same attribute group. For example, for a supplier, you can create a multi-row attribute group called ‘services’, with ‘service name’, ‘service type’, and ‘service frequency’ as the attributes. You can associate multiple rows of services with the supplier. You can create attribute pages to capture details of each attribute group. The attribute pages enable supplier and buyer users to view or edit data of attribute groups for a selected object instance based on access permissions.
Supplier management administrators can control access to a supplier’s profile. They can give suppliers partial access to the profile so that suppliers can login and maintain their profiles online. They can restrict other parts of the profile such as supplier performance evaluations, scorecard and other sensitive information about the supplier to some or all-internal users only. For more details, see Step 6: Setting up Profile Access in Setting up Supplier Profile.
Supplier Profile Creation Flow
New suppliers typically create their own profiles after they register. However, if you are implementing supplier profile management and you have suppliers that already exist in your purchasing and payables system, then you can use their existing details to create their profile rather than have the supplier re-enter all the information. The following table details the flow for a new supplier, where the supplier user collaborates to create their own profile. This is a feature of Supplier Lifecycle Management, thus you must have a license for Supplier Lifecycle Management product to use this flow.
| S. No. | Buyer Actions | Supplier User Actions | Comments |
|---|---|---|---|
| 1. | Buyer posts a Supplier Registration link on their website. | Refer to Self-Service Supplier Registration in Overview of Supplier Registration and Qualification Management. | |
| 2. | Supplier accesses self-service registration website; completes and submits registration form. | Notification of registration request is sent to buyer administrator(s). | |
| 3. | Buyer receives the request and sends a questionnaire to the Supplier for additional information. | The questionnaire is a registration RFI that is mapped to supplier’s extended profile attributes. | |
| 4. | Supplier accesses the link and creates a response. | ||
| 5. | Buyer administrator views registration request and approves or rejects the request. | If approved, a supplier record and user account is created for the supplier. A notification is sent to supplier with request status. |
|
| 6. | Buyer administrator assigns new user Supplier Profile Manager responsibility | Otherwise, the default supplier user responsibility is assigned to the user. | |
| 7. | Supplier user can begin creating supplier profile. | Supplier specifies company summary information, defines an address book and a contact directory, adds bank account details, and declares any appropriate business classifications or certifications (for example, minority-owned status). The supplier also identifies the goods and services the company can provide. Additionally, the supplier provides any other information as specified in the user defined attributes such as products, services, and certifications. |
| S. No. | Buyer Actions | Supplier User Actions | Comments |
| 1. | Buyer administrator accesses the information for the existing supplier. | Buyer administrators should create a supplier profile before any suppliers are granted the Supplier Profile Manager responsibility (Step 4). | |
| 2. | Supplier Management Administrator grants authorized supplier users the Supplier Profile Manager or Supplier Profile and User Manager responsibility. | ||
| 3. | Supplier users update company profile information. | ||
| 4. | Supplier Management Administrator view updated information | Any new address information provided by a supplier is used to update supplier site records in the purchasing and payables system. Use Business Events to synchronize information with spoke systems in case of Supplier Hub installation using custom integration. See Setting up Business Events in Implementing Supplier Data Publication and Synchronization. New contact information is used to update supplier contact records. |
|
| 5. | Supplier Management Administrator sets up UDAs to capture additional supplier information. | See Supplier Profile Management in Oracle Supplier Management User’s Guide. | |
| 6. | Supplier Provides additional UDA information. |
Implementing Supplier Management Groups
You define supplier management groups in terms of a buying organization's operating units. Each buyer administrator maintains one or more supplier management groups and the operating unit associated with these groups. As a buyer administrator, you can use supplier profile information for mass updates to all the operating units that you administer. Additionally, supplier management groups control which operating units a particular buyer administrator can maintain.
To implement supplier management groups, see Implementing Supplier Management Groups in Oracle iSupplier Portal Implementation Guide. In Step 3: Create Customized Responsibilities for Buyer Approvers, enter Supplier Management Main Menu as the Menu value in the Responsibilities window.
Setting up Supplier Profile
To set up supplier profile, complete the following:
-
Set up user defined attributes.
-
Set up supplier type.
-
Set up business diversity classifications.
-
Set up products and services categories.
-
Assign supplier profile manager responsibility to appropriate supplier users.
-
Set up profile access.
-
Set up advanced search.
-
Set up D&B enrichment.
-
Set up terms and controls.
-
Set up transactions view.
-
Set up tasks and notes.
-
Set up party relationships.
Step 1: Setting up User Defined Attributes
Prerequisite: Setting up UDAs requires functional understanding of UDAs in Supplier Management. See Supplier Directory Services in Oracle Supplier Management User’s Guide.
User defined attributes (UDA) enable buyers to manage additional supplier information. Buyers can aggregate attributes into multi-row or single-row attribute groups. Typically, the administrator would create UDAs and associate them with various types of suppliers. Then, the administrator would configure access controls on UDAs to restrict sensitive attributes from unauthorized viewers. To set up user defined attributes, complete the following tasks:
-
Define value sets.
-
Create attribute groups and attributes.
-
Associate attribute groups.
-
Create attribute pages for attribute groups.
-
Create user-defined functions.
-
Add actions to attribute groups.
Log in to Supplier Management with Supplier Management Administrator responsibility. Click on Supplier Home menu. Follow Administration tab to view Profile Extension page. The same page is also available from the Supplier Data Librarian Super User responsibility.
Defining Value Sets for User-Defined Attributes
User-defined attributes capture all the detailed information about a supplier. You can create user-defined attributes with validation logic to support the needs of your organization. To do so, create value sets and associate the value sets with user-defined attributes. Attributes can have a static or dynamic list of valid values, or a range of values.
-
Click Value Sets link to open the Maintain Value Sets page. This page displays the existing value sets.
-
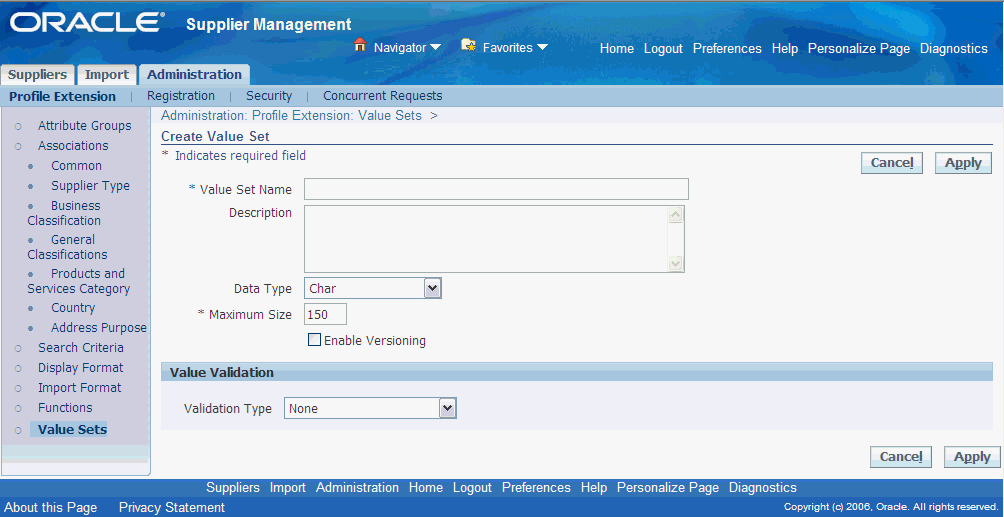
Click Create to open the Create Value Set page.
-
Specify the name and description.
Note: Once specified, you cannot edit the value set name.
-
Select the Data Type. The data type determines the values that are available in the value set. An attribute's data type must match the data type specified for that attribute's value set. For example, use the data type Number for the value set Rating because it contains all numeric values. In comparison, use data type Char for the value set Supplier Type because it only contains text values.
Note: You cannot edit the data type once the value set has been created.
-
Choose the value for Maximum Size if you wish to limit the user's input in the attribute text field. For example, in some cases you may wish to limit the number of characters in the attribute Date to 10 characters, or the number of characters in Name to 50. Keep the default value of 0 if you wish to omit this particular validation.
-
Enable Versioning is not supported from Supplier Lifecycle Management and Supplier Hub. If you enable versioning, then the value set will not be available.
-
-
None - Select None to indicate that there are no explicit set of values against which the user's input is validated.
-
Independent - You define the explicit values against which the user's input is validated here. To create explicit values, select Independent and specify the way the values are displayed as follows:
-
Pop list where users select values from a dropdown
-
List of values where users select values by clicking the list of values (LOV)
Oracle recommends that when you use the value set type Independent, you save it as a pop list.
-
-
Translatable Independent: This validation type behaves the same as Independent, but enables the display of values in another language.
-
Table - The explicit values against which the user's input is validated comes from a database table.
The application displays the value sets using the table validation type as a list of values.
-
-
Click Apply.
The Value Set Details page is displayed upon completion. You can edit certain settings after creation by clicking Update. You can find all existing value sets on the Value Sets page. You can search for value sets using the criteria Name, Description, Data type, or Validation type, as well as search for values within value sets. Optionally, add a description to a value.
For more on creating Child Value Sets, defining table value sets and creating independent values see Defining Value Sets for User-Defined Attributes in Oracle Product Information Management Implementation Guide.
Creating Attribute Groups and Attributes
To create attribute groups and attributes:
-
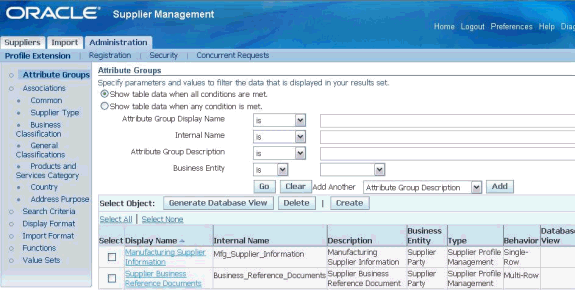
Click Attribute Groups link to open the Attribute Groups page.
-
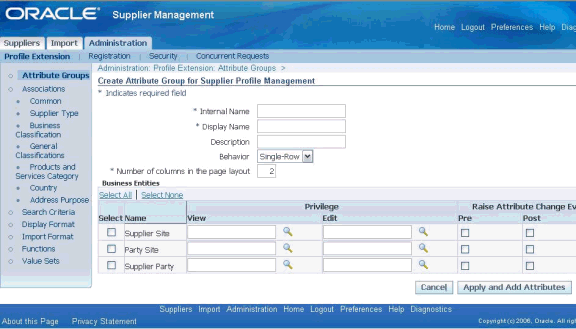
Click Create to open the Create Attribute Group for Supplier Profile Management page.
-
Enter the following:
-
Internal Name: Enter the internal name of the attribute group.
-
Display Name: Enter the name of the attribute group, as it will be displayed in the user interface.
-
Description: Optionally, enter the description of the attribute group.
-
Behavior: Select the Behavior of the attribute group:
-
Number of columns in the page layout: Enter the number of columns to appear in the attribute group page. The default value is 2. This field does not appear when defining a variant attribute group.
-
Number of rows in the page layout: This field only appears for multi-row attribute groups. Enter the number of rows to appear in the attribute group page. The default value is 5.
-
Business Entity: Select the business entity to which you want to apply the attribute group:
-
Supplier Party: This refers to the Supplier as a whole. If you select the Supplier Party check box, then you can use the attribute group for capturing supplier party details. For example, Business References are saved for a Supplier Party.
-
Party Site: This refers to an address of a supplier. If you select the Party site check box, then you can use the attribute group for capturing party site details. For example, Production capacity is recorded for Party sites.
-
Supplier Site: This refers to the combination of the supplier’s address and an Operating Unit in the buying organization. If you select the Supplier Site check box, then you can use the attribute group for capturing supplier site details. For example, logistics details such as Standard Delivery Time Guarantee may be captured at the Supplier Site level.
-
-
View Privilege: Select a viewing privilege. Users must have a view privilege for any object to which this attribute group is associated. Then, you can narrow the definition of viewing privileges to meet the needs of your enterprise. For example, you may create a privilege called View Supplier Business References and associate it with an attribute group called "Business References." Users who have view privileges for the supplier profile can view the supplier details, but not the business reference information associated with the profile. To view the business references associated with the supplier profile, users must have the additional View Supplier Business References privilege.
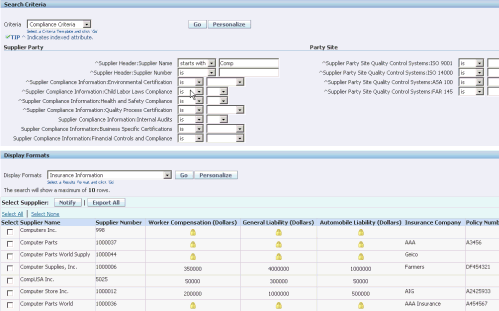
Note: Note: A lock icon appears in the search results if the user searching for suppliers does not have the privilege required to view a particular attribute group. To assign privileges to users, see Step 6: Setting up Profile Access in Setting up Supplier Profile.
-
Edit Privilege: Select an edit privilege. Users must have an edit privilege to edit information in this particular attribute group. Privileges are granted by roles assigned to users. If no view or edit privilege is specified for the attribute group, then users' ability to view and edit the attribute group is controlled by the view and edit privileges on the object to which the attribute group is associated. You can define editing privileges to meet the needs of your enterprise.
See Step 6: Setting up Profile Access in Setting up Supplier Profile for creating and associating View and Edit privileges.
-
-
Click Apply and Add Attribute to open the Create Attribute page.
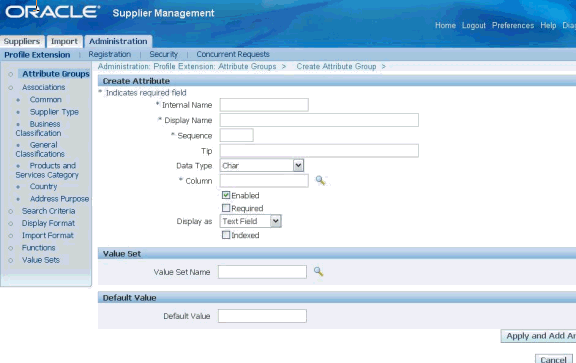
Use this page to add user-defined attributes to your attribute group. Note that clicking Apply and Add Attributes saves the attribute group and commits it to the database, even if you click Cancel while on the Create Attribute page. Alternatively, click Apply to only save the attribute group and stop the process. If choosing Apply and Add Attributes, continue on to the next step.
-
On the Create Attribute page, provide the following information:
-
Internal Name: The name of the attribute by which it is tracked internally.
-
Display Name: The name of the attribute as it appears within the user interface.
-
Sequence: The sequence number for the attribute. The sequence determines the order in which the attribute is displayed on the page, and also determines the order in which the attribute is processed.
-
Tip: The description of the attribute; this description also appears as tip text on pages that have attributes that can be updated.
-
Data Type: Lists the available data types. The data type that you select determines the values that are available in the column and value set. An attribute's data type must match the data type specified for that attribute's value set. The list of values for a value set only displays value sets whose data type matches the data type of the attribute.
Note: Selecting a data type always clears the column and value set. For example, say you selected the Number data type. Then you select your column and value set--remember that your column and value set choices are determined by the data type you chose. Then you decide to change the data type from Number to Date. Notice that after you change the data type, your column and value set are cleared; you need to select new ones based on your new data type. Additionally, the data type determines the values that are available in the Display As field. You cannot change the data type once an attribute is created.
The maximum number of characters for a character type attribute is 150 characters. Translatable text fields have a limit of 1,000 characters. Number type fields have a maximum size and precision of 22.5 (22 digits to the left of the decimal and 5 digits to the right).
-
Column: A list of values that enables you to specify the column in which the attribute is stored in the database table. The column list of values only returns columns with the data type you specified in Data Type. The list of values also indicates whether or not the column is indexed. If you want the attribute to be searchable, then select a column in the database. Ensure that the Indexed check box is selected before you complete the attribute definition. If no indexed columns are available in the database, and you still want a searchable attribute, select a non-indexed column, and ensure the Indexed check box is selected before completing the attribute definition; then the database column is automatically indexed. If you do not want the attribute to be searchable, and the only columns available in the database are indexed, then ensure that the Indexed check box is not selected before completing the attribute definition.
-
Enabled: Specify whether or not the attribute is enabled (and available for use) or disabled (and not available for use). If the attribute is enabled, specify whether or not the attribute is optional or required. If required, the user cannot save data for an object using the attribute group without entering a value for that attribute. You can always disable attributes. However, you cannot delete attributes after an attribute group has been associated with a supplier.
-
Required: Specify whether or not the user must enter an attribute value.
-
Display As: Determines how the attribute appears within the user interface. For example, if you select Text Field for an attribute called "Cost Center", then "Cost Center" appears in the user interface as a text field. The data type selected determines the available values for Display As. If you choose Checkbox, then the value set defaults to EGO_YES_NO. If you select Radio Group, then you must choose an independent value type set (in other words, the value set has a discrete set of values that you have already specified). If, while updating the value set, you select the Long List of Values validation type, attributes will be displayed as a text field with a List of Values, thereby ignoring your choice of Radio Group. If you select Text Field, and choose a value set whose type is independent, then your display would be either a poplist or list of values (whether or not you get the poplist or list of values is determined by the way you define the value set). Also, when the data type is Number, and Display As is a Text Field, a Unit of Measure list of values is presented. You can choose either the Unit of Measure or the Value Set; they are mutually exclusive. Hidden attributes do not show up in the user interface; this attribute is primarily populated via user-defined functions. Selecting Dynamic URL refreshes the page with a new section for specifying the dynamic URL. Enter a URL and use any attribute Internal Name in the attribute group, enclosed between dollar symbols, as a token for the value of a parameter. When users click on the URL, the value for that attribute will replace the token in the URL's query string. Selecting Static URL enables you to input a web page address.
-
Indexed: Specify whether or not you want the attribute to be indexed. If you choose to make this an indexed attribute, it will appear as an indexed attribute on the criteria template page. Only indexed attributes are available as sort criteria in result formats.
-
Value Set: Select a value set that will serve as a set of constraints for an attribute. For details about creating value sets, see Defining Value Sets for User-Defined Attributes discussed above.
-
Default Value: The default value of this attribute. If you've selected a value set, the value set's constraints apply to the default value. This value defaults upon object creation.
Caution: In an attribute group with at least one required attribute, no default values are applied for any attributes when a required attribute does not have an assigned default value.
-
-
Click Apply and Add Another to save and create another attribute or click Apply to save and stop the process.
Associating Attribute Groups
After creating attribute groups and attributes, you must associate them with supplier profiles. You can associate an attribute group only at the level at which you defined it. For example, when creating the attribute group ‘Production Capacity’, you must select the Supplier Site check box to be able to associate the attribute group with Supplier Sites. Moreover, the attribute group would appear for applicable Supplier Sites only. For example, if associating with Supplier Sites in US, Production Capacity attribute group will only appear for Supplier Sites that are in US. See Extended Supplier Profile in Oracle Supplier Management Implementation and Administration Guide..
-
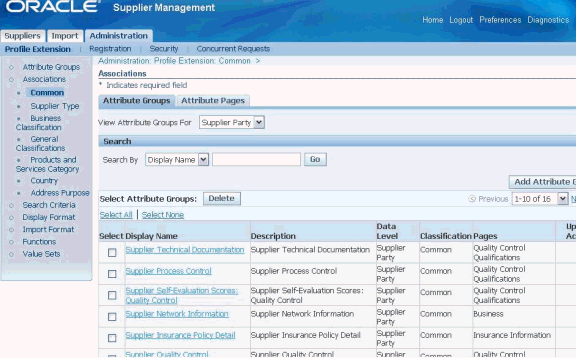
Click Associations link to open the Associations page.
-
Select Supplier Party as the business entity level in the View Attribute Groups For field under the Attribute Groups tab.
-
Click on any one of the classification types ‘Supplier Type’, ‘Business Classification’, General Classifications’, ‘Products and Services Category’, ‘Country’ or ‘Address Purpose’ to classify attribute groups by that classification type.
Note: Prior to associating attribute groups, set up ‘Supplier Type’, ‘Business Classification’, ‘General Classifications’ and ‘Products and Services Category’. These setups are covered in subsequent chapters.
-
On each classification type page, you must select a value for that classification type in order to associate the attribute group with Suppliers of that classification type value. For example, in case of Supplier Type classification type, first select value: ‘Manufacturing’ to associate attribute group ‘Manufacturing Supplier Information’ with Suppliers who are of type Manufacturing.
The View Attribute Groups For value is Supplier Party by default in this case, whereas on the Country association page, the value can be Party Site and Supplier Site. This selection determines which attribute groups can be associated with the classification. Only attribute groups defined at the selected data level are available for association.
-
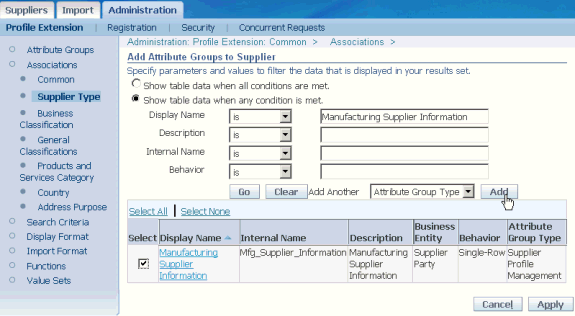
Click Add Attribute Group to open the Add Attribute Groups to Supplier page. This page displays the attribute groups created at the supplier site level and available for association.
-
Search for the appropriate attribute group. Select the attribute group and click Apply to associate the attribute group with the selected classification type and value. In this case, the classification type is ‘Supplier Type’ and value is ‘Manufacturing’.
-
You can associate attribute groups for other profile extension types similarly.
General Classifications have been provided for extending the associations to custom classifications. For more on General Classifications, See Supplier Classification Management in Oracle Supplier Management User’s Guide.
Creating Attribute Pages
After associating attribute groups with suppliers, you must arrange attribute groups into attribute pages for display in the Supplier’s profile. The location of the attribute page in the profile is dependent on the contained attribute groups and the business entity that they are defined for. For example, an Attribute Page containing Business References attribute group appears on the Supplier’s main profile page since Business References attribute group is defined for a Supplier Party, whereas an Attribute Page containing ‘Logistics Information’ attribute group, which is defined for Supplier Sites appears on the Address Book, next to a Supplier Site.
Supplier Site related Attribute Page showing Logistics Information
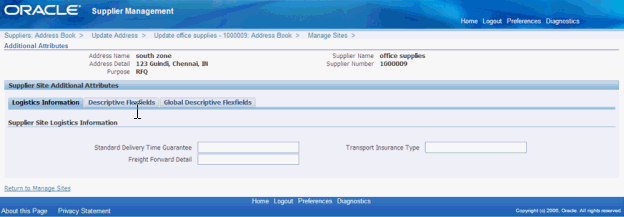
To create Attribute Pages and associate attribute groups, follow these steps:
-
Click Attribute Pages tab on the Associations page for the Common profile extension type.
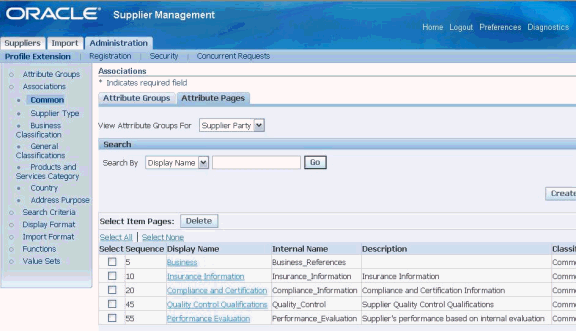
-
On the page where you associated attribute groups with classification types and values, click on the Attribute Pages tab. Only attribute groups available under the Attribute Groups tab can be added to an Attribute page.
All attribute groups within an attribute page have to be defined for the same business entity. That means an attribute group defined for Supplier Site cannot be shown on the same page as the attribute group defined for Supplier Party, since they must appear in different places in the Supplier’s profile. Pages containing Supplier Party attribute groups appear on the Organization page, whereas pages containing Party Site attribute groups appear on the Address Details page. Similarly, the page containing Supplier Site attribute groups appears in the Additional Attributes of a Supplier Site.
-
Select View Attribute Groups For to select all attribute groups defined for the selected business entity.
-
Click Create Page.
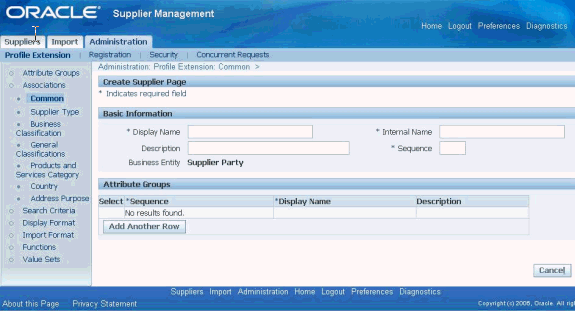
-
Provide basic information such as display name, internal name by which the attribute page will be known within the application, and the sequence at which you want this page to appear amongst the specific attribute group pages.
Note: The business entity is the value that you selected in the View Attribute Groups For field.
-
Click Add Another Row to associate an attribute group to the attribute page.
-
Click Apply.
-
Similarly, select Party Site or Supplier Site as the business entity level in the View Attribute Groups For field and click Create Page. You can associate attribute pages for other classification types similarly.
Creating User-Defined Functions
To define your own custom logic, you can add user-defined functions and actions to existing attribute groups. By first setting up user-defined attributes, you can then execute user-defined functions with those attributes.
User-defined functions can be Java, URL, or PL/SQL functions. Functions use input and/or output parameters of various data types such as string, integer, or Boolean. You can also map these parameters to attributes and object primary key values. Actions are trigger points for functions displayed as buttons or links on the page. You can determine the conditional visibility of the button and the label displayed on the button itself. You can also prompt the user based on the user's input.
To create User-Defined Functions, see Creating User-Defined Functions in Oracle Product Information Management User’s Guide.
Adding Actions to Attribute Groups
You can associate a function with an attribute group from the Associations page by clicking on the Action icon next to the attribute group.
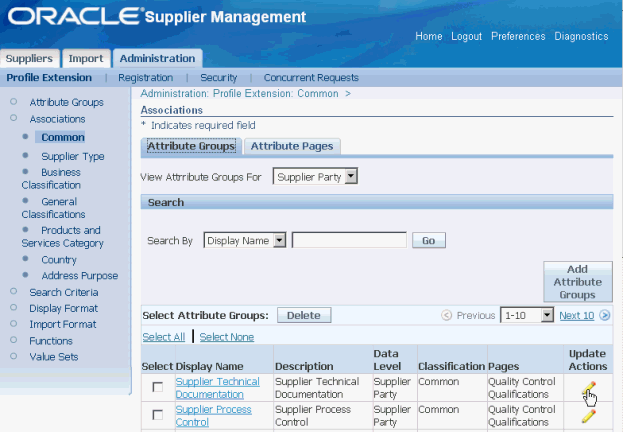
For more details on Adding actions, see Adding Actions to an Attribute Group in Oracle Product Information Management User’s Guide.
Step 2: Setting up Supplier Type
Supplier Type is a FND lookup and you can customize it as per your business needs. The lookup details are:
-
Name: Valid supplier types
-
Code: VENDOR TYPE
-
Description: Valid Supplier types
-
Application Name: Purchasing
You enter this value in the Type field of the Classification region of the Suppliers window. This value cannot exceed 25 characters or you will not be able to see it in the Suppliers window.
Step 3: Setting up Business Diversity Classifications
You can define a list of business classifications that you would like new and existing suppliers to use to classify themselves. See Define Business Classifications List of Values in the Oracle iSupplier Portal Implementation Guide. Follow all steps without any changes.
Step 4: Setting up Products and Services Categories
You can use the values available from the Purchasing Item Categories flexfield to set up a list or hierarchy of products and service. See Set up products and services categories in the Oracle iSupplier Portal Implementation Guide. Follow all steps without any changes.
Step 5: Assigning Responsibilities to Supplier Users
Once you have the supplier profile successfully implemented, you must assign the Supplier Profile Manager responsibility to the appropriate supplier users. This enables the supplier users to access and update their supplier profiles.
To create an account for a contact, open that contact’s details page from the Suppliers profile and enable Create User Account for this Contact. Select a user name and Supplier Profile Manager responsibility. Note that any responsibilities that are flagged as external will be displayed here. See Step 1: Flagging External Responsibilities in Implementing Supplier User Management.
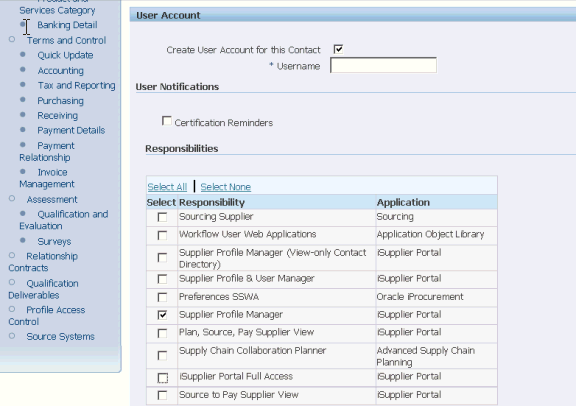
Any update performed by a Supplier Profile Manager triggers a notification to the Supplier Management Administrator(s). The administrators can access the changed profile and accept the update or reverse it. Accepting the update will promote the addition/changes into the purchasing and payables systems as appropriate.
Step 6: Setting up Profile Access
Supplier Management Administrator can restrict view and update access to portions of supplier profile from suppliers and internal users.
Setting up Function Security for Profile pages
All elements of a Supplier’s profile, except user-defined attributes, can be controlled with the help of function security. For example, the Supplier Profile Manager responsibility, predefined in Supplier Lifecycle Management for a supplier user, does not show the Terms and Control region. So Terms and Control are only visible to internal users. To make a section visible to suppliers, the administrator may add the menu or the associated functions to the Supplier Profile Manager Responsibility main menu.
Setting up Profile Access Control for User Defined Attributes
To control access to UDAs, Supplier Management Administrator can create custom privileges and use these privileges to assign users either view or edit access to the UDA attribute group. For example, create a privilege called ‘View Supplier Compliance’ and assign this privilege to the View field for the Supplier Party level of Supplier Compliance Information attribute group.
Now only those users who have the View Supplier Compliance privilege can view this UDA. All other users will not see this UDA in the associated Supplier’s profile.
Attribute Group Access Control page
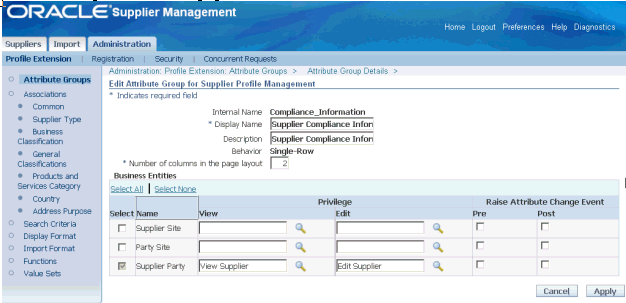
Users can be assigned privileges with the help of roles. A role (also called permission set) is a set of privileges. A role can be assigned to users from the profile access control page of the Supplier Profile. For example, create a role called Standard Buyer with the privilege View Supplier Compliance.
Roles page
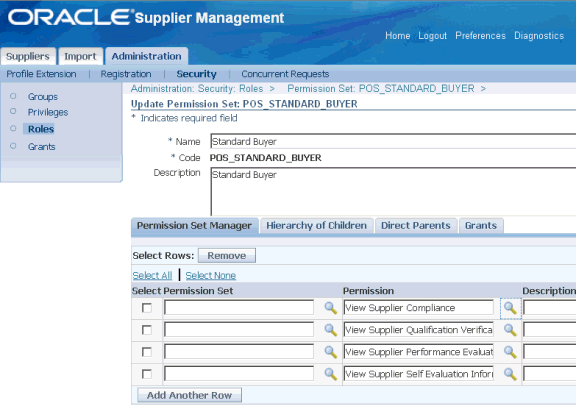
To control viewing of the UDA from a specific supplier’s profile, open that supplier’s profile and go to the Profile Access Control link in the side navigation bar. There, add the role Standard Buyer and assign it to Pat Stock. Now only Pat stock will be able to view Supplier Compliance Information UDA in this Supplier’s profile. Supplier Management Administrators can assign the role to a person, company, group or all uses.
Profile Access Control page of a Supplier’s Profile Showing Addition of Roles
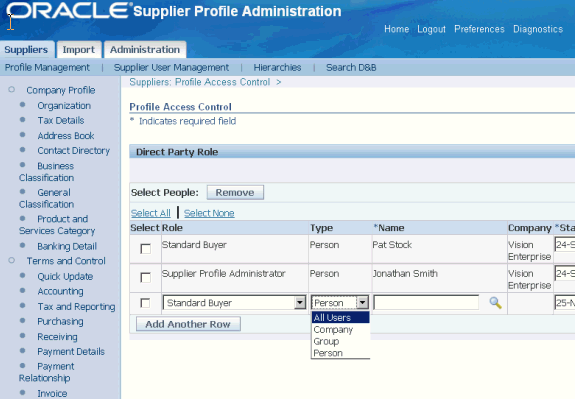
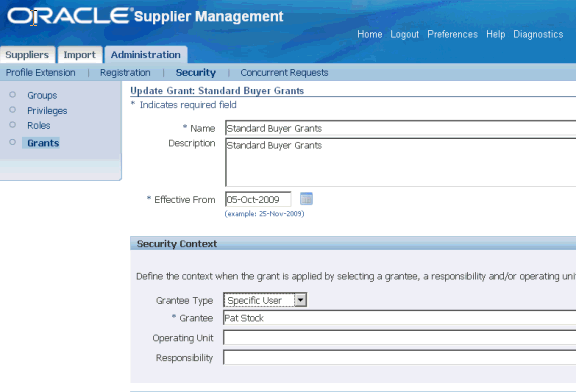
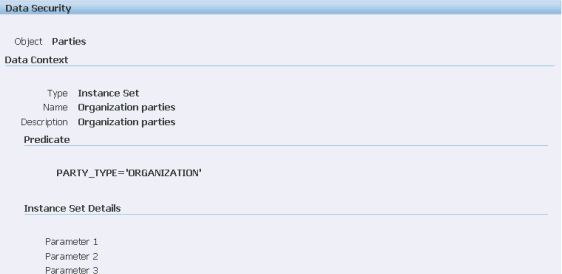
To control viewing of the UDA from all suppliers’ profiles instead of a specific supplier’s profile, use Grants. With the help of a grant, you can assign a role (also called permission set) to specific users, group of users or all users. Also the grant must be applied to a selected data set. In our example, create a grant called Standard Buyer Grants. Select the user Pat Stock. Apply the grant to the Object Parties. Then associate the role (or Set) Standard Buyer with the grant. Standard Buyer Grant will give Pat Stock view access to Supplier Compliance Information attribute group in all suppliers’ profiles. See Permissions, Permission Sets and Grants in Oracle Applications System Administrator's Guide – Security.
Note: Be cautious of using the ‘All Users’ option while setting up grants since this includes all Supplier Users. ‘All Users’ selection appears from the Grants page as well as the Profile Access Control for specific Supplier party.
Create Grants page showing assignment to a Specific User
Create Grants page showing association with selected data
Create Grants page showing assignment of a Role (also called permission set)

Permissions, Permission Sets and Grants are features of Oracle Applications System Administration framework. Supplier Management Administrators can also access this feature from Administration tab, under Security sub tab:
-
Groups: Groups, is a group of users.
-
Privileges: A privilege (also called permission) is the smallest unit of securable action that can be performed on the system.
-
Roles: A role (also called a permission set) is a group of privileges.
-
Grants: A grant is a way to assign roles to users for specified data objects.
For more on each of these features, see Oracle Applications System Administrator's Guide – Security.
Create the following privileges and roles and use them as a template for custom privileges and roles:
-
Role Name: Supplier Profile Administrator, Role Code: POS_SUPPLIER_PROFILE_ADMIN. Include the following default privileges:
-
Privilege Name: View Supplier, Code: POS_VIEW_SUPPLIER, Object Name: Parties
-
Privilege Name: Edit Supplier, Code: POS_EDIT_SUPPLIER, Object Name: Parties
-
Privilege Name: Grant/Revoke Profile Access Roles on the Supplier, Code: POS_EDIT_SUPPLIER_ACCESS, Object Name: Parties
-
-
Role Name: Standard Buyer, Role Code: POS_STANDARD_BUYER. Including the following default privilege:
-
Privilege Name: View Supplier, Code: POS_VIEW_SUPPLIER, Object Name: Parties
-
-
Role Name: Supplier User, Role Code: POS_SUPPLIER_USER. Doesn’t include any privileges, customers can add any predefined or self-defined privileges according to business requirements.
Setting up Mandatory Profile Options
Profile Access Control for UDAs is controlled by a profile option that is turned off by default. You must set the profile option POS: SM: Enable Data Security for Supplier to Yes or else none of the above setups will work. Additionally, set the profile option POS: SM: Default Role for Internal User with a role having ‘View Supplier’ privileges to Supplier Profile UDAs. If this profile option is not set with a role having ‘View Supplier’ privileges, internal users will be unable to perform simple supplier search. Supplier search result will return no suppliers.
Please note that UDA Access control also applies to the registration form for prospective suppliers. Supplier Management Administrator may grant ‘View and Update’ access to prospective supplier and internal users from the registration on-boarding configuration. See Step 4: Setting up Supplier Registration On-Boarding Configuration in Implementing Supplier Registration and Qualification Management. If a UDA has restricted view or edit privileges as described above, then that UDA is not visible to prospective suppliers.
Setting up Notes Access Privileges
Notes are not visible to suppliers. However, internal users can create, delete, and update notes based on access granted to them. See Oracle Common Application Calendar Implementation Guide for a list of notes privileges, privilege sets, and grants. In addition, Oracle Supplier Management provides the predefined POS Notes User permission set and the following predefined grants:
-
Supplier Management Administrator Notes Access
-
Supplier Management User Notes Access
-
Supplier Data Librarian Super User Notes Access
-
Supplier Data Librarian Notes Access
See Setting up Profile Access Control for User Defined Attributes discussed above.
Step 7: Setting up Advanced Search Criteria and Display Format
Advanced Search allows users to build complex search queries containing multiple search criteria. You may also save search criteria and reuse it for a frequently performed search. Additionally, you may set up display formats for displaying advance search results. A display format is a set of fields that you wish to be displayed in the search results. Once created and saved, the display formats will be available to all users who have access to supplier-advanced search. Search criteria and display formats created by the administrator are visible to all internal users.
To set up the advanced search criteria and display format: Use the Supplier Management Administrator responsibility and Profile Extension sub tab on the Administration tab.
Complete the following tasks:
-
Set up Advanced Search Criteria:
-
Click the Search Criteria link to open the Search Criteria page.
-
Click Create to open the Create Search Criteria page.
-
Enter search criteria name.
-
Optionally, enter a description for the criteria name.
-
Select the Default check box, if required.
-
Click Add Criteria to open the Add Criteria page.
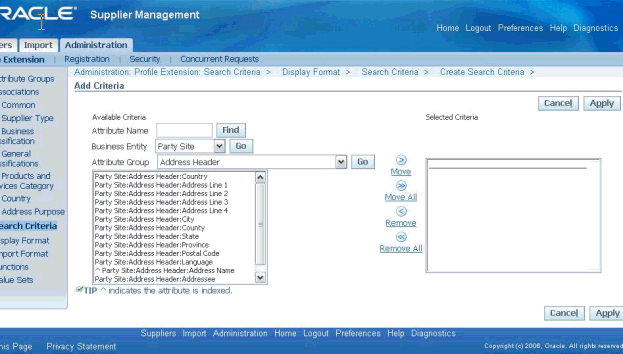
-
Select applicable attributes for the criteria and click Apply. If you wish to locate a single attribute, then enter its name and click Find. To search for attributes by business entity and attribute group, select the business entity, click Go, then select the attribute group and click Go again. On the Add Criteria page, you can move search criteria back and forth from the Available Criteria list to the Selected Criteria list via the Move, Move All, Remove, and Remove All shuttles.
-
-
Set up Display Formats:
-
Click the Display Format link to open the Display Format page.
-
Click Create to open the Create Display Format page.
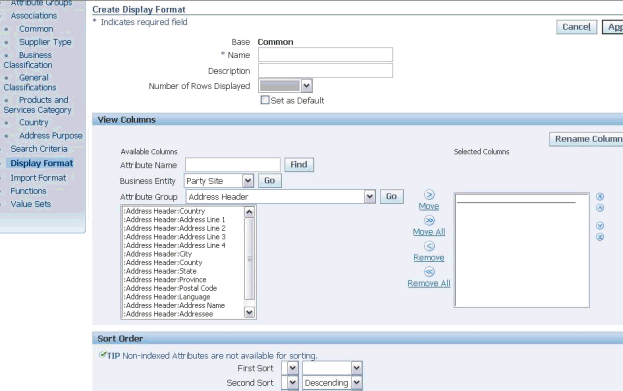
-
Provide the name and a description for the display format. Additionally, select the number of rows you want to display per page.
-
Optionally, set this display format as the default display format for the object by clicking Set as Default.
-
Enter applicable details and click Apply.
In the View Columns region, specify the columns you want to display in the search results display. If you simply wish to locate a single attribute, then enter its name and click Find. To search for attributes by business entity and attribute group, select the business entity, click Go, then select the attribute group and click Go again. To see the results correctly, it is recommended that you add the required set of search result row identifying attributes to the display format. If you do not specifically add the search result row identifying attributes, then the application adds the attributes to the display format automatically.
You can move display attributes back and forth from the Available Columns list to the Selected Columns list via the Move, Move All, Remove, and Remove All shuttles. You can rename the columns that will appear in your display format by clicking Rename Columns. On the Rename Columns page, the original column names that you have already selected are listed. Enter the new column names in the New Column Name field and click Continue.
In the Sort Order section, you can select up to three columns upon which to sort the display results. You can also specify whether or not the search results in these columns be displayed in ascending or descending order. Only indexed and non-secured attributes (attributes that are not secured by a view or edit privilege) are available for sorting. Thus, you cannot sort secured attributes.
-
When you create Search Criteria and Display Formats, the Attribute Groups available to add criteria are dependent on the Search context set on the Advanced Search page. For example; consider the attribute group EPA Guidelines. EPA Guidelines is associated with Country USA so it only applies to suppliers in the US. First you must set the Search context to Country and value to US. Only then EPA Guidelines will show up in the Create Search Criteria and Create Display Formats pages.
Step 8: Setting up Supplier Data Enrichment
Enrich user-entered information by purchasing D&B data for suppliers of type Organization. See Introduction to D&B in Oracle Trading Community Architecture User Guide.
Prerequisites: The Enrich button appears only if you have licensed Supplier Hub product and the profile option POS:SM Supplier Data Hub Configuration is set to Standalone or Integrated EBS. Moreover, you must have a contract with D&B to establish direct integration. See Introduction to D&B in Oracle Trading Community Architecture User Guide.
To enable data enrichment from D&B:
-
Set profile option POS:SM: Enable Buyer D&B Enrichment in Prospective Supplier Registration to Yes.
-
Configure Third Party integration. See Setting Up Third Party Data Integration in Oracle Trading Community Architecture Administration Guide.
Step 9: Setting up Terms and Controls
This section allows administrator to control accounting, tax and reporting, purchasing, receiving, payment details, payment details, payment relationships, and invoices in Oracle Purchasing and Oracle Payables. These are applicable only if Oracle Supplier Management shares the same installation instance as these applications.
For Oracle Purchasing related setups, see Supplier - Purchasing Financials Options in Oracle Payables Implementation Guide. For all other set ups refer to Oracle Supplier Management User’s Guide.
Step 10: Setting up Transaction Views
You can extend your view of transactions in Oracle Supplier Management to include transaction data from applications that are not part of E-Business Suite applications to provide a complete view into all supplier business transactions in your organization. This is available only from the Supplier Data Librarian responsibility.
How the transactions viewer works:
When you open the Transactions page from a Supplier’s profile, the transactions viewer engine reads metadata queries from supporting views and tables to create dynamic view objects for each transaction type. The view objects retrieve the data for the transaction type and display it on the Transactions page.
The transactions viewer metadata model consists of several tables that store information for supplier transaction types. At runtime, the transactions viewer engine retrieves and displays transactions for each supplier by running the queries stored in the metadata model. You can extend the transactions viewer metadata model by using queries that:
-
Identify suppliers from page context.
-
Identify suppliers using page context and existing external source system queries.
For more information on how to extend the transactions viewer and update metadata, including sample code, tables, and view descriptions, see Oracle Customer Data Hub Implementation Concepts and Strategies White Paper on My Oracle Support, Document 312811.1.
Step 11: Setting up Tasks and Notes
Tasks and notes are features of Oracle Common Application Calendar enabled from Supplier Lifecycle Management and Supplier Hub. As an optional step, you can set up tasks and notes.
To set up tasks, see task related profile options in Enabling Profile Options and Task Manager Common Steps in Oracle Common Application Calendar Implementation Guide. To set up notes, see Setting up Notes Access Privileges in Setting up Profile Access. Additionally, see Implementing Notes in Oracle Common Application Calendar Implementation Guide.
Step 12: Setting up Party Relationships
As an optional step, you can set up party relationships to manage relationships between parties including individuals, corporate entities, informal groups and organizations. See: Creating Relationship Types in the Oracle Trading Community Architecture Administration Guide.
Use the Supplier Data Librarian Super User responsibility and the Party Relationships subtab under the Administration tab to set up party relationships.
Running the Business Classification Re-certification Notification Program
Buyers need to schedule the Business Classification Re-Certification Notification concurrent program to run on a daily basis for sending reminder notifications to the designated supplier users.
To run the business classification re-certification notification program:
-
Navigate to Supplier Management Administrator responsibility, Administration tab. Click on Concurrent requests sub tab.
-
Select a Single Request option.
-
Click OK. The Submit Request page displays.
-
Search and select the Business Classification Recertification Notification item from the Name LOV.
-
Click Schedule. The Schedule page displays.
-
In the Run the Job region, select periodically.
-
Enter the value as 1 in the Re-Run field.
-
Select the Days item from the list.
-
Click OK.
-
Click Submit.