Configuring Security Post-installation
Overview
For an overview of post-installation security configuration, see the following "Security" section.
For an overview of post-installation security configuration of the user interface, see the section "How the User Interfaces Can Be Configured."
For additional information regarding user login access, see the sections "Other Security Features" and "Logging onto the Collaborator Workbench Administrator."
Security
The Demantra data and menus are secured, so that not all users have access to the same data and options. The security model includes the following features:
-
The Oracle license controls which menus are secured, so that not all users have access to the same data and options. The security model includes the following features:
-
The data is partitioned into components, which generally correspond to organizational roles. In the definition of a component, you can control the following:
-
The levels that can be seen
-
The degree of access for members of each level: no access, read-only access, read/write access, or full control (including the ability to delete members)
-
The series that can be seen
Each component has an owner, who acts as the administrator and who can create additional users:
-
-
Within a component, you can restrict each user to a subset of the data associated with that component. You can control the same data elements as previously described.
-
You can control access to menu items at the component level, the group level, or the user level. This includes both the menu bar and the right-click menu.
-
You can define program groups, or sets of menu items, and apply security at that level, for greater convenience.
For details, see “Security”.
How the User Interfaces Can Be Configured
Whether you start from a Demantra application as-is or from the Application Platform, you can configure the user interfaces in the following complementary ways:
-
You typically create worksheets to meet the needs of specific users. A worksheet is a working environment that shows specific data, aggregated and filtered as needed. Users can view, sort, edit, print, and so on. The next chapter, “Core Concepts”, describes the elements of worksheets.
-
You can create methods that the users can execute from within worksheets. The methods appear in the worksheets as options on the right-click menu. Demantra also provides default methods that you can redefine or disable. These allow users to create, edit, and delete level members.
-
You create components that subdivide the data as needed for different organizational roles. Each component has an owner, who acts as the administrator of the component. In turn, the owner can log onto the Business Modeler and further restrict data access for particular users.
-
You apply security so that different users have access to different menu options. See “Managing Security”.
-
You can configure the default layout of Collaborator Workbench, access to different elements of Collaborator Workbench, and the links and menus in Collaborator Workbench. You can also substitute custom graphics throughout the Web products. See “Customizing Demantra Web Pages”.
Other Security Features
Note the following additional security features:
-
To access the Workflow Manager, a User Group must be assigned to the workflow.group parameter (in the Business Modeler). For details, refer to Providing Access to the Workflow Editor.
-
After adding a user to a Collaboration Group, the Web server must be restarted before that user can access the Workflow Manager. For more information about User Groups see: Creating of Modifying a User Group
-
A user with the System Manager permission level can see all public worksheets and all private worksheets. Users with lower permission levels can see all public worksheets and all private worksheets created by themselves.
-
A user with the System Manager permission level can see the System menu in the desktop Demand Planner, in addition to the other menus.
-
Any user can log onto the Business Modeler. If the user's permission level is lower than System Manager, the user can only change his or her own password, as documented in the user guides.
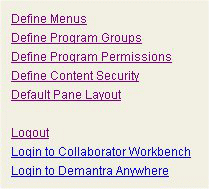
Logging onto the Collaborator Workbench Administrator
You use the Collaborator Workbench Administrator to control access to menu items.
To log onto the Collaborator Workbench Administrator
-
Open the administration login page:
http://server name/virtual directory/portal/adminLogin.jsp
For example:
http://frodo/demantra/portal/adminLogin.jsp
-
Enter the user name and password and click Log on.
Demantra displays the Administration page, which includes the following choices:
See also
"Customizing Demantra Web Pages"
Providing Access to the Workflow Editor
For a given user to log into the Workflow Editor, that user must be configured a specific way.
To provide access to the Workflow Editor
-
Log on to the Business Modeler as described in “Logging onto the Business Modeler.”
-
Create a group that includes all users who need to log into the Workflow Editor. See “Creating or Modifying a User Group”.
-
Using a database tool, query the user_security_group table (i.e. select * from user_security_group). The results will list the group_name and corresponding application_id for each group. For example, for the workflow group_name 'Collaborator', the application_id is 'USER_GROUP:5'.
-
Obtain the application_id of the newly-created group.
-
Set the workflow.group parameter in the APS_PARAMS table using the Business Modeler. Go to Parameters > System Parameters > Application Server > Workflow (tab). Add the application ID from the query above to the existing values for this parameter (separate values with a comma), save the changes, and then restart the application server.
See also
“Managing Workflows”
Dropdown Security
The fields “Security” and “Minimum Privilege Displayed” are enabled when Lookup Type is set to Level, or when Lookup Type is set to Table and the specified Table Name is a level table. Examples of level tables include Location, Items, Promotion, and Settlement. These control which level members a worksheet will be able to access.
If the lookup type is set as ‘Table’ but the table name is a level table, as listed in GTABLE column of GROUP_TABLES, security will be applied as though the lookup was on a Level.
Security
This dropdown has the following four options:
| None (default) | Dropdown security is turned off. |
| Direct | Security will be respected on the level being looked up and its direct parent level. If security has been defined explicitly on the level (for example, Site) a user will see those Sites to which they have access. If security has been defined on the immediate parent (for example, Account), the user will see only those Sites they have access to, as inherited through Account restrictions. |
| Uni-Dimensional | Security will be respected within the complete dimensional hierarchy of the level being looked up—both the direct parent hierarchy and indirect sibling hierarchies within the single dimension (item, location or GL). For example, if security has been defined on the ‘Customer’ level and a Lookup is created on the ‘Site’ level, a user would be restricted to seeing only those Sites for which they have access, as inferred from ‘Customer’ security. |
| Cross-dimensional | Security will be inherited across hierarchies via matrix relationships. For example, if security has been defined on the ‘Region’ level and a dropdown is created to lookup on ‘Item’ level in the Item hierarchy, the user will be restricted to only those products selling into the Regions they have access to, as determined through mdp_matrix. |
Minimum Privilege Displayed
When security is enabled (all but ‘None’ option), only those level members for which the user has Full Control or Read & Write access will be visible in the dropdown by default. If a user has no visibility or read-only visibility to a member, they will not be able to select that member as part of their planning process, particularly for hierarchical objects such as Accounts or Product Category.
However, in some instances a member may be secured as Read Only but accessible. For example, Promotion Type. The user will be unable to change the value, but should be able to select it when planning a promotion.
This access is controlled by the Minimum Privilege Displayed parameter, which has the following three options:
| Read Only | User can view all members of this level but cannot select or modify them. |
| Read & Write (default) | User can view, select, and edit members of this level but cannot delete members. |
| Full Control | User can view, select, edit, and delete members of this level. |
Controlling Access to Series
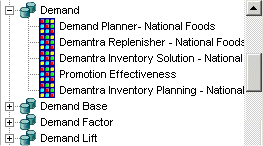
When you create a series in the Business Modeler, Demantra automatically adds that series to your component. You can give access to this series to other users of your component.
To control access to a series
-
Click Configuration > Configure Series or click the Configure Series button.
-
To see which components include a specific series, click the plus sign (+) to the left of the series name. The display expands to list all the components that include this series:
-
To make changes, right-click the series and then select Open > Expression Properties.
-
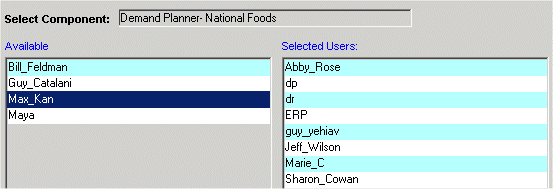
Click Next to access the Security page.
-
If you logged into Business Modeler with one of the internal Demantra passwords, you can select any component. Otherwise, you can make changes only within the component with which your ID is associated.
-
For each user of this component who needs access to this series, double-click the user name to move the user name from the Available list to the Selected Users list.
Feature Security
Demantra features are secured as follows:
-
Permission levels control access to administrative tools and to menu items. Demantra provides four predefined permission levels that you can customize. You can control access to all of the Demantra menus:
-
Menus on the Collaborator Workbench menu bar
-
Menus on the DSM menu bar
-
Menus on the Promotion Effectiveness menu bar
-
Menus on the Demand Management menu bar
-
Right-click menus associated with each level in your system
-
-
You can also control access to all the same menu items at the group and user ID level.
For convenience, you control access to individual menu items, to predefined collections of menu items, or to your own collections of menu items (your own program groups).
Permission Levels
Demantra defines four permission levels, as follows:
Note: Each Demantra software component (such as Demand Management or Sales & Operations Planning) has a component manager who has the highest permission level, and can assign all levels of permissions including system managers.
The table below shows the default rights for these four permission levels. Note that only the System Manager has a different set of permissions from the other three. However, users with the System Manager permission level can utilize the Collaborator Workbench Administration tool to modify the access restrictions for specific menu items, or sets of menu items, thereby changing these defaults. See the section Specifying Permissions for Menu Items.
| Permission Level | Business Modeler – login / change pwd | Business Modeler – All Menus | Collaborator Workbench Administration tool | Collaborator Workbench - view public and own worksheets | Collaborator Workbench - view all worksheets | Demand Planner - System menu |
| System Manager | X | X | X | X | X | X |
| Supervisor | X | - | - | X | - | - |
| Power User | X | - | - | X | - | - |
| Casual Supervisor | X | - | - | X | - | - |
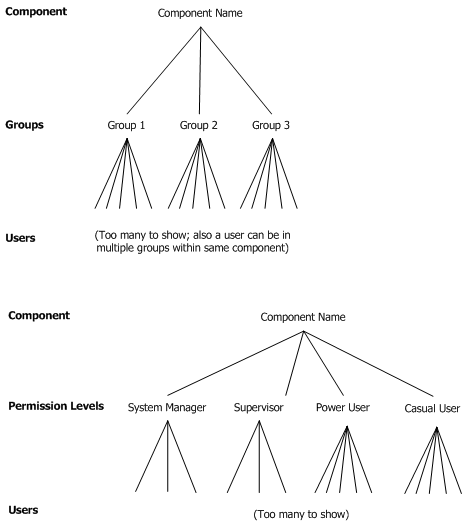
In order to understand how Demantra determines a given user's access to a given menu item, it is necessary to understand the permission hierarchies and how Demantra combines them.
Demantra has two independent permission hierarchies. In the first hierarchy, each component includes groups, and each group includes users. A user can belong to multiple groups, provided that all those groups belong to the same component. In the second hierarchy, each component includes four permission levels, and each user has one permission level.
Explicit and Implicit Permissions
In Collaborator Workbench you can display or hide any menu item. You can also display but disable a menu item, which can provide a useful clue about advanced features that are available to other users. Each permission is either explicit or implicit (inherited).
Note: For more information see:Logging into the Collaborator Workbench Administrator, Implementation Guide.
You define permissions in an expandable hierarchy like the following. For now, let's focus on the three check boxes:
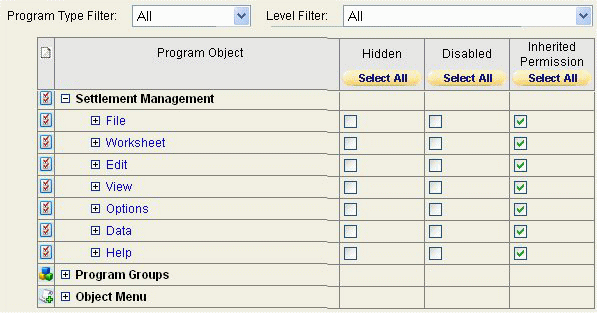
The following table describes how to use these check boxes:
| Desired outcome | Hidden | Disabled | Inherited Permission |
|---|---|---|---|
| Menu option is explicitly hidden | Checked | Irrelevant | Unchecked |
| Menu option is explicitly displayed but disabled | Unchecked | Checked | Unchecked |
| Menu option is explicitly displayed and enabled | Unchecked | Unchecked | Unchecked |
| Use implicit permissions for this menu item | Unchecked | Unchecked | Checked |
How Demantra Combines Multiple Permissions
For a given user and a given menu item, Demantra checks for all the following permission descriptions:
-
For the component
-
For each group to which the user belongs
-
For the permission level that the user has
-
For the user ID
-
For each program group to which the menu item belongs
To determine whether a user has access to a given menu item, Demantra searches for and combines the permission descriptions as follows.
-
Demantra checks to see if the user has an explicit permission setting (for a given menu item). If so, that setting is used, and all others are disregarded.
-
If the user does not have an explicit permission setting for a given menu item, then Demantra looks at the settings for the groups to which the user belongs, the permission level that the user has, and each program group that the menu item is in. Here, the following rules apply:
-
An explicit permission takes precedence over an implicit permission.
-
Among explicit permissions, the most liberal permission takes precedence.
-
Among implicit permissions, the most liberal permission takes precedence.
-
-
If no explicit permission setting for the menu item has been found so far, then Demantra uses the permission setting at the component level, if any.
-
If there is no setting at the component level, Demantra displays and enables the menu item.
See Also
“Data Security”
“Specifying Permissions for Menu Items”
Program Groups
For more information about Program Groups see: Defining a Program Group, Implementation Guide
Deleting a Program Group, Implementation Guide
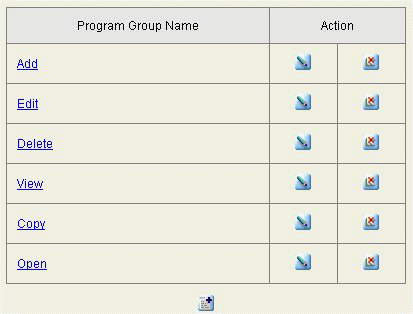
A program group is a collection of menu items, typically related to each other in some way. You create program groups so that you can easily control access to all the menu items in the group.
Demantra provides several predefined program groups, for convenience. These program groups contain only menu items from the right-click menus.
| Program group | Menu items in this group, by default |
|---|---|
| Add | New member right-click menu option for every level in the system. |
| Edit | Edit member right-click menu option for every level in the system. |
| Delete | Delete member right-click menu option for every level in the system. |
| View | View member right-click menu option for every level in the system. |
| Copy | Copy, Paste, and Paste from Clipboard right-click menu options for every applicable level in the system. (Note that this option is available only for promotional-type levels.) |
| Open | Open and Open With right-click menu options for every level in the system. |
Defining a Program Group
A program group is a collection of menu items, typically related to each other in some way. You create program groups so that you can easily control access to all the menu items in the group; see “Specifying Permissions for Menu Items”.
Demantra provides several predefined program groups, for convenience. These program groups contain only menu items from the right-click menus.
| Program group | Menu items in this group, by default |
|---|---|
| Add | New member right-click menu option for every level in the system. |
| Edit | Edit member Unmapped Conditional Text: HelpOnly right-click menu option for every level in the system. |
| Delete | Delete member right-click menu option for every level in the system. |
| View | View member right-click menu option for every level in the system. |
| Copy | Copy, Paste, and Paste from Clipboard right-click menu options for every applicable level in the system. (Note that this option is available only for promotional-type levels.) |
| Open | Open and Open With right-click menu options for every level in the system. |
-
Log into the Collaborator Workbench Administrator. See “Logging onto the Collaborator Workbench Administrator”.
The Administration page appears.
-
Click Define Program Groups.
The system displays a page that lists the existing program groups.
-
Click the Add Program Group button.
Demantra displays a page where you can define a new program group:
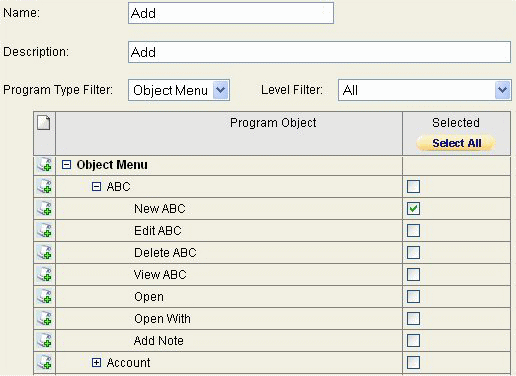
-
For Name and Description, specify a name and optional description for this program group.
-
Optionally select an item from the Program Type Filter selection list, to reduce the number of menus and menus items shown on this screen.
-
To display only options on the right-click menus, click Object Menu.
-
To display only options on the menu bars, click Menu.
-
-
Optionally select a level from the Level Filter selection list, to reduce the number of menus and menus items shown on this screen. (This filtering is available only if you are viewing right-click menus.)
-
In the table, expand the menus as needed.
-
In the Selected column, select the check box for each menu item to include within this program group.
-
Click OK.
You are now ready to define permissions for this program group; see “Specifying Permissions for Menu Items”.
See also
“Deleting a Program Group”
Redefining a Program Group
-
Log into the Collaborator Workbench Administrator. See “Logging onto the Collaborator Workbench Administrator”.
The Administration page appears.
-
Click Define Program Groups.
The system displays a page that lists the existing program groups.
-
In the row corresponding to the group you want to redefine, click the Edit Program Group button.
Demantra displays a page where you can edit this program group.
-
Optionally edit the Name and Description.
-
Optionally select an item from the Program Type Filter selection list, to reduce the number of menus and menus items shown on this screen.
-
To display only options on the right-click menus, click Object Menu.
-
To display only options on the menu bars, click Menu.
-
-
Optionally select a level from the Level Filter selection list, to reduce the number of menus and menus items shown on this screen. (This filtering is available only if you are viewing right-click menus.)
-
In the table, expand the menus as needed.
-
In the Selected column, select the check box for each menu item to include within this program group.
-
Click OK.
See also
“Deleting a Program Group”
Deleting a Program Group
-
Log into the Collaborator Workbench Administrator. See “Logging onto the Collaborator Workbench Administrator.”
The Administration page appears.
-
Click Define Program Groups.
The system displays a page that lists the existing program groups.
-
In the row corresponding to the group you want to delete, click the Delete Program Group button. No confirmation message is displayed; the group is deleted immediately.
See also
“Defining a Program Group”
Configuration Notes
The following table summarizes the Demantra security tools.
| Tool | Purpose/Notes |
|---|---|
| Components > Open/Create Component option* | Creates components, which are usually created as part of basic implementation. |
| Security > Create/Modify User option* | Creates users and configures all information except for access to menu items. |
| Security > Create/Modify Group option* | Creates user groups and configures all information except for access to menu items. |
| Collaborator Workbench Administrator | Controls access to menu items; defines program groups. |
| *These options are in the Business Modeler. |
Specifying Permissions for Menu Items
To specify permissions for menu items
-
Log into the Collaborator Workbench Administrator. See “Logging onto the Collaborator Workbench Administrator”.
The Administration page appears.
-
Click Define Program Permissions.
The system displays a page where you specify the category upon which to apply the menu availability.
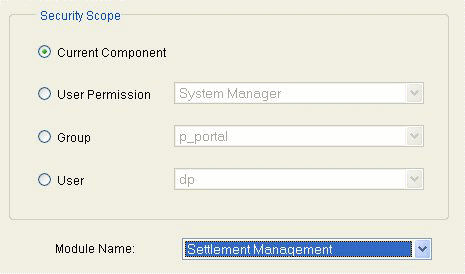
-
To define the scope, check one of the following radio buttons and select an item from the associated drop down list:
-
Click Next.
Demantra displays an expandable hierarchy that shows all the menu items you chose, like the following example:
Initially, the Inherited Permission check boxes are all checked, which means that the permissions that will be used are inherited from higher in the security hierarchies. Likewise, the Hidden and Disabled check boxes display the current inherited settings.
-
Optionally select an item from the Program Type Filter selection list, to reduce the number of menus and menus items shown on this screen.
-
To display only options on the right-click menus, click Object Menu.
-
To display only options on the menu bars, click Menu.
-
-
Optionally select a level from the Level Filter selection list, to reduce the number of menus and menus items shown on this screen. (This filtering is available only if you are viewing right-click menus.)
-
In the table, expand the menus as needed.
-
For each item in this table, specify permissions as follows:
Desired outcome Hidden Disabled Inherited Permission Menu option is explicitly hidden Checked Irrelevant Unchecked Menu option is explicitly displayed but disabled Unchecked Checked Unchecked Menu option is explicitly displayed and enabled Unchecked Unchecked Unchecked Use implicit permissions for this menu item Unchecked Unchecked Checked Note: To understand how multiple permissions are combined, see “How Demantra Combines Multiple Permissions”. -
Click Finish. The settings are saved.
See also
“Configuring Menus in Collaborator Workbench”