Customization Manager
This chapter covers the following topics:
- Introduction
- Major Definitions
- Setup Steps
- Security
- Diagnosing Issues
- Overview of the User Interface
- Managing Custom Applications
- Managing Custom Packages
- Maintaining the File Metadata Repository
- Reporting
- Customization Discovery
Introduction
Customization Manager has following capabilities:
-
Automated creation of customization packages that are deployable with Patch Manager or standard Oracle E-Business Suite Applications DBA (AD) Utilities.
-
Discover and report customizations in the in Database, File System (under APPL_TOP and JAVA_TOP), and Configurations. This report can help customers understand the footprint of the customizations they have, which in turn can be used to plan for upgrading to Oracle E-Business Suite Release 12.2 or for promoting their customizations to other instances.
-
Run readiness reports to ensure these customizations are ready for Oracle E-Business Suite online patching.
-
Support of over 200 different custom file types.
-
Validate and register custom objects.
-
Validate custom code to ensure adherence to Oracle standards or user-defined standards.
-
Auto-correct existing custom applications to ensure custom applications are defined according to Oracle standards.
-
Integrate with third part source control or version control software.
-
Package and promote custom packages across Oracle E-Business suite instances; leverages Patch Manager to deploy custom packages similar to Oracle patches across Oracle E-Business Suite instances.
-
Support for creation of National Language Support (NLS) patches.
Major Definitions
Custom Application
A custom application is a non-Oracle E-Business Suite application that is registered with Oracle Application Object Library and typically has (at least) its own directory structure and other components.
Custom File
Any file which is not shipped by Oracle but has been on deployed on an Oracle E-Business Suite instance for the purpose of customizing the Oracle E-Business Suite functionality. The file should be developed according to Customization Standards recommended by Oracle.
Custom Standards
Any proprietary standard followed by the customer, while developing the custom file, other than what is recommended by Oracle.
Package
A package is a bundle of custom files along with the metadata. It can be applied to any Oracle E-Business Suite instance using AD patching utilities.
File Source
The source control to which the custom files are checked in.
File Metadata Repository
The File Metadata Repository stores information of custom files used to create customization packages. This information can be used to manage and catalog customizations within the system.
File Manifest
The list of files included in a package.
Entity
One of the Oracle Application Object Library (FND) tables. Examples include: Profiles, Functions, Menus, and Responsibilities.
Seed Owner / Seed User
One of the below Oracle Seed Owners. The following is a list of Oracle predefined users used for uploading Oracle-shipped seed data.
-
ORACLE12.X.X
-
SYSADMIN
-
SEED
-
INITIAL SETUP
-
OPERATIONS
-
DATAMERGE
-
AUTOINSTALL
Customization Types
-
File System (Appl Top) - Custom files under $APPL_TOP
-
File System (Java Top) - Custom files under $JAVA_TOP
-
Database - Customized database objects
-
Configuration - Customized FND data
Setup Steps
-
Ensure that the Preferred Credentials are set for each user as described in the chapter Setting Credentials.
-
Ensure that the Stage Directory is specified in the Preferences page. This property specifies the OMS stage directory for package creation. To set this, navigate to Targets > Oracle E-Business Suite > Administer > Preferences. For more information, see: Setting Preferences.
Security
Oracle Application Management Pack for Oracle E-Business Suite uses the native Enterprise Manager functionality of privileges and roles for security. All management activities require that the user has the appropriate privilege(s). Refer to the section Privileges and Roles for Managing Oracle E-Business Suite, to see the privileges needed for each management action in Customization Manager.
Diagnosing Issues
Oracle Application Management Pack for Oracle E-Business Suite includes a pack diagnostics feature that can be used to troubleshoot issues by running diagnostic tests. Refer to the section Diagnostic Tests for Customization Manager.
Overview of the User Interface
Navigate to the Customization Manager Home Page
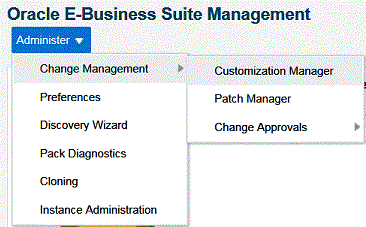
To navigate to the home page of Customization Manager, go the Oracle E-Business Suite Management page and expand the Administer menu. Select Change Management > Customization Manager.
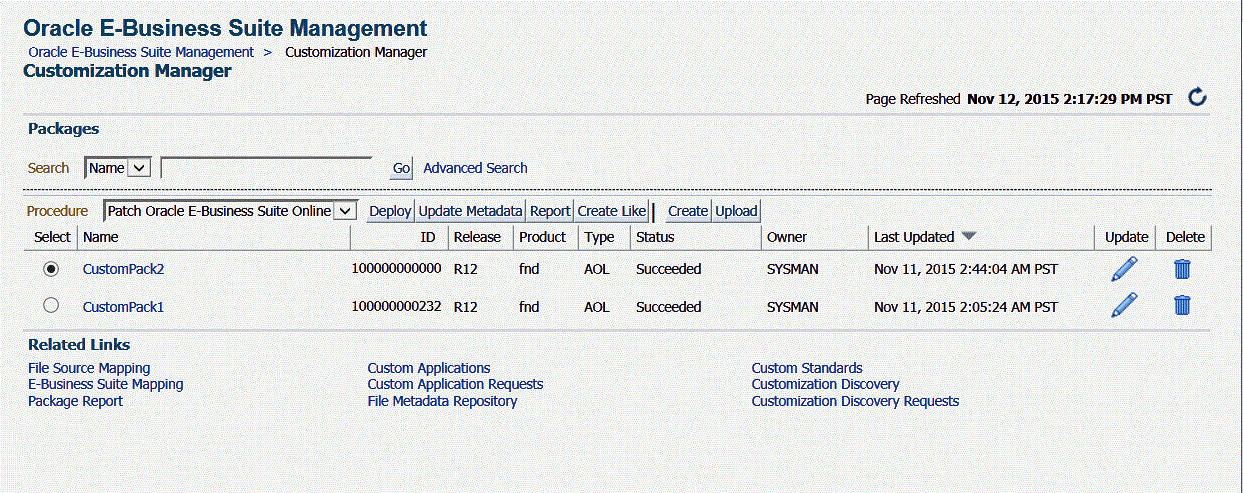
Home Page
The Customization Manager home page shows the list of packages created. You can select a package and perform management activities like deploy, create like, and so on. These features are explained later.
Related Links in the Home Page
You can navigate to all other pages from the Related Links section. All these features are explained in detail later.
Managing Custom Applications
By using the Custom Applications link you can perform the following operations on your custom applications:
-
View custom applications and instance associations.
-
Hide and unhide the custom applications within Customization Manager.
-
Register a new custom application.
-
Validate an already-registered custom application.
-
If a validation request fails, run the Auto-Correct feature for the application.
A custom application "definition" is de-coupled from registration. Once an application is defined, it can be registered on one or more instances.
A user must have the "Approve splice request" privilege to hide and unhide custom applications. By default, hidden custom applications will be invisible. A user can check the "show hidden custom applications" box to view the hidden custom applications.
To manage custom applications, go to the home page of Customization Manager and click on Custom Applications in the Related Links section.
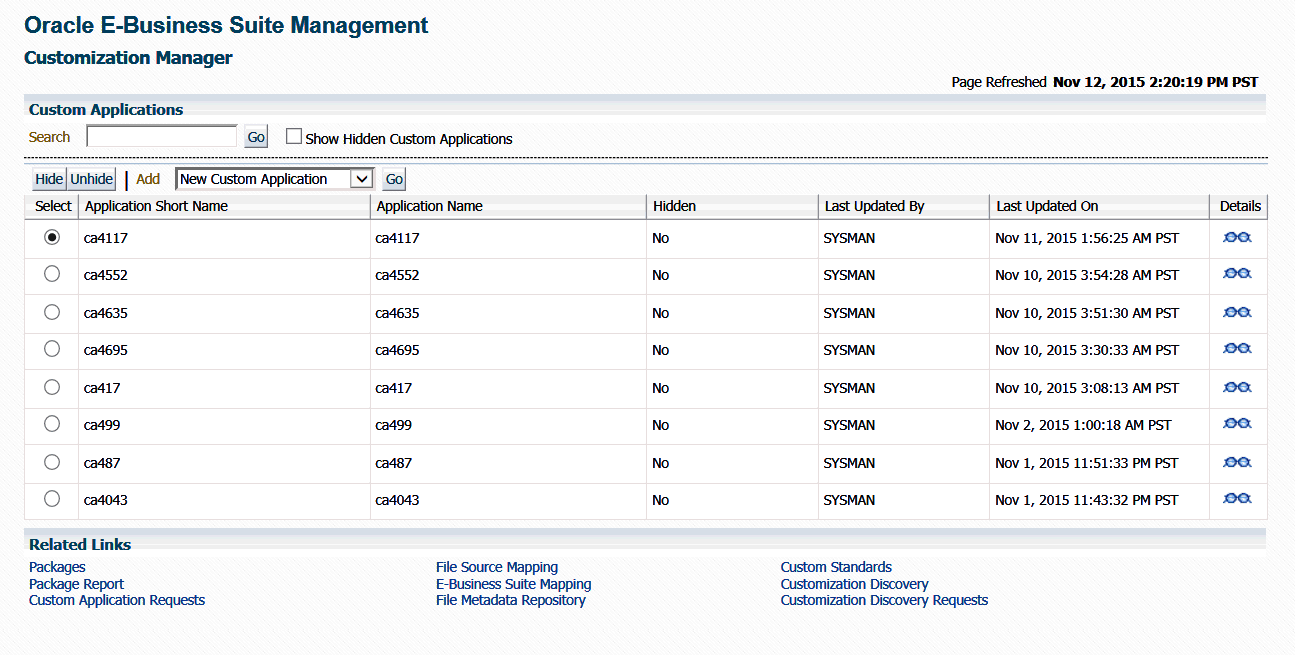
Define a new custom application
-
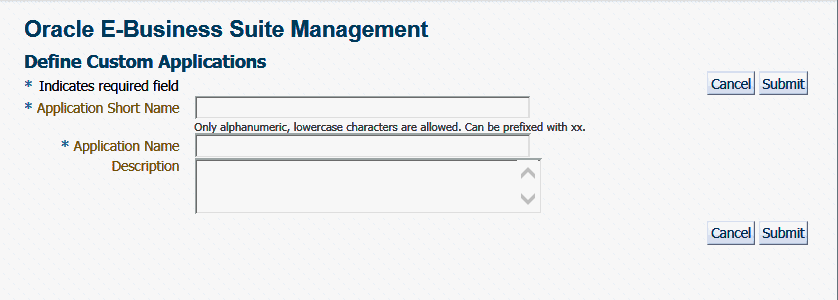
Select "New Custom Application" from the Add list and click Go. The Define Custom Applications page appears.
-
Specify an Application Short Name for your application. Note that the short name must be a maximum of 8 characters. Only alphanumeric characters and underscore (_) are allowed, and letters must be lowercase. The application short name is recommended to be prefixed with "xx".
-
Specify an Application Name for your application.
-
Optionally provide a description.
-
Click Submit to save your work.
Note: A custom application definition is not associated with any specific Oracle E-Business Suite instance but can be used to register the given custom application on one or more Oracle E-Business Suite instances.
Register a custom application for a specific Oracle E-Business Suite instance
Once you have defined a new custom application in Customization Manager, you can register it with Oracle E-Business Suite instances.
-
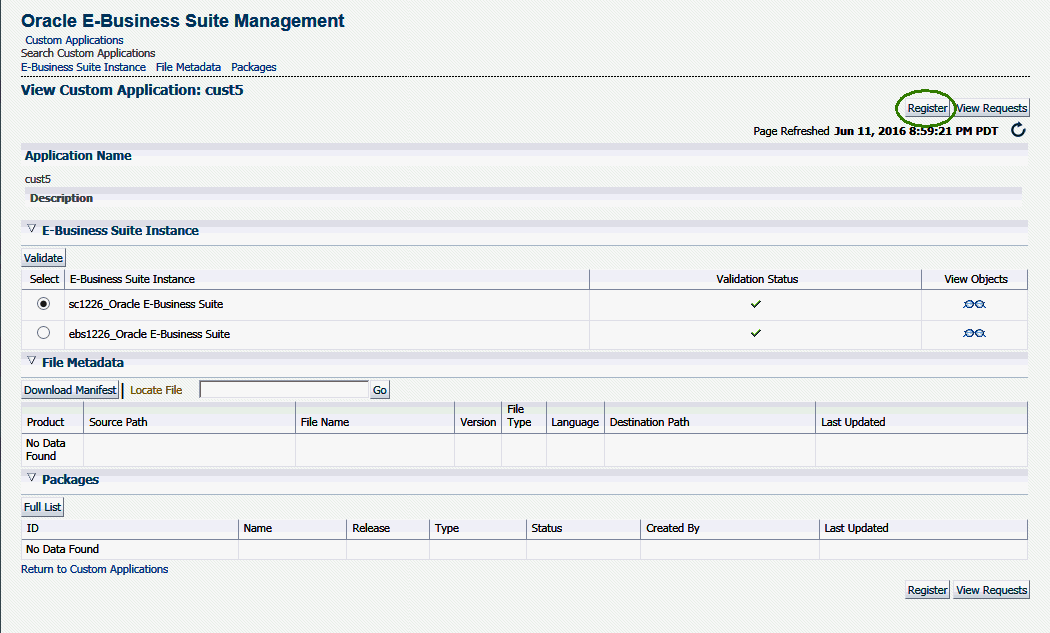
Navigate to the Custom Application Requests page using its link under Related Links on the Customization Manager home page and click the Register button. Alternatively, you can also click the Register button on the Custom Application details page.
-
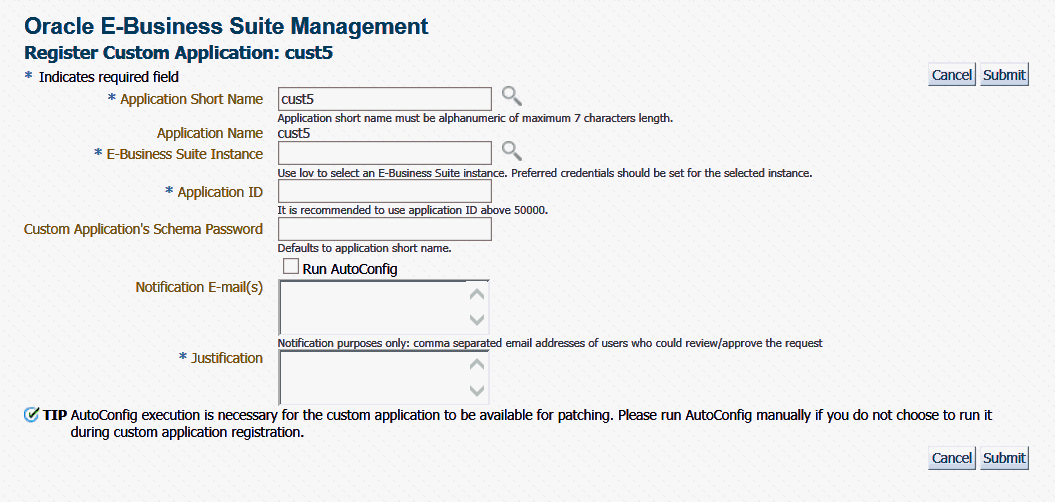
Enter in the Application Short Name for the application. You can use the LOV provided. Note that the Application Name defaults in.
-
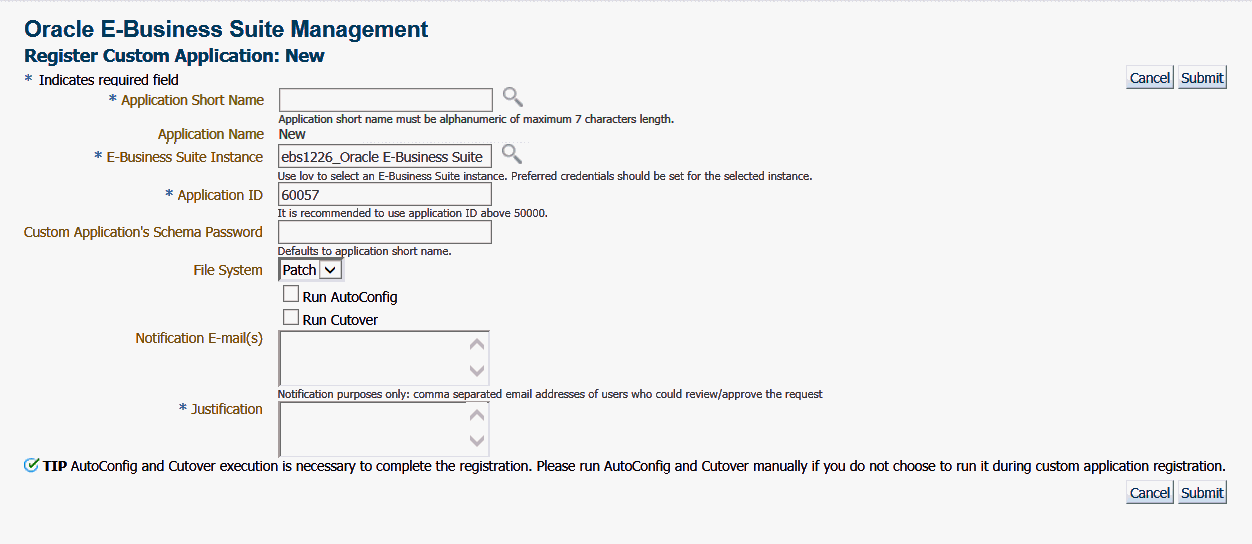
Enter in the Oracle E-Business Suite instance. You can use the LOV provided. Note that the required APPLSYS schema, APPS schema and system schema Preferred Credentials need to be set for this Oracle E-Business Suite instance.
-
Enter in an Application ID. Oracle recommends you use an application ID greater than 50000. Customization Manager automatically generates and defaults the recommended application ID.
-
Enter the custom application's schema password.
-
For an Oracle E-Business Suite Release 12.2 instance, specify whether to register the custom application on the Run file system or the Patch file system. If you choose the Patch file system, you have the option to defer the adop cutover.
-
Select "Run AutoConfig" if desired. AutoConfig execution is necessary for the custom application to be available for patching. Please run AutoConfig manually if you do not chose to run it during the custom application registration.
-
Enter e-mail addresses to notify when the request is approved and completed.
-
Enter a justification and click Submit. A request to register the custom application will be submitted. You can later track the request. See: Track a custom application request.
-
The request must be approved by a user with the Approve splice request privilege. Until then the request will be Pending Approval status. Once approved, select the Approved request and click Execute.
Note: You have the option of registering a custom application on a patch edition in Oracle E-Business Suite Release 12.2. In this way, you do not need to wait until a full fs_clone operation is executed to synchronize the patch edition with the run edition to apply custom patches on the patch edition. The WebLogic Administrator credentials must be set before you register the custom application on the patch edition.
Discover an existing custom application
Navigate to the Custom Applications page. Select "Existing Custom Application" from the Add drop-down list and click Go. The Discover Custom Applications page appears.
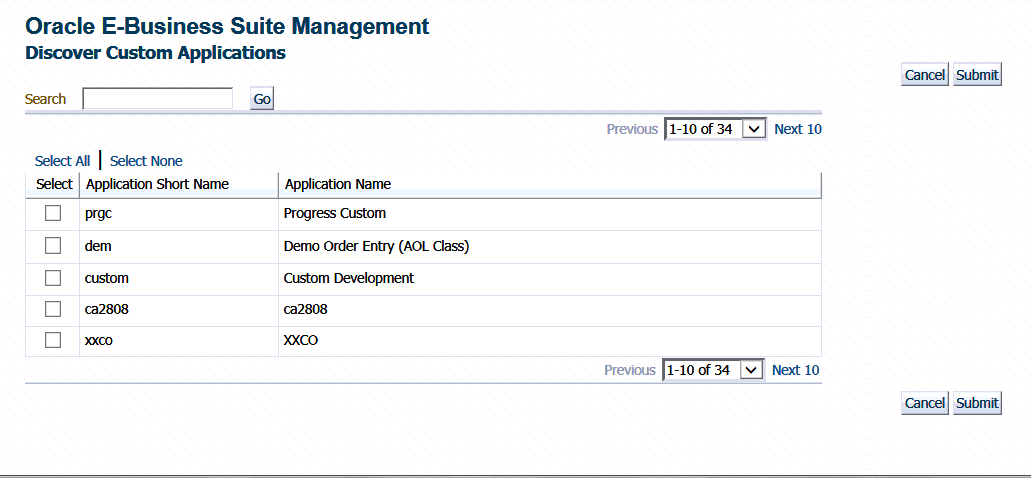
Optionally, you can use the Search feature to narrow down the results the table.
Select the custom application you wish to discover and click Submit.
Validate an existing custom application
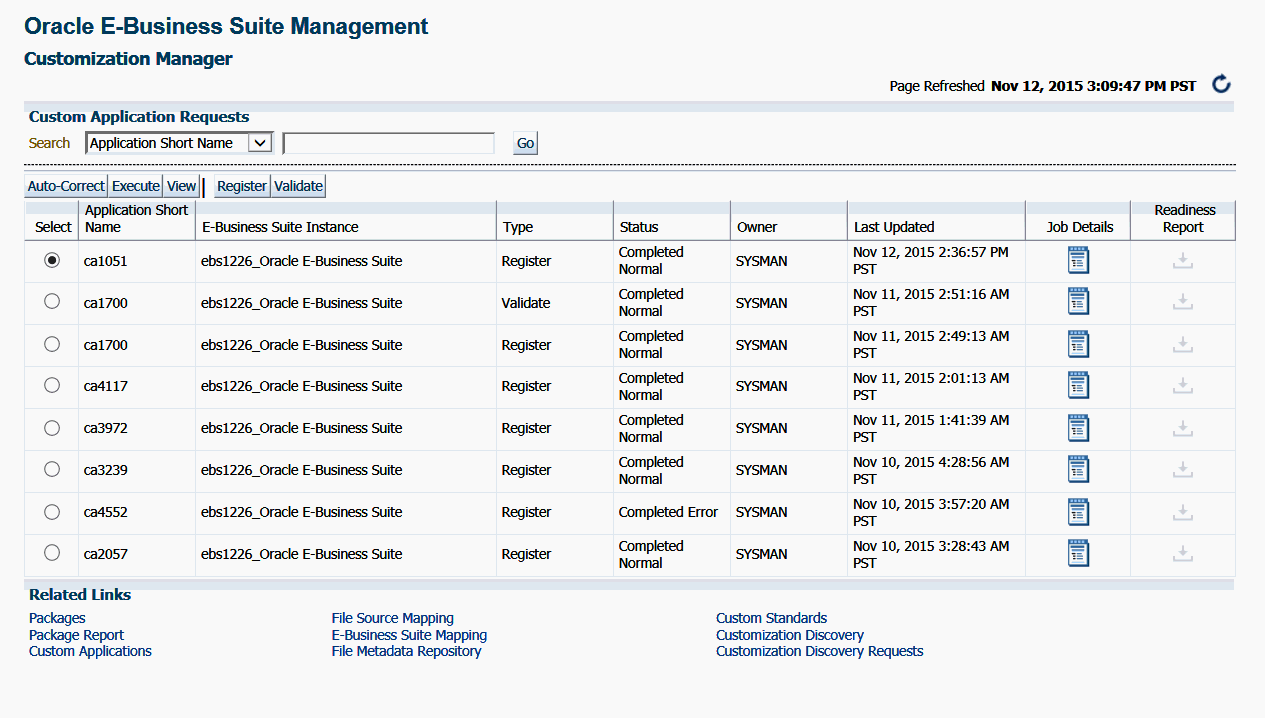
If you have custom applications registered in your Oracle E-Business Suite instances, you can validate them to check if you can apply a patch using AD patching utilities (adpatch for Oracle E-Business Suite Release 12.1.3 and earlier; adop for Release 12.2 and later).
-
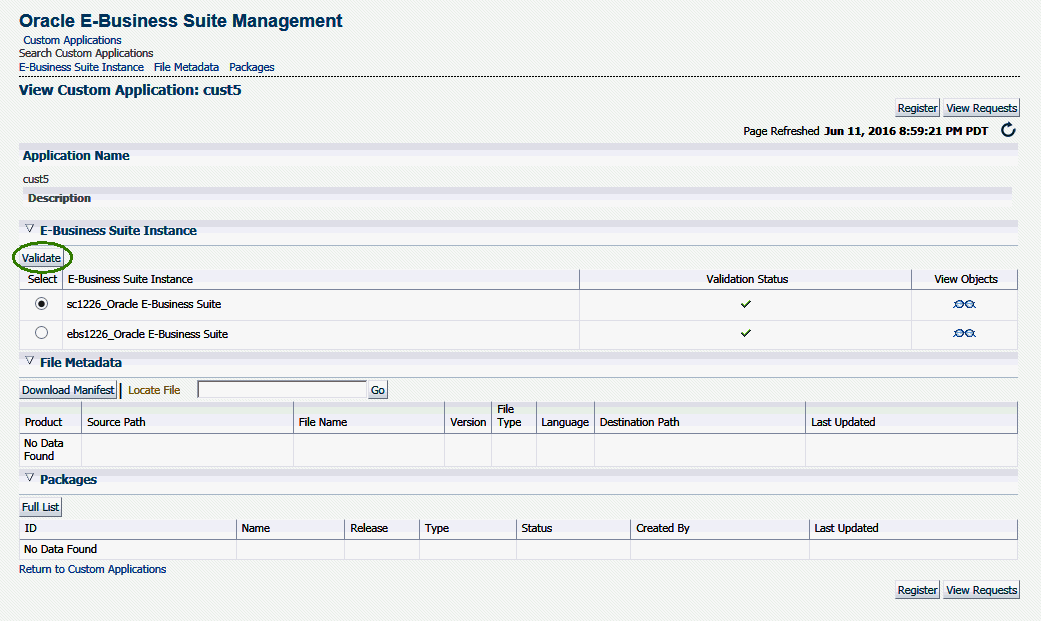
Navigate to the Custom Application Requests page using its link under Related Links. Click the Validate button. Alternatively, you can also select the Oracle E-Business Suite instance and click the Validate button on the Custom Application details page.
-
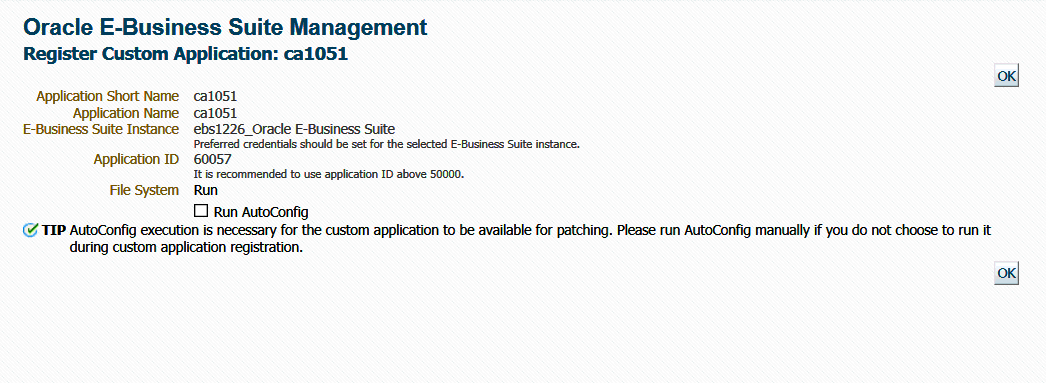
Enter in the Application Short Name for the application. You can use the LOV provided. Note that the Application Name defaults in.
-
Enter in the Oracle E-Business Suite instance. You can use the LOV provided. Note that the Preferred Credentials need to be set for this Oracle E-Business Suite instance.
-
Select "Generate Readiness Report for Online Patching" if desired for Release 12.2 instances. This option reports Edition-Based Redefinition (EBR) violations in the specified custom schema that include objects not complying with the EBR rules about non-editioned objects (data storage objects such as tables and materialized views), and referencing editioned objects (code objects such as: packages, triggers, object types, and so on). This report also lists several naming standard violations that must be fixed prior to applying the online patching enablement patch for Release 12.2.
-
Click Submit. A job to validate the custom application will be submitted. Validation is based on certain standards and is provided by Oracle Applications DBA (AD) utilities. For details about the validation, see: Validation of Custom Applications: Examples.
Auto-correct an existing custom application
If your request to validate a custom application fails, you can use the Auto-Correct feature to help you make the custom application conform to Oracle E-Business Suite standards. Note: This feature can only be used on failed validation requests.
The user who submits the auto-correction request must have the Splice Request privilege. The request must be approved for execution using Change Approval.
-
Click the "Custom Application Requests" link under Related Links on the Customization Manager home page. The Custom Application Requests page appears. Select a request and click the Auto-Correct button. Note: If you choose a request that did not fail in the Validation step, you will receive the error "Only failed validation requests are allowed for auto-correction."
-
In the Auto-Correct Custom Application page, enter the following:
-
Custom Application's Schema Password. If you do not enter a value, the application short name is used by default.
-
E-mail addresses for whom to notify when the request is approved and completed. (Optional)
-
Justification (Required)
-
-
Click Submit. A request to auto-correct this existing custom application will be submitted. You can later track the request. See: Track a custom application request.
-
The request must be approved by a user with “Approve splice request" privilege. Until then the request will be Pending Approval status. Once approved, select the Approved request and click Execute.
-
You can download the log if the corresponding job for your request has been purged and no longer exists in the Enterprise Manager system.
Track a custom application request
-
Navigate to the Custom Applications Requests page using its link under Related Links. Select a custom application request from the table and click View.

-
Details for the request will be shown.
Tip: To debug or view logs of a custom application request, click on the "Job Details" icon against the specific custom application request. This will show the EM job log associated with the custom application request. Click and view details on the "DO_JOB" step to view the detailed log of the given custom application request. In case of a failure of a custom application request, a new request should be submitted after rectifying the errors/failures listed in the job details log.
View the details of a custom application
View details of a custom application by navigating to Custom Applications, selecting the application name, and clicking its Details icon.
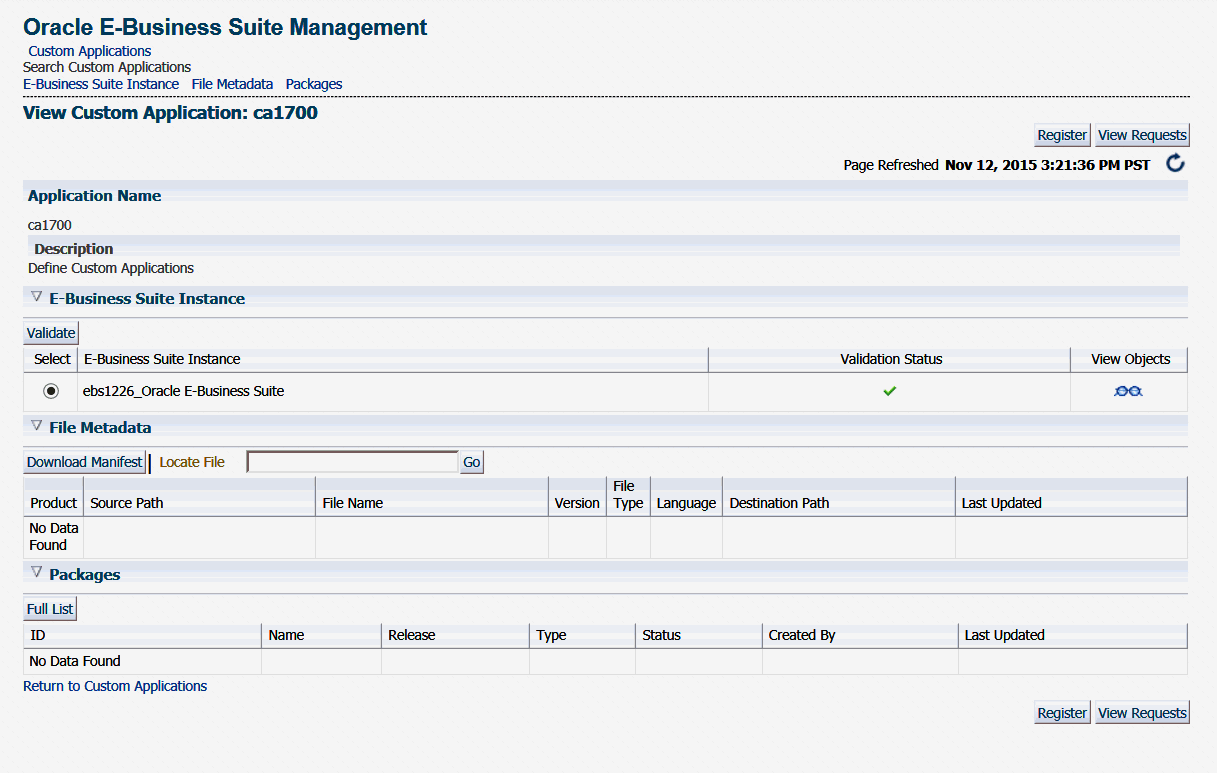
Details include:
-
A list of instances where the custom application is present with the status validated/not validated. If the status is not validated, it is recommended to use the Validate button to launch a validation request. A valid status ensures that custom patches for the given custom application can be applied on that instance.
-
Custom objects associated with the given custom application which are present on the given instance can be viewed by clicking on the "View Objects" icon. Customization Manager automatically discovers and relates the following objects associated with a custom application:
-
Custom Forms
-
Profile Options
-
Request Sets
-
Custom Database Objects
-
Alerts
-
Audit Group Information
-
-
All files in the File Metadata Repository for the given custom application.
-
A list of packages that have been created for the custom application.
Managing Custom Packages
Developing Custom Code
File Types
Customization Manager allows you to package custom files of a variety of file types, including the following:
-
Oracle Application Object Library (FND) objects - menus, responsibility, concurrent programs, and so on
-
Forms
-
Reports
-
Database objects - views, tables, triggers, packages, and so on
-
Oracle Application Framework components
For more information on file types, see Supported File Types in Customization Manager.
Standards for developing custom code
Custom code must be developed as per the standards published by Oracle. Refer to the customization standards in the Oracle E-Business Suite Developer's Guide. Also, for Oracle E-Business Suite Release 12.2, refer to My Oracle Support Knowledge Document 1577661.1, "Developing and Deploying Customizations in Oracle E-Business Suite Release 12.2."
Validations for custom code
Customization Manager has a standards checker to check if the files included in a custom package meet certain Oracle coding standards. This checker tests all code for standards compliance and cannot be turned on or off. Some standards are mandatory and will result in failure when Customization Manager attempts to build the package. Other standards are recommended, and the standards checker will give a warning but the package will be built. For example, Customization Manager mandates that each file included within a customization package has an Oracle-compliant source header present within the file. If a file in a package is missing this header, the package cannot be built. In addition to out-of-box Oracle coding standards, you can define your own standards to validate your custom code.
For more information on the standards checker, see: Customization Manager Coding Standards Validation.
User-Defined Custom Standards
You can add user-defined custom standards that meet your organizational IT standards and coding practices. These user-defined standards will be added to the standards checker to validate the files included in a custom package. You can skip this section if you do not wish to define your own development standards for custom code.
Types of custom standards
-
File naming conventions - For example, use the regular expression ^xx to enforce the rule that a filename should start with 'xx'.
-
File path conventions - For example, use the regular expression
^patch/115/sql$to enforce the rule that SQL files should be under the directory $XXPROD_TOP/patch/115/sql. -
File content restrictions - For example, use the regular expression
^((?!System\.out\.print).)*$to enforce the rule that Java files should not contain System.out.print statements.
Managing custom standards
Navigate to the Customization Manager home page and click on Custom Standards in the Related Links section. You can perform the following actions here:
-
View details of a custom standard
-
Add new custom standard
-
Edit a custom standard
-
Release a custom standard
-
Obsolete a custom standard
-
Delete a custom standard
-
Download custom standards

View details of a custom standard
You can view the following details of a custom standard:
-
Name
-
Type of the standard
-
Releases of Oracle E-Business Suite for which this standard is applicable
-
Status of the standard
-
Released - It is already in use
-
Obsolete - It is no longer in use
-
Saved - It is under development and is not ready for use
-
-
File types for which this standard is applicable
-
Severity if this standard is violated
-
User who created it
-
User who last updated it
-
Time stamp when the standard was last updated
Add a new custom standard
You must have the Create release package request privilege to create a custom standard.
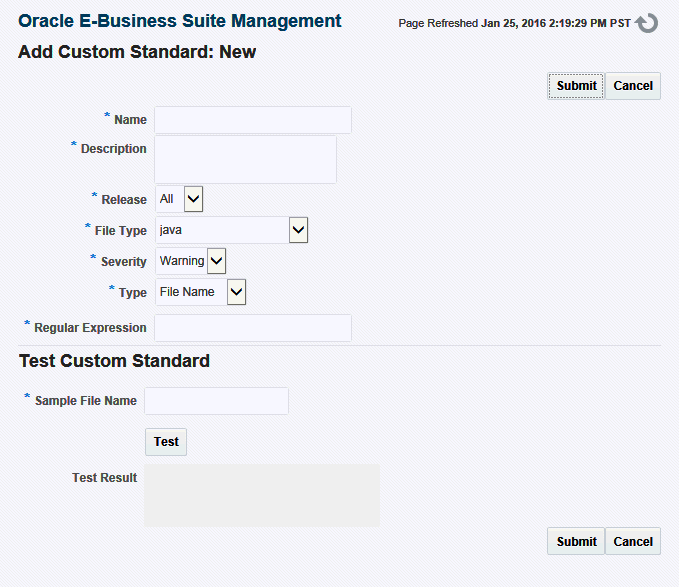
Click on the +Add button to create a new custom standard. Enter the following details:
-
Name of the standard
-
Description
-
Release
-
All - For all supported releases
-
11i - For Release 11i
-
R12 - For Release 12.0, 12.1, and 12.2
-
-
File Type
-
Severity
-
Error
-
Warning
-
-
Standard Type
-
File Path
-
File Name
-
File Content
-
-
Regular Expression to be used to validate the standard
Optionally you can test your standard. Provide the input based on the standard type and click Test.
Edit a custom standard
You can edit only the standards that you created. Released and obsolete standards cannot be edited. You can edit the following for a standard: Description, Release, File Type, Severity and Regular Expression. The Standard Name and Standard Type cannot be changed.
Delete a custom standard
You can delete a standard that is in the Saved status.
Release a custom standard
You must release a standard before it can be used in creating custom patches. After a standard is saved, a user can raise a request to release the standard. Only a user with the Approve release package request privilege can approve/reject the request. If the request is approved, then the standard will go to the Released state. Otherwise, it will go back to the Saved state. Meanwhile, the standard will be in the Pending Approval state. Once released, the standard cannot be edited or deleted.
Obsolete a custom standard
Released standards can be made obsolete. Once a standard is obsolete, it cannot be edited or deleted. A user can raise a request to obsolete the standard. Only a user with the Approve release package request privilege can approve/reject the request. If the request is approved, then the standard will go to the Obsolete state. Otherwise, it will go back to the Released state. Meanwhile, the standard will be in the Pending Approval state.
Download custom standards
You can download the details of released custom standards in HTML format and share it. The details include Standard Name, Standard Type, Description, Release, File Type, and Severity.
Creating Custom Packages
Registering the Source Control
To create a custom package you must first register your source control with Customization Manager. This registration is called File Source Mapping. This is a one-time activity. You can create more than one file source mapping if needed.
To create the File Source Mapping, go to the home page of Customization Manager and click on File Source Mapping in the Related Links section.
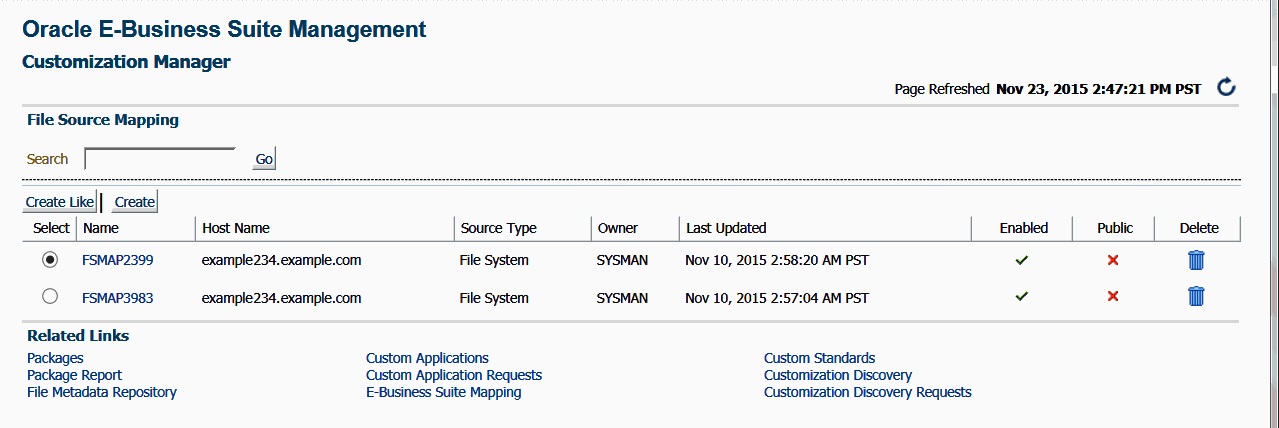
Here you can see a list of file source mappings already created.
View the details of a file source mapping
You can view the following details of a file source mapping:
-
Name of the source control.
-
Host from which the source control is accessible. The Oracle E-Business Suite plug-in must be deployed on this host.
-
Source Type - The type of the source control system. Valid values are: SubVersion, CVS, File System, or Others.
-
Owner - The user who created this file source mapping.
-
Last Updated - The date and time the mapping was last updated.
-
Enabled - Specifies if the mapping is enabled or disabled. You can enable/disable a mapping from the Update File Source Mapping page.
-
Public - Whether the given mapping is public. If a mapping is public, all users can view it, but only the owner and Super Administrators can edit it.
Create a file source mapping
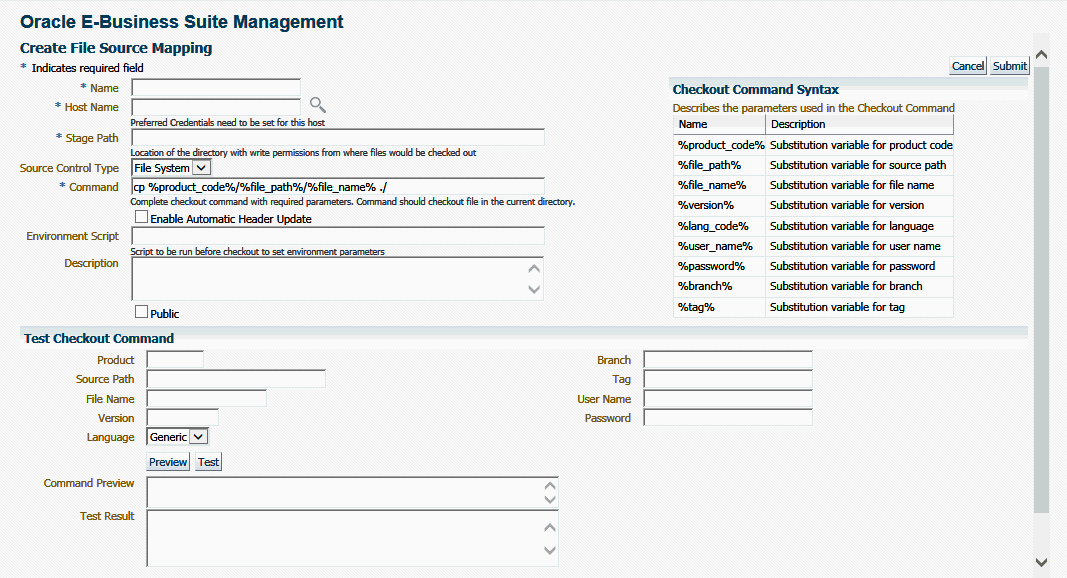
Click on the Create button and enter the details listed in the following table:
| Name | Description |
|---|---|
| Name | Name of the file source mapping. |
| Host Name | Host where the source control is installed. Preferred Credentials need to be set for this host. |
| Stage Path | A folder on the given host with read/write access which is used for temporary processing during checkout. |
| Source control type | Possible values are:
The source control type is used to default the checkout command. However, the checkout command can be modified based on your source control or file system configuration. If your source control system is not among CVS, SubVersion or File System, then you may choose "Others" and enter your checkout command. |
| Command | Enter the complete command, with required parameters, to be used to check out files. The parameters that can be used to construct the checkout command are mentioned under the "Checkout Command Syntax" box. This provides an open interface with which a user can integrate any third-party source control system with Customization Manager within Oracle Application Management Pack for Oracle E-Business Suite. However the user should be able to check out files from the command line on any supported platforms to use this open interface. |
| Environment Script (Optional) | The environment script to be run before files are checked out. This is used to set any environment parameters for preprocessing, if required. |
| Description | A brief description of the source control. |
| Public | Mark the file source mapping as Public if desired. If a file source mapping is marked as Public, any user can view it and use it to create a package. However, only the owner and Super Administrators can edit the file source mapping. |
| Enable Automatic Header Update | Explained later in the section Automatic Header Update and Insertion. |
Test the file source mapping
Oracle strongly recommends that you to test the checkout command by using the "Test Checkout Command" option. It is also important to ascertain that the user provided within the "host" credentials has the correct permissions on the given host selected for checkout.
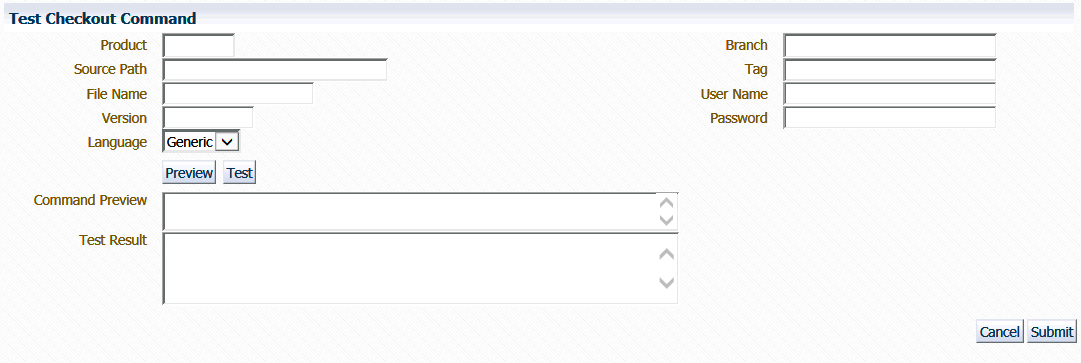
In the Test Checkout Command section Enter the following details:
-
Product
-
Source Path
-
File Name
-
Version
-
Language
-
Branch - If your source control system requires it and if a %branch% token is included within the checkout command.
-
Tag - If your source control system requires it and if a %tag% token is included within the checkout command.
-
User Name - If your source control system requires it and if a %user_name% token is included within the checkout command.
-
Password - If your source control system requires it and if a %password% token is included within the checkout command.
Use the Preview or Test button to preview or test the checkout command and version command. The results will be shown in the Command Preview or Test Results field.
Create a file source mapping using the "Create Like" button

Select the Create Like button on the File Source Mapping page to create a file source mapping by copying the details from an existing file source mapping. This procedure is used typically to create a mirror copy of the first file source mapping, or to create another file source mapping with minor modifications without having to enter all the relevant details about the file source mapping.
Update a file source mapping
You can update a file source mapping by clicking on its name listed in the main File Source Mapping page. You can only update the fields described below. It is not possible to update the host for a given file source mapping.
-
Source control type
-
Command
-
Stage Path
-
Environment Script
-
Description
-
Public (or not)
You can test the changes by following the steps mentioned in the previous section Test the file source mapping.
Disable or Enable a file source mapping
You can check or uncheck the Enabled box to enable or disable a file source mapping.
Delete a file source mapping
Use the icon provided to delete a mapping in the view list page. You can delete a mapping only when no package is associated with it.
Example of a file source mapping with parameters
The following table provides information on the file source mapping parameters and sample values for each parameter.
| Name | Description | Related User Interface Page | Sample Value |
|---|---|---|---|
| %product_code% | Substitution variable for the product code | Create/Update Package - File Listing | xxco |
| %file_path% | Substitution variable for source path | Create/Update Package - File Listing | patch/115/import |
| %file_name% | Substitution variable for file name | Create/Update Package - File Listing | Custom_Responsibilities.ldt |
| %version% | Substitution variable for version | Create/Update Package - File Listing | 115.32 |
| %lang_code% | Substitution variable for language | Create/Update Package - File Listing | US |
| %branch% | Substitution variable for branch | Create/Update Package - General | Prod13 |
| %tag% | Substitution variable for tag | Create/Update Package - General | Release12c |
| %user_name% | Substitution variable for username | Create/Update Package - General | developer1 |
| %password% | Substitution variable for password | Create/Update Package - General | password |
Here is the syntax of a checkout command with the parameters:
svn cat file:///usr/local/svn/%product_code%/%file_path%/%lang_code%/%file_name% --username %user_name% --password %password% > %file_name%
Here is the above checkout command with values substituted for the parameters:
svn cat file:///usr/local/svn/xxco/patch/115/import/US/Custom_Responsibilities.ldt --username developer1 --password password > Custom_Responsibilities.ldt
Source Headers Inside Custom Files
Each file included within a customization package should have an Oracle-compliant source header present within the file.
The following is an example of an Oracle-compliant header:
$Header: sample.txt 10.1 2012/04/06 09:38 lmathur ship $
The header contains the following elements:
-
Filename
-
Revision ID - This needs to be incremented every time a file is checked in
-
Date and time of checkin
-
Author
-
Shipment state - ship/noship. For custom files, use the value
ship
Automatic Header Update and Insertion
This option can be enabled while defining or updating the file source mapping used for package creation. When the "Automatic header update" option is selected, Customization Manager takes care of querying the source control repository to derive the revision number. It then updates the Oracle-compliant header present within the file with the same during the process of package creation. It is important to ascertain that the correct "Version command" is provided to lookup/query the revision number from the given source control repository, except when using the source control types 'File System' or 'CVS'. This feature is not supported when the source control type is File System. For CVS, there is no need to specify the version command because the header is always retrieved from the $Header string present within the file. Note that the checkout and version commands vary highly, based on the specific source control system.
-
When using the automatic header update feature with CVS, you must have a $Header placeholder within each source file. The placeholder header must be embedded in the source file before the file is checked in into CVS. Also ensure that you change the file name with the correct case within the $Header before embedding the header in the file.
-
When using Subversion, you must use Subversion client version 1.2 or above for automatic header update.
Automatic header update is supported for all file types. For binary files like forms, reports, and so on, you must provide a dummy placeholder for the header with enough appropriate offset (space). It is recommended to leave at least 40% extra offset (space) to accommodate incrementing revision numbers. During the process of package creation, the system uses this as a placeholder and updates it with the correct header. Again, the automatic header update option should be enabled and the correct version command should be specified within the file source mapping. The header is calculated based on the release and the version in the source control. For example, if you are building a package for Release 12 and the version of the file in the subversion repository is 29, then the header version calculated would be 120.29.
Automatic header insertion is supported only for selected file types. In this case, Customization Manager inserts a valid Oracle-compliant header into the source file during the process of package creation, even when there is no $Header present in the file. Automatic header insertion is supported for the following file types in case the file does not contain a proper $Header:
-
.css
-
.drvx
-
.htm
-
.html
-
.ildt
-
.java
-
.jlt
-
.jsp
-
.ldt
-
.msg
-
.odf
-
.pdt
-
.pkb
-
.pkh
-
.pks
-
.pl
-
.plb
-
.pls
-
.sh
-
.slt
-
.sql
-
.tpl
-
.wft
-
.wfx
-
.xdf
Adding a Header to Custom RTF Files
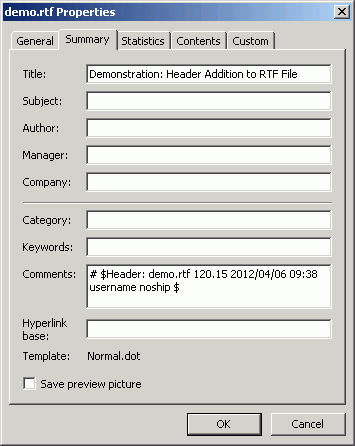
You can add a header to a custom RTF file by adding it to the file's "Comments" property. For example, in Microsoft Word, navigate to the File menu, select Properties, and enter the header in the Comments field as shown in the figure below.
E-Business Suite Mapping
When creating custom patches, you will need an E-Business Suite instance to compile Java or PLD files. The E-Business Suite Mapping indicates the Oracle E-Business Suite instance which would be used for this compilation. This mapping is not necessary if the custom patches do not contain Java or PLD files. However, an E-Business Suite Mapping is needed if you want to generate BI Publisher reports.
Go to the home page of Customization Manager and click on E-Business Suite Mapping in the Related Links section. Here you can see the list of E-Business Suite Mappings already created.
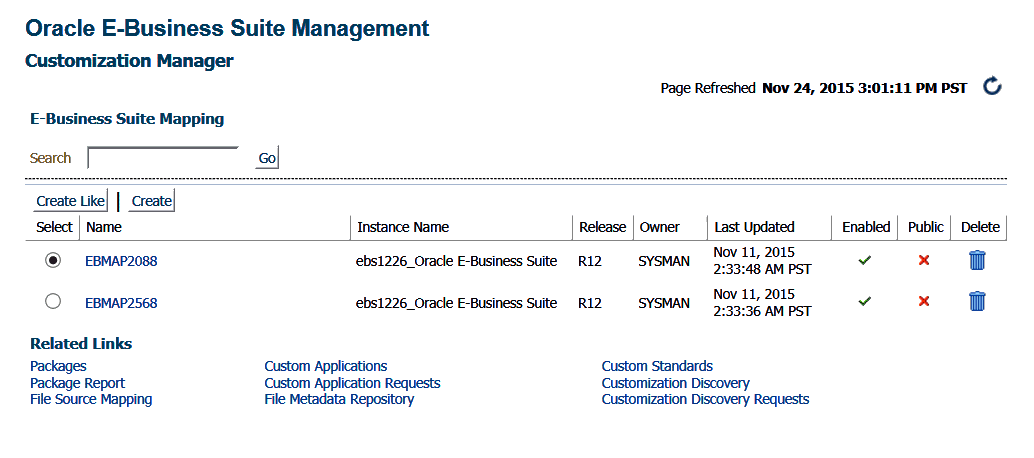
You can perform the following actions here:
-
Create a new E-Business Suite Mapping
-
Create an E-Business Suite Mapping using "Create Like"
-
Update an E-Business Suite Mapping
Create an E-Business Suite Mapping
Click on the Create button.
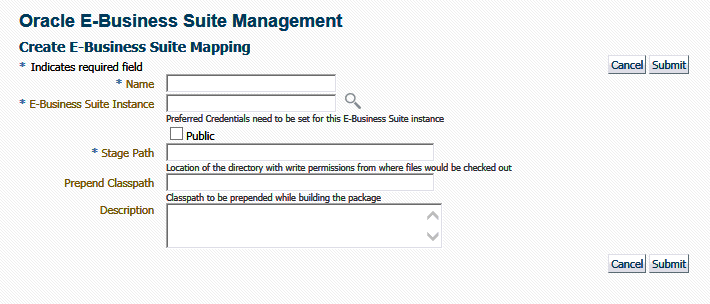
Enter the details listed in the following table:
| Name | Description |
|---|---|
| Name | Enter a name for the mapping. |
| E-Business Suite | Select an E-Business Suite instance from the LOV. |
| Public | If an E-Business Suite Mapping is marked as Public, any user can view it and use it to create a package, but only the owner and Super Administrators can edit it. This feature is typically useful when you would want the system administrator to create one mapping and enable all developers to use them, without having them know the details of the source control or Oracle E-Business Suite system. |
| Stage path | The stage path is the location of the directory with write permissions used for temporary processing during compilation and build process. |
| Prepend Classpath | This field is valid only with Java files. This classpath is prepended to these files when a package is built. This can be used to specify any third party libraries if you custom java files have dependencies on them. |
| Description | Enter a description. |
Create an E-Business Suite Mapping using "Create Like"
Select the Create Like button to create an E-Business Suite Mapping by copying the details from an existing E-Business Suite Mapping. This procedure can be used typically to create a mirror copy of the E-Business Suite mapping or create another E-Business Suite Mapping with minor modifications without having to enter all the relevant details about the E-Business Suite Mapping.
Update an E-Business Suite Mapping
Click on the name of the E-Business Suite mapping. It will open up the details page where you can edit it. You can make the following updates:
-
Enable or disable the mapping
-
Check or uncheck the public check box
-
Change the stage path, prepend classpath, and description
Packaging the Custom Code
Create a package
Once you have registered the source control and checked in your custom code, you can create the custom packages to be deployed in the Oracle E-Business Suite instance.
Go to the Customization Manager home page and click on Create.
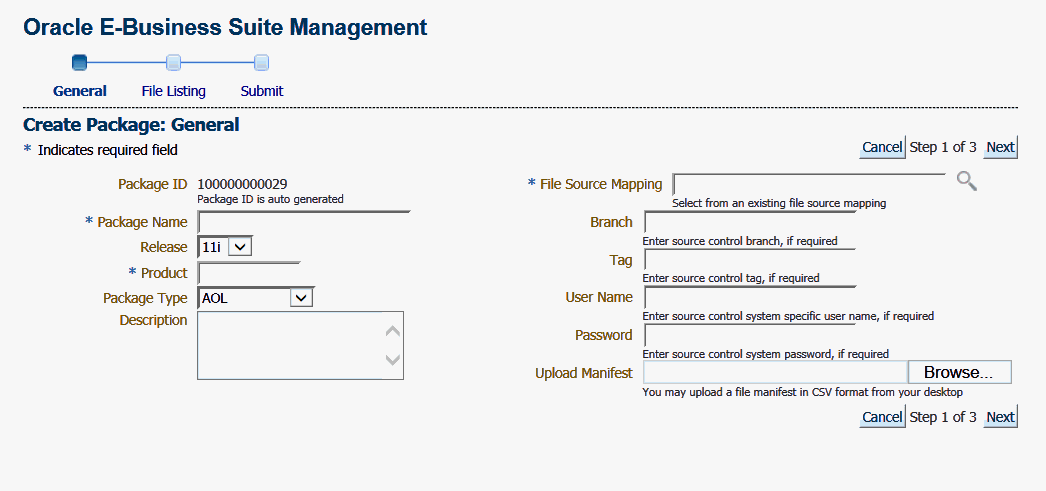
Enter values for the fields listed in the following table:
| Name | Description |
|---|---|
| Package ID | An auto-generated unique number. |
| Package Name | Enter a user-friendly name for the package. |
| Release | Select 11i for Release 11i (or) R12 for Release 12.0, Release 12.1, and Release 12.2. |
| Product | Enter the owning product application. This can be a seeded Oracle product or a custom product registered in Oracle E-Business Suite. |
| Package Type | Enter the package type. This value is for your own classification and convenience for searching and cataloging. No validation is performed on this field. |
| Description | Enter a description for your reference. This description becomes part of the package readme. |
| File Source Mapping | Select the File Source Mapping for this package from the list of previously-defined mappings. |
| Branch | Enter the branch for the source control system, if required. The branch will be substituted for the %branch% token within your checkout command. |
| Tag | Enter the tag for the source control system, if required. The tag will be substituted for the %tag% token within your checkout command. |
| User Name | Enter the user name to connect to the source control system, if required. The User Name will be substituted in the "%user_name%" parameter of the checkout command. |
| Password | Enter the password to connect to the source control system, if required. The password entered here would be substituted for the %password% token within your checkout command. |
| Upload Manifest | If you have a file manifest in a comma-separated value (CSV) format on your computer, you can upload it here. Refer to the section: Sample Manifest. |
Click Next to provide the list of files to be included in the package. You may add or remove file entries manually from the File Listing page. Alternatively, you may also include file entries from the File Metadata Repository using the Include Files button. Each file included in a customization package should have an Oracle-compliant source header present within the file. See: Source Header inside Custom Files.
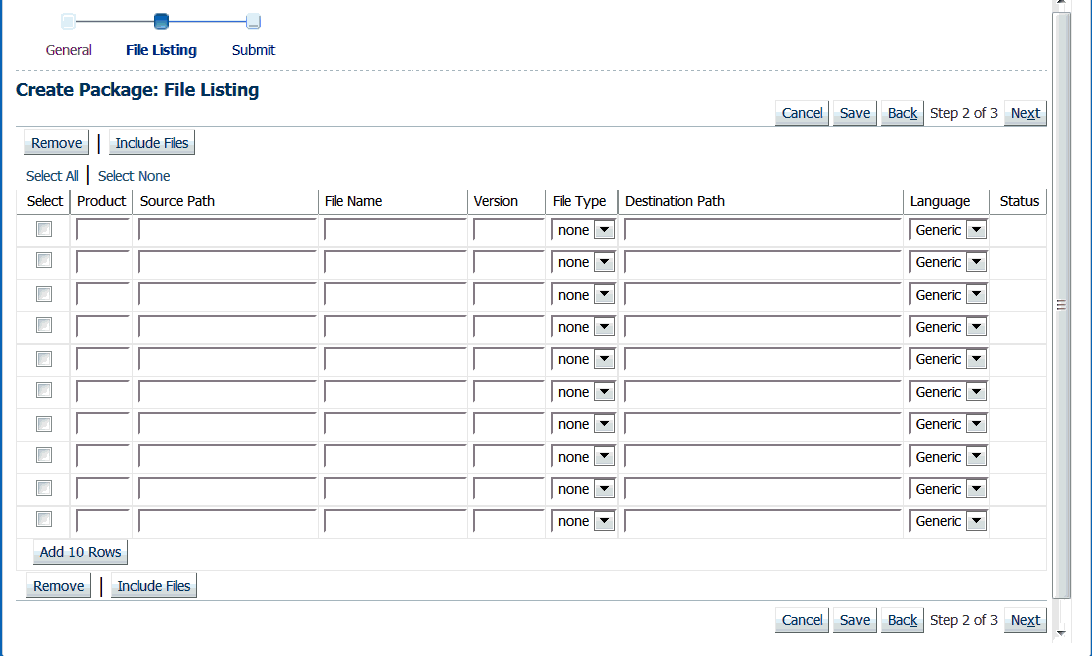
For each file, enter the details listed in the following table:
| Name | Description |
|---|---|
| Product | The owning product application. This can be a seeded Oracle product or a custom product registered in Oracle E-Business Suite (not in Customization Manager). This would be substituted in the "%product_code%" parameter in the checkout command. |
| Source Path | The source directory for the file on the source control system. This would be substituted in the "%file_path%" parameter in the checkout command. |
| File Name | The name of the file. This would be substituted in the "%file_name%" parameter in the checkout command. |
| Version (Optional) | The version of the file. The version is only needed if the checkout command will use the version information. This would be substituted to the "%version%" parameter in the checkout command. |
| File Type | The type of the file. Ensure that correct type is selected for the file entry. The Oracle Applications DBA (AD) patch driver instructions are based on the type selected. For details, please refer to the appendix Supported File Types in Customization Manager. |
| Destination Path | The destination path for the file in the Oracle E-Business Suite instance excluding the language subdirectory and relative path from the product top. For common file types, a default destination path is provided automatically but this default value can be overridden. The destination path must be an AD-compliant destination path according to Oracle E-Business Suite standards. The destination path in the patch driver is automatically suffixed with the language code chosen with exception to "Generic". Note: For "Generic" files, ensure that the destination path is entered correctly: For example, Product: XXCO Source Path: forms/US File Name: IDC.fmb Destination Path: forms Language: US The final destination path is "forms/US" but the values are entered separately. |
| Language (Optional) | The language code for the file. Select the language code as needed to generate the respective NLS patch. |
| Status | The status can be one of the following:
|
Click Next. Enter additional information for your package, as described in the following table:
| Name | Description |
|---|---|
| E-Business Suite information (Conditionally required) | The E-Business Suite mapping information is required only when the package contains at least one Java or PLD file. You can select the Oracle E-Business Suite Mapping from the list of previously-defined mappings. See: E-Business Suite Mapping. |
| Package Metadata | Enter the instructions for package application here. These instructions will become part of the package readme. |
| Comments | These comments will be recorded as part of the package history for tracking changes made to the package. |
| Prerequisite Information | For Release 11i packages, you can enter one or more prerequisite patch numbers that can be used for deployment validation with AD utilities and Patch Manager. For Release 12 (and higher) packages, enter in the prerequisite patch numbers that will be used in validation only when the package is deployed through Patch Manager. Note that this validation is done only if you use the Check Prerequisites button in the Patch Details page when creating a patch run in Patch Manager. |
| Mailing List | You can enter e-mail addresses for people who should be sent notifications about the package's creation status on the event of success or failure. It is recommended to have e-mail notifications set so that the appropriate users can be notified about the package success or failure. |
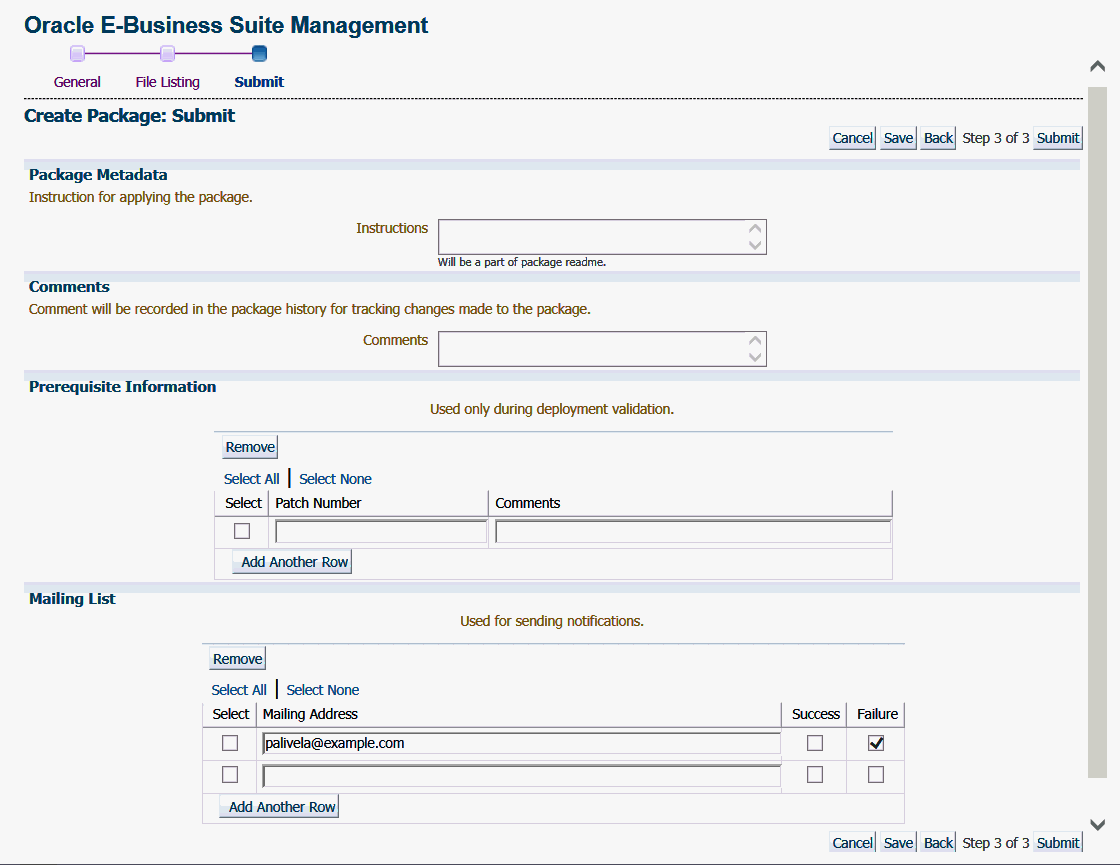
Click Submit to complete the package creation.
Sample Manifest
#Product,SourcePath,FileName,Version,Type,DestPath,LangCode
xxco,java\r12\reporter\cpserver,XXCOCustomCp.java,115.1,java,java
/r12/reporter/cpserver,Generic
xxco,patch\115\import,XXCOConcprog.ldt,115.9,software
ldt,patch/115/import,US
xxco,patch\115\import,XXCOMenu.ldt,,software
ldt,patch/115/import,US
xxco,patch\115\import,XXCOReqGroup.ldt,115.3,software
ldt,patch/115/import,US
xxco,patch\115\import,XXCOResp.ldt,115.7,software
ldt,patch/115/import,US
xxco,patch\115\import,XXCOUser.ldt,115.6,software
ldt,patch/115/import,US
xxco,forms,XXCOFRM.fmb,,fmb,forms,US
Automatic File Driver File Generation and Update
A file driver file is a master file for adpatch to identify valid Oracle E-Business Suite files for a given product (including a custom product). It is required to have an entry within the file driver file for selected file types like forms, reports, and so on. If not, then the following error is thrown during patching: "File in patch is not a known Oracle Applications file". Customization Manager takes care of this file driver file requirement automatically. Customization Manager implicitly generates a file driver file for the relevant files in a package. During deployment with Patch Manager, these entries are automatically added to the custom product master file driver file. In case a user applies a patch manually with adpatch, he or she can run updateFileDriver.pl within the <package>/meta-inf folder before invoking adpatch.
Note that if you get the error "File in patch is not a known Oracle Applications file" while applying a custom patch built with Customization Manager, then it could be due to a missing entry in file driver file for the custom product for one or more custom files.
The file driver file for a custom product is located under:
$<custom_product_top>/admin/driver/<custom_product_short_name>file.drv
For example, if XXCO is the custom product, then you can find the file driver file under
$XXCO_TOP/admin/driver/xxcofile.drv
All custom files would require an entry in the respective file driver file depending on the custom product to which they belong, EXCEPT files which have destination path beginning with any of the following:
-
admin
-
sql
-
mds
-
lib
-
patch
-
help
-
def
as well as any java file under destination path beginning with "java".
The usual format for an entry into the file driver file is:
<product> <subdirectory> <filename>
Sample entries are as below:
xxco admin/sql XXCONLADD.sql
xxco forms/<LANG> XXCOFORM.fmb
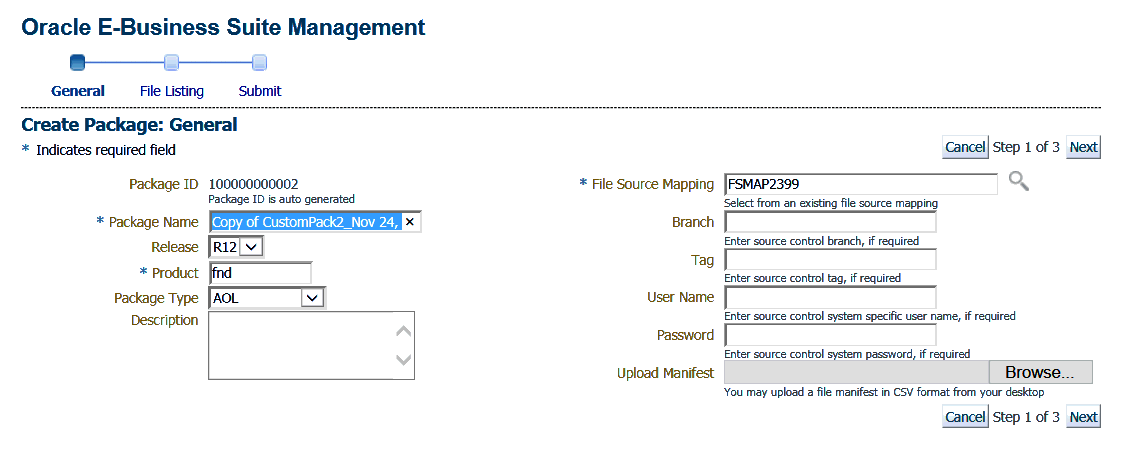
Create a package using the Create Like option
Customization Manager allows you to create a package by copying the details from an existing package.
From the Customization Manager home page, select the package to copy and click Create Like.
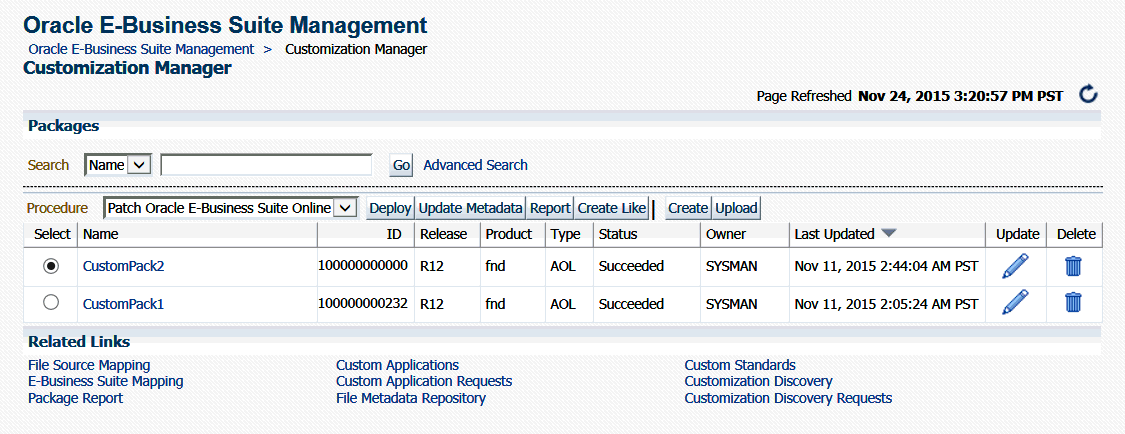
This procedure is used typically to create a mirror copy of the package or create another package with minor modifications without having to enter all the relevant details about the package.
Create a package using the Upload option
If, before using Customization Manager, you created a custom patch which is on a desktop or any other location, or even another EM instance, you can use the Upload option to upload that custom patch. In case you have multiple Enterprise Manager instances, you can download the custom patch from one EM instance and upload it to another EM instance. To download the custom patch from an EM instance, navigate to the View Packages UI of Customization Manager and download the patch from the Patch Downloads section. You can stage these downloaded patches in a temporary location and upload them to another EM instance.
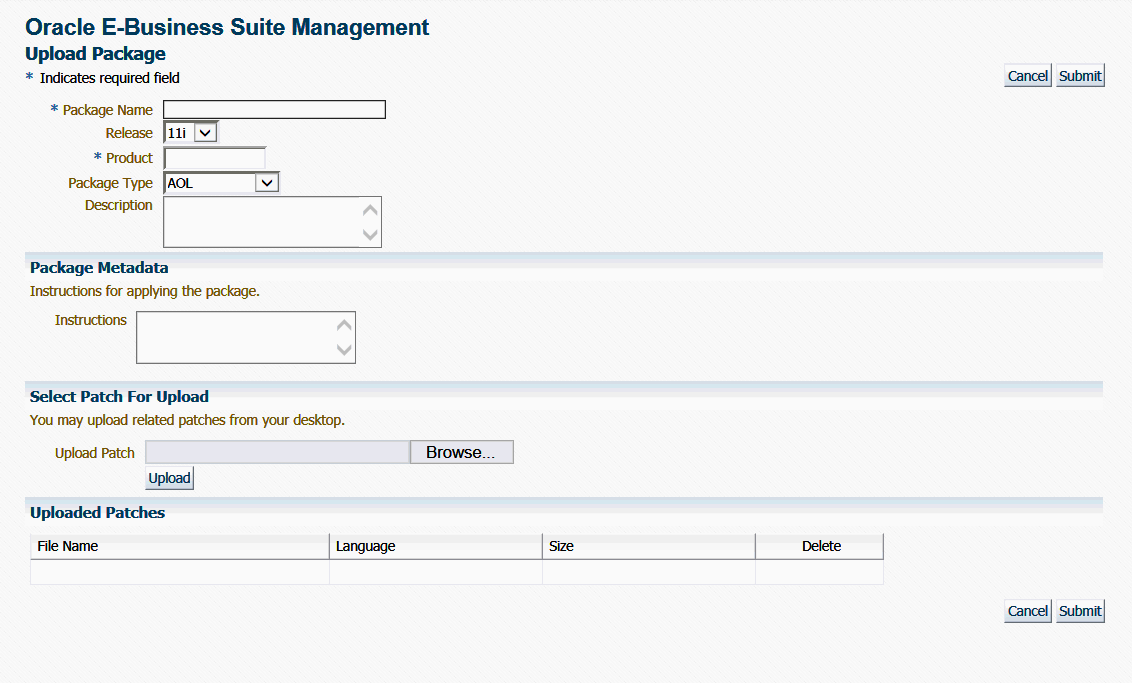
While uploading a custom patch, the following information is required:
-
Package Name
-
Release to which the custom patch belongs
-
Custom product/application associated with the custom patch
-
Package type: only for classification purposes
-
Description for your reference
-
Any specific instructions for applying the custom patch
You can upload one or more custom patches (NLS patches) to this customization package. However, it is important that all of them must be associated with the same unique patch number. Clicking the Submit button creates a customization package with the status "Succeeded". This customization package can now be deployed just like any other customization package and can be "Released" or "Obsoleted", when required.
Note: Reporting and update capabilities are not available for the uploaded packages.
Search for packages
You can perform an Advanced Search for packages with the following criteria:
-
Name
-
ID
-
Product
-
Instruction Contains
-
Prerequisite Patch
-
Description Contains
-
Owner
-
Release
-
Package Type
-
Standards Check Results
-
Status
-
Language
-
Public (Choose whether you want results with only Public packages, no Public packages, or either)
-
Contains File
-
Contains File with Version (Used in conjunction with "Contains File")
-
Updated within (Days)
-
File Source Mapping Name
-
Branch
-
Tag
-
E-Business Suite Mapping Name
-
Last Updated By
View a package
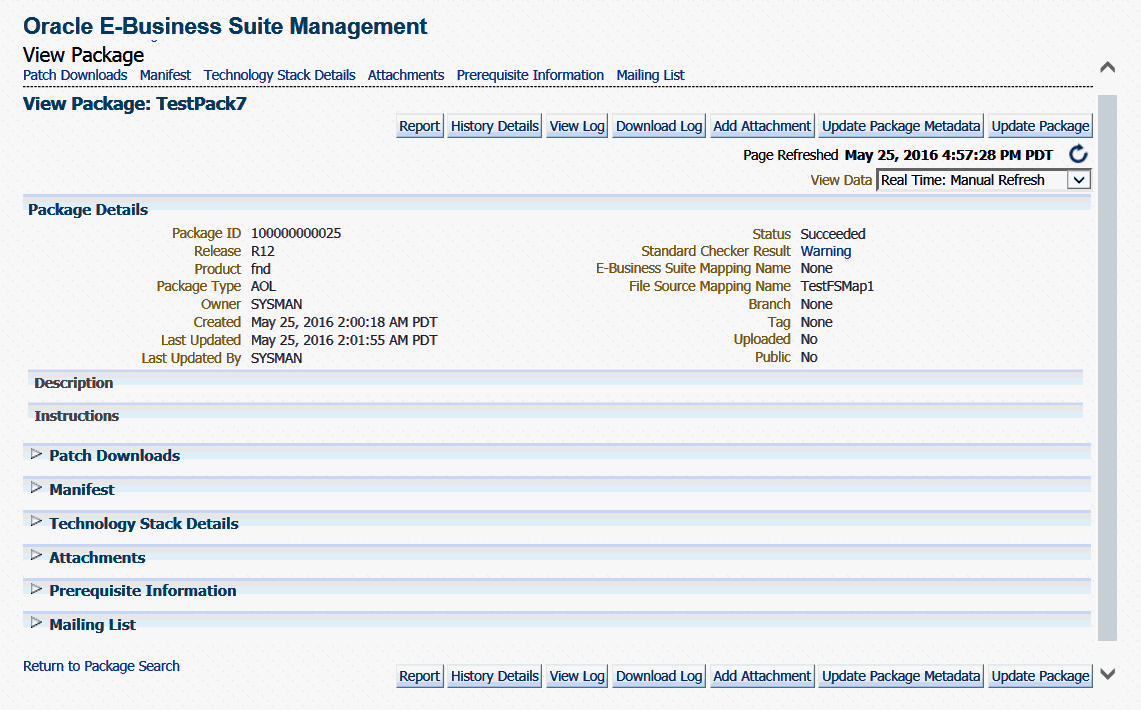
View package details by selecting its name in the search results table on the main Customization Manager page.
Package Details
The Package Details region includes the following:
-
Package ID
-
Release
-
Product
-
Package Type
-
Owner
-
Created - The date and time the package was created.
-
Last Updated - The date and time the package was last updated.
-
Last Updated By - The user who last updated the package.
-
Status - The status of the package. Possible values are: In Progress, Succeeded, Saved, Failed, Released, and Obsoleted.
-
Standard Checker Result - If applicable. Click on the link for detailed results.
-
E-Business Suite Mapping Name - If applicable.
-
File Source Mapping Name
-
Branch
-
Tag
-
Uploaded - Whether this package was created as a result of a patch upload.
-
Public - Whether this package is shared across all users.
Description
Any description entered for the package is shown here.
Instructions
Instructions entered in the Package Metadata field are shown here.
Patch Downloads
For each patch generated, the following information is shown here:
-
File Name - Click on the patch file name link to download the patch.
-
Language - The language of the patch.
-
Size - The size of the patch.
-
Readme - Click on the icon to download the readme. The readme file is in HTML format and includes the package description and package metadata.
Typically, each customization package could be associated with one or more language patches.
Manifest
The file manifest is shown here. Details for each file include Product, Source Path, File Name, Destination Path, Version, File Type, Language, and Last Updated timestamp.
Use the Download Manifest button to download the manifest as a comma-separated values (CSV) file, viewable in Microsoft Excel.
You can search for a specific file by entering in the file name in the "Locate File" field and clicking Go. Wildcard characters “%” and “*” are supported here.
Technology Stack Details
The Technology Stack Details for a package provide a snapshot of the technology stack properties for the Oracle E-Business Suite instance where the package was compiled. You can first check Technology Stack compatibility yourself by running "Instance Comparison" reports.
Attachments
You may add or remove any associated documentation like project plan, design documents, and so on. For each attachment, the following is listed:
-
File Name
-
Description
-
Last Updated timestamp
You can remove an attachment from the package using the Delete icon. If the package is Released or Obsoleted, then the attachments cannot be deleted.
Prerequisite Information
Any prerequisite patches are listed here along with any comments.
Mailing List
View the e-mail addresses for people who should be sent notifications about the package, on the event of success or failure.
Report
Use the Report button to create a report on the package. See: Reporting.
History Details (View Package History)
The package history provides a chronological view of all the important events in the lifecycle of a package.

From the View Package Details page, click on the History Details button to go to the View Package History page. This page provides high-level history tracking of the package, including the timestamp and user-entered comments for the following events:
-
Creation of package
-
Update of package
-
Release of package
You can also drill down to the Oracle Enterprise job details for the package creation and any updates.
View Log
Use the View Log button to view the most recent Oracle Enterprise Manager job details for the package.
Download Log
Use the Download Log button to download the consolidated log for the package creation. For Release 12.1.0.3.0 and later, this log is in HTML format. For the packages created with Release 12.1.0.2.0, this log is in .txt format.
Update a package
To update a package, find the package listing in the main Customization Manager page and select the icon in the Update column. Alternatively, use the Update Package button on the View Package page. For details of each field that can be updated, refer to Create a package.
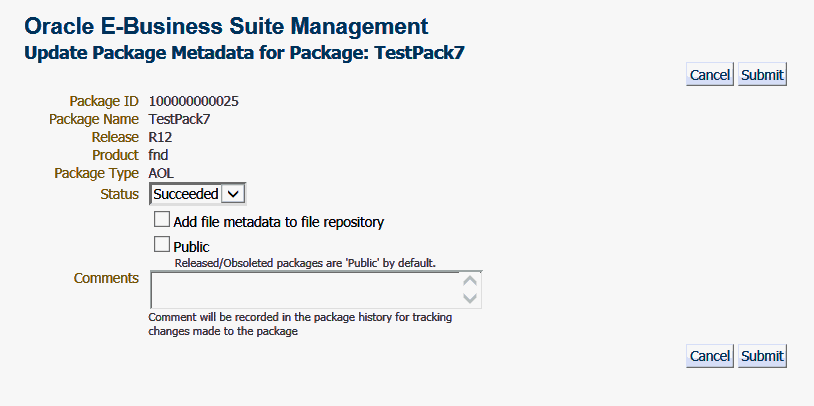
Update package metadata
Package metadata can be updated to change the status of the package or to push the file entries metadata in the package to the File Metadata Repository. Using the Update Package Metadata page, you can make the updates described in the following table:
| Name | Description |
|---|---|
| Status | You can release or obsolete a package by changing its status to "Released" or "Obsoleted". Once a package is updated to the "Released" status, it cannot be updated and it becomes accessible to other users. Once a package is moved to the "Obsoleted" status, it is no longer updatable or deployable. Note: With the Change Approval Framework, once an approver approves a request from a user to release/obsolete a customization package, the package is released/obsoleted. The user does not need to release/obsolete the package explicitly after the approval. Tip: Add comments for future reference when you release or obsolete a package. For example, state the reason why you obsolete a package. |
| Add file metadata to file repository | Add file metadata entries to the File Metadata Repository. |
| Public | If you are the owner of the package or a super administrator, you can mark the package as "Public" which enables the package to be shared across all users to view or update. |
| Comments | Add comments which are recorded in the package history for the above changes. |
Save the package
If, in the process of creating or updating a package definition, you want to save the package definition before submitting a request to have Enterprise Manager actually build the package, click the Save button on the File Listing page or the Submit page of the Create/Update process. Your package definition will be saved and it will appear on the main Customization Manager page with a status of Saved.
Release the package
Use the Update Package Metadata page to release a package. After a package is released, it is implicitly shared with other users to view and deploy. See: Update package metadata.
Note: With the Change Approval Framework, if an approval hierarchy exists for "release package" and all the approvers at the different levels approve a request to release a customization package, then the package is released. The user does not need to release the package explicitly after the approval. If an approval hierarchy does not exist, the request will follow a single level of approval mechanism.
Before you deploy a custom package using Patch Manager, it is recommended to run the Instance Comparison Report to compare the technology stack properties of the package with those of the instance to which the package is being deployed. Patch Manager does not stop the deployment of a patch if the technology stack properties are not compatible, so you should make your best judgment based on the Instance Comparison Reports. See: Reporting.
EM CLI Commands for Custom Package Creation
You can create custom packages using the Enterprise Manager command-line interface (EM CLI).
The following command is used to create a package:
emcli ebs_cm_package -action=createPatch -input_file=properties_file:<path to the input properties file>
The command to get the status of the creation of a package is:
emcli ebs_cm_package -action=getStatus -patch=number
The command to download a patch is:
emcli ebs_cm_package -action=downloadPatch -patch=number -host=name -directory=path
The command to download the log file of the creation of a package is:
emcli ebs_cm_package -action=downloadLog -patch=number -host=name -directory=path
The following table describes values for the input properties file.
| Parameters | Sample Values | Comments |
|---|---|---|
| RELEASE | 11i/R12 | Includes 12.2 Online Patches. |
| PRODUCT | Like xxco/fnd | Any Oracle shipped standard product (or) custom product |
| FILE_MANIFEST_CSV | /home/userabc/manifest.csv | Manifest in csv format. Details below. |
| FILE_SOURCE_ZIP | /home/userabc/source.zip | Details below. |
| FSM_HOST_NAME | dummy.example.com | A valid host where the files manifest.csv and source.zip are staged. |
| ESM_INSTANCE_NAME | ut121S-Oracle E-Business Suite |
|
| DESCRIPTION | Test Patch | Description for reference. |
| INSTRUCTION | For UAT | Any instruction for patch deployment |
| PREREQ_PATCHES | 100000000058;100000000060 | List of semicolon separated prerequisite patches |
| MAILING_LIST | abc@example.com | List of semicolon separated email IDs |
The value of command parameter -host=nameand the value of input.properties parameter FSM_HOST_NAME and ESM_INSTANCE_NAME should all be a valid target which are already discovered in Enterprise Manager.
The following is a sample input properties file for package creation:
RELEASE=R12
PRODUCT=xxco
FILE_MANIFEST_CSV=/home/oracle/OPC/manifest.csv
FILE_SOURCE_ZIP=/home/oracle/OPC/source.zip
FSM_HOST_NAME=dummy.example.com
ESM_INSTANCE_NAME=ut121S-Oracle E-Business Suite
DESCRIPTION=Test Desc
INSTRUCTION=Test Instruction
PREREQ_PATCHES=100000000058;100000000060
EMAIL_LIST=abc@example.com
The following table describes the manifest file.
| CSV Fields | Comments |
|---|---|
| Product | Any Oracle shipped standard product (or) custom product |
| Path |
|
| Language | Generic/US/KO/AR etc |
| Filename | Filename with extension |
| Filetype |
|
A sample manifest file for upload is:
xxco,xxco/oracle/apps/fnd/demo,Generic,Hello.java,OAF Component
fnd,java/demo,Generic,Hello.java,java
fnd,patch/115/import,Generic,afsvcct.lct,lct
fnd,patch/115/import,US,afsvcct.lct,lct
fnd,patch/115/import,KO,afsvcct.lct,lc
For each file entry in the manifest CSV, we expect <file> to be present under <prod>/<path>/<lang> within <source.zip>.
A sample structure of the source.zip file is:
fnd/patch/115/import/afsvcct.lct
fnd/patch/115/import/US/afsvcct.lct
fnd/patch/115/import/KO/afsvcct.lct
fnd/java/demo/Hello.java
xxco/xxco/oracle/apps/fnd/demo/Hello.java
Sample Commands
A sample command to submit a request for patch creation:
$EMCLI_HOME/emcli ebs_cm_package -action=createPatch -input_file=properties_file:/home/userabc/input.properties

Patch ID: 100000000064
Procedure Execution ID: 2BCD973D6186A475E050D20A7F16047E
emcli execution completed.
A sample command to check the status of a patch creation request:
$EMCLI_HOME/emcli ebs_cm_package -action=getStatus -patch=100000000064
Status: Succeeded
emcli execution completed.
A sample command to download the patch zip file once a request completes:
$EMCLI_HOME/emcli ebs_cm_package -action=downloadPatch -host=dummy.example.com -directory=/home/userabc -patch=100000000064
Writing file:/home/userabc/p100000000064_Generic.zipon the host:dummy.example.com
Writing file:/home/userabc/p100000000064_KO.zipon the host:dummy.example.com
emcli execution completed.
A sample command to download the request log to analyze patch creation failure:
$EMCLI_HOME/emcli ebs_cm_package -action=downloadLog -host=dummy.example.com -directory=/home/userabc -patch=100000000064
Writing file:/home/userabc/2BCD973D6186A475E050D20A7F16047E.zip on the host:dummy.example.com
emcli execution completed.
Maintaining the File Metadata Repository
The File Metadata Repository stores metadata information on each file. It can be used as a cataloging repository for all custom files within your enterprise. The File Metadata Repository is also aware of the objects within the custom files. This capability typically applies to SQL scripts and PL/SQL packages where the objects are tables, indexes, sequences, views, and so on.
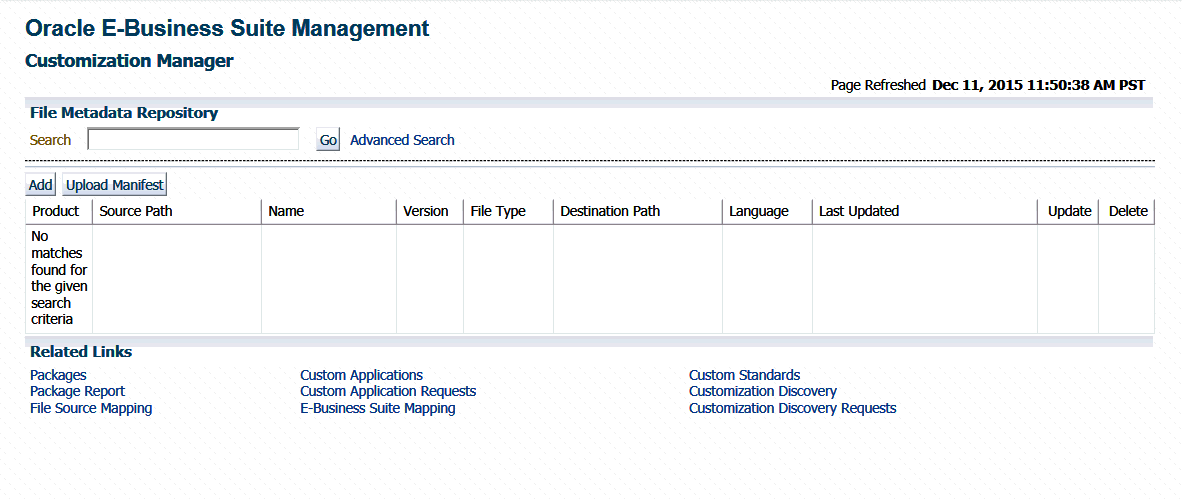
The system can parse and discover objects within custom files when added to the File Metadata Repository. This can be initiated from the Update Package Metadata page by clicking the box "Add file metadata to file repository". See also: Update Package Metadata.
Examples of custom objects include:
-
Tables
-
Views
-
Mviews and Mview logs
-
Triggers
-
PL/SQL package names
-
Indexes
You can view and updates objects populated for a given file. You can also search for files containing specified objects and include them during package creation or update.
Search capabilities are limited to:
-
PL/SQL spec and body (all formats)
-
SQL files
-
Oracle Application Framework XML files
-
XDF
Adding File Details to the File Metadata Repository
The information on a file can be uploaded to the repository in one of three ways:
-
By uploading a package's file manifest in CSV format to the repository.
-
By adding metadata for an individual file manually to the repository.
-
By updating the metadata for a file already in the repository.
You can add metadata to the repository using the "Add file metadata to file repository" option in the Update Package Metadata page. See: Update Package Metadata.
The File Metadata Repository can be accessed from its link under Related Links.
You can search for a file by entering the filename in the Search field on the main File Metadata Repository page. Alternatively, use Advanced Search to search for its file using one or more of the following: Filename, Product, Language, Source Path, Destination Path, Version, File Type, or Object Name.
Also, during the package create/update flow, you can search for files or files referring to objects within the file metadata repository using the Include Files button.
Upload a file manifest
-
Select the Upload Manifest button from the main File Metadata Repository page.
-
Select your file manifest file using the Browse button for the File Manifest field.
-
Optionally add a description.
-
Click Submit.
Add details for an individual file
-
Click on the Add button from the main File Metadata Repository page.
-
Enter the name of the file.
-
Enter the product to which the file belongs.
-
Enter its source path.
-
Enter the version of the file.
-
Select the file type from the list provided.
-
Enter the destination path.
-
Enter the language for the file.
-
Optionally enter a description.
-
Click Submit.
Updating the Metadata for a File Already in the File Metadata Repository
-
Select the Update icon for the file in the Search results table in the main File Metadata Repository page.
-
Update the file name, file type, version, product, source path, destination path, language, and/or description as desired.
-
Click Submit.
You can associate one or more customization objects to a given file in the Related Objects region. For instance, a PLS file might be associated with a PL/SQL procedure name as one of the objects. You might update a given file entry to associate one or more customization objects to it. This capability allows you to catalog and later search for customization objects using the Advanced Search option within the File Metadata Repository. However, there are currently no validation checks built into the system that use this information during package creation or deployment.
Reporting
Customization Manager offers powerful reporting capabilities to help you document, compare and track your customizations. You can generate three types of reports on packages:
-
A Standard report gives you details on a single package, including technology stack requirements and the file manifest. You might use this to document customizations.
-
A Comparison report allows you to compare two packages. For example, you might want to compare their technology stack snapshots or the versions of the files included in the packages.
-
An Instance Comparison report allows you to compare the details of the package with that of an actual Oracle E-Business Suite instance. The details which are compared include custom application, file driver file entries, file manifest and versions, and the technology stack snapshot of a package to the technology stack properties of a given instance. By doing this comparison you can determine possible compatibility issues of the package with the instance and assess the possible impact/possible issues before actually applying the patch.
Important: Oracle strongly recommends that you generate an Instance Comparison report for each custom package and the instance where it is intended to be deployed to identify any technology stack incompatibilities before actually applying the patch. Reports can be accessed from the Package Report link under Related Links for Customization Manager.
Creating a Report
To create a report, use one of the following navigation paths:
-
Select a package from the Package Search results page and click Report.
-
Click the Report button on the View Package page.
-
Click the Create button on the Package Report page.
Create a standard report
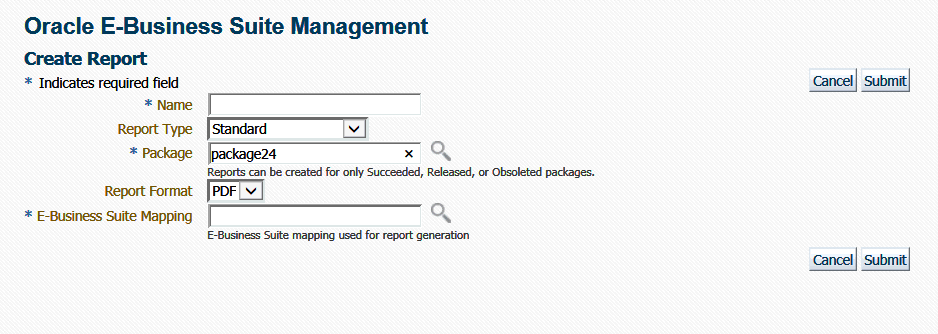
A Standard report gives you details on a single package, including technology stack requirements and the file manifest.
-
Enter in a user-friendly name for your report.
-
Choose Standard for the Report Type.
-
Enter the package you want the report to be based on in the Package field. This package must have the status of Succeeded, Released, or Obsoleted.
-
Enter the Report Format. Options are:
-
PDF (Portable Document Format)
-
RTF (Rich Text Format)
-
XLS (Microsoft Excel format)
-
-
Enter the Oracle E-Business Suite Mapping to be used for the report generation.
-
Click Submit.
Create a comparison report
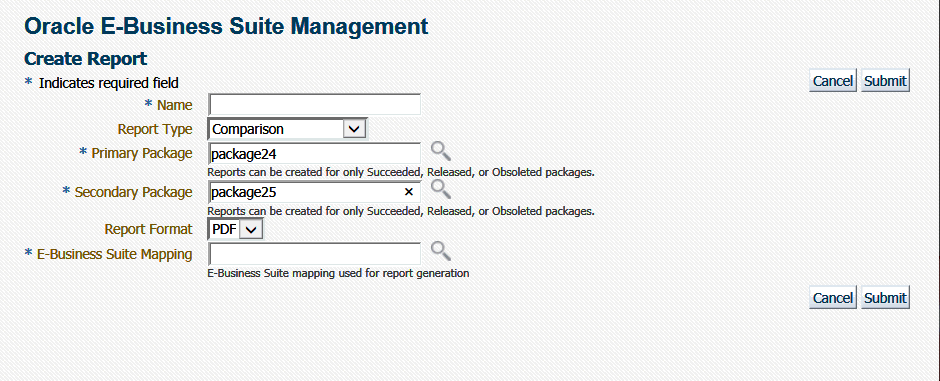
A Comparison report allows you to compare two packages. For example, you might want to compare technology stack requirements or versions of the files included in the packages.
-
Enter in a user-friendly name for your report.
-
Choose Comparison for the Report Type.
-
Enter the package name in the Primary Package field. This package must have the status of Succeeded, Released, or Obsoleted.
-
Enter the package name in the Secondary Package field. This package must have the status of Succeeded, Released, or Obsoleted.
-
Enter the Report Format. Options are:
-
PDF (Portable Document Format)
-
RTF (Rich Text Format)
-
XLS (Microsoft Excel format)
-
-
Enter the Oracle E-Business Suite Mapping to be used for the report generation. Please note that this instance would be only used to publish the report using BI Publisher.
-
Click Submit.
Create an instance comparison report
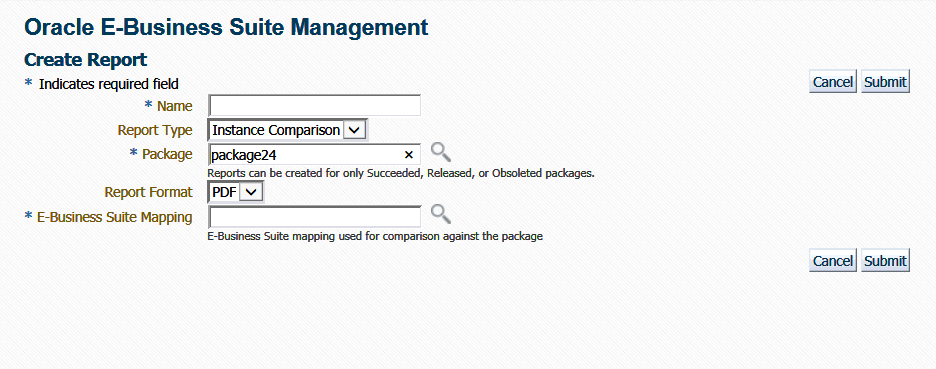
An Instance Comparison report allows you to compare the technology stack properties of a package to the technology stack properties of a given instance. By doing this comparison, you can tell if the package can be properly deployed on the instance. In addition, the report lists any missing entries in the file driver file, and compares files and versions within the package to those of the instance.
-
Enter in a user-friendly name for your report.
-
Choose Instance Comparison for the Report Type.
-
Enter the package you want the report to be based on in the Package field. This package must have the status of Succeeded, Released, or Obsoleted.
-
Enter the Report Format. Options are:
-
PDF (Portable Document Format)
-
RTF (Rich Text Format)
-
XLS (Microsoft Excel format)
-
-
Enter the Oracle E-Business Suite Mapping to be used for the report comparison. The Oracle E-Business Suite instance referred by this mapping would be the one which would be compared against the package. As a best practice, it is recommended to generate an instance comparison report for every instance where you intend to deploy the package, to identify any possible incompatibilities/issues before actually applying the package.
-
Click Submit.
Viewing a Report
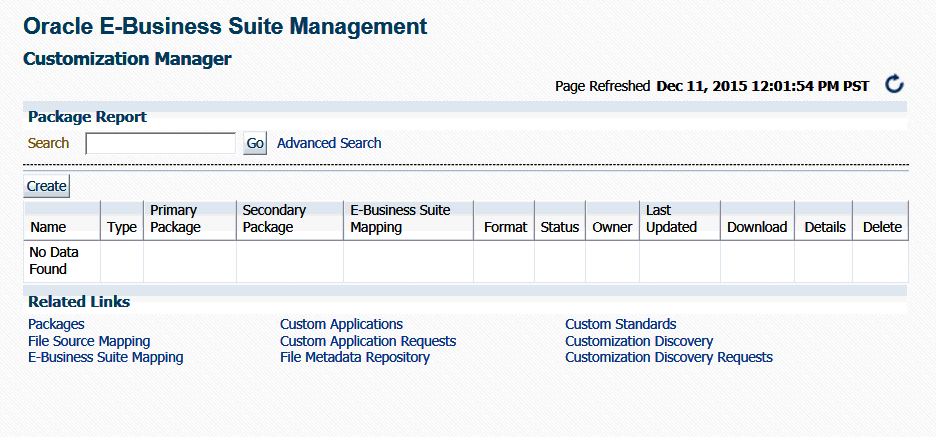
To access reports, navigate to the Customization Manager home page > Package Report (under Related Links).
In the Package Report search results table, the following is shown for each report:
-
Name - The name of the report.
-
Type - The type of the report; either Standard, Comparison, or Instance Comparison.
-
Primary Package - The primary package on which the report is based.
-
Secondary Package (if any) - For Comparison reports, the second package used in the comparison.
-
E-Business Suite Mapping - The E-Business Suite Mapping used in the report generation or comparison.
-
Format - The format of the report; either PDF, RTF, or XLS.
-
Status - The status of the report.
-
Owner - The user who created the report.
-
Last Updated - The Last Updated timestamp for the report.
-
Download - Click on the link provided to download a ZIP file containing the report.
-
Details - Click on the Details icon to view details on the report submission job. This link takes you to the Oracle Enterprise Manager Deployments Status page for the report submission.
-
Delete - Click on the Delete icon for the report to delete it.
Standard report output file
The Standard Report output file has three sections:
-
Package Details - Information pertaining to the package's definition.
-
Technology Stack Information - Properties and values of the technology stack of the instance mapped through the Oracle E-Business Suite Mapping for the package.
-
File Manifest - The listing of the files in the package. For each file, the following information is included: product, source path, name, version, language, and type.
Comparison report output file
The Comparison Report output file has three sections:
-
Package Details - Information pertaining to the packages' definitions.
-
Technology Stack Information - This section shows a comparison of the values of the two packages' technology stack details.
-
File Manifest - This section shows a comparison of the versions of each given file in the two packages.
Instance comparison report output file
The Instance Comparison Report output file has six sections:
-
Package Details - Information pertaining to the package's definition.
-
Oracle E-Business Suite Instance Information - Basic information for the instance used in the report comparison. Information includes name, patch level for Applications DBA (AD), patch level for Oracle Application Object Library (FND), and the database release information.
-
Missing custom products/applications.
-
Missing entries in file driver file.
-
File comparison to report missing files or version differences.
-
Technology Stack Details - For each given property, this table lists the value for the package and the value for the Oracle E-Business Suite instance, and how they compare to each other.
Searching for a Report
You can search for a report by its name on the main Package Report page, or use the Advanced Search link to search based on additional criteria, including:
-
E-Business Suite Mapping - The E-Business Suite mapping used for the report generation or comparison.
-
Primary Package - The primary package for the report.
-
Secondary Package - The secondary package, if any. The secondary package would be used in Comparison Reports.
-
Type - The type of report; either Standard, Comparison, or Instance Comparison.
-
Report Format - The format chosen for the report; either PDF, RTF, or XLS.
Customization Discovery
This feature is used to report the inventory of customizations present on a given Oracle E-Business Suite instance. Customization Discovery allows you to view inventory of customizations you have in a specific Oracle E-Business Suite environment. You can view the report by product, or all customizations; and you can export the report to a Microsoft Excel spreadsheet.
Customization Discovery currently allows you discover following customizations:
-
Discover customizations under $APPL_TOP.
-
Discover customizations under $JAVA_TOP.
-
Discover customizations for the following 15 database object types:
-
Regular Tables
-
Partitioned Tables
-
Index Organized Tables
-
Global Temporary Tables
-
Queued Tables
-
Views
-
Indexes
-
Sequences
-
Materialized Views
-
Materialized View Logs
-
Advanced Queues
-
Packages
-
Triggers
-
Types
-
Security Objects
-
-
Discover customized Oracle Application Object Library (FND) data for the following 18 entities:
-
Alerts
-
Concurrent Executables
-
Concurrent Programs
-
Descriptive Flexfields
-
Flexfield Value Sets
-
Forms
-
Functions
-
Grants
-
Menus
-
Messages
-
Print Styles
-
Printer Drivers
-
Printers
-
Profiles
-
Request Groups
-
Request Sets
-
Responsibilities
-
Users
-
-
Create and manage the File System Exclusion Rule List.
-
Create and manage the Database Exclusion Rule List.
-
Create and manage the Configuration Exclusion Rule List.
-
Discover customizations under $OA_HTML. (In this release you can view these customizations only in the CSV report.)
-
Discover database custom schemas. (In this release you can view these customizations only as part of the CSV report.)
You can manage your customization discovery requests from the Customization Discovery page available under Related Links for Customization Manager. From the new Customization Discovery dashboard, you should be able to perform the operations described below.
Submitting a Customization Discovery Request
Use the following steps to submit customization discovery request.
-
Navigate to Customization Discovery Request page. You can use one of the following navigation paths:
-
Select the Customization Discovery Requests link under Related Links on the Customization Manager home page.
-
Go to the Customization Discovery dashboard and select Customization Discovery Requests from the menu.
-
-
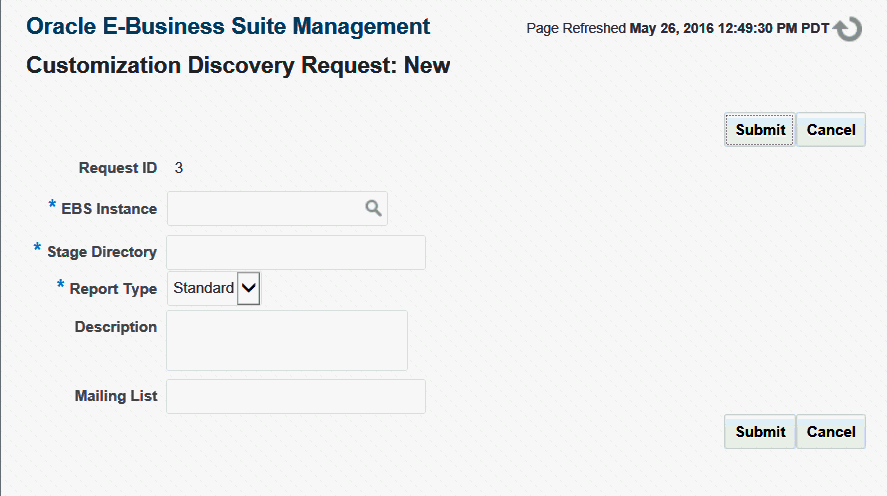
Click the New button.
-
Select an Oracle E-Business Suite instance using the LOV. You should have the Raise Customization Discovery Request privilege to raise a customization discovery request on the selected Oracle E-Business Suite instance.
-
Enter a valid stage directory on the given Oracle E-Business Suite instance.
-
Select a Report Type.
-
Standard: With this option, the downloadable compressed output file will contain only the CSV report files.
-
Debug: With this option, the downloadable compressed output file will contain the final CSV report files and as well as all the intermediate temporary files to debug any issues.
-
-
Enter a description.
-
Enter a mailing list separated by commas; this is used to send notifications on the request completion.
Tracking Request Status
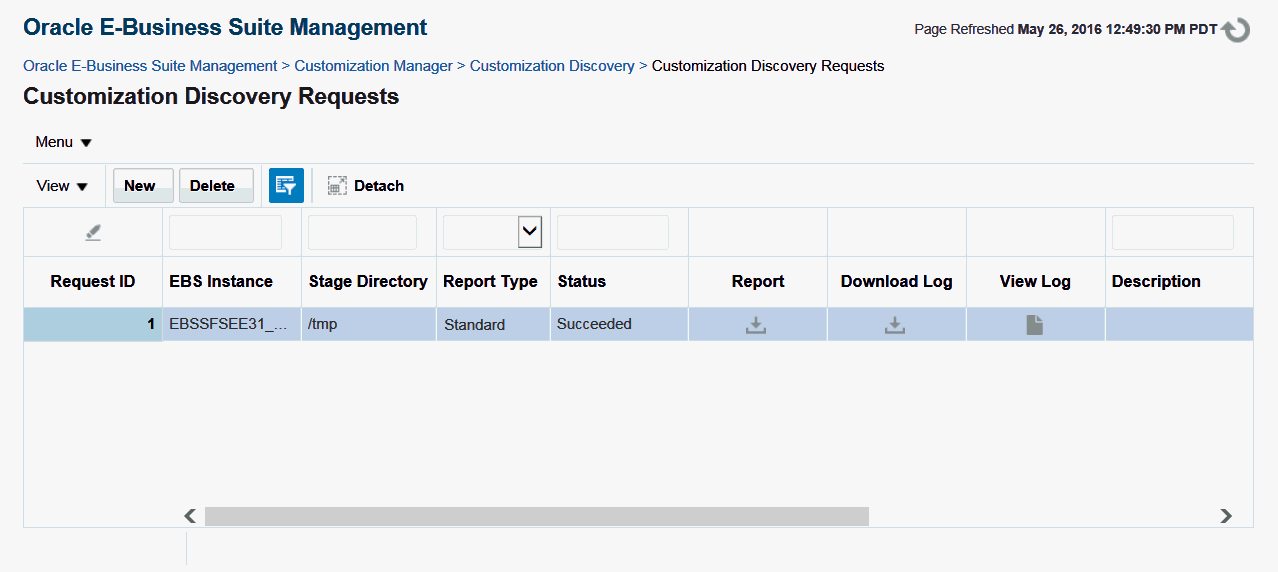
You can monitor only the requests submitted by you. The request will be in one of the following states:
-
Saved
-
In Progress
-
Succeeded
-
Failed
Deleting a Request
You can delete only the requests that are in a Succeeded or Failed state. The Delete action will purge all the reports associated with that request.
Viewing a Request Log
Once the request is in the In Progress state, a user can monitor the request progress through the EM Procedure Activity UI.
Downloading a Request Log
For Succeeded and Failed requests, you can download a consolidated log in HTML format.
Viewing Customization Details Offline
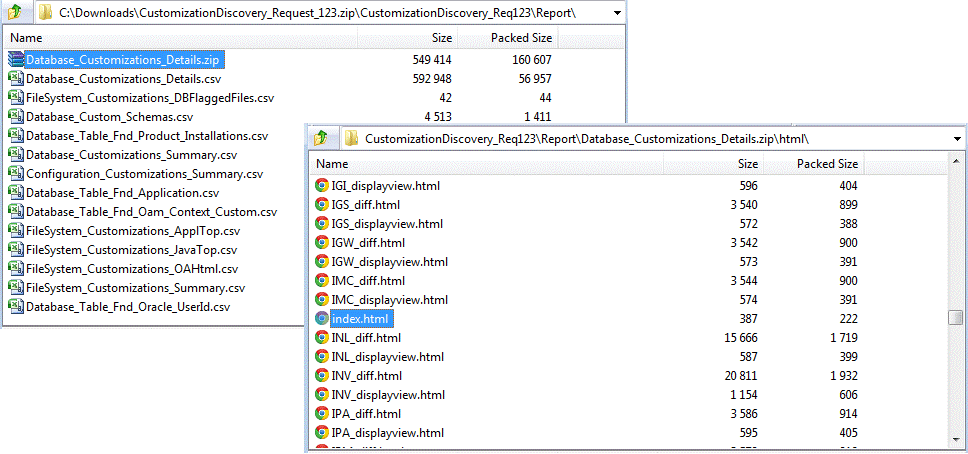
On successful completion of the request, you can download the report's compressed file to view the customization details offline in CSV/HTML format. A summary section and details about the discovered customization for each customization type are generated. For a failed request, you can download the compressed file to analyze the issue with the intermediate debug log files.
File System (ApplTop and JavaTop) Customization
The details listed below are included in the report:
-
Node/Hostname
-
Product
-
Sub Directory
-
File Name
-
File Size
-
File Last Modified Date
The Summary Report contains:
-
Total number of custom files per product
-
Total number of custom files per filetype
Database Customization
Baseline patches are needed for data model comparison. There is one patch for each release (11iMBL, 12.0.6, 12.1.3, and 12.2.4) for the standard copy Oracle database object definition XMLs. These patches need to be manually downloaded to the <OMSStageDir>/definition directory:
-
Patch 21387654 - PATCH FOR DATA MODEL COMPARISON (EBS RELEASE: 11IMBL)
-
Patch 21387658 - PATCH FOR DATA MODEL COMPARISON (EBS RELEASE: 12.0.6)
-
Patch 21387665 - PATCH FOR DATA MODEL COMPARISON (EBS RELEASE: 12.1.3)
-
Patch 21387666 - PATCH FOR DATA MODEL COMPARISON (EBS RELEASE: 12.2.4)
-
Patch 24308948 - PATCH FOR DATA MODEL COMPARISON (EBS RELEASE: 12.2.5)
The following table shows database object type, objects for each type and types of database object definition changes that are discovered during recognized discovery process.
| Discovered Object Type | Discovered Objects | Definition Changes Recognized During Discovery |
|---|---|---|
| Regular tables |
|
|
| Partitioned tables |
|
|
| Index organized tables |
|
|
| Global temporary tables |
|
|
| Queued tables |
|
|
| Views |
|
|
| Indexes |
|
|
| Sequences |
|
|
| Materialized views |
|
|
| Materialized view logs |
|
|
| Advanced queues |
|
|
| Packages |
|
|
| Triggers |
|
|
| Types |
|
|
| Security objects |
|
|
Note: In Oracle E-Business Suite Release 11i, IRC and AME products do not have their own product schemas but share with the PER schema. Therefore, objects in the PER schema that start with IRC or AME are considered to belong to the IRC or AME product.
Generally. the product ownership of an object is identified by the prefix of the object name. However, some products may have objects that start with different prefixes. The following table shows products and object prefix relationships.
| Product Short Name | Additional Prefixes |
|---|---|
| AR | HZ, OCM, RA, TAX |
| AP | OIE |
| AMS | AML |
| AMW | RCI |
| BOM | CST, CTO |
| CS | CSK, CSZ |
| EDW | EDW (from all product schema including the common schema, e.g. APPS) |
| FND | WF, UMX, FWK, OAM |
| INV | MTL |
| JTF | JTY, JTO, CAC, JTH, JTA |
| ONT | OE |
| OE | SO |
| PER | HR |
| PAY | PY |
| PO | RCV |
Configuration Customization
The details included are based on the entity.
Common For All Entities
-
Last Update Date
-
Owner
FND Entities
-
Alerts
-
Alert Name
-
Application Short Name
-
Description
-
-
Concurrent Executables
-
Application Short Name
-
Description
-
Executable Name
-
User Executable Name
-
-
Concurrent Programs
-
Application Short Name
-
Description
-
User Concurrent Program Name
-
-
Descriptive Flexfields
-
Application Short Name
-
Description
-
Descriptive Flexfield Name
-
-
Flexfield Value Sets
-
Description
-
Flexfield Value Set Name
-
-
Forms
-
Application Short Name
-
Description
-
User Form Name
-
-
Functions
-
Context Dependence
-
Description
-
Form References Form
-
Function Name
-
User Function Name
-
-
Grants
-
Ctx Resp App Short Name
-
Description
-
Grant Menu Name
-
Name
-
-
Menus
-
Description
-
User Menu Name
-
-
Messages
-
Application Short Name
-
Message Name
-
Message Text
-
-
Print Styles
-
Description
-
User Printer Style Name
-
-
Printer Drivers
-
Description
-
Printer Driver Name
-
-
Printers
-
Description
-
FP Type
-
Printer Name
-
-
Profiles
-
Application Short Name
-
Description
-
User Profile Option Name
-
-
Request Groups
-
Application Short Name
-
Description
-
Request Group Name
-
-
Request Sets
-
Concurrent Programming Name
-
Description
-
User Request Set Name
-
-
Responsibilities
-
Application Short Name
-
Description
-
Responsibility Name
-
-
Users
-
Description
-
User Name
-
The Summary Report contains:
-
Total number of customized data rows/entries per product
-
Total number of customized data rows/entries per entity
File System (OA_HTML) Customization
The inventory of the custom files under $OA_HTML are included only as a part of offline CSV reports. For each file, the below details are included in the report:
-
Node/Hostname
-
Product
-
Sub Directory
-
File Name
-
File Size
-
File Last Modified Date
Database Custom Schema
The following five CSV files are included as offline reports in this release. Only records in which application_id>=20000 are considered.
-
Database Custom Schemas
-
Application ID
-
Application Short Name
-
Oracle ID
-
Oracle Username
-
-
Database Table FND Application
-
Application ID
-
Application Short Name
-
Basepath
-
Product Code
-
Created By ID
-
Created By Name
-
Creation Date
-
Last Updated By ID
-
Last Updated By Name
-
Last Update Date
-
-
Database Table FND Product Installations
-
Application ID
-
Oracle ID
-
Product Version
-
Status
-
Industry
-
Tablespace
-
Index Tablespace
-
Temporary Tablespace
-
Sizing Factor
-
Install Group Num
-
DB Status
-
Patch Level
-
Created By ID
-
Created By Name
-
Creation Date
-
Last Updated By ID
-
Last Updated By Name
-
Last Update Date
-
-
Database Table FND Oracle User ID
-
Oracle ID
-
Oracle Username
-
Description
-
Enabled Flag
-
Read Only Flag
-
Install Group Num
-
Created By ID
-
Created By Name
-
Creation Date
-
Last Updated By ID
-
Last Updated By Name
-
Last Update Date
-
-
Database Table FND OAM Context Custom
-
OA Var
-
Ctx Type
-
OA Type
-
Name
-
Default Value
-
Title
-
Description
-
Viewing Customization Details Online
In the Customization Discovery dashboard, you can view the list of Oracle E-Business Suite instances on which the customization discovery request was completed successfully. Also, you can view the last successful discovered customization details online for each Oracle E-Business Suite instance. The summary is shown in the graphical format and the details are shown in the tabular format. You can filter the details based on the fields like customization type, node, product, file type, object type, and entity type. Optionally, you can choose to view only the Top-5 or Top-10 customizations for each customization type.
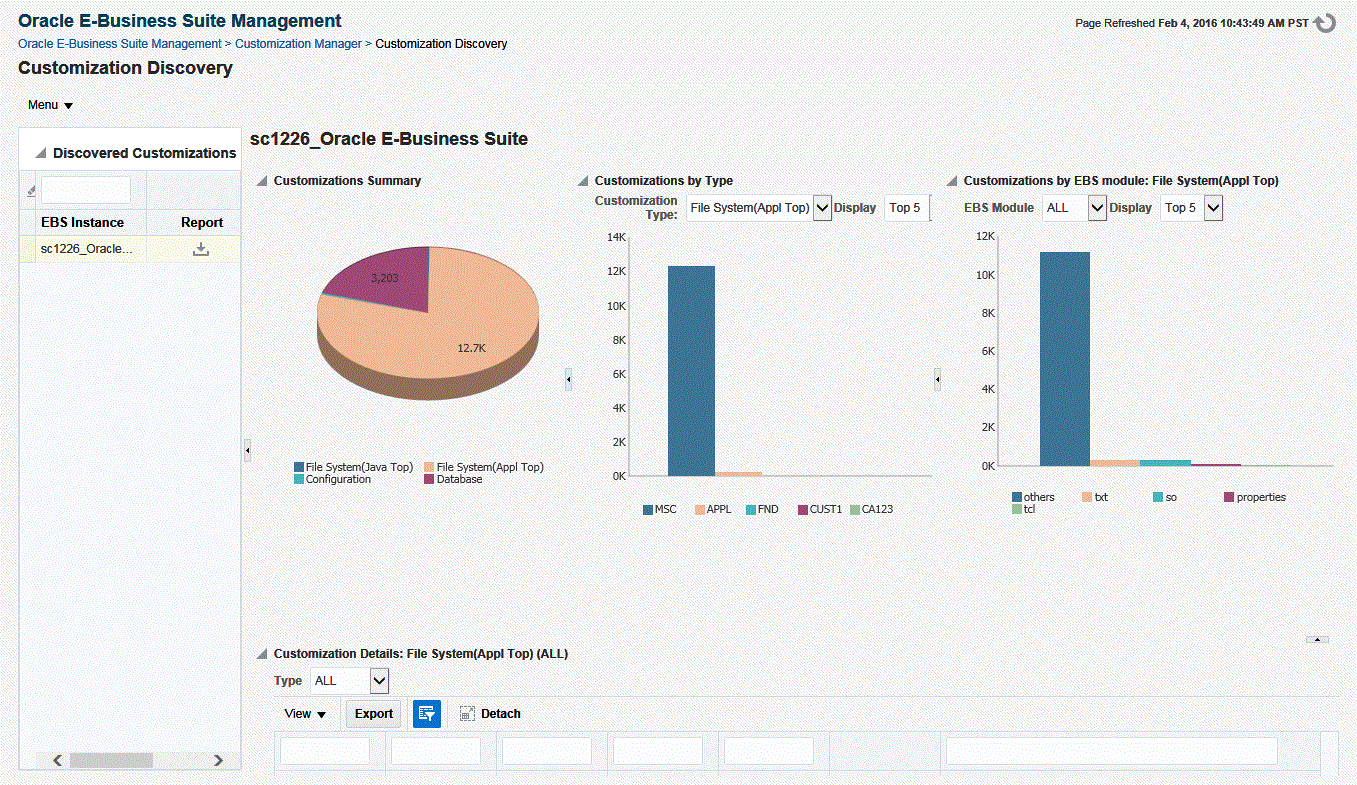
File System (Appl Top) Customization
-
Select the Oracle E-Business Suite instance in Discovered Customizations table.
-
Select Customization Type as "File System (Appl Top)".
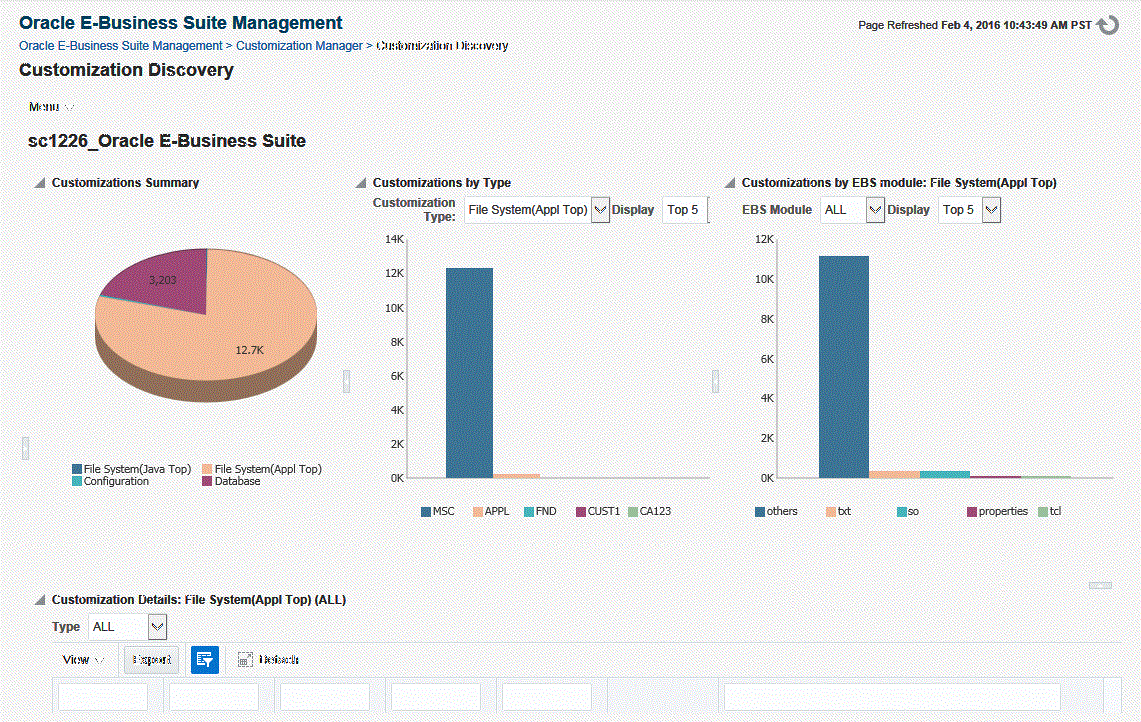
File System (Java Top) Customization
-
Select the Oracle E-Business Suite instance in Discovered Customizations table.
-
Select Customization Type as "File System (Java Top)".
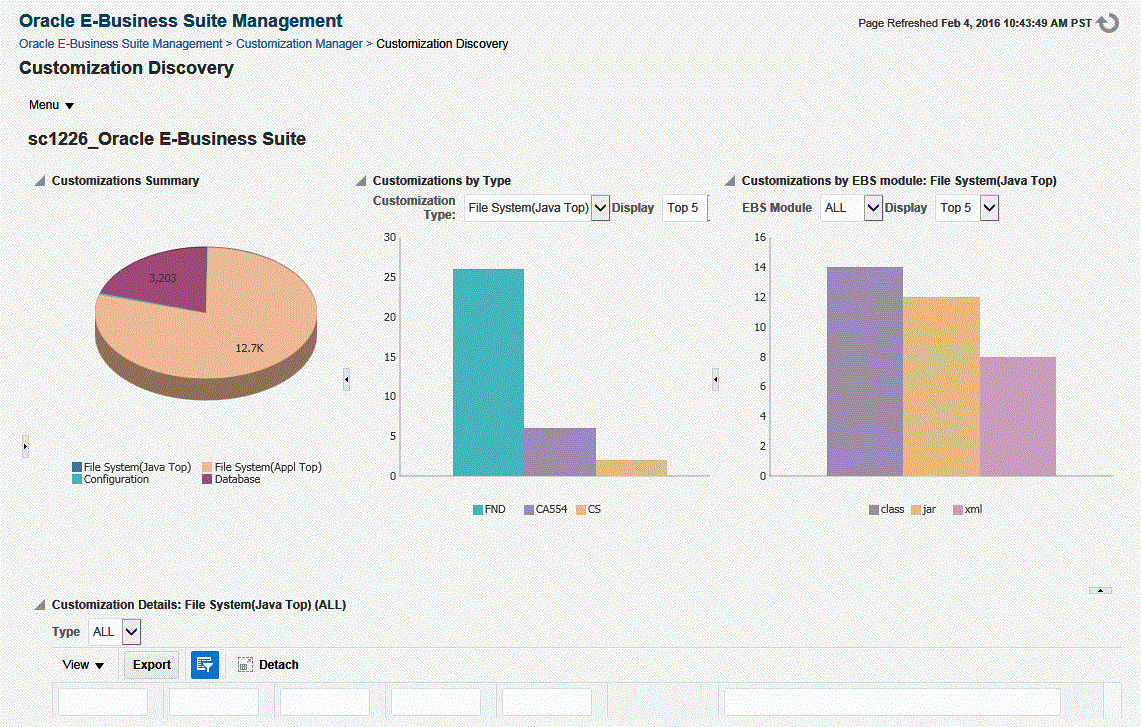
Database Customization
-
Select the Oracle E-Business Suite instance in Discovered Customizations table.
-
Select Customization Type as "Database".
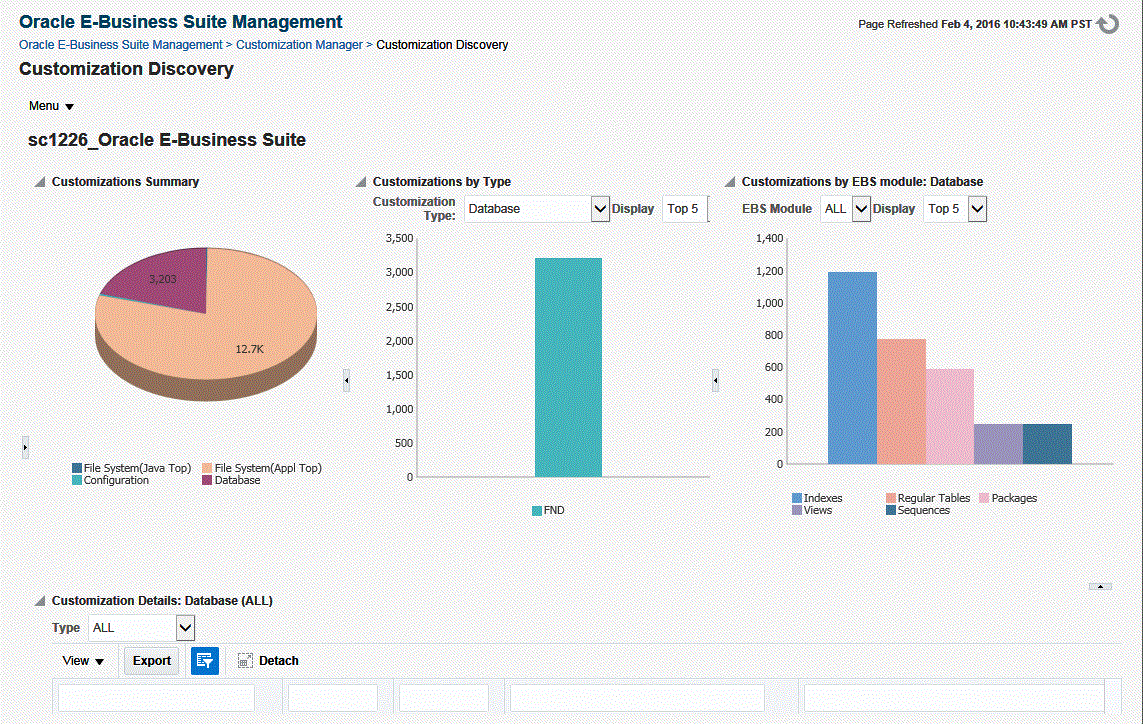
Configuration Customization
-
Select the Oracle E-Business Suite instance in Discovered Customizations table.
-
Select Customization Type as "Configuration".
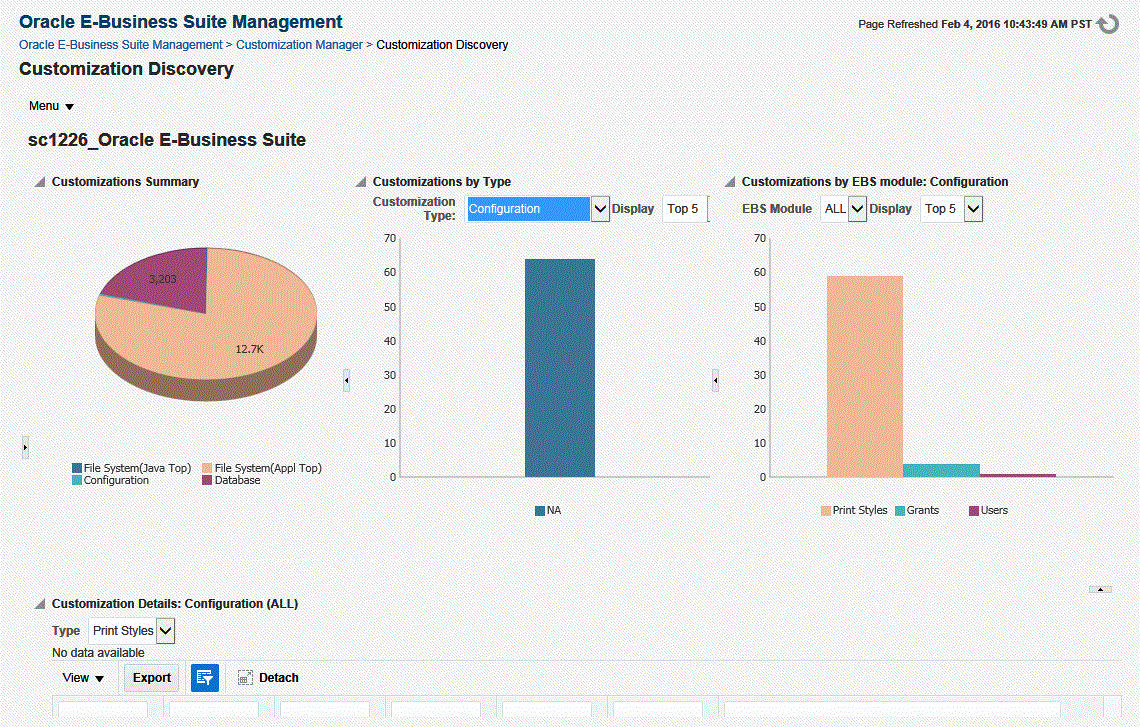
Search and Filter Customization
You can filter the details based on fields such as customization type, node, product, file type, and entity type.

Managing Exclusion Rule Lists
You can define your own rules to ignore the specific set of files or directories or Oracle E-Business Suite module in customization discovery. This is a user-specific feature where the rules are visible only to their owner and applicable only for the customization discovery request submitted by their owner. Only enabled rules will be applied during customization discovery.
-
You can edit, delete, enable, or disable a rule at any time.
-
All the user-specific rules that are in the Enabled state at the time of request submission will be applied for that customization discovery request.
Use the options on the menu on the Customization Discovery page to manage exclusion rules.
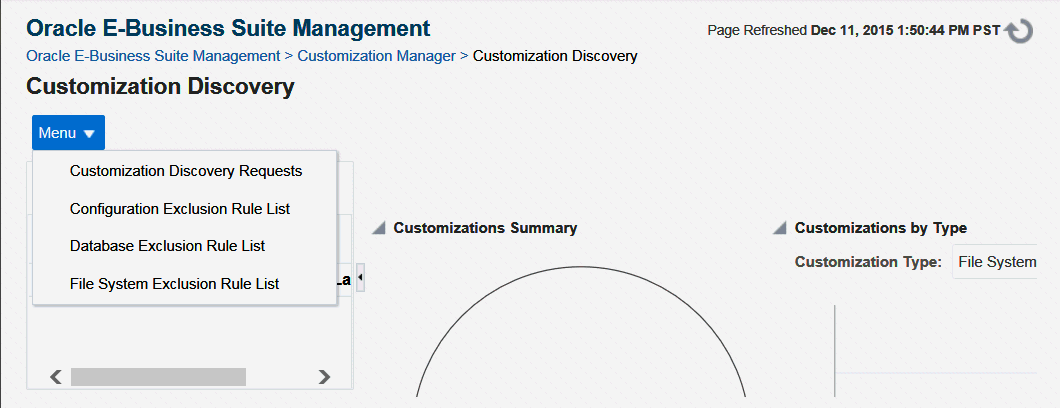
Add File System Exclusion Rule
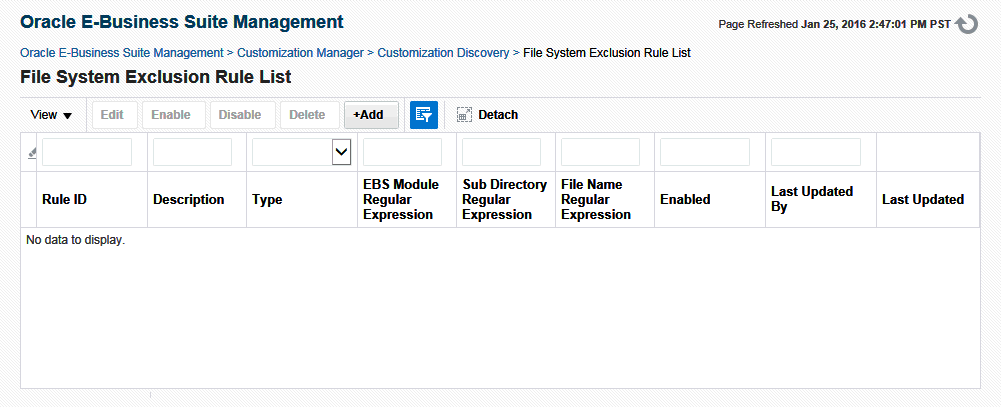
Perform the following steps to add a new file system exclusion rule.
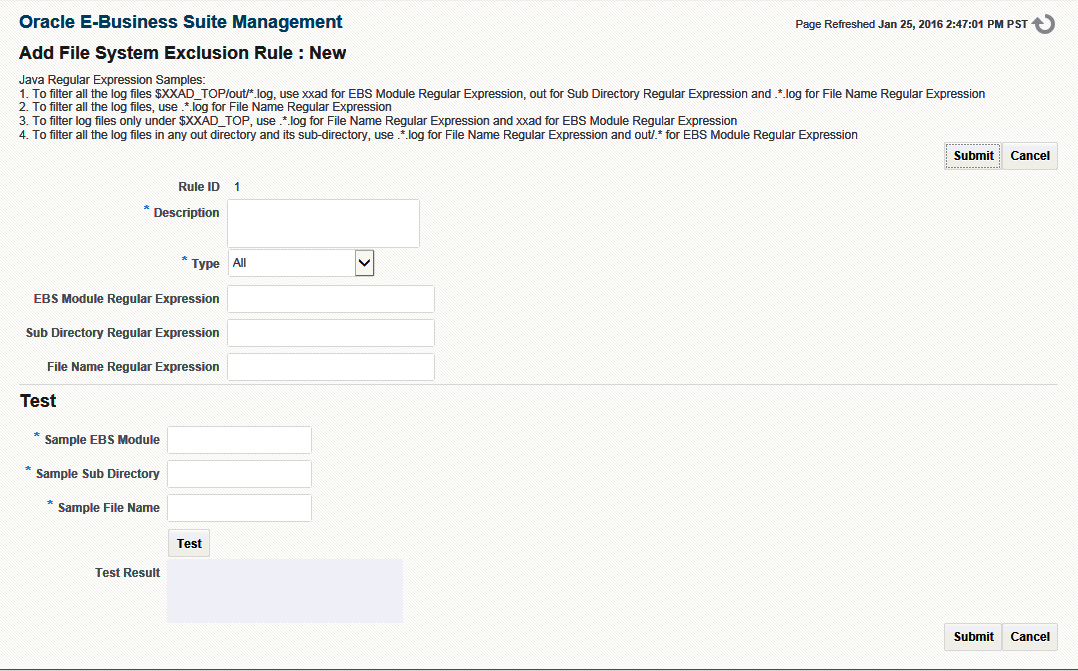
-
Enter a description.
-
Select Rule Type:
-
File System (JavaTop) - Rule applied only for the custom files under $JAVA_TOP
-
File System (ApplTop) - Rule applied only for the custom files under $APPL_TOP
-
All - Rule applied for the custom files under $APPL_TOP, $JAVA_TOP and $OA_HTML
-
-
Enter EBS Module Regular Expression.
-
Enter Sub Directory Regular Expression.
-
Enter File Name Regular Expression.
It is strongly recommended that you test the exclusion rule by using the Test option.
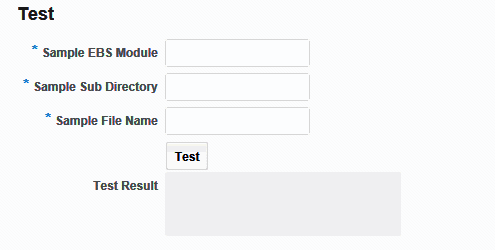
Add Database Exclusion Rule
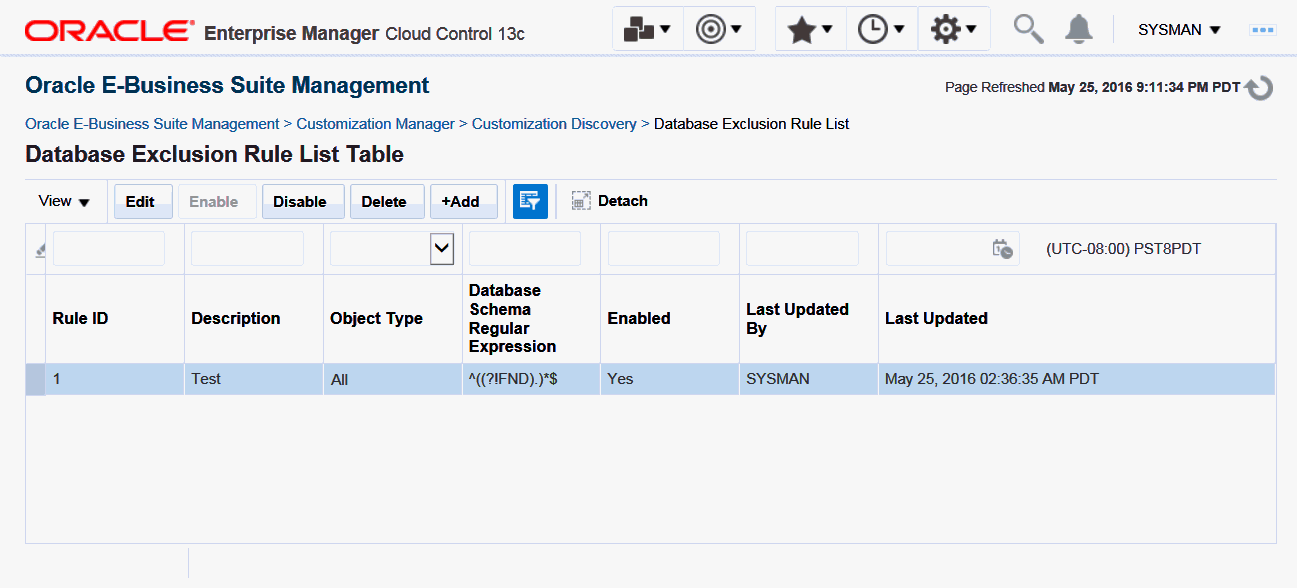
Click +Add to add a new database exclusion rule.
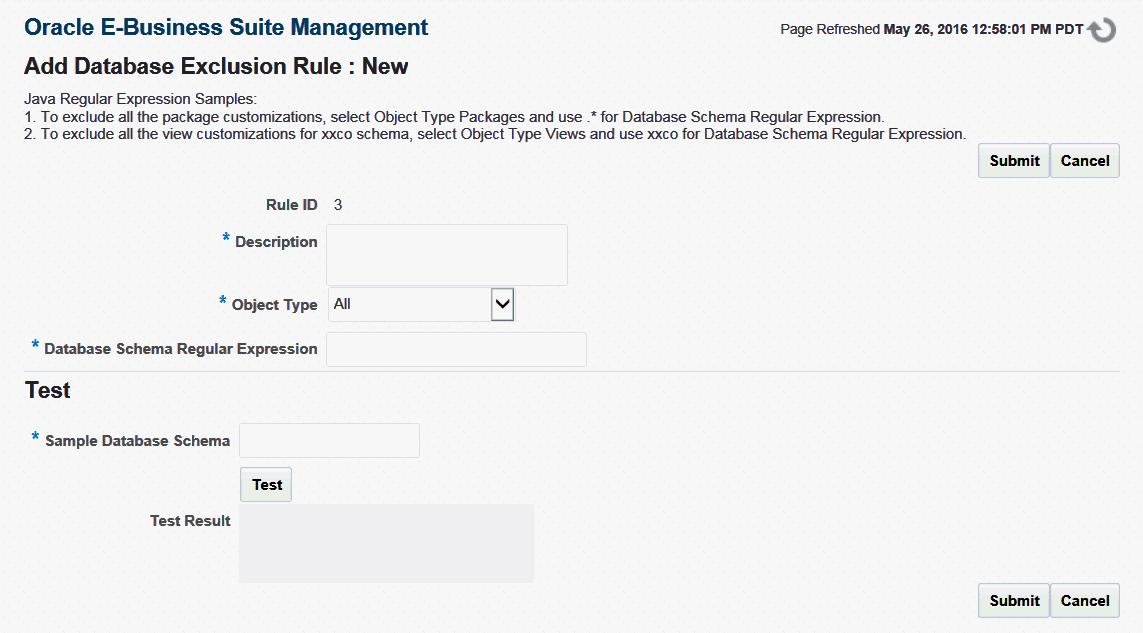
-
Enter a description.
-
Select Object Type
-
Enter Database schema Regular Expression.
It is strongly recommended that you test the exclusion rule by using the Test option.
Add Configuration Exclusion Rule
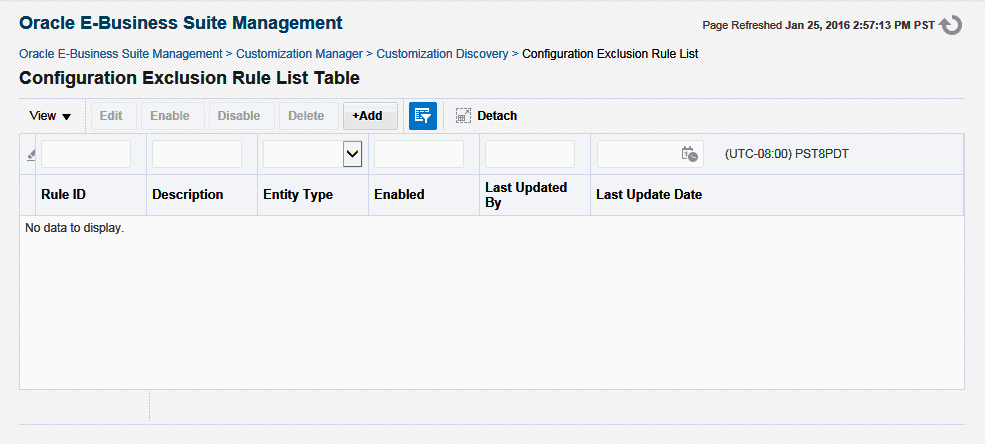
Click +Add to add a new configuration exclusion rule.
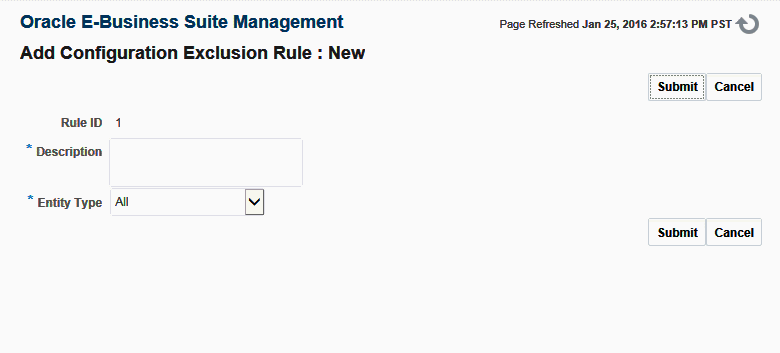
-
Enter a description.
-
Select Entity Type.
