Payroll Management
Payroll Definition
Consolidation Sets
Consolidation sets are the means by which you label payroll runs for further processing. This enables you to process the results from more than one payroll in a single action. You need only produce one tape per payment method for several payrolls, one set of reports and one set of costing for the whole set.
You can follow this procedure when scheduling additional runs. These are the runs you make in addition to your regular payroll runs; for example, to pay leavers. You can decide whether to consolidate an additional run with the regular run or switch it to a special set.
Consolidation sets are also used to label assignment sets when you use these for payroll processing. The same choices apply to assignment sets as to payrolls. You can accept the default consolidation set or select a new one when you set the run parameters in the Submit Requests window. You can also change the consolidation set after the run in the Update Payroll Run window.
Changes to a Consolidation Set
Consolidation sets facilitate the selective post-run processing of different payrolls. For example, after processing three payrolls in one consolidation set, you may want to select just one for immediate post-run processing. To do this, transfer the one you want to process to a new consolidation set.
You may also want to retry a payroll while continuing with prepayments for other payrolls whose status is Complete. This too would require a change of consolidation set for the first payroll.
See Assignment Sets
Period Types and Calendars
Since a payroll has only one pay frequency, you must define at least one payroll for each pay frequency you use. The following table shows the valid period types for pay frequency.
Period types and pay frequency table:
| Payroll Period Types | Periods per Year |
|---|---|
| Semi-Year | 2 |
| Quarter | 4 |
| Bi-Month | 6 |
| Calendar Month | 12 |
| Lunar Month | 13 |
| Semi-Month (not available for UK users) | 24 |
| Bi-Week | 26 |
| Ten-Day | 36 |
| Week | 52 |
Note: For Norway and Swedish users: Only Bi-Month, Calendar Month, Bi-Week, and Week payroll period types are available.
For Spanish users: Only Calendar Month payroll period is available.
Assignment Sets
There are three uses of assignment sets in Oracle HRMS:
-
You can run a QuickPaint report for a set of assignments, rather than individual assignments.
-
You can process subsets of the employees assigned to a payroll. Normally you initiate payroll runs and other post-run processes for one or more payrolls at a time. However, if you need to process smaller groups within a single payroll, you define an assignment set.
-
You can use a BEE concurrent process to create an identical batch line for each assignment in an assignment set.
There are three ways to define the set:
-
You can enter selection criteria, which the system generates into a formula. When you use the assignment set, Oracle FastFormula runs the formula to find the assignments that match the criteria. It checks all the assignments in the business group or, if you select a payroll when you define the set, all the assignments to that payroll. When you define the set you can also include or exclude individual assignments to modify the set created by the formula.
Important: To define an assignment set for a benefits eligibility profile, you must enter information about the person to be included or excluded in both the Amendment and Criteria windows.
See: Defining an Assignment Set Using Formula Criteria, Oracle HRMS FastFormula User Guide
-
You can select individually all the assignments you want to include in the set.
-
You can start from a full set of all the employees in the Business Group or all the employees assigned to a selected payroll. Then you can exclude individual assignments from the set.
See: Defining an Assignment Set by Including or Excluding Assignments, Oracle HRMS Enterprise and Workforce Management Guide
Defining a Payroll
Use the Payroll window to define a payroll, including its calendar and valid payment methods.
-
Set your effective date to a date early enough to handle any historical information you want to enter. Your effective date must be on or before the first period start date of the payroll calendar.
-
Enter the payroll's name and select its period type from the list.
-
Enter the end date of the payroll's first period, and the number of years for which the system should initially generate the payroll's calendar. You can increase this number later to generate additional years.
Note: Be aware that some processes require the calendar to extend into the future. For example, the PTO Carry Over process requires payroll periods extending to the end of the new accrual term.
When you enter the First Period End Date, make sure that the corresponding start date of the first period is after the start date of the payroll.
-
In the Date Offset region, you can change the zero default to a negative or positive number of days before or after the period end date. For example, for a semi-monthly payroll, the Cut Off date can be 3 days before the period end date (-3), while the Scheduled Run and Check dates can be 5 and 7 days after this date, respectively. You can also set the Payslip offset to determine when employees can view payslip information.
-
The Check Date, sometimes called Pay Date, is the date of constructive receipt of pay, on which paychecks become negotiable.
-
The Scheduled Run Date is the date scheduled for the Regular run of this payroll each period.
-
The Cut Off date, included for your reference, is the final date for entering or changing payroll information before a run.
-
A payslip offset, reckoned from the completion date for your payroll processes is always a positive number to enable you to prevent employees from viewing payslips before the official payment date. For example, if the payroll processes complete on 15th May, and employees do not receive payment until 20th May, you can enter an offset of 5 to align the payslip date to the payment date.
Note: Australia, China, Hong Kong, India, Japan, Korea, Singapore, and New Zealand users: You can set the payslip offset to determine when employees can view their payslip information.
These offsets are the defaults for the calendar. You can manually make date changes in the calendar (such as when an offset date falls on a weekend or holiday, by choosing Period Dates).
-
-
Select a default payment method for employees who have no valid personal payment method. You cannot select a method using magnetic tape because this requires information about employees' bank accounts.
-
Select a default consolidation set for this payroll. One consolidation set is created automatically when you define your Business Group. Oracle Payroll users can create other consolidation sets for payroll processing.
-
In the Costing region, you can enter information about the ledger and suspense account holding costing information for this payroll.
The information you enter here depends on the setup of your Cost Allocation key flexfield.
See: Setup of the Cost Allocation Key Flexfield, Oracle HRMS Enterprise and Workforce Management Guide
-
Check the Negative Payment Allowed check box if you want the PrePayments process to include negative payments. If you leave the box unchecked, the PrePayments process ignores negative payments.
-
Check the Multiple Assignment check box if you want an employee to receive a single payment, for multiple assignments carried out within your organization. However, if a PrePayments process, which runs prior to your effective processing date, already exists you cannot go back and change the Multiple Assignment check box. This box is only visible if the functionality is enabled for your localization.
Note: If you check the Multiple Assignment check box, make sure it remains checked throughout your payroll processing. Oracle Payroll reports in error if some of your payroll processes support multiple assignment processing and others do not.
-
If you are an Oracle Payroll user, enter the Statutory Information field to open the Statutory Information window.
Your Oracle localization team may have created fields in this window.
Note: The Statutory Information field is not visible if your HR:User Type profile option is set to HR User.
-
If the Payslip Modeler is enabled for your localization, then you can set locking period for payslip modeling. This restricts users from making updates to payroll information while modeling their payslip during a mock payroll run during the specified period.
-
Specify the number of days prior to and after a specified date when can you make changes for modeling the payslips.
You can specify the Availability Rules whether to disable the functionality days after the period start and days prior to the End date or enable the functionality between the days from start and before the period end date.
Note: You cannot make any changes beyond the days specified here for payslip modeling.
-
For Korea users only: Click in the Further Payroll Information field and specify the exemption amounts.
By default, the application uses the TRUNC function for tax calculations. Specify Yes if you want the application to use ROUND function instead of TRUNC function for tax calculations.
Specify if you want to adjust the amounts for standard tax breaks.
Specify if you want to enable reprioritization of pension related amounts as the last priority within the calculation category.
For Japan users only:
Click in the Further Payroll Information field and specify the following information
-
income tax dependent reference type
-
social insurance premium collection type
-
user defined year end adjustment formula
-
Hi Wp Monthly Remuneration Synchronous
-
Geppen Santei Process Date (MMDD)
-
Print Personal Number
-
-
Save your work.
-
Choose the Period Dates button to view the calendar generated for your payroll. In the Period Dates window:
-
You can view the default offset dates for every period, and you can manually override any of these dates in any record.
-
You can change the payroll's default Open status in any period to Closed to prevent further element entries. You can also reopen the period if necessary.
Important: Use this feature with caution. When you perform certain important tasks in Oracle HRMS, the system may automatically create or delete element entries. These tasks include hiring and terminating people, and updating assignments. You cannot change any element entries that span a closed payroll period, and so you may be prevented from performing these tasks.
-
-
Choose the Valid Payment Methods button to add valid payment methods for this payroll.
In the Valid Payment Methods window, the default payment method for the payroll appears automatically. You can add other methods. First set your effective date to the date you want the method to become valid.
Note: An employee assigned to this payroll can have any number of personal payment methods chosen from those you enter here for the payroll.
See: Entering Payment Methods for an Employee Assignment in Oracle HRMS Workforce, Sourcing, Deployment, and Talent Management Guide
Payments and Distribution
Cash Management and Oracle Payroll
Oracle Cash Management manages and controls the enterprise cash cycle. The Cash Management auto reconciliation matches Oracle Payroll against bank statement lines if the transaction meets the following criteria:
-
The Oracle Payroll payment number matches the statement line payment number.
-
The Oracle Payroll payment amount matches the statement line payment amount.
Cash Management accesses a view of payments generated by Oracle Payroll and compares it against the information on the bank statement. This process generates error messages on mismatched transactions.
Each time a new payment method is created, the bank details transfer to Oracle Accounts Payable. When defining a payment method, you must enter the GL Cash Account field to work with Cash Management.
Important: Because payment method details are passed to Accounts Payable from Payroll, it is important to ensure that you are entering this information correctly. If you inadvertently enter incorrect details, you could end up with reconciliation issues later.
Cash Management is available only for the Payroll payment methods of checks/cheques and electronic fund transfers (such as NACHA in the U.S, Direct Deposit in India).
Important: If you want to use Cash Management fully, you must install Oracle Accounts Payable and Oracle Accounts Receivable due to the interdependency of the products. All accounting functions take place in Accounts Payable and Accounts Receivable, and Cash Management provides the engine for reconciliation and forecast.
Defining a Payment Method
Use the Organizational Payment Method window to define payment methods for your enterprise.
From this window, you:
-
Supply the name and starting date of your payment method.
-
Enter the details of the source bank account from which your enterprise makes the payment.
-
Specify the General Ledger (GL) accounts that hold reconciliation and error details for the payment method.
-
Handle costing for the payment method. For example, you can specify whether to transfer the costs to GL and whether costing applies to cleared payments only, uncleared payments only, or a combination of cleared and uncleared payments.
-
Confirm that your source bank account in Oracle Payroll is the same bank account that Oracle Cash Management uses to clear your payments. This confirmation assures you that you are operating with a single consistent bank account rather than with duplicate accounts that introduce accounting errors.
To define a payment method
Supply a name and start date for your payment method
-
Set your effective date so that it reflects the date when you want to begin using this payment method.
-
Enter a name for the payment method, and select the payment method type.
For a third-party payment method, always select the type Check/Cheque. The default currency for your business group appears automatically.
-
If an alternative currency exists for your payment method, select it.
-
If your payment method controls payments to a third party such as a benefits carrier or garnishment receiver, check the Third Party Payment box.
Enter the source bank details for your payment method
-
Navigate to the Source Bank tab. The Country for your source bank account appears automatically.
-
Enter the Bank Details field to open the Bank Details window. Enter information about the account from which your enterprise intends to make payments.
If you are using Cash Management, include the following information:
-
Account Name
-
Account Type
-
Account Number
-
Bank Name: If this already exists, enter the name exactly as it appears in Accounts Payable.
-
Bank Branch: If this already exists, enter the name exactly as it appears in Accounts Payable.
Italy Users: You can enter the Bank Name, Bank Location, Account Number, and Account Name. The IBAN Account displays by default.
Ensure that you enter any additional bank details that are specific to your enterprise. For example, bank details for U.S. payment methods always require a transit code. The transit code, or transit routing number is the nine-digit number that identifies the financial institution. If the transit code is incorrect, the funds will not be posted to the account.
South Africa Users: Enter the account holder's name and indicate whether the account holder relationship is joint, own, or third party.
Belgium, Denmark, Finland, France, Germany, Hungary, Ireland, the Netherlands, Norway, Poland, Russia, Spain, and Sweden users: Enter the Bank Identifier Code (BIC) and International Bank Account Number (IBAN) in the Bank Identifier Code and the IBAN Number fields, respectively. Note that you must enter at least one of the account numbers, that is, either the International Bank Account Number (IBAN) or the Account Number. If you enter the Account Number, then the Bank Code and Branch Code fields are mandatory.
Warning: Always review the account setup for Oracle Accounts Payable before you define the account in Oracle Payroll. The details for your Payroll account must exactly match the account details in Accounts Payable. Otherwise, Accounts Payable creates an extra account with marginally different details. This duplicate account introduces errors when you reconcile payments between Payroll and Accounts Payable.
-
Specify what type of payments to cost for this payment method
-
Navigate to the Costing tab. Each check box indicates a particular type of payment. Check the boxes for each type of payment that you want to cost. When you subsequently run the Costing of Payment process, it costs each type of payment as you have indicated. The entries that you make for an individual check box can imply automatic checking of related boxes. Your choices are:
-
Cost Payment: Check this box to specify that you want to cost only uncleared payments for this payment method.
-
Cost Cleared Payment: Check this box to specify that you want to cost only cleared payments for this payment method. If you check this box, the Cost Payment box is also checked by default.
-
Cost Cleared Voided Payment only: Check this box to specify that you want to cost any voided payments that have also been cleared by Oracle Cash Management. If you check this box, the Cost Payment and Cost Cleared Payment boxes are also checked by default.
-
Exclude External/Manual Payment: Check this box to exclude any external/manual payments from costing. This exclusion is useful if you are using this payment method as a dummy payment method to cancel a previous payment, or if you are making a payment by cash. If you check this box, the Cost Payment box is also checked by default.
-
Transfer to GL: Check this box to specify that costed payments should transfer to General Ledger. If you check this box, the Cost Payment box is also checked by default.
-
Specify the GL accounts for this payment method
-
Navigate to the General Ledger tab.
-
Select Ledger to indicate the ledger to use if you intend to reconcile payments using Oracle Cash Management.
-
Select the GL Control Account.
-
Select GL Cash Account to indicate which cash account to use for the reconciliation of payments.
The entry for Description appears automatically by default, depending on what you enter in the GL Cash Account details.
-
Select the Cash Clearing Account.
-
Select the Error Account.
When you first specify the GL accounts for a bank account, these then become the default GL accounts for any other payment methods that use the same bank account. The defaults apply for all new payment methods using the bank account. They also apply retrospectively for any existing payment methods that were already using the same account. However, you can override these defaults by entering your preferred GL accounts on the General Ledger tab.
At this point, check that your Payroll setup and Cash Management setup are fully integrated.
Confirm that you can reconcile payments in Cash Management
-
Navigate to the Cash Management tab. You cannot change the information on this tab, but you can confirm that your GL accounts are correct.
-
To confirm that Oracle Cash Management is operating with the same source bank account that you are using in Oracle Payroll, view the check box. If the box is checked, then Oracle Cash Management holds the bank account for this payment method, and you can reconcile payments knowing that you are using an identical account in Payroll, and in Cash Management.
However, if the box is not checked, this indicates that Oracle Cash Management does not hold the details for your Payroll account. This may indicate that duplicate accounts exist and you should exercise caution when you reconcile your payments.
Enter further information for the payment method
-
Enter further information to determine how to process this payment method. Click in the Further Information field to see the range of further information for your enterprise. For Japan users only: Enter the company code and company name. Select the delimiter type for the Direct Deposit file.
-
For Norway users only: Enter values for the following fields to define the payment method level. (The same payment type supports the ISO20022 and older Telepay process).
Field Description Initiating Party Name Enter the name of the known party. Sender ID Enter the initiating party ID. This unique organization identification is assigned by an institution using an identification scheme. Typically, this is the customer-ID in the debtor bank based on the Brønnøysundregistrene and their Central Coordinating Register of Legal Entities, or other identification arranged with the bank. Scheme Name Enter the code for the identification scheme as published in an external list. The options are BANK and CUST: -
BANK: Debtor/creditor relates to a sub-level agreement under the main agreement (a bilateral agreement between a customer and a bank) regarding a special service or subsidiaries or divisions. When the scheme name is BANK, the Sender ID should have a Customer Service ID assigned by the bank.
-
CUST: Debtor/creditor relates to the main-agreement with the financial institution. When the scheme name is CUST, the sender ID should be the organization number of the initiating party.
Batch Booking Indicate whether [the requestor] has requested a single entry per individual transaction or a batch entry for the sum of the amounts of all transactions within the group of a message. The options are: -
No: Single Booking requested.
-
Yes: Batch Booking requested. This default value is Yes.
Note: The Yes and No values are reflected in XML as true and false.
Service Level Code The service level code specifies a pre-agreed upon service or level of service between the parties as published in an external service level code list. Select one of the following options: -
NURG (Non-urgent Payment): Select as the default.
-
SDVA (Same Day Value): Intercompany only (not for salaries).
-
SEPA (Single Euro Payments Area)
-
URGP (Urgent Payment): Only suppliers (SUPP) but not for salaries.
Payment File Format This field indicates which supported payment file format and process are in use. The supported processes are Telepay and ISO 20022. -
Telepay: Indicates that the older file format and process, the Norwegian Payment Process, are in use. This is the default value if the field is blank. If this value is set, and you run the newer ISO20022 process, then an error occurs.
-
ISO20022: Indicates that the ISO 20022 file format and process are in use. If this value is set and you run the older Telepay process, the following error message appears: Bank file format processed is not according to specified set up on Payment method.
Note: If you see this message, you must roll back the error process before running the new process.
Payment Identification ID The payment identification ID is a reference assigned by a sending party to identify the payment information block within a message. Payment Method Select one of the following values to specify the payment type to use for transferring the funds: -
CHK: Cheque
-
TRF: Credit Transfer. This default value is TRF.
Debtor Name Enter the name of the debtor party. Debtor ID The debtor ID is a unique identifier assigned to a debtor organization by an institution using an identification scheme. -
Setting Up Statement of Earnings
Setting Up a Global Statement of Earnings
Oracle HRMS enables you to view the online statement of earnings (SOE). To enable the correct display of values on your statement of earnings, you must complete each of these setup steps.
To set up the global statement of earnings:
-
Create a user category through the lookup SOE_USER_CATEGORY.
See: Creating User Types and Statuses, Oracle HRMS Enterprise and Workforce Management Guide
-
Set the value of the user category that you created as the profile value for the profile PAY: Statement of Earnings User Category.
See: User Profiles, Oracle HRMS Configuring, Reporting, and System Administration Guide
-
Add the predefined element sets for your earnings and deductions to the SOE Information EIT at the business group level.
For Canadian and US users only: SOE Information functionality is not available for Canadian and US legislations.
Swedish users only: Ensure that you have enabled your elements to display a code. You do this at the business group level by entering Extra Element Details for each element. When you select the EIT, you can make a further selection of Element Name, and specify a code for your selected element. This ensures that your SOE displays the element code in the earnings, deductions, and information regions.
-
Create an element set containing all the elements that you want to see displayed in the information region of the SOE.
For South Africa only: The Information region has been renamed to Fringe Benefits and Other Non Payments region. You use the predefined ZA SOE Fringe Benefits and Other Non Payments element set to display information in that region. You enter this element set in the Elements 3 field when you define your SOE Information at business group level.
The South African localization does not use balance attribution.
Users should now restart the Apache server as instructed in the final step.
-
Complete the SOE Detail Information EIT by adding the elements in your element set, and the SOE display balances to the EIT at the business group level.
-
Link the predefined SOE balance attribute to your business group. The attribute name is likely to have a leading localization code followed by the stem _SOE_BALANCE_ATTRIBUTES.
-
Define the attributes for your SOE balances.
-
Restart the Apache server and then check the SOE to ensure that the SOE displays the requirements that you selected.
Viewing Statement of Earnings
Oracle Payroll enables you to view an employee's statement of earnings (pay advice) without having to run the Pay Advice report.
You do this using the Statement of Earnings window.
There are various ways to access statement of earnings information. The information displayed may vary depending on whether you have run the PrePayments process or just a payroll run.
The information displayed in the Statement of Earnings window reflects the information in the printed pay advice.
The payroll run generates four types of Statement of Earnings (SOE):
-
Master Assignment Action SOE for each employee and shows aggregate Year to Date balances
-
Regular Payroll Run SOE for each employee and shows Period to Date and Year to Date balances
-
Separate Check SOE only if employee has an element with Separate Check input value set to Yes
-
Tax Separate Run SOE if employee has an element(s) with any of the following input values:
-
Separate Check set to Yes
-
Tax Separately set to Yes
-
Deduction Processing is set to other then All
-
Canada only: The Payroll Run SOE displays one "Master Assignment Action" master record and multiple records with second and third layer run types.
If you are processing Multiple Assignment Payments, then the PrePayment Statement of Earnings displays consolidated earnings and deductions information. The header information displayed on the Statement of Earnings is obtained from the primary assignment; however, if this assignment is not processed, then the header information is taken from the first assignment processed in the PrePayment process.
To view the last payroll with PrePayments run against it
Perform one of the following:
-
Select View | Statement of Earnings.
-
From the Assignment window, choose Others and select Statement of Earnings.
-
Choose the Statement of Earnings window in Fastpath.
To view the most recently run QuickPay results
-
From the Assignment window, choose Others and select QuickPay.
-
Choose View Results, and select Statement of Earnings from the View Results window.
To view the statement of earnings information without running PrePayments
See Viewing Assignment Process Results for an Assignment or Viewing Assignment Process Results for a Payroll Assignment.
Payroll Statutory Deductions and Reporting
Denmark Tax Overview
Oracle HRMS supports the deduction of employee tax. Employers have a statutory duty to deduct tax from employee pay. The withholding tax calculation depends on the employee tax card and earned taxable income in the pay period. The Danish tax card indicates four ways to calculate withholding tax:
-
Main (H) Tax Card
-
Secondary (B) Tax Card
-
Tax Free Income (F) Tax Card
-
No Tax Card
You can process taxation for some specific pay components such as bonus and benefits in kind. Typically, you calculate withholding tax for every employee assignment, even if an employee has multiple assignments within a legal entity. If you terminate an assignment during the tax year, you do not transfer the tax balances to a new assignment.
See: Setting Up Withholding Tax
You process all employee payments electronically through the employer's bank. The most widely used standard is via bank transfer (PBS). The PBS file format consists of different record types and the usage varies with the payment type. Oracle HRMS supports the generation of a payment file. You send this file to the employer's bank for electronic transfer of funds from the employer's bank account to the employee accounts.
See: Setting Up Electronic File Transfer (EFT)
Setting Up Withholding Tax
Oracle HRMS enables you to request and upload employee tax information from the tax administration. The application will extract the withholding tax information for each employee assignment.
-
Link the Tax element to your payroll.
-
You need to attach the Tax Card element to the employee's primary assignment.
You enter the Tax Card details using Oracle Self-Service HR (SSHR).
-
Upload the tax card details into your application.
Note: Once you upload the tax card information correctly, the application extracts the employee tax information and stores it in the available elements.
Uploading the Tax Card
Oracle HRMS enables you to request the employees' tax cards for the new tax year. You send the tax card request to the tax administration in the form of a flat file that contains the employee details. Every employee assignment appears as a separate row in the generated flat file.
The tax administration sends back a file, which is the same request file with the tax information added to every employee assignment record. The tax administration sends the electronic tax cards in a fixed file format. You upload the tax card information into the application.
If an employee's tax card changes during the tax year and if the tax administration issues a new tax card, you will have to update the new tax card manually into the application.
To send the tax card request
-
Choose the Single Request option.
-
Query the Danish E-Income Tax Card Requisition request in the Submit Request window.
-
Enter the information for the following parameters:
-
Legal Employer - Select the legal employer for whom you want to run the report. This is a mandatory parameter.
-
Start Date - Enter the date after which the Danish E-Income Tax Card Requisition concurrent program must pick new employees. This is a mandatory parameter.
-
Test Submission - The default value for this parameter is No. Select Yes for a test run of the report.
-
-
Submit the request.
-
Close the window.
Uploading the Tax Card - Pre 01-Jun-08
Oracle HRMS enables you to request the employees' tax cards for the new tax year. You send the tax card request to the tax administration in the form of a flat file that contains the employee details. Every employee assignment appears as a separate row in the generated flat file.
The tax administration sends back a file, which is the same request file with the tax information added to every employee assignment record. The tax administration sends the electronic tax cards in a fixed file format. You upload the tax card information into the application.
If an employee's tax card changes during the tax year and if the tax administration issues a new tax card, you will have to update the new tax card manually into the application.
-
To send the tax card request - pre 01-Jun-08:
-
Choose the Single Request option.
-
Query the Danish Tax Card Requisition request in the Submit Request window.
-
Enter the information for the following parameters:
-
Effective Date
-
Magnetic Filename
-
Legal Employer's Name
-
-
Submit the request.
-
Close the window.
-
-
To upload the tax card:
-
Convert the flat file that you receive from the Danish authorities to a text file (with extension .txt).
-
Run the meta-mapper process, if you have not already done so, and place the converted file in a directory readable by the database. This is a system administration task.
-
Choose the Single Request option.
-
Query the Danish Tax Card Upload request in the Submit Request window.
-
Enter the information for the following parameters:
-
File Name
-
Batch Name
-
Batch Reference
-
-
Submit the request.
-
Close the window.
-
Choose the Single Request option again.
-
Query the Data Pump Engine request in the Submit Request window.
-
Enter the information for the following parameters:
-
Batch Name
-
Validate
-
Action Parameter Group
-
-
Submit the request.
-
Close the window.
-
Payroll Processing and Analysis
Process Part of a Payroll
Oracle Payroll enables you to run a payroll and conduct post-processing on a payroll that has completed successfully. You can also enter subsequent changes and corrections for a payroll that has not completed successfully.
Oracle Payroll makes use of the following concepts when implementing payroll procedures:
Assignment Sets
Occasions when you need to use assignment sets for the payroll run include:
-
You need to process the night shift earlier than the rest of the payroll as they must receive their pay advices the night before the rest.
-
You need to process a correction run, as entries were not received in time for the normal run and the overtime must be paid this period.
-
You want to process an additional run for a long service award, which the enterprise is presenting as a cheque/check to each qualifying employee.
To fulfil these requirements, you can select from a range of assignments:
-
Include all assignments
-
Include or exclude individually identified assignments
-
Use a formula to include or exclude certain groups of assignments
Consolidation Sets
A consolidation set is a grouping of payrolls that simplify post-run processing and reporting. It enables you to produce a single set of reports, costing results, and other results for all payrolls in a consolidation set. When you run a payroll, make sure that you have named the consolidation set to which the payroll belongs.
Element and Distribution Sets
With a normal payroll run, you would want to include all elements, but for a long service award bonus you would want to include only the bonus element and the statutory elements. You first calculate gross pay for ascertaining the gross amount to transfer into the payroll account. Then you complete the gross to net calculation.
You can select element sets as follows:
-
Include all elements
-
Include or exclude individually identified elements
-
Include or exclude classifications of elements.
Canada only: When creating a Run set, you need to explicitly add the Canadian Tax recurring element to your element set.
US only: When creating a Run set, you need to explicitly add the VERTEX recurring element to your element set.
The predefined elements for Oracle Payroll are processed for every payroll run in which they have been included. The deductions are recalculated using the period totals, the amount already paid in previous runs is deducted, leaving the remainder as the deduction for the new payroll run.
QuickPay
QuickPay enables you to carry out payroll processing for individual employees. You can use QuickPay to pay employees who are leaving and who require payment immediately. If an employee asks what their net pay will be this month, you can run QuickPay to find the answer, then roll it back to remove all results from the database.
QuickPay: Two Options for PrePayments:
Once the QuickPay run has a status of Complete, you have a choice of two options for post-run processing:
-
Include the QuickPay in the batch prepayments processing for the assignment's payroll.
Choose this option if, for example, you have a new employee who joins after the payroll run for the current period has taken place. Instead of rolling back the whole payroll and resubmitting it with the new employee added, you run QuickPay instead so that you can include the new employee in the consolidation set for batch prepayments.
-
Start the PrePayments process from the QuickPay window, if necessary overriding the default payment method.
Choose this option if, for example, an employee is leaving and is waiting to be paid by cash or cheque/check.
Troubleshooting QuickPay: Concurrent Manager
When you start the QuickPay process, the screen freezes, and you cannot delete or update the QuickPay definition until the process completes.
You may receive one of the following error messages:
-
The process has not started
This means either that the concurrent manager has not been started, or that there are other requests of a higher priority. Ask your system administrator to start your request or change its priority.
-
The process has started but has not finished
Ask your system administrator to investigate the reason for this.
Overview of RetroPay Processing
Purpose of the RetroPay Process
Run the RetroPay process to ensure that your payroll run for the current period reflects any backdated payments or deductions. Backdated adjustments can occur when:
-
An employee receives a pay award that is backdated to a previous pay period.
-
The payroll department makes a retrospective correction for an error that occurred in a previous pay period
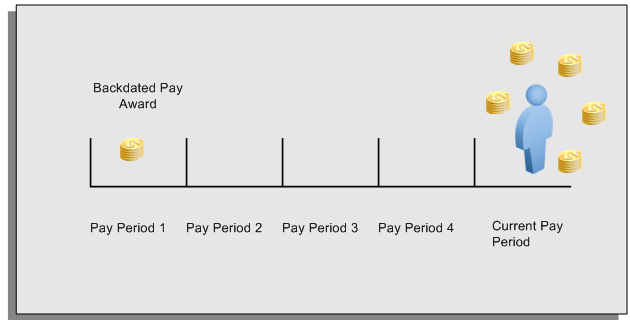
For example, at the start of the current pay period, this employee has a pay award backdated to pay period 1. The employee has not yet received any payments for this award. In the current pay period the employee is entitled to payments that represent the backdated amounts for:
-
Each of the preceding payroll periods (pay periods 1 to 4)
-
The current pay period
You run your RetroPay process to ensure that the employee receives correct payment when you next run the payroll.
Period Earned is Distinct from Period Paid
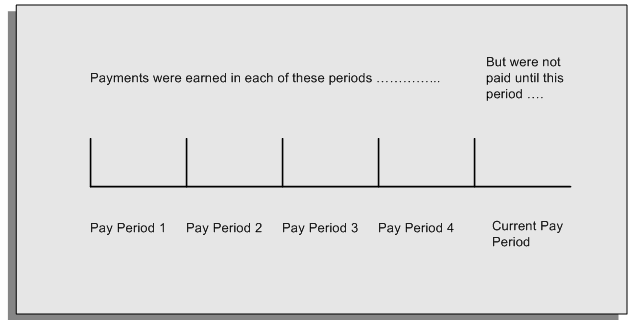
When backdated payments occur, the accuracy of your subsequent payroll processing depends on distinguishing between:
-
The period in which the payment was earned
-
The period in which the payment was made
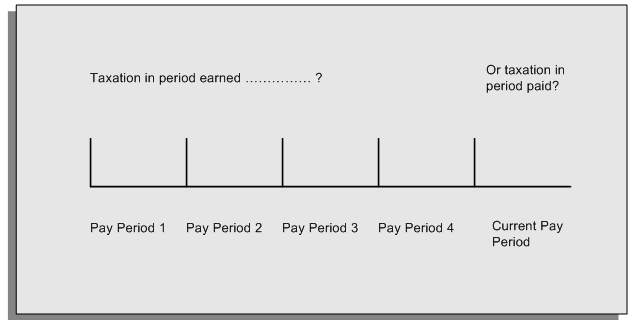
For example, the taxation implications are different for:
-
A pay award backdated to period 1 and not paid until the current period. You may want to tax this award in the current period.
-
A correction to an underpayment in period 3 which is paid to the employee in the current period. You may want to tax this correction in period 3 rather than in the current period.
The RetroPay Process Does Not Overwrite Your Historical Payment Records
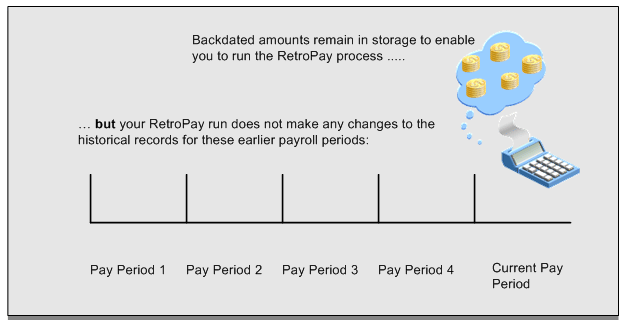
You never overwrite historical payroll data when you run RetroPay. Although you recalculate all periods that have retroactive changes whenever you run a RetroPay, you never modify the stored results for these periods. Instead, you create one or more RetroPay entries to receive the process results.
Think of the RetroPay process as a calculator holding results in memory so that it can process a final set of results. The RetroPay process uses your historical results to calculate the changes for the current period. The results for your current period change, but your historical records remain unchanged.
Process RetroPay with Overlapping Periods
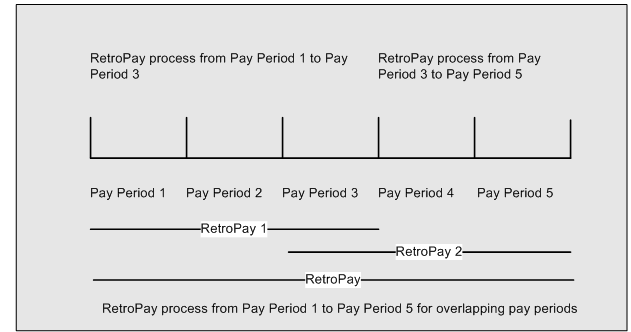
The RetroPay process recalculates payroll runs, balance adjustments and reversals from a particular date onwards, the start date of the recalculations. When you have retroactive changes overlapping another retroactive change, the application resets the start date to the earliest start date of the RetroPay processes and recalculates.
For example, you perform a RetroPay (RetroPay 1)for an assignment in period 3, with Payroll Runs being recalculated from a start date of period 1. In period 5, you perform another RetroPay (RetroPay 2) for the assignment with a start date of Period 3. The second RetroPay detects an overlap of RetroPays and sets the start date to the earliest start date.
In this case, the application sets the start date as Period 1. An overlapping override occurs to ensure that the balances are correct for the RetroPay process.
The processing of overlapping RetroPay results in an overall increase in time to process the RetroPay. If there are multiple overlaps, the increase in time is excessive.
RetroPay Processes Available in Oracle Payroll
Oracle Payroll provides several versions of RetroPay, for example Enhanced RetroPay, RetroPay by Element, and so on. However, in most situations, you only have access to a single version of RetroPay.
How To Identify Your Version of RetroPay
Navigate to the Submit Requests window, and search for RetroPay. Your search returns the name of the single version of RetroPay enabled for your use, for example, Enhanced RetroPay.
An exception occurs in transitional situations. If you are replacing RetroPay by Element with Enhanced RetroPay, the Submit Requests window enables you to select each version of RetroPay so that you can complete the transition.
Summary of Available RetroPay Processes
We recommend Enhanced RetroPay as the standard version of RetroPay for new customers to adopt. Older RetroPay versions do exist, and this table exists as reference so that you can distinguish between each version. In practice however, your System Administrator determines which version of RetroPay you can use, and you are unlikely to see any reference to RetroPay versions that are unavailable to you .
| RetroPay Process | Distinguishing Features |
|---|---|
| Enhanced RetroPay | Enables you to
|
| RetroPay by Element | Enables you to identify the value of backdated changes for individual elements |
| RetroPay by Run | Only for use with Oracle HRMS (Japan) |
| RetroPay (by Aggregate) | Does not differentiate backdated payments at element entry level. Produces a single aggregated RetroPay This is the original version of RetroPay. You can continue to use RetroPay (by Aggregate) but we recommend that new customers should implement Enhanced RetroPay rather than RetroPay (by Aggregate) |
Implications of Migrating Between RetroPay Processes
You cannot run one category of RetroPay with data that you have already run on a different category of RetroPay. For example, if your localization has moved from RetroPay by Run to Enhanced RetroPay, you cannot use Enhanced RetroPay on data previously processed in RetroPay by Run.
When to Run the RetroPay Process
The RetroPay Process and the Payroll Cycle
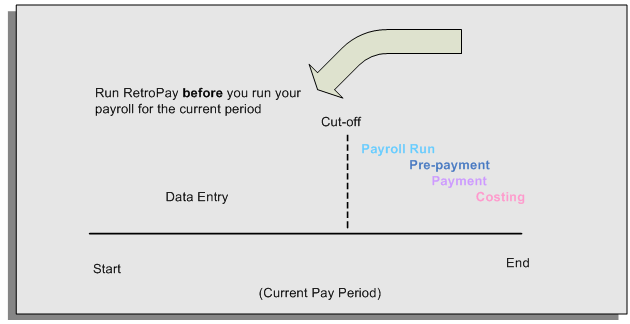
It is important to run your RetroPay process at the correct point in the payroll cycle. Always run RetroPay immediately before you run a payroll, and, for greatest accuracy, as close to the cut-off date as possible. The cut-off date is the point at which all data entry for the payroll is complete.
The RetroPay Process Always Precedes a Payroll Run
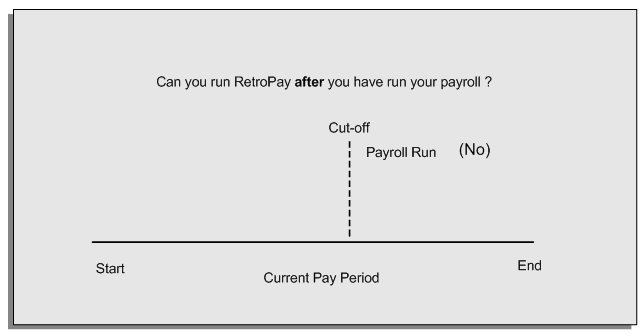
The RetroPay process cannot occur after your payroll run. If you run your payroll and then discover further backdated adjustments you must hold them over until a later payroll period and run the RetroPay process in that subsequent payroll period.
Backdated Adjustments Are Always Paid in the First Open Payroll Period
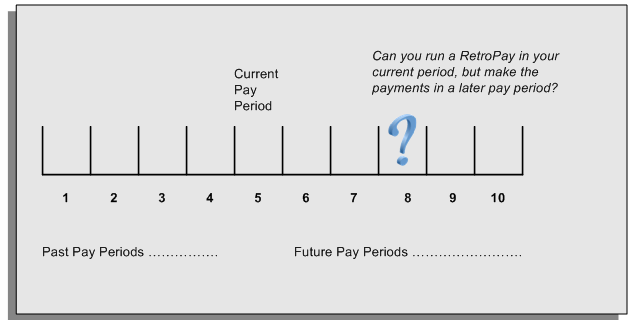
When you run a RetroPay process in your current payroll period, any backdated adjustments are always paid in your current payroll period. So, a RetroPay process in period 5 calculates any backdated adjustments from periods 1 to 4, and marks them for payment in period 5.
You cannot stipulate that a RetroPay process in period 5 should withhold any resulting payments until a future pay period. For example, you cannot stipulate that a RetroPay run in period 5 should withhold payments until period 8.
If you want to use a future payroll period such as period 8 to make payments of backdated amounts for periods 1 to 4, then you must wait until period 8 before you run your RetroPay process.
Starting a Payroll Run
You start a payroll run in the Submit Requests window.
To run a payroll
-
In the Name field, select the name of your payroll run process.
-
In the Parameters window, which opens automatically, select the payroll.
-
Select the default consolidation set name for the payroll, then select the current payroll period display.
-
Select a new consolidation set for the run if required.
Use the consolidation set to control post-run processing of the results.
-
Select the payroll period for the run.
-
Select an element set and assignment set if required.
US only: Make sure that you have included the VERTEX seeded recurring element in your element set if you are using an element set.
-
Select a run type.
-
If your legislation supports Regular and Supplemental runs, then select R for a Regular run or S for a Supplemental run.
India only: Select "Bonus" run type for paying bonus.
-
You can optionally enter a message to appear on the statements of earnings for this run if your SOE is designed to support such a message.
-
Choose Submit.
Running the PrePayments Process
Run this process when you want to do one of the following:
-
Distribute employee pay over more than one payment method using either a percentage or monetary split. You define the amount or percentage to be paid by each method for each employee in the Personal Payment Method window. You can also indicate that payment methods should take account of run types and run types at personal level.
-
Override the default payment methods. For example, you may need to run a supplemental payroll for which the distribution between payment methods will be different from that specified for the regular run. When you override the defaults, the payments for the supplemental run only are distributed according to the override payment method that you specify.
-
If Multiple Assignments is enabled for your Payroll, the PrePayments process creates one regular cheque for all assignments and one cheque for each separate payment. Assignments must be included on the same payroll in the same payroll period or they will not be included.
Note: The Net Pay from each assignment is deposited into the payment method account for the primary assignment unless the primary assignment is not processed. If it is not processed and the secondary assignment does not have a personal payment method, the employee receives a cheque.
Additional Information: You cannot delete personal payment methods if a PrePayment process is run.
Canada only: The PrePayments process creates different results depending on the setting of the Payroll Archiver Level option, which is set at the business group level. If you set it to "Tax Group," PrePayments consolidates the payment for all GREs of an assignment (which must belong to the same tax group), and Cheque Writer/Deposit Advice generates only one cheque or deposit (this can happen only at the beginning of the year, after running the last payroll for the previous year and before running the first payroll of the current year). If you set it to "GRE," PrePayments creates separate payments for each GRE, and Cheque Writer/Deposit Advice generates a cheque or deposit advice for each GRE.
See: Entering Payroll Archiver Level Information, Oracle HRMS Enterprise and Workforce Management Guide
You run this process from the Submit Requests window.
To run the PrePayments process
-
In the Name field, select PrePayments.
-
In the Parameters window, select the name of the payroll or consolidation set to run the process for.
When you select a payroll, the default consolidation set is displayed.
-
Enter the start and end dates of the time span for the prepayments processing to cover.
Note: If you specify the end date and not a start date, the process automatically uses the start date of the period for the end date you specified.
-
If required, enter an override payment method. The method you select overrides all other payment methods for this processing.
-
Choose OK.
-
Choose Submit
Setting Up Electronic File Transfer (EFT)
Oracle HRMS enables you to submit employee and payment details to the bank in the form of a bank transfer file (PBS).
-
Create a personal payment method of payment type, DK Payment Type.
-
Run the payroll process.
-
Run the pre-payment process.
-
Submit the EFT request using the Submit Request window.
-
View the output of the EFT file.
Running the EFT Process
Oracle HRMS provides the concurrent program, Danish Payment Output File, to run the Electronic File Transfer process.
You run Danish Payment Output File from the Submit Request window.
To run the Payment Output File
-
Select Danish Payment Output File in the Name field.
-
In the Parameters window, optionally enter the payroll name.
Note: You can restrict the processing of assignments to the specified payroll on the effective date.
-
Select the consolidation set.
-
Enter a start date for any prepayments to the employee.
-
Enter the effective date.
-
Select a payment method.
-
Enter the delivery check digit.
-
Enter the data supplier name and data supplier identification.
-
Enter the effective date.
-
Click Submit.
Setting Up Retro-Notification and RetroPay
Follow this process to set up the Retro-Notifications report, and the correct RetroPay process for your payroll.
-
The RetroPay component determines the default style of RetroPay processing for your localization. For example, you can specify that your default style is Tax When Paid, rather than Tax When Earned .
Note: The Tax When Paid Retro Style is available for China localization users only.
You can use either of the following methods to set up your RetroPay component:
Method How To Advantages Set Up the Organization DFF From the Additional Organizational Information window: -
Select Retro Component Usages.
-
Select the Tax Area.
-
Enter a Retro Style, for example, Tax When Paid.
-
Enter an Effective Start Date.
-
Enter an Effective Date.
-
Choose OK to confirm your choices.
Processing the retrospective payments for all employees in the same style is a faster alternative than setting up details at the element level for each assignment.
This method does not prevent you from making changes for individual assignments when you view RetroPay status.Set Up Retro Components and Spans at Element Level From the Element window: -
Query the element.
-
Choose the Recalculation tab.
South African users: Select the predefined ZA Statutory Updates event group from the list of values in the Recalculation Events field. Alternatively, you can create and attach an event group of your choice.
-
Choose the Retro Components button.
Important: Do not enable the Retro Component of the elements that are themselves being used to process retropay for another element.
-
Select a Recalculation Reason.
-
Select a Reprocess Type.
-
Select an Element Span to indicate the start date and end date on which you want to report.
You can modify entries at element level to make exceptions for particular assignments. Note: Your localization may advocate one of these as the preferred method.
-
-
Determine whether a retrospective change in Oracle Payroll will appear in the Retro-Notifications report. Set up an event group to contain all the retrospective change events that you want to record.
See: Setting Up the Retro-Notifications Report, Oracle HRMS Payroll Processing Management Guide
-
Although Enhanced RetroPay is the recommended RetroPay process for most localizations, your System Administrator can also set up these earlier versions of RetroPay.
See: Setting Up RetroPay by Element, Oracle HRMS Payroll Processing Management Guide
See: Setting Up RetroPay by Run and RetroPay (by Aggregate), Oracle HRMS Payroll Processing Management Guide
Set Up the RetroPay Component
Set Up the Retro-Notifications Report
Set Up Your RetroPay Process
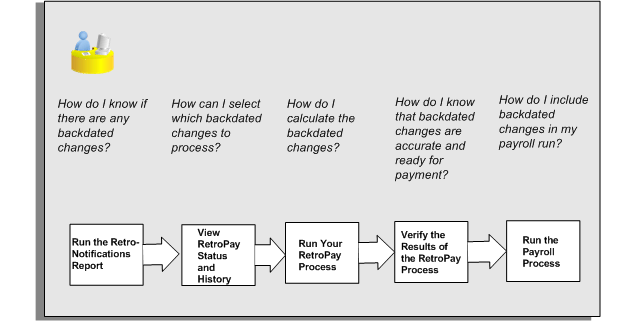
Understanding the Sequence of Your RetroPay Activities
Follow this sequence to:
-
Identify outstanding backdated adjustments
-
Monitor and control the processing of backdated adjustments
-
Include backdated adjustments in your next payroll run.
You can only run the Retro-Notifications report and view RetroPay status if you are using RetroPay by Element, or the version of RetroPay by Element sometimes referred to as Advanced or Enhanced RetroPay.
This sequence does not apply to RetroPay by Run and RetroPay (by Aggregate)
-
Run the Retro-Notifications report to identify any backdated changes that have not been included in a payroll run.
You can save your summary of backdated changes into either an assignment set or an event group.
Once you have identified the retrospective changes, you can then decide whether to include them in your RetroPay process.
The Enhanced Retro-Notifications report uses the Payroll Events Model to identify what changes have occurred to your underlying data. If these changes correspond to the retrospective types of change that you want to be notified about, then these changes appear on the Retro-Notifications report.
-
Once you have identified unprocessed retrospective payments, you can determine how you want to process these changes.
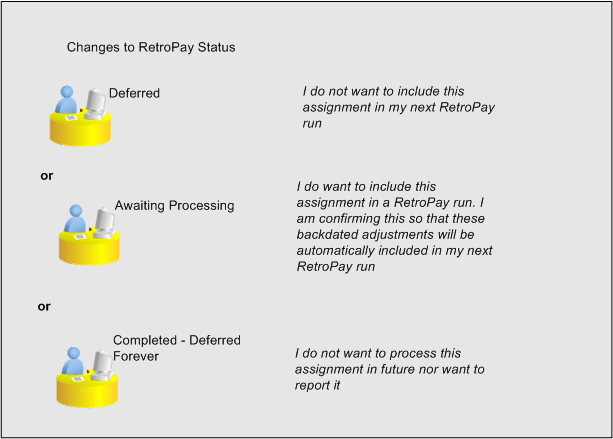
The Retro-Notifications report identifies the assignments with backdated adjustments. If you defer, then the assignment is not included when you next run RetroPay.
You can also include additional assignments that the Retro-Notifications report did not identify. This typically occurs when you discover additional backdated adjustments that were not known about when you ran the Retro-Notifications report.
The following diagram shows the sequence of statuses for each RetroPay status:
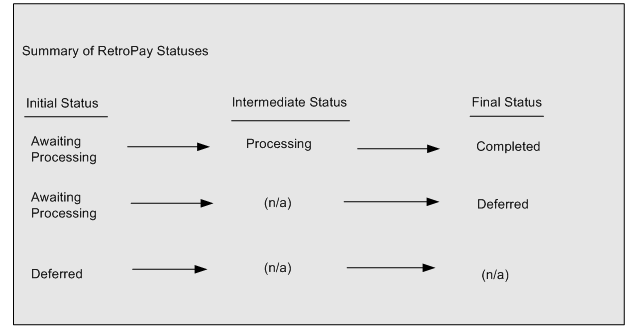
Once RetroPay processing begins, the initial status changes to an intermediate status of Processing.
You can query all retro assignments that are at the initial (outstanding) status, and all retro assignments at the final (completed) status.
The following diagram shows what statuses are included when your query All Outstanding, and All Completed:
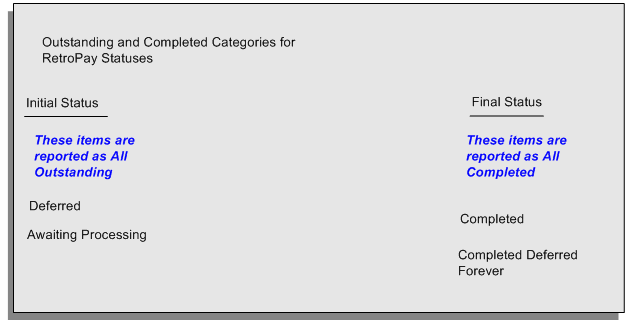
-
You enable Oracle Payroll to make retrospective adjustments for the combination of changes identified on the Retro-Notifications report, and subsequently modified when viewing RetroPay status.
See: Running Enhanced RetroPay
See: Running RetroPay by Element, Oracle HRMS Payroll Processing Management Guide
RetroPay by Element already enables you to distribute retrospective payments across individual elements.
If you have Enhanced RetroPay you can decide whether each retrospective payment requires:
-
A full reprocessing in which you recalculate all amounts for the current payroll. This option is typical when you are processing backdated payments, or when you want to deduct tax for backdated amounts in the period when it was earned, rather than in the current payroll period.
-
A limited reprocessing in which you recalculate only some of the amounts for the current payroll. This option is typical when you are processing corrections, or when you want to deduct tax for retrospective changes in the current payroll period rather than in the period when it was earned.
Components for RetroPay
Oracle Payroll describes each different type of Enhanced RetroPay run as a component. For example, you could set up a component Earnings Correction for the element Basic Salary. A component always has:
-
A name (for example, Earnings Correction)
-
A reprocess type (Static, Partial, Reprocess) to determine how to process the component
Element Spans for RetroPay
You can also attach element spans to your selected element. An element span provides a start and end date for retrospective processing.
-
-
When you have run the RetroPay process, verify your results and correct any errors.
-
Finally, run your payroll to reflect the adjustments that you have made for the retrospective payments.
Run the Retro-Notifications Report
View RetroPay Status and History
Run the RetroPay Process
Verify Your RetroPay Results
Run Your Payroll
Viewing RetroPay Status and History
You use the RetroPay Status window to control how you want to process changes that have a retrospective impact. You typically find outstanding retrospective changes where changes are entered in Self-Service HRMS independently of Oracle Payroll.
Use the RetroPay Status window to:
-
Identify any assignments that have changes implying retrospective processing.
-
Specify how you would like to process any outstanding retrospective changes.
-
Confirm that your application has processed the specified requests.
-
Create or update multiple retro assignments for status as Awaiting Processing or Deferred.
You can still use the Retro-Notifications report to identify all outstanding retrospective changes that have not been applied, and group them into an assignment set ready for processing.
See: Running the Retro-Notifications Report
However, the advantage of using the RetroPay Status window is that you can identify what you want to process, or exclude from processing, and then mark your selections for completion. Additionally if you have to create or update multiple retro assignments, you can do so using the Web ADI spreadsheet.
To search for assignments that have retrospective changes
-
Select the search criteria for assignments that you want to view. If you do not select any criteria, then your search returns all assignments that have retrospective changes. You can search for any of these criteria:
Name: Specify a name, or search for all names.
Assignment Number: Specify an assignment or search for all assignments.
Recalculation Date: Use this start date and end date to determine the period for retrospective changes.
Status: Select the status that you want to identify.
-
All Completed. This status displays all assignments with retrospective implications that are already processed.
-
All Outstanding. This status displays all assignments with retrospective implications that are not yet processed.
-
Awaiting Processing. This status indicates that this assignment has cleared for processing and that the processing will occur in the next payroll run.
-
Completed. This status indicates that this assignment has now been processed.
-
Completed – Deferred Forever. This status indicates that the retro assignments created by the system are deferred forever. The action of the retro assignment (RETRO_ASSIGNMENT_ACTION_ID) is to changed to –1. The retro assignments are not processed in the future nor reported with the new status.
-
Deferred. This status indicates that an assignment was scheduled for processing, but that the processing was deferred and will not occur until you change the status.
-
Processing. This status indicates that an assignment is being processed.
Recalculation Reason: This criterion indicates why retrospective processing is necessary and enables you to search particular categories of retrospective change to process them independently of other retrospective changes.
-
-
Click Go when you have selected all your search criteria.
To change the status of an assignment
You typically change the status of an assignment when you want to defer processing that was previously scheduled, or to indicate that you have already processed this change even though it was automatically scheduled.
-
Select the assignment that you want to change.
-
Select the new status for the assignment from the Change Status list of values.
-
Click Change Status.
To view the elements included on each assignment
-
Select the assignment name in the Name column.
-
View the elements for this assignment, and the Recalculation Reason for each element.
To update or delete elements for each assignment
-
Select the assignment name.
-
Click Update to add an element to the assignment.
-
Click Delete to remove an element from the assignment.
To confirm that your specified requests have been processed
-
Query the individual assignment, but leave the status field blank.
-
Alternatively, query all assignments with a status of All Completed or All Outstanding and check the details for your individual assignment.
To create multiple retro lines
-
Select the Create Retro Lines button.
-
A spreadsheet opens.
-
In the spreadsheet that appears, enter new records with a status of Awaiting Processing or Deferred.
-
Click on Upload. You can select Commit All Rows or Each Row option, if you want the application to validate all records and commit or validate each record prior to uploading the details to the database. If you select Each Row option, then all successful records will be uploaded and error records will not be uploaded. Only on successful validation, the application makes changes to the database.
If you select the Upload All Rows or Each Row, then the application does not validate the details prior to uploading.
To update the multiple retro lines
-
Query the assignments with Awaiting Processing or Deferred.
-
Click on Download to Spreadsheet check box and click Go
-
In the spreadsheet that opens, you can update the status. You cannot modify any employee or assignment information but can only change the status of the assignment or you can delete the retro entry or update the reprocess date of the retro entry.
Note: In the Entry Delete/ Update column, ensure to select the applicable value if there are any entry changes made. If you do not select any value the application does not make any changes to the database.
-
Click on Upload. You can select Commit All Rows or Each Row option, if you want the application to validate all records and commit or validate each record prior to uploading the details to the database. If you select the Each Row option, then all successful records will be uploaded and error records will not be uploaded. Only on successful validation, the application makes changes to the database.
If you select the Upload All Rows or Each Row, then the application does not validate the details prior to uploading.
Running the Retro-Notifications Report
Use the Retro-Notifications report to
-
Identify all retrospective changes that have occurred since the last payroll run.
-
Automatically save these changes into an assignment set or as an event, depending on which Retro-Notifications report that you use in your localization.
-
Produce a report that lists the employees included in the assignment set and the trigger event that included them. You can view this output through Concurrent Manager by clicking the View Output button. Your reporting output is stored under the title Retro-Notifications Report (Internal).
Retro-Notification information is particularly useful when changes with retrospective impact are entered in Self Service HRMS independently of the Payroll department.
The Retro-Notifications report does not perform any RetroPay processing. It only identifies element entries that have changed. You must still run your RetroPay process separately to process these changes. When you produce the assignment set, or event group, you can decide whether to:
-
Run your RetroPay process on all assignments in this assignment set.
-
Edit the assignment set or event group to remove or add assignments, and then run your RetroPay process.
-
Take no retrospective action on any of the assignments in the assignment set.
You can use the RetroPay Status window to schedule automatic processing.
You run the Retro-Notifications report from the Submit Processes and Reports window.
To run the Retro-Notifications report
-
Select Retro-Notifications report in the Name field. If the parameters window does not open automatically, click in the Parameters field to open it.
-
Select the payroll. You can only run this report for a single payroll.
-
Select the last Report Period that you want to run the report for. The List of Values contains all periods for your selected payroll. The report runs for all periods up to and including the one you select.
-
Select an Event Group for the report to use. You can only run this report for a single event group. A default event group captures changes made at element level, but you can override the default, if, for example, you are testing your initial setup.
-
Enter the name of the Assignment Set that you want the report to generate. You can use this assignment set as a starting point for further processing of the assignments identified in the report.
Note: The assignment set name generated by the report will include what you enter in the Generated Assignment Set field followed by the Report ID.
-
If you want to produce this report in Portable Document Format, (PDF), select a template.
-
Select OK and Submit.
When you have generated the assignment set remember to run your RetroPay process for those retrospective changes that you want to process. You can either run your RetroPay process directly or, if your RetroPay process is RetroPay by Element, or Enhanced RetroPay you can use the RetroPay Status window to schedule your processing.
Running the Retro-Notifications Report (Enhanced and Enhanced PDF)
-
Identify all retrospective changes that have occurred since the last payroll run.
-
Automatically save these changes into an assignment set, or as an event, depending on which Retro-Notifications report you use in your localization.
-
Produce a report (.a01) that lists the employees included in the assignment set and the trigger event that included them. You can view this output through Concurrent Manager by choosing the View Output button.
This information is particularly useful when changes with retrospective impact are entered in Self Service HRMS independently of the Payroll department.
The Retro-Notifications report does not perform any RetroPay processing. It only identifies element entries that have changed. You must still run your RetroPay process separately to process these changes. When you produce the assignment set, or event group, you can decide whether to:
-
Run your RetroPay process on all assignments in this assignment set.
-
Edit the assignment set or event group to remove or add assignments and then run your RetroPay process.
-
Take no retrospective action on any of the assignments in the assignment set.
You can use the RetroPay Status window to schedule automatic processing.
You run the Retro-Notifications (Enhanced) report from the Submit Processes and Reports window.
To run the Retro-Notifications (Enhanced) report
-
Select the payroll. You can only run this report for a single payroll
-
If you want to see the retro-notifications for a particular event group, select an overriding event group.
-
If you are running the PDF-enabled version of this report, select a template for your PDF output.
-
Select OK, and submit.
Running Enhanced RetroPay
Use the Enhanced RetroPay process to distribute backdated amounts or corrections that you have identified from the Retro-Notifications report.
You run the Enhanced RetroPay process from the Submit Requests window.
To run the Enhanced RetroPay process
-
Enter an effective date to indicate the date from which you want to create the retrospective elements for Enhanced RetroPay process.
-
Select the payroll.
-
If you want to create retrospective entries in a different pay period other than effective date, enter an entry creation date. The application creates retrospective entries in the pay period in which the Entry Creation Date occurs.
If you leave this field blank, the application creates the default retrospective entries as of Effective Date.
-
Click Submit
