Workforce Sourcing and Deployment
Appointments
Appointments and the Hiring Process
The appointment process takes the applicant from the recruitment process to employee administration where the initial tasks include entering terms and conditions and payroll information.
If you are an Oracle US Federal HRMS user, you use the Request for Personnel Action (RPA) to appoint employees.
If you are using Oracle SSHR, you can use the Candidate Offers functionality to generate offer letters.
Hire Dates and Future-Dated Changes
Oracle HRMS enables you to make future-dated changes to a person's details.
If you make future-dated changes to an applicant's details, such as changing their name, and you subsequently hire the person, the earliest hire date you can enter is the day following the date of the last change. The hire date can, of course, be a future date (providing it is at least 1 day after the date of the last change). For example, if you received an application on January 10th and you changed the applicant's details using future dates, say on January 22nd and February 10th, and you subsequently hire the applicant, the earliest hire date you can enter is February 11th (the date of the last change plus one day).
Alternatively, you could hire the applicant (change their person type to Employee), and then make the changes to their details with the status of Employee.
Back-to-Back Employment and Placements
Back-to-back employment and placements occur when a previous period of employment or a previous placement ends 1 day before a new period of employment or a new placement begins.
Oracle HRMS supports back-to-back employment and placements even where there is a difference in person types. That is, an ex-employee can begin a placement on the day following termination of their employment, and an ex-contingent worker can begin employment on the day following the end of their placement.
An ex-employee starting new employment or a placement on April 1st must have an actual termination date and a final processing date (for payroll processing) for their previous employment of March 31st. (If your enterprise does not have Oracle Payroll, the final processing date automatically defaults from the actual termination date).
An ex-contingent worker starting employment or a new placement on April 1st must have an actual termination date of March 31st for their most recent placement.
In both cases, there can be no future-dated changes.
Note: You cannot change the hire date of any back-to-back employment. Instead, you must cancel the employment and rehire the employee.
Earliest Hire Dates
-
An applicant's earliest hire date is either 1 day after you accept the application or the day after the last of any future-dated changes, whichever is later.
-
An ex-employee's earliest hire date is either 1 day after the final process date for the previous employment or the day after the last of any future-dated changes, whichever is later. For back-to-back employment, the final process date must be the actual termination date, and there can be no future-dated changes.
Note: Australia, Canada, China, Denmark, Hong Kong, India, Ireland, Korea, Kuwait, Mexico, New Zealand, Norway, Saudi Arabia, Singapore, South Africa, Russia, UK, US, United Arab Emirates, and International Payroll users can rehire ex-employee before the final process date. See: Rehire Before Final Process Date
-
An ex-contingent worker's earliest hire date is either 1 day after the actual termination date of the most recent placement or the day after the last of any future-dated changes, whichever is later. For back-to-back hiring, there can be no future-dated changes.
Rehire before Final Process Date
Australia, Canada, China, Denmark, Hong Kong, India, Ireland, Korea, Kuwait, Norway, Mexico, New Zealand, Saudi Arabia, Singapore, South Africa, Russia, UK, US, United Arab Emirates, and International Payroll Only: To provide greater flexibility in the hiring process, Oracle HRMS enables you to rehire a terminated employee before the Final Process (and after the Last Standard Process) date for their previous period of service.
Rehire before Final Process Date
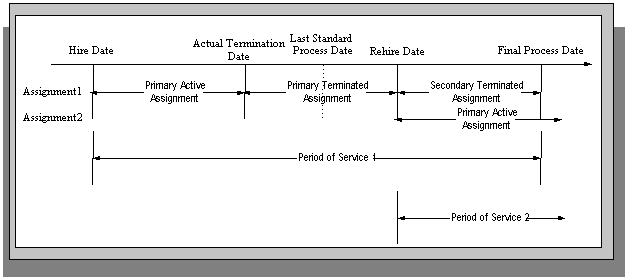
As illustrated in the diagram, when you complete the rehire, the application changes the existing, terminated assignment into a secondary assignment. The new, active assignment becomes the primary. You can then process payments from both assignments during the overlapping periods of service.
Note: When you cancel the rehire, the application changes the secondary terminated assignment back to a primary terminated assignment. The application however retains the date changes to the primary terminated assignment even after a cancellation. For example, if the actual termination date is 20 April, the final process date is 31 April, and you rehire the person on 25 April, the application updates the primary terminated assignment for the period 21 April to 24 April and creates a new one for the period 25 April to 31 April. If you subsequently cancel the rehire, then the application retains the primary terminated assignment for the period 21 April to 24 April as well as the one for the period 25 April to 31 April.
When you rehire before the final process date, the employee has overlapping periods of service between the rehire date and the final process date. The Terminate window displays the service dates for all the overlapping periods of service. The latest period of service appears by default. You can scroll down to view the earlier periods of service.
Valid Person Types for Applicants
You can convert an applicant to an employee but not to a contingent worker. However, an applicant can become a contingent worker (a Contingent Worker.Applicant) while their application for employment remains active. Subsequently, you can either cancel the application, and allow the contingent worker placement to continue, or end the contingent worker placement prior to hiring the applicant.
People
Windows for Maintaining Personal Information
Every enterprise must be able to record personal information for its employees, applicants, and contacts. HRMS enables you to enter and update this information using windows based on templates designed for your own working environment. Your system administrator can configure the predefined templates to match your people management processes.
If the template windows are not set up at your site, you can record personal information for all person types on the People and Assignment windows.
Note: The template windows are an efficient way to perform most basic HR management actions, such as hiring, ending an application, and updating assignments. However, the template windows do not support all DateTrack options, so for complex retroactive changes to history, you may have to use the People and Assignment windows.
Your system administrator can set up task flows from the template windows or the People and Assignment windows to give you access to all the windows in which you can record personal and employment information. You can enter information about:
-
New employees
-
Employment
-
Office location
-
Applicants
-
Background checks
-
Re-hire recommendations
-
Further names
-
Medical details
-
Address details
-
Telephone numbers
-
Picture record
-
Dependents, beneficiaries and other contacts
-
Contracts
-
Supplementary role
-
Elections
-
Previous Employment
-
Documents of Record
-
Allocated Checklists
You can also use these windows to update people's statuses, for example, from applicant to employee.
Note: The system administrator can create configured versions of the People window and the template windows so that you use each version for certain person types only or for certain functions only (entering employees, entering applicants, or hiring applicants).
Displaying Personal Information
Oracle HRMS enables you to easily access all the information you enter about people. There are lots of ways to view information about people held in Oracle HRMS. You can select the approach that best fits your needs. For example, you can:
-
Use Employee Direct Access to view and update your own personal details using a web browser.
-
Use Line Manager Direct Access to view information about people in your organization.
-
Use the Find and Summary windows of the People Management templates to display the people who interest you, then 'drill down', by clicking on buttons, to the information you need.
If the template windows are not set up at your site, you can display the same information using the Find Person window or a People folder.
-
Use an inquiry window to view specific information about a person, such as employment or absence history.
See: Using Inquiry Windows and Folders, Oracle HRMS Configuring, Reporting, and System Administration Guide
-
Use QuickPaint to design a report incorporating personal, assignment, application, or compensation information.
See: QuickPaint, Oracle HRMS Configuring, Reporting, and System Administration Guide
Finding a Person Using the Find Person Window
Entering a New Person (People Window)
Use the People window to enter and maintain basic personal information for all person types, including employees and contingent workers.
Note: You can also use one of the template windows such as Entering Employees or Entering Contingent Workers to enter new people.
The minimum information to enter for all categories of people is name and action type. In addition, for employees you must enter gender, employee number (if your enterprise uses manual number entry), and date of birth (for assignment to a payroll), nationality, religion, and the employee's name details in an alternative language, mainly English.
To enter a new person
-
Set your effective date to the appropriate date for adding the person to the application. If you are entering an employee, this should be their hire date.
-
Enter the person's name and other name details in the Name region:
-
Select a gender.
-
In the Action field, select an action type (such as Create Employment) and a person type. The person type you select displays immediately in the Person Type for Action field before you save it. If only one user person type exists for the action type, it displays automatically in the Person Type for Action field.
Note: If you enter a contingent worker who has a previous person type such as ex-employee, you can choose to revert the contingent worker back to the previous person type by using the Cancel Placement action.
You create user person types in the Person Types window. If you want to change a person type to another person type with the same system person type you must use the Person Type Usage window.
See: Changing Person Type Usage and Deleting OAB Person Type Usage, Oracle HRMS Workforce Sourcing, Deployment, and Talent Management Guide
Entering Employee Information
Enter the following information if the person is an employee. Otherwise, proceed to step 6.
-
If desired, change the Latest Start Date field.
-
The Latest Start Date field displays your effective date.
-
For employees who have previously worked for your enterprise, the Date First Hired field displays the start date of the employee's earliest, previous period of service. This date must be on or before the start date of the earliest period of service. The Date First Hired field is situated on the Benefits Tab.
If the latest start date and the date first hired are the same, when you amend the latest start date, the date first hired is set to the same date.
If you amend the latest start date to earlier than the date first hired, the date first hired is set to the same date.
Entering Identification Information
Enter the person's identification information in the Identification region:
-
-
If your enterprise uses a manual number generation scheme, enter an employee, applicant or contingent worker number. If your enterprise uses automatic number generation (including Use Employee Numbering for contingent workers), the employee, applicant, or contingent worker number automatically displays when you save your entries in this window.
Note: If you query a person who has a combination of employee, applicant, and contingent worker numbers, the employee number displays in the Number field. If the person lacks an employee number but has a contingent worker number and an applicant number, the contingent worker number displays. However, you can choose to view any of the identification numbers held for a person by selecting them from the list.
-
Enter the Civil Identity Number (Civil ID).
Kuwaiti users: This step is not mandatory for applicants.
UAE Users: Enter the National Identifier for the person.
Entering Personal Details
Enter personal details in the Personal tabbed region.
-
Enter the date of birth. You must do this before you can assign an employee to a payroll.
Note: The Age field displays the age of the person is automatically, on entering the birth date of the person.
-
Enter additional birth information into the Place of Birth, Region of Birth, and Country of Birth fields.
-
If the Work Telephone field is displayed, enter a work telephone number. Otherwise, use the Phone Numbers window to enter this information.
-
In the Status field, select a marital status.
-
Select whether your employee, applicant or contingent worker is:
-
Registered disabled
-
Not registered disabled
-
Partially disabled
-
Fully disabled
-
-
Save your work.
-
If your data already includes a person with the same civil identity number, or with the same family name and a first name and date of birth that is either the same or not entered, then a list of values shows all the people who share the details.
Note: People who are only entered with a person type of Other, that is someone external to your enterprise, are not shown in this list.
If you have entered neither a first name nor a date of birth, then the list of values displays all the records that match the information you have entered.
Note: The list of values displays only if your system administrator has set the HR: Cross Business Group profile option to Yes.
Do one of the following four tasks:
-
If the person you are entering already exists, but in a different business group, then select that person from the list of values. The person you are entering is saved in your current business group and linked to the existing person record to indicate they are the same person. If your application has person synchronization enabled, then the personal information entered for the new person is copied across to existing records in other business groups. If existing records have values for fields that the new record leaves blank, then these values appear in the new record. See: Person Record Synchronization, Oracle HRMS Workforce Sourcing, Deployment, and Talent Management Guide.
-
If the person already exists in your current business group then select that person from the list of values. The application retrieves the existing record and cancels the save you were trying to make, as one business group cannot contain two records for the same person. Close the new record and scroll down to display the existing record.
Note: You cannot link to any entry in the list of values marked with an asterisk as these either belong to your business group, or are linked to a person in your business group.
-
If the person already exists in TCA, but not in HRMS, then select that person from the list of values. The person you are entering is saved in your current business group and linked to the existing person record to indicate they are the same person. The information held for the person in TCA is updated with that entered in HRMS. See: People in a Global Enterprise, Oracle HRMS Workforce Sourcing, Deployment, and Talent Management Guide
-
If the person you are entering does not match any of the records displayed, then select No Match in the lookup. Your new person record is saved.
-
Entering Additional Personal Information (People Window)
Optionally, you can enter additional information for people in the tabbed regions of the People window described in the following steps.
Additional Information: The Background Information, Medical Information, and Rehire Information tabbed regions appear only if your system administrator has enabled them for you.
To enter office information for a new hire, an existing employee, or contingent worker
-
Choose the Office Details tabbed region.
-
Enter the office number.
-
Enter the internal location of this office.
-
Enter the office identifier for internal mail
-
Enter the person's email address.
-
In the Mail To field, select Home or Office to indicate the person's preferred mail destination.
To enter information for an applicant
-
Choose the Applicant tabbed region.
-
If the applicant's resume is on file, check the Exists check box.
-
If the applicant's resume is on file, select the date indicating when the resume was last updated.
-
Select a final date a file is to be maintained for this applicant.
To enter background check information
-
Choose the Background tabbed region.
-
Check whether the person background check has been performed.
-
Select the date the background check was performed.
To enter rehire recommendation information for an applicant who was a former employee or contingent worker
-
Choose the Rehire tabbed region.
-
If the former manager has recommended the applicant for rehire, check the Recommended check box.
-
Select the reason for this recommendation.
To enter further name information
-
Choose the Further Name tabbed region.
-
Enter one or more honors or degrees (BA, MBA, or JD, for example) that the person has earned.
-
Enter a preferred name (such as a nickname).
-
If the person was previously used a different name, enter the previous last name.
-
Enter the first part of the person's name, such as van der in the Prefix field. For someone whose last name is van der Zee, you can sort by the last word of the name , Zee. If you enter in the Last Name field, the application sorts name under van.
-
Enter the last part of the person's name, such as Junior or II in the Suffix field.
-
Enter the person's middle name.
To enter medical information for a person
-
Choose the Medical tabbed region.
-
Select the date of the person's last medical test
To enter other information for a person
-
Choose the Other tabbed region.
-
Select the type of schedule in the Availability/Schedule field; for example, the days of the week your employee works.
-
Enter the employee's work availability with your company. You select either the full time or part time work availability for the Saudi employees. You need to select Full time option for all the employees.
-
Select the language the person prefers for correspondence. For example, select German if the person prefers to correspond or receive company information such as terms of pension plan in German.
Additional Information: Note: The Correspondence language list includes in the FND_LANGUAGES table. This table contains the languages that Oracle National Language Support Runtime Libary (Oracle NLSRTL) supports. Check with your System administrator for information on NLSRTL supported languages.
-
If the person has died, enter the date of death.
Date of death defaults to the person's termination date if:
-
in the Terminate window you enter the termination reason of deceased, but
-
you do not provide the actual termination date, and
-
you have not yet entered a date of death
-
-
-
Select the current student status, if the person is a student.
-
In the Date Last Verified field, you can enter the date the person last checked this personal information for accuracy.
-
Check the Military Service check box if the person is employed in a military service.
The value of this field can impact benefits calculations.
-
Check the Second Passport Exists check box if the person possesses multiple passports.
To enter benefits information
-
Choose the Benefits tabbed region.
Additional Information: All fields in the Benefits tabbed region are optional. Most can help to determine plan eligibility or rates.
Additional Information: If necessary, you can add the Benefits Tab to the People window. Query the BEN_MANAGER menu in the Menus window and add the HR View Benefits function to the menu.
-
Enter a benefit group for your employee or applicant. Benefit groups help determine a person's eligibility for a plan or set benefit rates. For example, benefit groups can address mergers and acquisitions where eligibility is complicated, or assist in grandfathering a person into a very old plan.
-
Enter what kind of tobacco (cigarettes, pipe, cigar, or chewing, for example) your employee uses, if any.
-
Enter the medical plan number, which is the policy or group plan number of an externally provided medical plan.
-
Enter the adoption date, if the employee has adopted a child. This information, with the child's date of birth, can determine dependent eligibility. You can enter the adoption date only if you have entered a date of birth for the person. The adoption date must be the date of birth or later.
-
Enter the date you received the death certificate of a deceased employee. You can enter this only after you have entered the date of death in the Other Information region. The receipt of the death certificate must be after or equal to the date of death.
-
Enter an adjusted service date for your employee. Benefits can use this date, rather than the date first hired, to determine the length of service for eligibility, enrollment, and rates. The adjusted service date can credit service for former employers, grandfathered benefits, or in the case of mergers and acquisitions
-
Change the date first hired. For employees who have previously worked for your enterprise, the Date First Hired field displays the start date of the employee's earliest, previous period of service. This date must be on or before the start date of the earliest period of service.
-
Check the Other Coverage check box, if the employee or applicant has externally provided coverage.
-
Check the Voluntary Service check box, if your employee or applicant is volunteering, for example as a missionary.
To enter alternate names
-
Choose the Alternate Names tabbed region to enter name details in a different language, such as English. The passport office uses this information.
-
Enter the person's name in the First Name field.
-
Enter the name of the person's father.
-
Enter the name of the person's grandfather.
-
Enter the person's family name.
-
Save your work.
To enter additional information
-
Choose the Additional Information tabbed region.
-
Select your employee's nationality. This information enables you to calculate your employee's social insurance and other compensation benefits.
-
Enter the nationality number for Kuwaiti nationals. This is a numeric sequence number that the government allots to each national.
-
Enter an alphanumeric value as the article number for the person.
-
Select the date on which the person acquired Kuwait nationality.
-
Select your employee's religion. This information can affect your employee's leave entitlements.
-
Select your employee's former nationality. For example if your non-Kuwaiti employee is an American citizen, and has migrated from Spain, then you enter American as their nationality and Spanish as their previous nationality.
-
Save your work.
Defining Assignment Statuses (Assignment Window)
Entering Additional Assignment Details (Assignment Window)
Once you have set up basic assignment details, you can enter additional information, such as supervisor details, special ceiling progression points, and salary information, in the tabbed regions of the Assignment window. The tabbed regions that appear in the Assignment window vary according to person type and localization.
To enter supervisor information for an employee or contingent worker
-
Choose the Supervisor tabbed region.
-
Select the name and number of the worker's personal supervisor. If you use assignment-based supervisor hierarchies, select the supervisor's assignment number.
You can select a contingent worker as a supervisor only if the HR: Expand Role of Contingent Worker user profile option is set to Yes.
You can select a supervisor from another Business Group if the HR Cross Business Group user profile option is set to Yes at your site.
Note: The application does not update this information. Use organization and position hierarchies to show management reporting lines.
To enter probation period and notice information for an employee
-
Choose the Probation and Notice Period tabbed region.
-
Amend the default probation period for your employee's assignment, if required.
-
Enter the notice period for the assignment, if required.
To enter standard conditions information for an employee or contingent worker
-
Choose the Standard Conditions tabbed region.
-
Amend the standard work day information for your employee or contingent worker assignment, if required.
-
This step is for employees only. For benefit administration, enter whether the assignment is hourly or salaried.
Note: If you are setting up benefits based on salaried or hourly pay you must set up the Hourly/Salaried field in addition to the Pay Basis. The Pay Basis identifies how pay is quoted within Salary Administration and enables an employee to have their pay quoted as hourly, but be paid a salary. Therefore, for benefits, you need to set up whether your employee is paid hourly or receives a salary.
To enter primary or secondary assignment and miscellaneous information for an employee or contingent worker
-
Choose the Miscellaneous tabbed region.
-
Enter the internal address details (such as the floor or office number), if required. The system adds the details to the location address.
-
Select a reason for adding or changing the assignment. For example, you can use the Reason field to record promotions for your employees. You define valid reasons as values for the lookup types Reason for Change to Employee Assignment (EMP_ASSIGN_REASON) for employees and Contingent Worker Assignment Reasons (CWK_ASSIGN_REASON) for contingent workers.
-
Select the Manager box if the assignment is at manager level and you want to include this worker in the Organization Hierarchy Report as a manager. (You can select Manager for a contingent worker assignment only if the HR: Expand Role of Contingent Worker user profile option is set to Yes.)
-
Check the Primary check box to update a secondary assignment to Primary.
See: Changing Primary Assignments, Oracle HRMS Workforce Sourcing, Deployment, and Talent Management Guide
-
If you use Oracle Services Procurement to provide purchase order information for contingent worker assignments, the purchase order line may include the projected assignment end date. In this case, the date appears in the Projected Assignment End field. Otherwise, enter the projected end date of the assignment.
To enter employment terms for an employee
-
Choose the Employment Terms tabbed region.
-
Select the contract to be referenced by the assignment. The list of contracts is limited to those entered for the employee that have start dates on or before the assignment start date.
-
Select the agreement grade structure for the collective agreement. A window shows the grade factors for that grade structure.
-
Enter values for the grade factors. Or, choose the Combinations button and enter search criteria for one or more grade factors to display the reference grades that meet those criteria.
If you enter values directly into the grade factor fields, they must correspond to an existing reference grade unless the Override Allowed check box in the Agreement Grades window is checked.
Note: Any new combinations of values that you enter are unavailable for reuse with other assignments. To reuse a combination, you must define it as a reference grade in the Agreement Grades window.
To enter special ceiling information for an employee
-
Choose the Special Ceiling tabbed region.
-
Enter a special ceiling only if the employee is assigned to a grade, and if a grade scale is defined for this grade. This special ceiling overrides the ceiling defined for the grade scale.
To enter salary information for an employee
-
Select a salary basis for the employee.
-
You can also enter the frequency of salary and performance reviews.
Warning: If you change an employee's salary basis to one that uses a different salary element, the employee's existing salary element entry ends. Using the Salary Administration window, you should make a new salary entry for the employee, effective from the date of the salary basis change.
For more information about salary administration, see: Salary Administration, Oracle HRMS Compensation and Benefits Management Guide
To enter bargaining unit and union membership information for an employee
-
Choose the Bargaining Unit tabbed region.
-
Enter a bargaining unit code for your employee's assignment. This is usually the legally recognized collective negotiating organization.
Note: You set up your different bargaining units as values for the Lookup type BARGAINING_UNIT_CODE
-
Select whether the employee associated with the assignment is a member of a union.
To enter a billing title for an employee or contingent worker (Oracle Projects only)
-
Choose the Project Information tabbed region.
Note: The Project Information tabbed region displays only if you have installed Oracle Projects.
-
Enter a billing title. The information you enter in the Billing Title field serves as the default title on project customer invoices. You can override this information using Project Accounting.
-
Enter a project title.
To enter supplier information for a contingent worker
You use the Supplier tabbed region to record information about the supplier providing the contingent worker to your enterprise. The procedure depends on whether you are using Oracle Services Procurement to provide purchase order information for contingent worker assignments.
If you are not using Oracle Services Procurement:
-
Choose the Supplier tabbed region.
-
Select the name of the supplier and the supplier site for the contingent worker.
-
Enter supplier IDs for the contingent worker and the assignment, if available. These values identify the worker and the assignment to the supplier.
If you are using Oracle Services Procurement
-
Choose the Supplier tabbed region.
-
Select a purchase order number for this assignment.
-
If only one purchase order line exists, it appears in the Purchase Order Line field. Otherwise, select a purchase order line. Note that the Purchase Order Line field is enabled only when you select a purchase order.
-
Information from the purchase order appears automatically in the Supplier Name and Supplier Site fields. If the purchase order line includes a job value, it replaces any value in the Job field.
-
Enter supplier IDs for the contingent worker and the assignment, if available. These values identify the worker and the assignment to the supplier.
To enter General Organization for Social Insurance (GOSI) details
-
Choose the GOSI tabbed region.
-
Select the name of the employer.
-
Enter the employee's GOSI Number. If your employee does not have a GOSI Number, leave the field blank.
-
Specify whether your organization makes GOSI Annuities for Saudi employees. The default value is Yes.
Additional Information: You cannot specify GOSI Annuities for non-Saudi employees. For non-Saudi employees, the default value is No.
-
If you selected Yes in the Annuities field, enter the Annuities join date.
-
In the Hazards field, specify if your organization provides GOSI Hazards deductions on behalf of the employees. The Hazards field default is Yes for all employees.
-
Edit the Hazards join date, if required.
To enter grade ladder information for an employee
You must enter grade ladder information to use the Grade/Step Progression process.
-
Choose the Grade Ladder tabbed region.
-
Select the grade ladder for this assignment. If you selected a grade for this assignment previously, all the grade ladders that use that grade are available. If you have not selected a grade, all the active grade ladders in your enterprise are available.
To enter employment details information for an employee
Kuwaiti users only: Social security reports use this information.
-
Choose the Employment Details tabbed region.
-
Select the employer. Social security reports displays the name of the employer.
-
Enter a valid 11-digit social security number for your Kuwaiti employees.
Additional Information: If this person is a Kuwaiti national, then the social security number is mandatory. The application checks the nationality of the person against the local nationality set for the business group, which should always be set to Kuwait.
-
Select the date of commencement of subscription to the complementary or supplementary insurance scheme.
People Management Templates
Entering a New Employee
Two templates are provided in Oracle HRMS that enable you to enter employees. These are:
-
Enter Employees - This is intended to be used by users who are only interested in entering new employees onto the system, for example data entry clerks. It only uses the Maintain window and includes all the fields required to set up an employee.
-
Maintain Employees - This enables users to enter employees onto the system, and also to maintain existing records. It uses the Find, Summary and Maintain window to enable users to control a large amount of information relating to employees and their assignments.
Your system administrator will have set up these templates according to the needs of your enterprise and will have restricted your access according to the role you have to perform.
To enter a new employee using the Enter Employees template
Using enter employee template you enter the following:
Employee Details
-
Choose the Employee Details tabbed region.
-
If the application does not display the new window, click the New icon in the toolbar. Select New Employee.
-
Enter the personal details for the new employee. You must enter:
-
First Name
-
Family Name
-
Gender
-
Nationality
-
Civil Identity Number (Civil ID)
-
Person Type
-
Start Date
-
Organization name
All other personal information is optional.
-
-
Save your work.
Additional Name Details
Use the Additional Name Details tab region to enter name details in a different language, such as English.
-
Choose the Additional Name Details tabbed region.
-
Enter your employees' name in the Alternate First Name field.
-
Enter the name of your employee's father.
-
Enter the name of your employee's grandfather.
-
Enter the family name of your employee.
-
Enter the following details, if your employee is non-Kuwaiti:
-
Enter the last name of your employee such as Junior or II in the Suffix field.
-
Enter the first name of your employee in the Prefix field.
-
Enter the Middle Name of your employee.
-
-
Save your work.
Employment Details
-
Choose the Employment Details tabbed region.
-
Select the employer.
-
Enter your employee's 11-digit social security number.
Additional Information: If this person is a Kuwaiti national, then the social security number is mandatory. The application checks the nationality of the person against the local nationality set for the business group, which should always be set to Kuwait.
To enter a new employee using the Maintain Employees template
-
Display the Summary window of the Maintaining Employees form.
-
Choose the New icon in the toolbar or right-click on People By Name in the Data Organizer and choose New from the right mouse menu.
-
Select New Employee and choose OK.
The Personal tab is displayed for you to start entering information about the employee.
-
Set your effective date to the date when you want the assignment to begin, such as the hire date You can enter a date in the Date field next to the timeline bar and choose Go
-
Enter personal information for the employee. You must enter:
-
Name (person name, father's name, grandfather's name, and family name)
-
Type
-
Gender
-
Nationality
-
Civil Identity Number (Civil ID)
All other personal information is optional.
-
-
Choose the Communication tab if you want to enter contact information, such as addresses and phone numbers.
-
Enter application information in the Assignment, Compensation, and Schedule tabs, as required. See: Entering Employment Information, Oracle HRMS Workforce Sourcing, Deployment, and Talent Management Guide
-
Choose the Additional Name Details tab to enter person's details in an alternative language.
-
Choose the Employment Details tab to enter the employee level details.
-
Save your work. If you have missed any mandatory information, you are prompted to enter it before the new record is saved.
If a person already exists on your application with the same national identifier, or with the same surname and a first name and date of birth that is either the same or not entered, then a list of values is displayed that shows all the people who share the details. See Multiple Person Records
Entering Addresses
Entering Addresses (Address Window)
You can enter as many addresses as necessary for each person, using the Address window.
Note: You cannot enter or update address information in the Address window for a contact who is also an employee or contingent worker. Instead, update the relevant employee or contingent worker record.
To enter an address for a person
-
Select a national address style and click in the Address field.
If a local address style exists for your country, it is displayed as the default. Otherwise, the international style is displayed.
Finnish Users: To display the postal code and post office on the same row in line with the Finnish Address standard, the application displays them in the same field, separated by a space. If you are not using Finnish postal codes upload functionality, you must enter postal codes and post offices manually. See: Entering Postal Codes, Oracle HRMS for Finland Supplement
Dutch Users: When you record foreign addresses, ensure you use the Dutch International address style. This address style enables you to report the address in the wage report in the required format.
US and Canadian users: There is a choice of US address style and International address style if you have Vertex geocode data installed. If you are not maintaining DTW4 data and do not want to enforce the strict tax validation, then you can disable this using the HR:Enable DTW4 Defaults profile option.
Singapore Users: When you record addresses for local employees, ensure you use the Singapore (Formatted) address style. This address style enables you to report the Primary address in the IRAS reports in the required format.
Note: You can change existing address styles or create new ones if required. See: Changing Default National Address Styles, Oracle HRMS Configuring, Reporting, and System Administration Guide
A window opens with the address format for the country you select.
-
Enter your address information in this window.
Note: India Users:If the city is Delhi, New Delhi, Mumbai, Bombay, Kolkata, Calcutta, Chennai, or Madras, the application sets the metro status to Yes, else it is set to No.
Note: Use the Phone Numbers window instead of this window to record telephone numbers otherwise you will be maintaining two lists of numbers.
Kuwaiti users: You must select the Governorate (Muhafazat) for payroll processing.
UK users: If you enter the employee's address, then the first line is mandatory and the remaining lines are optional. If you enter the post code, then you must also enter the first line of the employee's address. If you enter the country in the first line, then you must enter the employee's address.
See: Adding Telephone Information, Oracle HRMS Workforce Sourcing, Deployment, and Talent Management Guide
Russian users: Ensure you enter the zip code for the Residential address category so that the code appears in statutory reports.
-
Choose the OK button. This returns you to the Address window.
-
Select an address type, such as home, or weekend, or business. You can only have one address of each type at any time.
Singapore Users: If you use company quarters, be sure to choose this address type, so it appears in the A8A report.
-
Check the Primary checkbox to identify the person's main address. Otherwise, leave blank. By default, the first address you enter is the Primary address.
Only one address at any time can be a person's Primary address.
Singapore Users: If you use the Singapore (Formatted) address, you must enter the block number or address number, the street name, and the postal code values within the address to ensure that the IRAS process validates correctly. If you enter the Unit Number, you must enter the Level (Floor) number in the XXX-XXXXX format.
-
Save your work.
To update the primary address
-
Enter an end date for the existing primary address.
Do not save.
-
Create the new primary address starting the next day and check the Primary Checkbox.
Note: An employee must always have a primary address, but you cannot enter more than one primary address for the same time period.
-
Save the new primary address.
To change from an international to a local address style
-
To change from a global (international) address style to a local address style, choose Change Global Style to Local. This button appears only when the current style is international.
The Personal Address Information window appears showing the new address structure. Values in fields common to both styles appear in the new structure.
If you choose Change Global Style to Local when there is no local style, Oracle HRMS displays an explanatory message and the style remains unchanged.
-
Complete the address definition, as appropriate.
-
Choose OK.
-
Save your work.
Entering Contracts
Entering Contracts
You enter and maintain contracts in the Contracts window.
-
Set your effective date to the start date of the contract.
-
Enter the reference code for the contract. The code for each contract attached to a person must be different, though more than one person can use the same contract reference code.
-
Select the status that indicates the contract is active. The period of service dates will also be displayed if a corresponding period of service exists.
See: Creating Contract Statuses, Oracle HRMS Workforce Sourcing, Deployment, and Talent Management Guide
-
Select the type of contract.
-
Select the status reason of the contract, such as contract still going-on and contract finishing. You must set up status reason using user defined Lookup Type CONTRACT_STATUS_REASON.
-
Enter the description of the contract.
-
Select the document status of the contract, such as pending, opened, printed and so on. You must set up document statuses using the user extensible Lookup Type DOCUMENT_STATUS.
-
Enter the date the document status of the contract changed.
Note: The document status is not DateTracked.
-
You can enter start and end reason information of the contract.
-
Enter the duration and the units of the contract, such as days, months, and weeks.
Note: On entering the duration for a fixed-term contract, Oracle HRMS displays the expiry date of the contract. The expiry date is calculated only for the specified period. If required, you can change the expiry date of the contract.
The expiry date field is disabled for the unlimited contract.
-
Enter the profession of the employee.
-
Enter the details about the parties that are involved in the contract.
-
You enter information about the extension of the contract in the extension period, number of extensions, and extension reason fields.
-
Select the employment status. This is used to calculate the compensation benefits for the employee.
-
Save your changes.
You can attach an electronic copy of any written contract that accompanies the record using the Attachments button.
See: Using Attachments, Oracle HRMS Configuring, Reporting, and System Administration Guide
Maintaining Contracts
The amendments made to a contract are datetracked. The result of any changes made to the status of a contract is dependent on whether the record is being corrected or updated. For example:
-
If you change the status of an active contract to make it inactive, and choose the Update button, the contract record will be ended. A new contract record with an inactive status will be created and the fields in the Active Contracts Dates region will become blank.
-
If you change the status of an active contract to make it inactive and choose the Correction button, the current contract record will be amended to appear as if the most recent active period has never occurred.
Deleting Contracts
If you mistakenly save information in the Contracts window you can delete it. You cannot perform this action if the contract is referenced by an assignment.
Note: Contracts cannot be date effectively end dated.
To delete a contract
-
Query the contract in the Contract window.
-
Select Delete Record from the Edit menu and proceed as instructed in the displayed windows.