Compensation and Benefits Management
General Compensation Structures
Elements: Building Blocks of Pay and Benefits
With Oracle HRMS, you define a working model of your own types of compensation and benefits and the policies or business rules that govern the allocation of these to your employees. You define these types as elements. Elements are the building blocks of pay and benefits, both for HR analysis and payroll processing.
-
Earnings, such as salary, wages, and bonuses
-
Benefits, such as employee stock purchase and pension plans
-
Absences from work
-
Non-payroll payments, such as expense reimbursements
-
Tangible items distributed to employees, such as tools, uniforms, mobile phones, or computers
-
Voluntary and involuntary deductions, as well as pre-tax and tax deductions
-
Employer taxes and other employer liabilities
There is no limit to the number of elements you can define, and all your definitions are datetracked.
How Are Elements Created?
Some elements are supplied predefined with Oracle HRMS, some are available in template libraries, others are generated by the system when you define certain types of compensation and benefits, and the remainder you can define using the Element window to best meet the needs of your own enterprise.
Predefined Elements
The predefined elements are specific to your localization. They typically include deductions for tax and wage attachments. They may also include standard earnings, such as salary. You should not make any changes to these predefined elements.
Template Elements
Using the Configuration Workbench, you can select many earnings and deductions from a template library for your country and industry. Your selected earnings and deductions form a template set that you can load into your business group. The template set includes the elements and the balances, balance feeds, and formulas required for payroll processing. You can configure any of these definitions to match your specific requirements.
Generated Elements
In certain legislations, including North America and the UK, Oracle Payroll users can initiate earnings and deductions, and the system generates the elements you require, along with balances, balance feeds, and formulas. The method of initiating earnings and deductions depends on your localization. Typically you use the Element Design Wizard, Earnings and Deductions windows, or other template windows for specific earnings and deduction types. The processing options you select in the wizard or window determine the rules embedded in the generated elements and formulas. As with template elements, you can configure generated elements and formulas to match any special requirements.
Also, when you create PTO Accrual Plans, the system generates elements for you.
Introduction to Element Definition
The following diagram illustrates the items that you can define or select to control the entry and processing of any earning, deduction, basic benefit, or payment.
Compensation Definition
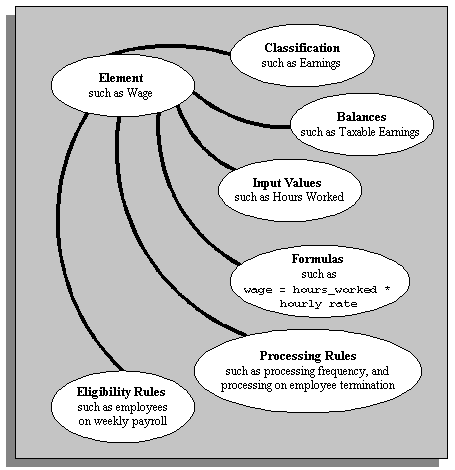
To take a simplified example, you could define an element called Wage, for hourly paid employees. You classify it in the predefined classification Earnings, which determines when it is processed in the payroll run and what payroll balances it feeds.
You specify one input value, Hours Worked, which must be entered in each pay period. (If necessary, you can define up to 15 input values, with fixed values, defaults, or validation.)
You associate a formula with the element, to calculate the wage for the pay period. A simple formula might be hours worked (from the input value) multiplied by hourly rate (which might, for example, be entered in the Grade Rate window).
You define who is eligible for the element by linking it to components of the employee assignment, such as grade, payroll, salary basis, or organization. In this example, the wage element is available to all employees on the weekly payroll.
You can define other processing rules, such as a termination rule. For example, you might specify that the employees' entry of the wage element should not close down on their termination date but remain open for processing of final pay.
Predefined Elements
The following table lists the predefined elements provided with Oracle HRMS for UAE.
| Element Name | Description |
|---|---|
| Social Insurance | Social Insurance |
| Contributory Salary | Contributory Salary |
| Contributory Salary Override | Contributory Salary Override |
| Contributory Salary Adjustment | Contributory Salary Adjustment |
| Employee Social Insurance | Employee Social Insurance |
| Employee Social Insurance Adjustment | Employee Social Insurance Adjustment |
| Employer Social Insurance | Employer Social Insurance |
| Employee Social Insurance Arrears | Employee Social Insurance Arrears |
| Employee Social Insurance Arrears Payment | Employee Social Insurance Arrears Payment |
| Social Insurance Adjustment | Social Insurance Adjustment |
| Employer Social Insurance Adjustment | Employer Social Insurance Adjustment |
| Gratuity | Gratuity |
| Gratuity Accrual Adjustment | Gratuity Accrual Adjustment |
| Gratuity Accrued | Gratuity Accrued |
| Gratuity Payment | Gratuity Payment |
| Leave Without Pay | Leave Without Pay |
| Loan Recovery | Loan Recovery |
| Loan Repayment Information | Loan Repayment Information |
| Loan Outstanding Information | Loan Outstanding Information |
| Retro Contributory Salary | Retro Contributory Salary |
| Retro Employee Social Insurance | Retro Employee Social Insurance |
| Retro Employer Social Insurance | Retro Employer Social Insurance |
| Retro Employer Social Insurance Adjustment | Retro Employer Social Insurance Adjustment |
| Retro Employee Social Insurance Adjustment | Retro Employee Social Insurance Adjustment |
| Retro Employee Social Insurance Arrears | Retro Employee Social Insurance Arrears |
Survey of the Classifications
The survey of the classifications identifies:
The function of elements within each primary classification
The processing priority range, default priority, and cost type for each classification
A list of the predefined secondary classifications within each primary classification
Primary Element Classifications
The survey of classifications identifies a list of classifications for predefined elements.
| Classification | Meaning |
|---|---|
| Balance Initialization | This is only applicable to element types used in balance initialization. |
| Information | Information |
| Direct Payment | Direct Payment |
| Absence | Absence |
| Earnings | Earnings |
| Employer Charges | Employer Charges |
| Pre Social Insurance Deductions | Pre Social Insurance Deductions |
| Social Insurance | Social Insurance |
| Voluntary Deductions | Voluntary Deductions |
| Termination Payments | Termination Payments |
| Involuntary Deductions | Involuntary Deductions |
Primary Classification Processing Properties and Cost Types
The following table shows the default processing priority and costing details for the primary classifications supplied.
| Primary Classification | Priority Range | Default Priority | Cost Type(D= Debit, C=Credit) |
|---|---|---|---|
| Balance Initialization | 0-0 | 0 | Null |
| Information | 1-10000 | 500 | D |
| Direct Payment | 1001-1500 | 1250 1 | D |
| Absence | 1501-2000 | 750 | D |
| Earnings | 2001-3000 | 2500 | D |
| Employer Charges | 3001-7000 | 3500 | D |
| Termination Payments | 4001-5000 | 4500 | D |
| Pre Social Insurance Deductions | 5001-6000 | 5500 | C |
| Social Insurance | 6001-6500 | 6250 | C |
| Voluntary Deductions | 7101-8000 | 7550 | C |
| Involuntary Deductions | 8101-9000 | 8550 | C |
Predefined Elements Classification
This table shows the predefined secondary classifications that the implementers use to create new elements. You cannot update or delete these predefined classifications.
An element is automatically given any default secondary classifications defined for its primary classification.
| Primary Classification | Secondary Classifications | Default |
|---|---|---|
| Earnings | Subject to Unpaid Leave : Earnings | N |
| Attachable Earnings | Y | |
| Subject To Social Insurance: Earnings | N | |
| Information | Subject to Unpaid Leave : Information | N |
| Subject to Social Insurance : Information | N | |
| Absence | Subject to Social Insurance : Absence | N |
| Pre Social Insurance Deductions | Attachable Pre Social Insurance | Y |
Setting Up Elements
Defining an Element
Use the Element window to create an element to represent compensation and benefit types or earnings and deductions.
This procedure describes how to define elements using a Payroll responsibility (that is, a responsibility with the HR User Type profile option set to Payroll User or HR with Payroll User). If you are an HR-only user, you will not see certain fields relating to element processing information. You can just ignore the steps that apply to these fields.
Note: Depending on your localization and the types of element you want to create, you may not need to start from scratch in the Element window. Check which earnings and deductions are available in the template library in the Configuration Workbench. If these template elements do not meet your requirements, you may be able to generate earnings and deductions using Earnings and Deductions windows or the Element Design Wizard. You can use the Element window to further configure template elements and generated elements.
-
For the United States and Canada, see: Earnings and Other Payments Overview, Oracle HRMS Compensation and Benefits Management Guide and Deductions Overview, Oracle HRMS Compensation and Benefits Management Guide
-
For Mexico, see: Element Design Wizard, Oracle HRMS Compensation and Benefits Management Guide
-
For UAE, see: Element Design Wizard
-
For Norway: You must set up an extra information type (EIT) element for a-melding reporting.
Dates, Names and Classifications
To enter dates, names, and a classification for the element
-
Set your effective date early enough to handle any historical element entries you want to make. Note that an element cannot be linked or entered until its start date.
-
Enter a unique:
-
Name
-
Reporting name
Start the names with a letter of the alphabet (not a number or symbol). The reporting name is a short identifier for reports and pay advices.
-
-
Enter a description for the element.
-
Select a Primary Classification.
This controls an element's processing priority and the balances it feeds. If you are defining a salary element for Salary Administration, you must select the classification Earnings.
Processing Information
To enter processing information for the element
-
Select the processing type. Select Recurring if an entry of this element applies in every period until the entry is ended, or Nonrecurring if an entry applies in one pay period only. The dates of the pay period are determined by the payroll to which the employee is assigned.
Note: If you are defining a salary element for salary administration, you must select the type Recurring. If you are defining a net-to-gross element you must select the type Nonrecurring.
-
Select a termination rule to determine how entries of the element are processed after termination of the employee:
Note: UK only: Always select Actual Termination for UK proration.
-
Actual Termination if you want recurring entries to close down on the date the employee leaves. For a nonrecurring element, select Actual Termination if you want the entries to close down at the end of the pay period in which the employee leaves, or on the date the assignment ends (the final process date) if this is earlier.
-
Final Close if you want the entries to stay open beyond the employee's leaving date so that you can continue to pay the employee.
If you are a Payroll user, you can also select:
-
Last Standard Process for all recurring and nonrecurring elements if you want their entries to close down on the Last Standard Process date or on the date the assignment ends (the final process date) if this is earlier. The Last Standard Process date defaults to the last day of the pay period in which the employee is terminated, but you can set it to a later period when you terminate an employee.
-
-
Select the Multiple Entries Allowed check box if you want to give an employee more than one entry of the element at the same time. If you are creating a net-to-gross element, you must select Multiple Entries Allowed.
-
Select the Additional Entries Allowed check box if you want to make occasional one-time entries of a recurring element (instead of, or in addition to, a normal recurring entry).
US and Canada only: The Additional Entry Allowed rule is not applicable for US and Canadian installations.
-
Select the Closed for Entry check box if you want to prevent any new entries being made for the element, either temporarily or permanently. This does not affect any existing entries of the element.
Important: Use this feature with caution. When you perform certain important tasks in Oracle HRMS, the application may automatically create or delete element entries. These tasks include hiring and terminating people, and updating assignments. Therefore, if you check Closed for Entry on an element, this might prevent users terminating employees and updating assignments. If there are standard links for the element, it will also prevent users hiring people who are eligible for the element.
HR-only users: Go to Currency.
Oracle Payroll Users:
-
Select the Process in Run check box if you want the element to process in payroll runs.
-
Select the Once Each Period check box to ensure that only the first payroll run of each period processes entries of this element.
Note: If this check box is not available for your localization, you can select a ONCE_EACH_PERIOD skip rule for the element instead.
-
Select the Indirect Results check box if you want the element only to accept entries from indirect formula results. Leave the check box unchecked if you want to accept entries both from indirect formula results and from manual entries in the Element Entries window.
-
Select the Adjustment Only check box if you want to use the element only for creating balance adjustments.
-
Select the Third Party Payments check box if you want to use the element only for creating third party payments.
Norway only: Currently, the third-party payment method for Norway is not supported.
-
Overwrite the default priority number in the Priority field if you want to determine the order in which the element processes within its classification range. Lower numbers process before higher ones.
If the order of processing within the element classification is not important, you can accept the default priority number, which is the midpoint of the range.
-
Select a formula in the Skip Rule field if you have written a skip rule formula to determine the circumstances in which the element should be processed.
UK only: If you are using different run types, select the ONCE_EACH_PERIOD skip rule for all earnings, to ensure they are not processed by each child run type.
Currency
The default currency for element entry values is the currency defined for the Business Group. You can select a different currency for the element if required.
Advanced Processing Information
Oracle Payroll users only: Use the Advanced tab to enter further processing information if you are defining:
-
An earnings type, such as a bonus, that is to be taxed separately from the normal payroll run. The element can also be paid separately.
-
An earnings type that requires a net-to-gross calculation. For example, this applies to bonus payments that are a fixed net amount. Oracle Payroll calculates the gross amount needed to meet the net pay.
-
UK: A pre-tax deduction that you want to reduce if there is insufficient pay to cover the deduction along with taxes and court orders. This requires iterative processing.
Note: The Advanced tab may not be available for some localizations.
To define an element as a separate payment
-
On the Advanced tab, select the Separate Payment check box.
The Process Separate box is checked automatically.
UK users: Do not select this check box. This functionality is not currently available for UK Payroll.
To define an element to process separately
-
On the Advanced tab, select the Process Separate check box.
To define an element for net-to-gross calculation
-
On the Advanced tab, select the Gross Up check box.
The Iterative Flag and Process Separate boxes are checked automatically.
-
Select DEFAULT_GROSSUP in the Iterative Formula field. This formula controls the iterative calculation of the pay value, adjusting an input value as necessary to get a result that is defined to be close enough to the required net payment.
Note: After saving your element, choose the Iterative Rules button to specify how to use the formula results. Also choose the Exclude Balances button to select which balances are grossed up for the element (meaning that these deductions are paid by the employer).
-
Optionally, enter a value in the Iterative Priority field to determine the sequence in which elements are adjusted during iterative calculations. Elements with lower iterative priority values are adjusted first.
-
Select the Separate Payment box if you want the payment to be made separately from the regular payment. UK Payroll, Irish Payroll: Do not select this check box.
-
Save your work.
To set up iterative processing for a pre-tax deduction (UK)
-
Check the Iterative Flag box.
-
Select PQP_GB_ITERATIVE_ARREARAGE in the Iterative Formula field.
-
Enter an Iterative Priority number in the range 1 to 1500. The element with the lowest iterative priority number is reduced first. If this deduction is reduced to zero and net pay is still insufficient to cover taxes and court orders, the element with the next lowest priority number is reduced, and so on.
Important: Iterative priority numbers must be in the reverse sequence of the processing priority numbers. This means that the element that is processed first is reduced last.
-
Choose Iterative Rules, and select the L_stopper rule.
Advance Pay Processing Information
Oracle Payroll Users only except Ireland. If Advance Pay by Element is enabled in your legislation, use the Advance Pay tab to:
-
Indicate that an element may be processed as an Advance Pay element
-
Establish the processing conditions for your Advance Pay element.
To define an element as an Advance Pay element
-
On the Advance Pay tab, check the Mark as an Advance Pay Indicator check box.
This marks the element as an Advance Pay indicator. This means that when you run the Advance Pay by Element process, it will identify this that this element can be potentially processed as an Advance Pay element according to the processing conditions that you define.
To set the processing conditions for an Advance Pay element
On the Advance Pay tab:
-
Check the Include as an Advance Element check box if you want to process this element as an Advance Pay element.
-
If you want to specify a separate Advance Pay element, select this element from the list of available elements in Use Advance Element. If you leave Use Advance Element blank and do not specify an element, then you do not select a separate advance pay element. You can still process advance payments, but all the entries are held within your current earnings element rather than reported separately in an advance pay element.
-
Check the Deduct Advance Amount check box if you want to show the deduction for the advance in the current payroll period. Every advance payment has a deduction associated with it to bring the overall payroll amounts back into balance. You can use this check box to control the point at which the deduction should be applied.
-
If you want to specify a separate Deduction element, select this element from the list of available elements in Use Deduction Element. If you leave Use Deduction Element blank and do not specify an element, then you do not create a separate deduction element. You can still process deductions for advance payments, but all the entries are held within your current earnings elements rather than reported separately in a deduction element.
Note that when you create either an Advance Pay element, or a Deductions element, you must ensure that it exists for the same period of time as the underlying earnings element, and that the input values match those on the underlying element.
-
Check the Process Advance Entry in Run check box if you want to include this element in a payroll run, If you do not check this box, then the element does not process in a payroll run and is reported as information in your Statement of Earnings report.
Continuous Calculation
For prerequisite steps to set up continuous calculation, see: Setting Up Continuous Calculation, Oracle HRMS Payroll Processing Management Guide
To set up an element for continuous calculation
-
Choose the Recalculation tab and select a RetroPay element. This is an event group that defines the events that trigger proration for this element.
Proration
In some localizations, Oracle Payroll can calculate proportionate earnings amounts whenever payroll-relevant data changes during a payroll period. The Payroll Earnings and Deductions section describes the full setup steps for the relevant localizations. To enable proration for an element, choose the Proration tab.
To set up an element for proration
-
Choose the Proration tab and select a proration group. This is an event group that defines the events that trigger proration for this element.
-
Optionally, select a proration formula. Alternatively you can edit the element's payroll formula to handle proration.
Further Information
-
Enter the Further Information field if:
-
Your Oracle localization team has set up additional fields for element definition
-
You are in the UK, and you use Oracle SSP/SMP
French Payroll:
-
Select a group, which is the name by which this element, and the others in the group, appears as one line on the pay advice.
-
On the pay advice, most earnings and deductions are shown as a base, a rate, and an amount. Select the base unit if you want this displayed on the pay advice.
South African Payroll
-
Enter a clearance number for Statutory Information and Deduction elements, if applicable. This number appears on the tax certificate.
Kuwait Payroll
-
Select a deduction type for the Deductions elements. This information is used by the PIFSS report.
-
-
Choose Input Values to define input values for the element
See: Defining an Element's Input Values, Oracle Compensation and Benefits Management Guide
Oracle Payroll Users:
-
Choose Balance Feeds to select balances you want this element to feed
See: Creating Balance Feeds for Individual Elements, Oracle HRMS Compensation and Benefits Management Guide
-
Click Balance Feed Control to add or remove secondary element classifications for this element.
Mexico only: Click this button to attach sub-classifications to your element.
See: Creating Classes of Balance Feeds, Oracle HRMS Compensation and Benefits Management Guide
-
Choose Frequency Rules to enter frequency rules to determine when the element should be processed.
See: Defining Frequency Rules, Oracle HRMS Compensation and Benefits Management Guide
-
For a net-to-gross element, choose Exclude Balances to select the deductions to be paid by the employer.
-
For a net-to-gross element, or any other element that is processed iteratively, choose Iterative Rules to specify how to use the Iterative Formula results.
Extra Information
Choose the Extra Information button to enter extra attribution for the element. You can link as much attribution as you need to an element.
Note: You can only access Extra Information types if your system administrator has set them up for your responsibility.
Payslip Modeler
If Payslip Modeler has been enabled, then you can specify whether to enable the element for payslip modeling. If you select No, the element will not be available for the users during payslip modeling process.
To enable an element to be available for payslip modeling, query the element and select Yes in the Enable Simulation field in the Element Extra Information window. You can select input values of this element which are to be made available for simulation. Only user enterable input values are available for Payslip modeling. Ensure to select all mandatory input values to be made available for simulation, if the element is available for simulation.
If the Multiple Entries checkbox is enabled for an element, then you cannot use this element for payslip modeling. Instead, create a copy of the base element, enter input values, attach the appropriate formulas and balances as the base element and then use this element for payslip modeling. Ensure that this new element is not used for payroll run.
Note: Please note that there is a restriction for predefined elements being used for payslip modeling. For predefined elements, if you setup the details in one business group, then these details will be accessible to other business groups. For example, for predefined element Regular Salary element, if you want to enable Input Value A for one Business Group and Input Value B for another Business group, then this is not possible. This limitation occurs for predefined elements applicable to all localizations. Therefore, if there are multiple business groups, then you must define a single structure for the predefined elements. If there are custom elements, then the custom elements are accessible only for that business group.
Usages
To exclude the element from a run type
-
Choose the Usages button if you want to exclude this element from a run type, or combination of run types.
-
Select the run type or combination of run types from which you want to exclude this element.
Note: For Norway: You must select the Employer Contributions run type to exclude the elements.
-
Select the effective dates for your exclusions.
-
Save your work.
Other Payroll Earnings and Deductions
Proration
Oracle HRMS enables you to calculate proportionate earnings amounts whenever payroll-relevant data is changed during a payroll period, for example, if an employee joins or leaves the company during a payroll period or if an employee's pay grade changes during a payroll period. Oracle HRMS performs a proration calculation to ensure that the employees' earnings are calculated correctly after taking account of these changes.
If you want to prorate an earnings element, such as basic salary, assign a proration event group to it. You can create an event group to group together all proration points (events) that affect an employee's salary, for example. The events might include:
-
An employee joining or leaving the enterprise
-
Changes to pay grades or grade rates
-
Changes to pay scales and progression points
-
Changes to hourly or annual pay rates
-
Changes to working hours
-
Changes to allowances or deductions
You then process the element using a formula that handles proration. You can either use a payroll formula that handles proration, or create a separate proration formula that runs after the main payroll formula only in payroll periods when a proration event occurs.
See:Writing Proration Formulas, Oracle HRMS Fast Formula User Guide
Element Design Wizard
Oracle HRMS provides a browser-based wizard, Element Design Wizard, through which you can define the following commonly used earnings and deductions elements:
-
Children Social Allowance (Earnings)
-
Cost of Living Allowance (Earnings)
-
Grade Allowance (Earnings)
-
Hourly Salary (Earnings)
-
Housing Allowance (Earnings)
-
Overtime Allowance (Earnings)
-
Shift Allowance (Earnings)
-
Social Allowance (Earnings)
-
Transport Allowance (Earnings)
-
Unpaid Leave (Absence)
-
Flat amount elements - for which you can define a flat amount as the element value
-
Percentage of basic salary elements - for which you can define a percentage of the basic salary as the element value
The Element Design wizard provides an easy, step-to-step guide to define elements, thus making the element creation process quick and error free.
You can select any of the following as the classification for your element:
-
Absence
-
Earnings
After you select the element classification, the wizard displays the list of secondary classifications available for the selected element.
Oracle HRMS provides predefined templates to create the above-mentioned elements. Each template applies a different calculation rule for the element.
When you define an element through the Element Design wizard, it automatically creates the following attributes for the element:
-
Input Values
-
Balances
-
Fast Formulas
-
Formula results
Setting Up Proration or Retro-Notification
Follow these steps if you want to set up your system for proration or retro-notification.
To complete basic setup for proration or retro-notification
-
In the Table Event Updates window, ensure that the events you want to use are already included in the required tables. Enter the table name. The lower half of the screen displays the fields that trigger proration or retro-notification if their values are changed.
If the table has already been defined but the required event is missing, create either an Update, Delete, or Insert event and enter the table row or column to which the event refers. You can only enter a column name if you are creating an Update event. Select the change type defined by the event.
Note: The Table Event Update window is not available in all localizations.
See: Making Table Event Updates, Oracle HRMS Payroll Processing Management Guide
-
If the events you require have not been defined in the Table Event Update window, set up the dynamic triggers for proration or retro-notification in the Dynamic Trigger Generation window. The triggers you need depend on the method you use to compensate your employees. For example, the tables required for compensation using Salary Administration are different from those required for compensation using pay grades. The tables you are likely to use are:
-
PER_ALL_ASSIGNMENTS_F
-
PER_ALL_PEOPLE_F
-
PAY_ELEMENT_ENTRIES_F
-
PAY_ELEMENT_ENTRY_VALUES_F
-
PER_SPINAL_POINT_PLACEMENTS_F
-
PER_GRADE_RULES_F
See: Defining Dynamic Triggers, Oracle HRMS Payroll Processing Management Guide
Note: French users: Ensure you enable the dynamic triggers for PAY_ELEMENT_ENTRIES_F and PER_ALL_ASSIGNMENTS_F.
-
-
Create an event group for your proration or retro-notification events. You must create the event groups before you can create your elements.
-
Select the Incident Register functional area in the Functional Area Maintenance window. Make sure that your triggers are included in this functional area. If your triggers are not included, insert them.
You must also activate the triggers according to legislation or business group. For more information, see: Grouping Dynamic Triggers into Legislative Functional Areas, Oracle HRMS Payroll Processing Management Guide
Setup for retro-notification should now be complete, meaning you can proceed to running the appropriate report. However, if you are setting up proration continue with the next steps.
To set up the elements for proration
-
Create your proration element. US and Mexico users: Initiate the earnings type or deduction, then query the generated element in the Element window to add a proration group and, optionally, a proration formula.
-
Make sure that you select a proration group for each element
-
Select a proration formula if you are using a separate proration formula to handle proration events (rather than enabling your payroll formula to handle proration)
-
Select Actual Termination as the termination processing rule
-
-
Define the input values for the element. For example, if you were using the sample payroll formulas that are enabled for proration, you would create the following input values:
-
Amount for a salary management element
-
Date Worked for a spinal point/pay scale element
-
Annual Deduction for a deduction or allowance
See: Defining an Element's Input Values, Oracle HRMS Compensation and Benefits Management Guide
-
-
Link the element to a specific payroll or payrolls. If you want the element to be used automatically each time the payroll is assigned, select the Standard check box. If you do not select this check box, you must enter the element for each assignment.
See: Defining Element Links, Oracle HRMS Cmpensation and Benefits Management Guide
To create the formula
-
Check that the database items to be used in your formula are available. If the required database items are not available, create them.
-
Create the proration formula or write a payroll formula that is enabled for proration.
To create a proration formula, see: Writing Proration Formulas, Oracle HRMS FastFormula User Guide
UK users: For examples of payroll formulas enabled for proration, see: Sample Payroll Formulas Enabled for Proration, Oracle HRMS FastFormula User Guide
For more information on writing formulas, see: Writing or Editing a Formula, Oracle HRMS FastFormula User Guide and Writing Payroll Formulas for Elements, Oracle HRMS FastFormula User Guide
-
Link the formula to your element in the Formula Result Rules window.
See: Defining Formula Processing and Result Rules, Oracle HRMS FastFormula User Guide
-
Attach the element to the salary basis if the salary is relevant for proration. Select the input value you created (such as Amount) in the Input Value Name field of the Salary Basis window.
See: Defining a Salary Basis, Oracle HRMS Compensation and Benefits Management Guide
Defining Event Groups
You define an event group from the Table Event Group window. You use an event group to group together all proration or retro-notification points that affect an employee's salary, such as salary increases.
To define an event group
-
Enter a name for your event group.
-
Select one of the following event group types:
Proration for a proration event group
Retro for a retro-notification event group
-
Select the proration or retro period.
-
Save your entries.
-
Select the events that can trigger proration or retro-notification in the Datetracked Events region. To do this, select the update type, the table containing the data, and the table column.
-
Save your work.
Loans
Loan Processing
If an employee has taken an approved loan, you can use Oracle HRMS to process the loan recovery. You can provide information about the type of loan, the repayable amount and the number of installments in which employees complete the repayment.
If you enter loan details for an employee using the Loan Recovery element, Oracle Payroll uses the predefined KW_LOAN_PROCESSING formula to deduct the loan amount and maintain the Loan Outstanding balance.
You can use the following predefined elements for loan recovery process:
-
Loan Recovery - To hold the information for loan processing
-
Loan Repayment Information - To hold information used internally for loan processing
-
Loan Outstanding Information - To hold information about outstanding loan
Oracle HRMS provides three balances to hold loan information:
-
Loan repaid balance - To hold the loan amount that the employee repays
-
Loan installments paid - To hold the total number of installments that the employee pays
-
Loan outstanding to hold the outstanding loan amount
Processing Loans
Processing Loans
To process the loan recovery amount, you must complete several steps.
-
Attach the element Loan Recovery to the employee, who has taken the loan, to calculate the loan repayment amount.
See: Making Manual Element Entries, Oracle HRMS Compensation and Benefits Management Guide
-
Enter the details of loan repayment, such as Loan Type, Loan Amount, Approved Date, Repayment Start Date, Monthly Repayment, and Installments.
See: Making Manual Element Entries, Oracle HRMS Compensation and Benefits Management Guide
Additional Information: You must enter values either for Monthly Repayment Amount or Total Number of Installments. If you enter both these values, the loan processing formula will use the monthly repayment amount to calculate the repayment amount.
-
For any particular month, if you want to put the loan deduction on hold for an employee for any reason, then set Hold Amortization to Yes.
-
Run the payroll process.
See: Starting a Payroll Run, Oracle HRMS Payroll Processing Management Guide