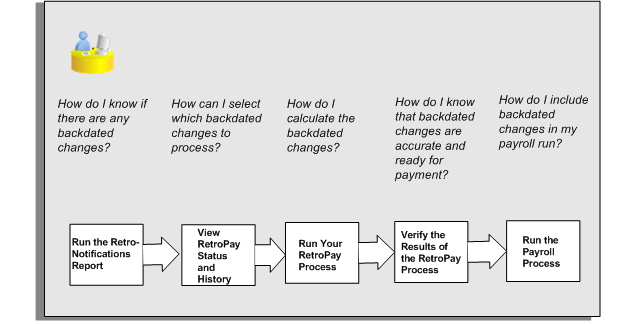
RetroPay Processing
RetroPay Processing
Overview of RetroPay Processing
Purpose of the RetroPay Process
Run the RetroPay process to ensure that your payroll run for the current period reflects any backdated payments or deductions. Backdated adjustments can occur when:
-
An employee receives a pay award that is backdated to a previous pay period.
-
The payroll department makes a retrospective correction for an error that occurred in a previous pay period
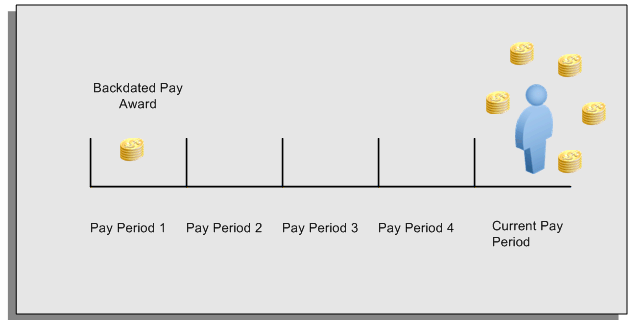
For example, at the start of the current pay period, this employee has a pay award backdated to pay period 1. The employee has not yet received any payments for this award. In the current pay period the employee is entitled to payments that represent the backdated amounts for:
-
Each of the preceding payroll periods (pay periods 1 to 4)
-
The current pay period
You run your RetroPay process to ensure that the employee receives correct payment when you next run the payroll.
Period Earned is Distinct from Period Paid
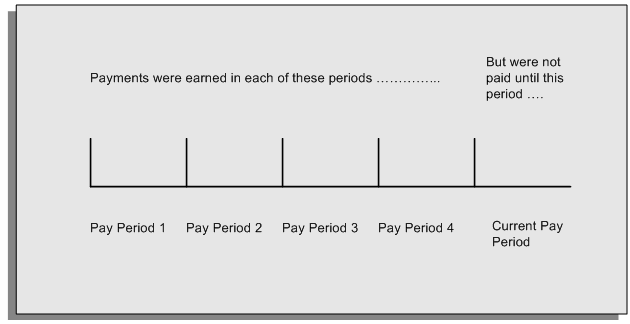
When backdated payments occur, the accuracy of your subsequent payroll processing depends on distinguishing between:
-
The period in which the payment was earned
-
The period in which the payment was made
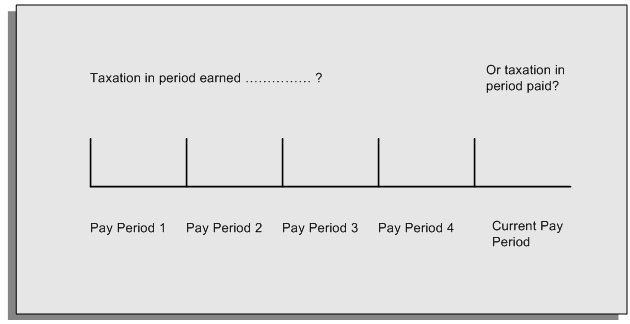
For example, the taxation implications are different for:
-
A pay award backdated to period 1 and not paid until the current period. You may want to tax this award in the current period.
-
A correction to an underpayment in period 3 which is paid to the employee in the current period. You may want to tax this correction in period 3 rather than in the current period.
The RetroPay Process Does Not Overwrite Your Historical Payment Records
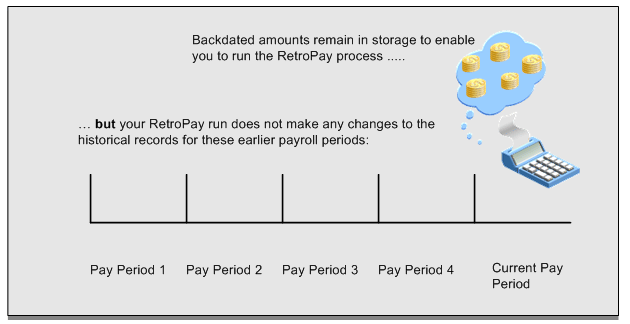
You never overwrite historical payroll data when you run RetroPay. Although you recalculate all periods that have retroactive changes whenever you run a RetroPay, you never modify the stored results for these periods. Instead, you create one or more RetroPay entries to receive the process results.
Think of the RetroPay process as a calculator holding results in memory so that it can process a final set of results. The RetroPay process uses your historical results to calculate the changes for the current period. The results for your current period change, but your historical records remain unchanged.
Process RetroPay with Overlapping Periods
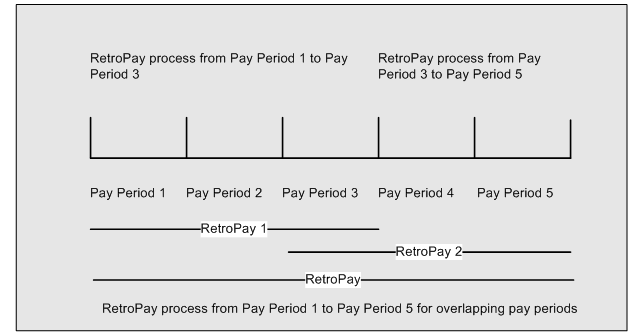
The RetroPay process recalculates payroll runs, balance adjustments and reversals from a particular date onwards, the start date of the recalculations. When you have retroactive changes overlapping another retroactive change, the application resets the start date to the earliest start date of the RetroPay processes and recalculates.
For example, you perform a RetroPay (RetroPay 1)for an assignment in period 3, with Payroll Runs being recalculated from a start date of period 1. In period 5, you perform another RetroPay (RetroPay 2) for the assignment with a start date of Period 3. The second RetroPay detects an overlap of RetroPays and sets the start date to the earliest start date.
In this case, the application sets the start date as Period 1. An overlapping override occurs to ensure that the balances are correct for the RetroPay process.
The processing of overlapping RetroPay results in an overall increase in time to process the RetroPay. If there are multiple overlaps, the increase in time is excessive.
When to Run the RetroPay Process
The RetroPay Process and the Payroll Cycle
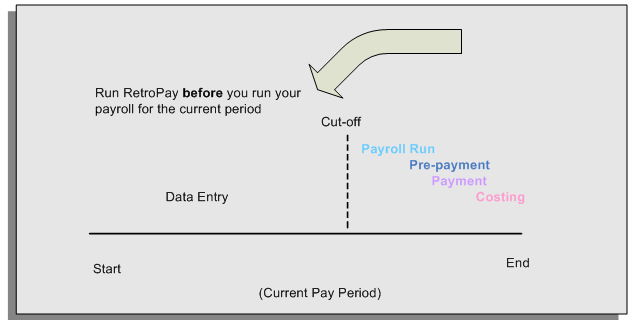
It is important to run your RetroPay process at the correct point in the payroll cycle. Always run RetroPay immediately before you run a payroll, and, for greatest accuracy, as close to the cut-off date as possible. The cut-off date is the point at which all data entry for the payroll is complete.
The RetroPay Process Always Precedes a Payroll Run
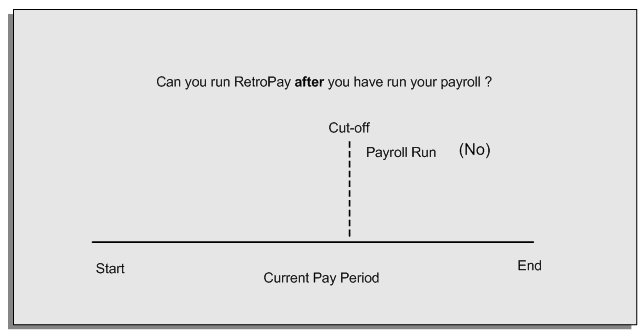
The RetroPay process cannot occur after your payroll run. If you run your payroll and then discover further backdated adjustments you must hold them over until a later payroll period and run the RetroPay process in that subsequent payroll period.
Backdated Adjustments Are Always Paid in the First Open Payroll Period
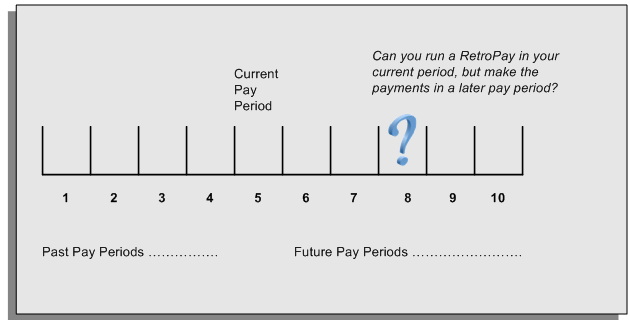
When you run a RetroPay process in your current payroll period, any backdated adjustments are always paid in your current payroll period. So, a RetroPay process in period 5 calculates any backdated adjustments from periods 1 to 4, and marks them for payment in period 5.
You cannot stipulate that a RetroPay process in period 5 should withhold any resulting payments until a future pay period. For example, you cannot stipulate that a RetroPay run in period 5 should withhold payments until period 8.
If you want to use a future payroll period such as period 8 to make payments of backdated amounts for periods 1 to 4, then you must wait until period 8 before you run your RetroPay process.
Troubleshooting RetroPay
The most common RetroPay problems occur when the RetroPay process completes, but produces unexpected results.
Consult these tables for quick reference on common RetroPay difficulties and their solutions. The problem description links or refers to extra information where you need more details to solve a problem.
Troubleshooting Enhanced RetroPay and Retro-Notification
| Problem Description | What to Do |
|---|---|
| Enhanced RetroPay is not available when you expected it to be, or you do not have the Retro Components button on the Recalculation tab of the Elements window. | This is a single problem - your localization has not implemented the legislation rule ADVANCED_RETRO. |
| View RetroPay Status does not display some of my expected choices | Contact your System Administrator. The configuration of View RetroPay Status is determined at setup. If the legislation rule RETRO_STATUS_USER_UPD is set to Y, then you have a choice when you view RetroPay status. You can either exclude the assignment from RetroPay processing (you select Deferred), or include it (you select Confirmed Awaiting Processing). However, if RETRO_STATUS_USER_UPD is set to N, then the assignment is automatically included in the next RetroPay run (it displays in View RetroPay Status as Included Awaiting Processing). |
| After setting up Enhanced RetroPay for the United States, the Enhanced RetroPay run does not produce any results. Also: the Retro-Notification report (Enhanced) for the United States does not record a salary change for an employee unless you add the changed details from View RetroPay Status. |
In both cases: Navigate to the Element window and ensure that the Default Component check box is checked. The United States has one component only (RetroPay) and one reprocess type (Reprocess) - you must check the Default Component check box for the element. |
| RetroPay Element field is missing when Enhanced RetroPay is enabled. | This is intended behavior. The RetroPay Element field is hidden when Enhanced RetroPay is enabled. You now add your RetroPay elements from the Retro Components button available from the Recalculation tab of the Elements window. |
| How do I know whether Enhanced RetroPay is enabled for my legislation? | System Administrators can run the following SQL code to determine whether Enhanced RetroPay is enabled. select * from pay_legislation_rules where rule_type like '%ADVANCED%RETRO%' and legislation_code = 'xx'; (Where "xx" is your legislation code). If the SQL query returns a rule mode of Y, then Enhanced RetroPay is enabled for your legislation. |
Troubleshooting Earlier Versions of RetroPay
| Problem Description | What To Do |
|---|---|
| RetroPay process element entry not generated for one or more assignments. | Check that the element links exist, then check your RetroPay setup. |
| Unexpected value returned. | Check your RetroPay setup. |
| Start and end times ignored. | Check for a previous RetroPay run that overlaps with your current run. If there is an overlap, rerun a new RetroPay with dates that fully include the period processed by the earlier RetroPay. |
| RetroPay Warning: Process Log shows zero employees in error - did not create element entries for processed employees. | Check that you are using the correct balance in the RetroPay set. If you are processing RetroPay within a single calendar year, choose a balance that represents gross pay for year to date. If your RetroPay spans two years, do not select a balance with the _YTD dimension. |
| Cannot use the Element Entries window to delete RetroPay generated elements. | Roll back the RetroPay process, remove the unwanted assignments from the assignment set and then rerun RetroPay.
Note: The RetroPay process does not permit use of the Element Entries window to make these changes. This is expected behavior rather than an error. |
| RetroPay Error: APP-6370 Cannot create an entry past the termination rule date. | The setup of your RetroPay element (specifically, the termination rule) does not enable you to process terminated employees. Remove the assignments of terminated employees from your assignment set and then rerun RetroPay. |
Detailed Problem Resolutions
This section provides step-by-step solutions for more complex problems.
Check that the Element Links Exist, and then Check Your RetroPay Setup
If the RetroPay process does not generate a RetroPay element for one or more assignments, follow this sequence to correct the problem,:
-
Check that there is a valid, current element link for each assignment in the RetroPay set. If the links do not exist, the RetroPay process can still calculate a retro-payment but cannot attribute the calculation results to an assignment.
-
Check that RetroPay entries exist for this assignment. Do this by inspecting the log file for the HR_HRPROC_EE_NOT_CRE message and searching for the text Warning RetroPay has detected no change. This text indicates that RetroPay entries do not exist. There are no differences between the original payroll run and the RetroPay run.
-
Check that your RetroPay setup correctly defines all the required balances. The RetroPay process always uses a balance to track the difference between an original entry and a retro entry. If retro-payments do not specifically feed your RetroPay balances, then the RetroPay process cannot identify that a retro-payment has occurred.
Example (from U.K. Payroll)
If you specify an NI balance in your RetroPay setup and then make changes to element entries that are not subject to tax or NI, your run results will be different when you compare the original run and the retro-paid run. However, the RetroPay element does not include these changes because it can only report on those differences that affect the NI balance.
-
Confirm that your RetroPay element has a classification of Earnings. The Earnings classification ensures that you can pay the amounts identified by the RetroPay process. Other classifications, such as Information, do not allow you to make payments.
-
Find out whether your RetroPay definition includes any Year to Date (_YTD) balances. If you run a RetroPay process that spans the end of year, you could see unexpected results if you are using _YTD balances. Errors occur because the payroll run clears the_YTD balance at the end of year in preparation for the next year.
-
Check that there is a correct end date for the payment of RetroPay entries. Do this by View | Lists | Employees by Element to see whether the entry was created for an unexpected period. If this is the case, set the end date to the first date of the payroll period in which the RetroPay entry should be paid. For example, if you run RetroPay for June to September 2004 to pay back pay in October 2004, your start date should be 01-JUN-2005 and your end date 01-OCT-2005.
Check Your RetroPay Setup
If the RetroPay process returns an unexpected value follow this sequence to correct the problem,:
-
Check the logic of the RetroPay setup to determine that you are feeding the correct balance and confirm that you are not feeding the correct balance more than once.
-
Find out whether your RetroPay definition includes any Year to Date (_YTD) balances. If you run a RetroPay process that spans the end of year, you may see unexpected results if you are using _YTD balances. Errors occur because the payroll run clears the_YTD balance at the end of year in preparation for the next year.
-
Establish whether there are changes elsewhere in the application that might impact the value of a balance. This can be a difficult area to identify because anything that feeds the balance specified in the RetroPay definition can potentially affect the RetroPay.
In particular:
-
Balances like Gross Pay can reflect multiple changes to an assignment. These changes can affect the recalculated value of that assignment.
-
Generic changes such as updates to a formula can affects the results of associated elements, and introduce balance value changes that subsequently affect RetroPay values.
-
Setting Up Retro-Notification and RetroPay
Follow this process to set up the Retro-Notifications report, and the correct RetroPay process for your payroll.
-
The RetroPay component determines the default style of RetroPay processing for your localization. For example, you can specify that your default style is Tax When Paid, rather than Tax When Earned .
Note: The Tax When Paid Retro Style is available for China localization users only.
You can use either of the following methods to set up your RetroPay component:
Method How To Advantages Set Up the Organization DFF From the Additional Organizational Information window: -
Select Retro Component Usages.
-
Select the Tax Area.
-
Enter a Retro Style, for example, Tax When Paid.
-
Enter an Effective Start Date.
-
Enter an Effective Date.
-
Choose OK to confirm your choices.
Processing the retrospective payments for all employees in the same style is a faster alternative than setting up details at the element level for each assignment.
This method does not prevent you from making changes for individual assignments when you view RetroPay status.Set Up Retro Components and Spans at Element Level From the Element window: -
Query the element.
-
Choose the Recalculation tab.
South African users: Select the predefined ZA Statutory Updates event group from the list of values in the Recalculation Events field. Alternatively, you can create and attach an event group of your choice.
-
Choose the Retro Components button.
Important: Do not enable the Retro Component of the elements that are themselves being used to process retropay for another element.
-
Select a Recalculation Reason.
-
Select a Reprocess Type.
-
Select an Element Span to indicate the start date and end date on which you want to report.
You can modify entries at element level to make exceptions for particular assignments. Note: Your localization may advocate one of these as the preferred method.
-
-
Determine whether a retrospective change in Oracle Payroll will appear in the Retro-Notifications report. Set up an event group to contain all the retrospective change events that you want to record.
-
Although Enhanced RetroPay is the recommended RetroPay process for most localizations, your System Administrator can also set up these earlier versions of RetroPay.
See: Setting Up RetroPay by Element, Oracle HRMS Payroll Processing Management Guide
See: Setting Up RetroPay by Run and RetroPay (by Aggregate), Oracle HRMS Payroll Processing Management Guide
Set Up the RetroPay Component
Set Up the Retro-Notifications Report
Set Up Your RetroPay Process
Setting Up the Retro-Notifications Report
You use the Retro-Notifications report to identify any changes that have a retrospective effect for payrolls that you have already run. You can define the relevant types of change by setting up an event group to specify the changes. Follow these steps to set up the Retro-Notifications report:
To enable dynamic triggers
-
Navigate to the Dynamic Triggers window.
-
Enable any dynamic triggers that the application generates. It is important to enable these triggers to ensure your payroll processing updates each database table correctly. The recommended minimum list of triggers to enable for the Retro-Notifications report is as follows:
Table Name Trigger Type PAY_ELEMENT_ENTRY_VALUES_F Update PAY_ELEMENT_ENTRIES_F Update PAY_ELEMENT_ENTRIES_F Insert PAY_ELEMENT_ENTRIES_F Delete
To define an event group
-
Navigate to the Table Event Group window.
-
Enter a name for your Event Group, for example, Retro-Notification Events.
-
Select Retro as your event groups type.
-
Save your entries.
-
Select the events that will produce notification if retrospective changes occur. Specify the following information to identify the type of update and the database table to which it applies:
-
Update Type
-
Base Table Name
-
Column Name
For example:
Update Type Table Column Name DateTrack Correction PAY_ELEMENT_ENTRY_VALUES_F SCREEN_ENTRY_VALUE DateTrack Update PAY_ELEMENT_ENTRIES_F EFFECTIVE_START_DATE DateTrack Update PAY_ELEMENT_ENTRIES_F EFFECTIVE_END_DATE DateTrack End Date PAY_ELEMENT_ENTRIES_F DateTrack Insert PAY_ELEMENT_ENTRIES_F DateTrack Delete PAY_ELEMENT_ENTRIES_F -
To enable the Incident Register
-
Navigate to the Functional Area Maintenance window.
-
Query the Incident Register and ensure that you have triggers defined.
-
Decide whether to capture the triggers by legislation, business group, or payroll. Navigate to each tab to make your selection.
Setting Up Enhanced RetroPay with Component Usages and Element Time Spans
Standard RetroPay is the default RetroPay processing method for the Netherlands. It enables you to deal with any earnings changes made in the previous or current year, and any changes to tax and social insurance, impacting payroll calculations made in the current year. To carry out RetroPay processing, for every earnings element defined, you must set up two RetroPay elements, both with the skip rule Once Each Period assigned. These elements require the primary classifications Earnings, for changes in the previous year, and Retro Earnings, for changes in the current year. The same rule applies to imputed elements with the classifications Imputed Earnings and Retro Imputed Earnings. You set up RetroPay component usages to define how RetroPay will process the component. For each of these components you define an element time span to specify the start and end dates of the retro processing, and which RetroPay element applies for each time span.
Note: Each RetroPay element you create must have the skip rule, Once Each Period, assigned to it. Users in the Netherlands select a particular RetroPay method by running the concurrent program Enable Dutch RetroPay Method and selecting, either standard or replacement. The default entry is standard.
Only add assignments requiring RetroPay processing to the RetroPay set. The RetroPay process posts retro entries for each of the assignments in the RetroPay set. Note that these retro entries always include any changes to tax and SI information, even if there are no retrospective earnings entries.
Each pre-tax or pre_si and pre-tax deductions element processed by RetroPay must have a corresponding RetroPay element with a primary classification of Retro Pre-Tax Deduction or Retro Pre-SI and Pre-Tax Deduction. You must also define a RetroPay Component Usage and an Element Span Usage for the original element for each RetroPay method used, whether Standard or Replacement. All earnings elements require a corresponding RetroPay element and link.
For further information on the methods of RetroPay available for the Netherlands, see: RetroPay for the Netherlands, Oracle HRMS Payroll Processing Management Guide.
For further information on how to enable your RetroPay method of choice, see:Enabling the Method of RetroPay, Oracle HRMS Payroll Processing Management Guide.
For further information on how to override the Replacement RetroPay method for the Netherlands, see: Business Groups: Entering Dutch Business Group Information, Oracle HRMS Enterprise and Workforce Management Guide.
Important: If you do not require the Replacement method of RetroPay, you do not have to enable the Standard method, as it is the default method.
Defining Retropay Earnings Elements
You enter element information in the Element window.
An example of defining an earnings element for Netherlands payroll appears in the notes below.
-
Define your salary element with the primary classification of Earnings.
-
Choose the Balance Feeds Control button. In the Balance Feed Control region select the appropriate element classifications from the list of values.
Note: Netherlands users, for example, select the classifications SI Income Subject to Standard Tax: Earnings and Subject to Standard Tax: Earnings.
-
Choose the Balance Feeds button to view the resulting balances feeding the element.
Note: You must now set up two retropay elements with the skip rule Once Each Period assigned.
-
Define the retropay element for the previous salary year, with the primary classification Earnings.
Note: Netherlands users, in the Processing region, click on the Skip Rule and select NL_ONCE_EACH_PERIOD from the menu.
-
Choose the Balance Feeds Control button. In the Balance Feed Control region select the appropriate element classifications from the list of values. Retropay elements for the previous year that are subject to tax must always be subclassified as subject to special tax, regardless of the tax category of the original earnings element. If an original earnings element is subject to standard tax, then the retropay element must be subject to special tax. This includes SI Income and SI Gross Salary elements that are subject to tax.
Note: Netherlands users, for example, select the classifications SI Income Subject to Special Tax: Earnings and Subject to Special Tax: Earnings.
-
Choose the Balance Feeds button to view the resulting balances feeding the element.
-
Save your work.
-
Define the retropay element for the current salary year, with the primary classification of Retro Earnings.
Note: Netherlands users, in the Processing region, click on the Skip Rule and select NL_ONCE_EACH_PERIOD from the menu.
-
Choose the Balance Feeds Control button. In the Balance Feed Control region select the appropriate element classifications from the list of values. Retropay elements for the current year, subject to tax, must always be subclassified the same as the tax category of the original earnings element. If an original earnings element is subject to standard tax, then the retropay element must be subject to standard tax also. This includes SI Income and SI Gross Salary elements that are subject to tax.
Note: Netherlands users, for example, select the classifications SI Income Subject to Standard Tax: Earnings and Subject to Standard Tax: Earnings.
-
Choose the Balance Feeds button to view the resulting balances feeding the element.
-
Save your work.
-
You can now set up your retropay components and element span usages.
Setting Up Retropay Component Usages
Retropay component usages assign the components to the salary elements you created, ensuring all the elements recalculate with the latest values.
-
Query your defined salary element, in the Element window.
-
Select the Recalculation tab, and check the Retro Components button.
-
In the Retropay Components region of the Retropay Element window, choose the component field, and an appropriate component from the list of values.
Note: Netherlands users select the Retro Component Standard, or Replacement as required.
-
Select the Reprocess Type. If you select Static, then Retropay will not process any changes to the element when running the relevant component. Opting for the Reprocess Type ensures the element changes process.
Note: Netherlands users select the Reprocess Type, Reprocess. Dutch Retropay processes the period of change, and not the nature of change, such as a correction or backdated change. As a result, the whole retro period reprocesses.
-
Save your work.
-
You can now enter the element time spans.
Example of a standard retropay component set up for an earnings element Element Component Name Reprocess Type Comments User Defined Element Standard Reprocess Retro Earnings Example of a replacement retropay component set up for an earnings element Element Component Name Reprocess Type Replace Run Use Override Dates User Defined Element Replacement Reprocess Yes Yes
Setting Up Element Span Usages for Earnings Elements
The element time span usages defines the start and end dates for retropay processing. Most elements have the standard time span of Start of Current Year to End of Time already assigned, to cover any changes made in the current year. The exceptions for the Netherlands are standard taxable income and standard tax deduction, which include the timescales Start of Current Year to End of Previous Quarter, and Start of Current Quarter to End of Time, to cover student taxation. For each earnings element, or imputed earnings element with a defined retropay component usage, you must define two element span usages. These element span usages cover the earnings for both the current and the previous year, defining not only how far back processing should cover, but also up to where a particular retropay element carries forward the retro changes. You must define your retropay elements and components before defining the element time spans.
Set up the Element Span Usages in the Retropay Elements window.
-
Query your defined salary element in the Element window.
-
Select the Recalculation tab, and check the Retro Components button.
-
In the Retropay Elements region, select the appropriate time spans from the From and To fields, to define the time period the retropay element is covering.
Note: In the Time Spans fields, for each earnings element or imputed earnings element with a standard retropay component usage defined, you must define the element span usages for both the current and previous years. For example, for the retropay element, Retro Salary Previous Year, you define the time span from Start of Time to End of Previous Year. For each earnings, or imputed earnings element with a replacement retropay component defined, you must define the element span usage for the current year. You can set up a second time span to cover the previous year, if required.
-
Select the retropay elements you created from the Retropay Element field.
-
Save your work.
Example of earnings element span definitions for both standard and replacement components Element Component Span From Span To Retropay Element User Defined Element Standard Start of Time End of Previous Year Retro Earnings Previous Year User Defined Element Standard Start of Current Year End of Time Retro Earnings Current Year User Defined Element Replacement Start of Current Year End of Time Retro Earnings Current Year User Defined Element Replacement Start of Time End of Previous Year Retro Earnings Previous Year
Understanding the Sequence of Your RetroPay Activities
Follow this sequence to:
-
Identify outstanding backdated adjustments
-
Monitor and control the processing of backdated adjustments
-
Include backdated adjustments in your next payroll run.
You can only run the Retro-Notifications report and view RetroPay status if you are using RetroPay by Element, or the version of RetroPay by Element sometimes referred to as Advanced or Enhanced RetroPay.
This sequence does not apply to RetroPay by Run and RetroPay (by Aggregate)
-
Run the Retro-Notifications report to identify any backdated changes that have not been included in a payroll run.
You can save your summary of backdated changes into either an assignment set or an event group.
Once you have identified the retrospective changes, you can then decide whether to include them in your RetroPay process.
The Enhanced Retro-Notifications report uses the Payroll Events Model to identify what changes have occurred to your underlying data. If these changes correspond to the retrospective types of change that you want to be notified about, then these changes appear on the Retro-Notifications report.
-
Once you have identified unprocessed retrospective payments, you can determine how you want to process these changes.
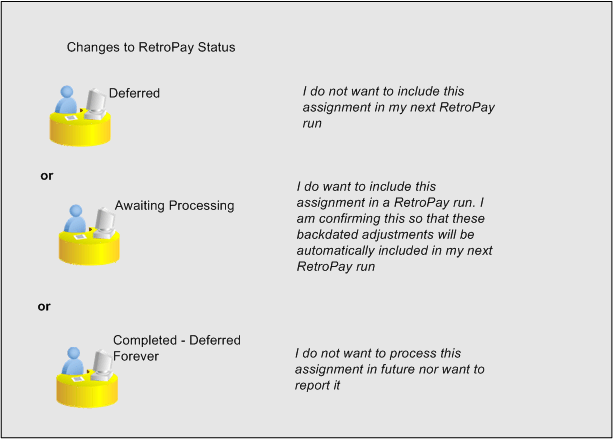
The Retro-Notifications report identifies the assignments with backdated adjustments. If you defer, then the assignment is not included when you next run RetroPay.
You can also include additional assignments that the Retro-Notifications report did not identify. This typically occurs when you discover additional backdated adjustments that were not known about when you ran the Retro-Notifications report.
The following diagram shows the sequence of statuses for each RetroPay status:
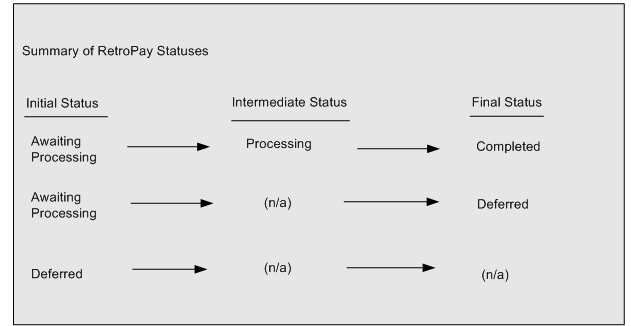
Once RetroPay processing begins, the initial status changes to an intermediate status of Processing.
You can query all retro assignments that are at the initial (outstanding) status, and all retro assignments at the final (completed) status.
The following diagram shows what statuses are included when your query All Outstanding, and All Completed:
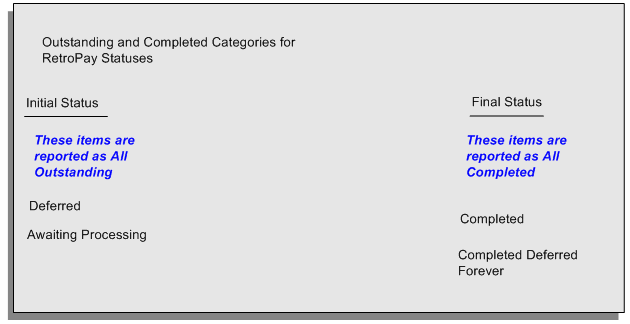
-
You enable Oracle Payroll to make retrospective adjustments for the combination of changes identified on the Retro-Notifications report, and subsequently modified when viewing RetroPay status.
See: Running Enhanced RetroPay
See: Running RetroPay by Element, Oracle HRMS Payroll Processing Management Guide
RetroPay by Element already enables you to distribute retrospective payments across individual elements.
If you have Enhanced RetroPay you can decide whether each retrospective payment requires:
-
A full reprocessing in which you recalculate all amounts for the current payroll. This option is typical when you are processing backdated payments, or when you want to deduct tax for backdated amounts in the period when it was earned, rather than in the current payroll period.
-
A limited reprocessing in which you recalculate only some of the amounts for the current payroll. This option is typical when you are processing corrections, or when you want to deduct tax for retrospective changes in the current payroll period rather than in the period when it was earned.
Components for RetroPay
Oracle Payroll describes each different type of Enhanced RetroPay run as a component. For example, you could set up a component Earnings Correction for the element Basic Salary. A component always has:
-
A name (for example, Earnings Correction)
-
A reprocess type (Static, Partial, Reprocess) to determine how to process the component
Element Spans for RetroPay
You can also attach element spans to your selected element. An element span provides a start and end date for retrospective processing.
-
-
When you have run the RetroPay process, verify your results and correct any errors.
-
Finally, run your payroll to reflect the adjustments that you have made for the retrospective payments.
Run the Retro-Notifications Report
View RetroPay Status and History
Run the RetroPay Process
Verify Your RetroPay Results
Run Your Payroll
Viewing RetroPay Status and History
You use the RetroPay Status window to control how you want to process changes that have a retrospective impact. You typically find outstanding retrospective changes where changes are entered in Self-Service HRMS independently of Oracle Payroll.
Use the RetroPay Status window to:
-
Identify any assignments that have changes implying retrospective processing.
-
Specify how you would like to process any outstanding retrospective changes.
-
Confirm that your application has processed the specified requests.
-
Create or update multiple retro assignments for status as Awaiting Processing or Deferred.
You can still use the Retro-Notifications report to identify all outstanding retrospective changes that have not been applied, and group them into an assignment set ready for processing.
See: Running the Retro-Notifications Report
However, the advantage of using the RetroPay Status window is that you can identify what you want to process, or exclude from processing, and then mark your selections for completion. Additionally if you have to create or update multiple retro assignments, you can do so using the Web ADI spreadsheet.
To search for assignments that have retrospective changes
-
Select the search criteria for assignments that you want to view. If you do not select any criteria, then your search returns all assignments that have retrospective changes. You can search for any of these criteria:
Name: Specify a name, or search for all names.
Assignment Number: Specify an assignment or search for all assignments.
Recalculation Date: Use this start date and end date to determine the period for retrospective changes.
Status: Select the status that you want to identify.
-
All Completed. This status displays all assignments with retrospective implications that are already processed.
-
All Outstanding. This status displays all assignments with retrospective implications that are not yet processed.
-
Awaiting Processing. This status indicates that this assignment has cleared for processing and that the processing will occur in the next payroll run.
-
Completed. This status indicates that this assignment has now been processed.
-
Completed – Deferred Forever. This status indicates that the retro assignments created by the system are deferred forever. The action of the retro assignment (RETRO_ASSIGNMENT_ACTION_ID) is to changed to –1. The retro assignments are not processed in the future nor reported with the new status.
-
Deferred. This status indicates that an assignment was scheduled for processing, but that the processing was deferred and will not occur until you change the status.
-
Processing. This status indicates that an assignment is being processed.
Recalculation Reason: This criterion indicates why retrospective processing is necessary and enables you to search particular categories of retrospective change to process them independently of other retrospective changes.
-
-
Click Go when you have selected all your search criteria.
To change the status of an assignment
You typically change the status of an assignment when you want to defer processing that was previously scheduled, or to indicate that you have already processed this change even though it was automatically scheduled.
-
Select the assignment that you want to change.
-
Select the new status for the assignment from the Change Status list of values.
-
Click Change Status.
To view the elements included on each assignment
-
Select the assignment name in the Name column.
-
View the elements for this assignment, and the Recalculation Reason for each element.
To update or delete elements for each assignment
-
Select the assignment name.
-
Click Update to add an element to the assignment.
-
Click Delete to remove an element from the assignment.
To confirm that your specified requests have been processed
-
Query the individual assignment, but leave the status field blank.
-
Alternatively, query all assignments with a status of All Completed or All Outstanding and check the details for your individual assignment.
To create multiple retro lines
-
Select the Create Retro Lines button.
-
A spreadsheet opens.
-
In the spreadsheet that appears, enter new records with a status of Awaiting Processing or Deferred.
-
Click on Upload. You can select Commit All Rows or Each Row option, if you want the application to validate all records and commit or validate each record prior to uploading the details to the database. If you select Each Row option, then all successful records will be uploaded and error records will not be uploaded. Only on successful validation, the application makes changes to the database.
If you select the Upload All Rows or Each Row, then the application does not validate the details prior to uploading.
To update the multiple retro lines
-
Query the assignments with Awaiting Processing or Deferred.
-
Click on Download to Spreadsheet check box and click Go
-
In the spreadsheet that opens, you can update the status. You cannot modify any employee or assignment information but can only change the status of the assignment or you can delete the retro entry or update the reprocess date of the retro entry.
Note: In the Entry Delete/ Update column, ensure to select the applicable value if there are any entry changes made. If you do not select any value the application does not make any changes to the database.
-
Click on Upload. You can select Commit All Rows or Each Row option, if you want the application to validate all records and commit or validate each record prior to uploading the details to the database. If you select the Each Row option, then all successful records will be uploaded and error records will not be uploaded. Only on successful validation, the application makes changes to the database.
If you select the Upload All Rows or Each Row, then the application does not validate the details prior to uploading.
Running the Retro-Notifications Report
Use the Retro-Notifications report to
-
Identify all retrospective changes that have occurred since the last payroll run.
-
Automatically save these changes into an assignment set or as an event, depending on which Retro-Notifications report that you use in your localization.
-
Produce a report that lists the employees included in the assignment set and the trigger event that included them. You can view this output through Concurrent Manager by clicking the View Output button. Your reporting output is stored under the title Retro-Notifications Report (Internal).
Retro-Notification information is particularly useful when changes with retrospective impact are entered in Self Service HRMS independently of the Payroll department.
The Retro-Notifications report does not perform any RetroPay processing. It only identifies element entries that have changed. You must still run your RetroPay process separately to process these changes. When you produce the assignment set, or event group, you can decide whether to:
-
Run your RetroPay process on all assignments in this assignment set.
-
Edit the assignment set or event group to remove or add assignments, and then run your RetroPay process.
-
Take no retrospective action on any of the assignments in the assignment set.
You can use the RetroPay Status window to schedule automatic processing.
You run the Retro-Notifications report from the Submit Processes and Reports window.
To run the Retro-Notifications report
-
Select Retro-Notifications report in the Name field. If the parameters window does not open automatically, click in the Parameters field to open it.
-
Select the payroll. You can only run this report for a single payroll.
-
Select the last Report Period that you want to run the report for. The List of Values contains all periods for your selected payroll. The report runs for all periods up to and including the one you select.
-
Select an Event Group for the report to use. You can only run this report for a single event group. A default event group captures changes made at element level, but you can override the default, if, for example, you are testing your initial setup.
-
Enter the name of the Assignment Set that you want the report to generate. You can use this assignment set as a starting point for further processing of the assignments identified in the report.
Note: The assignment set name generated by the report will include what you enter in the Generated Assignment Set field followed by the Report ID.
-
If you want to produce this report in Portable Document Format, (PDF), select a template.
-
Select OK and Submit.
When you have generated the assignment set remember to run your RetroPay process for those retrospective changes that you want to process. You can either run your RetroPay process directly or, if your RetroPay process is RetroPay by Element, or Enhanced RetroPay you can use the RetroPay Status window to schedule your processing.
Running the Retro-Notifications Report (Enhanced and Enhanced PDF)
-
Identify all retrospective changes that have occurred since the last payroll run.
-
Automatically save these changes into an assignment set, or as an event, depending on which Retro-Notifications report you use in your localization.
-
Produce a report (.a01) that lists the employees included in the assignment set and the trigger event that included them. You can view this output through Concurrent Manager by choosing the View Output button.
This information is particularly useful when changes with retrospective impact are entered in Self Service HRMS independently of the Payroll department.
The Retro-Notifications report does not perform any RetroPay processing. It only identifies element entries that have changed. You must still run your RetroPay process separately to process these changes. When you produce the assignment set, or event group, you can decide whether to:
-
Run your RetroPay process on all assignments in this assignment set.
-
Edit the assignment set or event group to remove or add assignments and then run your RetroPay process.
-
Take no retrospective action on any of the assignments in the assignment set.
You can use the RetroPay Status window to schedule automatic processing.
You run the Retro-Notifications (Enhanced) report from the Submit Processes and Reports window.
To run the Retro-Notifications (Enhanced) report
-
Select the payroll. You can only run this report for a single payroll
-
If you want to see the retro-notifications for a particular event group, select an overriding event group.
-
If you are running the PDF-enabled version of this report, select a template for your PDF output.
-
Select OK, and submit.
Running Enhanced RetroPay
Use the Enhanced RetroPay process to distribute backdated amounts or corrections that you have identified from the Retro-Notifications report.
You run the Enhanced RetroPay process from the Submit Requests window.
To run the Enhanced RetroPay process
-
Enter an effective date to indicate the date from which you want to create the retrospective elements for Enhanced RetroPay process.
-
Select the payroll.
-
If you want to create retrospective entries in a different pay period other than effective date, enter an entry creation date. The application creates retrospective entries in the pay period in which the Entry Creation Date occurs.
If you leave this field blank, the application creates the default retrospective entries as of Effective Date.
-
Click Submit
Running Quick RetroPay
Run Quick RetroPay to process any retrospective payments for a single assignment. You run the Quick RetroPay process from the Submit Requests window.
Note: It is not mandatory to run the Retro-Notifications Report for QuickRetropay process.
To run the Quick RetroPay process
-
Enter a date on which you want to create the derived retro element entries. This is mandatory.
-
Select the assignment number of the assignment for which you want to run the backdated change. This is mandatory.
-
Enter an earliest date from which you want to reprocess the assignment backdated changes. If you do not specify any date, then the application calculates it internally. This is optional.
-
If you want the retro-notifications for a particular event group, select an overriding event group.
-
Click Submit.
