Patch Manager
This chapter covers the following topics:
- Introduction
- Patch Manager Home
- Creating a Patch Run for Oracle E-Business Suite Release 12.1 and Earlier
- Creating a Patch Deployment Procedure for Oracle E-Business Suite Release 12.2
- Extending Patch Manager Deployment
- Patching an Oracle E-Business Suite Release 12.2 Instance using EM CLI
- Patching an Oracle E-Business Suite Release 12.1 or Earlier Instance using EM CLI
- Patch Worker Logs, Health Checks, and Troubleshooting
Introduction
Patch Manager allows you to deploy Oracle-delivered patches or customizations across Oracle E-Business Suite instances. You can create a patch run definition and run it multiple times on multiple instances and you can copy a patch procedure and modify it to suit your business needs. Also, you can easily access details on patch runs, correct errors if necessary, and continue the patch runs.
Note: If you will use Patch Manager with Oracle E-Business Suite Release 12.2, you should be familiar with Online Patching concepts before using Patch Manager. Refer to Oracle E-Business Suite Concepts and Oracle E-Business Suite Maintenance Guide for information on Online Patching.
Key Features
Patch Manager has the following features:
-
Delivers patch recommendations to Oracle E-Business Suite and Technology Stack.
-
Automates the deployment of Oracle-delivered patches and custom packages across multiple Oracle E-Business Suite instances.
-
Leverages common Oracle E-Business Suite utilities such as adpatch and adop.
-
Automates the patching deployment process to reduce overall patching deployment time and efforts.
-
Enforces patch promotion policies for applying patches to pre-production instances prior to applying them to production systems.
-
Supports searching and downloading of patches from My Oracle Support. The patches are downloaded to a central location on Oracle Management Server (OMS).
Note: If My Oracle Support is unavailable to OMS, then Patch Manager is also able to search for and apply patches from the central staging location.
-
Supports National Language Support (NLS) patches.
-
Provides a complete history of all patch deployments.
-
Provides a customizable patch deployment procedure.
-
Leverages Oracle Enterprise Manager infrastructure for distributed processing.
With Patch Manager, you can accomplish the following tasks:
-
View the readme of a patch with just one click.
-
Check for prerequisites for Oracle E-Business Suite application patches.
-
View and apply un-applied patches based on Oracle patch recommendations that are specific to any given Oracle E-Business Suite instance.
-
Schedule deployments based on the target's time zone.
-
Schedule deployments of patches immediately or in the future.
-
Perform a complete series of pre/post health checks when deploying patches.
-
Track and monitor all patching deployments "Running", "Scheduled", "Saved" and "Succeeded" from a centralized console.
-
View patching worker logs directly from the Patch Manager UI.
-
Send and receive notifications for patch failures and completion.
-
Run diagnostic tests. Oracle recommends running pack diagnostics for Patch Manager to ensure that credentials and privileges are set properly. For more information on pack diagnostics for Patch Manager, refer to: Diagnostic Tests for Patch Manager.
Running Patching Procedures from Enterprise Manager Command Line (EM CLI)
Patching procedures can also be run from Enterprise Manager command line interface (EM CLI, or emcli). The command used for creating a patch run is:
$EMCLI_HOME/emcli patch_ebs -input_file=ebs_patch_file:"<fully qualified path of ebs_patch_file.xml>"
Limitations of emcli verb 'patch_ebs':
-
The patches needs to be pre-downloaded at OMS patch stage directory location which is set in Preferences page.
-
Merge patches is currently not supported in the
emcliverb. -
Patch Run Description and Notification Email(s) cannot be set.
-
The Check Prerequisites feature is currently not available in the
emcliverb.
The format of the ebs_patch_file.xml and descriptions of tags for input xml file are described below in relevant sections for the Oracle E-Business Suite releases.
Patch Manager Home
The Patch Manager home page provides an overview of the patch deployment procedures. You can use the Personalize Page icon to hide, show, or reorder the regions on the page. For example, if you are patching Release 12.2 targets primarily, you can personalize the page to display the Online Patching region first and also display the Abort Runs and Cutover Runs regions.
The default Patch Manager home page displays following regions:
-
Patch Promotions - You can use this region to promote patches based on predefined patch promotion policies.
-
Patch Runs - used for targets on releases 12.1 and earlier
-
Online Patching - used for Release 12.2 targets
-
Patch Logs - used to access patching log files
Two other regions are available, but are hidden by default. Customers running Oracle E-Business Suite Release 12.2 or higher should enable these two hidden regions.
-
Abort Runs
-
Cutover Runs
Patch Manager Home Page
Patch Promotion Policies
Patch Manager delivers the capability to enforce user-defined patch promotion policies to ensure changes are made sequentially to pre-production instances (such as test or QA), and then promoted to production systems. These policies can be used to specify that patches must be applied to pre-production systems before applying them to production systems. This feature provides Audit Trail visibility and enhanced internal controls for patch application.
By default, the patch promotion policy feature is not enabled out of the box. Administrators can enable the promotion policy by setting the preference "Enforce Patch Promotion Policy". Once it is enabled, administrators can define various patch promotion policies including multiple Oracle E-Business Suite targets and enforce the sequence in which the patches are promoted. Approvals are required for each Oracle E-Business Suite target before patches can be applied. Requests for approval will be generated when a patch is submitted. A Super Administrator can decide not to use the patch promotion policy for emergency patching or can choose not to include a specific Oracle E-Business Suite target instance in any patch promotion policy. In the case of emergency patching, Patch Manager sends out a notification of the patch promotion violation as a warning. For example, the patch promotion policy for a customization could have the patch proceed from development to testing and user acceptance, then to quality assurance testing and finally to production.
Example of a Sequence of a Patch Promotion Policy

Setting up a Patch Promotion Policy
To create a new patch promotion policy, navigate to Patch Manager Home > Action (menu) > Configure Promotion Policies. Then follow these steps:
-
Select the Create icon. A new window appears.
-
Provide a name for your policy in the Create New Promotion Policy window.
-
Select the release of Oracle E-Business Suite instances for which the patch promotion policy is to be configured.
-
Select the targets for your policy from the "Available Targets" list and move them to the "Selected Targets" list.
Important: A target may belong to only one active policy. Because a given production system generally has multiple supporting instances that are clones of the production system, it would not make sense to put a supporting environment in two different patch promotion policies.
-
Move the targets up and down in the "Selected Targets" list to set the promotion order.
-
Click Save to save your work.
Creating a New Promotion Policy
Patch Promotion Policy Region

The Patch Promotion Policy region on the home page displays patches and their statuses on various targets. This table dynamically changes based upon the policy displayed. You can select multiple rows within the table in order to promote patches to the next target defined in the policy.
For example, several developers might submit patches to a development environment. During the promotion of these patches to the next environment, an administrator has the capability to bundle the multiple patches into a single deployment procedure.
You can select the patches they want to promote and click on Promote to apply the patches to the next Oracle E-Business Suite target instance in the patch promotion policy. The Patch Manager interview is then pre-populated with the selected patches and the target information.
A check mark in each target column indicates that the patch has been applied to the specified Oracle E-Business Suite instance. An 'X' mark indicates that the patch has not been applied to that target Oracle E-Business Suite instance. You can also access the patch readme file and Deployment Details from this region.
Patch Runs
The Patch Runs region of the Patch Manager Home lists the patch runs and their statuses for Oracle E-Business Suite Release 12.1 and earlier.
Patch Runs Region
You can perform various actions on a patch run depending on its status:
-
Review - Review details of the patch run.
-
Create Like - Copy an existing patch run, in order to change any aspect of the patch run or to run an identical run due to changes in the patch or target.
-
Edit - If a patch run is in Saved status, you can edit it.
-
Submit - If a patch run has been approved through the approval management system, it can be submitted from here.
To start a new patch run for Oracle E-Business Suite Release 12.1 and earlier, select "New Deployment". If a user has duplicated a “Patch Oracle E-Business Suite” deployment procedure, then clicking "New Deployment" will prompt you for which deployment procedure you would like to use. Otherwise, clicking "New Deployment" will begin the patch run interview.
By default, all records are displayed in the table. To filter the records by status, use the "Show" list. You can also use the Search button to apply additional filters to control which records are displayed.
Online Patching
The Online Patching region displays patch deployments against Oracle E-Business Suite Release 12.2 targets.
Online Patching Region
Note that with Release 12.2, the adop patching process in Patch Manager is separated into two deployment procedures. The first deployment procedure runs the prepare, apply, finalize, and optionally actualize_all phases. The second deployment procedure executes the cutover, cleanup, and optionally fs_clone phases.
You can click "New Deployment" to begin a new online patching interview. You can use the "Create Like" feature to create a copy of an existing deployment.
In this region you can filter by "Latest", "Hidden", and "All". These choices will show only the latest adop sessions, hidden adop sessions, or all of them, respectively.
The records in this region are displayed in a tree format with a parent - child - grandchild relationship. The parent is the target, the child is the adop session, and the grandchildren are the patch deployments. Patch Manager supports multiple patch deployments in a single adop session. If the deployment procedure has not started or has not run through the "prepare" phase then the deployment records will fall under "ADOP Pending Sessions".
Columns in the region are:
-
Phase - The adop phase the deployment procedure is currently running or ran last.
-
Apply Status - The status of the “Apply” deployment procedure.
-
Cutover Status - The status of the “Cutover” deployment procedure.
-
Review - Link to the review page displaying all interview information.
-
Create Like - Allows for duplication of an interview.
-
Edit - Allows for editing a saved interview.
-
Hide - Allows for hiding a deployment record from the display. The "Apply Status" column value of the record must be "Saved" or "Stopped" for this icon to be enabled. The hide feature hides this deployment from the "Latest" filter so the user can limit the number of saved and stopped deployments in the view. Hidden deployments can still be accessed from the "Hidden" filter setting of the view.
-
Submit - Allows for submission of a deployment procedure after the interview has been approved in the approval management system.
-
ADOP Details - This icon opens a window showing the adop phases, applied patches, database editions, and file system details.
-
Abort - Clicking this icon submits a deployment procedure that runs “adop phase=abort” on all nodes. Before the submission occurs there is a check to ensure the target Oracle E-Business Suite system is in a state that allows for abort (such as, the prepare phase has been run). The check also verifies that the session for which you are running abort is the latest adop session; this step is to ensure that the correct session is to be aborted.
-
Cutover - This icon submits the cutover deployment procedure. It opens a window in which you can schedule the cutover. This feature also ensures the adop session for which you are running is actually the latest.
-
Requestor - This is the user who requested the patch be applied.
-
Created By - This is the user who created the interview.
-
Last Updated - Timestamp indicating when the deployment procedure was last updated.
Patch Logs
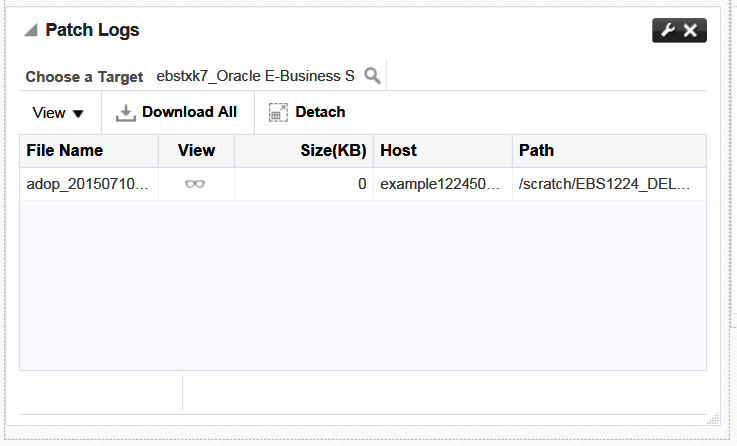
The Patch Logs region allows you to view and download patching log files across all hosts of an Oracle E-Business Suite system.
To access log files:
-
First select an Oracle E-Business Suite target to which you have been granted access in Enterprise Manager.
-
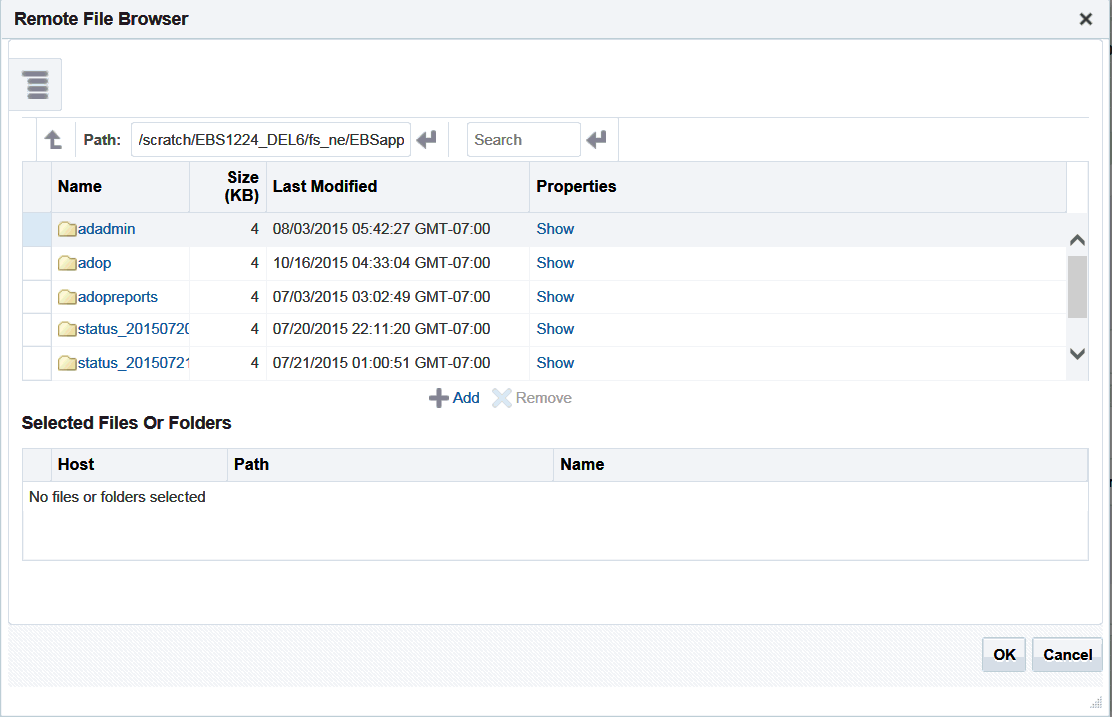
The Remote File Browser for one of the Oracle E-Business Suite nodes is displayed, showing the contents of the directory one level above $ADOP_LOG_HOME.
-
Browse through the directories to find the files you want. Select the files and add them to the Selected Files or Folders list. Click OK.
-
The selected files are then displayed in the Patch Manager Logs section, from which you can download or view the log files.
Remote File Browser
Prerequisites for viewing Patch Manager Logs
To access the Patch Manager Log Viewer, you must have your preferred credentials set for the Oracle E-Business Suite Node target(s) of all application tier hosts. To set these, the navigation in Enterprise Manager is Setup > Security > Preferred Credentials > Oracle E-Business Suite Node. These credentials are required in addition to the credentials needed to use Patch Manager.
In addition, you must have been granted the privilege to raise a Patch Manager request.
For more information, see: Overview of Credentials and Change Management Privileges.
Abort Deployments
Abort Deployments Region
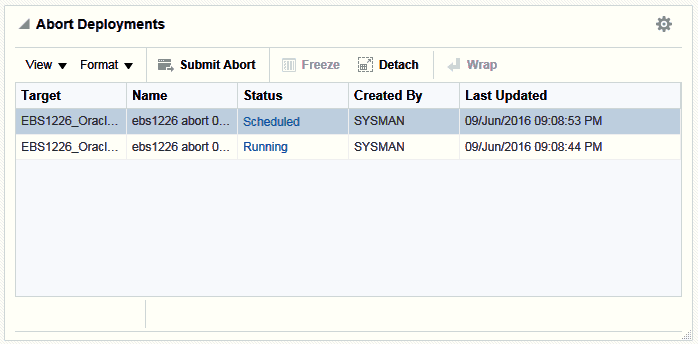
This section will show all the patch deployment runs that can be aborted.
You can submit a request to run an Abort operation against a specific target using the Submit Abort icon.
This region is hidden by default. Oracle E-Business Suite Release 12.2 customers can display this region on the Patch Manager home page by clicking on the Personalize Page icon on the Patch Manager home page.
Cutover Deployments
Cutover Deployments Region
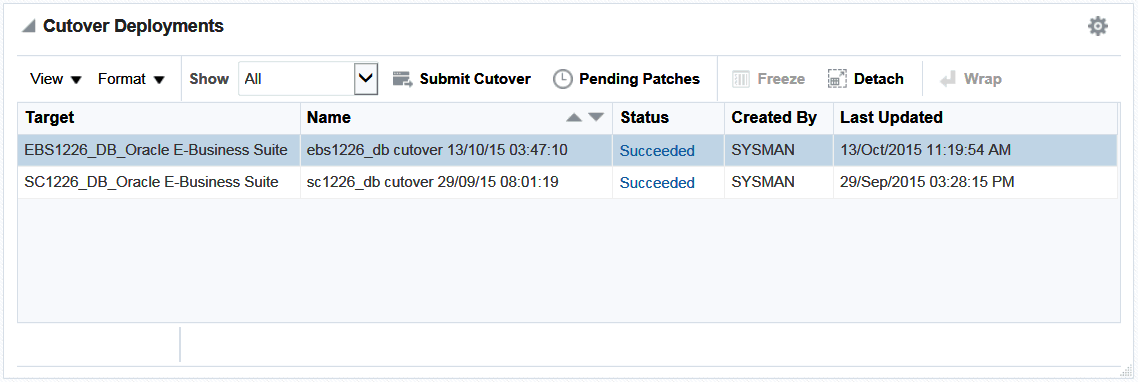
This region displays all executions of the “Cutover Oracle E-Business Suite” deployment procedure. This region is hidden by default. Oracle E-Business Suite Release 12.2 customers can display this cutover region on the Patch Manager home page by clicking on the Personalize Page icon on the home page.
You can submit a request to perform the cutover operation using the Submit Cutover icon.
Records can be filtered by status using the "Show" list. Use the Pending Patches button to find out all the applied patches on a particular Oracle E-Business Suite target awaiting cutover.
Patch Manager Prerequisites
The following are prerequisites to running a patching procedure. Unless otherwise noted, these prerequisites apply to all releases of Oracle E-Business Suite.
-
To download an Oracle patch directly from My Oracle Support, the following property must be set in the Preferences page.
-
Connect to My Oracle Support for Patches - This box should be checked.
-
-
Patches are downloaded to the OMS when they are applied. Set the preference OMS Patch Stage Directory Location to the directory to which the patch should be downloaded.
Note: If a patch has already been downloaded to the OMS (for example, in a prior patching procedure), then it will not be downloaded again. See: Key Features.
After a patch is on the OMS, it will then be moved to the target Oracle E-Business Suite system. The exception to this step is the case in which the system detects that an Oracle patch is already on the target; the system will not move the patch from the OMS to the target again. Custom patches, described in the next chapter, will always be moved from the OMS to the target because a developer can change the patch.
-
The following preferences are set to directories under the APPL_TOP by default. In general, you should leave these set to the default locations. You can override the default locations, but ensure that the Target Patch Directory Location is not shared amongst multiple Oracle E-Business Suite instances. The Target Stage Directory Location can be shared if all users accessing it have read/write permissions for all files.
-
Target Stage Directory Location - The directory to which zipped patches are downloaded.
-
Target Patch Directory Location - The directory to which patches are unzipped and from where the patches are applied.
For more information, see: Setting Preferences.
-
-
(Oracle E-Business Suite Release 12.1 and earlier only) As part of a queueing mechanism for patch runs, set the property Minutes Patch Manager should wait for a down target.
This setup will make patch manager wait for specified amount of time before failing when Patch Manager detects the target is in blackout state. Patch Manager will check every minute to see if the target has come out of the blackout state; if it has, Patch Manager will continue with the patch run. This property specifies in minutes the maximum length of time Patch Manager will wait before the patch run fails.
-
Patch Manager uses Preferred Credentials. These must be set prior to running a patch procedure. Navigate to Setup > Security > Preferred Credentials to set these. For more information, see: Overview of Credentials. The Preferred Credentials that might be required are:
-
Oracle E-Business Suite Node credentials must be set to the applmgr account for application tiers and Oracle account for database tiers.
-
Oracle E-Business Suite must have the "AppsDBCredSet" (the APPS schema) and "AppsSysDBCredSet" (the SYSTEM schema) set.
-
Oracle WebLogic Server preferred credentials must be set for Oracle E-Business Suite Release 12.2 targets.
Note: Database credentials are not required for Oracle E-Business Suite Release 12.2 targets.
If the APPS schema, system schema, or WLS Admin credentials are changed during the execution of a patching deployment procedure, then these changes will not be reflected in the running deployment procedure. A new deployment procedure will need to be started by the user.
If the credentials for the infrastructure targets are changed during an executing deployment procedure, these will be reflected in the currently running deployment procedure. For these types of credentials, the system uses a credential reference.
-
Note: In a RAC-based Oracle E-Business Suite Release 12.2 instance, using any Online Patching feature such as patch deployment, cutover, or abort, results in the following error: "Weblogic admin server credential test returned: DB SID passed to getWeblogicDomainName is null."
To work around the problem, follow these steps:
-
Navigate to Targets from the Enterprise Manager console.
-
From the list, choose "Oracle E-Business Suite."
-
Select the instance by clicking on it.
-
From the instance target menu, choose Target Setup > Monitoring Configuration.
-
Provide the SID value of the RAC database.
-
Click OK.
Blackout Periods
During the patching deployment process, the system will try to "black out" the targets associated with an Oracle E-Business Suite system. The user submitting the patch run must have the Operator or Blackout Target privilege to be able to black out the target. For more information on privileges, see: Privileges and Roles for Managing Oracle E-Business Suite and the Oracle Enterprise Manager Cloud Control Security Guide.
The following components of the E-Business Suite system will be blacked out during the patch run:
-
Concurrent Processing Service
-
Forms Based Applications Service
-
Internal Concurrent Manager
-
Listener
-
Oracle Applications Infrastructure Service
-
Oracle Applications Service
-
Oracle Applications System
-
Oracle Concurrent Manager
-
Oracle E-Business Suite Custom Objects
-
Oracle E-Business Suite Infrastructure
-
Oracle E-Business Suite Nodes System
-
Oracle E-Business Suite Patch Information
-
Oracle E-Business Suite System
-
Oracle E-Business Suite Workflow
-
Oracle Workflow Agent Listener
-
Oracle Workflow Background Engine
-
Oracle Workflow Notification Mailer
-
Self Service Applications Service
-
Workflow Service
-
Database Instance
-
Host
By default, the blackout time period is one hour. You can control the blackout duration setting the following properties in the Preferences page. Navigate to this page from the Preferences under Administer menu on the Oracle E-Business Suite Instances page.
-
Default Blackout Hours in Patch Manager
-
Default Blackout Minutes in Patch Manager
Creating a Patch Run for Oracle E-Business Suite Release 12.1 and Earlier
To create a patch run for Release 12.1 and earlier, ensure you have completed the prerequisite steps described earlier. Then navigate to Targets > Oracle E-Business Suite > Administer > Change Management > Patch Manager. From the Patch Manager home page, select "New Deployment" in the Patch Runs region.
Note that you can also copy an existing patch run. From the Patch Manager home page, select the patch run you wish to copy and click the Create Like icon.
Note: In the Patch Run interview you can use the Back button to go back to a previous step; however, entered values on the current page will be lost.
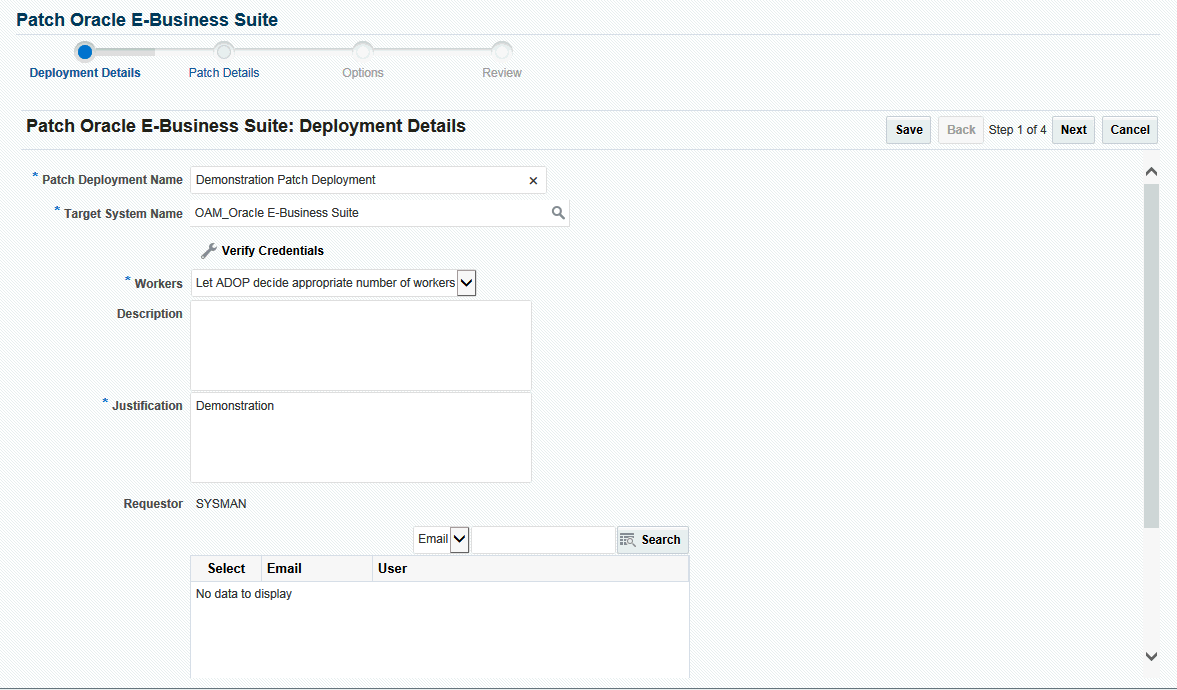
To create a Patch Deployment for Release 12.1 and earlier
-
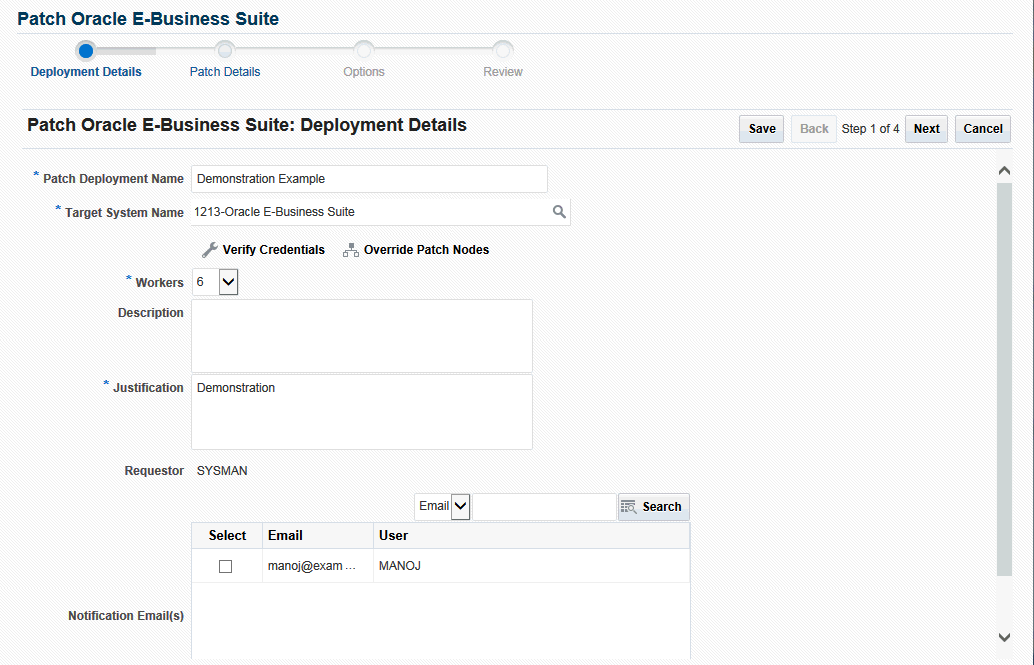
In the Deployment Details page, enter the details below.
Patch Oracle E-Business Suite: Deployment Details Page
-
Patch Deployment Name - Enter a user-friendly name for the patch run. You can search on this name later on.
-
Target System Name - Choose the target system.
Click Verify Credentials to test the Preferred Credentials for the applications system.
Select Override Patch Nodes to choose the hosts on which adpatch will run. The default host name is pre-populated. This option provides support DMZ configurations where some nodes contain a shared APPL_TOP and some nodes do not.
Note: You can select only one Oracle E-Business Suite target.
-
Workers - The number of workers available on the system. Note that you can change this value.
-
Description
-
Justification
-
Requestor - The default value is the user name with which you are signed in. You can change this to another name.
-
Notification Email(s) - Select the email addresses of users who should be notified of the patch run request.
-
-
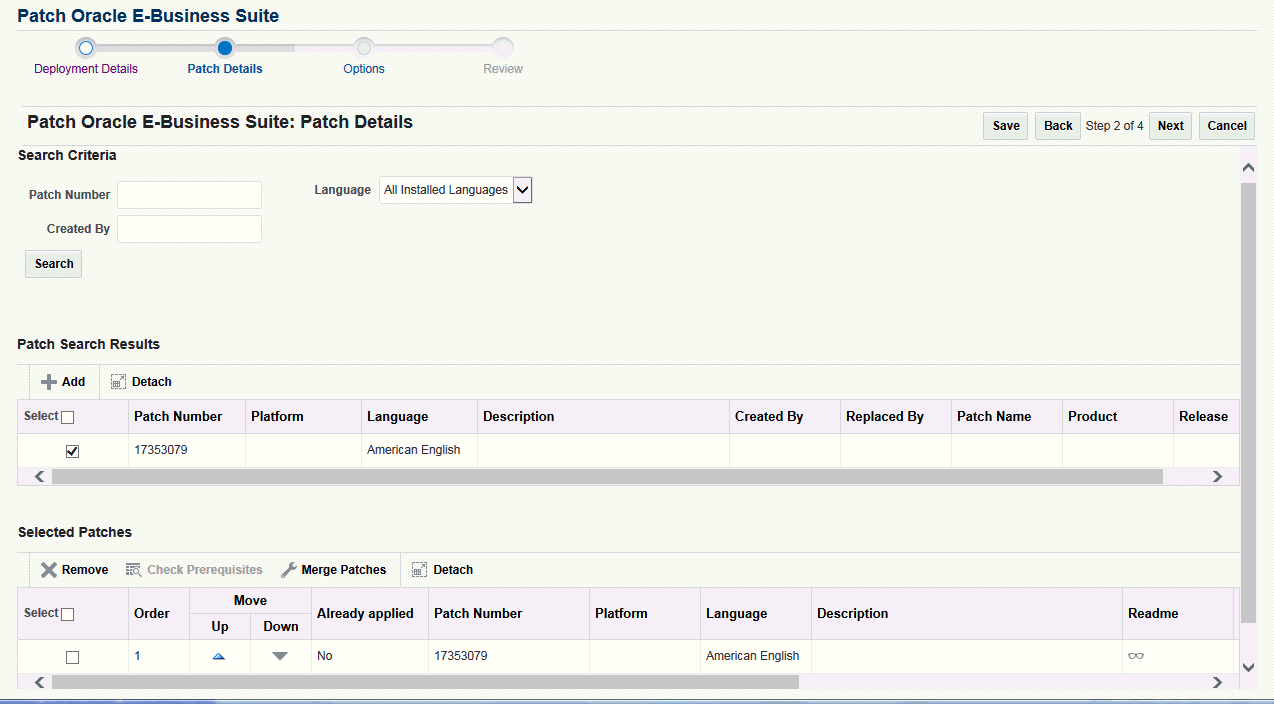
In the Patch Details page, search for the patch(es) to be applied.
Patch Oracle E-Business Suite: Patch Details Page
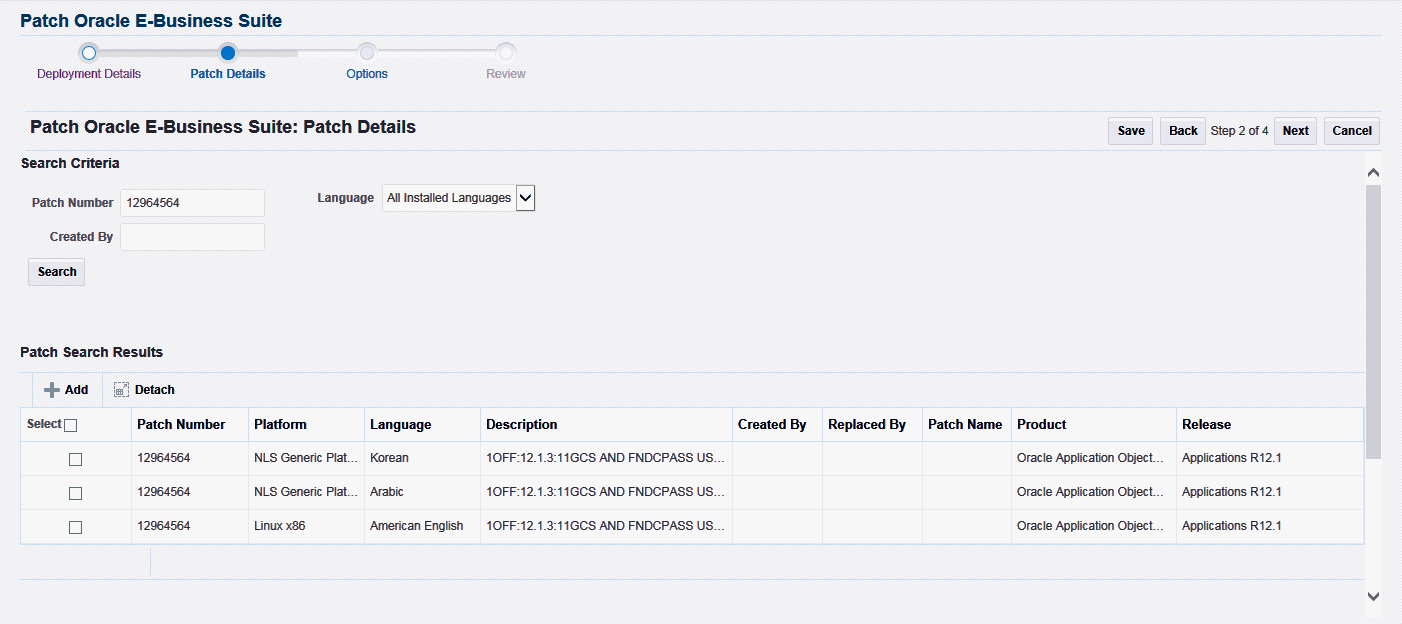
You can search on the following criteria:
-
Patch Number
-
Language - "All installed languages" will return the base (Generic or platform-specific) patch plus any language patches (if they exist) for every language installed on the selected targets. Choosing a specific language from the drop-down list will return its language patch if such patch exists.
-
Created By
-
Platform - Select "Generic Platform" if patch is not port-specific.
If you are searching for a patch for a specific platform, your search results will return a Generic-platform patch if no platform-specific patch exists.
From the Patch Search Results table, select patch(es) you wish to apply and click Add.
The search results will include the following for each patch found:
-
Patch Number
-
Platform
-
Language
-
Description
-
Created By
-
Replaced By
-
Patch Name
-
Product
-
Release
Note: By default Patch Manager searches for patches on My Oracle Support. If connectivity to My Oracle Support is disabled through the "MOSEnabled" preference, then the system will search among the patches that are already downloaded at the OMS stage directory location.
The following appears for each patch in the Selected Patches table.
-
Order - The order in which the patches should be applied. This will be displayed only when you have more than one patch selected and do not have the Merge Patches button selected. You can then reorder the patches.
-
Already Applied - Indicates if the patch is already applied or not
-
Patch Number - The patch number.
-
Patch Name
-
Platform - The platform for the patch.
-
Language
-
Description
-
Product - The name of the owning product.
-
README - Click on this icon to review the README file for the patch.
-
Created By - The user who created the patch (for custom patches).
-
Replaced By - The patch number that replaces this patch, if any.
-
Release - The release to which the patch is valid.
-
Files - The files to be downloaded for the patch.
-
Remove - If you want to remove this patch from the list, select the checkbox and click Remove.
Note: For a controlled-release patch, a password is necessary for downloading the patch. An icon appears, which you can click to enter a password. Passwords expire after a set duration, so for scheduled deployments further in the future, make sure you have already downloaded the patch and staged it.
Click Merge Patches if you wish to merge two or more patches.
Note: You should merge AD patches separately from non-AD patches.
Finally, you can check for prerequisites for your patches by clicking Check Prerequisites.
-
-
Specify a schedule in the Options page.
Patch Oracle E-Business Suite: Schedule Options
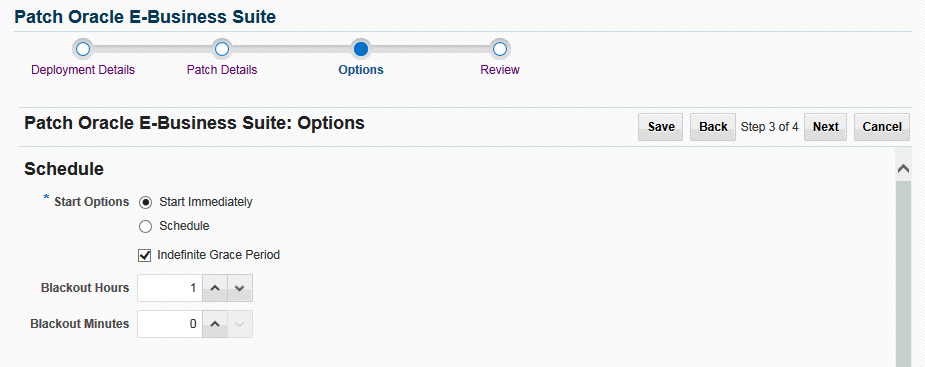
Choose from the following options:
-
Start Immediately - Patch application will be scheduled to start immediately.
-
Schedule - Patch application will start at the time you specify. Provide the Date, Time, and Time Zone.
-
Indefinite Grace Period - With Indefinite Grace Period enabled, if the patches cannot be applied at the scheduled time, the system will try to apply them as soon as possible, and will keep trying indefinitely. Alternatively, if you provide a defined Grace Period in hours and minutes, the system will only try to start the application of patch for that amount of time.
The Blackout Length indicates the amount of time the target system will have a blackout status in Enterprise Manager. Set this length to a higher value for large patch runs.
-
-
In the same Options page, specify Patch Options.
For more information on many of these options, see: Oracle E-Business Suite Patching Procedures and Oracle E-Business Suite Maintenance Utilities.
Patching Procedure Options and AutoPatch Options
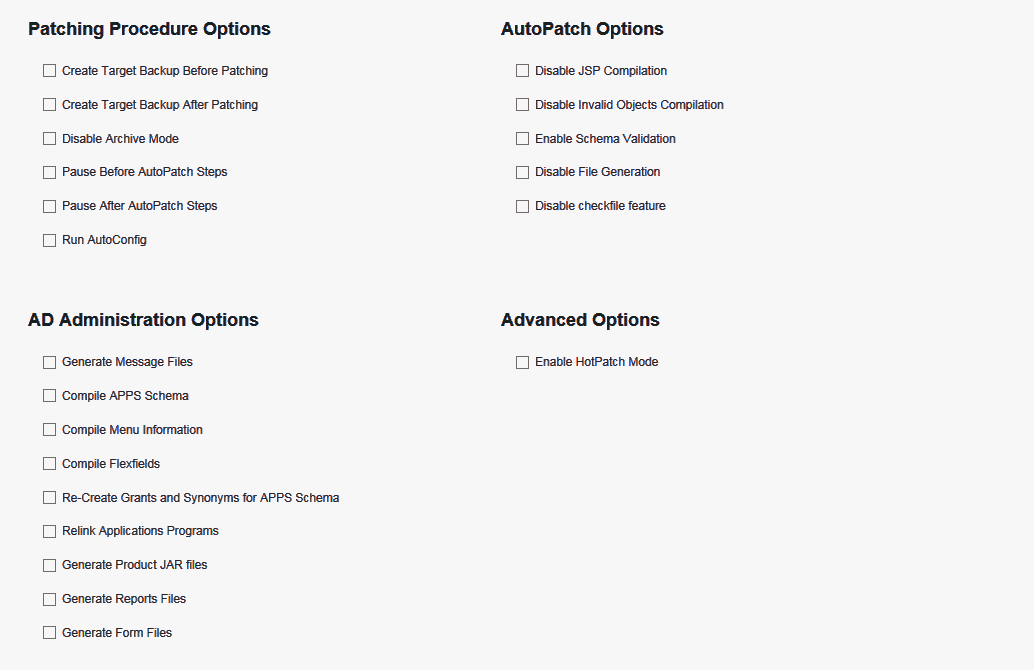
Patching Procedure Options include the following:
-
Create Target Backup Before Patching - Adds a pause after system is prepared for backup allowing for a manual backup.
-
Create Target Backup After Patching - Adds a pause after patch is applied and database is brought back down to allow for a manual backup.
-
Disable Archive Mode - Issues an 'alter database noarchivelog' command.
-
Pause Before AutoPatch Steps - Adds a pause before AutoPatch (adpatch) is run to allow for any necessary manual preparation.
AutoPatch (adpatch) is the Oracle Applications DBA (AD) tool that applies patches to an Oracle E-Business Suite system.
-
Pause After AutoPatch Steps - Adds a pause immediately after patch is applied to allow for any necessary manual activities.
-
Run AutoConfig - Run AutoConfig, the AD tool that manages configuration changes in an Oracle E-Business Suite system.
AutoPatch Options include the following:
-
Disable JSP Compilation - Tells adpatch not to automatically compile out-of-date JSP files (nocompilejsp command).
-
Disable Invalid Objects Compilation - Tells adpatch not to compile invalid objects (nocompiledb command).
-
Enable Schema Validation - Tells adpatch to connect to all registered Oracle E-Business Suite schemas at the start of the patching process.
-
Disable File Generation - Tells adpatch not to run commands normally found in generate driver (nogenerateportion command).
-
Disable checkfile feature - Tells adpatch to disable the checkfile feature while running database portion (nocheckfile command).
AD Administration Options and Advanced Options
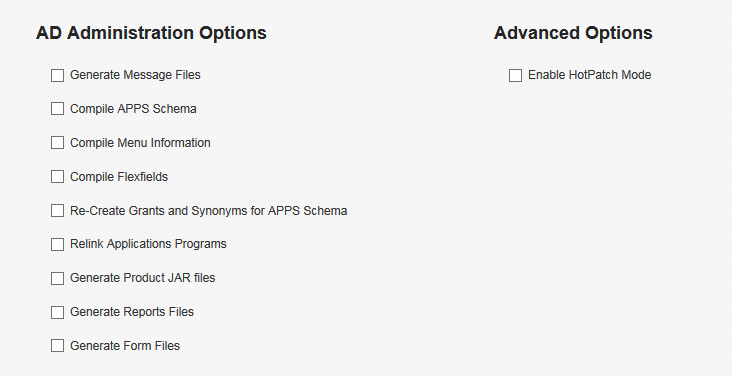
AD Administration Options are listed below. These tasks are done to manage database objects (database objects or data in the database related to Oracle E-Business Suite). For example, a patch might add new menu entries or change the setup of a flexfield.
-
Generate Message Files - Creates new message files after the messages have been loaded into the database. The README should instruct you when this is necessary.
-
Compile APPS Schema - Compiles the APPS schema.
-
Compile Menu Information - Compiles menus.
-
Compile Flexfields - Compiles flexfields.
-
Recreate Grants and Synonyms for APPS Schema - Recreates grants and synonyms for the APPS schema.
-
Relink Application Programs
-
Generate Product JAR Files
-
Generate Reports Files
-
Generate Form Files
Advanced Options are visible only if you have the 'Use advanced options in Oracle E-Business Suite Patching' target privilege. Advanced Options include the following:
-
Enable HotPatch Mode - Patch will be applied without shutting down the applications or database, disabling archive mode, or enabling maintenance mode.
In HotPatch mode, AutoPatch applies a patch regardless of whether the Oracle E-Business Suite system is in maintenance mode. Maintenance mode controls the system downtime period by managing user login sessions.
Note: In HotPatch mode, if the patch application fails, the process will still perform/execute the blackout steps in the "Patch Oracle E-Business Suite" procedure. The blackout notifies other Enterprise Manager administrators that a maintenance procedure is being performed on the environment.
For the Notifications region, specify the statuses for which you would like to be notified.
-
-
Review your patch deployment.
Patch Oracle E-Business Suite: Review Page

The Review Page lets you review your patch run details, target list, patch details, patching options, and schedule.
To copy a Patch Run for Oracle E-Business Suite Release 12.1 and Earlier
You might want to copy an existing patch run to change some aspect of it or to rerun it due to changes in the patch or target. To do this, select the patch run in the Patch Manager Home page and click the Create Like icon.
The system will take you through the patch deployment creation pages as if you were creating a new patch run, but with most values copied from the original patch run. Please note the following:
-
The Patch Deployment Name defaults to the original name prefixed with "Copy of" and appended with the date.
-
The Requestor field shows the original requestor's user name. This value cannot be changed.
-
The new patch run would be scheduled to run immediately by default, because the original run may have been scheduled for a now past date and time.
Creating a Patch Deployment Procedure for Oracle E-Business Suite Release 12.2
Note the following when running procedures for Oracle E-Business Release 12.2 instances:
-
Abort and cutover procedures cannot be run independently from patching procedures.
-
Running the adop phase fs_clone before the prepare phase as a part of a patching procedure is not supported. The fs_clone phase can be run individually.
To create a Patch Deployment
Ensure that you have completed the prerequisite steps described earlier.
Navigate to Targets > Oracle E-Business Suite > Administer > Change Management > Patch Manager. From the Patch Manager home page, select "New Deployment" in the Online Patching region.
-
On the Deployment Details page, enter the details below.
-
Patch Deployment Name - Enter a user-friendly name for the deployment procedure. You can search on this name later on.
-
Target System Name
-
Verify Credentials - Click this button to check your credentials. This feature ensures that valid preferred credentials are set for you. For information on credentials, see: Overview of Credentials.
-
Oracle E-Business Suite Node credentials (all application tiers; no database tier credentials are required)
-
System schema credentials
-
APPS schema credentials
-
WLS server credentials
-
-
Workers - Specify the number of workers. You can choose to let ADOP determine an appropriate number of workers or choose a number from the list. This field is available for Oracle Application Management Pack for Oracle E-Business Suite Release 13.1.1.1.0 Bundle Patch 1 onwards.
-
Description
-
Justification - Enter a justification that can be used by an approver deciding to approve or reject this request for patching.
-
Requestor - The default value is the user name with which you are signed in. You can change this to another name.
-
Notification Email(s) - Any users listed here will be notified when the patching deployment request is sent to approval management.
Note: These notifications are different from notifications sent regarding the status of a submitted deployment procedure.
Patch Oracle E-Business Suite: Deployment Details Page
-
-
In the Patch Details page, search for the patch to be applied.
Patch Oracle E-Business Suite: Patch Details Page
You can search for a patch based on the following criteria:
-
Patch Number
-
Language
-
Created By
-
Platform
Note: You must retrieve the desired patch through the Search region even if you have already downloaded the patch to the stage location (the process will not re-download the patch, however).
The search works as follows:
-
Custom patches if a patch number greater than 11 characters has been entered or no patch number has been entered.
-
Oracle patches if the patch number is less than 12 characters and the "Connect to My Oracle Support for Patches" preference is checked in the Preferences page. Since the target has already been chosen at this point in the interview process, the search will examine the target and search for only patches that are relevant with respect to languages and platform.
-
Downloaded patches if the patch number is less than 12 characters and the "Connect to My Oracle Support for Patches" preference is unchecked in the Preferences page.
Selecting the Merge Patches option will merge the patches when running adop later.
Selecting the Check Prerequisites option will connect to My Oracle Support (MOS), check the prerequisites for all the patches, and then check the target system to see if those patches have been applied. You must have "Connect to My Oracle Support for Patches" enabled in the Preferences page to use this option. If you do not have "Connect to My Oracle Support for Patches" enabled, the Check Pre-requisites button will be disabled and prerequisites for patches cannot be checked.
The prerequisite patches can also be selected in the pop-up window and then searched and selected to be applied along with the already selected patches.
The patch application order can be modified by clicking the "Move Up" and "Move Down" arrows.
Note that this page does not require any patches be selected. With Release 12.2, an "empty" patching cycle is supported in Patch Manager where only prepare, finalize, cutover, and cleanup are run.
The following appears for each patch in the Patch Search Results Table:
-
Check box for selection
-
Patch Number - The patch number.
-
Platform - The platform for the patch.
-
Language
-
Description
-
Created By
-
Replaced By
-
Patch Name
-
Product - The name of the owning product.
-
Release
Select the relevant checkbox(es) and click Add to add the selected patch(es) to your patch deployment. It will appear in the Selected Patches table.
Selected Patches Table

The following appears for each patch in the Selected Patches table.
-
Remove - Select the checkbox(es) and click on the Remove button to remove the patch(es) from the list.
-
Order - The order the patches should be applied. Use the Up and Down icons to change the order of the patches.
-
Patch Number- The patch number.
Note: For a controlled-release patch, a lock icon appears next to the patch number. Click on the icon to enter a password. Passwords expire after a set duration, so for scheduled deployments further in the future, make sure you have already downloaded the patch and staged it.
-
Platform - The platform for the patch.
-
Language
-
Description
-
Readme
-
Created By
-
Replaced By
-
Patch Name
-
Product - The name of the owning product.
-
Release
-
Files - The files to be downloaded for the patch.
-
-
Specify Options.
The online patching cycle has five phases. Patch Manager uses two separate deployment procedures to automate these five phases. The first deployment procedure runs the prepare, apply, finalize, and optionally actualize_all phases. The second deployment procedure executes cutover, cleanup, and optionally fs_clone.
On the options page you determine when each of these deployment procedures are executed. The first deployment procedure (that runs adop prepare, apply, finalize, and optionally actualize_all) can be started immediately upon submission or scheduled. If the "Schedule" option is selected, a date field is dynamically displayed. The grace period is the amount of time Enterprise Manager should wait if the Enterprise Manager job system cannot start the deployment procedure at the intended time.
Patch Application Deployment Procedure Options
Patch Application Deployment Procedure Options
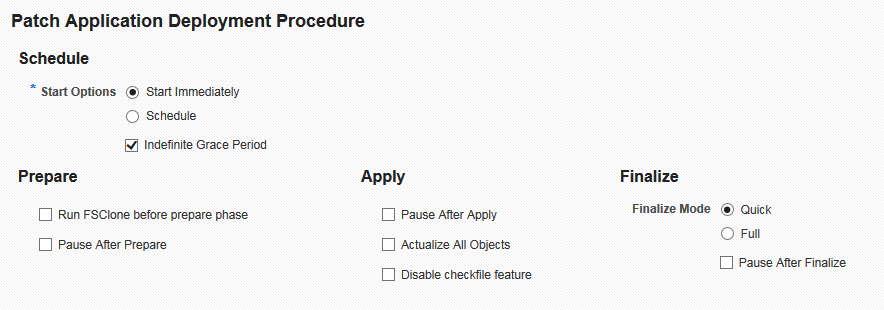
Specify the patch application schedule:
-
Start Immediately - Patch application will be scheduled to start immediately.
-
Schedule - Patch application will start at the time you specify. Provide the Date, Time, and Time Zone.
-
Indefinite Grace Period - With Indefinite Grace Period enabled, if the patches cannot be applied at the scheduled time, the system will try to apply them as soon as possible, and will keep trying indefinitely. Alternatively, if you provide a defined Grace Period in hours and minutes, the system will only try to start the application of patch for that amount of time.
For the Prepare phase, specify Run FSClone before prepare phase if you want to run fs_clone before the adop prepare phase. Also for the Prepare phase, specify Pause After Prepare if you want to stop execution of the deployment procedure after the adop prepare phase has been run. A user would then need to manually acknowledge the pause for Enterprise Manager to continue with the next step.
For the Apply phase, specify Pause After Apply if you want to stop execution of the deployment procedure after the adop apply phase has been run. A user would then need to manually acknowledge the pause for Enterprise Manager to continue.
For the Apply phase, specify Actualize All Objects if you want to run the adop actualize_all phase. If this option is chosen then the cleanup mode is switched to "full".
For the Finalize phase, specify the Finalize Mode. This option runs adop finalize phase in either Quick or Full mode.
Also for the Finalize phase, specify Pause After Finalize if you want to stop the execution of the deployment procedure after the adop finalize phase has been run. A user would then need to manually acknowledge the pause for Enterprise Manager to continue.
Cutover Deployment Procedure Options
Specify the cutover options.
Cutover Deployment Procedure Options
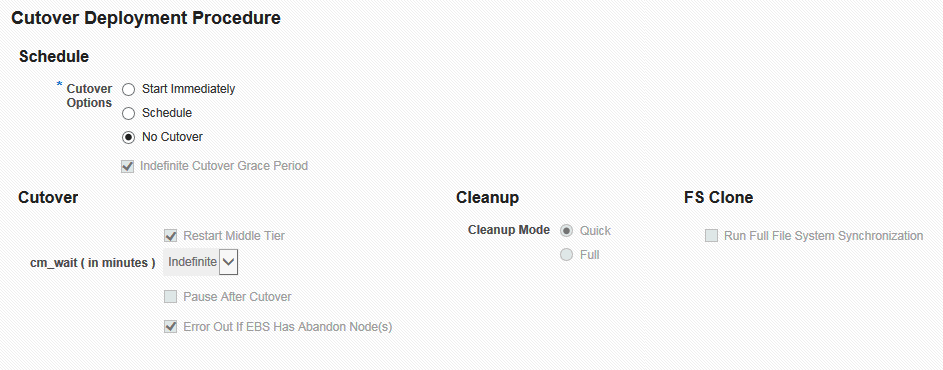
The Cutover deployment procedure has three options for execution:
-
Start Immediately
-
Schedule
-
No Cutover
It can start immediately or be scheduled as described above. In this case an immediate start means immediately after the Apply deployment procedure executes. If a user schedules this deployment procedure and the apply deployment procedure is still running after the schedule date, then the apply deployment procedure will fail when it attempts to submit cutover. The cutover deployment procedure can also be skipped entirely with the "No Cutover" option. "No Cutover" may be useful on a development environment where ten developers are patching a single target and they only want to bounce the instance at midnight. Another example may be when a prerequisite patch was missed. In this situation, a user could do a patch run through finalize with the missed prerequisite, and then restart the original failed deployment procedure. Starting with Release 13.1.1.1.0 Bundle Patch 1, "No Cutover" is the default behavior.
Check the Indefinite Cutover Grace Period box if you want Enterprise Manager to wait an indefinite amount of time if the Enterprise Manager job system cannot start the deployment procedure at the intended time.
For the Cutover phase, the Restart Middle Tier is selected by default. When cutover is run, this option controls whether the middle tier is restarted.
The parameter
cm_waitis used when running cutover to specify how long to wait for existing concurrent processes to finish running before shutting down the Internal Concurrent Manager. This feature is available starting from Release 13.1.1.1.0 Bundle Patch 1 only.The Pause After Cutover option stops the execution of the deployment procedure after the adop cutover phase has been run. A user would then need to manually acknowledge the pause for Enterprise Manager to continue.
The Error out if EBS has abandon node(s) option is selected by default. This option controls whether to allow cutover to happen or error out if abandon nodes are detected in the Oracle E-Business Suite instance.
For the Cleanup phase, choose whether you want the Cleanup Mode be run as Quick or Full.
For FS Clone, specify if you want to run a full file system synchronization.
Advanced Options
If you have the "Use advanced options in Oracle E-Business Suite Patching" target privilege, then Advanced Options will be available to you. If you have these options, then for the Apply phase, specify Hotpatch. This option will disable all other adop phases and run adop in hotpatch mode. This option is not supported unless specifically stated in the patch readme. A warning message is also displayed in Patch Manager when this option is chosen.
Notifications
For the Notifications region, specify for which statuses you want notifications to be sent. Users will be notified of a given status if the box is checked and either of the "Apply" or "Cutover" deployment procedures fall into that status.
Statuses for notifications are:
-
Action Required
-
Problems
-
Succeeded
-
Running
-
Suspended
-
-
Review your deployment procedure.
Patch Oracle E-Business Suite: Review Page
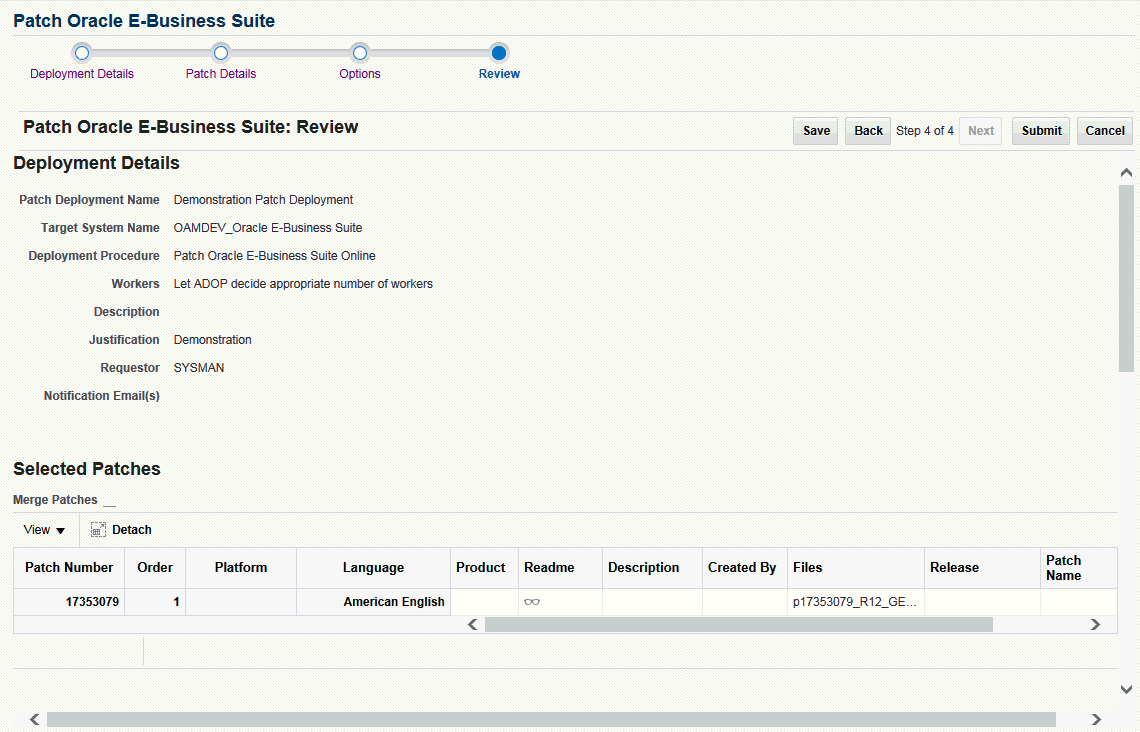
The Review Page lets you review your deployment procedure details.
Extending Patch Manager Deployment
You can extend Patch Manager procedures using the Deployment Procedure Manager using the steps below. In these steps you create a copy of an existing procedure and extend it in the Deployment Procedure Manager.
-
Navigate to Enterprise menu > Provisioning and Patching > Procedure Library.
-
Extensions are supported for the following two patching procedures for Oracle E-Business Suite:
-
"Patch Oracle E-Business Suite" (for Release 12.1 and earlier)
-
"Patch Oracle E-Business Suite Online" (for Release 12.2)
Note: Extensions are not supported in the deployment procedures for cutover and abort.
-
-
Click Create Like.
-
Rename the copy of the original procedure as desired. You can make other updates here as well.
-
Save your new procedure.
-
Upon saving, the Deployment Procedure Manager Procedures tab appears. Your new procedure is listed first. You can select this procedure and click Edit to add steps, choose notifications, or make other changes. For example, you might want to add steps to a copy of the shipped Patch Oracle E-Business Suite procedure to automate the following steps: Pre-Patch Application Tier Backup, Post-Patch Database Tier Backup, or Post-Patch Application Tier Backup.
For more information on the Deployment Procedure Manager and provisioning in Enterprise Manager, refer to the Enterprise Manager documentation, including:
-
Oracle Enterprise Manager Lifecycle Management Administrator's Guide
-
Oracle Enterprise Manager online help
Patching an Oracle E-Business Suite Release 12.2 Instance using EM CLI
To validate that an Oracle E-Business Suite instance is ready for patching, provide the following ebs_patch_file.xml file with the appropriate parameter values:
<EBSPatch>
  <PatchRunInfo>
     <PatchRunName>Validate PROD_Oracle E-Business Suite1</PatchRunName>
     <EBSTargetName>PROD_Oracle E-Business Suite</EBSTargetName>
     <Justification>Validating</Justification>
     <ValidateOnly>true</ValidateOnly>
  </PatchRunInfo>
</EBSPatch>
To patch an Oracle E-Business Suite 12.2 or above instance, please provide the following ebs_patch_file.xml file after filling in all the required parameters.
<?xml version="1.0"?>
<EBSPatch>
  <PatchRunInfo>
    <PatchRunName>test110220164405P</PatchRunName> <!-- Should always be a unique name -->
    <EBSTargetName>PROD_Oracle E-Business Suite</EBSTargetName> <!-- The EBS Target name to be patched-->
    <NumWorkers>40</NumWorkers> <!- Number of workers to adop. Available from 13.1.1.1.0 BP1 onwards -->
    <Justification>Urgently Needed</Justification> <!-- Patch justification -->
    <PatchProcedureName>Patch Oracle E-Business Suite Online</PatchProcedureName> <!-- The name of patching procedure. If tag not provided then Oracle default patching procedure shall be used. -->
  </PatchRunInfo>
  <PatchInfo>
    <Patch>
      <FileName>p21314570_R12.AZ.C_R12_GENERIC.zip</FileName> <!-- The filenames of patch which are already downloaded on OMS patch stage directory location -->
    </Patch>
    <Patch>
      <FileName>p21314571_R12.AZ.C_R12_GENERIC_1of2.zip</FileName>
      <FileName>p21314571_R12.AZ.C_R12_GENERIC_2of2.zip</FileName>
    </Patch>
  </PatchInfo>
  <OnlinePatchingOptions>
    <PatchApplicationDeploymentProcedure>
      <Schedule>Immediately</Schedule> <!-- Either 'Immediately' or date in YYYY-MM-DDTHH:mm:ss+TZ format e.g. 2016-02-11T17:40:22+00:00 -->
      <IndefiniteGracePeriod>false</IndefiniteGracePeriod> <!-- Either 'true' or 'false' -->
      <GracePeriodHours>2</GracePeriodHours> <!-- Provide if IndefiniteGracePeriod is false -->
      <GracePeriodMinutes>3</GracePeriodMinutes> <!-- Provide if IndefiniteGracePeriod is false -->
      <Prepare>
        <PauseAfterPrepare>true</PauseAfterPrepare> <!-- Either 'true' or 'false' -->
      </Prepare>
      <Apply>
        <PauseAfterApply>true</PauseAfterApply> <!-- Either 'true' or 'false' -->
        <ActualizeAll>true</ActualizeAll><!-- Either 'true' or 'false' -->
        <DisableCheckfile>false</DisableCheckfile><!-- 'true', to disable checkfile feature, 'false' otherwise-->
      </Apply>
      <Finalize>
        <PauseAfterFinalize>true</PauseAfterFinalize><!-- Either 'true' or 'false' -->
        <FinalizeMode>Quick</FinalizeMode> <!-- Either 'Quick' or 'Full' -->
      </Finalize>
    </PatchApplicationDeploymentProcedure>
    <CutoverDeploymentProcedure>
      <Schedule>NoCutover</Schedule> <!-- Possible values are 'Immediately' or 'NoCutover' or time in format YYYY-MM-DDTHH:mm:ss+TZ e.g. 2016-02-11T17:40:22+00:00 -->
      <IndefiniteGracePeriod>false</IndefiniteGracePeriod><!-- Either 'true' or 'false' -->
      <GracePeriodHours>2</GracePeriodHours> <!-- Provide if IndefiniteGracePeriod is false -->
      <GracePeriodMinutes>3</GracePeriodMinutes> <!-- Provide if IndefiniteGracePeriod is false -->
      <Cutover>
        <PauseAfterCutover>false</PauseAfterCutover><!-- Either 'true' or 'false' -->
        <Mtrestart>true</Mtrestart><!-- Should restart Middle tier after cutover. Either 'true' or 'false' -->
        <FailOnAbandonNode>true</FailOnAbandonNode><!-- Either 'true' or 'false' -->
      </Cutover>
      <Cleanup>
        <CleanupMode>Full</CleanupMode> <!-- Clean up mode is either 'Full' or 'Quick' -->
      </Cleanup>
      <FSClone>
        <runFSClone>true</runFSClone> <!--'true' if adop phase fs_clone needs to be run post cutover, 'false' otherwise -->
      </FSClone>
    </CutoverDeploymentProcedure>
  </OnlinePatchingOptions>
  <Notification>
    <ActionRequired>true</ActionRequired>
    <Problems>true</Problems>
    <Succeeded>true</Succeeded>
    <Running>false</Running>
    <Suspended>false</Suspended>
  </Notification>
</EBSPatch>
To apply a patch in hotpatch mode, provide the following ebs_patch_file.xml:
<?xml version="1.0"?>
<EBSPatch>
  <PatchRunInfo>
    <PatchRunName>test110220164405P</PatchRunName> <!-- Should always be a unique name -->
    <EBSTargetName>PROD_Oracle E-Business Suite</EBSTargetName> <!-- The EBS Target name to be patched-->
    <Justification>Urgently Needed</Justification> <!-- Patch justification -->
    <PatchProcedureName>Patch Oracle E-Business Suite Online</PatchProcedureName> <!-- The name of patching procedure. If tag not provided then Oracle default patching procedure shall be used. -->
  </PatchRunInfo>
  <PatchInfo>
    <Patch>
      <FileName>p21314570_R12.AZ.C_R12_GENERIC.zip</FileName> <!-- The filenames of patch which are already downloaded on OMS patch stage directory location -->
    </Patch>
    <Patch>
      <FileName>p21314571_R12.AZ.C_R12_GENERIC_1of2.zip</FileName>
      <FileName>p21314571_R12.AZ.C_R12_GENERIC_2of2.zip</FileName>
    </Patch>
  </PatchInfo>
  <OnlinePatchingOptions>
    <AdvancedOptions>
      <Hotpatch>true</Hotpatch>
    </AdvancedOptions>
    <PatchApplicationDeploymentProcedure>
      <Schedule>Immediately</Schedule> <!-- Either 'Immediately' or date in YYYY-MM-DDTHH:mm:ss+TZ format e.g. 2016-02-11T17:40:22+00:00 -->
      <IndefiniteGracePeriod>true</IndefiniteGracePeriod> <!-- Either 'true' or 'false' -->
      <GracePeriodHours>2</GracePeriodHours> <!-- Provide if IndefiniteGracePeriod is false -->
      <GracePeriodMinutes>3</GracePeriodMinutes> <!-- Provide if IndefiniteGracePeriod is false -->
      <Apply>
        <PauseAfterApply>true</PauseAfterApply> <!-- Either 'true' or 'false' -->
        <ActualizeAll>true</ActualizeAll><!-- Either 'true' or 'false' -->
        <DisableCheckfile>false</DisableCheckfile><!-- 'true', to disable checkfile feature, 'false' otherwise-->
      </Apply>
      <Finalize>
        <PauseAfterFinalize>true</PauseAfterFinalize><!-- Either 'true' or 'false' -->
        <FinalizeMode>Quick</FinalizeMode> <!-- Either 'Quick' or 'Full' -->
      </Finalize>
    </PatchApplicationDeploymentProcedure>
  </OnlinePatchingOptions>
  <Notification>
    <ActionRequired>true</ActionRequired>
    <Problems>true</Problems>
    <Succeeded>true</Succeeded>
    <Running>false</Running>
    <Suspended>false</Suspended>
  </Notification>
</EBSPatch>
To run only fsclone, the input file should be:
<?xml version="1.0"?>
<EBSPatch>
  <PatchRunInfo>
    <PatchRunName>test110220164405P</PatchRunName> <!-- Should always be a unique name -->
    <EBSTargetName>PROD_Oracle E-Business Suite</EBSTargetName> <!-- The EBS Target name to be patched-->
    <Justification>Urgently Needed</Justification> <!-- Patch justification -->
    <PatchProcedureName>Patch Oracle E-Business Suite Online</PatchProcedureName> <!-- The name of patching procedure. If tag not provided then Oracle default patching procedure shall be used. -->
  </PatchRunInfo>
  <OnlinePatchingOptions>
    <PatchApplicationDeploymentProcedure>
      <Schedule>Immediately</Schedule> <!-- Either 'Immediately' or date in YYYY-MM-DDTHH:mm:ss+TZ format e.g. 2016-02-11T17:40:22+00:00 -->
      <IndefiniteGracePeriod>false</IndefiniteGracePeriod> <!-- Either 'true' or 'false' -->
      <GracePeriodHours>2</GracePeriodHours> <!-- Provide if IndefiniteGracePeriod is false -->
      <GracePeriodMinutes>3</GracePeriodMinutes> <!-- Provide if IndefiniteGracePeriod is false -->
      <Prepare>
        <runFSClone>true</runFSClone>
      </Prepare>
    </PatchApplicationDeploymentProcedure>
    <CutoverDeploymentProcedure>
      <Schedule>NoCutover</Schedule> <!-- Fixed value -->
      <IndefiniteGracePeriod>true</IndefiniteGracePeriod><!-- Fixed value -->
    </CutoverDeploymentProcedure>
  </OnlinePatchingOptions>
  <Notification>
    <ActionRequired>true</ActionRequired>
    <Problems>true</Problems>
    <Succeeded>true</Succeeded>
    <Running>false</Running>
    <Suspended>false</Suspended>
  </Notification>
</EBSPatch>
Patching an Oracle E-Business Suite Release 12.1 or Earlier Instance using EM CLI
emcli patch_ebs -input_file=ebs_patch_file:"<fully qualifiedpath of ebs_patch_file.xml>"
To patch an Oracle E-Business Suite 12.1 or earlier instance, please provide the following ebs_patch_file.xml file after filling in all the required parameters:
<?xml version="1.0"?>
<EBSPatch>
<PatchRunInfo>
<PatchRunName>Test Patch run 2</PatchRunName>
<EBSTargetName>xxxx-Oracle E-Business Suite</EBSTargetName>
<Justification>Test Patch</Justification>
<PatchProcedureName>Patch Oracle E-Business Suite</PatchProcedureName>
</PatchRunInfo>
<PatchInfo>
<Patch>
<FileName>p22385471_R12.GL.B_R12_GENERIC.zip</FileName>
</Patch>
</PatchInfo>
<PatchingOptions>
<Schedule>Immediately</Schedule>
<!-- or time in format YYYY-MM-DDTHH:mm:ss+TZ e.g. 2020-04-17T05:25:00-07:00 -->
<IndefiniteGracePeriod>true</IndefiniteGracePeriod>
<GracePeriodHours>2</GracePeriodHours> <!-- if IndefiniteGracePeriod is false -->
<GracePeriodMinutes>3</GracePeriodMinutes> <!-- if IndefiniteGracePeriod is false -->
<BlackoutHours>4</BlackoutHours>
<BlackoutMinutes>20</BlackoutMinutes>
<AdvancedOptions>
<Hotpatch>false</Hotpatch>
</AdvancedOptions>
<PatchProcedureOptions>
<BackupBefore>false</BackupBefore>
<BackupAfter>false</BackupAfter>
<DisableArch>false</DisableArch>
<PauseBeforeAutoPatch>false</PauseBeforeAutoPatch>
<PauseAfterAutoPatch>false</PauseAfterAutoPatch>
<RunAutoconfig>true</RunAutoconfig>
<PauseAfterAutoconfig>false</PauseAfterAutoconfig>
</PatchProcedureOptions>
<AutoPatchOptions>
<DisableJspCompile>false</DisableJspCompile>
<DisableInvalidComp>false</DisableInvalidComp>
<EnableSchemaValidation>true</EnableSchemaValidation>
<DisableFileGen>false</DisableFileGen>
<DisableCheckfile>false</DisableCheckfile>
</AutoPatchOptions>
<ADAdminOptions>
<GenMessages>false</GenMessages>
<CompileAppsSchema>false</CompileAppsSchema>
<CompleMenu>false</CompleMenu>
<CompileFlex>false</CompileFlex>
<GrntsSyn>false</GrntsSyn>
<RelinkProg>false</RelinkProg>
<GenJars>false</GenJars>
<GenReports>false</GenReports>
<GenForms>false</GenForms>
</ADAdminOptions>
</PatchingOptions>
<Notification>
<ActionRequired>false</ActionRequired>
<Problems>false</Problems>
<Succeeded>false</Succeeded>
<Running>false</Running>
<Suspended>false</Suspended>
</Notification>
</EBSPatch>
Patch Worker Logs, Health Checks, and Troubleshooting
This section describes logging, health checks, and troubleshooting features within Patch Manager.
How to Access Patch Logs
The primary way to access log files is using the log viewer in the Patch Logs region of the Patch Manager Home page. See: Patch Logs.
Alternatively, you can drill down into the steps within an online patching deployment procedure execution to see the logs.
Health Checks
Patch Manager validates these servers shutting down and starting up: Listener, Forms server, Apache web services, and Internal Concurrent Manager.
How to Restart Failed Workers
For Oracle E-Business Suite Release 12.1 and earlier targets, use the following steps:
-
Navigate to your patch run using any method in "View a Patch Run".
-
Click on the Patch Run Name.
-
Click on the adpatch step (Apply Patch).
-
Select the checkbox for the failed target.
-
Click Update and Retry.
-
Change the parameter "restart_workers" to YES and click Retry.
Note: These steps are also listed in the AD Patch Log when you have a failed worker.
For Oracle E-Business Suite Release 12.2 and later targets, use similar steps to those above except navigate to your deployment and go to the adop apply phase step. Select the checkbox for the failed target, click Update, change the parameter "restart" to Yes, and click Retry.
-
Navigate to your deployment and select it.
-
Click on the adop apply phase.
-
Select the checkbox for the failed target.
-
Click Update and Retry.
-
Change the parameter "restart" to YES and click Retry.
How to Change the Patch Run Purge Policy
Enterprise Manager periodically purges Patch Manager deployment procedure execution data. As a result, older patch runs may not be accessible in Patch Manager. To change the purging frequency, run the following PL/SQL block connected to the repository as SYSMAN:
BEGIN
    MGMT_JOBS.drop_purge_policy('SYSPURGE_POLICY');
    MGMT_JOBS.register_purge_policy('SYSPURGE_POLICY', <number of days>,
null);
END;
Troubleshooting Patch Manager Deployment Failures
Access the log files is using the log viewer in the Patch Logs region of the Patch Manager Home page. See: Patch Logs.
To find errors using the Enterprise Manager Provisioning feature, do the following:
-
Find your patch run or deployment on the Patch Manager Home page.
-
Click on the status link for the patch run or deployment.
The Procedure Activity tab of the Deployment Procedure Manager in Provisioning appears.
-
For a patch run or deployment that failed, click on its Status link.
-
A list of Procedure Steps in the patch run or deployment is shown. Use the dropdown list to filter on the steps shown; for example, choose "Failed Steps" to see the steps that failed. More information on these steps is shown.
Note: After analyzing the log files, if you are confident that you can ignore any error and move forward, then in the Procedure Activity window, choose the menu item Actions > Ignore. This option allows you to ignore the error and move forward.
A Note on Applied Patches Metric Collection
The metric "applied_patches" of target type "Oracle E-Business Suite Patch Information" is modified to collect only 10,000 rows by default. If you want to collect information on all the patches applied over that limit, perform the following steps:
-
From the target menu of "Oracle E-Business Suite Patch Information", click on Target Setup > Monitoring configuration. Change the value of the property "Restrict collection" to 'No' and save it.
-
Log in to the Oracle E-Business Suite database and find the count of rows returned:
SELECT count(*) FROM ad_snapshot_bugfixes asb, ad_trackable_entities adte,ad_snapshots asn,ad_appl_tops aat,FND_PRODUCT_GROUPS fpg, ad_releases ar,ad_bugs ab,ad_patch_drivers apd,ad_patch_runs apr, ad_applied_patches aap, ad_patch_run_bugs aprb WHERE asb.bugfix_id = ab.bug_id AND asb.snapshot_id = asn.snapshot_id AND asn.snapshot_name = 'GLOBAL_VIEW' AND asn.snapshot_type = 'G' AND asn.appl_top_id=aat.appl_top_id AND ab.baseline_name=nvl(adte.baseline,'R12') AND aat.name='GLOBAL' AND aat.appl_top_type='G' AND aat.applications_system_name = fpg.applications_system_name AND upper(ab.trackable_entity_abbr) = Decode(upper(adte.abbreviation(+)),'SO', 'SQLSO','FA', 'OFA','AP', 'SQLAP','GL', 'SQLGL' ,UPPER(adte.abbreviation(+))) AND ar.release_id=asn.release_id AND fpg.release_name=ar.MAJOR_VERSION||'.'||ar.MINOR_VERSION||'.'||ar.TAPE_VERSIO N AND apd.applied_patch_id=aap.applied_patch_id AND apd.patch_driver_id=apr.patch_driver_id AND apr.patch_run_id=aprb.patch_run_id AND aprb.bug_id=ab.bug_id;
-
Modify
$AGENT_HOME/sysman/config/emd.propertiesand add the following property:CollectionResults.MaximumRowsFloodControlMax=<value>
Provide a value which is greater than the number of rows obtained in the above query.
After completing the above steps, use EMCTL commands to reload the emd.properties file and restart the agent.