| Oracle® Communications ASAP Cartridge Development Guide Release 7.2 E22486-01 |
|

 Previous |
 Next |
| Oracle® Communications ASAP Cartridge Development Guide Release 7.2 E22486-01 |
|
Previous |
Next |
This chapter describes how to create and deploy a service activation archive (SAR) file (Oracle Communications ASAP cartridge).
ASAP provides the following SAR file creation tools:
Oracle Communications Design Studio: Design Studio automatically generates a SAR file when you build an ASAP cartridge project without errors. Design Studio generates SAR files that support the ASAP 4.7 folder structure (see "ASAP 4.7 SAR File Folder Structure").
CreateSar: The ASAP_Home/programs/CreateSar script generates ASAP 4.6 SAR files. This script generates SAR files that support the ASAP 4.6 folder structure (see "ASAP 4.6 SAR File Folder Structure") and is included for backwards compatibility. For more information about the CreateSar script, see "Creating an ASAP 4.6 SAR File".
ASAP provides several SAR file deployment tools:
The Service Activation Deployment Tool (SADT): This tool can be used to deploy the ASAP service model contained in the SAR file. For more information, see "Deploying Service Models with the Service Activation Deployment Tool".
The Service Activation Configuration Tool (SACT): This tool is primarily used to configure ASAP servers using XML; however, SACT can also be used to deploy server-specific configuration changes within a SAR file contained in SarPatch_configure and SarPatch_unconfigure files. Design Studio cannot be used to generate these files: You must create them manually. For more information about this tool, see ASAP Server Configuration Guide.
The ASAP_Home/scripts/PostDeploySarFile: This tool can be used to deploy SQL*Plus-specific configuration changes within a SAR file contained in SarPatch and SarPatch_undeploy files. In addition, this tool searches SAR file directories for SQL files with no undeploy_ prefix and work order TST files and commits them to the database. Design Studio cannot be used to generate these files: You must create them manually.
The ASAP_Home/samples/DIT/scripts/installCartridge file: This sample script consolidates the SACT, SADT and PostDeploySarFile deployment options and should be customized for cartridges deployed in production environments.
Design Studio: Design Studio provides the same functionality as SADT, but does not support PostDeploySarFile or SACT functionality. This tool should be used in development environments. For more information about the Design Studio cartridge deployment feature, see the Oracle Communications Design Studio for Activation Help.
ASAP supports the following SAR file folder structure options:
Table 16-1 lists and describes the ASAP 4.7 SAR file folder structure used by Design Studio and supported for XML-based cartridges. You can enhance this directory structure with additional directories based on your requirements and deliverables.
Table 16-1 Design Studio ASAP 4.7 Folder Structure
| Directory | Description |
|---|---|
|
ActionProcessor |
This folder contains action processor XML information used by Design Studio. This information is stored in the SAR file but is not used by ASAP. |
|
doc |
This folder contains Design Studio autogenerated cartridge documentation. For more information about autogenerated cartridge documentation, see "Documenting ASAP Cartridges". |
|
lib |
This folder contains a .jar that provides the Java classes (autogenerated, or non-autogenerated) created to implement connections, or send network element (NE) commands as MML or API calls. |
|
META-INF |
This folder contains the following files:
|
|
NetworkElements |
This folder contains NE XML information that ASAP uses to make NE connections. |
|
ServiceModel |
This folder contains service model XML information, such as atomic actions, service actions, connection handlers, user-defined exit types, and so on. |
|
src |
This folder contains the source files for the Java classes compiled in the .jar file. |
|
stateTables |
This folder contains State Table files. |
When creating an ASAP 4.6 SAR file, you must use a fixed directory structure. This folder structure was developed in ASAP 4.6 and was replaced by the ASAP 4.7 folder structure (see "ASAP 4.7 SAR File Folder Structure"). ASAP supports the ASAP 4.6 folder structure for backwards compatibility.
|
Note: Design Studio uses the ASAP 4.7 SAR file folder structure when generating SAR files; however, you can import ASAP SAR files with the 4.6 folder structure into Design Studio. |
This section describes the minimum required structure; you can enhance this directory structure with additional directories based on your requirements and deliverables.
META-INF/activation-model.xml
vendor/
NE technology/
service pack/
             sample_wo/
             sarm/
                 ne_progs/
                 PLSQL/
             control/
                 PLSQL/
             nep/
                 PLSQL/
             java/
                 lib/
             cpp/
                 lib/
service_model/{at least one .xml file}
application_config/ {optional}
common/
             sarm/
                 ne_progs/
                 PLSQL/
             control/
                 PLSQL/
             nep/
                 PLSQL/
             java/
                 lib/
             cpp/
                 lib/
             service_model/ {optional}
             application_config/ {optional}
             scripts/ {optional}
vendor
…
The elements that uniquely identify an archive are a combination of the following:
NE or EMS/NMS vendor name
NE name and technology/software
Service provided by the service model
The directory format of vendor/NE technology/service pack/ avoids collisions with other activation model directory structures.
vendor directory – All ASAP service activation models developed for the same NE/EMS/NMS vendor reside in this directory.
vendor/NE Technology – All ASAP service activation models for the same NE/EMS/NMS vendor and the same software load reside in this directory.
vendor/NE Technology/service pack – The base directory for a specific service activation model. The following are examples of services: ADSL_ATM, SDSL_FR and Mail_Box.
An example of the directory format is Nortel/UEIMAS_5_2/ADSL_ATM.
Table 16-2 lists the directories supported for ASAP 4.6 SAR files.
Table 16-2 ASAP 4.6 SAR File Directory Structure
| Directory | Description |
|---|---|
|
sample_wo |
Contains sample work order test files. |
|
sarm |
Contains files specific to the current activation model and targeted for service in the SARM database.
|
|
control |
Contains files specific to the current activation model and targeted for service in the CONTROL database.
|
|
nep |
Contains files specific to the current activation model and targeted for service in the NEP database.
|
|
java |
Contains all implementation files for the JInterpreter.
|
|
cpp |
Contains the same as the java/ directory but refers to C++ files.
|
|
service_model |
Contains the XML documents that define the service models for this activation model. There must be at least one XML file in this directory. All documents in this service model directory must conform to the ServiceModel schema (refer to the following section). |
|
application_config |
Contains the XML documents that define configurations other than the service models for this activation model. There is no restriction on the number of XML files in this directory. All XML documents in this directory must conform to the activationConfig schema. The XML file in this directory can be an alternative to the SQL file in PLSQL directories above. This subdirectory is optional. |
|
common/scripts |
Contains the user patch script file SarPatch that is invoked by other utilities, such as PostDeploySarFile and asapConfig. These scripts customize the content within the SAR file, such as replacing fixed strings in the SQL or non-service-model XML files with relevant environment variables. The creator of the SAR file is responsible for providing this customization script file. The scripts and SarPatch are both optional. SarPatch is invoked after a SAR file has been deployed. It seeks any SQL file in PLSQL/ and WO test file in the sample_wo directory, and populates data into the relevant ASAP databases. Before populating, the utility tries to execute SarPatch in the common/scripts directory, if it exists in the SAR file, to make generic SQL data specific to the current activation model. This utility is invoked as follows: PostDeploySarFile [ -b ] sar_file_with_path This directory also contains the SarPatch_configure and SarPatch_unconfigure scripts. These scripts are invoked by the script asapConfig to perform customizations or patching against the application configuration within the SAR file. |
The common directory has a directory structure similar to service pack, with one more scripts subdirectory. The common directory contains all common files across different cartridges that share the same vendor/NE technology/ but offer different services. These files can include common definitions such as login/logout State Tables, connect/disconnect classes, and so on. It also contains some supplementary files such as the SarPatch script.
The sarm, control, nep, java, and cpp directories under the common directory have a similar structure and meaning as the directories located under the <service_pack> directory.
You can archive the directory using the assembly tool. The assembly tool:
Validates the directory structure
Ensures that an activation-model.xml file and at least one service model XML file exist
Validates the activation-model.xml file and all service model xml files against their respective schemas. This validation is performed using the Oracle9_0_2_0_0D XML parsers.
Picks up the activation model ID from the activation-model.xml file
You can also archive the directory using the jar command. Components other than service model components can be packaged in an archive file; for example, Design guidelines, API documentation, and source files.
After all validation is successfully completed, the assembly tool assembles the components to generate an archive file with a base file name that is the same as the ID, and supplies the sar extension. The assembly tool accepts the directory where the SAR file is to be placed as a parameter.
To run the assembly tool, enter the following command:
CreateSar [-help] [-v] <sar_file_dir>
The current directory must be the base from which the SAR file is made and it is the parent directory of the <vendor> directory. The <sar_file_dir> specifies where you want to put the SAR file you have created. The -v parameter enables directory structure validation. If you omit this parameter, no directory structure validation is performed. The SAR file name is generated based on the name in activation-model.xml.
The SADT deploys the SAR file. The SADT has three interfaces:
You can use the SADT to assemble and deploy generic service models and cartridge-specific service models.
You can invoke the SADT using a command-line interface. The command-line interface must be invoked by passing in the WebLogic URL, a user name and a password.
The command-line interface supports two modes of invocation:
Interactive – You can select options and enter data
Script-based – You can start the SADT from within scripts by passing in all parameters on the command-line.
|
Note: A customizable script sadtclient is available in ASAP_Home/scripts. This script enables you to pre-populate the information required in Step 2 for up to four working environments. The first time you use the script, you will be prompted to modify the script. |
You can choose from the following actions:
List all deployed Service Activation Archive model
Deploy a Service Activation Archive model
Undeploy a Service Activation Archive model
Query a Service Activation Archive model
To access the command-line utility in interactive mode, do the following.
From within a UNIX or Linux script, enter the following:
java -classpath $CLASSPATH com.mslv.activation.management.application.sadtClient
|
Note: If sadtClient.jar, asaplibcommon.jar or weblogic.jar are not in $CLASSPATH, add them. |
A login screen appears. Type the information that appears in italics.
Welcome to Service Activation Deployment Tool
Please enter WebLogic login information
WebLogic host:port -> myhost:1234
Username -> system
Password -> admin
JNDI Context -> (long JNDI string)
Replace ('t' for true, else false) -> (t or others)
Connecting to WebLogic server...
An example of a long JNDI string is System/S123/ApplicationType/ServiceActivation/Application/1-0;4-7;ASAP/Comp/
When you have defined your JNDI prefix, replace "S123" above with the appropriate $ENV_ID value in your ASAP environment, for example, "TST1".
After you have logged in, the following menu appears. Select the option you require:
***** Service Activation Deployment Tool *****
1. Deploy an activation model
2. Undeploy an activation model
3. Query an activation model
4. List all deployed activation models
5. Export existing service model
Enter Choice, <Q - Quit): 1
Option 5 enables you to save the activation model to a SAR file.
This menu option prompts you to do one of the following:
Type the absolute file path for a Service Activation Model Archive to be installed on the ASAP instance
Specify the SAR ID if the SAR already exists in ASAP but has not yet been deployed.
The status of deployment is displayed on screen and the menu option does not return until the SAR is successfully or unsuccessfully deployed.
***** 1. Deploy an activation model *****
Enter the file path or ID of the SAR you want to deploy
-> /sunenv123/samples/sadt/sar/Nortel_HLR_GEM14_MSP.sar
Deploying model...
Activation model </sunenv123/samples/sadt/sar/Nortel_HLR_GEM14_MSP.sar> has been deployed
Press ENTER to continue ...
This menu option prompts you to type the ID of an activation model to uninstall from an ASAP instance. If you do not know the SAR ID, refer to "List All Deployed Activation Models".
*****2. Undeploy an activation model *****
Enter the ID of the model you want to undeploy
-> Nortel_DMS_POTS
Activation model Nortel_DMS_POTS has been undeployed
This menu option prompts you to type the ID of an activation model to query. It only queries models that are deployed in ASAP. If the model is undeployed, it returns with a message stating the requested model is not deployed.
If you select Query an Activation Model, the following appears:
***** 3. Query an Activation Model *****
Enter the ID of the activation model you want to query
-> Nortel_HLR_GEM14_MSP
Querying activation model <Nortel_HLR_GEM14_MSP> ...
id: Nortel_HLR_GEM14_MSP
deployed: Yes
description: Nortel 3G Wireless GEM14 Cartridge
vendor: Nortel
technology: HLR
softwareLoad: GEM14
version:
author: Nortel Networks
label: 1.2
majorVersion: 1
minorVersion: 2
createDate: Sun Aug 13 00:00:00 GMT-05:00 2000
validDuration: P1Y2M3DT10H30M
All information in the deployment descriptor is returned except for the icon and all component elements.
This action lists IDs for all deployed models.
***** 4. List all deployed activation models *****
IDs of all deployed activation models are:
Nortel_HLR_GEM14_MSP
Nortel_PASSPORT_3_0_ATM_FR
You can access SADT using scripting through the command line interface. All functions in the command line interface are accessible from a single invocation of the tool. All parameters to a function can be passed on the command line.
Examples of invoking the command line tool for script-based usage:
Deploying a service activation model
This function call deploys the activation model specified by the file name:
java sadtClient -url myhost:1234 -username system -password admin - jndiContext "System/S123/ApplicationType/ServiceActivation/Application/1-0;4- 6;ASAP/Comp/" deploy /sunenv123/samples/sadt/sar/Nortel_HLR_GEM14_MSP.sar
This function call returns the same status as AMDT-450-1.2:
Activation model </sunenv123/samples/sadt/sar/Nortel_HLR_GEM14_MSP.sar> has been deployed
Undeploying an activation model
java sadtClient -url myhost:1234 -username system -password admin -jndiContext System/S123/ApplicationType/ServiceActivation/Application/1-0;4-7;ASAP/Comp/ -replace false undeploy Nortel_HLR_GEM14_MSP
This function call returns the same status as AMDT-450-1.3:
Activation model <Nortel_HLR_GEM14_MSP> has been undeployed
Querying for an activation model
java sadtClient -url myhost:1234 -username system -password admin -jndiContext System/S123/ApplicationType/ServiceActivation/Application/1-0;4-7;ASAP/Comp/ -replace false query Nortel_HLR_GEM14_MSP
This function call returns the information about the model, same as ADMT-450-1.4.
id: Nortel_HLR_GEM14_MSP
deployed: Yes
description: Nortel 3G Wireless GEM14 Cartridge
vendor: Nortel
technology: HLR
softwareLoad: GEM14
version:
author: Nortel Networks
label: 1.2
majorVersion: 1
minorVersion: 2
createDate: Sun Aug 13 00:00:00 EDT 2000
validDuration: P1Y2M3DT10H30M
List all deployed activation models, by doing one of the following:
Enter java sadtClient and follow the prompts
Enter the following:
java sadtClient -url myhost:1234 -username system -password admin -jndiContext System/S123/ApplicationType/ServiceActivation/Application/1-0;4-7;ASAP/Comp/ -replace false list
This function call returns a list of all model IDs that are deployed, same as ADMT-450-1.1.
IDs of deployed activation models are:
Nortel_DMS_POTS       Deployed
Nortel_HLR_GEM14_MSP  Undeployed
The following is a sample script to invoke the commands:
#!/bin/ksh
if [ -f /sunenv123/samples/sadt/sar/Nortel_HLR_GEM14_MSP.sar ]; then
java sadtClient -url myhost:1234 -username system -password admin -jndiContext System/S123/ApplicationType/ServiceActivation/Application/1-0;4-7;ASAP/Comp/ -replce true deploy /sunenv123/samples/sadt/sar/Nortel_HLR_GEM14_MSP.sar
fi
|
Note: In an actual script line, all the semicolons above must be preceded by an escape character "\". |
To simplify the use of the command scripts, ASAP includes scripts that prompt you to personalize them when invoked. Edit this script and follow the instructions placed at the beginning of the script to change required strings. After the script is personalized, you will not have to type the host name, port number, long JNDI string, user name, and password, which seldom need to be changed in a working environment.
For more information on personalized scripts, see ASAP Server Configuration Guide.
The Web-based SADT GUI is a standalone client application. Using the SADT GUI, you can:
To view deployed service activation models:
In the Address field of your Web browser, type the login URL (for example, http://<BEA_HOST>:<BEA_PORT>/<ENV_ID>/sadtConsole), and press Enter.
The Enter Network Password dialog box appears.
|
Note: <ENV_ID> represents the environment ID chosen in the installer. See the table of installation values in the Setup Guide. |
In the User Name field, enter your user name.
In the Password field, enter your password, and then click OK.
Click OK. The Service Activation Deployment Tool view appears.

View the details of a service activation model, by clicking the appropriate service activation label. The service activation model details are displayed in the lower part of the window.
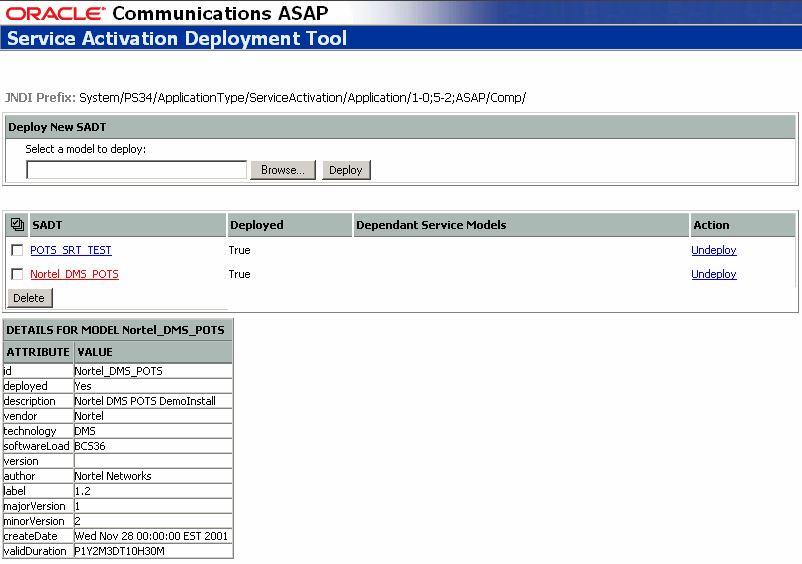
To deploy a service activation archive file, select a service activation archive file and then deploy the selected SAR file.
When deploying service models, you must pay special attention to dependencies (displayed in the Dependent Service Models column of the SADT console). If service model B is dependent on service model A, service model A must be deployed before service model B.
To deploy a service activation archive file:
In the Service Activation Deployment Tool view, do one of the following:
If the service activation archive file already appears in the list, click Deploy.
The Deploy Service Activation Models view appears.
If the service activation archive file that you want to deploy does not appear in the list, click Browse and navigate to the location of the SAR files. The SAR file name appears in the Select a model to deploy field.

Depending on your action above, click Deploy either in the list or in the Deploy New SADT section. All successfully deployed service activation models are flagged with True in the Deployed column.
|
Note: You can redeploy a service activation model that has already been deployed. If you change the contents of the deployment descriptor (activation-model.xml) of a SAR file, the modified SAR file is considered as a different version of the service activation model. In this case, you must undeploy the existing service activation model and then deploy the modified SAR file. |
You can undeploy one or more service activation models from an ASAP instance.
If you are undeploying a service model, you must undeploy the dependent service model before undeploying its parent. The SADT console displays an error message if you attempt to undeploy a service model that has dependent service models.
To undeploy a service activation model:
In the Service Activation Deployment Tool view, click Undeploy.
The screen refreshes and the Deployed column displays False.
You can deploy (and undeploy) SAR cartridge files without conflicts, even if multiple cartridges with the same content are deployed. When a SAR file is deployed through either the command line, GUI, or JMX-based interfaces, a target directory is created using the cartridge ID as a component in the directory name. The Java provisioning files are placed into this unique target directory where they will not be overwritten by future deployments.
After the Java provisioning files are placed in the target directory, the CLASSPATH is modified to contain references to the newly added Java JAR files.
With the Java Management Extension based interface, you can access all deployment functionality programmatically.
The ServiceActivationMBean is the base interface for all MBeans in the system. Every MBean is registered into the WebLogic Server (as MBeanServer) with an object name. ApplicationMBean represents an ASAP instance. Currently, its interface only defines some simple management functionality to retrieve and create new ActivationModelMBeans. An ActivationModelMBean represents an activation model archive. To create a new ActivationModelMBean, invoke the createActivationModelMBean method on an ApplicationMBean. After an ActivationModelMBean has been created, the archive can be deployed or undeployed.
You can configure JMX interfaces to validate all XML documents against their respective schemas within the WebLogic server. To enable validation, you must change the VALIDATE option to True in the web.xml deployment descriptor, through the WebLogic Administration Console console.
To enable the Validate option:
Navigate to ASAP domain name > Deployments > Web Applications, right-click sadtConsole and choose Edit Web Application Deployment Descriptor. A new browser window opens in which you can edit the deployment descriptors.
Navigate to Web Descriptor > Web App Descriptor. Right-click Env Entries and choose Configure a new EnvEntry.
In the screen that appears, enter the following:
Description – An optional description
Env Entry Name – VALIDATE
Env Entry Value – true
Env Entry Type – java.lang.String
Click Create.
The EnvEntry portion of web.xml appears as follows:
<env-entry>
    <env-entry-name>ASAP_BASE</env-entry-name>
                <env-entry-value>ASAPDEV_ASAP_BASE</env-entry-value>
    <env-entry-type>java.lang.String</env-entry-type>
  </env-entry>

  <env-entry>
    <env-entry-name>SYBASE</env-entry-name>
                <env-entry-value>ASAPDEV_SYBASE</env-entry-value>
    <env-entry-type>java.lang.String</env-entry-type>
  </env-entry>

<env-entry>
    <env-entry-name>VALIDATE</env-entry-name>
                <env-entry-value>false</env-entry-value>
    <env-entry-type>java.lang.String</env-entry-type>
  </env-entry>

<env-entry>
        <env-entry-name>SA-jndi-context</env-entry-name>
        <env-entry-value>System/SAAS-1/ApplicationType/ServiceActivation/Application/1-0;4-7
;ASAP/Comp/</env-entry-value>
        <env-entry-type>java.lang.String</env-entry-type>
  </env-entry>
When an ASAP server such as a SARM or NEP is initialized, configuration data groups are loaded from the database into memory. These configuration data groups are:
ASAP service definitions – Includes all service-action and atomic-action related configurations.
ASAP network interface configurations – Includes hosts, NE resources.
In some cases, configuration data can be loaded into memory after initialization (namely, State Table programs and NE communication parameters). For all other new service definitions or network interface configurations to take effect, you must do one of the following:
Restart the SARM and NEP
Dynamically add service definitions using asap_utils
For more information on asap_utils, see ASAP Server Configuration Guide
With asap_utils, you can dynamically add new items to the configuration without having to restart the ASAP servers. You can dynamically add service actions, atomic actions, mapping configuration, NEPs, hosts, routing, and NE resources by:
Updating the ASAP databases through asap_utils
Synchronizing the ASAP servers with the databases
|
Note: Only new configuration entries are added to the in-memory caches. Any updates and deletions of existing entries are ignored by the update procedure. These still require a restart of the affected ASAP servers. |
To dynamically configure service actions, atomic actions, mapping configuration, or NEPs, you must set up the ASAP system and its components as follows.
Make the configuration addition in the ASAP database manually by scripting (SQL inserts). You can add the configuration entries in Table 14-3 dynamically to ASAP. All other changes are ignored by the sychronization process.
Table 16-3 Configuration Entries and Synchronization
| Configuration Entry | Description | Synchronization Details |
|---|---|---|
|
Service Definition |
Service actions, atomic actions, service-action-TO-atomic mappings, service action-to-atomic action parameters, atomic action-State Table mappings |
Internal cache update with new entries in SARM and NEP servers. |
|
State Table |
Addition of new State Table |
Internal cache update in NEP server. This is already supported in ASAP. |
|
Network Element Definition |
NE definitions and associated NE connection properties, including primary and secondary devices, and host-to-remote NE mappings |
Internal cache and thread updates in SARM (atomic action queues) and NEP (session managers, command processors) application servers. |
|
NEP |
Entirely new NEP added to ASAP |
Internal cache and thread updates in SARM (NEP drivers, atomic action queues). |
|
Secondary NE Devices |
Communication devices in the auxiliary resource pool in existing NEPs |
Internal cache and thread updates in NEP (command processors). |
|
Note: A service definition consists of a service action and all its associated atomic actions and parameters. Adding a new atomic action to an existing service action or adding a new service action to an existing atomic action is considered a change to the service definition. The SARM server must be restarted before the new service definition takes effect. |
You can request the SARM and NEP servers to refresh the configuration in memory through the command options available in asap_utils. There are two commands in the asap_utils client application for the addition of new configuration entries. You use these commands to request that the ASAP servers synchronize the in-memory configuration with the configuration of the databases. You are responsible for ensuring that the database configurations have been applied (for example, through database insert scripts).
By sending RPCs to notify ASAP servers of the additional configuration entries, a synchronization process is performed in each of the ASAP servers to update the in-memory caches with the latest data of the configurations in the database. The synchronization reloads the relevant configuration information from the database into the memory. With the synchronization, you can add new service actions, atomic actions, mapping configurations, NEPs, host NEs, NE routings, and NE resources dynamically.
|
Note: You can only dynamically add new items, you cannot modify or delete new configurations. |
In asap_utils, the command choices for the newly added configuration are:
112. Load New Service Configuration into Cache
113. Load New NE Configuration into Cache
You are asked to provide the SARM and NEP names to which the updates apply. The defaults are the $SARM and $NEP environment variables. If multiple NEPs are to be updated, you can enter a list of NEP server names and the utility issues the appropriate request to each listed NEP. You are notified whether each RPC was successful or not. In all cases, the NEP update requests are issued.
After receiving the synchronization RPC, the ASAP server works with a specific handler to reload the relevant configuration data from the ASAP database into memory. The RPC returns a status to the client application, indicating whether reloading was successful or not.
The synchronization sequence is the reverse of the normal processing flow; in other words, the NEP is synchronized first, then the SARM.
You must ensure that the time interval between the database modification and the memory flush is as short as possible.
|
Note: Only SARM and NEP servers support the synchronization. |
|
 Copyright © 2012, Oracle and/or its affiliates. All rights reserved. Legal Notices |
|
